1
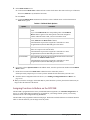
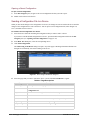
Update – click this button to update the output/input assigns.
Copy to Input/Output Assigns – click this button to transfer the number of outputs/inputs to the other assigns tab.
The labels are imported as well.
Import Global Labels – click this button to import global labels for the outputs/inputs.
Output/Input Range – use this list to select the range of outputs/inputs to view in the Output/Input Assigns. The
assigns tab will only display the I/O ranges in blocks of 120 outputs/inputs at a time, with each block selectable in
the range list.
Out/In (read-only) – the output/input number.
Label – click inside the table cell to edit or enter a name for the output/input. If you have configured global labels,
the labels can also be filled in by clicking the Import Global Labels button.
Macro Events Tab
Macro # (read-only) – the list order number of the macro.
Num. Rows – enter or select the number of event rows to add to the macro.
Update – click this button to update the macro with the number of rows entered in the Num. Rows box.
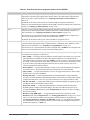
Event (read-only) – the list order number of the macro event.
Function – use the list to select a function to perform with the macro:
• Switch – performs a standard crosspoint switch.
• Macro – performs a macro within the executed macro.
• Protect – creates a protect condition on the destination of the selected crosspoint.
Output – click inside the table cell to enter or edit the destination output.
Input – click inside the table cell to enter or edit the source input.
Level Mask (1...32) – select the level mask(s) for the device affected by the macro.
Clear – click to clear the level mask(s).
Set – click to set the level mask(s).
Other Functions
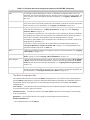
Refresh – click this button to revert to the configuration previously sent to the RCP-ME. The RCP-ME Connection
Editor will display the last settings that were sent to the RCP-ME via the Send Configuration button.
Send Firmware – click this button to open a file browser to select a software/firmware file to send to the RCP-ME.
Send Configuration – click this button to upload the settings to the RCP-ME. All configuration items become
active only after uploading.
Reboot – click this button to reboot the RCP-ME. This function does not clear the RCP-ME settings.
Close – click this button to close the RCP-ME Connection Editor in DashBoard.
Changing Device Details
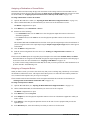
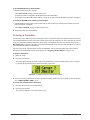
When a control panel is attached to the network, it is interrogated and an editor for the device can be opened in the
main pane of DashBoard (see Figure 4.5). Information is read from the device and shown in the simulated
RCP-ME.
To change the details for the RCP-ME:
1. In the Device Details frame, click inside the field that you want to change.
2. Enter the information as required.
4–8 • Setting Up the RCP-ME
RCP-ME User Guide (v01)