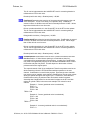
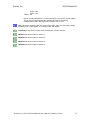
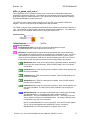
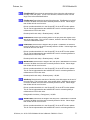
1
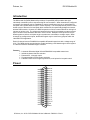
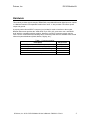
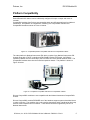
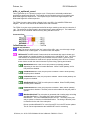
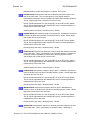
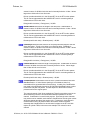
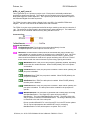
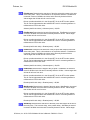
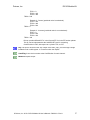
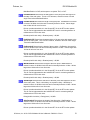
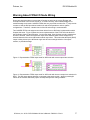
Differential Digital I/O Module Kit User’s Manual D000118 Rev A July 2012 Drivven ,Inc. • 12001 Network Blvd, Bldg E, Suite 110 • San Antonio, Texas 78249 • USA Phone : 210.248.9308 Web : www.drivven.com , E-mail : [email protected] Drivven, Inc. Diff IO Module Kit Contents Introduction ......................................................................................................................... 3 Pinout .................................................................................................................................. 3 Hardware ............................................................................................................................. 4 Powering the Module .......................................................................................................... 5 Platform Compatibility ....................................................................................................... 6 Inputs and Outputs .............................................................................................................. 8 Software .............................................................................................................................. 9 Creating a LabVIEW Project ............................................................................................ 11 Sub VI Documentation ..................................................................................................... 13 Warning About FPGA I/O Node Wiring .......................................................................... 37 Compliance and Certifications .......................................................................................... 38 Physical Specifications and Characteristics ...................................................................... 39 © Drivven, Inc. 2010 • Diff IO Module Kit User’s Manual • D000118 • Rev A 2 Drivven, Inc. Diff IO Module Kit Introduction The Differential I/O (DiffIO) Module Kit provides a CompactRIO (cRIO) module with eight individually controlled inputs or outputs having 50 nsec resolution. When channels are configured as outputs, the channels may be controlled by custom user Boolean logic or by specialized fuel and spark VIs included with the kit (EPT VI also required). The fuel and spark VIs provide control similar to that of Drivven’s fuel and spark driver module kits, but specifically designed to interact with the DiffIO module. However, the DiffIO outputs do not drive current sufficient for driving fuel injectors or ignition coils. The outputs are intended to be used for commands to external custom driver circuits or smart actuators with built in driver circuits. Multiple fuel and spark VIs may be ORed together to deliver multi-pulse engine-synchronous commands to a single output. When channels are configured as inputs, the Boolean signal may be used for any purpose within the LabVIEW FPGA application. Each I/O channel uses an RS485/422 compatible differential transceiver with a voltage range of 0-5V. The DiffIO module was designed to enable interfacing a PXI-based engine control system to a Drivven DCM-R1 embedded engine controller. Features: 8-channel differential digital I/O with RS485/422 compatible transceivers Individual channel direction selection Protected 5V, 1A supply output 50 nano-second input and output resolution LabVIEW FPGA VIs for engine-synchronous, multi-pulse fuel or spark control Pinout © Drivven, Inc. 2010 • Diff IO Module Kit User’s Manual • D000118 • Rev A 3 Drivven, Inc. Diff IO Module Kit Hardware This module provides eight channels of RS485/422 compatible differential digital inputs or outputs in a National Instrument CompactRIO module form factor. It also provides a 5V sensor power output and ground. A properly strain relieved DB-37 connector (not included) is used to interface to the module. National Instruments provides the "cRIO-9933 37-pin Conn. Kit, screw term conn. and DSUB shell" which is compatible with this module. However, any DB-37 connector system may be used. Drivven recommends the following DB-37 connector parts and tools available from several electronics parts distributors (Allied, Mouser, Digikey, etc.). Table 1. Connector parts list Description AMP HDP-20 Series 109 37P Receptacle Housing AMP HDP-20 Series 109 Crimp Socket Contact Norcomp D-Sub Connector Hood, 37P 45 Degree AMP D-Sub Insert/Extract Tool Paladin D-Sub 4-Indent Crimp Tool 26-20 AWG Mfr.’s Part # 1757820-4 205090-1 971-037-020R121 91067-2 1440 © Drivven, Inc. 2010 • Diff IO Module Kit User’s Manual • D000118 • Rev A 4 Drivven, Inc. Diff IO Module Kit Powering the Module The DiffIO module requires power from two different sources. One source is from the CompactRIO backplane male high density D-Sub 15-pin (HD15) connector which mates with the module’s female HD15 connector. This power source provides a regulated 5 volts and ground to various digital logic functions within the module. The CompactRIO 5V source is active whenever the CompactRIO or R-Series Expansion Chassis is properly powered. The module should be powered at the HD15 connector by plugging it into a CompactRIO or R-Series Expansion Chassis. The module’s HD15 connector should not be connected to any other device. Another required power connection is at the external DB-37 connector. The terminals are labeled BATT (19) and GND (18). Typical power sources will be from automotive 12V or 24V battery systems. However, the module can accept power from a range of 6V to 32V. The maximum power to the module is limited to 5W. When the 5V supply output is not being utilized, the module requires up to 2W from the external supply, depending on the number of channels operated as outputs and depending on their switching frequency. The external 5V supply output may be used for the remainder of the 5W power limit. If the external 5V supply output is shorted or overloaded, then the voltage output level will be reduced in order to limit the total power to 5W. This will cause the I/O transceivers to shutdown. This module requires both external power and power from the CompactRIO backplane. The module is designed in such a way that the high current path is directed through the BATT and GND terminals on the front of the module and not through the HD15 backplane connector. The module will not be recognized by software without both power supplies active. The external battery supply is not required in order for the module to be recognized by LabVIEW FPGA software. However, the RS485/422 channel transceivers will not be active without the external battery supply. © Drivven, Inc. 2010 • Diff IO Module Kit User’s Manual • D000118 • Rev A 5 Drivven, Inc. Diff IO Module Kit Platform Compatibility Each differential I/O channel can be individually configured for input or output and meets or exceeds CompactRIO modules from Drivven are compatible within two different platforms from National Instruments. One platform is CompactRIO, consisting of a CompactRIO controller and CompactRIO chassis as shown in Figure 1a below. Figure 1a. CompactRIO platform compatible with Drivven CompactRIO modules. The other platform is National Instruments PXI which consists of any National Instruments PXI chassis along with a PXI RT controller and PXI-78xxR R-Series FPGA card. An R-Series expansion chassis must be connected to the PXI FPGA card via a SHC68-68-RDIO cable. The CompactRIO modules insert into the R-Series expansion chassis. This platform is shown in Figure 1b below. Figure 1b. PXI platform compatible with Drivven CompactRIO modules. Drivven CompactRIO modules are not compatible with the National Instruments CompactDAQ chassis. Drivven CompactRIO modules REQUIRE one of the hardware support systems described above in order to function. The modules may not be used by themselves and/or interfaced to third party devices at the backplane HD15 connector. These efforts cannot be supported by Drivven or National Instruments. © Drivven, Inc. 2010 • Diff IO Module Kit User’s Manual • D000118 • Rev A 6 Drivven, Inc. Diff IO Module Kit You can use Drivven C Series modules with NI cRIO-911x, NI cRIO-907x, and NI R Series Expansion systems under the following conditions. –Leave one empty chassis slot between Drivven and NI modules. –Maintain an ambient system operating temperature of 0 to 45 °C. –Typical specifications of NI modules may not apply when used in a system with Drivven modules. –Warranted specifications are guaranteed for all NI modules except thermocouple modules when used in a system with Drivven modules. –The NI 9214 is recommended for thermocouple measurements in cRIO systems using Drivven modules. -Scan Interface mode, auto-detection, and ID mode are not supported for Drivven modules. © Drivven, Inc. 2010 • Diff IO Module Kit User’s Manual • D000118 • Rev A 7 Drivven, Inc. Diff IO Module Kit Inputs and Outputs Each differential I/O channel can be individually configured for input or output and meets or exceeds TIA/EIA RS-485 requirements. Channels are configured for input or output via the provided LabVIEW FPGA VI. Signaling rates up to 10Mbps are possible. Overvoltage Protection The RS485 input/output pins of the DiffIO module may be shorted together, shorted to ground, or shorted to -7V to +12V without damaging the channels. The RS485 input/output pins may be subjected to +/-50V, 15usec wide, 1% duty cycle pulses via a minimum of 100 ohms resistance without damage. A channel differential pin pair can withstand a differential input voltage of +/-12V. Digital Output Logic Levels at 8mA loads High: 4.0 – 5.0V Low: 0.1 – 0.4V Differential Input Logic Levels High: (a – b) > 200mV Low: (a – b) < -200mV © Drivven, Inc. 2010 • Diff IO Module Kit User’s Manual • D000118 • Rev A 8 Drivven, Inc. Diff IO Module Kit Software The DiffIO Module Kit is provided with an installer package which may be downloaded from Drivven’s Sharepoint website after obtaining login access from Drivven. User’s may go to https://portal.drivven.com/SoftwareDownload and enter the provided username and password to gain access to the specific product installer packages which have been purchased. The installer packages are executables which should be run on the intended development computer, having LabVIEW development tools installed. After installing the package, a “Start->Programs->Drivven>ProductRelease” menu item will be added to the Start menu. The specific product will have an example LabVIEW project appear under the “Examples” menu and the user manual will appear under the “Manuals” menu. User’s may copy and open the example project to experiment with the module or use as a starting point for a new application. All software files, example projects and documentation are installed to: C:\Program Files\National Instruments\LabVIEW X.X\vi.lib\addons\DrivvenProductRelease\. When working with block diagrams, user’s will notice a “Drivven” function palette added to the standard LabVIEW palette, specific for the RT or FPGA target. VIs for a specific Drivven product will be categorized according to product name. Also, some Drivven products will install RT and FPGA VIs under a “General” function palette which is intended to be used across multiple products. Requirements The Drivven VIs require: LabVIEW 8.6.1 Full Development or later LabVIEW RT Module 8.6.1 or later LabVIEW FPGA Module 8.6.1 or later NI-RIO 3.1 or later The Diff IO Module Kit is provided with seven LabVIEW FPGA VIs, shown in figure 2. © Drivven, Inc. 2010 • Diff IO Module Kit User’s Manual • D000118 • Rev A 9 Drivven, Inc. Diff IO Module Kit Figure 2a. Diff IO supervisor VI icon with leads. Figure 2b. Diff IO fuel VI icon with leads. Figure 2c. Diff IO spark VI icon with leads. Figure 2d. Diff IO multi-pulse (5) multi-channel (4) icon with leads. Figure 2e. Diff IO multi-pulse (5) icon with leads. Figure 2f. Diff IO CAD multi-pulse (5) multi-channel (4) icon with leads. Figure 2g. Diff IO CAD multi-pulse (5) icon with leads. The FPGA VIs must be placed within a Single Cycle Loop (SCL) of a LabVIEW FPGA block diagram. The SCL must execute at the default clock rate of 40 MHz. The FPGA VIs require a pre-synthesized netlist file having a matching name and an extension of .ngc. The netlist file must be located in the same directory as the matching VI. The installer will place this file in the LabVIEW addons directory along with the FPGA VI. © Drivven, Inc. 2010 • Diff IO Module Kit User’s Manual • D000118 • Rev A 10 Drivven, Inc. Diff IO Module Kit Creating a LabVIEW Project Drivven recommends working from the provided example application as a starting point for learning the use of the Drivven software blocks. However, the following section describes starting a LabVIEW project from scratch and adding a Drivven module. 1.) Install the Drivven software by running the installer executable and accepting the software license agreement. 2.) Restart LabVIEW, if previously running, and create a new LabVIEW project. 3.) Give the new project a name by clicking the “Save Project” button on the project toolbar. 4.) Right click on the highest item in the project hierarchy (“Project:…”) and navigate to “New->Targets and Devices…” 5.) Within the “Add Targets and Devices…” dialog, select the appropriate radio button, depending on whether you already have an existing powered and configured RT target on the network or if you are adding a new RT target which is not present yet on the network. a. Existing Target or Device i. Expand the appropriate category in the “Targets and Devices” list to see the discovered targets in that category. ii. Double-click the desired target to add it to your project. b. New Target or Device i. Expand the appropriate category in the “Targets and Devices” list to see all possible targets within that category. ii. Double-click the desired target to add it to your project. 6.) If the new RT target is not currently on the network, right-click on the RT target within the project and open the properties dialog to set the IP address or DNS name if necessary. 7.) Right-click on the RT target within the project and navigate to “New->Targets and Devices…” 8.) Within the “Add Targets and Devices…” dialog, select the appropriate radio button, depending on whether you already have an existing FPGA target connected to an existing RT target or if you are adding a new FPGA target which is not present yet. a. Existing Target or Device i. Expand the appropriate category in the “Targets and Devices” list to see the discovered FPGA targets in that category. ii. Double-click the desired target to add it to your project. b. New Target or Device i. Expand the appropriate category in the “Targets and Devices” list to see all possible targets within that category ii. Double-click the desired target to add it to your project. c. If working with a CompactRIO RT target, then an appropriate CompactRIO chassis must be added before adding an FPGA target. An FPGA target must be added to the cRIO chassis in order to force LabVIEW FPGA Interface mode. Scan Interface mode is not appropriate for working with Drivven products. The mode can also be set by right-clicking on the cRIO chassis within your project and opening the properties dialog. 9.) After adding the FPGA target, right-click on the FPGA target within the project and open the properties dialog to set the resource name if not set correctly already. The resource name can be found from MAX when connected to the actual remote system. 10.) If the FPGA target is a PXI or PCI card, then an R Series expansion chassis must be added under the FPGA target. This is done by right-clicking on the FPGA target and navigating to “New->R Series Expansion Chassis”. Within the following dialog, select the appropriate FPGA connector to which the chassis will be connected. A unique name for the chassis may also be specified. 11.) Right click on the R-Series expansion chassis or cRIO FPGA target and navigate to “New->C Series Modules…” © Drivven, Inc. 2010 • Diff IO Module Kit User’s Manual • D000118 • Rev A 11 Drivven, Inc. Diff IO Module Kit 12.) Select the “New Target or Device” radio button and double-click on the “C Series Module” in the “Targets and Devices” list. In the following dialog, select the desired Drivven module at the bottom of the “Module Type” list. The Drivven modules will be appended there if any Drivven module software has been installed. Select the appropriate module location. Finally, specify an appropriate name for the module, which will later appear in the FPGA I/O nodes in the FPGA block diagram. Having meaningful module names is important for preventing coding mistakes. 13.) After adding a module to the project, a folder will automatically be added to the project having the same module name given in the module configuration dialog. The folder will contain the FPGA I/O pins for the module slot. These I/O pins can be selected in the block diagram when connecting the module VI PinInput and PinOutput clusters to FPGA I/O nodes. The example application, discussed below, should be consulted for further details about connecting the PinInput and PinOutput clusters to FPGA I/O nodes. Within the example projects, notice the FPGA I/O node elements having module name prefixes. 14.) Some Drivven modules can be automatically recognized by LabVIEW when adding cRIO modules to the project. However, Drivven does not recommend using this feature because the module names, which are automatically assigned, are not meaningful (Mod1, Mod2, etc) and can lead to coding mistakes when wiring the Drivven FPGA VIs to the I/O nodes. Adding the modules to the project manually, as described above, is still the recommended method. © Drivven, Inc. 2010 • Diff IO Module Kit User’s Manual • D000118 • Rev A 12 Drivven, Inc. Diff IO Module Kit Sub VI Documentation diffio_supv_reva.vi This VI interfaces with the I/O pins of the Drivven Differential I/O (DiffIO) module. Each of the eight I/O channels of this module may be individually configured as input (default) or output via the Direction cluster. If a channel is specified as input, its level may be read via the DigitalInput cluster. If a channel is specified as output, its level may be specified via the DigitalOutput cluster. Channel directions are configured according to the Direction cluster when the FPGA application starts and maintained until restarted or the Init Boolean is pulsed. While Init is TRUE, the module I/O channel directions will be reconfigured according to the Direction cluster. The reconfiguration process takes approximately 160usec. Init must be TRUE for at least 80usec to be recognized. If Init is held TRUE, then reconfiguration cycles will continue until Init is released. All channels will be configured as inputs during sleep. Each I/O channel meets RS485/RS422 voltage specifications. The FPGA VI must be placed within a Single Cycle Loop (SCL) of a LabVIEW FPGA block diagram. The SCL must execute at the default clock rate of 40 MHz. The FPGA VI requires a pre-synthesized netlist file having a matching name and an extension of .ngc. The netlist file must be located in the same directory as the matching VI. The installer will place this file in the LabVIEW addons directory along with the FPGA VI. The PinInput and PinOutput clusters are wired to LabVIEW FPGA I/O nodes which are configured for a cRIO controller chassis or a cRIO R-Series expansion chassis. Refer to the LabVIEW FPGA documentation for details about creating and configuring FPGA I/O nodes. Connector Pane Controls and Indicators DiffIOPinInput These boolean controls must be connected to their corresponding FPGA I/O Node input item. DigitalOutput Cluster of boolean controls which specify the state of each module digital output while the corresponding channel direction Boolean is set to TRUE. Direction Cluster of boolean controls which specify the direction for each individual module I/O channel. Channel directions are configured when the FPGA application starts and maintained until restarted or the Init Boolean is pulsed. FALSE = Input TRUE = Output Init While Init is TRUE, the module I/O channel directions will be reconfigured according to the Direction cluster. The reconfiguration process takes approximately 160usec. Init must be TRUE for at least 80usec to be recognized. If Init is held TRUE, then © Drivven, Inc. 2010 • Diff IO Module Kit User’s Manual • D000118 • Rev A 13 Drivven, Inc. Diff IO Module Kit reconfiguration cycles will continue until Init is released. DiffIOPinOutput Each Boolean indicator with a "En" suffix must be connected to a corresponding Set Output Enable method of an FPGA I/O Method Node. Each Boolean indicator with a "Out" suffix must be connected to a corresponding Set Output Data method of an FPGA I/O Method Node. The SPIClk indicator must be connected to its corresponding FPGA I/O Node output item. Key This output is used to unlock the outputs of the various engine-synchronous output VIs included with the DiffIO module kit. It should be wired to the "key" input of each fuel or spark VI implemented from the DiffIO Module kit. The "key" value should be fed back through exactly one feedback node or shift register. DigitalInput Cluster of boolean indicators which indicate the state of each module digital input channel. ModulePresent Indicates the presence of the Differential I/O Module, plugged into the slot specified by the project settings. ModulePresent will be FALSE while the Init Bolean is TRUE. The module does not need to be externally powered via the 37-pin DSub connector for ModulePresent to indicate correctly. © Drivven, Inc. 2010 • Diff IO Module Kit User’s Manual • D000118 • Rev A 14 Drivven, Inc. Diff IO Module Kit diffio_vt_fuel_reva.vi This VI accepts the FuelSparkSupervisor from an EPT VI and generates a single Boolean output for a fuel pulse which can be specified by a duration and a start-angle or end-angle. When in end-angle mode, the specified duration will take precedence over the end-angle during engine speed fluctuations. The output of this VI is intended to be wired to a digital output channel of the Differential I/O Supervisor VI. Multiple fuel output blocks can be ORed together into one digital output channel for a multi-pulse strategy. The Key to this VI must be provided from the Differential Digital I/O Supervisor VI via a feedback node or shift register. The positions are specified in Crank Angle Ticks (CAT) MaxCAT = 2^(EPT Extrapolation) * Crank Teeth Per Cycle Duration is specified in 40MHz clock ticks Connector Pane Controls and Indicators Key This input is wired from the "key" output of the diffio_supv_reva.vi through a single feedback node or shift register. It is used to unlock the output. FuelControl Collection of control parameters for generating an engine-synchronous fuel injector command. FuelEnable When TRUE, the fuel command is enabled. When FALSE (default), the fuel command is disabled. PositionMode When FALSE (default), fuel pulses are generated according to EndPosition while StartPosition is ignored. When TRUE, fuel pulses are generated according to StartPosition while EndPosition is ignored. ActiveLow When FALSE (default), the output signal is active-high during fuel pulses. When TRUE, the output signal is active-low during fuel pulses. StartPosition This control is used when PositionMode is TRUE. Fuel pulses are generated with a leading edge coinciding with StartPosition. The length of the pulse will be according to Duration. The units of StartPosition are CAT. Drivven provides Offset2CAT.vi in the General RT VIs in the RT function palette. This VI can be implemented at the LabVIEW RT level for converting StartPosition in CAD, with respect to a cylinder TDC, to CAT. EndPosition This control is used when PositionMode is FALSE. Fuel pulses are generated with a trailing edge coinciding with EndPosition. The length of the pulse will be according to Duration. The leading edge will be determined by the requested Duration. When EndPosition is used, Duration will always take precedence over EndPosition in the presence of engine speed fluctuations. If the engine speed increases after the fuel pulse has started, then the trailing edge will occur after EndPosition in order to ensure that Duration is achieved. Likewise, if the engine speed decreases after the fuel pulse has started, then the trailing edge will occur before EndPosition. The units of EndPosition are CAT. © Drivven, Inc. 2010 • Diff IO Module Kit User’s Manual • D000118 • Rev A 15 Drivven, Inc. Diff IO Module Kit Drivven provides Offset2CAT.vi in the General RT VIs in the RT function palette. This VI can be implemented at the LabVIEW RT level for converting StartPosition in CAD, with respect to a cylinder TDC, to CAT. CutoffPosition All fuel pulse activity is "Cutoff" at CutoffPosition and reset for the next cycle. CutoffPosition must always be at least 45 crank angle degrees (CAD) after StartPosition or EndPosition, depending on PositionMode. If this minimum spacing is not maintained, then fuel commands will be generated with incorrect timing. The units of CutoffPosition are CAT. Drivven provides Offset2CAT.vi in the General RT VIs in the RT function palette. This VI can be implemented at the LabVIEW RT level for converting StartPosition in CAD, with respect to a cylinder TDC, to CAT. Duration Determines the length of the fuel command delivered to the output. Duration is entered in terms of 40 MHz clock ticks and is internally limited to 24 bits. Values larger than 24 bits will roll over from zero. Drivven provides time2ticks.vi in the General RT VIs in the RT function palette. This VI can be implemented at the LabVIEW RT level for converting duration in milliseconds to FPGA clock ticks. Duration(uint32 clock ticks) = Duration(msec) * 40,000. FuelSparkSupervisor This cluster input must be wired directly from the FuelSparkSupervisor cluster output of a Drivven EPT VI. FIOut This is the fuel pulse Boolean output which can be wired to one of the DigitalOutput ChanX inputs of the DiffIO supervisor VI. © Drivven, Inc. 2010 • Diff IO Module Kit User’s Manual • D000118 • Rev A 16 Drivven, Inc. Diff IO Module Kit diffio_vt_spark_reva.vi This VI accepts the FuelSparkSupervisor from an EPT VI and generates a single boolean output for a spark pulse which can be specified by a dwell and end-angle or start-angle and end-angle. When in dwell/end-angle mode, the specified end-angle will take precedence over the dwell during engine speed fluctuations. However, the MaxDwell and MinDwell parameters will take precendence over the end-angle. The output of this VI is intended to be wired to a digital output channel of the Differential I/O Supervisor VI. Multiple spark output blocks can be ORed together into one digital output channel for a multi-pulse strategy. The Key to this VI must be provided from the Differential I/O Supervisor VI via a feedback node or shift register. The positions are specified in Crank Angle Ticks (CAT) MaxCAT = 2^(EPT Extrapolation) * Crank Teeth Per Cycle Dwell is specified in 40MHz clock ticks Connector Pane Controls and Indicators Key This input is wired from the "key" output of the diffio_supv_reva.vi through a single feedback node or shift register. It is used to unlock the output. SparkControl Collection of control parameters for generating an engine-synchronous spark command. SparkEnable When TRUE, the spark command is enabled. When FALSE (default), the spark command is disabled. PositionMode When FALSE (default), spark pulses are generated according to EndPosition and Dwell while StartPosition is ignored. When TRUE, spark pulses are generated according to StartPosition and EndPosition while Dwell is ignored. ActiveLow When FALSE (default), the output signal is active-high during spark pulses. When TRUE, the output signal is active-low during spark pulses. StartPosition This control is used when PositionMode is TRUE. Spark pulses are generated with a leading edge coinciding with StartPosition. The units of StartPosition are CAT. Drivven provides Offset2CAT.vi in the General RT VIs in the RT function palette. This VI can be implemented at the LabVIEW RT level for converting StartPosition in CAD, with respect to a cylinder TDC, to CAT. EndPosition This control is always used, regardless of PositionMode setting. Spark pulses are generated with a trailing edge coinciding with EndPosition. The length of the pulse will be according to Dwell. The leading edge will be determined by the current requested Dwell and the current engine speed. EndPosition will always take precedence over Dwell in the presence of engine speed fluctuations. If the engine speed increases after the spark pulse has started, then the actual dwell will be slightly shorter than the requested Dwell to ensure that correct spark timing is achieved. Likewise, if the engine speed © Drivven, Inc. 2010 • Diff IO Module Kit User’s Manual • D000118 • Rev A 17 Drivven, Inc. Diff IO Module Kit decreases after the spark pulse has started, then the actual dwell be will slightly longer than the requested Dwell. However, MinDwell will take precedence over EndPosition to ensure that a spark occurs, even if it is late. Also, MaxDwell is enforced to protect the external driver circuit, even if the end of the spark pulse must occur before EndPosition. The units of EndPosition are CAT. Drivven provides Offset2CAT.vi in the General RT VIs in the RT function palette. This VI can be implemented at the LabVIEW RT level for converting StartPosition in CAD, with respect to a cylinder TDC, to CAT. CutoffPosition All spark pulse activity is "Cutoff" at CutoffPosition and reset for the next cycle. CutoffPosition must always be at least 45 crank angle degrees (CAD) after EndPosition. If this minimum spacing is not maintained, then spark commands will be generated with incorrect timing. The units of CutoffPosition are CAT. Drivven provides Offset2CAT.vi in the General RT VIs in the RT function palette. This VI can be implemented at the LabVIEW RT level for converting StartPosition in CAD, with respect to a cylinder TDC, to CAT. Dwell Determines the length of the spark command delivered to the driver circuit. Dwell is entered in terms of 40 MHz clock ticks and is internally limited to 24 bits. Values larger than 24 bits will roll over from zero. Drivven provides time2ticks.vi in the General RT VIs in the RT function palette. This VI can be implemented at the LabVIEW RT level for converting dwell in milliseconds to FPGA clock ticks. Dwell(uint32 clock ticks) = Dwell(msec) * 40,000. MinDwell Determines the minimum length of any spark pulse. It is possible that dwell could be cut short of the requested Dwell due to engine speed fluctuations or modifications to EndPosition. If MinDwell is not satisfied upon reaching EndPosition, then the pulse will be extended until MinDwell. This will ensure that a spark will always occur even if the timing is late. MinDwell should be set to a minimum value of dwell that will still guarantee a spark. MinDwell is entered in terms of 40 MHz clock ticks and is internally limited to 24 bits. Values larger than 24 bits will roll over from zero. Drivven provides time2ticks.vi in the General RT VIs in the RT function palette. This VI can be implemented at the LabVIEW RT level for converting dwell in milliseconds to FPGA clock ticks. Dwell(uint32 clock ticks) = Dwell(msec) * 40,000. MaxDwell Determines the maximum length of any spark pulse. It is possible that dwell could be extended beyond the requested Dwell due to engine speed fluctuations or modifications to EndPosition. If MaxDwell is exceeded before reaching EndPosition, then the pulse will be terminated. This will ensure that a spark command will not exceed the limits of the driver circuitry. MaxDwell is entered in terms of 40 MHz clock ticks and is internally limited to 24 bits. Values larger than 24 bits will roll over from zero. Drivven provides time2ticks.vi in the General RT VIs in the RT function palette. This VI can be implemented at the LabVIEW RT level for converting dwell in milliseconds to FPGA clock ticks. © Drivven, Inc. 2010 • Diff IO Module Kit User’s Manual • D000118 • Rev A 18 Drivven, Inc. Diff IO Module Kit Dwell(uint32 clock ticks) = Dwell(msec) * 40,000. FuelSparkSupervisor This cluster input must be wired directly from the FuelSparkSupervisor cluster output of a Drivven EPT VI. SparkOut This is the spark pulse Boolean output which can be wired to one of the DigitalOutput ChanX inputs of the DiffIO supervisor VI. © Drivven, Inc. 2010 • Diff IO Module Kit User’s Manual • D000118 • Rev A 19 Drivven, Inc. Diff IO Module Kit diffio_vt_mp5mux4_reva.vi This VI generates up to 5 pulses per engine cycle. Each pulse is individually enabled and specified for duration and spacing. The outputs must be unlocked by the Key provided by the Differential Digital I/O Supervisor VI. The outputs may be wired to the digital outputs of the Differential Digital I/O module supervisor. The FPGA VI must be placed within a Single Cycle Loop (SCL) of a LabVIEW FPGA block diagram. The SCL must execute at the default clock rate of 40 MHz. The FPGA VI requires a pre-synthesized netlist file having a matching name and an extension of .ngc. The netlist file must be located in the same directory as the matching VI. The installer will place this file in the LabVIEW addons directory along with the FPGA VI. Connector Pane Controls and Indicators Key This input is wired from the "key" output of the diffio_supv_reva.vi through a single feedback node or shift register. It is used to unlock the outputs. MPControlX The MPControlX Clusters should be terminated with control clusters and made available as complete clusters for interfacing to the LabVIEW RT level. No FPGA code interface is required with any of the members of these clusters. However, their elements will be described in detail here for proper interfacing at the RT level. Each of these clusters contain the control elements for pulse timing, spacing and duration. MainEnableX When TRUE, all five fuel pulses are potentially enabled, depending on the other four enable Booleans. When FALSE (default), all five fuel pulses are disabled. PilotEnableX When TRUE, the pilot pulse is enabled. When FALSE (default), the pilot pulse is disabled. PreEnableX When TRUE, the pre pulse is enabled. When FALSE (default), the pre pulse is disabled. AfterEnableX When TRUE, the after pulse is enabled. When FALSE (default), the after pulse is disabled. PostEnableX When TRUE, the post pulse is enabled. When FALSE (default), the post pulse is disabled. The after pulse must be enabled for the post pulse to operate. MainStartPositionX The main pulse is generated with a leading edge coinciding with MainStartPosition. The length of the pulse will be according to MainDuration. The units of MainStartPosition are CAT. The timing of the pilot and pre pulses is referenced to MainStartPosition. The timing of the after pulse is referenced to the end of the main pulse. Drivven provides Offset2CAT.vi in the General RT VIs in the RT function palette. This VI can be implemented at the LabVIEW RT level for converting © Drivven, Inc. 2010 • Diff IO Module Kit User’s Manual • D000118 • Rev A 20 Drivven, Inc. Diff IO Module Kit MainStartPosition in CAD, with respect to a cylinder TDC, to CAT. PilotAdvanceX Determines the start time of the pilot pulse with respect to the start of the main pulse. This is a time advance, not a position advance. PilotAdvance is entered in terms of 40 MHz clock ticks and is internally limited to 18 bits. Values larger than 18 bits will roll over from zero. Drivven provides time2ticks.vi in the General RT VIs in the RT function palette. This VI can be implemented at the LabVIEW RT level for converting advance in milliseconds to FPGA clock ticks. Advance(uint32 clock ticks) = Advance(msec) * 40,000. PilotDurationX Determines the length of the pilot pulse. PilotDuration is entered in terms of 40 MHz clock ticks and is internally limited to 18 bits. Values larger than 18 bits will roll over from zero. Drivven provides time2ticks.vi in the General RT VIs in the RT function palette. This VI can be implemented at the LabVIEW RT level for converting duration in milliseconds to FPGA clock ticks. Duration(uint32 clock ticks) = Duration(msec) * 40,000. PreAdvanceX Determines the start time of the pre pulse with respect to the start of the main pulse. This is a time advance, not a position advance. PreAdvance is entered in terms of 40 MHz clock ticks and is internally limited to 18 bits. Values larger than 18 bits will roll over from zero. Drivven provides time2ticks.vi in the General RT VIs in the RT function palette. This VI can be implemented at the LabVIEW RT level for converting advance in milliseconds to FPGA clock ticks. Advance(uint32 clock ticks) = Advance(msec) * 40,000. PreDurationX Determines the length of the pre pulse. PreDuration is entered in terms of 40 MHz clock ticks and is internally limited to 18 bits. Values larger than 18 bits will roll over from zero. Drivven provides time2ticks.vi in the General RT VIs in the RT function palette. This VI can be implemented at the LabVIEW RT level for converting duration in milliseconds to FPGA clock ticks. Duration(uint32 clock ticks) = Duration(msec) * 40,000. MainDurationX Determines the length of the main pulse. MainDuration is entered in terms of 40 MHz clock ticks and is internally limited to 18 bits. Values larger than 18 bits will roll over from zero. Drivven provides time2ticks.vi in the General RT VIs in the RT function palette. This VI can be implemented at the LabVIEW RT level for converting duration in milliseconds to FPGA clock ticks. Duration(uint32 clock ticks) = Duration(msec) * 40,000. AfterDelayX Determines the start time of the after pulse with respect to the end of the main pulse. This is a time delay, not a position delay. AfterDelay is © Drivven, Inc. 2010 • Diff IO Module Kit User’s Manual • D000118 • Rev A 21 Drivven, Inc. Diff IO Module Kit entered in terms of 40 MHz clock ticks and is internally limited to 18 bits. Values larger than 18 bits will roll over from zero. Drivven provides time2ticks.vi in the General RT VIs in the RT function palette. This VI can be implemented at the LabVIEW RT level for converting delay in milliseconds to FPGA clock ticks. Delay(uint32 clock ticks) = Delay(msec) * 40,000. AfterDurationX Determines the length of the after pulse. AfterDuration is entered in terms of 40 MHz clock ticks and is internally limited to 18 bits. Values larger than 18 bits will roll over from zero. Drivven provides time2ticks.vi in the General RT VIs in the RT function palette. This VI can be implemented at the LabVIEW RT level for converting duration in milliseconds to FPGA clock ticks. Duration(uint32 clock ticks) = Duration(msec) * 40,000. PostDelayX Determines the start time of the post pulse with respect to the end of the after pulse. This is a time delay, not a position delay. PostDelay is entered in terms of 40 MHz clock ticks and is internally limited to 18 bits. Values larger than 18 bits will roll over from zero. Drivven provides time2ticks.vi in the General RT VIs in the RT function palette. This VI can be implemented at the LabVIEW RT level for converting delay in milliseconds to FPGA clock ticks. Delay(uint32 clock ticks) = Delay(msec) * 40,000. PostDurationX Determines the length of the post pulse. PostDuration is entered in terms of 40 MHz clock ticks and is internally limited to 18 bits. Values larger than 18 bits will roll over from zero. Drivven provides time2ticks.vi in the General RT VIs in the RT function palette. This VI can be implemented at the LabVIEW RT level for converting duration in milliseconds to FPGA clock ticks. Duration(uint32 clock ticks) = Duration(msec) * 40,000. CutoffPositionX CutoffPosition must be set to a position at least 45 CAD after MainStartPosition. If this minimum spacing is not maintained, then fuel commands will be generated with incorrect timing. In reality, the CutoffPosition may need to be significantly larger than 45 CAD after MainStartPosition to allow for the after and post fuel pulses. This will depend on the duration of these pulses as well as the engine speed. The output channels of this VI are multiplexed. Therefore a position must be set which determines when the FPGA software switches operation to the next channel. CutoffPosition is used for this purpose. Even though some channels may not be used or enabled, each channel's CutoffPosition must be given values which are spaced throughout the engine cycle. Furthermore, each channel's CutoffPosition must be in positional order as channel number increases. Assuming that CuttoffPosition for each channel is written at the RT level with respect to cylinder TDCs, below are some example TDC values for each channel. © Drivven, Inc. 2010 • Diff IO Module Kit User’s Manual • D000118 • Rev A 22 Drivven, Inc. Diff IO Module Kit Example 1 - Correct (positional order is maintained): TDC1 = 0 TDC2 = 180 TDC3 = 360 TDC4 = 540 Example 2 - Correct (positional order is maintained): TDC1 = 180 TDC2 = 360 TDC3 = 540 TDC4 = 0 Example 3 - Incorrect (positional order is not maintained): TDC1 = 0 TDC2 = 540 TDC3 = 180 TDC4 = 360 Drivven provides Offset2CAT.vi in the General RT VIs in the RT function palette. This VI can be implemented at the LabVIEW RT level for converting CutoffPosition in CAD, with respect to a cylinder TDC, to CAT. FuelSparkSupervisor This cluster input must be wired directly from the FuelSparkSupervisor cluster output of a Drivven EPT VI. MPOutX Multi-pulse output for channel X. CutoffFlag A one-clock one-shot at the CutoffPosition for each channel. © Drivven, Inc. 2010 • Diff IO Module Kit User’s Manual • D000118 • Rev A 23 Drivven, Inc. Diff IO Module Kit diffio_vt_mp5_reva.vi This VI generates up to 5 pulses per engine cycle. Each pulse is individually enabled and specified for duration and spacing. The outputs must be unlocked by the Key provided by the Differential Digital I/O module supervisor. The outputs may be wired to the Boolean outputs of the Differential Digital I/O module supervisor. The FPGA VI must be placed within a Single Cycle Loop (SCL) of a LabVIEW FPGA block diagram. The SCL must execute at the default clock rate of 40 MHz. The FPGA VI requires a pre-synthesized netlist file having a matching name and an extension of .ngc. The netlist file must be located in the same directory as the matching VI. The installer will place this file in the LabVIEW addons directory along with the FPGA VI. Connector Pane Controls and Indicators FuelSparkSupervisor This cluster input must be wired directly from the FuelSparkSupervisor cluster output of a Drivven EPT VI. MPControl The MPControlX Clusters should be terminated with control clusters and made available as complete clusters for interfacing to the LabVIEW RT level. No FPGA code interface is required with any of the members of these clusters. However, their elements will be described in detail here for proper interfacing at the RT level. Each of these clusters contain the control elements for pulse timing, spacing and duration. MainEnable When TRUE, all five fuel pulses are potentially enabled, depending on the other four enable Booleans. When FALSE (default), all five fuel pulses are disabled. PilotEnable When TRUE, the pilot pulse is enabled. When FALSE (default), the pilot pulse is disabled. PreEnable When TRUE, the pre pulse is enabled. When FALSE (default), the pre pulse is disabled. AfterEnable When TRUE, the after pulse is enabled. When FALSE (default), the after pulse is disabled. PostEnable When TRUE, the post pulse is enabled. When FALSE (default), the post pulse is disabled. The after pulse must be enabled for the post pulse to operate. MainStartPosition The main pulse is generated with a leading edge coinciding with MainStartPosition. The length of the pulse will be according to MainDuration. The units of MainStartPosition are CAT. The timing of the pilot and pre pulses is referenced to MainStartPosition. The timing of the after pulse is referenced to the end of the main pulse. Drivven provides Offset2CAT.vi in the General RT VIs in the RT function palette. This VI can be implemented at the LabVIEW RT level for converting MainStartPosition in CAD, with respect to a cylinder TDC, to CAT. © Drivven, Inc. 2010 • Diff IO Module Kit User’s Manual • D000118 • Rev A 24 Drivven, Inc. Diff IO Module Kit PilotAdvance Determines the start time of the pilot pulse with respect to the start of the main pulse. This is a time advance, not a position advance. PilotAdvance is entered in terms of 40 MHz clock ticks and is internally limited to 24 bits. Values larger than 24 bits will roll over from zero. Drivven provides time2ticks.vi in the General RT VIs in the RT function palette. This VI can be implemented at the LabVIEW RT level for converting advance in milliseconds to FPGA clock ticks. Advance(uint32 clock ticks) = Advance(msec) * 40,000. PilotDuration Determines the length of the pilot pulse. PilotDuration is entered in terms of 40 MHz clock ticks and is internally limited to 24 bits. Values larger than 24 bits will roll over from zero. Drivven provides time2ticks.vi in the General RT VIs in the RT function palette. This VI can be implemented at the LabVIEW RT level for converting duration in milliseconds to FPGA clock ticks. Duration(uint32 clock ticks) = Duration(msec) * 40,000. PreAdvance Determines the start time of the pre pulse with respect to the start of the main pulse. This is a time advance, not a position advance. PreAdvance is entered in terms of 40 MHz clock ticks and is internally limited to 24 bits. Values larger than 24 bits will roll over from zero. Drivven provides time2ticks.vi in the General RT VIs in the RT function palette. This VI can be implemented at the LabVIEW RT level for converting advance in milliseconds to FPGA clock ticks. Advance(uint32 clock ticks) = Advance(msec) * 40,000. PreDuration Determines the length of the pre pulse. PreDuration is entered in terms of 40 MHz clock ticks and is internally limited to 24 bits. Values larger than 24 bits will roll over from zero. Drivven provides time2ticks.vi in the General RT VIs in the RT function palette. This VI can be implemented at the LabVIEW RT level for converting duration in milliseconds to FPGA clock ticks. Duration(uint32 clock ticks) = Duration(msec) * 40,000. MainDuration Determines the length of the main pulse. MainDuration is entered in terms of 40 MHz clock ticks and is internally limited to 24 bits. Values larger than 24 bits will roll over from zero. Drivven provides time2ticks.vi in the General RT VIs in the RT function palette. This VI can be implemented at the LabVIEW RT level for converting duration in milliseconds to FPGA clock ticks. Duration(uint32 clock ticks) = Duration(msec) * 40,000. AfterDelay Determines the start time of the after pulse with respect to the end of the main pulse. This is a time delay, not a position delay. AfterDelay is entered in terms of 40 MHz clock ticks and is internally limited to 24 bits. Values larger © Drivven, Inc. 2010 • Diff IO Module Kit User’s Manual • D000118 • Rev A 25 Drivven, Inc. Diff IO Module Kit than 24 bits will roll over from zero. Drivven provides time2ticks.vi in the General RT VIs in the RT function palette. This VI can be implemented at the LabVIEW RT level for converting delay in milliseconds to FPGA clock ticks. Delay(uint32 clock ticks) = Delay(msec) * 40,000. AfterDuration Determines the length of the after pulse. AfterDuration is entered in terms of 40 MHz clock ticks and is internally limited to 24 bits. Values larger than 24 bits will roll over from zero. Drivven provides time2ticks.vi in the General RT VIs in the RT function palette. This VI can be implemented at the LabVIEW RT level for converting duration in milliseconds to FPGA clock ticks. Duration(uint32 clock ticks) = Duration(msec) * 40,000. PostDelay Determines the start time of the post pulse with respect to the end of the after pulse. This is a time delay, not a position delay. PostDelay is entered in terms of 40 MHz clock ticks and is internally limited to 24 bits. Values larger than 24 bits will roll over from zero. Drivven provides time2ticks.vi in the General RT VIs in the RT function palette. This VI can be implemented at the LabVIEW RT level for converting delay in milliseconds to FPGA clock ticks. Delay(uint32 clock ticks) = Delay(msec) * 40,000. PostDuration Determines the length of the post pulse. PostDuration is entered in terms of 40 MHz clock ticks and is internally limited to 24 bits. Values larger than 24 bits will roll over from zero. Drivven provides time2ticks.vi in the General RT VIs in the RT function palette. This VI can be implemented at the LabVIEW RT level for converting duration in milliseconds to FPGA clock ticks. Duration(uint32 clock ticks) = Duration(msec) * 40,000. CutoffPosition CutoffPosition must be set to a position at least 45 CAD after MainStartPosition. If this minimum spacing is not maintained, then fuel commands will be generated with incorrect timing. In reality, the CutoffPosition may need to be significantly larger than 45 CAD after MainStartPosition to allow for the after and post fuel pulses. This will depend on the duration of these pulses as well as the engine speed. The output channels of this VI are multiplexed. Therefore a position must be set which determines when the FPGA software switches operation to the next channel. CutoffPosition is used for this purpose. Even though some channels may not be used or enabled, each channel's CutoffPosition must be given values which are spaced throughout the engine cycle. Furthermore, each channel's CutoffPosition must be in positional order as channel number increases. Assuming that CuttoffPosition for each channel is written at the RT level with respect to cylinder TDCs, below are some example TDC values for each channel. Example 1 - Correct (positional order is maintained): © Drivven, Inc. 2010 • Diff IO Module Kit User’s Manual • D000118 • Rev A 26 Drivven, Inc. Diff IO Module Kit TDC1 = 0 TDC2 = 180 TDC3 = 360 TDC4 = 540 Example 2 - Correct (positional order is maintained): TDC1 = 180 TDC2 = 360 TDC3 = 540 TDC4 = 0 Example 3 - Incorrect (positional order is not maintained): TDC1 = 0 TDC2 = 540 TDC3 = 180 TDC4 = 360 Drivven provides Offset2CAT.vi in the General RT VIs in the RT function palette. This VI can be implemented at the LabVIEW RT level for converting CutoffPosition in CAD, with respect to a cylinder TDC, to CAT. Key This input is wired from the "key" output of the diffio_supv_reva.vi through a single feedback node or shift register. It is used to unlock the outputs. CutoffFlag A one-clock one-shot at the CutoffPosition for each channel. MPOut Multi-pulse output. © Drivven, Inc. 2010 • Diff IO Module Kit User’s Manual • D000118 • Rev A 27 Drivven, Inc. Diff IO Module Kit diffio_vt_ppcad_mp5mux4_reva.vi This VI generates up to 5 pulses per engine cycle. Each pulse is individually enabled and specified for duration and spacing. The outputs must be unlocked by the Key provided by the Differential Digital I/O module supervisor. The outputs may be wired to the Boolean outputs of the Differential Digital I/O module supervisor. The FPGA VI must be placed within a Single Cycle Loop (SCL) of a LabVIEW FPGA block diagram. The SCL must execute at the default clock rate of 40 MHz. The FPGA VI requires a pre-synthesized netlist file having a matching name and an extension of .ngc. The netlist file must be located in the same directory as the matching VI. The installer will place this file in the LabVIEW addons directory along with the FPGA VI. Connector Pane Controls and Indicators FuelSparkSupervisor This cluster input must be wired directly from the FuelSparkSupervisor cluster output of a Drivven EPT VI. MPControlX The MPControlX Clusters should be terminated with control clusters and made available as complete clusters for interfacing to the LabVIEW RT level. No FPGA code interface is required with any of the members of these clusters. However, their elements will be described in detail here for proper interfacing at the RT level. Each of these clusters contain the control elements for pulse timing, spacing and duration. MainEnableX When TRUE, all five fuel pulses are potentially enabled, depending on the other four enable Booleans. When FALSE (default), all five fuel pulses are disabled. PilotEnableX When TRUE, the pilot pulse is enabled. When FALSE (default), the pilot pulse is disabled. PreEnableX When TRUE, the pre pulse is enabled. When FALSE (default), the pre pulse is disabled. AfterEnableX When TRUE, the after pulse is enabled. When FALSE (default), the after pulse is disabled. PostEnableX When TRUE, the post pulse is enabled. When FALSE (default), the post pulse is disabled. The after pulse must be enabled for the post pulse to operate. MainStartPositionX The main pulse is generated with a leading edge coinciding with MainStartPosition. The length of the pulse will be according to MainDuration. The units of MainStartPosition are CAT. The timing of the pilot and pre pulses is referenced to MainStartPosition. The timing of the after pulse is referenced to the end of the main pulse. Drivven provides Offset2CAT.vi in the General RT VIs in the RT function palette. This VI can be implemented at the LabVIEW RT level for converting © Drivven, Inc. 2010 • Diff IO Module Kit User’s Manual • D000118 • Rev A 28 Drivven, Inc. Diff IO Module Kit MainStartPosition in CAD, with respect to a cylinder TDC, to CAT. PilotOffsetCATX Determines the start position of the pilot pulse with respect to the start of the main pulse. This is a CAT advance, entered in terms of Crank Angle Ticks before MainStartPosition. PilotDurationX Determines the length of the pilot pulse. PilotDuration is entered in terms of 40 MHz clock ticks and is internally limited to 18 bits. Values larger than 18 bits will roll over from zero. Drivven provides time2ticks.vi in the General RT VIs in the RT function palette. This VI can be implemented at the LabVIEW RT level for converting duration in milliseconds to FPGA clock ticks. Duration(uint32 clock ticks) = Duration(msec) * 40,000. PreOffsetCATX Determines the start position of the pre pulse with respect to the start of the main pulse. This is a CAT advance, entered in terms of Crank Angle Ticks before MainStartPosition. PreDurationX Determines the length of the pre pulse. PreDuration is entered in terms of 40 MHz clock ticks and is internally limited to 18 bits. Values larger than 18 bits will roll over from zero. Drivven provides time2ticks.vi in the General RT VIs in the RT function palette. This VI can be implemented at the LabVIEW RT level for converting duration in milliseconds to FPGA clock ticks. Duration(uint32 clock ticks) = Duration(msec) * 40,000. MainDurationX Determines the length of the main pulse. MainDuration is entered in terms of 40 MHz clock ticks and is internally limited to 18 bits. Values larger than 18 bits will roll over from zero. Drivven provides time2ticks.vi in the General RT VIs in the RT function palette. This VI can be implemented at the LabVIEW RT level for converting duration in milliseconds to FPGA clock ticks. Duration(uint32 clock ticks) = Duration(msec) * 40,000. AfterDelayX Determines the start time of the after pulse with respect to the end of the main pulse. This is a time delay, not a position delay. AfterDelay is entered in terms of 40 MHz clock ticks and is internally limited to 24 bits. Values larger than 24 bits will roll over from zero. Drivven provides time2ticks.vi in the General RT VIs in the RT function palette. This VI can be implemented at the LabVIEW RT level for converting delay in milliseconds to FPGA clock ticks. Delay(uint32 clock ticks) = Delay(msec) * 40,000. AfterDurationX Determines the length of the after pulse. AfterDuration is entered in terms of 40 MHz clock ticks and is internally limited to 18 bits. Values larger than 18 bits will roll over from zero. Drivven provides time2ticks.vi in the General RT VIs in the RT function palette. © Drivven, Inc. 2010 • Diff IO Module Kit User’s Manual • D000118 • Rev A 29 Drivven, Inc. Diff IO Module Kit This VI can be implemented at the LabVIEW RT level for converting duration in milliseconds to FPGA clock ticks. Duration(uint32 clock ticks) = Duration(msec) * 40,000. PostDelayX Determines the start time of the post pulse with respect to the end of the after pulse. This is a time delay, not a position delay. PostDelay is entered in terms of 40 MHz clock ticks and is internally limited to 24 bits. Values larger than 24 bits will roll over from zero. Drivven provides time2ticks.vi in the General RT VIs in the RT function palette. This VI can be implemented at the LabVIEW RT level for converting delay in milliseconds to FPGA clock ticks. Delay(uint32 clock ticks) = Delay(msec) * 40,000. PostDurationX Determines the length of the post pulse. PostDuration is entered in terms of 40 MHz clock ticks and is internally limited to 18 bits. Values larger than 18 bits will roll over from zero. Drivven provides time2ticks.vi in the General RT VIs in the RT function palette. This VI can be implemented at the LabVIEW RT level for converting duration in milliseconds to FPGA clock ticks. Duration(uint32 clock ticks) = Duration(msec) * 40,000. CutoffPositionX CutoffPosition must be set to a position at least 45 CAD after MainStartPosition. If this minimum spacing is not maintained, then fuel commands will be generated with incorrect timing. In reality, the CutoffPosition may need to be significantly larger than 45 CAD after MainStartPosition to allow for the after and post fuel pulses. This will depend on the duration of these pulses as well as the engine speed. The output channels of this VI are multiplexed. Therefore a position must be set which determines when the FPGA software switches operation to the next channel. CutoffPosition is used for this purpose. Even though some channels may not be used or enabled, each channel's CutoffPosition must be given values which are spaced throughout the engine cycle. Furthermore, each channel's CutoffPosition must be in positional order as channel number increases. Assuming that CuttoffPosition for each channel is written at the RT level with respect to cylinder TDCs, below are some example TDC values for each channel. Example 1 - Correct (positional order is maintained): TDC1 = 0 TDC2 = 180 TDC3 = 360 TDC4 = 540 Example 2 - Correct (positional order is maintained): TDC1 = 180 TDC2 = 360 TDC3 = 540 TDC4 = 0 Example 3 - Incorrect (positional order is not maintained): TDC1 = 0 © Drivven, Inc. 2010 • Diff IO Module Kit User’s Manual • D000118 • Rev A 30 Drivven, Inc. Diff IO Module Kit TDC2 = 540 TDC3 = 180 TDC4 = 360 Drivven provides Offset2CAT.vi in the General RT VIs in the RT function palette. This VI can be implemented at the LabVIEW RT level for converting CutoffPosition in CAD, with respect to a cylinder TDC, to CAT. Key This input is wired from the "key" output of the diffio_supv_reva.vi through a single feedback node or shift register. It is used to unlock the outputs. CutoffFlag A one-clock one-shot at the CutoffPosition for each channel. MPOut1 Multi-pulse output for channel 1. MPOut2 Multi-pulse output for channel 2. MPOut3 Multi-pulse output for channel 3. MPOut4 Multi-pulse output for channel 4. © Drivven, Inc. 2010 • Diff IO Module Kit User’s Manual • D000118 • Rev A 31 Drivven, Inc. Diff IO Module Kit diffio_vt_ppcad_mp5_reva.vi This VI generates up to 5 pulses per engine cycle. Each pulse is individually enabled and specified for duration and spacing. The outputs must be unlocked by the Key provided by the Differential Digital I/O module supervisor. The outputs may be wired to the Boolean outputs of the Differential Digital I/O module supervisor. The FPGA VI must be placed within a Single Cycle Loop (SCL) of a LabVIEW FPGA block diagram. The SCL must execute at the default clock rate of 40 MHz. The FPGA VI requires a pre-synthesized netlist file having a matching name and an extension of .ngc. The netlist file must be located in the same directory as the matching VI. The installer will place this file in the LabVIEW addons directory along with the FPGA VI. Connector Pane Controls and Indicators FuelSparkSupervisor This cluster input must be wired directly from the FuelSparkSupervisor cluster output of a Drivven EPT VI. MPControl The MPControlX Clusters should be terminated with control clusters and made available as complete clusters for interfacing to the LabVIEW RT level. No FPGA code interface is required with any of the members of these clusters. However, their elements will be described in detail here for proper interfacing at the RT level. Each of these clusters contain the control elements for pulse timing, spacing and duration. MainEnable When TRUE, all five fuel pulses are potentially enabled, depending on the other four enable Booleans. When FALSE (default), all five fuel pulses are disabled. PilotEnable When TRUE, the pilot pulse is enabled. When FALSE (default), the pilot pulse is disabled. PreEnable When TRUE, the pre pulse is enabled. When FALSE (default), the pre pulse is disabled. AfterEnable When TRUE, the after pulse is enabled. When FALSE (default), the after pulse is disabled. PostEnable When TRUE, the post pulse is enabled. When FALSE (default), the post pulse is disabled. The after pulse must be enabled for the post pulse to operate. MainStartPosition The main pulse is generated with a leading edge coinciding with MainStartPosition. The length of the pulse will be according to MainDuration. The units of MainStartPosition are CAT. The timing of the pilot and pre pulses is referenced to MainStartPosition. The timing of the after pulse is referenced to the end of the main pulse. Drivven provides Offset2CAT.vi in the General RT VIs in the RT function palette. This VI can be implemented at the LabVIEW RT level for converting MainStartPosition in CAD, with respect to a cylinder TDC, to CAT. © Drivven, Inc. 2010 • Diff IO Module Kit User’s Manual • D000118 • Rev A 32 Drivven, Inc. Diff IO Module Kit PilotOffsetCAT Determines the start position of the pilot pulse with respect to the start of the main pulse. This is a CAT advance, entered in terms of Crank Angle Ticks before MainStartPosition. PilotDuration Determines the length of the pilot pulse. PilotDuration is entered in terms of 40 MHz clock ticks and is internally limited to 24 bits. Values larger than 24 bits will roll over from zero. Drivven provides time2ticks.vi in the General RT VIs in the RT function palette. This VI can be implemented at the LabVIEW RT level for converting duration in milliseconds to FPGA clock ticks. Duration(uint32 clock ticks) = Duration(msec) * 40,000. PreOffsetCAT Determines the start position of the pre pulse with respect to the start of the main pulse. This is a CAT advance, entered in terms of Crank Angle Ticks before MainStartPosition. PreDuration Determines the length of the pre pulse. PreDuration is entered in terms of 40 MHz clock ticks and is internally limited to 24 bits. Values larger than 24 bits will roll over from zero. Drivven provides time2ticks.vi in the General RT VIs in the RT function palette. This VI can be implemented at the LabVIEW RT level for converting duration in milliseconds to FPGA clock ticks. Duration(uint32 clock ticks) = Duration(msec) * 40,000. MainDuration Determines the length of the main pulse. MainDuration is entered in terms of 40 MHz clock ticks and is internally limited to 24 bits. Values larger than 24 bits will roll over from zero. Drivven provides time2ticks.vi in the General RT VIs in the RT function palette. This VI can be implemented at the LabVIEW RT level for converting duration in milliseconds to FPGA clock ticks. Duration(uint32 clock ticks) = Duration(msec) * 40,000. AfterDelay Determines the start time of the after pulse with respect to the end of the main pulse. This is a time delay, not a position delay. AfterDelay is entered in terms of 40 MHz clock ticks and is internally limited to 24 bits. Values larger than 24 bits will roll over from zero. Drivven provides time2ticks.vi in the General RT VIs in the RT function palette. This VI can be implemented at the LabVIEW RT level for converting delay in milliseconds to FPGA clock ticks. Delay(uint32 clock ticks) = Delay(msec) * 40,000. AfterDuration Determines the length of the after pulse. AfterDuration is entered in terms of 40 MHz clock ticks and is internally limited to 24 bits. Values larger than 24 bits will roll over from zero. Drivven provides time2ticks.vi in the General RT VIs in the RT function palette. This VI can be implemented at the LabVIEW RT level for converting duration in © Drivven, Inc. 2010 • Diff IO Module Kit User’s Manual • D000118 • Rev A 33 Drivven, Inc. Diff IO Module Kit milliseconds to FPGA clock ticks. Duration(uint32 clock ticks) = Duration(msec) * 40,000. PostDelay Determines the start time of the post pulse with respect to the end of the after pulse. This is a time delay, not a position delay. PostDelay is entered in terms of 40 MHz clock ticks and is internally limited to 24 bits. Values larger than 24 bits will roll over from zero. Drivven provides time2ticks.vi in the General RT VIs in the RT function palette. This VI can be implemented at the LabVIEW RT level for converting delay in milliseconds to FPGA clock ticks. Delay(uint32 clock ticks) = Delay(msec) * 40,000. PostDuration Determines the length of the post pulse. PostDuration is entered in terms of 40 MHz clock ticks and is internally limited to 24 bits. Values larger than 24 bits will roll over from zero. Drivven provides time2ticks.vi in the General RT VIs in the RT function palette. This VI can be implemented at the LabVIEW RT level for converting duration in milliseconds to FPGA clock ticks. Duration(uint32 clock ticks) = Duration(msec) * 40,000. CutoffPosition CutoffPosition must be set to a position at least 45 CAD after MainStartPosition. If this minimum spacing is not maintained, then fuel commands will be generated with incorrect timing. In reality, the CutoffPosition may need to be significantly larger than 45 CAD after MainStartPosition to allow for the after and post fuel pulses. This will depend on the duration of these pulses as well as the engine speed. The output channels of this VI are multiplexed. Therefore a position must be set which determines when the FPGA software switches operation to the next channel. CutoffPosition is used for this purpose. Even though some channels may not be used or enabled, each channel's CutoffPosition must be given values which are spaced throughout the engine cycle. Furthermore, each channel's CutoffPosition must be in positional order as channel number increases. Assuming that CuttoffPosition for each channel is written at the RT level with respect to cylinder TDCs, below are some example TDC values for each channel. Example 1 - Correct (positional order is maintained): TDC1 = 0 TDC2 = 180 TDC3 = 360 TDC4 = 540 Example 2 - Correct (positional order is maintained): TDC1 = 180 TDC2 = 360 TDC3 = 540 TDC4 = 0 Example 3 - Incorrect (positional order is not maintained): TDC1 = 0 TDC2 = 540 © Drivven, Inc. 2010 • Diff IO Module Kit User’s Manual • D000118 • Rev A 34 Drivven, Inc. Diff IO Module Kit TDC3 = 180 TDC4 = 360 Drivven provides Offset2CAT.vi in the General RT VIs in the RT function palette. This VI can be implemented at the LabVIEW RT level for converting CutoffPosition in CAD, with respect to a cylinder TDC, to CAT. Key This input is wired from the "key" output of the diffio_supv_reva.vi through a single feedback node or shift register. It is used to unlock the outputs. CutoffFlag A one-clock one-shot at the CutoffPosition for each channel. MPOut Multi-pulse output. © Drivven, Inc. 2010 • Diff IO Module Kit User’s Manual • D000118 • Rev A 35 Drivven, Inc. Diff IO Module Kit pwm_reva.vi This VI generates a Pulse Width Modulated signal based on the PWMControl cluster. When enabled, OutSig will toggle between TRUE and FALSE at a frequency determined by the Period. The PulseWidth and Polarity determine the relative time that OutSig remains in each state. This VI must be placed within a Single Cycle Loop (SCL) of a LabVIEW FPGA block diagram. The FPGA VI requires a pre-synthesized netlist file having a matching name and an extension of .ngc. The netlist file must be located in the same directory as the matching VI. The installer will place this file in the LabVIEW addons directory along with the FPGA VI. Connector Pane Controls and Indicators PWMControl Cluster of settings that define the generated signal. Enable When TRUE, the PWM signal is generated. Polarity When TRUE, the signal is set to an active low state. Period Period between the rising edges of SigOut in terms of clock ticks. PulseWidth Pulse width from the rising edge to the falling edge of OutSig in terms of clock ticks. OutSig Signal generated with the specified Period and PulseWidth. © Drivven, Inc. 2010 • Diff IO Module Kit User’s Manual • D000118 • Rev A 36 Drivven, Inc. Diff IO Module Kit Warning About FPGA I/O Node Wiring Great care should be taken to ensure that I/O nodes are wired to the correct PinInput and PinOutput clusters of the correct module VI. If wired incorrectly, then undefined behavior or rd module damage could result. LabVIEW FPGA does not yet provide a method for 3 party module vendors to hide the DIO pins behind module VIs and still be portable to various system configurations. Therefore, a double-check of the I/O node wiring is recommended. Two LabVIEW FPGA code snippets are shown below from an ADCombo implementation which illustrate this issue. Figure 3 shows the correct implementation of the FPGA I/O node block for the PinOutput cluster of the ADCombo. On the other hand, figure 4 shows a coding mistake that should be avoided. Notice the ADCombo output items where a Spark module output item is selected instead of the correct ADCombo module output item. This means that the Spark (DIO5) output is being driven by the ADCombo logic and will cause strange behavior of the spark module, or possible damage. Figure 3. Representative FPGA output node for ADCombo with correct output item selection. Figure 4. Representative FPGA output node for ADCombo with incorrect output item selection for DIO5. This will cause strange behavior or damage to the spark module. Applying meaningful names to the modules within the project can help identify these coding mistakes. © Drivven, Inc. 2010 • Diff IO Module Kit User’s Manual • D000118 • Rev A 37 Drivven, Inc. Diff IO Module Kit Compliance and Certifications Safety This product meets the requirements of the following standards of safety for electrical equipment for measurement, control, and laboratory use: IEC 61010-1, EN 61010-1 UL 61010-1, CSA 61010-1 Electromagnetic Compatibility This product meets the requirements of the following EMC standards for electrical equipment for measurement, control, and laboratory use: EN 61326-1 (IEC 61326-1): Class A emissions; Industrial immunity EN 55011 (CISPR 11): Group 1, Class A emissions AS/NZS CISPR 11: Group 1, Class A emissions FCC 47 CFR Part 15B: Class A emissions ICES-001: Class A emissions Caution: When operating this product, use shielded cables and accessories. CE Compliance This product meets the essential requirements of applicable European Directives as follows: 2006/95/EC; Low-Voltage Directive (safety) 2004/108/EC; Electromagnetic Compatibility Directive (EMC) Environmental Management NI is committed to designing and manufacturing products in an environmentally responsible manner. NI recognizes that eliminating certain hazardous substances from our products is beneficial to the environment and to NI customers. For additional environmental information, refer to the NI and the Environment Web page at ni.com/environment. This page contains the environmental regulations and directives with which NI complies, as well as other environmental information not included in this document. Waste Electrical and Electronic Equipment (WEEE) EU Customers At the end of the product life cycle, all products must be sent to a WEEE recycling center. For more information about WEEE recycling centers, National Instruments WEEE initiatives, and compliance with WEEE Directive 2002/96/EC on Waste Electrical and Electronic Equipment, visit ni.com/environment/weee. Battery Replacement and Disposal Battery Directive This device contains a long-life coin cell battery. If you need to replace it, use the Return Material Authorization (RMA) process or contact an authorized National Instruments service representative. For more information about compliance with the EU Battery Directive 2006/66/EC about Batteries and Accumulators and Waste Batteries and Accumulators, visit ni.com/environment/batterydirective. © Drivven, Inc. 2010 • Diff IO Module Kit User’s Manual • D000118 • Rev A 38 Drivven, Inc. Diff IO Module Kit Management Methods for Controlling Pollution Caused by Electronic Information Products Regulation (China RoHS) Chinese Customers National Instruments is in compliance with the Chinese policy on the Restriction of Hazardous Substances (RoHS) used in Electronic Information Products. For more information about the National Instruments China RoHS compliance, visit ni.com/environment/rohs_china. 电子信息产品污染控制管理办法( 中国RoHS) 中国客户 National Instruments符合中国电子信息产品中限制使用某些有害物质指令 (RoHS)。 关于National Instruments中国RoHS合规性信息,请登录 ni.com/environment/rohs_china。(For information about China RoHS compliance, go to ni.com/environment/rohs_china.) Physical Specifications and Characteristics Weight: 170 grams Maximum Altitude: 2000 m Maximum Ambient Temperature: 70º C Operating Humidity: 10% to 90% RH, noncondensing Pollution Degree: 2 Ingress Protection: IP40 For Indoor Use Only If you need to clean the module, wipe it with a dry towel Safety Guidelines Caution: Do not operate this module in a manner not specified in these operating instructions. Product misuse can result in a hazard. You can compromise the safety protection built into the product if the product is damaged in any way. If the product is damaged, return it to National Instruments for repair. © Drivven, Inc. 2010 • Diff IO Module Kit User’s Manual • D000118 • Rev A 39