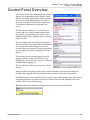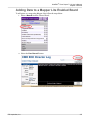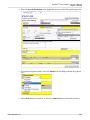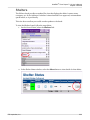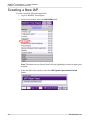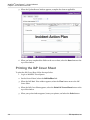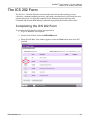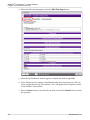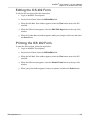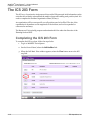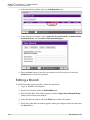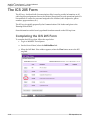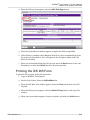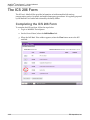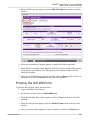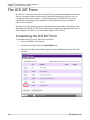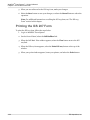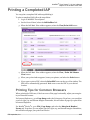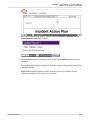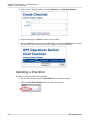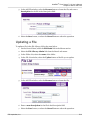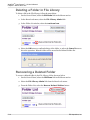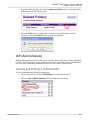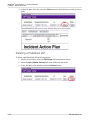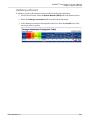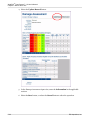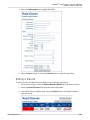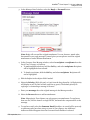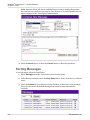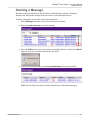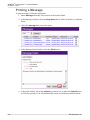
1
WebEOC® Town Square™
User’s Manual
Version 1.0
For ESi sales and operations:
ESi Acquisition, Inc.
823 Broad Street, Augusta, Georgia 30901-1400
USA
Tel: (706) 823-0911 or (800) 596-0911
Fax: (706) 826-9911
[email protected]
http://www.esi911.com/
WebEOC® and ESi® and Town Square™ are registered trademarks of ESi Acquisition, Inc.
MapTac™ and ESiWebFUSION™ are trademarks of ESi Acquisition, Inc.
Microsoft®, Windows®, and Internet Explorer® are registered trademarks of Microsoft Corporation.
Mozilla®and Firefox® are registered trademarks of Mozilla Foundation.
All other trademarks are the property of their respective companies.
© 2002-2011 ESi Acquisition, Inc.
All rights reserved. No part of this publication may be used commercially, reproduced, stored in a retrieval system or
transmitted, in any form or by any means, mechanical, photocopying, recording or otherwise, without the prior written
permission of ESi Acquisition, Inc. While every precaution has been taken in the preparation of this document, ESi
assumes no responsibility for errors or omissions. Neither is any liability assumed for damages resulting from the use
of the information contained herein.
Printed in USA.
Table of Contents
Chapter: 1 WebEOC Town Square Overview
Introduction .............................................................................................................. 1-1
Audience and Purpose ............................................................................................ 1-2
Built-in Process ........................................................................................................ 1-2
Time Conventions .................................................................................................... 1-2
Chapter: 2 Getting Started
Introduction .............................................................................................................. 2-1
Self-registration Requirements ................................................................................ 2-2
Logging in to Town Square ...................................................................................... 2-5
Control Panel Overview ......................................................................................... 2-10
Chapter:3 Boards
Introduction .............................................................................................................. 3-1
General Board Features .......................................................................................... 3-2
Board Views ............................................................................................................. 3-3
Mapper Lite .............................................................................................................. 3-4
The Boards Section ............................................................................................... 3-13
Chapter: 4 The Incident Action Plan
Introduction .............................................................................................................. 4-1
Creating a New IAP ................................................................................................. 4-2
The IAP Cover Sheet ............................................................................................... 4-4
The ICS 202 Form ................................................................................................... 4-7
The ICS 203 Form ................................................................................................. 4-10
Operations Branch List (ICS 204) .......................................................................... 4-13
The ICS 205 Form ................................................................................................. 4-18
The ICS 206 Form ................................................................................................. 4-20
The ICS 207 Form ................................................................................................. 4-22
Printing a Completed IAP ...................................................................................... 4-25
Publishing a Completed IAP .................................................................................. 4-26
Printing a Published IAP ........................................................................................ 4-28
Deleting a Published IAP ....................................................................................... 4-30
Chapter 5: Menus and Links
Introduction .............................................................................................................. 5-1
Town Square Menus ................................................................................................ 5-2
Checklist .................................................................................................................. 5-3
EM Menu ................................................................................................................. 5- 6
Status Boards (Edit)............................................................................................... 5-17
ICS/FEMA Forms................................................................................................... 5-37
Links ...................................................................................................................... 5-48
Chapter: 6 Tools
Introduction ............................................................................................................... 6-1
Messages ................................................................................................................. 6-2
Chapter: 7 Plugins
Introduction .............................................................................................................. 7-1
CAP Messaging ....................................................................................................... 7-2
MapTac™ ................................................................................................................. 7-6
Chapter 1: WebEOC Town Square Overview
Introduction
WebEOC® Town Square™ is Crisis Information Management Software (CIMS) designed
specifically for local emergency managers throughout the U.S. who want WebEOC power and
reliability, but are limited by staff and budget. Town Square offers many of the same features
and benefits as the industry-leading product WebEOC® Professional, which has been used
successfully since 1996 by many federal agencies, corporations and other organizations, to
manage a myriad of incidents and special events.
Town Square includes a set status boards, a NIMS Incident Action Planning (IAP) tool, and
ICS and FEMA forms. It also includes WebEOC® Mapper Lite, a quick and easy mapping tool,
and WebEOC® MapTac™, a briefing tool that allows users to publish, annotate, and share a
map, dispersion model, or digital photo with other users.
With Town Square, crisis information is immediately and universally available to authorized
users everywhere. Town Square gives local emergency managers and first responders the
ability to manage incidents and special events via the Internet from anywhere- inside the
EOC, your home, office, or at an event.
The design of Town Square is based on the following tenets of crisis information
management systems. CIMS should:
• Be affordable.
•
Be user-friendly.
•
Be easy to maintain by existing EMA or EOC staff with access to the vendor’s technical
support.
•
Be easy to configure.
•
Allow for remote access by authorized users located outside the local area network
(LAN).
•
Comply with the provisions for the National Incident Management System (NIMS).
•
Support users who implement both the Incident Command System (ICS) and
Emergency Support Functions (ESF) structure.
•
Integrate with other systems such as mapping.
•
Operate within a variety of network configurations.
•
Have a wide range of features consistent with the four phases of emergency
management.
ESi Acquisition, Inc.
1-1
WebEOC® Town Square™ 1.0 User’s Manual
Chapter 1: WebEOC Town Square Overview
Audience and Purpose
Audience
People who use Town Square are classified as either users or administrators. This manual is
written for users.
People who setup users and configure Town Square in accordance with an agency’s unique
needs are administrators. Administrators should refer to the WebEOC® Town Square™ 1.0
Administrator’s Manual.
Purpose
This manual provides you detailed instructions and the knowledge that you will need to
operate Town Square. Because Town Square is a tool that provides levels of access that can
be tailored to meet the unique needs of individual users and organizations, some of the Town
Square features covered in this manual may not be available to all users. See your
administrator for questions about a specific feature or capability.
Built-in Process
The information process flow in Town Square allows users to post data directly to boards.
This design is based on the ICS organizational structure (Command, Operations, Logistics,
Planning, and Finance).
Time Conventions
Town Square stamps all entries with a time and date. It also tracks and displays who entered
the information.
Entries appear in boards in the order in which they are entered into the system. For example,
if a telephonic report is received at 10 p.m. and is entered into Town Square at 10:01 p.m., the
system time stamp will be 10:01 p.m.
1-2
ESi Acquisition, Inc.
Chapter 2: Getting Started
Introduction
The WebEOC® Town Square™ interface empowers users to easily log in, access boards,
enter and update information, keep track of critical tasks, and review the latest event
information.
Detailed instructions are provided on the following topics in this chapter.
• Self-registration Requirements
•
Logging in to Town Square
•
Control Panel Overview
ESi Acquisition, Inc.
2-1
WebEOC® Town Square™ 1.0 User’s Manual
Chapter 2: Getting Started
Self-registration Requirements
The self-registration feature in Town Square allows first-time users to create their own
accounts using the position names and position access codes (PAC) provided by their
administrator.
If you occupy multiple EOC positions and self-registration is enabled, you can self-register for
each position for which you qualify. After you have completed self-registration, you can log in
to your account.
To complete self-registration, you will need your agency’s Town Square address or URL, the
name of the position you will be assigned to, and the position access code (PAC). If your
administrator has not given you these items, you will not be able to create a Town Square
user account.
A PAC is a position-specific code that your administrator generates in Town Square. The PAC
your administrator gives you can only be used for the position you are assigned to. This is an
example of a PAC: R$e9oP5!.
You must be able to access Town Square in order to register for a user account and log in.
Town Square is accessed using a Web browser over your organization’s intranet, or over the
Internet, depending on your network’s infrastructure. The first time you access Town Square,
you will need to type the URL of your Town Square into the Address field of your browser. If
you do not know the URL, contact your Town Square administrator.
We recommend you create a bookmark, or add a shortcut on your desktop, for your Town
Square address in order to access the site easily.
Before using Mozilla® Firefox® or Apple® Safari® to access Town Square, check with your
system administrator and confirm compatibility with these browsers
Completing Self-registration
To complete self-registration, follow the steps below.
1. Access your agency’s Town Square site.
2. In the WebEOC Town Square login screen, select the New User? Click here to
create an account link.
2-2
ESi Acquisition, Inc.
WebEOC® Town Square™ 1.0 User’s Manual
Chapter 2: Getting Started
3. When the Create Account window appears, enter your position in the Position Name
field, and enter your position access code in the Position Access Code field.
Note: The Position Access Code is case sensitive. As you enter the Position Access
Code, it will appear as a series of dots (●●●●●●●●).
4. Select the OK button to continue, or select the Cancel button to abort the operation.
5. In the Create Account screen,
enter a user name for your
new account in the User
Name field.
Note: Your agency may have
user name conventions in
place (e.g, first initial and last
name). Check with your
administrator before
choosing a user name.
6. Enter a password for this
account in the Password
field, and confirm the password in the Confirm Password field. The password is
case sensitive. As you enter
the password, it will appear
as a series of dots
(●●●●●●●●).
Note: If you reenter your password incorrectly, a warning will appear. Town Square
may require that you enter a stronger password. Contact your Town Square
administrator for assistance.
7. Enter your primary e-mail in the Primary Email field.
8. Enter any additional e-mail addresses in the Secondary Email field, and select
the Add button.
Note: There is no limit to the number of e-mail addresses you can enter. Repeat step
8 to enter additional e-mail addresses.
ESi Acquisition, Inc.
2-3
WebEOC® Town Square™ 1.0 User’s Manual
Chapter 2: Getting Started
9. The time zone defaults to the setting configured on your Town Square server. To
override this setting, select the Override Server Default Time Zone checkbox.
Note: We do not recommend changing the time zone as this may conflict with your
Town Square server setting.
10. If you choose to override the time zone configured, select the Default drop-down list,
and choose a new time zone.
11. Select the Use Daylight Saving Time checkbox if your agency observes daylight
saving time.
12. When you have completed the Create Account window, select the Save button to save
the new account, or select the Cancel button to abort the operation.
13. Select the OK button to confirm that your account has been created.
Note: All missing fields identified in red must be completed before you can save the
account.
2-4
ESi Acquisition, Inc.
WebEOC® Town Square™ 1.0 User’s Manual
Chapter 2: Getting Started
Logging in to Town Square
If you receive an error during the login process, see the “Generic Login Issues” section at the
end of this chapter.
To log in to your Town Square user account, follow the steps below.
1. Access your agency’s Town Square site.
2. In the WebEOC Town Square login screen, enter your user name in the User field,
and enter your password in the Password field.
Note: The password is case sensitive.
3. Select the OK button.
4. Select your position from the Position drop-down list, and select your incident
from the Incident drop-down list.
Note: Only those positions and incidents that your administrator has given you
access to will appear in the drop-down lists.
ESi Acquisition, Inc.
2-5
WebEOC® Town Square™ 1.0 User’s Manual
Chapter 2: Getting Started
5. Select the OK button to continue, or select the Cancel button to abort the operation.
The WebEOC Town Square Logged In window will appear, and your Control Panel
will open in a separate window. In order to reduce the number of windows that you
have open at a time, the Logged In window can be closed.
Retrieving Your User Name or Password
If you have forgotten your user name or password, you can retrieve them using the link on the
WebEOC Town Square login screen.
Note: This feature may not be enabled in your Town Square. Contact your Town Square
administrator if you have questions.
If you do not have an e-mail address entered for your user account, you will not be able to
retrieve your user name or password.
To retrieve your user name or reset your password, follow the steps below.
1. From the WebEOC Town Square login screen, select the Forgot Username/
Password? link.
2-6
ESi Acquisition, Inc.
WebEOC® Town Square™ 1.0 User’s Manual
Chapter 2: Getting Started
2. Select the Retrieve Username or Reset Password link.
3. If you select the Reset Password link, enter your user name and e-mail address in
the fields provided, and select the Continue button.
Note: If your administrator has enabled “password history,” you will not be able to
re-use a previous password.
4. A confirmation window will appear. Select the OK button. You should receive an email containing a link to reset your password.
5. If you select the Retrieve Username link, enter your e-mail address in the Email
Address field, and reenter it in the Confirm Address field.
6. Select the Continue button.
ESi Acquisition, Inc.
2-7
WebEOC® Town Square™ 1.0 User’s Manual
Chapter 2: Getting Started
7. Select the OK button in the confirmation window. You will receive an e-mail containing your user name.
Generic Login Issues
This section contains common login issues and instructions for resolving those issues.
Invalid User Name or Password
If you entered your user name or password incorrectly, an invalid password window will
appear. Select the OK button. Go to the section “Logging in to Town Square” in this chapter
and repeat the steps.
User Account Locked
If you exceed the number of failed login attempts allowed, a User account is locked window
will appear. Select the OK button, and contact your administrator to unlock your account.
2-8
ESi Acquisition, Inc.
WebEOC® Town Square™ 1.0 User’s Manual
Chapter 2: Getting Started
Control Panel Overview
The Control Panel is the information hub of Town
Square. It is organized by Boards, Menus, Tools,
Plugins, and Links. Within each of these sections,
the items are listed alphabetically. You will see
items on your Control Panel based on what your
Town Square administrator has granted you
access.
All Town Square windows (i.e., Control Panel,
boards, links, etc.) may be resized and moved to
any position on the desktop. You can also open
multiple boards and/or multiple copies of a board,
plug-in, or link.
Your user name and position appear at the top of
the Control Panel. If your user name is highlighted,
you can select it to make changes to your user
account. Select your position to change the position
you are logged in to without logging out of Town
Square.
The incident you are currently logged in to also
appears at the top of the Control Panel. If it is
highlighted, you can select it to log in to a different
incident without logging out.
The Log Off button allows you to log out of Town
Square.
Items in red have new data posted to them. Select the name to open that item. When the
board has been opened and the new data has been viewed, the font will reset to black.
The X button next to a board indicates if it is closed or open. If the board is open, the X button
will appear red next to it's name on the Control Panel. Select the red X button to close the
window. The X button will turn grey.
Message notifications and alerts will appear at the bottom of the Control Panel.
ESi Acquisition, Inc.
2-9
WebEOC® Town Square™ 1.0 User’s Manual
Chapter 2: Getting Started
If there are sections on your Control Panel you do not need to view, select the name (Boards,
Menus, Tools, Plugins, or Links) to collapse that section.
Editing Your User Account
The user name on the Control Panel will be displayed as a static or an active link. If this link is
active, you will be able to edit your user account.
To edit your user account, follow the steps below.
1. On the Control Panel, select the user name link.
2-10
ESi Acquisition, Inc.
WebEOC® Town Square™ 1.0 User’s Manual
Chapter 2: Getting Started
2. From the User Account window, edit your information. See the “Self-registration” section in this chapter for detailed instructions
3. Select the Save button to save your changes, or select the Cancel button to abort the
operation.
ESi Acquisition, Inc.
2-11
WebEOC® Town Square™ 1.0 User’s Manual
Chapter 2: Getting Started
Editing Your Position and Incident
You can edit your position and the incident you are logged in to from the Control Panel.
Changing your position assignment or the incident may also change the boards, menus, tools,
plug-ins, and links that you will be able to access from the Control Panel.
To edit your position or incident, follow the steps below.
1. On the Control Panel, select the Position or select the Incident link to change your
position or incident you are logged in to.
2. Select a new position from the Position drop-down list.
3. To change the incident, select a new incident from the Incident drop-down list.
4. Select the OK button, or select the Cancel button to abort the operation. The new
incident name and/or position you selected will be displayed.
2-12
ESi Acquisition, Inc.
Chapter 3:Boards
Introduction
Boards are the heart of WebEOC® Town Square™. They are the mechanism to share and
manage real-time event information with authorized users everywhere. In Town Square,
incident information is transmitted and displayed in boards, making the information
universally available to all authorized users simultaneously.
In the context of Crisis Information Management Systems (CIMS), a board is equal to a large,
chronological or categorical paper-based status board that dominates EOCs and command
centers around the country.
With Town Square, users enter information electronically into boards and information is
instantly viewed by authorized users. There is no duplicating of data, no loose paper forms,
and no shouting from section to section to share information. Town Square helps you build
reports, request assistance, deploy resources, store documents, map almost anything, and
more.
In Town Square, standard government forms (e.g., ICS, FEMA, and Situation Reports, etc.)
used to track emergency response tasks are built as boards to implement your agency’s
information process flow.
Status boards in Town Square are based on the National Incident Management System
(NIMS) structure and are designed to support local jurisdictional crisis information
management needs.
ESi Acquisition, Inc.
3-1
WebEOC® Town Square™ 1.0 User’s Manual
Chapter 3: Boards
General Board Features
Navigation
Since boards are displayed in windows that can be resized, the number of entries that can be
viewed at any one time will vary. If a board has more entries than can be viewed at the same
time, use the scroll bar to navigate through the window. Each board may also be resized to
increase or decrease the viewing area. If the board consists of multiple pages, use the arrow
buttons located at the bottom of the window to navigate.
The left double arrow returns to the first page; the single left arrow returns to the previous
page; and the right arrow advances to the next page.
Board Refresh
Each time a new entry is posted or an entry is updated, the board refreshes with the new or
changed entry appearing at the top of the board (unless the board is sorted or filtered). To
temporarily suspend this refresh process when scrolling through entries on a board, select the
Disable Refresh checkbox located at the bottom of each board.
Note: Uncheck the Disable Refresh checkbox to re-enable the automatic refresh feature.
3-2
ESi Acquisition, Inc.
WebEOC® Town Square™ 1.0 User’s Manual
Chapter 3: Boards
Board Views
The first thing you need to understand about boards is that boards can have multiple views.
Access to the board views will be based on your assigned position. Also, the board views that
you have access to are determined by your Town Square administrator. You may have access
to all of the boards, forms, reports, or plans or a combination of these.
A view is just another way of looking at the same data. The typical board views are:
• Input,
•
List, and
•
Details.
New data or updates to data are entered in the input
view. Select the board link on the Control Panel and
select the New Record or Update Record button to
add or update entries.
A board may have a list view. This view could
contain all of the data for a board, or it may contain
a subset of data. List views are useful because they
allow you to focus on the most important data.
An example of a list view is the Shelters board. You
may not need to know if a shelter is pet friendly or
Red Cross approved—you may just need to know which shelter has the most beds available so
you can send victims there. The simplified list view allows you to easily locate the name of the
shelter and see the most important information for the shelter instantly. List views typically
contain a button for a detailed view of the shelter information.
ESi Acquisition, Inc.
3-3
WebEOC® Town Square™ 1.0 User’s Manual
Chapter 3: Boards
WebEOC Mapper Lite
WebEOC® Mapper Lite is an optional feature that your administrator may have enabled for
Town Square.
Mapper Lite integrates online mapping with the boards available in Town Square. It uses
Yahoo!® maps to geolocate address information associated with a status board. By adding
Mapper Lite capability to a board, entries from that board can be tied to an address and
displayed on a map with an identifying point.
For a board to be a candidate for adding GIS support, it must meet specific criteria.
• The status board must be associated to a location for some or all of its entries.
•
The location must be an address (i.e., address, city, state, and/or ZIP code) and X,Y
(latitude/longitude) coordinates.
Data from multiple Town Square boards can be viewed simultaneously on the same map and
displayed as points representing the state of the information. Point colors can be defined to
reflect the item’s status. For example, a Shelters status board can be built to maintain a list of
shelters and their statuses. When you open a map in the Shelters board, a point will be
displayed for each shelter. The point color could be green or red, to reflect the shelter status
of open or closed.
With Mapper Lite, users can:
• View live, updating, multi-user Town Square board data on a map and
•
Display data from multiple boards on a single map.
Note: User access to board layers in Mapper Lite is controlled by the board
permissions assigned to a user’s group.
3-4
ESi Acquisition, Inc.
WebEOC® Town Square™ 1.0 User’s Manual
Chapter 3: Boards
Adding Data to a Mapper Lite Enabled Board
To add points to a map using Mapper Lite, follow the steps below.
1. Select a Board from the Control Panel.
2. Select the New Record button.
ESi Acquisition, Inc.
3-5
WebEOC® Town Square™ 1.0 User’s Manual
Chapter 3: Boards
3. In the data entry window, enter a label for the map in the Map Label field. This label
will be displayed next to the point on the map.
4. Enter the address information in the Address/Location field. At a minimum, enter
the street number and street name (e.g., 318 Drayton Street). You can narrow the list
of matches in the geo-database by including the street number, street name, city,
state, and/or ZIP code.
5. Select the Get Address button to execute the search for address matches. When the
search is complete, a drop-down list of possible matches for the address will be
displayed below the Address/Location field. The Lat/Long values for the first item in
the drop-down list will automatically populate the coordinate fields.
6. Select the address that matches your entry.
3-6
ESi Acquisition, Inc.
WebEOC® Town Square™ 1.0 User’s Manual
Chapter 3: Boards
7. Select the Map It button. The address will be displayed on the map marked with a
colored symbol (circle, square, or rectangle).
8. Complete the data entry screen, and select the Save to add the point to the map. The
point will display as a circle.
ESi Acquisition, Inc.
3-7
WebEOC® Town Square™ 1.0 User’s Manual
Chapter 3: Boards
Displaying a Map from a Board
To display a map from a board, select the Map button on the board display.
A WebEOC Mapper Lite window will open with the mapped point.
The new board entry will display a symbol (circle, square, or rectangle) on the map.
Administrators can assign colors to represent the status of map data. If the status of the
mapped point is tied to board data, such as shelter status (full, open, or closed), then the
mapped points for that status board will take on the color-code assigned to that status.
3-8
ESi Acquisition, Inc.
WebEOC® Town Square™ 1.0 User’s Manual
Chapter 3: Boards
Navigating Mapper Lite
Navigation and Zoom Controls
Pan Tool
Located in the upper left corner of the window, the pan tool allows you to pan to different
areas on the map by holding the left mouse button on the desired arrow symbol.
Zoom Control
Zoom in by selecting the plus symbol. Zoom out by selecting the minus symbol. If you want
to zoom out to the full extent of the map, select the globe symbol.
Note: You can also zoom by using the scroll wheel on the mouse. Click in the map display,
and scroll up to increase magnification, or scroll down to decrease the magnification.
Showing Labels
Select the Show Labels checkbox to identify the geo-coded data points on the map.
ESi Acquisition, Inc.
3-9
WebEOC® Town Square™ 1.0 User’s Manual
Chapter 3: Boards
Selecting Base Layers
Select the radio button to set the type of base layer to be applied to the map view: Streets,
Satellite, or Hybrid.
Base Layer Examples
•
3-10
Street Map
ESi Acquisition, Inc.
WebEOC® Town Square™ 1.0 User’s Manual
Chapter 3: Boards
•
Satellite Map
•
Hybrid Map (This view is a street map on top of a satellite map.)
ESi Acquisition, Inc.
3-11
WebEOC® Town Square™ 1.0 User’s Manual
Chapter 3: Boards
Selecting Overlays (Boards)
All Mapper Lite-enabled boards are listed under Overlays in the Selection tool. To turn board
points on or off, select the checkbox next to the board that you want. All the board geocoded data points will be displayed on the map.
3-12
ESi Acquisition, Inc.
WebEOC® Town Square™ 1.0 User’s Manual
Chapter 3: Boards
The Boards Section
Town Square boards are designed to track, display, and manage the information following an
Incident Command System (ICS) organizational structure. This built-in board design helps
you to quickly enter information to your position log and send it on to others to view.
The Control Panel below shows what the Boards section on a Control Panel may look like.
This section will provide detailed instructions for the following board views.
• Activity Log
•
Significant Events
•
Contacts
•
File Library
•
IAP Builder
•
Incident Action Plans (Published)
•
Press Release
•
Resource Request/Task Assignments
•
Shelters
•
Situation Report
Event Reporting Boards
The Activity Log and Significant Event board views are used to accomplish the recording,
tracking, and viewing of “who did what when” in Town Square. Your Activity Log allows you
to record information and activities at the position level and selectively display the
information on the Significant Event board without having to re-enter information.
ESi Acquisition, Inc.
3-13
WebEOC® Town Square™ 1.0 User’s Manual
Chapter 3: Boards
Activity Log
All positions have an Activity Log (also known as a Position Log), that allows you to keep a
chronological record of the activities you performed. Information you enter is displayed on
your own log and is not visible to others. However, if an entry meets the criteria of a post to
the Significant Events, you can mark the entry to be displayed on the Significant Events
board for others to view. You have the option to post one or all of your Activity Log records to
the Significant Events board display that can be viewed by others.
Adding a New Record to the Activity Log
To add a new record to the Activity Log, follow the steps below.
1. On the Control Panel, select the Activity Log link.
2. Select the New Record button.
Note: The title of the Activity Log is the same as the name of the position you are
logged in as.
3-14
ESi Acquisition, Inc.
WebEOC® Town Square™ 1.0 User’s Manual
Chapter 3: Boards
3. Enter the information in the input view of the Activity Log.
4. Select the Post to Significant
Events check box if the information
needs to be displayed for other
positions to read.
5. In the Spell Checker pop-up window,
select the appropriate options to
correct the error.
6. When the spell check is complete,
select the OK button.
7. Select the Save button to continue,
or select the Cancel button to abort
the operation.
ESi Acquisition, Inc.
3-15
WebEOC® Town Square™ 1.0 User’s Manual
Chapter 3: Boards
Significant Events
The Significant Events board displays all of the entries marked as Post to Significant Events
in each user’s Activity Log, providing a chronology of events, activities, and actions taken
during an incident.
The Significant Events board has the same look and similar functionality as an Activity Log.
3-16
ESi Acquisition, Inc.
WebEOC® Town Square™ 1.0 User’s Manual
Chapter 3: Boards
Updating a Record on the Significant Events Board
To update a record on the Significant Events boards, follow the steps below.
1. On the Control Panel, select the Significant Events link.
2. Select the Update Record button.
ESi Acquisition, Inc.
3-17
WebEOC® Town Square™ 1.0 User’s Manual
Chapter 3: Boards
3. Update the applicable fields in the input view.
Note: The Post to Significant Events check box is unavailable since you are updating
the record. The input view at the bottom provides a Record History of all the entries.
4. In the Spell Checker pop-up window,
select the appropriate options to
correct the error.
5. When the spell check is complete,
select the OK button.
6. Select the Save button to save the
updated record, or the select the
Cancel button to abort the operation.
3-18
ESi Acquisition, Inc.
WebEOC® Town Square™ 1.0 User’s Manual
Chapter 3: Boards
Contacts
The Contacts board allows you to record information on individuals or other organizations
that you will need to contact during an event.
Adding a Contact to the Contacts Board
To add a contact to the Contacts board, follow the steps below.
1. On the Control Panel, select the Contacts link.
2. In the Contacts List window, select the Add Contact button.
ESi Acquisition, Inc.
3-19
WebEOC® Town Square™ 1.0 User’s Manual
Chapter 3: Boards
3. Enter the information in the applicable sections of the input view.
4. For Contact Type, select the radio button for one of the following options.
a. Shared (Shared contacts can be viewed by everyone.)
b. Private (Private contacts can only be viewed by the Position whocreated it.)
5. In the Spell Checker pop-up window, select the appropriate options to correct the
error.
6. When the spell check is complete, select the OK button.
7. Select the Save button to continue, or select the Cancel button to abort the
operation.
3-20
ESi Acquisition, Inc.
WebEOC® Town Square™ 1.0 User’s Manual
Chapter 3: Boards
Updating a Contact Record
To update a contact record, follow the steps below.
1. On the Control Panel, select the Contacts link.
2. In the Contacts List window, select the Update button for the contact that you want
to update.
3. Update the information as applicable.
4. Select the Save button to continue, or select the Cancel button to abort the
operation.
Removing a Contact Record
To remove a contact record, follow the steps below.
1. On the Control Panel, select the Contacts link.
2. In the Contacts List window, select the Update button for the contact that you want
to remove.
ESi Acquisition, Inc.
3-21
WebEOC® Town Square™ 1.0 User’s Manual
Chapter 3: Boards
3. In the Contacts record, select the Delete Contact check box.
Note: No window will appear to confirm deletion of the record.
4. Select the Save button, or select the Cancel button to abort the operation.
3-22
ESi Acquisition, Inc.
WebEOC® Town Square™ 1.0 User’s Manual
Chapter 3: Boards
Searching and Filtering Contact Records
The Search and Filter features help you to quickly locate records in the Contacts List.
Searching Using Any Contact Information
Search pulls all records that match any combination of words you entered. After your search
is complete, you must clear the search if you switch to use the letter or other filter buttons.
Searching Using Filter Buttons
You can also search for a contact by selecting one of the following filters.
• Use the alphabet buttons to filter contacts whose last name begins with that letter.
•
Use the Private Contacts button to show only contacts you designated as private.
•
Use the Shared Contacts button to filter the list to contacts shared with others.
•
Use the Show All button to view all contacts, both shared and private.
Incident Action Plans
All positions have access to view and print Incident Action Plans (IAPs). Plans are built in the
IAP Builder board. After they are published, they move to the Incident Action Plans
(Published) board.
See Chapter 4: The Incident Action Plan, for detailed instructions on these boards.
ESi Acquisition, Inc.
3-23
WebEOC® Town Square™ 1.0 User’s Manual
Chapter 3: Boards
Press Release
Every emergency response involves the media, and almost every emergency response
organization has a Public Information Officer (PIO) responsible for the development and
release of accurate and complete public information regarding the incident.
The Press Release board provides a repository of links to press release files stored internally
in the Town Square database or a file stored externally. Selecting a link displays the press
release in its entirety.
Adding a Record to the Press Release Board
To add a record to the Press Release board, follow the steps below.
1. On the Control Panel, select the Press Release link.
2. In the Press Release window, select the Add Press Release button.
3-24
ESi Acquisition, Inc.
WebEOC® Town Square™ 1.0 User’s Manual
Chapter 3: Boards
3. In the input view, enter a
Title for the press release,
and select the Browse
button to upload the file.
4. Select the Save button to
continue, or select the
Cancel button to abort the
operation.
Updating a Record to the Press Release Board
To update a record to the Press Release board, follow the steps below.
1. On the Control Panel, select the Press Release link.
2. In the Press Release window, select the Update button of the record you want to
update.
3. In the input view, update the
applicable fields. Uploading
a new file will replace the
existing press release.
4. Select the Save button to
continue, or select the
Cancel button to abort the
operation.
ESi Acquisition, Inc.
3-25
WebEOC® Town Square™ 1.0 User’s Manual
Chapter 3: Boards
Removing a Record from the Press Release Board
To remove a record from the Press Release board, follow the steps below.
1. On the Control Panel, select the Press Release link.
2. In the Press Release window, select the Update button of the record you want to
remove.
3. In the input view, select the Remove check box.
Note: No window will appear to confirm deletion of the record.
4. Select the Save button to continue, or select the Cancel button to abort the
operation.
Viewing Press Release Attachments
To view a Press Release attachment, follow the steps below.
1. On the Control Panel, select the Press Release link.
2. In the Press Release window, select the Attachment link of the press release you
want to view.
3-26
ESi Acquisition, Inc.
WebEOC® Town Square™ 1.0 User’s Manual
Chapter 3: Boards
Resource Requests/Task Assignments
The Resource Request/Task Assignments board allows you to create, update, and change the
status of resource requests and task assignments.
Creating a Resource Request
To create a resource request message, follow the steps below.
1. On the Control Panel, select the Resource Request/Task Assignments link.
2. In the Resource Requests & Task Assignments window, select the New Resource
Request button. An ICS-213 RR (Resource Request Message) input view will open.
ESi Acquisition, Inc.
3-27
WebEOC® Town Square™ 1.0 User’s Manual
Chapter 3: Boards
3. In the Request Details section of the ICS-213 RR form, select a position from the
Routing drop-down list of positions in your organization. The position you select will
receive the request and will be assigned the responsibility to complete the request.
4. Complete the fields as applicable. The Incident Name, Date/Time, and Resource
Request # will populate automatically.
5. Select the Save button to continue, or select the Cancel button to abort the
operation.
Updating Your Resource Request
To update a resource request message, follow the steps below.
1. On the Control Panel, select the Resource Request/Task Assignments link.
2. In the Resource Requests & Task Assignments window, select the My Requests
button.
3. Select the Update button for the Resource Request record.
3-28
ESi Acquisition, Inc.
WebEOC® Town Square™ 1.0 User’s Manual
Chapter 3: Boards
4. Enter the new information in the applicable sections of the ICS-213 RR input view.
5. To update the Request Status, select the status from the Request Status drop-down
list.
6. Select Save button to continue, or select the Cancel button to abort the operation.
ESi Acquisition, Inc.
3-29
WebEOC® Town Square™ 1.0 User’s Manual
Chapter 3: Boards
Creating a Task Assignment
To create a task assignment, follow the steps below.
1. On the Control Panel, select the Resource Request/Task Assignments link.
2. In the Resource Requests & Task Assignments window, select the New Task
Assignment button.
3. In the Task Assignment Message form, select a position from the Routing dropdown list of positions in your organization. The position you select will be assigned
the responsibility to complete the task.
4. Complete the fields as applicable. The Incident Name, Date/Time, and Task # will
populate automatically.
5. Select the Save button to continue, or select the Cancel button to abort the
operation.
3-30
ESi Acquisition, Inc.
WebEOC® Town Square™ 1.0 User’s Manual
Chapter 3: Boards
Updating Your Task Assignment
To update a task assignment record, follow the steps below.
1. On the Control Panel, select the Resource Request/Task Assignments link.
2. In the Resource Requests & Task Assignments window, select the My Assignments
button. This will only list tasks assigned to you.
3. Select the Update button for the Task Assignment record.
4. Update the information as applicable.
5. Select the status of the task from the Task Status drop-down list if applicable.
6. Select the Save button to continue, or select the Cancel button to abort the
operation.
ESi Acquisition, Inc.
3-31
WebEOC® Town Square™ 1.0 User’s Manual
Chapter 3: Boards
Filtering Resource Requests and Task Assignments
To help you locate specific tasks and requests, several filter buttons are available.
My Assignments Button
Use this filter button to display tasks and requests assigned to you.
My Requests Button
Use this filter button to display tasks and requests assigned to others.
View All Button
Use this filter button to display all tasks and requests.
Status Filter
Select a status from the Status Filter drop-down list to view tasks and requests.
3-32
ESi Acquisition, Inc.
WebEOC® Town Square™ 1.0 User’s Manual
Chapter 3: Boards
Shelters
The Shelters board provides a standard list view that displays the shelter’s name, status,
occupancy, etc. It also indicates if a shelter is American Red Cross approved, accommodates
special needs, or is pet friendly.
This view does not allow you to add or make updates to the board.
To view the Shelters board, follow the steps below.
1. On the Control Panel, select the Shelters link.
2. In the Shelter Status window, select the Select button to view details for that shelter.
ESi Acquisition, Inc.
3-33
WebEOC® Town Square™ 1.0 User’s Manual
Chapter 3: Boards
3. Review the Shelter Status details window, and select the Return to List button.
3-34
ESi Acquisition, Inc.
WebEOC® Town Square™ 1.0 User’s Manual
Chapter 3: Boards
Situation Report
Situation reports are typically published at least once every 24 hours during an emergency.
Town Square provides a standard format that is based on the Incident Command System for
creating standard plans.
This view does not allow you to add or make updates to the board.
To view the Situation Report board, follow the steps below.
1. On the Control Panel, select the Situation Report link.
2. In the Situation Report window, select the Attachment link.
The Situation Report will open in a new window.
ESi Acquisition, Inc.
3-35
Chapter 4: The Incident Action Plan
Introduction
An Incident Action Plan (IAP) contains general control objectives reflecting the overall
incident strategy and specific action plans for the next operational period. The IAP is
developed by the Unified Command, Command Staff, and General Staff. An effective IAP
includes the following.
• Specific objectives for the next operational period
•
Defined work assignments for the next operational period, including extracts of sitespecific safety messages
Note: The Site Safety Plan is generally a stand-alone document and is not included in
the IAP.
•
Defined resources that are needed to accomplish the work order
•
An organizational chart depicting how all response personnel are to be organized
•
Radio and telephone communications for all incident personnel
•
A specific medical plan to follow in case of a responder emergency
•
Detailed resource risks
WebEOC® Town Square™ contains two IAP boards: IAP Builder and Incident Action Plans
(Published).
The IAP Builder board contains the following Incident Command System (ICS) forms.
• IAP Cover Sheet
•
ICS 202 - Incident Objectives
•
ICS 203 - Organization Assignment List
•
ICS 204 - Operations Branch List
•
ICS 205 - Incident Radio Communications Plan
•
ICS 206 - Medical Plan
•
ICS 207 - Organizational Chart
ESi Acquisition, Inc.
4-1
WebEOC® Town Square™ 1.0 User’s Manual
Chapter 4:The Incident Action Plan
Creating a New IAP
To create a new IAP, follow the steps below.
1. Log in to WebEOC Town Square.
2. On the Control Panel, select the IAP Builder link.
Note: The boards on your Control Panel will vary depending on what your agency has
assigned.
3. In the IAP Main View window, select the Add/Update Operational Period
button.
4-2
ESi Acquisition, Inc.
WebEOC® Town Square™ 1.0 User’s Manual
Chapter 4:The Incident Action Plan
4. In the New Record window, enter a name for the incident in the Incident Name field.
5. Select the calendar icon to select an Operation Period Beginning and an Operation
Period Ending date and time.
6. Select the Save button to create the new IAP.
When the IAP Main View appears, you can complete the forms in any order. You do
not have to complete all of the forms for any incident record.
ESi Acquisition, Inc.
4-3
WebEOC® Town Square™ 1.0 User’s Manual
Chapter 4:The Incident Action Plan
The IAP Cover Sheet
Completing the IAP Cover Sheet
To complete the IAP Cover Sheet, follow the steps below.
1. Log in to WebEOC Town Square.
2. On the Control Panel, select the IAP Builder link.
3. When the IAP Main View window appears, select the View button next to the IAP
Cover Sheet.
Note: The ICS 204 does not appear on the IAP Main View window because it is
completed within the ICS 203.
4-4
ESi Acquisition, Inc.
WebEOC® Town Square™ 1.0 User’s Manual
Chapter 4:The Incident Action Plan
4. In the IAP Cover Sheet window, select the Edit IAP Cover Sheet button.
ESi Acquisition, Inc.
4-5
WebEOC® Town Square™ 1.0 User’s Manual
Chapter 4:The Incident Action Plan
5. When the Update Record window appears, complete the form as applicable.
6. When you have completed the fields on the cover sheet, select the Save button at the
top of the window.
Printing the IAP Cover Sheet
To print the IAP Cover Sheet, follow the steps below.
1. Log in to WebEOC Town Square.
2. On the Control Panel, select the IAP Builder link.
3. When the IAP Main View window appears, select the View button next to the IAP
Cover Sheet.
4. When the IAP Cover Sheet appears, select the Print IAP Cover Sheet button at the
top of the window.
5. When your print window appears, locate your printer, and select the Print button.
4-6
ESi Acquisition, Inc.
WebEOC® Town Square™ 1.0 User’s Manual
Chapter 4:The Incident Action Plan
The ICS 202 Form
The ICS 202 - Incident Objectives form describes the basic incident strategy, control
objectives, command emphasis/priorities, and safety considerations for use during the next
operational period. It is typically completed by the Planning Section following each
Command and General Staff Meeting conducted in preparing the Incident Action Plan.
Completing the ICS 202 Form
To complete the ICS 202 form, follow the steps below.
1. Log in to WebEOC Town Square.
2. On the Control Panel, select the IAP Builder link.
3. When the IAP Main View window appears, select the View button next to the ICS
202 link.
ESi Acquisition, Inc.
4-7
WebEOC® Town Square™ 1.0 User’s Manual
Chapter 4:The Incident Action Plan
4. When the ICS 202 form appears, select the Edit This Page button.
5. When the Update Record window appears, complete the fields as applicable.
6. If the ICS 202 form is complete, select Yes from the drop-down list next to ICS 202
Form completed at the top of the window. “Yes” will appear in the Complete column
of the IAP Main View window.
7. Select the Save button to save the ICS 202 form, or select the Cancel button to abort
the operation.
4-8
ESi Acquisition, Inc.
WebEOC® Town Square™ 1.0 User’s Manual
Chapter 4:The Incident Action Plan
Editing the ICS 202 Form
To edit the ICS 202 form, follow the steps below.
1. Log in to WebEOC Town Square.
2. On the Control Panel, select the IAP Builder link.
3. When the IAP Main View window appears, select the View button next to the ICS
202 link.
4. When the ICS 202 form appears, select the Edit This Page button at the top of the
window.
5. When the Update Record window appears, make your changes to the form, and select
the Save button.
Printing the ICS 202 Form
To print the ICS 202 form, follow the steps below.
1. Log in to WebEOC Town Square.
2. On the Control Panel, select the IAP Builder link.
3. When the IAP Main View window appears, select the View button next to the ICS
202 link.
4. When the ICS 202 form appears, select the Print ICS 202 button at the top of the
window.
5. When your print window appears, locate your printer, and select the Print button.
ESi Acquisition, Inc.
4-9
WebEOC® Town Square™ 1.0 User’s Manual
Chapter 4:The Incident Action Plan
The ICS 203 Form
The ICS 203 - Organization Assignment List provides ICS personnel with information on the
units that are currently activated and the names of personnel staffing each position/unit. It is
used to complete the Incident Organization Chart (ICS 207).
An organization will be event-specific; not all positions need to be filled. The size of the
organization is dependent on the magnitude of the incident, and can be expanded or
contracted as necessary.
The Resources Unit typically prepares and maintains this list under the direction of the
Planning Section Chief.
Completing the ICS 203 Form
To complete the ICS 203 form, follow the steps below.
1. Log in to WebEOC Town Square.
2. On the Control Panel, select the IAP Builder link.
3. When the IAP Main View window appears, select the View button next to the ICS
203 link.
4-10
ESi Acquisition, Inc.
WebEOC® Town Square™ 1.0 User’s Manual
Chapter 4:The Incident Action Plan
4. When the ICS 203 form appears, select the Edit This Page button.
ESi Acquisition, Inc.
4-11
WebEOC® Town Square™ 1.0 User’s Manual
Chapter 4:The Incident Action Plan
5. When the Update Record window appears, complete the fields as applicable.
6. If the ICS 203 form is complete, select Yes from the drop-down list next to ICS 203
Form completed at the top of the window. “Yes” will appear in the Complete column
of the IAP Main View window.
7. Select the Save button to save the ICS 203 form, or select the Cancel button to abort
the operation.
Editing the ICS 203 Form
To edit the ICS 203 form, follow the steps below.
1. Log in to WebEOC Town Square.
2. On the Control Panel, select the IAP Builder link.
3. When the IAP Main View window appears, select the View button next to the ICS
203 link.
4. When the ICS 203 form appears, select the Edit This Page button at the top of the
window.
5. When the Update Record window appears, make your changes to the form, and select
the Save button.
Printing the ICS 203 Form
To print the ICS 203 form, follow the steps below.
1. Log in to WebEOC Town Square.
2. On the Control Panel, select the IAP Builder link.
3. When the IAP Main View window appears, select the View button next to the ICS
203 link.
4. When the ICS 203 form appears, select the Print ICS 203 button at the top of the
window.
5. When your print window appears, locate your printer, and select the Print button.
4-12
ESi Acquisition, Inc.
WebEOC® Town Square™ 1.0 User’s Manual
Chapter 4:The Incident Action Plan
Operations Branch List (ICS 204)
The Branch List informs division and group supervisors of incident assignments. After the
Unified Command and General Staff agree to the assignments, the assignment information is
given to the appropriate divisions and groups.
The Branch List is typically prepared by the Resources Unit, using guidance from the ICS 202
and the Operations Section Chief. The Branch List must be approved by the Planning Section
Chief and Operations Section Chief. When approved, it is included as part of the IAP.
The Branch List is generated using the Operations Branch Setup button in the IAP Main
View window. If you have not entered branch and division data, the Branch List window will
be empty.
Adding Branches to Your Operation
You can only add branches to the Operations Section of the ICS 203 form. Air Operations is
the only branch available by default.
To add branches to your operation, follow the steps below.
1. Log in to WebEOC Town Square.
2. On the Control Panel, select the IAP Builder link.
3. When the IAP Main View window appears, select the Operations Branch Setup
button at the bottom of the window.
ESi Acquisition, Inc.
4-13
WebEOC® Town Square™ 1.0 User’s Manual
Chapter 4:The Incident Action Plan
4. In the Branch List window, select the Add Branch button.
5. In the New Record window, enter a name for the new branch, the name of the
branch director, and the name of the branch deputy.
6. Select the Save button to save the new branch to the ICS 203 form, or select the
Cancel button to abort the operation.
Editing a Branch
To edit the branches in your operation, follow the steps below.
1. Log in to WebEOC Town Square.
2. On the Control Panel, select the IAP Builder link.
3. When the IAP Main View window appears, select the Operations Branch Setup
button at the bottom of the window.
4. In the Branch List window, select the Edit button in the Edit column.
5. When the Update Record window appears, make your changes to the form, and select
the Save button.
4-14
ESi Acquisition, Inc.
WebEOC® Town Square™ 1.0 User’s Manual
Chapter 4:The Incident Action Plan
Adding a Division to a Branch
To add divisions to your existing branches, follow the steps below.
1. Log in to WebEOC Town Square.
2. On the Control Panel, select the IAP Builder link.
3. When the IAP Main View window appears, select the Operations Branch Setup
button.
4. In the Branch List window, select the Edit button in the Divisions column.
Note: You must have an existing branch to add a division.
5. In the Division/Groups window, select the Add Division/Group button.
6. In the New Record window, enter the name of the new division and the name of
the division leader.
7. Select the Save button to save the new division to the ICS 203, or select the Cancel
button to abort the operation.
ESi Acquisition, Inc.
4-15
WebEOC® Town Square™ 1.0 User’s Manual
Chapter 4:The Incident Action Plan
Editing a Division
To edit your operation’s divisions, follow the steps below.
1. Log in to WebEOC Town Square.
2. On the Control Panel, select the IAP Builder link.
3. When the IAP Main View window appears, select the Operations Branch Setup
button.
4. In the Branch List window, select the Edit button in the Divisions column.
5. In the Division/Groups window, select the View button in the ICS 204 column.
6. When the ICS 204 / Division Detail window appears, select the Edit This Page
button. Some of the fields will already be populated from data entered on the ICS 203.
4-16
ESi Acquisition, Inc.
WebEOC® Town Square™ 1.0 User’s Manual
Chapter 4:The Incident Action Plan
7. When the Update Record window appears, edit the fields as applicable.
8. If the ICS 204 form is complete, select Yes from the drop-down list next to ICS 204
Form completed at the top of the window.
9. When you are finished editing the ICS 204 form, select the Save button to save your
information, or select the Cancel button to abort the operation.
Removing a Division
To remove a division, follow the steps below.
1. Log in to WebEOC Town Square.
2. On the Control Panel, select the IAP Builder link.
3. When the IAP Main View window appears, select the Operations Branch Setup
button at the bottom of the window.
4. In the Branch List window, select the Edit button in the Divisions column.
5. In the Division/Groups window, select the Delete button in the Delete column.
6. When the Update Record window appears, select Yes from the delete division dropdown list.
7. Select the Save button to delete the division, or select the Cancel button to abort the
operation.
ESi Acquisition, Inc.
4-17
WebEOC® Town Square™ 1.0 User’s Manual
Chapter 4:The Incident Action Plan
The ICS 205 Form
The ICS 205 - Incident Radio Communications Plan is used to provide information on all
radio frequency assignments down to the Division/Group level for each operational period. It
lists methods of contact for personnel assigned to the incident (radio frequencies, phone
numbers, pager numbers, etc.).
The ICS 205 is typically prepared by the Communications Unit Leader and given to the
Planning Section Chief.
Some information on this form is populated from data entered on the ICS 203 form.
Completing the ICS 205 Form
To complete the ICS 205 form, follow the steps below.
1. Log in to WebEOC Town Square.
2. On the Control Panel, select the IAP Builder link.
3. When the IAP Main View window appears, select the View button next to the ICS
205 link.
4-18
ESi Acquisition, Inc.
WebEOC® Town Square™ 1.0 User’s Manual
Chapter 4:The Incident Action Plan
4. When the ICS 205 form appears, select the Edit This Page button.
5. When the Update Record window appears, complete the fields as applicable.
6. If the ICS 205 is complete, select Yes from the ICS 205 Form completed drop-down
list at the top of the window. “Yes” will appear in the Complete column of the IAP
Main View window.
7. When you are finished editing the ICS 205 form, select the Save button to save your
information, or select the Cancel button to abort the operation.
Printing the ICS 205 Form
To print the ICS 205 form, follow the steps below.
1. Log in to WebEOC Town Square.
2. On the Control Panel, select the IAP Builder link.
3. When the IAP Main View window appears, select the View button next to the ICS
205 link.
4. When the ICS 205 form appears, select the Print ICS 205 button at the top of the
window.
5. When your print window appears, locate your printer, and select the Print button.
ESi Acquisition, Inc.
4-19
WebEOC® Town Square™ 1.0 User’s Manual
Chapter 4:The Incident Action Plan
The ICS 206 Form
The ICS 206 - Medical Plan provides information on incident medical aid stations,
transportation services, hospitals, and medical emergency procedures. It is typically prepared
by the Medical Unit Leader and reviewed by the Safety Officer.
Completing the ICS 206 Form
To complete the ICS 206 form, follow the steps below.
1. Log in to WebEOC Town Square.
2. On the Control Panel, select the IAP Builder link.
3. When the IAP Main View window appears, select the View button next to the ICS
206 link.
4-20
ESi Acquisition, Inc.
WebEOC® Town Square™ 1.0 User’s Manual
Chapter 4:The Incident Action Plan
4. When the ICS 206 form appears, select the Edit This Page button at the top of the
window.
5. When the Update Record window appears, complete the fields as applicable.
6. If the ICS 206 is complete, select Yes from the ICS 206 Form completed drop-down
list at the top of the window.“Yes” will appear in the Complete column of the IAP
Main View window.
7. When you are finished editing the ICS 206 form, select the Save button to save your
information, or select the Cancel button to abort the operation.
Printing the ICS 206 Form
To print the ICS 206 form, follow the steps below.
1. Log in to WebEOC Town Square.
2. On the Control Panel, select the IAP Builder link.
3. When the IAP Main View window appears, select the View button next to the ICS
206 link.
4. When the ICS 206 form appears, select the Print ICS 206 button at the top of the
window.
5. When your print window appears, locate your printer, and select the Print button.
ESi Acquisition, Inc.
4-21
WebEOC® Town Square™ 1.0 User’s Manual
Chapter 4:The Incident Action Plan
The ICS 207 Form
The ICS 207 - Organizational Chart provides ICS personnel with information on the units
that are currently activated and the names of personnel staffing each position/unit. An
organization will be event-specific—not all positions need to be filled. The size of the
organization is dependent on the magnitude of the incident and can be expanded or
contracted as necessary.
The Resources Unit typically prepares and maintains this chart under the direction of the
Planning Section Chief. The ICS-203 is used to help complete the Organizational Chart. To
make changes to the ICS 207, you must make changes to the ICS 203.
Completing the ICS 207 Form
To complete the ICS 207 form, follow the steps below.
1. Log in to WebEOC Town Square.
2. On the Control Panel, select the IAP Builder link.
3. When the IAP Main View window appears, select the View button next to the ICS
207 link.
4-22
ESi Acquisition, Inc.
WebEOC® Town Square™ 1.0 User’s Manual
Chapter 4:The Incident Action Plan
4. When the ICS 207 form appears, select the Edit This Page button.
ESi Acquisition, Inc.
4-23
WebEOC® Town Square™ 1.0 User’s Manual
Chapter 4:The Incident Action Plan
5. When you are redirected to the ICS 203 form, make your changes.
6. Select the Save button to save your changes, or select the Cancel button to abort the
operation.
Note: For additional instructions on editing the ICS 203 form, see “The ICS 203
Form” section in this chapter.
Printing the ICS 207 Form
To print the ICS 207 form, follow the steps below.
1. Log in to WebEOC Town Square.
2. On the Control Panel, select the IAP Builder link.
3. When the IAP Main View window appears, select the View button next to the ICS
207 link.
4. When the ICS 207 form appears, select the Print ICS 207 button at the top of the
window.
5. When your print window appears, locate your printer, and select the Print button.
4-24
ESi Acquisition, Inc.
WebEOC® Town Square™ 1.0 User’s Manual
Chapter 4:The Incident Action Plan
Printing a Completed IAP
You can print a completed IAP without publishing it.
To print a completed IAP, follow the steps below.
1. Log in to WebEOC Town Square.
2. On the Control Panel, select the IAP Builder link.
3. When the IAP Main View window appears, select the View/Print IAP button.
4. When the IAP Main View window appears, select the View / Print IAP Master
View button.
5. When your print window appears, locate your printer, and select the Print button.
6. If you want to print a PDF, select the Print PDF button at the top of the window. The
PDF will be automatically generated. Make sure to save the PDF to your desired
location.
Printing Tips for Common Browsers
When printing the ICS forms, if the form runs off the page horizontally, adjust your margins
in your Internet browser.
For Internet Explorer® 7, go to Page Setup under the Print menu. From here, you can adjust
your left, right, top, and bottom margins. Remember, this will affect all pages you print from
in Internet Explorer®.
For Mozilla® Firefox® 2, go to File | Page Setup, and select the Margins & Header/
Footer tab. From here, you can adjust your left, right, top, and bottom margins. Remember,
this will affect all pages your print from Firefox.
ESi Acquisition, Inc.
4-25
WebEOC® Town Square™ 1.0 User’s Manual
Chapter 4:The Incident Action Plan
Publishing a Completed IAP
When you have completed your IAP, you can publish it to the Incident Action Plan
(Published) board. Publishing your IAP will allow you to keep a historical record of each IAP
for an operational period. After you publish the IAP, it can no longer be edited. The Incident
Action Plan (Published) board will house all of your published IAPs.
To publish a completed IAP, follow the steps below.
1. Log in to WebEOC Town Square.
2. On the Control Panel, select the IAP Builder board.
3. When the IAP Main View window appears, select the View / Print IAP button at the
bottom of the window.
4. When the IAP appears, select the Publish button.
4-26
ESi Acquisition, Inc.
WebEOC® Town Square™ 1.0 User’s Manual
Chapter 4:The Incident Action Plan
5. When the Update Record window appears, select the Check to publish IAP for
[Your Incident’s Name] checkbox.
6. Select the Save button to publish the IAP, or select the Cancel button to abort the
operation.
The published IAP will move from the IAP Builder board to the Incident Action Plans
(Published) board.
Note: Published IAPs cannot be edited. However, they can be deleted. See the
“Deleting a Published IAP” section in this chapter.
ESi Acquisition, Inc.
4-27
WebEOC® Town Square™ 1.0 User’s Manual
Chapter 4:The Incident Action Plan
Printing a Published IAP
To print a published IAP, follow the steps below.
1. Log in to WebEOC Town Square.
2. On the Control Panel, select the Incident Action Plans (Published) board.
3. When the IAP Main View window appears, select the View button next to the IAP
you want to print.
4-28
ESi Acquisition, Inc.
WebEOC® Town Square™ 1.0 User’s Manual
Chapter 4:The Incident Action Plan
4. When the IAP appears, select the Print IAP Master View button, or select the
Print PDF button.
5. If you select the Print PDF button, the PDF will be automatically generated. Be sure
to save the PDF to your desired location.
6. If you select the Print IAP Master View button, your print window will appear.
Locate your printer, and select the Print button.
ESi Acquisition, Inc.
4-29
WebEOC® Town Square™ 1.0 User’s Manual
Chapter 4:The Incident Action Plan
Deleting a Published IAP
You can only delete an IAP if you have the proper permissions configured.
Deleting an IAP is performed in the Menus section of the Control Panel. See Chapter 5:
Menus and Links for detailed instructions on deleting an IAP.
4-30
ESi Acquisition, Inc.
Chapter 5: Menus and Links
Introduction
Menus give you an easy way to
access multiple boards, plug-ins,
links, and other menu items that
are grouped under a single link on
the Control Panel. When you select
the menu title, a list of items will
open in a new window or sub-menu
that is similar in appearance and
functionality to the Control Panel.
Menus on the Control Panel are
appended with a double-arrow
icon. Sub-menus are accessed by
selecting the menu title. Menus can
be closed by selecting the X button
next to the menu title. Once a submenu is open, the X on the Control
Panel will appear in red to confirm
the menu is active. If a menu
contains a board, the board link on the sub-menu and the link on the Control Panel will
change to red when new information has been posted to the board.
Links allow you to access a system, a Web site, or a particular file. The link typically opens a
new window displaying the external system or Web site. See your WebEOC® Town Square™
administrator for access to additional links.
ESi Acquisition, Inc.
5-1
WebEOC® Town Square™ 1.0 User’s Manual
Chapter 5: Menus and Links
Town Square Menus
Menus are a convenient way to group the board views you use most often to complete tasks.
Multiple Menus can be created to help you quickly access boards, tools, and plug-ins. Menus
also keep the Control Panel more streamlined for easy navigation.
Town Square provides a set of menus that are already configured to support a positionspecific information process flow.
5-2
ESi Acquisition, Inc.
WebEOC® Town Square™ 1.0 User’s Manual
Chapter 5: Menus and Links
Checklist
The Checklist menu allows users to create and edit checklists in the Checklist Builder and
document the completion of activities in the Checklist board.
Building the Checklist
To build and edit the checklist, follow the steps below.
1. On the Control Panel, select the Checklist link in the Menus section.
2. Select the Checklist Builder link in the Boards sub-menu.
3. Select the Add Checklist Item button.
ESi Acquisition, Inc.
5-3
WebEOC® Town Square™ 1.0 User’s Manual
Chapter 5: Menus and Links
4. In the Create Checklist window, enter the Item No. and Item Description.
5. Repeat these steps to add more items to the checklist.
6. Select the Save button to save the checklist item, or select the Cancel button to abort
the operation. The checklist list items will appear in the Checklist board.
Updating a Checklist
To update a checklist, follow the steps below.
1. On the Control Panel, select the Checklist link in the Menus section.
2. Select the Checklist Builder link in the Boards sub-menu.
5-4
ESi Acquisition, Inc.
WebEOC® Town Square™ 1.0 User’s Manual
Chapter 5: Menus and Links
3. In the Checklist Builder window, select the Update button next to a checklist item to
update it, or select the Add Checklist Item button to add additional steps to this
checklist.
4. If you select the Add Checklist Item button, enter the new item in the Create
Checklist window.
5. Select the Save button to save your changes, or select the Cancel button to abort the
operation.
Completing a Checklist Item
To complete a checklist item, follow the steps below.
1. On the Control Panel, select the Checklist link in the Menus section.
2. Select the Checklist link in the Boards sub-menu.
ESi Acquisition, Inc.
5-5
WebEOC® Town Square™ 1.0 User’s Manual
Chapter 5: Menus and Links
3. Select the Update button from the Checklist display window.
4. In the checklist window, enter any comments about this checklist item in the
Comments field, and select the Complete checkbox. The date and time will
automatically populate the gray field.
5. Select the Save button to save your changes, or select Cancel to abort the operation.
The completed checklist item will be displayed on the Checklist board.
5-6
ESi Acquisition, Inc.
WebEOC® Town Square™ 1.0 User’s Manual
Chapter 5: Menus and Links
EM Menu
The EM Menu contains the boards a position will use to track and document response
activities from a management or administrative level.
The following boards are accessible within the EM Menu.
• File Library Admin
•
IAP (Admin/Delete)
•
Logged In
•
Resource/Task Update All
•
AAR (After Action Report Management View)
AAR
Adding an AAR Entry
To add an entry to the AAR board, follow the steps below.
1. On the Control Panel, select the EM Menu link in the Menus section.
ESi Acquisition, Inc.
5-7
WebEOC® Town Square™ 1.0 User’s Manual
Chapter 5: Menus and Links
2. Select the AAR link from the Boards sub-menu.
3. In the After Action Comments and Recommendations window, select the New AAR
Entry button.
5-8
ESi Acquisition, Inc.
WebEOC® Town Square™ 1.0 User’s Manual
Chapter 5: Menus and Links
4. In the After Action Comments and Recommendations form, complete the fields in
accordance with the Form Filling Instructions.
5. Select the Save button, or select Cancel to abort the operation.
ESi Acquisition, Inc.
5-9
WebEOC® Town Square™ 1.0 User’s Manual
Chapter 5: Menus and Links
Editing an AAR Record
To edit an AAR record, follow the steps below.
1. On the Control Panel, select the EM Menu link in the Menus section.
2. Select the AAR link from the Boards sub-menu window.
3. Select the Edit button for the record you want to update. The After Action Comments
and Recommendations form will open.
4. Enter the information in the applicable sections in the AAR record, and select the
Save button.
File Library Admin
The File Library Admin board provides the ability for users to create shared and private
folders to store files.
Adding a New Folder to the File Library
To add a new folder to the File Library Admin board, follow the steps below.
1. On the Control Panel, select the EM Menu link in the Menus section.
2. Select the File Library Admin link from the Boards sub-menu.
3. In the Folder List view, select the Create New Folder button.
5-10
ESi Acquisition, Inc.
WebEOC® Town Square™ 1.0 User’s Manual
Chapter 5: Menus and Links
4. Enter the name in the Folder Name text field.
5. For Folder Type, select the radio button for one of the following options.
a. Shared (Shared folders can be viewed by everyone.)
b.
Private (Private folders can only be viewed by the position who created it.)
6. Select the Save button, or select Cancel to abort the operations.
Editing a Folder in the File Library
To edit a folder in the File Library, follow the steps below.
1. On the Control Panel, select the EM Menu link in the Menus section.
2. Select the File Library Admin link, from the Boards sub-menu.
3. In the Folder List window, select the Edit link next to the folder name you want to
edit.
ESi Acquisition, Inc.
5-11
WebEOC® Town Square™ 1.0 User’s Manual
Chapter 5: Menus and Links
4.
Edit the Folder Name or change the Folder Type option to Shared or Private.
5. Select the Save button, or select the Cancel button to abort the operation.
Adding a File to a Folder
To add a file to a folder in the File Library, follow the steps below.
1. On the Control Panel, select the EM Menu link in the Menus section.
2. Select the File Library Admin link from the Boards sub-menu.
3. In the Folder List, select the Name of the folder.
4. In the File List window, select the Add File button.
5-12
ESi Acquisition, Inc.
WebEOC® Town Square™ 1.0 User’s Manual
Chapter 5: Menus and Links
5. In the Add File window, select the Browse button to locate the file, and enter a
description for the file in the Description field.
6. Select the Save button, or select the Cancel button to abort the operation.
Updating a File
To update a file in the File Library, follow the steps below.
1. On the Control Panel, select the EM Menu link in the Menus section.
2. Select the File Library Admin link from the Boards sub-menu.
3. In the Folder List, select the name of the folder.
4. In the File List window, select the Update button of the file you to update.
5. In the Add File window, select the Browse button to locate the file.
6. Enter a new description for the file in the Description field.
7. Select the Save button, or select the Cancel button to abort the operation.
ESi Acquisition, Inc.
5-13
WebEOC® Town Square™ 1.0 User’s Manual
Chapter 5: Menus and Links
Deleting a Folder in File Library
To delete a file in the File Library, follow the steps below.
1. On the Control Panel, select the EM Menu link in the Menus section.
2. In the Boards sub-menu, select the File Library Admin link .
3. In the Folder List window, select the trash can icon.
4. Select the OK button to confirm deletion of the folder, or select the Cancel button to
abort the operation. Deleted folders will be stored in the Deleted Folders list.
Recovering a Deleted Folder
To recover a deleted folder in the File Library, follow the steps below.
1. On the Control Panel, select the EM Menu link in the Menus section.
2. Select the File Library Admin link from the Boards sub-menu.
3. From the Folder List, select the Recover Deleted Folders button.
5-14
ESi Acquisition, Inc.
WebEOC® Town Square™ 1.0 User’s Manual
Chapter 5: Menus and Links
4. From the Deleted Folders list, select the Recover Folder button. The folder will be
added back to the File Library view.
5. Select the OK button to confirm that you want to restore the folder to the File
Library, or select the Cancel button to abort the operation.
IAP (Admin/Delete)
Published Incident Action Plans (IAP) can be viewed in the Incident Action Plans (Published)
board located in the Boards section of the Control Panel. Users with access to the EM Menu
can view, print, and delete published IAPs from the IAP (Admin/Delete) board.
Viewing and Printing a Published IAP
To view a published IAP, follow the steps below.
1. On the Control Panel, select the EM Menu link in the Menus section.
2. Select the IAP (Admin/Delete) link from the Boards sub-menu.
ESi Acquisition, Inc.
5-15
WebEOC® Town Square™ 1.0 User’s Manual
Chapter 5: Menus and Links
3. In the IAP Main View list, select the View button for the IAP that you want to view or
print.
The published IAP will open in a new window for you to view or print.
Deleting a Published IAP
To delete a published IAP, follow the steps below.
1. On the Control Panel, select the EM Menu link in the Menus section.
2. Select the IAP (Admin/Delete) link from the Boards sub-menu.
3. In the IAP Main View window, select the Delete button.
5-16
ESi Acquisition, Inc.
WebEOC® Town Square™ 1.0 User’s Manual
Chapter 5: Menus and Links
4. Select one of the following options.
a. To delete the record, select Yes from the drop-down list and select the Save
button.
b.
To save the record, select No from the drop-down list and select the Save button.
c. To abort updating the record, select the Cancel button.
Logged In
The Logged In board displays a list of users who are currently logged in to Town Square. The
list of users logged in can be viewed either by their user name or their position.
To view users currently logged in to Town Square, follow the steps below.
1. On the Control Panel, select the EM Menu link in the Menus section.
2. Select the Logged In link from the Boards sub-menu.
3.
ESi Acquisition, Inc.
To view users logged in by user name, select the Users List button.
5-17
WebEOC® Town Square™ 1.0 User’s Manual
Chapter 5: Menus and Links
4.
To view users logged in by position, select the Position List button.
Status Boards (Edit)
The Status Board (Edit) menu contains several status boards that are design to track and
provide up-to-date information on property damage, roads, hospitals, and shelters using the
following boards.
• AAR (After Action Review)
•
Damage Assessment
•
Road Closures
•
Hospitals
•
Shelters
Note: For instructions on the After Action Review (AAR) board, see the EM Menu section in
this chapter.
5-18
ESi Acquisition, Inc.
WebEOC® Town Square™ 1.0 User’s Manual
Chapter 5: Menus and Links
Damage Assessment Board
This board maintains a cumulative total of property damage and dollar value loss estimates.
Adding a New Record
To add a record to the Damage Assessment board, follow the steps below.
1. On the Control Panel, select the Status Boards (Edit) link in the Menus section.
2. Select the Damage Assessment link, from the Boards sub-menu.
3. In the Damage Assessment Countywide Totals display, select the New Record
button.
ESi Acquisition, Inc.
5-19
WebEOC® Town Square™ 1.0 User’s Manual
Chapter 5: Menus and Links
Note: If an entry has not been added to the board, the board view will contain a place
holder “$NaN” in the first row. This will disappear after the first entry is saved.
4. Enter the information in the applicable fields.
5. Select the Save button, or select the Cancel to abort the operation.
5-20
ESi Acquisition, Inc.
WebEOC® Town Square™ 1.0 User’s Manual
Chapter 5: Menus and Links
Updating a Record
To update a record to the Damage Assessment board, follow the steps below.
1. On the Control Panel, select the Status Boards (Edit) link in the Menus section.
2. Select the Damage Assessment link from the Boards sub-menu.
3. In the Damage Assessment Countywide Totals list, select the Details icon of the
record you want to update.
ESi Acquisition, Inc.
5-21
WebEOC® Town Square™ 1.0 User’s Manual
Chapter 5: Menus and Links
4. Select the Update Record button.
5. In the Damage Assessment input view, enter the information in the applicable
sections.
6. Select the Save button, or select the Cancel button to abort the operation.
5-22
ESi Acquisition, Inc.
WebEOC® Town Square™ 1.0 User’s Manual
Chapter 5: Menus and Links
Hospitals
The Hospitals board enables users to add, edit and display a list of hospitals and the services
they provide. This board is compliant with Hospital Incident Command System (HICS IV)
standards used in emergencies and in daily operations. Users can track and provide updates
on emergency room availability, room capacity, total occupancy, number of beds available,
and other detailed information on hospital services and infrastructure systems.
Adding a New Record
To add a record to the Hospitals board follow the steps below.
1. On the Control Panel, select the Status Boards (Edit) link in the Menus section.
2. Select the Hospitals link from the Boards sub-menu.
3. In the Hospital Status window, select the Add Hospital button.
ESi Acquisition, Inc.
5-23
WebEOC® Town Square™ 1.0 User’s Manual
Chapter 5: Menus and Links
4. Enter the information in the applicable fields.
5. Select the Save button, or select the Cancel button to abort the operation.
Viewing a Record
To view details of a record to the Hospitals board, follow the steps below.
1. On the Control Panel, select the Status Boards (Edit) link in the Menus section.
2. Select the Hospitals link from the Boards sub-menu.
3. In the Hospital Status list, select the Details button of the hospital record you want
to view.
5-24
ESi Acquisition, Inc.
WebEOC® Town Square™ 1.0 User’s Manual
Chapter 5: Menus and Links
4. Review the details of the record, and select the Print PDF button, the Return to
List button, or the Update Record button.
Updating a Record
To update a record to the Hospitals board, follow the steps below.
1. On the Control Panel, select the Status Boards (Edit) link in the Menus section.
2. Select the Hospitals link from the Boards sub-menu.
3. In the Hospital Status list, select the Update button of the hospital record you want
to update.
4. Enter the updated information in the hospital input form.
5. Select the Save button, or select the Cancel button to abort the operation.
ESi Acquisition, Inc.
5-25
WebEOC® Town Square™ 1.0 User’s Manual
Chapter 5: Menus and Links
Removing a Record
To remove a record from the Hospitals board, follow the steps below.
1. On the Control Panel, select the Status Boards (Edit) link in the Menus section.
2. Select the Hospitals link from the Boards sub-menu.
3. In the Hospital Status list, select the Update button of the hospital record you want
to remove.
4. Scroll to the bottom of the Hospital General Information Input view, and select the
Remove Hospital From List checkbox.
5. Select the Save button to remove the entry, or select the Cancel button to abort the
operation.
Printing an Individual Hospital Record
To print the details of an individual hospital record, follow the steps below.
1. On the Control Panel, select the Status Boards (Edit) link in the Menus section.
2. Select the Hospitals link from the Boards sub-menu.
3. In the Hospital Status list, select the Details icon of the hospital record you want to
print.
5-26
ESi Acquisition, Inc.
WebEOC® Town Square™ 1.0 User’s Manual
Chapter 5: Menus and Links
4. From the Hospital Status record, select the Print PDF button.
5. Select the Print icon in the tool bar at the top of the PDF file.
ESi Acquisition, Inc.
5-27
WebEOC® Town Square™ 1.0 User’s Manual
Chapter 5: Menus and Links
Road Closures
This board will enable you to update, track, and display information on the status of roads
closed.
Adding a New Record
To add a new record to the Road Closures board, follow the steps below.
1. On the Control Panel, select the Status Boards (Edit) link in the Menus section.
2. Select the Road Closures link from the Boards sub-menu.
3. In the Road Closures window, select the New Road Closure button.
5-28
ESi Acquisition, Inc.
WebEOC® Town Square™ 1.0 User’s Manual
Chapter 5: Menus and Links
4. Enter the information in the applicable fields.
5. Select the Save button, or select the Cancel button to abort the operation.
Editing a Record
To edit a record to the Road Closures display view, follow the steps below.
1. On the Control Panel, select the Status Boards (Edit) link in the Menus section.
2. Select the Road Closures link from the Boards sub-menu.
3. In the Road Closures display view, select the Select button in the Edit column to
open the record.
ESi Acquisition, Inc.
5-29
WebEOC® Town Square™ 1.0 User’s Manual
Chapter 5: Menus and Links
4. Enter the updated information in the applicable sections of the input form.
5. Select the Save button, or select the Cancel button to abort the operation.
Viewing a Record
To view a record on the Road Closures board, follow the steps below.
1. On the Control Panel, select the Status Boards (Edit) link in the Menus section.
2. Select the Road Closures link from the Boards sub-menu.
3. In the Road Closures display view, select the Details icon in the Detail column to
view the record.
4. Review the details of the record, and select the Print PDF button, the Return to
List button or the Update Record button.
5-30
ESi Acquisition, Inc.
WebEOC® Town Square™ 1.0 User’s Manual
Chapter 5: Menus and Links
Removing a Record
To remove a record to the Road Closures board, follow the steps below.
1. On the Control Panel, select the Status Boards (Edit) link in the Menus section.
2. Select the Road Closures link from the Boards sub-menu.
3. In the Road Closures display view, select the Select button in the Edit column to
open the record.
ESi Acquisition, Inc.
5-31
WebEOC® Town Square™ 1.0 User’s Manual
Chapter 5: Menus and Links
4. At the bottom of the Road Closure input view, select the Remove from List
checkbox.
5. Select the Save button, or select the Cancel button to abort the operation.
5-32
ESi Acquisition, Inc.
WebEOC® Town Square™ 1.0 User’s Manual
Chapter 5: Menus and Links
Printing a Detail Record
To print a detail record from the Road Closures board, follow the steps below.
1. On the Control Panel, select the Status Boards (Edit) link in the Menus section.
2. Select the Road Closures link in the Boards sub-menu.
3. In the Road Closures display view, select the Details icon in the Detail column to
open the record.
4. Select the Print PDF button.
ESi Acquisition, Inc.
5-33
WebEOC® Town Square™ 1.0 User’s Manual
Chapter 5: Menus and Links
5. A browser window will open. Select the PDF print icon from the tool bar.
5-34
ESi Acquisition, Inc.
WebEOC® Town Square™ 1.0 User’s Manual
Chapter 5: Menus and Links
Shelters Board
This board will enable you to update, track, and display information on the status of shelters.
Adding a Record to Shelter Status Board
To add a new record to the Shelters status board, follow the steps below.
1. On the Control Panel, select the Status Boards (Edit) link in the Menus section.
2. Select the Shelters link from the Boards sub-menu.
3. In the Shelter Status display view, select the Add Shelter button.
ESi Acquisition, Inc.
5-35
WebEOC® Town Square™ 1.0 User’s Manual
Chapter 5: Menus and Links
4. Enter the information in the applicable sections of the Shelter input view.
5. Select the Save button, or select the Cancel button to abort the operation.
5-36
ESi Acquisition, Inc.
WebEOC® Town Square™ 1.0 User’s Manual
Chapter 5: Menus and Links
Editing a Record
To edit a shelter record, follow the steps below.
1. On the Control Panel, select the Status Boards (Edit) link in the Menus section.
2. Select the Shelters link from the Boards sub-menu.
3. In the Shelter Status display view, select the Update button in the Update column.
4. Enter the information as applicable in the Shelter input view.
5. Select the Save button, or select the Cancel button to abort the operation.
Deleting a Record
To delete a shelter record, follow the steps below.
1. On the Control Panel, select the Status Boards (Edit) link in the Menus section.
2. Select the Shelters link from the Boards sub-menu.
3. In the Shelter Status display view, select the Update button in the Update column of
the shelter record you want to delete.
ESi Acquisition, Inc.
5-37
WebEOC® Town Square™ 1.0 User’s Manual
Chapter 5: Menus and Links
4. At the bottom of the Shelter input view, select the Delete Shelter checkbox.
5. Select the Save button to delete the shelter record, or select the Cancel button to
abort the operation.
5-38
ESi Acquisition, Inc.
WebEOC® Town Square™ 1.0 User’s Manual
Chapter 5: Menus and Links
ICS/FEMA Forms
The ICS/FEMA Forms menu contains all of the current FEMA and ICS forms. Preparing the
forms within Town Square creates an electronic completed document. This assists in
document retention because the data entered each form is saved to the database.
ICS Forms Menu
Town Square includes a set of ICS forms to support the five major components common to
most organizations: Command, Operations, Planning, Logistics, and Finance.
This section provides general instructions on how to enter data and view details of an ICS
record.
Adding an ICS Record
To add an ICS record, follow the steps below.
1. On the Control Panel, select the ICS/FEMA Forms link in the Menus section.
2. Select the ICS Forms menu.
ESi Acquisition, Inc.
5-39
WebEOC® Town Square™ 1.0 User’s Manual
Chapter 5: Menus and Links
3. In the Boards list of the ICS Forms menu, select the board name of the ICS Form.
4. In the ICS display view, select the Create New Form button to open the input view
of the ICS form.
5-40
ESi Acquisition, Inc.
WebEOC® Town Square™ 1.0 User’s Manual
Chapter 5: Menus and Links
5. Enter the information in the applicable sections.
6. Select the Save button, or select the Cancel button to abort the operation.
Viewing an ICS Record
To view an ICS record, follow the steps below.
1. On the Control Panel, select the ICS/FEMA forms link in the Menus section.
2. Select the ICS Forms menu.
3. From the Boards list of the ICS Forms menu, select the board name of the ICS Form
you want to view.
ESi Acquisition, Inc.
5-41
WebEOC® Town Square™ 1.0 User’s Manual
Chapter 5: Menus and Links
4. In the ICS forms display view, select the Select button for the ICS record.
You can view the details of ICS form record.
Editing an ICS Record
To edit an ICS record, follow the steps below.
1. On the Control Panel, select the ICS/FEMA Forms link in the Menus section.
2. Select the ICS Forms menu.
3. In the Boards list of the ICS Forms menu, select the board name of the ICS form.
5-42
ESi Acquisition, Inc.
WebEOC® Town Square™ 1.0 User’s Manual
Chapter 5: Menus and Links
4. In the ICS forms display view, select the Update button for the ICS record that you
want to edit.
5. Update the information as applicable.
ESi Acquisition, Inc.
5-43
WebEOC® Town Square™ 1.0 User’s Manual
Chapter 5: Menus and Links
Printing an ICS Record
To print an ICS record, follow the steps below.
1. On the Control Panel, select the ICS/FEMA Forms link in the Menus section.
2. Select the ICS Forms menu.
3. In the Boards list of the ICS Forms menu, select the board name of the ICS form.
4. In the ICS forms display view, select the Select button for the ICS record that you
want to print.
5. Select either the Print This Page or the Print PDF button. The Print PDF button
will open a browser window to display the ICS form in a PDF view.
5-44
ESi Acquisition, Inc.
WebEOC® Town Square™ 1.0 User’s Manual
Chapter 5: Menus and Links
FEMA Forms
Town Square includes a menu of the FEMA forms contained within the Federal Emergency
Management Agency’s Applicant Handbook. The handbook describes how applicants (e.g.,
cities, counties, etc.) can apply for federal assistance under the Public Assistance Program.
For detailed instructions on completing the forms, see the FEMA Applicant Handbook
(http://www.fema.gov/pdf/government/grant/pa/apphndbk.pdf).
Adding a FEMA Form Record
To add a FEMA form record, follow the steps below.
1. On the Control Panel, select the ICS/FEMA Forms link from the Menus section.
2. Select the FEMA Forms menu.
3. In the Boards list of the FEMA forms sub-menu, select the board name of the
FEMA form.
4. In the FEMA form display view, select the Create New Form button.
ESi Acquisition, Inc.
5-45
WebEOC® Town Square™ 1.0 User’s Manual
Chapter 5: Menus and Links
5. Complete the information as applicable to the form instructions.
6. Select the Save button, or select the Cancel button to abort the operation.
Updating a Record
To update a FEMA form record, follow the steps below.
1. On the Control Panel, select the ICS/FEMA Forms link from the Menus section.
2. Select the FEMA Forms menu.
5-46
ESi Acquisition, Inc.
WebEOC® Town Square™ 1.0 User’s Manual
Chapter 5: Menus and Links
3. In the Boards list of the FEMA forms sub-menu, select the board name of the
FEMA form.
4. In the FEMA form display view, select the Update button.
ESi Acquisition, Inc.
5-47
WebEOC® Town Square™ 1.0 User’s Manual
Chapter 5: Menus and Links
5. Update the information as applicable.
6. Select the Save button, or select the Cancel to abort the operations.
Printing a Record
To print a FEMA Form record, follow the steps below.
1. On the Control Panel, select the ICS/FEMA Forms link from the Menus section.
2. Select the FEMA Forms menu.
5-48
ESi Acquisition, Inc.
WebEOC® Town Square™ 1.0 User’s Manual
Chapter 5: Menus and Links
3. In the Boards list of the FEMA forms sub-menu, select the board name of the
FEMA form.
4. In the FEMA form display view, select the Select button in the Details column of the
record you want to print. The latest record will be listed at the top.
5. Select the Print this page or the Print PDF button. Selecting the Print PDF button
will display the FEMA record as a PDF in your browser window. You can then select
the print icon on the tool bar.
ESi Acquisition, Inc.
5-49
WebEOC® Town Square™ 1.0 User’s Manual
Chapter 5: Menus and Links
Links
External Web sites can be accessed via the Links section on your Control Panel. A limitless
number of links can be added. To access Links, select the link name in Links section on the
Control Panel.
The Web site will open in a new window. The links available to you are determined by your
administrator.
5-50
ESi Acquisition, Inc.
Chapter 6: Tools
Introduction
WebEOC® Town Square™ provides the capability to use e-mail to communicate incident
information among responders. In Town Square, incident information is transmitted via
boards. With the Messages tool, you can communicate with other users via an internal
messaging link unique to Town Square. If your organization allows it, you can send messages
to any e-mail server or e-mail addressable device, such as cell phones or pagers. It also allows
you to send and forward messages to e-mail accounts external to Town Square. All messages
sent or received by you are seen regardless of the incident you are logged in to.
ESi Acquisition, Inc.
6-1
WebEOC® Town Square™ 1.0 User’s Manual
Chapter 6: Tools
Messages
Composing and Sending a Message
To compose and send a message, follow the steps below.
1. Access your agency’s Town Square site.
2. In the WebEOC Town Square log in window, enter your user name in the User field,
and enter your password in the Password field.
Note: The password is case sensitive.
3. Select the OK button.
4. Select your position from the Position drop-down list, and select your incident
from the Incident drop-down list.
Note: Only those positions and incidents that your administrator has given you
access to will appear in the drop-down lists.
5. Select the OK button to continue, or select the Cancel button to abort the operation.
6. On the Control Panel, select the Messages link from the Tools section.
6-2
ESi Acquisition, Inc.
WebEOC® Town Square™ 1.0 User’s Manual
Chapter 6:Tools
7. In the Messages window, select the Compose button.
8. In the Compose New Message window, select the recipient or recipients from the
list of Users, Groups, or Positions.
a. To make multiple selections, hold the Ctrl key and select each recipient.
Recipients’ name should be highlighted.
b. To deselect recipients, hold the Ctrl key and select the recipient’s name once.
Recipient’s name should not be highlighted.
9. Enter the subject in the subject field.
10. Select the priority (High, Normal, or Low) from the drop-down list. (A High priority
will display as red, Normal as black, and Low as green.)
11. Enter your message in the message field.
12. Select the Browse button to add an attachment.
Note: Town Square messaging can only support one attachment. To send more than
one file, save the items to a ZIP file, and attach the compressed file to the message.
ESi Acquisition, Inc.
6-3
WebEOC® Town Square™ 1.0 User’s Manual
Chapter 6: Tools
13. To send an e-mail, select the Generate Email checkbox. An Additional Addresses
field will appear when the Generate Email checkbox is selected.
Note: The sender must have an e-mail address set up in Town Square. The sender
does not need to enter e-mail addresses for recipients who have e-mail setup in Town
Square.
14. For recipients who do not have e-mail addresses setup in Town Square, enter the
e-mail addresses in the Additional Addresses field textbox. Separate each e-mail
address by a comma. An unlimited number of addresses may be entered.
15. Select the Send button, or select the Cancel button to abort the operation. You will
automatically return to the Messages window.
Replying to and Forwarding a Message
To reply or forward a message, follow the steps below.
1. Select Messages from the Tools section on the Control Panel.
2. In the Messages window, select the message you want to reply and/or forward.
6-4
ESi Acquisition, Inc.
WebEOC® Town Square™ 1.0 User’s Manual
Chapter 6:Tools
3. In the Message Detail window, select the Reply or Forward button.
Note: Reply will not send the original attachment. You can, however, attach other
documents in your reply message. Forward gives you an option to send the original
attachment or send a different attachment.
4. In the Compose New Message window, select the recipient or recipients from the
list of Users, Groups, or Positions.
a. To make multiple selections, hold the Ctrl key, and select recipients. Recipients
will be highlighted when selected.
b. To deselect recipients, hold the Ctrl key, and select recipients. Recipients will
not be highlighted.
5. Edit the Subject in the subject field if needed.
6. Select the Priority (High, Normal, or Low) from the drop-down list. (A High priority
will display as red, Normal as black, and Low as green). The default priority for
replying to or forwarding a message is Normal.
7. Enter your message above the original message in the Message textbox.
8. Select the Browse button to add an attachment.
Note: Messaging in Town Square can only support one attachment. To send more
than one file, save the items to a single ZIP file, and attach the compressed file to the
message.
9. To send an e-mail, select the Generate Email checkbox. An e-mail will be sent only
to addressees who have been set up as users in Town Square. An Additional
Addresses field will appear when the Generate Email checkbox is selected.
ESi Acquisition, Inc.
6-5
WebEOC® Town Square™ 1.0 User’s Manual
Chapter 6: Tools
Note: Generate Email will not be available if the user who is sending the message
does not have an e-mail account setup in Town Square or if e-mail capability has not
been configured by the Town Square administrator.
10. Select the Send button, or select the Cancel button to abort the operations.
Sorting Messages
To sort messages, follow the steps below.
1. Select Messages from the Tools section on the Control Panel.
2. In the Messages window, select the drop-down list for Inbox, Sent Items, or Deleted
Items.
3. Select the column (From, Subject, Priority, Incident, or Received) of the messages
that you want sorted. (By default messages are sorted by latest date and time
received.)
6-6
ESi Acquisition, Inc.
WebEOC® Town Square™ 1.0 User’s Manual
Chapter 6:Tools
Deleting a Message
Messages cannot be deleted from the Sent Items or Deleted Items windows. Deleting a
message only changes the message from your Inbox to your Deleted Items box.
To delete a message from the Inbox, follow the steps below.
1. Select Messages from the Tools section on the Control Panel.
2. Select the trash can icon next to the message.
3. Select the OK button to move the message to the Deleted Items, or select the Cancel
button to abort the operation and return to the Inbox.
4. You can view deleted items by selecting Deleted Items in the drop-down list.
Note: You can still view, reply, forward, and print any of the deleted messages.
ESi Acquisition, Inc.
6-7
WebEOC® Town Square™ 1.0 User’s Manual
Chapter 6: Tools
Printing a Message
To print a message, follow the steps below.
1. Select Messages from the Tools section on the Control Panel.
2. In the Messages window, select the drop-down list for Inbox, Sent Items, or Deleted
Items.
3.
Select the message that you want to print.
4. In the Message Detail window, select the Print button.
5. In the print window, choose the printer you want to use, or select the Cancel button
to abort the operation. You will automatically return to the Message Detail window.
6-8
ESi Acquisition, Inc.
Chapter 7: Plugins
Introduction
WebEOC® Town Square™ has two plug-ins: CAP messaging, and MapTac™.
Town Square includes two plug-ins.
• CAP messaging collects and distributes all-hazard safety notifications and emergency
warnings and
•
ESi Acquisition, Inc.
MapTac is a briefing tool used to display a variety of graphics and images.
7-1
WebEOC® Town Square™ 1.0 User’s Manual
Chapter 7: Plugins
CAP Messaging
CAP ia an acronym for Common Alerting Protocol. The CAP messaging plug-in is a simple,
flexible data interchange format for collecting and distributing all-hazard safety notifications
and emergency warnings over information networks and public alerting systems.
CAP messages are managed similar to an e-mail client program such as Microsoft® Outlook®.
CAP messages are stored in one of three folders: the Inbox, Sent Items, and Trash.
In order to send and receive CAP messages, your agency must be registered with the Disaster
Management Interoperability Service (DMIS) CAP service as a Collaborative Operations
Group (COG) and the DMIS service must be available. If you are unable to send or receive
CAP messages, contact your Town Square administrator and request verification that CAP
messaging is properly configured and that the DMIS service is running.
Accessing and Viewing CAP Messages
In order to view, send, and receive CAP messages, your agency must be registered with the
Disaster Management Interoperability Service (DMIS) as a Collaborative Operations
Group (COG) and the DMIS must be available. If the DMIS service is unavailable or the
connection is unusually slow, you will receive a time-out message. If you are unable to send or
receive CAP messages, contact your Town Square administrator.
To access and view CAP messages, follow the steps below.
1. Access your agency’s WebEOC Town Square site.
2. In the WebEOC Town Square login screen, enter your user name in the User field,
and enter your password in the Password field.
Note: The password is case sensitive.
3. Select the OK button.
4. Select your position from the Position drop-down list, and select your incident
from the Incident drop-down list.
Note: Only those positions and incidents that your administrator has given you
access to will appear in the drop-down lists.
5. Select the OK button to continue, or select the Cancel button to abort the operation.
7-2
ESi Acquisition, Inc.
WebEOC® Town Square™ 1.0 User’s Manual
Chapter 7:Plugins
6. Select CAP from the Plugins section on the Control Panel.
7. In the CAP Message List window, select Inbox, Sent Items, or Trash from the
Folder drop-down list.
8. Select the Get Messages button. A list of messages will appear for the folder (Inbox,
Sent Items, or Trash) selected.
9. Select the message to view. The message will be displayed in the CAP Message Detail
window.
10. Select the Return to List button to return to the CAP Message List.
Sending a CAP Message
To send a CAP message, follow the steps below.
1. Select CAP from the Plugins section on the Control Panel.
2. Select the Post Message button.
ESi Acquisition, Inc.
7-3
WebEOC® Town Square™ 1.0 User’s Manual
Chapter 7: Plugins
3. In the Post CAP Message window, enter all the required information in accordance
with the CAP specification documentation. For CAP field descriptions, go to
http://www.oasis-open.org/specs/index.php#capv1.1.
4. Select the Post Message button to send the message, or select the Cancel button to
abort the operation.
7-4
ESi Acquisition, Inc.
WebEOC® Town Square™ 1.0 User’s Manual
Chapter 7:Plugins
Emptying the CAP Trash Folder
To clear CAP messages that have been marked for deletion, follow the steps below.
1. Select CAP from the Plugins section on the Control Panel.
2. Select Trash from the Folder drop-down list. A list of all CAP messages that this user
has marked for deletion displays and the Empty Trash button is enabled.
3. Select the Empty Trash button. This will permanently remove all of the messages in
the Trash folder.
ESi Acquisition, Inc.
7-5
WebEOC® Town Square™ 1.0 User’s Manual
Chapter 7: Plugins
MapTac™
MapTac™ is a briefing tool used to display a variety of graphics and images. It replaces or
augments static, paper-based maps and magnetic light boards common in many EOCs.
MapTac allows authorized users to access an image of a static map, dispersion model, digital
photo, etc., from any map/GIS source or digital camera and, using their web browser, share
the tactical scene with other users instantly.
MapTac can use images from any GIS or mapping system to produce a static image file (e.g.,
JPEG, GIF, BMP, etc.). Existing web-based mapping resources available on the Internet can
also be used to plot an address in order to create the image file that can then be saved to
MapTac and annotated as necessary using the icon palette and drawing tools. MapTac also
allows responders at geographically separate locations to view, and depending on user
privileges, update images real-time.
Users with appropriate permissions can add markers such as push pins, fire trucks, road
blocks, etc., with or without labels and draw shapes on the image. Labels can be added and
edited at any time. Administrators can add a URL to an icon allowing users to access related
information by selecting the icon attached to the image file in MapTac.
MapTac Components
The figure below illustrates the major components of the MapTac user interface. The headers
in the tool pane can be expanded and collapsed by selecting the related tab. The major
components are as follows.
• Maps: This drop-down list contains all of the maps your administrator has uploaded
and contains a Clear Map button.
7-6
•
Shapes: This tab contains ellipses, polygon, and free-hand drawing tools; a delete
button; and shape color drop-down list.
•
Labels: This tab contains add and remove label buttons.
•
Marker tabs: There are multiple marker tabs that contain categorized icons that can
be added to your maps.
•
Map view pane: The right of the MapTac window contains the map you are working
on and a printer icon.
ESi Acquisition, Inc.
WebEOC® Town Square™ 1.0 User’s Manual
Chapter 7:Plugins
Viewing a Map
To access a map or an image for viewing, follow the steps below.
1. Select MapTac from the Plugins section on the Control Panel.
2. Select a map for display from the Maps drop-down list.
Note: The image or map will resize automatically anytime you change the size of your
window. If you do not want the map or image to be resized contact your Town Square
administrator.
ESi Acquisition, Inc.
7-7
WebEOC® Town Square™ 1.0 User’s Manual
Chapter 7: Plugins
Printing a Map
To print a map or an image, follow the steps below.
1. Select MapTac from the Plugins section on the Control Panel.
2. Select a map that you want to print from the Maps drop-down list.
3. Select the print icon.
Placing Markers on a Map
If you have “read-only” permission to a map, you will not be able to add markers to a map.
MapTac is pre-loaded with 25 categories of DHS symbology.
To place a marker on a map, follow the steps below.
1. Select MapTac from the Plugins section on the Control Panel.
2. Select a map to display from the Maps drop-down list.
3. Select the desired marker tab. This will open the tab and show all the icons under
that tab.
7-8
ESi Acquisition, Inc.
WebEOC® Town Square™ 1.0 User’s Manual
Chapter 7:Plugins
4. Select the marker that you want to place on the map. To see what the marker
represents, rest your mouse on the icon and a pop-up will reveal the marker title.
5. Move your cursor on the map to the desired location on the map and single-click.
The marker will appear on the map. You cannot drag and drop the markers to place
them on the map.
Moving Markers
Select the marker, and hold the left mouse button down. Drag the marker to the new
destination, and release the mouse button.
ESi Acquisition, Inc.
7-9
WebEOC® Town Square™ 1.0 User’s Manual
Chapter 7: Plugins
Resizing a Marker
To resize a marker, hover your cursor over the marker. Select the handle that appears around
the marker, and drag the handle in until the marker is the desired size.
Deleting a Marker
To delete a marker, follow the steps below.
1. Right click on the marker. A delete confirmation dialog will display.
2.
7-10
Select the OK button to delete the marker from the map, or select the Cancel button
to abort the operation.
ESi Acquisition, Inc.
WebEOC® Town Square™ 1.0 User’s Manual
Chapter 7:Plugins
Drawing and Placing Shapes on a Map
Shapes are useful to highlight specific locations or areas on a map. This tool is particularly
useful to show areas that have been affected by an incident. A user can draw, resize and place
either an ellipse, polygon or a line anywhere on a map. Shapes can be highlighted with one of
the three transparent colors red, green or blue.
Users that have “read-only” permissions will not be able to add shapes to a map.
To draw and place a shape on a map, follow the steps below.
1. Select the Shapes tab to display the shape palette.
2. Select the desired shape button from the shape palette.
3. Select the color from the drop-down list.
ESi Acquisition, Inc.
7-11
WebEOC® Town Square™ 1.0 User’s Manual
Chapter 7: Plugins
Deleting a Shape
To delete a shape, follow the steps below.
1. Right click the shape. A delete confirmation dialog will appear.
2. Select the OK button to delete the shape from the map, or select the Cancel button to
abort the operation.
Note: You can also select the delete icon in the Shapes palette, and select the shape
you want to delete.
Adding a Label to a Marker
Labels can be added to any of the available markers. However, labels cannot be added to
shapes.
Users with “read-only” permissions will not be able to add labels to a map.
To add a label to a marker, follow the steps below.
1. Select the Labels tab to display the label palette.
7-12
ESi Acquisition, Inc.
WebEOC® Town Square™ 1.0 User’s Manual
Chapter 7:Plugins
2. Select the Set Label button to add a label.
3. Select the marker to be labeled. The Label Text field will appear.
4. Enter the text for the label, and select the OK button. The label will appear under the
marker.
Clearing a Label on a Marker
To clear a label on a marker, follow the steps below.
1. Select the Labels tab to display the label palette.
2. Select the Clear Label button.
3. Select the marker that you want to remove the label.
ESi Acquisition, Inc.
7-13
WebEOC® Town Square™ 1.0 User’s Manual
Chapter 7: Plugins
Clearing All Items from a Map
To clear all shapes, markers, and labels from a map, select the Clear Map button.
A confirmation window will appear. Select the OK button to clear all shapes, markers, and
labels from the map. Select the Cancel button to abort the operation and return to the map.
7-14
ESi Acquisition, Inc.
ESi Acquisition, Inc. 823 Broad Street Augusta, GA 30901 (706) 823-0911 www.webeoc.com