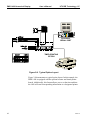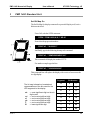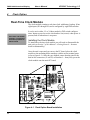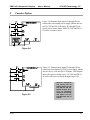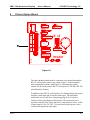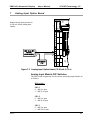
1
PMD 1400 Numerical Display User Manual Sales and Marketing 343 St. Paul Blvd. Carol Stream, IL 60188 Tel: (630)668-3900 FAX: (630)668-4676 Factory Customer Service/Order Entry 4140 Utica Ridge Rd. Bettendorf, IA 52722 Tel: (319)359-7501 (800)711-5109 FAX: (319)359-9094 Application Hotline 1 (800) TEC-ENGR (832-3647) Vist our web site at: 79737-3 2nd Printing — 03/2000 www.avg.net PMD 1400 NUMERICAL DISPLAY USERS MANUAL WARNING! In the application of UTICOR Technology, LP programmable control devices, you should consider them components. Therefore, provisions other than the programmable control device must be taken to protect personnel in the event of a programmable control device malfunction. Programmable control devices should not be used as stand-alone protection in any application. Unless proper safeguards are used, unwanted start-ups could result in equipment damage or personal injury. If programmable controllers are used with operator interface and like devices, this hazard should be of primary importance. The operator should be made aware of this hazard and appropriate precautions should be taken. In addition, consideration should be given to the use of an emergency stop function that is independent of the programmable controller. The diagrams and examples in this user’s manual are included for illustrative purposes only. UTICOR Technology, LP cannot assume responsibility or liability for actual use based on the diagrams and examples. © Copyright 1997–2000 All rights reserved UTICOR Technology, LP AVG Automation P.O. Box 1327 4140 Utica Ridge Road Bettendorf, IA 52722-1327 2nd printing – 03/00 Manual Number 79737-3 PMD 1400 Numerical Display User’s Manual UTICOR Technology, LP Table of Contents Caution Table of Contents ..................................................................................................................... i Section 1 • Introduction.......................................................................................................... 1 Section 2 • Getting Started Wiring Your PMD 1400 ..................................................................................................... 6 Reassembling the Unit ........................................................................................................ 8 Option Modules ................................................................................................................ 11 Slave Port .......................................................................................................................... 12 Error Codes ....................................................................................................................... 14 Counter Board Errors........................................................................................................ 14 Section 3 • PMD 1400 Standard Unit Features ............................................................................................................................. 16 Addressing ........................................................................................................................ 16 Characteristics .................................................................................................................. 16 Programming .................................................................................................................... 17 Unit Number ..................................................................................................................... 19 ASCII Commands ............................................................................................................ 22 Programming Using ASCII Characters ............................................................................ 23 Programming: Using ASCII Protocol through BASIC Commands ................................. 37 Section 4 • Clock Option ...................................................................................................... 43 Real-Time Clock Module ................................................................................................. 44 Installing the Clock Module ....................................................................................... 44 Real-Time Clock Dip Switches .................................................................................. 45 Real-Time Clock Inputs.............................................................................................. 46 Section 5 • Counter Option .................................................................................................. 49 Counter Module ................................................................................................................ 50 Installing the Counter Module .................................................................................... 50 Rate Counter ............................................................................................................... 51 Rate Per Second .......................................................................................................... 51 Rate Per Minute .......................................................................................................... 51 Accumulator ............................................................................................................... 51 Relay ........................................................................................................................... 52 Counter Board Inputs.................................................................................................. 53 79737-3 i PMD 1400 Numerical Display User’s Manual UTICOR Technology, LP Table of Contents Section 6 • Printer Option Board ........................................................................................ 59 Printer Port Sub-option Board .......................................................................................... 60 Section 7 • Analog Input Option Board .............................................................................. 63 Installing the Analog Input Module.................................................................................. 64 Analog Input Module DIP Switches ........................................................................... 65 Analog Input Modules ................................................................................................ 67 Section 8 • PMD 1400 Specifications ................................................................................... 79 Hardware Specifications ................................................................................................... 80 Configurations (figure 8-1) ............................................................................................... 81 Outside Dimensions for the PMD 1400 (figure 8-2) ........................................................ 84 Glossary ................................................................................................................................. 87 Index .................................................................................................................................... 93 ii 79737-3 PMD 1400 Numerical Display 1 User’s Manual UTICOR Technology, LP Introduction The PMD 1400 is UTICOR’s latest innovation in the area of programmable message displays. The PMD 1400 is a low cost, numerical display that can be interfaced to your personal computer or programmable controller. The unit — that can be purchased with either four or six characterplaces — uses seven-segment LEDs to display four-inch high digits. The PMD 1400 also comes with selectable decimal points and colons. In addition, if you need more display area, this versatile PMD can be stacked up to eight units, creating a multi-line, vertical display. The PMD 1400 also features a computer interface port used to enter data onto the display. Any of UTICOR’s master display units having a slave port can display a data set value on the PMD 1400. The unit supports either UTICOR or ASCII protocol. Standard equipment shipped with the PMD 1400 includes ceiling suspended mounting. Wall mounting kits are also available. PMD 1400 Features: • • • • • • • • • • • • 79737-3 Seven segment red LED display Four-inch characters Choose four or six character display Selectable decimal point or colon placement Up to eight units can be stacked for multi-line displays Serial/parallel interface Available slave port to drive other PMD 1400s Adjustable LED brightness RS-232/RS-422A communications Individually addressed multiple displays Choose counter or clock option boards Analog signals 1 PMD 1400 Numerical Display User’s Manual UTICOR Technology, LP Addressing The PMD 1400 The PMD 1400 can be addressed individually or in a group with other slave message displays. UTICOR assigns its message displays a group and unit number. The PMD 1400 will always be a member of group zero. However, the unit number can range from 0 to 63. This gives you the added advantage of being able to send each unit different information, while still residing in the network. Available Option Modules There are four optional features available for the PMD 1400 — a clock module, a counter module, a timed-printing module, and an analog input module. The clock option allows the unit to operate as a real-time clock, while the counter module allows the unit to be configured as either a rate or accumulative counter. The third option allows the operator to print hard copy of displayed data. The current analog input board and the voltage analog input board allows you to display values for analog signals onto digital display units. The counter and clock options have parallel inputs, while the timed-printing module is serial. All four have configuration switches. 2 79737-3 PMD 1400 Numerical Display 2 User’s Manual UTICOR Technology, LP Getting Started This section explains how to set up the PMD 1400 for operation. It covers wiring, cable hook-up, and general installation. It also discusses the PMD on power up. Wiring Your PMD 1400 To connect power to the 1400, you’ll need to partially disassemble the unit. The tools needed to do so include: a phillips screwdriver, a medium-size slotted screwdriver, and a pair of needlenose pliers. Figure 2-1 shows the various components that need to be removed to connect the power and communication cables to the PMD. There are six screws (A) located on the display’s front that need to be removed. Once they are removed, you can remove the two angle brackets (B) holding the colored lense in place. Carefully lift the lense (C) to remove and place it where it won’t get damaged. You are now looking at the display’s LEDs. At the top of the display, above the LEDs, are five more screws (three if you have the four-digit model) that hold the LEDs and circuit boards in place. Carefully remove them and the star-washers. The LEDs are attached to circuit boards that slide into grooves on the bottom of the display. Once the screws holding the top in place are removed, slide the circuit boards out and carefully turn them over. If you have a four-digit display, the LEDs are attached to only one circuit board. Once the boards are turned over, locate the power terminal, situated towards the left center of the unit. It is designated TB3 and consists of three screw terminals. Figure 2-1 79737-3 3 PMD 1400 Numerical Display User’s Manual UTICOR Technology, LP Figure 2-2. PMD 1400 Power Cable Wiring Layout Run the power cable through the pre-punched hole in the top or bottom of the display before you connect the wire leads to the terminal. Once you determine the correct lead locations simply insert the wire and screw down. We recommend that you tie down the wire to the unit to prevent damage resulting from the wire being pulled out. Connect the L2 (neutral) lead to the center post, labeled L2 on the screw terminal; connect the L1 (hot) lead to the post labeled L1; and then connect the ground wire to the terminal marked GND (see figure 2-2, above.) Once the power cable has been installed, we recommend that you connect the communication cable while the unit is open. To determine the correct wiring configuration for your application, refer to figures 2-3, 2-4, 2-5 and 2-6 on the following pages. 4 79737-3 PMD 1400 Numerical Display User’s Manual UTICOR Technology, LP Reassembling the Unit To reassemble the PMD 1400 start by replacing the LEDs and circuit boards making sure they are aligned with the bottom edge slot on the PMD casing. Carefully slide the boards into the slots and replace the screws previously taken out. Return the colored lense to its proper location and position the anglebrackets to hold it in place. Replace the six remaining screws. Figure 2-3. RS-232 9-pin Wiring 79737-3 5 PMD 1400 Numerical Display User’s Manual UTICOR Technology, LP Figure 2-4. RS-232 25-pin Wiring 6 79737-3 PMD 1400 Numerical Display User’s Manual UTICOR Technology, LP Figure 2-5. RS-422 Serial Port Wiring Figure 2-6. PMD 1400 Master/Slave Wiring 79737-3 7 PMD 1400 Numerical Display User’s Manual UTICOR Technology, LP Power Up The PMD 1400 goes through several start-up diagnostics when first powered up. It turns on all display segments and performs RAM and PROM tests. If either test fails, the unit displays corresponding error codes. Note: Call AVG UTICOR Technical Support at 800-TECENGR (832-3647) if these errors are displayed. The power-up sequence performs the display test for four seconds and displays the software version for four seconds. The software version is displayed as “SF 1.” The number indicates the software version. For example, a “1” refers to version “A,” while a “2” would refer to version “B.” After the version has been displayed, the PMD’s unit number is displayed as “U xx.” The “xx” refers to the unit number as a figure between 0 and 63. The PMD 1400 then enters its operating display mode. Option Modules If the unit has an option board installed, it will update the display every one tenth second using information from the option board. Also, it constantly monitors the computer interface port. Data from this port will be displayed immediately. There is no differentiation between data from an option board or the computer interface, so you must control the timing of the data going to the display. Information from the computer interface overwrites data from the option board and data from the option board overwrites data from the computer interface. A unit is considered a slave when its computer interface port is connected to the slave port of another unit. 8 When a unit is in the display mode it sends information to all connected slaves. The master PMD 1400 regularly sends the “select all units” command, ensuring that any units connected to the network will be active. The basic display configuration has a serial port for computer interface communications and a slave port. The slave port is an RS-422 fixed at 9600 baud, while the computer interface is an RS-422/232 and has switch selectable baud rates, stop bits and parities. 79737-3 PMD 1400 Numerical Display User’s Manual UTICOR Technology, LP Slave Port The PMD 1400 is a basic display unit without an option board. The slave port will always send data to update the slave displays. If a slave display has four-digits and the master has six-digits, the four least significant digits will be displayed. If the 1400 slave unit has six-digits and the master display has four-digits, the two most significant digits of the slave display will be zeros. Also, multiple PMD masters can be controlled from one PC. Data from the PMD masters will appear on the specific PMD 1400 displays linked to them (see figure 2-7). Figure 2-7. Typical PC, PMD 1400 Master/Slave Network 79737-3 9 PMD 1400 Numerical Display User’s Manual UTICOR Technology, LP RS-232/422 SERIAL PORT TIMED-PRINTING OPTION Figure 2-8. Typical Option Layout Figure 2-8 demonstrates a typical option layout. In this example, the PMD 1400 is equipped with the optional counter and timed-printer boards. Additionally, this format allows you to set the time and date the 1400 will send corresponding information to a designated printer. 10 79737-3 PMD 1400 Numerical Display User’s Manual UTICOR Technology, LP Error Codes If the PMD 1400 encounters an error during its power up it will indicate the error by displaying an “E” followed by an error code. The error codes are defined below. Error Code 1 Prom check error 2 RAM test failed 3 Prom check error on option board 4 Serial E2 failed 5 Counter Board not installed — or ^PCxx set for other than 00 Counter Board Errors If the value returned by the counter board exceeds the display’s capacity, an overflow error indicated by “uuuuuu” or “uuuu” will be displayed. If a counter board error is encountered, Call AVG UTICOR Technical Support @ 1 (800) 832-3647. 79737-3 11 PMD 1400 Numerical Display user's manual Section 3 PMD 1400 Standard Unit UTICOR Technology, L.P. AVG Automation PMD 1400 Numerical Display 3 User’s Manual UTICOR Technology, LP PMD 1400 Standard Unit Features The PMD 1400 standard unit features a seven-segment, red LED display with four-inch high characters and adjustable brightness. It comes in four- or six-character models and has selectable decimal and colon locations. The PMD 1400 can be used separately or in conjuction with other units to make a multi-line display. Standard equipment includes a serial interface and a slave port to drive other PMD 1400 displays. Addressing The PMD 1400 fills the display right-to-left, and always displays leading zeros if present. The PMD 1400 can be addressed individually or in a slave display network. UTICOR addresses its message displays with a group and unit number. The PMD 1400 will always be a member of group zero and have a unit number between 0 and 63. One advantage to this system is the ability to send each unit different information pertaining to its particular station while residing on the same network. Characteristics The PMD 1400 numerical display displays leading zeros when present. In addition, if the value of the number exceeds the display size, it will truncate the most significant digit (left most). For optimum printing performance, the timed printing option should be installed with the clock or counter option modules. Other than the number of digits, the two PMD models (four or six characters) operate in the same manner. However, UTICOR has four available options that can be installed in either model. Currently, UTICOR offers a clock option board, counter option board, a timed-printing option and an analog input option board. The options will be discussed in further detail later in the manual. There are more option modules scheduled for availability at a future date. 16 79737-3 PMD 1400 Numerical Display 3 User’s Manual UTICOR Technology, LP PMD 1400 Standard Unit Programming Programming the PMD 1400 initially begins by correctly setting the DIP switches. DIP Switches There are 24 DIP switches contained in three sets of eight on the CPU board. The switches determine the configurations of the display and serial port. The 0 and 1 DIP switch positions listed correspond to switch positions on the PC board. DIP switch setting 1 is inthe up position; DIP switch setting 0 is in the down position. Switch Group 1 (SW1-1 -> SW1-8) Computer Port Baud Rate 1200 4800 9600* 19200 SW1-1 0 1 0 1 SW1-2 0 0 1 1 Parity None* Active SW1-3 0 1 Parity Type Odd* Even SW1-4 0 1 Stop Bits 1* 2 SW1-5 0 1 Computer Port RS-422 RS-232* SW1-6 0 1 SW1-7 through SW1-8 are reserved. * denotes factory setting 79737-3 17 PMD 1400 Numerical Display 3 User’s Manual UTICOR Technology, LP PMD 1400 Standard Unit Switch Group 2 (SW2-1 -> SW2-8) DECIMAL POINT F E D C B A 4-Digit A B C D N/A N/A N/A N/A 6-Digit SW2-1 SW2-2 SW2-3 A B C D E F N/A N/A 0 1 0 1 0 1 0 1 0 0 1 1 0 0 1 1 0 0 0 0 1 1 1 1 COLON B Colon A Colon B Off On Off On Off On Off N/A (4) N/A (4) Off On On A SW2-4 0 0 1 0 1 1 SW2-5 0 1 0 1 0 1 BRIGHTNESS LEVEL Lowest Highest 18 SW2-6 SW2-7 SW2-8 0 1 0 1 0 1 0 1 0 0 1 1 0 0 1 1 0 0 0 0 1 1 1 1 79737-3 PMD 1400 Numerical Display 3 User’s Manual UTICOR Technology, LP PMD 1400 Standard Unit Unit Number The unit number can be selected from zero to 63 by using DIP switch group SW3-1 through SW3-6. These switches are used to select the Binary group number. Switch Group 3 (SW3-1 ->SW3-8) SW3-1 = Binary 1 SW3-2 = Binary 2 SW3-3 = Binary 4 SW3-4 = Binary 8 SW3-5 = Binary 16 SW3-6 = Binary 32 All switches set to zero represent the unit number zero; and all switches set to one represent unit number 63. Switch Group 4 (SW4-1 -> SW4-8) If the PMD 1400 is connected to the slave port of a PMD master (PMD 200, 300, 400, etc.) then one of the four data sets can be displayed on the PMD 1400. Switches 4-1 and 4-2 determine the PMD data set “send variable data” command will be displayed. Data Set 1 2 3 4 SW4-1 0 1 0 1 SW4-2 0 0 1 1 Switches 4-3 and 4-4 are used to trigger hardware tests based on their respective settings. Tests include a display test, a serial port loop back test, and a DIP switch test. SW4-3 0 1 0 1 79737-3 SW4-4 0 0 1 1 (Used to determine test functions) No test Display test Serial port loop back test DIP Switch test 19 PMD 1400 Numerical Display 3 User’s Manual UTICOR Technology, LP PMD 1400 Standard Unit Display Test The display test turns on all display segments and cycles through the eight intensity levels of the display. It remains in the display test until the test mode DIP switches are changed. Wiring Configuration for the Serial Port Loop Back Test TB1 -SD1 ------------- -RD1 +SD1 ------------ +RD1 -SD2 ------------- -RD2 +SD2 ------------ +RD2 Serial Port Loop Back Test The Serial Port loop back test checks the serial ports on the processor board. The display is divided into two, two-digit numbers. The number on the right indicates errors that occur during the slave port loop back test; while the number on the left indicates errors that occur during the computer interface loop test. If either number increments, the port is not receiving characters it has sent out. The transmit lines should be connected to the receive lines during the loop back test. DIP Switch Test The DIP switch test mode displays the DIP switch currently being tested. The right-most digit of the display lights one segment for each switch. When SW4-1 is turned on, the test proceeds to the next switch. The test continues until the test mode switches are changed. NOTE: Switches 1-7, 1-8 and 3-7, 3-8 cannot be tested. These switches are not connected to the input buffer and are reserved. NOTE: When SW1-1 is turned on the test proceeds to SW2; when SW2-1 is turned on the test proceeds to SW3; when SW3-1 is turned on the test proceeds to SW4; and when SW4-1 is turned on the test proceeds to SW1. SW4-5 0 = Normal display mode (no digit significance) 1 = Display most significant digits on a four-digit slave. This switch controls which digits will be displayed when the unit is being used as a slave. If the master has six digits and the slave has four, the switch allows the slave to display the four most significant digits. Note: This switch should not be set on the master unit. If the switch inadvertently is set on the master, the unit will not function properly. 20 79737-3 PMD 1400 Numerical Display 3 User’s Manual UTICOR Technology, LP PMD 1400 Standard Unit SW4-6 1 = Leading Spaces 0 = Leading Zero This switch allows you to suppress leading zeros/blanks. Command Terminator If the command terminator is not specified, the command is executed as soon as the required number of characters is received. A subset of the PMD protocol commands is also supported. The identity, set variable data, and read variable data commands are implemented. SW4-7 1 = Command Terminator <cr> 0 = Command Terminator <lf> SW4-8 1 = No Command Terminator 0 = Command Terminator from SW4-7 Computer Interface Commands There is no practical method for selecting the computer interface protocol — both are supported at the same time. When computer interface is ASCII protocol, all commands begin with a carat sign (^) followed by one or two uppercase letters representing the command. All commands are terminated by the command terminator specified by its corresponding DIP switch settings. Two commands from UTICOR’s PMD ASCII protocol are also supported —0 ^A and ^M, which are Select Active Unit, and Send Variable Data, respectively. The command terminator is represented by using <ct>, <cr> or <lf>. If the command terminator is not specified, the command is executed as soon as the required number of characters are received by the PMD. Any character not preceded by a command letter is ignored. 79737-3 21 PMD 1400 Numerical Display 3 User’s Manual UTICOR Technology, LP PMD 1400 Standard Unit ASCII Commands In this section we will begin by explaining the available ASCII commands, followed by their format and a brief description. ASCII Commands 22 ^A Select Active Unit ^PD Program Time of Day print entry day field ^BM Set The Display according to the Bit Map ^PR Print Data ^BR Set The Display Brightness ^PT Program Time of Day print entry time field ^BS Set Slave Units Display Brightness ^RC Read Counter Preset Value ^CO Set The Colon(s) ^RD Read The Display ^DA Set The Date ^RO Read Offset ^DC Display Control ^RP Read Time of Day print entry ^DI Display A Number ^RS Read Span ^DP Set The Decimal(s) ^RT Read Time and Date ^IO Internal Offset ^SD Set The Display ^IS Internal Span ^ST Status Identification ^M Send Variable Data ^TI Set The Time ^PC Print Counter ^TP Control Time of Day printing 79737-3 PMD 1400 Numerical Display 3 User’s Manual UTICOR Technology, LP PMD 1400 Standard Unit Programming Using ASCII Characters ^A Select Active Unit The Select Active Unit command is used to select the PMD units receiving command codes. All units are capable of accepting all commands, however, only active units selected by this command process the codes. When a unit has been selected, all other PMDs on the network disengage from the command codes. All PMD 1400s are assigned group 0. The unit number for each PMD is selectable by using the DIP switches and has a unit range of zero to 63. When all units are selected, none of the displays reply to any command. A reply will only be issued when a single unit has been activated. Command code = ^A Command format = ^Agguuuu gg = 00; uuuu = 0000–0063 ^BM Set Bit Map On Display There are three basic rules for selecting units: 1) Group X and Unit X select only the unit with a matching group and unit. 2) Group X and Unit 0 select all units in a group. 3) Group 0 and Unit 0 selects all units. This powerful command allows you to activate any combination of display segments. The command contains a hexadecimal representation of the bits that correspond to the LED segments in the display. Each seven segment LED is defined as shown below. On a four-digit display only the data for the last four digits is used (efghijkl). Command code = ^BM Command format = ^BMabcdefghijkl<ct> — continued 79737-3 23 PMD 1400 Numerical Display 3 User’s Manual UTICOR Technology, LP PMD 1400 Standard Unit ab = most significant digit on six-digit displays cd = next most significant digit ef = next most significant digit (MSD on four-digit display) gh = next most significant digit ij = next most significant digit kl = least significant digit An example of this would be: A HEX 60 (binary 01100000) will display a “1” by turning on segments e and f. To display all 1s on a six-digit display, enter the command “^BM606060606060<ct>.” The HEX number ^BMFFFFFFFFFFFF turns on all segments of the display. ^BR Set Display Brightness This command is used to set the brightness of the display characters. The brightness parameter ranges from 0 to seven — seven is the brightest setting. Command code = ^BR Command format = ^BRa<ct> a = 0 through 7 (0 – dimmest and 7 – brightest setting) ^DP Turn Decimal On/Off This command is used to specify the location of the decimal on the display. 24 79737-3 PMD 1400 Numerical Display 3 User’s Manual UTICOR Technology, LP PMD 1400 Standard Unit ^BS Slave Brightness Control This allows you to set the brightness on slave units through the computer interface. Only the unit addressed by the command will be changed. The brightness level set by this command will be defaulted when the unit is restarted. Command code = ^BS Command format = ^BSxxy<ct> xx = (0–63) 0 = all units y = (0–7) 0 = dimmest level, 7 = brightest level ^CO Turn Colon On/Off This command is used to place colons on the display. The colon must be set on or off using this command. The command overrides the colon placement specified by its corresponding DIP switch. The decimal and colon functions must be turned on and off using the ^DP and ^CO commands, respectively. Command code = ^CO Command format = ^COa<ct> a = 0–2 0 = colons are turned off 1 = turn right most colon on 2 = turn second colon on (six-digit model only) ^DA Set The Date (Clock option required) This command is used to set the date in the real-time clock. The date must be sent in the format shown below. The command is only valid on units that are equipped with a real-time clock. The real-time clock is available as an separate option and as a timed-printing board option. Command code = ^DA Command format = ^DAddmtyy<ct> dd = day (1–31) mt = month (1–12) yy = year (0–99) 79737-3 25 PMD 1400 Numerical Display 3 User’s Manual UTICOR Technology, LP PMD 1400 Standard Unit ^DC Display Control The Display Control command allows you to prevent the option board from updating the display. When the option board cannot update the display, only data from the computer interface is displayed. A second command must be received to start the option board updating the display again. If the option board is updating the display, any data from the computer interface will be overwritten before it can be viewed. If data from the computer interface is to be displayed, option board updates should be disabled first. Command code = ^DC Command format = ^DCn<ct> If n = 1, then this allows the option board to update the display every 1/10 sec. If n = 0, then the option board will stop updating the display. If the PMD 1400 is equipped with a counter, the Preset Digits command sets the value from which the counter will begin to increment or decrement from. ^DI Preset Digits The Preset Digits command is used to display a number and set the current value of the option board. For a counter module this value becomes the base to increment or decrement from. The digits in the command will be displayed. If the command is sent to a four-digit display, the last four (least significant “cdef”) will be displayed. The other digits are ignored. The command supports hexadecimal characters A through F, but will not send the hex number to an option board as a preset value. If the hex number is not present, it will be displayed and a decimal value will be used to set the option board. Command code = ^DI Command format = ^DIabcdef <ct> (six-digit display) a = most significant digit b = next most significant digit c = next most significant digit (MSD on a four-digit display) d = next most significant digit e = next most significant digit f = least significant digit 26 79737-3 PMD 1400 Numerical Display 3 User’s Manual UTICOR Technology, LP PMD 1400 Standard Unit Once a decimal is inserted it does not change when new data is sent to the display. The command overrides the decimal placement specified by the DIP switch settings. Command code = ^DP Command format = ^DPa<ct> The decimal and colon functions must be turned on and off using the ^DP and ^CO commands, respectively. a = 0 through 6 0 = turn all decimal points off 1 = turn the first place decimal on — far right 2 = turn the second decimal place on 3 = turn the third decimal place on 4 = turn the fourth decimal place on 5 = turn the fifth decimal place on (six-digit model only) 6 = turn the sixth decimal place on (six-digit model only) ^IO Internal Offset This command will always result in the specified offset being stored in the serial EEPROM. When switch 2-6 on an analog input option board is in the 1 position, the offset is specified internally. The internal offset is stored in the serial EEPROM on the PMD1400’s processor board. The offset is entered into the serial EEPROM through the internal offset command. If switch 2-6 is set for external offset, the offset value used will not be changed by this command. If switch 2-6 is set for internal offset, the new offset value will be used for the next current or voltage reading. If the sign is negative and the value is 0, the command will be ignored. Command code = ^IO Command format = ^IOsxxxxx<ct> s = the sign of the offset xxxxx = the offset in decimal <ct> = the PMD 1400 command terminator selected ^IS Internal Span The command will always result in the specified span being stored in the serial EEPROM. When switch 1-8 on an analog input option board is in the 79737-3 27 PMD 1400 Numerical Display 3 User’s Manual UTICOR Technology, LP PMD 1400 Standard Unit 1 position, the span is specified internally. The internal span is stored in the serial EEPROM on the PMD 1400’s processor board. The span is entered into the serial EEPROM through the internal span command. If switch 1-8 is set for external span, the span value used will not be changed by this command. The span cannot be greater than 4000. If the command specifies a span greater than 4000, it will be ignored. Command code = ^IS Command format = ^ISxxxx<ct> xxxx = the span in decimal <ct> = the PMD 1400 command terminator selected ^M Send Variable Data This command is used to send variable data to PMD displays. When received by the PMD 1400, the command’s data set number (1–4) must match the data set indicated by the PMD’s DIP switch settings. If it does not match, the data will be ignored. Command code = ^M Command format = ^Msnnnnn s = data set numbers 1 through 4; nnnnn = data set value ^PC Print Counter Although this command is valid, it only affects units equipped with the optional counter board and printer port sub-option. The counter mode must be set to accumulator (SW1-3 must be set to one). The Print Counter command controls how the counter information is printed. Command code = ^PC Command format = ^PCnncp<ct> nn = time and date entry (01–10) c = counter print option 0 = internal counter does not print 1 = internal counter prints and resets to zero —and continued 2 = displayed number is printed — the internal 28 79737-3 PMD 1400 Numerical Display 3 User’s Manual UTICOR Technology, LP PMD 1400 Standard Unit If printing occurs without sending the ^PC command it will function as before. accumulated counts are reset p = print descriptor flag 1 = print one word description of counter value (internal or accumulated) 2 = description does not print <ct> = command terminator When the counter print option (c) is set at zero, the counter and accumulative count are printed, however, the accumulative count is not reset. In addition, the print descriptor flag has no effect. When the counter print option is set to one, the time and date entry causes the value of the internal counter to be printed instead of the displayed accumulative count. The Print Counter command allows the internal counter value to be printed. The print descriptor flag (p) causes the word “INTERNAL” to be printed after the count. In addition, once the internal count is printed it sets to zero. When the counter print option is set at two, the displayed accumulative count is printed. And if the descriptor flag is still set at one, “ACCUMULATED” will be printed after the count. Once the count has been printed, both the internal and displayed counts are set to zero. ^PD Program Time-of-Day Print Date (Print and Counter Options required) This command programs the print date for the time of day print entry. There can be up to 10 entries. The time is specified using the ^PT command. Command code = ^PD Command format = ^PDnnddmm<ct> nn = the time and date entry number (01–10) dd = day (1–31) mm = month (1–12) The hours or minutes fields within the time or date can be wildcarded by substituting a (*). If a field is wildcarded it will match anytime. If the hours field contains (**), the time field will match every hour. — continued 79737-3 29 PMD 1400 Numerical Display 3 User’s Manual UTICOR Technology, LP PMD 1400 Standard Unit ^PR Print Data (Timed-printing Option) This command triggers the data currently on the display to be sent to the printer port. (This command is operable only with the optional timed-printing module.) Command code = ^PR Command format = ^PR<ct> ^PT Program Time-of-Day Print Time (Timed-printing and Clock Option required) This allows you to program the time-of-day print time in the PMD 1400. You can set up to 10 different print times. The date is specified using the ^PD command. In addition, the time-of-day print format must match the format of the current clock setting. For example, if the clock is set in the 24 hour mode, the command line should specify the print time in the 24 hour format. An asterisk placed in substitution for the hours or minutes will cause them to always match the current hour and minute. Command code = ^PT Command format = ^PTnnmshhmm<ct> nn = time and date entry (01–10) m = 0 — enables the print time m = 1 — disables print time s = option byte 0 = 24 hour format 1 = 12 hour format 2 = 12 hour format p.m. hh = hours (0–23) mm = minutes (0–59) The hours or minutes fields within the time or date can be considered a wildcard by substituting an asterisk (*). If a field is a wildcard, it will always match the time. If the hours field contains two asterisks (**), the time will always match the current hour. ^RC Read Counter Preset Value This command allows the counter preset value on units equipped with a counter to be read by the computer interface. If the unit does not have a 30 79737-3 PMD 1400 Numerical Display 3 User’s Manual UTICOR Technology, LP PMD 1400 Standard Unit counter it returns the value 9999 or 999999. Command code = ^RC Command format = ^RC<ct> Command reply = ^RCabcdef <ct> In descending order: a = most significant digit b = next significant digit c = next significant digit d = next significant digit e = next significant digit f = least significant digit 0 on four-digit display 0 on four-digit display ^RD Read Display This command allows you to read the digits on the display using the computer interface. When an active unit receives the command, it returns the data being displayed. All displays return six digits. A four-digit display returns four digits and truncates the two significant digits. Command code = ^RD Command format = ^RD <ct> Common reply = ^RDabcdef <ct> When ^RD command is preceeded by ^BM command, the ^RD wil always return RD?????? This is because the Set Bit Map on Display command could cause a pattern of activated segments in a character position that doesnt make a printable character. 79737-3 a = most significant digit 0 on the four-digit display b = next most significant digit 0 on the four-digit display c = next most significant digit Most significant digit on four-digit display d = next most significant digit e = next most significant digit f = least significant digit ^RO Read Offset This command is for the analog input option boards and is used to obtain the current value of the offset currently being used by the display. This could be either the internal or external offset depending upon the position of SW2-6. If the counter or clock option board is installed, this command will return 999999 for the span if it is a 6-digit display. With a counter or clock option board installed, span 009999 will be returned if it is a 4-digit display. These 31 PMD 1400 Numerical Display 3 User’s Manual UTICOR Technology, LP PMD 1400 Standard Unit are both invalid values for their respective display size. If no option board is installed, the respectibe invalid value will also be returned. If a valid offset is negative, a “-” will appear in the “a” position. Command code = ^RO Command format = ^ROabcdef<ct> abcdef = value of the offset currently being used by the display Read Time-of-Day Print Entry This command returns the value of a time of day print entry. The format is as follows: Command code = ^RP Command format = ^RPnnijhhmmddmtcp<ct> If the PMD 1400 does not have the counter option installed and set up for accumulator, the characters c and p will remain zero. 32 nn = the time and date entry number (01–10) If: i = 0 then the command is enabled = 1 the command is disabled j = 0 the time format is 24 hour = 1 the time format is 12 hour a.m. = 2 the time format is 12 hour p.m. hh = hours (0–23) mm = minutes (0–59) dd = day (1–31) mt = month (1–12) c = counter print option If: c = 0 the accumulated count prints = 1 the internal counter prints and resets = 2 the accumulated count will print, and the internal and accumulative counts will reset. p = print descriptor flag If: p = 0 a one word description of the counter will be printed. The description will be “INTERNAL” or “ACCUMULATED.” p = 1 the description will not print 79737-3 PMD 1400 Numerical Display 3 User’s Manual UTICOR Technology, LP PMD 1400 Standard Unit ^RS Read Span This command is for the analog input option boards and is used to obtain the current value of the span currently being used by the display. This could be either the internal or external span depending upon the position of SW1-8. If the counter or clock option board is installed, this command will return 9999 for the span. This is an invalid value. If no option board is installed, 9999 will be returned also. Command code = ^RS Command format = ^RSabcd<ct> abcd = the value of the span currently being used by the display ^RT Read Time and Date This command reads the current time and date from the PMD 1400. If the unit is not equipped with the optional clock board, it will return zeros in each field. Command code = ^RT Command format = ^RT<ct> Command reply = ^RTahhmmssddmtyy a = option byte 0 = 24 hour time 1 = 12 hour time a.m. 2 = 12 hour time p.m. hh = hours (0–23) mm = minutes (0–59) ss = seconds (0–59) dd = day (1–31) mt = month (1–12) yy = year (0–99) 79737-3 33 PMD 1400 Numerical Display 3 User’s Manual UTICOR Technology, LP PMD 1400 Standard Unit ^SD Preset Display This command allows you to set the entire display including decimal points and colons. In addition, the starting digit can be specified. Command code = ^SD Command format = ^SDwxyzabcdef<ct> wx = bit map of decimal points to turn on — This is an ASCII representation of the hexadecimal number of the bit map of the decimal points to activate. wx = 00 turn all decimal points off wx = FF turn all decimal points on wx = 01 turn on right most decimal point wx = 02 turn on second place decimal point wx = 03 turn on first and second place decimal points y = bit map of colons to turn on — This is an ASCII representation of the hexadecimal number used as a bit map of the colons to turn on. y = 0 turns all colons off y = 1 turns on right colon y = 2 turns on left colons y = 3 turns on all colons z = starting digit to display — This indicates which of the digits (a through f) should be displayed as the least significant digit. 0 = use normal display rules (f is the least significant) 1 = e is the least significant digit 2 = d is the least significant digit 3 = c is the least significant digit 4 = b is the least significant digit 5 = a is the least significant digit a = most significant digit b = next most significant digit c = next most significant digit d = next most significant digit e = next most significant digit f = least significant digit 34 79737-3 PMD 1400 Numerical Display 3 User’s Manual UTICOR Technology, LP PMD 1400 Standard Unit ^ST Status ID The Status ID command is used to obtain the configuration of the display. The command allows you to ascertain the number of digits that are on the display, the option board (if applicable) and the software revision level. Command code = ^ST Command format = ^ST <ct> Command reply = ^STrnptttu<ct> r = ASCII letter for software revision code (A, B, C, etc.) n = 4 or 6 — number of display digits p = P if timed — printing option is installed, 0 if not ttt = option board number (0–255) u = ASCII letter for option board software revision code The option boards are numbered as follows: 0 = no option board installed 1 = counter option board 2 = clock option board 3 = analog voltage 4 = analog current ^TI Set The Time (Clock Option Required) The Set Time command allows you to set the time on the display. The command is only valid on units that are equipped with a real-time clock. The time is programmed using the following format: The Set Time function can be set in three different formats; 12 or 24 hour mode and 12 hour a.m. or p.m. 79737-3 Command code = ^TI Command format = ^TIshhmmss<ct> s = option byte 0 = 24 hour time 1 = 12 hour time a.m. 2 = 12 hour time p.m. hh = hours (0–23) mm = minutes (0–59) ss = seconds (0–59) 35 PMD 1400 Numerical Display 3 User’s Manual UTICOR Technology, LP PMD 1400 Standard Unit ^TP Time-of-Day Print Control (Timed-printing and Clock Option required) This allows the time of day print feature to be enabled on units equipped with the optional printer port. Command code = ^TP Command format = ^TPx<ct> x = 0 stop all time of day printing x = 1 continue time of day printing 36 79737-3 PMD 1400 Numerical Display 3 User’s Manual UTICOR Technology, LP PMD 1400 Standard Unit Programming: Using ASCII Protocol through BASIC commands Before you can start programming your PMD 1400 using ASCII protocol, you must first open a channel of communication to the unit. For our examples we used Quick BASIC© as the programming environment from which the ASCII commands were entered. The first step in communicating with your PMD is to type in the BASIC command that enables you to open a communications port. To do this the following OPEN statement is used: OPEN “COM1:9600,N,8,1” AS #1 To remedy a device timeout error, make sure the correct COM port is selected and correct BASIC syntax is used. The communications port used on your computer is the one you specified in the OPEN statement. In our examples, lines with single quotation marks represent lines that are not read by the compiler, but rather used as lines of text for reference throughout the program code. We recommend using comments when coding your PMD 1400 BASIC commands. 79737-3 This statement opens COM Port 1 and sets the baud rate at 9600; N indicates the parity, which in this case is no; the number eight designates the number of data bits; and the one indicates the number of stop bits. If the unit is set up and wired incorrectly, you will get a DEVICE TIMEOUT error. This indicates that BASIC did not receive information from an input/output device within a specific amount of time. It should be noted that following the OPEN statement, all other BASIC commands will begin with the PRINT # statement. If your PMD 1400 is equipped with an option module you’ll need to first “switch” it off. To do this enter the following command lines: ‘ Open Com Port 1 and set initial operating parameters OPEN “COM1:9600,N,8,1” AS #1 ‘ Select PMD group and unit number PRINT #1, “^A000000” 37 PMD 1400 Numerical Display 3 User’s Manual UTICOR Technology, LP PMD 1400 Standard Unit ‘ Disable the option board PRINT #1, “^DC0” The new BASIC statement introduced is the PRINT # statement. It writes the specified data sequentially to the port that was previously opened in the OPEN statement. The PRINT # statement is used to enter the ASCII commands and follows BASIC syntax. Displaying a Number To display a number on your PMD 1400 type in the following commands: OPEN “COM1:9600,N,8,1” AS # ‘Open Com Port 1 PRINT #1, “^A000000” ‘Selects PMD 1400 Unit 0 PRINT #1, “^DI001993” ‘Displays the number 001993 In this example, the number 001993 will be displayed on the PMD. Because all character places must be filled, two leading zeros were added. The ^DP command allows you to place a decimal point in one or all of available positions. ^DP1 will position the decimal in the right most position on your display. The ^DP command allows you to place a decimal in any of the positions available on your PMD 1400 model. OPEN “COM1:9600,N,8,1” AS #1 PRINT #1, “^A000001” PRINT #1, “^DP1” ‘ Sets decimal point in position 1 The only new command here is on line three, ^DP1. This positions the decimal point at the first or right-most location. You can specify a different position by replacing the one with a number corresponding to the number of display digits on your PMD unit. 38 79737-3 PMD 1400 Numerical Display 3 User’s Manual UTICOR Technology, LP PMD 1400 Standard Unit Set Bit Map On The Set Bit Map On display command is a powerful display tool, but is a little more involved. First of all, code the OPEN statement: OPEN “COM1:9600,N,8,1” AS #1 Next select the proper unit number: PRINT #1, “^A000001” And finally, type in the following bit map code command: PRINT #1, “^BMF6B6DAE0F260” This command will display the number 952731. For another example type the line: PRINT #1, “^606060606060” This command line will replace the display with a series of ones across the six-digit display. Segment The bit map is based on hexadecimal representations of the bits used for the LED segments in the display. ab cd ef gh ij kl 79737-3 = most significant digit on the sixdigit model = next most significant digit = next most significant digit = next most significant digit = next most significant digit = least significant digit Bit Number d 0 1 a 1 2 b 2 4 c 3 8 d 4 10 e 5 20 f 6 40 g 7 80 39 PMD 1400 Numerical Display 3 User’s Manual UTICOR Technology, LP PMD 1400 Standard Unit Set Display Brightness Another powerful tool of the PMD 1400 is its ability to have the display’s intensity programmed. There are eight intensity levels ranging from zero to seven that can be set according to preference. OPEN “COM1:9600,N,8,1” AS #1 PRINT #1, “^A000001” PRINT #1, “^BR3” In the above example the command line PRINT #1, “^BR3” changes the intensity of the display from its default setting of seven to the less intense setting of three. The valid settings are: 0, 1, 2, 3, 4, 5, 6, and 7. Slave Brightness Control This is a similar command to the previous Set Display Brightness command. The command line is ^BS and allows you to program the intensity level of additional slaves' displays. However, only the unit addressed by the command is affected and the intensity level will be defaulted when the unit is restarted. The levels of intensity range from zero to seven, with seven being the highest. OPEN “COM1:9600,N,8,1” as #1 PRINT #1, “^A000000” PRINT #1, “^BS05” The above example opens the com port, selects the PMD, and sets all slaves’ displays to an intensity level of five. Set The Colon(s) The colon(s) are set using this command. The user can select all, one or both colons. In the below example the command ^CO is used to select the colon in the right most place. OPEN “COM1:9600,N,8,1” as #1 PRINT #1, “^A000000” PRINT #1, “^CO1” 40 79737-3 PMD 1400 Numerical Display 3 User’s Manual UTICOR Technology, LP PMD 1400 Standard Unit Send Variable Data This command sends variable data to the PMD display. In order for this command to be recognized, the data set number must match the data set indicated by the DIP switch settings. If the numbers do not match, the data will be ignored. OPEN “COM1:9600,N,8,1” as #1 PRINT #1, “^A000000” PRINT #1, “^M155555” Preset Display This allows you to set the entire display including decimals and colons. In addition, the starting digit can be specified. The new command here is ^SD. Refer to the ASCII description of the ^SD command found earlier in this section for further reference. OPEN “COM1:9600,N,8,1” as #1 PRINT #1, “^A000000” PRINT #1, “^SD0100” In the above example, ^SD activates the command; 01 turns the rightmost decimal point on; the zero indicates that both colons are off; the next zero designates the least significant, in this case, normal display rules are followed. Wrap Up The programming samples in this section are intended to get you started. They represent a majority of the available ASCII commands that you can use to program your PMD 1400. 79737-3 41 42 PMD 1400 Numerical Display user's manual Section 4 Clock Option UTICOR Technology, L.P. AVG Automation PMD 1400 Numerical Display 4 User’s Manual UTICOR Technology, LP Clock Option Real-Time Clock Module The clock module contains a real-time clock with battery backup. It has eight inputs (D1 through D8) and is configured by eight DIP switches. The 0 and 1 DIP Switch positions correspond with switch positions on the PC board. It can be set in either 12- or 24-hour modes by DIP switch configurations. Inputs are used to set the clock and are on (source) when power is present, and off when there is no power. Installing the Clock Module To install the real-time clock module you will need to disassemble the unit (refer to Section 2 of this Manual —Getting Started— for more detail on disassembly.) Once the unit is open and you can see the PC board, place the clock module so the mounting holes match up with the screw terminal posts (refer to figure 4-1). After they are aligned, ensure that the pins for the dual in-line connectors (J1 and J2) are matched — then firmly press the clock module onto the main PC board. Figure 4-1. Clock Option Board Installation 44 79737-3 PMD 1400 Numerical Display 4 User’s Manual UTICOR Technology, LP Clock Option Real-Time Clock DIP Switches SW1-1 0 = 12 hour mode 1 = 24 hour mode (when reset by parallel port only) SW1-2 0 = display hr/min/sec 1 = display a.m./p.m. The DIP switch positions on the clock option board are factory set in the down or 0 position SW1-3 through SW1-8 are not used. SW1-1 controls the mode of the clock when being set using the parallel port. When the clock is set using parallel inputs, the previous time is overridden. If the parallel inputs are not used to set the clock, the If D8 is on D1 through D7 are defined as follows: D7 D6 D5 Digit Selected Off Off Off Off Off On Off On Off Off On On On Off Off On Off On 79737-3 1st Digit (right) 2nd Digit (second right) 3rd 4th 5th (6-digit display only) 6th (6-digit display only) D4 D3 D2 D1 Value of Digit Off Off Off Off Off Off Off Off On On On On On On On On Off Off Off Off On On On On Off Off Off Off On On On On Off Off On On Off Off On On Off Off On On Off Off On On Off On Off On Off On Off On Off On Off On Off On Off On 0 1 2 3 4 5 6 7 8 9 — digit 4 or 6 A P Not Defined Not Defined Not Defined 45 PMD 1400 Numerical Display 4 User’s Manual UTICOR Technology, LP Clock Option switch has no effect. Real-Time Clock Inputs If D8 is Off then D1 through D7 are defined as follows: D1 Increments seconds at one per second changing to five per second if D1 is on for more than five seconds. There is no a.m. or p.m. indicator on the display. However, the a.m./p.m. indicator is printed when the time is printed. D2 Increments minutes at one per second changing to five per second if D2 is on for more than five seconds. D3 Increments hours at one per second while D3 is on. D4 This must be on to allow the time to be set using D1 through D3. *D5 Resets clock. If the clock is in the 24 hour format it will be reset to 00:00:00 If the clock is in the 12 hour format it is set to 12:00:00 a.m. **D6 Places clock on hold. D7 If this is on, the display test is run and all segments are switched on. In addition, D1 through D4 are deactivated. *When the clock reset input is active the time cannot be set using inputs D1 through D4. The clock reset always takes place when activated, however, the reset time will not be displayed when input D7 (display test) is active. **The clock hold stops the clock when activated and releases the clock when deactivated. The clock can be set from inputs D1 through D4 when the clock is running or stopped. 46 79737-3 PMD 1400 Numerical Display 4 User’s Manual UTICOR Technology, LP Clock Option Clock Inputs Wiring Schematic Figure 4-2 illustrates the wiring scheme for externally adding inputs to the clock module. Figure 4-2. Clock Inputs Wiring Scheme 79737-3 47 48 PMD 1400 Numerical Display user's manual Section 5 Counter Option UTICOR Technology, L.P. AVG Automation PMD 1400 Numerical Display 5 User’s Manual UTICOR Technology, LP Counter Option Counter Module The counter module has eight inputs (D1 through D8), one output relay, and eight DIP switches for configuration. The counter module operates in two modes, accumulative and rate. Each mode offers a low speed (200 counts per second) and a high speed (150,000 counts per second.) The rates are DIP switch selectable. The rate counter monitors the count and extrapolates rate per second into rate per minute. The inputs are on when there is power and off when there is no power. Installing the Counter Module The installation of the counter option board is similar to the installation of the clock module. First you will need to disassemble the PMD (refer to Section 2 —Getting Started— for more detail on disassembling the unit.) Once the unit is open and you can see the PC board, place the counter module so the mounting holes match up with the screw terminal posts (refer to figure 5-1.) After they are aligned, ensure that the pins for the dual in-line connectors (J1 and J2) are matched — then firmly press the counter module onto the main PC board. Figure 5-1. Counter Option Board Installation 50 79737-3 PMD 1400 Numerical Display 5 User’s Manual UTICOR Technology, LP Counter Option Rate Counter The rate counter can function in one of two modes, rate per second or rate per minute. Unpredictable results can occur if the counter counts down while in the rate mode. The rate counter will turn on the relay when the rate count is equal to or greater than the preset value. The relay will be de-energized when the rate is less than the preset value. If there is no preset value the display will assume a preset value of the maximum number that can be displayed (9999 or 999999). Rate Per Second If the rate overflows the display size and causes an overflow error, the relay will not turn on. The rate per second mode samples the counter every 1/10 second for one second and displays the rate per second. The counts for the last 10 1/10 intervals are maintained to update the display every 1/10 second. Rate Per Minute The rate per minute mode samples the counter every second and extrapolates this into rate per minute based on the sample size set by the DIP switches. Sample sizes of 1, 5, 10, 15, 20, 30 and 60 are available. The sample size indicates the number of readings used to calculate the rate per minute. For example with a sample size of 10, the counter board is read every second and the last 10 readings will be added together and multiplied by six to determine the rate per minute. With a sample size of 10 it will take 10 seconds before the reading will accurately reflect the current rate. For rates that fluctuate rapidly it is better to use a smaller sample size while rates that do not change often can use a larger sample size. Accumulator The counter can be used as an accumulator of values that are counted up or down. The counter has a preset value that can be set using the computer interface parallel inputs. A reset will set the counter to zero. The counter will not count down past zero or count past 9999 or 999999 depending on your respective PMD 1400 model. The accumulator turns on the relay when the counter is greater than or equal to the preset value. On a restart, the preset value is set to the maximum value for the display (9999 or 999999). When the counter reads a value less than the preset, the relay is turned off. 79737-3 51 User’s Manual PMD 1400 Numerical Display 5 UTICOR Technology, LP Counter Option Relay There is a delay of 10 to 110 milliseconds from the time the counter input is triggered until the relay is energized. The Counter Board DIP Switch Settings are as follows: The 0 and 1 DIP Switch positions correspond with switch positions on the PC board. SW1-1 Counter Setup 1 = Separate clocks for up and down *0 = Single clock with up/down control SW1-2 Counter Speed *0 = Low speed 200Hz 1 = High speed 150KHz SW1-3 Counter Mode 0 = Rate counter *1 = Accumulator SW1-4 Counter Rate Select *0 = per second 1 = per minute SW1-5 SW1-6 SW1-7 *0 1 0 1 0 1 0 1 *0 0 1 1 0 0 1 1 *0 0 0 0 1 1 1 1 SW1-8 Rate per Minute Sample Size 1 3 5 10 15 20 30 60 Counter Input Polarity (not the parallel port) *0 = Inputs are Active High 1 = Inputs are Active Low * denotes factory setting 52 79737-3 PMD 1400 Numerical Display 5 User’s Manual UTICOR Technology, LP Counter Option Counter Board Inputs If D8 is off then D1 through D7 are defined as follows: * D1 = On Counter is inhibited D2 = On Resets counter to zero ** D3 = On Accumulative counter is set to the preset value. D4 not used D5 not used D6 = On Displays current counter preset value *** D7 = On Display test (all display segments are activated.) *The relay is activated if the value of the counter is greater or equal to the preset value. **Once the preset value has been displayed the relay becomes activated when the counter equals zero. ***If D7 is On and an overflow error occurs, the error will not be displayed due to the display of the test pattern. The reset counter function performs a hardware reset on the counter and sets the display to zero. If the high-speed accumulator counter is reset without inhibiting the count at the same time, it’s possible a preset value less than 15,000 may be missed and the relay will not energize. When D8 is on, it allows you to enter a preset number on the display. From this preset, the display can count up or down. 79737-3 If D8 is On then D1 through D7 are defined as follows: D7 D6 D5 Digit Selected Off Off Off Off On On On On 1st digit (rightmost) 2nd (second from right) 3rd 4th 5th (on six digit display) 6th (on six digit display) Not defined Not defined Off Off On On Off Off On On Off On Off On Off On Off On 53 PMD 1400 Numerical Display 5 54 User’s Manual UTICOR Technology, LP Counter Option D4 D3 D2 D1 Value of Digit Off Off Off Off Off Off Off Off On On On On On On On On 0 1 2 3 4 5 6 7 8 9 not defined not defined not defined not defined not defined not defined Off Off Off Off On On On On Off Off Off Off On On On On Off Off On On Off Off On On Off Off On On Off Off On On Off On Off On Off On Off On Off On Off On Off On Off On 79737-3 PMD 1400 Numerical Display 5 User’s Manual UTICOR Technology, LP Counter Option Counter Board Inputs This table illustrates when the counter registers an up or down If SW1-1 is in the up position, the clocks are set individually for SW1-8 Clock Up Input Down Up/Down Input 0 0 0-> 1 transition 0 1 X 0 0-> 1 transition 0 0 X 1 1 1 1->0 transition 1 0 X 1 1->0 transition 1 1 X 0 If SW1-1 is in the lower position, the unit uses a single clock SW1-8 Clock Up input Down Up/Down Input 1 1->0 transition 1 1 1->0 transition 0 0 0->1 transition 0 0 0 1t 1 iti LEGEND 0 = INPUT IS LOW 1 = INPUT IS HIGH 1->0 = HIGH TO LOW 0->1 = LOW TO HIGH X = STATE OF THE INPUT IS DIP Switch positions are as noted: 1 = Up position 0 = Down position SW1-8 determines counter input polarity IRRELEVANT 79737-3 55 PMD 1400 Numerical Display 5 User’s Manual UTICOR Technology, LP Counter Option Figure 5-2 illustrates how counts are registered using the internal 12 volt power source. In the top diagram the inputs UP CLK and DN U/D are used to designate a count up/down attitude. While the bottom diagram uses the UP CLK input to determine whether the DN U/D input will increment or decrement. Figure 5-2 Figure 5-3 shows the Counter Module with an external power source. The operable range is between 10 and 30 VDC. Input operation is the same as with the internal power source. The UP CLK and DN U/D inputs are defaulted to sink, while inputs D1 through D8 are set to source. Figure 5-3 56 79737-3 PMD 1400 Numerical Display 5 User’s Manual UTICOR Technology, LP Counter Option Figure 5-4 illustrates how inputs D1 through D8 are connected to an external power supply. Shown also are the Up CLK and DN U/D inputs. D1 through D8 are factory set to source inputs, while UP CLK and DN U/ D can be set sink or source. Figure 5-4 Figure 5-5 illustrates how inputs D1 through D8 are connected to the internal 12 VDC power supply. Shown also are the Up CLK and DN U/D inputs. This diagram shows the inputs as being source. UP CLK and DN U/ D can be sink/source selected through Jumper JP1. Figure 5-5 79737-3 Inputs D1 through D8 are factory set as source inputs. UP CLK and DN U/D are defaulted as sink, however, by changing Jumper J1 from A to B, the inputs can be switched from sink to source. 57 PMD 1400 Numerical Display 5 User’s Manual UTICOR Technology, LP Counter Option Figure 5-6 shows the location and position of Jumper 1. The jumper is factory set in the “A” position allowing inputs UP CLK and DN U/D to operate in the sink mode. However, to allow inputs UP CLK and DN U/D to operate in a source configuration, JP1 must be changed to the “B” position. Figure 5-6. Jumper J1 Location and Position 58 79737-3 PMD 1400 Numerical Display user's manual Section 6 Printer Option Board UTICOR Technology, L.P. AVG Automation PMD 1400 Numerical Display 6 User’s Manual UTICOR Technology, LP Printer Option Board Printer Port Sub-Option Board The clock on the printer sub-option board cannot be used to display current time. The timed-printing port sub-option board contains a printer port and additionally, a print-time clock. The print board attaches to the host option board and can be installed on all available option boards. The clock, however, is used only as a data-source for time and date printing. To display the time, your PMD must have the optional clock module. The clock on the timed-printing board is for setting the print-time and date only. Data is printed when the input on the timed-printing sub-option board is switched from off to on or when the ^PR command is received. The printed output will contain colons and decimals that are displayed and will follow the format as shown: 88:88:88 DD-MMM-YY<CR><LF> (only if the real-time clock is present) XXXXXX<CR><LF> (data on the display) <CR><LF> (a blank line) DIP Switch Settings For Printer Port The 0 and 1 DIP Switch positions correspond with switch positions on the PC board. Baud Rate 300 1200 2400 9600* SW1-1 0 1 0 1 Parity None* On SW1-3 0 1 Parity Type Odd Even* SW1-4 0 1 Stop Bits 1* 2 SW1-5 0 1 SW1-2 0 0 1 1 * denotes factory settings 60 79737-3 PMD 1400 Numerical Display 6 User’s Manual UTICOR Technology, LP Printer Option Board Figure 6-1 The timed-printing board must be connected to the printer through the RS-232 serial port to produce any output. Figure 6-1 shows approximate component locations, while figure 6-2 illustrates the wiring scheme for the timed-printer's RS-232 serial port to UTICOR's SIP 100 (Serial Interface Printer). In addition to the RS-232 serial interface, the timed-printing sub-option includes a print input (A) to start the printer port. The print input enables the user to add a low-voltage triggering device, such as a switch, to force print displayed information. The print input port is optically isolated (1500 Vrms) and can be connected as a source, with a voltage range of 10 to 30 VDC. User provided isolated power can be connected to support the print input. 79737-3 61 PMD 1400 Numerical Display 6 User’s Manual UTICOR Technology, LP Printer Option Board In figure 6-2, the SIP 100 serial printer represents a typical application that can be used with the PMD 1400 sub-optional timed-printing port. The SIP 100 is a low-cost, low-maintenance printer that interfaces to any UTICOR PMD, and is generally used as a table-top or panel mounted printer. Figure 6-2 Figure 6-3 shows how an external power supply can be used to send displayed data to a serial printer. If the printer module is used in conjuction with another option module, it can derive the necessary voltage internally from that module to be able to print data. Figure 6-3 62 79737-3 PMD 1400 Numerical Display user's manual Section 7 Analog Input Option Board Current: 4-20 mA • 10-50 mA Voltage: 0-1 v • 0-10 v UTICOR Technology, L.P. AVG Automation PMD 1400 Numerical Display 7 User’s Manual UTICOR Technology, LP Analog Input Option Board Installing the Analog Input Module To install the analog input module you will need to disassemble the unit (refer to Section 2 — Getting Started — for more detail on disassembling the unit.) Once the unit is open and you can see the PC board, place the module so the mounting holes match up with the screw terminal posts (refer to figure 7-1.) After they are aligned, ensure that the pins for the dual inline connectors (J1 and J2) are matched — then firmly, press the analog input module onto the main PC board. Diagram shows wiring scheme for 4– 20 mA (75G87), or 0–1 volt or 0-10 volts (75G92), analog input module. Voltage or current values depend on which option board is installed. Figure 7-1. Analog Input Option Board (4–20 mA, 0–1 v) 64 79737-3 PMD 1400 Numerical Display 7 User’s Manual UTICOR Technology, LP Analog Input Option Board Diagram shows wiring scheme for 10–50 mA (75G87) analog input module. Figure 7-2. Analog Input Option Board (10-50 mA, 0–10 v) Analog Input Module DIP Switches The DIP switch assignments for the current and analog input boards are as follows: DIP switch 1 SW1-1 0 – add 0 to span 1 – add 25 to span SW1-2 0 – add 0 to span 1 – add 50 to span SW1-3 0 – add 0 to span 1 – add 100 to span 79737-3 65 PMD 1400 Numerical Display 7 User’s Manual UTICOR Technology, LP Analog Input Option Board SW1-4 0 – add 0 to span 1 – add 200 to span SW2-6 0 – SW2-1 to SW2-6 will specify offset 1 – Offset must be set internally SW1-5 0 – add 0 top span 1 – add 500 to span SW2-7 0 – Alarm relay activated when value is <= preset 1 – Alarm relay activated when value is >= preset SW1-6 0 – add 0 to span 1 – add 1,000 to span SW1-7 0 – add 0 to span 1 – add 2,000 to span SW1-8 0 – SW1-1 to SW1-7 specify span 1 – to specify span internally DIP switch 2 SW2-1 0 – add 0 to offset 1 – add 250 to offset SW2-2 0 – add 0 to offset 1 – add 500 to offset SW2-8 Not used DIP Switch 3 SW3-1 0 – 10-50mA, 0-10 volts 1 – 4-20mA, 0-1 volt SW3-2 0 – 4-20mA, 0-1 volt 1 – 10-50mA, 0-10 volts NOTE: SW3-1 and 2 must not be set in the same position. SW2-3 0 – add 0 to offset 1 – add 1,000 to offset SW2-4 0 – add 0 to offset 1 – add 2,000 to offset SW2-5 0 – offset is positive 1 – offset is negative 66 79737-3 PMD 1400 Numerical Display 7 User’s Manual UTICOR Technology, LP Analog Input Option Board Analog Input Modules Current Analog Input option board Voltage Analog Input option board These option boards allow you to display values for analog signals onto digital display units. Both boards display the number as a linear function of the input. You specify the function through a span and offset. Span The span is the difference in the displayed number over the input current or voltage range. Offset This is the number added in the linear equation and can be either negative or positive. The PMD 1400 can display numbers in the range of -99999 to 99999 or -999 to 999 depending on the PMD 1400 model type. Each analog input option board has a relay that can be activated according to the input. All switches are read when the unit is initially powered up. Status ID Command For the Status ID command (^ST) the option board number returned will be 003 for the current analog input option board. For the voltage analog option board the number 004 will be returned. Display Input Range Setup Each PMD 1400 analog input option has two input ranges that can be used. The ranges are selected by two switches on Dip Switch SW3. NOTE: For both analog input option boards, SW3-1 and SW3-2 should never be set to the same position. Current Input Ranges The ranges for the current option board are from 4 to 20mA and from 10 to 50 mA. To select the 4 to 20 mA range SW3-1 should be set to 1 and SW3-2 should be set to 0. To select the 10 to 50 mA range SW3-1 should be set to 0 and SW3-2 should be set to 1. 79737-3 67 PMD 1400 Numerical Display 7 User’s Manual UTICOR Technology, LP Analog Input Option Board Voltage Input Ranges The ranges for the voltage board are from 0 to 1 volt and 0 to 10 volts. To select the 0 to 1 volt range SW3-1 should be set to 1 and SW3-2 should be to 0. To select the 0 to 10 volt range SW3-1 should be set to 0 and SW3-2 is set to the 1 position. Determining Span and Offset Current Span and Offset equations The current analog input board’s span and offset can be calculated from two current input values and the desired display values for those current input values. The two display values, DV1 and DV2 are used to calculate the display range DR. DR = DV2 - DV1 The current range, CR is determined from the two current input values CI1 and CI2. CR = CI2 - CI1 Additional information that needs to be considered is the current range the display uses. The display current range, DCR is 16 mA for the 4 to 20 mA range and 40 mA for the 10 to 50 mA range. 4–20 mA: 10–50 mA: DCR = 20 mA - 4 mA = 16 mA DCR = 50 mA - 10 mA = 40 mA The equation for the span is as follows: Span = DR * DCR / CR To find the offset, use one of the input currents and its desired display value. Offset = DV2 - (Span * CI2 / DCR) Example: To arrive at the offset and span values for the current analog option board: 68 79737-3 PMD 1400 Numerical Display 7 User’s Manual UTICOR Technology, LP Analog Input Option Board A level sensing device puts out 30 mA when a storage tank contains 200 gallons and 50 mA when there are 1,000 gallons. The 10 to 50 mA input would be used for the display current range because 30 to 50 mA is within this range. The values are as follows: CI1 = 30 mA; CI2 = 50 mA; DV1 = 200; DV2 = 1,000 DCR = 50 mA - 10 mA = 40 mA Using the following equation: DR = 1,000 - 200 = 800 CR = 50 mA - 30 mA = 20 mA Span = 800 * 40 mA / 20 mA = 1,600 Offset = 1,000 - (1,600 * 50 mA / 40 mA) = -1,000 Another example would be: When 20 mA is input, a value of 999 should be displayed. When 4 mA is input 0 should be displayed. The values for the equations are: CI1 = 4 mA; CI2 = 20 mA; DV1 = 0; DV2 = 999 DCR = 20 mA - 4 mA = 16 mA Using the equations gives: DR = 999 - 0 = 999 CR = 20 mA - 4mA = 16mA Span = 999 * 16 mA / 16 mA = 999 Offset = 0 - (999 * 4 mA / 16 mA) = -250 (rounded) 79737-3 69 PMD 1400 Numerical Display 7 User’s Manual UTICOR Technology, LP Analog Input Option Board Voltage span and offset equations The voltage analog input board’s span and offset can be calculated from two voltage input values and the desired display values for those input values. The two display values, DV1 and DV2 are used to calculate the display range DR. DR = DV2 - DV1 The voltage range, VR is determined from the two voltage input values VI1 and VI2. VR = VI2 - VI1 The only other information needed is the voltage range the display will use. The display voltage range DVR is 1V for the 0 to 1 volt range and 10 volts for the 0 to 10 volt range. 0– 1: 0–10: DVR = 1V - 0V = 1V DVR = 10V - 0V = 10V The equation for the span is as follows: Span = DR * DVR / VR To find the offset use one of the input voltages and its desired display value. Offset = DV2 - (Span * VI2 / DVR) An example of a voltage span and offset would be: A pressure sensing device outputs three volts when the pressure is 20 psi, and outputs eight volts when the pressure reaches 100 psi. The 0 to 10 volt input would be used for the display voltage range. The given values are as follows: VI1 = 3 volts; VI2 = 8 volts DV1 = 20 volts; DV2 = 100 Span = 80 * 10 volts / 5 volts = 160 70 79737-3 PMD 1400 Numerical Display 7 User’s Manual UTICOR Technology, LP Analog Input Option Board Since the span multiplied by 10 is still less than the maximum allowed span of 4,000 we will use 1,600 for the span. All the displayed values would be multiplied by 10, so: DV1 = 200 and DV2 = 1,000 The decimal point between the two least significant digits on the display could be set on using the normal methods available to the PMD 1400. This shows the least significant digit on the display represents tenths of a psi. Plugging values for DV2 and VI2 into the offset equation gives: Offset = 1,000 - (1,600 * 8 volts / 10 volts) = -280 Another example of the voltage input module would be: When 1 volt is input a value of 999 should be displayed. When 0 volts is input a zero should be displayed. The display range would be 0 to 1 volt. VI1 = 0 volts; VI2 = 1 volt DV1 = 0; DV2 = 999 DCR = 1 volt - 0 volt = 1 volt Using the following equations: DR = 999 - 0 = 999 CR = 1 volt - 0 volt = 1 volt Span = 999 * 1 volt / 1 volt = 999 Offset = 0 - (999 * 0 volt / 1 volt) = 0 Specifying Span The span for the current and voltage analog input boards may be specified in two ways: internally or externally. External Span When switch 1-8 on the analog input option board is in the 0 position, the span is specified externally. The external span is determined by switches 1-1 to 1-7. Each switch set to one will cause its value to be added to determine the span. The values for each switch is as follows: 79737-3 71 PMD 1400 Numerical Display 7 User’s Manual UTICOR Technology, LP Analog Input Option Board Switch 1-1 1-2 1-3 1-4 1-5 1-6 1-7 Span Value 25 50 100 200 500 1,000 2,000 For example, if switches 1-1, 1-2 and 1-6 are set to 1 and all of the other switches, 1-3, 1-4, 1-5, 1-7 and 1-8 are set zero, the span will be 1,075. Internal Span When switch 1-8 on an analog input option board is in the 1 position, the span is specified internally. The internal span is stored in the serial EEPROM on the PMD 1400's processor board. The span is entered into the serial EEPROM through the internal span command. The format of this command is as follows: ^ISxxxx<ct> xxxx is the span in decimal <ct> is the PMD 1400 command terminator. This command will always result in the specified span being stored in the serial EEPROM. If switch 1-8 is set for external span, the span value used will not be changed by this command. The span cannot be greater than 4,000. If the command specifies a span greater than 4,000 it will be ignored. Specifying offset The offset for the current and voltage analog input board can also be specified in two ways: internally and externally. External Offset When switch 2-6 on an analog input option board is in the zero position the offset is specified externally. The external offset is determined by switches 2-1 to 2-4. Each switch set to one will cause it absolute 72 79737-3 PMD 1400 Numerical Display 7 User’s Manual UTICOR Technology, LP Analog Input Option Board value to be added, determining the offset. Each switch set to one will cause its absolute value to be added to determine the offset. The values for each switch is as follows: Switch 2-1 2-2 2-3 2-4 Offset Value 250 500 1,000 2,000 Switch 2-5 is used to determine the sign of the offset. If switch 2-5 is in the one position, the sign of the offset is negative. If switch 2-5 is in the zero position, the sign of the offset is positive. For example, if switches 2-1, 2-2, 2-4 and 2-5 are set to 1 and 2-3 and 2-6 are set to zero, the offset will be -2,750. Internal Offset When switch 2-6 on an analog input option board is in the one position, the offset is specified internally. The internal offset is stored in the serial EEPROM on the PMD 1400 processor board. The offset is entered into the serial EEPROM through the internal offset command. The format of this command is as follows: ^IOsxxxxx<ct> s is the sign of the offset xxxxx is the offset in decimal <ct> is the PMD 1400 command terminator This command will always result in the specified offset being stored in the serial EEPROM. If switch 2-6 is set for external offset, the offset value will not be changed by this command. If switch 2-6 is set for internal offset, the new offset will be used for the next current or voltage reading. If the sign is negative and the value is 0, the command will be ignored. 79737-3 73 PMD 1400 Numerical Display 7 User’s Manual UTICOR Technology, LP Analog Input Option Board Read Span Command The format for this command is: ^RS<ct> The display will return: ^RSabcd<ct> The string abcd represents the current value of the span used by the display. This could be the internal or external span depending on the position of SW1-8. If the counter or clock option is installed this command will return 9999 for the span. This is an invalid value. If there is no option board installed, 9999 will also be returned. Read Offset Command The format for this command is: ^RO<ct> The display will return: ^ROabcdef<ct> The string abcdef represents the value of the offset currently being used by the display. This could be either the internal or external offset depending on the position of SW2-6. If the counter or clock option is installed, this command will return 999999 for the span if the unit is a six digit display and 009999 for a four digit display. Both values are invalid for their respective display sizes. If there is no option board the respective invalid value will also be returned. IF a valid offset is negative, a “-” will appear in the “a” position. Relay Alarm Switch 2-7 controls when the relay is activated. Every time a new value is written to the display that reflects the current or voltage input, the value will be compared to the preset value. 74 79737-3 PMD 1400 Numerical Display 7 User’s Manual UTICOR Technology, LP Analog Input Option Board If the switch is in the one position, the relay will be activated when the value is greater to or equal to the preset. The relay would then be deactivated when the value is less than the preset. If the switch is in the 0 position, the relay will be activated when the value is less than or equal to the preset. The relay would then be deactivated when the value is greater than the preset. If switch 2-7 is set to one and the calculated display value is larger than the display can handle, the alarm will be activated. Setting the Preset There are three ways you can set the preset value: initialization, computer interface command, and through the parallel port. Initialization The value of the preset after power up depends on the position of switch 2-7. If this is in the one position, the preset is initialized to the maximum value. The maximum value is 99999 for a six-digit display and 999 for a four-digit display. If switch 2-7 is in the zero position, the preset is initialized to the minimum value. The minimum value is -99999 for a six-digit display and -999 for the four-digit display. Computer Interface The preset may be set through the “Display a number” (preset digits) command. The format is: ^DIabcdef<ct> abcdef is the preset is decimal <ct> is the PMD 1400 command terminator This command will generally display the value. If no option board is installed, the value will be displayed. If the preset in the command is positive, it will be displayed on a unit with the clock option installed. The first character, a, may be “-” for negative preset. If the clock or counter option board is installed and this comand is for a negative preset, the command will be ignored. If the unit is a four-digit display, the command with a negative preset would cause -def to be displayed. 79737-3 75 PMD 1400 Numerical Display 7 User’s Manual UTICOR Technology, LP Analog Input Option Board Digits B and C would be ignored for displaying a negative preset. However, all digits would be used in determining the preset to set in the unit. If a character in abcde is in the range of hexadecimal A-F, the value will be displayed, but the preset will not be set. If the preset in the command is negative and there is a hex digit in the range of A-F in the b, c, d, e or f postion, the command will be ignored. If no option board or a clock option is installed, the preset will not be set. If the preset in the command is beyond the range of the display, the preset will not be changed. Parallel Port The preset can be set through the parallel interface one digit at a time. Input D8 must be on. The rest of the inputs will be defined as follows: D7 D6 D5 Digit Selected Off Off Off 1st digit (rightmost) Off Off On 2nd (from right) Off On Off 3rd Off On On 4th On Off Off 5th (on 6-digit model) On Off On 6th (on 6-digit model) On On Off not defined On On On not defined D4 Off Off Off Off Off Off Off Off On On On On On D3 Off Off Off Off On On On On Off Off Off Off On D2 Off Off On On Off Off On On Off Off On On Off D1 Off On Off On Off On Off On Off On Off On Off Value of digit 0 1 2 3 4 5 6 7 8 9 -* not defined not defined —continued 76 79737-3 PMD 1400 Numerical Display 7 User’s Manual UTICOR Technology, LP Analog Input Option Board D4 On On On D3 On On On D2 Off On On D1 On Off On Value of digit not defined not defined not defined *Allowed only on digit four of the four-digit display or digit six of the six-digit display. When a combination for the value of a digit is not defined, the current preset will appear on the display, but will not be changed. Read Preset Command The command referred to as the Read Counter Preset has been changed to Read Preset and will work for reading the preset of the analog input option boards. The format of the command is ^RC. The format of the reply is ^RCabcdef<ct>. The most significant digit is in the a position while the least significant digit is in the f postion. If the preset is negative for the analog input option boards, the a position will be a “-.” If no option board or a clock option is installed, 999999 will be returned if the unit is a six-digit display and 009999 will be returned for a four-digit display. These are invalid values for the analog option board. Operation On power up the switches are read to determine the settings used for the PMD 1400 with the current or voltage analog input option. The computer interface is checked continuously for commands. Checking for any installed option boards. The option board gets checked every tenth of a second. When the option board is checked, the parallel port takes first priority. If D8 of the parallel port is off, the rest of the inputs are defined as follows: D1 not used D2 not used D3 not used D4 not used D5 is On D6 is On D7 is On 79737-3 Display value from analog to digital converter Display preset value Display test (turns on all display segments) 77 PMD 1400 Numerical Display 7 User’s Manual UTICOR Technology, LP Analog Input Option Board When more than one input among D5, D6, and D7 are active, input D7 has highest priority, then D6 and D5. If there is no active parallel input the display will show the value determined from the input and the user supplied span and offset. The relay will be activated or deactivated according to the value displayed from the input. The state of the relay will not be changed while the display test, current preset value or A/D value is being displayed. Figure 7-2 illustrates the wiring scheme for externally adding inputs to the analog input module. Figure 7-2. Analog Input Module Parallel Inputs Wiring Schematic 78 79737-3 PMD 1400 Numerical Display user's manual Section 8 PMD 1400 Specifications UTICOR Technology, L.P. AVG Automation PMD 1400 Numerical Display 8 User’s Manual UTICOR Technology, LP PMD 1400 Specifications Hardware Specifications Standard Unit Service Power: Operating Temperature: Storage Temperature: Electrical: Noise Tolerance: Humidity: Dimensions: Construction: Display Type: Number of Digits: Character Height: Viewing Distance: Input Serial Port: Power Consumption: 115/230 VAC 0 to 60° C -40 to 95° C NEMA ICS 2-230 Showering Arc ANSI C37.90a-1974 SWC 10-95 RH non-condensing 19.43" x 6.5" x 4" (four-digit) 28.23" x 6.5" x 4" (six-digit) NEMA 12 Seven-segment red LED Four-digit model and six-digit model Four inches 200 feet RS-232, RS-422A, 1200-19,200 baud 6 digit 50 va 4 digit 45 va Real-time Clock/Parallel Port Input (Source Mode): Input Levels: Isolation: 10 volts @ 2.7 mA 20 volts @ 5.7 mA 30 volts @ 8.7 mA High > 9 volts Low < 3 volts 1500 VDC Timed Printer Port Active state voltage: Active state current: Off state voltage: Off state current: 80 9 VDC across inputs typically 3 mA at 12 VDC less than 3 VDC across inputs Typically .5 mA 79737-3 PMD 1400 Numerical Display 8 User’s Manual UTICOR Technology, LP PMD 1400 Specifications Hardware Specifications Figure 8-1. Configurations Optional Counter Counter Speed: Rate Monitor: Operating Voltage: Input Voltage Range: Input Levels: Input Speed: Relay: 79737-3 200 or 150K counts per second Events per second or events per minute 10–30 Volts Operating Range: 10 volts @ 14 mA 20 volts @ 18 mA 30 volts @ 23 mA 10 volts @ 1.2 mA 20 volts @ 2.4 mA 30 volts @ 3.6 mA High > 2/3 Viso Input Voltage Low < 1/3 Viso Input Voltage High Speed < 150 KHz Low Speed < 200 Hz Form ‘A’, normally open contact 3 amps @ 230 VAC or 30 VDC, max. 81 PMD 1400 Numerical Display 8 User’s Manual UTICOR Technology, LP PMD 1400 Specifications Hardware Specifications Analog Input Module Parallel Port Input (source mode): Input Levels: High > 9 volts Low < 3 volts Isolation: 1500 VDC A/D Converter Input Sensitivity: 82 10 volts @ 2.7 mA 20 volts @ 5.7 mA 30 volts @ 8.7 mA 1638.4 units/mA @ 4–20mA 655.36 units/mA @ 10–50mA 32.768 units/mV @ 0–1 v 3.2768 units/mV @ 0–10 v Offset: software calculates 4/10 mA offset Linearity: ±0.02% (±-0.05% for 0–1v range) Accuracy: 12 bit at 25C (11 bit at 25C for 0–1v range) Temperature Drift: 100 ppm/C Acquisition time: 100 mS Operating Temp: 0 – 60° C Maximum input voltage drop: .59 v (current mode) Isolation: 1500 Vrms Power Consumption: 50 mA @ 5 VDC 25 mA @ 12 VDC isol. Optional Power Output: 100 mA @ 24 VDC isol. Relay Contacts: form A no - 3A @ 250 VAC or 30 VDC 79737-3 PMD 1400 Numerical Display 8 User’s Manual UTICOR Technology, LP PMD 1400 Specifications Hardware Specifications Parallel Port D1 D2 D3 D4 D5 D6 D7 D8 COM preset digit value preset digit value preset digit value preset digit value preset digit value preset digit select/display preset preset digit select/display test set preset/other select “-” parallel port common Analog Inputs Current/Voltage AN1 AN2 COM+ 4-20 mA / 0-1v, 0-10v 10-50 mA / No Connect 24VDC Isolated Output Option +24 VDC -24 VDC Relay Contacts 1 No Contact 1 2 No Contact 2 79737-3 83 PMD 1400 Numerical Display 8 User’s Manual UTICOR Technology, LP PMD 1400 Specifications PMD 1400 FOUR-DIGIT MODEL PMD 1400 SIX-DIGIT MODEL NTS Figure 8-2. Outside Dimensions (Sheet 1 of 2) 84 79737-3 PMD 1400 Numerical Display 8 User’s Manual UTICOR Technology, LP PMD 1400 Specifications PMD 1400 SIX-DIGIT STACKED TWO HIGH PMD 1400 SIX-DIGIT STACKED FOUR HIGH NTS Figure 8-2. Outside Dimensions (Sheet 2 of 2) 79737-3 85 86 PMD 1400 Numerical Display user's manual Glossary UTICOR Technology, L.P. AVG Automation PMD 1400 Numerical Display User’s Manual UTICOR Technology, LP Glossary AC Abbreviation for alternating current ASCII Abbreviation for American Standard Code for Information Interchange; it represents a code for defining alphanumeric characters. Amps Abbreviation for ampere; a unit of electrical current or rate of flow of electrons; one volt across one ohm of resistance causes a current flow of one ampere. BCD Abbreviation for Binary Coded Decimal; a system of number representation where each digit of a decimal number is represented by a four-digit binary number. Baud rate The speed at which serial data is transmitted and received; rated at bits per second. Bidirectional Describes a device that can transmit and receive data. Binary A numbering system in which each digit can take on values from 0 to 1; the base 2 numbering system Bit Abbreviation for Binary digit; the smallest unit of information in the binary numbering system; represented by the digits 0 and 1 Buffer Electrical: an isolating circuit used in an electronic device to avoid reaction of a driven circuit on the corresponding driver circuit. Software: a memory location that stores transmitted information for later use. Byte A single group of eight bits processed together (in parallel). Checksum A calculation of all data bits being transmitted; is used by the receiving device for checking data integrity. Computer interface An electrical communication gateway between a computer and a peripheral. Control characters ASCII code sequences used to make the display perform special tasks. 88 79737-3 PMD 1400 Numerical Display User’s Manual UTICOR Technology, LP Glossary Controller terminals These wiring terminals interface to the programmable logic controller (PLC) or other device that operates the unit; terminals used by the controller are the Parallel Port, the Message Control Terminals, and VDC In/Out terminals. Daisy chain A serial wiring method where the communication cable enters one unit and exits to the next unit. DC Abbreviation for Direct Current Decrement A gradual decrease in quantity Default The initial state of attributes DIP switch A mechanical switch housed in a dual in-line pack used for selecting unit attributes EEPROM Abbreviation for Electronically Erasable Programmable Read Only Memory; this type of read-only memory can be altered with commands of the programming terminal and does not lose its contents when power is turned off. EPROM Abbreviation for Electronically Programmable Read Only Memory; a read only memory where stored data can be erased by ultraviolet light or other means and reprogrammed bit by bit with appropriate voltage pulses Group Number A four-bit Binary number used as part of the unit identifier Handshaking The method used to coordinate sending and receiving data by means of signals indicating when it is okay to transmit or receive data. Hexadecimal (HEX) Base 16 numbering system; digits 0 through 10 and A through F where F is equal to fifteen Increment Gradual increase in quantity. Input devices Devices such as limit switches, pressure switches, push buttons, etc., that supply data to a controller. 79737-3 89 PMD 1400 Numerical Display User’s Manual UTICOR Technology, LP Glossary Interfacing Interconnecting two pieces of equipment so they can communicate; the interconnection can be physical, electrical or logical. Isolated bidirectional Provides two-way interface between devices using RS-232C and RS-422A/RS adapter 485A communication standards. LED Acronym for Light Emitting Diode; a pn junction that emits light when biased in the forward direction. NEMA Standards Abbreviation for National Electrical Manufacturers Association that provides standards for electrical equipment approved by the majority of its members. NEMA 4x See NEMA standards. 4x enclosures provide a degree of protection against corrosion, windblown dust and rain, splashing water and hose-directed water, and remain undamaged by the formation of ice on the enclosure. They meet hose-down, external icing and corrosion-resistance design tests. UTICOR uses #316 grade stainless steel. NEMA 12 See NEMA standards; 12 enclosures provide a degree of protection against dust, falling dirt and dripping non-corrosive liquids. They meet drip, dust and rust-resistance design tests. Noise immunity The ability of an electronic device to reject interfering noise signals. PMD Abbreviation for Programmable Message Display, copyrighted by UTICOR Technology, Inc. Parallel port 8-input port through which message numbers and data information from a controller or other device is entered into the unit when it is in the display mode. Parameter A constant or element, the value of which characterizes the behavior of one or more variables associated with a given system Parity A method of testing the accuracy of binary numbers used in recorded, transmitted or received data; For even parity, the sum 90 79737-3 PMD 1400 Numerical Display User’s Manual UTICOR Technology, LP Glossary of the ones is an even number; for odd parity, the sum of the ones is an odd number. Parity bit An additional bit added to a binary word to make the sum of the number of “1s” always even or odd Peripheral equipment In a data processing system, any unit of equipment, distinct from the central processing unit, that may provide the system with outside communication Printer port The place of access on a 1400 unit that allows for communication between it and the specified printer Protocol A formal set of rules governing the communication between two devices; the PMD 1400 supports UTICOR and ASCII protocol. RAM memory Abbreviation for Random Access Memory; RAM is a type of memory that requires that power be applied in order to retain the data stored in it. ROM Abbreviation for Read Only Memory; a ROM is a solid-state storage memory whose contents cannot be altered by the controller RS-232 IEEE standard for serial communication with a 50 ft. distance limitation RS-422 IEEE standard for serial communication with a 4000 ft. distance limitation Real-time clock A clock that indicates the passage of time Sink When using the Parallel Port with a sinking module, the positive side of the electrical power supply is used for reference and the negative voltage level is equal to a logic one. Slave port The place of access on a master unit for serial connection to a slave display 79737-3 91 PMD 1400 Numerical Display User’s Manual UTICOR Technology, LP Glossary Slo Blo fuse A type of fuse that will withstand short current surges Source When using the Parallel Port, this term refers to using the negative side of the voltage supply for reference and the positive side for logic one levels. Stop bit The last one or more bits sent in a synchronous data transmission to indicate the logical end of a series of bits. Unit address A set of two numbers which uniquely identify a unit in a communication network. Unit number A twelve-bit binary number used to identify a member of a group. VAC Abbreviation for Voltage Altering Current. VDC Abbreviation for Voltage Direct Current. Variable data Real-time numerical quantities displayed in stored messages. 92 79737-3 PMD 1400 Numerical Display User’s Manual UTICOR Technology, LP Index A E accumulative counter 3 Accumulator 51 Addressing 3, 16 Analog Input Modules 3, 67 Analog Input Option Board 16 angle-brackets 6 ASCII Commands 22 ASCII protocol 21, 37 Error Codes 14 F Features 16 “force print” 61 G C general installation Getting Started 5 Caution (inside cover page) Characteristics 16 circuit boards 6 Clock Module 44 clock module 3 Clock option board 16 colored lense 6 Command Terminator 21 communication cable 7 Computer Interface Commands 21 Configurations 81 Counter Board Errors 14 Counter Board Inputs 53, 55 Counter Board Output Relay 52 Counter Module 50 counter module 3 Counter option board 16 CPU board 17 Current Analog Input Option Board 3 H hard copy 3 Hardware Specifications 79 high-speed accumulator 51 I Installing the Clock Module 44 Installing the Counter Module 50 Installing the Analog Input Module 64 Internal Offset 27 Internal Span 28 L lead locations 7 LEDs 6 D DEVICE TIME-OUT error 37 diagnostics 11 DIP Switch Settings For Printer Port DIP Switch Test 20 DIP Switches 17 disassembly 6 Display Control 26 display segments 11 display size 16 Display Test 11, 20 Displaying a Number 38 79737-3 6 M 60 Master PMD 1400 10 mounting kits 2 N network 12 93 PMD 1400 Numerical Display User’s Manual UTICOR Technology, LP Index O OPEN statement 37 Option Modules 3, 11 output relay 50 Outside Dimensions forthe PMD 1400 84 P parallel inputs 3 PMD 1400 Specifications 79 PMD 1400 Standard Unit 16 PMD casing 8 PMD masters 12 power cable 7 power terminal 7 Preset Digits 26 Preset Display 34, 41 PRINT # statement 37 print input 61 Print The Data 30 Printer option 16 Printer Port Sub-option Board 60 Program Time of Day Print Time 30 Program Time-of-Day Print Date 29 Programming 17 programming environment 37 Programming using ASCII characters 23 Programming: Using ASCII protocol through BASIC Commands 37 PROM test 11 real-time clock 3 Real-Time Clock DIP Switches Real-Time Clock Inputs 46 Real-Time Clock Module 44 Reassembling the Unit 8 Reassembly 8 Relay 52 reset counter function 53 RS-232, 25-pin connector 9 RS-232, 9-pin connector 8 RS-232 serial port 61 S Select Active Unit 23 Select All Units command 11 Send Variable Data 21, 41 Serial Port Loop Back Test 19 Set Bit Map On 39 Set Bit Map On Display 23 Set Display Brightness 24, 40 Set The Colon(s) 40 Set The Date 35 Set The Time 35 SIP 100 (Serial Interface Printer) 61 Slave Brightness Control 25, 40 Slave Port 12 slave port 11 software version 11 Status ID 35 Status ID Command 35 T Q Quick BASIC© 37 R RAM test 11 Rate Counter 51 rate counter 3 Rate Per Minute 51 Rate Per Second 51 Read Counter Preset Value 31 Read Display 31 Read Time and Date 33 Read Time of Day Print Entry 32 94 45 Time Of Day Print Control timed-printing board 61 timed-printing module 3 tools 6 Turn Colon On/Off 25 Turn Decimal On/Off 27 36 U–W unit number 11, 19 UTICOR’s PMD protocol 21 Wiring the PMD 1400 6 Wrap Up 41 79737-3