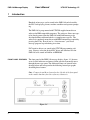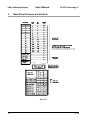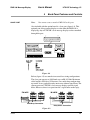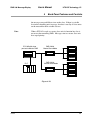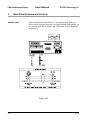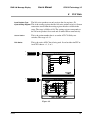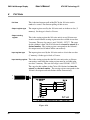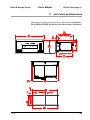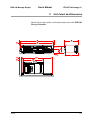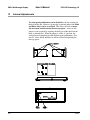
1
PMD 180
user's manual
PMD 180 Message Display
User’s Manual
WARNING
In the application of UTICOR Technology, LP programmable control devices, you
should consider them components. Therefore, provisions other than the programmable control device must be taken to protect personnel in the event of a programmable control device malfunction. Programmable control devices should not be
used as stand-alone protection in any application. Unless proper safeguards are
used, unwanted start-ups could result in equipment damage or personal injury. If
programmable controllers are used with operator interface and like devices, this
hazard should be of primary importance. The operator should be made aware of
this hazard and appropriate precautions should be taken.
In addition, consideration should be given to the use of an emergency stop function that is independent of the programmable controller.
The diagrams and examples in this user’s manual are included for illustrative purposes only. UTICOR Technology, LP cannot assume responsibility or liability for
actual use based on the diagrams and examples.
IMPORTANT: Static messages that remain on the display for an extended
period of time may cause uneven illumination of the display’s dot matrix
grid. This is caused by the inherent properties of all vacuum fluorescent
display technology. To avoid uneven character display, use the DISPLAY
SAVER TIME-OUT feature described in the manual. Do not leave the same
message on the display for indefinite periods of time.
Sales and Marketing
343 St. Paul Blvd.
Carol Stream, IL 60188
Tel: (630)668-3900
FAX: (630)668-4676
Factory Customer Service/Order Entry
© Copyright 1993–2002
All rights reserved
UTICOR Technology, LP
AVG Automation
P.O. Box 1327
4140 Utica Ridge Road
Bettendorf, IA 52722-1327
1st Printing — 3/02
4140 Utica Ridge Rd.
Bettendorf, IA 52722
Tel: (319)359-7501
(800)711-5109
FAX: (319)359-9094
Application Hotline
1 (800) TEC-ENGR (832-3647)
Vist our web site at:
www.avg.net
Manual Number 79736-6
PMD 180 Message Display
User’s Manual
UTICOR Technology, LP
Table of Contents
1 Introduction .................................................................................................................. 1
Overview ......................................................................................................................................... 1
Front Panel Features ........................................................................................................................ 2
Back Panel Features ......................................................................................................................... 3
Connections ..................................................................................................................................... 5
2 Getting Started ............................................................................................................ 9
Computer Hardware ........................................................................................................................ 9
Software .......................................................................................................................................... 9
Interconnect Cable 9
Using 10F54 Software ..................................................................................................................... 9
3 Display Front Panel Features and Controls .................................................................... 13
V.F. Display ................................................................................................................................... 13
Battery OK LED ............................................................................................................................ 13
Power LED .................................................................................................................................... 13
Mode Buttons ................................................................................................................................ 13
Display Mode ................................................................................................................................ 15
Computer Interface ........................................................................................................................ 15
PLC Port ....................................................................................................................................... 15
Set Clock ....................................................................................................................................... 15
Data Logging .................................................................................................................................. 15
Test Functions ................................................................................................................................ 15
Demonstration Mode ...................................................................................................................... 15
4 Back Panel Features and Controls ................................................................................... 17
Power Input ................................................................................................................................... 17
Computer Interface ........................................................................................................................ 17
PLC Interface ................................................................................................................................ 18
Switches ........................................................................................................................................ 19
SW1-7 Storing the PLC Driver in EEPROM .................................................................................. 20
Parallel Port ................................................................................................................................... 21
Slave Port ...................................................................................................................................... 23
Slave Port (Master/Slave Command Mode) .................................................................................... 24
Printer Port .................................................................................................................................... 26
5 Programming .......................................................................................................................... 27
Programming the PMD ................................................................................................................... 27
Offline Development ....................................................................................................................... 27
File Network Menu ........................................................................................................................ 30
79736-6
i
PMD 180 Message Display
User’s Manual
UTICOR Technology, LP
Table of Contents
PLC Function Menu ....................................................................................................................... 30
Communications Setup ................................................................................................................... 31
Online Network Menu .................................................................................................................... 33
Filtering Slave Addresses ................................................................................................................ 36
Computer Interface Commands ................................................................................................ 36
6 Message Attributes ..................................................................................................... 39
Chain Message ............................................................................................................................... 39
Scroll Upwards .............................................................................................................................. 39
Scroll Left ...................................................................................................................................... 40
Print Message ................................................................................................................................ 40
Clear Display ................................................................................................................................. 40
Center Message ............................................................................................................................. 41
Blink Message ................................................................................................................................ 41
Send to Slave ................................................................................................................................. 41
Invisible Message ........................................................................................................................... 42
Log Message ................................................................................................................................. 42
Display Height/Width ...................................................................................................................... 42
Dataset Disabled ............................................................................................................................ 42
Message Examples ......................................................................................................................... 43
7 System Attributes ................................................................................................................... 45
Blink Attributes .............................................................................................................................. 45
Scroll Attributes ............................................................................................................................. 45
Miscellaneous Attributes ................................................................................................................. 45
Special Function Messages ............................................................................................................. 47
Print Port Attributes ........................................................................................................................ 48
Parallel Port Attributes .................................................................................................................... 48
8 PLC Data ................................................................................................................................... 49
Introduction to the PLC Drivers ...................................................................................................... 49
PLC Data ...................................................................................................................................... 50
Flag Bits of Output Register #1 ....................................................................................................... 51
Flag Bits of Input Register #1 .......................................................................................................... 54
Random Access Drivers ................................................................................................................. 54
Output Words (to PMD) ................................................................................................................ 55
Input Words (from PMD) ............................................................................................................... 56
Discrete Triggers ............................................................................................................................ 56
PLC System Attributes ................................................................................................................... 57
Message Queue ............................................................................................................................. 58
ii
79736-6
PMD 180 Message Display
User’s Manual
UTICOR Technology, LP
Table of Contents
Message Priority ............................................................................................................................ 58
AEG PLC Driver Attibutes ............................................................................................................. 60
Allen-Bradley SLC 500 PLC and 1747 AIC Module Driver Attributes ........................................... 61
Allen-Bradley SLC 500 DF1 Module Driver Attributes (Standard Driver) ....................................... 63
Allen-Bradley PLC5 Series PLC Driver Attributes .......................................................................... 66
GE 90-30/90-70 PLC Driver Attributes ......................................................................................... 67
IDEC FA-2/FA-2J/FA-3S/FA2-5M PLC Driver Attributes ........................................................... 69
Klockner Moeller PS 306/316 PLC Driver Attributes ..................................................................... 71
Mitsubishi FX Series PLC Driver Attributes .................................................................................... 72
Mitsubishi Melsec-A Series PLC Driver Attributes .......................................................................... 74
Modicon Modbus PLC Driver Attributes ........................................................................................ 76
Omron Host Link Unit PLC Driver Attributes ................................................................................. 78
Reliance XL II PLC Driver Attributes ............................................................................................. 80
Reliance Automate PLC Driver Attributes ....................................................................................... 81
Siemens 100 Series, 115 CPU PLC Driver Attributes ..................................................................... 83
Square D Sy/Max PLC Driver Attributes ........................................................................................ 85
Texas Instruments 405 Series PLC Driver Attributes ....................................................................... 87
Texas Instruments 505 Series PLC Driver Attributes ....................................................................... 89
Toshiba EX100/250/500/200B PLC Driver Attibutes ..................................................................... 90
ASCII Protocol for Computer/PLC Interface .................................................................................. 93
ASCII Functions ............................................................................................................................ 93
Examples ..................................................................................................................................... 100
Conclusions .................................................................................................................................. 101
10 General Specifications ........................................................................................................ 103
11 Unit Cutout and Dimensions ............................................................................................. 105
12 Internal Adjustments ............................................................................................................ 113
13 System Attribute Default Settings ............................................................................ 115
14 International Character Sets .............................................................................................. 117
15 Control Codes and Special Characters .......................................................................... 125
Control Codes ............................................................................................................................. 125
Special Characters ....................................................................................................................... 126
Insert Time ................................................................................................................................... 126
Insert Date ................................................................................................................................... 126
Toggle Blink ................................................................................................................................. 126
79736-6
iii
PMD 180 Message Display
User’s Manual
UTICOR Technology, LP
Table of Contents
Inserting Data Sets ....................................................................................................................... 126
Typeover/Insert ............................................................................................................................ 126
Null Characters ............................................................................................................................ 127
Character Size .............................................................................................................................. 127
Clear a Line ................................................................................................................................. 127
Insert a Blank Line ....................................................................................................................... 127
16 Displayed Errors ...................................................................................................... 129
17 Troubleshooting ....................................................................................................... 131
GLOSSARY ..................................................................................................................... 133
INDEX
iv
.......................................................................................................................... 141
79736-6
PMD 180 Message Display
User’s Manual
UTICOR Technology, LP
1
Introduction
Congratulations on your decision to enhance your intra-plant communications by incorporating a UTICOR PMD into your system. With the help of this manual, you will soon be able to
start using the versatile features of the PMD. The ‘Getting Started’ and ‘Features and Controls’ sections in this manual explain how to operate your unit. The additional sections provide
more detailed information on the PMD’s attributes and include a glossary and index for your
quick reference. Of course, if you still encounter difficulty, call AVG UTICOR technical support at 1-800-TEC-ENGR.
OVERVIEW
The PMD 180 is a compact message display that can be interfaced to a
name brand PLC through the PLC’s program loader port. With the
PMD 180, you will also receive programming software that you install
on an IBM (or compatible) computer. Use the software to program
messages online or offline, set up the computer’s communication
parameters, and load the PLC driver information into the PMD.
Depending on what options you order, the PMD can have 8K, 32K,
64K, or 128K of EEPROM or 32K or 128K of RAM. Also available as
an option, is an extra board that adds a parallel, slave, and printer port
to the unit.
Computer interface is available through RS-232C, RS-422A, or RS485A with either UTICOR or ASCII protocol. The PLC interface can
accommodate RS-232C, RS-422A, or current loop communications.
RS-485A can only be used on the PLC port when the option board is
present.
The PMD 180 is also available in a message controller model. The
message controller has all the same features as the PMD 180 except the
actual display. A UTICOR slave message display must be used with the
message controller. The option board that includes the slave port is
standard on the message controller model.
The PMD 180 has a 16-message circular queue. The message queue
can be enabled or disabled and can be advanced manually or automatically. Messages can be assigned a priority when they are triggered by
the PLC — only the messages in the queue with the highest priority will
be displayed. (The higher the priority number assigned when the message is sent, the higher its priority.)
— continued
79736-6
1
PMD 180 Message Display
1
User’s Manual
UTICOR Technology, LP
Introduction
Hundreds of messages can be stored in the PMD 180 and selected by
the PLC for displaying alarms, machine condition and operator prompting.
The PMD 180 is programmed with UTICOR supplied menu-driven
software for IBM compatible computers. The software allows messages
to be directly entered into the PMD 180 with RAM memory or be
developed offline and downloaded as a complete message file. The
software is completely menu driven with HELP information acquired by
pressing the F1 key. Even if you’re a “first time user” you’ll have
message programs up and running in no time.
PLC interface drivers are stored in the UTICOR programming software. You may select the desired PLC driver and download it to the
PMD 180 to be stored in RAM or in EEPROM.
FRONT PANEL FEATURES
The front panel of the PMD 180 message display (figure 1-1) features
several visual indicators and means for the operator to manually move
through the message queue. The different features are lettered in the
drawing below and correspond to the following lettered paragraphs
describing these features.
Note: Features A and B are located on the left side of the front panel
on the models that have four lines of twenty characters.
Figure 1-1
2
79736-6
PMD 180 Message Display
User’s Manual
UTICOR Technology, LP
1
Introduction
A. The power indicating LED will be lit when the logic powers at a
level acceptable for the internal circuitry to operate.
B. The battery OK indicator will be illuminated when the unit is on as
long as the battery is at a reasonable voltage level to retain correct time,
date, and user RAM data if power to the unit is lost.
C. The display is used to show the operator either messages
programmed in the PMD or messages sent through the computer
interface.
D. The mode and enter button are used to select the PMD’s mode of
operation. They are also used to manually advance messages in the
message queue.
BACK PANEL FEATURES
All connections to the PMD message display are made on the back
panel (see figure 1-2). There are also switches that can be set on the
back of the unit. These different connectors and switches are lettered in
the drawing below and described in the following paragraphs.
Figure 1-2
A. Use the power input terminals to connect the AC or DC voltage
powering the unit. AC units are configured for 115 VAC from the
factory but can be configured for 230 VAC. DC units operate at a
nominal 24 VDC.
79736-6
3
User’s Manual
PMD 180 Message Display
1
UTICOR Technology, LP
Introduction
B1. A computer can be interfaced to the unit to program or control it
through this 9-pin ‘D’-type connector using RS-232C communications.
B2. The terminal blocks on the right side of this cluster are used for
computer interface using either RS-422A or RS-485A standards. Only
one communication standard can be used at a time.
C1. A PLC can be interfaced through the 9-pin ‘D’-type connector
when using RS-232 or current loop communications. Only one standard
can be used at a time.
C2. The terminal blocks on the left side of this cluster are used for
PLC interface using either RS-422A or RS-485A standards. Only one
standard can be used at a time and the option board with the parallel,
printer, and slave ports must be present to use RS-485.
D. The array of dip switches is used to set the computer port and
PLC port terminal strips for RS-422 or RS-485 communications and to
enable/disable the front panel mode buttons.
E.
This switch is used to enable and disable the current loop interface.
F. The parallel port can be used to trigger messages and enter data
set values through a discrete output module of the PLC.
G. The slave port sends data to any of UTICOR’s slave message
displays.
H. The printer port sends user message information to a serial printer
via an RS-232C cable.
I.
4
The battery can be changed by removing this panel.
79736-6
PMD 180 Message Display
User’s Manual
UTICOR Technology, LP
1
CONNECTIONS
Introduction
All connections to the PMD 180 message controller are made on the
front of the unit (figure 1-3). The different connections and switches are
shown in the drawing below and descriptions follow.
Figure 1-3
A. Use the power input terminals to connect the AC or DC voltage
powering the unit. AC units are configured for 115 VAC from the
factory but can be configured for 230 VAC. DC units operate at a
nominal 24 VDC.
B1. A computer can be interfaced to the unit to program or control it
through this 9-pin ‘D’-type connector using RS-232C communications.
B2. The terminal blocks on the right side of this cluster are used for
computer interface using either RS-422A or RS-485A standards. Only
one communication standard can be used at a time.
C1. A PLC can be interfaced through the 9-pin ‘D’-type connector
when using RS-232 or current loop communications. Only one standard
can be used at a time.
C2. The terminal blocks on the left side of this cluster are used for PLC
interface using either RS-422A or RS-485A standards. Only one standard can be used at a time and the option board with the parallel,
printer, and slave ports must be present to use RS-485.
D. The array of dip switches is used to set the computer port and PLC
port terminal strips for RS-422 or RS-485 communications and to
enable/disable the front panel mode buttons.
79736-6
5
User’s Manual
PMD 180 Message Display
1
UTICOR Technology, LP
Introduction
E.
This switch is used to enable and disable the current loop interface.
F. The parallel port can be used to trigger messages and enter data
set values through a discrete output module of the PLC.
G. Use the slave port to send data to any UTICOR slave message
display.
H. The printer port is used to send user message information to a
Serial printer via an RS-232C cable.
I.
The battery can be changed by removing this panel.
J. The mode and enter buttons are used to select the PMD’s mode of
operation. They are also used to manually advance messages in the
message queue.
K. The power indicating LED will be lit when the logic power is at a
level acceptable for the internal circuitry to operate.
L. The battery OK indicator will be illuminated when the unit is on as
long as the battery is at a reasonable voltage level to retain correct time,
date, and user RAM data if power to the unit is lost.
6
79736-6
PMD 180 Message Display
User’s Manual
UTICOR Technology, LP
1
Introduction
Figure 1-4, below, shows a block diagram of the PMD 180.
Figure 1-4
79736-6
7
PMD 180 Message Display
1
User’s Manual
UTICOR Technology, LP
Introduction
This page intentionally left blank.
8
79736-6
PMD 180 Message Display
User’s Manual
UTICOR Technology, LP
2
Getting Started
The first step in programming a UTICOR Programmable Message Display is establishing
communication between your computer and the PMD. Follow the guidelines below.
COMPUTER HARDWARE
IBM or compatible computer
640K RAM
One serial port (COM1, COM2, COM3, or COM4)
DOS 2.1 or later
CONFIG.SYS file in the computer’s root directory should have the
following two statements: FILES=20; BUFFERS=20
SOFTWARE
UTICOR programming software (Part Number 10F54)
INTERCONNECT CABLE
Note: Additional wires or jumpers in the cable may cause communication problems between the computer and the PMD.
An interconnect cable is required for proper communication. This cable
will connect to the COM1, COM2, COM3, or COM4 port of the
computer and the programming port of the PMD. The drawing shown
is for RS-232C communications. However, RS-422A and RS-485A
connections are also available.
PMD 180
PMD 180
PMD 180
Figure 2-1
USING 10F54 SOFTWARE
Boot the IBM/Compatible using MS/PC DOS. Insert the UTICOR
10F54 disk into an available drive. (In this example we will use drive
A:>.)
Select the hard drive where the 10F54 disk is to be installed. (In this
example, we will use the C drive.)
79736-6
9
PMD 180 Message Display
2
User’s Manual
UTICOR Technology, LP
Getting Started
At the C:> prompt, type A:\INSTALL followed by the ENTER key.
The ‘install’ program will prompt you through the process.
After the program is installed, bring up the subdirectory where the
program is stored and enter PMD180 followed by the ENTER key for
a color monitor. If using a monochrome monitor, type PMD180-MON
followed by the ENTER key. If using an LCD monitor, type PMD180 LCD followed by the ENTER key.
Now that you have entered the program, use the Communications
Setup selection to make sure that the communications parameters of the
PMD match those of the computer. The default parameters of the PMD
are as follows:
Group Number = 1
Unit Number = 1
Baud Rate = 9600
Parity = None
Data Bits = 8
Stop Bits = 1
Requires CTS = No
Requires RTS = No
Checksum = CRC
The default parameters of the computer set up by the programming
software are:
Group Number = 1
Unit Number = 1
Communication port = COM1
Baud Rate = 9600
Parity = None
Data Bits = 8
Stop Bits = 1
Requires CTS = No
Requires RTS = No
Checksum = CRC
You should now be able to communicate with the PMD.
10
79736-6
PMD 180 Message Display
User’s Manual
UTICOR Technology, LP
2
Getting Started
Use the Mode and Enter buttons on the front of the PMD to set up the
computer interface port parameters. The Mode key is used to toggle
through the options and the Enter key is used to select the option
displayed on the screen. Use the Mode key to proceed after the port is
set up. Make sure that both ports match. Save port settings and return
to the main menu. Select the Online Network option of 10F54 and
press S to check the Status ID of the PMD. If communication has been
established, you will see the current status of the unit. If there is no
communication, there will be a communication error message. If communications have not been established, then check your cable connections, proper COM port on the computer, and verify the baud rate
setting of 10F54 matches that of the PMD.
79736-6
11
PMD 180 Message Display
2
User’s Manual
UTICOR Technology, LP
Getting Started
This page intentionally left blank.
12
79736-6
User’s Manual
PMD 180 Message Display
3
UTICOR Technology, LP
Display Front Panel Features and Controls
The front panel of the PMD 180 is available in both NEMA 12 and NEMA 4X. It features a
vacuum fluorescent display, battery and logic power status indicators, and mode select keys.
V. F. DISPLAY
The PMD 180 comes with a multi-character vacuum fluorescent display. Its characters are composed in a 5 x 7 matrix. An inherent characteristic of vacuum fluorescent displays is that they tend to show uneven
illumination if the same message is left on them for a long period of
time. UTICOR has devised two ways in which to battle this problem.
One is the ‘Display Saver Timeout’ feature. When enabled, the display
will go blank if a message is left on the display longer than the preset
amount of time determined by the user. When another message is
triggered on the display, the new message will be displayed. The other
way UTICOR fights this problem is the ‘Display Test’ found under
‘Test Functions’ with the ‘Mode Select’ keys. By running this test for
an extended period of time, some of the evenness will return to the
display.
BATTERY OK LED
The ‘Battery OK’ LED is used to indicate to the operator whether or
not the battery is at a voltage level which could sustain the clock and
the user RAM in the event that supply power is lost. The LED is only lit
when the unit is powered and the battery is good. When the unit is
programmed, a message can be dedicated as the ‘low battery’ message.
POWER LED
The ‘Power’ LED is used to indicate to the operator that logic power is
at a valid level for proper operation of the unit.
MODE BUTTONS
There are three Mode keys on the front of the unit (Mode, Enter, and
Restart). These keys are used to select the Setup modes for the PMD
180. Use the Mode key to advance through the different Setup modes.
When you have reached the Setup mode you need, use the Enter key to
select it. Likewise, use the Mode key to advance through the different
options offered for each step of the setup and the Enter key to select the
option you want when it is shown on the unit’s display. After pressing
restart and the unit times out, the Mode and Enter keys are used to
scroll through the message queue.
79736-6
13
PMD 180 Message Display
3
User’s Manual
UTICOR Technology, LP
Display Front Panel Features and Controls
Below are listed the different Setup Modes and the options within each
of them.
Display Mode
Computer Interface/Program Port
Baud rate: 300, 600, 1200, 2400, 4800, or 9600*
Parity: Off*, Odd, or Even
Stop Bits: 1* or 2
RS-485: No* or Yes
Protocol: PMD* or ASCII
Checksum: CRC*, EOR, or None
Group: 01*, Unit: 0001*
* Default Values
PLC Port
Baud rate: 300, 600, 1200, 2400, 4800, 9600, or 19200
Parity: Off, Odd, or Even
Stop Bits: 1 or 2
Data Bits: 7 or 8
Set Clock
Mode: AM, PM, or 24 (Factory setting is AM/PM
mode)
Time: HH:MM:SS
Date: DD-MMM-YY
Data Logging
Test Functions
Setup Mode
Computer Interface Diagnostics
Display Test
Operator Interface
Parallel Port Test
Demonstration Mode
14
79736-6
User’s Manual
PMD 180 Message Display
3
UTICOR Technology, LP
Display Front Panel Features and Controls
DISPLAY MODE
The display mode is the operating mode of the PMD 180. Both programming and general operation are performed while in this mode.
COMPUTER INTERFACE
The computer interface mode allows you to set up the PMD’s computer
port to match the communication parameters of the host computer. The
10F54 programming software operates with both PMD and ASCII
protocol.
PLC PORT
The PLC port mode lets you set up the PMD’s PLC port to match the
port parameters of the PLC being monitored.
SET CLOCK
The ‘Set Clock’ option allows you to set the clock to the current time
and date. The clock information can be used in messages or stamped on
the data log.
DATA LOGGING
The Data Logging option allows the user to display or print (if option
board is present) the contents of the data log if it is not empty. In the
“Display” option, the MODE button moves to the next entry and the
ENTER button displays the message text one screen at a time.
TEST FUNCTIONS
Test Functions provide a test of the integrity of the connections that
have been made to the PMD 180, and test the display. The Setup Mode
option takes you out of Test Functions. Computer Interface Diagnostics
will display the different bytes received from the computer in hexadecimal. The Display Test option lets you check the operation of the display. This test also can be used to rejuvenate the evenness of intensity
on the display. The Operator Interface option is not present on the
PMD 180. The Parallel Port test will give you a hexadecimal representation of the data and control bits.
DEMONSTRATION MODE
The ‘Demonstration Mode’ is an illustration tool. When this option is
selected, message #1 will be displayed.
79736-6
15
PMD 180 Message Display
3
User’s Manual
UTICOR Technology, LP
Display Front Panel Features and Controls
This page intentionally left blank.
16
79736-6
User’s Manual
PMD 180 Message Display
4
UTICOR Technology, LP
Back Panel Features and Controls
The back panel of the PMD 180 is used to make all the interfacing connections to the PLC and
other devices being used to control the unit. In this section the different back panel features
will be discussed.
The power input connectors (figure 4-1) are used to apply the proper
voltage potential to the unit. AC units can operate at either a nominal
115 VAC or 230 VAC. DC units operate at a nominal 24 VDC. The
specific operating voltage range is shown in Section 10, General Specifications, of this manual.
POWER INPUT
GND
L2L1
Figure 4-1
COMPUTER INTERFACE
There are two computer interface connectors. One is a 9-pin ‘D’-type
connector. This connector is used solely for RS-232C communications.
There are also screw-clamp terminals for computer interface. These
terminals are used for either RS-422A or RS-485A communications.
Remember — that only one type of communication parameter can be
used at any one time.
This port is to be used when programming, uploading,
and downloading messages. An IBM or compatible,
using 10F54 software, can be connected to the 9-pin Dsub (RS-232C) or to the computer interface terminal
strip (RS-422A/RS-485).
GND
L2L1
Figure 4-2
79736-6
17
PMD 180 Message Display
4
User’s Manual
UTICOR Technology, LP
Back Panel Features and Controls
PLC INTERFACE
Reference figure 4-3. There are two PLC interface connectors. One is a
9-pin ‘D’-type connector. This connector is used for either RS-232C or
current loop communications. The other group consists of screw-clamp
terminals. These terminals are used for either RS-422A or RS-485A
communications. To use RS-485 communications to the PLC, the
option board must be present. Remember that only one type of communication parameter can be used at any one time.
GNDL2L1
Figure 4-3
18
79736-6
User’s Manual
PMD 180 Message Display
4
SWITCHES
UTICOR Technology, LP
Back Panel Features and Controls
There is a single switch located between the 9-pin ‘D’ connectors for
PLC and computer interface. (See figure 4-4.) This switch is used to
enable and disable the ‘current loop’ interface mode of the PLC
port.The second switch package consists of nine switches. This array of
switches is used to set the PLC and computer interface terminal blocks
for either RS-422A or RS-485A communication. When RS-485A is not
being used, the switches must be set for RS-422A. The position 9
switch is used along with an internal jumper to enable/disable the Mode,
Enter, and Restart buttons on the front of the unit.
Figure 4-4
Selects whether PLC driver is store in RAM or EEPROM memory*
The second switch package consists of
nine switches. (See figure 4-5.) This
array of switches is used to set the PLC
and computer interface terminal blocks
for either RS-422A or RS-485A communication. When RS-485A is not being
used, the switches must be set for RS422A. The position 7 switch allows you
to store the PLC driver code in the
EEPROM (see following page for
specific instructions.) The position 9
switch is used along with an internal
jumper to enable/disable the Mode,
Enter, and Restart buttons on the front
of the unit.
Figure 4-5
79736-6
19
User’s Manual
PMD 180 Message Display
4
UTICOR Technology, LP
Back Panel Features and Controls
SW1-7 Storing the PLC Driver in EEPROM
You must have Revision I of the PMD180 exec software (P/N 10C86)
installed for this option. The PMD180 exec software is installed at the
factory. All PMD 180s that are currently shipping have this revision of
the exec. If you are using this manual to configure an older PMD180,
it may not have revision I installed. (This exec revision number will be
displayed briefly upon initial power-up of the PMD. Call technical
support, if you’re unsure or cannot find the exec revision number.)
Previous versions of PMD 180 exec software stored the PLC driver in
the battery-backed RAM. If the battery failed, the driver was lost. The
new software, revision I, allows you to store the PLC driver code in
the EEPROM, thus retaining the code even if the battery fails. External
DIP switch SW1-7, if set to position 0, indicates that the driver will
automatically be saved to EEPROM when it is uploaded. Setting it to
position 1 indicates the driver is only stored in RAM. Using this
feature (save to EEPROM) requires a minimum of 32K of EEPROM
memory. Only units with 32K, 64K or 128K of EEPROM can use this
feature.
If the driver is stored in the EEPROM, it will be loaded from the
EEPROM to RAM upon power-up. If a corrupted data log is detected
during this process, the data log will be initialized.
CAUTION
DO NOT change SW1-7 while the unit is on. This
will corrupt user memory and the driver. If SW1-7
is changed, YOU MUST repeat steps 1 though 5,
below. Using this feature WILL result in a LOSS of
16K of user memory.
To enable/disable this feature, perform the following steps:
1.
2.
3.
4.
5.
20
Turn PMD off.
Set SW1-7 to 0 to store the driver in EEPROM,
or 1 to store in RAM.
Turn unit on.
Upload user file.
Upload PLC driver (if the random driver is uploaded
with the user file, this step can be skipped.)
79736-6
PMD 180 Message Display
User’s Manual
4
PARALLEL PORT
UTICOR Technology, LP
Back Panel Features and Controls
Included on the option board is a parallel port connector (figure 4-6).
This is a 25-pin ‘D’-type connector. This port has 16 data bits and 4
control bits. Use discrete outputs from the PLC to trigger messages and
display data set values. The 4 control bits can also be used to assign
priority to a message.
GNDL2L1
Figure 4-6
This optional port lets messages and/or variable data be displayed. The
connection is generally to an output module with a voltage range of 10–
30 VDC. For more information on interfacing to the parallel port, see
figure 4-7 on the next page.
79736-6
21
PMD 180 Message Display
4
User’s Manual
UTICOR Technology, LP
Back Panel Features and Controls
Figure 4-7
22
79736-6
User’s Manual
PMD 180 Message Display
4
SLAVE PORT
Note:
UTICOR Technology, LP
Back Panel Features and Controls
You cannot connect another PMD 180 to this port.
Also included with the option board is a slave port (figure 4-8). This
optional port allows remote displays to echo what the PMD 180 is
displaying. Any of UTICOR’s slave message displays can be controlled
through this port.
Figure 4-8
Below (figure 4-9) are some basic master/slave wiring configurations.
The slave port operates at 9600 baud over an RS-422 link. Maximum
cable length is 4000 feet (1220 meters). In a multi-drop configuration,
up to nine slaves can be driven by one master without signal boost. The
repeater ports on UTICOR’s slave message displays provide signal
boost. However, there is no provision for a signal boost on the reply.
Multi-Drop Connection
Daisy-Chain Connection
Figure 4-9
79736-6
23
PMD 180 Message Display
4
User’s Manual
UTICOR Technology, LP
Back Panel Features and Controls
Slave Port (Master/Slave Command Mode)
The master/slave command mode lets you use a master PMD 180 or
PCI 185 as a slave to another master PMD 180 or PCI 185. The controlling unit is set up through the System Attributes menu while online
or offline. Select the Slave Port Mode option. Normal mode lets you
send messages to regular PMD slaves through the slave port. The
Master CMD mode lets you send computer interface messages to other
PMD 180s or PCI 185s out of the master’s slave port. (See figure 410.)
The PMD 180s and PCI 185s receiving the computer interface commands can receive these commands either through their computer
interface ports or their PLC interface ports. Use the PLC interface port
if you need the computer interface port for other purposes. In order to
use the PLC interface port, you must select the UTICOR Master Slave
driver from the Upload PLC Code option in the PLC functions menu.
Wiring to either port is made to the RS-422 portion of the respective
port similar to that of a regular slave display in multi-drop fashion as
shown on the previous page.
Here are the parameters for interfacing to the computer and PLC
interface ports.
Computer interface
Group #:
XX
Unit #:
XXXX
Baud Rate:
Parity:
Stop Bits:
Data Bits:8
Checksum:
PLC interface
Group # & Unit # is set through
computer interface setup using the
front keypad
9600
Baud Rate:
9600
None
Parity:
None
1
Stop Bits:
1
Data Bits:
8
EOR
Regardless of which port receives the computer interface message
codes, regular PMD slave displays can be controlled through the slave
ports of the master units configured as slaves.
To display a message on a master unit configured as a slave, a message
must be called up on the controlling master and sent to that slave unit.
The message that is called up must have the same message number as
24
79736-6
User’s Manual
PMD 180 Message Display
4
UTICOR Technology, LP
Back Panel Features and Controls
the message you would like to view on the slave. If there is variable
data in the controlling unit’s message, that data is used by all slave units
on the network for their variable data sets.
Note:
When a PCI 185 is used as a master slave unit, its function key data is
not sent to the controlling PMD. Messages sent to a master slave unit
have equal priority.
PCI 185 with slave
port set to Master CMD
PMD 180 in
Master Slave Mode
Slave
Slave
Slave
PLC
PMD 180 in
Master Slave Mode
Slave
Slave
Slave
Figure 4-10
79736-6
25
PMD 180 Message Display
4
User’s Manual
UTICOR Technology, LP
Back Panel Features and Controls
PRINTER PORT
Also included on the option board is a serial printer port. This port
allows you to have messages that are triggered on the PMD printed out
on a serial printer. The serial ports pin assignments are provided below
in figure 4-11.
Figure 4-11
26
79736-6
PMD 180 Message Display
User’s Manual
UTICOR Technology, LP
5
PROGRAMMING THE PMD
Programming
You cannot run the 10F54 programming software from the floppy disk
it was received on. It must be installed, through its install program, on a
hard drive. When the DOS prompt is set to the drive and directory
where the software is located, type in P M D 1 8 0 and press ENTER.
You will then see the main menu. Press F1 for context-sensitive HELP
screens.
1
2
3
4
5*
ESC
–
–
–
–
–
–
Offline Development
File Network
PLC Functions
Communications Setup
Online Network
Exit to DOS
* EEPROM units will not perform any of the PMD180 programming
software’s Online Network functions that alter the user message program (except Clear Memory). RAM memory must be installed to use
these functions.
OFFLINE DEVELOPMENT The Offline Development menu performs all the offline programming. It
is not necessary for a PMD 180 to be connected to use these selections.
1
2
3
4
5
6
7
8
9
E
C
D
F
M
S
ESC
79736-6
–
–
–
–
–
–
–
–
–
–
–
–
–
–
–
–
Open Message File
Simulator
Compact Message File
Print Message File
System Attributes
Default Message Attributes
Set Attribute in Range
Find a String
File Merge Functions
Edit Message
Copy Messages
Delete Messages
Fill Messages
Move Messages
Program Status
Return to Main Menu
27
PMD 180 Message Display
5
User’s Manual
UTICOR Technology, LP
Programming
1– Open Message File
The ‘Open Message File’ option lets a disk file be opened or created for
editing. You must open a message file before you can access any other
option. All the information stored in the message file will be available
for editing. The highlighted filename indicates the currently selected file.
Pressing the RETURN key opens the highlighted file. A new file can
also be opened by simply typing a new name and pressing the RETURN
key. As the filename is being entered, it is displayed to the right of the
‘Select Filename:’ prompt on the lower left portion of the screen.
Note: Factory default directory is C:\PMD180. If you installed the
software in any other directory, you must change to that directory by
pressing F3.
2–Simulator
The “Simulator” selection allows messages to be viewed as they would
be on the PMD 180 or PMD 3000 slave when the 3000 simulator is
selected from this option. For the PMD 3000 simulator, leading zeros
will always be displayed for variable data.
3–Compact Message File
The ‘Compact Message File’ selection lets the message file be compacted on the disk. This should be used after a program has been
developed to shrink the disk usage of the program.
4–Print Message File
The ‘Print Message File’ option allows a specified range of messages
and attributes to be printed to the system printer.
5–System Attributes
Selecting the ‘System Attributes’ option will call up the operating
parameters of the message display. These different parameters include
the blink, scroll, print port, parallel port, and miscellaneous attributes.
The F10 key saves the attributes as the defaults.
6–Default Message Attributes
The ‘Default Message Attributes’ selection allows the default values
for the message attributes of unprogrammed messages to be set. The
user can customize the default attributes for new messages to accommodate specific needs.
7–Set Attribute in Range
The ‘Set Attribute in Range’ selection allows the attribute values for a
range of messages to be changed. All the messages in the range will
adopt the new attributes as long as the message type is the same. If a
message is a chain message and the attributes are for a non-chain
message, then the chain message attributes will not be effected.
28
79736-6
PMD 180 Message Display
User’s Manual
UTICOR Technology, LP
5
Programming
8–Find a String
The ‘Find a String’ selection allows the message text to be searched for
a specified string of characters. All the message numbers with message
text containing the string will be displayed. If the ‘..more..’ prompt is
displayed, any key pressed, other than the ESC key, will display more
message numbers.
9–File Merge Functions
The ‘File Merge Functions’ selection will bring up another menu. This
menu has four options on it. They include: Open Secondary File which
allows another disk file to be opened for transferring messages to and
from; Fill Messages which lets a single message from one of the files to
be copied to one or more messages in the other file; Copy Messages
which lets a range of messages from one of the files to be copied to a
range of messages in the other file; and the ESC selection which returns
you to the ‘Offline Development’ menu.
E–Edit Message
The ‘Edit Message’ selection allows messages in the open file to be
added or edited. When the screen is entered, message #1 is displayed by
default. To display a different message, enter digits followed by RETURN at the ‘Message Number’ prompt. If the message is programmed, the attributes and text for the message are displayed. Otherwise, the default attributes and empty text box are displayed.
C–Copy Messages
The ‘Copy Messages’ option copies the source range of messages to
the destination range. The source messages are not deleted.
D–Delete Messages
The ‘Delete Messages’ selection allows a range of messages to be
deleted.
F–Fill Messages
The ‘Fill Message’ selection copies a single message to a range of
messages.
M–Move Messages
The ‘Move Messages’ option allows a range of messages to be moved.
The messages in the source range are deleted after the move.
S–Program Status
The ‘Program Status’ screen displays information on the message file
program. If the ‘..more..’ prompt is displayed, any key pressed, other
than ESC, will display more message numbers. Otherwise, any key
pressed returns to the ‘Offline Development’ menu.
ESC–Return to Main Menu
This selection takes you back to the ‘Main Menu.’
79736-6
29
PMD 180 Message Display
5
User’s Manual
UTICOR Technology, LP
Programming
FILE NETWORK MENU
The File Network menu has options used to handle the uploading and
downloading of files to the PMD 180.
1
2
3
ESC
–
–
–
–
Upload File to PMD
Download File to Disk
Verify a File
Return to Main Menu
1–Upload File to PMD
The ‘Upload File to PMD’ selection reads a file from disk and copies it
into the PMD 180. All the information stored to the message file is now
in the PMD. When using a random message file, this option lets the user
upload more than the message if desired. It will also let the user upload
the PLC driver code and the random PLC attributes. You are prompted
for the part(s) of the file to be loaded.
2–Download File
The ‘Download File to Disk’ option duplicates a program from the
PMD 180 into a file on disk. The program information stored to that
message file is available offline. If the file already exists, it is overwritten.
Note: With standard files, neither Option #1 nor Option #2 include the
PLC settings. They must be loaded separately.
3–Verify a File
The ‘Verify a File’ option compares the program in the PMD 180 with a
file on disk. A file can also be verified by typing the name then pressing
the ENTER key. As the filename is being entered, it is displayed to the
right of the ‘Select Filename:’ on the lower left portion of the screen.
ESC–Return to Main Menu
Pressing the ESC key returns you to the Main Menu.
PLC FUNCTION MENU
The PLC Function menu contains the options used to handle the PLC
setup.
1
2
3
4
ESC
30
–
–
–
–
–
Upload PLC Code
Edit Attributes in PMD
Edit PLC File Defaults
Remove PLC Code
Return to Main Menu
79736-6
User’s Manual
PMD 180 Message Display
UTICOR Technology, LP
5
1–Upload PLC Code
Programming
The ‘Upload PLC Code’ selection brings up a menu of the PLC drivers
that are supported. Selecting one of the menu items loads the driver for
that PLC into the PMD 180. Use your arrow keys and Enter to choose
the PLC you are connecting to.
This option lets you change the attributes of the loaded PLC
code without downloading a new PLC driver.
2–Edit PLC Attributes in PMD
3–Edit PLC File Defaults
The ‘Edit PLC File Defaults’ selection allows you to change the PLC
default values of any particular PLC driver prior to sending the driver to
the PMD. The defaults are used as a template when the file is uploaded.
4–Remove PLC Code
The ‘Remove PLC Code’ selection loads a NULL driver into the PMD
180 so that the unit may operate without a PLC connected.
ESC–Return to Main Menu
This selection takes you back to the ‘Main Menu.’
COMMUNICATIONS SETUP
The Communications Setup option lets you set the communication
parameters of the computer to accommodate those of the PMD 180 and
attached printer. This setup is vital to ensure proper exchange of data
between the computer and the PMD.
COMP. INT PRINTER
Group Number:
1
Unit Number:
1
Port:
COM1
LPT1
BAUD Rate:
9600
9600
Parity:
NONE
NONE
Data Bits:
EIGHT
EIGHT
Stop Bits:
ONE
ONE
Require CTS:
NO
NO
Control RTS:
NO
Checksum:
CRC
79736-6
31
PMD 180 Message Display
5
User’s Manual
UTICOR Technology, LP
Programming
Group/Unit Number
The group and unit number selections are used to specify which PMD
180 the computer is going to communicate with. Group numbers can
range from 0 to 15 and unit numbers can range from 0 to 4095. The
default values of these settings are group 1, unit 1.
Port
This option allows the user to designate which port on the computer is
going to be used to interface to the PMD and which port will send data
to the printer.
The PMD can be interfaced to COM1, COM2, COM3, or COM4. The
default setting is COM1.
The printer port can be set as LPT1, LPT2, or any of the COM ports.
The default port is LPT1.
Baud Rate
This selection is used to set the speed that the above selected ports will
operate. The default setting is 9600 baud for both ports. However, if the
LPT1 or LPT2 port is selected for the printer port, the baud rate setting
will have no effect.
Parity
This selection allows the user to use a parity bit to ensure the integrity
of the communications between the computer and either the PMD 180
or the printer. Available settings are even, odd, or none. The default
setting for both ports is NONE (no parity).
Data Bits
This option lets the user select the number of data bits that will be used
for communications between the computer and the printer. The selections available are 7 or 8. The default value is 8 data bits. The PMD’s
communication protocol requires 8 data bits.
Stop Bits
This option lets the user choose one or two stop bits to indicate the end
of transmission between the computer and either the PMD or the
printer. The default selection is one stop bit.
Require CTS
This selection can be enabled or disabled depending on whether or not a
Clear to Send handshaking signal is required or desired. The default
value is No (disabled).
Control RTS
If using either a UTICOR bidirectional adapter or some other adapter to
convert to RS-485, this selection should say YES to accommodate the
RS-485 requirements. The default setting is NO.
32
79736-6
User’s Manual
PMD 180 Message Display
UTICOR Technology, LP
5
Programming
Checksum
This selection allows the user to choose the type of checksum that is to
be used by the computer when communicating with the PMD 180. The
different types of checksum available are CRC, XOR, or None. The
default setting is CRC. If ASCII protocol is to be used to control the
PMD, the CRC checksum should be used. Otherwise communications
may not be as reliable between the two units.
ONLINE NETWORK MENU
The Online Network option lets you change the PMD setup without
going offline.
1 –
Display Programmed Message
2 –
Display Packet Message
3 –
Clear Memory
4 –
System Attributes
5 –
Default Message Attributes
6 –
Set Attribute in Range
7 –
Clear Queue
8 –
Data Log
9 –
Test Memory
E –
Edit Message
C –
Copy Messages
D –
Delete Messages
F –
Fill Messages
M –
Move Messages
S –
Status ID
T –
Time and Date
V –
Variable Data
L –
LED/Function Key Data
ESC –
Return to Main Menu
The ‘Display Programmed Message’ selection allows a programmed message in the PMD to be triggered onto the PMD 180
display.
1–Display Programmed Message
2–Display Packet Message
The Packet Message’ selection displays a message on the PMD 180
without storing the message in the PMD 180 memory.
3–Clear Memory
The ‘Clear Memory’ option clears and initializes the PMD 180. A
confirmation prompt is given to allow the operation to be aborted. This
command will not clear the data log or the PLC driver. You must use
the Data Log (option 8) option to clear the data log and the PLC
Functions (under the Main Menu) to clear the PLC driver.
79736-6
33
PMD 180 Message Display
5
User’s Manual
UTICOR Technology, LP
Programming
4–System Attributes
The ‘System Attributes’ screen gives you a listing of the Blink, Scroll,
Print Port, Parallel Port, and Miscellaneous Attributes. Multiple screens
are used to set the attributes. Any parameters not altered retain their
previous value. Saving stores all attributes. Likewise, aborting results in
all the attributes being restored to their previous values.
5–Default Message Attributes
The ‘Default Message Attributes’ option changes the default
attributes for messages not programmed yet. This allows the user to
customize the default message attributes for their specific application.
6–Set Attribute in Range
The ‘Set Attribute in Range’ selection allows the attribute values for a
range of messages to be changed. All the messages in the range will
adopt the new attributes as long as the message type is the same. If a
message is a chain message and the attributes are for a non-chain
message, then the chain message attributes will not be effected.
7–Clear Queue
The ‘Clear Queue’ option allows the message queue to be partially or
completely cleared. The queue size is sixteen messages.
8–Data Log
The ‘Data Log’ selection lets the data log entries, from the PMD 180,
be viewed, cleared and printed. The data log size is about 700 entries.
This value varies with the different PLC drivers that are loaded. For an
exact value of data log entries, do a ‘Status ID’ command after the PLC
driver has been loaded.
9–Test Memory
This command allows the user to test the integrity of the user memory.
When selected, the programming terminal will show an estimate of how
long the test will take.
Note: User memory will be cleared when this test is executed.
E–Edit Message
The ‘Edit Message’ selection allows messages to be added or edited.
When the screen is entered, message #1 is displayed by default. To
display a different message, enter digits followed by RETURN at the
‘Message Number’ prompt. If the message is programmed, the attributes and text for the message are displayed. Otherwise, the default
attributes and empty text box are displayed.
C–Copy Messages
The ‘Copy Messages’ option copies the source range of messages to
the destination range. The source messages are not deleted. Use the F10
key to copy the source range to the destination range.
34
79736-6
PMD 180 Message Display
User’s Manual
UTICOR Technology, LP
5
Programming
D–Delete Messages
The ‘Delete Messages’ selection lets you delete a single message or a
range of messages.
F–Fill Messages
The ‘Fill Message’ selection copies a single message to a range of
messages.
M–Move Messages
The ‘Move Messages’ option allows a range of messages to be moved
from the source range to the range starting at the target start message.
The messages in the source range are deleted after the move.
S–Status ID
The ‘Status ID’ selection will show you information about the PMD
180. Information will include software and hardware revisions, memory
available, and PLC selection. Any key pressed returns to the ‘Online
Network’ menu.
T–Time and Date
The ‘Time and Date’ selection reads the time and date from the PMD
180 and computer. The PMD’s time can be changed through this selection.
V–Variable Data
The ‘Variable Data’ option allows the data sets to be viewed or edited.
L–LED/Function Key Data
The ‘LED/Function Key Data’ is not available on the PMD 180.
ESC–Return to Main Menu
This selection takes you back to the ‘Main Menu.’
79736-6
35
User’s Manual
PMD 180 Message Display
5
UTICOR Technology, LP
Programming
FILTERING SLAVE
ADDRESSES
This feature was added to the PMD180 Software (P/N 10C86, Revision
“J” or later, ONLY). This feature allows a PMD180 Master to filter out
messages to specific slaves. Up to 8 separate slave addresses can be
filtered out. When a slave’s address is being filtered only packet messages received via the computer interface port are sent to the slave. Any
other messages are blocked. This effectively passes control of the slave
from the PMD180 master to the PC connected to the PMD180 master’s
computer interface port. When the slave’s address is removed from the
filter list control is returned to the PMD180 master.
You can implement filtering by using two new computer interface
commands: Modify Filter List (code 86) and Read Filter List (code
87). These commands allow the user to add or remove addresses from
the filter list. These commands are described below.
PROGRAMMING NOTES: Messages sent to multiple slaves (Group 0/
Unit 0 or Group x/Unit 0) cannot be filtered on an individual slave
basis. If the multiple slave address is in the filter list, the message is not
sent to any slaves. If the address is not in the list, the message is sent to
all slaves. For example, if Group 0/Unit 0 is in the filter list, then messages addressed to Group 0/Unit 0 will not be sent to any slaves. If it is
not in the filter list, messages addressed to Group 0/Unit 0 will be sent
to all slaves. Filtering messages to Group 0/Unit 0 only filters messages
addressed to Group 0/Unit 0, it will not filter messages to individual
slaves. You will have to decide which option best suits your application.
On power-up the PMD180 master clears the filter list.
COMPUTER INTERFACE
COMMANDS
MODIFY FILTER LIST
Byte
1
2
3
4
5
6
7
8
8+N*2
9+N*2
COMMAND
Value
HEX AA Start of Message Byte
8+N*2 Length
B4-B7 4 bit group number
B0-B3 Most Significant Bits of 12-bit unit number
8 Least Significant Bits of 12 Bit unit number
86 = Command Code
Control Byte
0 = add addresses to filter list
1 = remove addresses from filter list
2 = remove all addresses from filter list
N = number of addresses in command
addresses (2 bytes each, MSB, LSB)
Checksum LSB
Checksum MSB
REPLY = Standard Reply
36
79736-6
User’s Manual
PMD 180 Message Display
UTICOR Technology, LP
5
Programming
This command allows you to add or remove addresses to filter, or to
completely erase the filter list from the master. The number of slaves to
add or remove from the filter list is indicated by byte 7, the number of
addresses in command. The next 2 to 16 bytes are addresses for up to 8
slaves affected by the command. Two bytes are needed for each slave’s
16-bit Group/Unit Address. If the Control Byte is set to 2, the number
of addresses and addresses themselves, are not required.
If the Filter List in the PMD180 is full (already has 8 addresses) an
insufficient memory error (dec. 6) is returned in the reply. If the Control Byte is a value other than 0-2, an invalid data byte error is returned
(dec. 24). If an attempt is made to remove non-existent addresses from
the list, no error is returned.
READ FILTER LIST
Byte
1
2
3
4
5
6
7
COMMAND
Value
HEX AA Start of Message Byte
6 length
B4-B7 4-bit group number
B0-B3 Most Significant Bits of 12-bit unit number
8 Least Significant Bits of 12 Bit unit number
87 = Message Code
Checksum LSB
Checksum MSB
REPLY
Byte
1
2
3
4
5
6
7-22
23
24
Value
HEX AA Start of Message Byte
23 Length
B4-B7 4 bit group number
B0-B3 Most Significant Bits of 12-bit unit number
8 Least Significant Bits of 12 Bit unit number
87 = Command code
Number of addresses in the filter list
Addresses (2 bytes each, MSB, LSB)
Checksum LSB
Checksum MSB
This command returns the filter list. If there are less than 8 addresses in
the list then 0/0 is returned for the remaining addresses.
79736-6
37
PMD 180 Message Display
5
User’s Manual
UTICOR Technology, LP
Programming
This page intentionally left blank.
38
79736-6
PMD 180 Message Display
User’s Manual
UTICOR Technology, LP
6
CHAIN MESSAGE
Message Attributes
[Y] A chain message will automatically display a group of other
messages. The chained message contains a list of message numbers to
be displayed. No message text is entered, only message numbers.
Example: Message 2 is a chained message
1> 25
2> 125
3> 34
4> 9
When message 2 is selected, then messages 25, 125, 34 and 9 will
automatically be displayed for a predetermined time. Each message in
the chain will be displayed for the same amount of time. Refer to “System Attributes Section” for setting the chain time. All chain messages
will use this time setting. The maximum number of messages in a chain
is 115.
Repeat Chain
[Y] Will cause the list of chain messages to repeat until a new message
is selected.
[N] Will display the list of chain messages once.
SCROLL UPWARDS
[Y] Message lines will scroll up from a lower line of the display to next
line up of the display. The maximum number of characters in a scroll up
message is 235.
Bottom Line/Top Line
The message will scroll from the selected bottom line to the selected
top line. The bottom line value must equal to or greater than that of the
top line.
Repeat
[Y] The scroll up message will keep repeating until a new message is
selected.
[N] The scroll up message will be displayed once.
Scroll Rate
79736-6
Determines the rate this particular message will scroll up. The range for
scroll rate is 0.1 to 9.9 seconds. A value of 0.0 causes the PMD to use
the value found in the system attributes.
39
User’s Manual
PMD 180 Message Display
6
UTICOR Technology, LP
Message Attributes
SCROLL LEFT
[Y] The message will scroll from right to left on any one line of the
display. The maximum number of characters in a scroll message is 230.
Scroll Line
Select which line of the display the message will scroll on.
Repeat
[Y] The scroll left message will keep repeating until a new message is
selected.
[N] The scroll left message will be displayed once.
Scroll Rate
PRINT MESSAGE
On 1 Line
Determines the rate this particular message will scroll across the display.
The range for scroll rate is 0.1 to 9.9 seconds.
[Y] The message text, when selected will be sent to the optional RS232 serial printer port of the display. This allows messages to be printed
when they are selected to be displayed.
[Y] The message text will be printed on 1 line of the printer. Line wrap
is dependent on the printer being used.
[N] Message text will be printed in same manner as shown on the
display.
<CR><LF>
[Y] A carriage return and line feed will be sent to the printer after the
message text is printed.
[N] The next message will start printing where the last message
stopped printing.
Note:
If the message to be printed contains variable data, then
these data sets must to be updated before the message text will be
printed.
CLEAR DISPLAY
[Y] Will cause the previous message to be erased from the display and
will cause all 4 data sets to be reset to zero when the System Attributes’
“Clear Data Sets” selection is enabled.
[N] Previously displayed characters will remain on the display where
this message does not overlay them. Data sets remain unchanged.
40
79736-6
User’s Manual
PMD 180 Message Display
UTICOR Technology, LP
6
Message Attributes
Example:
CENTER MESSAGE
Previous
Message
New
Message
Result
[Y]
1234567890
2ND LINE
ABC
ABC
[N]
1234567890
2ND LINE
ABC
ABC4567890
2ND LINE
[Y] Will cause message text to be centered on all lines of the display.
All data sets will be reset to zero when a centered message is selected,
and the System Attribute ‘Clear Data Sets’ is enabled.
[N] Text will be displayed as entered in the message. Data sets are not
effected.
Non-Centered
MESSAGE
NEXT LINE
BLINK MESSAGE
Centered
MESSAGE
NEXT LINE
[Y] The entire message (including time, date and variable data) will
blink on and off when displayed. Characters that remain on the display
from previous messages will also blink.
Refer to “System Attributes Section” to set blink on and blink off times.
SEND TO SLAVE*
[Y] Will send the selected message to one or more slave displays
connected to the RS-422 slave port.
* Only valid when the option board is present
All Slaves
[Y] Will send the message to all slaves connected to the RS-422 slave
port. This function sets the group number to 0 and the unit number to 0.
[N] Allows the group and unit number to be individually set.
79736-6
41
User’s Manual
PMD 180 Message Display
6
UTICOR Technology, LP
Message Attributes
Group/Unit Number
The group and unit number allows a message to be sent to a group of
slave displays or a single slave display within a group. Valid group
numbers = 0 to 15. Valid unit numbers = 0 to 4095
3000 Top Stick
This command is used to indicate to the PMD what stick of the unit is
to be used as the top stick of the PMD 3000 slave display on which the
message will be displayed.*
3000 Bottom Stick
This command is used to indicate the bottom stick of the PMD 3000 on
which the message will be displayed.*
* A stick is the part of the display where twenty, 2-inch characters can be displayed. A PMD 3000N1W4H has a total of four
sticks within it, with the top stick being stick #1 and the bottom
stick being stick #4.
INVISIBLE MESSAGE
[Y] The message will not be displayed on the master display, but can
be sent to slaves, printed or logged.
[N] The message will be displayed as normal.
LOG MESSAGE
[Y] When the message is selected, the message number will be stored
in the internal data log along with the time and date. If there is variable
data in the message, their values will also be stored in the data log.
[N] The message will not be logged.
Note: The data log must be enabled. Refer to “System Attributes”.
DISPLAY HEIGHT/WIDTH
Use this option to select the proper size of the display that is being
used.
DATASET DISABLED
[N] The data set value can be changed with the numeric keypad on the
front of the display (PCI 185 only).
[Y] The data set value cannot be changed with the numeric keypad on
the front of the display (PCI 185 only).
42
79736-6
PMD 180 Message Display
User’s Manual
UTICOR Technology, LP
6
MESSAGE EXAMPLES
Example #1
Message Attributes
Following are some message examples demonstrating some of the
special features that are available on the PMD 180.
This example will show how to program a stationary 2-line message
that is centered and has the top line blinking.
From the Edit Messages selection in either the Online Network or
Offline Development menus, enter a message number. Make sure that
Center Message has been selected and that the display size matches that
of the display that the message will appear on. Then, press F6 to edit
the message text. Press F8 to toggle Blink on. Type in “CAUTION!”
and press Enter. Then, type in “TABLE NOT IN PLACE.” Press F10
to save the editing session.
Example #2
This example will show how to program a single-line message that
includes variable data. The variable data will be the three least significant digits from data set #3 that will represent temperature. The message will also scroll left on the top line of the display.
From the Edit Message selection, enter the message number and choose
the Scroll Left option. Select line one and toggle the repeat option to
‘Y.’ Press F6 to edit the message text. Type in “The current oven
temperature is AltF4AltF5AltF6 degrees Fahrenheit.” Press F10 to
save the message.
Example #3
79736-6
When an informational message as that shown in example #2 is being
shown, on the top line of the display, another message can be overlaid
on the second line to give instructions without disturbing the first
message. This is done by choosing N for the Clears Display option
when programming the message and not putting any text on line one.
43
PMD 180 Message Display
6
User’s Manual
UTICOR Technology, LP
Message Attributes
This page intentionally left blank.
44
79736-6
PMD 180 Message Display
User’s Manual
UTICOR Technology, LP
7
System Attributes
The system attributes selection lets the user change the unit’s system default settings. The
PMD 180’s system attributes can be set in both the Offline Development or Online Network
options in the 10F54 programming software. In either case, the options and methods are identical.
BLINK ATTRIBUTES
The blink attributes determine the interval that a blinking message or
character will be on and off. The on and off time ranges are in tenths of
a second from 0 to 99. The default setting is 5/10 of a second.
SCROLL ATTRIBUTES
The scroll attributes determine the rate a scrolling message will move
up or left. Scroll UP time is the period that the message will be displayed on each line in tenths of a second. The default value is 5/10 of a
second. The Scroll LEFT time is the period that a character will be
displayed in each column in tenths of a second. The default value is 5/10
of a second.
MISCELLANEOUS
ATTRIBUTES
The miscellaneous attributes pertain to many of the special characteristics and features that UTICOR has included in the PMD 180.
Display Saver
The display saver option will turn the display off after a message has
been shown for a predetermined period to prolong the clarity of the
vacuum fluorescent tube. The values are in hours. The selectable range
is from 1 to 23 hours and a zero value disables the display saver. The
default value is zero (disabled).
Chain Message
There are two selections that pertain to chain messages. The first
selection is for how long each static message within the chain will be
displayed in tenths of a second. The default value is 100 (10 seconds).
The second selection determines how many times a scrolling message
within a chain message will be repeated before advancing to the next
message in the chain. The range for repeating is from 0 to 255 and the
default value is zero.
Message Queue
There are three selections pertaining to the message queue in the PMD.
The first selection determines whether the queue advances automatically, is advanced manually, or is disabled. The default setting of this
selection disables the queue. The second selection is for when the queue
is advanced automatically. The selection determines how long each
static message will be displayed before the queue is advanced to the
next message in the circular queue. The range for this value is in tenths
of a second from 0 to 255. The default setting is 100 (10 seconds). The
79736-6
45
User’s Manual
PMD 180 Message Display
7
UTICOR Technology, LP
System Attributes
third selection determines how many times a scrolling message within
the queue will be repeated before the queue is advanced. The repeat
range is from 0 to 255 times with a default of 0.
Data Log Enable
This selection allows you to enable and disable the data log. When
enabled, messages triggered that are to be logged, will be put in the
data log. The default for this selection disables the data log.
Clear Data Sets
When enabled, the clear data sets selection will clear the data sets’ data
to zero from the PMD when any message is called up with the “Clear
Data Set” or “Center Message” attribute set. The default setting will
clear the data set data.
LED Control
The LED has a default that has the PLC controlling the LEDs rather
than the PMD under System Attributes.
Character Sets
This selection allows the user to choose which one of eight character
sets will be used. The different character sets available are American,
Cyrillic, French, German, English, Danish, Swedish, and Kana. A listing
of the different characters available in each set is shown in Appendix E.
The default setting for this option is American.
Send PLC Time
Registers
Data Sets Use
Leading Zeroes
Slave Port Mode
This selection lets you choose whether or not to send real-time clock
data from the PMD to the PLC. The default setting does not send the
data.
This selection lets you have leading zeros to indicate that a data set
value belongs in the particular field of the message. When using leading
zeros, a data set value would look like this: 0003. When not using this
option, the same variable data would look like this: 3. The default for
this option enables the leading zeros.
Normal: In this mode any slave display can be connected to the PMD
180’s slave port to display messages.
Master CMD: In this mode the master PMD 180 slave port will be
connected to another PMD 180 master PLC port and will send to it
commands to display the same message number as the master. The
slave master unit will need to have the UTICOR master slave PLC
driver installed.
46
79736-6
User’s Manual
PMD 180 Message Display
UTICOR Technology, LP
7
System Attributes
SPECIAL FUNCTION MESSAGES
Commands can be assigned to different messages that will make a
particular message perform a specific function. Functions include low
battery detection, enabling, disabling and clearing the data log, and
incrementing and decrementing the real-time clock.
Low Battery
Note:
If another message is called up by the PLC, this message
will be cleared and only displayed again upon power up or Restart.
When the battery used to back up the real-time clock, data log, and
RAM memory gets below the level where it can perform its job, the
PMD senses this. A message can be assigned to be triggered when this
happens. The valid range is from 0 to 65535 and the default value is
65535 (non-active).
Enable Data Log
The data log can be enabled by triggering a message that has that
command assigned to it. However, the message does not have to exist.
The valid number range is from 0 to 65535 and the default value is
65535 (non-active).
Disable Data Log
The data log can be disabled by triggering a message that has that
command assigned to it. However, the message does not have to exist.
The valid number range is from 0 to 65535 and the default value is
65535 (non-active).
Clear Data Log
The data log can be cleared by triggering a message that has that command assigned to it. However, the message does not have to exist. The
valid number range is from 0 to 65535 and the default value is 65535
(non-active).
Print Data Log
The data log can be printed by triggering a message that has that particular command assigned to it. However, the message does not have
to exist. The valid message number range is from 0 to 65535 and the
default value is 65535 (non-active).
Increment Clock
A message can be assigned a command that will cause the real-time
clock in the PMD to be incremented one hour when it is triggered. The
message does not have to exist. The valid message number range is
from 0 to 65535 and the default value is 65535 (non-active).
79736-6
47
User’s Manual
PMD 180 Message Display
7
UTICOR Technology, LP
System Attributes
Decrement Clock
A message can be assigned a command that will cause the real-time
clock in the PMD to be decremented one hour when it is triggered. The
message does not have to exist. The valid message number range is
from 0 to 65535 and the default value is 65535 (non-active).
PRINT PORT ATTRIBUTES
The optional printer port can be customized to accommodate the
parameters of most serial printers. This allows you to print messages as
they are triggered and print the data log.
Baud Rate
The printer port will send data at 300, 600, 1200, 2400, 4800, or 9600
baud. The default setting is 1200 baud.
Parity
The printer port will operate with odd, even, or no parity. The default
parity setting is none.
Stop Bits
The printer port supports communication with one or two stop bits. Its
default value is one stop bit.
Print Time/Date
If desired, the PMD will send the current time and date to the printer
when it sends other information to be printed. The default setting does
not send the time and date data.
PARALLEL PORT
ATTRIBUTES
Inverted\Non-Inverted
Flags
48
The optional parallel port can be set up to accommodate several different types of discrete I/O modules from the PLC. Among the attributes
that can be changed are an inverted/non-inverted flag, the data format,
and the debounce time.
This option lets the PMD read the information from the PLC’s discrete
I/O either logically inverted or non-inverted.
Data Format
This attribute is used to select binary or BCD for the format that the
optional parallel port will be read.
Debounce Time
This option is used to select the time needed for the input lines to the
PMD to stabilize. The valid range is 0 to 99 milliseconds. The default
value is 5 msec.
79736-6
PMD 180 Message Display
User’s Manual
UTICOR Technology, LP
8
PLC Data
INTRODUCTION TO THE PLC DRIVERS
All PLC drivers are designed to use a common, but flexible, interface to the main software of
the 180 series product. The main code needs the information on the serial connection. This
information is the baud rate, parity, stop bits, data bits and whether or not the RS-485 is used.
Some PLCs may not support all of the options that the 180 series PLC driver offers. For this
reason flexible PLC attribute screens have been created for each PLC driver.
Having flexible PLC attribute screens allows for each PLC driver to have individual information that it needs to communicate and exchange data with the 180 series unit. This can be
information such as unit identification, register type or location, or starting register number.
The attributes are set when loading the driver with the programming software package. Each
PLC will have its own explanation of the attributes as they will be seen when loading the driver
or editing the attributes. Both of these functions can be found in the “PLC Functions” menu
off the “Main” menu of the programming software package.
Please NOTE — Where possible, default values for a PLC are noted in BOLD UNDERLINE
within this section.
IMPORTANT: 32 (2 groups of 16 contiguous) registers must be set aside in the PLC
for the 180 series product to properly communicate (true for standard only).
NOTES
If PLC attributes are changed while communications between the 180
series product and the PLC are active, an error may occur and be
displayed from starting communications over.
Since the unit is communicating with the PLC via the serial link, the poll
time can affect the scan time of both the unit and the PLC. Similarily,
the more the 180 series product is performing, the more time it takes.
For example, if data is to be sent to the PLC continuously, the communications time can be doubled, or more, depending upon the PLC make
and model. With the PLC constant polling may slow its scan time due
to communications processing.
The 180 series documentation uses bit 0 to indicate the least significant
bit of a word and bit 15 to indicate the most significant.
79736-6
49
User’s Manual
PMD 180 Message Display
8
PLC Data
PLC DATA
PLC Output
Register #
1
PCI 185 only
PCI 185 only
PCI 185 only
PCI 185 only
PCI 185 only
2
3
4
5
6
7
8
9 PCI 185
10–11
12 PCI 185
13–14
15
16
50
UTICOR Technology, LP
PLC data consists of a group of 16 PLC registers used to hold the
output values to the PCI/PMD and a group of 16 registers used to hold
the input values from the unit. Communications with the PLC will be
via a serial link to the PLC’s serial port. Following, is a list of the
output registers from the PLC and a list of the input registers from the
180 series unit. The poll time in the PLC driver defines how often the
unit reads the PLC output registers.
Description
Flags
bit 0 = message number valid
0 = valid, 1 = invalid
bit 1 = data sets valid
0 = valid, 1 = invalid
bit 2 = clear queue valid
0 = valid, 1 = invalid
bit 3 = LEDs valid
0 = valid, 1 = invalid
bit 4 = data set 1 key enable0 = enable, 1 = disable
bit 5 = data set 2 key enable0 = enable, 1 = disable
bit 6 = data set 3 key enable0 = enable, 1 = disable
bit 7 = data set 4 key enable0 = enable, 1 = disable
bits 8–12, not used
bit 13 = slave/group/unit #
0 = valid, 1 = invalid
bits 14–15, not used
Message number to display
Message priority (the higher the number, the higher the priority)
Data set #1
Data set #2
Data set #3
Data set #4
Message number to clear from the queue (65535 = all messages)
LEDs 1–16 (bit 0 = LED 1, bit 15 = LED 16)
(0 = LED off, 1 = LED on)
Reserved
Function keys 1–16 enable (0 = enable, 1 = disable)
Reserved
Data sets slave group and unit number
Reserved
79736-6
User’s Manual
PMD 180 Message Display
UTICOR Technology, LP
8
PLC Data
Example:
Register
Data (HEX)
1
2
3
4
5
6
7
8
9
10
11
12
13–14
15
16
0000
0100
0010
0123
4567
89AB
CDEF
004F
8821
0000
0000
0000
0000
1001
0000
Explanation
Everything is valid and enabled
Display message number 256
Priority is sixteen
291 is the value in data set #1
17767 is the value in data set #2
35243 is the value in data set #3
52719 is the value in data set #4
Clear message 79 from the queue
Turn on LEDs 16, 12, 6, and 1
Reserved
Reserved
Enable function keys 1–16
Reserved
Data set slave group and unit*
Reserved
*Using word 15 you can direct data set information to a specific slave by placing its group and unit number in
this register. Bits 0–11 are used for the unit number, while bits 12-15 are used for the group number.
Flag Bits of Output Register #1
Bit 0
This bit is used to verify that the data in register #2 is valid or invalid. If
this bit is a logic one, the PCI/PMD will ignore that data. When this bit
is set low, the current message number is triggered and the data in the
variable registers is read in once regardless of the setting of flag bit #1.
Bit 1
This bit is used to confirm the validity of the data in registers #4-7. If
this bit is a logic one, the PCI/PMD will ignore the variable data registers. However, when a message is triggered, the variable data registers
will be read regardless of the state of this flag bit.
Bit 2
This bit is used to verify that the message number in register #8 is the
one that should be cleared from the message queue.
Bit 3
This bit is used to signal whether the LED information in register #9 is
valid to be sent to the PCI. If this bit is at a logic one, the PCI will
ignore that register.
79736-6
51
User’s Manual
PMD 180 Message Display
8
UTICOR Technology, LP
PLC Data
Bit 4
This bit is used to enable or disable the Data Set 1 key on the front of
the PCI. If this bit is set to a logic one, the operator cannot change the
variable data in that data set using the numeric keypad.
Bit 5
This bit is used to enable or disable the Data Set 2 key on the front of
the PCI. If this bit is set to a logic one, the operator cannot change the
variable data in that data set using the numeric keypad.
Bit 6
This bit is used to enable or disable the Data Set 3 key on the front of
the PCI. If this bit is set to a logic one, the operator cannot change the
variable data in that data set using the numeric keypad.
Bit 7
This bit is used to enable or disable the Data Set 4 key on the front of
the PCI. If this bit is set to a logic one, the operator cannot change the
variable data in that data set using the numeric keypad.
After the message in the previous example is received by the PCI, it
sends a reply to the PLC’s input registers. The PCI updates the PLC
input registers whenever any of the register values change. The input
format is as follows in the table below.
Bit 8
This bit is used to enable or disable the circular message queue if the
queue status in the system attributes is in either auto or manual mode.
Bit 13
This bit is used to enable or disable the data set slave group and unit
number. If enabled, the data sets will be sent to the slave(s) specified in
the data sets slave group and unit register.
PLC Input
Register #
1
PCI 185 only
PCI 185 only
PCI 185 only
PCI 185 only
PCI 185 only
PCI 185 only
PCI 185 only
PCI 185 only
PCI 185 only
52
Description
Flags
bit 0 = message number valid
bit 1 = data sets valid
bit 2 = clear queue valid
bit 3 = LEDs valid
bit 4 = operator entering data set 1
bit 5 = operator entering data set 2
bit 6 = operator entering data set 3
bit 7 = operator entering data set 4
bit 8 = operator changed data set 1
bit 9 = operator changed data set 2
bit 10 = operator changed data set 3
bit 11 = operator changed data set 4
bit 12 = full message queue
bit 13 = slave/group/unit #
bits 14–15 not used
0 = valid, 1 = invalid
0 = valid, 1 = invalid
0 = valid, 1 = invalid
0 = valid, 1 = invalid
0 = no, 1 = yes
0 = no,
1 = yes
0 = no,
1 = yes
0 = no,
1 = yes
0 = no,
1 = yes
0 = no,
1 = yes
0 = no,
1 = yes
0 = no,
1 = yes
0 = no,
1 = yes
0 = valid, 1 = invalid
79736-6
User’s Manual
PMD 180 Message Display
UTICOR Technology, LP
8
PLC Input
Register #
2
3
4
5
6 PCI 185
7
8
9
10
11
12
13
14
15–16
PLC Data
Description
Data Set #1
Data Set #2
Data Set #3
Data Set #4
Function Keys 1–16 (bit 0 = F1, bit 15 = F16)
(0 = not pressed, 1 = pressed)
Reserved
Reserved
Year (0-99)*
Month (1-12)*
Day (1-31)*
Hour (1-12) or (0-23)*
Minute (0-59)*
*Clock information can be read by
Second (0-59)*
the PLC if selected in the System
Reserved
Attributes Menu
Example:
Register
Data (HEX)
Explanation
1
0000
2
3
4
5
6
7
8
9
10
11
12
13
14
15–16
0123
4567
98AB
CDEF
1032
0000
0000
005D
000A
000F
0010
0025
002F
0000
Everything is valid, data sets are not being altered and
have not been changed, message queue is not full
291 is the value in data set #1
17767 is the value in data set #2
35243 is the value in data set #3
52719 is the value in data set #4
Function keys 13, 6, 5, and 2 were pressed
Reserved
Reserved
1993 is the year
October is the month
It is the fifteenth day of the month
The hour is 4 PM
The minute is 37
The second is 47
Reserved
79736-6
53
PMD 180 Message Display
8
User’s Manual
UTICOR Technology, LP
PLC Data
Flag Bits of Input Register #1
Bits 0 through 3
These bits echo bits zero through three of the first output register from
the PLC and can be used for handshaking.
Bits 4 through 7
When the Data Set 1 through 4 key is pressed on the PCI, the respective bit is set to a logic one and remains there until the “Enter Data” key
is pressed.
Bits 8 through 11
These bits remain at logic zero unless the front-panel keypad is used to
change variable data values in input registers #2 through #5 (data sets
#1 - #4 respectively). The bit is set to a one after the “Enter Data” key
is pressed and remain there until another message is triggered or a data
set key is pressed.
Bit 12
For all PLC driver communications, bit 12 of input register 1 is used to
indicate whether the message queue is full or not. If the bit is set to a
logic 1, the queue is full. A logic 0 indicates the message queue is not
full.
Bit 13
Slave Group/Unit # Valid
Random Access Drivers
0 = Valid, 1 = Invalid
Random access drivers must be used in a PMD180 configured as
random, and standard drivers in a PMD 180 configured as standard.
The random access feature lets the user define non-continguous blocks
of data in the I/O to be used for interfacing between the PLC and the
display unit.
Along with this, the random access drivers let you use four global and
four message data sets. The four global data sets are defined when the
PLC attributes are edited and are the default data sets. The four message data sets are defined by pressing F7 when editing your message
and entering the location to be polled for the value. The defined location remains where the display looks for that data set unless the next
message triggered either clears the display or defines a new location.
When using the random access feature, the user can define up to forty
discrete PLC outputs that will trigger a message.
Note: If the user configures the unit for random access and is using an older
message file, they must open the file offline and select the specific random PLC
driver before uploading that message file or it will not work.
54
79736-6
User’s Manual
PMD 180 Message Display
UTICOR Technology, LP
8
PLC Data
bit 0 = message number valid
0 = valid, 1 = invalid
bit 1 = data sets valid
0 = valid, 1 = invalid
bit 2 = clear queue valid
0 = valid, 1 = invalid
bit 3 = LEDs valid
0 = valid, 1 = invalid
PCI 185 only
bit 4 = data set 1 key enable0 = enable, 1 = disable
PCI 185 only
bit 5 = data set 2 key enable0 = enable, 1 = disable
PCI 185 only
bit 6 = data set 3 key enable0 = enable, 1 = disable
PCI 185 only
bit 7 = data set 4 key enable0 = enable, 1 = disable
bit 8 = circular message queue enable 0 = enable, 1 = disable
bit 9 = not used
bit 10 = not used
bit 11 = not used
bit 12 = not used
bit 13 = slave group/unit valid
0 = valid, 1 = invalid
bit 14 = not used
bit 15 = not used
Message number
Message priority
Global data set #1
Global data set #2
Global data set #3
Global data set #4
Message number to clear from queue
PCI 185 only
LEDs 1–16
bit 0 = LED 1
0 = LED Off, 1 = LED On
bit 15 = LED 16
0 = LED Off, 1 = LED On
LEDs 17–32 future use only
LEDs 33–48 future use only
PCI 185 only
Function keys 1–16 enable
bit 0 = F key 1
0 = enabled, 1 = disabled
bit 15 = F key 16
0 = enabled, 1 = disabled
Function keys 17–32 enable future use only
Function keys 33–48 enable future use only
Data set slave group and unit
Output Words (to PMD)
79736-6
Flags
55
PMD 180 Message Display
8
User’s Manual
UTICOR Technology, LP
PLC Data
Input Words (from PMD)
Global data set #1
value of default data set 1
Global data set #2
value of default data set 2
Global data set #3
value of default data set 3
Global data set #4
value of default data set 4
Function keys 1–16 pressed
bit 0 = F1
0 = not pressed, 1 = pressed
bits 15 = F16
0 = not pressed, 1 = pressed
Function keys 17–32 pressed
future use only
Function keys 33–48 pressed
future use only
Flags bit 0 = message # valid
0 = valid, 1 = invalid
bit 1 = data sets valid
0 = valid, 1 = invalid
bit 2 = clear queue valid
0 = valid, 1 = invalid
bit 3 = LEDs valid
0 = valid, 1 = invalid
bit 4 = operator enter data set 1
0 = no, 1 = yes
bit 5 = operator enter data set 2
0 = no, 1 = yes
bit 6 = operator enter data set 3
0 = no, 1 = yes
bit 7 = operator enter data set 4
0 = no, 1 = yes
bit 8 = operator alter data set 1
0 = no, 1 = yes
bit 9 = operator alter data set 2
0 = no, 1 = yes
bit 10 = operator alter data set 3
0 = no, 1 = yes
bit 11 = operator alter data set 4
0 = no, 1 = yes
bit 12 = full message queue
0 = no, 1 = yes
bit 13 = slave group/unit # valid
0 = valid, 1 = invalid
bit 14 = not used
bit 15 = not used
Year
Month
Day
Hours
Minutes
Seconds
Discrete Triggers
This is an added feature for the random access PMD. It allows for a list
of discretes to be monitored that can trigger a message number associated with it. These will be checked with the PLC data, after the message
number data is checked and in the order entered in the list.
56
79736-6
PMD 180 Message Display
User’s Manual
UTICOR Technology, LP
8
PLC Data
The PMD will trigger the message when the bit goes from cleared to
set. The priority of the message will be that of the message priority data
from the PLC.
PLC System Attributes
PLC SYSTEM ATTRIBUTES
PLC CODE REVISION
MSG # DISCRETE TRIGGER
65535
65535
65535
65535
65535
65535
65535
65535
65535
65535
65535
65535
65535
65535
65535
65535
65535
65535
65535
65535
MSG # DISCRETE TRIGGER
65535
65535
65535
65535
65535
65535
65535
65535
65535
65535
65535
65535
65535
65535
65535
65535
65535
65535
65535
65535
When the random access driver is selected, the user defines each address to be used for interfacing along with the communication parameters. This is done by selecting A — Edit PLC Attributes from the
offline menu.
The first screen that appears defines the communication parameters.
The items included are the baud rate, parity, stop bits, data bits, etc.
More screens are reached using the Page Up and Page Down keys on
the programming terminal.
79736-6
57
User’s Manual
PMD 180 Message Display
8
UTICOR Technology, LP
PLC Data
The second screen has the user define the PLC output words used to
send data to the display. The third screen has the user define the PLC
input words that the message display writes to, and the fourth screen
asks the user to define discrete triggers to display specific messages.
Message Queue
The 180 series offers the use of a 16-message circular message queue.
The queue can be enabled or disabled through the System Attributes
option in either the Offline Development or Online Network menus. As
each message is triggered, it will be placed in the queue. The user has
the option of disabling the queue using automatic advancement or
manual advancement.
Note: When the queue is enabled, chain messages that repeat use the
queue repeat count from the system attributes. Also note that when the
queue is enabled, the operator cannot enter variable data with the
keypad on the PCI units.
Message Priority
When the queue is being used, messages can be given a priority when
triggered. The priority is used to relay the urgency that the message
needs to be handled with. If higher priority messages have entered the
queue, no lower priority messages will be displayed until there are no
more high priority messages in the queue. The priority of the message is
set in register #3 of the output block. The higher the message’s priority
number, the higher the message’s priority. If there are two messages in
the queue with an equal priority and that priority is the highest in the
queue, then those messages will share time being displayed until one or
both messages are cleared from the queue or a message with a higher
priority is sent to the queue. Zero is the lowest priority number.
If messages are being triggered through the optional parallel port, D17
and D20 must be equal to a 1 to trigger a message. D18 and D19 will
be used to control the message queue as shown below.
58
D18
D19
Definition
0
1
0
1
0
0
1
1
Message is priority 0
Message is priority 1
Remove the selected message from queue
Remove all messages from queue
79736-6
User’s Manual
PMD 180 Message Display
UTICOR Technology, LP
8
PLC Data
For all PLC drivers, the 180 series product can only communicate to
one PLC. In most of the drivers, the 180 product and the PLC have to
be connected directly together with no other 180 unit or PLC connected
to the communication cable between them. Following is a table that
lists the lowest revisions of the different components useable for each
PLC driver available for the PMD 180 and PCI 185 products.
Hardware
Revision
Firmware
Revision
10F54
Revision
Driver
Revision
AEG
A
E
E.1
B
A-B SLC 500 & 1747 AIC Module
(Random Driver)
B
E
G.1
E
A-B SLC 500 DF1
A
E
G.1
B
A-B PLC5 DF1
A
D
G.1
A
ASCII
A
D
D.1
A
GE 90-30 & 90-70
A
A
B.1
B
IDEC FA-2, FA-2J, FA-3S, & FA2-5M
A
E
E.2
B
Klockner Moeller PS 306 & PS 316
A
E
E.1
B
Mitsubishi FX Series
A
C
C.1
A
Mitsubishi Melsec-A
A
D
E.1
A
Modicon Modbus
(Random Driver)
A
H
G.1
C
Omron Host Link Unit
A
C
C.1
A
Reliance Shark XL II
A
D
D.1
A
Reliance Automate
A
E
E.1
A
Siemens 100 Series, 115 CPU
A
B
B.1
B
Square D SY/MAX
A
E
E.2
D
Texas Instruments 405 Series
A
B
B.1
B
Texas Instruments 505 Series
A
E
E.1
A
Toshiba EX100/250/20 OB
A
B
B.1
B
UTICOR Director 4001
A
A
F.2
A
UTICOR Master Slave
A
H
G.1
A
PLC Driver
79736-6
59
User’s Manual
PMD 180 Message Display
8
UTICOR Technology, LP
PLC Data
AEG PLC DRIVER ATTRIBUTES
(See figure 8-1)
This PLC driver is designed to use marker words in the AEG PLC. The
driver needs to know which marker words.
The PLC driver for the AEG unit uses declaration lists 17 and 18. If
anything other than the 180 series product is connected to the PLC that
uses these declaration lists, their definitions for those lists will be lost
when the unit is connected to the PLC.
60
Baud Rate
The baud rate for the AEG is fixed at 9600 baud. The 180 unit and PLC
must be set the same.
Parity
The parity for the AEG is fixed at odd parity.
Stop Bits
The AEG is fixed at one stop bit.
Data Bits
Data bits for the AEG are fixed at eight.
Select RS-485
The PLC uses RS-232 communications. This does not need to be
selected unless using an RS-232/RS-485 converter.
Poll Time
This is the time between polls of the PLC by the 180 unit in tenths of a
second. For constant polling, set this to zero.
Output register type
The output registers used by the 180 series unit are marker words.
Output starting word
This is the starting marker word that the 180 series unit is to read.
Sixteen consecutive words from the starting word must be available in
the PLC. The valid range is 1 to 1970. The starting word corresponds
to the 180 unit’s first word and all others follow consecutively.
Input register type
The 180 series unit can only write to marker words.
Input starting word
This is the starting marker word that the 180 series unit will write to.
Sixteen consecutive words from the starting register must be available
in the range. The range is then 1 to 1970. The starting word corresponds to the 180 unit’s first word and all others follow consecutively.
79736-6
PMD 180 Message Display
User’s Manual
UTICOR Technology, LP
8
PLC Data
Figure 8-1
ALLEN-BRADLEY SLC 500 PLC AND 1747 AIC MODULE DRIVER ATTRIBUTES
(See figure 8-2)
This PLC driver/connection is for the random driver only and it
cannot be loaded into a standard PMD 180. The random driver is for
DH-485 only. The display unit interfaces to either the PLC’s programming port or it uses the 1747-AIC DH485 link coupler to communicate
with the PLC. Note that the 1747-PIC personal computer interface
converter cannot be used to interface a PMD to a SLC series PLC.
Also note that the PMD must have revision “B” hardware and the
option board must be present.
This driver is designed to use S, B, T, C, R, or N files to exhange data
with the PLC. The particular file entries and serial port settings must be
defined for the driver. The driver uses an ASCII communication protocol and exchanges data with the PLC.
In order for the 180 series unit to be directly connected to the SLC 500
or the 1747-AIC module, the optional slave, printer, and parallel port
board must be present. Also, to use the unit with the 1747-AIC network
interface module, the 180 product needs to have the LE terminal on the
RS-485 terminal block. If this terminal is not present, the unit will need
to be returned to the factory for rework.
The serial port on the PLC supports baud rates of 9600 and 19200
baud. The other port settings are fixed at even parity, 8 data bits, and 1
stop bit.
79736-6
61
PMD 180 Message Display
8
62
User’s Manual
UTICOR Technology, LP
PLC Data
Displayed Errors
If an illegal file number or register number is stored in the PLC driver
attributes, a PLC MSG BAD REGISTER error will be displayed.
Baud Rate:
The baud rate options supported by the SLC 500’s port are 9600 and
19200.
Parity
The SLC 500’s port is fixed at even parity.
Stop Bits
The SLC 500’s port is fixed at 1 stop bit.
Data Bits
The SLC 500’s port is fixed at 8 data bits.
Select RS-485
This is fixed at Yes selecting RS-485.
Poll Time
This is the frequency of polling of the PLC by the message display in
tenths of a second. The valid range for this is from 0 to 255. For
constant polling, set this to zero. Some SLC 500 processors cannot
handle constant polling when two or more devices are trying to communicate with it. Increasing the poll time may help to avoid communication problelms.
PMD Address
This is the address on the network where the 180 unit resides. The
address range is 0-31. This address must be a unique address on the
network.
PLC Address
This is the address on the network at which the PLC resides. The
address range is 0-31. This address must be a unique address on the
network.
Max Node Address
This is the maximum number of nodes on the network. Set this to the
PLC with the highest address to make the network as small as possible.
The range is 0-31.
Output N-file
The 180 series unit reads from N-files. Therefore, either use file number
7 or a file in the range from 9 to 255.
Output starting word
This is the starting N-file word that the 180 series unit is to read.
Sixteen consecutive words from the starting word must be available in
the N-file. Since the N-file is not a fixed size, the user is responsible for
79736-6
PMD 180 Message Display
User’s Manual
UTICOR Technology, LP
8
PLC Data
ensuring that sixteen consecutive words from the starting word are
available. The default range is 0 to 240. The starting word corresponds
to the 180 unit’s first input word and all others follow consecutively.
Input N-file number
The 180 series unit writes to N-files. Therefore, either use file number 7
or one in the range from 9 to 255.
Input starting word
This is the starting N-file word that the 180 series unit is to write to.
Sixteen consecutive words from the starting word must be available in
the N-file. Since the N-file is not a fixed size, the user is responsible to
make sure sixteen consecutive words from the starting word are available. The default range is 0 to 240. The starting word corresponds to
the 180 unit’s first output word and all others follow consecutively.
Note: We have found that since a SLC 5/01 only handles one message
at a time, there will be communication difficulties when three or more
devices on the network are trying to communicate.
Figure 8-2
ALLEN-BRADLEY SLC 500 DF1 MODULE DRIVER ATTRIBUTES(STANDARD DRIVER)
(See figure 8-3)
79736-6
The Standard Driver is for DF1 communication protocol only. This
driver uses integer N-file entries in the Allen-Bradley SLC 500 PLC.
The driver must know which integer file entries and the serial port
settings.
63
PMD 180 Message Display
8
User’s Manual
UTICOR Technology, LP
PLC Data
The interface driver uses a Data-Highway communication protocol and
exchanges data with the PLC using N-file words. Port settings can be
set to any options available on both the PMD and the PLC.
Note:
The module must be configured with the following settings:
Half-duplex mode in the DF1 Protocol Menu; Local mode in the
DF1 Protocol Menu; BCC checksum in the DF1 Protocol Menu;
and the jumper for the DF1 port must be configured for RS-232.
Baud Rate
The baud rate options supported by the SLC 500’s port are 300, 600,
1200, 2400, 9600, and 19200.
Parity
The interface module port is adjustable to even, odd, or no parity.
Stop Bits
The interface module can have 1 or 2 stop bits.
Data Bits
The DF1 module’s port must be set to 8 data bits.
Select RS-485
The interface module uses either RS-485 or RS-232/422. Set this
option to YES if the module is configured to use RS-485, otherwise, set
it to NO. The option board must be present if using RS-485.
Poll Time
This is the time between polls of the PLC by the 180 series product in
tenths of a second. For constant polling set this to zero.
PMD Address
This is the address on the network at which the PMD resides. The
address range is 0–254. This address must be the same as the master
station address configured in the Interface Module’s DF1 Protocol
Menu.
This is the address on the network at which the PLC resides. The
address range is 0–31. This must be a unique address on the DH-485
network.
This is the address for the interface module on the network. The address range is 0 - 254. The address must be the same as the slave
address configured in the Interface Module’s DF1 protocol menu.
PLC Address
Interface Address
Message Timeout
64
This is the time for the interface module to wait for a response from the
PLC. The range is 100 to 12750 mS. The message timeout is configured under the DH-485 Port Menu. The 180 series unit and the interface module must have the same message timeout value in order to
communicate.
79736-6
PMD 180 Message Display
User’s Manual
UTICOR Technology, LP
8
PLC Data
Output N-file
The 180 series product reads from N-files. Therefore, either use file
number 7 or a file in the range from 9 to 255.
Output starting word
This is the starting N-file word that the 180 series product is to read.
Sixteen consecutive words from the starting word must be available in
the N-file. Since the N-file is not a fixed size, the user is responsible to
make sure sixteen consecutive words from the starting word are available. The range is 0 to 240. The starting word corresponds to the 180
unit’s first input word and all others follow consecutively.
Input N-file number
The 180 series product writes to N-files. Therefore, either use file
number 7 or one in the range from 9 to 255.
Input starting word
This is the starting N-file word that the 180 series unit is to write to.
Sixteen consecutive words from the starting word must be available in
the N-file. Since the N-file is not a fixed size, the user is responsible to
make sure sixteen consecutive words from the starting word are available. The range is 0 to 240. The starting word corresponds to the 180
unit’s first output word and all others follow consecutively.
Figure 8-3
79736-6
65
PMD 180 Message Display
8
User’s Manual
UTICOR Technology, LP
PLC Data
ALLEN-BRADLEY PLC5 SERIES PLC DRIVER ATTRIBUTES
(See figure 8-4)
This driver is designed to use integer N-file entries in the Allen-Bradley
PLC5. The driver needs to know which integer file entries to use and
the serial port settings. The 180 Series product uses Data-Highway
communication protocol to exchange data with the PLC.
Channel 0 on the PLC5 module must be configured with the following
settings:
Channel 0:
Control line:
Error detection:
66
DF1 (point to point)
No handshaking
BCC
Baud rate
The baud rate options supported by 180 Series for the channel 0 port of
the PLC5 are 300, 600, 1200, 2400, 4800, 9600, and 19200.
Parity
The channel 0 port supports even or no parity.
Stop bits
The PLC5’s channel 0 port supports 1 or 2 stop bits.
Data bits
The PLC’s channel 0 port must be set to 8 data bits.
Select RS-485
The channel 0 port only supports RS-232 serial protocol.
Poll time
This is the time between polls of the PLC5 by the 180 product in tenths
of a second. For constant polling set this to zero.
Output N-file number
The 180 products read from N-files. The valid range is from 10 to 999.
Output starting word
This is the starting N-file word the 180 product is to read. Sixteen
consecutive words from the starting word must be available in the Nfile. Since the N-file is not a fixed size, the user is responsible to make
sure sixteen consecutive words from the starting word are available.
The range is from 0 to 984. The starting word corresponds to the 180
product’s first output word and all others follow consecutively.
Input N-file number
The 180 products write to N-files. The valid range is from 10 to 999.
79736-6
PMD 180 Message Display
User’s Manual
UTICOR Technology, LP
8
Input starting word
PLC Data
This is the starting N-file word the 180 product will write to. Sixteen
consecutive words from the starting word must be available in the Nfile. since the N-file is not a fixed size, the user is responsible to make
sure sixteen consecutive words from the starting word are available.
The range is from 0 to 984. The starting word corresponds to the 180
product’s first input word and all others follow consecutively.
Figure 8-4
GE 90-30/90-70 PLC DRIVER ATTRIBUTES
(See figure 8-5)
This 180 series PLC driver is designed to use %R registers in the GE
90-30/90-70 series PLC. The driver needs to know which registers to
use and the serial port settings, and other individual controller attributes.
This driver uses 8 data bits. This is the only serial port parameter the
PLC restricts. All other port settings can be set to any options available
on both the 180 series unit and the PLC. This includes the controllers
defaults of 19200 Baud, ODD parity, 1 stop bit.
Baud rate
The baud rate options for the both the GE 90-30/90-70 and 180 series
unit are 300, 600, 1200, 2400, 4800, 9600, and 19200. The PLC and
180 series must have the same baud rates to communicate.
Parity
Both the 180 series unit and GE 90-30/90-70 have the options of
NONE, ODD or EVEN parity. The two units must have the same
parity to communicate.
79736-6
67
PMD 180 Message Display
8
UTICOR Technology, LP
PLC Data
Stop Bits
Both the 180 series unit and GE 90-30/90-70 have the options of 1 or 2
stop bits. Both units must have the same number of stop bits to communicate.
Data Bits
The 180 series unit restricts this to 8 data bits for the GE PLC.
Select RS-485
The GE 90-30/90-70 interface does not support RS-485.
Poll time
This is the time between polls of the PLC by the 180 unit in tenths of a
second. For constant polling set this to zero.
PLC CPU ID
This is the CPU ID of the controller. It must match that of the PLC that
the 180 unit is to exchange data with. If the field is completely blank
(deleted characters, not spaces) it will try to attach to the first controller
possible. This is case sensitive, and must match uppercase and lowercase letters with that of the CPU ID.
Output register type
The 180 series units can only read %R registers, no other selection is
possible.
Output starting
register
68
User’s Manual
This is the starting register the 180 series unit is to read. Sixteen consecutive words from the starting register must be available in the %R
register range. The range is then 0001 to 16369. The starting register
corresponds to the 180 unit’s first output word and all others follow
consecutively.
Input register type
The 180 units can only write to %R registers, no other selection is
possible.
Input starting register
This is the starting register that the 180 unit writes to. Sixteen consecutive words from the starting register must be available in the %R register range. The range is then 0001 to 16369. The starting register
corresponds to the 180 unit’s first input word and all others follow
consecutively.
Level 2 Password
This is the password for privilege level 2. If there is no password for
level 2 this field must be completely blank (deleted characters, not
spaces). This is case sensitive, and must match uppercase and lowercase letters with that of the CPU level 2 password.
79736-6
PMD 180 Message Display
User’s Manual
UTICOR Technology, LP
8
PLC Data
0
1
Figure 8-5
IDEC FA-2/FA-2J/FA-3S/FA2-5M PLC DRIVER ATTRIBUTES
(See figure 8-6)
The IDEC part number PF2-CLA link adapter must be used to connect
the 180 series product and the host unit.
This driver uses data registers in the IDEC series PLC. The driver needs
to know which data registers and which PLC series are being used.
Baud Rate
The baud rate allowed by the PLC is 9600.
Parity
The parity can only be even.
Stop Bits
The number of stop bits is fixed at 1 for the IDEC series PLC.
Data Bits
The number of data bits is fixed at 8 for the IDEC series PLC.
Select RS-485
The IDEC series PLC uses RS-232 serial protocol. Select this only if
using an RS-485/RS-232 converter.
Poll Time
This is the time between polls of the PLC by the 180 series unit in
tenths of a second. For constant polling, set this to zero.
79736-6
69
PMD 180 Message Display
8
User’s Manual
UTICOR Technology, LP
PLC Data
PLC Series
The 180 series products work with the following PLCs: FA-2/FA-2J,
FA-3S/FA2-5m.
Output Register Type
The 180 series products can only read data registers (D).
Output Starting
Register
This is the starting data register the 180 series product is to read.
Sixteen consecutive words from the starting data register must be
available in the register range. The range is D0–D984. The starting data
register corresponds to the 180 series product’s first word and all others
follow consecutively.
Input Register Type
The 180 series products can only write to data registers (D).
Input Starting Register
This is the starting data register the 180 series product will write to.
Sixteen consecutive words from the starting data register must be
available in the register range. The range is D0–D984. The starting data
register corresponds to the first word and all others follow consecutively.
0
1
Figure 8-6
70
79736-6
PMD 180 Message Display
User’s Manual
UTICOR Technology, LP
8
PLC Data
KLOCKNER MOELLER PS 306/316 PLC DRIVER ATTRIBUTES
(See figure 8-7)
The PLC driver for the PS 306/316 series controller is designed to use
the PLC’s Marker words (MW memory). The driver needs to know
which marker words to use.
Baud Rate
The baud rate for the PS 306/316 is fixed at 9600 baud. The 180 unit
and PLC must be set the same.
Parity
The parity for the PS 306/316 is fixed at no parity.
Stop Bits
The PS 306/316 is fixed at two stop bits.
Data Bits
Data bits for the PS 306/316 are fixed at eight.
Select RS-485
The PLC uses RS-485 communications and must be selected if the 180
series unit is to be connected directly to the PLC. This does not need to
be selected if using an RS-485/RS-232 converter.
Poll Time
This is the time between polls of the PLC by the 180 unit in tenths of a
second. For constant polling, set this to zero.
Output register type
The output registers used by the 180 unit are in the marker words
(MW).
Output starting
register
This is the starting register that the 180 series unit is to read. Sixteen
consecutive words from the starting register must be available in the
register type range. The valid range is 0000 to 2157. The starting
register corresponds to the 180 unit’s first word and all others follow
consecutively.
Input register type
The 180 unit can only write to registers in the marker words (MW).
Input starting register
This is the starting register that the 180 series unit will write to. Sixteen
consecutive words from the starting register must be available in the
range. The range is then 0000 to 2157. The starting register corresponds to the 180 unit’s first word and all others follow consecutively.
79736-6
71
PMD 180 Message Display
8
User’s Manual
UTICOR Technology, LP
PLC Data
Figure 8-7
MITSUBISHI FX SERIES PLC DRIVER ATTRIBUTES
(See figure 8-8)
The Mitsubishi part number PCX-KIT-1 must be used to connect the
180 unit and host link unit. The CTS signal supplied by the RS-422 to
RS-232 converter in that kit, is needed for the 180 and host link unit to
communicate.
The FX series PLC driver uses data registers in the PLC. However, the
180 unit needs to know which registers. The FX series has fixed serial
port settings of 9600 baud, even parity, 1 stop bit, and 7 data bits.
72
Baud Rate
The baud rate for the Mitsubishi FX is fixed at 9600 baud. The 180 unit
and PLC must be set the same.
Parity
The parity for the Mitsubishi FX is fixed at even parity.
79736-6
PMD 180 Message Display
User’s Manual
UTICOR Technology, LP
8
PLC Data
Stop Bits
The Mitsubishi FX series is fixed at one stop bit.
Data Bits
Data bits for the Mitsubishi FX are fixed at seven.
Select RS-485
The PLC does not use RS-485 communications. An RS-485 converter
must be used for this type of communications.
Poll Time
This is the time between polls of the PLC by the 180 unit in tenths of a
second. For constant polling, set this to zero.
Output register type
The 180 series unit can only read data registers (D).
Output starting
register
This is the starting register the 180 series unit reads. Sixteen consecutive words from the starting register must be available in the register
type range. The range is 0 to 496. The starting register conforms to the
180’s first word and all others follow consecutively.
Input register type
The 180 series unit can only write to data registers (D).
Input starting register
This is the starting register the 180 series unit will write to. Sixteen
consecutive words from the starting register must be available in the
range. The range is 0 to 496. The starting register conforms to the
180’s first word and all others follow consecutively.
0
1
Figure 8-8
79736-6
73
PMD 180 Message Display
8
User’s Manual
UTICOR Technology, LP
PLC Data
MITSUBISHI MELSEC-A SERIES PLC DRIVER ATTRIBUTES
(See figure 8-9)
The AJ71C24-S6 computer link module must have the following
settings in order to communicate with the 180 series product. The mode
setting switch must be set for format‘A.’ This is the only format the
software driver is set to handle. Switch #21 must be in the ON position
enabling the checksum for the message. Switch #22 must be set in the
ON position to allow writing to the CPU while in RUN mode. Switch
#11 toggles between RS-232 and RS-422, When the switch is ON it is
set up for RS-422. Full duplex transmission is the only type supported
by the software driver.
This driver is to use data registers in the AJ71C24 Computer Link
Module. The driver needs to know which registers are to be used.
Baud Rate
The baud rate can be 300, 600, 1200, 2400, 4800, 9600, or 19200
baud.
Parity
The parity can be enabled or disabled. If it is enabled, then odd or even
parity can be selected.
Stop Bits
The number of stop bits is adjustable from 1 to 2.
Data Bits
The number of data bits is adjustable from 7 to 8.
Select RS-485
The AJ71C24 module does not support RS-485 serial communications.
Poll Time
This is the time between polls of the AJ71C24 by the 180 series product
in tenths of a second. For constant polling set this to zero.
Output Register Type
The 180 series products can only read data registers (D).
Output Starting
Register
74
This is the starting register the 180 series product will read from.
Sixteen consecutive words from the starting register must be available
in the register range. The range is then 0000 to 6128. The starting
register corresponds to the first word and all others follow consecutively.
79736-6
PMD 180 Message Display
User’s Manual
UTICOR Technology, LP
8
PLC Data
Input Register Type
Input Starting Register
The 180 series products can only write to the data registers (D).
This is the starting register that the 180 series product writes to. Sixteen
consecutive words from the starting register must be available in the
range. The range is 0000 to 6128. The starting register corresponds to
the 180 series product’s first word and all others follow consecutively.
Station Number
This is the station number that is set on the AJ71C24-S6 by two
switches. The range is 0–31.
PLC-Series
This is the series of PLC that is being used. It can be either AnCPU or
AnACPU where n = 1, 2, or 3.
0
1
0
1
Figure 8-9
79736-6
75
PMD 180 Message Display
8
User’s Manual
UTICOR Technology, LP
PLC Data
MODICON MODBUS PLC DRIVER ATTRIBUTES
(See figure 8-10)
This 180 series PLC driver is a random access driver and cannot be
loaded into a PMD 180 configured as standard. It is designed to use
registers in the Modicon PLC. The driver needs to know which registers to use and the Modbus serial port settings.
The 180 series Modicon Modbus PLC driver uses the RTU (Remote
Terminal Unit) mode. This is the only serial port parameter the 180 unit
restricts. The controller must be set to RTU mode. All other port
settings can be set to any options available on both the 180 unit and the
PLC. This includes the controllers defaults of RTU mode, EVEN
parity, 1 stop bit, address 1 and 9600 baud.
76
Baud rate
The Baud rate options for the 180 series unit are 300, 600, 1200, 2400,
4800, 9600, and 19200. The PLC and 180 unit must have the same
Baud rates to communicate.
Parity
Both the 180 series unit and Modicon PLC have the options of NONE,
ODD or EVEN parity. The PLC and 180 unit must have the same
parity to communicate.
Stop Bits
Both the 180 series unit and Modicon PLC have the options of 1 or 2
stop bits. The PLC and 180 unit must have the same number of stop
bits to communicate.
Data Bits
The 180 series unit restricts this to 8 data bits for the Modicon PLC
because the 180 unit uses RTU mode which is 8 data bits.
Select RS-485
The Modicon PLC uses a RS-232 (RTU) serial communication protocol. Only use this if using a RS-485/RS-232 converter between the 180
unit and the Modicon PLC.
Poll time
This is the time between polls of the PLC by the 180 series unit in
tenths of a second. For constant polling set this to zero.
Address
This is the address of the controller. The range of the address is 1 to
247 depending on the controller model. Set this to the controllers
address setting.
79736-6
PMD 180 Message Display
User’s Manual
UTICOR Technology, LP
8
Output register type
Output starting
register
PLC Data
The 180 series unit can read either the 3xxxx or 4xxxx register range.
This attribute tells the 180 unit which type the output starting register
is.
This is the starting register the 180 series unit is to read from. Sixteen
consecutive words from the starting register must be available in the
output register type range. The range is then 0001 to 9984. The
starting register corresponds to the 180 unit’s first output word and all
others follow consecutively.
Input register type
The 180 series unit can only write to the 4xxxx register range so this is
fixed for the Modicon PLC.
Input starting register
This is the starting register that the 180 series unit writes to. The 180
unit can only write to 4xxxx register. Sixteen consecutive words from
the starting register must be available in the 4xxxx range. The range is
then 0001 to 9984 and will be a 4xxxx register. The starting register
corresponds to the 180 unit’s first input word and all others follow
consecutively.
0
1
Figure 8-10
79736-6
77
PMD 180 Message Display
8
User’s Manual
UTICOR Technology, LP
PLC Data
OMRON HOST LINK UNIT PLC DRIVER ATTRIBUTES
(See figure 8-11)
The PLC driver for the OMRON Host Link is designed to use data
memory registers (DM) in the OMRON PLC. It allows for both the
single and multiple link protocol so the Host Link Unit need not be
changed.
Note:
The 180 series unit must be connected directly to a Host Link
Unit. The driver does not support the link adapter.
The driver needs to know which registers to use and the settings of the
Host Link Unit.
Port settings can be set to any options available on both the 180 series
unit and the PLC.
Baud rate
The baud rate options supported by the OMRON Host Link Unit are
300, 600, 1200, 2400, 4800, 9600, and 19,200 baud. The Host Link
Unit and 180 unit must be set to the same baud rate to communicate.
Parity
Even or odd parity can be used by the Host Link Unit. The Host Link
Unit and 180 series unit must be set to the same parity to communicate.
Stop Bits
The Host Link Unit supports one or two stop bits. The Host Link Unit
and 180 unit must be set to the same number of stop bits to communicate.
Data Bits
The Omron Host Link Unit supports settings of 7 or 8 data bits. Set the
number of data bits the same for the 180 unit and Host Link Unit to
communicate.
Note:
The option board must be present on the unit to use RS-485
communications on the PLC port.
78
Select RS-485
If using RS-485 or using a converter that allows data sent by the 180
series unit to be echoed back to the 180 series unit on the same line, this
must be set to YES. Otherwise, it can be set to NO.
Poll time
This is the time between polls of the PLC by the 180 unit in tenths of a
second. For constant polling, set this to zero.
79736-6
PMD 180 Message Display
User’s Manual
UTICOR Technology, LP
8
Output register type
Starting output
register
PLC Data
The 180 series unit will only read the data memory (DM) register range.
This is the starting output register the 180 series unit is to read. Sixteen
consecutive words from the starting register must be available in the
DM register range. The range is then 0000 to 6640. The starting register corresponds to the 180 unit’s first word and all others follow consecutively.
Input register type
The 180 series unit will only write to the data memory (DM) register
range.
Starting input register
This is the starting register that the 180 series unit will write to. The
180 unit only writes to DM registers. Sixteen consecutive words from
the starting register must be available in the DM range. The range is
from 0 to 6640. The starting register corresponds to the 180 unit’s first
word and all others follow consecutively.
Single/Multiple Link
This needs to be set the same as the setting of the single/multiple link
selector switch of the Host Link Unit in order for the two to communicate.
Unit Number
When the multiple link is used, the 180 series unit needs the Host Link
Unit number address to communicate. If the single link is used, this field
has no meaning.
0
1
Figure 8-11
79736-6
79
PMD 180 Message Display
8
User’s Manual
UTICOR Technology, LP
PLC Data
RELIANCE XL II PLC DRIVER ATTRIBUTES
(See figure 8-12)
This 180 series PLC driver is designed to be used only with the XL II
series from Reliance. No other Reliance PLC is supported by this driver.
The switch on the top of the communication interface must be selecting
‘COM2.’
This driver is designed to use internal outputs (M) in the Reliance XL II
series PLC. The driver needs to know which registers to use and the
settings of the PLC. Port settings can be set to any options available on
both the 180 unit and the PLC.
Baud rate
The baud rate options supported are 300, 600, 1200, 2400, 4800, 9600,
and 19200. The PLC and the 180 unit baud rates must be the same to
communicate.
Parity
The 180 unit supports even, odd, or no parity. The PLC and 180 unit
parity settings must be the same in order to communicate.
Stop bits
The 180 unit supports one or two stop bits. The PLC and 180 unit stop
bit settings must be the same in order to communicate.
Data bits
The driver is fixed at seven data bits.
Select RS-485
If using RS-485 or using a converter that allows data sent by the 180
series unit to be echoed back on the same line, this option must be set to
yes. Otherwise set this to no.
Poll time
This is the time between polls of the PLC by the 180 unit in tenths of a
second. For constant polling, set this to zero.
Output register type
The 180 series unit will only read the internal output (M) register range.
Output starting
register
80
This is the starting register that the 180 series unit is to read. Sixteen
consecutive words from the starting register must be available in the M
register range. (Two registers per word, or a total of 32 internal outputs) The starting range is then 400 to 640 or 700 to 940. The starting
register corresponds to the 180 unit’s first input word and all others
follow consecutively.
79736-6
PMD 180 Message Display
User’s Manual
UTICOR Technology, LP
8
PLC Data
Input register type
The 180 series unit will only write to the data memory (M) register
range.
Input starting register
This is the starting register that the 180 series unit writes to. The 180
unit only writes to M registers. Sixteen consecutive words from the
starting register must be available in the M range. (Two registers per
word, or a total of 32 internal outputs) The range is then 400 to 640 or
700 to 940. The starting register corresponds to the 180 unit’s first
output word and all others follow consecutively.
0
1
Figure 8-12
RELIANCE AUTOMATE PLC DRIVER ATTRIBUTES
(See figure 8-12)
This 180 series PLC driver is designed to use registers in the Automate
series PLCs. The registers to be used must be defined for the driver.
Note, do not use I/O or system registers as these are critical registers
and unexpected results may be produced.
Baud Rate
The baud rates allowed are 300, 600, 1200, 2400, 4800, 9600, and
19200. The one selected depends on the PLC port used. The PLC and
180 unit must have the same baud rates to communicate.
Parity
The parity can be none, odd, or even and depends on the port selected.
79736-6
81
PMD 180 Message Display
8
UTICOR Technology, LP
PLC Data
Stop Bits
The number of stop bits is fixed at 1 for the Automate series PLC.
Data Bits:
The number of data bits is fixed at 8 for the Automate series PLC.
Select RS-485
The Automate series PLC uses a n RS-232C serial protocol. Use this if
using an RS-485/RS-232 converter.
Poll Time
This is the time between polls of the PLC by the 180 series unit in
tenths of a second. For constant polling, set this at zero.
Origin Node
This is the node that the 180 unit is addressed at. The range is 0 to 250.
This must be entered as a decimal number.
Origin Slot
This is the slot that the 180 unit is addressed at. The range is 0 to 15.
This must be entered as a decimal number.
Destination Node
This is the node address of the PLC that the message is supposed to go
to. The range is 0 to 250. This must be entered as a decimal number.
Destination Slot
This is the slot address of the PLC that the message is supposed to go
to. The range is 0 to 15. This must be entered as a decimal number.
Input Starting Register
This is the starting register that the 180 series unit writes to. Sixteen
consecutive words from the starting register must be available in the
range. The range is then 0 to 57326. The starting register corresponds
to the 180 unit’s first output word and all others follow consecutively.
This must be entered as a decimal number.
Output Starting
Register
82
User’s Manual
This is the starting register the 180 series unit is to read. Sixteen consecutive words from the starting register must be available in the register type range. The range is then 0 to 57326. The starting register
corresponds to the 180 unit’s first input word and all others follow
consecutively. This must be entered as a decimal number.
79736-6
PMD 180 Message Display
User’s Manual
UTICOR Technology, LP
8
PLC Data
0
1
Figure 8-13
SIEMENS 100 SERIES, 115 CPU PLC DRIVER ATTRIBUTES
(See figure 8-14)
The 180 series PLC driver for Siemens controller is designed to use the
controllers data blocks. The driver needs to know which data blocks
and the data words in the data blocks to use.
The Siemens driver reads the complete data block, so keeping the data
block larger than needed can slow the scan of the outputs (to 180 unit).
The driver also sets one register at a time, so changing multiple registers constantly can slow the scan of the outputs (to 180 unit) also.
Baud rate
The Baud rate for the S5-100U is fixed at 9600 Baud.
Parity
The parity for the S5-100U is fixed at an EVEN parity.
Stop Bits
The number of stop bits is fixed at 1.
Data Bits
The number of data bits per byte is fixed at 8 bits.
Select RS-485
The Siemens PLC uses a current loop or an RS-232/current loop
convert for serial communication protocol. RS-485 can not be used.
Poll time
This is the time between polls of the PLC by the 180 series unit in
tenths of a second. For constant polling set this to zero.
79736-6
83
PMD 180 Message Display
8
User’s Manual
UTICOR Technology, LP
PLC Data
Output data block
This is the data block (DB) number that the 180 series unit is to read.
This can be any data block that can be used by the user program. The
limits are between data blocks 2 through 255.
Output starting word
This is the starting word in the output data block for the 180 unit to
read. It can be any legal data word in the data block. For the starting
data word to be legal in the 180 series unit, sixteen consecutive words
from the starting data word must be defined. The starting word corresponds to the 180 unit’s first output word and all others follow consecutively. The limits are data word 0 to data word 240.
Input data block
This is the data block (DB) number that the 180 unit writes to. This
can be any data block that can be used by the user program, including
the output data block as long as the starting data words are set to at
least sixteen words apart. The limits are data blocks 2 to data block
255.
Input starting word
This is the starting word in the input data block that the 180 series unit
writes to. It can be any legal data word in the data block. For the
starting data word to be legal in the 180 unit, sixteen consecutive words
from the starting data word must be defined. The starting word corresponds to the 180 unit’s first input word and all others follow consecutively. The limits are data word 0 to data word 240.
0
1
0
1
Figure 8-14
84
79736-6
PMD 180 Message Display
User’s Manual
UTICOR Technology, LP
8
PLC Data
SQUARE D SY/MAX PLC DRIVER ATTRIBUTES
(See figure 8-15)
This driver allows the 180 series unit to be connected to the NIM
module and processor port. The driver is designed to use register
entries in the Square D SY/MAX PLC. The driver needs to know which
registers to use and the serial port settings.
The 180 series SY/MAX PLC driver uses an ASCII communication
protocol and uses register words to exchange data with the PLC. Port
settings can be set to any options available on both the 180 unit and the
PLC. The serial port on the PLC supports baud rates of 300, 600, 1200,
4800, 9600, and 19200 baud. The other port settings are fixed at even
parity , 8 data bits, and 1 stop bit.
Displayed Errors
If only one drop address is given, a PLC MSG BAD REGISTER
error is displayed.
Baud rate
The baud rate options supported by the SY/MAX’s port are 300, 600,
1200, 4800, 9600, and 19200 baud. The PLC and 180 unit must be set
to the same baud rates to communicate.
Parity
The SY/MAX’s port is fixed at even parity.
Stop Bits
The SY/MAX’s port is fixed at 1 stop bit.
Data Bits
The SY/MAX’s port is fixed at 8 data bits.
Select RS-485
The SY/MAX’s port does not support RS-485.
Poll time
This is the time between polls of the PLC by the 180 series unit in
tenths of a second. For constant polling, set this to zero.
Output starting
register
79736-6
This is the starting register the 180 series unit is to read. Sixteen
consecutive registers from the starting register must be available in the
PLC. The valid starting register range is 1 to 8177. The starting register
corresponds to the 180 unit’s first input word and all others follow
consecutively.
85
PMD 180 Message Display
8
86
User’s Manual
UTICOR Technology, LP
PLC Data
Input starting register
This is the starting register the 180 series unit is to write to. Sixteen
consecutive registers from the starting register must be available in the
PLC. The valid starting register range is 1 to 7985. The starting register
corresponds to the 180 unit’s first output word and all others follow
consecutively.
Route value #1
This is the first route value (in decimal). The legal address range is 0 to
199. A route value of 0 indicates there are no more drops from this
level on. If route value #1 is defined, then route value #2 must be
defined.
Route value #2
This is the second route value (in decimal). The legal address range is 0
to 199. A route value of 0 indicates there are no more drops from this
level on. If route value #1 is defined, then route value #2 must also be
defined, otherwise an error will result.
Route value #3
This is the third route value (in decimal). The legal address range is 0 to
199. A route value of 0 indicates there are no more drops from this
level on. If a previous route value is defined as 0, then this level will not
be checked.
Route value #4
This is the fourth route value (in decimal). The legal address range is 0
to 199. A route value of 0 indicates there are no more drops from this
level on. If a previous route value is defined as 0, then this level will not
be checked.
Route value #5
This is the fifth route value (in decimal). The legal address range is 0 to
199. A route value of 0 indicates there are no more drops from this
level on. If a previous route value is defined as 0, then this level will not
be checked.
Route value #6
This is the sixth route value (in decimal). The legal address range is 0 to
199. If a previous route value is defined as 0, then this level will not be
checked.
79736-6
PMD 180 Message Display
User’s Manual
UTICOR Technology, LP
8
PLC Data
0
1
Figure 8-15
TEXAS INSTRUMENTS 405 SERIES PLC DRIVER ATTRIBUTES
(See figure 8-16)
The 180 series PLC driver for Texas Instruments 405 series controller is
designed to use the PLCs’ user data V memory. The driver needs to
know which data words to use.
The key switch on the TI 405 series PLC must be in the term position in
order to operate with the software driver. It will not work with the
switch in the run position.
Baud rate
The Baud rate for the 405 series is fixed at 9600 Baud.
Parity
The parity for the 405 series is fixed at an ODD parity.
Stop Bits
The number of stop bits is fixed at 1 for the 405 series.
Data Bits
The number of data bits per byte is fixed at 8 bits for the 405 series.
Select RS-485
The Texas Instruments 405 series PLC uses an RS-232 serial protocol.
Use this if using an RS-485/RS-232 converter.
79736-6
87
PMD 180 Message Display
8
User’s Manual
UTICOR Technology, LP
PLC Data
Poll time
This is the time between polls of the PLC by the 180 series unit in
tenths of a second. For constant polling set this to zero.
Output register type
The output registers used by the 180 series unit are in the user data (V
memory). So the type is fixed as Vxxxxx.
Output starting
register
This is the starting register the 180 series unit is to read. Sixteen consecutive words from the starting register must be available in user data
V memory. The user data range is octal V01400 - V07377. The range
for this attribute is then 768 to 3824 decimal and must be entered as a
decimal number. The starting register corresponds to the 180 unit’s
first output word and all others follow consecutively.
Input register type
The input registers used by the 180 series unit are also in the user data
(V memory). So the type is fixed as Vxxxxx.
Input starting register
This is the starting register that the 180 series unit writes to. Sixteen
consecutive words from the starting register must be available in the
user data V memory. The user data range is octal V01400 - V07377.
The range for this attribute is then 768 to 3824 decimal and must be
entered as a decimal number. The starting register corresponds to the
180 unit’s first input word and all others follow consecutively.
0
1
Figure 8-16
88
79736-6
PMD 180 Message Display
User’s Manual
UTICOR Technology, LP
8
PLC Data
TEXAS INSTRUMENTS 505 SERIES PLC DRIVER ATTRIBUTES
(See figure 8-17)
The PMD 180 series PLC driver for the Texas Instruments 505 series
controller is designed to use the PLC’s user data V memory. The driver
needs to know which data words to use.
Baud rate
The baud rate for the 505 series is adjustable. The available settings are
300, 600, 1200, 2400, 4800, 9600, and 19200 baud
Parity
The parity for the 50 series is fixed at no parity.
Stop bits
The number of stop bits is fixed at 1 for the 505 series.
Data bits
The number of data bits per byte is fixed at 8 bits for the 505 series.
Select RS-485
The Texas Instruments 505 series PLC uses an RS-232C serial protocol.
Poll time
This is the time between polls of the PLC by the 180 unit in tenths of a
second. For constant polling set this to 0.
Output register type
The output registers used by the 180 series unit are in the user data (V
memory). Therefore the type is fixed as Vxxxxx.
Output starting register
This is the starting register the 180 unit is to read. Sixteen consecutive
words from the starting register must be available in user data V
memory. The user data range is from 1 to 65520 and must be entered as
a decimal. The starting register corresponds to the 180 unit’s first input
word and all others follow consecutively.
Input register type
The input registers used by the 180 series are also in the user data (V
memory). Therefore the type is fixed as Vxxxxx.
Input starting register
This is the starting register that the 180 series writes to. Sixteen consecutive words from the starting register must be available in the user
data V memory. The range for this attribute is from 1 to 65520. The
starting register corresponds to the 180 unit’s first output word and all
others follow consecutively.
79736-6
89
PMD 180 Message Display
8
User’s Manual
UTICOR Technology, LP
PLC Data
0
1
0
1
Figure 8-17
TOSHIBA EX100/250/500/200B PLC DRIVER ATTRIBUTES
(See figure 8-18)
This 180 series PLC driver is designed to use registers in the Toshiba
PLC. The driver needs to know which registers to use and the serial
port settings.
The 180 series’ Toshiba PLC driver uses the binary communication
protocol. This is the only serial protocol the 180 series unit supports.
Port settings can be set to any options available on both the 180 unit
and the PLC. For the PLCs’ programmer port the serial ports parameters are set at 4800 Baud, EVEN parity, 8 data bits, and 1 stop bit.
The computer link port on the PLC or module supports Baud rates of
300, 600, 1200, 2400, 4800, and 9600 Baud; and parity selections of
NONE, ODD, or EVEN.
90
79736-6
User’s Manual
PMD 180 Message Display
UTICOR Technology, LP
8
PLC Data
Baud rate
The Baud rate for the Toshiba PLCs’ programmer port is fixed at 4800
Baud. The Baud rate options supported by the Toshiba PLCs’ computer link port are 300, 600, 1200, 2400, 4800, and 9600. Not all these
Baud rates are available on all computer links. The PLC and 180 unit
must be set to the same Baud rates to communicate.
Parity
The Toshiba PLCs’ programmer port is fixed at EVEN parity. The
Toshiba PLCs’ computer link port supports settings of NONE, EVEN
or ODD parity. The PLC and 180 unit must be set to the same parity to
communicate.
Stop Bits
Both Toshiba PLC ports are fixed at 1 stop bit. The PLC and 180 unit
must be set to 1 stop bit to communicate.
Data Bits
Both Toshiba PLC ports are fixed at 8 data bits. The PLC and 180 unit
must be set to 8 data bits to communicate.
Select RS-485
If using RS-485 or using a converter that allows data sent by the 180
series unit to be echoed back to the 180 unit on the same line this must
be set to YES. Otherwise, it can be set to NO, if the 180 unit RD and
SD are connected somewhere on the line.
Poll time
This is the time between polls of the PLC by the 180 unit in tenths of a
second. For constant polling set this to zero.
When the computer link is used the 180 unit needs the computer
link station address. If the programmer link is used, this field has no
meaning.
Station (Computer link only)
Output register type
Output starting
register
79736-6
The 180 series unit only reads the D register range, so this is fixed for
the Toshiba PLC.
This is the starting register the 180 series unit is to read. Sixteen consecutive words from the starting register must be available in the D
register type range. The range is then 0000 to 1520. The starting
register corresponds to the 180 unit’s first output word and all others
follow consecutively.
91
PMD 180 Message Display
8
User’s Manual
UTICOR Technology, LP
PLC Data
Input register type
The 180 series unit only writes to the D register range, so this is fixed
for the Toshiba PLC.
Input starting register
This is the starting register that the 180 series unit writes to. The 180
unit only writes to D registers. Sixteen consecutive words from the
starting register must be available in the D range. The range is then
0000 to 1520. The starting register corresponds to the 180 unit’s first
input word and all others follow consecutively.
PLC Port
This needs to be set to the correct port depending on how the PLC is to
be connected to the 180 series unit. The 180 unit needs to know which
port, so it can or cannot use the station address. An invalid setting will
cause communication errors.
0
1
0
1
Figure 8-18
92
79736-6
PMD 180 Message Display
User’s Manual
UTICOR Technology, LP
9
ASCII PROTOCOL
ASCII PROTOCOL FOR COMPUTER/PLC INTERFACE
Note:
Only one port (computer or PLC) can operate with ASCII
protocol at a time. To control the LEDs with the ASCII driver on the
PLC port, set the system attribute ‘LED control’ to computer interface.
The Computer Interface can operate with either normal PMD protocol
or ASCII protocol. When the Computer Interface has been programmed for ASCII protocol, the display will act like an ASCII terminal. Likewise, the PLC Interface can operate with a name-brand driver
or with ASCII protocol. When using ASCII protocol for computer
interface, select CRC checksum so that the 10F54 programming can
also be used.
Note: The ^ is an ASCII circumflex (9410, 5E16, or Shift+6) and not a
control command. Only printable characters will be processed. The
ASCII circumflex (^) will not be printed since it is used for the control
functions that can be used to control the way that text is displayed.
After the unit has been set up in ASCII protocol, the unit can be put
back into Display mode which is the normal operating mode of the
Operator Interface. After the unit receives a ^A command to select it,
all text is displayed as it is received. Some exceptional formatting can be
accomplished with the special functions provided. Additionally, the user
can send packets that define messages to take advantage of the PCI’s
display and message control capabilities. Note that the ASCII mode is
compatible with the current ASCII slave products with a few exceptions. The ^B command for select blink mode is not supported. The ^P
command allows you to scroll messages.
ASCII FUNCTIONS
When the Operator Interface is receiving commands in ASCII mode, it
must receive the correct number of characters before it will perform the
specified command. Each time a ^ is received, it is assumed to be the
beginning of a new command with the exception of ^Qnn commands
which must be received as part of a ^P or ^O command. When a ^ is
received, the unit will start a new current command and throw out any
part of a command it may have been in the process of receiving. Note
that a unit must be selected with the ^Agguuuu command before it will
process any other characters or commands. If it is not selected, it will
not process any input.
79736-6
93
User’s Manual
PMD 180 Message Display
9
UTICOR Technology, LP
ASCII PROTOCOL
The following is a list of the different commands and their general
meanings.
Note:
^Agguuuu
^bxxxxx
^cx
^Cn
^En
^Frr
^Gbbcc
^Hrrcc
^In
^Jn
^Knnnnn
^Msnnnnn
^Nnnnnn
^Onnnnn
^P
^Qnn
^r
^Un
^Vxyabcd=
^Xn
^Z
Commands are case sensitive.
=
=
=
=
=
=
=
=
=
=
=
=
=
=
=
=
Select Unit
Clear Message Queue
Enable/Disable Message Queue
Select Center Mode
Reset Display
Select Scroll Rate
Select On/Off Rate
Position Cursor
Select New Line
Select Wrap
Trigger Programmed Message
New Variable Data
Delete Message
Program Message
Display Text
Message Attributes (Note that this command
can only be used inside ^Onnnnn or ^P
commands)
=
Read current function key status
=
Read Data Set(s)
Set LED on/off
=
Blink Delimiters on/off
=
End of Text or Message
A more detailed description of each of these commands and the definition of its variables follows —
^Agguuuu SELECT UNIT
This command selects which unit(s) will process the ASCII commands
that are sent out. It will allow multiple units to be connected together
and addressed. These units can be addressed as a whole, as a subset, or
as individual units. Only units that have been selected will process
commands.
gg
uuuu
94
= a 2-digit group number
= a 4-digit unit number
79736-6
User’s Manual
PMD 180 Message Display
UTICOR Technology, LP
9
ASCII PROTOCOL
In both cases, the number must be padded with zeros (i.e. for unit 45,
the number would be 0045).
All units will always process all ^A commands to see if they have been
selected or deselected. A unit is deselected by not being selected in a
^A command.
There are three basic rules for selecting units.
1. Group x and Unit x selects only the unit
with matching numbers.
2. Group x and Unit 0 selects all units in group x.
3. Group 0 and Unit 0 selects all units.
^bxxxxx CLEAR MESSAGE QUEUE
This command allows the user to clear one or all messages from the
queue. To clear a specific message from the queue, fill the variable
xxxxx with a particular message number. To clear all messages from the
queue, use the number 65535 for the variable. No reply is sent back to
the ASCII controller.
^cx ENABLE/DISABLE MESSAGE QUEUE
This command allows the user to either enable or disable the message
queue. The default setting is disabled. No reply is sent back to the
ASCII controller
x
x
= 0 = queue enabled
= 1 = queue disabled
^Cn SELECT CENTER MODE
This command allows the user to center text on the display.
n
n
= 0 = turn centering off
= 1 = turn centering on
^En RESET DISPLAY
This command performs clear and/or reset of the selected unit. The user
can specify which level of reset to perform.
n
n
n
79736-6
= 0 = clear the display and home the cursor
= 1 = clear the display and reset all parameters modified by
ASCII protocol
= 2 = clear the display and leave the cursor at its current
position
95
User’s Manual
PMD 180 Message Display
9
UTICOR Technology, LP
ASCII PROTOCOL
^Frr SELECT SCROLL RATE
This command selects the rate at which the unit will scroll text from
right to left.
rr = 01 to 99
01 = .1 second
99 = 9.9 seconds
The number selected must be between 1 and 99. Values less than 10
must be padded with zeros.
^Gbbcc SELECT ON/OFF RATE
The user selects the rate at which the display will blink on and off. The
valid range is between 1 and 99. Values less than 10 must be padded
with zeros.
bb
cc
01
99
= 01 - 99 blink on interval
= 01 - 99 blink off interval
= .1 second
= 9.9 seconds
^Hrrcc POSITION CURSOR
This command lets the user position the cursor anywhere on the display.
The row and column values must be within the range for the display
being used.
rr
cc
= 01 - 04 row...valid range for 185 displays
= 01 - 40 column...valid range for 185 displays
^In SELECT NEW LINE
This command controls how a carriage return sent to the display will
effect the cursor. If new line is on, then a carriage return will cause the
cursor to be advanced to the beginning of the next line. If new line is
off, then a carriage return will cause the cursor to be advanced to the
beginning of the line that it is currently on. The default value for New
Line is ON.
n
n
96
= 0 = New Line is off
= 1 = New Line is on
79736-6
User’s Manual
PMD 180 Message Display
UTICOR Technology, LP
9
ASCII PROTOCOL
^Jn SELECT WRAP
This command controls how the cursor advances past the end of a
display line. When wrap is on, the cursor advances to the beginning of
the next line. When wrap is off, the cursor remains at the end of the line
the cursor is currently on.
n
n
= 0 = wrap is off
= 1 = wrap is on
^Knnnnn TRIGGER PROGRAMMED MESSAGE
This command lets the user make a previously programmed message in
the unit be displayed. The message number must be the number of an
existing message. If the message does not exist, nothing will be displayed. Message number must be padded with zeros for any message
less than 10,000.
nnnnn
= 5 - digit message number
^Msnnnnn NEW VARIABLE DATA
This command lets the user send new variable data to the unit. The user
must define which data set and the new data to be used when sending to
the PCI.
s
nnnnn
= 1 - 4 data set number
= 5 - digit data set value
^Nnnnnn DELETE MESSAGE (RAM Units only)
This command lets the user delete a message in the PCI. The user must
specify a 5 -digit message number to be deleted.
nnnnn
= 5 - digit message number
^Onnnnn PROGRAM MESSAGE (RAM Units only)
Messages are programmed with this command. The message number
selected must be unique to the other messages in the PCI. The text must
be followed by a ^Z or the message will be ignored. The maximum
length of text including carriage returns is 223 characters.1
nnnnn
79736-6
= 5 - digit message number
97
User’s Manual
PMD 180 Message Display
9
UTICOR Technology, LP
ASCII PROTOCOL
^P DISPLAY TEXT
This command allows the user to display text using the attributes of the
PCI 400 that are not available through the other ASCII commands. This
command works the same as the ^Onnnnn command except the
message is displayed right away and not programmed into the unit. The
maximum length of text including carriage returns is 225 characters.1
^Qnn MESSAGE ATTRIBUTES
This command is only usable with ^Onnnnn and ^P commands. It
allows you to add attributes to the display text, some of which are not
available through other ASCII protocol commands.
^Q01
^Q02
^Q03
^Q04
^Q05r
^Q06gguuuu
^Q07n
^Q08
^Q09
^Q10btr
^Q11lr
= Blink Entire Message
= Center Message
= Not Valid
= Log Message
= Chain Message r = repeat (0 = no, 1 = yes)
= Send to Slave Group and Unit
= Data Set n goes Here (All 5 digits of the
indicated will be displayed or inserted into the
message being programmed)
= Insert Time Here
= Insert Date Here
= Scroll Up b = bottom row (1-4), t = top row
(1-4), repeat (0 = no, 1 = yes)
= Scroll left l = line # (1-4), r = repeat (0 = no,
1 = yes)
^r READ CURRENT FUNCTION KEY STATUS
This command will cause the PCI to send back the current status of the
function keys. The PCI will return a bitmap of the function keys’ status.
The standard reply format from the PCI, when a bitmap representation
is selected, will be in this form:
^rabcd^Z
a
= Function Keys 16 - 13
b
= Function Keys 12 - 9
c
= Function Keys 8 - 5
d
= Function Keys 4 - 1
98
79736-6
User’s Manual
PMD 180 Message Display
UTICOR Technology, LP
9
ASCII PROTOCOL
^Un READ DATA SETS
This command will cause the PCI to return the current value of the
variable data sets. The user can specify that either one or all data sets be
returned.
n = 0 = send all data sets
n = 1 - 4 = send only the data set specified by n.
The standard reply format will vary depending on whether all or only
one of the data sets were selected. The format for one will be
^Uxaaaaa^Z. The format for all of the data sets is
^Uxaaaaa,bbbbb,ccccc,ddddd^Z.
x
x
x
x
x
aaaaa
bbbbb
ccccc
ddddd
= 0 = all data is ready
= 1 = data set 1 is not ready
= 2 = data set 2 is not ready
= 3 = data set 3 is not ready
= 4 = data set 4 is not ready
= data set 1, or specified data set for single data set
selection
= data set 2
= data set 3
= data set 4
^Vxyabcd SET LED ON/OFF
This command is used to turn the status LEDs of the operator interface
on and off. The LEDs on or off depending on the bitmap sent. LEDs
that are not specified in the bitmap will not be effected by this command. The definitions of the variables in this command are as follows:
x
x
y
y
y
a
b
c
d
= 0 = Turn LEDs off
= 1 = Turn LEDs on
= 1 = LED group #1 (1 - 16)
= 2 = LED group #2 (17 - 32)
= 3 = LED group #3 (33 - 48)
= LEDs 16 - 13 of this group
= LEDs 12 - 9 of this group
= LEDs 8 - 5 of this group
= LEDs 4 - 1 of this group
The command ^V113A04 will turn on LEDs 14, 13, 12, 10, and 3 on
the PCI 185 front panel.
79736-6
99
User’s Manual
PMD 180 Message Display
9
UTICOR Technology, LP
ASCII PROTOCOL
^Xn BLINK DELIMITERS
This command is used when you want only part of the message to blink.
After the ‘blink on’ command is received, all following characters will
blink until a ‘blink off’ command is received. The variable functions as
follows:
n
n
= 0 = blink is off
= 1 = blink is on
^Z END OF TEXT OR MESSAGE
This command must follow all ^O and ^P commands for the message
to be valid. It will also be the last element in all replies given by the PCI.
Message numbers for a chain message are to be entered on one line
with no carriage return between the individual message numbers. Each
message number requires 5 digits. If a message number has less than 5
digits, it must be padded with zeros.
EXAMPLES
In this portion we provide some illustrations on how messages are
programmed. The first illustration will be for displaying text on a single
unit.
This first example is to be sent to unit 124, group 3.
^A030124Testing ASCII Mode
This will cause the text “Testing ASCII Mode” to be displayed at the
current cursor position on a PCI set up as group 3 unit 124. All other
PCIs on the same line will ignore this text. Any further commands or
text would only be processed or displayed by this unit until another ^A
command is issued to select a different PCI. All units will monitor all
commands listening for a ^A command whether they are selected or
not. Only selected units will display text or process commands.
The second illustration will trigger message # 439 to be displayed by the
currently selected PCI.
^K00439
100
79736-6
PMD 180 Message Display
User’s Manual
UTICOR Technology, LP
9
ASCII PROTOCOL
The third illustration will program message # 228 with Center and Log
Message.
^O00228^Q02^Q04Message text for msg. 228^Z
CONCLUSION
The ASCII protocol allows the PCI to act like an ASCII terminal.
Using the selected interface port, the user can program messages,
trigger messages, and take advantage of many of the other features and
advantages of the PCI 185 Operator Interfaces.
79736-6
101
PMD 180 Message Display
9
User’s Manual
UTICOR Technology, LP
ASCII PROTOCOL
This page intentionally left blank.
102
79736-6
PMD 180 Message Display
User’s Manual
UTICOR Technology, LP
10
General Specifications
NEMA Ratings:
Message Display Only
NEMA 12 (NEMA 4X Optional)
Electrical Interference
Tolerance:
NEMA ICS 2-230 Showering Arc Test
ANSI C37.90a-1974 (SWC) Surge Withstand Capability Test
Power Requirements:
AC Displays:
DC Displays:
AC Controllers:
DC Controllers:
Fuse Type:
115 VAC Unit: .25 Amp @ 250 VAC, 2 AG, Sub-Miniature, Slo-Blo
230 VAC Unit: .25 Amp @ 250 VAC, 2 AG, Sub-Miniature, Slo-Blo
24 VDC Unit: .5 Amp @ 250 VAC, 2 AG, Sub-Miniature, Slo-Blo
Operating Temperature:
0 to +60 °C Ambient
Storage Temperature:
-40 to +95 °C Ambient
Humidity:
10–95% Relative Humidity Non-Condensing
Battery:
.5AA Lithium 3.6 V
Battery Life:
Typically 5 years (Minimum 1.5 years when OFF continuously)
Clock Accuracy:
1 Minute per month error (Maximum)
Message Memory Type:
EEPROM:
RAM:
8K, 32K, 64K, or 128K
32K or 128K
Memory Life:
EEPROM:
RAM:
Min. 10,000 changes to a given location
Unlimited changes (Theoretically)
Memory Usage:
Approximately 175 80-character messages/16Kbytes of memory
Display Configuration:
2 Lines of 40 characters vacuum fluorescent (Blue)
4 Lines of 20 characters vacuum fluorescent (Blue)
2 Lines of 20 characters vacuum fluorescent (Blue)
Display Type:
5 x 7 Dot matrix
Character Height:
4.65 mm high characters (2 Lines of 40 characters)
5.0 mm high characters (4 Lines of 20 characters)
5.05 mm high characters (2 Lines of 20 characters)
Viewing Distance:
10 feet (3 meters) approximately
79736-6
115/230 VAC (102-132/194-250), 47-63 Hz, 11 VA
24 VDC (20-32), 11 VA
115/230 VAC (102-132/194-250), 47-63 Hz, 8 VA
24 VDC (20-32), 8 VA
103
PMD 180 Message Display
10
User’s Manual
UTICOR Technology, LP
General Specifications
Character sets:
Space
Requirements:
U.S., Cyrillic, German, English, Danish, Swedish, French,
and Japanese Kana
13.375 Wide x 5.370 High x 5.175 Deep (NEMA 12, 2x40 Model)
13.875 Wide x 5.870 High x 5.175 Deep (NEMA 4X, 2x40 Model)
11.338 Wide x 5.669 High x 5.175 Deep (NEMA 12, 4x20 Model)
11.838 Wide x 6.169 High x 5.175 Deep (NEMA 4X, 4x20 Model)
8.650 Wide x 3.700 High x 5.175 Deep (NEMA 12, 2x20 Model)
9.150 Wide x 4.200 High x 5.175 Deep (NEMA 4X, 2x20 Model)
12.500 Wide x 3.559 High x 4.860 Deep (Message Controller)
Weight:
4.5 pounds (Message Display)
3.8 pounds (Message Controller)
Mounting:
Panel mount with built-in mounting studs (Message Display)
Panel mount with pre-cut keyways for ¼-20 bolts (Message Controllers)
Terminal Blocks:
Wire-Clamp terminal blocks for 18-22 AWG
104
79736-6
PMD 180 Message Display
User’s Manual
11
UTICOR Technology, LP
Unit Cutout and Dimensions
Shown below are the cutout and mounting dimensions of the Standard
NEMA 12, PMD 180 that has two lines of forty characters.
79736-6
105
PMD 180 Message Display
11
User’s Manual
UTICOR Technology, LP
Unit Cutout and Dimensions
Shown below are the cutout and mounting dimensions of the Standard
NEMA 12, PMD 180 that has four lines of twenty characters.
106
79736-6
PMD 180 Message Display
User’s Manual
11
UTICOR Technology, LP
Unit Cutout and Dimensions
Shown below are the cutout and mounting dimensions of the Standard
NEMA 12, PMD 180 that has two lines of twenty characters.
79736-6
107
PMD 180 Message Display
11
User’s Manual
UTICOR Technology, LP
Unit Cutout and Dimensions
Shown below are the cutout and mounting dimensions of the Stainless
Steel, NEMA 4X PMD 180 that has two lines of forty characters.
108
79736-6
PMD 180 Message Display
User’s Manual
11
UTICOR Technology, LP
Unit Cutout and Dimensions
Shown below are the cutout and mounting dimensions of the Stainless
Steel, NEMA 4X PMD 180 that has four lines of twenty characters.
79736-6
109
PMD 180 Message Display
11
User’s Manual
UTICOR Technology, LP
Unit Cutout and Dimensions
Shown below are the cutout and mounting dimensions of the Stainless
Steel, NEMA 4X PMD 180 that has two lines of twenty characters.
110
79736-6
PMD 180 Message Display
User’s Manual
11
UTICOR Technology, LP
Unit Cutout and Dimensions
Shown below are the outline and mounting dimensions of the PMD 180
Message Controller.
79736-6
111
PMD 180 Message Display
User’s Manual
UTICOR Technology, LP
This page intentionally left blank.
112
79736-6
PMD 180 Message Display
User’s Manual
UTICOR Technology, LP
12
Internal Adjustments
If you are powering the PMD 180 with 230 VAC, it is necessary to
move an internal jumper. The drawing below shows the procedure
used to move this jumper.
79736-6
113
User’s Manual
PMD 180 Message Display
12
UTICOR Technology, LP
Internal Adjustments
The front panel pushbuttons can be disabled by the dip switches on
the back of the unit. However, by moving an internal jumper, the Mode
and Enter kekys can be re-enabled. This allows the user to manually increment and decrement the message queue. Access to this
jumper can be acquired by separting the back part of the unit from the
front as shown below. When the jumper is in the “A” position, dip
switch nine will completely disable the front panel pushbuttons. Position “B” allows Mode and Enter to still be used for manipulating the
message queue.
114
79736-6
PMD 180 Message Display
User’s Manual
13
UTICOR Technology, LP
System Attribute Default Settings
The PMD 180’s default system attributes are listed below. These different settings can be changed either online or offline. Numeric values are
changed with the number keys on the computer. Other values are
changed with the space bar.
Blink Attributes:
Blink ON time = 0.5 seconds
Blink OFF time = 0.5 seconds
Scroll Attributes:
Scroll UP time = 0.5 seconds per line
Scroll LEFT time = 0.2 seconds per column
Miscellaneous Attributes:
Display Saver Timeout = Disabled
Chain message time = 10 seconds per message within the chain
Chain message, repeat scrolling message = no repeat
Queue status = Disabled
Queue message time = 10 seconds per message within the queue
Queue message, repeat scrolling message = no repeat
Data Log enable = data log is disabled
Clear data sets = yes
Character set = American
Send PLC time registers = no
Data sets use leading zeros = no
Special Function Messages:
Low battery message number = none selected
Enable data log message number = none selected
Disable data log message number = none selected
Clear data log message number = none selected
Increment clock 1 hour message number = none selected
Decrement clock 1 hour message number = none selected
Print Port Attributes:
Baud rate = 1200 baud
Parity = none
Stop bits = one
Print Time/Date = no
Parallel Port Attributes:
Inverted Flag = port is being read logically inverted (Inverted)
Data format = BCD
Debounce time = 5 milliseconds
79736-6
115
PMD 180 Message Display
User’s Manual
UTICOR Technology, LP
This page intentionally left blank.
116
79736-6
PMD 180 Message Display
User’s Manual
14
UTICOR Technology, LP
International Character Sets
The PMD 180 can use one of eight international character sets when
displaying messages. The different character sets are U.S., Cyrillic,
Germany, England, Denmark, Sweden, France, and Kana. These
character sets are selected through the System Attributes option in
either the Offline Development or Online Network menus in the programming software. The different characters than can be displayed are
shown in the following chart. When a space is left blank on the chart,
the character in the U.S. column will be displayed.
79736-6
117
PMD 180 Message Display
14
118
User’s Manual
UTICOR Technology, LP
International Character Sets
79736-6
PMD 180 Message Display
User’s Manual
14
79736-6
UTICOR Technology, LP
International Character Sets
119
PMD 180 Message Display
14
120
User’s Manual
UTICOR Technology, LP
International Character Sets
79736-6
PMD 180 Message Display
User’s Manual
14
79736-6
UTICOR Technology, LP
International Character Sets
121
PMD 180 Message Display
14
122
User’s Manual
UTICOR Technology, LP
International Character Sets
79736-6
PMD 180 Message Display
User’s Manual
14
79736-6
UTICOR Technology, LP
International Character Sets
123
PMD 180 Message Display
User’s Manual
UTICOR Technology, LP
This page intentionally left blank.
124
79736-6
User’s Manual
PMD 180 Message Display
15
UTICOR Technology, LP
Control Codes and Special Characters
Control Codes
The following control codes can be programmed into the message to
perform special functions. The control codes will not be displayed on
the PMD. The codes are entered by pressing the Control key and the
indicated character.
79736-6
ASCII
Character
000
001
002
003
004
005
006
007
008
009
010
011
012
013
014
015
016
017
018
019
020
021
022
023
024
025
026
027
028
029
030
031
NUL
SOH
STX
ETX
EOT
ENO
ACK
BEL
BS
JT
LF
VT
FF
CR
SO
SI
DLE
DC1
DC2
DC3
DC4
NAK
SYN
ETB
CAN
EM
SUB
ESC
FS
GS
RS
US
Control Code
^@
^A
^B
^C
^D
^E
^F
^G
^H
^I
^J
^K
^L
^M
^N
^O
^P
^Q
^R
^S
^T
^U
^V
^W
^X
^Y
^Z
^[
^\
^]
^^
^_
125
User’s Manual
PMD 180 Message Display
15
UTICOR Technology, LP
Control Codes and Special Characters
Special Characters
When programming a message, there are keys that can be pressed to
add features to the message. They are as follows.
Insert Time
By pressing the F7 key the time (as found in the real-time clock of the
PMD) will be added to the message starting at the current cursor
position. The way it is inserted is HH:MM:SS.
Insert Date
By pressing ShiftF7, the date (as found in the real-time clock of the
PMD) will be added to the message starting at the current cursor
position. The way it is inserted is DD:MMM:YY.
Toggle Blink
If only individual characters or a group of the total characters in the
message are to blink within the message, use the F8 key to toggle blink
on and off. The blink rate is determined in the System Attributes selection of the Offline Development and Online Network menus in the
10F54 programming software.
Inserting Data Sets
Either the entirety or any part of any of the variable data from the four
data sets can be inserted in any message. The way in which this is
accomplished, is as follows. The variable data value range is from 0 to
65535.
Ten Thousands
Thousands
Hundreds
Tens
Units
Data Set 1
F2
F3
F4
F5
F6
Data Set 2
Shift F2
Shift F3
Shift F4
Shift F5
Shift F6
Data Set 3
Alt F2
Alt F3
Alt F4
Alt F5
Alt F6
Data Set 4
Ctrl F2
Ctrl F3
Ctrl F4
Ctrl F5
Ctrl F6
Typeover/Insert
When entering text into a message, the option is available to either type
over existing text or insert text at the current cursor position. This
option is toggled by pressing the Insert key.
126
79736-6
User’s Manual
PMD 180 Message Display
15
UTICOR Technology, LP
Control Codes and Special Characters
Null Characters
Null characters can be placed into message text by using either the right
arrow key or Ctrl 2.
Character Size
When using a PMD 3000 slave display with the PMD 180, the size of
the characters on the PMD 3000 can vary within a message. This is
achieved with key strokes while entering the message. Character heights
that can be used (depending on the PMD 3000 display size) are 2", 4",
6", 8" narrow (same width as 4"), and 8". The different key strokes for
selecting them are as follows.
2"
6"
8"
=
=
=
Alt 2
Alt 6
Alt 8
4"
8"N
=
=
Alt 4
Alt 7
After a character size is entered, the proceeding characters will be that
size until changed again or the end of the message. The graphic screen
used when programming messages that will be sent to a PMD 3000 will
reflect the character size. The control codes used to change the character size will be displayed on the PMD 180. To avoid this, make the
message an invisible one.
Clear a Line
Clear a line of text when editing a message by pressing Shift F9.
Insert a Blank Line
Insert a blank line when editing a message by pressing Shift F10.
79736-6
127
PMD 180 Message Display
User’s Manual
UTICOR Technology, LP
This page intentionally left blank.
128
79736-6
PMD 180 Message Display
User’s Manual
UTICOR Technology, LP
16
Displayed Errors
BAD COMP INTERFACE
The computer interface port settings (baud rate, parity, stop bits) are
invalid.
BAD PRINTER SETTINGS
The printer port settings (baud rate, parity, stop bits) are invalid.
BAD SLAVE SETTINGS
The slave port settings (baud rate, parity, stop bits) are invalid.
INCOMPATIBLE DRIVER
The revision of the executive chip is not compatible with the revision of
the downloaded PLC driver code.
PLC MSG BAD REGISTER
The user has specified an illegal or invalid register number or type.
PLC MSG ERROR
There was an error communication with the PLC.
PLC MSG TIMEOUT
The PLC did not reply to the PMD.
PLC PORT NOT SET UP
The PLC port settings (baud rate, parity, stop bits) are invalid.
PROM FAILURE
The PROM’s checksum did not match what was programmed. The
program in the PROM is invalid.
NO PLC DRIVER
No PLC driver code has been downloaded to the unit.
RAM FAILURE
The RAM in the unit has failed.
Note:
If the unit has an error (i.e., a message timeout), an error
message is displayed. When the error is rectified, if the message number valid, the message will be redisplayed.
79736-6
129
PMD 180 Message Display
User’s Manual
UTICOR Technology, LP
This page intentionally left blank.
130
79736-6
User’s Manual
PMD 180 Message Display
UTICOR Technology, LP
17
Symptom
Troubleshooting
Cannot communicate from the computer to the PMD.
Possible Solutions
Symptom:
1.
Make sure the PMD and the computer are both setup for the same
communication parameters.
2.
Check to see if the computer is connected to one of the computer
interface ports on the back of the PMD.
3.
Verify that the dip switches are set correctly for the type of
communication standard that you are using to communicate with
the computer. i.e. RS-232, RS-422, or RS-485.
4.
If you are using the RS-485 standard, make sure you have the
option board that allows you to communicate RS-485.
5.
If you are using the RS-232 standard, make sure the cable only
has three conductors between the computer and the PMD. Other
wise, handshaking signals might be introduced and cause
problems with the communications.
6.
Make sure the PMD is in the Display Mode. All communications
between the computer and the PMD are accomplished through the
Display Mode.
Cannot get the PLC to initiate a message.
Possible Solutions:
79736-6
1.
Check to see if the correct PLC Driver is loaded into the PMD.
2.
Make sure the setup of the PLC Driver matches the communication
setup of the PLC port that the PMD is connected to.
3.
See if the first output word is set up to allow a message number to
be accepted by the PMD.
4.
Make sure the message word is being placed into the second
output word by the PLC.
131
User’s Manual
PMD 180 Message Display
17
UTICOR Technology, LP
Troubleshooting
Symptom:
5.
Check to see if the PLC is connected to one of the PLC Ports on
the back of the PMD.
6.
Be sure you are dedicating 16 input and 16 output words in the
PLC to the PMD only so that they are not being used by anything
else in the PLC.
7.
Make sure the Dip Switches are set to the correct communication
standard. i.e. RS-232, current loop, RS-422, or RS-485
8.
If you are using the RS-485 standard, make sure you have the
option board that allows you to communicate RS 485.
Cannot get Variable Data into the message.
Possible Solutions:
132
1.
Make sure the message is programmed to contain variable data
areas. This is accomplished by using the F2-F6 keys when editing
the message text. F2-F6 for Data Set 1, Shift F2-F6 for Data Set
2, Alt F2-F6 for Data Set 3, and Ctrl F2-F6 for Data Set 4. F2 is
the Most Significant Digit and F6 is the Least Significant Digit.
2.
See if the first output word is set up to allow the entering of
variable data.
3.
Make sure you are placing the Variable Data in the correct PLC
output words, words 4-7, that corresponds to the Data Set
Number that you programmed into the message.
79736-6
PMD 180 Message Display
User’s Manual
UTICOR Technology, LP
Glossary
AC
Abbreviation for alternating current
ASCII
Abbreviation for American Standard Code for Information Interchange.
It represents a code for defining alphanumeric characters.
Adapter
An intermediate device that permits attachment of special accessories or
provides special means for mounting
Alphanumeric
Pertaining to a character set that contains both letters and numerals and
usually other characters
Amps
Abbreviation for ampere; A unit of electrical current or rate of flow of
electrons. One volt across 1 ohm of resistance causes a current flow of
1 ampere.
BCD
Binary Coded Decimal; a system of number representation where each
digit of a decimal number is represented by a binary number
Baud rate
The speed at which serial data is transmitted and received. Rated at bits
per second.
Bidirectional
Descriptive of a device that can transmit and receive data
Binary
A numbering system in which each digit can take on values from 0 to 1;
the base 2 numbering system
Bit
An acronym for Binary digit; the smallest unit of information in the
binary numbering system. Represented by the digits 0 and 1
Buffer
An isolating circuit used in an electronic device to avoid reaction of a
driven circuit on the corresponding driver circuit
Byte
A single group of bits processed together (in parallel). It can consist of
a variable number of bits
Byte Diagram
Illustration that defines how bytes are utilized in message memory
Checksum
A calculation of all data bits being transmitted, used by the receiving
device for data integrity
79736-6
133
PMD 180 Message Display
User’s Manual
UTICOR Technology, LP
Glossary
Chain Message
A message which links up to 115 individual messages together and
displays at a user-defined rate
Computer Interface
Peripheral equipment for attaching computer to other devices
Control Characters
ASCII codes used to make the display perform special tasks
Controller Terminal
These terminals interface to the programmable controller or other
device that operates the PMD; terminals used by the controller are the
parallel port, the message control terminal and VDC In and Out terminals
Daisy Chain
A serial wiring method where the cable goes from unit to unit
Data Hold
Allows data present on the parallel port to be accepted by the PMD
Data Log
An area of memory set aside for a time and date stamped historical
record of events in the PMD
Data Select
Two control inputs on the parallel port used to select the data set
number
DC
Abbreviation for direct current
Debounce Time
A period allowed for contacts to stabilize
Decrement
Subtract one
Default
The initial state of attributes
Delimiter
A character that distinguishes a string of characters and therefore
cannot be a member of the string: e.g. Blink delimiter
DIN
Deutsche Industrie Normenausschuss; German association that determines the standards for electrical and other equipment in that country;
European standard which gives very precise cut-out mounting dimensions
Dip Switch
A mechanical switch housed in a dual inline pack
134
79736-6
User’s Manual
PMD 180 Message Display
UTICOR Technology, LP
Glossary
Display Mode
The operating mode; when in this mode, the PMD is controlled by a
programmable controller or other intelligent device; the PMD can also
be interfaced to a printer, alarm device, slave message units, or computer
Dump
Sending of all or part of the unit memory contents through a serial port
EEPROM
Electronically Erasable Programmable Read Only Memory; this type of
read only memory can be altered with commands of the programming
terminal
EPROM
Electronically Programmable Read Only Memory; a read-only memory
in which stored data can be erased by ultraviolet light or other means
and re-programmed bit by bit with appropriate voltage pulses
FIFO
First-in, First-out; a list in memory where the first item received is the
first item retrieved
Group Number
A four-bit binary number used as part of the unit identifier
HEX
See hexadecimal
Hexadecimal
Base sixteen numbering system with digits 0 through F where F equals
1510
Handshaking
The establishment of synchronization between sending and receiving
equipment by means of exchange of specific character configurations
IEEE
Institute of Electrical and Electronics Engineers
Increment
Add one
Input Devices
Devices such as limit switches, pressure switches, push buttons, etc.
that supply data to a controller. These discrete inputs are two types:
those with common return, and those with individual returns (referred
to as isolated inputs). Other inputs include analog devices and digital
encoders
79736-6
135
PMD 180 Message Display
User’s Manual
UTICOR Technology, LP
Glossary
Interfacing
Interconnecting a controller with its application devices, and data
terminals through various modules and cables. Interface modules
convert controller logic levels into external signal levels and vice versa
Invisible Messages
Messages sent to printer or slave but not the master display
Isolated Bidirectional Adapter Provides two-way interface between devices using RS-232C and
RS-422A/RS-485A communication standards
LED
Light-Emitting Diode—a pn junction that emits light when forward
biased
Message Attributes
The specific codes and commands of a PMD message
NEMA Standards
Consensus standards for electrical equipment approved by the majority
of the members of the National Electrical Manufacturers Association
(NEMA)
NEMA 4X
National Electrical Manufacturers Association; 4X enclosures are
intended for indoor or outdoor use primarily to provide a degree of
protection against corrosion, windblown dust and rain, splashing water,
and hose-directed water; and to be undamaged by the formation of ice
on the enclosure. They shall meet hosedown, external icing, and corrosion-resistance design tests. UTICOR uses #316 grade stainless steel
NEMA 12
National Electrical Manufacturers Association; 12 enclosures are
intended for indoor and outdoor use primarily to provide a degree of
protection against dust, falling dirt, and dripping noncorrosive liquids.
They meet drip, dust, and rust-resistance design tests.
Noise Immunity
The ability of an electronic device to reject interfering noise signals
Null Character
An ASCII character that is neither a displayed character or a command
but can be defined by the user. In UTICOR displays, the null character
is used as placeholder in the current message when overlaying it on an
existing message and will not effect that previous message where there
are null characters.
136
79736-6
PMD 180 Message Display
User’s Manual
UTICOR Technology, LP
Glossary
Offline Programming
Message programs are developed with UTICOR software and stored to
disk. The message file can then be up loaded to the PMD display. The
computer does not need to be connected to the PMD to program
messages.
Online Programming
The PMD master display is programmed directly from the computer.
The PMD must be connected to the programming computer.
PCI
Programmable Communications Interface; allows two-way communication between operator and machine. Through a series of function keys
and LEDs, an operator can determine and respond to operation status
PMD
Stands for Programmable Message Display and is Copyrighted by
UTICOR Technology, Inc.
Parallel Port
16-input port through which message numbers and data information
from a controller or other device is entered into the PMD when in the
Display mode
Parameter
A constant or element, the value of which characterizes the behavior of
one or more variables associated with a given system
Parity
A method of testing the accuracy of binary numbers used in recorded,
transmitted, or received data: for even parity, the sum of the ones is an
even number; for odd parity, the sum of the ones is an odd number
Parity bit
An additional bit added to a binary word to make the sum of the number of “1s” always even or odd
Peripheral Equipment
In a data processing system, any unit of equipment, distinct from the
central processing unit, which may provide the system with outside
communication
Printer Port
The place of access on a PMD that allows for communication between
the message display and specified printer
Protocol
A formal set of rules governing the format and timing of data between
two communicating devices. Some PMD products can use either
UTICOR protocol or ASCII protocol.
79736-6
137
PMD 180 Message Display
User’s Manual
UTICOR Technology, LP
Glossary
RAM Memory
Acronym for Random Access Memory; RAM is a type of memory that
can be accessed (read from) or loaded (written into) depending on the
particular addressing and operation codes generated internally in the
controller; requires a battery.
ROM
Acronym for Read Only Memory; a ROM is a solid-state storage
memory whose contents cannot be altered by the controller
RS-232
Electrical characteristics of a single-ended digital interface circuits
RS-422
Electrical characteristics of balanced-voltage digital interface circuits
Real-time Clock
A clock that indicates the passage of actual time during which physical
events take place
Scrolling Message
A message that contains up to 235 characters and scrolls upward or
from right to left.
Sink
When using the parallel port with a sinking module, the positive side of
the source is used for reference and the negative voltage is equal to a
logic one.
Sllave Port
The place of access on a PMD master for serial connection to a slave
display
Slo Blo
A type of fuse that will withstand short current surges
Source
When using the parallel port, this term refers to using the negative side
of the voltage supply for reference and the positive side for logic one
levels
Stop Bit
The last one or two bits sent in a synchronous data transmission to
indicate the end of the message
Unit Address
Two bytes that contain the two identifiers (Group and Unit number)
that distinguish one message display from another; present in each
message to specify which PMD should respond
Unit Number
A twelve-bit binary number used to identify which member of its group
it is
138
79736-6
PMD 180 Message Display
User’s Manual
UTICOR Technology, LP
Glossary
VAC
Voltage alternating current
VDC
Voltage direct current
Variable Data
Fields within a message that allow the real-time display of values that
are entered either from the keypad or controlling device
Vacuum Fluorescent
An evacuated display tube in which the anodes are coated with a phosphor that glows when electrons from the cathode strike it, to create a
display
79736-6
139
PMD 180 Message Display
User’s Manual
UTICOR Technology, LP
This page intentionally left blank.
140
79736-6
PMD 180 Message Display
User’s Manual
UTICOR Technology, LP
Index
Symbols
10F54 Software 27
installation 9
A
AEG PLC
Driver attributes 60
Allen-Bradley 1747 AIC Module
Driver attribures 61
Allen-Bradley PLC5
Driver attributes 66
Allen-Bradley SLC 500
Driver attributes 61
Allen-Bradley SLC 500 DF1 Module
Driver attributes 63
D
Data log 34, 46
Clear message 47
Disable message 47
Enable message 47
Log message 42
Data sets 46
ASCII protocol 97, 98, 99
Inserting in a message 126
Leading zeros 46
Display saver 45
E
EEPROM 20
exec software 20
B
Back Panel
Features 3
Battery OK LED 13
C
Chain message 45
ASCII protocol 98
Attributes 45
Clear 40
Communications setup 31
Group/Unit number 32
Port settings 32
Computer
Hardware 9
Software 9
Computer hardware 9
Computer interface
ASCII Protocol 93
Default parameters 10
Interconnect cable 9
Wiring 17
Control codes 125
79736-6
F
File network 30
Download file to disk 30
Return to main menu 30
Upload file to PMD 30
Verify a file 30
Front Panel
Features 13, 27
Front panel
Features 2
G
GE 90-30 PLC
Driver attributes 67
I
IDEC FA-2/FA-2J/FA-3S/FA2-5M
Driver Attributes 69
International Character Sets
Selection 46
141
PMD 180 Message Display
K
Klockner Moeller
Driver attributes 71
M
Message 41
Special characters 126
Message attributes
Blink message 41
Center message 41
Clear display 40
Dataset disabled 42
Display height/width 42
Invisible message 42
Log message 42
Print message 40
Scroll left 40
Scroll upwards 39
Send to slave 41
Message Priority 58
Message queue 45, 58
Mitsubishi FX series
Driver attributes 72
Mitsubishi Melsec-A Series
Driver Attributes 74
Mode Buttons 13
MODICON Modbus
Driver attributes 76
O
Offline Development 27
Offline development
Compact message file 28
Copy messages 29
Default message attributes 28
Delete messages 29
Edit message 29
File merge functions 29
Fill messages 29
Find a string 29
142
User’s Manual
UTICOR Technology, LP
Print message file 28
Return to main menu 29
Set Attribute in range 28
Simulator 28
System attributes 28
OMRON host link unit
Driver attributes 78
Online network 33
Clear memory 33
Clear queue 34
Copy messages 34
Data log 34
Default message attributes 34
Delete messages 35
Display packet message 33
Display programmed message 33
Edit message 34
Fill messages 35
Move messages 35
Return to main menu 35
Set attribute in range 34
Status ID 35
System attributes 34
Test memory 34
Time and date 35
Variable data 35
P
PLC data
Input registers 52
Output registers 50
PLC Drivers
Introduction 49
PLC function 30
Edit PLC attributes in the PCI 31
Edit PLC file defaults 31
Remove PLC code 31
Return to main menu 31
Upload PLC code 31
PLC Interface
79736-6
PMD 180 Message Display
User’s Manual
ASCII Protocol 93
PMD 3000
Defining the display field 42
Power input
Wiring 17
Power LED 13
R
Reliance Automate
Driver Attributes 81
RELIANCE XL II
Driver attributes 80
RS-422A/RS-485A
Switch settings 19
UTICOR Technology, LP
Print port attributes 48
Scroll attributes 45
T
Texas Instruments 405 Series
Driver attributes 87
V
Vacuum Fluorescent display 13
Variable data
Inserting in a message 126
Leading zeros 46
S
Setup modes
Computer Interface 14
Demonstration mode 14
Options 14
PLC port 14
Test functions 14
Siemens 100 Series, 115 CPU
Driver attributes 83
Slave port
Connector 21
Software
Installation 9
Special characters 126
Special function messages 47
Clear data log 47
Decrement clock 48
Disable data log 47
Enable data log 47
Increment clock 47
Low battery 47
Storing the PLC Driver in EEPROM 20
SW1-7 20
System attributes 45
Blink attributes 45
Miscellaneous attributes 45
Parallel port attributes 48
79736-6
143
PMD 180 Message Display
User’s Manual
UTICOR Technology, LP
This page intentionally left blank.
144
79736-6