1
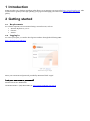
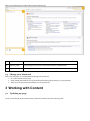
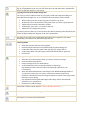
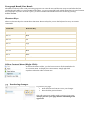
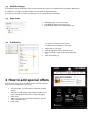
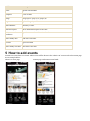
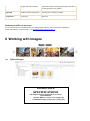
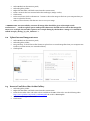
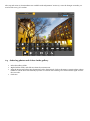
therocks.com
Content Management
System
Tenant User Guide
August 2014
Table of Contents
1
Introduction ............................................................................................. 1
2
Getting started ........................................................................................ 1
2.1
Requirements ..........................................................................................1
2.2 Logging in ................................................................................................1
2.3 Change your Password ...........................................................................2
3
Working with Content ............................................................................ 2
3.1
Updating my page ...................................................................................2
3.2 Text Editor ...............................................................................................4
3.3 Previewing changes ................................................................................6
3.4 Publish changes .......................................................................................7
3.5
Page status ...............................................................................................7
3.6 Notification ..............................................................................................7
4
How to add special offers ..................................................................... 7
5
How to add events ................................................................................. 8
6
Working with images ........................................................................... 10
6.1
Upload images ...................................................................................... 10
6.2 Upload several images at once ........................................................... 11
6.3 Insert a YouTube video in the Gallery............................................... 11
6.4 Edit an image ........................................................................................ 12
6.5
Ordering photos and videos in the gallery ....................................... 13
1 Introduction
SHFA provides you a platform (Umbraco) that allows you to manage your page on the http://www.therocks.com. This
manual aims to guide you through updating your page and managing your own events, special offers and images
gallery.
2 Getting started
2.1 Requirements
For a better experience we recommend using a recent browser, such as:
• Internet Explorer 8, 9 or 10
• Chrome
• Firefox
2.2 Logging in
To access your space, you need to first log into Umbraco through the following URL:
http://therocks.com/umbraco/
Umbraco Login Page
Enter your username and password provided by SHFA and click “Login”.
Lost your username or password?
Please contact our Webmaster:
Tania McLachlan T: (02) 9240 8537 | E: [email protected]
SHFA Phase 1.2 Scope of Work 16th August 2013
After a successful login you will see the Content section page:
#1
Pages tree
You will see in this area all pages that belong to you.
#2
Sections panel
This panel gives you access to the Content section and the Media
#3
Logout
Link to logout
2.3 Change your Password
After your first login, it’s recommended to change your password.
• Go to the content section page
• If the change Password tab is not shown then reload the page (Press F5 on your keyboard)
• Enter your current password and then your new password
3 Working with Content
3.1 Updating my page
If you are not already in the content section, click the content icon in the sections panel.
SHFA Phase 1.2 Scope of Work 16th August 2013
•
•
Click your page name (1)
Update your content in the different tabs (2). You can refer to the table below to get some help on each field
(Mandatory fields are bolded):
Tab
Field name
Description
Content
Full description
This is where you edit the body of your page.
Tags
Enter tags associated with the page. Tags must be
separated by a comma.
Summary
The summary is shown on your page above the
map and in search results page.
Map location
Location of your establishment on the map
Address
Event address, please specify your full address
(street, city, postcode and state
e.g. 66 Harrington Street, The Rocks, NSW, 2000)
Contact Number
A contact number. Please include the area code in
brackets e.g. (02) 1234 5678
Website URL
Your website URL
Location /
Contact details
Please enter your address without “http://”
Social Media
Metadata
SHFA Phase 1.2 Scope of Work 16th August 2013
Add links to your Facebook, Twitter, Youtube and
Instagram sites
The Meta Data tab lets you assign keywords used
to index your page in the website search engine
and enables your page to be displayed when filters
are applied.
Suitable for
Select whether it is suitable for families, couples
and groups
Category
Select Tenant
Cuisine
Select the cuisine/s on offer
Type
Select the business type
Views
Select Water views if applicable
Things To Do
section only
Activity
Select type of activity
Stay section only
Features
Select the features
Rating
Select the star rating for your hotel
Shop section only
Type
Select the type of shop
Media
Thumbnail image
Image used on the page listing all tenants and the
search results page.
Specs: 470px (w) x 306px (h)
Banner Image
Image used at the top of the event page
Specs: 960px (w) x 350px (h)
Images and Videos Gallery
Link to the folder containing all images and videos
to be displayed in your gallery.
Optional
Enable Facebook Comments
Function not available
Settings
Ignore this section
Properties
Name
Update the name of your business
Template
Ignore this field
Eat & Drink section
only
3.2 Text Editor
The Visual Editor helps you format the content of your page.
When entering content into the Full Description and Summary fields under the content tab, you will see this toolbar.
Several of the buttons are similar to that of a standard word processor. However, there are a few buttons to make note
of:
SHFA Phase 1.2 Scope of Work 16th August 2013
If you are proficient in the use of HTML, you can switch to HTML mode and create your
page by writing HTML code. You can also check the code and make minor adjustments
here to get the page exactly as you want it.
Copying Content from Other Programs
You can copy text to Umbraco from any program you like. The important thing is to
paste the text in the right way, so as to maintain the look and feel of the website.
•
•
•
•
•
Select and copy the text in the program you want to copy from.
Position the cursor in the editor at the point where you want to place the text.
Click Paste from Word in the editor toolbar.
In the dialog, press Ctrl + V to paste in the text.
Click Insert to complete the process.
By pasting content in this way, it ensures that only those formatting rules allowed by the
system are kept and that the integrity of the site is maintained.
The styles list provides a set of predefined styles that can be applied to text whilst
maintaining a consistent look and feel through the site.
Inserting links
•
•
•
•
•
Select the text that will form the hyperlink.
Click the Insert Link button to launch the link properties dialog box.
In the URL field, enter the URL of the web page you wish to link to.
In the Target field, select the target window the link should be opened in.
Click Insert
Inserting an Image
•
•
•
•
•
•
Place the cursor in the editor where you want to insert your image.
Click the Insert Image button.
Select an image from your media library.
In the Name field, enter a name/description for the image.
(By default the name of the file will be automatically entered for your
convenience)
Enter the desired dimensions of the image in the Width and Height fields. If
you choose to enter your own values, ensure the Constrain proportions
checkbox is checked to ensure the image maintains its aspect ratio and prevents
distortion of your image.
(By default the actual width and height of the image will be automatically
entered for you convenience)
Click Insert to add the image.
This button is used to insert “Macros”. Macros should not be used
This button will add a table in your page.
This allows you to insert special characters.
SHFA Phase 1.2 Scope of Work 16th August 2013
Paragraph Break/Line Break
The Editor is like any other word processing program. You write the text, and the text wraps around when the line
reaches the end. When you press ENTER in the editor, you get a paragraph break, which means there is space between
the paragraphs. If you do not want a space, you have to make a line break instead. You do this by pressing
SHIFT+ENTER.
Shortcut Keys
There are shortcut keys for certain editor functions. Shortcut keys let you use the keyboard to carry out certain
commands.
Command
Shortcut Key
Ctrl + Z
Undo
Ctrl + Y
Redo
Ctrl + X
Cut
Ctrl + C
Copy
Ctrl + V
Paste
Ctrl + B
Bold
Ctrl + I
Italic
Ctrl + A
Select all
Editor Context Menu (Right-Click)
As well as the editor toolbar, you also have access to all the standard tools
via a context menu. To display the context menu, simply right click
anywhere within the editor content area.
3.3 Previewing changes
To preview your page:
• First click the save button to save your changes
• Then click the preview button
This will open a new window with a preview of your page.
Always preview your page before submitting it for
approval.
SHFA Phase 1.2 Scope of Work 16th August 2013
3.4 Publish changes
Your changes will not be directly visible on the website. They have to be validated first by the SHFA Webmaster.
To submit your changes to SHFA click the Save and send for Approval button.
You will see a message on screen to confirm that your content has been submitted.
3.5 Page status
•
•
•
Published pages are shown in black.
Unpublished pages are shown in grey.
Unpublished amends are marked with a star.
3.6 Notification
To receive a notification every time a
modification is published on your page:
•
•
•
•
Right click on your page
Click Notification in the context menu (1)
Select “Publish” in the Notifications dialog box
(2)
And click Update (3)
4 How to add special offers
Special offers are shown in the Offers section of the site and the
first four on are displayed on your page.
•
•
•
•
•
To add an Offer, you must first be within the Content
section.
From the content section, right click the name of your
page in the left hand side panel, a menu will appear.
Click create.
Enter a name for the special offer and select “Special
Offer” Document type.
Click Create
SHFA Phase 1.2 Scope of Work 16th August 2013
Fields
Description
Name
Special offer headline
Template
Leave as Offer
Image
Image specs: 470px (w) x 306px (h)
Logo
Upload a logo if you like
Offer Headline
Summary of offer
Offer description
More detailed description of the offer
Offer terms and
conditions
Specific terms and conditions for the offer
Offer validity date
End date of the offer
Voucher
Ignore this field
Offer validity start date
Start date of the offer
5 How to add events
Tenants can create their own events. These events will be shown in the “What’s On” section and on the tenant page.
See an example below:
What’s on event page:
Tenant page with tenant events listed:
SHFA Phase 1.2 Scope of Work 16th August 2013
To add an event, you must first be within the Content section.
• From the content section, right click the name of your page in the left hand side panel, a menu will appear.
• Click “Create.”
• In the new window, enter the name of your event and select "T3" Event.
• Click “Create.”
Tab
Field name
Description
Events Dates
Reoccurring
Tick this box if your event is reoccurring.
Reoccurrence
How often does this event reoccur?
Start Date and End date
Event start and end dates. These fields are used by
the search engine and are not shown on the event
page.
Event Date as Text
Event dates as plain text
Full description
This is where you edit the body of the event page.
Tags
Enter tags associated with the event. Tags must be
separated by a comma.
Summary
The summary is shown on the event page above
the map and in search results page.
Map location
Location of the event on the map
Address
Event address, please specify your full address
(street, city, postcode and state
e.g. 66 Harrington Street, The Rocks, NSW, 2000)
Contact Number
A contact number. Please include the area code in
brackets e.g. (02) 1234 5678
Website URL
Event website URL.
Content
Location /
Contact details
Please enter your address without “http://”
Metadata
Media
The Meta Data tab lets you assign keywords used
to index your page in the website search engine
and enables your page to be displayed when filters
are applied.
Thumbnail image
Image used on the page listing all tenants and the
search results page.
Specs: 470px (w) x 306px (h)
Banner Image
Image used at the top of the event page
Specs: 960px (w) x 350px (h)
SHFA Phase 1.2 Scope of Work 16th August 2013
Images and Videos Gallery
Link to the folder containing all images and videos
to be displayed in your gallery.
Optional
Enable Facebook Comments
Function not currently available
Properties
Event Type
Select T3
Remove an offer or an event
If you need to remove a published offer or event from the website, please contact the webmaster:
Tania McLachlan T: (02) 9240 8537 | E: [email protected]
6 Working with images
6.1 Upload images
IMAGE SIZE
SPECIFICATIONS
All images must be uploaded as per these
specifications:
o Narrow Banner: 960px (w) x 350px (h)
o Thumbnail image: 470px (w) x 306px (h)
SHFA Phase 1.2 Scope of Work 16th August 2013
•
•
•
•
•
•
•
Select Media from the Sections panel;
Select the gallery folder;
Right click the folder, and click Create from the context menu;
Enter a name for the new item and select the media type (Image or File);
Click Create;
In the next screen, click on the Browse... button to choose the image or file from your computer that you
want to upload to the site;
When you have chosen, click the Save icon to save your image.
**IMPORTANT: For accessibility reasons all image files should be given a descriptive title.
Underscores ‘ _’ need to replace spaces and special characters should not be used in the image file
name. For example, do not label a picture of a couple dining by the harbour “Image 1!” it should be
called “Couple_dining_by_the_harbour” **
6.2 Upload several images at once
•
•
•
•
Select Media from the Sections panel;
Select the gallery folder;
Drag and drop, or click ‘Choose files’ button to upload one or several image files from your computer into
Umbraco content section (see screenshot below),
Click Upload.
6.3 Insert a YouTube video in the Gallery
•
•
•
•
•
Select the gallery folder.
Right click the folder, and click Create from the context menu
Enter the YouTube video code. This code is available in the URL of the video. For the following video:
http://www.youtube.com/watch?v=oKhZYEQthfo the code is oKhZYEQthfo.
Select the media type “Video Link”
Click Create.
SHFA Phase 1.2 Scope of Work 16th August 2013
6.4 Edit an image
An image Editor comes with Umbraco and it allows you to resize/crop images and apply effects.
To access the editor:
• Select the image you want to edit (1)
• And click “Open image in external editor” (2)
The editor will open in a new window:
SHFA Phase 1.2 Scope of Work 16th August 2013
The crop and resize (2) functionalities are available under Adjustment” section (1). Once the changes are made, you
need to click save (3) to confirm.
6.5 Ordering photos and videos in the gallery
•
•
•
•
Select the Gallery folder.
Right click the folder, and click Sort from the context menu.
Drag the images and videos into the required order. Alternatively, click on the Name or Creation date column
header to sort the items automatically by Name or Creation date. Clicking on a column header again reverses
the sort order.
Click Save
SHFA Phase 1.2 Scope of Work 16th August 2013