1
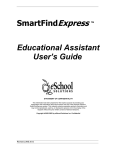
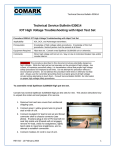
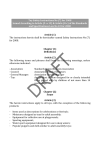
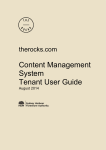
Early Childhood Employment Registry
https://ecer.eschoolsolutions.com
Quick Tips for Administrators
How To......
Overview of the Navigation Tabs
Pgs.2-5
Create an Absence/Vacancy
Pg. 6
View the Jobs that have been created for your location
Pg. 9
Set your Priority Lists (Preferred, Do Not Use)
Pg. 10
How to View Your Priority Lists ( bullet #7)
Pg. 11
Viewing Your Staff and Supply Staff Profiles
Pg. 12
Reports – Setting Up Email Notifications for Daily Absence Status
Pg. 13
Canceling an Assignment/Placement
Pg. 15
Employee Registration Instructions
Pg. 16
Reminder:
There is a helpful User Guide with full details on every aspect of
the system available on the website.
To access the User Guide go to the top right corner of the website
and click on the Help button.
1
https://ecer.eschoolsolutions.com
Home
Here is a screen example of the
home page for Administrators.
The home page provides detail
on the number of absences
posted, and the total jobs filled for
you location(s). There are tabs
along the top to help with
navigation through the site.
Administration Tab
Announcements
In this tab, you can change the
greeting that appears on your
employee’s home page and the
messages that appear on the
location home page.
2
To modify the message or welcome, click on the name you wish to modify (anything underlined will take you to
the modify screen).
In the announcement field, you can write your message. If modifying the general message, please do not delete
the HTML code that links members to the orientation videos.
You can tap enter to go down a line or you can enter <br> for a line break. <br><br> means two lines.
Note: you can create a new message; however it must fit the “type”. For operators, the messages you will be
creating or modifying will be the two “All Users” and “substitute” messages. The administrators for centres would
be creating messages for their centre locations and staff.
Creating Absences/ Creating Vacancies
Employees and their Administrators have the capability create absences. For details on creating an absence, go
to the Administration User Guide in the ecer.eschoolsolutions.com help tab, or see the notes below for a quick
reference.
Absence: when an employee is going to be away from their current position for a period of time and a substitute
may or may not be needed to replace the employee.
Vacancy: is when no employee exists, but a substitute is required (extra support on a day when the team need to
meet with a parent, or an employee leaves and you have not filled the position yet).
Daily Job Counts
This basic information provides you with the total jobs created for the coming months. It will not tell you where the
jobs are or the details surrounding the job. The detail is in calendar format with the number of jobs posted for that
day on the calendar.
Job Inquiry
This feature will tell you about the absences posted by all locations. You can search for absences, vacancies,
cancelled, open and active (filled) jobs.
Priority Lists
This feature allows the administrator the ability to set preferred substitutes on a priority call list, or identify
substitutes that are not to be called by the SFE system.
Preferred List
This is where you can set as many preferred
lists as you like. You can have a preferred
list for each of your employees (Substitutes
that you want to come in when a specific
employee is away), or you can have
preferred lists for the age groupings
(classifications) at your centre.
Do Not Use List
This is where you can place substitutes that
have added your location to their choices;
however you do wish to utilize them or you
have not interviewed them yet.
3
Profile Inquiry
This is where an administrator can make
adjustments to an employee’s profile
(availability).
Profile New
This is where the system operators will
add a new employee to your centre or a
new substitute to the system.
Administrators do not have access to
adding new profiles to the system.
You can enter information on this
page, but can not save it.
Absence Approval
When an employee requests an
absence that requires your approval
(PD, vacation, flex time), you can go
to this page to find out how many
approvals you need to review and
approve or decline.
If you create the absences for your
centre(s), you will not have any to
approve as you are the approver and
set the absence on their behalf.
4
Reports Tab
Main Reports
Today’s Jobs
All jobs posted for the one day
you select.
Set up an email notification to
tell you about the fill rate for
the day’s jobs. This how you
will know if an absence has
been filled for a job posted
today.
Today’s Available Subs.
Search through your list of
substitutes to see who is
available on a specific day,
prior to pre-arranging for an
absence.
Active Substitutes
Check out your substitute’s
schedules and unavailable days.
5
Creating an Absence or Vacancy
1.
If you know the employee’s User ID
enter it here. If you are entering an
employee and you do not know the ID
number, you can do a “Name Lookup”.
2. Click on the employee name that you wish
to. In this case it is Fanny Price.
Now you will set all the particulars for this
absence.
a. Confirm that the employee is
correct.
b. Confirm the location and
classification is correct.
c. Choose the reason for the
absence
d. Is a substitute required?
Choose yes or no.
e. Choose the date that you want
a substitute to begin and end.
There are calendars present if
you wish to click on the date
instead of entering the data.
6
f.
If your employee is leaving for a
portion of the day and you want to
track the total hours absent, you can
enter in the time your employee has
left for the day until they come back
that day, or you can leave it if the
employee is gone for the whole day.
This part does not affect the
substitute’s posting. (for example, if
your employee has left for an
appointment and taking the afternoon
off and you want to track the hours).
g. Set the beginning and end time for
the substitute posting. This setting is
important. It tells the system what
time you want the sub. to show up.
Choosing your Substitute (optional)
h. If you have a substitute that you
would like to be called first, you can
specify them here.
i.
Have you pre-arranged this
substitute and they do not need to
be contacted by the system?
Choose YES, if you do not have a
substitute in mind, choose NO.
j.
Any special Instructions for this
posting? (is there a field trip to be
ready for, would you like them to call
you to confirm their acceptance of
the job? Do you expect this person
to have something prepared for the
day?) Enter instructions in the
space provided. You can also attach
files if you need to.
7
k.
Click on Continue to move to the detail
summary.
l.
Look over your posting to be sure all is
correct.
m. Click on Create Absence to finalize the
process and retrieve your Job # as a
confirmation of the posting.
8
View the Jobs that Have Been Created for Your Location(s)
1. Choose Job Inquiry/Reports in the
Administrator tab
2. If you want to check on a specific job
number, you can enter the job number at
the top of the form.
3. If you don’t know the job number or want
to see absences posted over a span of
time, enter in the job status you are
looking for (active, open, canceled) it is
recommended to choose “All exclude
canceled”.
4. Select your search dates with a beginning
date and an end date.
5. Choose how you want the order of jobs to
be presented (optional).
6. Click on Search. The successfully created
jobs will be visible at the bottom of the
page.
7. You can also create a report that will
appear as a PDF.
Status Legend
Open = Job has yet to be filled
Active= job has been filled
IVR = Sub accepted job over the
phone
Pre-Arranged = Sub was prearranged by the administrator or
employee
Web Search = Sub accepted the job
through the website.
9
Priority Lists – Preferred Substitutes and Do Not Call Substitutes
1. Choose Priority Lists in the
Administrator tab
At this point you are ready to search for
people already on your lists.
To add someone to one of your
“Preferred List”:
2. Choose “New” at the bottom of the page
3. Do a Name Look up for the substitute you
want to add to your preferred list.
4. Choose the type of list (preferred)
5. Choosing Classification: This is if you
want a substitute called first because of
their certification (RECE, Non-ECE,
Dietary)
Choosing Location: this is if you want a
substitute called first for your overall
location (doesn’t matter which room, just
an overall preferred).
Choosing Employee: This is where you
are selecting a preferred substitute to
come in when a certain employee is going
to be away.
For Location/Employee, you can only
choose one of these.
6. Don’t worry about the order number and
level unless you have a number of substitutes on a specific list (ie, location) and want to place an order in
which the substitutes would be called.
7. Click on save to finish the task.
10
To add someone to your “Do Not Use List”
1. In the Administrator tab, click on Priority Lists
2. Click on “New”.
3. Do a name look up for the substitute you
want to add to the list.
4. Choose a reason for placing them on the list.
5. Choosing Classification: This is if you want
a substitute excluded from your call out list
because of their certification (RECE, NonECE, Dietary)
Choosing Location: this is if you want a
substitute excluded from your call out list for
your overall location (doesn’t matter which
room, just an overall preferred).
Choosing Employee: This is when you are
blocking a substitute to come in, when a certain
employee is going to be away. You may like that substitute for most of your location, but not when they work
with a certain person. For example, if your staff Amy is going to be away and substitute Megan does not work
well with the present staff Ellen, you would put Megan on Amy’s do not use list. She will not be called when
Amy is going to be away.
For Location/Employee, you can only choose on of these.
6.
Don’t worry about choosing an order or level.
7. Save to finish the task. At the
bottom of the search page, you
will see your Do Not Use List and
the reason’s.
To delete someone from a list, just check
the delete box in that substitute’s row and click on the blue Delete button. The substitute is not deleted from the
system, but from that list.
11
Profile Inquiry/Reports
Profile Inquiry is where
you can take a look at
your employee’s profiles
and see the substitutes
that have picked your
location as a place they
would like to work.
To see a full list of your
employees or substitutes, ignore
all the search criteria and go
straight to search.
To filter your search, there are
many choices to select.
Criteria Legend
Active=actively using the system
Inactive= not presently working
Registered = with the system
Avail New Jobs= is taking on new and future jobs
Avail Long Term = will take on long term contracts
Certified = Member of the College of ECE’s
Avail General Calling = will take calls for centre’s the sub. is linked to.
Expired = RECE Status with College has expired
12
Reports
Today’s Job Report
This can be a quick pop up report, but also be a
report that will let you know if job postings have been
filled for the day and who has filled them.
To Set Up Daily Notification Emails
1. Choose Today’s Jobs in the Report List
2. Choose the Job Status categories that you would
like details on. (Recommended: All, exclude
canceled).
3. Choose the location
4. Don’t worry about classification or reason
5. You can sort by job #, the status of the posting,
the employee...(recommended, Job #)
6. Choose your output format, or how you would like
the report to be emailed. (Recommended, PDF).
7. Choose the information you want displayed in
your report.
8. Name the report something different from
“Today’s Job’s”.
9. Name the report again. Same as the report Title.
10. Choose “Save & Schedule”
13
11. Choose the “Calendar Reoccurrence” button.
12. How often would you like the report emailed to
you? Half hour, or hourly.
13. What time would you like the report emails to
start and end. You can choose both AM and
PM times (remember, the system starts calling
at 6:00am until the jobs are to start and then
again from 5:00 pm to 9:00 for future jobs).
14. Which days of the week do you want the
emails (every day, or just weekdays?
15. You can choose the months you want the
emails. (if you closed for the summer, you may
want to un check the summer months so you
don’t receive emails)
16. Don’t worry about choosing calendar days.
17. Don’t worry about choosing an end date or
time. You can go back in and cancel the report
if you do not want the report anymore.
18. Set your email notification by putting your
email address in the To: field
19. Give the email a subject:
20. You can type a message if you like, but not
necessary.
21. Choose how you want to view the attachment.
(PDF, DOCX(word 2007 and newer), CSV (can
be converted into spreadsheets), XLS (Excel
2007 and newer))
22. Save the schedule to finish the task.
14
Altering or Canceling an Assignment
1. In the Administration tab, choose
Job Inquiry.
2. If you know the job number, enter
it in the “Enter Job #” field.
3. If you don’t know the number, you
can search for the job through the
field choices.
4. When the list of jobs populates,
click on the job number (it will be
underlined)
5. To alter the assignment, go through the
details and change what you need to, and
save.
6. To Cancel, click on “Cancel Job”
7. You will be asked to confirm the
cancellation.
8. A Red notice will appear at the top of the
page telling you the Job Cancel was
Successful.
15
Registering with the ECER
Employee and Substitutes
Employee and Substitutes
1. Call 1 855 806 8805
2. A welcome will prompt the caller for their ID
number
3. Enter your ID number and then press *
4. The system will ask the caller to enter their
PIN number
5. Enter the default PIN number (your ID
number) and then Press *
6. The system will ask the caller to reset their
PIN number
7. Reset your PIN and press *
8. The system will ask the caller to voice their
name after the beep.
9. Voice your name and then press *
10. Callers can then use the phone to review
assignments, manage their profile and
cancel assignments.
1. Call 1 855 806 8805
2. A welcome will prompt the caller for their
ID number
3. Enter your ID number and then press *
4. The system will ask the caller to enter their
PIN number
5. Enter the default PIN number (your ID
number) and then Press *
6. The system will ask the caller to reset their
PIN number
7. Reset your PIN and press *
8. The system will ask the caller to voice their
name after the beep.
9. Voice your name and then press *
10. Callers can then use the phone to review
assignments, manage their profile and
cancel assignments.
11. Sub’s can choose the locations they would
prefer to work at over the phone or online
at: ecer.eschoolsolutions.com
11. Sub’s can choose the locations they would
prefer to work at over the phone or online
at: ecer.eschoolsolutions.com
Employee and Substitutes
Employee and Substitutes
1. Call 1 855 806 8805
2. A welcome will prompt the caller for their ID
number
3. Enter your ID number and then press *
4. The system will ask the caller to enter their
PIN number
5. Enter the default PIN number (your ID
number) and then Press *
6. The system will ask the caller to reset their
PIN number
7. Reset your PIN and press *
8. The system will ask the caller to voice their
name after the beep.
9. Voice your name and then press *
10. Callers can then use the phone to review
assignments, manage their profile and
cancel assignments.
1. Call 1 855 806 8805
2. A welcome will prompt the caller for their ID
number
3. Enter your ID number and then press *
4. The system will ask the caller to enter their
PIN number
5. Enter the default PIN number (your ID
number) and then Press *
6. The system will ask the caller to reset their
PIN number
7. Reset your PIN and press *
8. The system will ask the caller to voice their
name after the beep.
9. Voice your name and then press *
10. Callers can then use the phone to review
assignments, manage their profile and cancel
assignments.
11. Sub’s can choose the locations they would
prefer to work at over the phone or online
at: ecer.eschoolsolutions.com
11. Sub’s can choose the locations they would
prefer to work at over the phone or online at:
ecer.eschoolsolutions.com
16