1
xx
ZZZ
Cerify CYSW
Automated Video Content Verification System
User Manual
*P077035205*
077-0352-05
ZZZ
Cerify CYSW
Automated Video Content Verification System
User Manual
www.tektronix.com
077-0352-05
Copyright © Tektronix. All rights reserved. Licensed software products are owned by Tektronix or its
subsidiaries or suppliers, and are protected by national copyright laws and international treaty provisions.
Tektronix products are covered by U.S. and foreign patents, issued and pending. Information in this
publication supersedes that in all previously published material. Specifications and price change privileges
reserved.
TEKTRONIX and TEK are registered trademarks of Tektronix, Inc.
Cerify is trademark of Tektronix, Inc.
Online Help part number 076-0198-05
This document supports software version 7.2 and above.
Contacting Tektronix
Tektronix, Inc.
14150 SW Karl Braun Drive
P.O. Box 500
Beaverton, OR 97077
USA
For product information, sales, service, and technical support:
In North America, call 1-800-833-9200.
Worldwide, visit www.tektronix.com to find contacts in your area.
Warranty
Tektronix warrants that the media on which this software product is furnished and the encoding of the programs
on the media will be free from defects in materials and workmanship for a period of three (3) months from the
date of shipment. If any such medium or encoding proves defective during the warranty period, Tektronix will
provide a replacement in exchange for the defective medium. Except as to the media on which this software
product is furnished, this software product is provided “as is” without warranty of any kind, either express or
implied. Tektronix does not warrant that the functions contained in this software product will meet Customer's
requirements or that the operation of the programs will be uninterrupted or error-free.
In order to obtain service under this warranty, Customer must notify Tektronix of the defect before the
expiration of the warranty period. If Tektronix is unable to provide a replacement that is free from defects in
materials and workmanship within a reasonable time thereafter, Customer may terminate the license for this
software product and return this software product and any associated materials for credit or refund.
THIS WARRANTY IS GIVEN BY TEKTRONIX WITH RESPECT TO THE PRODUCT IN LIEU OF ANY
OTHER WARRANTIES, EXPRESS OR IMPLIED. TEKTRONIX AND ITS VENDORS DISCLAIM ANY
IMPLIED WARRANTIES OF MERCHANTABILITY OR FITNESS FOR A PARTICULAR PURPOSE.
TEKTRONIX' RESPONSIBILITY TO REPLACE DEFECTIVE MEDIA OR REFUND CUSTOMER'S
PAYMENT IS THE SOLE AND EXCLUSIVE REMEDY PROVIDED TO THE CUSTOMER FOR
BREACH OF THIS WARRANTY. TEKTRONIX AND ITS VENDORS WILL NOT BE LIABLE FOR
ANY INDIRECT, SPECIAL, INCIDENTAL, OR CONSEQUENTIAL DAMAGES IRRESPECTIVE OF
WHETHER TEKTRONIX OR THE VENDOR HAS ADVANCE NOTICE OF THE POSSIBILITY OF
SUCH DAMAGES.
Table of Contents
Table of Contents
Acknowledgements
Acknowledgements.................................................................................................
1
Preface
Preface ...............................................................................................................
Contents of this Manual.......................................................................................
Related Documentation .......................................................................................
3
3
3
Getting Started
Product Description ................................................................................................
System Components ...........................................................................................
System Installation .................................................................................................
Prerequisites ....................................................................................................
Software Installation..........................................................................................
Software Uninstallation ......................................................................................
Software Reinstallation ......................................................................................
Software Upgrade.............................................................................................
Network Settings..............................................................................................
Accessing the Application ........................................................................................
Starting the Application ......................................................................................
Cerify Windows Service .....................................................................................
Starting a Cluster..............................................................................................
Accessing the Web User Interface ..........................................................................
Logging in to the Application ...............................................................................
Logging Out ...................................................................................................
5
5
9
9
12
18
18
19
20
21
21
22
22
23
23
23
Operating Basics
Concepts ............................................................................................................
Users ...........................................................................................................
MediaLocations ...............................................................................................
MediaSets......................................................................................................
Templates ......................................................................................................
Profiles .........................................................................................................
Jobs .............................................................................................................
Alerts ...........................................................................................................
Reports .........................................................................................................
Archiving ......................................................................................................
Clustering ......................................................................................................
Cerify Automated Video Content Verification System User Manual
25
25
26
26
26
27
27
27
28
28
28
i
Table of Contents
Functional Overview ..............................................................................................
System Tray Icon .............................................................................................
Web User Interface ...........................................................................................
Error Handling ................................................................................................
Tutorials ............................................................................................................
Work Flow .....................................................................................................
Before You Begin .............................................................................................
Creating a MediaLocation ...................................................................................
Creating a MediaSet ..........................................................................................
Creating a Template ..........................................................................................
Creating a Profile .............................................................................................
Creating a Job .................................................................................................
Inspecting Job Results........................................................................................
Generating a Report ..........................................................................................
Archiving ......................................................................................................
Exporting Templates..........................................................................................
Importing Templates..........................................................................................
28
28
29
35
36
37
38
40
41
44
46
47
47
48
48
49
49
Reference
Introduction ........................................................................................................
Jobs..................................................................................................................
Jobs Monitor ..................................................................................................
New Job........................................................................................................
Modifying Jobs................................................................................................
Job Details .....................................................................................................
Processing Result .............................................................................................
Alert Levels ...................................................................................................
Alert Details ...................................................................................................
Start and End Positions of Quality Alerts ..................................................................
Frame View....................................................................................................
Profiles ..............................................................................................................
Profile Details .................................................................................................
Edit Profile.....................................................................................................
New Profile ....................................................................................................
Templates ...........................................................................................................
Template Details ..............................................................................................
Edit Template..................................................................................................
New Template .................................................................................................
Exporting Templates..........................................................................................
Importing Templates..........................................................................................
Container Templates...............................................................................................
Checks Common to All Container Layers .................................................................
ii
51
51
51
52
53
54
55
56
57
58
59
60
61
61
62
63
66
67
68
69
70
71
72
Cerify Automated Video Content Verification System User Manual
Table of Contents
Container Checks Specific to MPEG-2 Transport Stream Standard ....................................
Container Checks Specific to MPEG-2 Program Stream Standard......................................
Container Checks Specific to SMPTE 377M / MXF Standard ..........................................
Video Templates ...................................................................................................
Common Video Configuration Checks .....................................................................
Video Quality..................................................................................................
Video Checks Specific to MPEG-4 Standard ..............................................................
Video Checks Specific to MPEG-2 Standard ..............................................................
Video Checks Specific to VC-1 Standard ..................................................................
Video Checks Specific to H.264/AVC Standard...........................................................
Video Checks Specific to the DV50/100/DVCPro Standard .............................................
Video Checks Specific to the ProRes Standard ............................................................
Video Checks Specific to Generic QuickTime Video.....................................................
Video Checks Specific to JPEG 2000 ......................................................................
Audio Templates...................................................................................................
Common Audio Configuration Checks.....................................................................
Audio Quality Checks ........................................................................................
Audio Checks Specific to MPEG1 and MPEG-2 Audio Standards .....................................
Audio Checks Specific to Dolby-E Audio Standard ......................................................
Audio Checks Specific to AC-3 Audio Standard..........................................................
Audio Checks Specific to AAC Audio Standard ..........................................................
Audio Checks Specific to PCM Audio Standard ..........................................................
Audio Checks Specific to DV Audio Standard ............................................................
Action Templates ..................................................................................................
MediaSets ..........................................................................................................
New MediaSet.................................................................................................
Edit MediaSet .................................................................................................
Configure DropBox...........................................................................................
DropBox Filters .............................................................................................
Reports............................................................................................................
Options............................................................................................................
Change Password ...........................................................................................
Records per Page............................................................................................
Jobs View ....................................................................................................
Admin.............................................................................................................
User Management ..........................................................................................
Modify User .................................................................................................
New User ....................................................................................................
MediaLocation Management ..............................................................................
Mail Settings ................................................................................................
Processing Settings .........................................................................................
Database Backup............................................................................................
Cerify Automated Video Content Verification System User Manual
73
73
74
74
74
78
80
81
83
83
84
85
85
86
86
87
88
90
91
91
92
92
93
93
97
97
98
99
102
103
103
103
104
104
104
105
105
105
106
110
110
111
iii
Table of Contents
Schedule Job Deletion......................................................................................
Report File Settings.........................................................................................
Stream Information .........................................................................................
VLC playback ...............................................................................................
Application Log.............................................................................................
Media Test Units Page .....................................................................................
Help ...............................................................................................................
Accessing the Online Help.................................................................................
Using the Online Help......................................................................................
112
112
113
113
115
115
116
116
117
Appendices
Appendix A: Alerts..............................................................................................
List of Alerts ................................................................................................
Appendix B: Supported Compression Standards ............................................................
Supported Video Compression Standards................................................................
Supported Audio Compression Standards ...............................................................
File Types and Container Formats ........................................................................
Supported Wrapper and Codec Combinations...........................................................
Standards References.......................................................................................
Appendix C: Software Maintenance...........................................................................
Configuring the Cerify Application.......................................................................
Reinitializing the Cerify Application .....................................................................
Database Backup/Restore Utility .........................................................................
Loading Example Jobs .....................................................................................
Capturing Cerify Status Information Using the Support Monitor Script .............................
Upgrading Dongle Options ................................................................................
Using NFS Client on Windows ...........................................................................
Appendix D: CeriTalk...........................................................................................
CeriTalk XML Reports.....................................................................................
CeriTalk SOAP API ........................................................................................
Appendix E: Configuring Your Cerify Installation ..........................................................
Number of Channels........................................................................................
Modes of Operation ........................................................................................
Configuring Your Cerify Installation for Best Performance ...........................................
Commercial off-the-Shelf Recommendations ...........................................................
119
119
176
176
180
182
183
184
186
186
187
187
189
190
192
194
196
196
199
204
204
205
208
212
Glossary
Glossary Terms ..................................................................................................
213
Index
iv
Cerify Automated Video Content Verification System User Manual
Acknowledgements
Acknowledgements
Acknowledgements
Apache. This product uses software developed by the Apache Software Foundation, www.apache.org.
This includes the following software: Andariel, Ant, Apache Commons, Axis, Castor, Log4j, Struts,
Spring and Xerces.
Apple. This product uses parts of the Darwin Streaming Server source code covered by the Apple Public
Source License. For copies of this license and modifications made to the source code please refer to the
software license notices and source code provided with Cerify.
Apple and QuickTime are trademarks of Apple Inc., registered in the United States and other countries.
Dolby. Manufactured under license from Dolby Laboratories. "Dolby", "Pro Logic", and the double-D
symbol are trademarks of Dolby Laboratories. Confidential unpublished works. Copyright 1992-1999
Dolby Laboratories. All rights reserved.
Expat. This product uses the Expat XML Parser, expat.sourceforge.net.
FFmpeg. This product uses software developed by the FFmpeg project, ffmpeg.mplayerhq.hu.
Specifically, support for DV is provided by some components of the libavcodec and libavutil libraries.
HTMLUNIT. This product includes software developed by Gargoyle Software Inc.
http://www.GargoyleSoftware.com/
Java This product uses Java™ technology. The TM and technology are explicitly required by Sun
(http://www.sun.com/policies/trademarks ).
JBoss. Modifications have been made to the source code of the JBoss application server. This source
code is available on request.
JCIFS. This product uses the Java CIFS Client Library, jcifs.samba.org.
JDIC This product uses the JDIC Java integration components. jdic.dev.java.net
JPEG. This product uses free JPEG software from the Independent JPEG Group.
JUnit. This product uses the JUnit regression testing framework, www.junit.org.
MXF. This product uses MXF software developed by and used under license from OPENCUBE
Technologies SAS, www.mxftk.com.
MySQL. This product is powered by the MySQL database. MySQL is written and distributed under
the GNU General Public License which means the source code is freely distributed and available to
the general public.
Neko. This product includes software developed by Andy Clark.
Rhino. This product uses the Rhino implementation of JavaScript, http://www.mozilla.org/rhino/.
Saxon. This product uses Saxon XSLT processor, saxon.sourceforge.net.
Windows Media. This product is protected by certain intellectual property rights of Microsoft. Use or
distribution of such technology outside of this product is prohibited without a license from Microsoft.
Cerify Automated Video Content Verification System User Manual
1
Acknowledgements
Acknowledgements
WinDump. This product uses the WinDUMP network diagnostic utilities www.winpcap.org/windump
WinPcap. This product uses the WinPcap packet capture libraries www.winpcap.org
7-Zip. This product uses the 7-ZIP file archiver. www.7-zip.org
2
Cerify Automated Video Content Verification System User Manual
Preface
Preface
Preface
Cerify is an automated system for testing compressed digital media before transmission or use. Through a
Web-based interface, users can create Jobs, which will perform a sequence of checks on a set of media
files, and view the results.
Contents of this Manual
This manual describes the system in detail, provides procedures for using the system, and includes full
reference documentation.
Getting Started describes the system capabilities, configuration, and first time operation.
Operating Basics provides a functional overview, basic concepts, and tutorials for using the system.
Reference provides detailed information about each page (or window, or menu item) in the user
interface.
Appendix A: Alerts lists and defines all the stream compliance and integrity checks that can be
carried out.
Appendix B: Supported Compression Standards describes compression standards and file formats
that the system recognizes.
Appendix C: Software Maintenance details the procedure to reinitialize the Cerify application and to
upgrade the license dongle options.
Appendix D: CeriTalk provides information about an XML-based API that lets you interact with Cerify
from within other applications, making it possible to integrate Cerify with other content management,
broadcast automation, and workflow systems.
Appendix E: Configuring Your Cerify Installation provides information on modes of operation,
configuring your installation for best performance and commercial off-the-shelf platform
recommendations.
Related Documentation
The following related documents support the product:
Cerify Online Help (Tektronix part number, 076-0198-xx)
Cerify Release Notes
Cerify Third Party Software License Notice Document (Tektronix part number, 001-1513-xx)
Cerify Quick Start User Manual (Tektronix part number, 071-2680-xx)
Read This First (Tektronix part number, 061-4355-xx)
Cerify Automated Video Content Verification System User Manual
3
Preface
4
Preface
Cerify Automated Video Content Verification System User Manual
Getting Started
Product Description
Product Description
This is a media testing product which runs either on a single computer or on a cluster of two or more
dedicated computers connected on a network running Microsoft Windows. This automated video content
verification system can be used to check for correct digital encoding and against baseband quality
parameters. It provides both broadcast and production operations with a fast, cost effective QC solution.
Cerify can be integrated with your existing infrastructure using the CeriTalk API to interface with asset
management systems and provide a completely automated workflow. A Web based user interface allows
test results to be viewed from any network connected workstation.
System Components
Cerify accesses digital media from local storage, such as a local hard drive or DVD, as well as network
storage, such as a Windows file server or FTP server.
A Cerify system can be set up in two basic ways:
The first consists of a single self-contained unit which runs all the management and testing processes
of the system.
The second consists of a networked cluster of three or more units, which enables simultaneous
processing of a greater number of files. The networked cluster contains a single Supervisor and one
or more Media Test Units.
License Dongle
The license dongle must be plugged into the USB port on your computer to run the application. In a
clustered system, Media Test Units acquire their licenses from the Supervisor.
License dongle
It is possible to navigate the user interface and see previous results when no dongle is installed, but it is not
possible to carry out new checks of digital media files. The license dongle controls:
The types of codecs and file formats that can be checked.
The number of channels that can be used.
For demo dongles, when the license will expire.
Server configuration (there can only be one Supervisor unit in a cluster)
Cerify Automated Video Content Verification System User Manual
5
Getting Started
Product Description
Networking
In a clustered configuration, network interface on all of the units, including the Supervisor and Media Test
Units, should be connected to the local area network. This connection is used to access media files, to
service Web clients, and to carry cluster control traffic.
Clustering topology
Software Components
Software components include:
A Web-based user interface, which allows users to create and control Jobs, and to view or report
the results of these Jobs. This interface is accessed over the network by using a Web browser. All
you need to know is the IP address of your unit.
Media test service, which performs media file verification according to the rules chosen by the user.
A database, which provides robust storage of the system entities, including users, Jobs, and Job results.
An XML-based control and reporting API known as CeriTalk. CeriTalk allows interaction with Cerify
from within other applications, making it possible to integrate Cerify with other content management,
broadcast automation, and workflow systems.
A Web application server that provides access to the Web interface and runs the core services for
the application.
6
Cerify Automated Video Content Verification System User Manual
Getting Started
Product Description
A license server, which controls the types of files that can be verified.
The system tray icon and menu, which provides access to the Cerify Web-based user interface and
allows the application to be started and stopped.
Cerify as a Standalone System
A standalone system is a single machine that combines the functions of a Supervisor unit and a Media Test
Unit. The process that carries out the media file testing is known as the Media Test Client (MTC).
Cerify Cluster
The Supervisor unit controls the cluster system. It hosts the database and the Web server, allowing
multiple users to set up and view Jobs. It is responsible for locating the media files from the network, but
delegates actual transfer and processing of these files to one or more Media Test Units. The Supervisor
unit organizes and stores the resulting outputs.
Each Media Test Unit is responsible for processing the digital media files in a networked cluster. It
applies the user-specified tests, and reports back the results. The Supervisor can also be configured to
process the files.
Local area networking
Clustering Requirements.
Two or more PCs with 64-bit Windows Server 2008 SE OS installed.
Administrator privileges on all the machines on which the Cerify software will be installed.
Meet the minimum Hardware specifications.
Cerify Automated Video Content Verification System User Manual
7
Getting Started
Product Description
All the clustering PCs should be in the same network with correctly configured Static IP addresses.
All of the PCs in the cluster should be able to route to each other. The Supervisor unit is given a
network name that is recognized and resolved by all the Media Test Units.
You should know the fully qualified name of the Supervisor unit and provide this when Media Test
Units installer asks for the name of the Supervisor unit.
All the Media Test Units should reside on the same network as the Supervisor unit.
If the Supervisor or Media Test Units have more than one network interfaces, it is better to bridge
all the network interfaces together. For instructions on configuring the network bridge, refer to
Configuring a Network Bridge (see page 16).
Synchronization between all the units in cluster must be maintained. For example, use an NTP server
to synchronize the units in a cluster.
Clustering Scenarios Which may not Work
Clusters may not work in the following scenarios:
If the Supervisor and the Media Test Unit are in different subnets wherein the switch blocks the
multicast or UDP traffic.
If any of Supervisor or Media Test Unit systems has Windows firewall running.
If a Media Test Unit cannot resolve Supervisor host name.
If the Supervisor does not have a host name or if the Supervisor has a host name with Japanese
or Chinese characters.
If a network has another system with the same host name as the Supervisor system.
If the host name of the Supervisor changes after cluster installation.
If the http port on the Supervisor is configured to a different port number after cluster installation (In
this case, Media Test Unit cerify.properties, the property cerify.supervisor.httpport must be changed to
the new port number).
If either the Supervisor or the Media Test Unit has multiple network interfaces and the IP addresses
change after the installation. In this case, the property cerify.jboss.bindaddress must to be changed to
the current IP address.
If the Supervisor has multiple network interfaces connected to the same network and if DNS/WINS
are not configured properly, troubleshoot this problem by doing either of the following:
By adding an entry containing the Supervisor host name and the IP address used by Cerify on
Supervisor in "hosts" file, which can be found in C:\WINDOWS\system32\drivers\etc in all
the Media Test Units.
By bridging all the network interfaces together.
Clusters might not work correctly if there is momentary network outage in which case the clusters
have to be restarted.
8
Cerify Automated Video Content Verification System User Manual
Getting Started
System Installation
System Installation
This section provides details of hardware, software and user prerequisites for the system and instructions
on performing the software installation.
Prerequisites
Hardware Prerequisites
Cerify is designed to be run on a variety of PC hardware. Consequently, the choice of hardware is
determined by performance and throughput requirements for your installation.
This section recommends hardware configuration for some situations in which Cerify is typically used.
Single Channel Installation. A single channel installation of Cerify is one that is licensed to test a single
media file at a time. Such installations are normally performed on a PC or a laptop computer and are
suitable for situations where a low throughput is sufficient and performance is not critical.
It is recommended that you use a computer that meets the following minimum requirements for such
installations:
Processor speed: 2 GHz
Cerify is a CPU-intensive application. For better results, choose a dual core system with a clock speed
of 3 GHz and as much on-chip memory cache as possible.
Memory: 2 GB RAM
It is recommended to use a minimum of 1 GB to a maximum of 3 GB per channel and an
additional 1 GB for the operating system and the application. For best performance on a single channel
install, this would be:
1 channel x 3 GB + 1 GB = 4 GB
Hard disk drive: 50 GB of free space
The amount of hard disk storage necessary depends on the average size of the files that you will be
testing and the mode of operation of Cerify that applies to the file formats that you are testing.
Refer to Modes of Operation (see page 205) for details on the different modes of operation and how
they impact disk space requirements.
A network interface
A DVD drive (used for installing the software)
A USB port for connecting the license dongle
A license dongle (provided with the product)
Cerify Automated Video Content Verification System User Manual
9
Getting Started
System Installation
Multi-channel Enterprise Installation. A typical multi-channel installation of Cerify tests 4-8 media files at a
time on a single unit. Due to the high throughput and performance requirements that are expected from such
installations, it is recommended that server class hardware and operating systems be used in such cases.
In addition to the throughput required, the hardware requirements for such installations also depend
heavily on the mode of operation that will be used.
Cerify can operate in two modes:
Streaming mode
In this mode, media files are read directly from the media server hosting the file and are not copied
to the local hard disk of the Cerify system. This is the default mode of operation and is also the
preferred one.
Copying mode
Media files are copied to the local hard disk of the Cerify system before processing can begin. By
default, Cerify will not copy files to the local hard disk, but it is possible to force Cerify to operate in
this mode.
The mode of operation that applies to your Cerify installation depends on the file formats you would like to
test and other work flow and connectivity related constraints that might apply to your situation. See the
Modes of Operation (see page 205) for a detailed discussion on the factors that influence this.
The functional differences between these two modes of operation impact primarily on the disk space
availability and disk configuration requirements. Specifically, the copying mode requires a greater amount
of disk space and high levels of concurrent read/write performance from the hard drives in order for best
overall performance while the streaming mode can derive comparable overall performance with a lesser
amount of disk space and lower read/write efficiency. Consequently, when possible, the streaming mode
should be used in preference to copying mode.
For multi-channel installations, the general guidelines that should be followed when selecting hardware
(the values given are the minimum recommended for a 4-channel installation) are:
Processor: 3 GHz
Ensure you have twice as many cores as the number of channels. For a 4-channel installation, this
means that you should have eight cores available. It is also recommended that for best performance,
you choose as much on-chip memory cache as possible.
NOTE. The ProRes decoder is capable of using as many processors as available to improve processing
performance. If you are processing ProRes media files, having more processor cores than the recommended
two per channel might improve performance.
Memory: 6 GB RAM
Recommend a minimum of 1 GB to a maximum of 3 GB per channel and an additional 1 GB to 4 GB
for the operating system and the Cerify database. For the best performance with 4 channels, this
would be:
4-channels x 3 GB + 4 GB = 16 GB
10
Cerify Automated Video Content Verification System User Manual
Getting Started
System Installation
Hard disk drive: 100 GB x 3
For an enterprise installation, Tektronix recommends using a RAID on which to place the MS
Windows and Cerify installation (including database) to achieve fault tolerance in case of disk failure.
This logical drive should be at least 100 GB in size. For systems that are expected to support high
levels of throughput, it is recommended that you have 500 GB of space on this logical drive.
The amount of additional storage you need depends on the mode of operation that applies to your
installation, the average size of the files you will be processing and the number of channels you
will be running.
Streaming mode
Due to the minimal hard disk utilization when operating in the streaming mode, it is sufficient to
provide a single dedicated hard disk of 100 GB in size as temporary storage for Cerify.
Copying mode
The minimum hard disk space provided must be greater than the average file size being processed
multiplied by the number of channels. It is recommended that the temporary storage be RAID-ed
for better performance.
For help choosing the optimal number of hard disks for your installation and the best RAID levels to
use, see Configuring Your Cerify Installation for Best Performance (see page 208).
Network interface: 1 Gbit/s
You might use multiple network interfaces to improve available network bandwidth.
Integrated RAID controller
A DVD drive (used for installing the software)
A USB port, for connecting the license dongle
A license dongle (provided with the product)
Redundant power supply
For more detailed specification of a validated enterprise PC platform, see Commercial off-the-Shelf
Recommendations (see page 212).
Cerify Automated Video Content Verification System User Manual
11
Getting Started
System Installation
Supported Platforms
Windows XP - 32 bit and 64 bit
Windows Vista - 32 bit and 64 bit
Windows 7 - 32 bit and 64 bit
Windows Server 2003 64-bit
Windows Server 2008 64-bit
NOTE. Apple ProRes, Generic QuickTime and JPEG 2000 Video decoding functions are not available on
Microsoft Windows XP 64 bit and Windows Server 2003 because the QuickTime Player is not supported on
these platforms.
Software Prerequisites
The computer on which the application is installed will need the following:
To run one of the Supported Platforms.
To access the system through its Web user interface from another computer on the network, the client
computer must have a Web browser installed.
NOTE. To access the application, the preferred Web browser is Microsoft Internet Explorer (version
7.0 and above). The application has also been tested with Mozilla Firefox. There may be minor visual
differences in the appearance of the user interface in different Web browsers.
Software Installation
Before installing the Cerify application, your PC must be correctly connected to your local network.
This allows:
The Cerify application to test the files that are available on other machines on the network.
Other machines to interact with Cerify automatically (for example, using CeriTalk automation clients,
or copying of report files to network locations).
Multiple users to connect to the Cerify Web user interface from remote computers.
For the last two cases, you need to know the IP address or the network name of the machine that Cerify
is installed on. Network settings on the PC are configured in the usual manner using Windows. If your
machine is not properly configured or you do not know the name or IP address information, contact your
system administrator.
12
Cerify Automated Video Content Verification System User Manual
Getting Started
System Installation
Installing Cerify
The installation of the Cerify takes several minutes; typically between 5 and 15 minutes depending on
the speed of your PC. To install Cerify, perform the following steps:
1. Run the Cerify Installer.
2. Insert the Cerify dongle.
3. Optional: Install Apple QuickTime Player.
Before installing the Cerify , you should be aware of the following issues:
1. Cerify relies on third-party software applications that are packaged and installed with it: JBoss and
MySQL. If these applications are already used on the PC, you should remove them before attempting
to install the Cerify.
2. The Cerify license server relies on Aladdin HASP SRM drivers, which are installed and configured
along with it. It is recommended that other applications that rely on HASP licenses not be used with
Cerify on the same machine.
3. Cerify uses a number of network services that are local to the host PC. These services can sometimes
be blocked by personal firewall software, in which case an error message will be displayed when Cerify
starts. For example, on Cerify start up, a check is made to verify that communication with HASP can
be established. If the Cerify application is unable to communicate with HASP, an error message,
Unable to connect to HASP License Manager (port 1947). Please check if the HASP License
Manager service is running and is not blocked by a firewall is displayed and Cerify is stopped.
In such situations, configure the firewall to allow the service on the appropriate port, or alternatively
disable the firewall entirely.
4. It is recommended that the Cerify application should be installed on a machine where it can be
used as the sole running application. Cerify makes intensive use of both CPU and memory and
will considerably degrade the performance of other running applications. Similarly, running other
applications or services simultaneously will degrade the performance of Cerify and increase the time
taken to process a media file.
Cerify Automated Video Content Verification System User Manual
13
Getting Started
System Installation
Running the Cerify Installer.
Ensure that you are logged in as a user with administrator privileges.
NOTE. If you try to install the Cerify application without administrator privileges, the following message
appears: “The Cerify application can be installed or uninstalled only by a system administrator. Please
log in as administrator and try again”.
Insert the Cerify DVD provided by Tektronix. The Cerify Application Browser opens. Click the Install
Cerify link to launch the Cerify installer. Follow the on-screen instructions to perform the installation.
NOTE. If you try to install the Cerify application on an unsupported platform
(refer to Supported Platforms (see page 12)), then the following message appears: “This is not a supported
Windows operating system. Cerify will probably operate correctly but has not been validated on this OS.
Do you wish to continue installation?”
If the browser does not open, or if the Install Cerify link does not work, navigate to the Exec folder on
the DVD and double-click CerifySetup<version>.exe. Follow the on-screen instructions to perform
the installation.
A number of third party software applications are installed during the installation process. Most of these
are not visible, but you will be notified as the WinPcap and HASP drivers are installed.
NOTE. WinPcap is not used in the normal operation of the Cerify application. It is used when you collect
support diagnostics to troubleshoot networking issues with Cerify. For more information on support
diagnostics, refer to Capturing Cerify Status Information Using the Support Monitor Script (see page 190).
Installation Options
Cerify can be installed in the following ways:
Standalone
Supervisor: The Supervisor unit controls the cluster system. It hosts the database and the Web server,
allowing multiple users to set up and view Jobs.
Media Test Unit: Each Media Test Unit is responsible for processing the digital media files in a
networked cluster.
NOTE. During the installation of Cerify, if there are multiple network interfaces in the system, the installer
provides the list of IP addresses and asks the user to select an IP address to be used by Cerify.
14
Cerify Automated Video Content Verification System User Manual
Getting Started
System Installation
Installing Cerify as a Supervisor. Follow the steps described in Run Cerify Installer (see page 14) and
Installing Cerify (see page 13) to install Cerify as a Supervisor. During the installation, a dialog box appears
with the list of installation options. To continue with the Supervisor installation, select Supervisor in the
installation options dialog box. Sometime during the installation, a dialog box appears where you must:
Enable or disable file-processing option on the Supervisor.
Enter the number of channels if you have selected the file processing option on the Supervisor.
Choose the IP address to be used by Cerify.
At the end of the installation, the installer prompts you with an option to load the demo content. If you
choose this option, Cerify will be loaded with a demo database, which will contain some sample jobs
with results.
Installing Cerify as a Media Test Unit. Follow the steps described in Run Cerify Installer (see page 14) and
Installing Cerify (see page 13) to install Cerify as a Media Test Unit. During the installation, a dialog
box appears with the list of installation options. To continue with an Media Test Unit installation, select
Media Test Unit in the installation options dialog box. Sometime during the installation, a dialog box
appears where you must:
Enter the host name of the Supervisor.
Choose the IP address to be used by Cerify.
Enter the number of channels.
Configuring a Cluster. To configure a cluster, you must:
Install Cerify as a Supervisor on the system which must be configured as supervisor of the cluster.
Install Cerify as a Media Test Unit on one or more systems.
When installing Cerify as a Media Test Unit, the installer prompts you to enter the supervisor host name.
The installer checks whether the Media Test Unit can reach the Supervisor system using the host name
entered. If the Supervisor system cannot be reached, a message appears whether you still want to continue
the installation.
You can also configure multiple clusters on the same network. To configure multiple clusters on the same
network, you need to install multiple Supervisors. During a Media Test Unit installation, in the Cerify
System Settings dialog box, you must enter the respective Supervisor host name.
NOTE. To configure a cluster, the versions of Cerify on the Supervisor and the Media Test Unit should be
the same. Once the installation is complete, Cerify will be started on both the Supervisor and the Media
Test Unit. Access Supervisor using Cerify Web UI and navigate to the Admin page, click the Media Test
Units link to the page containing the list of Media Test Units.
Cerify Automated Video Content Verification System User Manual
15
Getting Started
System Installation
Upgrading and Uninstalling a Cluster. Insert the installer CD and follow the on-screen instructions. To
upgrade a cluster, do the following:
Upgrade Cerify on the Supervisor by running the latest version of installer and choosing Supervisor
as installer type.
Upgrade Cerify on all of the Media Test Units by running the latest version of installer and choosing
Media Test Unit as the installer type.
Refer to the Software Upgrade (see page 19) section for instructions on upgrading.
To uninstall a cluster, do the following:
Uninstall Cerify on the Supervisor.
Uninstall Cerify on all of the Media Test Units.
Refer to the Software Uninstallation (see page 18) section for instructions on uninstallation.
Configuring a Network Bridge. If the system has multiple network adapters, it is recommended that you
bridge all the network adapters.
1. From the Start menu, select Control Panel > Network Connections.
2. Select two network adapters at the same time, right-click and select Bridge Connections. Windows
will build up a network bridge automatically. When the bridge is built successfully, the IP address of
the two adapters disappears.
3. Select the Network Bridge and configure a new IP address in the Properties menu for LAN
connections.
Installation Folders. During the installation process, select the following locations:
Installation Location: The folder where the application is installed.
Temporary Storage Location: Before processing media files from an external server, Cerify may
need to copy the remote files to the PC on which the Cerify application is installed. This folder is
used as the location to store such temporary copies. Cerify copies the file only when operating in copy
mode and accesses the file using the ftp://, smb://, or gvg:// protocols. See Modes of Operation (see
page 205) for help determining the mode that applies to your installation.
NOTE. There should be sufficient free space in the temp folder to store large video files. The location for
this temp folder can be on any drive on the computer.
If you would like multiple users to be able to run the Cerify application on the PC, make sure to select
a location that has read and write permissions for those users. A temporary directory located within a
users private directory is not suitable in this case.
16
Cerify Automated Video Content Verification System User Manual
Getting Started
System Installation
Insert the Cerify Dongle.
Insert the Cerify license dongle supplied with the system in any of the available USB ports of your
computer.
NOTE. Do not insert the dongle before the Cerify installation. Insert the dongle only when the installer
prompts you.
NOTE. If Cerify reports license failures after the dongle has been installed, it is possible that firewall
software is interfering with the license service. Please ensure that port 1947 is open in any firewall
software that is in use.
The number of files that can be simultaneously processed by Cerify will be the number of allowed channels
specified in the dongle. If a time-expiry dongle is connected, the default number of files processed is 1.
Sometimes, you will need to change the number of files that can be simultaneously processed by
Cerify. You can change the number of parallel processing channel setting by changing the value
of the property “cerify.processorsperbox” in “cerify.properties” file located at <Installation
Directory>/Cerify/JBoss/server/all/conf.
The following lists the different situations for standalone installation:
When Cerify is started with no dongle connected, then (irrespective of whether a value has been
specified in the “cerify.processorsperbox” property or not) the number of allowed channels is zero.
When Cerify is started with a perpetually licensed dongle and if the “cerify.processorsperbox” property
is not set then the number of allowed channels is controlled by the dongle.
When Cerify is started with any valid dongle and a valid number of channels is specified for the
“cerify.processorsperbox” property, then this value would be used if it is less than or equal to the
number of channels controlled by the dongle. If the value is greater than the number of channels
controlled by the dongle then the number of channels controlled by the dongle takes precedence.
When Cerify is started with any valid dongle and the number of channels specified for the
“cerify.processorsperbox” property is -1, then the number of allowed channels is controlled by the
dongle
When Cerify is started with a time-expired dongle and if the “cerify.processorsperbox” property is not
set, then the number of allowed channels is set to 1
Install Apple QuickTime Player.
To process Apple ProRes files or to process files using the Generic QuickTime Video template or to process
files using the JPEG 2000 Video template, you have to install QuickTime Player. You can download
QuickTime player from the link http://www.apple.com/quicktime/download/ .
NOTE. If QuickTime Player is already installed, make sure that it is version 7.5.5 or later.
Cerify Automated Video Content Verification System User Manual
17
Getting Started
System Installation
Software Uninstallation
Before uninstallation, ensure that you have administrator privileges. If you try to uninstall Cerify without
administrator privileges, the uninstallation process will be aborted.
Cerify can be uninstalled in two ways:
Through Start > Control Panel > Add or Remove Programs.
By rerunning the CerifySetup<version>.exe that you used to install the current version and following
the on-screen instructions.
NOTE. If the Cerify installer version is higher than the currently installed version, the installation will be
upgraded to the newer version.
If the Cerify installer version is lower than the current installed version, the installer will abort without
taking any action.
NOTE. The Cerify installation process places the WinPCap and HASP utilities in the Add or Remove
Programs list. The uninstallation process does not remove WinPCap in case it is being used by other
programs or you want to continue to use it for other purposes. The HASP drivers are uninstalled. If you
want to uninstall WinPCap, this can be done in the usual way from the Add or Remove Programs list.
NOTE. If you select the Backup database option during uninstallation, the current database will be
backed up to C:\Documents and Settings\<username>\Cerify\CerifyBackup_<version>_<timestamp>. You are given the option to change the directory where you want to
back up the database. All relevant configuration files will be backed up to C:\Documents and
Settings\<username>\Cerify\CerifyConfig_<version>_<timestamp>. The "Backup
database" option will not be available if you are uninstalling the Media Test Unit, as the Media Test
Unit does not have its own database.
NOTE. If Cerify6.0 is uninstalled using Add or Remove Programs option or using Cerify6.0 installer, there
will be no “backup” option. The Cerify database and configuration files will always be backed up at the
location C:\Documents and Settings\<username>\Cerify\CerifyBackup. When Cerify7.2 is
installed, the installer will change the directory name “CerifyBackup” to “CerifyBackup_6.0”.
Software Reinstallation
To reinstall Cerify, you must uninstall Cerify, and then rerun the installer. Rerunning the installer that
was used to install the current version of Cerify will cause Cerify to be uninstalled. It does not repair
the existing installation.
18
Cerify Automated Video Content Verification System User Manual
Getting Started
System Installation
Software Upgrade
To upgrade the current version of Cerify to Cerify version 7.2, run the setup file for version 7.2 and
follow the on-screen instructions.
It is possible to upgrade in any of the following ways:
Standalone > Supervisor
Standalone > Standalone
Standalone > Media Test Unit
Supervisor > Supervisor
Supervisor > Standalone
Supervisor > Media Test Unit
Media Test Unit > Supervisor
Media Test Unit > Standalone
Media Test Unit > Media Test Unit
If you would like to back up the current database while you are upgrading from Supervisor
or Standalone Cerify, choose the Backup database option during the upgrade process.
The current database is backed up to the location C:\Documents and Settings\<User
name>\Cerify\CerifyConfig_<version>_<timestamp> by default. You may change this location
by choosing a different folder for backing up the files.
The upgrade process also backs up relevant configuration files from the current installation. These files
are backed up to C:\Documents and Settings\<User name>\Cerify\CerifyBackUp_<version>_<timestamp>.
When you are upgrading to a Supervisor or standalone Cerify, the database is upgraded automatically after
the installation. If the database upgrade fails, the installer will install Cerify with a clean database and
inform you about the failure. The Backup database option will not be available while upgrading from
Media Test Units, as they do not have their own database.
Cerify Automated Video Content Verification System User Manual
19
Getting Started
System Installation
Reverting to the previous version of Cerify
In some circumstances, such as a failed software upgrade, you might want to revert to an older version of
Cerify. To do this, follow these steps:
NOTE. You should have a database backup and a copy of configuration files from the version you would
like to revert to as a pre-condition.
1. Uninstall the current version of Cerify. While uninstalling, back up the database by selecting the
Backup database option.
2. Install the older version of Cerify.
3. Restore the database of older version using CerifyDatabase Utility tool. For help on how to use this
tool, refer to Database Backup/Restore Utility (see page 187).
Network Settings
In most circumstances, the PC on which Cerify is installed requires only one network interface. There are
two scenarios where it is necessary to have two network interfaces. The first is when the network on which
the Web clients will access the Web user interface needs to be physically separate from the network that
stores the media file assets. The second scenario is when the Cerify system is to access media files from a
Grass Valley Profile or K2 server. In this case, the additional network interface should be connected to the
control network that runs the Grass Valley AMP service. This enables Cerify to list the contents available
on the Grass Valley servers. The first network interface on the PC should continue to be connected to
the video server network as follows:
On a standalone Profile XP, to either the Media Ethernet card, if present, or the Ethernet interface of a
Universal Interface Module (UIM), if present
On a SAN-based Profile XP network, to the Gigabit Media network provided by a Universal Interface
Module, if present
On a SAN-based K2 network or a standalone K2 Media Client, to the Media/FTP network
For a K2, it is possible to use direct FTP connectivity, in the same fashion as other video servers. In this
case, the AMP control network does not need to be accessed and no additional network interface is needed.
20
Cerify Automated Video Content Verification System User Manual
Getting Started
Accessing the Application
Accessing the Application
Starting the Application
Before accessing the Web user interface, it is necessary to start the application. The Cerify application
is typically left running for long periods, even when there are no active users, because new jobs or files
might need to be processed due to the use of drop boxes or CeriTalk.
To start the application, click the Start Cerify icon. Alternatively, the application may be started from the
Windows Start menu.
NOTE. Cerify will fail to start if any other Web services using port 80 are running on the system where
Cerify is installed. You can run Cerify once you shut down other Web services running on port 80 on
the system.
The startup time of the Cerify application can be up to 3 minutes. The application has started and is ready
to use when you see a Cerify login page in your Web browser.
To run Cerify, the user should have administrator rights.
You can change the port number used by Cerify by updating the Cerify system property “cerify.http.port”.
See Configuring the Cerify Application (see page 186) for details on how to update Cerify system
properties.
NOTE. On start up, Cerify reads this port number from “cerify.properties” and checks to ensure that this
port is not used by any other application. If it finds the port number specified to be in use, an error
message detailing the failure is displayed and startup operation is aborted. If the system cannot find any
value set to this system property, it will use the default port number 80.
Once the application has started, you can access the Cerify Web user interface from any computer
on the same network. You can access the Web user interface using the URL http://<Cerify IP
Address>:<http port> where <http port> is the value set for the property cerify.http.port.
Cerify Automated Video Content Verification System User Manual
21
Getting Started
Accessing the Application
Cerify Windows Service
Installation
1. Stop Cerify if it is running by right clicking on the Cerify system tray icon and clicking on Stop Cerify.
2. Install the Cerify Windows service by running the following command from the Cerify installation
directory: CerifyService.bat install.
3. This will install and start Cerify as a service. You can see the new service called Cerify in the Windows
Services utility. To access the utility, select Control Panel > Administrative Tools > Services.
After Cerify is running as a service, you can control the service by running the following commands
from the Cerify installation directory:
To stop the Cerify service, run CerifyService.bat stop.
To start the Cerify service, run CerifyService.bat start.
To uninstall the Cerify service, run CerifyService.bat uninstall.
Alternatively, after you have installed the service, you can control the Cerify service using the Windows
Services utility.
Limitations
1. To install and control the service on Windows Vista, Windows 7, and Windows server 2008, you will
need to login as a user Administrator. If you login as a different user with administrative privileges,
you will have to do the following:
a. Open Windows explorer and navigate to C:\WINDOWS\system32.
b. Right-click on cmd.exe and select Run as administrator.
c. In the resulting command window, change directory to the Cerify installation directory.
d. Run the instructions given in the previous section for installing and controlling the Cerify service.
2. If a MediaLocation is configured with a mapped network drive, then Cerify cannot access the files in
this MediaLocation until the user is logged into the system.
Starting a Cluster
Perform the following steps to start a Cluster:
1. Start Cerify on Supervisor unit by clicking Start > All Programs > Tektronix > Cerify > Start Cerify.
2. Start Cerify on Media Test Units by clicking Start > All Programs > Tektronix >Cerify Media Test
Unit > Start Cerify.
3. Enter the URL http:// <Cerify host name> into your Web browser where Cerify host name is the
Supervisor host name.
22
Cerify Automated Video Content Verification System User Manual
Getting Started
Accessing the Application
Accessing the Web User Interface
To access the application, you will need a Web browser installed on your computer.
To access the Web user interface from a remote computer, you need to know the IP address of the PC on
which Cerify is installed in Standalone or Supervisor mode.
Enter the URL http://<Cerify IP address> into your Web browser where "Cerify IP address"
is the IP address of the system, where Cerify is installed in Standalone or Supervisor mode.
NOTE. For cluster configuration, Tektronix recommends that both the Supervisor and Media Test Units
are configured with a static IP Address.
To access the Web user interface in a more convenient fashion on the PC on which Cerify is installed,
click Start > All Programs > Tektronix > Cerify > Launch Cerify Web UI. This will automatically
launch your default Web browser and take you to the correct Cerify Web page. Alternatively, you can
do this by right clicking on the Cerify system tray icon and selecting Launch Cerify Web UI.
NOTE. To access the Web user interface on a Media Test Unit, click Start > All Programs > Tektronix >
Cerify Media Test Unit >Launch Cerify Web UI.
Logging in to the Application
When you access the Cerify Web page, you are presented with the Cerify application login screen.
1. Enter your Username and Password in the login page. Once these credentials have been correctly
supplied, the Cerify Web browser will display the top level Jobs page (see page 27).
2. Use your mouse and keyboard to navigate this Web interface and enter information in the usual way.
NOTE. The default user name is “admin” and password is “admin”.
NOTE. If the user name and password are invalid, an error message appears, and you will remain on
the login page. There is no limit to the number of times you can attempt to log in. User names are case
sensitive, so if you have trouble logging in, check the Caps Lock key. If you forget your password, contact
the Cerify administrator.
CAUTION. If a session is inactive for a period, you will automatically be logged out. Any attempt to
resume the session will redirect you to the login page.
Logging Out
Click the text that reads Log out in the page header to log out of the application. This returns you to the
login page.
Cerify Automated Video Content Verification System User Manual
23
Getting Started
24
Accessing the Application
Cerify Automated Video Content Verification System User Manual
Operating Basics
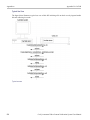
Concepts
Concepts
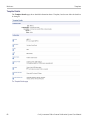
This section introduces the central concepts and entities used within the system. These entities and their
relationships are shown in the following figure.
NOTE. The following figure indicates the basic relationships between the entities. For simplicity, the figure
shows one of each type of entity. In practice, there can be many instances of each type of entity, with each
child entity potentially being used by multiple parent entities.
Entities
Users
Before using the system, you must log in with your username and password credentials. These credentials
will have been assigned by a user who has administrator access.
By default, the system is installed with a single predefined user whose name and password are both set
to admin. This user has administrator access. It is recommended that this password is changed the first
time the administrator logs into the system. Administrator access rights allow a user to modify system
properties, and in particular to create and modify MediaLocations (see page 26) and Users.
You can find more information about users in the Modify User (see page 105) and New User (see
page 105) sections.
Cerify Automated Video Content Verification System User Manual
25
Operating Basics
Concepts
MediaLocations
A MediaLocation is a local or network file storage location from which the system can access media files.
Typically, this would be a directory on the hard drive or a video server that provides FTP or Windows file
share access. To create a MediaLocation, a user must supply its URL and the username and password
required to access this URL. In addition, you must supply a unique name to be used within the system to
identify the MediaLocation.
Only users with administrator access are able to create or modify MediaLocations.
Refer to Admin Page (see page 104) and MediaLocation Management (see page 106) for more information.
MediaSets
A MediaSet is a collection of media files that you want to check.
A MediaSet can be a DropBox. A DropBox is a directory that is continually monitored for new media
files. A MediaSet that is not a DropBox is simply a static collection of media files manually selected from
one or more of the MediaLocations.
If a Job is associated with a DropBox, every file that appears in the DropBox over time will be processed.
For additional information, refer to MediaSets (see page 97).
Templates
To check a media file, you must define which checks should be applied when the file is tested. A
Template is a collection of such checks chosen to perform specific tests that you require. The four types
of Templates are:
Container Templates, which apply to the transport/container layer of a media file
Video Templates, which apply to the digital video content of a media file
Audio Templates, which apply to the digital audio content of a media file
Action Templates, which specify actions to be performed as a result of processing a media file
You can create multiple Templates of the same type for different purposes. For example, you might create
a "Movies" Template, which contains a set of rules appropriate for HD MPEG-2 content, and an "on-line
content" Template, which contains a set of rules appropriate for lower resolution H.264/AVC content.
For additional information, refer to Templates (see page 63).
26
Cerify Automated Video Content Verification System User Manual
Operating Basics
Concepts
Profiles
A Profile gathers together a container, video, audio, and action Template, providing a complete set of
checks that can be applied when you want to test one or more media files. Any of the component Templates
can be omitted, depending on your requirements. For example, it makes no sense to apply any container or
audio checks to a media file that consists solely of a video elementary stream.
You can define multiple Profiles for different purposes. Following on from the previous example, you
might create an "on-line content" Profile, which specifies a QuickTime Mov file wrapper in the container
Template, H.264/AVC checks for the video Template, and AAC checks for the audio Template.
For additional information, refer to Profiles (see page 60).
Jobs
A Job is the term given to an individual testing process that can be run by the system. Each Job can
process multiple media files or a single media file, depending on the requirements of the user. The set of
files processed by a Job is defined by its MediaSet.
By creating a Job, you request the checks defined by a particular Profile be applied to the files in a
particular MediaSet. In addition, you must specify the name and priority of the Job. The system can queue
multiple Jobs to be run, whereby each Job is scheduled to be processed according to its priority.
The system processes one media file at a time.
How long it takes to process a Job depends upon a number of factors:
The resolution of the video being processed (the larger the picture, the slower the processing)
The video standard concerned (some standards, such as H.264/AVC, take more time to process)
The number of tests selected (performing all the video quality checks can be processor intensive,
because it requires the analysis of every pixel in each frame of video)
The bit rate (in general, the higher the bit rate, the slower the processing)
Hardware performance of the PC on which Cerify is installed
For additional information, refer to Jobs (see page 51).
Alerts
Alerts announce any checks that fail as a Job executes. Each alert indicates the severity of the failure,
as well as where and why the check failed. The system gathers alerts associated with a particular Job,
so that you can access the results from the top level and easily navigate to the details, such as which
individual frames have Alerts.
The system organizes and summarizes any alerts raised against a particular Job, so that, at the top level, a
single processing result status can be assigned to the Job. To view more detailed information, you can
drill down through the interface, revealing (for example) which individual frames have raised alerts.
For additional information, refer to Alert Details (see page 57).
Cerify Automated Video Content Verification System User Manual
27
Operating Basics
Functional Overview
Reports
Reports provide you with a way to query the system database and obtain information in a predefined
format. A Job report presents the results of a particular Job in tabular form.
For additional information, refer to Reports (see page 103).
Archiving
The system allows you to archive entities that are no longer required. MediaSets, Templates, Profiles,
and Jobs can all be archived.
When an entity is archived, it remains present in the database, and can be recovered if necessary. Archived
entities are inactive and usually hidden from view. Inactive entities cannot be used to construct new
entities. So, for example, if a Job is archived before completion, it will not process any pending media files.
For additional information, refer to Active/Archive View Control (see page 32) and Archive/Restore
Control (see page 32).
Clustering
To increase processing throughput, units can be clustered. Each cluster consists of a single Supervisor
unit and one or more Media Test Units.
In a clustered configuration, the Supervisor unit hosts the database and the Web server. The Supervisor
unit communicates with the rest of the local network, accessing media files and serving the Web user
interface. The Media Test Units are allocated media files to process by the Supervisor unit. The results of
this processing are stored by the Supervisor unit into a single database.
Functional Overview
This section gives an overview of the Cerify user interface.
System Tray Icon
The Cerify system tray icon appears in the system tray, near the clock, once the application is started. The
system tray icon provides menu items that allows easy control of the application.
Cerify system tray icon
28
Cerify Automated Video Content Verification System User Manual
Operating Basics
Functional Overview
Left-click the icon to launch the default Web browser and load the Cerify page showing the list of
jobs in it.
Right-click the icon to bring up the system tray icon menu, which provides four options:
Launch Cerify Web UI, which launches the default Web browser and loads the Cerify page
showing the list of jobs in it.
About, which shows the About Box of the application. The About Box displays product details
such as product name, version and copyright information. The About Box can be closed by
simply clicking on it.
Stop Cerify, which stops all job processing and shuts down the application completely. The
application takes about 2 to 3 minutes to shut down completely. Note that shutting down the Web
browser when using the Web user interface does not stop Cerify or stop any jobs running.
CAUTION. Do not stop the application or its component services using the Microsoft Windows Task
Manager. Always use the system tray menu for shutting down the application.
Launch Cerify User manual, which launches the user manual PDF.
Cerify system tray menu
Web User Interface
The user interface consists of a structured collection of various types of pages accessed using a Web
browser. The pages contain a page header, page body, and footer. The pages can contain the following
elements:
Icons (see page 30)
Navigation bar (see page 31)
Login Details and AutoRefresh links (see page 31)
Trail widget (see page 32)
Active/archive view control (see page 32)
Archive/restore control (see page 32)
Tables (see page 33)
Footer (see page 34)
Cerify Automated Video Content Verification System User Manual
29
Operating Basics
Functional Overview
Icons
The following table lists the icons used in the interface.
Icon
Description
Collapse this section
Expand this section
Copy this item
Remove this item
Edit this item
Directory
File in a directory
Obtain context sensitive help
Status unknown
Failed with fatal error status
Failed with error status
Failed with warning status
Succeeded with no errors or warnings
Item created through the Cerify Web user interface
Item created through CeriTalk API
Sort items in this column in descending order
Sort items in this column in ascending order
Press this button to trigger the selected action
Add another set of values to the rules
Removes any set of values from the rule
xxx
30
Cerify Automated Video Content Verification System User Manual
Operating Basics
Functional Overview
Page Header
Navigation Bar. The navigation bar provides a quick route to the top level of any of the pages. The
selected button on this header indicates which top-level page is selected. In the following example,
the Jobs page (see page 51) is selected.
Navigation bar
Login Details and AutoRefresh links.
The login details, located below the navigation bar at the top-right section of the screen, show who you are
logged in as and provide a link enabling you to log out.
The license status of Cerify is also reported in this section. The license information can be one of the
following:
License status
Details
Licensed
Cerify is fully licensed. Jobs can be processed.
Licensed - # day(s) remaining
Cerify is licensed for the next # number of days and Jobs
can be processed.
Licensed - expires today
Cerify is licensed for today and Jobs can be processed.
License expired
The license for Cerify has expired. The Web interface
may be used but no new Jobs can be started and Jobs in
progress will stop.
Unlicensed
Cerify is unlicensed. This may be because a suitable dongle
cannot be found. The Web interface may be used but no
new Jobs can be started and Jobs in progress will stop.
If Cerify cannot find a license when it starts up, Jobs will
remain in the waiting state until a license can be found. An
additional message will be displayed in the Jobs Monitor
page, above the list of Jobs in this case.
If Cerify finds a license when it starts up and later becomes
unlicensed, Jobs will be processed, but will fail because
no license is available.
xxx
Cerify Automated Video Content Verification System User Manual
31
Operating Basics
Functional Overview
Breadcrumb. The breadcrumb allows you to see your position in the hierarchy and to navigate from this
position. For example, the following figure shows that you have navigated three levels down from the
Jobs Monitor (see page 51) to view the Alert Details (see page 57) for a particular media file. The Jobs
Monitor, Job Details, Processing Result, and Alert Details fields are all links that allow you to quickly step
up one or more levels.
The breadcrumb
Page Body
The body of the page holds the buttons, forms, tables, and reports that are used to query and control
the system.
The Jobs Monitor page body
Active/Archive View Control. Jobs (see page 51), Profiles (see page 60), Templates (see page 63) and
MediaSets (see page 97) can all be archived. The Active/Archive view control allows you to choose which
entities of a particular type to view. Using this control, you can view Active, Archived, or All entities of a
given type. For example, the preceding figure shows a page of Active Jobs.
NOTE. When an entity is archived, it is not removed from the database, but it becomes inactive. Inactive
entities cannot be used to construct new entities.
For example, a new Job (see page 51) can only be constructed from active MediaSets (see page 97) and
active Profiles (see page 60).
Archive/Restore Control. The Archive/Restore control allows you to archive and restore entities. This
control appears below the tables of items on the Jobs Monitor (see page 51) page for example.
32
Cerify Automated Video Content Verification System User Manual
Operating Basics
Functional Overview
To archive entities, select the corresponding check boxes in the left column of the table, and then click the
Go button on the Archive/Restore Control. The preceding figure shows a user ready to archive three Jobs.
To restore entities from archive, set the Active/Archive View Control (see page 32) to All or Archived,
which allows you to select archived objects. After selecting the items that you would like to restore, set the
Archive/Restore Control to Restore from archive, and then click the Go button on the Archive/Restore
Control. You can also delete, stop, and resume entities. For more information, refer to Modifying Jobs
(see page 53).
Select All Control. The Select All control is presented as a checkbox input associated with the Sel column
header in entity tables in the Cerify Web user interface. This control can be used to select/deselect all
items in the associated table before performing actions on them using the Archive/Restore control.
This control is available on the tables that list Jobs (see page 51), Profiles (see page 60), Templates (see
page 63) and MediaSets (see page 97).
Tables.
The system displays collections of entities in the form of tables. These tables share a number of common
features.
The leftmost column of the table allows you to select the item.
The arrow icons and allow you to sort the table based on values in a particular column (for
example, sort a table of Jobs based on their Start Time).
The white arrow shows the currently active sort order.
Sorting the table deselects all items.
Clicking the help icon
provides information on a particular column.
In the preceding figure, since you have selected to view a maximum number of five rows in a table and
there are more than five active Jobs, table paging controls appear below the table. For information on
changing the table display preferences, refer to the Options (see page 103) page.
The highlight indicates that page 1 is the current page.
To select a different page, use the numbered links or the prev and next links.
The following table describes each column in the tables.
Column heading
Channel
Description
Shows if a Job or MediaSet was created by a user through the Web user interface
or by an automation system through the CeriTalk API
Copy
Click the copy icon
to copy an item and edit the copy
Creator
Shows which user created an item
Creation Time
Shows when this Job was created
Description
Shows the description of an item, as originally entered by the user
Edit
Click on the edit icon
to edit an item
Cerify Automated Video Content Verification System User Manual
33
Operating Basics
Functional Overview
Column heading
Description
End Time
Shows when a Job or media file finished executing
Files
Shows the total number of files in a MediaSet
File Size
Shows the total size of all the files in a MediaSet. Note that Cerify uses "kB", "MB" and
"GB" to represent 1024 bytes, 1048576 bytes, and 1073741824 bytes, respectively; a
1000 based system is not used.
Job Status
Shows the status of a Job (for example, Processing)
MediaSet
Shows the MediaSet name for this Job
Name
Shows the name of an item, as originally entered by the user
Priority
Shows a Job priority (for example, High)
Profile
Shows the Profile name for this Job
Progress
Shows the percentage progress of a Job
Result
Shows a Job processing result
Sel
Check the box in this column to select an item to be archived or restored
Start Time
Shows when a Job or media file started processing
Status
Shows the Active/Archive status of an item
DropBox
Indicates if a given MediaSet is a DropBox
xxx
Empty Tables. When you navigate to the Jobs page, if no Jobs (see page 51) have been created, or all Jobs
are archived, the page body will appear as shown in the following figure.
No Jobs
Collapsing Headings. Some pages contain sections that can be expanded or collapsed to control how much
information is displayed on the page. Click anywhere on a line containing the collapse icon
information. Click on a line containing the expand icon
to hide
to view more information.
Footer
The footer displays a copyright notice and version information.
34
Cerify Automated Video Content Verification System User Manual
Operating Basics
Functional Overview
Error Handling
Form Input Errors
The system informs you if a mistake is made while filling an input form. For example, if you attempt
to create a New Job (see page 52) without supplying any text in the Job Name field, the form will
be redisplayed with an error message. The error message is in red text, next to the invalid field on the
form as shown in the following figure.
Input errors
Cerify Automated Video Content Verification System User Manual
35
Operating Basics
Tutorials
Work Flow Errors
The system informs you if an attempt is made to perform an operation out of the correct sequence. For
example, if you attempt to create a Job (see page 51) before a Profile (see page 60) or MediaSet (see
page 97) has been created, an error page will appear, as shown in the following figure:
Work flow error page
Application Errors
Occasionally the application is unable to handle a request, in which case it will display the message: An
internal Cerify Error has occurred. You should be able to continue using the application as normal after
this. If the problem persists, contact your local Tektronix representative.
Tutorials
The following tutorials start from a clean installation and step through the process of creating a new Job
and checking on its progress. To run these tutorials, you will need the following:
Access to a computer with Cerify installed
A Cerify user account with administrator privileges (see page 104)
The tutorials are as follows:
Before You Begin (see page 38): How to start using the system
Creating a MediaLocation (see page 40): How to create a MediaLocation
Creating a MediaSet (see page 41): How to create a MediaSet by selecting files from a MediaLocation
Creating a Template (see page 44): How to create a Video Template
Creating a Profile (see page 46): How to create a Profile from your Video Template
Creating a Job (see page 47): How to create a Job from your Profile and MediaSet
36
Cerify Automated Video Content Verification System User Manual
Operating Basics
Tutorials
Inspecting Job Results (see page 47): How to review the progress of a Job and inspect the Job results
Creating a Report (see page 48): How to create a printable report on the Job
Archiving (see page 48): How to archive the MediaSet and the Job
Exporting Templates (see page 49): How to export the Video Template
Importing Templates (see page 49): How to import the Video Template previously exported
Work Flow
The following figure indicates the dependencies between the entities that make up a Job. It shows,
for example, that a MediaSet requires a MediaLocation; any attempt to create a MediaSet when no
MediaLocations exist will generate a Work Flow Error (see page 36). Similarly, it is a work flow error to
attempt to create a Job when there are no active MediaSets or Profiles.
Entity relationships
Cerify Automated Video Content Verification System User Manual
37
Operating Basics
Tutorials
Before You Begin
1. Start the Cerify application by clicking the Start Cerify icon on your desktop or by using the Start
menu. For information about accessing the application, see Accessing the Application (see page 21).
NOTE. To run this tutorial, you must log in with administrator access. Note that the system comes with a
single user already set up as administrator. The Username and Password are both set to admin.
If a session is inactive for a certain period of time, you will be logged out. If this happens during the
tutorial, you will be redirected to the login page. Log back in to continue.
2. On successful start up, Cerify presents you the login page using your default browser. The following
login page shows a user about to log in to the system at http://134.64.235.216.
TIP. On any Web page you can click the help icon
obtain context-sensitive help.
(shown below on the right side of the login page) to
3. Enter your user name and password into the appropriate fields in the login page and click the Enter
button. After you have logged in, you will be taken to the Jobs Monitor (see page 51).
38
Cerify Automated Video Content Verification System User Manual
Operating Basics
Tutorials
The following figure shows what this page looks like when no Jobs are active, which will be the case if
this tutorial is being run from a clean installation.
Jobs Monitor page
The header contains the Navigation Bar (see page 31), which allows you to quickly navigate between
the major areas of the user interface. In this case, the Jobs button is selected, indicating you are on one
of the Jobs pages.
In addition, the header shows that you are logged in as admin.
The body of the page contains:
A line of text informing you that there are no Jobs in this view
An Active/Archive View Control (see page 32), allowing you to view any archived Jobs (see page 27)
A New Job button. Clicking this button will generate a workflow error, because you have not yet
created a Profile and a MediaSet. For additional information, refer to Work Flow Errors (see page 36).
Cerify Automated Video Content Verification System User Manual
39
Operating Basics
Tutorials
Creating a MediaLocation
A MediaLocation is a network location from which the system can access media files. Users with
administrator access can create and modify MediaLocations (see page 26).
1. Click the Admin button on the Navigation Bar (see page 31) to access the Admin (see page 104)
page, as shown in the following figure.
Creating a MediaLocation
2. Start creating a new MediaLocation by clicking the Go button next to the text that reads Create
new MediaLocation. You should see a form.
3. Fill in the fields in the form as shown in the following table, and then click Create to create the
MediaLocation.
Field
Value
MediaLocation Name
Cerify example content
URL
c:\Program Files\Tektronix\Cerify\cerify_demo
Username
-
Password
-
xxx
New MediaLocation
40
Cerify Automated Video Content Verification System User Manual
Operating Basics
Tutorials
NOTE. The system validates the MediaLocation details when you click the Create button, checking that the
MediaLocation name is unique, the URL exists, and that the specified user can access files at that URL.
If any of these checks fail, the MediaLocation will not be created; instead, the form will be posted back
to the screen with an error message indicating what the problem is.
For additional information on creating MediaLocations, refer to MediaLocation Management (see
page 106)
Creating a MediaSet
Now that you have created a MediaLocation, you can create a MediaSet that collects together some of
the files at this location.
1. Click the MediaSets button on the Navigation Bar (see page 31) to visit the MediaSets page.
2. Start creating a new MediaSet by clicking the New MediaSet button. You will see a page like the one
shown in the following figure.
New mediaset
3. Select no for the DropBox mode.
Cerify Automated Video Content Verification System User Manual
41
Operating Basics
Tutorials
4. Enter a suitable name for the MediaSet and click Create to create the MediaSet and continue to the
Edit MediaSet (see page 98), as shown in the following figure.
Edit MediaSet
The Edit MediaSet page provides details of the files already in the MediaSet (there should be none
yet). It shows directories with a
icon, and files with a
icon. The page also provides the controls
for you to add new files.
5. Add files to the MediaSet using the directory and file browser.
To reveal the contents of a directory, double-click the directory.
To close the directory and go up a level, open the drop-down menu control at the top right of the
file browser to provide a selection of recent directories.
To select a file, double-click the
42
file icon (it will appear in the Files table).
Cerify Automated Video Content Verification System User Manual
Operating Basics
Tutorials
The following figure shows a MediaSet to which three files have been added.
MediaSet containing files
6. You can also add a file to the MediaSet by entering the full path to the file in the File name text
field at the bottom of the page.
This path must include the full URL of the file. For example, c:\Program Files\Tektronix\Cerify\cerify_demo\news\airport_interview.ts.
Cerify Automated Video Content Verification System User Manual
43
Operating Basics
Tutorials
Creating a Template
To test the files in your new MediaSet, you need to decide which checks to apply. Checks can be applied
to the container or wrapper layer, the video stream, and the audio stream, using container, video, and
audio Templates, respectively.
In addition, using an Action Template, you can define actions to take when files have been checked.
1. Click the Templates button on the Navigation Bar (see page 31) to start creating a Template. You will
see a page listing the Templates that are present in your current Templates view.
Select Video Template Type
1. Click the New Video Template button to create a new Video Template. You will be prompted to select
a Template type, as shown in the following figure.
Select Template type
The Template type you choose depends on the type of video content you want to check. This type will
be the Video Standard used when the video was encoded: for example, MPEG-2 or H.263.
2. Use the drop-down menu to select MPEG-2, and then click the Select button to take you to the New
Video Template page. The New Video Template page is where you define which checks to include in
your Video Template.
New Video Template
CAUTION. The new Template will not be saved until you click the Create button at the bottom of the
page. When you click Create, the system will check that the fields you have filled contain valid data, and
prompt you to fix any problems. If there are no problems, the new Template will be created and stored
in the database.
1. Enter a name for the Template, “News Video”, and optionally a description.
2. Configure the checks to be applied by selecting the check boxes and entering values into the text fields.
(See the following figure for a typical Video Template configuration.) Use the Add / Remove buttons
to configure the Resolution rule with multiple sets of valid values (see page 69). For a full explanation
of the checks performed by each rule, click on the
icon next to each rule name.
3. Click the Create button at the bottom of the page to create the new Video Template.
44
Cerify Automated Video Content Verification System User Manual
Operating Basics
Tutorials
The following figure shows a typical MPEG-2 Video Template configuration. When this Template
is used to check a video stream, it will check:
The video is MPEG-2 encoded.
The video is encoded using MPEG-2 Main Profile, Main Level.
The video bit stream syntax conforms with the MPEG-2 Standard, but any alerts relating to Buffer
analysis and alert number 22209 will be suppressed.
A maximum of 500 alerts will be displayed.
Each alert type will be displayed a maximum of 20 times.
The video resolution is 720 by 480 pixels or 1280 by 1080 pixels.
Video Template configuration
For additional information, refer to Video Templates (see page 74).
Cerify Automated Video Content Verification System User Manual
45
Operating Basics
Tutorials
To create an Audio Template, the process is very similar as described in the following steps.
1. Return to the Templates page by clicking the Templates link on the navigation bar.
2. Click the New Audio Template button to create a new Audio Template. Select MPEG-1 /
MPEG-2 Audio from the select box, and then click the Select button.
3. Enter the name "News Audio" for the Template, and optionally a description.
4. Configure the checks to be applied by selecting the check boxes and entering values into the text fields.
The precise choice of rules and parameters does not matter for the purposes of this tutorial.
5. Click the Create button at the bottom of the page to create the new Audio Template.
Create a Container Template using the same steps. When prompted to select the Template type, choose
MPEG-2 Transport Stream; otherwise follow the same steps as for the other Templates. The precise
choice of rules and parameters does not matter for the purposes of this tutorial.
Creating a Profile
To use your new template in a Job, you must include it in a Profile.
1. Click the Profiles button on the Navigation Bar (see page 31) to go to the top-level Profiles page.
2. Click the New Profile button.
3. Enter a name and optionally a description for the Profile, as shown in the following figure.
4. Select the Container Template, Audio Template, and Video Template you just created. If you created
more than one audio template, click the Plus icon to display another audio template selection field.
5. Click the Create button to create a Profile.
For additional information, refer to Profiles (see page 60).
46
Cerify Automated Video Content Verification System User Manual
Operating Basics
Tutorials
Creating a Job
Having created a MediaSet and a Profile, you can now create a Job.
1. Click the Jobs button on the Navigation Bar (see page 31) to go to the top-level Jobs page.
2. Click the New Job button.
3. Enter a name for the Job. Set the Job priority to "Low", and select the Profile and MediaSet that
you previously created.
4. Click Create to create the Job.
Creating a Job
Inspecting Job Results
1. Access the Jobs Monitor page by clicking the Jobs button on the Navigation Bar (see page 31). This
page gives feedback on the status of all running Jobs (unless the Job view has been set to Archived).
This feedback includes:
A processing result summary for each Job
Status and progress information for each Job
Summary information about the entities associated with each Job
Timing information for each Job
2. Click the AutoRefresh button in the page header to arrange for the page to refresh periodically
with no further intervention. This is useful when you are monitoring the progress of a large Job that
might take several minutes to complete.
3. Wait for the Job Status to show complete before continuing with this tutorial. This may take several
minutes.
4. From the Jobs Monitor, you can drill down for more details about a Job result. For additional
information on Inspecting Job Results, refer to Job Details (see page 54), Processing Result (see
page 55) and Alert Details (see page 57).
Cerify Automated Video Content Verification System User Manual
47
Operating Basics
Tutorials
Generating a Report
1. Access the Reports page by clicking the Reports button on the Navigation Bar (see page 31). This
page allows you to generate Job processing reports.
2. In the Enter Jobname field, enter the name of the job that you created.
3. Click the Generate button to generate a report on your Job. For detailed description, refer to Reports
(see page 103).
Archiving
1. To archive your Job (refer to Archiving (see page 28)), go to the Jobs Monitor page by clicking the
Jobs button on the Navigation Bar (see page 31).
a. Select the Job to archive by selecting the checkbox in the left column of the Jobs Monitor table.
b. Make sure that the action drop-down menu under the table reads Archive, and then click Go to
archive the Job.
Archiving a Job
2. To view archived Jobs, set the Active/Archive view control to All or Archived. The table will
be updated to reflect your choice. You can restore archived Jobs from this new view, if required.
MediaSets, Templates, Profiles, and Jobs can all be archived.
48
Cerify Automated Video Content Verification System User Manual
Operating Basics
Tutorials
Exporting Templates
1. To export your Templates, go to the Templates page by clicking the Templates button on the
Navigation Bar (see page 31).
2. Select the Templates to export by selecting the checkbox in the left column of the appropriate
Template table.
3. Click on the Export button at the bottom of the page to export the selected Template.
4. When prompted, select a location to save the Templates file, and click Save. The file will be saved to
the location you select.
Importing Templates
1. To import the XML Template file generated by Exporting Templates (see page 49), go to the Templates
page by clicking the Templates button on the Navigation Bar (see page 31).
2. Click the Browse button at the bottom of the page to access the Open File dialog.
3. Navigate to the location where the file is, select it, and click Open.
4. Click on the Import button to import the selected file. A template with the same name will exist, select
the option If a template of the same name already exists, replace it, and then import the template.
5. The Templates defined in the file will be successfully imported, and a success message will be
displayed on the Templates page.
NOTE. There is a range of example templates in the <installation directory>/Example
Templates directory that may be useful to you. The example templates are preloaded onto Cerify and you
can view them in the Templates page.
Cerify Automated Video Content Verification System User Manual
49
Operating Basics
50
Tutorials
Cerify Automated Video Content Verification System User Manual
Reference
Introduction
Introduction
This chapter provides a reference guide for users. It is organized in much the same way as the user
interface is organized, with sections for each main page and subsections for the subpages.
Jobs
A Job applies the various checks in a Profile (see page 60) against the media files in a MediaSet (see
page 97).
A Job is identified by its unique name. In addition, a Job is assigned a Priority upon creation.
The top-level Jobs page is accessed by selecting the Jobs button from the navigation bar. When you open
this page, you will be presented with a Table (see page 33) displaying Jobs that are filtered according to
the Archive/Restore Control (see page 32). If no Jobs match the current filter, an informative message
will be displayed.
Jobs Monitor
The Jobs Monitor page provides a top-level view of the status of Jobs. The following figure shows the
status of three Jobs. One Job is succeeded with no errors or warnings; the remaining two have raised errors.
NOTE. In this example, the user has limited both how many rows and which columns of the Jobs Monitor
are displayed.
The Jobs Monitor page
Cerify Automated Video Content Verification System User Manual
51
Reference
Jobs
From this page it is possible to:
View Job Details (see page 54) for a Job by clicking on the Job name.
View the details for the Job MediaSet (see page 97) and Profile (see page 60) by clicking on the
MediaSet or Profile name.
Create a New Job (see page 52) by clicking the New Job button.
Create a New Job (see page 52) by clicking the
copy icon.
Modifying Jobs (see page 53) by clicking the jobs to be modified, selecting the required action from
the Archive/Restore control and clicking the Go button.
New Job
The New Job page is accessed either by copying an existing Job (see page 51), or by creating a new Job.
The New Job page
You should enter a Job Name, set the Priority, and choose a Profile and a MediaSet, before clicking the
Create button to create the Job.
CAUTION. Jobs cannot be created unless one or more MediaSets (see page 97) and Profiles (see page 60)
are active. If this is not the case, then any attempt to create a Job will generate a Work Flow Error
(see page 36).
52
Cerify Automated Video Content Verification System User Manual
Reference
Jobs
Modifying Jobs
It is possible to modify the state of existing Jobs in a number of ways, using the same Archive/Restore
control (see page 32) that is described in the Archiving Tutorial (see page 48).
To modify a Job, do the following:
1. Select the Jobs you want to modify by selecting the checkbox in the left column of the Jobs Monitor
table.
2. Select the desired action from the action drop-down menu under the table.
3. Click Go to carry out the action.
It is possible to select the following actions:
Archive, Restore from archive. Used to remove from view or restore to view the selected Jobs. Note
that archiving processing Jobs will automatically cause those Jobs to be immediately stopped. When
the Job is removed from the archive, it will remain in the stopped state until the user chooses to resume
the Job. This is to prevent unwanted processing of Jobs occurring when the Job was complete at the
point of archive, but could restart processing when removed from the archive because the associated
MediaSet has had new files placed in it.
Stop (finish current files), Stop (immediately). Stop processing the Job. Results of media files
that have already been completed will be retained and processing of unprocessed media files can be
resumed when desired. The first option allows media files that are currently being processed to run to
completion, whereas the second option will immediately terminate all processing. In the latter case,
all results from the currently processing media files for that Job will be removed, and if the Job is
resumed, processing will restart from the beginning of the media file.
Resume. Resume the processing of a stopped Job. Any media files that have not yet been processed
will begin processing.
Set priority to high, Set priority to medium, Set priority to low. Change the priority of the
selected Jobs to the new priority. This will affect waiting Jobs and the priority which are assigned to
unprocessed media files in currently processing Jobs. Changing Job priorities never causes a currently
running media test process to be stopped.
Delete. Delete the selected Jobs from the database. All the results associated with that Job, including
stream information, alert details and thumbnails, will be permanently deleted. Use the archive
functionality if you want to remove the Job from view, but be able to revisit the results in future.
Cerify Automated Video Content Verification System User Manual
53
Reference
Jobs
Job Details
The Job Details page is accessed from the Jobs Monitor (see page 51) page. It provides summary details
for all the media files in the Jobs MediaSet as shown in the following figure.
This page also provides an option to playback the media files in the Jobs MediaSet. This option becomes
available only when the VLC playback (see page 113) feature is enabled.
The Jobs Details page
processing result icon or the media
To see exactly which errors caused the Job to fail, click either the
file name. This will take you to the Processing Result (see page 55) page.
Clicking the
play button starts the playback of the media file using the VLC media player.
To play back the media file, it must satisfy the following conditions:
The media file has not moved from the original location from where it was analyzed
The media file has an encoding scheme that is supported by the VLC media player
54
Cerify Automated Video Content Verification System User Manual
Reference
Jobs
Processing Result
The Processing Result page provides information on the alerts raised by a particular media file. This page
also displays the stream information for the media file concerned. Stream information is grouped into three
separate sections: Container Info, Video Info, and Audio Info. Where there are multiple audio tracks in
the stream, all track information is displayed. You can select the extent of stream information that gets
displayed on this page using the stream information display (see page 113) setting.
Stream information is updated as processing progresses. Many properties (such as "Picture size" or "Video
standard") will be available shortly after processing begins, and others (such as "Length") will only be
available after processing is complete. Some properties may be output and subsequently updated during
processing. The values displayed will always be the most recent values encountered in the stream.
If the VLC player has been installed and enabled, you can also play back the media file from this page
by selecting the play button that is available against eligible alerts.
The Processing Results page
Cerify Automated Video Content Verification System User Manual
55
Reference
Jobs
You can drill down for more Alert Details (see page 57) on a particular alert by clicking either the
processing result icon or the title of the alert.
Alert Levels
Four different levels of alerts can be reported by Cerify according to the severity of the issue: fatal,
error, warning, and info.
Fatal
A fatal alert occurs when it is not possible for the system to complete processing of a media file and the
processing is terminated. This might be caused by something in the media file bitstream, such as a severe
syntax error that makes that stream completely unintelligible or an option being present in the bitstream
that is not supported by the decoder. Alternatively, the alert might be caused by a system problem, such
as a license error, or failure to copy a media file off a video server.
Error
An error alert occurs where the media file fails a check specified by one of the Templates that the media
is being checked against. Alerts raised by syntax checking will be given an error status if they have the
potential to prevent correct decoding of the stream. An example of this is where an out of range value
has been used in a bit stream.
Warning
A warning alert indicates that there is some issue with the stream, but that this is not necessarily a problem.
This might be that a certain number of alerts has been exceeded or that the bitstream is non-compliant in
some minor way that almost certainly will not affect the decoding of the stream.
Info
Info alerts are relatively rare, and are used to inform users of additional useful information that will not
cause a problem.
56
Cerify Automated Video Content Verification System User Manual
Reference
Jobs
Alert Details
The Alert Details page provides more information on an individual alert, including thumbnail images of
surrounding frames (where appropriate). The thumbnail images link to full Frame View (see page 59)
of these frames.
The Alert Details page
The table within the details section provides specific details about the alert. Each of the table columns is
outlined below.
Column
Description
Level
You can refer to alert levels (see page 56) and their associated icons (see page 119)
for detailed description.
Alert ID
Unique alert ID. See alert IDs (see page 119).
Location
This is the position relative to the start of the stream where the alert was generated.
For quality alerts, a more detailed description is given in start and end positions of
quality alerts (see page 58).
Start
Optional column, only present for quality alerts. For more information, refer to, start and
end positions of quality alerts (see page 58).
End
Optional column, only present for quality alerts. You can refer to start and end positions
of quality alerts (see page 58) for detailed description.
Channel Index
Optional column, only present for audio quality alerts (see page 88). When processing
a multi-channel audio stream, this index will indicate the channel to which the alert
applies. Channel indices start from 1.
Channel Name
Optional column, only present for audio quality alerts (see page 88). The name of the
channel to which the alert applies, as given by the audio standard.
Title
Description of alert type. This will always be the same for a given alert ID.
Cerify Automated Video Content Verification System User Manual
57
Reference
Jobs
Column
Description
Details
Details of the alert specific to this occurrence. This should provide a reason as to why
the test failed.
Thumbnail
Thumbnail of the video frame (if available) at the alert location. Click the image to
view the full Frame View (see page 59)
xxx
Start and End Positions of Quality Alerts
The quality alerts ( video quality (see page 78) and audio quality (see page 88) ) are special in that they can
apply to a range of video or audio. This is in contrast to most alerts, which have an instantaneous position.
Because of this, quality alerts within Cerify contain the following additional information:
The start position of the error condition
The location at which the error condition exceeded its permitted length
The end position of the error condition
Only one alert will be raised for a given error condition sequence, regardless of length.
Example: A rule is set up to disallow more than 5 seconds of black during video. A video clip has an
unwanted sequence of 30 seconds of black beginning at 1m 20s. Cerify will generate a single video quality
alert with the following information:
Start: 1m 20s - the start of the black sequence
Location: 1m 25s - the point at which 5 second limit was exceeded
End: 1m 50s - the end of the black sequence
58
Cerify Automated Video Content Verification System User Manual
Reference
Jobs
Frame View
The Frame View Page shows a larger thumbnail image of the Frame. This thumbnail is based upon a down
sampled version of the full frame, using the top field only for interlaced content, so in some cases the
detected artifact may not be visible. Red rectangles highlight any areas of the frame that generated alerts.
The "next" and "prev" links at the bottom of the frame image allow navigation across frames in the
film-strip display for the alert. These links are displayed based on the position of the current frame in
the film-strip. The first frame of the film-strip has only the "next" link associated with it and the last
frame has only the "prev" link on it.
The Frame View page
Cerify Automated Video Content Verification System User Manual
59
Reference
Profiles
Profiles
A Profile gathers together a Container (see page 71), Video (see page 74), Audio (see page 86) and
Action (see page 93) Template, providing a complete set of checks that can be applied to a MediaSet (see
page 97). Any of the component Templates can be omitted, depending on user requirements.
The top-level Profiles page is accessed by selecting the Profiles button from the navigation bar. When
you open this page, you are presented with a table (see page 33) displaying Profiles filtered according
to Active/Archive View Control (see page 32). If no Profiles match the current filter, an informative
message will be displayed.
The Profiles page
From the top-level Profiles page (see page 60), it is possible to:
Archive and restore Profiles
View Profile details (see page 61) by clicking the Profile name in the ProfileName column.
Edit a Profile (see page 61) by clicking the edit
icon.
Create a new Profile (see page 62) by clicking the New Profile button.
Create a new Profile from an existing one (see page 62) by clicking the
60
copy icon.
Cerify Automated Video Content Verification System User Manual
Reference
Profiles
Profile Details
The Profile Details page shows detailed information about a Profile.
The Profile Details page
Edit Profile
A Profile can be edited to change its constituent Templates:
Container (see page 71)
Video (see page 74)
Audio (see page 86)
Action (see page 93)
Cerify Automated Video Content Verification System User Manual
61
Reference
Profiles
The Profile name and description cannot be changed.
Edit Profile page
Click the Update button to submit changes to the Profile (see page 60).
New Profile
The New Profile page is accessed either by copying an existing Profile or by creating a new Profile.
The New Profile page
To create a new Profile, enter a name for the Profile and, optionally, a description, and select the desired
Templates (see page 63) from the drop-down menus. To add a second audio template, click the plus icon
next to the audio field. Click the Create button to create the Profile.
62
Cerify Automated Video Content Verification System User Manual
Reference
Templates
Templates
Templates allow you to collect together rules to be used or actions to be taken when checking files in a
MediaSet (see page 97).
The four types of Templates are:
Container Templates (see page 71), which gather rules applying to the container layer
Video Templates (see page 74), which gather rules applying to video elementary streams
Audio Templates (see page 86), which gather rules applying to audio elementary streams
Action Templates (see page 93), which gather actions to be performed when generating Job processing
events
The top-level Templates page is accessed by selecting the Templates button from the navigation bar.
When you open this page, you are presented with tables (see page 33) displaying Container, Video, Audio,
and Action Templates filtered according to Active/Archive View Control (see page 32). If no Templates
match the current filter, an informative message will be displayed. The following figure shows a Container
Template, a Video Template, an Audio Template, and an Action Template.
Cerify Automated Video Content Verification System User Manual
63
Reference
64
Templates
Cerify Automated Video Content Verification System User Manual
Reference
Templates
NOTE. Some example templates are preloaded onto Cerify. These templates can be used, copied, edited,
and archived in the same way as those created by users. The XML files containing these templates can be
found in <Installation directory> /Example Templates.
From the top-level Templates page (see page 63) it is possible to:
Archive and restore Templates (see page 32)
View details of a Template (see page 66) by clicking its name in the Template Name column
Edit a Template (see page 67) by clicking the edit
icon
Create a new Template (see page 68) by clicking the New Template button for the type of Template
(see page 63) required
Create a new Template from an existing one (see page 68) by clicking the
copy icon
Export Templates (see page 69)
Import Templates (see page 70)
Cerify Automated Video Content Verification System User Manual
65
Reference
Templates
Template Details
The Template Details page shows detailed information about a Template, but does not allow the details to
be changed.
The Template Details page
66
Cerify Automated Video Content Verification System User Manual
Reference
Templates
Edit Template
A Template can be edited to change the Template Name, Description, and Template rule parameters. In
the following figure, the user has entered a Template Name and description, and has enabled some rules.
Not all of the rules for the Template are shown.
The Edit Template page
Click the Update button at the bottom of the page to submit changes to the Template. This will also update
the version of the Template.
Cerify Automated Video Content Verification System User Manual
67
Reference
Templates
New Template
The New Template page is accessed either by copying an existing Template, or by creating a new Template
(see page 63).
To create a new Template, determine the type of Template you want to create and click the corresponding
New Container Template, New Video Template, New Audio Template, or New Action Template
button.
In the following screen, select the standard for the Template you want to create. For a Video Template,
this might be MPEG-2, MPEG-4 or some other video standard. The resulting New Template page is very
similar to the Edit Template (see page 67) page.
Enter a name for the Template and, optionally, a description. Finally, you must set up the Template
rule definitions.
Template rules specify precisely what to check when processing content. For example, a Template rule
might require that video content has a certain resolution, or that the audio stream has a certain bit rate. The
Template rules that can be defined depend upon the type of Template and its standard.
For more details on each rule, refer to the descriptions in the following sections on Container Templates
(see page 71), Video Templates (see page 74), Audio Templates (see page 86) and Action Templates
(see page 93).
To find more information about a rule when defining a Template, click the
next to the rule name.
Template rules are enabled and disabled by clicking the checkbox on the left side of the Edit Template
page. A Template can contain a single enabled rule or many enabled rules. Different rules require different
parameters to be defined, depending on the type of rule. For example, a rule that specifies video resolution
will require you to enter the expected number of pixels.
When you have finished defining all of the rules, click the Create button at the bottom of the page
to create the Template.
If you are uncertain as to what rules and parameter values to use, try looking at one of the preloaded
example templates and gradually adjust the rules until you are comfortable with the operation of the
template.
If you have imported a database from an earlier version of Cerify (before 6.x), the pre-loaded example
templates will not be available. In this case, they can be imported as described in the Importing Templates
(see page 49) section.
68
Cerify Automated Video Content Verification System User Manual
Reference
Templates
Multiple Sets of Values
Some of the rules in Container, Video and Audio Templates accept multiple sets of values. You can define
these rules like any other - with a single set of values, or you can define multiple set valid values. If you
use multiple sets, the test will pass if the value matches any of the sets.
These rules can be recognized by the add/remove buttons to the right of the rule.
Rules that accepts multiple sets of values
Add button. A new row of inputs will appear
To add another set of valid values to the rule, click on the
at the bottom of the rule. You can add as many new rows as you need.
Remove button to the right of that row. The
To remove any set of values from the rule, click on the
row will disappear from the rule. You can remove all rows but one.
Exporting Templates
Templates can be exported from the top-level Templates page. Once exported, Templates can be imported
into any Cerify system running a compatible version of Cerify. Any number of Templates, of any type
(Container, Video, Audio and Action) and status (Active or Archived), can be exported to a single file.
NOTE. When exporting Action Templates, passwords used by rules to access remote locations are not
exported.
To export a set of Templates, select the templates you want to export by checking the corresponding check
boxes in the leftmost column of the Templates tables and pressing the Export button at the bottom of the
page. Choose a location to save the Templates export file to when prompted. Exported Template files use
XML to store template information, following the Template Information schema definition.
If you are viewing this page from the Help pages in the Cerify Web interface, you can click the following
link to view the Template Information schema definition
To download the Template information XML schema:
In Microsoft Internet Explorer, right-click the above link and select the Save Target As option from
the pop-up menu.
In Mozilla Firefox, right-click the above link and select the Save Link As option from the pop-up
menu.
If you are viewing this page from a printed or a PDF version of the Cerify user manual, access the URL
http://your_cerify_host/TemplateInformation.xsd, replacing your_cerify_host with the
IP address or host name of your Cerify system, to view the Template Information Schema definition.
When a table contains too many Templates to fit on a single page, the system will split it to be displayed
over a number of pages. If you cannot see all the Templates you want to export in the tables, you may
Cerify Automated Video Content Verification System User Manual
69
Reference
Templates
need to change the number of Records per page (see page 104) to allow more Templates to be shown on
each page. You may also need to change the Active/Archive view (see page 32) to display both Active
and/or Archived Templates.
Importing Templates
Any Template file generated by exporting Templates as described in Exporting Templates (see page 49)
can be imported into any Cerify system running a compatible version of Cerify. This is done from the
top-level Templates page (see page 63).
NOTE. There are some example template XML files in the directory "Example Templates" inside the
directory where the Cerify application is installed. These templates are preloaded into Cerify when it
is first installed.
NOTE. After importing Action Templates, it is necessary to edit them and re-enter the appropriate
passwords for rules that access local/remote locations.
To import a set of templates, click the Browse button at the bottom of the Templates page to access the
Open File dialog box. Using this dialog box, navigate to the location of the template file to import, select
it, and click Open. Select the “If template of the same name already exists, replace it” checkbox to
update the templates of the same name and standard which already exist in Cerify. If you do not select
this option, templates in the file with a name that already exists in Cerify will not be imported. Finally,
click the Import button to import templates from the selected file.
If all Templates in the file are successfully imported, a success message will be displayed on the Templates
page. More detailed messages, listing all imported Templates, can be found in the Admin Log (see
page 115).
If any of the Templates in the file cannot be imported, an error message will be displayed on the Templates
page. More detailed error messages, listing all imported Templates and all individual errors, can be
found in the Admin Log.
There are three groups of errors that can prevent a Template from being successfully imported:
System Level Errors
System Level errors are raised when the file being imported does not conform to the Template Information
schema definition. If you are viewing this page from the Help pages in the Cerify Web interface, you can
click the following link to view the Template Information schema definition.
Message in Admin Log
Cause
Error importing templates: File does not validate against
schema.
The file being imported does not conform to the schema.
xxx
70
Cerify Automated Video Content Verification System User Manual
Reference
Container Templates
Template Level Errors
Template Level errors are raised when a Template in the file being imported is not valid, and cannot be
imported. Other valid templates within the XML file will still be imported. There are three types of
Template Level Errors:
Error message
Cause
Error in Template "X": Template could not be imported.
A Template with that name already exists. Select the "If
template already exists, replace it" option when importing
to overwrite the existing version.
There is a Template in the file to be imported named "X",
but a Template named "X" already exists in Cerify. If the "If
template already exists, replace it" option is not selected,
this error will be raised. If it is selected, Template "X" will be
updated with the new version being imported.
Error in Template "X": Template could not be imported.
Attempt has been made to create a template for an
unrecognized standard.
There is a Template in the file to be imported named "X". The
standard defined in the file for this Template is not one of the
Video, Audio, or Container standards recognized by Cerify.
Error in Template "X": Template could not be imported.
Mandatory rules Y, Z not present.
There is a Template in the file to be imported named "X".
Rules Y and Z, which are mandatory for the standard of
that Template, are not present in that Template. Mandatory
rules are those that always appear checked when creating a
Template using the Web UI and cannot be unchecked. For
example, Alert Limit and Particular Alert Limit.
xxx
Rule Level Errors
Rule Level errors are raised when a Template in the file being imported includes an invalid rule; in this case,
the Template is partially imported, excluding the invalid rule. There are four types of Rule Level Errors:
Error message
Cause
Error in Template "X": Rule "Y" could not be imported. A
rule ID submitted has not been recognized.
Rule "Y" defined in Template "X" is not recognized as a valid
rule.
Error in Template "X": Rule "Y" could not be imported. The
rule input name submitted ("A") is not recognized.
Rule "Y" defined in Template "X" is invalid as one of the
inputs defined for it, "A", is not recognized as belonging to
that rule.
Error in Template "X": Rule "Y" could not be imported. "A"
is required.
Rule "Y" defined in Template "X" is invalid as one of the
inputs defined for the rule, named "A", must have a valid
value but is either empty or not present in the import file.
Error in Template "X": Rule "Y" could not be imported.
The value "x" submitted for the rule input "A" is not a valid
option.
OR
Error in Template "X": Rule "Y" could not be imported. "A"
is not a number.
Rule "Y" defined in Template "X" is invalid as the value "x"
supplied for input "A" is not valid.
xxx
Container Templates
Container Templates collect together rules applying to the wrapper or container layer.
Cerify Automated Video Content Verification System User Manual
71
Reference
Container Templates
Checks Common to All Container Layers
Check
Description
Standard
Confirms that the container layer is of the type indicated in the Template (for example, MPEG-2
Transport Stream). This check is mandatory and cannot be disabled.
Trying to treat a container format wrongly, for example processing an MPEG-2 Transport Stream
as MXF, will almost certainly lead to spurious alerts. Cerify will raise an alert and cease analysis
immediately in the event of a mismatch between observed and expected container format.
Integrity checks
Checks the syntax and integrity of the container layer; that is, the problems in the wrapper file, but not
in the elementary streams.
NOTE. Cerify does not perform full syntax checks for container layers, and is limited to reporting
serious errors that prevent the correct interpretation of the stream. This check is mandatory and cannot
be disabled.
Suppress
Alerts
Alerts may be suppressed individually by entering the alert ID into the text field titled Suppress alert
IDs. Note that fatal alerts can never be suppressed. Suppressed alerts will not count towards any of the
alert limits set by the Alert limit or Individual Alert limit.
Alert limit
This rule can be used to limit the number of container alerts raised. It is not possible to switch off this
check; however the value can be set to a maximum of 10,000.
Clicking the "Terminate processing if limit is exceeded" checkbox causes file processing to stop if the
alert limit is exceeded. In this case, certain stream properties that require the whole file to be processed
(such as length of stream) are not reported. Similarly, end of stream test cases will not be executed. If
the checkbox is not checked, processing will proceed to completion but any further container alerts will
be suppressed and not shown. In either case, an alert will be raised, indicating that further alerts have
been suppressed. If the alert limit has been exceeded, fatal alerts will still be displayed.
Note that the Individual Alert limit can be used to prevent the results being swamped by a particular
container alert.
Individual Alert
limit
This rule can be used to limit the number of container alerts with the same ID number. This prevents
the results being swamped by a particular container alert. It is not possible to switch off this check;
however, the value can be set to a maximum of 10,000. This value should be kept lower than the Alert
limit value, since the latter takes precedence.
File size
Checks the size of the input file in bytes. For container layers that support external references (for
example MXF and QuickTime files) this does not include the sizes of the external files.
Play time
Checks the stream play time, defined as the maximum play time of all decoded audio and video streams.
Bit rate
This tests the bit rate for the stream, calculated as the file size divided by the play time, as defined above.
Multiple sets (see page 69) of valid values can be defined for this rule.
Video streams
This tests the number of video elementary streams contained within the container layer.
Audio streams
This tests the number of audio elementary streams contained within the container layer.
Audio/video
duration
Checks that the audio stream duration is longer than the video stream duration by a minimum amount
but not by more than the maximum specified amount.
Skip First Few
Alerts
This rule can be used to suppress the audio and video alerts for the first few frames or milliseconds
of the file.
Skip Last Few
Alerts
This rule can be used to suppress the audio and video alerts for the last few frames or milliseconds
of the file.
xxx
72
Cerify Automated Video Content Verification System User Manual
Reference
Container Templates
Container Checks Specific to MPEG-2 Transport Stream Standard
Check
Description
Packet size
Checks the packet size used by the MPEG-2 Transport Stream. This can be 188, 192, 204, or 208
bytes. Packet size is defined as the separation between sync_bytes in the MPEG-2 transport stream.
This is a check on the separation of the first pair of sync_bytes only. If the packet size varies later in the
stream, it will be reported as a synchronization error.
CableLabs
VOD
This tests against some of the requirements of CableLabs Video-On-Demand Content Encoding Profiles
Specification (MD-SP-VOD-CEP-l01-040107). The checks are: that the transport stream contains a
single Program only; that audio streams must have stream type equal to 0x81 (Dolby Digital); that
video streams must have stream_type equal to 0x02 (MPEG-2); that an MPEG-2 video stream is on
PID 0x1E1; that a Dolby Digital audio stream is on PID 0x1E2, and any other audio streams follow on
consecutive PIDs; that the Program Clock Reference (PCR) occurs in PID 0x1E1 (the video stream).
DVB Closed
Caption
Checks that the Program Map Table associated with the decoded video stream includes a PID with
Closed Caption data. Such a PID must include a VBI_data_descriptor (as described in ETSI EN 301
775) containing a closed_captioning_data_field() element.
DVB Teletext
Checks that the Program Map Table associated with the decoded video stream includes a PID with
Teletext data. Such a PID must include a VBI_data_descriptor (as described in ETSI EN 301 775)
containing a txt_data_field() element.
Video PID
Checks that the decoded video stream was found on a specific PID or PIDs. Multiple PIDS can
be specified using a comma-separated list, and/or PID ranges. For example, "128-130,481" checks
that the video stream is on any of PIDs 128, 129, 130 or 481. Hexadecimal PID numbers can be
given by using the '0x' prefix.
Audio PID
Checks that the decoded audio stream was found on a specific PID or PIDs. Multiple PIDS can be
specified using a comma-separated list, and/or PID ranges. For example, "482-484,4098" checks that
the video stream is on any of PIDs 482, 483, 484 or 4098. Hexadecimal PID numbers can be given
by using the '0x' prefix.
If this rule used on a file which contains no audio stream, an alert will not be generated. To catch this
case, use the "Number of audio streams" rule.
xxx
Container Checks Specific to MPEG-2 Program Stream Standard
Check
Description
VBI
Checks for the presence of Pinnacle Vertical Blanking Information, as indicated by the use of Pinnacle
proprietary syntax in private_stream_2
Video
Checks for the presence of at least one video stream as indicated by the presence of packets with
a stream_id in the range 0xE0 - 0xEF inclusive
Audio
Checks for the presence of at least one audio stream as indicated by the presence of packets with a
stream_id in the range 0xC0 - 0xDF inclusive
Pack header
Checks for the presence of a pack_header PS packet type as indicated by the presence of packets with
the start code 0x000001BA
System header
Checks for the presence of a system_header PS packet type as indicated by the presence of packets
with the start code 0x000001BB
Program
Stream Map
Checks for the presence of a program_stream_map PS packet type as indicated by the presence of
packets with the start code 0x000001BC
Cerify Automated Video Content Verification System User Manual
73
Reference
Video Templates
Check
Description
Program
Stream
Directory
Checks for the presence of a program_stream_directory PS packet type as indicated by the presence of
packets with the start code 0x000001FF
Private Stream
1
Checks for the presence of private_stream_1 as indicated by packets with stream_id = 0xBD
Private Stream
2
Checks for the presence of private_stream_2 as indicated by packets with stream_id = 0xBF
Padding stream
Checks for the presence of padding_stream as indicated by packets with stream_id = 0xBE
xxx
Container Checks Specific to SMPTE 377M / MXF Standard
Check
Description
Operational
Pattern
Checks the Operational Pattern reported by the MXF file.
Footer Partition
Tests that a footer partition pack is present at the end of the MXF file. A missing footer partition often
indicates that a file has been truncated, and might cause problems for editing software and other
systems.
Clip Duration
Compares the duration of the decoded video stream against the duration of the material package
defined in the MXF file, and alerts if they are different. There is a tolerance of 1 video frame duration.
A failure of this test might mean that the MXF file has been badly packaged or truncated.
Clip Start
Timecode
Tests the start timecode of the MXF file material package. It is possible to specify a minimum, a
maximum, or both. Timecodes must be given in the format HH:MM:SS:FF (where FF is frame number).
xxx
Video Templates
Video Templates gather rules applying to video elementary streams.
Common Video Configuration Checks
74
Check
Description
Standard
Checks that the input file is encoded to the expected standard. Without this check, an MPEG-2 file
(for example) could pass an MPEG-4 Video Template provided that the Template did not test any
MPEG-4 specific features.
Since treating an MPEG-2 stream as MPEG-4 will almost certainly lead to spurious alerts, Cerify will
raise an alert and cease analysis immediately in the event of a mismatch between observed and
expected standard.
If the media file does not contain a video stream, an alert will be raised and processing will terminate
immediately.
Syntax Checks
Enables strict testing for compliance to the detected standard. This will generate alerts for corrupted
streams, and streams generated by misconfigured or noncompliant encoders. Each type of alert has a
numeric ID, which is shown in the Alert Details page.
Cerify Automated Video Content Verification System User Manual
Reference
Video Templates
Check
Description
Suppress
Alerts
Alerts can be suppressed individually (by entering the alert ID into the text field titled Plus additional
alert IDs) as well as in a predefined group selected from the list. Note that fatal alerts can never be
suppressed. Suppressed alerts will not count towards any of the alert limits set by the Alert limit or
Individual Alert limit.
Quick Check
Enabling the Quick Check rule prompts Cerify to run a partial check of the media file being tested. This
rule lets you quickly gather basic stream information and perform checks on them without performing a
full decode of the asset. Stream information thus gathered can also be used by automation clients using
the CeriTalk API to select an appropriate Profile to apply to the media file or to perform content sorting
based on stream attributes. The following tests will not be run when performing a Quick Check:
Container Templates:
File size
Play time
Bitrate
Has Pinnacle VBI (MPEG-2 Program Stream)
Has Video Stream (MPEG-2 Program Stream)
Has Audio Stream (MPEG-2 Program Stream)
Has System Header (MPEG-2 Program Stream)
Has Program Stream Map (MPEG-2 Program Stream)
Has Program Stream Directory (MPEG-2 Program Stream)
Has Private Stream 1 (MPEG-2 Program Stream)
Has Private Stream 2 (MPEG-2 Program Stream)
Has Padding Stream (MPEG-2 Program Stream)
Packet size (MPEG-2 Transport Stream)
Has DVB Closed Caption Information (MPEG-2 Transport Stream)
Has DVB Teletext Information (MPEG-2 Transport Stream)
Operational Parameter (MXF)
Cerify Automated Video Content Verification System User Manual
75
Reference
Check
Quick Check
(continued)
Video Templates
Description
Video Templates:
Play time
Frame rate
Bitrate
Data partitioning (MPEG-4, H.264)
AC Prediction (MPEG-4)
Forward Prediction (VC1 and MPEG-4)
Bidirectional Prediction (VC1 and MPEG-4)
Loop Filter (VC1)
Copyright extension (MPEG-2)
First GOP closed
GOP interval
All quality tests:
Black frames
Freeze frame
Loss of Chroma
Letterbox
Pillarbox
Blockiness
Luma Limit Violation
RGB Component Violation
Quantization
Audio Templates:
Play time
Bitrate
All quality tests:
Silence
Mute
Peak level maximum
Peak level minimum
Clipping
Test tone
76
Cerify Automated Video Content Verification System User Manual
Reference
Video Templates
Check
Description
Alert limit
This rule can be used to limit the number of video alerts raised. It is not possible to turn off this check;
however the value can be set to a maximum of 10,000.
Selecting the "Terminate processing if limit is exceeded" checkbox causes file processing to stop if the
alert limit is exceeded. In this case, certain stream properties that require the whole file to be processed
(such as length of stream) are not reported. Similarly, end of stream test cases will not be executed. If
the checkbox is not cleared, processing will proceed to completion but any further video alerts will be
suppressed and not shown. In either case, an alert will be raised, indicating that further alerts will not be
raised. If the alert limit has been exceeded, fatal alerts will still be displayed.
Note that the Individual Alert limit can be used to prevent the results being swamped by a particular
video alert.
Individual Alert
limit
This rule can be used to limit the number of video alerts with the same ID. This prevents the results
being swamped by a particular video alert. It is not possible to turn off this check; however, the value
can be set to a maximum of 10,000. This value should be kept lower than the Alert limit value, since
the latter takes precedence.
Field Order
This rule checks that the field dominance indicated by the coded stream and the decoded video
is consistent with a given field order.
Top field first will check that the coded stream is flagged as such and that the bottom field does
not appear to be from an earlier point in time than the top field.
Bottom field first for the opposite of Top field first.
Consistent with stream flags checks that the decoded video field order is the same as the field
order indicated by the coded stream.
In the case where pulldown is achieved through the use of stream flags, or any stream where the coded
field order is expected to change, Consistent with stream flags is the only appropriate check to use.
For streams that have already had pulldown applied in the source video (so that the coded field order is
constant), any of these three checks may be suitable.
Interlace
This check will either require or prohibit interlaced coding (not available for H.263).
Play time
Used to check the play time of the video elementary stream. Defined as the presentation time of the last
video frame in display order.
Multiple sets (see page 69) of valid values can be defined for this rule.
Encoded
Picture Size
Tests the video resolution (frame width by frame height) in pixels. The size reported is used to encode
the picture. For some codecs, this size may be different to the intended display size of the picture.
Frame width is defined as the coded video frame width reported by the first stream header only. Frame
height is defined as the coded video frame height reported by the first stream header only. For interlaced
video, encoded picture size is the height of the reconstructed frame (twice the field height).
Multiple sets (see page 69) of valid values can be defined for this rule.
Color depth
Tests the color depth (bits per sample) of the decoded video. This is usually 8, but may be higher in
some standards (not available for H.263, MPEG-2 or DV25).
Frame rate
Tests the average frame rate (calculated as <frames- 1>/<duration>) of the video sequence. This check
does not use any declared frame rate in the stream header.
Multiple sets (see page 69) of valid values can be defined for this rule.
Cerify Automated Video Content Verification System User Manual
77
Reference
Video Templates
Check
Description
Bit rate
Tests the average bit rate of the video elementary stream, calculated as <stream_size>/<duration>.
This check does not apply buffer analysis rules.
Multiple sets (see page 69) of valid values can be defined for this rule.
Display Aspect
Ratio
Tests the aspect ratio of the intended display dimensions of the video stream. According to the codec
being used, this depends upon a combination of the indicated display aspect ratio in the stream, the
indicated pixel aspect ratio, and the frame size (in pixels). Consequently, this will not necessarily
correspond to the actual resulting aspect ratio on all display devices. The mechanism used for detecting
the MPEG-2 display aspect ratio is documented in more detail in the section Video Checks Specific
to MPEG-2 Standard (see page 81).
Multiple sets (see page 69) of valid values can be defined for this rule.
xxx
Video Quality
For interlaced content, all quality checks consider each frame to contain the top field and the bottom field
in a single picture. It is not possible to apply these checks on each field.
78
Check
Description
Black frames
at start, end, or
during video
These checks enforce or prohibit a certain duration of black at the beginning and end of the sequence,
or to prohibit periods of black in the middle. The Black level tolerance field determines what luma level
is considered to be black by the test. If the Black level tolerance is N, then any pixels in the bottom N %
of the signal range are considered to be black. An N value of 0% corresponds to a luma value of 16 and
100% corresponds to a luma value of 235. The Ignore failures for up to...% of picture area parameter
allows a percentage of the screen area to exceed the threshold yet for the frame to still be considered
black. This is typically used to disregard small amounts of analog noise and/or channel logos.
Freeze frame
sequence
This check can detect a sequence of repeated frames. The Maximum allowed duration parameter
gives the length of a frozen sequence above which an alert will be generated. Sequences of frozen
frames equal to or shorter than this duration will not lead to an alert. For example: entering "2 identical
frames" will allow two consecutive identical frames to pass, but will generate an alert if three consecutive
identical frames are encountered.
The Ignore monochromatic frames option allows frames which are predominantly a single color (such
as black) to be ignored and so not cause freeze frame alerts.
Frames are considered "repeated" if every 16x16 block of luma samples differs by less than a given
root mean square error from the corresponding block in a previous frame. The Frames differ at ...%
or more of luma range parameter controls this sensitivity. If you are getting frozen frame alerts for
sequences with significant movement, lower this value. If frozen sequences are not leading to an alert
being raised when you think they should, raise this value.
Loss of Chroma
This check ensures that the video has color information. It will cause an alert if the color signal is lost
(if the chroma components of the decoded video fall to zero or nearly so). The Maximum allowed
duration parameter gives the maximum number of video frames or seconds that are permitted to be
monochrome before an alert is triggered. The parameter Ignore failures for first...at start allows the
test to skip over a certain amount at the beginning of the video stream, without generating alerts.
Similarly, the Ignore failures for last...at end parameter skips over a given amount at the end. These
parameters are typically used to skip over monochrome title and credit sequences. The Chroma level
tolerance percentage gives the signal level below which the check will trigger an alert. 0% will alert on
Cr and Cb values of 128, while 100% will alert on any value from 16 to 240. The Ignore failures for
up to...% of picture area specifies the amount of the picture area that may contain color information
without causing the check to trigger an alert. These last two parameters are typically used to disregard
small amounts of analog noise and/or channel logos.
Cerify Automated Video Content Verification System User Manual
Reference
Video Templates
Check
Description
Letterbox
and Pillarbox
checks
These checks enforce a certain aspect ratio in the active picture area, or to prohibit letterboxing (or
pillarboxing) altogether. If the Disallow Letterboxing or Disallow Pillarboxing check boxes are
selected, the Desired Aspect Ratio parameters are ignored. In this case, no black bars are allowed at
the top and bottom of the frame (Letterboxing) or at the left and right sides (Pillarboxing). Otherwise, this
check will calculate the correct sizes of the black bars for the given aspect ratio, and trigger an alert if
the video does not comply. The parameter Ignore failures for first...at start allows the test to skip over
a certain amount at the beginning of the video stream, without generating alerts. Similarly, the Ignore
failures for last...at end parameter skips over a given amount at the end. The Maximum allowed
duration parameter gives the maximum number of video frames or seconds that are permitted to have
improper black bars, before an alert is triggered. The Black level tolerance parameter specifies
the luma level that the check regards as "black", with 0% corresponding to the value 16, and 100%
corresponding to 235. This tolerance is typically used to disregard small amounts of analog noise in
the otherwise black borders of the frame. To allow for small variations in the detected position of the
black bars, the Out-of-position tolerance parameter specifies the number of scan lines (or pixel
columns) by which a black bar may be out of place, without an alert being triggered. Two further
parameters, Black level tolerance and accounting for...% of picture area not black specify a rule
for skipping frames that are too dark to reliably detect the black bars. Once again, 0% corresponds
to 16 and 100% corresponds to 235.
Blockiness
This is a subjective measure of video quality. Each frame is assigned a quality metric (based on
compression artifacts) in the range 0-99, and a moving average is calculated to allow for brief periods
of poor quality (such as fast camera pans) to be disregarded if required. An alert is generated if the
video quality drops below the given threshold.
The image is divided into four quadrants and blockiness measurement is recorded for each quadrant
on each frame. A rolling average is calculated for a sequence of frames, and if the rolling average
for one or more of the four quadrants exceeds the user-specified threshold an alert is raised. The
"offending" frame reported will be the last frame in the sequence of N.
Blockiness measurements will continue to be taken after an alert is raised, but another alert will not
be raised until at least another N consecutively blocky frames have passed. So if you were averaging
over 10 frames and your stream had contained a sequence of 22 blocky frames, you would expect
an alert at frame 10 and an alert at frame 20.
The blockiness score that is reported in an alert is the lowest of the four quadrants rolling average if
more than one quadrant exceeds the threshold. The averaged score is rounded to the nearest integer.
Cerify Automated Video Content Verification System User Manual
79
Reference
Video Templates
Check
Description
Luma Limit
Violation
This tests that the luma component (Y') of the Y'CbCr signal is within valid limits. The Maximum
Duration parameter gives the maximum number of video frames or seconds that are permitted to have
violations before an alert is triggered. The Low Limit and High Limit fields allow for more strict or more
lenient rules for when a pixel is considered a violation. The defaults of -1% to 103% comply with EBU
Tech Rec. R103-2000. These limits may be specified in mV, %, or 8 bit decimal values where values
in mV or % are first converted to 8 bit decimal. For example, the ranges 0-700mV and 0-100% are
converted to 16-235 decimal, similarly, -7-721mV or -1%-103% = 14-242 decimal. The Out-of-Limits
Tolerance Filter applies a low pass filter to the video before checking the limits to remove brief limit
violations that are only a small amount over the limit. The default 50% filter setting complies with EBU
Tech Rec. R103-2000 and IEEE Standard 205 for SD signals. This video standard recognizes that very
brief violations, which cause small dots on the video image to be out-of-limit, are not a problem in
practice. The lower the percentage entered here, the less likely a brief violation is to cause an alert.
Values of 64 and above are not recommended. The Out-of-Limits Tolerance Filter is only applied if the
Apply tolerance filter check box is checked. The Ignore failure... field allows an illegal signal for a
given percentage of the screen area to not cause an alert. If the area of the screen in violation is greater
than this percentage, an alert will be generated.
RGB
Component
Violation
This test ensures that the Y', Cb and Cr components of the decoded video lie within the legal range
given by ITU-R BT.601-5 or ITU-R BT.709-5. The Maximum duration parameter gives the maximum
number of video frames or seconds that are permitted to have violations, before an alert is triggered.
The Colorspace Conversion allows for the selection of the method for conversion from Y'CbCr to RGB.
If Auto is selected, then ITU-R BT.709-5 is used if the frame has more than 1000x648 pixels, otherwise,
ITU-R BT.601-5 is used. The Low Limit and High Limit fields allow for more strict or more lenient rules
for when a pixel is considered a violation. The defaults of -35mV to 735mV comply with EBU Tech Rec.
R103-2000. These limits may be specified in mV, % or 8 bit decimal values where values in mV or %
are first converted to 8 bit decimal. For example, the ranges 0-700mV and 0-100% are converted to
16-235 decimal, similarly, -35-735mV or -5%-105% = 5-246 decimal. The Out-of-Limits Tolerance
Filter applies a low pass filter to the video before checking the limits to remove brief limit violations that
are only a small amount over the limit. The default 50% filter setting complies with EBU Tech Rec.
R103-2000 and IEEE Standard 205 for SD signals. This video standard recognizes that very brief
violations, which cause small dots on the video image to be out-of-limit, are not a problem in practice.
The lower the percentage entered here, the less likely a brief violation is to cause an alert. Values of
64 and above are not recommended. The Out-of-Limits Tolerance Filter is only applied if the Apply
tolerance filter check box is checked. The Ignore failure... field allows an illegal signal for a given
percentage of the screen area to not cause an alert. If the area of the screen in violation is greater
than this percentage, an alert will be generated.
xxx
Video Checks Specific to MPEG-4 Standard
Check
80
Description
Profile and level
Checks whether the video conforms to the MPEG-4 Part 2 Profile and Level specified by the user.
GOVHeader
Tests whether a Group Of VOP (GOV) header exists anywhere in the stream. This test is based on
detecting the group_of_vop_start_code syntax element in the stream.
Visual object
sequence
header
Tests whether a VisualObjectSequence() header exists anywhere in the stream. This test is based on
detecting the visual_object_sequence_start_code syntax element in the stream.
Video object
header
Tests whether a video_object_start_code is present in the stream.
Cerify Automated Video Content Verification System User Manual
Reference
Video Templates
Check
Description
AC prediction
Tests whether the video sequence contains any macroblocks that use AC Prediction. This test is based
on detecting the ac_pred_flag syntax element.
Forward
prediction
Tests whether the video sequence contains any frames that use forward motion prediction (P-VOPs,
B-VOPs and S-VOPs).
Bidirectional
prediction
Tests whether the video sequence contains any B-VOPS.
Quarter sample
MV
Tests whether quarter sample motion compensation is used, as determined by the quarter_sample
element in the VideoObjectLayer() header.
4MV block
modes
Tests whether the inter4v macroblock type is ever used in a P-VOP.
Global motion
compensation
Tests whether the sprite_enable element in the VideoObjectLayer() header is set to GMC. This does not
test whether GMC S-VOPs are actually ever used.
Data
partitioning
Tests the value of the data_partitioned element in the VideoObjectLayer() header. Macroblocks in Data
partitioned streams have motion vectors coded separately from texture (DCT) information.
Resync
markers
Tests for the presence of resync markers in coded VOPs, as determined by the resync_marker_disable
element in the VideoObjectLayer() header.
RVLC
Tests whether Reversible Variable Length Codes are in use, as determined by the reversible_vlc
element in the VideoObjectLayer() header. Reversible VLCs give greater opportunity for error correction
at the expense of slightly lower coding efficiency.
xxx
Video Checks Specific to MPEG-2 Standard
Check
Description
Standard
This Template can be used to process both MPEG-2 and MPEG-1 video. If the video is MPEG-1 an alert
will be raised, and this can be suppressed by selecting the checkbox.
Cerify supports the decoding of MPEG-2 constrained bitstreams with Main profile or 4:2:2 profile.
MPEG-1 constrained bitstreams are not fully supported and will be treated as MPEG-2 bitstreams. This
can lead to various issues when processing MPEG-1 constrained bitstreams, typically including spurious
alerts, but also possible picture corruption and failure to decode the stream. For a more complete
description of the differences between MPEG-1 and MPEG-2 bitstreams please refer to section D.9 of
the ITU-T H.262 or ISO/IEC 13818-2 specification.
Since trying to process a video format which is not MPEG-1 or MPEG-2 will almost certainly lead to
spurious alerts, Cerify will raise an alert and cease analysis immediately if the video is not either of
these types.
Profile
Detects whether the stream conforms to the Main or 4:2:2 profile.
Level
Detects whether the stream conforms to the Main, High 1440 or High level, or to some level below
the one specified by the user.
Display Aspect
Ratio
For MPEG-2 streams the system examines the aspect_ratio_information field (see Table 6-3 in ISO/IEC
13818-2). If this value is 0010, 0011, or 0100 then this directly represents a Display Aspect Ratio and
the corresponding value will be used to carry out the check. If the value is 0001 then the Sample Aspect
Ratio is 1 and the Display Aspect ratio will be deduced from the frame height and width. Selecting
the value "Unspecified" for this check, will check that the aspect_ratio_information field has not been
set to any of the above four values.
Color Format
Tests the color sub sampling of the decoded video.
Cerify Automated Video Content Verification System User Manual
81
Reference
Video Templates
Check
Description
Indicated bit
rate
Tests the value of the bit rate (in bits per second) indicated by the MPEG-2 bit_rate element, as given in
the stream sequence header and used in VBV calculations.
Only one failure of this test will be reported for any single incorrect value.
Sequence
display
extension
Tests for the presence or absence of an MPEG-2 sequence_display_extension following every sequence
header. Every sequence header is tested, but repeated failures are not shown.
Copyright
extension
This test will check that an MPEG-2 copyright_extension structure occurs at least once in the stream,
and (optionally) that its contents match the given values. The Identifier and Copyright Number fields
each accept values in decimal, or may be left empty if no check is to be performed.
Every copyright_extension present in the stream is tested.
VBV buffer size
Tests on the value of vbv_buffer_size given in the sequence header (and sequence extension for
MPEG-2). This is expressed in units of 16K (16384 bytes).
Only one failure of this test will be reported for any single incorrect value.
First GOP
closed
Checks that the first GOP header encountered in the stream has closed_gop set to 1. (This does not
check that the first GOP header occurs at the beginning of the stream; see the GOP Interval check.)
GOP interval
Checks the frequency of GOP headers, expressed in terms of the number of pictures between
successive headers. For example, specifying min=2 and max=2 would require a GOP header on
every other picture. It is also possible to check that the first picture in the sequence is preceded by
a GOP header.
CC standard
Checks for the presence of closed caption standard data in the entire duration of the stream. You
can select one or a combination of the closed caption standards (CEA 608, CEA 708 and SCTE 20
SCTE 21) for the Closed Caption Presence test.
CC absent
Checks for the absence of closed caption data in the entire duration of the stream/file.
CEA 608
caption
services
Checks for the presence of closed caption services for CEA 608. You can select one or a combination of
CEA 608 caption services, which are CC1, CC2, CC3, and CC4.
CEA 608 text
services
Checks for the presence of text services for CEA 608. You can select one or a combination of CEA
608 text services, which are T1, T2, T3, and T4.
CEA 708
caption
services
Checks for the presence of closed caption services for CEA 708. You can select one or a combination of
CEA 708 caption services, which are Service 1, Service 2, Service 3, Service 4, Service 5, and Service 6.
SCTE 20 line
number
Checks for line number where the SCTE 20 closed caption data is carried.
SCTE 21 line
number
Checks for line number where the SCTE 21 closed caption data is carried.
Quantization
This ensures that the quantizer_scale never exceeds the user supplied values for inter and intra blocks
for more than a given duration in seconds/frames. If the combined percentage of inter and intra blocks in
a frame exceeding their threshold is greater than the percentage entered then that frame will fail the test.
The quantizer scale can be any number in the range of 1 to 112.
xxx
82
Cerify Automated Video Content Verification System User Manual
Reference
Video Templates
Video Checks Specific to VC-1 Standard
Check
Description
Profile
Checks whether the video conforms to the Simple, Main or Advanced profile.
Sample aspect
ratio
Tests the sample aspect ratio of the video stream. The sample aspect ratio is the ratio between the
intended horizontal distance between the columns and the intended vertical distance between the rows
of the luma sample array in a frame.
Range
mapping
Tests whether the video stream makes use of range mapping in Advanced profile to scale luma and
color-difference values. Every entry point header is checked.
This does not test range reduction (as used in Main profile).
Loop filter
Tests whether loop filtering has been enabled for the sequence. For Advanced profile, this value
is tested at each entry point header.
Intensity
compensation
Tests whether any pictures in the video stream use intensity compensation.
Forward
prediction
Tests whether the video sequence contains any frame types (for example, P pictures, B pictures)
which use forward motion prediction.
Bidirectional
prediction
Tests whether the video sequence contains any frame types (for example, B pictures) which use
bidirectional motion prediction.
Quantization
This ensures that the quantizer scale (MQUANT) never exceeds the user supplied value for more than a
given duration in seconds/frames. If the percentage of macroblocks in a frame exceeding the threshold
is greater than the percentage entered then that frame will fail the test. The quantizer scale can be
any number in the range of 1 to 31.
Dropped
frames
This test ensures that the time difference between frames never exceeds the user supplied duration in
seconds/frames.
For inputs specified in seconds, if the gap in presentation times for consecutive frames exceeds the
threshold then the later frame will fail the test.
For inputs specified in frames, the most recent frame timings are used to calculate the probable intended
frame rate and a frame whose timing exceeds the frame threshold will fail the test. Setting a maximum
gap of one frame will give an alert for any dropped frames.
xxx
Video Checks Specific to H.264/AVC Standard
Check
Description
Profile
Checks whether the H.264/AVC level and profile match or conform to those selected by the user.
AVC-Intra
restrictions
Enforces the AVC Intra restrictions as per the "SMPTE RP 2027-2007 AVC Intra-Frame Coding
Specification" standard.
Sample aspect
ratio
Tests the sample aspect ratio of the video stream. The sample aspect ratio is the ratio between the
intended horizontal distance between the columns and the intended vertical distance between the rows
of the luma sample array in a frame.
Entropy coding
Tests whether the entropy coding is CABAC (exclusively) or CAVLC (exclusively), as determined by the
entropy_coding_mode flag in the picture parameter set(s) of the video stream.
Data
partitioning
Data partitioning is used for error resilience. This rule can either check that data partitioning is used
throughout the stream, or that it is never used at all.
xxx
Cerify Automated Video Content Verification System User Manual
83
Reference
Video Templates
Video Checks Specific to the DV50/100/DVCPro Standard
Check
Description
DV Profile
Checks whether the DV profile (video system) matches or conforms to that selected by the user. The
Profiles show the number of lines and field rate, color sampling, and video bit rate:
1. 525/60 4:1:1 25Mb/s
2. 625/50 4:1:1 25Mb/s
3. 625/50 4:2:0 25Mb/s
4. 525/60 4:2:2 50Mb/s
5. 625/50 4:2:2 50Mb/s
6. 1080/60i 4:2:2 100Mb/s
7. 1080/50i 4:2:2 100Mb/s
8. 720/60p 4:2:2 100Mb/s
9. 720/50p 4:2:2 100Mb/s
Field Order
This rule checks that the field dominance indicated by the coded stream and the decoded video is
consistent with a “Bottom Field first” field order.
Standards body
Checks that the file conforms to either the IEC (DV) or the SMPTE (DVCPRO) standards.
Closed
captions
(Standard)
Checks if closed caption data is present in the first frame of the stream as defined by the IEC DV
standard.
Closed
captions (GVG
Line 19)
Checks if alternate closed caption data is present in VAUX pack 38 throughout the stream as defined
by Grass Valley for Line 19 closed caption data. If closed captions are required, it can be specified
that the closed caption data must not be null (four bytes of 0x80 in the closed caption pack) for more
than the supplied duration.
xxx
84
Cerify Automated Video Content Verification System User Manual
Reference
Video Templates
Video Checks Specific to the ProRes Standard
Check
Description
Profile
Checks that the video stream is one of the following formats:
Apple Prores 422
Apple Prores 422 (HQ)
Apple Prores 422 (LT)
Apple Prores 422 (Proxy)
Apple Prores 4444
Display picture
size
Tests the video display resolution (frame width by frame height), in pixels. The display picture size is
not necessarily the same as the encoded picture size.
Multiple sets of valid values can be defined for this rule.
Alpha channel
Checks for the presence of an encoded alpha channel. Cerify will ignore any Alpha channels when
performing baseband checks.
xxx
Video Checks Specific to Generic QuickTime Video
The Generic QuickTime Video template uses the QuickTime Player to decode a video stream contained
within a QuickTime MOV, MP4, or 3GPP container file. It does not support all of the container formats
that are supported by QuickTime Player, such as AVI. Creating a Profile using this template with a
container template which is not "QuickTime" or "MP4 / 3GPP" results in an error. Unlike other video
templates which are specific to a particular video codec, any video stream that can be decoded by
QuickTime Player can be decoded using this template. Additional video codec capability may be acquired
by installing an appropriate third-party plug-in for QuickTime Player.
The stream properties returned when using this template are those reported by QuickTime, which in some
circumstances might not be consistent with analogous information carried in the elementary stream.
Check
Description
QuickTime
This check causes the video stream to be decoded using the QuickTime framework rather than Cerify’s
internal video decoders. It also checks that the container format of the media file is QuickTime MOV,
MP4, or 3GPP.
Standard
This checks that the standard of the decoded video stream matches the entered value. If you are
unsure of the value to enter in this field, process a candidate media file using a Generic QuickTime
Video template without the standard rule enabled and with the QuickCheck rule enabled. The standard
of the video stream will be reported in the Video Info of the job result. Use this value in the standard
rule to ensure that all subsequent files are of the correct video standard.
Display picture
size
Tests the video display resolution (frame width by frame height), in pixels. The display picture size is
not necessarily the same as the encoded picture size.
Multiple sets of valid values can be defined for this rule.
Alpha channel
Checks for the presence of an encoded alpha channel. Cerify will ignore any Alpha channels when
performing baseband checks.
xxx
Cerify Automated Video Content Verification System User Manual
85
Reference
Audio Templates
NOTE. When using the Generic QuickTime Video template, it generally results in significant performance
gains over other video template types as it uses multi-core processors and no syntax checking.
For example, H.264 decoding is approximately five times faster.
Video Checks Specific to JPEG 2000
The JPEG 2000 Video template uses the QuickTime Player to decode JPEG 2000 video streams contained
within a QuickTime MOV, MP4, or 3GPP container file. It does not support all of the container formats
that are supported by QuickTime Player, such as AVI. Creating a Profile using this template with a
container template which is not "QuickTime" or "MP4 / 3GPP" results in an error. The stream properties
returned when using this template are those reported by QuickTime, which in some circumstances might
not be consistent with analogous information carried in the elementary stream.
Check
Description
QuickTime
This check causes the video stream to be decoded using the QuickTime framework rather than Cerify’s
internal video decoders. It also checks that the container format of the media file is QuickTime MOV,
MP4, or 3GPP.
Display picture
size
Tests the video display resolution (frame width by frame height), in pixels. The display picture size is
not necessarily the same as the encoded picture size. Multiple sets of valid values can be defined
for this rule.
Alpha channel
Checks for the presence of an encoded alpha channel. Cerify will ignore any Alpha channels when
performing baseband checks.
xxx
NOTE. When using the JPEG 2000 template, syntax checking is not supported.
Audio Templates
Audio Templates collect together rules applying to audio elementary streams.
86
Cerify Automated Video Content Verification System User Manual
Reference
Audio Templates
Common Audio Configuration Checks
Check
Description
Standard
Checks that the input file is encoded to the expected standard. This check is mandatory and cannot
be disabled.
Because improper handling of an audio format file, such as processing PCM as AAC, will almost
certainly lead to spurious alerts, Cerify will raise an alert and cease analysis immediately in the event of
a mismatch between observed and expected audio format.
If the media file does not contain an audio stream, an alert will be raised and processing will terminate
immediately.
Track
You can choose the track using either Track Index or Track Id (Identity).
Track Index: Specifies the index of the audio track that is to be processed. The index is relative to
the natural ordering of the audio tracks within the container layer, such as PIDs for MPEG-2 Transport
Streams. The index only takes in to account the tracks using the codec of the current audio template. If
the rule is not used, the first audio stream found of the appropriate codec type is processed.
For example, for an MPEG-2 Transport stream containing two MPEG-1 Audio streams and one Dolby
Digital stream, in order to process the first MPEG-1 Audio stream, a track index of 0 should be specified
and in order to process the second MPEG-1 Audio stream, a track Index of 1 should be specified. To
process the Dolby Digital stream, the rule is not required since there is only one Dolby Digital stream.
Track Id: Specifies the identity of the audio track that is to be processed. The track id value used will
depend on the id used to identify the audio track in the container. The following table gives the values
used in the track id field for different containers.
MOV/MP4/3GPP – Track ID of the audio track
MPEG-2 PS – Stream id of the audio track
MPEG-2 TS – PID of the audio track
MXF – Track ID of the audio track
ASF – Stream number of the audio track
GXF – Track ID of the audio track
You can also specify multiple tracks to be processed in a single template. Track indexes and Track Ids
can be in either decimal or hexadecimal format; hexadecimal indexes must be preceded by '0X'. You
can use the following formats to specify multiple tracks:
a–b
a–b,c
a,b–c
a–b,c–d
a,b,c,d
* (This applies to all the track in that standard)
–1 (Default track. The result of processing will be similar to the case where the rule for choosing
track id or track index is not selected)
Syntax checks
Enables strict testing for compliance to the detected standard. This will generate alerts for corrupted
streams, and streams generated by misconfigured or noncompliant encoders. Each type of syntax alert
has a numeric ID which is shown in the Alert Details page.
Suppress
Alerts
Alerts can be suppressed individually by entering the alert ID into the text field titled Suppress alert IDs.
Note that fatal alerts can never be suppressed. Suppressed alerts will not count toward any of the alert
limits set by the Alert limit or Individual Alert limit.
Cerify Automated Video Content Verification System User Manual
87
Reference
Audio Templates
Check
Description
Alert limit
This rule limits the number of audio alerts raised. It is not possible to switch off this check; however
the value can be set to a maximum of 10,000.
Clicking the "Terminate processing if limit is exceeded" checkbox causes file processing to stop if the
alert limit is exceeded. In this case certain stream properties that require the whole file to be processed
(such as length of stream) are not reported. Similarly, end of stream test cases will not be executed. If
the checkbox is not selected, processing will proceed to completion but any further audio alerts will be
suppressed and not shown to the user. In either case an alert will be raised indicating that further alerts
have been suppressed. If the alert limit has been exceeded, fatal alerts will still be displayed.
Note that the Individual Alert limit can be used to prevent the results being swamped by a particular
audio alert.
Individual Alert
limit
This rule limits the number of audio alerts with the same ID number. This prevents the results being
swamped by a particular audio alert. It is not possible to switch off this check; however, the value can
be set to a maximum of 10,000. This value should be kept lower than the Alert limit value, since
the latter takes precedence.
Sample rate
This tests the sample rate of decoded audio. It is independent of the number of channels, so for example
if you are expecting 48 kHz 2-channel audio then you need to enter 48000 here.
Multiple sets (see page 69) of valid values can be defined for this rule.
Number of
channels
This tests how many audio channels are present in the decoded audio elementary stream (the
system only decodes one audio elementary stream at a time). For example: even if there are 3 audio
elementary streams in a transport stream (each with 2-channel audio), the system will only decode one
of the three streams; therefore, this test will see only 2 channels.
Multiple sets (see page 69) of valid values can be defined for this rule.
Play time
This tests the length, in seconds, of the decoded audio stream.
Multiple sets (see page 69) of valid values can be defined for this rule.
Bit rate
Tests the average bit rate of the audio elementary stream, calculated as <stream_size>/<duration>.
Multiple sets (see page 69) of valid values can be defined for this rule.
xxx
Audio Quality Checks
Check
Description
Ignore alerts for
null tracks
This rule is used to ignore the audio quality alerts when there is no data in the track.
Silence at start,
end, or during
video
These checks require or disallow a period of silence at the beginning and end of the audio sequence,
or to disallow periods of silence in the middle. Silence detection can be enabled or disabled on a
per-channel basis. No alerts will be raised if silence detection is requested for a channel that does not
exist (the "number of channels" test can be used in conjunction if necessary to detect missing channels).
Cerify analyzes the decoded audio stream for a given channel and tests each sample, deciding whether
or not the sample is silent. Cerify considers a sample to be silent if:
The sample value differs from the previous sample by less than 0.5% of the sample range
OR
The sample value difference from the last non-silent sample by less than 0.5% of the sample range
88
Cerify Automated Video Content Verification System User Manual
Reference
Audio Templates
Check
Description
Mute at start,
end, or during
video
These checks enforce or prohibit a certain period of digital audio muting at the beginning and end of
the sequence, or to prohibit periods of muted audio in the middle. Mute detection can be enabled or
disabled on a per-channel basis. No alerts will be raised if mute detection is requested for a channel
that does not exist (use in conjunction with the "number of channels" test if necessary). A sample is
considered muted if its value is zero. Duration may be expressed in seconds, video frames or audio
frames. The latter will only be useful if the duration of an audio frame is known beforehand.
Peak level
maximum
This test ensures that the peak level in the stream does not exceed a given maximum level. The level
may be expressed in linear terms (from 0.0 to 1.0) or in dBFS (decibels full scale: any negative value,
where 0.0 represents the maximum sample value). Peak level tests can be enabled or disabled on
a per-channel basis.
Alerts generated by this test represent instantaneous violations, so their start and end times are the
same.
This test can be configured as either “Peak Level” test or “True Peak Level” test. When “True Peak
Level” test is selected, the input stream is over-sampled appropriately (depending on the sampling
rate), before testing it for peak.
Peak level
minimum
This test ensures that the peak level in the stream reaches a given minimum level. The level may
be expressed in linear terms (from 0.0 to 1.0) or in dBFS (decibels full scale: any negative value,
where 0.0 represents the maximum sample value). Peak level tests can be enabled or disabled on
a per-channel basis.
This test can be configured as either “Peak Level” test or “True Peak Level” test.
Clipping
This test detects audio clipping, as defined by a run of successive samples whose value is very similar
but non-silent. This definition permits the detection of clipping at non-peak values (which is possible
if the audio has been processed since the original clipping occurred). This test can be configured to
ignore occasional clips; a threshold frequency must be given, below which alerts will not be generated.
Clipping tests can be enabled or disabled on a per-channel basis.
Test tone at
start and end
These checks enforce or prohibit a period of a single frequency tone at the beginning and end of
the sequence. Test tone checks can be enabled or disabled on a per-channel basis. If the test is
prohibiting a test tone, then the duration field specifies a maximum duration (this will typically be 0).
If the test is enforcing a test tone, then the duration is a minimum length. Duration can be expressed
in seconds, video frames or audio frames. The latter will only be useful if the duration of an audio
frame is known beforehand.
Cerify Automated Video Content Verification System User Manual
89
Reference
Audio Templates
Check
Description
Long Loudness
Long loudness is a running average loudness for the user selected channels over the entire stream.
The average is computed for each audio sample in the stream. This test measures the long audio
loudness in the stream according to ITU-R BS.1770 standard and ensures that the long loudness
level in the stream does not go beyond given minimum and maximum threshold levels. The loudness
levels are expressed in LKFS units (Loudness, K weighted, relative to nominal scale). The range for
both maximum and minimum threshold levels is from -60 LKFS to 0 LKFS. Loudness is measured and
averaged over the selected channels. Alerts generated by this test represent periods of violations,
with the start and end times. Sometimes the alerts might represent instantaneous violations, so their
start and end times are same.
Multiple sets of valid values can be defined for this rule. By defining multiple sets of values for this
rule, you can define different minimum and maximum threshold levels for different group of channels.
(See also Multiple Sets of Values (see page 69).)
Short Loudness
Short loudness is a moving window average loudness for the user selected channels. The average
is computed for all audio samples in the moving window, according to ITU-R BS.1770 standard. The
moving window duration is user configurable. This test measures the short audio loudness in the
stream and ensures that the short loudness level in the stream does not go beyond given minimum and
maximum levels. The loudness levels are expressed in LKFS units (Loudness, K weighted, relative
to nominal scale). The range for both maximum and minimum threshold levels is from -60 LKFS to 0
LKFS. The range for moving window duration is 0.5 seconds to 30 seconds. Alerts generated by this
test represent periods of violations, with the start and end times. Sometimes the alerts might represent
instantaneous violations, so their start and end times are same.
Multiple sets of valid values can be defined for this rule. By defining multiple sets of values for this rule,
you can define different threshold levels and window duration for different group of channels. (See also
Multiple Sets of Values (see page 69).)
xxx
Audio Checks Specific to MPEG1 and MPEG-2 Audio Standards
Check
Description
Standard
A single Template is used to check MPEG-1 and MPEG-2 part 3 standard audio streams since they
are so closely related. If the user needs to explicitly check that the audio stream conforms to just
one of these standard, this check can be used.
Since trying to process an audio format that is not MPEG-1 or MPEG-2 will almost certainly lead to
spurious alerts, Cerify will raise an alert and cease analysis immediately if the audio is not either of
these types.
If the media file does not contain an audio stream, an alert will be raised and processing will terminate
immediately.
Layer
Used to check whether this is a Layer I or Layer II audio stream.
Error protection
This tests for the presence or absence of error protection. This corresponds to the protection_bit
element in the first audio frame header.
Stereo Coding
This tests that a given stereo coding mode is (or is not) used in the first audio frame header.
Variable bit rate
This tests whether the value of the bit_rate_index element ever varies over the course of the stream.
xxx
90
Cerify Automated Video Content Verification System User Manual
Reference
Audio Templates
Audio Checks Specific to Dolby-E Audio Standard
Check
Description
CRC and
continuity
checks
This rule checks the CRCs of each Dolby-E frame, and generates an alert whenever a corrupt segment
is found.
This rule also generates an alert if the frame rate, bit depth or program configuration vary mid-stream, as
this is usually undesirable (although technically possible.)
Startcode
search
This rule controls how much of a PCM stream will be scanned for SMPTE 337M startcodes (which
are required for Dolby-E transport).
When the system layer does not explicitly mark an audio stream as Dolby-E, then this parameter
must be set high enough to include the beginning of the Dolby-E data. For example, if a stream has
10 seconds of PCM silence before the Dolby-E begins, then this value should be set slightly higher 12 seconds would be suitable.
The consequence of setting this value too low is that Dolby-E streams may be processed as PCM.
The consequence of setting this value too high is that streams may take a long time to begin
processing as the startcode scanning takes place.
Audio frame
rate
This tests the frame rate of a Dolby-E stream.
The value which is reported and tested is the value found in the first frame of the Dolby-E audio stream.
If the "CRC and continuity checks" rule is enabled, a warning will be generated if subsequent frames
have different frame rates.
Program
configuration
This rule tests the program configuration (sometimes called "program sequence") of a Dolby-E stream.
The program configuration determines the number of coded channels present, and groups them into
logical "programs".
The value which is reported and tested is the value found in the first frame of the Dolby-E audio stream.
If the "CRC and continuity checks" rule is enabled, a warning will be generated if subsequent frames
have different program configurations.
Payload bit
depth
This rule tests the bit depth (bits per word) of a Dolby-E stream. Although this is usually the bit-depth of
the enclosing SMPTE 337M stream, this does not have to be the case.
The value which is reported and tested is the value found in the first frame of the Dolby-E audio stream.
If the "CRC and continuity checks" rule is enabled, a warning will be generated if subsequent frames
have different bit depths.
xxx
Audio Checks Specific to AC-3 Audio Standard
Check
Description
Channel
configuration
This controls which channels are output by the AC-3 decoder. The stereo output mode may be either
stereo or Dolby Surround compatible. Dual mono is always reproduced as stereo. If this option is not
enabled, the decoder will select a channel configuration matching that of the audio coding mode of
the first frame of the stream.
Nominal bit rate
This tests the nominal bit rate of an AC-3 stream as derived from Table 5.13 ("Frame Size Code Table")
of the ATSC A/52 standard "Digital Audio Compression Standard (AC-3)".
Audio coding
mode
This tests the audio coding mode of an AC-3 stream as derived from Table 5.3 ("Audio Coding Mode
Table") of the ATSC A/52 standard "Digital Audio Compression Standard (AC-3)".
Low frequency
effects channel
This tests whether or not the low frequency effects channel is present in the encoded stream.
xxx
Cerify Automated Video Content Verification System User Manual
91
Reference
Audio Templates
Audio Checks Specific to AAC Audio Standard
Check
Description
Profile
Checks whether the stream AAC profile (if MPEG-2) or Audio Object Type (if MPEG-4) can be decoded
by a decoder of the given profile.
MPEG-2 Main profile decoders can decode Main profile and LC profile streams.
MPEG-2 LC profile decoders can only decode LC profile streams.
MPEG-4 AAC profile decoders can only decode streams using the "AAC LC" audio object type.
MPEG-4 High Efficiency AAC profile decoders can decode streams using either the "AAC LC" or
"SBR" audio object types.
SBR
information
Checks whether the stream contains SBR (Spectral Band Replication) information. This is used to
check for HE-AAC streams.
xxx
Audio Checks Specific to PCM Audio Standard
Check
Description
PCM type
Tests the PCM type.
RIFF (also known as Wave or .wav) is little-endian byte-aligned PCM. It is also used to refer to
little-endian samples inside, or referenced by, MP4 and QuickTime files ("sowt", "ni24" and "ni32"
atom types).
AIFF is big-endian byte-aligned PCM. It is also used to refer to big-endian samples inside, or
referenced by, MP4 and QuickTime files ("twos", "in24" and "in32" atom types).
8-Channel AES3 is specified in SMPTE 331M chapter 6, and is the audio type used in the D10
format. Although 8 channels are always physically present in the stream, they may not all contain
valid data. In the case of 8-Channel AES3, the Number of channels test refers to the number of
channels containing valid data.
MXF AES is AES3 audio data in an MXF file. It is little-endian byte-aligned PCM, as described in
SMPTE 382M.
MXF BWF is Broadcast Wave audio data in an MXF file. It is little-endian byte-aligned PCM, as
described in SMPTE 382M.
Pinnacle is the type of uncompressed audio used in Pinnacle-augmented MPEG-2 Program
Streams. It uses packed, big-endian samples.
GXF is the type of uncompressed audio used in the SMPTE 360M / GXF file format. It is little-endian
and byte-aligned.
DVD LPCM is the DVD standard for carrying LPCM audio inside MPEG-2 PS audio sub-streams. It
uses packed, big-endian samples.
To further distinguish between these types, use the Sample depth and Byte order checks.
Sample depth
Tests the number of significant bits in each audio sample. This not necessarily equal to the number of
bits per sample stored in the stream.
Byte order
Tests whether the PCM audio format is big endian (Most Significant Bit first) or little endian (Least
Significant Bit first).
xxx
92
Cerify Automated Video Content Verification System User Manual
Reference
Action Templates
Audio Checks Specific to DV Audio Standard
Check
Description
Locked
Checks if the audio stream is "Locked" to a constant sample rate. SMPTE (DVCPRO) audio streams
are always Locked, but IEC DV audio streams may be Locked or Unlocked. If Unlocked, the sample
rate may vary between limits prescribed in the standard.
Sample rate
This tests the nominal sample rate of decoded audio as reported by the stream. This might differ
slightly from the actual rate for Unlocked streams.
Sample depth
Tests the number of significant bits in each audio sample. This not necessarily equal to the number of
bits per sample stored in the stream.
xxx
Action Templates
Action Templates collect together actions to take when events occur. Typically, these events are related to
Job processing (see page 51).
Table 1: Action Template rules
Event
Action
Description
On start
E-mail
Send user(s) an e-mail when a Job (see page 51) starts, when a media file starts
getting processed, or on both events.
On start
E-mail
Report
Write an e-mail file containing a Report (see page 103) to the reports directory (see
page 112) when a Job (see page 51) starts, when a media file starts getting processed,
or on both events.
On start
XML Report
Generate a report in XML format and store it in the reports directory (see page 112)
when a Job (see page 51) starts, when a media file starts getting processed, or on both
events. More information about the XML format and the schema is given in the CeriTalk
XML Reports (see page 196) section in the appendix.
On start
Execute
Script
Run a script when a media file starts getting processed. For conditions governing the
use of this rule, refer step 1 in the Handling Action Template Events (see page 94)
section.
On error
E-mail
Send user(s) an e-mail when a Job (see page 51) or a media file fails with error status,
or on both events.
On error
Email Report
Write an e-mail file containing a Report (see page 103) to the reports directory (see
page 112) when a Job (see page 51) or a media file fails with error status, or on both
events.
On error
XML Report
Generate a report in XML format and store it in the reports directory (see page 112)
when a Job (see page 51) or a media file fails with error status or on both events.
More information about the XML format and the schema is given in the CeriTalk XML
Reports (see page 196) section in the appendix.
On error
Copy file
Copy media files which fail with error status to a network location, specifying whether
the original file should be deleted. For conditions governing this rule, refer step 2 in the
Handling Action Template Events (see page 94) section.
Cerify Automated Video Content Verification System User Manual
93
Reference
Action Templates
Table 1: Action Template rules (cont.)
Event
Action
Description
On error
Move file
Move media files that fail to a different location on the remote server without transferring
the media file via the Cerify unit. If the force overwrite... option is not checked, the
system will abort the move if a file with the same name as the media file being moved
exists in the destination folder. When checked, this option causes the system to attempt
to force the move by first deleting the file in the destination folder. For conditions
governing this rule, refer step 3 in the Handling Action Template Events (see page 94)
section.
On error
Execute
Script
Run a script when a media file fails with error status. For conditions governing this rule,
refer step 1 in the Handling Action Template Events (see page 94) section.
On success
E-mail
Send user(s) an e-mail when a Job (see page 51) or a media file succeeds, or on
both events.
On success
E-mail
Report
Write an e-mail file containing a Report (see page 103) to the reports directory (see
page 112) when a Job (see page 51) or a media file succeeds, or on both events.
On success
XML Report
Generate a report in XML format and store it in the reports directory (see page 112)
when a Job (see page 51) or a media file succeeds, or on both events.
More information about the XML format and the schema is given in the CeriTalk XML
Reports (see page 196) section in the appendix.
On success
Copy file
Copy Job media files which succeed to a network location, specifying whether the
original file should be deleted. For conditions governing this rule, refer step 2 in the
Handling Action Template Events (see page 94) section.
On success
Move file
Move media files that fail to a different location on the same remote server without
transferring the Media File via the Cerify system. If the force Overwrite option is not
checked, the system will abort the move if a file with the same name as the media file
being moved exists in the destination folder. When checked, this option causes the
system to attempt to force the move by first deleting the file in the destination folder.
For conditions governing this rule, refer step 3 in the Handling Action Template Events
(see page 94) section.
On success
Execute
Script
Run a script when a media file succeeds. For conditions governing this rule, refer step 1
in the Handling Action Template Events (see page 94) section.
xxx
Handling Action Template Events
Following are some of the considerations that need to be followed when any of the events fail or succeed:
1. Scripts being run as part of an Action Template are automatically passed the following parameters:
URL of the file processed.
Username used to access the file. This may be blank if no username was provided when setting the
MediaLocation that contains this file.
Password used to access the file. This may be blank if no username was provided when setting the
MediaLocation that contains this file.
Path to the generated XML Report. This XML Report is generated before running the script, and
will be deleted once the script has run. This parameter may be blank if the XML Report could
not be generated.
94
Cerify Automated Video Content Verification System User Manual
Reference
Action Templates
These parameters are always passed in the order listed above.
In addition to these default parameters, it is possible to pass additional parameters to the scripts.
To do this, enter one parameter per line in the Parameters text box when setting up the Template.
These values will be passed in to the script, in the same order as they appear in the Web UI. This
can be used, for example, to pass in locations to move files to, or characters to be used when
renaming the file. If the box is left empty, no additional parameters will be given to the script.
To pass an empty additional parameter to the script, insert a blank line in the box. For example,
if the box contains:
Parameter 1
(Empty line)
Parameter 3
Then the script will receive the additional parameters "Parameter 1", "", "Parameter 3".
The script output will be logged to/opt/cerify/user_scripts/user_scripts.log on the
Cerify unit. This log file may be useful when diagnosing issues with the scripts.
Some sample scripts are available in /opt/cerify/action_scripts. The purpose of the scripts
and a description of the parameters taken by each of them are detailed in the README.txt file
available at this location.
2. For video servers that store assets using directories (for example, Pinnacle servers), or referenced
formats (for example, QuickTime MOV files), it is not possible to copy, move, or delete the entire
media clip asset with this method. Use another method to copy and delete this type of asset after
processing.
Cerify Automated Video Content Verification System User Manual
95
Reference
Action Templates
3. Following conditions govern the use of the Move File rule:
The destination directory should already exist.
The destination directory must be accessible using the same user and password credentials used to
access the original media file.
If a media file references other essence files as is possible for some types of MXF and Quick
Time files these essence files will not be moved.
The file move will raise an alert if:
The GVG or FTP protocol is used.
The target directory does not exist.
The target directory and original media file URLs do not reside on the same server.
The user does not have write permission for the original media file (normal Cerify processing
only requires read permission) or the target directory.
The CIFS and NFS server and client are not configured to allow file renames.
A file with the same name as the media file being moved exists in the destination directory and
the user does not have sufficient permissions to overwrite it.
4. E-mail addresses should be entered in the text input field of the form. To specify more than one user,
enter a comma-separated list of e-mail addresses. Network locations are entered by providing a URL,
together with username and password credentials to access this URL. These URLs should take the
same form as the URL username and password that are entered when setting up a MediaLocation.
NOTE. The files are only deleted from their original location if the copy action succeeds.
CAUTION. The system can only send e-mails if the administrator has configured Mail Settings (see
page 110). E-mail Reports, however, are written as *.eml files to the reports directory (see page 112)
(which must have been set up by the administrator (see page 104) ) and addressed to the specified user(s).
96
Cerify Automated Video Content Verification System User Manual
Reference
MediaSets
MediaSets
The MediaSets page is accessed by selecting the MediaSets button from the navigation bar. On entering
this page, the user is presented with a table (see page 33) of MediaSets filtered according to the current
MediaSet view ( Active, Archived or All (see page 32) ). The New MediaSet button at the bottom of the
main body of the page allows the user to start creating a new MediaSet.
CAUTION. MediaSets cannot be created until one or more MediaLocations (see page 106) have been set
up by the administrator (see page 104). If no MediaLocation have been set up, then any attempt to create a
MediaSet will generate a work flow error (see page 36).
The Archive/Restore control (see page 32) on this page can be used to:
Archive, Restore from archive. Used to remove from view or restore to view the selected MediaSets.
Delete. Delete the selected MediaSets from the database. Use the archive functionality to remove the
MediaSet from view, but be able to revisit/restore in future. Deletion of MediaSets that are used by
Active/Archived Jobs is not allowed.
New MediaSet
The New MediaSet page is a simple form prompting the user to enter a name for the MediaSet and to
select which type of MediaSet should be created.
MediaSet types
Description
Dynamic (DropBox)
A dynamic MediaSet (also known as a DropBox) is a directory selected from one of
the available MediaLocations (see page 106) that will be monitored for content. If a
Job (see page 51) is associated with a DropBox, every time a new video file appears
in the DropBox directory, it will be processed. Once created, a DropBox cannot be
edited, though it can be archived or deleted.
Static
A static MediaSet is a fixed collection of files selected from one or more of the
available MediaLocations (see page 106). Once created it can be edited, if required.
xxx
Create new MediaSet
Cerify Automated Video Content Verification System User Manual
97
Reference
MediaSets
Click the Create button to create the new MediaSet. You will be taken to either the Edit MediaSet page
(see page 98) or the Configure DropBox page (see page 99), depending on whether or not the MediaSet is
a DropBox.
Edit MediaSet
The Edit MediaSet page tabulates the media files in a static MediaSet, and provides both a file browser and
text entry field to update this MediaSet.
Remove files from the static MediaSet by clicking the delete icon (
).
Files in a static MediaSet
Add files to the static MediaSet using the directory and file browser. Firstly, select the MediaLocation that
contains the files to be added to this MediaSet.
and files
in the MediaLocation and directory that is currently
The file browser shows the directories
selected. To close the current directory and go up a level, open the drop down menu control at the top of
the file browser. This provides a selection of recent directories. To add a file to the MediaSet, double-click
on the
file icon. It will get added to the Files table.
Alternatively, you can enter a path to the file directly into the File name text field at the foot of the page
and press the Select button. This path must be relative to the directory currently being browsed.
98
Cerify Automated Video Content Verification System User Manual
Reference
MediaSets
Only 10 files or directories are listed at a time. Click the Next and Prev links, or use your mouse, to see
other files in larger directories.
The MediaSet file browser
Configure DropBox
To configure a DropBox, select a DropBox Mode and a DropBox Path.
A DropBox Mode is a predefined set of filters (see page 102). Edit any of the DropBox Filters (see
page 102) to create a Custom DropBox Mode.
DropBox modes
Description
Standard
Monitor media files in the top-level of the DropBox.
Only M2V
Only monitor files with a m2v extension in the top-level of the DropBox.
Only MOV
Only monitor files with a mov extension in the top-level of the DropBox.
Only MPG
Only monitor files with a mpg extension in the top-level of the DropBox.
Only VC1
Only monitor files with a vc1 extension in the top-level of the DropBox.
Only VOB
Only monitor files with a vob extension in the top-level of the DropBox.
Only WMV
Only monitor files with a wmv extension in the top-level of the DropBox.
Pinnacle
The DropBox resides on a Pinnacle server. Monitor all media files named std in
first-level subdirectories of the DropBox path.
Custom
User defined DropBox Filters (see page 102).
xxx
Cerify Automated Video Content Verification System User Manual
99
Reference
MediaSets
Configuring Automatic Reprocessing of Files in a DropBox
A file in a DropBox can be automatically reprocessed if there is a change in the last modified time
or the size of the file.
To configure automatic reprocessing of files:
1. Select Enable file reprocessing check box.
2. Select an option from Reprocess files based on drop-down menu.
The files are reprocessed based on the following options in the drop-down menu:
Item
Description
Change in last modified time or
file size
A file is reprocessed if there is a change in the last modified time or the size of the file.
Change in last modified time
A file is reprocessed if there is a change in the last modified time of the file.
Change in file size
A file is reprocessed if there is a change in the size of the file.
xxx
100
Cerify Automated Video Content Verification System User Manual
Reference
MediaSets
In the DropBox path, type the path into the File name field, and then click Create button to finish
configuring the DropBox. Alternatively, set the path by clicking the
directory icons to get to the
correct directory, and then click Create button.
Configure a DropBox
Cerify Automated Video Content Verification System User Manual
101
Reference
MediaSets
DropBox Filters
DropBox filters allow you to limit which files get automatically added to a DropBox. Any of the following
filter properties can be edited.
Filter properties
Description
Filename filter
The Filename filter allows you to select the files to be added to the DropBox by
entering a wildcard pattern. Valid characters are ? which is used to represent exactly
one character, and * which is used to represent any number of characters. If you
want to match against the literal occurrence of a ? or * in a filename, you must
precede them with a backslash. To match the literal occurrence of a backslash, you
must input two backslashes into the filter. Filters are not case-sensitive.
Folder depth
By default, the system will only include files in the selected directory for processing.
This is the same as entering a depth of 0. Entering a depth of 1 will also include files
within the immediate child folders. A depth of 2 will go a level deeper, and so on.
Modified from
Only files with a modification time later than or equal to the time entered will be
processed by the system. Dates can be entered using the calendar widget or can be
typed in manually, in which case they must be in the “yyyy-mm-dd hh:mm” format. If
the field is unedited or blank, the filter will not restrict based on this field. Note that all
dates and times should be entered as UTC time.
Modified to
Only files with a modification time earlier than or equal to the time entered will be
processed by the system.
Minimum file size in bytes
Only files with a file size greater than or equal to the value entered will be processed
by the system.
Maximum file size in bytes
Only files with a file size less than or equal to the value entered will be processed
by the system.
Reprocess files on last modified
timestamp change
Only the files with a change in the last timestamp period will be reprocessed.
Reprocess files on size change
Only the files with a change in the file size will be reprocessed.
xxx
Table 2: Example filename filters
Filename filter
Will match
*
everything
Will not match
*.mpg
foo.mpg, FoO.mPg
foo.mgp1, foo.mpeg
*.m?v
foo.mov, foo.m2v
foo.mv, foo.moov
news0??.mpg
news012.mpg, news000.mpg
news01.mpg, news0123.mpg
strange\?name.mpg
strange?name.mpg
strange1name.mpg, strangename.mpg
strange\*name.mpg
strange*name.mpg
strange1name.mpg, strangename.mpg
strange\\name.mpg
strange\name.mpg
strange1name.mpg, strangename.mpg
xxx
102
Cerify Automated Video Content Verification System User Manual
Reference
Reports
CAUTION. When setting up DropBox MediaSets, avoid using filters that pull in all (or a majority of)
available assets on a loaded video server into a single DropBox MediaSet. Setting up such huge
DropBoxes (holding in excess of 10,000 media files) is known to cause operational difficulties, such as
difficulty in inspecting Job results, and should be actively avoided. In cases where a large number of assets
are to be processed from the same location, you should use DropBox filters, such as Modified from
and Modified to, to split the available content into multiple DropBoxes of manageable sizes (up to a
few thousand files) and set up Jobs using them.
Reports
The Reports page is accessed by selecting the Reports button from the navigation bar.
It allows you to set up and then generate a printer-friendly summary report of Job processing results. The
two types of Reports that can be generated are:
Job reports: allow the generation of reports for all or specific Jobs
File reports: allow the generation of reports based on media file names
The Report type drop-down can be used to switch between the two types of reports. When Job type
is selected, use the Jobname field to specify the name of the Job for which you want to generate the
report. You can also enter partial Jobnames in this field to generate reports on all Jobs that have a name
containing the partial name entered in this field. For File reports, use the Filename field to specify the
name of the report file. You can enter either the full URL to a media file or just the filename into this
field. The list of Jobs/Files in a report can also be narrowed down based on parameters such as Profile
Name, Date from and Date to (the dates correspond to the Start and End time of Job/File processing).
You can also specify the order in which items should be listed in the report, using the Sort by and Sort
order fields. The system supports sorting the results based on Date, Job name, and Profile name in both
ascending and descending directions.
The reports generated also provide links to media file processing results as well as alert details.
Options
The Options page is accessed by selecting the Options button from the navigation bar. It allows you to
configure personal options and preferences such as password, list of columns to display on the Jobs
Monitor and number of items to display per page when viewing tables of entities.
Change Password
You can change the password by entering the current password, and then entering and confirming the new
password. The administrator can reset the password for any user at any time.
Cerify Automated Video Content Verification System User Manual
103
Reference
Admin
Records per Page
When a table, such as Job results, contains too many rows to fit on a single page, the system will split
the report to display it over a number of pages. By default, the system presents tables with 10 rows or
fewer. This number can be configured according to personal preference by entering a new value in the
No. Records per page field in the Options page.
Jobs View
The columns in the table displayed by the Jobs Monitor (see page 51) can be configured to user preferences.
This is done by clicking the check boxes in the presented form and then clicking the Update button.
For example, the following figure shows the preferences of a user who does not want to see a Job creation
time or channel.
Jobs View Options
Admin
The Admin page can only be accessed by users with administrator privilege. Select the Admin button
from the navigation bar to open the Admin page.
NOTE. The navigation bar includes an Admin button only if the logged-in user has administrator privilege.
104
Cerify Automated Video Content Verification System User Manual
Reference
Admin
The Admin page allows you to:
Create and modify users (see page 105)
Create and modify MediaLocations (see page 106)
Manage email settings (see page 110)
Change system-wide processing settings (see page 110)
Back up and Restore database (see page 111)
Enable scheduled Job deletion (see page 112)
Change system-wide report file settings (see page 112)
Change system-wide stream information display threshold setting (see page 113)
Enable the VLC playback feature (see page 113)
View the application log (see page 115)
User Management
The Modify User section of the Admin page allows the administrator to create a new user or reset an
existing user password. Once created, a user cannot be deleted.
Modify User
The properties for an existing user can be modified by selecting that user from the drop-down menu on the
Admin page. Enter and confirm a new password for the selected user.
New User
The New User page is a form with fields for Username, Password, Confirm password, and Grant
administrator access. Once these fields have been filled out, click the Create button to create the new user.
The new user name must be unique. New users can change their passwords by visiting the Options page
(see page 103), or, if they have administrator access, by visiting the Modify User page (see page 105).
Note that user names are case sensitive.
Cerify Automated Video Content Verification System User Manual
105
Reference
Admin
MediaLocation Management
A MediaLocation (see page 26) is a location on the local computer or on the network from which the
system can access media files. Once a MediaLocation has been created, users will be able to create
MediaSets (see page 97) and Jobs (see page 51) that use files from this location.
To create a MediaLocation, enter the URL or the file path of the location and, where necessary, the name
and password of a user with permission to access media at this location. Any of these fields can be
modified later. If the supplied URL cannot be accessed using the supplied credentials, an input error
(see page 35) will be reported.
MediaLocation URLs can be split into two types:
file:// protocols which refer to any file accessible via a driver letter (C:, D:, E:) available on the
Cerify system. The media file accessed may be local (on the local hard drive) or remote (a network
drive). These URLs can start with file://, in which case forward slashes must be used. For example,
file://C:/Video. Alternatively, a standard Windows file path can be used, in which case back
slashes must be used. For example, C:\Video.
Other network protocols which Cerify has built in support for: ftp://, gvg://, and smb://. In this case, the
URL must always contain a protocol identifier (for example, ftp:// or smb://) to allow the system
to identify the type of MediaLocation. Note that these URLs must always use forward slashes and not
back slashes in directory paths. For example, smb:\\machinename\dir is not a valid location.
NOTE. Typically, the system does not modify or delete any of the files under the supplied URL; it only
requires read access for processing. However, users can specify Action Template (see page 93) rules that
will copy a media file to a new location and then delete the original upon completion of a Job. In this
case the user will require write access to the location in question.
NOTE. UNC notation is not supported in MediaLocation. For example, \\machinename\dir is not
a valid location.
106
Cerify Automated Video Content Verification System User Manual
Reference
Admin
More examples of the different types of access protocols and network URLs are given in the following
table.
Table 3: Supported connectivity types and protocols
Test asset
location
Access
protocol
Example URL
URL description
Local Hard
Drive
FILE
file://C:/testassets
Access files on the local hard drive of the machine
on which Cerify is installed.
Such URLs have two parts, the first being the
protocol identifier file:// and the second part
C:/testassets being a locally accessible path.
C:\testassets
NOTE. The URL format for the FILE protocol
uses forward slashes and not backslashes as the
corresponding native path structure in Windows.
Also, you need not specify a user name/password
when setting up a MediaLocation using the file://
protocol.
DVD drive
or Removable storage
FILE
DVD drive
or Removable storage on
a remote
computer
FILE or
SMB
FTP server
Windows
File Share
file://D:/testfolder
E:\samples
file:// protocol should be used when accessing a
DVD drive or removable storage device that is
available locally to the machine running Cerify.
z:\USBshare
In cases where test assets are located on a remote
DVD drive or removable device then that device
must be shared. In the second example, the Z:
drive on the Cerify system has been set up to point
to the shared drive
FTP
ftp://192.168.0.153/
assets/
File Transfer Protocol. Access the assets directory
using the FTP server at the supplied location.
FILE or
SMB
file://Z:/dir
Test assets located in a shared folder on a remote
PC may be access over file:// protocol through
mapped network drives. The example given
assumes the remote shared folder to be mapped as
“Z” drive on the machine running Cerify.
Windows networking, also known as CIFS can also
be used to access files and directories mounted on
machine name.
smb://machinename/DVDshare/
smb://machinename/dir
NOTE. It is recommended that the file:// protocol
be used in preference to smb:// in this case, unless
fine grained control of smb client configuration which
is not supported by Windows is needed (needing to
set the buffer size to use when copying files from
remote Windows shares).
Cerify Automated Video Content Verification System User Manual
107
Reference
Admin
Table 3: Supported connectivity types and protocols (cont.)
Test asset
location
Access
protocol
Example URL
URL description
Remote
machine
running a
Network
File Share
(NFS)
server
FILE
file://N:/dir
Network File Shares allow you to access from
Cerify, test assets that are located on any remote
server that runs an NFS server irrespective of the
remote server’s operating system (for example,
a Linux server). Shares exported by the remote
NFS server are accessed locally with the help of
an NFS client. Once appropriately configured, the
NFS client lets you access the remote folder as if it
were a local drive, which lets you process remote
assets from such shares using the file:// protocol.
The example URL assumes N:\ to be mapped to
such a remote NFS share using an NFS client, such
as the one freely available from Microsoft.
Refer to Using NFS Client on Windows (see
page 194)
Grass
Valley
Server
GVG
gvg://192.168.0.154/192
.168.100.10/EXT:/
There are at least three components to a GVG
URL: in the example to the left, “192.168.0.154”
is the IP address of an AMP (Advanced Media
Protocol) server running on the Windows NT control
network. “192.168.100.10” is the IP address of
the corresponding FTP server on the Grass Valley
video network. “EXT:” is the Dataset (also called
the Volume Name) of the disk where the content
resides. The GVG protocol is only suitable for
use in MediaLocations (see page 26) and not (for
example) in the Database Backup (see page 111)
settings or the Report File Settings (see page 112).
Due to the way in which Grass Valley servers work,
it is impossible to validate logon credentials until an
attempt to retrieve a file is made. For this reason,
a MediaLocation will always be created regardless
of whether the username and password given are
correct, so it is important that the username and
password are entered carefully. The usernames
"movie" and "mxfmovie", both with blank passwords,
are common.
(This example URL should be
entered on a single line with no
spaces.)
NOTE. Only GVG Profile servers require the
use of this protocol. GVG K2 servers support file
transfer over FTP and should be accessed using
the FTP protocol.
108
Cerify Automated Video Content Verification System User Manual
Reference
Admin
Table 3: Supported connectivity types and protocols (cont.)
Test asset
location
Access
protocol
Example URL
URL description
Omneon
MediaGrid
FILE
file://Z:/testassets
Test assets that are held on an Omneon MediaGrid
File System can be accessed using the file://
protocol through mapped network drives.
NOTE. You will need to install the MediaGrid File
System Driver on the machine running Cerify in
order to be able to create the mapped network drive.
xxx
These connectivity methods can be used to access any Video Server which supports one or more of
these protocols. In practice, the video server may not support the protocol completely which can lead to
difficulties when trying to connect Cerify to the server. The servers listed below are explicitly supported.
Cerify may connect correctly to other types of servers, and there have been successful installations of
Cerify with other types of servers.
Table 4: Supported video servers
Name
Description
Generic Windows servers
Files can be accessed by standard Window File share. All versions of Windows that
can share files through the Windows file share protocol are supported.
Omneon
For Omneon Spectrums, FTP connectivity is preferred since it has superior throughput
to CIFS. By default Omneon Spectrums do not support more than 10 simultaneous
FTP read connections. It is preferable to use the Omneon MediaGrid File System
Driver rather than the ContentBridge for connecting to a MediaGrid.
Pinnacle (Avid)
The Pinnacle Warp and Media Stream 8000 series servers are supported. Care
should be taken when creating Pinnacle DropBoxes with extremely large numbers
of assets, since the time required to update the DropBox will be very long. Where
possible a lower level (more nested) directory should be selected as the DropBox.
Grass Valley
The Grass Valley Profile and K2 servers are supported. Connectivity with Profile
servers is provided by the 3rd Gigabit Ethernet interface (NIC 3), which should be
connected to the Grass Valley AMP control network. Cerify requires the AMP service
to be running and it is sometimes necessary to configure the server to run the AMP
service. K2 servers can be connected in the same way; alternatively a single FTP
connection can be used. Fiber channel connectivity is not supported.
Nexio
Modifications may be required to the Cerify configuration in order to access a Nexio
server, please contact your Tektronix representative for more details.
Isilon
Files can be accessed by SMB or FTP (or NFS).
SeaChange
Files can be accessed by FTP. The Forcelistnodot property in cerify.properties has
to be set to True.
Apple XSAN
Files can be accessed through FTP or NFS.
xxx
Cerify Automated Video Content Verification System User Manual
109
Reference
Admin
Mail Settings
The Mail Settings form allows the administrator to configure an e-mail server for use by the system. The
required settings are:
Setting
Description
Server
The host name or IP address of an SMTP server that the system can access.
Example: my.mailserver.com.
Username
A user name recognized by the mail server (leave blank if the mail server requires
no authentication).
Password
The password recognized by the mail server for this user.
Sender e-mail address
The address from which the system will send e-mail.
xxx
NOTE. E-mail use is optional within the system. The only use of e-mail within the system is in the rules
for Action Templates (see page 93). If no such rules are required, then the e-mail settings form can be
left blank.
Processing Settings
The Processing Settings section of the Admin page (see page 104) allows the administrator to configure
system-wide settings.
Setting
Default
Description
Poster frame coverage
15%
The percentage of the frame area that must be non-black
for that frame to be classed as a poster frame.
Poster frame threshold
15%
The percentage grayscale value used to determine if a
pixel is black. A grayscale value of 0% corresponds to a
luma value of 16, and 100% corresponds to 235. This
percentage is also used in an inverted sense to determine
if a pixel is white.
xxx
NOTE. A Poster Frame is the first visually distinct frame of a video asset following any white or black
lead-in. The system uses a heuristic to determine which frame this is: the default settings use a threshold of
15% and a coverage of 15%, meaning that the pixels are considered black if their grayscale value is 15% or
less, and that a frame is considered to be a poster frame if it is the first frame with 15% or more non-black
pixels. The system also reverses this test, swapping white for black, to handle video assets that have a
white lead in. Poster frames provide the thumbnail images used on the Job Details (see page 54) page.
110
Cerify Automated Video Content Verification System User Manual
Reference
Admin
Database Backup
The system maintains a database of all entities (Jobs, Profiles, Templates, MediaSets and MediaLocations)
created by users, as well of all the results, alerts and thumbnails create by running Jobs. The administrator
can arrange for this data to be backed up by entering the following information:
Database backup settings
Description
Backup Directory URL
The URL of a directory to be used for backups. This URL can use the FTP or
Windows File Share protocols supported by the system. Refer to MediaLocation
Management (see page 106). The system will create the backup in this directory
in a file called backup.sql.
Username
The name of a user with write access to this directory.
Password
The user password.
xxx
Once the database backup settings have been entered correctly, clicking the Backup now button within
the Database Backup section will initiate an immediate backup of the database. Ensure that no Jobs are
running when carrying out a backup. Any Jobs or other operations which are in progress during the
backup may fail.
CAUTION. Database loss can be caused, for example, by disk caching corruption during power failure. To
avoid losing data, you should set up a backup location and confirm that the backup file is created in that
location. Depending upon the importance of the data, backups should be created regularly, from once a
day to once a week. To reduce the risk of losing the current Cerify database, the use of a suitable RAID
system, such as RAID-1, for the hard drives is recommended.
Clicking the Restore backup button will cause the system to look for the existence of a backup.sql file
in the backup directory URL set and to restore the database from this backup file. When the restore from
backup is in progress, any user trying to access the system will be taken to an informational page instead.
When the restore is complete, the user will be taken back to the Admin screen.
CAUTION. The restore operation will restore user names and passwords to the previous state. If the admin
password has changed, ensure that you know the previous admin password before carrying out the restore.
Cerify Automated Video Content Verification System User Manual
111
Reference
Admin
Schedule Job Deletion
These settings allow you to automatically purge the Cerify database of completed Jobs older than a
specified age. All associated result information (for example: alert details, stream information and
thumbnail images) pertaining to the Jobs that match the deletion criteria are also deleted.
Setting
Default
Description
Enable Job deletion
Off
Turn On/Off scheduled Job deletion.
Delete Jobs older than
30
The age of Jobs to be considered for scheduled deletion,
specified in days. The age of a Job is calculated as the time
elapsed, in days, since it was last marked complete.
Perform deletion at
2
The hour of the day in which to start the scheduled Job
deletion operation. This setting accepts values in the range
(0-23) and should be used to ensure that the deletion
happens during a period of least system usage.
xxx
NOTE. Only those Jobs with all their media files marked as complete or aborted are considered for
scheduled deletion. Jobs that have been manually paused/stopped will need to be deleted through
the Cerify Web user interface.
Report File Settings
Action Templates (see page 93) allow users to create e-mail and XML reports, which detail the results of
Job processing.
These e-mail reports can either be:
Sent directly to a user (in which case, an administrator must also set up e-mail settings (see page 110))
Written to a network location as an *.eml file (in which case, an administrator must enter suitable
report file settings)
The XML reports are also written out to the same network location as the e-mail files.
Setting
Description
Report directory URL
The URL of a directory to be used for report files. This URL can use the FTP
or Windows File Share protocols supported by Cerify. Refer to MediaLocation
Management (see page 106).
Username
The name of a user with write access to this directory.
Password
The user password.
xxx
112
Cerify Automated Video Content Verification System User Manual
Reference
Admin
Stream Information
The stream information section of the Admin page (see page 104) allows the administrator to configure the
system-wide threshold for displaying stream information for processed media files. This setting can be
modified to display either a minimal set of attributes, most attributes or all of the stream information that
has been captured by the system for the media file.
Setting
Default
Description
Display
minimal
attributes
The extent of stream information attributes that must be
displayed in Processing Results page and Reports.
xxx
NOTE. Stream information is a set of attributes that describe the media file that was processed. These
attributes are grouped into three sections: Container Info, Video Info, and Audio Info. The stream
information for a media file is displayed on the Processing Result (see page 55) page and in the Reports
(see page 103) generated by the system.
VLC playback
The VLC playback section of the Admin page (see page 104) allows the administrator to enable the VLC
playback feature, which lets users of the system play back processed media files from the Web user interface
on client machines. This setting can be used to enable/disable this feature for all users of the system.
Setting
Default
Description
Enable media file playback with VLC
media player
Off
Availability of the VLC playback feature, enabled or
disabled.
xxx
NOTE. Refer to the Enabling VLC playback (see page 114) section for more information on the additional
software requirements for this feature to be operational. Refer to Job Details (see page 54) for information
on playing back processed media files.
If the VLC playback feature is enabled in the system but the client machine does not meet the software
prerequisites for this feature, attempting to play back media files will generate browser errors. In Mozilla
Firefox you get the error message "Firefox doesn't know how to open this address, because the protocol
(cerify) isn't associated with any program". In Microsoft Internet Explorer, the browser shows a "The page
cannot be displayed" error.
Cerify Automated Video Content Verification System User Manual
113
Reference
Admin
Enabling VLC playback
The VLC Playback feature is optional and will not affect the Cerify functions. Also, the software
components installed to enable the playback feature will not affect Cerify functions. To enable playback of
media files analyzed by the system from the Web user interface, you would also need to do the following:
Install the CerifyVlcLauncher application on each of the client machines from which you want to
access the Cerify Web user interface.
Install the VLC media player on each of the client machines from which you want to access the
Cerify Web user interface. Visit www.videolan.org for information on how to obtain and install
the VLC media player.
Enable the VLC playback feature from the Cerify Web user interface. Refer to VLC playback (see
page 113) for more information on enabling the VLC playback feature.
To install the CerifyVlcLauncher application:
Download the CerifyVlcLauncher installer to the target client machine. If you are viewing this page
from the Help pages in the Cerify Web interface, click here to begin the download.
If you are viewing this page from a printed or a PDF version of the user manual, please access the URL
http://your_cerify_host/CerifyVlcLauncher_1.0.msi, replacing your_cerify_host
with the IP address or hostname of your Cerify system.
Double-click the downloaded installer to start the installation process.
Follow the on-screen instructions to complete the installation.
The VLC playback feature supports the following container and video standards:
Standard
Supported wrappers/codecs
Container
MPEG-2 part 1 PS
MPEG-2 part 1 TS
MPEG-2 part 2
QuickTime (self-contained movies only)
MP4
ASF
3GPP
DV
MXF
GXF
Video
MPEG-2
MPEG-4
H.264/AVC
VC-1
H.263
DV
xxx
114
Cerify Automated Video Content Verification System User Manual
Reference
Admin
NOTE. The CerifyVlcLauncher application is supported on the same Microsoft Windows platforms that
Cerify is supported on.
Tektronix does not provide technical support for the VLC application and its functionality.
Software components required to be installed to enable the playback feature have no effect on how Cerify
functions and are strictly optional.
The CerifyVlcLauncher installation adds information to the system registry on the client machine and
creates folders and files during the installation. The installation will fail if the user attempting the
installation is not authorized to modify the system registry or to create files/folders on the client machine.
This feature requires Cerify to pass MediaLocation credentials, such as CIFS and FTP usernames and
passwords, to the VLC application for it to be able to access MediaLocations. This information gets
cached by VLC, which may be considered as compromising logical security.
On accessing a VLC playback (see page 113) link using the Mozilla Firefox Web browser for the first time
on a client machine, the browser will request the user for permission to launch the CerifyVlcLauncher
application to handle the "cerify:" links. You should select the "Launch application" button in this
"External Protocol Request" dialog for the VLC playback feature to work. This warning dialog provides
an option to let Firefox remember this choice and can be selected to avoid subsequent attempts to playback
media files from raising this warning again. In Microsoft Internet Explorer, no such warning is raised.
To enable access to smb:// shares over the network, you may need to create a Windows network mapping to
the target share on the client machine.
Playback of files with non-ASCII characters in their names is not supported by the VLC feature.
Application Log
By clicking Log on the Admin page (see page 104), users with administrator privilege can view the
application Log. This log contains high level information logged by the system, such as version upgrade
details, database backup and restore details and template import and export details.
Media Test Units Page
By selecting the Media Test Units link on the Admin page (see page 104), it is possible to view the status
of the Media Test Units connected in a cluster. Since a standalone system does not connect to any Media
Test Units, this link is unavailable in the Web UI of a standalone system. When you click the link, you are
taken to the Media Test Units page which lists all the Media Test Units that are in the cluster.
NOTE. This list displays all the Media Test Units that have been ever added to the cluster, including those
that are currently off or not connected.
Cerify Automated Video Content Verification System User Manual
115
Reference
Help
The Media Test Units page displays the following information about each Media Test Unit:
The status of each Media Test Unit. This can take two values: "Active" or "Disconnected".
The IP address of the Media Test Unit. This IP address will be same as the one chosen during the
Media Test Unit installation.
The number of channels configured on that Media Test Unit.
The host name of the Media Test Unit.
From the Media Test Units page it is possible to remove the information about a particular Media Test
Unit, by clicking the Delete icon. This is useful if a unit has been permanently physically removed from a
cluster and is not going to be reconnected. For example, this might occur due to a hardware failure, or
if the Media Test Unit is being moved to another cluster. Media Test Units can be removed only if they
are currently not active.
NOTE. Clicking the Delete icon does not mean that this Media Test Unit will not be included in the cluster
next time it is rebooted; it simply removes the Media Test Unit details from the database. Therefore, if
this is done in error, it is possible to view the details for the Media Test Unit the next time it is booted
into the cluster.
Help
This section provides information on accessing and navigating the online help pages for the system.
Accessing the Online Help
The online version of this manual can be accessed at any time by selecting the Help button from the page
header. This link is context-sensitive and will take the user to a section of the manual appropriate to
the page that is being viewed.
In addition, links to the online manual are embedded within the main body of most pages of the user
interface. These links are also context-sensitive and are indicated by the
icon.
116
Cerify Automated Video Content Verification System User Manual
Reference
Help
Using the Online Help
The online version of this manual can be navigated using a Web browser. Every page contains
informational icons.
Table 5: Informational icons
Icon
Description
Caution! Used to warn the reader of a possible pitfall.
Tip. Advice for the reader.
Note. Extra information on a section.
xxx
When you click Help on the Navigation bar, help information appears as shown in the following figure.
The Table of Contents appears on the left pane and the help information appears on the right pane.
Navigate to any section by clicking the topics listed in the Table of Contents or by clicking the Back or
Next link. You can access the PDF version of the help file and the release notes by clicking User manual
and Release Notes links respectively.
Cerify Automated Video Content Verification System User Manual
117
Reference
118
Help
Cerify Automated Video Content Verification System User Manual
Appendices
Appendix A: Alerts
Appendix A: Alerts
This section lists and defines all the stream compliance and integrity checks that can be carried out. These
include: checks that the stream codewords are correctly formed, semantic checks that decoded values
are within the allowable range for that parameter; parameter checks; quality checks associated with tests
performed on baseband video.
Table 6: Alert icons in the Web user interface
Icon
Severity
Fatal
Error
Warning
Info
xxx
List of Alerts
In the following table, Alert ID specifies the alert identifier visible in the Alert Details page (see page 57);
Severity shows the alert severity level; Class shows the codec(s) or container(s) that the alert relates to,
or whether it relates to a parameter or template rule check; Context shows the area of syntax within the
stream or container, or the check or test case the alert is related to; Title shows the description of the check.
Table 7: Alerts
Alert ID
Severity
Class
Context
Title
11001
Fatal
All
General
Unexpected system fatal
11002
Fatal
All
General
Unexpected fatal
11003
Fatal
All
General
Unclassified fatal
11004
Fatal
All
General
Invalid file format
11005
Fatal
All
General
Licence feature error
11006
Fatal
All
General
Memory allocation failure
11007
Fatal
All video
General Video
Frame width is zero
11008
Fatal
All video
General Video
Frame height is zero
11009
Fatal
All video
General Video
Invalid image format
11010
Fatal
All audio
General Audio
Invalid audio format
11011
Fatal
All
General
No entry point found
11012
Fatal
All
General
Input is scrambled
11013
Fatal
All video
General Video
Invalid video format
11014
Fatal
All
General
Unsupported input file
format
Cerify Automated Video Content Verification System User Manual
119
Appendices
Appendix A: Alerts
Table 7: Alerts (cont.)
120
Alert ID
Severity
Class
Context
Title
11015
Fatal
All
General
Processing Error
11016
Fatal
All
General
Unrecognised input file
format
11017
Fatal
All
General
Can't open input file
11018
Fatal
All
General
Can't select track
11019
Fatal
All
General
Video stream not present
11020
Fatal
All
General
Audio stream not present
11021
Fatal
All
General
Temporary File Error
11022
Fatal
All
General
Socket Error
11023
Fatal
All
General
QuickTime missing
11024
Fatal
All
General
Required QuickTime
plug-in missing
11025
Fatal
All
General
QuickTime error
11501
Fatal
MPEG-2 video,
MPEG-4 video,
H.264/AVC video,
MPEG-4 container
General
Fatally out of sync
11751
Fatal
H.263 video
Picture Layer
Unsupported options in the
stream
11752
Fatal
H.263 video
Picture Layer
Unsupported option:
Annex E
11753
Fatal
H.263 video
Picture Layer
Unsupported option:
Annex N
11754
Fatal
H.263 video
Picture Layer
Unsupported option:
Annex R
11755
Fatal
H.263 video
Picture Layer
Unsupported option:
Picture Type
11756
Fatal
H.263 video
Picture Layer
Unsupported option: RPS
mode/IDS mode
11757
Fatal
H.263 video
Picture Layer
Unsupported option: PB
frames
11758
Fatal
H.263 video
Picture Layer
Invalid custom picture
format
12060
Fatal
MPEG-2 video
Macroblock
Invalid macroblock_escape
12076
Fatal
MPEG-2 video
Video Sequence
Invalid chroma_format
12084
Fatal
MPEG-2 video
Video Sequence
Invalid video_format
12196
Fatal
MPEG-2 video
Video Sequence
Scalability modes not
supported
12198
Fatal
MPEG-2 video
Video Sequence
Chroma format not
supported
Cerify Automated Video Content Verification System User Manual
Appendices
Appendix A: Alerts
Table 7: Alerts (cont.)
Alert ID
Severity
Class
Context
Title
12199
Fatal
MPEG-2 video
Video Sequence
Unrecognised stream type
12200
Fatal
MPEG-2 video
Video Sequence
Repeated header differs
from previous header
13001
Fatal
MPEG-4 video
Video Object Layer
Unsupported video_object_type_indication
13002
Fatal
MPEG-4 video
Video Object Layer
VOP width zero
13003
Fatal
MPEG-4 video
Video Object Layer
VOP width odd
13004
Fatal
MPEG-4 video
Video Object Layer
VOP width greater than
maximum supported
13005
Fatal
MPEG-4 video
Video Object Layer
VOP height zero
13006
Fatal
MPEG-4 video
Video Object Layer
VOP height odd
13007
Fatal
MPEG-4 video
Video Object Layer
VOP height greater than
maximum supported
13008
Fatal
MPEG-4 video
Video Object Layer
Interlace unsupported
13010
Fatal
MPEG-4 video
Video Object Layer
obmc_disable zero
13011
Fatal
MPEG-4 video
Video Object Layer
sprite_enable is 1
13012
Fatal
MPEG-4 video
Video Object Layer
not_8_bit is 1
13013
Fatal
MPEG-4 video
Video Object Layer
newpred_enable is on
13014
Fatal
MPEG-4 video
Video Object Layer
reduced_resolution_vop_enable is on
13015
Fatal
MPEG-4 video
Video Object Layer
scalability is 1
13016
Fatal
MPEG-4 video
General
Invalid start code
13017
Fatal
MPEG-4 video
Visual Object
OBMC unsupported
13018
Fatal
MPEG-4 video
Video Object Layer
Unsupported
chroma_format
13019
Fatal
MPEG-4 video
Video Object Layer
Unsupported low_delay
13020
Fatal
MPEG-4 video
Video Object Layer
Unsupported
video_object_layer_shape
extension
13021
Fatal
MPEG-4 video
Video Object Layer
S-VOP not allowed
13022
Fatal
MPEG-4 video
Video Object Layer
Unsupported visual object
type
13023
Fatal
H.263 video, MPEG-4
video
General
Input buffer length
exceeded
13025
Fatal
H.263 video, MPEG-4
video
General
Unsupported video format
14019
Fatal
H.264/AVC video
RBSP.SPS
Incorrect num_ref_frames_in_pic_order_cnt_cycle
14037
Fatal
H.264/AVC video
RBSP.PPS
Incorrect
num_slice_groups_minus1
Cerify Automated Video Content Verification System User Manual
121
Appendices
Appendix A: Alerts
Table 7: Alerts (cont.)
122
Alert ID
Severity
Class
Context
Title
14269
Fatal
H.264/AVC video
RBSP.Slice layer
Illegal
slice_group_map_type
14270
Fatal
H.264/AVC video
RBSP.SEI
Illegal ref_area_indicator
14271
Fatal
H.264/AVC video
NAL unit
Failed to position input
stream
14274
Fatal
H.264/AVC video
General
Level unsupported
14275
Fatal
H.264/AVC video
NAL unit
NALU too large
14276
Fatal
H.264/AVC video
General
Profile unlicensed
14277
Fatal
H.264/AVC video
General
Invalid reference frame
14280
Fatal
H.264/AVC video
RBSP
No valid Sequence
Parameter Set available
14281
Fatal
H.264/AVC video
General
Too many slices
14282
Fatal
H.264/AVC video
RBSP
DPB too small to contain
any pictures
15001
Fatal
YUV video
General
Invalid raw file format
15250
Fatal
Dolby-E
Dolby-E Frame
No Dolby-E frame found
16000
Fatal
VC-1 video
Sequence Layer
Invalid profile
16364
Fatal
VC-1 video
Sequence Layer
Metadata indicates
non-compliant stream
16365
Fatal
VC-1 video
Sequence Layer
Failed to parse sequence
header
16366
Fatal
VC-1 video
Picture Layer
Multiresolution coding not
supported
16501
Fatal
Parameter
Container Parameter Check
Test for attribute System
Container failed
16502
Fatal
Parameter
Video Parameter Check
Test for attribute Video
Standard failed
16503
Fatal
Parameter
Audio Parameter Check
Test for attribute Audio
Standard failed
17547
Fatal
MPEG-1/2 audio
Audio Data
Failed to open bit allocation
table
17548
Fatal
MPEG-1/2 audio
Audio Data
Failed to open bit stream
17549
Fatal
MPEG-1/2 audio
Audio Data
Failed to open file
17550
Fatal
MPEG-1/2 audio
Audio Data
Failed to open Huffman
table
17551
Fatal
MPEG-1/2 audio
Audio Data
Failed to open synthesis
table
17552
Fatal
MPEG-1/2 audio
Audio Data
Error in synthesis window
table
17553
Fatal
MPEG-1/2 audio
Audio Data
Error in Huffman table
17554
Fatal
MPEG-1/2 audio
Audio Data
Error in Huffman tree
Cerify Automated Video Content Verification System User Manual
Appendices
Appendix A: Alerts
Table 7: Alerts (cont.)
Alert ID
Severity
Class
Context
Title
17555
Fatal
MPEG-1/2 audio
Audio Data
Layer and mode
combination are invalid
for indexing into js bound
array
17556
Fatal
MPEG-1/2 audio
Audio Data
Buffer overflow reading
bitstream
17557
Fatal
MPEG-1/2 audio
Audio Data
Stream writing can only be
done in word blocks
17558
Fatal
MPEG-1/2 audio
Audio Main Data
Side info error - block type
is zero
17559
Fatal
MPEG-1/2 audio
Audio Header
Layer parameter in header
is invalid
17953
Fatal
AAC audio
Aac Main Ssr Lc Ltp
Payloads
Required FIR Filter
undefined by this decoder
17954
Fatal
AAC audio
Aac Main Ssr Lc Ltp
Payloads
Error in downsampling
17955
Fatal
AAC audio
Aac Decoder Config
Audio object not supported
by this decoder
17956
Fatal
AAC audio
Aac Sequence
Access Unit to be removed
is missing
17957
Fatal
AAC audio
Aac Sequence
Access Unit to be removed
is not of expected length
17958
Fatal
AAC audio
Aac Sequence
Start and/or end of Access
Unit to be decoded is not
byte aligned
17959
Fatal
AAC audio
Aac Sequence
AAC bit buffers have
become out of sync
17960
Fatal
AAC audio
Aac Sequence
Required AAC buffer has
not been created
17961
Fatal
AAC audio
Aac Sequence
Overflow in bit buffer
during bit transfer
17963
Fatal
AAC audio
Aac Sequence
Channel configuration is
inconsistent
17964
Fatal
AAC audio
Aac Sbr Payloads
SBR bitstream is invalid
- error in reading or
decoding SBR data
17965
Fatal
AAC audio
Aac Decoder Config
Sampling frequency not
supported by this decoder
17966
Fatal
AAC audio
Aac Sequence
Two channels without a
shared common window
is not supported by this
decoder
17967
Fatal
AAC audio
Aac Main Ssr Lc Ltp
Payloads
Huffman decoding failed
Cerify Automated Video Content Verification System User Manual
123
Appendices
Appendix A: Alerts
Table 7: Alerts (cont.)
124
Alert ID
Severity
Class
Context
Title
17968
Fatal
AAC audio
Aac Main Ssr Lc Ltp
Payloads
Error reading or decoding
coupling_channel_element
(CCE)
17969
Fatal
AAC audio
Aac Main Ssr Lc Ltp
Payloads
Error reading or decoding
data_stream_element
(DSE)
17970
Fatal
AAC audio
Aac Sbr Payloads
The number of SBR
elements found in this
frame does not match the
number of single_channel_elements and channel_pair_elements
17972
Fatal
AAC audio
Aac Sequence
Wrong number of channels
in command line
17973
Fatal
AAC audio
Aac Sequence
Scalable sample rate
(SSR) is not allowed in this
profile
17974
Fatal
AAC audio
Aac Subsidiary Payloads
window_sequence is
incorrect
17975
Fatal
AAC audio
Aac Subsidiary Payloads
Unknown predictor type
17982
Fatal
AAC audio
Aac Subsidiary Payloads
hcod_esc_z escape prefix
is longer than 8 bits long
17983
Fatal
AAC audio
Aac Subsidiary Payloads
hcod_esc_y escape prefix
is longer than 8 bits long
17987
Fatal
AAC audio
Aac Subsidiary Payloads
Cannot specify both length
of scalefactor data and
reversible variable length
coding (RVLC)
17989
Fatal
AAC audio
Aac Subsidiary Payloads
Gain control not
implemented in this
decoder
17992
Fatal
AAC audio
Aac Sequence
Negative number of bits
calculated while decoding
huffman codeword
17993
Fatal
AAC audio
Aac Sequence
Specified window shape
is not supported by this
decoder
17994
Fatal
AAC audio
Aac Sequence
Specified window length is
invalid
17995
Fatal
AAC audio
Aac Sequence
Specified number of short
windows is invalid
17996
Fatal
AAC audio
Aac Sequence
Specified window
sequence is invalid
Cerify Automated Video Content Verification System User Manual
Appendices
Appendix A: Alerts
Table 7: Alerts (cont.)
Alert ID
Severity
Class
Context
Title
17997
Fatal
AAC audio
Aac Sequence
Specified predictor order is
invalid
17998
Fatal
AAC audio
Aac Sequence
Specified time constant is
invalid
17999
Fatal
AAC audio
Aac Sequence
Specified attenuation is
invalid
18000
Fatal
AAC audio
Aac Sequence
Specified number of
segment bits is too large
18001
Fatal
AAC audio
Aac Sequence
Error reading codeword
18003
Fatal
AAC audio
Aac Sequence
Error in ln gain calculation
18004
Fatal
AAC audio
Aac Sequence
Specified block length is
too large
18005
Fatal
AAC audio
Aac Sequence
Specified sample rate
index is invalid
18006
Fatal
AAC audio
Aac Sequence
Specified bitrate index is
invalid
18007
Fatal
AAC audio
Aac Sbr Payloads
Failed to initialise the SBR
decoder
18008
Fatal
AAC audio
Aac Sequence
Invalid number of channels
18009
Fatal
AAC audio
Aac Sequence
Internal AAC decoder error
18250
Fatal
MXF
MXF Container layer
Fatal MXF Container error
18251
Fatal
MXF
MXF Container layer
Missing external essence
18252
Fatal
MXF
MXF Container layer
Missing sample depth
information
18253
Fatal
MXF
MXF Container layer
Unsupported Operational
Pattern
21001
Error
All
General
Unclassified error
21002
Error
All
General
VLD error
21003
Error
All
General
Missing start code
21004
Error
All audio
General Audio
Audio decode error
21005
Error
All
General
Unable to copy file to
remote location
21006
Error
All
General
Additional syntax
restriction not met
21007
Error
All
General
Unable to move file
21008
Error
All
General
File size error
21009
Error
All audio
General audio
Audio template error
21010
Error
All audio
General audio
Audio stream not present
21501
Error
H.263 video
General
Too many out-of-sync
21502
Error
H.263 video
General
Out of sync
Cerify Automated Video Content Verification System User Manual
125
Appendices
Appendix A: Alerts
Table 7: Alerts (cont.)
126
Alert ID
Severity
Class
Context
Title
21751
Error
H.263 video
Block Layer
More than 64 coefficients
21752
Error
H.263 video
Picture Layer
SEPB1 is 0
21753
Error
H.263 video
Picture Layer
SEPB1 is 0 (RS sub-mode)
21754
Error
H.263 video
Picture Layer
SEPB2 is 0 (MBA>11)
21755
Error
H.263 video
Picture Layer
SEPB2 is 0 (MBA>9 and
CPM)
21756
Error
H.263 video
Picture Layer
SEPB3 is 0
21757
Error
H.263 video
Picture Layer
PTYPE 1st bit 1 is not 1
21758
Error
H.263 video
Picture Layer
PTYPE 2nd bit 1 is not 0
21759
Error
H.263 video
Picture Layer
Invalid picture size in
OPPTYPE
21760
Error
H.263 video
MB Layer
Too many MBs in GOB
21761
Error
H.263 video
MB Layer
Error in MCBPC_P VLC
21762
Error
H.263 video
MB Layer
Error in MCBPC_I VLC
21763
Error
H.263 video
MB Layer
Error in CBPY VLC
21764
Error
H.263 video
MB Layer
Error in AIC VLC
21765
Error
H.263 video
MB Layer
Error in MV VLC
21766
Error
H.263 video
GOB Layer
Out of sync in GOB
21767
Error
H.263 video
Picture Layer
Error in stuffing bits
21768
Error
H.263 video
Picture Layer
marker_bit is 0
21769
Error
H.263 video
MB Layer
Error MQUANT is zero
21770
Error
H.263 video
Block Layer
Error in TCOEFF
21771
Error
H.263 video
MB Layer
Motion vector exceeds
picture boundary
22000
Error
MPEG-2 video
Video Sequence
Unknown extension_start_code_identifier
22001
Error
MPEG-2 video
Video Sequence
Invalid start_code
22002
Error
MPEG-2 video
Video Sequence
Invalid extension_start_code
22007
Error
MPEG-2 video
Picture
Invalid picture_coding_type
22009
Error
MPEG-2 video
Picture
Invalid full_pel_forward_vector
22010
Error
MPEG-2 video
Picture
Invalid forward_f_code
22011
Error
MPEG-2 video
Picture
Invalid full_pel_backward_vector
22012
Error
MPEG-2 video
Picture
Invalid backward_f_code
22013
Error
MPEG-2 video
Picture
Invalid extra_bit_picture
22015
Error
MPEG-2 video
Picture
Invalid f_code
Cerify Automated Video Content Verification System User Manual
Appendices
Appendix A: Alerts
Table 7: Alerts (cont.)
Alert ID
Severity
Class
Context
Title
22016
Error
MPEG-2 video
Picture
Invalid intra_dc_precision
22017
Error
MPEG-2 video
Picture
Invalid picture_structure
22024
Error
MPEG-2 video
Picture
Invalid repeat_first_field
22053
Error
MPEG-2 video
Slice
Invalid quantiser_scale_code
22062
Error
MPEG-2 video
Macroblock
Invalid frame_motion_type
22063
Error
MPEG-2 video
Macroblock
Invalid field_motion_type
22066
Error
MPEG-2 video
Video Sequence
Invalid horizontal_size_value
22067
Error
MPEG-2 video
Video Sequence
Invalid vertical_size_value
22068
Error
MPEG-2 video
Video Sequence
Invalid aspect_ratio_information
22069
Error
MPEG-2 video
Video Sequence
Invalid frame_rate_code
22074
Error
MPEG-2 video
Video Sequence
Invalid profile_and_level_indication
22082
Error
MPEG-2 video
Video Sequence
Invalid frame_rate_extension_n
22083
Error
MPEG-2 video
Video Sequence
Invalid frame_rate_extension_d
22086
Error
MPEG-2 video
Video Sequence
Invalid colour_primaries
22087
Error
MPEG-2 video
Video Sequence
Invalid transfer_characteristics
22088
Error
MPEG-2 video
Video Sequence
Invalid matrix_coefficients
22098
Error
MPEG-2 video
Macroblock
Invalid macroblock_stuffing
22099
Error
MPEG-2 video
Macroblock
Bad VLC for
macroblock_type
22100
Error
MPEG-2 video
Macroblock
Bad VLC for macroblock_address_increment
22101
Error
MPEG-2 video
Macroblock
Bad VLC for motion_code
22102
Error
MPEG-2 video
Macroblock
Bad VLC for
motion_residual
22103
Error
MPEG-2 video
Macroblock
Bad VLC for dmvector
22104
Error
MPEG-2 video
Macroblock
Bad VLC for
coded_block_pattern_420
22105
Error
MPEG-2 video
Block
Bad VLC for
dct_intradc_size_luma
22106
Error
MPEG-2 video
Block
Bad VLC for
dct_intradc_size_chroma
Cerify Automated Video Content Verification System User Manual
127
Appendices
Appendix A: Alerts
Table 7: Alerts (cont.)
128
Alert ID
Severity
Class
Context
Title
22107
Error
MPEG-2 video
Block
Bad VLC for
dct_intradc_differential
22111
Error
MPEG-2 video
Block
Invalid dct_escape_level
22112
Error
MPEG-2 video
Block
Bad VLC for
dct_differential
22133
Error
MPEG-2 video
Picture
Invalid quantizer_matrix_value
22142
Error
MPEG-2 video
Picture
Invalid padding_byte
22155
Error
MPEG-2 video
Picture
Invalid units_of_seconds
22156
Error
MPEG-2 video
Picture
Invalid tens_of_seconds
22157
Error
MPEG-2 video
Picture
Invalid units_of_minutes
22158
Error
MPEG-2 video
Picture
Invalid tens_of_minutes
22159
Error
MPEG-2 video
Picture
Invalid units_of_hours
22160
Error
MPEG-2 video
Picture
Invalid tens_of_hours
22196
Error
MPEG-2 video
Slice
Too many macroblocks in
picture
22197
Error
MPEG-2 video
Video Sequence
Unexpected start code
found
22198
Error
MPEG-2 video
Macroblock
Motion vector out of range
22199
Error
MPEG-2 video
Block
DCT coefficient index out
of bounds
22200
Error
MPEG-2 video
Video Sequence
No end-of-sequence start
code found
22201
Error
MPEG-2 video
Picture
Premature end of picture
22202
Error
MPEG-2 video
Video Sequence
Unmatched field
22203
Error
MPEG-2 video
Video Sequence
I picture expected after
GOP header
22204
Error
MPEG-2 video
Macroblock
Block uses forward
prediction when
closed_gop = 1
22205
Error
MPEG-2 video
Video Sequence
Too many luma samples
per second
22206
Error
MPEG-2 video
Video Sequence
Frame size too large for
Level constraints
22207
Error
MPEG-2 video
Video Sequence
Frame rate too high for
Level constraints
22208
Error
MPEG-2 video
Video Sequence
Bit rate too high for Level
constraints
22209
Error
MPEG-2 video
Video Sequence
VBV requirement too high
for Level constraints
22210
Error
MPEG-2 video
Picture
Bad slice order
Cerify Automated Video Content Verification System User Manual
Appendices
Appendix A: Alerts
Table 7: Alerts (cont.)
Alert ID
Severity
Class
Context
Title
22211
Error
MPEG-2 video
Video Sequence
Repeated header differs
from previous header
22212
Error
MPEG-2 video
Video Sequence
Reserved profile/level
22251
Error
MPEG-2 transport
stream
MPEG-2 Transport Stream
Missing sync_byte
22252
Error
MPEG-2 transport
stream
MPEG-2 Transport Stream
Packet has
transport_error_indicator
set
22253
Error
MPEG-2 transport
stream
MPEG-2 Transport Stream
Invalid adaptation_field_control value
22254
Error
MPEG-2 transport
stream
MPEG-2 Transport Stream
Invalid adaptation field
22255
Error
MPEG-2 transport
stream
MPEG-2 Transport Stream
Invalid payload_unit_start_indicator
value
22256
Error
MPEG-2 transport
stream
MPEG-2 Transport Stream
Invalid adaptation_field_extension_length field
22257
Error
MPEG-2 transport
stream
MPEG-2 Transport Stream
Incorrect adaptation_field_length field
22258
Error
MPEG-2 transport
stream
MPEG-2 Transport Stream
Transport stream packet
skipped
22259
Error
MPEG-2 transport
stream
MPEG-2 Transport Stream
Unexpected
continuity_counter
22260
Error
MPEG-2 transport
stream
MPEG-2 Transport Stream
Failed whilst parsing PAT
or PMT tables
22261
Error
MPEG-2 transport
stream
MPEG-2 Transport Stream
New Program Association
Table
23001
Error
MPEG-4 video
Visual Object Sequence
Reserved Profile/Level
23002
Error
MPEG-4 video
Video Object Plane
dct_dc_size value
23003
Error
MPEG-4 video
Video Object Plane
dct_dc_size_luminance
value
23004
Error
MPEG-4 video
Video Object Plane
dct_dc_size_chrominance
value
23005
Error
MPEG-4 video
Video Object Plane
More than 64 coefficients
23006
Error
MPEG-4 video
Video Object Layer
Reserved video_object_type_indication
23007
Error
MPEG-4 video
Video Object Layer
Reserved
video_object_layer_verid
23008
Error
MPEG-4 video
Video Object Layer
Reserved
video_object_layer_priority
23009
Error
MPEG-4 video
Video Object Layer
Reserved pixel aspect ratio
Cerify Automated Video Content Verification System User Manual
129
Appendices
Appendix A: Alerts
Table 7: Alerts (cont.)
130
Alert ID
Severity
Class
Context
Title
23010
Error
MPEG-4 video
Video Object Layer
par_width zero
23011
Error
MPEG-4 video
Video Object Layer
par_height zero
23012
Error
MPEG-4 video
Video Object Layer
Reserved chroma_format
23013
Error
MPEG-4 video
Video Object Layer
VBV Buffer size total zero
23014
Error
MPEG-4 video
Video Object Layer
VBV Bit rate total zero
23015
Error
MPEG-4 video
Video Object Layer
VBV Occupancy total zero
23016
Error
MPEG-4 video
Video Object Layer
video_object_layer_shape
not permitted
23017
Error
MPEG-4 video
Video Object Layer
vop_time_increment_resolution is zero
23018
Error
MPEG-4 video
Video Object Layer
fixed_vop_time_increment
greater than vop_time_increment_resolution
23019
Error
MPEG-4 video
Video Object Layer
VOP width greater than
maximum allowed
23020
Error
MPEG-4 video
Video Object Layer
VOP width greater than
maximum allowed
23021
Error
MPEG-4 video
Video Object Layer
Too many MBs for
Profile/Level
23022
Error
MPEG-4 video
Video Object Layer
marker_bit is 0
23023
Error
MPEG-4 video
Video Object Layer
Interlace not allowed in
ASP L0-L3
23024
Error
MPEG-4 video
Video Object Layer
Error loading
intra_quant_matrix
23025
Error
MPEG-4 video
Video Object Layer
video_object_layer_verid
not permitted
23026
Error
MPEG-4 video
Visual Object Sequence
Reserved video_format
23027
Error
MPEG-4 video
Visual Object Sequence
Reserved colour_primaries
23028
Error
MPEG-4 video
Visual Object Sequence
Reserved
transfer_characteristics
23029
Error
MPEG-4 video
Visual Object Sequence
Reserved
matrix_coefficients
23030
Error
MPEG-4 video
Group of VOPs
time_code_hours out of
range
23031
Error
MPEG-4 video
Group of VOPs
time_code_minutes out of
range
23032
Error
MPEG-4 video
Group of VOPs
time_code_seconds out of
range
23033
Error
MPEG-4 video
Group of VOPs
broken_link is 1
23034
Error
MPEG-4 video
General
Start code error
23035
Error
MPEG-4 video
Visual Object Sequence
Missing user data
Cerify Automated Video Content Verification System User Manual
Appendices
Appendix A: Alerts
Table 7: Alerts (cont.)
Alert ID
Severity
Class
Context
Title
23036
Error
MPEG-4 video
Video Object Plane
Out of data
23037
Error
MPEG-4 video
Video Object Plane
Too many MBs in data
partitioned VOP
23038
Error
MPEG-4 video
Video Object Plane
Quant is zero
23039
Error
MPEG-4 video
Video Object Plane
Quant is greater than 31
23040
Error
MPEG-4 video
Video Object Plane
Invalid RVLC
23041
Error
MPEG-4 video
Video Object Layer
Interlace not allowed in SP
23042
Error
MPEG-4 video
Video Object Layer
Method 1 quantisation not
allowed in SP
23043
Error
MPEG-4 video
Video Object Layer
Quarter sample not
allowed in SP
23044
Error
MPEG-4 video
Video Object Plane
B-VOPs present when
low_delay = 1
23045
Error
MPEG-4 video
Video Object Plane
TCOEF ESCAPE sign is
zero
23046
Error
MPEG-4 video
Video Object Plane
TCOEF LEVEL is zero
23047
Error
MPEG-4 video
Video Object Plane
TCOEF ESCAPE expected
23048
Error
MPEG-4 video
Video Object Layer
Invalid video object type
23049
Error
MPEG-4 video
Group of VOPs
Missing I-VOP after GOV
Header
23050
Error
H.263 video, MPEG-4
video
General
Unexpected end of stream
23251
Error
MPEG-4 container
MPEG-4 Container layer
Bad atom size
23252
Error
MPEG-4 container
MPEG-4 Container layer
Parser error
23253
Error
MPEG-4 container
MPEG-4 Container layer
File structure integrity error
23254
Error
MPEG-4 container
MPEG-4 Container layer
Missing “mdat” box
23255
Error
MPEG-4 container
MPEG-4 Container layer
Misread atom
23256
Error
MPEG-4 container
MPEG-4 Container layer
Missing SPS and/or PPS
23500
Error
ADTS
ADTS Container layer
SSR Not Supported
23501
Error
ADTS
ADTS Container layer
Invalid LTP
24001
Error
H.264/AVC video
NAL unit
Incorrect forbidden_zero_bit
24002
Error
H.264/AVC video
NAL unit
Incorrect nal_ref_idc
24004
Error
H.264/AVC video
NAL unit
Incorrect rbsp_byte
24005
Error
H.264/AVC video
NAL unit
Incorrect emulation_prevention_three_byte
24006
Error
H.264/AVC video
RBSP.SPS
Incorrect profile_idc
24010
Error
H.264/AVC video
RBSP.SPS
Incorrect reserved_zero_4bits
24011
Error
H.264/AVC video
RBSP.SPS
Incorrect level_idc
Cerify Automated Video Content Verification System User Manual
131
Appendices
Appendix A: Alerts
Table 7: Alerts (cont.)
132
Alert ID
Severity
Class
Context
Title
24012
Error
H.264/AVC video
RBSP
Incorrect seq_parameter_set_id
24013
Error
H.264/AVC video
RBSP.SPS
Incorrect
log2_max_frame_num_minus4
24014
Error
H.264/AVC video
RBSP.SPS
Incorrect pic_order_cnt_type
24015
Error
H.264/AVC video
RBSP.SPS
Incorrect
log2_max_pic_order_cnt_lsb_minus4
24017
Error
H.264/AVC video
RBSP.SPS
Incorrect offset_for_non_ref_pic
24018
Error
H.264/AVC video
RBSP.SPS
Incorrect offset_for_top_to_bottom_field
24020
Error
H.264/AVC video
RBSP.SPS
Incorrect offset_for_ref_frame
24021
Error
H.264/AVC video
RBSP.SPS
Incorrect num_ref_frames
24022
Error
H.264/AVC video
RBSP.SPS
Incorrect gaps_in_frame_
num_value_allowed_flag
24023
Error
H.264/AVC video
RBSP.SPS
Incorrect
pic_width_in_mbs_minus1
24024
Error
H.264/AVC video
RBSP.SPS
Incorrect pic_height_in_map_units_minus1
24025
Error
H.264/AVC video
RBSP.SPS
Incorrect
frame_mbs_only_flag
24027
Error
H.264/AVC video
RBSP.SPS
Incorrect direct_8x8_inference_flag
24029
Error
H.264/AVC video
RBSP.SPS
Incorrect
frame_crop_left_offset
24030
Error
H.264/AVC video
RBSP.SPS
Incorrect
frame_crop_right_offset
24031
Error
H.264/AVC video
RBSP.SPS
Incorrect
frame_crop_top_offset
24032
Error
H.264/AVC video
RBSP.SPS
Incorrect frame_crop_bottom_offset
24034
Error
H.264/AVC video
RBSP.PPS
Incorrect pic_parameter_set_id
24035
Error
H.264/AVC video
RBSP.PPS
Incorrect entropy_coding_mode_flag
Cerify Automated Video Content Verification System User Manual
Appendices
Appendix A: Alerts
Table 7: Alerts (cont.)
Alert ID
Severity
Class
Context
Title
24038
Error
H.264/AVC video
RBSP.PPS
Incorrect
slice_group_map_type
24039
Error
H.264/AVC video
RBSP.PPS
Incorrect run_length_minus1
24040
Error
H.264/AVC video
RBSP.PPS
Incorrect top_left
24041
Error
H.264/AVC video
RBSP.PPS
Incorrect bottom_right
24042
Error
H.264/AVC video
RBSP.PPS
Incorrect
slice_group_change_direction_flag
24043
Error
H.264/AVC video
RBSP.PPS
Incorrect slice_group_change_rate_minus1
24044
Error
H.264/AVC video
RBSP.PPS
Incorrect pic_size_in_map_units_minus1
24045
Error
H.264/AVC video
RBSP.PPS
Incorrect slice_group_id
24046
Error
H.264/AVC video
RBSP
Incorrect
num_ref_idx_l0_active_minus1
24047
Error
H.264/AVC video
RBSP
Incorrect
num_ref_idx_l1_active_minus1
24048
Error
H.264/AVC video
RBSP.PPS
Incorrect
weighted_pred_flag
24049
Error
H.264/AVC video
RBSP.PPS
Incorrect
weighted_bipred_idc
24050
Error
H.264/AVC video
RBSP.PPS
Incorrect pic_init_qp_minus26
24051
Error
H.264/AVC video
RBSP.PPS
Incorrect pic_init_qs_minus26
24052
Error
H.264/AVC video
RBSP.PPS
Incorrect chroma_qp_index_offset
24055
Error
H.264/AVC video
RBSP.PPS
Incorrect redundant_pic_cnt_present_flag
24056
Error
H.264/AVC video
RBSP
Incorrect ff_byte
24057
Error
H.264/AVC video
RBSP
Incorrect last_payload_type_byte
24058
Error
H.264/AVC video
RBSP
Incorrect last_payload_size_byte
24059
Error
H.264/AVC video
RBSP
Incorrect primary_pic_type
24060
Error
H.264/AVC video
RBSP.Slice layer
Incorrect slice_id
24061
Error
H.264/AVC video
RBSP.Slice layer
Incorrect redundant_pic_cnt
Cerify Automated Video Content Verification System User Manual
133
Appendices
Appendix A: Alerts
Table 7: Alerts (cont.)
134
Alert ID
Severity
Class
Context
Title
24062
Error
H.264/AVC video
RBSP
Incorrect
cabac_zero_word
24063
Error
H.264/AVC video
NAL unit
Incorrect
rbsp_stop_one_bit
24064
Error
H.264/AVC video
NAL unit
Incorrect rbsp_alignment_zero_bit
24065
Error
H.264/AVC video
NAL unit
Incorrect rbsp_trailing_bits
24066
Error
H.264/AVC video
RBSP.Slice layer.Slice
header
Incorrect first_mb_in_slice
24067
Error
H.264/AVC video
RBSP.Slice layer.Slice
header
Incorrect slice_type
24068
Error
H.264/AVC video
RBSP.Slice layer.Slice
header
Incorrect frame_num
24071
Error
H.264/AVC video
RBSP.Slice layer.Slice
header
Incorrect idr_pic_id
24072
Error
H.264/AVC video
RBSP.Slice layer.Slice
header
Incorrect pic_order_cnt_lsb
24073
Error
H.264/AVC video
RBSP.Slice layer.Slice
header
Incorrect delta_pic_order_cnt_bottom
24074
Error
H.264/AVC video
RBSP.Slice layer.Slice
header
Incorrect delta_pic_order_cnt
24077
Error
H.264/AVC video
RBSP.Slice layer.Slice
header
Incorrect cabac_init_idc
24078
Error
H.264/AVC video
RBSP.Slice layer.Slice
header
Incorrect slice_qp_delta
24080
Error
H.264/AVC video
RBSP.Slice layer.Slice
header
Incorrect slice_qs_delta
24081
Error
H.264/AVC video
RBSP.Slice layer.Slice
header
Incorrect disable_deblocking_filter_idc
24082
Error
H.264/AVC video
RBSP.Slice layer.Slice
header
Incorrect slice_alpha_c0_offset_div2
24083
Error
H.264/AVC video
RBSP.Slice layer.Slice
header
Incorrect slice_beta_offset_div2
24084
Error
H.264/AVC video
RBSP.Slice layer.Slice
header
Incorrect
slice_group_change_cycle
24085
Error
H.264/AVC video
RBSP.Slice layer.Slice
header
Incorrect ref_pic_list_reordering_flag_l0
24086
Error
H.264/AVC video
RBSP.Slice layer.Slice
header
Incorrect reordering_of_pic_nums_idc
24087
Error
H.264/AVC video
RBSP.Slice layer.Slice
header
Incorrect
abs_diff_pic_num_minus1
Cerify Automated Video Content Verification System User Manual
Appendices
Appendix A: Alerts
Table 7: Alerts (cont.)
Alert ID
Severity
Class
Context
Title
24088
Error
H.264/AVC video
RBSP.Slice layer.Slice
header
Incorrect
long_term_pic_num
24089
Error
H.264/AVC video
RBSP.Slice layer.Slice
header
Incorrect ref_pic_list_reordering_flag_l1
24090
Error
H.264/AVC video
RBSP.Slice layer.Slice
header
Incorrect
luma_log2_weight_denom
24091
Error
H.264/AVC video
RBSP.Slice layer.Slice
header
Incorrect
chroma_log2_weight_denom
24092
Error
H.264/AVC video
RBSP.Slice layer.Slice
header
Incorrect
luma_weight_l0_flag
24093
Error
H.264/AVC video
RBSP.Slice layer.Slice
header
Incorrect luma_weight_l0
24094
Error
H.264/AVC video
RBSP.Slice layer.Slice
header
Incorrect luma_offset_l0
24095
Error
H.264/AVC video
RBSP.Slice layer.Slice
header
Incorrect
chroma_weight_l0_flag
24096
Error
H.264/AVC video
RBSP.Slice layer.Slice
header
Incorrect
chroma_weight_l0
24097
Error
H.264/AVC video
RBSP.Slice layer.Slice
header
Incorrect chroma_offset_l0
24098
Error
H.264/AVC video
RBSP.Slice layer.Slice
header
Incorrect
luma_weight_l1_flag
24099
Error
H.264/AVC video
RBSP.Slice layer.Slice
header
Incorrect luma_weight_l1
24100
Error
H.264/AVC video
RBSP.Slice layer.Slice
header
Incorrect luma_offset_l1
24101
Error
H.264/AVC video
RBSP.Slice layer.Slice
header
Incorrect
chroma_weight_l1_flag
24102
Error
H.264/AVC video
RBSP.Slice layer.Slice
header
Incorrect
chroma_weight_l1
24103
Error
H.264/AVC video
RBSP.Slice layer.Slice
header
Incorrect chroma_offset_l1
24104
Error
H.264/AVC video
RBSP.Slice layer.Slice
header
Incorrect no_output_of_prior_pics_flag
24105
Error
H.264/AVC video
RBSP.Slice layer.Slice
header
Incorrect long_term_reference_flag
24106
Error
H.264/AVC video
RBSP.Slice layer.Slice
header
Incorrect adaptive_ref_pic_marking_mode_flag
Cerify Automated Video Content Verification System User Manual
135
Appendices
Appendix A: Alerts
Table 7: Alerts (cont.)
136
Alert ID
Severity
Class
Context
Title
24107
Error
H.264/AVC video
RBSP.Slice layer.Slice
header
Incorrect memory_management_control_operation
24108
Error
H.264/AVC video
RBSP.Slice layer.Slice
header
Incorrect difference_of_pic_nums_minus1
24109
Error
H.264/AVC video
RBSP.Slice layer.Slice
header
Incorrect
long_term_frame_idx
24110
Error
H.264/AVC video
RBSP.Slice layer.Slice
header
Incorrect max_long_term_
frame_idx_plus1
24111
Error
H.264/AVC video
RBSP.Slice layer.Slice data
Incorrect cabac_alignment_one_bit
24112
Error
H.264/AVC video
RBSP.Slice layer.Slice data
Incorrect codIOffset
24113
Error
H.264/AVC video
RBSP.Slice layer.Slice data
Incorrect mb_skip_run
24117
Error
H.264/AVC video
RBSP.Slice layer.Slice data
Incorrect mb_type
24118
Error
H.264/AVC video
RBSP.Slice layer.Slice data
Incorrect pcm_alignment_zero_bit
24120
Error
H.264/AVC video
RBSP.Slice layer.Slice data
Incorrect
coded_block_pattern
24121
Error
H.264/AVC video
RBSP.Slice layer.Slice data
Incorrect mb_qp_delta
24122
Error
H.264/AVC video
RBSP.Slice layer.Slice data
Incorrect prev_intra4x4_pred_mode_flag
24123
Error
H.264/AVC video
RBSP.Slice layer.Slice data
Incorrect rem_intra4x4_pred_mode
24124
Error
H.264/AVC video
RBSP.Slice layer.Slice data
Incorrect intra_chroma_pred_mode
24125
Error
H.264/AVC video
RBSP.Slice layer.Slice data
Incorrect ref_idx_l0
24126
Error
H.264/AVC video
RBSP.Slice layer.Slice data
Incorrect ref_idx_l1
24127
Error
H.264/AVC video
RBSP.Slice layer.Slice data
Incorrect mvd_l0
24128
Error
H.264/AVC video
RBSP.Slice layer.Slice data
Incorrect mvd_l1
24129
Error
H.264/AVC video
RBSP.Slice layer.Slice data
Incorrect sub_mb_type
24132
Error
H.264/AVC video
RBSP.Slice layer.Slice data
Incorrect level_prefix
24133
Error
H.264/AVC video
RBSP.Slice layer.Slice data
Incorrect level_suffix
24134
Error
H.264/AVC video
RBSP.Slice layer.Slice data
Incorrect total_zeros
24135
Error
H.264/AVC video
RBSP.Slice layer.Slice data
Incorrect run_before
24139
Error
H.264/AVC video
RBSP.Slice layer.Slice data
Incorrect coeff_abs_level_minus1
24141
Error
H.264/AVC video
Byte stream
Incorrect zero_byte
24142
Error
H.264/AVC video
Byte stream
Incorrect start_code_prefix_one_3bytes
24143
Error
H.264/AVC video
RBSP.SEI
Incorrect bit_equal_to_one
Cerify Automated Video Content Verification System User Manual
Appendices
Appendix A: Alerts
Table 7: Alerts (cont.)
Alert ID
Severity
Class
Context
Title
24144
Error
H.264/AVC video
RBSP.SEI
Incorrect
bit_equal_to_zero
24145
Error
H.264/AVC video
RBSP.SEI
Incorrect initial_cpb_removal_delay
24146
Error
H.264/AVC video
RBSP.SEI
Incorrect initial_cpb_removal_delay_offset
24147
Error
H.264/AVC video
RBSP.SEI
Incorrect cpb_removal_delay
24148
Error
H.264/AVC video
RBSP.SEI
Incorrect dpb_output_delay
24149
Error
H.264/AVC video
RBSP.SEI
Incorrect pic_struct
24150
Error
H.264/AVC video
RBSP.SEI
Incorrect clock_timestamp_flag
24151
Error
H.264/AVC video
RBSP.SEI
Incorrect ct_type
24152
Error
H.264/AVC video
RBSP.SEI
Incorrect
nuit_field_based_flag
24153
Error
H.264/AVC video
RBSP.SEI
Incorrect counting_type
24154
Error
H.264/AVC video
RBSP.SEI
Incorrect full_timestamp_flag
24155
Error
H.264/AVC video
RBSP.SEI
Incorrect discontinuity_flag
24156
Error
H.264/AVC video
RBSP.SEI
Incorrect cnt_dropped_flag
24157
Error
H.264/AVC video
RBSP.SEI
Incorrect n_frames
24158
Error
H.264/AVC video
RBSP.SEI
Incorrect seconds_value
24159
Error
H.264/AVC video
RBSP.SEI
Incorrect minutes_value
24160
Error
H.264/AVC video
RBSP.SEI
Incorrect hours_value
24161
Error
H.264/AVC video
RBSP.SEI
Incorrect seconds_flag
24162
Error
H.264/AVC video
RBSP.SEI
Incorrect minutes_flag
24163
Error
H.264/AVC video
RBSP.SEI
Incorrect hours_flag
24164
Error
H.264/AVC video
RBSP.SEI
Incorrect time_offset
24165
Error
H.264/AVC video
RBSP.SEI
Incorrect
pan_scan_rect_id
24166
Error
H.264/AVC video
RBSP.SEI
Incorrect
pan_scan_rect_cancel_flag
24167
Error
H.264/AVC video
RBSP.SEI
Incorrect
pan_scan_cnt_minus1
24168
Error
H.264/AVC video
RBSP.SEI
Incorrect
pan_scan_rect_left_offset
24169
Error
H.264/AVC video
RBSP.SEI
Incorrect
pan_scan_rect_right_offset
Cerify Automated Video Content Verification System User Manual
137
Appendices
Appendix A: Alerts
Table 7: Alerts (cont.)
138
Alert ID
Severity
Class
Context
Title
24170
Error
H.264/AVC video
RBSP.SEI
Incorrect
pan_scan_rect_top_offset
24171
Error
H.264/AVC video
RBSP.SEI
Incorrect
pan_scan_rect_bottom_offset
24172
Error
H.264/AVC video
RBSP.SEI
Incorrect
pan_scan_rect_repetition_period
24173
Error
H.264/AVC video
RBSP.SEI
Incorrect itu_t_t35_country_code
24174
Error
H.264/AVC video
RBSP.SEI
Incorrect itu_t_t35_country_code_extension_byte
24175
Error
H.264/AVC video
RBSP.SEI
Incorrect itu_t_t35_payload_byte
24176
Error
H.264/AVC video
RBSP.SEI
Incorrect
uuid_iso_iec_11578
24177
Error
H.264/AVC video
RBSP.SEI
Incorrect user_data_payload_byte
24178
Error
H.264/AVC video
RBSP.SEI
Incorrect recovery_frame_cnt
24179
Error
H.264/AVC video
RBSP.SEI
Incorrect exact_match_flag
24180
Error
H.264/AVC video
RBSP.SEI
Incorrect broken_link_flag
24181
Error
H.264/AVC video
RBSP.SEI
Incorrect changing_slice_group_idc
24182
Error
H.264/AVC video
RBSP.SEI
Incorrect original_idr_flag
24183
Error
H.264/AVC video
RBSP.SEI
Incorrect original_frame_num
24184
Error
H.264/AVC video
RBSP.SEI
Incorrect original_field_pic_flag
24185
Error
H.264/AVC video
RBSP.SEI
Incorrect original_field_bottom_flag
24186
Error
H.264/AVC video
RBSP.SEI
Incorrect target_frame_num
24187
Error
H.264/AVC video
RBSP.SEI
Incorrect spare_field_flag
24188
Error
H.264/AVC video
RBSP.SEI
Incorrect target_bottom_field_flag
24189
Error
H.264/AVC video
RBSP.SEI
Incorrect
num_spare_pics_minus1
24190
Error
H.264/AVC video
RBSP.SEI
Incorrect
delta_spare_frame_num
24191
Error
H.264/AVC video
RBSP.SEI
Incorrect spare_bottom_field_flag
Cerify Automated Video Content Verification System User Manual
Appendices
Appendix A: Alerts
Table 7: Alerts (cont.)
Alert ID
Severity
Class
Context
Title
24192
Error
H.264/AVC video
RBSP.SEI
Incorrect spare_area_idc
24193
Error
H.264/AVC video
RBSP.SEI
Incorrect spare_unit_flag
24194
Error
H.264/AVC video
RBSP.SEI
Incorrect zero_run_length
24195
Error
H.264/AVC video
RBSP.SEI
Incorrect
scene_info_present_flag
24196
Error
H.264/AVC video
RBSP.SEI
Incorrect scene_id
24197
Error
H.264/AVC video
RBSP.SEI
Incorrect scene_transition_type
24198
Error
H.264/AVC video
RBSP.SEI
Incorrect second_scene_id
24199
Error
H.264/AVC video
RBSP.SEI
Incorrect
sub_seq_layer_num
24200
Error
H.264/AVC video
RBSP.SEI
Incorrect sub_seq_id
24201
Error
H.264/AVC video
RBSP.SEI
Incorrect first_ref_pic_flag
24202
Error
H.264/AVC video
RBSP.SEI
Incorrect leading_non_ref_pic_flag
24203
Error
H.264/AVC video
RBSP.SEI
Incorrect last_pic_flag
24204
Error
H.264/AVC video
RBSP.SEI
Incorrect
sub_seq_frame_num_flag
24205
Error
H.264/AVC video
RBSP.SEI
Incorrect
sub_seq_frame_num
24206
Error
H.264/AVC video
RBSP.SEI
Incorrect
num_sub_seq_layers_minus1
24207
Error
H.264/AVC video
RBSP.SEI
Incorrect accurate_statistics_flag
24208
Error
H.264/AVC video
RBSP.SEI
Incorrect average_bit_rate
24209
Error
H.264/AVC video
RBSP.SEI
Incorrect average_frame_rate
24210
Error
H.264/AVC video
RBSP.SEI
Incorrect duration_flag
24211
Error
H.264/AVC video
RBSP.SEI
Incorrect sub_seq_duration
24212
Error
H.264/AVC video
RBSP.SEI
Incorrect average_rate_flag
24213
Error
H.264/AVC video
RBSP.SEI
Incorrect num_referenced_subseqs
24214
Error
H.264/AVC video
RBSP.SEI
Incorrect
ref_sub_seq_layer_num
24215
Error
H.264/AVC video
RBSP.SEI
Incorrect ref_sub_seq_id
24216
Error
H.264/AVC video
RBSP.SEI
Incorrect ref_sub_seq_direction
Cerify Automated Video Content Verification System User Manual
139
Appendices
Appendix A: Alerts
Table 7: Alerts (cont.)
140
Alert ID
Severity
Class
Context
Title
24217
Error
H.264/AVC video
RBSP.SEI
Incorrect
full_frame_freeze_repetition_period
24218
Error
H.264/AVC video
RBSP.SEI
Incorrect snapshot_id
24219
Error
H.264/AVC video
RBSP.SEI
Incorrect progressive_refinement_id
24220
Error
H.264/AVC video
RBSP.SEI
Incorrect num_refinement_steps_minus1
24221
Error
H.264/AVC video
RBSP.SEI
Incorrect num_slice_groups_in_set_minus1
24222
Error
H.264/AVC video
RBSP.SEI
Incorrect exact_sample_value_match_flag
24223
Error
H.264/AVC video
RBSP.SEI
Incorrect
pan_scan_rect_flag
24224
Error
H.264/AVC video
RBSP.SEI
Incorrect reserved_sei_message_payload_byte
24225
Error
H.264/AVC video
RBSP.SPS.VUI
Incorrect aspect_ratio_info_present_flag
24226
Error
H.264/AVC video
RBSP.SPS.VUI
Incorrect aspect_ratio_idc
24227
Error
H.264/AVC video
RBSP.SPS.VUI
Incorrect sar_width
24228
Error
H.264/AVC video
RBSP.SPS.VUI
Incorrect sar_height
24229
Error
H.264/AVC video
RBSP.SPS.VUI
Incorrect overscan_info_present_flag
24230
Error
H.264/AVC video
RBSP.SPS.VUI
Incorrect overscan_appropriate_flag
24231
Error
H.264/AVC video
RBSP.SPS.VUI
Incorrect video_signal_type_present_flag
24232
Error
H.264/AVC video
RBSP.SPS.VUI
Incorrect video_format
24233
Error
H.264/AVC video
RBSP.SPS.VUI
Incorrect
video_full_range_flag
24234
Error
H.264/AVC video
RBSP.SPS.VUI
Incorrect colour_description_present_flag
24235
Error
H.264/AVC video
RBSP.SPS.VUI
Incorrect colour_primaries
24236
Error
H.264/AVC video
RBSP.SPS.VUI
Incorrect transfer_characteristics
24237
Error
H.264/AVC video
RBSP.SPS.VUI
Incorrect matrix_coefficients
24238
Error
H.264/AVC video
RBSP.SPS.VUI
Incorrect chroma_loc_info_present_flag
24239
Error
H.264/AVC video
RBSP.SPS.VUI
Incorrect chroma_sample_loc_type_top_field
Cerify Automated Video Content Verification System User Manual
Appendices
Appendix A: Alerts
Table 7: Alerts (cont.)
Alert ID
Severity
Class
Context
Title
24240
Error
H.264/AVC video
RBSP.SPS.VUI
Incorrect chroma_sample_loc_type_bottom_field
24241
Error
H.264/AVC video
RBSP.SPS.VUI
Incorrect timing_info_present_flag
24242
Error
H.264/AVC video
RBSP.SPS.VUI
Incorrect
num_units_in_tick
24243
Error
H.264/AVC video
RBSP.SPS.VUI
Incorrect time_scale
24244
Error
H.264/AVC video
RBSP.SPS.VUI
Incorrect
fixed_frame_rate_flag
24245
Error
H.264/AVC video
RBSP.SPS.VUI
Incorrect nal_hrd_parameters_present_flag
24246
Error
H.264/AVC video
RBSP.SPS.VUI
Incorrect vcl_hrd_parameters_present_flag
24247
Error
H.264/AVC video
RBSP.SPS.VUI
Incorrect low_delay_hrd_flag
24248
Error
H.264/AVC video
RBSP.SPS.VUI
Incorrect
pic_struct_present_flag
24249
Error
H.264/AVC video
RBSP.SPS.VUI
Incorrect bitstream_restriction_flag
24250
Error
H.264/AVC video
RBSP.SPS.VUI
Incorrect motion_vectors_over_pic_boundaries_flag
24251
Error
H.264/AVC video
RBSP.SPS.VUI
Incorrect
max_bytes_per_pic_denom
24252
Error
H.264/AVC video
RBSP.SPS.VUI
Incorrect
max_bits_per_mb_denom
24253
Error
H.264/AVC video
RBSP.SPS.VUI
Incorrect
log2_max_mv_length_horizontal
24254
Error
H.264/AVC video
RBSP.SPS.VUI
Incorrect
log2_max_mv_length_vertical
24255
Error
H.264/AVC video
RBSP.SPS.VUI
Incorrect num_reorder_frames
24256
Error
H.264/AVC video
RBSP.SPS.VUI
Incorrect
max_dec_frame_buffering
24257
Error
H.264/AVC video
RBSP.SPS.VUI
Incorrect cpb_cnt_minus1
24258
Error
H.264/AVC video
RBSP.SPS.VUI
Incorrect bit_rate_scale
24259
Error
H.264/AVC video
RBSP.SPS.VUI
Incorrect cpb_size_scale
24260
Error
H.264/AVC video
RBSP.SPS.VUI
Incorrect
bit_rate_value_minus1
Cerify Automated Video Content Verification System User Manual
141
Appendices
Appendix A: Alerts
Table 7: Alerts (cont.)
142
Alert ID
Severity
Class
Context
Title
24261
Error
H.264/AVC video
RBSP.SPS.VUI
Incorrect
cpb_size_value_minus1
24262
Error
H.264/AVC video
RBSP.SPS.VUI
Incorrect cbr_flag
24263
Error
H.264/AVC video
RBSP.SPS.VUI
Incorrect initial_cpb_removal_delay_length_minus1
24264
Error
H.264/AVC video
RBSP.SPS.VUI
Incorrect cpb_removal_delay_length_minus1
24265
Error
H.264/AVC video
RBSP.SPS.VUI
Incorrect dpb_output_delay_length_minus1
24266
Error
H.264/AVC video
RBSP.SPS.VUI
Incorrect time_offset_length
24267
Error
H.264/AVC video
RBSP.Slice layer.Slice data
Incorrect bottom_mb_field_decoding_flag
24269
Error
H.264/AVC video
RBSP.Slice layer.Slice data
Failed to find
NumCoeff/TrailingOnes
24270
Error
H.264/AVC video
RBSP.Slice layer.Slice data
Failed to find
NumCoeff/TrailingOnes
ChromaDC
24271
Error
H.264/AVC video
RBSP.Slice layer.Slice data
VLC parse error: Level
codeword
24272
Error
H.264/AVC video
RBSP.Slice layer.Slice data
VLC parse error: Total
Zeros codeword
24273
Error
H.264/AVC video
RBSP.Slice layer.Slice data
VLC parse error: Total
Zeros Chroma DC
codeword
24274
Error
H.264/AVC video
RBSP.Slice layer.Slice data
VLC parse error: Run
codeword
24275
Error
H.264/AVC video
RBSP.Slice layer.Slice data
Unexpected
HOR_PRED_8 chroma
intra prediction mode
24276
Error
H.264/AVC video
RBSP.Slice layer.Slice data
Unexpected
VERT_PRED_8 chroma
intra prediction mode
24277
Error
H.264/AVC video
RBSP.Slice layer.Slice data
Unexpected PLANE_8
chroma intra prediction
mode
24278
Error
H.264/AVC video
RBSP.Slice layer.Slice data
Unexpected
HOR_PRED_16 intra
prediction mode
24279
Error
H.264/AVC video
RBSP.Slice layer.Slice data
Unexpected
VERT_PRED_16 intra
prediction mode
Cerify Automated Video Content Verification System User Manual
Appendices
Appendix A: Alerts
Table 7: Alerts (cont.)
Alert ID
Severity
Class
Context
Title
24280
Error
H.264/AVC video
RBSP.Slice layer.Slice data
Unexpected
PLANE_16 intra prediction
mode
24282
Error
H.264/AVC video
RBSP
Non-zero frame_num in idr
pix
24283
Error
H.264/AVC video
RBSP
Duplicate frame_num
in short-term reference
picture buffer
24284
Error
H.264/AVC video
RBSP
Invalid frame store type
24285
Error
H.264/AVC video
RBSP
Empty decoded picture
buffer
24286
Error
H.264/AVC video
RBSP
POC Out of order.
24288
Error
H.264/AVC video
RBSP.SEI
Reserved
picture_structure
24289
Error
H.264/AVC video
RBSP.Slice layer
Invalid num_slice_group_
map_units_minus1
24290
Error
H.264/AVC video
RBSP.Slice layer.Slice data
Invalid block type
24291
Error
H.264/AVC video
RBSP
Invalid remapping_of_pic_nums_idc
command
24292
Error
H.264/AVC video
RBSP
Invalid memory_management_control_operation
24293
Error
H.264/AVC video
RBSP
Incorrect pic_order_cnt_type
24294
Error
H.264/AVC video
NAL unit
Missing startcode in NAL
24295
Error
H.264/AVC video
NAL unit
Error reading NALU
24296
Error
H.264/AVC video
NAL unit
All zero data sequence in
RBSP
24297
Error
H.264/AVC video
RBSP.Slice layer
Invalid slice type
24298
Error
H.264/AVC video
RBSP.Slice layer.Slice data
Parse error: 2x2 DC
Chroma codeword
24299
Error
H.264/AVC video
RBSP
Expected Instantaneous
Decoding Refresh picture
24300
Error
H.264/AVC video
RBSP
Unexpected Instantaneous
Decoding Refresh picture
24301
Error
H.264/AVC video
RBSP
Incorrect adaptive_ref_pic_buffering_flag
24302
Error
H.264/AVC video
NAL unit
Empty Raw Byte Sequence
Payload
24303
Error
H.264/AVC video
NAL unit
Reading too many bits
from Raw Byte Sequence
Payload
Cerify Automated Video Content Verification System User Manual
143
Appendices
Appendix A: Alerts
Table 7: Alerts (cont.)
144
Alert ID
Severity
Class
Context
Title
24304
Error
H.264/AVC video
RBSP
Invalid Picture Parameter
Set
24305
Error
H.264/AVC video
RBSP
Invalid Sequence
Parameter Set
24306
Error
H.264/AVC video
RBSP.Slice layer.Slice
header
Picture missing in stream
24307
Error
H.264/AVC video
RBSP.Slice layer.Slice
header
Too few entries in list
reordering
24308
Error
H.264/AVC video
RBSP.Slice layer
Macroblock reference
unavailable
24309
Error
H.264/AVC video
RBSP.SPS
Frame area too large for
Level
24310
Error
H.264/AVC video
RBSP.Slice layer.Slice
header
Too many entries in list
reordering
24311
Error
H.264/AVC video
RBSP.Slice layer.Slice
header
Too few entries in list
reordering
24312
Error
H.264/AVC video
RBSP.SEI
No active SPS
24313
Error
H.264/AVC video
RBSP.SPS
Missing VUI information in
active SPS
24314
Error
H.264/AVC video
RBSP.SEI
Incorrect Supplementary
Enhancement Information
message size
24315
Error
H.264/AVC video
RBSP
Full decoded picture buffer
24316
Error
H.264/AVC video
NAL unit
Access Delimiter NALU
not at start of access unit
24317
Error
H.264/AVC video
NAL unit
SEI NAL Unit does not
precede primary coded
picture
24318
Error
H.264/AVC video
RBSP.SEI
Badly positioned Buffering
Period SEI message
24319
Error
H.264/AVC video
NAL unit
Bad ordering of redundant
pictures
24320
Error
H.264/AVC video
NAL unit
Badly positioned End Of
Sequence NAL Unit
24321
Error
H.264/AVC video
NAL unit
Badly positioned End Of
Stream NAL Unit
24322
Error
H.264/AVC video
NAL unit
NAL Unit should not
precede VCL NAL Unit
24323
Error
H.264/AVC video
RBSP.SPS
Active SPS replaced with
non-identical SPS
24324
Error
H.264/AVC video
RBSP.Slice layer
Bad slice order
24325
Error
H.264/AVC video
RBSP.SPS
Bad cropping rectangle in
SPS
Cerify Automated Video Content Verification System User Manual
Appendices
Appendix A: Alerts
Table 7: Alerts (cont.)
Alert ID
Severity
Class
Context
Title
24327
Error
H.264/AVC video
RBSP.Slice layer.Slice data
Motion vector component
exceeds level limit
24328
Error
H.264/AVC video
RBSP.Slice layer.Slice data
Divergent motion vectors:
MaxSubMbRectSize
exceeded
24329
Error
H.264/AVC video
NAL unit
Too many macroblocks per
second
24330
Error
H.264/AVC video
NAL unit
Minimum compression
ratio not met
24331
Error
H.264/AVC video
NAL unit
Slice rate limit exceeded
24332
Error
H.264/AVC video
RBSP.Slice layer.Slice data
Too many motion vectors
per two consecutive
macroblocks
24333
Error
H.264/AVC video
RBSP.Slice layer
Macroblock too large
24334
Error
H.264/AVC video
NAL unit
No suitable HRD "bucket"
for given level
24335
Error
H.264/AVC video
RBSP.Slice layer.Slice data
MinLumaBiPredSize
constraint disobeyed
24336
Error
H.264/AVC video
NAL unit
Data partitioned NALU
disallowed by profile
24337
Error
H.264/AVC video
Picture Layer
Field pair has differing
frame number
24338
Error
H.264/AVC video
Picture Layer
Two fields in a pair have
the same parity
24339
Error
H.264/AVC video
Picture Layer
A field was expected but
not found
24340
Error
H.264/AVC video
NAL unit
Sequence does not begin
with an IDR NALU
24341
Error
H.264/AVC video
RBSP
Reference frame for long
term marking not found
24342
Error
H.264/AVC video
RBSP.SPS
Incorrect profile_idc
24343
Error
H.264/AVC video
RBSP.SPS
Invalid constraint_setx_flag
24344
Error
H.264/AVC video
RBSP.SPS
Intermediate transform
values out of range
24345
Error
H.264/AVC video
RBSP.Slice layer.Slice data
Incorrect pcm_byte
24346
Error
H.264/AVC video
General
Frame size exceeds the
limit for AVC Intra
24803
Error
H.264/AVC video
RBSP.SPS
Incorrect delta_scale
24804
Error
H.264/AVC video
RBSP.SPS
Incorrect chroma_format_idc
Cerify Automated Video Content Verification System User Manual
145
Appendices
Appendix A: Alerts
Table 7: Alerts (cont.)
146
Alert ID
Severity
Class
Context
Title
24805
Error
H.264/AVC video
RBSP.SPS
Incorrect residual_colour_transform_flag
24806
Error
H.264/AVC video
RBSP.SPS
Incorrect
bit_depth_luma_minus8
24807
Error
H.264/AVC video
RBSP.SPS
Incorrect
bit_depth_chroma_minus8
24808
Error
H.264/AVC video
RBSP.SPS
Incorrect qpprime_y_zero_transform_bypass_flag
24809
Error
H.264/AVC video
RBSP.SPS
Incorrect seq_scaling_matrix_present_flag
24810
Error
H.264/AVC video
RBSP.SPS
Incorrect seq_scaling_list_present_flag
24811
Error
H.264/AVC video
RBSP.PPS
Incorrect transform_8x8_mode_flag
24812
Error
H.264/AVC video
RBSP.PPS
Incorrect pic_scaling_matrix_present_flag
24813
Error
H.264/AVC video
RBSP.PPS
Incorrect pic_scaling_list_present_flag
24814
Error
H.264/AVC video
RBSP.PPS
Incorrect second_chroma_qp_index_offset
24815
Error
H.264/AVC video
Byte stream
Incorrect leading_zero_8bits
24816
Error
H.264/AVC video
RBSP.SEI
Incorrect film_grain_characteristics_cancel_flag
24817
Error
H.264/AVC video
RBSP.SEI
Incorrect model_id
24818
Error
H.264/AVC video
RBSP.SEI
Incorrect separate_colour_description_present_flag
24819
Error
H.264/AVC video
RBSP.SEI
Incorrect film_grain_bit_depth_luma_minus8
24820
Error
H.264/AVC video
RBSP.SEI
Incorrect film_grain_bit_depth_chroma_minus8
24821
Error
H.264/AVC video
RBSP.SEI
Incorrect
film_grain_full_range_flag
24822
Error
H.264/AVC video
RBSP.SEI
Incorrect
film_grain_colour_primaries
24823
Error
H.264/AVC video
RBSP.SEI
Incorrect film_grain_transfer_characteristics
Cerify Automated Video Content Verification System User Manual
Appendices
Appendix A: Alerts
Table 7: Alerts (cont.)
Alert ID
Severity
Class
Context
Title
24824
Error
H.264/AVC video
RBSP.SEI
Incorrect film_grain_matrix_coefficients
24825
Error
H.264/AVC video
RBSP.SEI
Incorrect blending_mode_id
24826
Error
H.264/AVC video
RBSP.SEI
Incorrect log2_scale_factor
24827
Error
H.264/AVC video
RBSP.SEI
Incorrect
comp_model_present_flag
24828
Error
H.264/AVC video
RBSP.SEI
Incorrect num_intensity_intervals_minus1
24829
Error
H.264/AVC video
RBSP.SEI
Incorrect num_model_values_minus1
24830
Error
H.264/AVC video
RBSP.SEI
Incorrect intensity_interval_lower_bound
24831
Error
H.264/AVC video
RBSP.SEI
Incorrect intensity_interval_upper_bound
24832
Error
H.264/AVC video
RBSP.SEI
Incorrect
comp_model_value
24833
Error
H.264/AVC video
RBSP.SEI
Incorrect film_grain_characteristics_repetition_period
24834
Error
H.264/AVC video
RBSP.SEI
Incorrect deblocking_display_preference_cancel_flag
24835
Error
H.264/AVC video
RBSP.SEI
Incorrect display_prior_to_deblocking_preferred_flag
24836
Error
H.264/AVC video
RBSP.SEI
Incorrect
dec_frame_buffering_constraint_flag
24837
Error
H.264/AVC video
RBSP.SEI
Incorrect deblocking_display_preference_repetition_period
24838
Error
H.264/AVC video
RBSP.SEI
Incorrect field_views_flag
24839
Error
H.264/AVC video
RBSP.SEI
Incorrect
top_field_is_left_view_flag
24840
Error
H.264/AVC video
RBSP.SEI
Incorrect current_frame_is_left_view_flag
24841
Error
H.264/AVC video
RBSP.SEI
Incorrect
next_frame_is_second_view_flag
24842
Error
H.264/AVC video
RBSP.SEI
Incorrect
left_view_self_contained_flag
Cerify Automated Video Content Verification System User Manual
147
Appendices
Appendix A: Alerts
Table 7: Alerts (cont.)
148
Alert ID
Severity
Class
Context
Title
24843
Error
H.264/AVC video
RBSP.SEI
Incorrect
right_view_self_contained_flag
24844
Error
H.264/AVC video
RBSP.Slice layer.Slice data
Incorrect transform_size_8x8_flag
24845
Error
H.264/AVC video
RBSP.Slice layer.Slice data
Incorrect pcm_sample_luma
24846
Error
H.264/AVC video
RBSP.Slice layer.Slice data
Incorrect pcm_sample_chroma
24847
Error
H.264/AVC video
Byte stream
Incorrect trailing_zero_8bits
24848
Error
H.264/AVC video
RBSP.SEI
Incorrect tone_map_id
24849
Error
H.264/AVC video
RBSP.SEI
Incorrect tone_map_cancel_flag
24850
Error
H.264/AVC video
RBSP.SEI
Incorrect tone_map_repetition_period
24851
Error
H.264/AVC video
RBSP.SEI
Incorrect
coded_data_bit_depth
24852
Error
H.264/AVC video
RBSP.SEI
Incorrect target_bit_depth
24853
Error
H.264/AVC video
RBSP.SEI
Incorrect model_id
24854
Error
H.264/AVC video
RBSP.SEI
Incorrect min_value
24855
Error
H.264/AVC video
RBSP.SEI
Incorrect max_value
24856
Error
H.264/AVC video
RBSP.SEI
Incorrect sigmoid_midpoint
24857
Error
H.264/AVC video
RBSP.SEI
Incorrect sigmoid_width
24858
Error
H.264/AVC video
RBSP.SEI
Incorrect
start_of_coded_interval
24859
Error
H.264/AVC video
RBSP.SEI
Incorrect num_pivots
24860
Error
H.264/AVC video
RBSP.SEI
Incorrect
coded_pivot_value
24861
Error
H.264/AVC video
RBSP.SEI
Incorrect target_pivot_value
24862
Error
H.264/AVC video
RBSP.SEI
Incorrect filter_hint_size_y
24863
Error
H.264/AVC video
RBSP.SEI
Incorrect filter_hint_size_x
24864
Error
H.264/AVC video
RBSP.SEI
Incorrect filter_hint_type
24865
Error
H.264/AVC video
RBSP.SEI
Incorrect filter_hint
24866
Error
H.264/AVC video
RBSP.SEI
Incorrect additional_extension_flag
25001
Error
YUV video
General
Incomplete frame read
25250
Error
Dolby-E
Dolby-E Frame
Dolby-E CRC Check Failed
Cerify Automated Video Content Verification System User Manual
Appendices
Appendix A: Alerts
Table 7: Alerts (cont.)
Alert ID
Severity
Class
Context
Title
25251
Error
Dolby-E
Dolby-E Frame
Couldn't read Dolby-E
frame
25501
Error
WMA
WMA Frame
Bitstream Corruption
26000
Error
VC-1 video
Sequence Layer
Invalid profile
26001
Error
VC-1 video
Sequence Layer
Invalid level
26002
Error
VC-1 video
Sequence Layer
Invalid chromaformat
26012
Error
VC-1 video
Sequence Layer
Invalid reserved
26017
Error
VC-1 video
Sequence Layer
Invalid aspect_ratio
26022
Error
VC-1 video
Sequence Layer
Invalid frameratenr
26023
Error
VC-1 video
Sequence Layer
Invalid frameratedr
26026
Error
VC-1 video
Sequence Layer
Invalid color_prim
26027
Error
VC-1 video
Sequence Layer
Invalid transfer_char
26028
Error
VC-1 video
Sequence Layer
Invalid matrix_coef
26035
Error
VC-1 video
Picture Layer
Bad VLC for fcm
26036
Error
VC-1 video
Picture Layer
Bad VLC for ptype
26049
Error
VC-1 video
Picture Layer
Invalid pqindex
26055
Error
VC-1 video
Picture Layer
Bad VLC for imode
26057
Error
VC-1 video
Picture Layer
Bad VLC for condover
26058
Error
VC-1 video
Picture Layer
Bad VLC for transacfrm
26059
Error
VC-1 video
Picture Layer
Bad VLC for transacfrm2
26061
Error
VC-1 video
Picture Layer
Bad VLC for bfraction
26066
Error
VC-1 video
Picture Layer
Bad VLC for norm2
26067
Error
VC-1 video
Picture Layer
Bad VLC for diff2
26068
Error
VC-1 video
Picture Layer
Bad VLC for norm6
26069
Error
VC-1 video
Picture Layer
Bad VLC for diff6
26070
Error
VC-1 video
Picture Layer
Bad VLC for mvrange
26078
Error
VC-1 video
Picture Layer
Bad VLC for mvmode
26079
Error
VC-1 video
Picture Layer
Bad VLC for mvmode2
26080
Error
VC-1 video
Picture Layer
Bad VLC for mvtab
26081
Error
VC-1 video
Picture Layer
Bad VLC for cbptab
26084
Error
VC-1 video
Macroblock Layer
Bad VLC for mqdiff
26088
Error
VC-1 video
Slice Layer
Invalid slice_addr
26089
Error
VC-1 video
Slice Layer
Bad VLC for
unknown_huffman
26090
Error
VC-1 video
Macroblock Layer
Bad VLC for cbpcy
26091
Error
VC-1 video
Block Layer
Bad VLC for dccoef
26092
Error
VC-1 video
Block Layer
Bad VLC for dccoefesc
26096
Error
VC-1 video
Block Layer
Bad VLC for esclvlsz
Cerify Automated Video Content Verification System User Manual
149
Appendices
Appendix A: Alerts
Table 7: Alerts (cont.)
150
Alert ID
Severity
Class
Context
Title
26098
Error
VC-1 video
Block Layer
Bad VLC for esclvl
26099
Error
VC-1 video
Block Layer
Bad VLC for escrun
26100
Error
VC-1 video
Block Layer
Bad VLC for escmode
26104
Error
VC-1 video
Block Layer
Bad VLC for accoef1
26105
Error
VC-1 video
Block Layer
Bad VLC for accoef2
26106
Error
VC-1 video
Macroblock Layer
Bad VLC for mvtab_index
26107
Error
VC-1 video
Macroblock Layer
Bad VLC for dmv_x
26108
Error
VC-1 video
Macroblock Layer
Bad VLC for dmv_y
26112
Error
VC-1 video
Macroblock Layer
Bad VLC for ttmb
26113
Error
VC-1 video
Block Layer
Bad VLC for ttblk
26114
Error
VC-1 video
Block Layer
Bad VLC for subblkpat
26116
Error
VC-1 video
Macroblock Layer
Bad VLC for bmvtype
26124
Error
VC-1 video
Entry Point Header
Invalid dquant
26127
Error
VC-1 video
Entry Point Header
Invalid quantizer
26137
Error
VC-1 video
Picture Layer
Bad VLC for mbmode
26140
Error
VC-1 video
Macroblock Layer
Bad VLC for 2mvbp
26141
Error
VC-1 video
Macroblock Layer
Bad VLC for 4mvbp
26142
Error
VC-1 video
Picture Layer
Bad VLC for dmvrange
26147
Error
VC-1 video
Picture Layer
Bad VLC for mbmodetab
26151
Error
VC-1 video
Sequence Layer
Invalid startcode_prefix
26152
Error
VC-1 video
Sequence Layer
Invalid startcode_suffix
26156
Error
VC-1 video
Picture Layer
Invalid bf
26160
Error
VC-1 video
Sequence Layer
Invalid res_sm
26161
Error
VC-1 video
Sequence Layer
Invalid res_rtm_flag
26162
Error
VC-1 video
Sequence Layer
Invalid res_x8
26164
Error
VC-1 video
Sequence Layer
Invalid res_fasttx
26165
Error
VC-1 video
Sequence Layer
Invalid res_transtab
26169
Error
VC-1 video
Picture Layer
Bad VLC for refdist
26176
Error
VC-1 video
Picture Layer
Bad VLC for intcompfield
26179
Error
VC-1 video
Sequence Layer
Invalid flushing_zero_bit
26180
Error
VC-1 video
Sequence Layer
Invalid flushing_one_bit
26250
Error
ASF
ASF Container layer
ASF Container Error
26364
Error
VC-1 video
Block Layer
Too many coefficients in
block
26365
Error
VC-1 video
Slice Layer
Unexpected slice start
address
26366
Error
VC-1 video
Picture Layer
Mquant out of range
26367
Error
VC-1 video
Sequence Layer
Profile violation
Cerify Automated Video Content Verification System User Manual
Appendices
Appendix A: Alerts
Table 7: Alerts (cont.)
Alert ID
Severity
Class
Context
Title
26368
Error
VC-1 video
Sequence Layer
Unordered HRD
parameters
26369
Error
VC-1 video
Entry Point Header
broken_link should be 0
26370
Error
VC-1 video
Entry Point Header
Frame size change not
indicated
26371
Error
VC-1 video
Entry Point Header
Maximum frame size
exceeded
26372
Error
VC-1 video
Entry Point Header
Range mapping
changed without
CLOSED_ENTRY=1
26373
Error
VC-1 video
Macroblock Layer
Intra block mode invalid
26374
Error
VC-1 video
Picture Layer
Frame count not
consecutive
26375
Error
VC-1 video
Picture Layer
Range reduction different
to that of next anchor
26376
Error
VC-1 video
Picture Layer
B Frame MV range smaller
than next anchor
26377
Error
VC-1 video
Picture Layer
Picture resolution different
from preceding I frame
26378
Error
VC-1 video
Picture Layer
Unexpected frame coding
mode
26379
Error
VC-1 video
Picture Layer
RNDCTRL must be 0 in I
pictures
26380
Error
VC-1 video
Picture Layer
Pan scan information not
found
26381
Error
VC-1 video
Picture Layer
Missing start code
26501
Error
Parameter
Audio Parameter Check
Test for attribute AAC SBR
Information failed
26502
Error
Parameter
Audio Parameter Check
Test for attribute AC3
Nominal Bit Rate failed
26503
Error
Parameter
Audio Parameter Check
Test for attribute Audio Bits
per Second failed
26504
Error
Parameter
Audio Parameter Check
Test for attribute Audio
Length in Seconds failed
26505
Error
Parameter
Audio Parameter Check
Test for attribute MPEG2
Error Protection failed
26506
Error
Parameter
Audio Parameter Check
Test for attribute MPEG2
Stereo Coding failed
26507
Error
Parameter
Audio Parameter Check
Test for attribute
MPEG2 Variable Bit Rate
failed
26508
Error
Parameter
Audio Parameter Check
Test for attribute Number
of Audio Channels failed
Cerify Automated Video Content Verification System User Manual
151
Appendices
Appendix A: Alerts
Table 7: Alerts (cont.)
152
Alert ID
Severity
Class
Context
Title
26509
Error
Parameter
Audio Parameter Check
Test for attribute Audio
Profile failed
26510
Error
Parameter
Audio Parameter Check
Test for attribute Audio
Sample Depth failed
26511
Error
Parameter
Audio Parameter Check
Test for attribute Audio
Sample Rate failed
26512
Error
Parameter
Audio Parameter Check
Test for attribute
Uncompressed Audio
Little-Endian failed
26513
Error
Parameter
Container Parameter Check
Test for attribute Bits per
Second (system) failed
26514
Error
Parameter
Container Parameter Check
Test for attribute System
Length in Bytes failed
26515
Error
Parameter
Container Parameter Check
Test for attribute System
Length in Seconds failed
26516
Error
Parameter
Container Parameter Check
Test for attribute MPEG2
Program Stream Has
Audio Stream failed
26517
Error
Parameter
Container Parameter Check
Test for attribute MPEG2
Program Stream Has Pack
Header failed
26518
Error
Parameter
Container Parameter Check
Test for attribute MPEG2
Program Stream Has
Padding Stream failed
26519
Error
Parameter
Container Parameter Check
Test for attribute MPEG2
Program Stream Has
Pinnacle VBI failed
26520
Error
Parameter
Container Parameter Check
Test for attribute MPEG2
Program Stream Has
Private Stream 1 failed
26521
Error
Parameter
Container Parameter Check
Test for attribute MPEG2
Program Stream Has
Private Stream 2 failed
26522
Error
Parameter
Container Parameter Check
Test for attribute MPEG2
Program Stream Has
Program Stream Directory
failed
26523
Error
Parameter
Container Parameter Check
Test for attribute MPEG2
Program Stream Has
Program Stream Map
failed
26524
Error
Parameter
Container Parameter Check
Test for attribute MPEG2
Program Stream Has
System Header failed
Cerify Automated Video Content Verification System User Manual
Appendices
Appendix A: Alerts
Table 7: Alerts (cont.)
Alert ID
Severity
Class
Context
Title
26525
Error
Parameter
Container Parameter Check
Test for attribute MPEG2
Program Stream Has
Video Stream failed
26526
Error
Parameter
Container Parameter Check
Test for attribute MPEG2
Transport Stream Has
DVB Closed Caption
Information failed
26527
Error
Parameter
Container Parameter Check
Test for attribute MPEG2
Transport Stream Has
DVB Teletext Information
failed
26528
Error
Parameter
Container Parameter Check
Test for attribute MPEG2
Transport Stream Packet
Size failed
26529
Error
Parameter
Container Parameter Check
Test for attribute MXF
Operational Pattern failed
26530
Error
Parameter
Container Parameter Check
Test for attribute Number
of Audio Streams failed
26531
Error
Parameter
Container Parameter Check
Test for attribute Number
of Video Streams failed
26532
Error
Parameter
Video Parameter Check
Test for attribute AVC Level
failed
26533
Error
Parameter
Video Parameter Check
Test for attribute AVC
Profile failed
26534
Error
Parameter
Video Parameter Check
Test for attribute AVC
Profile (constraint set 0
flag) failed
26535
Error
Parameter
Video Parameter Check
Test for attribute AVC
Profile (constraint set 1
flag) failed
26536
Error
Parameter
Video Parameter Check
Test for attribute AVC
Profile (constraint set 2
flag) failed
26537
Error
Parameter
Video Parameter Check
Test for attribute Average
Video Frame Rate failed
26538
Error
Parameter
Video Parameter Check
Test for attribute Video
Bidirectional Prediction
failed
26539
Error
Parameter
Video Parameter Check
Test for attribute Video
Forward Prediction failed
26540
Error
Parameter
Video Parameter Check
Test for attribute Video Bits
per Second failed
26541
Error
Parameter
Video Parameter Check
Test for attribute Video
Colour Format failed
Cerify Automated Video Content Verification System User Manual
153
Appendices
Appendix A: Alerts
Table 7: Alerts (cont.)
154
Alert ID
Severity
Class
Context
Title
26542
Error
Parameter
Video Parameter Check
Test for attribute Video
Colour Depth failed
26543
Error
Parameter
Video Parameter Check
Test for attribute Video
Display Aspect Ratio failed
26544
Error
Parameter
Video Parameter Check
Test for attribute Video
Frame Height failed
26545
Error
Parameter
Video Parameter Check
Test for attribute Video
Frame Width failed
26546
Error
Parameter
Video Parameter Check
Test for attribute Video
Interlaced failed
26547
Error
Parameter
Video Parameter Check
Test for attribute Video
Length in Seconds failed
26548
Error
Parameter
Video Parameter Check
Test for attribute MPEG2
Copyrighted failed
26549
Error
Parameter
Video Parameter Check
Test for attribute MPEG2
Copyright Extension failed
26550
Error
Parameter
Video Parameter Check
Test for attribute MPEG2
Copyright Original/Copy
failed
26551
Error
Parameter
Video Parameter Check
Test for attribute MPEG2
Copyright Number failed
26552
Error
Parameter
Video Parameter Check
Test for attribute MPEG2
Has Sequence Display
Extension failed
26553
Error
Parameter
Video Parameter Check
Test for attribute MPEG2
Level failed
26554
Error
Parameter
Video Parameter Check
Test for attribute MPEG2
Nominal Bit Rate failed
26555
Error
Parameter
Video Parameter Check
Test for attribute
MPEG2 VBV Buffer Size
failed
26556
Error
Parameter
Video Parameter Check
Test for attribute MPEG4
GOV Header failed
26558
Error
Parameter
Video Parameter Check
Test for attribute Video
Level failed
26559
Error
Parameter
Video Parameter Check
Test for attribute MPEG4
Uses 4MV failed
26560
Error
Parameter
Video Parameter Check
Test for attribute MPEG4
Uses AC Prediction failed
26561
Error
Parameter
Video Parameter Check
Test for attribute MPEG4
Uses Data Partitioning
failed
Cerify Automated Video Content Verification System User Manual
Appendices
Appendix A: Alerts
Table 7: Alerts (cont.)
Alert ID
Severity
Class
Context
Title
26562
Error
Parameter
Video Parameter Check
Test for attribute MPEG4
Uses GMC failed
26563
Error
Parameter
Video Parameter Check
Test for attribute MPEG4
Uses Quarter Sample
failed
26564
Error
Parameter
Video Parameter Check
Test for attribute MPEG4
Uses RVLC failed
26565
Error
Parameter
Video Parameter Check
Test for attribute MPEG4
Uses Resync Marker failed
26566
Error
Parameter
Video Parameter Check
Test for attribute MPEG4
Uses Visual Object Header
failed
26567
Error
Parameter
Video Parameter Check
Test for attribute MPEG4
Uses Video Object
Sequence Header failed
26568
Error
Parameter
Video Parameter Check
Test for attribute Video
Profile failed
26569
Error
Parameter
Video Parameter Check
Test for attribute Video
Sample Aspect Ratio failed
26570
Error
Parameter
Video Parameter Check
Test for attribute Video
Standard failed
26571
Error
Parameter
Video Parameter Check
Test for attribute Uses
CABAC failed
26572
Error
Parameter
Video Parameter Check
Test for attribute Uses
CAVLC failed
26573
Error
Parameter
Video Parameter Check
Test for attribute Uses Data
Partitioning failed
26574
Error
Parameter
Video Parameter Check
Test for attribute Uses Non
DP Slices failed
26575
Error
Parameter
Video Parameter Check
Test for attribute VC1 Uses
Intensity Compensation
failed
26576
Error
Parameter
Video Parameter Check
Test for attribute VC1 Uses
Loop Filter failed
26577
Error
Parameter
Video Parameter Check
Test for attribute VC1 Uses
Multi-Res failed
26578
Error
Parameter
Video Parameter Check
Test for attribute VC1 Uses
Range Mapping failed
26579
Error
Parameter
Audio Parameter Check
Test for attribute AC3 Audio
Coding Mode failed
26580
Error
Parameter
Audio Parameter Check
Test for attribute AC3 Audio
Low Frequency Effects
Channel failed
Cerify Automated Video Content Verification System User Manual
155
Appendices
Appendix A: Alerts
Table 7: Alerts (cont.)
156
Alert ID
Severity
Class
Context
Title
26581
Error
Parameter
Audio Parameter Check
Test for attribute Program
Sequence failed
26582
Error
Parameter
Audio Parameter Check
Test for attribute Frame
Rate failed
26583
Error
Parameter
Audio Parameter Check
Test for attribute Audio
Standard failed
26584
Error
Parameter
Video Parameter Check
Test for attribute Video
Type failed
26585
Error
Parameter
Audio Parameter Check
Test for attribute Audio
Track Index failed
26586
Error
Parameter
Container Parameter Check
Test for attribute Video
Duration Minus Audio
Duration failed
26587
Error
Parameter
Video Parameter Check
Test for attribute DV
Standards Body failed
26588
Error
Parameter
Video Parameter Check
Test for attribute DV Has
Closed Caption (Standard)
failed
26589
Error
Parameter
Audio Parameter Check
Test for attribute DV Audio
Locked failed
26590
Error
Parameter
Video Parameter Check
Test for attribute DV Has
Closed Caption (GVG Line
19) failed
26591
Error
Parameter
Container Parameter Check
Test for attribute MXF
Footer Partition Present
failed
26592
Error
Parameter
Video Parameter Check
Test for attribute Video
Resolution failed
26593
Error
Parameter
Container Parameter Check
Test for attribute Mxf Clip
Duration Comparison
failed
26594
Error
Parameter
Container Parameter Check
Test for attribute Mxf Start
TimeCode failed
26595
Error
Parameter
Video Parameter Check
Test for attribute Alpha
Channel failed
26596
Error
Parameter
Video Parameter Check
Test for attribute Display
Width failed
26597
Error
Parameter
Video Parameter Check
Test for attribute Display
Height failed
27001
Error
Template rule
Audio Test Case
Audio silence missing
27002
Error
Template rule
Audio Test Case
Audio silence exceeds
permitted length
Cerify Automated Video Content Verification System User Manual
Appendices
Appendix A: Alerts
Table 7: Alerts (cont.)
Alert ID
Severity
Class
Context
Title
27003
Error
Template rule
Audio Test Case
Audio peak level exceeds
permitted maximum value
27004
Error
Template rule
Audio Test Case
Audio peak level does not
reach required minimum
value
27006
Error
Template rule
Audio Test Case
Maximum permitted
number of audio clips
exceeded
27007
Error
Template rule
Audio Test Case
Audio test tone missing
27008
Error
Template rule
Audio Test Case
Audio test tone exceeds
permitted length
27009
Error
Template rule
Video Test Case
Black video sequence
missing
27010
Error
Template rule
Video Test Case
Black video sequence
exceeds permitted length
27011
Error
Template rule
Video Test Case
Block Artifacts exceed
permitted number
27012
Error
Template rule
Video Test Case
Illegal signal component
detected
27013
Error
Template rule
Video Test Case
Invalid signal component
detected
27014
Error
Parameter
Container Parameter Check
Violation of Cable Labs
VOD CEP specification
27015
Error
Template rule
Video Test Case
Bad placement of MPEG-2
GOP headers
27016
Error
Template rule
Video Test Case
An MPEG-2 GOP header
should have been closed,
but was not
27017
Error
Template rule
Audio Test Case
Audio mute missing
27018
Error
Template rule
Audio Test Case
Audio mute exceeds
permitted length
27019
Error
Template rule
Video Test Case
Quantiser level exceeds
permitted value
27020
Error
Template rule
Video Test Case
Monochrome video
sequence detected
27021
Error
Template rule
Video Test Case
Letterboxing error detected
27022
Error
Template rule
Video Test Case
Pillarboxing error detected
27023
Error
Template rule
Video Test Case
Luma limit violation
detected
27024
Error
Template rule
Video Test Case
RGB component violation
detected
27026
Error
Template rule
Container Parameter Check
Audio on unexpected PID
Cerify Automated Video Content Verification System User Manual
157
Appendices
Appendix A: Alerts
Table 7: Alerts (cont.)
158
Alert ID
Severity
Class
Context
Title
27027
Error
Template rule
Container Parameter Check
Video on unexpected PID
27028
Error
Template rule
Video Test Case
Freeze frame detected
27029
Error
Template rule
Video Test Case
Baseband field order error
27030
Error
Template rule
Video Test Case
Stream flag field order
error
27031
Error
Template rule
Video Test Case
Field order mismatch
27032
Error
Template rule
Video Test Case
Drop frame violation
27033
Error
Template rule
Video Test Case
No field order flagged
27034
Error
Template rule
Video Test Case
Invalid field order flags
27035
Error
Template rule
Video Test Case
Line 19 closed captions
27036
Error
Template rule
Video Test Case
Line 19 closed captions
data
27037
Error
Template rule
Audio Test Case
Audio Loudness exceeds
permitted maximum limit
27038
Error
Template rule
Audio Test Case
Audio Loudness below
permitted minimum limit
27501
Error
MPEG-1/2 audio
Audio Header
Incorrect syncword
27502
Error
MPEG-1/2 audio
Audio Header
Incorrect ID
27503
Error
MPEG-1/2 audio
Audio Header
Incorrect layer
27504
Error
MPEG-1/2 audio
Audio Header
Incorrect protection_bit
27505
Error
MPEG-1/2 audio
Audio Header
Incorrect bitrate_index
27506
Error
MPEG-1/2 audio
Audio Header
Incorrect sampling_frequency
27507
Error
MPEG-1/2 audio
Audio Header
Incorrect padding_bit
27508
Error
MPEG-1/2 audio
Audio Header
Incorrect private_bit
27509
Error
MPEG-1/2 audio
Audio Header
Incorrect mode
27510
Error
MPEG-1/2 audio
Audio Header
Incorrect mode_extension
27511
Error
MPEG-1/2 audio
Audio Header
Incorrect copyright
27512
Error
MPEG-1/2 audio
Audio Header
Incorrect original_copy
27513
Error
MPEG-1/2 audio
Audio Header
Incorrect emphasis
27514
Error
MPEG-1/2 audio
Audio Error Check
Incorrect crc_check
27515
Error
MPEG-1/2 audio
Audio Data
Incorrect allocation
27516
Error
MPEG-1/2 audio
Audio Data
Incorrect scalefactor
27517
Error
MPEG-1/2 audio
Audio Data
Incorrect sample
27518
Error
MPEG-1/2 audio
Audio Data
Incorrect scfsi
27519
Error
MPEG-1/2 audio
Audio Data
Incorrect samplecode
27520
Error
MPEG-1/2 audio
Audio Data
Incorrect main_data_begin
27521
Error
MPEG-1/2 audio
Audio Data
Incorrect private_bits
27522
Error
MPEG-1/2 audio
Audio Data
Incorrect part2_3_Length
Cerify Automated Video Content Verification System User Manual
Appendices
Appendix A: Alerts
Table 7: Alerts (cont.)
Alert ID
Severity
Class
Context
27523
Error
MPEG-1/2 audio
Audio Data
Incorrect big_values
27524
Error
MPEG-1/2 audio
Audio Data
Incorrect global_gain
27525
Error
MPEG-1/2 audio
Audio Data
Incorrect scalefac_compress
27526
Error
MPEG-1/2 audio
Audio Data
Incorrect window_switching_flag
27527
Error
MPEG-1/2 audio
Audio Data
Incorrect block_type
27528
Error
MPEG-1/2 audio
Audio Data
Incorrect mixed_block_flag
27529
Error
MPEG-1/2 audio
Audio Data
Incorrect table_select
27530
Error
MPEG-1/2 audio
Audio Data
Incorrect subblock_gain
27531
Error
MPEG-1/2 audio
Audio Data
Incorrect region0_count
27532
Error
MPEG-1/2 audio
Audio Data
Incorrect regionl_count
27533
Error
MPEG-1/2 audio
Audio Data
Incorrect preflag
27534
Error
MPEG-1/2 audio
Audio Data
Incorrect scalefac_scale
27535
Error
MPEG-1/2 audio
Audio Data
Incorrect countltable_select
27536
Error
MPEG-1/2 audio
Audio Main Data
Incorrect scalefac_l
27537
Error
MPEG-1/2 audio
Audio Main Data
Incorrect scalefac_s
27538
Error
MPEG-1/2 audio
Audio Huffman Code Bits
Incorrect hcod
27539
Error
MPEG-1/2 audio
Audio Huffman Code Bits
Incorrect linbitsx
27540
Error
MPEG-1/2 audio
Audio Huffman Code Bits
Incorrect signx
27541
Error
MPEG-1/2 audio
Audio Huffman Code Bits
Incorrect linbitsy
27542
Error
MPEG-1/2 audio
Audio Huffman Code Bits
Incorrect signy
27543
Error
MPEG-1/2 audio
Audio Huffman Code Bits
Incorrect signv
27544
Error
MPEG-1/2 audio
Audio Huffman Code Bits
Incorrect signw
27545
Error
MPEG-1/2 audio
Audio Ancillary Data
Incorrect ancillary_bit
27547
Error
MPEG-1/2 audio
Audio Header
ID is inconsistent between
frames
27548
Error
MPEG-1/2 audio
Audio Header
Layer is inconsistent
between frames
27549
Error
MPEG-1/2 audio
Audio Header
Protection bit is
inconsistent between
frames
27550
Error
MPEG-1/2 audio
Audio Header
Sample frequency is
inconsistent between
frames
27551
Error
MPEG-1/2 audio
Audio Header
Copyright bit is inconsistent
between frames
Cerify Automated Video Content Verification System User Manual
Title
159
Appendices
Appendix A: Alerts
Table 7: Alerts (cont.)
160
Alert ID
Severity
Class
Context
Title
27552
Error
MPEG-1/2 audio
Audio Header
Original/Copy bit is
inconsistent between
frames
27553
Error
MPEG-1/2 audio
Audio Header
Emphasis bit is
inconsistent between
frames
27751
Error
AAC audio
Adts Header
Incorrect Adts_Syncword
27752
Error
AAC audio
Adts Header
Incorrect Adts_ID
27753
Error
AAC audio
Adts Header
Incorrect Adts_Layer
27754
Error
AAC audio
Adts Header
Incorrect Adts_protection_absent
27755
Error
AAC audio
Adts Header
Incorrect Adts_Profile_ObjectType
27756
Error
AAC audio
Adts Header
Incorrect Adts_sampling_frequency_index
27757
Error
AAC audio
Adts Header
Incorrect Adts_private_bit
27758
Error
AAC audio
Adts Header
Incorrect Adts_channel_configuration
27759
Error
AAC audio
Adts Header
Incorrect Adts_original_copy
27760
Error
AAC audio
Adts Header
Incorrect Adts_home
27761
Error
AAC audio
Adts Header
Incorrect Adts_copyright_identification_bit
27762
Error
AAC audio
Adts Header
Incorrect Adts_copyright_identification_start
27763
Error
AAC audio
Adts Header
Incorrect
Adts_aac_frame_length
27764
Error
AAC audio
Adts Header
Incorrect
Adts_adts_buffer_fullness
27765
Error
AAC audio
Adts Header
Incorrect Adts_no_raw_data_blocks_in_frame
27766
Error
AAC audio
Adts Error Check
Incorrect Adts_crc_check
27767
Error
AAC audio
Adts Error Check
Incorrect
Adts_raw_data_block_position
27768
Error
AAC audio
Aac Decoder Config
Incorrect audioObjectType
27769
Error
AAC audio
Aac Decoder Config
Incorrect samplingFrequencyIndex
27770
Error
AAC audio
Aac Decoder Config
Incorrect samplingFrequency
Cerify Automated Video Content Verification System User Manual
Appendices
Appendix A: Alerts
Table 7: Alerts (cont.)
Alert ID
Severity
Class
Context
Title
27771
Error
AAC audio
Aac Decoder Config
Incorrect channelConfiguration
27772
Error
AAC audio
Aac Decoder Config
Incorrect extensionSamplingFrequencyIndex
27773
Error
AAC audio
Aac Decoder Config
Incorrect extensionSamplingFrequency
27774
Error
AAC audio
Aac Decoder Config
Incorrect epConfig
27775
Error
AAC audio
Aac Decoder Config
Incorrect directMapping
27776
Error
AAC audio
Aac Decoder Config
Incorrect syncExtensionType
27777
Error
AAC audio
Aac Decoder Config
Incorrect extensionAudioObjectType
27778
Error
AAC audio
Aac Decoder Config
Incorrect sbrPresentFlag
27779
Error
AAC audio
Aac Decoder Config
Incorrect frameLengthFlag
27780
Error
AAC audio
Aac Decoder Config
Incorrect dependsOnCoreCoder
27781
Error
AAC audio
Aac Decoder Config
Incorrect coreCoderDelay
27782
Error
AAC audio
Aac Decoder Config
Incorrect extensionFlag
27783
Error
AAC audio
Aac Decoder Config
Incorrect layerNr
27784
Error
AAC audio
Aac Decoder Config
Incorrect numOfSubFrame
27785
Error
AAC audio
Aac Decoder Config
Incorrect layer_length
27786
Error
AAC audio
Aac Decoder Config
Incorrect aacSectionDataResilienceFlag
27787
Error
AAC audio
Aac Decoder Config
Incorrect aacScalefactorDataResilienceFlag
27788
Error
AAC audio
Aac Decoder Config
Incorrect aacSpectralDataResilienceFlag
27789
Error
AAC audio
Aac Decoder Config
Incorrect extensionFlag3
27790
Error
AAC audio
Aac Program Config
Incorrect element_instance_tag
27791
Error
AAC audio
Aac Program Config
Incorrect object_type
27792
Error
AAC audio
Aac Program Config
Incorrect sampling_frequency_index
27793
Error
AAC audio
Aac Program Config
Incorrect num_front_channel_elements
27794
Error
AAC audio
Aac Program Config
Incorrect num_side_channel_elements
27795
Error
AAC audio
Aac Program Config
Incorrect num_back_channel_elements
27796
Error
AAC audio
Aac Program Config
Incorrect num_lfe_channel_elements
Cerify Automated Video Content Verification System User Manual
161
Appendices
Appendix A: Alerts
Table 7: Alerts (cont.)
162
Alert ID
Severity
Class
Context
Title
27797
Error
AAC audio
Aac Program Config
Incorrect num_assoc_data_elements
27798
Error
AAC audio
Aac Program Config
Incorrect num_valid_cc_elements
27799
Error
AAC audio
Aac Program Config
Incorrect mono_mixdown_present
27800
Error
AAC audio
Aac Program Config
Incorrect mono_mixdown_element_number
27801
Error
AAC audio
Aac Program Config
Incorrect stereo_mixdown_present
27802
Error
AAC audio
Aac Program Config
Incorrect stereo_mixdown_element_number
27803
Error
AAC audio
Aac Program Config
Incorrect matrix_mixdown_idx_present
27804
Error
AAC audio
Aac Program Config
Incorrect matrix_mixdown_idx
27805
Error
AAC audio
Aac Program Config
Incorrect pseudo_surround_enable
27806
Error
AAC audio
Aac Program Config
Incorrect front_element_is_cpe
27807
Error
AAC audio
Aac Program Config
Incorrect front_element_tag_select
27808
Error
AAC audio
Aac Program Config
Incorrect side_element_is_cpe
27809
Error
AAC audio
Aac Program Config
Incorrect side_element_tag_select
27810
Error
AAC audio
Aac Program Config
Incorrect back_element_is_cpe
27811
Error
AAC audio
Aac Program Config
Incorrect back_element_tag_select
27812
Error
AAC audio
Aac Program Config
Incorrect lfe_element_tag_select
27813
Error
AAC audio
Aac Program Config
Incorrect assoc_data_element_tag_select
27814
Error
AAC audio
Aac Program Config
Incorrect cc_element_is_ind_sw
27815
Error
AAC audio
Aac Program Config
Incorrect valid_cc_element_tag_select
27816
Error
AAC audio
Aac Program Config
Incorrect comment_field_bytes
27817
Error
AAC audio
Aac Program Config
Incorrect comment_field_data
Cerify Automated Video Content Verification System User Manual
Appendices
Appendix A: Alerts
Table 7: Alerts (cont.)
Alert ID
Severity
Class
Context
Title
27818
Error
AAC audio
Aac Main Ssr Lc Ltp
Payloads
Incorrect id_syn_ele
27819
Error
AAC audio
Aac Main Ssr Lc Ltp
Payloads
Incorrect common_window
27820
Error
AAC audio
Aac Main Ssr Lc Ltp
Payloads
Incorrect
ms_mask_present
27821
Error
AAC audio
Aac Main Ssr Lc Ltp
Payloads
Incorrect ms_used
27822
Error
AAC audio
Aac Main Ssr Lc Ltp
Payloads
Incorrect ics_reserved_bit
27823
Error
AAC audio
Aac Main Ssr Lc Ltp
Payloads
Incorrect window_sequence
27824
Error
AAC audio
Aac Main Ssr Lc Ltp
Payloads
Incorrect window_shape
27825
Error
AAC audio
Aac Main Ssr Lc Ltp
Payloads
Incorrect max_sfb
27826
Error
AAC audio
Aac Main Ssr Lc Ltp
Payloads
Incorrect scale_factor_grouping
27827
Error
AAC audio
Aac Main Ssr Lc Ltp
Payloads
Incorrect predictor_data_present
27828
Error
AAC audio
Aac Main Ssr Lc Ltp
Payloads
Incorrect predictor_reset
27829
Error
AAC audio
Aac Main Ssr Lc Ltp
Payloads
Incorrect predictor_reset_group_number
27830
Error
AAC audio
Aac Main Ssr Lc Ltp
Payloads
Incorrect prediction_used
27831
Error
AAC audio
Aac Main Ssr Lc Ltp
Payloads
Incorrect ltp_data_present
27832
Error
AAC audio
Aac Main Ssr Lc Ltp
Payloads
Incorrect number_pulse
27833
Error
AAC audio
Aac Main Ssr Lc Ltp
Payloads
Incorrect pulse_start_sfb
27834
Error
AAC audio
Aac Main Ssr Lc Ltp
Payloads
Incorrect pulse_offset
27835
Error
AAC audio
Aac Main Ssr Lc Ltp
Payloads
Incorrect pulse_amp
27836
Error
AAC audio
Aac Main Ssr Lc Ltp
Payloads
Incorrect ind_sw_cce_flag
27837
Error
AAC audio
Aac Main Ssr Lc Ltp
Payloads
Incorrect num_coupled_elements
27838
Error
AAC audio
Aac Main Ssr Lc Ltp
Payloads
Incorrect cc_target_is_cpe
Cerify Automated Video Content Verification System User Manual
163
Appendices
Appendix A: Alerts
Table 7: Alerts (cont.)
164
Alert ID
Severity
Class
Context
Title
27839
Error
AAC audio
Aac Main Ssr Lc Ltp
Payloads
Incorrect cc_target_tag_select
27840
Error
AAC audio
Aac Main Ssr Lc Ltp
Payloads
Incorrect cc_l
27841
Error
AAC audio
Aac Main Ssr Lc Ltp
Payloads
Incorrect cc_r
27842
Error
AAC audio
Aac Main Ssr Lc Ltp
Payloads
Incorrect cc_domain
27843
Error
AAC audio
Aac Main Ssr Lc Ltp
Payloads
Incorrect gain_element_sign
27844
Error
AAC audio
Aac Main Ssr Lc Ltp
Payloads
Incorrect gain_element_scale
27845
Error
AAC audio
Aac Main Ssr Lc Ltp
Payloads
Incorrect common_gain_element_present
27846
Error
AAC audio
Aac Main Ssr Lc Ltp
Payloads
Incorrect hcod_sf
27847
Error
AAC audio
Aac Main Ssr Lc Ltp
Payloads
Incorrect
data_byte_align_flag
27848
Error
AAC audio
Aac Main Ssr Lc Ltp
Payloads
Incorrect count
27849
Error
AAC audio
Aac Main Ssr Lc Ltp
Payloads
Incorrect esc_count
27850
Error
AAC audio
Aac Main Ssr Lc Ltp
Payloads
Incorrect
data_stream_byte
27851
Error
AAC audio
Aac Main Ssr Lc Ltp
Payloads
Incorrect max_band
27852
Error
AAC audio
Aac Main Ssr Lc Ltp
Payloads
Incorrect alevcode
27853
Error
AAC audio
Aac Main Ssr Lc Ltp
Payloads
Incorrect aloccode
27854
Error
AAC audio
Aac Main Ssr Lc Ltp
Payloads
Incorrect adjust_num
27855
Error
AAC audio
Aac Subsidiary Payloads
Incorrect global_gain
27856
Error
AAC audio
Aac Subsidiary Payloads
Incorrect
pulse_data_present
27857
Error
AAC audio
Aac Subsidiary Payloads
Incorrect tns_data_present
27858
Error
AAC audio
Aac Subsidiary Payloads
Incorrect gain_control_data_present
27859
Error
AAC audio
Aac Subsidiary Payloads
Incorrect length_of_reordered_spectral_data
Cerify Automated Video Content Verification System User Manual
Appendices
Appendix A: Alerts
Table 7: Alerts (cont.)
Alert ID
Severity
Class
Context
Title
27860
Error
AAC audio
Aac Subsidiary Payloads
Incorrect
length_of_longest_codeword
27861
Error
AAC audio
Aac Subsidiary Payloads
Incorrect sect_cb
27862
Error
AAC audio
Aac Subsidiary Payloads
Incorrect sect_len_incr
27863
Error
AAC audio
Aac Subsidiary Payloads
Incorrect dpcm_noise_nrg
27864
Error
AAC audio
Aac Subsidiary Payloads
Incorrect sf_concealment
27865
Error
AAC audio
Aac Subsidiary Payloads
Incorrect rev_global_gain
27866
Error
AAC audio
Aac Subsidiary Payloads
Incorrect length_of_rvlc_sf
27867
Error
AAC audio
Aac Subsidiary Payloads
Incorrect rvlc_cod_sf
27868
Error
AAC audio
Aac Subsidiary Payloads
Incorrect sf_escapes_present
27869
Error
AAC audio
Aac Subsidiary Payloads
Incorrect
length_of_rvlc_escapes
27870
Error
AAC audio
Aac Subsidiary Payloads
Incorrect rvlc_esc_sf
27871
Error
AAC audio
Aac Subsidiary Payloads
Incorrect
dpcm_noise_last_position
27872
Error
AAC audio
Aac Subsidiary Payloads
Incorrect n_filt
27873
Error
AAC audio
Aac Subsidiary Payloads
Incorrect coef_res
27874
Error
AAC audio
Aac Subsidiary Payloads
Incorrect length
27875
Error
AAC audio
Aac Subsidiary Payloads
Incorrect order
27876
Error
AAC audio
Aac Subsidiary Payloads
Incorrect direction
27877
Error
AAC audio
Aac Subsidiary Payloads
Incorrect coef_compress
27878
Error
AAC audio
Aac Subsidiary Payloads
Incorrect coef
27879
Error
AAC audio
Aac Subsidiary Payloads
Incorrect ltp_lag_update
27880
Error
AAC audio
Aac Subsidiary Payloads
Incorrect ltp_lag
27881
Error
AAC audio
Aac Subsidiary Payloads
Incorrect ltp_coef
27882
Error
AAC audio
Aac Subsidiary Payloads
Incorrect ltp_long_used
27883
Error
AAC audio
Aac Subsidiary Payloads
Incorrect ltp_short_used
27884
Error
AAC audio
Aac Subsidiary Payloads
Incorrect
ltp_short_lag_present
27885
Error
AAC audio
Aac Subsidiary Payloads
Incorrect ltp_short_lag
27886
Error
AAC audio
Aac Subsidiary Payloads
Incorrect hcod
27887
Error
AAC audio
Aac Subsidiary Payloads
Incorrect quad_sign_bits
27888
Error
AAC audio
Aac Subsidiary Payloads
Incorrect pair_sign_bits
27889
Error
AAC audio
Aac Subsidiary Payloads
Incorrect hcod_esc_y
27890
Error
AAC audio
Aac Subsidiary Payloads
Incorrect hcod_esc_z
27891
Error
AAC audio
Aac Subsidiary Payloads
Incorrect extension_type
Cerify Automated Video Content Verification System User Manual
165
Appendices
Appendix A: Alerts
Table 7: Alerts (cont.)
166
Alert ID
Severity
Class
Context
Title
27892
Error
AAC audio
Aac Subsidiary Payloads
Incorrect fill_nibble
27893
Error
AAC audio
Aac Subsidiary Payloads
Incorrect fill_byte
27894
Error
AAC audio
Aac Subsidiary Payloads
Incorrect other_bits
27895
Error
AAC audio
Aac Subsidiary Payloads
Incorrect pce_tag_present
27896
Error
AAC audio
Aac Subsidiary Payloads
Incorrect pce_instance_tag
27897
Error
AAC audio
Aac Subsidiary Payloads
Incorrect drc_tag_reserved_bits
27898
Error
AAC audio
Aac Subsidiary Payloads
Incorrect excluded_chns_present
27899
Error
AAC audio
Aac Subsidiary Payloads
Incorrect
drc_bands_present
27900
Error
AAC audio
Aac Subsidiary Payloads
Incorrect drc_band_incr
27901
Error
AAC audio
Aac Subsidiary Payloads
Incorrect drc_bands_reserved_bits
27902
Error
AAC audio
Aac Subsidiary Payloads
Incorrect drc_band_top
27903
Error
AAC audio
Aac Subsidiary Payloads
Incorrect
prog_ref_level_present
27904
Error
AAC audio
Aac Subsidiary Payloads
Incorrect prog_ref_level
27905
Error
AAC audio
Aac Subsidiary Payloads
Incorrect
prog_ref_level_reserved_bits
27906
Error
AAC audio
Aac Subsidiary Payloads
Incorrect dyn_rng_sgn
27907
Error
AAC audio
Aac Subsidiary Payloads
Incorrect dyn_rng_ctl
27908
Error
AAC audio
Aac Subsidiary Payloads
Incorrect reordered_spectral_data
27909
Error
AAC audio
Aac Sbr Payloads
Incorrect bs_sbr_crc_bits
27910
Error
AAC audio
Aac Sbr Payloads
Incorrect bs_header_flag
27911
Error
AAC audio
Aac Sbr Payloads
Incorrect bs_fill_bits
27912
Error
AAC audio
Aac Sbr Payloads
Incorrect bs_amp_res
27913
Error
AAC audio
Aac Sbr Payloads
Incorrect bs_start_freq
27914
Error
AAC audio
Aac Sbr Payloads
Incorrect bs_stop_freq
27915
Error
AAC audio
Aac Sbr Payloads
Incorrect bs_xover_band
27916
Error
AAC audio
Aac Sbr Payloads
Incorrect bs_reserved
27917
Error
AAC audio
Aac Sbr Payloads
Incorrect bs_header_extra_1
27918
Error
AAC audio
Aac Sbr Payloads
Incorrect bs_header_extra_2
27919
Error
AAC audio
Aac Sbr Payloads
Incorrect bs_freq_scale
27920
Error
AAC audio
Aac Sbr Payloads
Incorrect bs_alter_scale
Cerify Automated Video Content Verification System User Manual
Appendices
Appendix A: Alerts
Table 7: Alerts (cont.)
Alert ID
Severity
Class
Context
Title
27921
Error
AAC audio
Aac Sbr Payloads
Incorrect bs_noise_bands
27922
Error
AAC audio
Aac Sbr Payloads
Incorrect bs_limiter_bands
27923
Error
AAC audio
Aac Sbr Payloads
Incorrect bs_limiter_gains
27924
Error
AAC audio
Aac Sbr Payloads
Incorrect bs_interpol_freq
27925
Error
AAC audio
Aac Sbr Payloads
Incorrect bs_smoothing_mode
27926
Error
AAC audio
Aac Sbr Payloads
Incorrect bs_data_extra
27927
Error
AAC audio
Aac Sbr Payloads
Incorrect bs_add_harmonic_flag
27928
Error
AAC audio
Aac Sbr Payloads
Incorrect bs_extended_data
27929
Error
AAC audio
Aac Sbr Payloads
Incorrect bs_extension_size
27930
Error
AAC audio
Aac Sbr Payloads
Incorrect bs_esc_count
27931
Error
AAC audio
Aac Sbr Payloads
Incorrect bs_extension_id
27932
Error
AAC audio
Aac Sbr Payloads
Incorrect bs_coupling
27933
Error
AAC audio
Aac Sbr Payloads
Incorrect bs_frame_class
27934
Error
AAC audio
Aac Sbr Payloads
Incorrect tmp
27935
Error
AAC audio
Aac Sbr Payloads
Incorrect bs_freq_res
27936
Error
AAC audio
Aac Sbr Payloads
Incorrect bs_pointer
27937
Error
AAC audio
Aac Sbr Payloads
Incorrect bs_var_bord_0
27938
Error
AAC audio
Aac Sbr Payloads
Incorrect bs_var_bord_1
27939
Error
AAC audio
Aac Sbr Payloads
Incorrect bs_num_rel_0
27940
Error
AAC audio
Aac Sbr Payloads
Incorrect bs_num_rel_1
27941
Error
AAC audio
Aac Sbr Payloads
Incorrect bs_df_env
27942
Error
AAC audio
Aac Sbr Payloads
Incorrect bs_df_noise
27943
Error
AAC audio
Aac Sbr Payloads
Incorrect bs_invf_mode
27944
Error
AAC audio
Aac Sbr Payloads
Incorrect
bs_env_start_value_balance
27945
Error
AAC audio
Aac Sbr Payloads
Incorrect
bs_env_start_value_level
27946
Error
AAC audio
Aac Sbr Payloads
Incorrect bs_codeword
27947
Error
AAC audio
Aac Sbr Payloads
Incorrect
bs_noise_start_value_balance
27948
Error
AAC audio
Aac Sbr Payloads
Incorrect bs_noise_start_
value_level
27949
Error
AAC audio
Aac Sbr Payloads
Incorrect bs_add_harmonic
Cerify Automated Video Content Verification System User Manual
167
Appendices
Appendix A: Alerts
Table 7: Alerts (cont.)
Alert ID
168
Severity
Class
Context
Title
27950
Error
AAC audio
Aac Sbr Payloads
Incorrect unused_sbr_data
27951
Error
AAC audio
Aac Program Config
Incorrect alignment_bits
27953
Error
AAC audio
Aac Subsidiary Payloads
Error processing pulse
data
27954
Error
AAC audio
Aac Subsidiary Payloads
Number of scalefactor
bands is greater than max
scalefactor bands
27955
Error
AAC audio
Aac Subsidiary Payloads
Number of scalefactor
bands is not equal to total
scalefactor bands
27956
Error
AAC audio
Aac Subsidiary Payloads
Number of sections
is greater than total
scalefactor bands
27957
Error
AAC audio
Aac Subsidiary Payloads
Huffman codebook is not
equal to number of groups
27958
Error
AAC audio
Aac Subsidiary Payloads
Huffman codeword is
longer than specified
length of longest codeword
27959
Error
AAC audio
Aac Subsidiary Payloads
Invalid huffman codebook
specified
27960
Error
AAC audio
Aac Subsidiary Payloads
Number of sections is zero
but max scalefactor bands
is non zero
27961
Error
AAC audio
Aac Subsidiary Payloads
Cannot set
pulse_data_present for
short blocks
27962
Error
AAC audio
Aac Subsidiary Payloads
Scalefactor too large
27963
Error
AAC audio
Aac Subsidiary Payloads
Scalefactor too small
27964
Error
AAC audio
Aac Subsidiary Payloads
Max scalefactor band is
greater than scale factor
bands per subblock
27965
Error
AAC audio
Aac Sequence
Prediction is not allowed in
this profile
27966
Error
AAC audio
Aac Sequence
length_of_reordered_spectral_data
is too long
27967
Error
AAC audio
Aac Sequence
Specified channel not
supported by this decoder
27968
Error
AAC audio
Audio Test Case
Profile constraint not met
28250
Error
MXF
MXF Container layer
MXF Container Error
28251
Error
MXF
MXF Container layer
Library Initialisation Failure
28252
Error
MXF
MXF Container layer
Audio will not be decoded
28253
Error
MXF
MXF Container layer
Incomplete edit unit
Cerify Automated Video Content Verification System User Manual
Appendices
Appendix A: Alerts
Table 7: Alerts (cont.)
Alert ID
Severity
Class
Context
Title
28569
Error
DV video
Header
Invalid header section type
28570
Error
DV video
Header
Invalid DIF block sequence
number
28571
Error
DV video
Header
Invalid header DIF block
number
28572
Error
DV video
Subcode
Invalid Subcode DIF block
number
28573
Error
DV video
VAUX
Invalid VAUX DIF block
number
28574
Error
DV video
Video Data
Invalid Video Data DIF
block number
28575
Error
DV video
Header
Invalid DSF flag
28576
Error
DV video
Header
Invalid zero bit
28577
Error
DV video
Header
Invalid track application ID
28578
Error
DV video
Subcode
Invalid Subcode section
type
28579
Error
DV video
Subcode
Invalid Subcode sync block
number
28580
Error
DV video
Subcode
Invalid TimeCode pack
code word
28581
Error
DV video
Subcode
Invalid BinaryGroup pack
code word
28582
Error
DV video
VAUX
Invalid VAUX section type
28583
Error
DV video
VAUX
Invalid VAUX source pack
identifier code
28584
Error
DV video
VAUX
Invalid field system
28585
Error
DV video
VAUX
Invalid colour format
28586
Error
DV video
VAUX
Invalid VAUX source
control pack identifier code
28587
Error
DV video
VAUX
Invalid channel
28588
Error
DV video
Video Data
Invalid section type for
video
28589
Error
DV video
Video Data
Invalid code for macro
block status
28590
Error
DV video
VAUX
Invalid colour frames
identification code
28591
Error
DV video
VAUX
Invalid copy generation
management system
28592
Error
DV video
VAUX
Invalid display select mode
28593
Error
DV video
VAUX
Invalid input source for just
previous recording
Cerify Automated Video Content Verification System User Manual
169
Appendices
Appendix A: Alerts
Table 7: Alerts (cont.)
170
Alert ID
Severity
Class
Context
Title
28594
Error
DV video
VAUX
Invalid broadcast system
28595
Error
DV video
VAUX
Invalid VISC
28596
Error
DV video
Subcode
Invalid Absolute Track
Number
28597
Error
DV video
Subcode
Invalid Channel Half
28598
Error
DV video
Subcode
Invalid TAG ID
28599
Error
DV video
Subcode
Invalid Time Code Pack
28600
Error
DV video
Subcode
Invalid Binary Group Pack
28601
Error
DV video
Frame
Invalid Subcode Pack
28602
Error
DV video
Video Data
Missing EOB marker in
coefficient bitstream
28603
Error
DV video
Video Data
Corrupt ac coefficient
bitstream
28750
Error
GXF
GXF Container layer
GXF Container Error
28751
Error
GXF
GXF Container layer
GXF Packet Error
31001
Warning
All
General
Unclassified warning
31002
Warning
All
General
Delayed start code
31003
Warning
All
General
Long delay until next frame
display
31004
Warning
All
General
Audio-Video delay
exceeds threshold
31005
Warning
All
General
Unmatched Audio-Video
event
31006
Warning
All
General
Unique alert limit reached
31007
Warning
Parameter
Audio Parameter Check
Bad parameters in Audio
Template
31008
Warning
Parameter
Video Parameter Check
Bad parameters in Video
Template
31009
Warning
Parameter
Container Parameter Check
Bad parameters in
Container Template
31010
Warning
All
General
Maximum number of alerts
exceeded
31011
Warning
All
General
End of stream tests could
not be run
31012
Warning
Parameter
General
Bad Template parameters
31501
Warning
H.263 video
Picture Layer
Two consecutive temporal
refs are zero
31751
Warning
H.263 video
Picture Layer
PSUPP being sent
31752
Warning
H.263 video
Picture Layer
Pspare being sent
(ignored)
31753
Warning
H.263 video
Picture Layer
Forbidden codeword
Cerify Automated Video Content Verification System User Manual
Appendices
Appendix A: Alerts
Table 7: Alerts (cont.)
Alert ID
Severity
Class
Context
Title
32000
Warning
MPEG-2 video
Video Sequence
Unknown extension_start_code_identifier
32003
Warning
MPEG-2 video
General
Invalid marker_bit
32004
Warning
MPEG-2 video
General
Invalid zero_bit
32005
Warning
MPEG-2 video
General
Invalid zero_byte
32044
Warning
MPEG-2 video
Picture
Invalid copyright_reserved_bits
32058
Warning
MPEG-2 video
Slice
Invalid extra_bit_slice
32068
Warning
MPEG-2 video
Video Sequence
Invalid aspect_ratio_information
32072
Warning
MPEG-2 video
Video Sequence
Invalid constrained_parameters_flag
32092
Warning
MPEG-2 video
Video Sequence
Invalid time_code_hours
32093
Warning
MPEG-2 video
Video Sequence
Invalid time_code_minutes
32094
Warning
MPEG-2 video
Video Sequence
Invalid time_code_seconds
32095
Warning
MPEG-2 video
Video Sequence
Invalid time_code_pictures
32114
Warning
MPEG-2 video
Picture
Invalid camera_params_reserved1
32115
Warning
MPEG-2 video
Picture
Invalid camera_params_reserved2
32120
Warning
MPEG-2 video
Picture
Invalid vertical_angle_of_view
32144
Warning
MPEG-2 video
Picture
Invalid counting_type
32195
Warning
MPEG-2 video
Picture
Invalid data_type
32196
Warning
MPEG-2 video
Video Sequence
Incorrect frame rate
fraction
32197
Warning
MPEG-2 video
Picture
Incorrect vbv_delay
32198
Warning
MPEG-2 video
Video Object Plane
VBV overflow
32199
Warning
MPEG-2 video
Video Object Plane
VBV underflow
32200
Warning
MPEG-2 video
Video Sequence
Data present after end of
video sequence
32201
Warning
MPEG-2 video
Video Sequence
Concatenated sequence
32202
Warning
MPEG-2 video
Video Sequence
Profile/level not supported
33001
Warning
MPEG-4 video
Video Object Plane
modulo_time_base is zero
33002
Warning
MPEG-4 video
Video Object Plane
Incorrect stuffing bits
33003
Warning
MPEG-4 video
General
Maximum frame rate
exceeded for SP / Level 0
33004
Warning
MPEG-4 video
Video Object Plane
vop_time_increment
has changed while
resynchronising
Cerify Automated Video Content Verification System User Manual
171
Appendices
Appendix A: Alerts
Table 7: Alerts (cont.)
172
Alert ID
Severity
Class
Context
Title
33005
Warning
MPEG-4 video
Video Object Plane
intra_dc_vlc_thr is not 0
33006
Warning
MPEG-4 video
Video Object Plane
vop_fcode_forward is >
1 in SP Level 0
33007
Warning
MPEG-4 video
Video Object Plane
vop_fcode_backward is >
1 in SP Level 0
33008
Warning
MPEG-4 video
General
Invalid entry point
33009
Warning
MPEG-4 video
Visual Object Sequence
Missing visual_object_sequence_end_code
33010
Warning
MPEG-4 video
Video Object Plane
dquant read after
ac_pred_flag=1
33011
Warning
MPEG-4 video
Video Object Plane
Header mismatch
33012
Warning
MPEG-4 video
Video Object Layer
vop_time_increment is
repeated
33013
Warning
MPEG-4 video
Video Object Plane
VBV overflow
33014
Warning
MPEG-4 video
Video Object Plane
VBV underflow
33015
Warning
MPEG-4 video
Video Object Plane
VCV overflow
33016
Warning
MPEG-4 video
Video Object Plane
VMV overflow
33017
Warning
MPEG-4 video
Group of VOPs
Display time overlap
33018
Warning
MPEG-4 video
Video Object Layer
sprite_brightness_change
is non-zero with GMC
33251
Warning
MPEG-4 container
MPEG-4 Container layer
Incompatible sample
descriptions
34269
Warning
H.264/AVC video
RBSP.Slice layer.Slice data
Intra prediction mode not
allowed
34270
Warning
H.264/AVC video
RBSP.Slice layer.Slice data
Illegal Intra prediction
mode
34272
Warning
H.264/AVC video
NAL unit
Forbidden bit set
34273
Warning
H.264/AVC video
NAL unit
Incorrect zero_byte
34274
Warning
H.264/AVC video
NAL unit
Incorrect start_code_prefix_one_3bytes
34275
Warning
H.264/AVC video
NAL unit
Undefined NALU
34277
Warning
H.264/AVC video
RBSP
Mismatch in
long_term_frame_idx
34278
Warning
H.264/AVC video
RBSP.SEI
Incorrect filler payload
bytes
34280
Warning
H.264/AVC video
RBSP
Zero Pred Blocks in edge
distortion calculation
34281
Warning
H.264/AVC video
RBSP.Slice layer
Macroblock out of range
34282
Warning
H.264/AVC video
RBSP.Slice layer
Incorrect field_pic_flag
34283
Warning
H.264/AVC video
RBSP
Outputting frame as
unpaired field
Cerify Automated Video Content Verification System User Manual
Appendices
Appendix A: Alerts
Table 7: Alerts (cont.)
Alert ID
Severity
Class
Context
34284
Warning
H.264/AVC video
RBSP
Incorrect reserved bits
34285
Warning
H.264/AVC video
NAL unit
Incorrect trailing bits
34287
Warning
H.264/AVC video
RBSP
Incorrect seq_parameter_set_id
34288
Warning
H.264/AVC video
RBSP
Incorrect
log2_max_frame_num_minus4
34289
Warning
H.264/AVC video
RBSP
Incorrect
log2_max_pic_order_cnt_lsb_minus4
34290
Warning
H.264/AVC video
RBSP
Incorrect offset_for_non_ref_pic
34291
Warning
H.264/AVC video
Video Object Plane
HRD overflow
34292
Warning
H.264/AVC video
Video Object Plane
HRD underflow
34293
Warning
H.264/AVC video
Video Object Plane
Failed HRD conformance
check
34294
Warning
H.264/AVC video
RBSP.Slice layer.Slice data
Aborting slice decode
34295
Warning
H.264/AVC video
RBSP.Slice layer
Expected start of new
picture.
34296
Warning
H.264/AVC video
NAL unit
Incorrect leading_zero_8bit
34297
Warning
H.264/AVC video
General
HRD information missing
34298
Warning
H.264/AVC video
RBSP.SPS
SPS changed in new
Coded Video Sequence
34299
Warning
H.264/AVC video
NAL unit
Slice type prohibited by
Access Unit Delimiter
NALU
35250
Warning
Dolby-E
Dolby-E Frame
Mid-stream Dolby-E
configuration change
36158
Warning
VC-1 video
Picture Layer
Invalid intra8_flag
36364
Warning
VC-1 video
Sequence Layer
Pre-RC1 interlaced stream
36501
Warning
Parameter
General
Test not run during Quick
Check
37001
Warning
Template rule
General
Test not supported
37002
Warning
Template rule
General
Decoded data unavailable
for test case
37953
Warning
AAC audio
Aac Sequence
Reached end of audio
frame
38002
Warning
Dolby Digital audio
Synchronization Information
Sample rate change
38250
Warning
MXF
MXF Container layer
MXF Container Warning
38569
Warning
DV video
Frame
Invalid Reserved Bit
Cerify Automated Video Content Verification System User Manual
Title
173
Appendices
Appendix A: Alerts
Table 7: Alerts (cont.)
174
Alert ID
Severity
Class
Context
Title
38570
Warning
DV video
Frame
Invalid sequence number
38571
Warning
DV video
Frame
Invalid No Information Byte
38572
Warning
DV video
VAUX
Invalid Reserved Tuner
Category
38573
Warning
DV video
Frame
Invalid No Information
Pack
38574
Warning
DV video
Frame
Invalid No Reserved Pack
38575
Warning
DV video
Header
No video present in stream
38576
Warning
DV video
Unknown
Invalid AAUX PC0 Header
field
38577
Warning
DV video
Unknown
Invalid AAUX LF field
38578
Warning
DV video
Unknown
Invalid AAUX AFSIZE field
38579
Warning
DV video
Unknown
Invalid AAUX CHN field
38580
Warning
DV video
Unknown
Invalid AAUX
AUDIOMODE field
38581
Warning
DV video
Unknown
Invalid AAUX STYPE field
38582
Warning
DV video
Unknown
Invalid AAUX SMP field
38583
Warning
DV video
Unknown
Invalid AAUX QU field
38584
Warning
DV video
Unknown
Invalid AAUX 5060 field
38585
Warning
DV video
Unknown
Invalid AAUX Reserved
field
41001
Info
All
General
Unclassified info
41002
Info
All
General
Alert suppressed
42196
Info
MPEG-2 video
Video Sequence
Simple profile not
supported
42251
Info
MPEG-2 transport
stream
MPEG-2 Transport Stream
Unsupported buffering
model
43001
Info
MPEG-4 video
Visual Object Sequence
Header is repeated
44269
Info
H.264/AVC video
RBSP.SPS
DPB size undetermined
44270
Info
H.264/AVC video
RBSP.SPS
Unsupported profile
47001
Info
Template rule
Video Test Case
Video type summary
48250
Info
MXF
MXF Container layer
MXF Container Information
71000
Error
MPEG-2 video
Closed Caption
CEA 608 Closed Caption
File error
71001
Error
MPEG-2 video
Closed Caption
CEA 608 Closed Caption
Data with Invalid byte
71002
Error
MPEG-2 video
Closed Caption
CEA 608 Closed Caption
Data with Invalid XDS
command
Cerify Automated Video Content Verification System User Manual
Appendices
Appendix A: Alerts
Table 7: Alerts (cont.)
Alert ID
Severity
Class
Context
Title
71003
Error
MPEG-2 video
Closed Caption
CEA 608 Closed Caption
Data with Invalid XDS code
71004
Error
MPEG-2 video
Closed Caption
SCTE20 Closed Caption
with forbidden field number
71005
Error
MPEG-2 video
Closed Caption
CEA 708 with unsupported
character
71006
Error
MPEG-2 video
Closed Caption
CEA 608 CC data on
invalid field
71007
Error
MPEG-2 video
Closed Caption
Invalid character in 608 CC
71008
Error
MPEG-2 video
Closed Caption
SCTE21 Closed Caption
with forbidden field number
xxx
Cerify Automated Video Content Verification System User Manual
175
Appendices
Appendix B: Supported Compression Standards
Appendix B: Supported Compression Standards
This chapter provides details about the compression standards and file formats recognized by the system.
CAUTION. The system processes at most one video stream and at most one audio stream from any one
container file. If, for example, more than one audio stream is present in a container file, the system will
process the audio stream that best matches any Audio Template (see page 86) set up for that stream
by the user.
Supported Video Compression Standards
Raw, uncompressed video formats are not supported.
Video standard
Description
H.264/AVC
176
Standard
ITU-T Recommendation H.264 Advanced video coding for generic audiovisual
services.
Aliases
H.264, AVC, MPEG-4 part 10
Supported revisions
ITU-T Rec. H.264 | ISO/IEC 14496-10 version 7
SMPTE RP 2027-2007 AVC Intra-Frame Coding Specification for SSM Card
Applications
Supported features
Baseline Profile- all levels from 1 to 5.1 inclusive
Extended Profile - all levels from 1 to 5.1 inclusive
Main Profile - all levels from 1 to 5.1 inclusive
High Profile - all levels from 1 to 5.1 inclusive
High/10-bit - all levels from 1 to 5.1 inclusive
High/4:2:2 - all levels from 1 to 5.1 inclusive
High 4:4:4 Predictive Profile - all Levels from 1 to 5.1 inclusive
High 10 Intra Profile - all Levels from 1 to 5.1 inclusive
High 4:2:2 Intra Profile - all Levels from 1 to 5.1 inclusive
High 4:4:4 Intra Profile- all Levels from 1 to 5.1 inclusive
CAVLC 4:4:4 Intra Profile - all Levels from 1 to 5.1 inclusive
Constraints
Maximum 396 slices per picture
Type I HRD conformance tests not supported
HRD DPB verification not supported
I_PCM support not fully implemented
Video data greater than 8 bits is decoded to 8 bits for execution of quality checks.
Cerify Automated Video Content Verification System User Manual
Appendices
Video standard
Appendix B: Supported Compression Standards
Description
VC-1
Standard
SMPTE 421M VC-1 Compressed Video Bitstream Format and Decoding Process
Aliases
VC-1, VC9, Microsoft WM9
Supported revisions
Final Committee Draft I, Revision 4 2005-06-02
Supported features
All Profiles and levels are supported; simple Profile; Low and Medium level
Main Profile; low, medium and high level
Advanced Profile; L0, L1, L2, L3, L4
Constraints
HRD verification is not supported
Multiresolution coding is not supported
MPEG-4 Part 2
Standard
ISO/IEC 14496-2 Information technology - Coding of audio-visual objects - Part
2: Visual
Aliases
MPEG-4 part 2
Supported revisions
Third edition 2004-06-01
Amendment 1 2002
Amendment 2 2002
Corrigendum 1 2004
Supported features
Simple Profile; Level 0, Level 1, Level 2, Level 3
Advanced simple Profile; Level 0, Level 1, Level 2, Level 3,Level 3b, Level 4, Level 5
Main Profile; Level 2, Level 3
Constraints
The following main Profile tools are not supported: P-VOP based temporal scalability,
Binary shape, Gray shape, Sprites.
Complexity estimation headers are decoded but not analyzed.
Comments
MPEG-4 Part 2 Level 0 is an addition to simple Profile, which is not in the
MPEG-4 standard reference. Level 0 is targeted at mobile systems; for example with
a maximum picture size of QCIF and maximum frame rate of 15 frames per second.
MPEG-2 Part 2
Standard
ISO/IEC 13818-2 Information technology - Generic coding of moving pictures and
associated audio information: Video.
Aliases
MPEG-2 part 2, H.262
Supported revisions
Second edition 2000-12-15
ISO/IEC 13818-2:2000 Technical Corrigendum 1
Supported features
Main Profile; main level, high level, high level 1440
422 Profile: main level, high level
Constraints
Backward compatibility with MPEG-1 is not fully supported, but MPEG-1 streams that
can be successfully decoded as MPEG-2 streams can be processed.
Cerify Automated Video Content Verification System User Manual
177
Appendices
Video standard
Appendix B: Supported Compression Standards
Description
H.263
Standard
ITU-T Recommendation H.263 Video Coding for Low Bit Rate Communication
Aliases
H.263
Supported revisions
02/98
Supported features
H.263 Baseline Standard:
Constraints
4CIF resolution is not supported.
Comments
Limited test coverage
Standard
IEC 61834 parts 1, 2 and 4 - Helical-scan digital video cassette recording system
using 6,35mm magnetic tape for consumer use
SMPTE 314M - Data Structure for DV-Based Audio, Data and Compressed Video 25
and 50 Mb/s.
SMPTE 370M - Data Structure for DV-Based Audio, Data and Compressed Video at
100 Mb/s 1080/60i, 1080/50i, 720/60p, 720/50p.
Aliases
DV, DV25, DVCPRO, DVCAM
DV50, DVCPRO50
DV100, DVCPRO100, DVCPRO HD
Supported revisions
1998 (IEC), 1999 (SMPTE-314M), 2006 (SMPTE-370M))
Supported features
DV 25Mb/s 4:1:1 525/60
DV 25Mb/s 4:1:1 625/50
DV 25Mb/s 4:2:0 625/50
DV 50Mb/s 4:2:2 525/60
DV 50Mb/s 4:2:2 625/50
DV 100Mb/s 4:2:2 1080/60i
DV 100Mb/s 4:2:2 1080/50i
DV 100Mb/s 4:2:2 720/60p
DV 100Mb/s 4:2:2 720/50p
Constraints
IEC 61834-3 resolutions 1250/50 and 1125/60 not supported.
The following syntax elements are not checked: DFTIA, SOFT ID, REMAIN TIME,
TIME CODE, TEXT, CHAPTER START, REMAIN TIME
HD resolutions are described as 1920x1080 and 1280x720 by the standards but
DVCPRO HD is defined to resample this to 1440x1080 (1080i50) or 1280x1080
(1080i60) or 960x720 (720p) before encoding the image. It is this lower resolution
which is reported.
DV
Apple ProRes
178
Standard
Apple Computer Inc. ProRes family
Aliases
ProRes 422
Supported revisions
2007, 2009
Cerify Automated Video Content Verification System User Manual
Appendices
Appendix B: Supported Compression Standards
Video standard
Description
Supported features
Apple Prores 422
Apple Prores 422 (HQ)
Apple Prores 422 (LT)
Apple Prores 422 (Proxy)
Apple Prores 4444
Constraints
Syntax elements are not checked.
Video data greater than 8 bits is decoded to 8 bits for executing quality checks.
In the signal range tests, the high and low limits specified for 8-bit digital should lie
in the range 0 to 255.
Apple QuickTime Player must be installed to decode this format.
Generic QuickTime Video
Standard
N/A
Aliases
N/A
Supported revisions
N/A
Supported features
Any video format that QuickTime Player is capable of decoding.
Constraints
The video must be carried in a MOV, MP4, or 3GPP container.
Video syntax elements are not checked.
Video data greater than 8 bits is decoded to 8 bits for execution of quality checks.
In the signal range tests, the high and low limits specified for 8 bits digital should lie
in the range 0 to 255.
Apple QuickTime Player must be installed.
JPEG 2000 Video
Standard
The JPEG 2000 image coding system (ISO/IEC 15444)
Aliases
JPEG 2000, J2K
Supported revisions
As per Quicktime Player
Supported features
Features supported by Quick Time Player
Constraints
The video must be carried in a MOV, MP4, or 3GPP container.
Video syntax elements are not checked. Video data greater than 8 bits is decoded to
8 bits for execution of quality checks.
In the signal range tests, the high and low limits specified for 8 bits digital should lie
in the range 0 to 255.
Apple QuickTime Player must be installed.
xxx
Cerify Automated Video Content Verification System User Manual
179
Appendices
Appendix B: Supported Compression Standards
Supported Audio Compression Standards
Audio standard
Description
Uncompressed audio
Supported features
RIFF (also known as wave or .wav)
AIFF
8-Channel AES3 as per SMPTE 331M (MXF only)
AES3 (MXF only)
Broadcast Wave Format (MXF only)
Pinnacle PCM (MPEG-2 Program Stream only)
GXF PCM
DVD LPCM (DVD specification for LPCM in MPEG-2 Program Stream)
MPEG-1 part 3
Standard
MPEG-1 audio: ISO/IEC 11172–3: 1993
Aliases
MPEG-1
Supported features
Layer I, Layer II
Constraints
Layer III (alias MP3) not supported
MPEG-2 part 3
Standard
MPEG-2 audio: ISO/IEC 13818-3: First edition
Aliases
MPEG-2
Supported features
Layer I, Layer II
Constraints
Layer III (alias MP3) not supported
MPEG-2 part 7 AAC
Standard
MPEG-2 ISO/IEC 13818–7: 2004
Aliases
AAC
Supported features
Main Profile
Low complexity (LC) Profile
Constraints
Scalable Sampling Rate Profile (SSR) not supported
MPEG-4 part 3
180
Standard
MPEG-4 ISO/IEC 14496–3: 2001
Aliases
AAC Plus, HE-AAC
Supported objects
Null
AAC Main
AAC LC (low complexity)
AAC LTP (long term prediction)
SBR (spectral band replication)
Supported Profiles
AAC
High Efficiency AAC
Constraints
No other objects are supported other than those listed above
No other profiles are supported other than those listed above
Cerify Automated Video Content Verification System User Manual
Appendices
Audio standard
Comments
Appendix B: Supported Compression Standards
Description
MPEG-4 part 3 is backward-compatible with MPEG-2 part 7.
aacPlus refers to enhancements developed by Coding Technologies.
aacPlus V1 is standardized as the high efficiency Profile of MPEG-4 part 3 (HE AAC).
Dolby Digital
Standard
Digital Audio Compression Standard (AC-3, E-AC-3) Revision B, Document A/52B:
2005
Aliases
Dolby Digital, AC-3
Supported objects
Baseline standard
Annex D: Extended/alternate bit stream syntax
Constraints
Midstream sample rate change not supported.
Pro-logic not supported. Dolby-Digital syntax elements are not checked.
DV Audio
Standard
IEC 61834 parts 1, 2 and 4 - Helical-scan digital video cassette recording system
using 6,35mm magnetic tape for consumer use
SMPTE 314M - Data Structure for DV-Based Audio, Data and Compressed Video 25
and 50 Mb/s
SMPTE 370M - Data Structure for DV-Based Audio, Data and Compressed Video at
100 Mb/s 1080/60i, 1080/50i, 720/60p, 720/50p.
Aliases
DV, DV25, DVCPRO, DVCAM
DV50, DVCPRO50
DV100, DVCPRO100, DVCPRO HD
Supported revisions
1998 (IEC), 1999 (SMPTE-314M), 2006 (SMPTE-370M)
Supported features
48000, 44100, or 32000 sample rates
2, 4, or 8 channels
12 and 16 bit sample depth
Locked and unlocked
Constraints
IEC DV25 4-channel audio is not supported. (4 channels are supported in
DVCPRO50)
DVCPRO HD 720p audio is not supported - but DVCPRO HD 1080i audio is
supported.
DV Audio syntax elements are not checked.
Window Media Audio Standard
Standard
Microsoft - Windows Media Audio (Standard)
Aliases
WMA, WMA Standard
Supported features
VBR
CBR
All sub-syntax versions (1 and 2)
All profile level versions (1, 2 and 3)
Cerify Automated Video Content Verification System User Manual
181
Appendices
Audio standard
Constraints
Appendix B: Supported Compression Standards
Description
WMA Pro is not supported
WMA Voice is not supported
WMA Lossless is not supported
WMA syntax elements are not checked
Dolby-E
Standard
Dolby-E
http://www.dolby.com/professional/pro_audio_engineering/ solutions_dolbye.html
Constraints
Support is limited to CRC checking and high-level attribute tests (program
configuration, bit depth, duration and frame rate).
Audio thumbnails and Audio Quality Checks (see page 88) are not supported for
Dolby-E.
xxx
File Types and Container Formats
Supported file types and container formats include:
Format
Description
Microsoft ASF
Standard
Advanced Systems Format (ASF) Specification, Microsoft Corporation, December,
2004.
Aliases
WMV, Windows Media, WM9
Constraints
Does not support external references
MP4 files
Standard
MP4: ISO/IEC 14996–14: 2003
Supported atoms
avc1, avcC, co64, ctts, dinf, dref, esds, ftyp, hdlr, mdat, mdhd, mdia, minf, moov,
mp4a, mp4v, smhd, stbl, stco, stsc, stsd, stsz, stts, tkhd, trak, url, urn, vmhd, skip
3GPP
Standard
3GPP TS 26.244 3GPP file format: Release 6
Supported atoms
avc1, avcC, co64, ctts, dinf, dref, esds, ftyp, hdlr, mdat, mdhd, mdia, minf, moov,
mp4a, mp4v, smhd, stbl, stco, stsc, stsd, stsz, stts, tkhd, trak, url, urn, vmhd, skip,
s263, d263, bitr
GXF
Standard
SMPTE 360M-2004 General Exchange Format
Constraints
Only MPEG-2 video and PCM audio supported
MXF
Standard
SMPTE 377M-2004 Material Exchange Format
Supported code reference
OpenCube MXFTk v. 2.2.1
Constraints
Limited to OP1a, OP1b, OPAtom1A and OPAtom1B operational patterns
QuickTime
182
Standard
QuickTime File Format (Apple Computer Inc.), 2001
Aliases
QuickTime, QT, Omneon QT, Mov
Cerify Automated Video Content Verification System User Manual
Appendices
Appendix B: Supported Compression Standards
Format
Description
Supported atoms
avc1, avcC, co64, ctts, dinf, dref, esds, ftyp, hdlr, mdat, mdhd, mdia, minf, moov,
mp4a, mp4v, smhd, stbl, stco, stsc, stsd, stsz, stts, tkhd, trak, url , urn , vmhd, skip,
mpeg, dvcp, dvpp, dvc , dv5n, dv5p ni24, sowt, in24, twos, in32, ni32, mp4a, alis
MPEG-2 Systems
Standard
MPEG-2: ISO/IEC 13818–1: 2001
Aliases
MPEG-2 TS, MPEG-2 PS, MPEG-2 PES
Supported features
Supported TS packet sizes: 188, 192, 204, 208
Constraints
Intended to operate on single program transports streams only
Additional layers or extensions specified in regional industry standards are not
supported (such as ARIB, ATSC, and DVB)
PAT split between multiple packets not supported
Buffer analysis not supported
Standard
MPEG-4 ISO/IEC 14496–3: 2001
Comments
Limited syntax verification
xxx
Supported Wrapper and Codec Combinations
The table below defines the combinations of codecs and containers that are supported. A √ at the
intersection shows that the codec (row) is supported in the container (column), while an × indicates
that this combination is not supported. The ES container format column indicates which codecs can be
processed as a simple elementary stream with no associated wrapper layer.
Table 8: Supported wrapper and codec combinations
Container Format
Type
Elementary
stream
format
Video
H.263
√
ASF
×
Video
MPEG-2
part 2
√
Video
MPEG-4
part 2
Video
MP4
3GPP
√
×
√
×
√
×
MPEG-2
PES
×
√
√
√
√
√
√
√
×
√
√
√
×
×
×
×
×
H.264/AVC
√
×
√
√
√
√
√
√
√
×
Video
DV
√
×
×
×
×
×
×
Video
VC-1
×
×
×
√
×
√
×
ProRes
√
×
×
Video
√
×
×
√
×
×
×
√
×
×
×
×
×
Video
Generic
QuickTime
×
×
√
√
√
×
×
×
×
×
Audio
MPEG-1
part 3
×
×
×
×
×
√
√
√
√
×
ES
QuickTime
Cerify Automated Video Content Verification System User Manual
MPEG-2
PS
×
MPEG-2
TS
×
MXF
×
GXF
×
183
Appendices
Appendix B: Supported Compression Standards
Table 8: Supported wrapper and codec combinations (cont.)
Type
Elementary
stream
format
Container Format
ES
×
ASF
×
MP4
×
3GPP
×
QuickTime
×
MPEG-2
PES
MPEG-2
PS
MPEG-2
TS
MXF
√
√
√
√
GXF
×
Audio
MPEG-2
part 3
Audio
MPEG-2
part 7
×
×
√
√
√
√
√
√
×
×
Audio
MPEG-4
part 3
×
×
√
√
√
√
√
√
×
×
Audio
Dolby
Digital
×
×
×
×
×
√
√
√
×
×
Audio
Dolby-E
×
×
×
×
√
×
×
×
√
√
Audio
PCM
×
×
×
×
Audio
WMA
Standard
×
√
×
×
√
×
√
×
√
×
√
×
√
×
√
×
Audio
DV Audio
√
×
×
×
×
×
×
×
×
×
xxx
Standards References
MPEG-4 Part 2 (Visual): standard number ISO/IEC 14496-2:2004; ISO title: Information technology
- Coding of audio-visual objects: Part 2: Visual, 3rd Edition 2004-06-01; plus 14496-2:2004 Technical
Corrigendum 1 Published 2004-06-15
H.263: Video Coding for Low Bit Rate Communication. International Telecommunication Union
(ITU) 1998
MPEG-4 Video Verification Model version 18.0: document reference number ISO/IEC
JTC1/SC29/WG11 N3908 dated January 2001
MPEG-4 Part 2 (Visual) ISO/IEC 14496-2 Amendment 2, 2002-02-01: Streaming video Profile
(contains Advanced Simple Profile)
MPEG-4 Part 2 (Visual) ISO/IEC 14496-2:2001 Final Draft Amendment 3 FDAM 3:2003(E): New
levels and tools for MPEG-4 visual (contains Advanced Simple Profile Level 3b)
MPEG-4 Part 2 (Visual) ISO/IEC 14496-2 Microsoft reference software: FDAM1-2.3-001213 version
2 dated July 3rd 2000
MPEG-4 Part 4 (Conformance Testing) ISO/IEC Study of CD 14496-4 N3067 1999-03-18, Visual
clause w3067_4(v)
MPEG-4 Part 4 (Conformance Testing) ISO/IEC 14496-4 MPEG-4 Normative ISO bitstreams dated
05/11/2001, specified in sections 4.5.3.1 and 4.5.7 of Reference 8
MPEG-4 Part 4 (Conformance Testing) ISO/IEC 14496-4 MPEG-4 Donated bitstreams dated
14/07/2000, referred to in section 4.5.8 of Reference 8
184
Cerify Automated Video Content Verification System User Manual
Appendices
Appendix B: Supported Compression Standards
MPEG-4 Part 1 (Systems) ISO/IEC 14496-1: Information technology - Coding of audio-visual
objects: Part 1: Systems, 3rd Edition dated March 2002
3rd Generation Partnership Project; Technical Specification Group Services and System Aspects;
Transparent end-to-end Packet-switched Streaming Service (PSS); Protocols and codecs (Release 5);
reference 3GPP TS 26.234 V5.5.0 (2003-06)
H.264/AVC Standard ISO/IEC 14496-10 (First Edition 2003-12-01): Information technology - Coding
of audio-visual objects - Part 10: Advanced video coding with document JVT-K051 "Version 3 of
H.264/AVC" dated 9 June 2004 (errata and Fidelity Range Extensions) and document JVT-L047d8
"Draft Text of H.264/AVC Fidelity Range Extensions Amendment" (AVC Amendment 1 Fidelity
Range Extensions, Draft) dated 28 August 2004
MPEG-2 Part 2 (Visual): ISO/IEC 13818-2 Second edition 2000-12-15 (2000 E): Information
technology - Generic coding of moving pictures and associated audio information: Video with
Amendment 1: Content description data (2001-12-15, corrected version 2002-08-01) and Technical
Corrigendum 1 (published 2002-03-01)
MPEG-2 Part 1 (Systems): ISO/IEC 13818-1 Second edition 2000-12-01 (2000 E): Information
technology - Generic coding of moving pictures and associated audio information: Systems with
Amendment 1: Carriage of metadata over ITU-T Rec. H.222.0 ISO/IEC 13818-1 streams (2003-08-01,
corrected version 2003-10-15) and Technical Corrigendum 1 (published 2002-03-01) and Technical
Corrigendum 2 (published 2002-12-01) and Amendment 3 Transport of AVC video data over ITU-T
Rec. H222.0/ ISO/IEC 13818-1 streams, dated 2004-11-01
DVD Standard for Video: DVD-Video Book Part 3: Video Specifications v1.13
SMPTE "Proposed SMPTE Standard for Television: VC-1 Compressed Video Bitstream Format and
Decoding Process" committee draft 2, revision 1, reference number SMPTE CD xxxM (otherwise
referred to as VC-1)
SMPTE 331M-2004 Element and Metadata Definitions for the SDTI-CP
SMPTE 360M-2004 General Exchange Format (GXF)
SMPTE 377M-2004 Material Exchange Format (MXF)
Advanced Systems Format (ASF) Specification: revision 01.20.02; Microsoft Corporation, June 2004.
MPEG-2 audio: ISO/IEC 13818-3:1998 Information technology Generic coding of moving pictures
and associated audio information Part 3: Audio
MPEG-2 AAC: ISO/IEC 13818-7:2004 Information technology Generic coding of moving pictures
and associated audio information Part 7: Advanced Audio Coding (AAC)
MPEG-4 AAC (AAC plus): ISO/IEC 14496-3:2001 Information technology Coding of audio-visual
objects Part 3: Audio plus Cor1:2002, Cor1:2004, Cor2:2004, Amd1:2003, Amd2:2004, Amd3
HE AAC codecs: ISO/IEC 14496-3:2001 Information technology Coding of audio-visual objects Part
3: Audio plus Cor1:2002, Cor1:2004, Cor2:2004, Amd1:2003, Amd2:2004, Amd3
CEA-608-E, Line 21 Data Service, April, 2008.
CEA-708-D, Digital Television (DTV) Closed Captioning, August, 2008.
ANSI SCTE 20, Methods for Carriage of Closed Captions and Non-Real Time Sampled Video.
Cerify Automated Video Content Verification System User Manual
185
Appendices
Appendix C: Software Maintenance
Appendix C: Software Maintenance
This section details the procedure to configure and reinitialize the Cerify application, backup and restore
the database, update the Cerify license dongle options, and use an NFS client on Windows.
Configuring the Cerify Application
Sometimes you may need to modify the configuration of your Cerify installation to suit your
environment. For example, some types of video servers require special configuration in
the Cerify file client. Such properties can be changed by editing the file, <installation
directory>\jboss\server\all\conf\cerify.properties using a normal text editor such as
Notepad - the file must be saved as a plain text document. This file contains comments describing what
each of the different settings does. For the new settings to take effect, the Cerify application should be
stopped and restarted after the cerify.properties file has been edited and saved. Such configuration
changes will need to be manually reapplied if the Cerify application is reinstalled or upgraded.
The settings in this file determine a number of important behaviors of Cerify. The default settings will work
for most customers, but there are some workflow scenarios and video server models where modifications
will be necessary. The following list gives examples of a few of areas that can be configured:
Streaming mode. Should files be copied locally to Cerify before processing.
FTP connectivity. For example, how many video server FTP connections are allowed and what
the time-out should be.
Copy bandwidth. Ability to limit the rate at which files are copied from video servers.
Report customizing. The location of files that allow the user to customize the HTML reports generated
by Cerify.
File size stability. Whether and how long to wait for files to be stable before Cerify processes them.
Port range used. Enables you to change the lower limit of the port number range that Cerify uses for
internal communication. Set to 17250 by default.
186
Cerify Automated Video Content Verification System User Manual
Appendices
Appendix C: Software Maintenance
Reinitializing the Cerify Application
Follow this procedure to reinitialize the Cerify application.
CAUTION. This process results in the database being reinitialized and all information being stored in the
database being lost. Carry out this process only if the data has no value or if a database backup exists.
1. Shut down the Cerify application. In case of cluster configuration, shut down the Cerify on the
Supervisor and all the Media Test Units.
2. Open a Microsoft Windows command prompt - this can be done by clicking Start >Run and typing
cmd at the prompt.
3. Change to the Cerify directory (this is the folder where Cerify was installed on your PC)
cd C:\Program Files\Tektronix\Cerify.
4. Execute the reset script by issuing the command: reset-application.
5. Start the Cerify application in the usual way after the script has finished executing.
NOTE. In cluster configuration, reset-application.bat should be run only on Supervisor system.
Database Backup/Restore Utility
The command line database backup/restore utility allows you to back up and restore your Cerify database.
This tool performs the backup/restore operation by copying the folders where the Cerify database stores its
data onto a secondary location on the Cerify host. This tool requires the Cerify application to be stopped
for such backups/restores to be performed. For this reason, this utility cannot be used as an operational
tool for backing up/restoring Cerify databases. In contrast, the backup/restore feature available on the Web
UI uses the standard SQL format for data export/import and can be used even when Cerify is running.
On startup, the tool checks if Cerify is running and will only proceed if it is stopped. A clear error message
is displayed if it finds it to be running.
NOTE. It is not possible to use this utility to restore the database backed up by Cerify Web UI. Conversely
it is not possible to restore the database backed up by this utility using Cerify Web UI.
NOTE. This utility can restore the backup which is created by Cerify Installer during uninstallation
or upgrade.
NOTE. Backing up and restoring using this utility can sometimes be faster than using the backup/restore
feature of the Web UI: especially when dealing with large databases.
Cerify Automated Video Content Verification System User Manual
187
Appendices
Appendix C: Software Maintenance
To run the database backup/restore utility, navigate to <Installation directory> and run the
CerifyDatabaseUtility.bat file. Entering the –option=help command prompt provides help
information on the command. The user will invariably need to pass in command line arguments to this
script, so it may be useful to be explicit that they will need to open a “cmd”, then “cd” to the folder where
the script lives and run the batch file with the appropriate options passed in as arguments.
Backing up the database using the CerifyDatabaseUtility
If you want to backup the current database to the default location, C:\Documents and
Settings\<username>\Cerify, you can use the following command:
CerifyDatabaseUtility.bat –option=backup
If you want to backup the current database to a location other than the default location (for example, if you
want to backup the database to the folder C:\CerifyBackup), use the following command:
CerifyDatabaseUtility.bat –option=backup –backupfolder=C:\CerifyBackup
After the backup is complete, you can see a CerifyBackup_<version>_<timestamp> folder in the
directory you chose to do the backup.
Restoring the database using the CerifyDatabaseUtility
If you want to restore a backed up database from the default location into your current installation, use
the following command:
CerifyDatabaseUtility.bat –option=restore
When this command is issued, you will also be prompted to backup the current database.
If there are more than one time stamped backup folders in the default location, then you will be asked to
choose the backup folder to be used for restore.
If you want to restore a backed up database from a location other than the default location, you can
use the following command:
CerifyDatabaseUtility.bat –option=restore –backupfolder=C:\CerifyBackup
Scenarios where database backup/restore utility can be used.
1. You can use the database backup/restore utility when you downgrade Cerify to the older version and
you want to restore the database backup which is available for that version. Note that when Cerify is
upgraded from an older version to a newer version, the installer will backup the database by default.
Also, because the name of the backup folder contains both version and timestamp information, you
can identify the correct backup folder to restore with ease.
2. You can use the database backup/restore utility to restore a database, if your database gets corrupted.
NOTE. In cluster configuration, CerifyDatabaseUtility.bat should be run only on Supervisor
system.
188
Cerify Automated Video Content Verification System User Manual
Appendices
Appendix C: Software Maintenance
Loading Example Jobs
Cerify is provided with some sample files (stored in the <installation directory>/cerify_demo folder) and a
script to set up a number of Jobs, Profiles, Templates, MediaSets, and MediaLocation in Cerify to check
these sample files. This is a convenient way of loading some sample content into Cerify and also verifying
that Cerify is behaving correctly, for example after a software upgrade.
NOTE. It is not possible to run this script again because it is not possible to create MediaLocations,
Templates, and Profiles with the same name. If you need to run this script again, you should first clean out
your database, using the procedure described in Reinitializing the Cerify Application (see page 187).
Follow the steps below to load the example content:
1. Start Cerify.
2. Click Start > Run and type cmd at the prompt to open a Microsoft Windows command prompt.
3. Change to the Cerify directory (this is the folder where Cerify was installed on your PC
cd C:\Program Files\Tektronix\Cerify.
4. Execute the script by issuing the command: Demo_loader.
After running this script, you will see new Jobs, Profiles, Templates, MediaSets, and MediaLocations in
the Cerify UI and the Jobs will be processing. Once the Jobs are completed, you will be able to navigate
the results and create reports.
NOTE. In cluster configuration, Demo_loader.bat should be run only on Supervisor system.
Cerify Automated Video Content Verification System User Manual
189
Appendices
Appendix C: Software Maintenance
Capturing Cerify Status Information Using the Support Monitor Script
The support monitor script is designed to be run either on a Cerify system that is experiencing problems of
some form or on a Cerify system that has just been setup so that the state of the system can be captured.
The script aims to automatically capture as much information as it can from a Cerify system that could
be relevant to Tektronix engineers diagnosing the problem. The captured information is saved into a zip
file for ease of transfer.
Running the Script
1. Run the Support Monitor by selecting Start > All Programs > Tektronix > Cerify > Collect Support
Diagnostics.
a. The support monitor provides the options to include a database backup and to capture the TCP
traffic.
b. You are prompted to enter y/n on each of these options. On entering y, the support monitor will
include a database backup or TCP traffic information capture. If you enter any other key including
n, the support monitor will skip the corresponding action.
c. Pressing X when prompted creates a zip file of all the collected information and stops the support
monitor.
d. By default the support monitor captured will include the following information:
– System information
– Template information
– License information (obtained by running the command line Cerify Dongle Assistant tool)
e. In the case of a Cerify system experiencing problems, you should proceed to reproduce the
problem while the support monitor is running. Once the problem has been reproduced, the support
monitor can be stopped by pressing x. The support monitor will then start creating a zip file
containing all system information captured. This may take several minutes; do not terminate the
command window or terminate the script even if the script takes a while to exit.
The support zip file will be named based on the current date and time, for example,
support-2006-10-04-08-39.zip. The Zip file will be saved in C:\Documents and
Settings\<username>\cerify\Support\Supportmonitor-<date-time>.zip.
2. Follow the on-screen prompts, until the utility fully completes creating the output file.
3. Send an e-mail or otherwise transfer the data to Tektronix along with a description of the problem.
190
Cerify Automated Video Content Verification System User Manual
Appendices
Appendix C: Software Maintenance
Best Practices
Be wary of allowing the monitor to run for too long - it is rarely useful to have very large trace files. It
is recommended that the resulting .zip file should be kept less than 500 MB.
When invoked, the supportmonitor utility will capture all of the system state data necessary for
the analysis and troubleshooting of the system including network traffic to/from the video servers.
Consequently, these files can become extremely large if care is not taken when setting up the system
prior to capturing data with the tool. Extremely large files will make transfer of the files to Tektronix
impractical.
For example, if you are capturing data related to the interaction of Cerify with a particular FTP server
where you are experiencing difficulty, perform the following steps:
Set up the system to create a new MediaSet.
Start the supportmonitor tool.
Attempt to add several files to the MediaSet, then stop the supportmonitor tool by pressing x.
This should result in a trace file of manageable size, which should contain the necessary information
for the engineering team to troubleshoot the problem.
NOTE. Running the supportmonitor scripts on the Supervisor will capture the necessary data of the
Supervisor and not the Media Test Units. To capture any necessary data of a Media Test Unit, you need to
run the supportmonitor scripts on that particular Media Test Unit.
To capture support diagnostics on a Media Test Unit, run the Support Monitor by selecting Start > All
Programs > Tektronix > Cerify Media Test Unit > Collect Support Diagnostics.
Cerify Automated Video Content Verification System User Manual
191
Appendices
Appendix C: Software Maintenance
Upgrading Dongle Options
This section describes how to update the Cerify license key (USB dongle) to enable additional
functionality. You may want to do this in the following circumstances:
To increase the number of files that may be processed simultaneously.
To take advantage of new features in a software update that requires a license update (not all software
updates require this).
To operate a cluster.
Before this procedure can commence, a purchase agreement must be in place.
Option Upgrade Instructions
The basic procedure is for you to create a c2v (customer-to-vendor) file which securely encapsulates the
current state of the dongle and to send this file to Tektronix. Tektronix will process this file, add the
upgraded options, and return to you a new v2c (vendor-to-customer) file. This v2c file is used to update
the dongle.
NOTE. You must create a new c2v file every time you request an update. Updates will only be successful if
they are based on an up-to-date c2v file generated from your current dongle. Old c2v files cannot be used.
The upgrade process must be performed on the computer hosting the USB dongle. No other USB dongle
should be connected to this computer.
Request Update.
1. Stop Cerify and ensure that the USB dongle is connected to the computer.
2. Click Start > All Programs > Tektronix > Cerify > Update Cerify Dongle to run the update tool. If
Cerify is not installed on the computer with the dongle connected, then view this page in the online
help from the computer that hosts the dongle and click here to run the tool.
NOTE. The click here short cut will not be available on Media Test Unit.
3. Click the Collect Key Status Information tab and click the Collect Information button.
4. Enter a file name for the c2v file to be saved, for example C:\CerifyKey\TestUpdate.c2v.
5. Send an e-mail to [email protected], including the following:
The c2v file (for example C:/CerifyKey/TestUpdate.c2v in the example above).
Your Tektronix order number for the update.
The version number of Cerify you will use with this dongle. You can find this at the bottom of any
page on the Cerify Web UI, for example, 6.0.1.34. If you are updating the dongle in preparation
for a software upgrade, make sure the version number that you provide is the same as the version
to which you are upgrading.
192
Cerify Automated Video Content Verification System User Manual
Appendices
Appendix C: Software Maintenance
Apply Update.
1. Tektronix will send you an email with the v2c file attached. Save the v2c file to the computer that
the dongle is connected to.
2. Stop Cerify and ensure the USB dongle is connected to the computer.
3. Click Start > All Programs > Tektronix > Cerify > Update Cerify Dongle to run the update tool. If
Cerify is not installed on the computer with the dongle connected, then view this page in the online
help from the computer that hosts the dongle and click here to run the tool.
4. Click the Apply License Update tab and click the ‘…’ button.
5. Browse to the location of the v2c file and double-click the v2c file.
6. Click Apply Update to upload the changes in your license options to the USB dongle.
7. When prompted, enter a file name for the update receipt (c2v file) that is generated in response to the
update. If a future update is required, this c2v file can be used to skip steps 1 to 4 in the Request
Update process.
8. Restart Cerify.
Notes
Any clustered Media Test Units are inoperable whenever the dongle is removed from the system.
While you wait for the v2c file to be delivered, you can continue to use the dongle.
The c2v and v2c files are encrypted. The v2c file is generated for the USB dongle that the c2v file was
generated from; you cannot use the v2c file to update a different dongle.
Cerify Automated Video Content Verification System User Manual
193
Appendices
Appendix C: Software Maintenance
Using NFS Client on Windows
This section describes how to install and use the Windows NFS Client.
The NFS client provided by Microsoft is used for browsing and accessing NFS shared files and folders on
an NFS network. Follow these procedures to use NFS client on different Windows platforms:
For Windows XP
1. Download the NFS client from the Microsoft Web site. Search for “Unix services” on MS Windows in
the Microsoft Web site to locate the NFS client.
2. Install the NFS client on the Windows system.
3. Select Start > Programs > Windows services for Unix > Service for Unix administration. A
pop-up window is displayed with all the installed clients. Select client for NFS and right-click. If
the Start option is disabled, then the NFS client is already started. If Start option is enabled, click
the Start option to start the NFS client service.
4. Open Windows explorer. Select My Network Places > Entire Network > NFS network > Default
LAN. This will display all the systems on which the NFS shared folders and files are present.
5. To process files on NFS using Cerify, map the folder having streams to be processed on to the current
Windows system. Select Tools > Map Network Drive from the explorer window. Browse through the
NFS network to the folder of choice on a machine. Map this path to a drive on the system.
6. In Cerify, create a MediaLocation using file:// protocol to this mapped network drive. For example, if
the NFS shared folder is mapped to z: on the system, the MediaLocation URL will be file://z:/ .
7. MediaSets can then be created using this MediaLocation.
For Windows Server 2008
1. The in-built NFS client on the Windows Server 2008 has to be installed to access the NFS shares. To
do this, select Control Panel > Programs and Features.
2. Select Turn Windows features on or off in the Tasks pane.
3. On the left pane, select Roles and right-click. Select Add Role options.
4. A wizard window opens. Select Server Roles in the left pane. Install the DNS Server, File Services and
Network Policy and Access Services features (each option will open its own wizard for installation).
5. Select Start > Programs > Administrative tools > Services for Network File System (NFS). A
window opens displaying all the installed clients. Select client for NFS and right-click. If the Start
option is disabled, then the NFS client is already started. If Start option is enabled, click the Start
option to start the NFS client service.
194
Cerify Automated Video Content Verification System User Manual
Appendices
Appendix C: Software Maintenance
6. To process files on NFS using Cerify, map the folder having streams to be processed to the current
Windows system. This can be done by executing the following command from the command line:
mount -o fileaccess=777 -u:<username>-p:<password> \\ComputerName\ShareName
{DeviceName\*}
Where DeviceName is the Drive letter to which this was mapped.
* indicates next available drive letter (one of these options should be used).
Username is the login name for the system with NFS shared folders.
Password is the login password for the system with NFS shared folders.
7. In Cerify, create a MediaLocation using file:// protocol to this mapped network drive. For example, If
the NFS shared folder is mapped to Z: on the system, the MediaLocation URL will be file://z:/ .
8. MediaSets can then be created using this MediaLocation.
Cerify Automated Video Content Verification System User Manual
195
Appendices
Appendix D: CeriTalk
Appendix D: CeriTalk
CeriTalk is an XML based API that lets you interact with Cerify from within other applications, making it
possible to integrate Cerify with other content management, broadcast automation and workflow systems.
The CeriTalk API lets a client application integrate with Cerify in two distinct modes. An application
requiring only to read status information could make use of CeriTalk XML Reports (see page 196)
(CeriTalk1), which produces file-based XML reports that provide detailed status information and results
of Jobs and media files. When tighter integration is required, including the ability to programmatically
create and control Jobs and MediaSets in Cerify, a client application may use the CeriTalk SOAP API
(see page 199) (CeriTalk2).
The CeriTalk SOAP API is available from Cerify version 4.0 and higher and exposes a richer set of
functions compared to CeriTalk1. Though the SOAP API does not deprecate the XML reports-based
interface, it should be preferred over XML reports for Cerify integration.
CeriTalk XML Reports
CeriTalk XML Reports support gathering status information pertaining to Jobs and media files as they are
being processed.
It lets you get status information on a per media file or a per Job basis on events in the system, such as:
Start of a Job being processed
Start of a media file being processed
A Job completing and passing its checks
A Job completing and failing one or more of its checks
A media file completing and passing its checks
A media file completing and failing one or more of its checks
CeriTalk makes Cerify status information accessible to consumer applications through XML reports
that are automatically generated as per preconfigured settings. To do this, you must define an Action
Template specifying the events on which you would like the system to generate CeriTalk XML reports,
and associate this Action Template with a Profile (see page 60) that can be used by a Job. It is possible
to create multiple Action Templates to encapsulate the different kinds of events that you may wish
to trigger CeriTalk report generation.
The location to which the system writes the CeriTalk XML reports is set through Report File Settings (see
page 112), which can be accessed from the Admin Page (see page 104).
NOTE. You must set the Report File Settings (see page 112) before CeriTalk XML reports can be generated.
196
Cerify Automated Video Content Verification System User Manual
Appendices
Appendix D: CeriTalk
The file naming convention followed by CeriTalk XML reports is as follows:
Generic event
Report file name
Job Start
<Jobname>_Start_<timestamp>.xml
File Start
<Jobname>_<Filename>_Start_<timestamp>.xml
Job End
<Jobname>_End_<timestamp>.xml
File End
<Jobname>_<Filename>_End_<timestamp>.xml
xxx
The Jobname and Filename elements of report file names include names of the specific Job and media file
against which a report was generated. The timestamp component represents the time at which the specific
report file was generated, and is given in the yyyyMMddTHHmmssSSS format.
For example, a CeriTalk report file, named "QTJob_mini-short.mov_End_20061006T122515725.xml",
can be inferred to have been generated at the "End" of processing a media file named "mini-short.mov" by
a Job named "QTJob" - at 12:25:15:725 on 2006-Oct-06.
CeriTalk Report Attributes
The following table gives a list of some of the Job and media file attributes present in CeriTalk reports.
The final column in the table refers to the Schema data type of the attribute, as defined in the XML
Schema Part 2: Datatypes specification.
Attribute name
name
Description
Value set
Name of the Job or media file.
string
priority
The Job priority.
Enumeration: "Low", "Medium" or
"High"
profile
Name of the Profile of the Job.
string
mediaset
Name of the MediaSet for the Job.
string
started
The time at which the Job or media file started
processing.
dateTime (in yyyy-MM-ddTHH:mm:ss
format)
completed
The time at which the Job or media file finished
processing.
dateTime (in yyyy-MM-ddTHH:mm:ss
format)
result
The result for a Job or media file.
Enumeration: "Success", "Warning" or
"Error"
path
Location (URL) from where the processed media file
was obtained.
string
size
Size of the media file (in bytes).
integer
status
Processing status for the media file.
Enumeration: "waiting", "copying",
"processing", "complete", "paused" or
"aborted"
progress
Progress of media file processing represented in
percentage.
integer, in the range 0-100
url
A hyperlink that points back into the Cerify Web user
interface, to a location where more information can be
obtained regarding the Job, media file or alert.
URL
Cerify Automated Video Content Verification System User Manual
197
Appendices
Appendix D: CeriTalk
Attribute name
Description
Value set
alertid
An identifier that represents the specific type of alert
that was raised. For a complete list of Cerify alert IDs,
refer to Alerts (see page 119).
integer
title
A title representing the alert that was raised.
string
level
Severity level for the alert.
Enumeration: "info", "warning", "error"
or "fatal"
location
The location of the alert, which is a Template rule or a
video/audio frame that generated this alert.
string
start
Optional column only present for quality alerts. Refer
to start and end positions of quality alerts (see
page 58) for a detailed description.
string
end
Optional column only present for quality alerts. For
detailed description, refer to start and end positions of
quality alerts (see page 58).
string
channelindex
When processing a multichannel audio stream, this
index will indicate the channel to which the alert
applies. Only present for audio quality alerts.
integer
channelname
The name of the channel to which the alert applies, as
given by the audio standard. Only present for audio
quality alerts.
string
type
The type of alert raised.
Enumeration: "parameter", "container",
"video", "audio" or "system"
details
Alert details.
string
xxx
In addition to the above list of attributes, CeriTalk reports reproduce all of the stream information captured
during media file processing. These attributes provide metadata on the container, video and audio layers
of the media file and are presented as key-value pairs in the report.
For a complete list of the attributes available in CeriTalk reports refer the CeriTalk schema definition. If
you are viewing this page from the Help pages in the Cerify Web user interface, click the following link to
view the CeriTalk XML schema definition and the Template Information schema definition.
To download the XML Schemas:
In Microsoft Internet Explorer, right-click the above link and select the Save Target As option from
the pop-up menu.
In Mozilla Firefox, right-click the above link and select the Save Link As option from the pop-up
menu.
If you are viewing this page from a printed or PDF version of the Cerify user manual,
please access the URLs http://your_cerify_host/CerifyReports.xsd and
http://your_cerify_host/TemplateInformation.xsd, replacing your_cerify_host with the
IP address or hostname of your Cerify system, to view the respective schema definitions.
198
Cerify Automated Video Content Verification System User Manual
Appendices
Appendix D: CeriTalk
CeriTalk SOAP API
The CeriTalk SOAP (Simple Object Access Protocol) API provides remote programmatic access to control
the Cerify standalone system and clusters. The current version of this API provides methods to:
Create a static MediaSet
Add a media file to an existing MediaSet
Delete a static MediaSet
Create and control Jobs
Get details of Template checks performed for a Job
List available Profiles
List available MediaLocations
Obtain the status and results of Jobs and Media Files
Monitor the state of the system
CeriTalk SOAP API does not provide support for:
Creating dynamic MediaSets (drop-boxes)
Creating or editing Templates, Profiles, and MediaLocations
Modifying administration or options settings
System
The CeriTalk API is implemented using standard Web service technology, which allows integrators to take
advantage of off-the-shelf tools and to use a wide range of programming languages to access Cerify.
The following figure shows the entities involved in integrating Cerify with an automation system using
the SOAP API.
Integrating Cerify
Cerify Automated Video Content Verification System User Manual
199
Appendices
Appendix D: CeriTalk
The Cerify system hosts a CeriTalk server, which responds to CeriTalk API method calls. The CeriTalk
client code runs on the automation system and calls CeriTalk API methods as required by the automation
system. In the case of a cluster, the CeriTalk client communicates only with the Supervisor unit and
never directly with the Media Test Units.
Messaging Model
All CeriTalk messaging takes place using synchronous remote procedure calls carried via SOAP. Each
method has a set of input parameters and returns the requested data or an error message indicating the
reason for failure. For an overview of the available methods, refer to Method Summary (see page 201). If
you are viewing this page from the Help pages in the Cerify Web interface, click here to view the Web
service definition (WSDL) file for the API. Alternately, if you are viewing this page from a printed or PDF
version of Cerify user manual, please access the URL http://your_cerify_host/CeriTalk?wsdl,
replacing your_cerify_host with the IP address or hostname of your Cerify system, to view the
Web service definition (WSDL) file.
CeriTalk is a stateless protocol. As long as the appropriate entities exist at the point a method is invoked,
the method can safely be invoked. Asynchronous event notification of CeriTalk clients is not supported.
Therefore, events such as the completion of a Job or the raising of an alert have to be detected by the
CeriTalk client by polling the Cerify system using the appropriate status method call. It is recommended
that polling does not occur at a frequency of greater than one method call a second.
SOAP
The Simple Object Access Protocol (SOAP) is a lightweight protocol for exchanging structured information
between endpoints in a distributed environment. SOAP uses XML to define an extensible messaging
framework and allows messages to be exchanged over a variety of underlying protocols. SOAP 1.2 is
defined by W3C in references SOAP 1.2 Part 1: Messaging Framework and SOAP 1.2 Part 2: Adjuncts.
Protocol Binding. SOAP is independent of the protocol that is used to transmit messages. The protocol
binding provided by the CeriTalk API is the SOAP HTTP binding.
Method Invocation. SOAP in itself does not define any programming model or application semantics;
instead it defines a simple mechanism that can be applied in a large variety of systems. The CeriTalk API
uses SOAP to encapsulate a request-response style programming model. The client sends SOAP messages
to invoke API methods: the parameters of the method are serialized into the message. Method results
are returned through the SOAP message response. URL references to image data may be included in the
results to provide media thumbnails.
200
Cerify Automated Video Content Verification System User Manual
Appendices
Appendix D: CeriTalk
Method Summary
The following table gives a brief overview of the operations provided in the CeriTalk SOAP API. For more
detailed documentation, consult the Software Development Kit (SDK) (see page 203).
Operation Name
Description
AddMediaFileToMediaSet
Add a new media file (specified by URL) to an existing MediaSet (specified by
mediaSetName). The URL must be within the MediaLocation specified.
ControlJob
Change the state or priority of an existing Job.
CreateJob
Create a new Job using an existing MediaSet and Profile.
CreateMediaSet
Create a new MediaSet. The media file specified by URL is added to the MediaSet.
The URL must be within the MediaLocation specified.
ControlMediaSet
Change the state of a MediaSet. Currently supports deletion only.
GetJobResults
Retrieve the test results for a given Job (specified by jobName). If a complete set of
results is desired, use the GetJobStatus operation to ensure that the Job has a status
of "complete" before requesting the results.
GetTemplatesForJob
Retrieve the Template details for a given Job (specified by jobName). A complete
list of Template checks that were applied to the media files in the Job, along with
parameter values for each check, is returned. This information can be used to
accurately reconstruct the Templates used with the Job specified on a different Cerify
system using the Template Import (see page 70) feature.
GetJobs
Retrieve a list of active (not archived) Job names according to Date and/or Status
criteria. If createTimeRangeFrom is populated, then all active Jobs created on or
after that date will be returned. If createTimeRangeTo is populated, then all active
Jobs created on or before that date will be returned. If status is populated, all active
Jobs having that status will be returned. More than one criterion can be populated, in
which case the results are ANDed together.
GetJobStatus
Retrieve the status for a given Job (specified by jobName).
GetMediaFileResults
Retrieve the test results for a given media file (specified by URL) within a given Job
(specified by jobName). If complete results are required, use the GetMediaFileStatus
operation to ensure that the media file has a status of "complete" before requesting
the results.
GetMediaFileStatus
Retrieve the status for a given media file (specified by URL) within a given Job
(specified by JobName).
GetProfiles
Retrieve a list of all active (non-archived) Profile names.
GetSystemStatus
Retrieve overall status information in order to make Job assignment decisions.
Returned values are: total Jobs pending and number of Media Test Units in cluster
(this is the number of Jobs shown as "Waiting" in the Web UI).
GetMediaLocations
Retrieve a list of names and URLs of all MediaLocations that are available.
xxx
Cerify Automated Video Content Verification System User Manual
201
Appendices
Appendix D: CeriTalk
Typical Use Case
The figure below illustrates a typical use case of this API: initiating a Job to check a newly ingested media
file and collecting its results.
Typical use case
202
Cerify Automated Video Content Verification System User Manual
Appendices
Appendix D: CeriTalk
Software Development Kit (SDK)
A Software Development Kit (SDK) is provided in conjunction with the CeriTalk SOAP API. This
comprises the following:
Sample CeriTalk client code for Java and .NET platforms
Detailed HTML documentation of all operations, their inputs, outputs, and faults
WSDL (Web Services Description Language) file describing the SOAP API
XML schema definition used by the WSDL
To retrieve and unpack the SDK:
Download the archive file to the target machine. If you are viewing this page from the Help pages in
the Cerify Web interface, select either
CeriTalk SDK (zip: Windows) or
CeriTalk SDK (tar.gz: UNIX/Linux)
to begin the download.
If you are viewing this page from a printed or PDF version of the Cerify user manual, please
access the URL http://your_cerify_host/ceritalk-sdk-VERSIONNUMBER.zip
or http://your_cerify_host/ceritalk-sdk-VERSIONNUMBER.tar.gz, replacing
your_cerify_host with the IP address or hostname of your Cerify system and VERSIONNUMBER
with the full software version number of your Cerify installation (you can find this in the footer section
of each page of the Cerify Web user interface), to download the CeriTalk SDK package of your choice.
Unpack it, using an appropriate tool such as tar or WinZip. The contents will be unpacked into a
directory named ceritalk-sdk-VERSIONNUMBER.
Contents of the SDK.
README.txt: Explains the contents of the SDK. It is a copy of this list.
doc/: Detailed HTML documentation about the API methods can be found in CeriTalk.html in
this folder.
sample_code/: Sample code for a representative automation use-case.
sample_code/common/: Common components used to build sample code: WSDL and schema.
These can also be downloaded from a Cerify system but are provided here as a convenience.
sample_code/java/: Sample code written in Java using the Apache Axis SOAP stack. Consult the
README.txt file in this directory for instructions on how to build and run the Java client.
sample_code/dotnet/: Sample code written in C# using the Microsoft .NET Framework SDK.
Consult the README.txt file in this directory for instructions on how to build and run the .NET client.
Cerify Automated Video Content Verification System User Manual
203
Appendices
Appendix E: Configuring Your Cerify Installation
Appendix E: Configuring Your Cerify Installation
This section provides information on modes of operation, configuring your installation for best
performance, and commercial off-the-shelf platform recommendations.
Number of Channels
This number is derived from the throughput expectation for the installation and is the single most
important factor influencing selection and configuration of the hardware on which to run Cerify. All
guidance in this section of the document assumes that the number of channels that you would like to
license is determined in advance.
The processing speed of Cerify is affected by a number of factors:
Content Format
It is important to establish the exact type of content you want to process. This includes: the codec standard,
the profile of the standard, the resolution, the bit rate, and whether the content is long-GOP or I-frame only.
The longer the play time of the media file, the longer Cerify will take to process the file. The play time and
processing time are roughly proportional.
Cerify Templates
Cerify performance will depend on the checks that Cerify is running, as defined by the Templates settings
in the chosen Profile. The processing time of a media file increases as baseband tests are added. The
parameters used in the baseband checks also affect processing time. For example, the RGB gamut and
Luma limit checks become significantly shorter if low pass filtering is not enabled.
External System Factors
The following external system factors also influence the processing speed of Cerify:
File transfer protocol used. For details see “Supported Protocols” under MediaLocation Management
Referenced or encapsulated container format
Network infrastructure
Video server throttling
Of these four factors, the content format has the most significant impact on speed. However, even for a
given content format, the processing speed of Cerify can vary by a multiple of 3 or 4 due to the other factors.
Due to a high degree of potential variance in performance, the most reliable way to predict the performance
of the product and determine the number of channels required to meet a given throughput, is to run
well-designed trials that are representative of the intended application.
204
Cerify Automated Video Content Verification System User Manual
Appendices
Appendix E: Configuring Your Cerify Installation
Contact your Tektronix representative for help in designing trials to determine the number of channels that
will meet your requirements.
NOTE. All guidance in subsequent sections of this chapter assumes that the number of channels you
want to license is determined in advance.
Modes of Operation
Cerify processes media files in two modes that differ in their use of network and hard disk usage: streaming
and copying. The choice of mode is primarily dependent on the format of the media file being analyzed but
may be a result of media server connectivity configuration.
Streaming Mode
Some media file formats are suitable for analysis as they are read directly from the media server hosting
the file and do not require to be copied to the local hard disk of the Cerify system. These media file formats
are referred to as "streamable" and this mode of operation is referred to as the “streaming” mode.
Examples of streamable formats are:
DV
GXF
MPEG-2 Program Stream
MPEG-2 Transport Stream
MXF frame-wrapped
MXF and QuickTime MOV files with external-reference media files
QuickTime MOV or MP4 files where the Movie (moov) atom is BEFORE any Media Data (mdat)
atoms in the file
Streamable files do not require significant disk storage on the Cerify system above that required for
the normal operation of Cerify. There is no requirement for particular disk configuration to provide
performance benefits. The network configuration can affect processing performance, especially if there are
many media files being processed simultaneously.
Follow the steps below to determine if a file is streamable or not:
1. In the Admin page, set the Stream Information value to all attributes.
2. Process the file in Cerify.
3. After the processing is complete, click the job name to get the job details page. Click the file path in
the job details page to the get the processing result page.
4. Under the container information section, a properly called “Streamable” is displayed with the value as
“yes” if the file is streamable and “no” if the file is non-streamable.
Cerify Automated Video Content Verification System User Manual
205
Appendices
Appendix E: Configuring Your Cerify Installation
Copying Mode
Some media formats need to be copied to the local hard disk of the Cerify system before processing can
begin. This is usually because the format of the file contains information at the end of the file that is critical
for correct processing of the file. Some media files will need to be copied entirely before processing can
begin whereas some only require to be copied partially. This mode of operation where files are copied
in full or part to the Cerify system’s local hard disk is referred to as the “copying” mode and such file
formats are referred to as “unstreamable”.
Examples of unstreamable files are:
ASF
QuickTime MOV or MP4 files where the Movie (moov) atom is AFTER any Media Data (mdat)
atoms in the file
Packetized streams that have audio/video synchronization issues where there is a significant delay
between the audio and video presentation times.
For unstreamable files, in the worst-case scenario, an entire media file will need to be copied to the local
Cerify disk. Sufficient storage is required on the Cerify system along with a disk configuration that is
optimised for high concurrent read/write performance. The network configuration can affect the latency to
begin processing, especially if there are many media files being copied simultaneously.
NOTE. This mode of operation requires high network and disk bandwidth. In a multi-channel situation,
analyzing media files with a number of external reference files, it is possible that the network copy will
require more disk bandwidth than is available. This can then cause application performance issues where
the disk bandwidth becomes a bottleneck for the system. To mitigate this, the network bandwidth used for a
file can be limited to a rate to prevent the disk from becoming overloaded with write requests. You can do
this by adjusting the property “vqual.io.maxfilecopyrate” in cerify.properties. This property limits the total
rate at which Cerify will attempt to retrieve asset data.
Force Copy
The mode of operation is normally automatically selected on a per file basis by the system based on the
characteristics of the file under test. However, you can force Cerify to operate in the “copying” mode
where it treats streamable files as if they are unstreamable by copying them to the local disk as quickly as
possible while it starts processing the file.
This feature is intended for use in situations where the media file server has a limited number of
connections available and Cerify is processing a media file that references other external media files; for
example, MXF or QuickTime MOVs. In this situation, Cerify may need to copy the main media file
entirely to free up a server connection to obtain one of the reference media files. If there are one or more
other reference media files and no other available connections, Cerify will repeat this behavior until all
of the reference files are copied to the Cerify system. This behavior is also desirable in the situation
where there are fewer server connections available than Cerify channels. To fully utilize the processing
capability of Cerify, it is necessary to copy the files locally so that the number of media server connections
does not limit the Cerify processing capability.
To enable this feature, set the Cerify system property cerify.forcecopy to true. See Software Maintenance
(see page 186).
206
Cerify Automated Video Content Verification System User Manual
Appendices
Appendix E: Configuring Your Cerify Installation
Growing Media Files
In most cases, Cerify cannot fully process a file from a media server while the file is still growing in size.
This is due to limitations of most FTP and SMB servers where the media server is unable to reliably
transfer such growing files to Cerify over these protocols.
The only situation where it is possible to process growing files from media servers is over the FTP protocol
when the FTP server used to access the media will reliably ensure that the whole file is transferred to
Cerify, even if the file size changes after the FTP transfer begins.
NOTE. To process growing files, the file stabilization checks performed by Cerify must be disabled. This
can be done by setting the value of the Cerify system property cerify.filestreamretry to 0. In addition, you
will also need to set the vqual.io.ftp.filesizeunknown system property to true. For information on how to
modify Cerify system properties, refer to Software Maintenance (see page 186) .
Files of Unknown Size
In some cases, video servers do not report the size for the file being transferred to Cerify for testing. This
results in Cerify considering such files as ones with an unknown size.
This typically happens in the following two cases:
Servers that do not report file size. In this case, the file size is not reported, often because the file does not
exist on the server but is created and streamed to Cerify on request. This happens with Grass Valley servers
when accessed through the Advanced Media Protocol (AMP) service using the gvg:// protocol from Cerify.
For more information on the gvg:// protocol, refer to Supported connectivity types and protocols .
FTP Servers with Virtual File Systems. In this case, the server maintains a virtual file system, where it is
necessary to obtain the file in a number of different formats. This is achieved by Cerify requesting a file
with the same base name as reported in the FTP listing, but with a different file extension.
For example, Nexio servers could return an FTP listing that shows assets to have the .lxf extension,
but requires Cerify to transfer and process .mxf files of the same base name. Such behaviour in
Cerify – of being able to switch file extensions before FTP transfers – is achieved by setting the
vqual.io.ftp.filegetprefix and vqual.io.ftp.filegetsuffix system properties. To handle such situations, you
must set the vqual.io.ftp.filesizeunknown Cerify system property to true. Refer to Configuring the Cerify
Application (see page 186) for information on how to modify Cerify system properties.
In cases, when the file size is unknown, Cerify has no way of sensibly reporting the progress since Cerify
requires the file size to calculate the progress percentage. As a result, Cerify reports the file to be at
0% progress for the duration of processing. Eventually, when Cerify has stopped receiving file data
from the server, it considers the end of the file to have been reached and accordingly moves the progress
percentage from 0% to 100%.
NOTE. Do not interpret this behaviour which causes files to appear “stuck” at 0% for long periods as the
absence of processing. It is possible to identify this scenario by the presence of stream information being
reported against the file even though of the progress percentage reported being 0%.
Cerify Automated Video Content Verification System User Manual
207
Appendices
Appendix E: Configuring Your Cerify Installation
Configuring Your Cerify Installation for Best Performance
Choosing the Number of Hard Disks and Their Sizes
The amount of storage space you’ll need on the Cerify unit depend on four factors:
The number of channels licensed
The average size of the files you will be testing
The mode in which Cerify operates (Streaming/Copying)
The level of fault tolerance you want to build into your system
In copying mode, the amount of temporary data that Cerify will need to keep on the disk is determined by
the number of channels you want to run multiplied by the average size of the files you will be testing. In
streaming mode, since the files are not copied on to the disk, the temporary storage requirement for Cerify
is minimal, typically of the range of 10-20% of the temporary storage space required for copying mode. It
is recommended that the temporary storage space be served by a dedicated hard disk (or RAID array).
In addition to the amount of temporary storage required, the selected platform will also need to
accommodate the Cerify application and its database. It is recommended that the Cerify application and
the operating system be confined to two separate hard disks, each of the same size, so they could be
effectively incorporated into a RAID array that offers redundancy for these two critical components.
Consider the following installation:
Running 4 channels
Using copying mode
Processing files that are on average 75 GB in size
Requiring fault tolerance on operating system and the Cerify application
The number of disks recommended would be calculated as follows: 4 * 75 GB = 300 GB of temporary
space, served by a RAID array consisting of 3 disks each of 150 GB. Two separate disks, one each for
Cerify and the operating system. It is recommended that you provide for this with two 500 GB drives
for enterprise level usage. That is a total 5 disks two of them about 500 GB in size and three of them
150 GB in size each.
To run the same number of channels in the streaming mode, you will need only 3 disks, two of them about
500 GB in size for the operating system and the application. This is the same as in the case of the copying
mode, but a single hard disk of around 100 GB size servicing the temporary storage for Cerify.
Partitioning Hard Disks
The three major components that make up the hard disk usage on your Cerify installation are:
The operating system
Cerify application (software and the database)
Temporary storage for copied media files and page files created by the system
208
Cerify Automated Video Content Verification System User Manual
Appendices
Appendix E: Configuring Your Cerify Installation
Best results are achieved when these three components are confined to separate logical drives/partitions.
For example, the operating system being installed on the C:\ drive, Cerify being installed on D:\ and an E:\
drive being dedicated for system page files and temporary storage for Cerify.
Adding Fault Tolerance
In addition to the requirements for logical drive partitioning, it is also generally desirable to add fault
tolerance to Cerify installations in operational use, especially when used in an enterprise setting. This
can be achieved by creating RAID arrays using the hard disks in your computer. This will let the system
tolerate disk failures without suspending the services and gives an opportunity for fault repairs while the
system remains online.
NOTE. The use or otherwise of RAID on the Cerify machine does not in any way influence the functional
behavior of Cerify and is not a pre-requisite. However, there are certain performance gains to be
achieved by doing this, especially when operating in the copying mode. It is highly recommended that
you install Cerify into a system with appropriately configured RAID arrays for reasons of data security
and performance.
CAUTION. To prevent a loss of data, normal data protection measures like routinely backing up the Cerify
database should be performed irrespective of whether or not your Cerify system is fault tolerant. Such
backups should preferably be made onto a location outside the Cerify unit. See Database Backup (see
page 111).
Due to the differences in the levels of fault tolerance desired in different use cases, the disk configurations
recommended also vary. Some of the typical usage scenarios and the recommended RAID configurations
to use are documented below:
Scenario 1: Single Channel Install. Due to the non-critical nature of single channel installs, they generally
do not use a RAID configuration. If database or OS redundancy is desired, it is recommended that you
follow the same RAID configuration guidance that applies to multi-channel installations for your mode
of operation. Note that this may require provision of additional hard disks and a RAID adapter to the
single channel platform.
Scenario 2: Four Channel Install, Streaming Mode. The recommended hard disk partitioning layout in
this case is:
Hard disk 1: Partition C:\
Hard disk 2: Partition D:\
Hard disk 3: Partition E:\
It is assumed that hard disks 1 and 2 are a group of disks of the same size. Choose the number and
size of disks that best fits your level of usage when operating in the streaming mode. See Choosing the
Number of Hard Disks and Their Sizes (see page 208)
Cerify Automated Video Content Verification System User Manual
209
Appendices
Appendix E: Configuring Your Cerify Installation
The very low amount of disk access in the streaming mode does not require the temporary storage to use a
RAID configuration. It is recommended that you use hard disk 3 as the temporary storage location for
Cerify and configure your operating system to write page files to it.
Scenario 3: Four Channel Install, Copying Mode. The recommended hard disk partitioning layout in
this case is:
Hard disk 1: Partition C:\
Hard disk 2: Partition D:\
Hard disk 3: Partition E:\
Hard disk 4: Partition E:\
Hard disk 5: Partition E:\
It is assumed that hard disks 1 and 2 are a group of disks of the same size and disks 3, 4 and 5 are another
group of disks of the same size. Choose the number and size of disks that best fits your level of usage. See
Choosing the Number of Hard Disks and Their Sizes (see page 208)
The recommended RAID configuration and application layout for this scenario is: Create a RAID1 array
to hold the C:\ and D:\ drives and install the operating system on C:\ and the Cerify application on D:\.
Create a RAID0 array using the hard disks 3, 4 and 5 and use it as the temporary storage location for
Cerify and configure your operating system to write page files to it.
Such a configuration will provide high levels of fault tolerance for the operating system and the application
while also improving overall performance by making disk access into the temporary storage much faster
than on a system that is not using a RAID configuration.
NOTE. The temporary storage location used by Cerify can be selected during the installation. This can
also be changed after the installation by modifying the Cerify system property cerify.temp.location to the
desired folder. See Software Maintenance (see page 186).
Performance Tuning Your Operating System
The overall performance of your Cerify unit can also be enhanced by fine tuning the performance of the
operating system it is installed on. Listed below are some Windows system parameters that may be
modified for better Cerify performance.
NOTE. The following table focuses primarily on Windows Server 2008, 64-bit Standard Edition, which
is the recommended enterprise platform for Cerify. It is possible that some of the parameters are not
available on other Windows operating systems and changing them may not produce the desired effect on
such platforms.
210
Cerify Automated Video Content Verification System User Manual
Appendices
Parameter
Appendix E: Configuring Your Cerify Installation
Description
Network bandwidth parameters
AsynchronousCredits
This parameter limits the number of concurrent asynchronous
SMB commands in a single connection. The default value for this
parameter is 512. The value of this parameter can be increased
to achieve greater concurrency when using Cerify to access files
from a remote video server over the smb:// protocol. This setting
can be accessed through the registry key: HKEY_LOCAL_MACHINE\SYSTEM\CurrentControlSet\Services\Lanmanserver\
parameters.
Disk I/O parameters
Stripe Unit Size
This parameter controls the data stripe size used by the NFS file
system. The default value for this parameter is 64 KB, but, can
be adjusted between 4 KB to 1 MB. Increasing the value to 1 MB
could help improve file system performance under typical Cerify
usage. This value can be set at the time of RAID configuration.
The RAID utility asks you to select the Stripe value ranging from
8 KB to 1 MB. Recommended values are 64 KB for RAID 1 and
128 KB for RAID 0.
TreatHostAsStableStorage
This parameter disables the processing of write flush
commands from clients. The default value for this parameter
is 0. Changing the value of this parameter to 1 could
improve server performance and reduce client latency.
This setting can be accessed through the registry key:
HKEY_LOCAL_MACHINE\SYSTEM\CurrentControlSet\Services\
Lanmanserver\parameters.
AdditionalCriticalWorkerThreads
This parameter affects the number of threads that the file system
cache uses for read-ahead and write-behind requests. The default
value for this parameter is 0. Raising this value can allow for
more queued I/O in the storage subsystem and can improve I/O
performance. This parameter can be access through the registry
key: HKLM\SYSTEM\CurrentControlSet\Control\SessionManager\Executive. It is recommended that you change this value to
16.
MaximumTunnelEntries
This parameter controls the size of the NTFS tunnel cache. The
default value for this parameter is 1024. Reducing this value can
significantly improve file deletion performance for directories that
contain a large number of files. This setting can be accessed
through the registry key: HKEY_LOCAL_MACHINE\SYSTEM\CurrentControlSet\Control\FileSystem.
Disabling File Last Access Time Update
By default, Windows Server 2008 disables last-access
time updates. It is recommended that it be left disabled
as it increases CPU overhead for file read/write/open
operations. This setting is defined by the registry data word
“NTFSDisableLastAccessUpdate” defined in the registry key:
HKLM\System\CurrentControlSet\Control\FileSystem\. Set the
value of this entry to 1 to disable last access time updates.
xxx
Cerify Automated Video Content Verification System User Manual
211
Appendices
Appendix E: Configuring Your Cerify Installation
NOTE. The caching policy of your server can have a major performance impact on your hardware. You
can enable Write Caching property by right clicking Drive Names > Hardware > Properties-Policies >
Enable Write Caching. Depending on the RAID hardware configuration used, enabling Adaptive Read
Ahead and Write Through is also recommended.
CAUTION. It is recommended that the TCP/IP Offload Engine (TOE) option be left disabled on network
interfaces that support it. It has been observed that enabling this option can lead to intermittent
connectivity errors when processing multiple files simultaneously over the ftp:// protocol.
Commercial off-the-Shelf Recommendations
The following hardware specification is recommended for a 4-channel Cerify operating in copying mode.
Manufacturer: Dell Corporation
Model: Power Edge 2950
Processor
Dual Quad Core Xeon X5450 (3.0 GHz, 2x6 MB, 1333 MHz FSB)
Riser
Riser with PCI Express Support (2x PCIe x8 slots; 1x PCIe x4 slot)
Memory
16 GB (4x4 GB Dual Rank DIMMs) 667 MHz FBD
Chassis
PE2950 III - Chassis 3.5HDD x6 Backplane
Optical drive
DVD-ROM Drive SATA with SATA Cable
RAID adapter
PERC 6/i, Integrated Controller Card x6 backplane
PE2950 III C8 MSS R1/R5 Add-in PERC 5/i / 6/i
Networking
Intel PRO 1000PT Dual Port Server Adapter, Gigabit NIC, Cu, PCIe x4
TCP/IP Offload Engine 2P
Hard disks
500 GB Near-Line SAS 7.2k 3.5" HD Hot Plug x 2, in a RAID1 array
300 GB SAS 15k 3.5" Additional HD Hot Plug x 3, in a RAID0 array
xxx
NOTE. The number and size of the three 300 GB hard disks to include depends on the average size of your
files and the number of channels you are using. In streaming mode, the second RAID is not required and you
can use a single disk for temporary file storage. Choose the amount of storage and to configure your hard
disks for best performance. See Configuring Your Cerify Installation for Best Performance (see page 208).
212
Cerify Automated Video Content Verification System User Manual
Glossary
Glossary Terms
Glossary Terms
Administrator
A type of user who has unrestricted access to the system, including access to functions for creating and
modifying MediaLocations and users.
Alert
Alerts announce any checks that fail as a Job executes. Each alert indicates the severity of the failure,
as well as where and why the check failed. The system gathers alerts associated with a particular Job,
so that you can access the results from the top level and easily navigate to the details (such as which
individual frames have alerts).
AMP
Advanced Media Protocol of Grass Valley.
Audio Channel
A sequence of data representing an audio signal intended to be reproduced at one listening position.
For example, a stereo audio track consists of two channels, while a Dolby Digital 5.1 track consists
of six channels.
Audio Track
A grouping of audio channels that are to be played back at the same time. This may include separate
streams in Media Files such as MXF that are played back together. For example, a file containing Spanish
language, English language, and a voice-over from the director contains three audio tracks.
Client machine
An individual computer that is used to access the system through a Web interface or via the CeriTalk API.
Container file
A file that acts as a container or wrapper for one or more elementary streams. Rules for handling container
files are configured using a Container Template.
Channels
The term “channels” refers to the number of media files that a Cerify unit will be required to test in parallel.
Cerify Automated Video Content Verification System User Manual
213
Glossary
Glossary Terms
Cluster Network
The cluster network contains a single Supervisor and one or more Media Test Units.
Customer Network
The LAN on which the video servers are located from which Cerify accesses the media files it processes.
Typically, this might be the broadcast network.
Elementary stream
Compressed digital media data relating to a single video or audio component.
Job
A Job associates a MediaSet with a Profile. By creating a Job, you request the checks defined by the Profile
be applied to the files in the MediaSet.
License dongle
A USB key device. To enable files to be processed, a license dongle must be available to the Cerify system.
Media file
A file containing compressed digital media: audio, video, or both.
MediaLocation
A local or network location where media files can be found, identified by a unique name within the system;
set up in the system by the administrator. Typically, this network location corresponds to the Ethernet port
of a video file server.
MediaSet
A set of media files; can be static or dynamic. A static MediaSet is a collection of media files chosen from
one or more of the MediaLocations. A dynamic MediaSet (or DropBox), is a directory that is continually
monitored by the system for new media files. If a Job is associated with a DropBox, every file that appears
in the DropBox over time will be processed.
Media Test Client
The software component that processes media files.
214
Cerify Automated Video Content Verification System User Manual
Glossary
Glossary Terms
Media type
The specific format of a media file or stream.
Media Test Unit
The Media Test Unit is responsible for the actual processing of the digital media files in a cluster. It
applies the user-specified tests and reports back the results to the Supervisor unit. The term is sometimes
abbreviated to MTU.
Profile
A Profile gathers together different types of Templates, providing a complete set of checks to be applied to
a MediaSet. Depending on the requirements of the MediaSet to be checked, any or all types of Templates
may be included.
Poster Frame
A Poster Frame is the first visually distinct frame of a video asset following any white or black lead-in.
Reports
Reports provide users with a way to query the system database and obtain information in a predefined
format. A Job report presents the results of a particular Job in tabular form.
Server
Refers to a system which provides one or more services to client devices. Cerify is a server because it
provides a Web server to allow users to control the unit via a Web browser. Internally, Cerify provides
other services, such as a database, and license management.
Standalone system
Standalone system is a single machine that combines the functionality of a Supervisor unit and a Media
Test Unit.
Supervisor
The Supervisor controls the cluster. It hosts the database and the Web server and is responsible for
controlling the cluster network.
System
System is used to refer to the entire Cerify system and the PC on which it resides.
Cerify Automated Video Content Verification System User Manual
215
Glossary
Glossary Terms
Template
A collection of checks to be made when checking a media file. The four types of Templates are:
Container Template: gathers rules that apply to the transport/container layer of a media file.
Video Template: gathers rules that apply to the digital video content of a media file.
Audio Template: gathers rules that apply to the digital video content of a media file.
Action Template: gathers rules that specify actions to be applied as a result of processing a media file.
Users
The system can support multiple users accessing the system via the Web UI. Each user has name and
password credentials which they must use to log in to the system. These credentials will have been
assigned by a user who has administrator access to the system. When creating a user, an administrator can
choose whether to give the new user administrator rights.
216
Cerify Automated Video Content Verification System User Manual
Index
Index
Symbols and Numbers
B
4MV block modes, 81
Bidirectional prediction, 83
Bit rate, 78
audio, 88
Black frames, 78
Blockiness, 79
Body of the page, 32
Breadcrumb, 32
Byte order, 92
A
AAC Profile, 92
AC prediction, 81
Action Template rules, 93
Active/Archive view control, 32
Adding Fault Tolerance, 209
Admin page, 104
Administrator, 104
Alert details, 57
Alert details page, 57
Alert Levels, 56
Error, 56
Fatal, 56
Info, 56
Warning, 56
Alert limit, 77
Alerts, 55
Application access, 21
Archive/Restore control, 32
Archiving, 48
Aspect ratio, 78
Audio, 73
Audio Coding Mode, 91
Audio compression standards
supported, 180
Dolby Digital, 180
MPEG-1 part 3, 180
MPEG-2 part 3, 180
MPEG-2 part 7 AAC, 180
MPEG-4 part 3, 180
Uncompressed audio, 180
Window Media Audio
Standard, 180
Audio configuration checks, 86
Audio standard, 87
Audio Templates, 86
Audio track
ID, 87
Index, 87
AVC-Intra restrictions, 83
C
CC absent, 82
CC standard, 82
CEA 608 caption services, 82
CEA 608 text services, 82
CEA 708 caption services, 82
CeriTalk, 196
Messaging Model, 200
SOAP API (CeriTalk2), 199
XML Reports
(CeriTalk1), 196
Change password, 103
Channels, 204
Choosing the Number of Hard
Disks and Their Sizes, 208
Clipping, 89
Closed caption, 73
Cluster configuration, 15
Collapse a heading, 34
Collapse a section, 30
Color depth, 77
Color format, 81
Compression standards, 176
Concepts, 25
Container formats supported, 182
Container Templates, 71
Continuity checks (Dolby-E), 91
Copy an item, 30
Copying Mode, 206
Copyright extension, 82
Copyright notice, 34
CRC checks (Dolby-E), 91
Cerify Automated Video Content Verification System User Manual
Create
MediaLocation, 40
MediaSet, 41
new Profile, 60
new user, 105
Profile, 46
report, 48
Template, 44
D
Data partitioning, 81
Database
backup, 111
Database Utility, 187
Display Aspect Ratio
(MPEG-2), 81
Dolby Digital, 180
DropBox filters, 102
Dropped frames, 83
DV, 176
DV Audio, 180
E
E-mail settings, 110
Edit
item, 30
MediaSet, 43
Profiles, 61
Template, 67
Edit Profile page, 62
Empty table, 34
Enable Job deletion, 112
Entropy coding, 83
Error protection, 90
Errors, 35
form input, 35
system, 36
work flow, 36
Example Jobs, 189
Expand a section, 30
Exporting Templates, 69
217
Index
F
Field Order, 77
File types supported, 182
Files of Unknown Size, 207
First GOP closed, 82
Force Copy, 206
Form input errors, 35
Forward prediction, 81
Frame rate, 77
Frame rate (Dolby-E), 91
Frame view, 59
Frame View page, 59
Freeze frame, 78
G
Global motion compensation, 81
GMC, 81
GOP interval, 82
GOVHeader, 80
Grass Valley, 109
Growing Media Files, 207
H
H.263, 176
H.264/AVC, 176
H.264/AVC Profile, 83
Hardware prerequisites, 9
Headings, collapsing, 34
Help, 116
I
Icons, 30
Importing Templates, 70
Indicated bit rate, 82
Individual Alert limit, 88
Insert dongle, 17
Inspecting
Job results, 47
Intensity compensation, 83
Interlace, 77
J
Job, 51
inspecting results, 47
Modifying, 53
view, 104
218
Job Details page, 54
L
Letterbox check, 79
License
dongle, 5
Loading Example Jobs, 189
Log (of system information), 115
Login details, 31
Loop filter, 83
Loss of Chroma, 78
Low Frequency effects
channel, 91
Luma Limit Violation, 80
M
Mail settings, 110
Media file playback, 113
Media Test Unit
installation, 15
MediaLocation, 26
creation, 40
management, 106
MediaSet, 26
creation, 41
Modes of Operation, 205
Modify
user, 105
MPEG-1 / MPEG-2 standard, 90
MPEG-1 part 3, 180
MPEG-2 audio layer, 90
MPEG-2 level, 81
MPEG-2 Part 2, 176
MPEG-2 part 3, 180
MPEG-2 part 7 AAC, 180
MPEG-2 profile, 81
MPEG-2 standard, 81
MPEG-4 Part 2, 176
MPEG-4 part 3, 180
MPEG-4 profile and level, 80
Multi-channel Installation, 10
Multiple sets of values, 69
Mute, 89
N
Navigation
bar, 31
breadcrumb, 32
Network Settings, 20
New Job page, 52
New MediaSet, 43
New profile page, 62
New Template page, 68
NFS, 194
Nominal bit rate, 91
Number of channels, 88
Number of Channels, 204
O
Off-the-Shelf Recommendations, 212
Omneon Spectrum, 109
Online help, 116
Operational Pattern, 74
Options page, 103
Options upgrade
Dongle upgrade, 192
P
Pack header, 73
Packet size, 73
Padding stream, 74
Page body, 32
Page header, 31
Partitioning Hard Disks, 208
Password
change, 103
Payload bit depth, 91
PCM type, 92
Peak level maximum, 89
Peak level minimum, 89
Performance Tuning, 210
PID, 73
Pillarbox check, 79
Pinnacle (Avid), 109
Play time
audio, 88
video, 77
Poster frame coverage, 110
Poster frame threshold, 110
Private Stream 1, 74
Private Stream 2, 74
Processing result page, 55
Processing settings, 110
Cerify Automated Video Content Verification System User Manual
Index
Profile, 60
archiving, 60
creating, 46
creating new, 60
editing, 61
restoring, 60
Profile Details page, 61
Program configuration, 91
Program stream Directory, 74
Program Stream Map, 73
Q
Quantization, 83
Quarter sample MV, 81
Quick Check, 75
R
RAID, 211
Range mapping, 83
Records per page, 104
Reinstalling Cerify, 18
Remove an item, 30
Report file settings, 112
Reports, 28
creating, 48
Resolution, 77
Restore backup, 111
Resync markers, 81
Reversible Variable Length
Codes, 81
RGB Component Violation, 80
RVLC, 81
S
Sample aspect ratio, 83
Sample depth, 92
Sample rate, 88
SBR, 92
Schedule Job deletion, 112
SCTE 20 line number, 82
SCTE 21 line number, 82
SDK, 203
Section
collapsing, 30
Select All control, 33
Sequence display extension, 82
Server, 110
Silence, 88
Single Channel Installation, 9
SMPTE 337M, 91
SMTP server, 110
SOAP, 200
Software components, 6
Software Installation, 12
Software maintenance, 186
Software prerequisites, 12
Software Upgrade, 19
Sort items, 30
Standards
video compression, 176
Standards references, 184
Standardsaudio compression, 180
Stereo Coding, 90
Stream Information, 113
Stream Information Display, 113
Streaming Mode, 205
Supervisor
installation, 15
Support Monitor, 190
Supported protocols, 107
Supported video servers, 109
Supported Wrapper and Codec
Combinations, 183
Suppress Alerts
video, 72
Syntax Checks
audio, 87
video, 74
System
errors, 36
System components, 5
System header, 73
T
Tables, 33
Teletext, 73
Template
Action, 63
Audio, 63
Container, 63
creating, 44
Video, 63
Template export, 69
Template import, 70
Templates, 26
Cerify Automated Video Content Verification System User Manual
Test tone, 89
U
Uncompressed audio, 180
Uninstallation, 18
User, 25
creating, 105
management, 105
modifying, 105
User interface, 29
Using NFS Client on
Windows, 194
V
Variable bit rate, 90
VBI, 73
VBV buffer size, 82
VC-1, 176
VC-1 Profile, 83
Version, 34
Video, 73
Video compression standards
supported, 176
DV, 176
H.263, 176
H.264/AVC, 176
MPEG-2 Part 2, 176
MPEG-4 Part 2, 176
VC-1, 176
Video Configuration Checks, 74
Video object header, 80
Video quality checks, 78
Video standard, 74
Video Template type, 44
Video Templates, 74
View
frame, 59
Jobs, 104
Profile details, 60
Visual object sequence header, 80
VLC playback, 114
VOD, 73
W
Web user interface access, 23
Window Media Audio
Standard, 180
219
Index
Windows servers, 109
Windows service
installation, 22
220
WMA, 180
Work flow
errors, 36
Cerify Automated Video Content Verification System User Manual