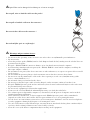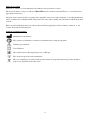
1
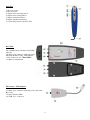
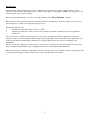
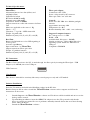
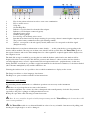
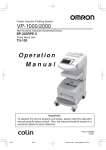
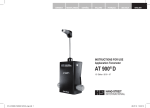
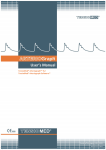
User Manual
PulsePenLab device is manufactured by DiaTecne s.r.l., with Headquarters in Milan, Italy.
!
This manual is an integral part of the product and must be kept together with it.
The PulsePenLab is a non invasive device for the Pulse Wave Velocity assessment in small laboratory
animals. It provides an enhanced sensitivity, a reduced plunger size and a higher sample rate than the standard
PulsePen device. The PulsePenLab allows longitudinal studies with repeated measurements during the life
of the animals, avoiding their sacrifice, in opposition to the invasive method. Moreover the required time for
examinations is quite short compared to the invasive method. Animals are sedated and put in place directly on a
metal plate or interposing an external heated layer for better comfort. The pressure probes are fixed on
adjustable arms with two micromanipolators.
Composition:
The PulsePenLab device (code PPLab2) is made up of the following parts, contained in the package:
•
•
Battery-powered Base Unit (code EC004), for the connection of the tonometric probes, equipped with
fiber optic interface for data transmission.
Two PulsePen (code TN4Lab) Tonometric probes for the acquisition of a pressure signal with the noninvasive “applanation tonometry” method, connected to the Base Unit powering them.
Accessories for the computer connection:
•
Fiber optic cable
•
Fiber Optic - USB Adapter (code AF002)
Mechanical Assembly:
•
Aluminum Plate
•
Two adjustable arms
•
Two Micromanipolators
•
Two fixing arrangements for the Pressure Probes
Generic accessories:
•
Usb memory with software
•
Two 1.5 V - AA - Alkaline batteries
•
This manual
•
Guarantee
•
Carrying bag
Note: the PulsePenLab must be connected to a computer, provided by the user, in order to be able to
visualize the signals and process the significant parameters. The connection to the computer is galvanically
insulated and is made using the fiber optic cable and the AF002 adapter.
1
PulsePen:
1) Pressure sensor
2) Freeze button
3) Signal offset lowering button
4) Signal offset raising button
5) Signal attenuation button
6) Signal amplification button
7) Connecting cable for the Base Unit
Base Unit:
8/9) On/Off button with battery life LED
indicator
10) Fiber optic connector with ring nut for
link with the Fiber Optic -USB Adapter
11/12) Connectors for PulsePen
13) Battery compartment
Fiber Optic - USB Adapter:
14) Fiber optic connector with ring nut for link with
Base Unit
15) Data indicator LED
16) USB - P.C. Connector
2
Intended use:
In this manual, when writing about device or equipment, the reference is to all its component units, unless
otherwise indicated. The “Fiber Optic Cable” and the “Fiber Optic - USB Adapter AF002” are support parts for
connecting the device to the computer.
For the operational functions, pls refer to the online manual of the PulsePenLab software.
This device has been designed solely for veterinary laboratory research uses. It therefore must not be used for a
direct diagnosis or check of vital physiological processes.
The primary functions are:
1.
Calculation of the Pulse Wave Velocity – PWV.
2.
Graphic representation of the pressure curves with the automatic calculation of several significant
parameters.
It is necessary for a qualified, skilled operator to be present, one familiar with the “applanation tonometry”
method, for the use of the equipment. The morphology and amplitude of the acquired pressure signals and, as a
result, the parameters automatically calculated are strongly influenced by the operator’s handling of the
instrument.
For the correct and complete use of the device, it is necessary to enter the systolic and diastolic blood pressure
values obtained independently using a sphygmomanometer or an alternative instrumentation.
Pulse wave velocity is defined as propagation velocity of the pressure waves from the center to the periphery and
is obtained by dividing the distance between two points and the related transit time.
3
Technical Specifications:
PulsePen:
Adjustment buttons: base line (Offset) and
amplitude (Gain)
Signal Freeze button
Resolution: 0.00976 mmHg
Dynamic range: 640 mmHg
Acquisition: 16 bit @ 1000Hz
Output connections: cable with connector for Base
Unit
Max force applicable to the sensor: 1 Kg
Shock: # 5 g
Vibrations: # 2 g @ 0 ÷ 2 KHz sinusoidal
Weight: 34g with cable
Dimensions [mm]: 132 (L) x 23 (W) x 16 (H)
Fiber optic adapter:
Connection to PC: USB
Power: self-powered by PC connector
Fiber optic cable: 3m - ø2.2 mm
General:
Power: Two IEC LR6 -AA- Alkaline penlight
batteries
Approximate autonomy: 40h
Temperature: 0 ÷ 40°C
Relative humidity: 30% ÷ 80% non condensing
Suggested computer features:
P.C. with processor $ 1 GHz
RAM $ 1GB
Available hard disk space $ 300 MB
Graphic resolution $ 1280 x 1024, 256 colors
Operating system: Windows® XP/Vista/7/8
USB port
Compliance: EN60950
Base Unit:
Button: On/Off with two-colors LED signaling of
reserve power
Acoustic signal Buzzer
Input connections: 2x PulsePen
Output connections: Fiber optic cable
Weight: 87g without batteries
Dimensions [mm]: 144 (L) x 63 (W) x 31 (H)
PC Connection:
The Base Unit connection to the P.C. is made through the fiber optic by inserting the Fiber Optic - USB
Adapter (code AF002) into a free USB port:
USB Connector:
Classification:
This device is intended for veterinary laboratory research purposes only and is CE marked.
Software Installation:
Insert the Usb memory included in the PulsePen package in the PC drive.
Run the Setup.exe file in order to install the PulsePenLab software on the computer and follow the
instructions on the screen.
1.
2.
3.
Launch Setup.exe : the PulsePenLab software and Usb drivers will be installed and an icon on the
desktop will be created.
Upon finishing installation, insert the AF002 Usb adapter in one free Usb port and verify that the
device is correctly recognized. In case of problems, manually reinstall drivers that are in the following
folder: wRs Usb Driver
Launch the PulsePenLab software.
4
Use of the device:
Insert the batteries into the Base Unit’s battery compartment in the indicated way.
! Use only 1.5V IEC LR6 – AA Alkaline penlight batteries.
! Note: dead batteries must be disposed of in the special containers, since they are high-pollution wastes !
Connect the PulsePen probes by inserting each cable connector into the corresponding 3-pin socket of the
Base Unit.
Insert the fiber optic cable into the specific connectors of the Base Unit on one side and the Fiber Optic - USB
Adapter on the other.
The fiber must be pushed in all the way and fastened by screwing the outside ring nut.
Note: Due to mechanical tolerance, and especially with new fibers, the optic fiber may appear to be
completely inserted when it actually is not:
Fiber correctly inserted
Fiber NOT correctly inserted
Note: in order to avoid damaging the connector, do not over tighten the ring nut. It’s enough that the fiber
does not pull out during normal use of the equipment! Remember to unscrew the ring nut to loosen it before
pulling out the fiber optic cable!
Run the PulsePenLab software on the PC and switch on the Base Unit, by pressing the On\Off button,
until you hear the acoustic signal and the LED starts blinking (about 1.5 sec)
When the LED is green it means that the batteries are ok, while red indicates they are running down. In that case
replace the batteries with new ones as soon as possible.
The LED on the AF002 adapter is on when the signal transmission on the Optic Fiber takes place.
Place the PulsePen probes on the region to be explored: the acquired signals will be displayed on the
computer screen. Proceed according to the online software instructions.
To switch off the system keep pressed the On\Off button until you hear an acoustic signal, and the LED stops
blinking (about 1.5 sec)
Note: The device will automatically switch off in case of absence of tonotometric signal for more than 5
minutes.
5
1.
2.
3.
4.
5.
6.
7.
8.
9.
10.
11.
12.
Key for the patient selection in order to start a new examination
Key to archive access.
Setup key.
On line Help Key.
Indicator of correct data flow from the fiber adapter.
Indicator of Usb adapter connected (green).
Graphical battery gauge
Numeric battery gauge.
Icon for Ecg or Tonometric active sensor
Bar that shows data from Usb adapter waiting for processing: shorter it means higher computer speed
The positive battery terminal becomes yellow during standby.
Sensor 1 corresponds to the red signal (Carotid) while sensor 2 corresponds to the blue signal
(Peripheral artery).
Select the Patient icon and insert information as name, family, ... : at this point the keys corresponding to the
arteries will be enabled. Choosing one of them a new window will be opened. Place the PulsePen probe on
the region of interest and use the micromanipolators for a fine regulation: acquired signals will be displayed on
the computer screen.
The hard disk storage is enabled by pressing the icon with the diskette symbol and a new window will be
displayed in order to insert systolic and diastolic pressures and distances: values are three and are related to
carotid-peripheral artery, carotid - suprasternal notch and suprasternal notch - peripheral artery: in this way
during the PWV assessment it’s possible to apply both methods for the distance evaluation, i.e the direct method
(direct distance multiplied by 0.8) and the subtractive one.
Selecting the Archive icon, it is possible to choose which examination to display on the screen.
The Setup icon allows to select language, date format, ..
The Help icon opens a window with the on line instructions.
Maintenance and cleaning:
No particular periodic maintenance or calibration operations are necessary on the instrument.
!
In the case of prolonged non-use, remove the batteries.
To clean the equipment, use a clean, dry cloth or dampened with a small quantity of alcohol. Pay attention
especially to the probe’s plunger avoiding mechanical stresses.
Roll up the optic fiber cable following its natural curvature.
!
Note: be very careful to keep the alcohol from penetrating into the PulsePen probe because this could
cause serious problems !
!
The PulsePen cable is very thin and flexible in order to be easy to handle. One must avoid pulling, and
bending it at a right angle so as not to damage it.
6
! Optic Fiber can be damaged if trodden upon, or bent at an angle!
Do not pull, twist or bend the cable near the probe !
Do not pull or bend the cable near the connector !
Do not twist the cable near the connector !
Do not bend fiber optic at a right angle !
!
•
•
•
•
•
•
•
•
•
•
•
•
•
•
•
•
•
•
Warnings and precautions for use:
Do not use in the operating room, or in any case where there are inflammable gases/substances.
Do not sterilize.
Clean the pressure probe (TN4Lab) with a cloth dampened with alcohol, making sure the alcohol does not
penetrate into the probe.
Keep the “EC004, TN4Lab" units at a distance of no less than 2 meters from the computer.
Avoid touching simultaneously any part of the “EC004, TN4Lab” units and the computer, including the
fiber optic adapter “AF002” .
Do not immerse any part of the device into water or other substances, or expose it to sprays. Never use Gel
on the sensor!
Do not submit the pressure plunger of the tonometric unit to shocks or stresses above limits.
Do not carry out any maintenance work on the device opening it; in the case of malfunctioning of the
device, contact DiaTecne s.r.l.
Do not make changes of any kind to the device.
Do not step on the fiber optic cable or bend it sharply, with a curvature radius of less than 3 cm.
Keep the TN4Lab pressure probe and its cable away from electrical outlets and surfaces where there may
be potentially dangerous voltages.
Do not use the equipment for intracardiac applications.
Connect to the electrical Earth the aluminum plate using one of the threaded holes.
Use a battery-powered (portable) computer or, alternatively, an AC-powered computer with a medicalstandard insulation transformer.
If any abrasions, sheath tears, or defects appear in the TN4Lab pressure probe cables, immediately
suspend use of the device and send the defective part to Diatecne s.r.l. for repair/replacement.
Use the device at a safe distance from sources of electromagnetic disturbance such as wireless telephones
or other equipment emitting high frequency electromagnetic waves.
Use only 1.5V batteries of the indicated type, inserting them as stated and checking their condition before
each use (dead or damaged batteries may cause leakage of acid).
Close the cover of the battery compartment before turning on the equipment.
7
•
•
•
•
Insert the connector of the TN4Lab pressure probe only into the corresponding 3-pin connector of the Base
Unit EC004. Do not use the 3-pin connector of the EC004 for any other kind of connection.
The equipment must never be used in situations where a defibrillator is required, since it has not been
designed for such use.
Use the equipment only for the purposes stated in this manual.
DiaTecne s.r.l. will not be held responsible for any damages caused to persons, animals, or things if the
user does not scrupulously follow the indications given in this manual.
Reciprocal interferences with other equipments:
The PulsePenLab was designed to be immune to electrical, electromagnetic, electrostatic and magnetic
disturbances that are normally present; likewise, the PulsePenLab produces a small amount of
disturbances for other equipments. It cannot, however, be excluded that, in particular situations, some
functioning anomalies could appear also in the form of signal alteration; in this case it is necessary, when
possible, to move away all potential sources of disturbance, or to move to a more appropriate location.
Considering the intended use of the device, the operator may easily recognize any anomalous functioning
situation, such as, for example, the presence of “noise” over the signal or alteration of the morphology, and
follow the indications suggested here.
Problems in use and solutions:
THE DEVICE DOES NOT TURN ON ( THE LED DOES NOT BLINK):
13.
Check to see that the batteries are inserted in the correct way and that they are not dead.
14.
Keep the On/Off button pressed until the LED starts to blink (about 1.5 sec). Eventually make a first
test with the PulsePen probes disconnected.
NO SIGNALS ARRIVE TO THE COMPUTER:
15.
Check to see that the Base Unit device is turned on, with the LED blinking green.
16.
Make sure that the LED on the AF002 Adapter is on.
17.
Make sure that the system is not in “Freeze” mode, pressing the specific side button on the PulsePen
probe.
18.
Disconnect the fiber optic cable, unscrewing the ring nut of the Base Unit connector, and check to see
that a red light is turned on inside it.
19.
Check to see that the fiber optic cable is not damaged at both ends and is intact along its entire length;
the signal would suffer an excessive attenuation if a section were bent or crushed; in this case, if it is
one extremity that is damaged, cut off the end piece with a sharp cutter, perpendicularly to the direction
of the fiber itself: the cut must be clean and not jagged.
20.
Insert the fiber optic cable all the way into the corresponding sockets of the Base Unit and the Fiber
Optic - USB Adapter, screwing the ring nuts.
21.
Make sure that the Fiber Optic - USB Adapter was installed correctly and that is inserted correctly into
the computer.
22.
Ensure that the Computer Protection software, such as Antivirus, Firewall, etc., does not prevent access
to external devices.
If you find it is not possible to solve the problems listed by yourself, or if you have doubts regarding the
functioning of the equipment, please contact DiaTecne s.r.l. by e-mail at [email protected].
You will receive technical assistance in a short time.
8
Notes on recycling:
DiaTecne is sensitive to environmental issues linked to the production of waste.
The user that wishes to dispose of the used PulsePen device should contact DiaTecne s.r.l. and will receive
appropriate instructions.
Adequate waste selection before recycling and compatible waste processing contributes to avoiding detrimental
effects on nature and on human health, an promotes the reuse and recycling of the material of which the product
is made.
Please note that inadequate disposal of the product entails the application of the normative sanctions of the
country where this should take place.
Symbols and Abbreviations:
Manufacturer information
This symbols recommends to read the user manual before using the apparatus
Warning: pay attention
Class II Device
This symbol advices that applied parts are of BF type
The device incorporates radio transmitters
The crossed garbage can symbol indicates that, when no longer functional, the product should be
disposed of separately from other waste.
9
10
Index
pg.
Composition . . . . . . . . . . . . . . . . . . . . . . . . . . . . . . . . . . . . . . . . . . . . . . . . . . . . . . . . . . . . . . . . . . . . . . . . . . . .
PulsePen . . . . . . . . . . . . . . . . . . . . . . . . . . . . . . . . . . . . . . . . . . . . . . . . . . . . . . . . . . . . . . . . . . . . . . . . . . . . . . .
Base Unit . . . . . . . . . . . . . . . . . . . . . . . . . . . . . . . . . . . . . . . . . . . . . . . . . . . . . . . . . . . . . . . . . . . . . . . . . . . . . .
Fiber Optic - USB Adapter . . . . . . . . . . . . . . . . . . . . . . . . . . . . . . . . . . . . . . . . . . . . . . . . . . . . . . . . . . . . . . . . .
Intended use . . . . . . . . . . . . . . . . . . . . . . . . . . . . . . . . . . . . . . . . . . . . . . . . . . . . . . . . . . . . . . . . . . . . . . . . . . . .
Technical Specifications . . . . . . . . . . . . . . . . . . . . . . . . . . . . . . . . . . . . . . . . . . . . . . . . . . . . . . . . . . . . . . . . . . .
PC Connection . . . . . . . . . . . . . . . . . . . . . . . . . . . . . . . . . . . . . . . . . . . . . . . . . . . . . . . . . . . . . . . . . . . . . . . . . .
Software Installation . . . . . . . . . . . . . . . . . . . . . . . . . . . . . . . . . . . . . . . . . . . . . . . . . . . . . . . . . . . . . . . . . . . . . .
Use of the device . . . . . . . . . . . . . . . . . . . . . . . . . . . . . . . . . . . . . . . . . . . . . . . . . . . . . . . . . . . . . . . . . . . . . . . .
Maintenance and cleaning . . . . . . . . . . . . . . . . . . . . . . . . . . . . . . . . . . . . . . . . . . . . . . . . . . . . . . . . . . . . . . . . .
Warnings and precautions for use . . . . . . . . . . . . . . . . . . . . . . . . . . . . . . . . . . . . . . . . . . . . . . . . . . . . . . . . . . .
Reciprocal interferences with other equipments . . . . . . . . . . . . . . . . . . . . . . . . . . . . . . . . . . . . . . . . . . . . . . . . .
Problems in use and solutions . . . . . . . . . . . . . . . . . . . . . . . . . . . . . . . . . . . . . . . . . . . . . . . . . . . . . . . . . . . . . .
Notes on recycling . . . . . . . . . . . . . . . . . . . . . . . . . . . . . . . . . . . . . . . . . . . . . . . . . . . . . . . . . . . . . . . . . . . . . . .
Symbols and Abbreviations . . . . . . . . . . . . . . . . . . . . . . . . . . . . . . . . . . . . . . . . . . . . . . . . . . . . . . . . . . . . . . . .
Document printing:
In case more printed copies of the document are necessary, open the corresponding “pdf” file with the Adobe
Reader program or similar, select options “booklet”, “both sides”, “left binding ”, “page size A4", print, fold
and bind as shown:
Note: with a view to constant product improvement, Diatecne s.r.l. reserves the right to make any changes it
deems necessary, without notice, both to this manual and to the PulsePenLab device, communicating
these changes only to the competent bodies.
11
1
2
2
2
3
4
4
4
5
6
7
8
8
9
9
PulsePen® is a trademark of DiaTecne s.r.l. Milan - Italy
Copyright © 2015 - V. 1.1 Eng