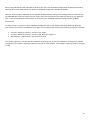
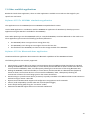
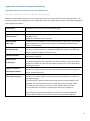
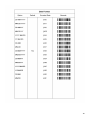
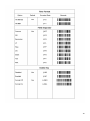
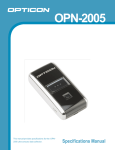
1
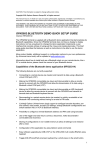
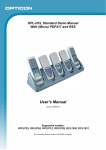
OPN2004/OPN2005/PX20 Batch demo application Version RFI37938 (OPN2004&5) / RFM37938 (PX20) February 21, 2014 Opticon Sensors Europe BV Opticon, Inc. 1 Contents 1 OVERVIEW........................................................................................................................... 3 1.1 Capabilities of the Batch demo application ........................................................................ 3 2 SYSTEM REQUIREMENTS .................................................................................................... 4 2.1 Minimum required OS version ............................................................................................ 4 2.2 OseComm32 host application ............................................................................................. 4 2.3 NetO32 host application ..................................................................................................... 4 2.4 Appload ............................................................................................................................... 4 2.5 Software updates ................................................................................................................ 4 3 CUSTOMIZING YOUR BARCODE TERMINAL ........................................................................ 5 3.1 Selecting the USB interface (VCP or MSD) .......................................................................... 5 3.2 OSE Universal Menu Book support ..................................................................................... 6 4 BARCODE DATABASE FILE ................................................................................................... 7 5 SCANNING BARCODES ........................................................................................................ 8 6 DELETING THE DATABASE FILE FROM THE BARCODE READER ........................................... 8 7 INSTALLING DRIVERS........................................................................................................... 9 7.1 USB-VCP drivers .................................................................................................................. 9 8 USING THE MASS STORAGE DEVICE (MSD) INTERFACE ...................................................... 9 9 USING THE USB-VCP INTERFACE ....................................................................................... 10 9.1 OseComm.......................................................................................................................... 10 9.2 Neto32 .............................................................................................................................. 11 10 LOADING SOFTWARE ON THE BARCODE READER ............................................................ 13 10.1 Software codes ................................................................................................................. 13 10.2 Loading software using Appload ....................................................................................... 13 11 OTHER AVAILABLE APPLICATIONS .................................................................................... 14 11.1 Trouble shooting ............................................................................................................... 15 11.1.1 Restart mechanisms .......................................................................................................... 15 11.1.2 Halting your application .................................................................................................... 15 11.1.3 Halting the Operating System ........................................................................................... 15 12 VERSION HISTORY ............................................................................................................. 16 APPENDIX A: DATABASE OUTPUT FORMATTING ........................................................................... 17 2 CAUTION: This information is subject to change without prior notice. Copyright 2014, Opticon Sensors Europe BV, all rights reserved. This manual may not, in whole or in part, be copied, photocopied, reproduced, translated or converted to any electronic or machine readable form without prior written consent of Opticon Sensors Europe. THE GENERAL USE AND FUNCTIONING OF THE BAR CODE SCANNER IS DESCRIBED IN THIS DOCUMENT. ALSO GENERAL SETUP INSTRUCTIONS TO GET STARTED ARE DESCRIBED IN THIS DOCUMENT. FOR FURTHER INSTRUCTIONS CONSULT OPTICON OR YOUR LOCAL DEALER. 1 Overview The batch demo application for the OPN2004, OPN2005, and PX20 demonstrates the ability of these devices to save scanned barcode data into a file on the device, and for the devices to deliver the scanned barcode data file to a local PC. The data files can be retrieved from the scanners either by using USB-MSD (Mass Storage Device; the barcode scanner effectively becomes a small USB thumb drive) or by using the OseComm or NetO file transfer protocols over USB-VCP (Virtual COM Port; serial port emulation). Since these barcode readers don't have a display to show any instructions to the user, this demo application implements a user interface that consists entirely of using just the 2 keys to scan barcodes. This brief setup guide describes all of the demo application’s features as well as handling instructions. More product details, additional support and more configuration options to customize this application to your own preferences (by using the Universal Menu Book) can be found at www.opticon.com 1.1 Capabilities of the Batch demo application The following features are currently supported: Scanning and storing barcodes into a database file on the internal RAM disk. Retrieving the barcode database file via a local PC or laptop using the OseComm or NetO protocols over USBVCP. Using the barcode readers as USB Mass Storage Devices (MSD) to retrieve the barcode database file. OSE Universal Menu Book support to configure all barcode decoders, prefixes and suffixes, read modes, and various other options. Storing of configurations in non-volatile memory to allow all settings to be restored after a reset. Configuring the output format of the database file. Simple firmware upgrading via USB-VCP by using Appload, Opticon’s utility for flashing firmware on barcode readers. 3 2 System Requirements 2.1 Minimum required OS version This demo application requires the OS version: OPN2004: RBIV0026 (or higher) OPN2005: RBLV0026 (or higher) PX20: RBMV0026 (or higher) To check the currently installed OS version, use Appload (Select: ‘Utilities’ > ‘Show software version’). To check the currently installed application version as well as the OS version, scan the 'Z1' menu label while in USBVCP mode. (See Universal Menu Book, Chapter 7.) Note that you will need to have an open serial terminal connected to the COM/serial port allocated by your host PC’s OS to see the reported versions; this can be done with Appload’s RS232 Monitor. 2.2 OseComm32 host application This demo application can use Opticon’s OseComm32 application to transfer files from the barcode readers to a local PC or laptop. This application can be downloaded from our web site. The minimum required OseComm32 version is Version 1.0.4.0. 2.3 NetO32 host application This demo application can use Opticon’s legacy file-transfer protocol, NetO, by use of the NetO32 Windows application. This application can be downloaded from our website. Note that continued development for NetO32 has ceased in favor of OseComm, but it is still supported by this demo application. Use the NetO configuration label in Appendix A to switch to the NetO protocol and see chapter 9.2 for more information. 2.4 Appload To be able to install this demo application firmware onto your barcode reader, you'll need to have Appload installed on your PC. Make sure you have the latest version of Appload, which can be found on our web site. Please read the 'Loading of software' section of this manual before downloading any software on your barcode reader. 2.5 Software updates In the future more features and bug fixes are likely to be implemented into the OS and this application. To find out if there are software updates available, please check our web site. All available software and documentation for the barcode readers can be found at www.opticon.com in the following sections: ‘Service and support' > 'Software' / 'Manuals' > 'OPN2004 / OPN2005 / PX20’ 4 3 Customizing your barcode terminal In the following section a brief overview is given on how to configure your barcode reader for your desired application. 3.1 Selecting the USB interface (VCP or MSD) This batch demo application supports two methods of retrieving your barcode database file from the barcode readers: USB Mass Storage Device (MSD) USB Virtual Com Port (USB-VCP) using OseComm or NetO32 to retrieve the file After loading this software on your barcode reader for the first time, the barcode reader will automatically be reset to use USB-VCP by default. If you would like to use your barcode reader as a USB-MSD device, read the label below. (The labels below can be read without reading any SET/END labels) USB-MSD default More information on how to use your barcode reader as a USB-MSD device will be given in chapter 8. To switch back to USB-VCP default (to load software, for example) read the label below. USB-VCP default More information on how to use your barcode reader with USB-VCP and OseComm32/NetO32 will be given in Chapter 9. 5 3.2 OSE Universal Menu Book support The barcode readers this demo application supports can be configured by scanning various configuration barcodes found in our Universal Menu Book*. This makes it possible to customize your barcode reader without having to actually change the source code of this demo application. The OPN supports (most of the) menu options listed in the following chapters: 1. Defaults (See the supported default label listed above) 3.1 Enabling/disabling readable codes 3.2 Setting of fixed, minimum and maximum lengths of readable codes 3.3 Code specific options (2D symbologies only supported by the PX20) 4.1 Case conversion 4.2 Set prefixes 4.3 Set suffixes 5.1 Read modes, add-on wait modes 5.1.1 Multiple read reset time 5.1.2 Quiet zone options (margins) 5.2 Read time options 5.4 Redundancy 5.5 Positive and negative barcodes 6.1 Buzzer settings 6.2 Good read LED options 7.1 Diagnostics * The Universal Menu Book can be downloaded from our web site. 6 4 Barcode database file All scanned unique barcodes are stored in a database file with non-fixed length records. Besides the barcode data, the quantity, serial number and a date/time stamp can be stored. The default format of each record in the database file is: <Barcode>,<Quantity>,<serial #>,<hh:mm:ss>,<dd/mm/yyyy> Example: 8710841030181,12,003278,14:41:03,23/11/2009 8710841090246,2,003278,14:41:04,23/11/2009 9780131103627,1,003278,14:41:00,23/11/2009 The filename of the database is 'SCANNED.TXT', which is stored on the barcode readers. The resulting database file can be imported into various applications as a comma-separated value (CSV) file. When using the USB-VCP with OseComm or NetO to retrieve the barcode data, any transmitted data will be appended (by default) to any previously retrieved barcode data on your host PC, so all data of one or more barcode readers will end up in a single database file. The barcode file will be deleted from the barcode reader after successful transmission. When using USB-MSD you can manually retrieve or delete the database file 'SCANNED.TXT'. Please note that when deleting this file in USB-MSD, also delete the local files 'SCANNED.TMP' and 'SCANNED.IDX' from the disk as well. These other files are the files the barcode terminal actually uses, while 'SCANNED.TXT' is merely an export from these files created upon connecting the scanner to USB. Editing 'SCANNED.TXT' while still resident on the device’s “drive” will have no effect. Editing 'SCANNED.TMP' will cause 'SCANNED.IDX' (search indexfile) to become corrupt. To customize the output format of the database file, please refer to Appendix A. If no quantity field is specified in the output format, then each barcode will be stored as a separate record. 7 5 Scanning barcodes This demo application uses the trigger button to enable the scan engine to scan barcodes. If a barcode is read using the trigger key and is successfully read, a good-read beep is sounded and a green goodread LED is shown. The barcode is then stored in the database with a quantity of '1'. If the same barcode is scanned again the quantity is incremented by one, if quantity is an enabled field in the barcode database output format. To decrement the quantity of a barcode that's already in the database the barcode should be read using the small delete key. A short good read beep is sounded and an orange good-read LED is shown. If a barcode is scanned using the delete key that isn't present in the database, or that already has a quantity of '0', a low error beep is sounded and a red LED is shown. Negative quantities are not supported by default, but when using the 'Negative quantities' option (see Appendix A) it is possible to scan negative quantities of barcodes. When a specific barcode has a negative quantity the LED color changes from green (add) or orange (subtract) to red on a good read and the sound becomes slightly lower. 6 Deleting the database file from the barcode reader It is possible that your barcode reader may become full, have a corrupt flash disk, or contain unwanted barcode data that you no longer need and wish to delete. In these situations it is possible to read the label below to erase all files from the flash disk.* _+-FORMAT-+_ When using the barcode reader in USB-MSD mode, then it’s also possible to delete the files manually using a file browser. Make sure you delete all 3 files when doing so. You can also delete all the files on the flash disk by holding the clear key (small square button) for 10 seconds. This option is disabled by default; see Appendix A for codes to toggle this option on and off. * Note: If the batteries of the barcode readers go dry, then the barcode readers don’t lose their barcode data. However it is possible that the internal clocks will be reset if the batteries are completely drained. This requires the correct time to be reconfigured using Appload. 8 7 Installing drivers 7.1 USB-VCP drivers To be able to communicate with the barcode readers using USB-VCP, you will need to have Opticon’s USB driver installed on your PC. This driver can be found on our website on the 'Service and Support' page. www.opticon.com/SERVICE-AND-SUPPORT.aspx The driver can be found in the section called 'Software' and then selecting the OPN2004, OPN2005 or PX20 on the following page. USB Drivers Installers.exe USB-VCP driver for Windows 2000 , Windows XP (32bit) & Windows Vista/7 (32bit) USB-VCP driver for Windows XP (64bit) & Windows Vista/7 (64bit) After installing the USB driver, you can connect your barcode reader to USB using the mini-USB cable. Windows will then automatically install a virtual COM port on your PC, which can be selected in various applications, like Appload, Hyperterminal, OseComm32 and NetO32. 8 Using the Mass Storage Device (MSD) interface When the USB-MSD interface has been selected (see chapter 3.1) the barcode readers will behave like USB thumb drives when connected to USB. Any scanned barcodes will be stored in a comma separated value file called ‘SCANNED.TXT’, which can be copied/moved from the barcode reader using a file browser. Due to the limited amount of flash memory inside the barcode readers the size of the file system is rather small, being about 1MB. This is enough space for storing barcodes, but not for using the barcode readers as a portable hard drive. Important notes: When deleting ‘SCANNED.TXT’ also delete the local files 'SCANNED.TMP' and 'SCANNED.IDX' from the disk as well, because those are the files the barcode terminal is actually using, while 'SCANNED.TXT' is merely an export of these files. Editing 'SCANNED.TXT' will have no effect and will be reverted back to its previous state as soon as the USB cable is subsequently connected again. Editing 'SCANNED.TMP' will cause 'SCANNED.IDX' (fast search index-file) to become corrupt, which can cause the barcode reader to crash! 9 9 Using the USB-VCP interface When the USB-VCP interface has been selected (see chapter 3.1), the barcode database file can be transmitted to a local PC using the OseComm or NetO file transfer protocols. To be able to receive the files on the host, you'll need OseComm32 or NetO32 installed. The latest version of OseComm32 can be downloaded from our website under 'Service and support' > 'Software' > 'OseComm'. NetO32 can be downloaded from http://ftp.opticonusa.com/Downloads/NetO32.zip. OseComm is used by default in this demo application. OseComm32’s use will be described below. The use of NetO32 will be described in the following chapter. Configuration codes to switch between OseComm and NetO32 are listed in Appendix A. 9.1 OseComm The serial configuration of OseComm32 is limited to selecting the correct COM-port of your device in the Serial port Communication Settings window of OseComm32. Because the serial port of your barcode reader only exists while the barcode reader is connected, choose ‘x times success’ as ‘Protocol type’ to be able to safely disconnect the USB cable after the protocol has finished. Don’t disconnect your device while the protocol is still running! Select ‘Run protocol at start’ if you wish to execute the protocol tasks at startup. Next, go to ‘Protocol Tasks’, select ‘Receive File(s)’ under ‘Task Group’ and press ‘Add task’. 10 In the Receive Files(s) Dialog the task can be configured as shown in the following image. Finally, select ‘Options’ > ‘Start Protocol’. More information about additional OseComm32 features can be found in the help file of OseComm32. 9.2 Neto32 When the USB-VCP interface has been selected (see chapter 3.1) and the NetO protocol (see Appendix A), then the barcode database file can be transmitted to a remote PC or laptop using NetO32. The data is transmitted by the USB cable (USB-VCP). To be able to receive the files on the host, you'll need NetO32 to be installed. The latest version of NetO32 can be downloaded from our web site under 'Service and support' > 'Software' > 'Neto32'. More information about additional Neto32 features that aren't described in this manual can be found the help file of NetO32. Screenshot of the main window of NetO32 11 When using USB-VCP and the USB cable to retrieve your data, then the RS232 configuration of NetO32 is limited to selecting the correct COM-port of your device in the RS232 configuration window of NetO32. However, when using the USB cable it's not possible to keep NetO32 running in the background due to the fact that the USB COM-port won't be present on your system until you've physically connected your device to your USB port. Also it's not recommended to disconnect or to reconnect your OPN2002/3 without having stopped the NetOprotocol first. For these reasons it's easiest to place a NetO32 configuration file on your desktop that downloads the data from your device once and then immediately closes again. This can be done by selecting the following 3 options in NetO32. Protocol > Polling and Timing > Protocol type: Single Protocol > Polling and Timing > Protocol type: Quit after single run Miscellaneous > Appearance > Run protocol on start The correct sequence to retrieve the data would be connecting your device to the USB port, clicking on the NetO32 configuration file and then remove the device from your PC when desired. Don't forget it regularly needs be charged as well. 12 10 Loading software on the barcode reader The following chapter will describe how to load new software onto the barcode readers. Important note: When installing a new operating system firmware or application firmware on the barcode reader it’s possible that any barcode data left on the device will be lost! 10.1 Software codes The barcode readers run an embedded OS (operating system) and an embedded application. Both the OS and the application can be loaded by a small PC application called Appload, which can be downloaded from our web site. The operating system filename and version that contain a unique three-letter code, signifying the particular barcode reader the operating system is built for. Before you try to load a new operating system on your barcode reader, you have to know which operating system file (e.g. RBIVxxxx.hex) should be loaded on your barcode reader. This same convention is typically followed for application filenames and versions as well. In the table below you can find the software codes for the supported barcode readers. Terminal OPN2004 OPN2005 PX20 OS RBI RBL RBM Application RFI RFI / RFL RFI / RFL / RFM 10.2 Loading software using Appload To be able to load software on the barcode readers using the mini USB cable, first make sure you’ve selected the USB-VCP interface (see chapter 3.1), because USB-MSD is not yet a supported interface from which software can be installed. Also make sure you have the USB-VCP driver installed on your PC (see chapter 7.1). After that, please follow the instructions below. Connect the barcode reader to your PC or laptop using the mini-USB cable. Start Appload and select the (virtual) COM port of your barcode reader in Appload. Select the OS or application file in Appload using File > Download. 13 11 Other available applications Besides this batch demo application, there are other applications available on our web site that might fit your specific use case better. Software V3727x: OPN2001 simulation application This application turns the OPN2004/5 into an OPN2001-compatible batch scanner. Use this OPN application in combination with the OPN2001 PC application for Windows (or develop your own application using the SDK that's available for the OPN2001). Note: When planning to use the OPN2004/5 solely as a standard OPN2001, so without Bluetooth or the need to run other applications, please note the following (hardware) differences: The OPN2004/5 does not support laser aiming (laser dot) The OPN2004/5 can’t change its scan angle to shorten the laser line The flash disk of the OPN2004/5 is slower than the storage method of the OPN2001 Software V3791x: Bluetooth demo application The Bluetooth demo application demonstrates the Bluetooth capabilities of the OPN2005 and PX20. The following features are currently supported: Connecting to a remote device (as master) and transmitting data using Bluetooth SPP (analogous to USB-VCP) Making the OPN2005 / PX20 connectable (as a slave device) and discoverable to allow a remote host device to connect with the OPN2005 / PX20, and subsequently allowing the transmission of data using Bluetooth SPP Making the OPN2005 / PX20 connectable (as a slave device) and discoverable as a Bluetooth HID (keyboard) device to allow a remote host device to connect with the OPN2005 / PX20 , subsequently allowing the transmission of data as if it were being typed on the remote host device Reconnecting to a paired remote device (as master) to quickly reestablish a lost Bluetooth SPP or HID connection without having to reenter a PIN code Opticon Universal Menu Book support and configuration using Opticon serial commands iPhone / iPad compatibility (remote wake and virtual keyboard toggle) Secure Simple Pairing (SSP) using the “Just works” model USB-VCP and USB-HID support when not connected to Bluetooth 14 11.1 Trouble shooting Since the barcode readers don't have a display, they also don't have a system menu to resort to when a crashing application or OS prevents you from loading new software on your barcode reader. For this reason the barcode readers have a few escape mechanisms to allow you to restart, halt your application, and/or install new software. This can be very useful in case the barcode reader has crashed or is restarting due to a crashing application or OS. 11.1.1 Restart mechanisms Automatic Manually The barcode readers have a watchdog timer to determine whether the OS is still running or has crashed. This watchdog will cause the device to restart after about 1 second if the OS has crashed. This watchdog timer will not cause a restart when only the application has crashed. The barcode readers have a manual restart mechanism that allows you to restart in situations that the OS is still running, but the application has crashed. In order to activate this mechanism, press and hold both the trigger and delete key for at least 20 seconds. After the barcode reader has sounded a short beep, you can release both keys to complete the restart. 11.1.2 Halting your application Restart your application using one of the two restart methods listed above, but keep both keys pressed after the short beep. Release the trigger key first to halt the application. If successful, the LED of your barcode reader should now be blinking orange. You should now be able to load new application or OS software. To exit the halted application state, press both keys for 20 seconds. 11.1.3 Halting the Operating System (only required if a corrupt OS is installed) Restart your application using one of the 2 methods listed above, but keep both keys pressed after the short beep. Release the clear key first to halt the operating system. If successful, the LED of your barcode reader should now be blinking red. You should now be able to load a new OS. To exit the halted operating system state, press both keys for 3 seconds. 15 12 Version history RFG35410 RFG35411 RFG35412 RFG35413 RFG35414 RFG35415 RFG35416 RFIS0940 RFI37931 RFI37932 RFI37933 RFI37934 RFI37935 RFI37936 RFI37937 RFI37938, RFM37938 First release Added configurable database formatting Fixed very slow storing of barcodes Preliminary addition of USB-MSD Added USB-MSD and updated manual Fixed USB-MSD issue Small LED bug fixes First release OPN2004 OSE version OPN2004 with bug fixing Fixed USB-MSD issues Added OPN2005 support Added PX20 support (incl. 2D barcodes) Added NetO support Ported previous functionality for field length from RFG35416 Removed blinking green LED when connected to USB – charge indicator is now active Small fixes in regards to read mode Added ability to format flash disk by holding clear key for 10 seconds Format of flash disk by clear key now an option Support for fixed and variable length barcode and quantity fields, configured by options Fixed reading of C128 configuration labels for the PX20 Fixed database issue at which duplicate barcodes could create double entries and deleting of a barcode could fail Split application into 2 separate version to improve battery life of OPN2004/5 and read modes of PX20 Appload now returns application version Fixed issue that could cause a corrupted database December 7, 2009 December 14, 2009 February 3, 2010 June 10, 2011 June 17, 2011 June 29, 2011 March 3, 2012 December 26, 2012 April 9, 2013 April 25, 2013 July 31, 2013 August 22, 2013 September 17, 2013 October 22, 2013 January 27, 2014 February 20, 2014 Please check our web site at www.opticon.com to see if there are updates available for this application, the Operating System, OseComm32 and/or this manual. 16 Appendix A: Database output formatting The default output format of each record in the database file is: <Barcode>,<Quantity>,<serial #>,<hh:mm:ss>,<dd/mm/yyyy> However, this application allows you to customize this format to make it suitable for your own application. The following aspects of the output format are configurable. Read the configuration barcodes on the following page to select the various options. Date format 16 date formats are supported (see following page) Time format 2 time formats are supported (hh:mm:ss and hh:mm) Field separator Enable/disable delete key Barcode field size Quantity field size Delete record if quantity=0 Negative quantities allowed/not allowed Field output sequence The field separator is the character that is used to separate the various fields of a database record. 7 different separators can be selected. By default the small delete key can be used to remove a previously read barcode from the database or reduce its quantity by 1. By disabling the delete key this option can be disabled. By default the barcode field size is variable length, but this can be changed between 1 and 99 characters by reading 2 configuration labels on the following page to specify both digits of the desired size. By default the quantity field is variable length, but this can be changed from 1 to 9 characters if desired. By default a record is deleted if a barcode in the database (with a quantity of 1) is read using the delete key. However if you desire to keep a record of all delete actions it is possible to leave the record with a quantity of '0' in the database by disabling this option. By default you can not delete a barcode that's not present in the database. However for some purposes it can be useful to be able to read them anyway to specify a negative quantity. Each record can contain up to 5 fields (barcode, date, time, quantity and serial number). The output sequence can be customized by reading up to 5 labels on the following page. By not specifying a quantity field each barcode will be stored separately in the database. The database also will not be sorted and in case a barcode is read using the delete key the last occurrence in the database will be deleted. It is not allowed to not specify a barcode field in the output sequence. Note: When changing the field sequence, make sure you've downloaded the existing database file from the OPN or otherwise formatted the RAM disk. 17 18 19 20 21 22 23