1
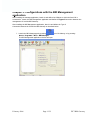
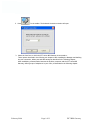
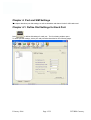
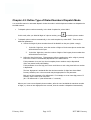
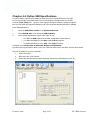
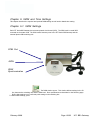
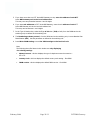
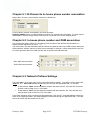
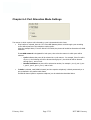
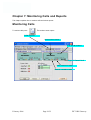
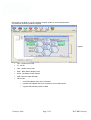
DISCOVERY
telecom
DTT BRI Gateway
TM
ISDN B RI to GSM Gate way
Version 6.2.1
User Manual
Connecting
Landline Phones to
Cellphones directly
February-2006
Page 1/32
BRI Gat eway
DISCOVERY
telecom
Usage Warnings
1) High voltage transients, surges, and other power irregularities can cause extensive damage.
It is the user's responsibility to provide a power protection system.
2) It is the user's responsibility to install, operate, and maintain the system in accordance with all
applicable codes, regulations, and safety measures.
Trademark and Patents
All trademarks, patents and copyrights apply.
General Manual Notes
Without BRIor notice and without obligation, the contents of this manual may be revised to
incorporate changes and improvements. Every effort has been made to ensure that the information is
complete
and accurate at the time of publication. Nevertheless, DTT ltd cannot
be hel d
responsible for errors or commissions.
February-2006
Page 2/32
DTT BRI Gateway
DISCOVERY
telecom
Dear Customer,
We thank you for purchasing our DTT BRI Gateway.
The information in this manual does not constitute a warranty of performance,
although the information has been compiled and checked for accuracy by DTT
Ltd.
All our products are developed and produced by experienced engineers, who
aspire to achieve customer satisfaction, utility value and reliability of products.
Warranty Policy
The Dual Cell to BRI Gateway product you have purchased is under warranty of 12
months from the date of purchase, by the original purchaser. In case of defects of
materials or workmanship, DTT will replace it free of charge.
This warranty applies to hardware/software but does not include SIM Cards.
This warranty will not be honored if the device has been mishandled in any way.
We hope you enjoy our product and we will be happy to receive any comments
you may have. This will enable us to improve our products and the Technical
Support that we give to every customer.
February-2006
Page 3/32
DTT BRI Gateway
DISCOVERY
telecom
Table of Content
Getting Started .......................................................................................................................................................... 5
Check your package Items ....................................................................................................................................... 7
The Dual Cell BRI Gateway Solution Overview .......................................................................................................... 8
Chapter 1: Installing SIM Cards and Connecting the Cables ..................................................................................... 9
Chapter 2: Installing the Manager Application..........................................................................................................11
Chapter 3: Configurations with the BRI Management application ............................................................................13
Chapter 4: Port and SIM Settings .............................................................................................................................15
Chapter 4.1: Define Dial Settings for Each Port........................................................................................................15
Chapter 4.2: Define Type of Dialed Numbers Dispatch Mode ...................................................................................16
Chapter 4.3: Define Minimum Amount of Time between Outgoing Calls ..................................................................17
Chapter 4.4: Define SIM Specifications ....................................................................................................................18
Chapter 4.5: Define the SIM Channel Lock ...............................................................................................................19
Chapter 5: ISDN and Time Settings ..........................................................................................................................20
Chapter 5.1: ISDN Settings .......................................................................................................................................20
Chapter 5.2: Time and Date setting ..........................................................................................................................23
Chapter 6: B-Channel Port Association .................................................................................................................24
Chapter 6.1: B-Channel to In-house phone number association ..............................................................................26
Chapter 6.2: In-house phone number and GSM association.....................................................................................26
Chapter 6.3: Network Prefixes Settings....................................................................................................................26
Chapter 6.4: Port Allocation Mode Settings..............................................................................................................27
Chapter 6.5: Make Port/Prefix Settings.....................................................................................................................28
Chapter 7: Monitoring Calls and Reports .................................................................................................................30
February-2006
Page 4/32
DTT BRI Gateway
DISCOVERY
telecom
Getting Started
DTT team is glad you have chosen to use the DTT's Dual-Cell GSM to BRI gateway for your
needs, we will do our best to make your installation efforts as well as day-to-day configuration and monitoring tasks be
pleasant tasks as possible. We wish you a smooth operation while greatly saving your office mobile phone calls.
This chapter is your Map for installation, configuration and monitoring tasks and includes a short explanation on
each stage as well as references for more elaborated explanations, drawings and examples in the following chapters. The
following is a list of tasks you shall perform, where you shall go over it sequentially or skip tasks that are optional and not
required for your current needs. It is advised that you will use the following tasks as
your check-up Do To List.
We advise that you will make a print this chapter and put notes on each stage when completed (e.g. V mark when done).
•
Mandatory - Check that all Package items delivered in your package
Refer to Check your Package Items chapter for checking that all items that should
be in your package.
•
Mandatory
Install The Management Application
On the PC/Laptop allocated for the system management install the MS-Windows Management Application with the
provided CD.
Refer to Chapter 2: Installing the Manager Application chapter for all items that should be in your package.
•
Mandatory SIM cards installation and connections
o Install SIM Cards
o Install Power Supply and 12v Power Cable
o Install Antennas
o Install ISDN cable
o Install RS-232 (Comport cable) for PC serial COM port connection
Refer to Chapter 1: SIM Cards Installation and Cables Connecting for specific and detailed guidelines.
•
Mandatory
General configurations
In order to operate the system, mandatory basic setups should be performed in using serial RS-232 via
PC COM port.
Refer to Chapter 3: Configurations with the BRI Management application .
•
Mandatory - system configuration
Use the RS-232 connection and BRI Management MS-Windows application.
You can use this method for later day-to-day management for monitoring and reports of the BRI gateway activity.
Gateway system via IP is highly recommended as you can have the management done remotely from the
system via internet connection.
February-2006
Page 5/32
DTT BRI Gateway
DISCOVERY
telecom
•
Mandatory Tasks - Port, ISDN Channels, Phone Numbers Configurations
In order to operate the system ports and use the installed SIM cards and the ISDN connection a certain setups
should be performed. Refer to the following chapter that match your configuration needs:
Chapter 4 Port and SIM Settings
Chapter 4.1: Define Dial Settings for Each Port
Chapter 4.2: Define Type of Dialed Numbers Dispatch Mode
Chapter 4.3: Define Minimum Amount of Time between Outgoing Calls
Chapter 4.4: Define SIM Specifications
Chapter 4.5: Define the Channel Lock
Chapter 5: ISDN and Time Settings
Chapter 5.1: ISDN Settings
Chapter 5.2: Time and Date setting
Chapter 6: B-Channel Port Association
•
Optional Task - Monitoring and reports
The BRI Management MS-Windows application enables you to monitor calls in real time. It is recommended that the
management application PC will be kept connected to enable fast response for configuration and continues
monitoring of the system.
The BRI Management MS-Windows application enables you to generate call reports and export the report files for
additional analysis. It is recommended that the management application PC will be connected via IP to enable flexible
and continues connection with the monitored system.
Refer to Chapter 7: Monitoring Calls and Reports
For getting the most updated Product Info on the Web
February-2006
Page 6/32
DTT BRI Gateway
DISCOVERY
telecom
Check your package Items
Please verify your package contains the following components (some were ordered specific) before installation:
•
Main Hardware Device - The Dual Cell BRI gateway
•
110/220V 50-60Hz Electric Power converter to 12V with cables supplied
•
Software Installation CD - Installation kit of the Dual Cell Manager CD for MS-Windows Management
Application, this User Manual file and additional auxiliary utilities.
•
2 GSM Antennas
•
RS-232 Serial PC COMport connection cable (RJ-45 to RS-232 COM)
we ll be referred as Comport cable in this manual
February-2006
To be installed to the BRI gateway
Page 7/32
DTT BRI Gateway
DISCOVERY
telecom
The Dual Cell BRI Gateway Solution Overview
The Dual Cell BRI gateway, that will be referred as the BRI gateway in short, is a device that connects your
desk phones directly to cellular phone networks. This gateway completely bypasses the local landline
telephone company. Two desk phones can be connected to each Dual Cell gateway via a Phone switching unit
(often a PBX type switch). Each port in the Dual-Cell gateway contains a SIM. A SIM is a smart card that
contains information such as the GSM network and phone number billing and verification Id.
The Dual Cell can be configured to direct phone calls through the most economical SIM.
An MS-Windows PC/Laptop shall be used to operate the BRI Management MS-Windows application.
The BRI Management MS-Windows application is used for configuration, monitoring and usage reports
generation, via RS-232 (Comport) PC COM. For monitoring reports and statistics, it is recommended to keep
the management application connected to the BRI gateway. The Management Application provided is
mandatory for configuring the BRI gateway operation and optional for monitoring and reports. However it is
highly recommended to leave the management application always connected to the BRI for on-line
monitoring, reporting and performing configuration changes as required.
The BRI Management MS-Windows application provides the following functionalities:
• Configuration - Connections, ports, channels, SIM cards and operational modes can be configured
• Monitoring - Call operations can be monitored from the Management Application. Therefore you
may wish to leave a computer permanently connected to the Multi-Cell BRI system all time.
• Reports and statistics - Calls report, calls history, antenna reception, status logs and more, can be
generated for analysis in standard MS-Windows data processing tools such as MS-ACCESS and MSEXCEL.
February-2006
Page 8/32
DTT BRI Gateway
DISCOVERY
telecom
Chapter 1: Installing SIM Cards and Connecting the Cables
First you shall install the GSM SIM cards and later connect several cables and install the antennas to the BRI
Gateway.
Installing the SIM Cards
Insert the SIM cards into the Dual Cell as follows:
• On the bottom side of the Dual Cell, open the SIM chambers by sliding the cover panels sideways.
• Open the SIM slots as follows: Position the back of the Dual Cell as shown below, grip the clip in
the chamber, and slide the clip toward yourself, about 1⁄4 cm.
•
While the clip is slid toward you, pull it upward and outward. The end closest to you is on a hinge. Insert
the SIM, so that contacts are facing down, close the clip, and close the cover panel.
February-2006
Page 9/32
DTT BRI Gateway
DISCOVERY
telecom
Connecting the Cables
•
12v power cable - The device power cable is supplied with a power supply converter for covering all
main voltage electricity services in the world. Connect a 120V (North America), or 240V (Europe)
power supply cable to the BRI-Cell gateway.
•
ISDN cable - The regular ISDN cable is used to connect the system to the PBX, serving the Office
landline phones.
For the regular ISDN cable, connect the ISDN line from the telephone switching unit in your office to
the Multi-Cell unit. Connect the ISDN line to the RJ-45 socket labeled "ISDN " in the front of the
Multi-Cell unit, as shown below.
•
PC Comport RS-232 cable - The RS-232 serial connection cable between the BRI and the PC with
the BRI Management Application installed.
•
Antenna Cables
12V Power
Socket
To PC
COM
Socket
February-2006
Connect the Antennas via antenna cables as shown below.
PC COMPort
connection
Antennas
ISDN
Cable
Page 10/32
DTT BRI Gateway
DISCOVERY
telecom
Chapter 2: Installing the Manager Application
Before operation, configuration settings must be made in the DTT Series BRI Gateway.
Configuration is done in an auxiliary computer. Configuration is done in an auxiliary PC with the BRI
Management MS-Windows Application provided for MS-Windows operating system .
Install the BRI
Management application into an MS-Windows PC
1. Insert the BRI Management installation CD disk into the CD drive of the PC.
2. In Windows Explorer, navigate to the installation CD drive.
3. Double click
to install the BRI Management Application.
The Installation window will open.
February-2006
Page 11/32
DTT BRI Gateway
DISCOVERY
telecom
4. Click Next.
5. The Setup Type window will open.
6. Select Complete and click next.
The Begin Installation window will open.
7. Click Install. The BRI Management application installs itself. Wait all steps till a completion
message will appear.
February-2006
Page 12/32
DTT BRI Gateway
DISCOVERY
telecom
Chapter 3: Configurations with the BRI Management
application
After installing the manager application, launch it and define the COMport to which the Dual Cell is
connected to. Launch the BRI Management application and define the Type of Connection between the
management PC and the BRI Gateway.
After installing the BRI Management application, launch it and define the Type of
Connection between the PC and the BRI Gateway as described below.
1. Launch the BRI Management by pressing on
your PC desktop, or by pressing:
Start > Programs > DTT > BRI Manager.
The BRI Management application window will open.
February-2006
Page 13/32
DTT BRI Gateway
DISCOVERY
telecom
2. Press
In the toolbar. The Selected Connection window will open.
3. Select the Com Port to which the DTT Series BRI Gateway is connected to.
These options described in the following sub chapters. After installing the Manager and defining
the port connection, define port and SIM settings as described in the following chapter.
After establishing communication between the auxiliary computer and the DTT Series BRI
Gateway, define groups of telephones in your office, as described in the following chapter.
February-2006
Page 14/32
DTT BRI Gateway
DISCOVERY
telecom
Chapter 4: Port and SIM Settings
This chapter describes port dial settings, as well as timetables and channel locks for SIM cards used.
Chapter 4.1: Define Dial Settings for Each Port
Press
to define dial settings for each port. The Port Setting window opens.
To define port dial settings, click a port and proceed as described on the following pages.
February-2006
Page 15/32
DTT BRI Gateway
DISCOVERY
telecom
Chapter 4.2: Define Type of Dialed Numbers Dispatch Mode
You can define manual or automatic dispatch. Select the mode in which telephone numbers are dispatched to
the GSM network.
•
To dispatch phone numbers manually, in the Send Complete list, select HASH.
In this mode, after you dialed all digits of a phone number, press
•
to send the phone number.
To dispatch phone numbers automatically, in the send complete list, select OMIT. Then set three
additional parameters:
a. Define the length of phone numbers that will be dialed from the port (within a range).
i. In the Min. Digits box, enter the number of digits of the shortest phone number that
will be dialed from this port.
ii. In the Max. Digits box, enter the number of digits of the longest phone number that
will be dialed from this port
b. Define the Inter Digit Pause. This parameter defines a waiting time, after a digit is pressed,
before the number is automatically dispatched to the GSM network.
If this parameter is set too low, then incomplete phone numbers may be dispatched
if the user pauses briefly while dialing.
If this parameter is set too high, then users would have to wait a long time before a number
is dispatched.
The inter digit pause is activated after the minimum number of digits have been dialed.
In many situations, two or three seconds may be appropriate for this parameter.
Each unit of this parameter is 50 milliseconds. For example, to set an inter digit pause of 3
seconds, enter a value of 60 in this box
(60 * 50 milliseconds = 3,000 milliseconds = 3 seconds).
When a port is set to auto-dispatch phone numbers, after the user has dialed the maximum number
of digits, or, when an inter digit pause has occurred, then the number is dispatched automatically.
February-2006
Page 16/32
DTT BRI Gateway
DISCOVERY
telecom
Chapter 4.3: Define Minimum Amount of Time between
Outgoing Calls
Setup the minimum amount of time between outgoing calls in the Intercall Timer box.
Set this parameter according to limitations of the GSM network.
In many situations, two seconds may be an appropriate value for this parameter. Define a Period
Where SIM Time Limitations will be restored
In the Day of restore call limit box, enter the number of days desired to define a period where SIM time
limitations will be restored. SIM time limitations are defined in the Maximum Number of
Call Minutes box, in the SIM Settings window.
After making port settings, you MUST press Write Port Setting to send the settings to the DTT Series
BRI Gateway unit. Then make settings for each SIM, as explained in the following section.
February-2006
Page 17/32
DTT BRI Gateway
DISCOVERY
telecom
Chapter 4.4: Define SIM Specifications
In order to define a specific SIM setting you shall point on the specific SIM in the Port SIMs
tree on the Left side of the Main screen. First we will define the activation time for the SIM.
Press the [Time Table] Tab. The Time Table Tab with SIM Spec definition window will appear.
Now you can define the main SIM definitions and Time range and days that SIM will be enabled.
Enter SIM specifications:
1.
Enter the SIM phone number in the Phone number box.
2.
Enter the PIN code of the SIM in the PIN CODE box.
3.
Select a caller identification option in the Caller ID list:
o
To enable the GSM network to set caller ID standards, select Network.
o
To enable identification of the SIM, select CLIR Suppression.
o
To disable identification of the SIM, select CLIR Invocation.
If desired, set an airtime limit at Maximum Number of Call Minutes.
Set Hours and Days that SIM is Active in the Time Table tab, define hours, and days, that the SIM is active.
Days can be divided in up to four intervals.
1
- Select an interval.
2
- Enter the hours of the interval.
3
- Select days that this interval will be activated. Select days of deactivation in the row.
February-2006
Page 18/32
DTT BRI Gateway
DISCOVERY
telecom
Chapter 4.5: Define the SIM Channel Lock
Refer to the port and SIM setup window shown in the previous chapter.
The SIM can be locked permanently to a specific channel, or it can be set to be locked temporarily,
to the channel with the strongest signal in the time of call generation.
To assign the SIM permanently to a specific channel, in the BCCH Lock box, enter a channel number
between 1 124, or 512 885 (inclusive).
To set the channel lock so that the SIM temporarily locks to the channel with the strongest
signal at the time of the phone call, enter 0 in the BCCH Lock box.
February-2006
Page 19/32
DTT BRI Gateway
DISCOVERY
telecom
Chapter 5: ISDN and Time Settings
This chapter describes the required and optional ISDN settings as well as the related time setting.
Chapter 5.1: ISDN Settings
Each DTT Series BRI Gateway has a master printed circuit board (PCB). The ISDN card is a small PCB
mounted on the master PCB. The ISDN card is between ports in the DTT Series BRI Gateway and the
external phones PBX switching unit.
COM Port
ISDN
ISDN
Synchronization
. The ISDN window opens. This window defines settings in the E1
line, between the switching unit and the ISDN card. Enter specifications as described on the following page.
Ensure that settings are in conformity with settings in the switching box.
To define ISDN settings, press
February-2006
Page 20/32
DTT BRI Gateway
DISCOVERY
telecom
Continue Settings in the ISDN configuration window as follows:
1
The control PCB has an EEPROM containing master card software. Enter the version of the
master card software in System Version.
2
The ISDN module is a small PCB connected to the master PCB. The ISDN module has an EEPROM
containing ISM software. Enter the ISM version in the ISM version box.
3
Select Point to Point to Point or Multipoint in the Connection mode box.
4
In the Incoming Calls box, select the interface of incoming calls (from the switching unit to the ISDN
card), Overlap (pulse) or In Block (packet), in conformity with the setting in the switching unit.
•
If Overlap is selected, then proceed to step 5.
•
If “In Block is selected, then enter a value in a ring signal parameter. The box labeled
Minimum number of called number digits from ISDN is a ring signal parameter. This parameter
determines when a ring signal will be initiated in calls coming from the switching box, to the ISDN
card. Enter the minimum number of digits of incoming phone numbers in this box (for example
050-787-444 = 10 digits).
February-2006
Page 21/32
DTT BRI Gateway
DISCOVERY
telecom
5
If you have more than one DTT Series BRI Gateway on site, enter the address of each DTT
Series BRI Gateway unit in the Local address box.
This entry can accept number between 1 and 20 digits.
6
If you have sub-addresses of DTT Series BRI Gateway, enter the sub address of each DTT
Series BRI Gateway unit in the Local sub address box.
This entry can be between 1 and 4 digits.
7
In the Type of Number box, select the Type Of Number (TON) of calls, from the ISDN card to the
switching unit, as defined in the switching unit.
8
The Numbering scheme protocol, from the ISDN card to the switching unit, is set at Number Plan
Identification (NPI). Set this parameter as defined in the switching unit.
9
Press Write ISDN Setting to send the ISDN settings to the Dual Cell unit.
Note:
The following three filed boxes in this window are only displaying
the existing settings
•
Network access: this box displays the type of telephone network connection
NT or TE.
•
Country Code: this box displays the default country code setting
•
ISDN version: this box displays the default ISDN version
February-2006
Page 22/32
EuroISDN.
EuroISDN.
DTT BRI Gateway
DISCOVERY
telecom
Chapter 5.2: Time and Date setting
In the bottom part of the ISDN window set the date, time and day. Then press Set System Time to
send the settings to the DTT Series BRI Gateway.
February-2006
Page 23/32
DTT BRI Gateway
DISCOVERY
telecom
Chapter 6: B-Channel
Port Association
Communication through a Dual Cell is performed via ports on one end, and B-channels on the other end:
Each Dual Cell has two ports . Each port extends to a GSM module (containing a SIM ). The GSM
module communicates to the GSM network.
On the opposite end of the Dual Cell , two B-channels communicate to the switching unit.
GSM
Cellphone
Landline
Phone
Incoming calls, from switching unit to
ISDN card: minimum digits (example
050-787-4444 = 10 digits
"Outgoing" calls, from ISDN card to
switching unit: maximum digits 4
(example 6001 = 4 digits)
RJ-11
PSTN
Switching
GSM Module
ISDN (BRI)
2 x B-Channels
Mapped into 2
operating GSM SIM Cards
DTT Dual Cell
BRI Gateway
This chapter explains the assigning of B-channels to in-house phones and the allocation of calls to DTT
Series BRI Gateway ports.
February-2006
Page 24/32DTT BRI Gateway
DISCOVERY
telecom
to open the B-Channel/Port setup
These settings are made in the B-channel/Port window. Press
window. This window is divided into four frames, as shown on the following page.
February-2006
Page 25/32
DTT BRI Gateway
DISCOVERY
telecom
Chapter 6.1: B-Channel to In-house phone number association
Assign office in-house phone number extensions to B-Channels
In-house phone numbers are assigned in the lower left frame.
Outgoing number refers to internal telephone numbers (For example, 6001 and 6002). For each channel
that extends to a phone simply mark the check box of it as shown in the screen snapshot above.
Chapter 6.2: In-house phone number and GSM association
This prefixes table setting frame is for associating prefix numbers of the different GSM operators to a
channel number appears on the left (1. , 2.).
This means that a port that associates with this channel can generate calls only to GSM numbers having the
defined prefixes. Another option is to define a port association to channel 0, which means that the port can
be used to generate calls to any GSM operator with no limit but the SIM cards limit.
Blue GSM network prefixes
Red GSM network prefixes
Chapter 6.3: Network Prefixes Settings
The prefix table is in the lower right corner of the B-channel/Port window. This table is used to direct calls
(from the DTT Series BRI Gateway to GSM networks) through the appropriate SIM. For example:
•
If GSM network Blue includes telephone numbers that start with 051, 052, and 053, then these
prefixes could be listed in row 1 of this table.
•
If GSM network Red includes telephone numbers that start with 061, 062, 063, and 064, then
these prefixes could be listed in row 2 of this table.
If the Prefix allocation mode is selected (as described below), then the DTT Series BRI Gateway checks the
prefix of the outgoing numbers, and sends dispatches phone calls through the appropriate SIM. This helps
ensure the lowest call rate possible for the user.
February-2006
Page 26/32
DTT BRI Gateway
DISCOVERY
telecom
Chapter 6.4: Port Allocation Mode Settings
The manner in which a phone call is directed to a port is determined in this frame.
•
If By Prefixes is selected, then the DTT Series BRI Gateway directs a call through a port according
to the defined prefixes of the telephone number prefix.
Using the example above, If a user dials 051-333-4444, the phone call would be directed as 051 GSM
extension.
If one GSM network is designated for both ports, then select the manner in which ports will be
selected:
•
o
Cyclic indicates that ports will be selected in a cyclic manner: for example, if the first call is
via port 1, the following call will be directed through port 2, the third call will be directed
through port 1, and so forth.
o
Random indicates that ports will be selected at random, for example: port 2, port 2, port
1, port 2, port 2, port 1, port 1, and so forth.
If Static is selected, each ISDN B channel (and its respective telephone) is linked permanently to a
port as defined in the prefixes table frame.
An ISDN B channel (and its respective telephone) can be switched as described below.
February-2006
Page 27/32
DTT BRI Gateway
DISCOVERY
telecom
Chapter 6.5: Make Port/Prefix Settings
Port/prefix settings are made in the upper left frame of this window and associates channel to a prefix entry
of GSM operator extensions. If Prefix is set to 0, the phone connected to the port of the channel can call
to any GSM operators the SIMs support with no limit.
1 Check a port to activate it.
2 Assign a prefix group numbers to ports. Using the above example, if you have placed
a SIM of GSM network Blue in GSM port 1, and prefix group #1 includes prefixes
of the Blue network, then enter 1 in the prefix column in the row of Port #1.
3 If you want ports permanently linked to B channels, and you want to change the
order of connections, proceed as follows:
a. Click a cell in the B-channel column and drag the cell to the Stock column.
b. Click the remaining cell in the B-channel column and drag it to the row of the desired port.
February-2006
Page 28/32
DTT BRI Gateway
DISCOVERY
telecom
c. Drag the cell in the Stock column to the desired position in the B-channel column.
February-2006
Page 29/32
DTT BRI Gateway
DISCOVERY
telecom
Chapter 7: Monitoring Calls and Reports
This chapter explains how to monitor calls and review reports.
Monitoring Calls
To monitor calls press .
The monitor screen opens.
GSM Network
SIM Insertion status
Port and B-channel
Type of Channel lock
SIM connection status
Network connection status
February-2006
Page 30/32
DTT BRI Gateway
DISCOVERY
telecom
Click inside a port block to view the antenna reception quality of surrounding antennas.
The Antennas monitoring window will popup.
Legend:
•
LAC - Location Area Code.
•
CI - Cell ID
•
MCC - Mobile Contry Code
•
BSIC - Basic Station Identity Code
•
BCCH - Broadcast Control Channel
•
RSSI- Receiver Signal Strength
•
LED modes:
o
A red LED indicates there is no connection.
o
A yellow LED indicates there is a connection, but no data transfer.
o
A green LED indicates transfer of data.
February-2006
Page 31/32
DTT BRI Gateway
DISCOVERY
telecom
Call Reports
Press
February-2006
to review the call report.
Page 32/32
DTT BRI Gateway