1
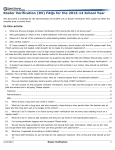
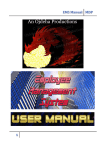
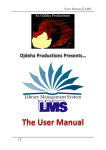
Universal Device Control Systems
www.udcsys.com
Hi-Z Antennas
Hi-Z 3 Triangular Array
Local and Remote Control System
HZ3AC User Manual Version 2.1
May, 2014
Universal Device Control Systems
Copyright © 2014 All Rights Reserved
Section
Content
Page
I
General Description
1
II
Control System Installation
1
III
Control System Operation
2
IV
System Control Button Label Customization
3
V
Trouble Shooting
3
VI
Remote Control Operation
4
Section I General Description
The HZ3AC Control System provides users the ability to implement local direction control of a Hi-Z Antennas
3 Element Triangular Array receive antenna system with the click of a mouse. The control system can also be
used for direction control while operating from a remote location using a remote desktop application or the
UDCS/N4PY Integrated Server System over a reliable Internet connection. Control system ports not used for
the preconfigured application can be used for other station control functions. Refer to the Application Notes
Page at www.udcsys.com for details.
HZ3AC Control System Block Diagram
Direction Control GUI
HZ3AC Controller
Section II Installation
Please read and understand instructions in this manual and the Control System Software Quick Start Guide
before starting the installation process. Control Software is available for download at udcs.weebly.com
Controller Software Installation
Refer to the Control Software Quick Start Guide for details
• Insert the Control Software CD in the CDROM/DVD drive on the station computer
• Start the installation process by clicking Install
• Click OK and follow the installation prompts and click Finish to run the default application
• Ignore the hamShack Switch Not Found message by clicking OK
• After the default control window appears exit the program
System Hardware Installation (Refer to Figure 1 on Page 2)
• Plug the HZ3AC USB cable into an unused USB port on the station computer
• Connect the red and black power cable to the station 13.8 Volt DC supply
• Start the HZ3AC Control Program by clicking on the hamShack Switch desktop icon
• Verify control lead 1 and 2 functionality against the Hi-Z Truth Table on page 3, Section IV
• Connect Hi-Z 3 power and control leads 1 – 4 to barrier strip positions as shown in Figure 1
1
Figure 1
HZ3AC to Hi-Z 3 Phase Box Control and Power Lead Connections
Section III Control System Operation
To change Hi-Z 3 receive antenna system direction click the desired control button
No Direction Selected
Direction 1 (North)
2
Direction 2 (Northeast)
Section IV Control Button Label Customization
Control Window Label Change
Control Window Default Label
1. Click Settings
2. Default Label Displayed in the Call Sign area in Settings
3. Place cursor at the end of the last letter in the default label
4. Backspace to remove default label and type the desired label text:
5.
Hit the Enter Key to complete label change
Control Switch Label Customization
Customizing Default Labels
Label customization Steps 1 – 7
1. Right Click on the center direction indicator label
2.
Follow steps 1-7 to change the default
control switch top center label
Dir 1
Dir 4
Default Labels appear
3. Place cursor at the end of Dir 2 and backspace to clear the label
4. N
change
NE
Type the desired direction label
5. Hit the Enter Key to change the label
Do not change or delete the
(RS) function symbol
6. Spaces can be added between NE and SE to center labels
7. << N
NE >> Add indicator arrows if desired
Section IV Troubleshooting
1. Verify the USB cable is connected to the station control computer
2. Verify the DC Power cable is connected to the station supply as shown in Figure 1 and power is on
3. Verify control leads 1 and 2 actions are functioning properly using a multi meter while switching
controller directions
Direction 1 (N)
Control 1 GND
Direction 4
Control 1 & 4 GND
Direction 2
Control 3 & 4 GND
Direction 5
Control 3 GND
Direction 3
Control 2 GND
Direction 6
Control 2 & 4 GND
4. Verify power lead connections to the Hi-Z Phase Boxes, 13.8 volts is required
5. Click on the SGP Window Assignments button in the Settings Window to verify settings are unchanged
Should trouble persist after verifying all system settings and connections are correct and power is provided,
follow troubleshooting instructions in the Hi-Z 3 user manual
3
Section V Remote Control Operation
There are two methods of operating the HZ3AC system from a remote location by using a remote desktop
application or the UDCS/N4PY Integrated Client Server and rig control system.
Remote Desktop Application Control Method
Remote desktop applications enable users to see and control a connected PC as though they are sitting directly in
front of it. Remote desktop applications to include Citrix Systems GoToMyPC, LogMeIn, Symantec
pcAnywhere, RealVNC and later versions of Windows have remote desktop capability that can be used for
remote control operation. Depending on the quality of an Internet connection there may be some degree of
latency due screen refreshing as the system control software is running on the station computer.
UDCS / N4PY Integrated Client Server Method
The integrated Client – Server software feature provides a seamless Remote Radio Control System. Software
running on the Radio Server PC sends and receives commands and also receives status information from the
radio. Software on the client PC presents a graphical representation of radio controls and HZ3AC control
functions. The client server system reduces latency as the control applications reside on the remote computer.
The radio’s frequency, mode, gain and other functions can be adjusted; antennas and other station equipment can
be selected or switched remotely using controller GUI Buttons. The Client Server Feature can also provide
automatic antenna switching and the ability to use paddles at the Remote Client end for sending CW.
To implement the Integrated Client Server function, purchase and install the version of N4PY Rig Control
Software for the type of radio to be used in the system. Follow instructions in the Client-Server and N4PY Rig
Control manuals for system configuration and operation details.
4