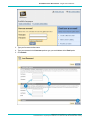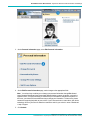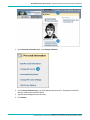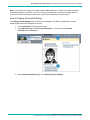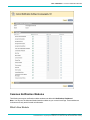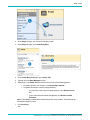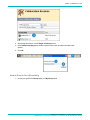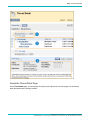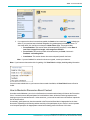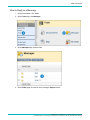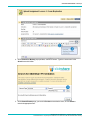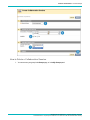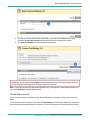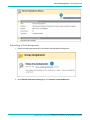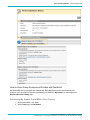
1
Help for Students
Blackboard Learn Release 9.1 - Help for Students - Page 1
© 2012 Blackboard Inc. Proprietary and Confidential. U.S. Patent No. 6,988,138. Additional Patents Pending.
Publication Date and Copyright Notice
Blackboard Learn™ Help for Release 9.1 Service Pack 8 (SP 8)
Publication Date: May 7, 2012
Worldwide Headquarters
International Headquarters
Blackboard Inc.
Blackboard International B.V.
650 Massachusetts Avenue NW
Sixth Floor
Washington, DC 20001-3796 USA
Paleisstraat 1-5
1012RB Amsterdam
The Netherlands
+1 800 424 9299 toll free USA & Canada
+1 202 463 4860 telephone
+31 (0) 20 788 2450 (NL) telephone
+1 202 463 4863 fax
+31 (0) 20 788 2451 (NL) fax
www.blackboard.com
www.blackboard.com
Copyright © 1997-2012. Blackboard Inc. All rights reserved. Blackboard, the Blackboard logo, BbWorld, and
Blackboard product names are trademarks of Blackboard Inc. or its subsidiaries. Blackboard products may be
covered by one or more of the following U.S. patents: 7,493,396, 7,558,853, 6,816,878.
Microsoft and Windows are registered trademarks of Microsoft Corporation in the United States and/or other
countries. Sun, Solaris, and Java are either registered trademarks or trademarks of Sun Microsystems, Inc. in
the United States and/or other countries. Oracle is a registered trademark of Oracle Corporation in the United
States and/or other countries. Red Hat is a registered trademark of Red Hat, Inc. in the United States and/or
other countries. Linux is a registered trademark of Linus Torvalds in the United States and/or other
countries. Apache is a trademark of The Apache Software Foundation in the United States and/or other
countries. Real Player and Real Audio Movie are trademarks of RealNetworks in the United States and/or other
countries. Macromedia, Authorware, Shockwave, Adobe and Acrobat Reader are either registered trademarks
or trademarks of Adobe Systems Incorporated in the United States and/or other countries. Macintosh and
QuickTime are registered trademarks of Apple Computer, Inc. in the United States and/or other countries.
Crystal Reports is a trademark of Business Objects in the United States and/or other countries. WebEQ is a
trademark of Design Science, Inc. in the United States and/or other countries. JSpell is a trademark of The
Solution Café in the United States and/or other countries.
Other product and company names mentioned herein may be the trademarks of their respective owners. No part of the contents of this project may be reproduced or transmitted in any form or by any means without
the written permission of the publisher, Blackboard Inc.
Blackboard Learn Release 9.1 - Help for Students - Page 2
© 2012 Blackboard Inc. Proprietary and Confidential. U.S. Patent No. 6,988,138. Additional Patents Pending.
Contents
Help for Students
1
Blackboard Learn Environment
10
Logging In to Blackboard Learn
10
Frequently Asked Questions
10
About the Gateway Page
10
How to Log In
11
Forget Your Password?
11
11
How to Retrieve Your Password
About the Blackboard Learn Environment
13
My Places: Edit Personal Information and Settings
15
How to Edit Personal Information
15
How to Change Your Password
17
How to Personalize My Places
19
How to Change Personal Settings
21
How to Set Privacy Options
22
Course Catalog
24
Browsing the Course Catalog
24
Viewing a Course as a Guest
25
Course Menu
25
Course Menu Icons
26
Viewing New Content
27
Viewing the Course Map
28
Search for Users
29
How to Search for Other Students in Your Course Using the Roster
29
How to Search for Users in the User Directory
30
Screen Readers
31
Language Packs
31
How to Set a Language Pack Preference
Accessibility
31
33
About the Structure of Blackboard Learn Pages
33
About Keyboard Navigation
34
Tabs and Modules
35
My Institution Tab
35
Exploring the Tools Panel
35
Exploring the Modules
36
Next Steps
37
Courses Tab
37
Blackboard Learn Release 9.1 - Help for Students - Page 3
© 2012 Blackboard Inc. Proprietary and Confidential. U.S. Patent No. 6,988,138. Additional Patents Pending.
About Course Enrollments
37
About the Courses Tab
39
Customizing Tab Modules
40
How to Customize Module Layout
40
How to Personalize the Page
42
How to Add a Module
43
Next Steps
45
45
Working With Modules
Editing Module Content
45
Minimizing a Module
45
Opening a Module in a New Window
45
Removing a Module
46
Accessing Information in a Module
46
Notifications
47
Exploring the Notifications Settings
47
How to Edit Notification Settings
48
Selecting Individual Notifications and Email Notifications
50
Common Notification Modules
51
What's New Module
51
To Do Module
52
About Organizations
52
Text Editor
53
Entering Text
53
Text Box Options
53
Copying and Pasting Text to Prevent Loss
53
Permitted File Names
54
Using the Text Editor
54
The Text Editor
54
Entering Text
55
Compatible Browsers
55
Copying and Pasting Text to Prevent Loss
55
Text Editor Features
55
Keyboard Shortcuts for the Text Editor
58
Inserting Multimedia Files from the Text Editor
60
Image Fields
61
MPEG or AVI Fields
61
QuickTime Fields
62
Audio Fields
62
Flash or Shockwave Fields
63
Blackboard Learn Release 9.1 - Help for Students - Page 4
© 2012 Blackboard Inc. Proprietary and Confidential. U.S. Patent No. 6,988,138. Additional Patents Pending.
Linking to File Attachments from the Text Editor
How to Link File Attachments from the Text Editor
Using the Math and Science Notation Tool
63
63
65
MathML Equation Editor
65
Accessing the Equation Editor
66
Creating and Editing Equations
66
Running Spell Check in the Text Editor
67
Word Lists
67
Personal Word List and Cookie
68
Using Spell Check
68
Recognized Errors
68
Using the Content Editor
69
The Content Editor
69
Content Editor Availability
69
Copying and Pasting Text to Prevent Loss
70
Adding and Editing Content
70
Simple Content Editor Features
70
Advanced Content Editor Features
71
Working with Lists
74
Using Spell Check
74
Using Find and Replace
75
How to Use Links
76
Inserting Lines and Horizontal Rules
80
Adding Images
81
Adding Media Files
82
Adding Mashup Objects
85
Using the Math Editor
85
Working with Tables
86
Using Anchors
94
Advanced Functions
94
Using the Right-Click Contextual Menu
95
Keyboard Shortcuts for the Content Editor
96
Tools
98
About Course Tools
98
About Third Party and External Tools
98
Announcements
99
How to View Announcements
Blogs
How to Access a Blog
99
100
101
Blackboard Learn Release 9.1 - Help for Students - Page 5
© 2012 Blackboard Inc. Proprietary and Confidential. U.S. Patent No. 6,988,138. Additional Patents Pending.
How to Create a Blog Entry
103
Viewing Blog Drafts
105
How to Comment on a Blog Entry
106
How to Edit a Blog Entry
108
How to Delete a Blog Entry
111
Viewing Blog Grades
112
Troubleshooting Blog Management
113
113
Calendar
How to Open the Calendar
113
How to Create a Personal Event
114
How to Delete and Edit a Personal Event
116
How to View a Specific Date
117
Collaboration Tools
118
About Collaboration Tools
118
Virtual Classroom
120
Chat
131
Accessing Recorded Collaboration Sessions
137
Contacts
151
How to View Contacts
152
How to Create or Edit a Contact
152
How to Delete a Contact
154
How to Search for a Contact
154
Discussion Board
155
How to Access the Discussion Board
156
Viewing a Discussion Forum
157
Using List View and Tree View in Discussions
158
Viewing a Discussion Thread
160
About the Thread Detail Page
161
How to Create Threads in a Discussion Forum
163
How to Save Posts as Draft and Submit Later
165
How to Change the Displayed Threads
169
How to Reply to Discussion Posts
170
How to Rate Discussion Posts
173
How to Search Discussion Posts
175
How to Collect Discussion Posts
177
How to Filter Discussion Posts After Searching or Collecting
178
How to Sort Discussion Posts After Searching or Collecting
180
How to View Discussion Board Grades
182
How to Moderate Discussion Board Content
183
Blackboard Learn Release 9.1 - Help for Students - Page 6
© 2012 Blackboard Inc. Proprietary and Confidential. U.S. Patent No. 6,988,138. Additional Patents Pending.
Email
186
Before You Begin
186
How to Send Email
187
Troubleshooting
188
Journals
188
How to Access a Journal
190
How to Create a Journal Entry
191
Viewing Journal Drafts
194
How to Comment on a Journal Entry
194
How to Edit a Journal Entry
196
How to Delete a Journal Entry
199
Viewing Journal Grades
201
Troubleshooting Journal Management
202
Messages
202
How to Create a Message
203
How to Create a Message Folder
205
How to View a Message
207
How to Reply to a Message
209
How to Forward a Message
211
How to Move a Message
214
How to Delete a Message
216
How to Print a Message
218
My Grades
220
How to Access My Grades
220
How to View Grade Details
221
My Grade Item Status
222
Search for Users
222
How to Search for Other Students in Your Course Using the Roster
222
How to Search for Users in the User Directory
223
Tasks
224
How to Open the Task List
225
How to Create or Edit a Personal Task
225
How to Sort the List of Tasks
228
How to Change the Status of a Task
229
How to Delete a Personal Task
230
How to View Task Details
231
Wikis
232
How to Create a Wiki Page
232
How to Edit Wiki Content
235
Blackboard Learn Release 9.1 - Help for Students - Page 7
© 2012 Blackboard Inc. Proprietary and Confidential. U.S. Patent No. 6,988,138. Additional Patents Pending.
How to Link to other Wiki Pages
237
How to Comment on a Wiki Entry
240
How to View Your Contributions
242
How to View Grades for Wiki Contributions
245
Courses and Content
249
About Courses
249
About Course Content
249
Course Content Areas
251
Course Cartridges
252
Accessing a Course Cartridge
252
Troubleshooting Course Cartridge Issues
253
Lesson Plans
253
Learning Modules
255
Following a Sequential Path
255
Navigating within Learning Modules
255
Using the Table of Contents
256
How to Move the Table of Contents
256
Mashups
256
Default Mashup Types
257
How to Create a Mashup Item Using the Text Editor
257
Course Groups
261
About Course Groups
261
Managing Group Collaboration Sessions
268
Exchanging Files within a Course Group
275
Emailing a Course Group
278
Group Assignments
280
Tests and Assignments
298
Tests and Surveys
298
Question Types
298
Grading Questions
299
How to Take an Assessment
299
Timed Assessments
300
Feedback and Grades
302
Multiple Assessment Attempts
302
Presentation Option
302
Submitting Assignments
303
Frequently Asked Questions
303
How to Submit an Assignment
304
How to Save an Assignment as Draft and Submit Later
306
Blackboard Learn Release 9.1 - Help for Students - Page 8
© 2012 Blackboard Inc. Proprietary and Confidential. U.S. Patent No. 6,988,138. Additional Patents Pending.
How to Edit or Resubmit an Assignment
311
How to View Assignment Grades and Feedback
314
Group Assignments
317
Frequently Asked Questions
317
How to Submit Work for a Group Assignment
318
How to Save a Group Assignment as Draft and Submit Later
321
How to Edit or Resubmit a Group Assignment
326
How to View Group Assignment Grades and Feedback
330
About SafeAssign
334
How SafeAssignments Work
335
How to Submit a SafeAssignment
336
How to View SafeAssignment Submissions
337
Digital Dropbox
341
Blackboard Learn Release 9.1 - Help for Students - Page 9
© 2012 Blackboard Inc. Proprietary and Confidential. U.S. Patent No. 6,988,138. Additional Patents Pending.
Blackboard Learn Environment > Logging In to Blackboard Learn
Blackboard Learn Environment
Logging In to Blackboard Learn
The first step in using Blackboard Learn is to log in to the system. Your school will provide you with the URL,
username, and password.
Note: You may be directed immediately to the My Institution tab. If so, you may also log in through a button
on the header frame or a special portal module.
IMPORTANT! Passwords enable access to personal information. To maintain security do not share
passwords with others.
Frequently Asked Questions
What do I do if I can't log in?
Please contact the computing help desk at your school. If you’re not sure how to contact them, look for the
technology office on your school’s website or search the internet for your school’s name + Blackboard + help or
support.
About the Gateway Page
The Gateway page welcomes you and provides a login button to access Blackboard Learn. You must have a
valid username and password to log in.
If the Gateway page does not appear, you may also log in through a button on the header frame or a special
portal module.
IMPORTANT! Cookies must be enabled within the web browser. Enable cookies through your browser's
settings or options menu.
Login: Use this function to log in to Blackboard Learn.
Blackboard Learn Release 9.1 - Help for Students - Page 10
© 2012 Blackboard Inc. Proprietary and Confidential. U.S. Patent No. 6,988,138. Additional Patents Pending.
Blackboard Learn Environment > Forget Your Password?
Change Text Size: Display assistance in changing the size of the text displayed in the browser.
High Contrast Setting: Change the display to assist low vision users. You can select whether to use your
operating system's High Contrast settings or use Blackboard styles.
Create a New Account: Create an account to use Blackboard Learn.
View Course Catalog: View courses belonging to your preferred program of study.
Preview as Guest: Preview Blackboard Learn without using a system account. You may be able to browse
the catalog and preview courses as a guest but you will not have access to the entire course.
How to Log In
1. Type your Username.
2. Type your Password. The maximum number of characters in a password is 32. Passwords are
case sensitive.
3. Click Login.
Result
You are directed to the My Institution tab.
Forget Your Password?
You must complete the Lost Password page to obtain a new password. You will create a new password based
on instructions received in an email. You must enter information in all the fields in the Username Option
section or all of the fields in the Email Address Option section.
How to Retrieve Your Password
1. Type the URL for Blackboard Learn into a web browser.
2. On the Gateway page, click Forget Your Password?
Blackboard Learn Release 9.1 - Help for Students - Page 11
© 2012 Blackboard Inc. Proprietary and Confidential. U.S. Patent No. 6,988,138. Additional Patents Pending.
Blackboard Learn Environment > Forget Your Password?
3. Type your first name and last name.
4. Type your username in the Username option or type your email address in the Email option.
5. Click Submit.
Blackboard Learn Release 9.1 - Help for Students - Page 12
© 2012 Blackboard Inc. Proprietary and Confidential. U.S. Patent No. 6,988,138. Additional Patents Pending.
Blackboard Learn Environment > About the Blackboard Learn Environment
Result
An email will be sent with instructions to change your password. The current password will remain active until it
is changed by following the instructions.
About the Blackboard Learn Environment
The following are some things to keep in mind when using Blackboard Learn:
l
The Blackboard administrator at your school may disable certain tools within the application. If you
encounter tools that you are unable to access, contact the administrator.
l
The openness of Blackboard Learn allows instructors, leaders, and administrators the option to
customize the interface. The names for some items in Blackboard Learn may differ from those that
you see in the documentation.
l
Building Blocks allow your school to integrate external applications, tools, content, and services into
Blackboard Learn. Building Blocks are integrated in such a way that they appear in the interface like
any other tool you can use.
Browser Compatibility
Information on supported web browsers, plug-ins, and operating systems for Blackboard Learn is available in
the Student and Faculty Resource Center.
Contact your school's computing help desk for information on which version of Blackboard Learn your school is
using, as compatibility varies by version.
Blackboard Mobile Learn can be used on a variety of mobile devices, including BlackBerry®, Android™, and
iOS devices such as iPad, iPhone, and iPod Touch. Contact your school's computing help desk for information
on whether your school has made Blackboard Mobile Learn available.
Learning Your Way Around
Blackboard Learn Release 9.1 - Help for Students - Page 13
© 2012 Blackboard Inc. Proprietary and Confidential. U.S. Patent No. 6,988,138. Additional Patents Pending.
Blackboard Learn Environment > About the Blackboard Learn Environment
Page header: The area at the top of the screen that contains the tabs, the My Places link, and the links for
Home, Help, and Logout. To learn more, see More About the Page Header.
Tabs: Blackboard Learn has two common tabs, the My Institution tab and the Courses tab. If your school
licenses community engagement, the My Institution tab, Community tab, and Services tab are available. In
addition, community engagement enables your school to create custom tabs. The Blackboard administrator at
your school can rename the tabs. To learn more, see My Institution Tab.
Course-to-Course Navigation: Use the course-to-course navigation feature to access all courses you are
enrolled in. Click the Action Link next to the course title and select another course from the contextual menu.
For example, if you are viewing the Discussion Board in one course and select another course from the
contextual menu, you are taken to that course's Discussion Board. In addition, breadcrumbs track the most
recently visited pages within a course.
Course Menu: The panel on the left side of the interface contains links to all course content, such as
Content Areas, individual tools, web links, course links, and module pages. To learn more, see Course Menu.
Content frame: The larger area of the screen adjacent to the Course Menu that displays the selected
Content Area, tool, or material.
Action Bar: The rows at the top of the content frame, containing page-level actions, such as Create
Thread in the Discussion Board or Submit in the Assignment tool.
More About the Page Header
The Blackboard Learn user interface is made up of components that allow you to easily navigate, enter data,
edit items, and change options within Blackboard Learn. After logging into Blackboard, you will "land" on the My
Institution page. Pages and the tabs that you access can be renamed by your Blackboard administrator. Tabs
that are visible depend on what capabilities your school has licensed.
Example:
If your school licenses community engagement and you are a member of a club or organization, that club has
the capability to create their own tab for club business within Blackboard Learn.
The page header always contains the tabs, the My Places link, and the links for Home, Help, and Logout.
Notice that even within a course, the page header remains the same.
Tabs: Blackboard Learn has two common tabs, the My Institution tab, and the Courses tab. If your school
licenses community engagement, the My Institution tab, Community tab, and Services tab are available. In
addition, community engagement enables your school to create custom tabs and present different tabs to users
based on Institution Roles.
My Places: The My Places link provides users with quick and easy navigation to a variety of places within
Blackboard Learn. Tasks available in My Places include changing your password and editing personal settings.
Home: The Home link directs you to the Blackboard website where you can see information about our
products and services as well as contact the support team.
Help: The Help link can be set by the administrator at your school to point to school resources for providing
assistance to users.
Logout: You can use Logout to exit from Blackboard Learn.
Blackboard Learn Release 9.1 - Help for Students - Page 14
© 2012 Blackboard Inc. Proprietary and Confidential. U.S. Patent No. 6,988,138. Additional Patents Pending.
Blackboard Learn Environment > My Places: Edit Personal Information and Settings
Printing Course Content
Because Blackboard Learn is web-based, printing is handled through your web browser, or, if the content is an
attached file such as a Microsoft® Word document, through that program.
Most browsers have a "Help" option explaining more about printing.
If you need assistance printing course content, contact your school's computing help desk.
Paging Options
You can edit the paging options to specify how many items appear on a page in Blackboard Learn. For example,
you can determine how many forums appear on the main Discussion Board page.
The default is 25 items per page and the maximum number of items is 1,000 per page. Clicking Show All
displays all items and causes the other controls to disappear. For performance, the items per page should not
be greatly expanded.
Use the following steps to edit the paging options.
1. Click Edit Paging.
2. Type a number in the Items per page text box. If the number is greater than the total number of
items, then all items appear. If the number is less than one, then one item appears.
3. Click OK.
My Places: Edit Personal Information and Settings
My Places provides you with quick and easy navigation to a variety of places within Blackboard Learn. This
feature contains a customizable set of links to frequently accessed information and tools. My Places also
allows you to edit your personal information and settings.
Note: Your school may not allow you to change your personal information, password, or settings through
Blackboard Learn. Because Blackboard Learn often shares data with other systems on campus, such as the
registrar's office, it may be necessary to ensure that your information is the same everywhere. In this case,
your school will have a different way to change your information. To learn more, please contact the computing
help desk at your school. If you’re not sure how to contact them, look for the technology office on your school’s
website or search the web for your school’s name + Blackboard + help or support.
How to Edit Personal Information
You can edit the information that appears in your account profile on the Edit Personal Information page.
Changes made on this page are reflected throughout Blackboard Learn. For example, if you change your last
name, the new last name appears in all courses you are enrolled in. Most of the personal information is optional.
1. Click the My Places link at the top of the page.
2. On the My Places page, select Personal Information. You can also access Personal
Information on the Tools panel.
Blackboard Learn Release 9.1 - Help for Students - Page 15
© 2012 Blackboard Inc. Proprietary and Confidential. U.S. Patent No. 6,988,138. Additional Patents Pending.
Blackboard Learn Environment > My Places: Edit Personal Information and Settings
3. On the Personal Information page, select Edit Personal Information.
4. On the Edit Personal Information page, make changes to the appropriate fields.
Note: Your school may not allow you to change your personal information through Blackboard
Learn. Because Blackboard Learn often shares data with other systems on campus, such as the
registrar's office, it may be necessary to ensure that your information is the same everywhere. In
this case, your school will have a different way to change your information. To learn more, please
contact the computing help desk at your school. If you’re not sure how to contact them, look for the
technology office on your school’s website or search the web for your school’s name + Blackboard
+ help or support.
5. Click Submit.
Blackboard Learn Release 9.1 - Help for Students - Page 16
© 2012 Blackboard Inc. Proprietary and Confidential. U.S. Patent No. 6,988,138. Additional Patents Pending.
Blackboard Learn Environment > My Places: Edit Personal Information and Settings
How to Change Your Password
Blackboard recommends that you change your password periodically to ensure security. Do not use common
personal information as your password, such as your name.
1. Click the My Places link at the top of the page.
2. On the My Places page, select Personal Information. You can also access Personal
Information on the Tools panel.
Blackboard Learn Release 9.1 - Help for Students - Page 17
© 2012 Blackboard Inc. Proprietary and Confidential. U.S. Patent No. 6,988,138. Additional Patents Pending.
Blackboard Learn Environment > My Places: Edit Personal Information and Settings
3. On the Personal Information page, select Change Password.
4. On the Change Password page, type a new password for the account. The password must be at
least one character and contain no spaces.
5. Type the password again to ensure accuracy.
6. Click Submit.
Blackboard Learn Release 9.1 - Help for Students - Page 18
© 2012 Blackboard Inc. Proprietary and Confidential. U.S. Patent No. 6,988,138. Additional Patents Pending.
Blackboard Learn Environment > My Places: Edit Personal Information and Settings
Note: Your school may not allow you to change your password through Blackboard Learn.
Because Blackboard Learn often shares data with other systems on campus, such as the registrar's
office, it may be necessary to ensure that your information is the same everywhere. In this case,
your school will have a different way to change your information. To learn more, please contact the
computing help desk at your school. If you’re not sure how to contact them, look for the technology
office on your school’s website or search the web for your school’s name + Blackboard + help or
support.
How to Personalize My Places
You can upload an avatar which can be used to represent you throughout the system.
1. Click the My Places link at the top of the page.
2. On the My Places page, select Personal Information. You can also access Personal
Information on the Tools panel.
3. On the Personal Information page, select Personalize My Places.
Blackboard Learn Release 9.1 - Help for Students - Page 19
© 2012 Blackboard Inc. Proprietary and Confidential. U.S. Patent No. 6,988,138. Additional Patents Pending.
Blackboard Learn Environment > My Places: Edit Personal Information and Settings
4. On the Personalize My Places page, you can add or change your personal avatar. Avatar images
should be no larger than 150 pixels by 150 pixels. Select Use custom avatar image.
5. Click Browse My Computer.
6. Select the avatar image file and click Open.
7. You can display links to the courses that you are enrolled in My Places. Select My Courses. To
limit the list to the most recently visited courses, type a number in the Show only courses visited
since: days field.
8. Click Submit.
Result
Your personal avatar is displayed in My Places, Blogs, Journals, and within Notifications Modules (including
What's New, Needs Attention, To Do, and Alerts).
Blackboard Learn Release 9.1 - Help for Students - Page 20
© 2012 Blackboard Inc. Proprietary and Confidential. U.S. Patent No. 6,988,138. Additional Patents Pending.
Blackboard Learn Environment > My Places: Edit Personal Information and Settings
Note: Your school may not allow you to add an avatar to Blackboard Learn. To learn more, please contact the
computing help desk at your school. If you’re not sure how to contact them, look for the technology office on
your school’s website or search the web for your school’s name + Blackboard + help or support.
How to Change Personal Settings
The Change Personal Settings function allows you to manage the Text Editor, Language Pack, and the
display of page instructions throughout the system.
1. Click the My Places link at the top of the page.
2. On the My Places page, select Personal Information. You can also access Personal
Information on the Tools panel.
3. On the Personal Information page, select Change Personal Settings.
Blackboard Learn Release 9.1 - Help for Students - Page 21
© 2012 Blackboard Inc. Proprietary and Confidential. U.S. Patent No. 6,988,138. Additional Patents Pending.
Blackboard Learn Environment > My Places: Edit Personal Information and Settings
4. On the Change Personal Settings page, click On to enable the Text Editor, which allows you to
create content through a simple editor when you enter content in text boxes throughout Blackboard
Learn.
5. Select a User Language Pack from the drop-down list that is localized to your culture or accept
the default.
6. To display page instructions for every page, click Yes. Page instructions are brief explanations of
the features of a particular page. On some pages, there will be a link to More Help that will open a
new window with additional steps on using the feature you are viewing.
7. Click Submit.
How to Set Privacy Options
Privacy Options allows you to choose the information you would like to make publicly available. This
Blackboard Learn Release 9.1 - Help for Students - Page 22
© 2012 Blackboard Inc. Proprietary and Confidential. U.S. Patent No. 6,988,138. Additional Patents Pending.
Blackboard Learn Environment > My Places: Edit Personal Information and Settings
information appears in Rosters and Group pages. You may also select to make this information available in the
User Directory. If an email address is not made available it will not appear in the Roster, Group pages, User
Directory, the Collaboration tool or in any other part of the application.
1. Click the My Places link at the top of the page.
2. On the My Places page, select Personal Information. You can also access Personal
Information on the Tools panel.
3. On the Personal Information page, select Set Privacy Options.
4. On the Set Privacy Options page, select the appropriate check boxes to make personal
information visible to other Blackboard users.
Blackboard Learn Release 9.1 - Help for Students - Page 23
© 2012 Blackboard Inc. Proprietary and Confidential. U.S. Patent No. 6,988,138. Additional Patents Pending.
Blackboard Learn Environment > Course Catalog
5. To list your profile information in the user directory, select the check box.
6. To prevent other course members from contacting you by email, select the email option check box.
7. To prevent your name from being displayed in the course roster, select the check box.
8. Click Submit.
Related Tutorials
Editing Your Personal Information (Flash movie | 1m 58s | 3,429 KB) |
Changing Your
Password (Flash movie | 1m 32s | 3,117 KB) |
Setting Your Privacy Options (Flash movie | 2m 09s | 3,709 KB)
Course Catalog
The Course Catalog lists all courses offered at the school in defined categories, such as semester and subject
matter.
If your school licenses community engagement, the Organization Catalog lists all organizations at the school in
defined categories, such as organization type or semester availability.
The catalog allows you to search for courses or organizations using a keyword or a specific category. The links
in the catalog display instructor information and a course description. You may also be able to enroll, preview,
or log in to a course depending on how your school customizes Blackboard Learn.
Note: The administrator at your school may choose to use a different catalog or no catalog at all.
Browsing the Course Catalog
Click View Course Catalog on the Gateway page. Or, log in and open the Courses tab or the Community tab
to be able to browse the listings.
Blackboard Learn Release 9.1 - Help for Students - Page 24
© 2012 Blackboard Inc. Proprietary and Confidential. U.S. Patent No. 6,988,138. Additional Patents Pending.
Blackboard Learn Environment > Course Menu
Search Catalog: Use the drop-down lists to limit the search by parameters.
Go: Click Go to search for a course.
Browse Categories: Use the drop-down list to find courses belonging to a category, and click Go to start
the search.
Browse Terms: Use the drop-down list to find the available courses during a term, and click Go to start the
search.
Viewing a Course as a Guest
You may be able to browse the catalog and preview courses as a guest. Click the link to a course to view it as a
guest. Guests do not have access to the entire course.
Note: Your instructor determines whether you are allowed to preview a course prior to enrollment so this option
may not be available for all courses.
Course Menu
The Course Menu appears on the left side of a course and contains links to materials and tools within the
course. Your instructor can customize the style of the Course Menu and the content and tools available to
users. As such, your courses may look a bit different from each other and have different sets of tools available.
Blackboard Learn Release 9.1 - Help for Students - Page 25
© 2012 Blackboard Inc. Proprietary and Confidential. U.S. Patent No. 6,988,138. Additional Patents Pending.
Blackboard Learn Environment > Course Menu
You can expand or collapse the Course Menu frame. Click
or expand it to its fullest size.
to collapse the Course Menu so it is out of sight
Course Menu Icons
At the top of the Course Menu is a set of icons that can be used to change the display of the Course Menu. The
menu can be displayed as text links or buttons, as a Folder tree, or in a separate window.
List View: The List View icon contains text links that lead to course materials and tools.
Folder View: The Folder View icon uses icons and expandable folders to access content and tools. You
can expand folders to reveal items and collapse to save space.
Blackboard Learn Release 9.1 - Help for Students - Page 26
© 2012 Blackboard Inc. Proprietary and Confidential. U.S. Patent No. 6,988,138. Additional Patents Pending.
Blackboard Learn Environment > Course Menu
Display in a New Window: The Display in a New Window icon opens the Course Menu in a separate
window.
Refresh: The Refresh icon is used to view any new content added to the Course Menu.
Note: Your instructor can determine the default view of the Course Menu, so these options may be
unavailable.
Viewing New Content
When content is added to the Course Menu or the Course Map, that content does not appear for 20 minutes. To
Blackboard Learn Release 9.1 - Help for Students - Page 27
© 2012 Blackboard Inc. Proprietary and Confidential. U.S. Patent No. 6,988,138. Additional Patents Pending.
Blackboard Learn Environment > Course Menu
ensure that you are viewing the latest content for a course, click Refresh.
Viewing the Course Map
The Course Map is a collapsible tree directory that is used for navigation within a course. You can open the
Course Map from the Course Menu. When you use Virtual Classroom, the Course Map is called Map in the
Tools list.
The pop-up Course Map provides a view of the course content and available tools in Folder View. You can
expand or collapse folders in the Course Map to help organize your view. You can browse and make selections
from the Course Map when adding a course link to an Announcement, the Course Menu, or a course area, such
as a Content Area, Learning Module, Lesson Plan, or folder. You can also view the Course Map when using the
Collaboration tool and the Performance Dashboard.
Blackboard Learn Release 9.1 - Help for Students - Page 28
© 2012 Blackboard Inc. Proprietary and Confidential. U.S. Patent No. 6,988,138. Additional Patents Pending.
Blackboard Learn Environment > Search for Users
Search for Users
Note: Your instructor controls which tools are available. If these tools are not available, your instructor may
have disabled them.
To search for other students in your course, use the Roster. The name of each student is included in the Roster
automatically. You cannot remove your name from the Roster, but you can choose to make your email address
available.
To search for other students and instructors in the system, use the User Directory. You can choose whether to
be included and what information to share by setting your privacy options. To learn more, see How to Set
Privacy Options.
For your personal information to appear in the Roster or User Directory, it must be appear on the Edit Personal
Information page. To learn more, see How to Edit Personal Information.
How to Search for Other Students in Your Course Using the Roster
1. On the Course Menu, click Tools.
2. On the Tools page, click Roster.
3. On the Roster page, use the following parameters to search for users, or click Go to list all
students:
l
First Name
l
Last Name
l
Contains
l
Equal to
l
Starts with
l
Not blank
4. Type a name or keyword in the text box.
5. Click Go.
Blackboard Learn Release 9.1 - Help for Students - Page 29
© 2012 Blackboard Inc. Proprietary and Confidential. U.S. Patent No. 6,988,138. Additional Patents Pending.
Blackboard Learn Environment > Search for Users
How to Search for Users in the User Directory
1. On the Tools panel, click User Directory.
2. On the Users page, use the following parameters to search for users, or click Go to list all users:
l
Username
l
First Name
l
Last Name
l
Email
l
Contains
l
Equal to
l
Starts with
3. Type a name or keyword in the text box.
4. Click Go.
Blackboard Learn Release 9.1 - Help for Students - Page 30
© 2012 Blackboard Inc. Proprietary and Confidential. U.S. Patent No. 6,988,138. Additional Patents Pending.
Blackboard Learn Environment > Screen Readers
Screen Readers
Blackboard Learn has created a Screen Reader Tutorial to provide users who access the application through a
screen reader with information to help them use the system successfully.
To view the tutorial, see the Blackboard Learn Screen Reader Tutorial.
Language Packs
Language Packs present Blackboard Learn using language and cultural norms matched to different audiences.
Language Packs are defined at the system level, the course level, and at the user level.
At the system level, the administrator defines one language pack as the system default. This is the language
that appears when no other language packs are specified at the course level or at the user level.
At the course level, the instructor can set a language pack and enforce it. When a language pack is enforced, all
users see that language pack. If the language pack is not enforced, and a user has a preferred language pack
associated with their account, the user’s language pack preference overrides the course language pack.
At the user level, individuals may select their preferred language pack.
How to Set a Language Pack Preference
1. Click the My Places link at the top of the page.
2. On the My Places page, select Personal Information. You can also access Personal
Information from the Tools panel.
Blackboard Learn Release 9.1 - Help for Students - Page 31
© 2012 Blackboard Inc. Proprietary and Confidential. U.S. Patent No. 6,988,138. Additional Patents Pending.
Blackboard Learn Environment > Language Packs
3. On the Personal Information page, select Change Personal Settings.
4. On the Change Personal Settings page, select a language pack from the drop-down list.
5. Click Submit.
Blackboard Learn Release 9.1 - Help for Students - Page 32
© 2012 Blackboard Inc. Proprietary and Confidential. U.S. Patent No. 6,988,138. Additional Patents Pending.
Blackboard Learn Environment > Accessibility
Spell Check and Language Packs
The Spell Check tool supports English (United States), English (Great Britain), French, and Spanish. The Spell
Check tool does not work with other language packs. If Spell Check does not recognize the language pack it
uses a supported dictionary.
Accessibility
Blackboard® is committed to ensuring that the platform is usable and accessible. The code and user interface
design techniques are continually audited to ensure the application is usable by everyone, to the greatest extent
possible, regardless of age, ability, or situation.
Blackboard measures and evaluates accessibility levels using two sets of standards: Section 508 of the
Rehabilitation Act issued from the United States federal government and the Web Content Accessibility
Guidelines (WCAG 2.0) issued by the World Wide Web Consortium (W3C). Audits of our software releases are
conducted by a third party to ensure the accessibility of the products. For Blackboard Learn Release 9.1's
conformance with the accessibility standards under Section 508 of the Rehabilitation Act using the Voluntary
Product Accessibility Template® (VPAT®) tool, see the VPAT for Blackboard Learn Release 9.1.
To learn more about Blackboard’s commitment to accessibility, see http://www.blackboard.com/accessibility
and http://blog.blackboard.com/accessibility.
About the Structure of Blackboard Learn Pages
A logical heading structure was put in place to properly structure the page and allow users to navigate using
headings. Headings are used consistently throughout the application giving users the ability to quickly
understand the structure of any page in the application and move to the appropriate section of the page or
content item quickly and easily.
As is required, a single H1 is provided to identify the page the user is looking at. In Blackboard Learn, the page
title (example “Course Documents”) is always the H1.
H2 headings are used to delineate major sections of a page. These headings are generally hidden and allow
screen reader users to skip directly to each major page section. For example, there are two H2 headings on a
Blackboard Learn Release 9.1 - Help for Students - Page 33
© 2012 Blackboard Inc. Proprietary and Confidential. U.S. Patent No. 6,988,138. Additional Patents Pending.
Blackboard Learn Environment > Accessibility
Course page: one for the Course Menu and one for the main content located immediately above the action bar
on the content page.
H3 headings are typically used as the title of content items or key content elements on a page. For example,
the title of an assignment on a “Course Documents” page is an H3 so the user can easily find it.
Note: In order to reduce the visual clutter on a page a number of elements are hidden until they receive either
mouse or keyboard focus. Once focus is given these elements become active and follow typical keyboard
interaction models.
About Keyboard Navigation
Industry standard keyboard interactions are used throughout Blackboard Learn to move between menus, open
menus and select items within a menu. Keyboard navigation patterns may differ between browsers (Internet
Explorer, Firefox, Safari, Chrome) but the interactions within any particular browser are common and
consistent.
Note: If you are using a Mac with Firefox or Safari and are having difficulty navigating using your keyboard you
may need to review and update your operating system and browser settings to ensure they are properly
configured for keyboard navigation. To learn more, see:
l
Firefox setup
l
Firefox keyboard navigation tips
l
Mac general setup
Blackboard Learn Release 9.1 - Help for Students - Page 34
© 2012 Blackboard Inc. Proprietary and Confidential. U.S. Patent No. 6,988,138. Additional Patents Pending.
Tabs and Modules > My Institution Tab
Tabs and Modules
My Institution Tab
The My Institution tab contains tools and content. Several modules include content pulled from courses
specific to each user. Remember that the Blackboard administrator at your school can rename tabs. The
Institution tab is a type of Module Page that contains Modules that you select from a list. A Module can be a
tool, such as a calculator, or it can display dynamic information such as grades, alerts, and announcements.
You can personalize the content and layout of the My Institution tab. The options you set are the default
settings that appear each time you login. While you can choose which modules appear, the Blackboard
administrator at your school may restrict or require modules.
In some instances, you may have access to several tabs that contain modules. These additional tabs include
the same features for customizing the content and layout of modules.
Tools: The Tools panel is the area that contains tools to manage information and communicate with other
users.
Module: Modules contain links that allow you to view information and navigate to your courses. The
Blackboard administrator at your school determines what default modules will appear on the My Institution
tab, so you may see different items.
Add Module: Select modules to appear on the My Institution page.
Personalize Page: The Personalize Page function allows you to change the color scheme of your page.
Exploring the Tools Panel
The Blackboard administrator at your school determines which Tools appear in the panel on the My Institution
Blackboard Learn Release 9.1 - Help for Students - Page 35
© 2012 Blackboard Inc. Proprietary and Confidential. U.S. Patent No. 6,988,138. Additional Patents Pending.
Tabs and Modules > My Institution Tab
tab, so you may see different items.
l
Announcements: Use this tool to view important information, reminders, or updates posted by your
instructor. For example, your instructor can use announcements to provide corrections and
clarifications of materials, assignment due dates or exam schedules, or reminders or helpful tips.
l
Calendar: View the Calendar to see events that your instructor has added. You can also post private
or personal events in the calendar.
l
Tasks: Add personal tasks using the Tasks tool. You can also use this tool to keep track of work that
must be completed..
l
My Grades: The My Grades page shows the status of gradable items such as tests, assignments,
journal, and blog entries, and Discussion Board posts.
l
Send Email: Send email messages to other course members' external email addresses.
l
User Directory: The User Directory lists users within Blackboard Learn. Users only appear in the
User Directory if they indicate that they want to be included on the Set Privacy Options page.
l
Address Book: Store contact information in the address book. The address book is empty until you
create contacts. You must create a profile for anyone you want to add to your address book even if
the contact is a Blackboard Learn user.
l
Personal Information: Use the Personal Information link to access and edit the same personal
information found in the My Places link in the header.
Exploring the Modules
The My Institution tab contains modules. A Module can be a tool, such as a calculator, or it can display
dynamic information such as grades, alerts, and announcements. Modules allow you to view information such
as events, announcements, and a list of your courses. Administrators can also present more advanced
modules, such as news channels or tools using the Content Collection. Modules contain links that allow you to
navigate to areas in your courses. The Blackboard administrator at your school can rename modules and
determine which will appear when you log in to your course for the first time.
Blackboard Learn Release 9.1 - Help for Students - Page 36
© 2012 Blackboard Inc. Proprietary and Confidential. U.S. Patent No. 6,988,138. Additional Patents Pending.
Tabs and Modules > Courses Tab
My Announcements: The My Announcements module displays announcements from all courses in
which you are enrolled, as well as school-wide announcements. It can also contain announcements from your
school’s administrator. Announcements communicate important, time-sensitive information. When you click an
announcement link, you are taken to the main Announcements page.
My Courses: The My Courses module lists all the courses to which you have access. The list of courses
should update based on the courses you are currently enrolled in.
My Calendar: The My Calendar module displays calendar dates for courses in which you are enrolled and
any personal events you have added.
My Tasks: The My Tasks module lists tasks for all courses in which you are enrolled.
Next Steps
Personalize the placement, color, and selection of modules that appear on the My Institution or Notifications
Dashboard tabs. To learn more, see Customizing Tab Modules. View updates for a course in a module. To
learn more, see Common Notification Modules.
Courses Tab
The Courses tab contains tools and content. Several modules include information pulled from courses specific
to each user. Remember that the Blackboard administrator at your school can rename tabs.
About Course Enrollments
Blackboard Learn Release 9.1 - Help for Students - Page 37
© 2012 Blackboard Inc. Proprietary and Confidential. U.S. Patent No. 6,988,138. Additional Patents Pending.
Tabs and Modules > Courses Tab
Course enrollments are handled by your school. If you are enrolled in a course but do not see it in the course
list, or if you are enrolled in the incorrect course, contact your school's computing help desk for assistance.
You cannot delete old or unwanted courses, but you can hide them from view.
Follow these steps to hide courses in the Course List module.
Note: Your school controls all options in Blackboard Learn, including whether you can customize modules. If
you are unable to complete the steps, contact your school's computing help desk for assistance.
1. Click the Manage Course List Module Settings icon in the Course List module's heading.
2. Locate the row for the course you would like to hide and clear the check box in the Course Name
column.
3. Ensure all check marks are cleared in that course's row.
4. Repeat for any other courses you would like to hide.
5. Click Submit.
Note: If you would like to hide courses in a module on another tab, such as the My Courses module on the My
Institution tab, you can follow these instructions for those modules.
Blackboard Learn Release 9.1 - Help for Students - Page 38
© 2012 Blackboard Inc. Proprietary and Confidential. U.S. Patent No. 6,988,138. Additional Patents Pending.
Tabs and Modules > Courses Tab
About the Courses Tab
Course Search: You can search for a course, and if allowed, preview the course. Type a keyword or text
string in the text box, click Go, and the results appears on the Browse Course Catalog page.
Course List: From the list, you can access any course you are enrolled in or teaching. For example, if you
are a student in two courses and a Teaching Assistant in one course, your course list will be divided into the
courses you are enrolled in and the courses in which you are a TA.
Course Catalog: You can search the catalog for courses or organizations. Select a category link or click
Browse Course Catalog to begin your search. On the Browse Course Catalog page, you can narrow your
search by course name, ID, description, or instructor. Type a keyword or text string in the box, click Go, and
the results appear.
Blackboard Learn Release 9.1 - Help for Students - Page 39
© 2012 Blackboard Inc. Proprietary and Confidential. U.S. Patent No. 6,988,138. Additional Patents Pending.
Tabs and Modules > Customizing Tab Modules
If your school licenses community engagement, the organization catalog lists all organizations in categories,
such as organization type or semester availability.
Guests are able to browse the catalog and preview courses. Guests do not have access to the entire course.
Instructors determine whether users are allowed to preview a course prior to enrollment.
Note: The Blackboard administrator at your school may choose to use a different catalog or no catalog at all.
Customizing Tab Modules
You can personalize the placement, color, and selection of modules that appear on the My Institution or
Notifications Dashboard tabs. The Notifications Dashboard tab appears only if your school licenses
community engagement.
How to Customize Module Layout
You can reorder the modules on any tab using the drag-and-drop function or the Keyboard Accessible
Reordering tool.
Blackboard Learn Release 9.1 - Help for Students - Page 40
© 2012 Blackboard Inc. Proprietary and Confidential. U.S. Patent No. 6,988,138. Additional Patents Pending.
Tabs and Modules > Customizing Tab Modules
Using the Drag-and-Drop Function
1. Click and hold the header of a module to move it to a new location. The module is surrounded by a
dashed line as it is moved.
2. Release the module to place it in its new location.
Using the Keyboard Accessible Reordering Tool
The Keyboard Accessible Reordering tool provides users with an alternative method to reorder items. The
tool appears on the Action Bar wherever content can be reordered, such as on a module page, a content page,
or the Course Menu.
1. On the Action Bar, click
to access the pop-up Reorder: Modules window.
2. Select one of the modules.
3. Use the up and down arrow icons to move the module to a new position in a column list.
-ORUse the right and left pointing arrows to move module between columns.
Blackboard Learn Release 9.1 - Help for Students - Page 41
© 2012 Blackboard Inc. Proprietary and Confidential. U.S. Patent No. 6,988,138. Additional Patents Pending.
Tabs and Modules > Customizing Tab Modules
4. Click Submit.
5. Click OK.
How to Personalize the Page
1. Access the My Institution tab or another tab containing modules.
2. Click Personalize Page in the top right-hand corner.
3. On the Personalize page, select a color scheme from the Color Palette Library.
4. Click Submit.
Blackboard Learn Release 9.1 - Help for Students - Page 42
© 2012 Blackboard Inc. Proprietary and Confidential. U.S. Patent No. 6,988,138. Additional Patents Pending.
Tabs and Modules > Customizing Tab Modules
How to Add a Module
1. Access the My Institution tab or another tab containing modules.
2. Click Add Module on the upper left-hand corner.
3. On the Add Module page, select the modules to appear on the tab. Options that are disabled have
been set by the Blackboard administrator at your school and cannot be changed. 4. Click Submit.
Blackboard Learn Release 9.1 - Help for Students - Page 43
© 2012 Blackboard Inc. Proprietary and Confidential. U.S. Patent No. 6,988,138. Additional Patents Pending.
Tabs and Modules > Customizing Tab Modules
Blackboard Learn Release 9.1 - Help for Students - Page 44
© 2012 Blackboard Inc. Proprietary and Confidential. U.S. Patent No. 6,988,138. Additional Patents Pending.
Tabs and Modules > Working With Modules
Next Steps
You can edit, minimize, display in a separate window, and remove modules from a tab area. To learn more, see
Working With Modules.
Working With Modules
Modules can be minimized, displayed in a separate window, or removed. Modules can be removed only if you
have the option to do so. Some modules are required to display.
Editing Module Content
Click the Manage Module Settings icon located at the top of each module to edit the information for that
specific module.
Minimizing a Module
Click the minimize (-) icon located at the top of each module to minimize a module. Opening a Module in a New Window
Click the dual-window icon located at the top of each module to open it in a separate window. If the icon does
not appear, then this option is not available for that module.
Blackboard Learn Release 9.1 - Help for Students - Page 45
© 2012 Blackboard Inc. Proprietary and Confidential. U.S. Patent No. 6,988,138. Additional Patents Pending.
Tabs and Modules > Working With Modules
Removing a Module
Click the remove icon (X) located at the top of each module to remove the module. Click Remove and a
confirmation receipt appears when the process is complete. Removing a module does not mean deleting it. You
can restore deleted modules by using the Add Module function. Modules that do not have a remove icon are
required and cannot be removed.
Accessing Information in a Module
Click the link in the module window to display the information that you want to view. Information may display in
Blackboard Learn Release 9.1 - Help for Students - Page 46
© 2012 Blackboard Inc. Proprietary and Confidential. U.S. Patent No. 6,988,138. Additional Patents Pending.
Tabs and Modules > Notifications
the same tab, in a separate window, or the link may direct you to another tab in Blackboard Learn.
Notifications
If allowed by the Blackboard administrator at your school, you can choose which items you want to be notified
about and specify settings for each item. Notifications for specific tools and features can be delivered on your
Blackboard Learn Institution dashboard, by email, or on your mobile device.
WARNING! If the Blackboard administrator at your school has defined the notification settings, those
settings will take precedence over your settings.
About the Notification System
From My Places, you can manage notification settings for all of the courses and organizations you are enrolled
in. The Notification System is a framework for the delivery of notifications to Blackboard Learn users. When an
event occurs in the system (such as an assignment being created, submitting a survey, or an overdue test), the
Notification System informs you of what you need (and want) to know using one or more of available
notification methods.
The first and most important thing you need to understand about this system is that all enabled notifications are
generated automatically whenever their associated event occurs. For example, when your instructor creates an
assignment and makes it available, the system automatically creates the appropriate notifications.
Exploring the Notifications Settings
Click My Places then Edit Notifications Settings to display the Edit Notifications Settings page.
Blackboard Learn Release 9.1 - Help for Students - Page 47
© 2012 Blackboard Inc. Proprietary and Confidential. U.S. Patent No. 6,988,138. Additional Patents Pending.
Tabs and Modules > Notifications
Edit General Settings: Defines the general notification settings such as email format, deletion schedule,
and reminder schedule for courses and organizations.
Edit Individual Course Settings: Displays the current notification settings for courses in which you are
enrolled. Changes to the notification settings for a specific course can be made on this page.
Bulk Edit Notification Settings: Select a set of courses or organizations to update and change the
notification settings for them in one step.
Edit Individual Organization Settings: Displays the current notification settings for organizations in
which you are enrolled. Changes to the notification settings for a specific organization can be made on this
page.
How to Edit Notification Settings
1. Click the My Places link at the top of the page.
2. On the My Places page, select Edit Notification Settings.
Blackboard Learn Release 9.1 - Help for Students - Page 48
© 2012 Blackboard Inc. Proprietary and Confidential. U.S. Patent No. 6,988,138. Additional Patents Pending.
Tabs and Modules > Notifications
3. On the Edit Notification Settings page, select Edit General Settings.
4. On the General Settings page, you may elect to receive an email for each notification, or elect to
receive a daily digest email that contains information on all of the notifications for that day. You
have the ability to set the time for the daily digest.
l
Individual Messages: Emails will be sent for each notification. For Early Warning
System details, unread Discussion Board messages, unread blog posts, and unread
journal entries, however, the digest selection is necessary.
l
Daily Email Digest: All notifications will be collected and sent in a daily digest.
5. Set the number of days until a notification is automatically removed.
6. You can set Due Date reminders for notifications. Select Yes. This reminder will be emailed to you.
Set the number of days before the Due Date to send an email. The email will be sent as a digest
email or as individual emails, depending upon the option you select.
7. Click Submit.
Blackboard Learn Release 9.1 - Help for Students - Page 49
© 2012 Blackboard Inc. Proprietary and Confidential. U.S. Patent No. 6,988,138. Additional Patents Pending.
Tabs and Modules > Notifications
Selecting Individual Notifications and Email Notifications
It is possible to select specific notification types and emails that you will receive. All Notification types, by
default, are turned On to display on the Dashboard. Thus, these notifications will display in the modules on the
Notifications Dashboard page.
All Email notification types, by default, are turned Off. If you turn on the notification for a specific tool or feature,
an email will be sent out corresponding to that notification. For the following items, email notifications can only
be sent out if daily digest email is selected: l
Early Warning System Rule details
l
Unread Discussion Board messages
l
Unread blog posts
l
Unread journal entries
After selecting the appropriate settings, click Submit to save these settings. Blackboard Learn Release 9.1 - Help for Students - Page 50
© 2012 Blackboard Inc. Proprietary and Confidential. U.S. Patent No. 6,988,138. Additional Patents Pending.
Tabs and Modules > Common Notification Modules
Common Notification Modules
The following are common notification modules students can add to their Notifications Dashboard.
Note: You may see The Alerts and Needs Attention modules on your course Home Page. These modules are
for instructor use only and will contain no information.
What's New Module
Blackboard Learn Release 9.1 - Help for Students - Page 51
© 2012 Blackboard Inc. Proprietary and Confidential. U.S. Patent No. 6,988,138. Additional Patents Pending.
Tabs and Modules > About Organizations
The What's New module reports on additions and changes to course content. The module displays the number
of new items for each content type and links to a page for each course. The module will show items within the
last seven days. The What's New module may appear at the My Institution tab if your school licenses
community engagement.
The content types that are reported in the module are:
l
Assessments
l
Assignments
l
Blogs
l
Content
l
Discussion Board posts
The What's New module reports information that is made available to the entire course. Content that becomes
available to you after certain criteria are met is not reported in this module.
The What's New module reports changes once a day. You can see what has changed the first time you log in
for the day. Any changes made after you log in do not appear in the module until the next day unless you
Refresh your browser.
The updates you see for a course only display if the content is made available and you are a participant in the
course.
To Do Module
The To Do module provides a chronological listing of upcoming due dates that students can use as the
launching point for their daily course work. This module is divided into What's Past Due and What's Due.
The What's Past Due area displays any assessment, assignment, or survey that has passed its due date with
no submission. The What's Due displays information about any assessment, assignment, or survey that
contains a due date.
Note: The To Do module is not the same as the Tasks tool. To learn more about tasks, see Tasks.
About Organizations
Institutions have organizations of different types, from academic to special interest. Organizations in
Blackboard Learn contain content and tools to keep you informed and in touch with other members of your
organization.
An organization looks exactly like a course. It has a:
l
Menu similar to the Course Menu
l
Home Page
l
Tools similar to Course Tools, like announcements and discussions to name a few.
The organization leader and your institution administrator manage organization enrollments. You may self-enroll
if that option has been enabled. Contact the organization leader or your institution administrator about
enrollment. Once enrolled, only the leader or an administrator can unenroll a participant.
Blackboard Learn Release 9.1 - Help for Students - Page 52
© 2012 Blackboard Inc. Proprietary and Confidential. U.S. Patent No. 6,988,138. Additional Patents Pending.
Text Editor > Entering Text
Text Editor
Entering Text
By default, Blackboard Learn formats text to 12-point, left-justified Arial font. Any other formatting must be done
with HTML tags or using the Text Editor.
Text boxes may appear using the Text Editor or with the options shown below. To learn more about the Text
Editor, see Using the Text Editor.
Text Box Options
Smart Text, plain text, or HTML may be used in the Text Editor. Options at the bottom of the box allow you to
switch the text entry format at anytime.
Format Option
Behavior
Smart Text
Smart Text automatically recognizes a link entered in the text box. Smart Text
should be used if the intent is to display the text in the exact way that it is
typed. Line breaks, tabbing, and other keyboard formatting will be retained
with Smart Text.
Smart Text recognizes the ENTER key as a paragraph tag and accepts HTML
tags as well. Smart Text will also prompt you to load images if an image
source tag appears. Web addresses entered as URLs are converted to links.
The URL must begin with "http://" and there must be a space before the
"http://" to distinguish it from the previous word. If an image tag, <IMG>, is
entered in Smart Text, Blackboard Learn will automatically prompt you to
upload the image.
Plain Text
Plain text displays text as it is written in the text area. Plain text does not
render HTML code. HTML code will appear as text.
Plain text strips any formatting from the text, except for line breaks. The result
is completely unformatted text. This may be useful if you need to do a lot of
copy and pasting of the content, or if the intent is to display code information.
For example, if you want to show how to write something in HTML, plain text
should be used to retain the HTML tags in the content. Plain text does not
work with MathML or the equation editor. Changing a text box that includes a
mathematical formula to plain text will make the formula unreadable.
HTML
Displays text as coded by the user using Hypertext Mark-up Language
(HTML) tags.
The HTML option should be used only if you know how to use HTML. The
result will be content formatted by the HTML tags used.
Preview shows you how the formatted text appears when rendered in the browser.
Note: The Smart Text and plain text options are only available if your Blackboard administrator has turned off
the Text Editor or if you do not have a Windows Operating System and Internet Explorer Version 5.x or a later.
Note: It is not possible to display a file in a content item and add a Smart Text or plain text description. Add the
description as a separate content item and then add the file in the next content item.
Copying and Pasting Text to Prevent Loss
To protect against losing work if a network connection loss or software error occurs, you may choose to type in
an offline simple text editor, such as Notepad, and copy and paste your work into Blackboard Learn. Copying
Blackboard Learn Release 9.1 - Help for Students - Page 53
© 2012 Blackboard Inc. Proprietary and Confidential. U.S. Patent No. 6,988,138. Additional Patents Pending.
Text Editor > Using the Text Editor
and pasting from fully-featured word processing programs such as Microsoft Word may insert hidden formatting
that can cause display issues. You can add the desired formatting after the text has been pasted into and saved
in Blackboard Learn's text editor.
Alternately, you can select and copy all of the text typed in Blackboard Learn before submitting or saving. Use
the mouse to select the text and then and right-click to copy the text, or press CTRL+A to select all of the text
and then press CTRL+C to copy the text. On Mac systems, use the COMMAND key rather than CTRL.
Permitted File Names
Blackboard Learn allows the use of all characters in file names. However, your operating system and browser
may limit the types characters accepted. For example, some browsers do not accept multi-byte characters,
and some do not support extended character sets.
Using the Text Editor
The editor that you see depends on your school. Most schools use the Blackboard Learn Text Editor. Your
screen reader will announce the Text Editor. To learn more, continue reading this topic.
If your school has signed up for a limited field trial, the Content Editor will appear. Your screen reader will
announce the Content Editor. To learn more, see The Content Editor.
The Text Editor
The Text Editor presents controls for adding and formatting text, equations, and multimedia files. When it is
enabled, it appears throughout the system as the default editor when adding text through a text box.
Note: The Blackboard administrator at your school and your instructor control whether this tool is available. If
this tool has been turned off, it will not appear in the interface and will not be available for you to use.
If the Text Editor does not appear, first check the following list of browsers to ensure that the current browser is
compatible. If the Text Editor still does not appear, it has most likely been disabled by the Blackboard
administrator at your school.
Users who access the system through assistive technologies should use standard text entry options instead of
the Text Editor.
Administrators can disable the Text Editor and control the availability of the features (Spell Check, WebEQ,
MathML, HTML Validation). It is possible that not all users will see all features.
Blackboard Learn Release 9.1 - Help for Students - Page 54
© 2012 Blackboard Inc. Proprietary and Confidential. U.S. Patent No. 6,988,138. Additional Patents Pending.
Text Editor > Using the Text Editor
IMPORTANT! You have the option to attach different types of files to the Text Editor. Do not copy and
paste a file from one text box to another. This will result in an error.
Entering Text
By default, Blackboard Learn will format text to 12-point, left-justified Arial. Any other formatting must be done
using the Text Editor.
Compatible Browsers
The Text Editor is compatible with all the supported browsers for Blackboard Learn.
Firefox does not permit users to access their computer's clipboard.
l
To cut, use CTRL-X, the contextual menu or the Edit menu in the browser's toolbar.
l
To copy, use CTRL-C, the contextual menu or the Edit menu in the browser's toolbar.
l
To paste, use CTRL-V the contextual menu or the Edit menu in the browser's toolbar.
Macintosh users can use right-click paste on Firefox no matter where the clipboard content originates.
Macintosh users may find that this does not fully resolve the problem, particularly because Firefox does not
permit pasting text from Microsoft Office files on the Mac. To accomplish this task, paste the text into a basic
text editor, such as TextEdit or Notepad, and then paste the text into the Text Editor.
Safari does not permit users to access their computer's clipboard.
l
To cut, use CTRL-X, the contextual menu or the Edit menu in the browser's toolbar.
l
To copy, use CTRL-C, the contextual menu or the Edit menu in the browser's toolbar.
l
To paste, use CTRL-V the contextual menu or the Edit menu in the browser's toolbar.
Copying and Pasting Text to Prevent Loss
To protect against losing work if an Internet connection loss or software error occurs, you may choose to type in
an offline simple text editor, such as Notepad, and copy and paste your work into Blackboard Learn. Copying
and pasting from fully-featured word processing programs such as Microsoft Word may insert hidden formatting
that can cause display issues. You can add the desired formatting after the text has been pasted into and saved
in Blackboard Learn's text editor.
Alternately, you can select and copy all of the text typed in Blackboard Learn before submitting or saving. Use
the mouse to select the text and then and right-click to copy the text, or press CTRL+A to select all of the text
and then press CTRL+C to copy the text.
Text Editor Features
The Text Editor has three collapsible rows of functions.
The following tables define each function:
Blackboard Learn Release 9.1 - Help for Students - Page 55
© 2012 Blackboard Inc. Proprietary and Confidential. U.S. Patent No. 6,988,138. Additional Patents Pending.
Text Editor > Using the Text Editor
Function
Description
Select a style for the text. The options correspond to standard HTML Style types.
Select the size of the text.
Select the font face for the text.
Make selected text bold.
Make selected text italic.
Underline the selected text.
Display text with a horizontal line through the characters. This font style is not supported by all
browsers.
Display text on the same line, but slightly below the current text.
Display text on the same line, but slightly above the current text.
Align text to the left.
Align text in the center.
Align text to the right.
Begin typing on the left side of the Text box and text typed moves across the screen left to right.
Begin typing on the right side of the Text box and text typed moves across the screen right to
left.
Create an ordered or numbered list or add a numbered list item.
Create an unordered or bulleted list or add a bullet list item.
Move text left.
Move text right.
Function Description
Select the ABC check mark to open Spell Check. To learn more, see Running Spell Check in the Text
Editor.
Cut the selected items.
Copy the selected items.
Paste copied or cut content.
Deletes formatting tags that are shown in the Pathfinder at the bottom of the text box. Select the
formatting tag to delete in the Pathfinder and then click Clear Formatting to delete. This is useful when
copying and pasting text from another application yields discrepancies in formatting.
Select the circular arrow pointing to the left to undo the previous action.
Select the circular arrow pointing to the right to redo the previous action.
Blackboard Learn Release 9.1 - Help for Students - Page 56
© 2012 Blackboard Inc. Proprietary and Confidential. U.S. Patent No. 6,988,138. Additional Patents Pending.
Text Editor > Using the Text Editor
Function Description
Add a hyperlink. Types include: file, ftp, gopher, http, https, mailto, news, telnet, and wais. Please keep in
mind that when creating a hyperlink, the text that appears on the page is separate from the information
about the link. Information about where the link points is stored in a tag that surrounds the text.
Therefore, it is possible to change the link without changing the text that appears to users. Please be
careful when constructing links to ensure that the text is consistent with where users will be taken when
they click the link.
Add a table.
Add a horizontal line.
Add a select color to the selected text.
Click and select a symbol to be used in the text.
Select text, click the Highlight Text icon, and select a color to use to set off the selected text.
Open the WebEQ Equation Editor icon (vx) to add an equation. Equations cannot be added to a cell in a
table. Instead, create the equation outside the table and then cut and paste the equation into the cell. To
learn more, see Using the Math and Science Notation Tool.
Open the MathML Equation Editor icon to add an equation. To learn more, see Using the Math and
Science Notation Tool.
Click the opposing chevrons icon (< >) to view and edit the text in the source code that is generated by
the Text Editor. Click the icon again to restore the standard view.
Preview the content as it will be seen by end users.
Opens a new window that reports on the validation of the source coding. Validation of source code is run
against XHTML 1.0 Strict rules. Not all reported errors will cause pages to malfunction; however, errors
can affect the way a page appears, how style sheets are employed, and accessibility. Poorly formed
HTML will be selected and can be corrected.
The third row will only appear where it is possible to attach a file or link to a file.
Blackboard Learn Release 9.1 - Help for Students - Page 57
© 2012 Blackboard Inc. Proprietary and Confidential. U.S. Patent No. 6,988,138. Additional Patents Pending.
Text Editor > Using the Text Editor
Function Description
Add a file to the text area. The Insert Content Link page will appear. The system supports the following
file types: .doc, .exe, .html, .htm, .pdf, .ppt, .pps, .txt, .wpd, .xls, .zip.
l
Browse My Computer: Select a file from the local machine.
l
Browse Course: If Course Files is the Course's storage repository, select a file from Course
Files.
l
Browse Content Collection: If your school licenses content management, select a file from the
Content Collection.
l
Source URL: Type a URL to create a link to a file outside of the local system.
l
Name of Link to File: Provide a descriptive name of the content is helpful for the user. This
allows the user to read the link in context, rather than simply read the name of the file being
linked to.
l
Alt Text: Provide text to describe what this image is for a visually impaired or blind user using
assistive technology such as screen readers. All image and multimedia files should have alt
text associated with them.
l
Launch in new window: Select whether to open the file in the current window or open a new
browser window to display the file. Depending on your browser settings, some files may also
open in a new tab.
To learn more, see Linking to File Attachments from the Text Editor
Add an image to the text area. The Insert Image page appears. The system supports the following file
types: .gif, .jif, .jpg, jpeg, .png, .tiff, .wmf.
Add MPEG/AVI media content to the text area. The Insert MPEG/AVI File page appears. The system
supports the following file types: .avi, .mpg, .mpeg. To learn more, see Inserting Multimedia Files from the
Text Editor.
Add Apple QuickTime media to the text area. The Insert QuickTime File page appears. The system
supports the following file type: .qt. To learn more, see Inserting Multimedia Files from the Text Editor.
Add an audio file, such as .mp3, .midi or .wav to the text area. The Insert Audio File page appears. The
system supports the following file types: .aiff, .asf, .mp3, .midi, .moov, .mov, .mp, .wav, .wma, .wmv. To
learn more, see Inserting Multimedia Files from the Text Editor.
Add Adobe Flash or Shockwave media to the text area. The Insert Flash/Shockwave File page appears.
The system supports the following file types: .swa, .swf. To learn more, see Inserting Multimedia Files
from the Text Editor.
Add a Flickr Photo, SlideShare Presentation, or YouTube Video. The Search for page appears. The
system supports any files available on YouTube, SlideShare, or Flickr.
Keyboard Shortcuts for the Text Editor
The Text Editor supports the keyboard shortcuts listed in the following table. Mac users should use the
COMMAND key instead of the CTRL key (abbreviated as CMD in the table).
Note: If the shortcut keys that move selected items one character left, right, up, or down are used, the object
being moved will be absolutely positioned. An absolutely positioned element is determined by pixels, so moving
it up once will move it up one pixel.
Keyboard Shortcut
Description
RIGHT ARROW
Move one character to the right.
LEFT ARROW
Move one character to the left.
DOWN ARROW
Move down one line.
Blackboard Learn Release 9.1 - Help for Students - Page 58
© 2012 Blackboard Inc. Proprietary and Confidential. U.S. Patent No. 6,988,138. Additional Patents Pending.
Text Editor > Using the Text Editor
Keyboard Shortcut
Description
UP ARROW
Move up one line.
CTRL+RIGHT ARROW
MAC: CMD+RIGHT ARROW
Move right one word.
CTRL+LEFT ARROW
MAC: CMD+LEFT ARROW
Move left one word.
END
Move to the end of the line.
HOME
Move to the start of the line.
CTRL+DOWN ARROW
MAC: CMD+DOWN ARROW
Move down one paragraph.
CTRL+UP ARROW
MAC: CMD+UP ARROW
Move up one paragraph.
PAGE DOWN
Move down one page.
PAGE UP
Move up one page.
CTRL+HOME
MAC: CMD+HOME
Move to the beginning of the text.
CTRL+END
MAC: CMD+END
Move to the end of the text.
Selection
SHIFT+RIGHT ARROW
Extend the selection one character to the right.
SHIFT+LEFT ARROW
Extend the selection one character to the left.
CTRL+SHIFT+RIGHT
ARROW
MAC: CMD+SHIFT+RIGHT
ARROW
Extend the selection right one word.
CTRL+SHIFT+LEFT ARROW
MAC: CMD+SHIFT+LEFT
ARROW
Extend the selection left one word.
SHIFT+UP ARROW
Extend the selection up one line.
SHIFT+DOWN ARROW
Extend the selection down one line.
SHIFT+END
Extend the selection to the end of the current line.
SHIFT+HOME
Extend the selection to the start of the current line.
SHIFT+PAGE DOWN
Extend the selection down one page.
SHIFT+PAGE UP
Extend the selection up one page.
CTRL+SHIFT+END
Extend the selection to the end of the document.
CTRL+SHIFT+HOME
MAC: CMD+SHIFT+HOME
Extend the selection to the beginning of the document.
CTRL+A MAC: CMD+A
Select all elements in the document.
Editing
BACKSPACE
Delete the selection. Or, if there is no selection, delete the character to the left of the
mouse pointer.
Blackboard Learn Release 9.1 - Help for Students - Page 59
© 2012 Blackboard Inc. Proprietary and Confidential. U.S. Patent No. 6,988,138. Additional Patents Pending.
Text Editor > Inserting Multimedia Files from the Text Editor
Keyboard Shortcut
Description
CTRL+BACKSPACE
MAC: CMD+BACKSPACE
Delete all of a word to the left of the mouse pointer.
CTRL+C MAC: CMD+C
Copy the selection.
CTRL+V MAC: CMD+V
Paste cut contents or copied contents.
CTRL+X MAC: CMD+X
Cut the selection.
DELETE
Delete the selection.
INSERT
Toggle between inserting and overwriting text.
CTRL+Z
MAC: CMD+Z
Undo the most recent formatting command.
CTRL+Y
MAC: CMD+Y
Redo the most recent undone command.
CTRL+F
MAC: CMD+F
Find text.
SHIFT+F10
Display the context menu. This is the same as a right-click.
Formatting
CTRL+B
MAC: CMD+B
Toggle bold formatting.
CTRL+I
MAC: CMD+I
Toggle italic formatting.
CTRL+U
MAC: CMD+U
Toggle underlining.
Inserting Multimedia Files from the Text Editor
When authoring content in the Text Editor, you can insert the following multimedia file types:
l
l
Image
o
MPEG or AVI: MPEG (Moving Picture Expert Groups) files are audio-visual files in a digital
compressed format. AVI (Audio Video Interleave) is Microsoft’s file format for storing audio
and video data.
o
QuickTime: QuickTime is a video and animation system developed by Apple that supports
most formats, including JPG and MPEG. Users with a PC will require a QuickTime driver to
view QuickTime files. Macintosh users do not require this driver.
Audio
o
Flash or Shockwave: Adobe Flash and Shockwave files support audio, animation and
video. They are also browser independent. Browsers require specific plug-ins to run Flash
and Shockwave files.
The following table explains which functions in the File Attachment Toolbar of the Text Editor are used to add
different file types.
Blackboard Learn Release 9.1 - Help for Students - Page 60
© 2012 Blackboard Inc. Proprietary and Confidential. U.S. Patent No. 6,988,138. Additional Patents Pending.
Text Editor > Inserting Multimedia Files from the Text Editor
Function File Attachment Types
.doc, .exe, .html, .htm, .pdf, .ppt, .pps, .rtf, .tiff .txt, .wmf, .wpd, .xls, .zip
.gif, .jif, .jpg, .jpeg, .tiff, .wmf
.asf, .avi, .mpg, .mpeg, .wmv
.qt, moov, .mov
.aiff, .asf, .au, .mpe, .mp3, .ra, .ram, .rm, .wav, .wma,
.swf
The options to control how a multimedia file displays, such as should it loop, should the controls display, will
not be available after the file has been inserted. To edit these options, use the HTML view and edit the options
directly.
Image Fields
The following table details the fields on the Insert Image page.
Field
Description
Select Image
Browse
Click Browse to locate a file.
Specify Source
URL
Enter a URL to create a link to a file outside the local system.
Image Options
Set the Width
Enter the width of the image in pixels.
Set the Height
Enter the height of the image in pixels.
Image Target
URL
Enter a URL to create a link to a file outside of the local system.
Launch in new
window
Choose whether to display the image in a new window.
Border
Choose a border for the image. If None is chosen there will be no border around the image.
Alt Text
Alternate text is displayed if the image does not display and is read by screen readers. It is
important to include for accessibility.
MPEG or AVI Fields
The following table details the fields on the Insert MPEG File page.
Blackboard Learn Release 9.1 - Help for Students - Page 61
© 2012 Blackboard Inc. Proprietary and Confidential. U.S. Patent No. 6,988,138. Additional Patents Pending.
Text Editor > Inserting Multimedia Files from the Text Editor
Field
Description
Insert MPEG File
Browse
Click Browse to locate a file.
Specify Source Enter a URL to create a link to a file outside of the local system.
URL
MPEG File Options
Set the Width
Enter the width of the video in pixels.
Set the Height
Enter the height of the video in pixels.
AutoStart
Select Yes to start playing when the page is opened. Select No to let users start playing manually
after opening the page.
Loop
Choose whether the file repeats continuously.
Controls
Select the size of controls to appear to users. Controls must be available if users are to start the
video manually.
Alt Text
Alternate text is displayed if the image does not display and is read by screen readers. It is
important to include for accessibility.
QuickTime Fields
The following table details the fields on the Insert QuickTime File page.
Field
Description
Insert QuickTime File
Browse
Click Browse to locate a file.
Specify
Source URL
Enter a URL to create a link to a file outside of the local system.
QuickTime File Options
Set the Width
Enter the width of the video.
Set the Height
Enter the height of the video.
AutoStart
Select Yes to start playing when the page is opened. Select No to let users start playing manually
after opening the page.
Loop
Choose whether the file should repeat continuously.
Controls
Select to display controls.
Alt Text
Alternate text is displayed if the image does not display and is read by screen readers. It is
important to include for accessibility.
Audio Fields
The following table details the fields on the Insert Audio File page.
Field
Description
Insert Audio File
Browse
Click Browse to locate a file.
Blackboard Learn Release 9.1 - Help for Students - Page 62
© 2012 Blackboard Inc. Proprietary and Confidential. U.S. Patent No. 6,988,138. Additional Patents Pending.
Text Editor > Linking to File Attachments from the Text Editor
Field
Description
Specify
Source URL
Enter a URL to create a link to a file outside of the local system.
Audio File Options
AutoStart
Select Yes to start playing when the page is opened. Select No to let users start playing manually
after opening the page.
Loop
Choose whether the file repeats continuously.
Controls
Select to display controls.
Alt Text
Alternate text is displayed if the image does not display and is read by screen readers. It is
important to include for accessibility.
Flash or Shockwave Fields
The following table details the fields on the Insert SWF File page.
Field
Description
Insert SWF File
Browse
Click Browse to locate a file.
Specify
Source URL
Enter a URL to create a link to a file outside of the local system.
SWF File Options
Set the
Width
Enter the width of the Flash file.
Set the
Height
Enter the height of the Flash file.
AutoStart
Select Yes to start playing when the page is opened. Select No to let users start playing manually
after opening the page.
Loop Choose whether the file repeats continuously.
Set Quality
Select the quality of the images that will appear to users. Note that the better the quality of an image
the larger the file. Larger files take longer to open.
Alt Text
Alternate text is displayed if the image does not display and is read by screen readers. It is
important to include for accessibility. Linking to File Attachments from the Text Editor
One important feature in Blackboard Learn is the ability to attach files from inside the Text Editor. This enables
both instructors and students to exchange text and other content within a course. Files can be attached from
the local computer or as a URL link.
How to Link File Attachments from the Text Editor
You can include a link to a file attachment by clicking the Attach File function from the Text Editor. You can
select a file from your computer or from Content Collection, or insert a file as a URL link.
Blackboard Learn Release 9.1 - Help for Students - Page 63
© 2012 Blackboard Inc. Proprietary and Confidential. U.S. Patent No. 6,988,138. Additional Patents Pending.
Text Editor > Linking to File Attachments from the Text Editor
The following table details the fields on the Insert Content Link to File page.
Field
Description
Select Content Link
Browse
Click Browse to locate a file.
Specify Source
URL
Enter a URL to create a link to a file outside of the local system. For example:
http://blackboard/images/picture1.jpeg.
Content Link Options
Name of Link to
File
Enter the name of the link that users click to access the attached file.
Alt Text
Enter text that appears when a pointer hovers over the link. Alternate text is important for
accessibility.
Launch in New
Window
Select Yes to have the file open in a new separate window. Select No to have the file open in
the content frame.
Blackboard Learn Release 9.1 - Help for Students - Page 64
© 2012 Blackboard Inc. Proprietary and Confidential. U.S. Patent No. 6,988,138. Additional Patents Pending.
Text Editor > Using the Math and Science Notation Tool
Using the Math and Science Notation Tool
The Math and Science Notation Tool (WebEQ Equation Editor) is a general purpose equation editor. It
enables you to use mathematical and scientific notation. You can add equations, edit existing equations, and
move equations within the Equation Editor.
The Java 2 Run Time Environment is required to use the Math and Science Notation Tool.
For best performance on a Windows® operating system, use Internet Explorer 6.0 or later.
For best performance on a Macintosh®:
l
Mac OS X v 10.2 or later
l
Install the MRJ Plug-in from http://homepage.mac.com/pcbeard/MRJPlugin/.
You may receive a pop-up box when launching WebEQ that asks you to trust an applet provided by Design
Science, the maker of WebEQ. If you click Always, the pop-up will no longer appear on that computer when
launching WebEQ.
MathML Equation Editor
The MathML Equation Editor functions in the same way at the Math and Science Notation Tool. Instead of
opening with the symbol buttons, a blank text box will appear where users can enter XML.
Blackboard Learn Release 9.1 - Help for Students - Page 65
© 2012 Blackboard Inc. Proprietary and Confidential. U.S. Patent No. 6,988,138. Additional Patents Pending.
Text Editor > Using the Math and Science Notation Tool
Accessing the Equation Editor
You can access the WebEQ Equation Editor by clicking the Math and Science Notation Tool icon.
To insert XML, you can click the MathML Equation Editor icon.
Tip: If an equation is more than one line or uses a large font size, the equation may be cut off when it appears
on the page. Add an empty line after the final line in the equation to prevent this error.
Creating and Editing Equations
After an equation has been created it is copied and used again or copied and edited using the WebEQ Equation
Editor features.
The table below describes the functions available in the Math and Science Notation Tool.
To . . .
Then . . .
create a name for the
equation
enter a name in the Equation Name field. To accept the default name do not make any
changes.
create an equation
use the equation symbols available on the keyboard or in the toolbar to create equations.
edit an existing
equation
select the equation from the Edit Equation drop-down list. The equation will appear in the
editor. Click Edit to save the changes.
submit the equation
and its name
click Add.
Tip: If an equation is more than one line or uses a large font size, the equation may be cut off when it appears
in a course. Add an empty line after the final line in the equation to prevent this error.
Blackboard Learn Release 9.1 - Help for Students - Page 66
© 2012 Blackboard Inc. Proprietary and Confidential. U.S. Patent No. 6,988,138. Additional Patents Pending.
Text Editor > Running Spell Check in the Text Editor
Running Spell Check in the Text Editor
The Spell Check function supports a full English dictionary, a supplemental word list configured by the
Blackboard administrator at your school, and custom word lists that are stored on your local machine. The
Spell Check function is available wherever you can enter blocks of text. It is also available as a module if your
school licenses community engagement.
When Spell Check is launched it will review the text block and sequentially bring up any words it does not
recognize for review.
Word Lists
Misspelled words are determined by the following three sources:
l
Spell Check Dictionary: A full English dictionary that includes words that will not be flagged for
correction. The dictionary is also the only source for suggestions. This dictionary cannot be edited.
l
Supplemental Word List: A list of additional terms added by the Blackboard administrator at your
school that do not appear in the default dictionary.
Blackboard Learn Release 9.1 - Help for Students - Page 67
© 2012 Blackboard Inc. Proprietary and Confidential. U.S. Patent No. 6,988,138. Additional Patents Pending.
Text Editor > Running Spell Check in the Text Editor
l
Personal Word List: This word list is stored on each user’s local machine. Words are added to this
list using the Learn function. The words in the personal word list are not flagged for correction. These
words are not included as suggestions for misspelled words. Extensive personal word lists may slow
performance of the Spell Check tool.
Personal Word List and Cookie
The personal word list is stored as a small file known as a "cookie" on your local computer. Cookies are
commonly used by web browser applications to store information that needs to be saved between browser
sessions and computer reboots.
This cookie is not user or installation specific. Therefore, your personal word list will be available to you
whenever you are using Spell Check as long as you are on the same computer.
Also, if someone else logs onto the same computer, they will use the same personal word list. For example, if
one person creates a personal word list on a computer in the computer lab, this word list will be available to
everyone who uses this same computer in the lab.
Note: The only way to transfer a personal word list to another computer is to copy the associated cookie file.
For school-owned computers, this usually is not possible or permitted.
Using Spell Check
When Spell Check is launched, it reviews the text block and sequentially brings up any words it does not
recognize for review.
The following table details the functions available.
Function
Description
Action
Replace the
occurrence of a word
with a correction or
suggestion
Enter a correction in the Replace With field or select a suggestion from the
list. Click Replace to change the word in the text to the word in the
Replace With field. If the misspelled word appears later in the text block it
will be flagged again for correction.
Replace every
occurrence of a word
in the text with a
correction or
suggestion
Enter a correction in the Replace With field or select a suggestion from the
list. Click Replace All to change every occurrence of the word in the text
with the word in the Replace With field.
Ignore the word and
not make a correction
Click Ignore. The word will not be changed. If the word appears again in
the text block it will be flagged for correction.
Ignore every
occurrence of the
word in the text block
Click Ignore All. The word will not be changed and Spell Check will not
flag it for correction again in the text.
Teach Spell Check to Click Learn. The word will be added to the personal word list. Whenever
recognize the word as Spell Check is run on this computer, the word will be recognized as valid
correct
and not flagged.
Close the spell check
without finishing
Click Finish.
Recognized Errors
Spell Check can recognize the following circumstances:
Blackboard Learn Release 9.1 - Help for Students - Page 68
© 2012 Blackboard Inc. Proprietary and Confidential. U.S. Patent No. 6,988,138. Additional Patents Pending.
Text Editor > Using the Content Editor
l
Double words are recognized as errors.
l
Irregular capitalization is not recognized as an error.
l
Initial capitalization at the beginning of sentences is not checked.
l
Words in ALL CAPS are checked for spelling errors.
l
Words that contain numbers are recognized as errors.
l
A word that appears in the supplemental or personal word list must be entered as a correction during a
spell check (these words do not appear as suggestions). The Spell Check tool must be run again to
verify that the word is spelled correctly.
Using the Content Editor
The editor that you see depends on your school. Most schools use the Blackboard Learn Text Editor. Your
screen reader will announce the Text Editor. To learn more, see The Text Editor.
If your school has signed up for a limited field trial, the Content Editor will appear. Your screen reader will
announce the Content Editor. To learn more, continue reading this topic.
The Content Editor
The Content Editor presents controls for adding and formatting text, equations, tables, and multimedia files.
The Content Editor has two view modes: simple mode and advanced mode, which are selected by using the
Show More ( ) or Show Less ( ) button in the upper right corner of the top Content Editor action bar.
The simple mode, described in Simple Content Editor Features, contains a minimal set of the most used text
formatting functions. The advanced mode, described in Advanced Content Editor Features, includes every
available formatting and object attachment function.
Buttons for functions not currently available will be grayed out. For example, the buttons to apply or remove a
hyperlink are available only when text or an object has been selected. Buttons for certain functions which can
be turned on or off, such as the Spell Check function, are highlighted when selected and active
Content Editor Availability
Note: The Blackboard administrator at your school and your instructor control the Content Editor's features
and availability.
If you are having difficulty accessing the content editor, contact your school's computing help desk for
assistance.
Blackboard Learn Release 9.1 - Help for Students - Page 69
© 2012 Blackboard Inc. Proprietary and Confidential. U.S. Patent No. 6,988,138. Additional Patents Pending.
Text Editor > Using the Content Editor
If your school is not participating in the field trial, see Using the Text Editor.
Copying and Pasting Text to Prevent Loss
To protect against losing work if an Internet connection loss or software error occurs, you may choose to type in
an offline simple text editor, such as Notepad, and copy and paste your work into Blackboard Learn.
Alternately, you can select and copy all of the text typed in Blackboard Learn before submitting or saving. Use
the mouse to select the text and then and right-click to copy the text, or press CTRL+A to select all of the text
and then press CTRL+C to copy the text. If you are using a Mac, use the COMMAND key instead of CTRL.
Adding and Editing Content
By default, Blackboard Learn formats text to 12-point, left-justified Arial. Any other formatting must be done
using the Content Editor's functions. With the cursor positioned in the content entry pane, there are four
methods for adding, formatting, and editing text and objects:
l
Using the Content Editor function buttons. See Simple Content Editor Features and Advanced
Content Editor Features.
l
Using the right-click contextual menu. See Using the Right-Click Contextual Menu.
l
Using keyboard shortcuts. See Keyboard Shortcuts for the Content Editor.
l
Editing the HTML code directly. See HTML Code View.
Simple Content Editor Features
The Content Editor's simple mode has a single row of functions.
The following table defines each function:
Function
Description
Make selected text bold.
Make selected text italic.
Underline the selected text.
Select the font face for the text. Click the down arrow next to the displayed current font to select
from a list of all available fonts.
Select the size of the text. Click the down arrow next to the displayed current font size to select
from a list of all available font sizes.
Set the text color. Click the down arrow next to the text color button to select a different text color.
Create an unordered or bulleted list or add a bullet list item. For more information, see Working
with Lists.
Blackboard Learn Release 9.1 - Help for Students - Page 70
© 2012 Blackboard Inc. Proprietary and Confidential. U.S. Patent No. 6,988,138. Additional Patents Pending.
Text Editor > Using the Content Editor
Function
Description
Create an ordered or numbered list or add a numbered list item. For more information, see
Working with Lists.
Begin the automatic Spell Check. Click the down arrow next to the Spell Check button to select
a different language. For more information, see Using Spell Check.
Add a new or edit an existing hyperlink. For more information, see How to Use Links
Remove a hyperlink from the selected text or object.
Open the Context Editor help information pop-up display.
Expand the Content Editor window to fill the entire browser frame.
Switch to the advanced formatting and content entry button set.
Advanced Content Editor Features
The Content Editor expanded to show its advanced features has four rows of functions.
The following tables describe each function:
Row 1 Function
Description
Make selected text bold.
Make selected text italic.
Underline the selected text.
Display text with a horizontal line through the letters (strikethrough).
Select a paragraph style for the text. Click the down arrow next to the displayed current style to
select from a list of all available styles
Select the font face for the text. Click the down arrow next to the displayed current font to select
from a list of all available fonts.
Select the size of the text. Click the down arrow next to the displayed current font size to select
from a list of all available font sizes.
Blackboard Learn Release 9.1 - Help for Students - Page 71
© 2012 Blackboard Inc. Proprietary and Confidential. U.S. Patent No. 6,988,138. Additional Patents Pending.
Text Editor > Using the Content Editor
Row 1 Function
Description
Set the text color. Click the down arrow next to the text color button to select a different text color.
Set the text highlight (background) color. Click the down arrow next to the highlight button to
select a different highlight color.
Open the Context Editor help information pop-up display.
Expand the Content Editor window to fill the entire browser frame.
Switch to the simple formatting and content entry button set.
Row 2
Function Description
Cut the selected items.
Copy the selected items.
Paste the most recently copied or cut items.
Undo the previous action.
Redo the previous action (available only if an action has been undone).
Create an unordered or bulleted list or add a bullet list item. For more information, see Working with
Lists.
Create an ordered or numbered list or add a numbered list item. For more information, see Working with
Lists..
Align text to the left margin.
Align text in the center.
Align text to the right.
Align text to both the left and right margins.
Move the text or object to the right (indent). Click again to indent further.
Move the text or object to the left (outdent). Click again to outdent further. It is not possible to go beyond
the left margin.
Make the text into a superscript.
Make the text into a subscript.
Enter text to the right of the current cursor location (default).
Enter text to the left of the current cursor location.
Begin the automatic Spell Check. Click the down arrow next to the Spell Check button to select a
different language. For more information, see Using Spell Check
Clear all formatting, leaving only the plain text.
Blackboard Learn Release 9.1 - Help for Students - Page 72
© 2012 Blackboard Inc. Proprietary and Confidential. U.S. Patent No. 6,988,138. Additional Patents Pending.
Text Editor > Using the Content Editor
Row 3
Function Description
Search for and replace text. For more details, see Using Find and Replace.
Add a new or edit an existing hyperlink. For more information, see How to Use Links
Remove a hyperlink from the selected text or object.
Add a thin horizontal line to the current cursor position, spanning the entire width of the text area.
Add a thin centered line, setting width, height relative to the current position, and whether to use
shadows. For more information, see Inserting Lines and Horizontal Rules.
Click to show all non-printing characters. Click again to hide them from view.
Format the text as a block quote.
Open the Select Symbol pop-up. Select the symbol to insert at the current cursor position.
Open the Insert Emoticon pop-up. Select the emoticon to insert at the current cursor position.
Add a file to the text area. The Insert Content Link pop-up appears. The following file types are
supported: .doc, .exe, .html, .htm, .pdf, .ppt, .pps, .txt, .wpd, .xls, .zip. You can add a file from your
computer, from the Content Collection, or from a URL.
Add an image to the text area, or edit an existing selected image. The Insert/Edit Image pop-up appears.
Most of the common image types are supported, including .gif, .jpg, .bmp, .png, .tif. You can add images
from your computer, from the Content Collection, or from a URL. For more information, see Adding
Images.
Add a media clip to the text area, or edit an existing selected media object. The Insert/Edit Media pop-up
appears. Type: From the dropdown, select the type of media you want to add. The supported types
include Flash (default), HTML 5 video, Quicktime, Shockwave, Windows Media, and Real Media. You
can add media files from your computer, from the Content Collection, or from a URL. For more
information, see Adding Media Files.
Add a Mashup object to the text area. Click to display a drop-down list to pick from one of the supported
Mashup object types: Flickr photo, Slideshare presentation, YouTube video, NBC content. A pop-up to
search for the object appears. For more information, see Adding Mashup Objects.
Open the visual math equation editor page, the WIRIS Formula Editor. For more information, see Using
the Math Editor.
Opens a preview window to enable you to see how the content will appear once published.
Row 4
Function Description
Click to open the Create/Modify Table pop-up display. For more information about tables, see Working
with Tables.
Click to open the Table Row Properties pop-up display.
Click to open the Table Cell Properties pop-up display.
Insert a blank row in the table above the current cursor position.
Insert a blank row in the table after the current cursor position.
Delete the current column from the table. If multiple columns are selected, all of them are deleted.
Insert a blank column in the table to the left of the current cursor position.
Blackboard Learn Release 9.1 - Help for Students - Page 73
© 2012 Blackboard Inc. Proprietary and Confidential. U.S. Patent No. 6,988,138. Additional Patents Pending.
Text Editor > Using the Content Editor
Row 4
Function Description
Insert a blank column in the table to the right of the current cursor position.
Delete the current column from the table. If multiple columns are selected, all of them are deleted.
Merge two or more selected table cells into a single cell.
Split previously merged table cells. If the cell or cells are not ones that were merged, nothing happens.
Click to open the HTML Code View pop-up display. From there, you can edit the content HTML code
directly. This feature is intended only for experienced web developers. For more information, see HTML
Code View
Position the cursor where you want the anchor to appear, and click to open the Insert/Edit Anchor popup. Anchors are used to position (anchor) other items and objects, such as images. For more
information, see Using Anchors.
Insert a non-breaking space at the current cursor position.
Edit the Cascading Style Sheet (CSS). This feature is intended only for experienced web developers. For
more information, see Advanced Image Settings.
Working with Lists
l
Ordered/Numbered Lists: Creates an ordered or numbered list, or add a numbered list item. Click
the down arrow next to the numbered list button (
) to select between the available list ordering
schemes. Choices include alphabetic, Roman numerals, and Greek symbols.
l
Bullet Lists: Creates an unordered or bullet list, or add a bullet list item. Click the down arrow next to
the bullet list button (
) to select between the available bullet list symbols.
Using Spell Check
The Spell Check button (
) turns the automatic spell check function on or off. Words detected as potentially
misspelled or not found in the spell check dictionary will be indicated throughout the text with wavy red
underlining. If you resume typing text, the spell check function switches off.
Click an underlined word to see a list of suggested corrections, to ignore the single instance, or to ignore all
occurrences of the indicated word.
Blackboard Learn Release 9.1 - Help for Students - Page 74
© 2012 Blackboard Inc. Proprietary and Confidential. U.S. Patent No. 6,988,138. Additional Patents Pending.
Text Editor > Using the Content Editor
Click the down arrow next to the Spell Check button to select a different spell check language dictionary.
Note: The Blackboard administrator at your school determines which spelling dictionaries are available.
Using Find and Replace
Click the Find/Replace button (
Find/Replace pop-up displays.
) to search for matching text, and optionally replace it with other text. The
Finding Text
To search for text, on the Find/Replace pop-up, select the Find/Replace tab and enter the text to find.
The radio buttons choose whether to search up or down from the current cursor position. Select the Match case
option to match upper and lower case, or clear it to ignore case in matching the search text.
Click Find next to locate the next match, or Cancel to close the window.
You can also click the Replace tab to switch to the Replace text function.
Replacing Text
To search for and replace text, on the Find/Replace pop-up, select the Replace tab and enter the text to find
and the text to replace it.
The radio buttons choose whether to search up or down from the current cursor position. Select the Match case
option to match upper and lower case, or clear it to ignore case in matching the search text.
Blackboard Learn Release 9.1 - Help for Students - Page 75
© 2012 Blackboard Inc. Proprietary and Confidential. U.S. Patent No. 6,988,138. Additional Patents Pending.
Text Editor > Using the Content Editor
l
Replace: Replace the next instance found.
l
Replace All: Replace every matched instance.
l
Find Next: Find the next match and highlight it, but do not change the text.
You can also click the Find/Replace tab to switch to the search-only function.
How to Use Links
Select text or an object and click the Link button ( ) to add a new or edit an existing hyperlink. To remove a
link, select the link and click the Remove Link button ( ). You can also link and unlink by using the right-click
contextual menu.
Note: The Link and Remove Link buttons are grayed out and unavailable unless text or an object has been
selected. Clicking Remove Link for something that has no hyperlink does nothing and is ignored.
On the Insert/Edit Link pop-up there are a number of controls and settings not only to define where the link
goes, but how it is handled when clicked.
Link General Settings
On the General tab, you can specify a link to a website, a file from your computer, or an item in the course files.
Blackboard Learn Release 9.1 - Help for Students - Page 76
© 2012 Blackboard Inc. Proprietary and Confidential. U.S. Patent No. 6,988,138. Additional Patents Pending.
Text Editor > Using the Content Editor
The Target drop-down enables you to select where to open the link:
l
Open in this window/frame
l
Open in a new window
l
Open in parent window/frame
l
Open in top frame, replacing all current frames
Type an optional Title for the window or frame displayed when the link is clicked. Optionally, select a link
Class, if alternate choices are available, otherwise the drop-down has only Not-Set.
Link Popup Settings
On the Popup tab, you can specify a Javascript URL to open a browser popup window when clicked.
Blackboard Learn Release 9.1 - Help for Students - Page 77
© 2012 Blackboard Inc. Proprietary and Confidential. U.S. Patent No. 6,988,138. Additional Patents Pending.
Text Editor > Using the Content Editor
l
Javascript popup: This box must be selected to enter the specifications for a Javascript-enabled
pop-up window.
l
Popup URL: Enter the link (URL) to the target.
l
Window name: Optionally enter the name to be displayed as the title of the popup window, otherwise
the title is left blank.
l
Size: Enter the size in horizontal and vertical pixels for the popup. If no values are entered, the target
default will be used.
l
Position (X/Y): Enter the position on the screen to display the popup. The value “c/c” will center the
popup. If left blank, the computer's operating system will decide where to put the popup relative to
other open windows on the screen. Because screen resolutions can vary, do not use this setting
unless there is a compelling reason to do so.
l
Options:
o
Show location bar: Include a URL address bar. Only enable this if you want students to be
free to navigate away from the current course content.
o
Show menu bar: Include a standard browser menu bar. This should be enabled only if
browser functions such as save, print, and so on are actually needed.
o
Show toolbars: Include browser toolbars. This should also only be enabled if actually
needed.
o
Show status bar: Show the browser status bar. The main reason not to include this is to
reduce clutter and screen space requirements for the popup.
o
Show scrollbars: Include vertical and/or horizontal scrollbars in the popup. Select this
option if the target content will not fit in the default or specified popup window size.
o
Make window resizable: Allow the student to resize the popup.
Blackboard Learn Release 9.1 - Help for Students - Page 78
© 2012 Blackboard Inc. Proprietary and Confidential. U.S. Patent No. 6,988,138. Additional Patents Pending.
Text Editor > Using the Content Editor
o
Dependent: Restricts the popup only to function with the current browser type (Internet
Explorer, Firefox, Safari, and so on). This setting should not be enabled unless the content
is not compatible with alternative browsers.
o
Insert ‘return false’: Prevents any further actions or events from taking place in the popup
window. Usually this setting is not needed, except in certain legacy compatibility
situations.
Link Events Settings
On the Events tab, you can specify links to be followed or files to be run when certain conditions occur, such as
key presses, mouse clicks, or window focus is changed.
Note: This capability is not usually needed, and is intended only for experienced web developers.
Advanced Tab
The Advanced tab allows you to set a number of advanced properties for the link, including ID, style, classes,
language codes, and much more.
Blackboard Learn Release 9.1 - Help for Students - Page 79
© 2012 Blackboard Inc. Proprietary and Confidential. U.S. Patent No. 6,988,138. Additional Patents Pending.
Text Editor > Using the Content Editor
Note: In general, you will not need to set or modify any of the advanced settings, and are intended only for
experienced web developers.
Inserting Lines and Horizontal Rules
Line: Click the Line button (
width of the text area
) to add a thin horizontal line to the current cursor position, spanning the entire
Horizontal Rule: Click the Horizontal Rule button (
) to add a thin centered line. You can set:
l
Width in pixels or as a percentage of the total available width of the text area
l
Height of the line relative to the current position
l
Whether to have the line shadowed or not (default is with shadow)
Use the Width drop-down list to select between pixels or percentage. Use the Height drop-down list to select
between Normal, or a height increment from 1 to 5. Click Insert to add the line or Cancel to abort.
Blackboard Learn Release 9.1 - Help for Students - Page 80
© 2012 Blackboard Inc. Proprietary and Confidential. U.S. Patent No. 6,988,138. Additional Patents Pending.
Text Editor > Using the Content Editor
Adding Images
Click the Insert Image button ( ) to add an image to the text area, or edit an existing selected image. Another
way to add an image is to use the right-click contextual menu. You can also select an existing image in the text,
right-click it, and select Image from the contextual menu to edit its properties. The Insert/Edit Image pop-up
appears.
Most of the common image types are supported, including .gif, .jpg, .bmp, .png, .tif, and many others.
Note: Use the more compact, compressed file formats whenever possible, such as .jpg, .png, or .gif, to
reduce the time required to download the embedded image.
General Image Settings
On the General tab, once a specific image has been selected, a view of it is displayed in the Preview pane.
l
Browse My Computer: Click to select an image file from the local machine.
l
Browse Content Collection: If your school licenses content management, click to select a file from
the Content Collection.
l
Image URL: Enter a URL to create a link to a file outside of the local system.
Image description: Type a description for the image (optional, but recommended for accessibility readers).
Title: Type a title for the image (optional).
Appearance Settings
The Appearance tab allows control over image placement and appearance. A sample thumbnail display on the
right side of the pane shows how the various choices will appear.
l
Alignment: Controls the placement of the image relative to the nearby text. Choices include
baseline, top, middle, bottom, text top, text bottom, left, and right.
Blackboard Learn Release 9.1 - Help for Students - Page 81
© 2012 Blackboard Inc. Proprietary and Confidential. U.S. Patent No. 6,988,138. Additional Patents Pending.
Text Editor > Using the Content Editor
l
Dimensions: The size the image is to be displayed, in pixels. If not set, the actual image size is
used. If the constrain proportions box is checked, the image will be resized without horizontal or
vertical distortion.
l
Vertical space: The margin (in pixels) to be reserved above and below the image.
l
Horizontal space: The margin (in pixels) to be reserved to either side of the image.
l
Border: Draws a border around the image, with line weight specified as pixels.
l
Style: Whenever any of the appearance settings are changed, this line shows the HTML code that
will be used to format the image. You can also enter, alter, or fine-tune the code directly if necessary.
Advanced Image Settings
Advanced image settings allow you to specify an alternative image based on mouse activity, and to set
additional identification, language, and link parameters. Normally, there is no need to set or change these
settings.
Adding Media Files
Click the Insert Media button ( ) to add a media clip to the text area, or edit an existing selected media item.
You can also select an existing media object in the text, right-click it, and select Edit Media from the
contextual menu to edit its properties. The Insert/Edit Media pop-up appears.
Blackboard Learn Release 9.1 - Help for Students - Page 82
© 2012 Blackboard Inc. Proprietary and Confidential. U.S. Patent No. 6,988,138. Additional Patents Pending.
Text Editor > Using the Content Editor
General Media Settings
Type: From the drop-down list, select the type of media you want to add. The supported types include:
l
Flash (default)
l
HTML 5 video
l
Quicktime
l
Shockwave
l
Windows Media
l
Real Media
After setting the media type:
l
File/URL: Type a URL to create a link to a media file outside of the local system.
l
Browse My Computer: Click to select a media file from the local machine.
l
Browse Content Collection: If your school licenses content management, click to select a media
file from the Content Collection.
l
Dimensions: Specify the dimensions, in pixels, for the media to be displayed. If left blank, the
media’s actual size will be used. Constrain proportions prevents the media from being distorted
vertically or horizontally if resized.
Once a specific image has been selected, a view of it is displayed in the Preview pane.
Blackboard Learn Release 9.1 - Help for Students - Page 83
© 2012 Blackboard Inc. Proprietary and Confidential. U.S. Patent No. 6,988,138. Additional Patents Pending.
Text Editor > Using the Content Editor
Advanced Media Settings
On the Advanced tab, you can set advanced display parameters, as well as a number of options specific to
Flash media only.
Advanced:
l
Id: Set an identification code for the media.
l
Name: Type a name for the media.
l
Align: Set whether the media is to be aligned top, right, bottom, or left.
l
Background: Set a background color for the media.
l
V-Space and H-Space: Set vertical and horizontal margins for space around the embedded media.
Flash options:
l
Quality: Set the playback quality for the Flash media. Choices include high, low, autohigh,
autolow, and best.
l
Scale: Selects a resizing option for Flash media. Choices include showall, noborder, exactfit, and
noscale.
l
WMode: Sets a display mode for the media. Choices are window, opaque, and transparent.
Blackboard Learn Release 9.1 - Help for Students - Page 84
© 2012 Blackboard Inc. Proprietary and Confidential. U.S. Patent No. 6,988,138. Additional Patents Pending.
Text Editor > Using the Content Editor
l
SAlign: Sets the position alignment for the media within the Flash media player. Choices are Left,
Top, Right, Bottom, Top Left, Top Right, Bottom Left, and Bottom Right.
l
Auto play: Select to have the Flash media play automatically upon being selected.
l
Loop: Set the media to loop (replay) after reaching the end.
l
Show menu: Show the Flash media player menu.
l
SWLiveConnect: This parameter is used only in older Flash media, and when selected allows the
player and browser to exchange information.This parameter is not typically necessary.
l
Base and Flashvars: Manually configure the Flash options. These features are intended only for
advanced web developers needing a high degree of control and customization over the Flash player
appearance and behavior.
Media Source Settings
The Source tab enables you to enter custom media HTML code directly, and is intended only for advanced web
developers.
Adding Mashup Objects
Click the Insert Mashup button (
object types:
l
Flickr Photo
l
SlideShare Presentation
l
YouTube Video
l
NBC Content
) to display a drop-down list to pick from one of the supported Mashup
A pop-up displays, from which you can search for the selected Mashup type. To learn more about how students
can use Mashups, see Mashups.
Note: Availability of specific Mashup objects and types is determined by your school's Blackboard
administrator.
Once an item has been selected, you can set viewing and presentation options.
Click Preview to see how the Mashup object will appear. Click Back to go back and select a different item.
When you are satisfied with the selection and options, click Submit to continue, or Cancel to abort adding the
Mashup.
Using the Math Editor
Click the Open Math Editor button ( ) to open the math equation editor pop-up, the WIRIS Formula Editor.
This is a powerful mathematics editor which can enable you to compose formulas using a simple visual editing
tool, and then embed these equations in the content as high-quality .png images. The tabs along the top of the
page select between different elements:
l
General
l
Operators
l
Symbols
l
Big operations
l
Matrix mathematics
l
Arrows
Blackboard Learn Release 9.1 - Help for Students - Page 85
© 2012 Blackboard Inc. Proprietary and Confidential. U.S. Patent No. 6,988,138. Additional Patents Pending.
Text Editor > Using the Content Editor
l
Greek symbols
l
Superscript, subscript, and accents
l
Other miscellaneous math elements
l
Functions
For additional information and help, click the Manual link on the equation editor page. This will take you to the
WIRIS website user manual.
Note: Javascript must be enabled for the math editor to function.
Working with Tables
Click the Create Table button ( ) to open the Create/Modify Table pop-up display. You can use the Create
Table command from the contextual right-click menu.
On the General tab, you can set the general properties for the table. Note that even after being created, the
table can be modified directly using the table functions and commands. It is also possible to resize the table by
clicking and dragging the table border anchors.
Note: Most of the table function buttons are unavailable (grayed out) unless the cursor is positioned inside an
existing table.
Blackboard Learn Release 9.1 - Help for Students - Page 86
© 2012 Blackboard Inc. Proprietary and Confidential. U.S. Patent No. 6,988,138. Additional Patents Pending.
Text Editor > Using the Content Editor
Table General Properties include:
l
Columns: Type the initial number of columns for the table.
l
Rows: Type the initial number of rows for the table.
l
Cell Padding: Type the padding, in number of pixels, for the individual table cells.
l
Cell Spacing: Type the spacing, in number of pixels, to separate the table cells.
l
Alignment: Select the table alignment: Center, Left, or Right. If not set, the current paragraph
alignment is used.
l
Border: Creates a simple black line border around the table. Type a number in pixels to determine the
width of the table border.
l
Width: Sets the width of the table, in either pixels or percentage of the available display width. If left
blank, the table is automatically sized as needed to fit the content.
l
Height: Sets the height of the table, in either pixels or percentage of the available display height. If
left blank, the table is automatically sized as needed to fit the content.
l
Class: If selected, enables you to set the HTML class for the table. If your setup does not use
classes, there is no need to use this setting
l
Table Caption: If enabled, the table is created with a caption cell at the top.
The Advanced table creation tab enables you to set additional properties for the table.
Blackboard Learn Release 9.1 - Help for Students - Page 87
© 2012 Blackboard Inc. Proprietary and Confidential. U.S. Patent No. 6,988,138. Additional Patents Pending.
Text Editor > Using the Content Editor
l
Id: Type a table description or identifier.
l
Summary: Type a description for the table.
l
Style: Allows HTML code overrides for the placement, size, appearance, and border.
l
Language code: Assign a language code to the table (this is used in translations).
l
Background image: Use a graphic image to appear as a background for the table. You can type a
URL to create a link to an image file outside of the local system.
o
Browse My Computer: Click to select an image file from the local machine.
o
Browse Content Collection: If your school licenses content management, click to select
an image file from the Content Collection.
l
Frame: Sets the table frame parameter. Choices in the drop-down list include void, above, below,
hsides, lhs, rhs, vsides, box, or border.
l
Rules: Sets rules for the table content. Choices in the drop-down list include none, groups, rows,
cols, or all.
l
Language direction: Set whether text entered in the table goes from right to left, or left to right from
the cursor position.
l
Border color: Set the color for the table border.
l
Background color: Set the background color for the table.
Setting Row and Cell Properties
Row properties settings affect an entire table row or any number of selected table rows, while cell properties
affect the current table cell or any number of selected cells.
Blackboard Learn Release 9.1 - Help for Students - Page 88
© 2012 Blackboard Inc. Proprietary and Confidential. U.S. Patent No. 6,988,138. Additional Patents Pending.
Text Editor > Using the Content Editor
Click the Row Properties button ( ) to open the Table row properties pop-up. From there you can set
formatting parameters to control how the contents of a given table row (or selected rows) will appear.
From the table row properties General tab you can set:
l
Row in table part: Whether the row is intended to be Table Body, Table Head (heading or label), or
Table Foot (bottom of table).
l
Alignment: Set the row’s cell contents to left, center, or right alignment.
l
Vertical alignment: Set the row’s cell contents to top, center, or bottom alignment.
l
Class: Set the row content HTML class. This value is not needed if classes are not used.
l
Height: Manually set the height of the row. Otherwise, the row expands or contracts as needed to fit
the contents.
A drop-down list at the bottom of the Table row properties display allows you to select between:
l
Update the current row or selected rows only (default).
l
Update odd rows in the table.
l
Update even rows in the table.
l
Update all rows in the table.
The Advanced tab enables you to set additional row properties.
Blackboard Learn Release 9.1 - Help for Students - Page 89
© 2012 Blackboard Inc. Proprietary and Confidential. U.S. Patent No. 6,988,138. Additional Patents Pending.
Text Editor > Using the Content Editor
l
Id: Type a row description or identifier.
l
Style: Allows HTML code overrides for the placement, size, appearance, and border.
l
Language direction: Set whether text entered in the row goes from right to left, or left to right from
the cursor position.
l
Language code: Assign a language code to the row (this is used in translations).
l
Background image: Use a graphic image to appear as a background for the row. You can type a
URL to create a link to an image file outside of the local system.
o
Browse My Computer: Click to select an image file from the local machine.
o
Browse Content Collection: If your school licenses content management, click to select
an image file from the Content Collection.
l
Border color: Set the color for the row border.
l
Background color: Set the background color for the row.
Click the Cell Properties button ( ) to open the Table cell properties pop-up. From there you can set
formatting parameters to control how the contents of a given table cell (or selected cells) will appear.
Blackboard Learn Release 9.1 - Help for Students - Page 90
© 2012 Blackboard Inc. Proprietary and Confidential. U.S. Patent No. 6,988,138. Additional Patents Pending.
Text Editor > Using the Content Editor
From the table cell properties General tab you can set:
l
Alignment: Set the row’s cell contents to left, center, or right alignment.
l
Cell type: Set the cell content type to either Data or Header.
l
Vertical alignment: Set the cell contents to top, center, or bottom alignment.
l
Scope: Expands the modification selection beyond an individual cell and applies the changes to a
Column, Row, Column Group, or Row Group.
l
Width: Manually set the width of the cell.
l
Height: Manually set the height of the cell.
l
Class: Set the row content HTML class. This value is not needed if classes are not used.
A drop-down list at the bottom of the Table cell properties display allows you to select between:
l
Update the current cell or selected cells only (default).
l
Update all cells in the row.
l
Update all cells in the table.
The Advanced tab enables you to set additional cell properties.
Blackboard Learn Release 9.1 - Help for Students - Page 91
© 2012 Blackboard Inc. Proprietary and Confidential. U.S. Patent No. 6,988,138. Additional Patents Pending.
Text Editor > Using the Content Editor
l
Id: Type a cell description or identifier.
l
Style: Allows HTML code overrides for the placement, size, appearance, and border.
l
Language direction: Set whether text entered in the cell goes from right to left, or left to right from
the cursor position.
l
Language code: Assign a language code to the cell (this is used in translations).
l
Background image: Use a graphic image to appear as a background for the cell. You can type a
URL to create a link to an image file outside of the local system.
o
Browse My Computer: Click to select an image file from the local machine.
o
Browse Content Collection: If your school licenses content management, click to select
an image file from the Content Collection.
l
Border color: Set the color for the cell border.
l
Background color: Set the background color for the cell.
Blackboard Learn Release 9.1 - Help for Students - Page 92
© 2012 Blackboard Inc. Proprietary and Confidential. U.S. Patent No. 6,988,138. Additional Patents Pending.
Text Editor > Using the Content Editor
Editing Tables
Table Editing
Button
Description
Click to open the Create/Modify Table pop-up. If clicked inside a table, a new table is created
inside the first one.
Click to open the Table Row Properties pop-up.
Click to open the Table Cell Properties pop-up.
Insert a blank row above the current cursor position.
Insert a blank row after the current cursor position.
Delete the current column from the table. If multiple columns are selected, all of them are
deleted.
Insert a blank column to the left of (before) the current cursor position.
Insert a blank column to the right of (after) the current cursor position.
Delete the current column from the table. If multiple columns are selected, all of them are
deleted.
Merge two or more selected cells into a single table cell.
Split previously merged table cells. If the cell or cells are not ones that were merged, nothing
happens.
To resize a table, in addition to using table, row, or cell properties, another way to do this is to click and drag one
of the table border anchors. These are positioned at each of the table corners (to make the entire table larger or
smaller) and in the middle of each side—left, right, top, and bottom (to resize the table horizontally or vertically
only).
You can also right-click anywhere inside an existing table to see a contextual table editing menu, duplicating
many of the functions provided by the Content Editor buttons. These include:
l
Create Table: Open the Create/Modify Table pop-up. If clicked inside a table, a new table is
created inside the first one.
l
Table Properties: Open the Table Properties pop-up.
l
Delete Table: Delete the table at the current cursor location.
l
Cell: Open a submenu with cell-specific table functions.
o
o
o
Cell Properties: Open the Table Cell Properties pop-up.
Split Cells: Split the currently selected cell (only works if the cell at the cursor location
or the selected cells were previously merged.
Merge Cells: Select to merge cells at the current cursor location.
Blackboard Learn Release 9.1 - Help for Students - Page 93
© 2012 Blackboard Inc. Proprietary and Confidential. U.S. Patent No. 6,988,138. Additional Patents Pending.
Text Editor > Using the Content Editor
l
Row: Open a submenu with row-specific functions.
o
Row Properties: Open the Table Row Properties pop-up.
o
Insert Row Before: Insert a blank row above the current cursor position.
o
Insert Row After: Insert a blank row below the current cursor position.
o
l
Delete Row: Delete the current row. If multiple rows are selected, all of them are
deleted.
o
Cut table row: Cut the current row or selected rows, and copy to the clipboard.
o
Copy table row: Copy the current row or selected rows, and copy to the clipboard.
o
Paste table row before: Paste the most recently cut or copied row or rows above the
current cursor position.
o
Paste table row after: Paste the most recently cut or copied row or rows below the
current cursor position.
Column: Opens a submenu with column-specific functions.
o
Insert Column Before: Insert a blank column to the left of the current cursor position.
o
Insert Column After: Insert a blank column to the right of the current cursor position.
o
Remove Column: Delete the current column. If multiple columns are selected, all of
them are deleted.
Using Anchors
Anchors are used to position (anchor) other items and objects, such as images. Position the cursor where you
want the anchor to appear, and click the Anchor button ( ) to open the Insert/Edit Anchor pop-up. Type a
name for the anchor and click Insert to add it.
To modify an existing anchor, select it and click Anchor.
To remove an anchor, select it and press Delete.
Note: Deleting an anchor will also delete any object or text anchored to it.
Advanced Functions
HTML Code View
Click the HTML Code View button ( ) to open the HTML Code View pop-up. From there, you can edit the
content HTML code directly. When finished, click Update to apply your changes, or Cancel to abort.
The Content Editor does perform some code verification, and will try to add or remove HTML tags as needed to
keep the code valid and working. However, it is possible to enter invalid codes or tags, and the Content Editor's
auto-correcting capabilities may not catch all instances and displayed results can be unpredictable.
Note: This feature is intended mainly for experienced web developers.
Editing CSS
Click the Edit CSS button (
displays.
) to edit the Cascading Style Sheet (CSS) for the page. The Edit CSS pop-up
Note: This feature is intended mainly for experienced web developers.
Blackboard Learn Release 9.1 - Help for Students - Page 94
© 2012 Blackboard Inc. Proprietary and Confidential. U.S. Patent No. 6,988,138. Additional Patents Pending.
Text Editor > Using the Content Editor
From the Edit CSS pop-up, using the tabs and individual settings, it is possible to customize nearly all of the
basic formatting defaults for the current Content Editor display. Each tab controls a different category of style
overrides.
l
Text: Set the font face, size, style, weight, and aspects of text appearance.
l
Background: Use a background color or image, and set how it is displayed.
l
Block: Set formatting options at the paragraph level, including word and letter spacing, alignment,
indents, and so on.
l
Box: Set defaults for drawn boxes.
l
Border: Set the style, width, and color for all aspect of table and object borders.
l
List: Set defaults for formatted lists.
l
Position: Set the overall page positioning, placement, and clipping preferences.
When you are finished, click Apply or Update to make the changes, or Cancel to abort.
Using the Right-Click Contextual Menu
The right-click contextual menu provides access to some of the Content Editor's basic commonly-used
functions, and varies depending on the location of the cursor, the content near it, and whether or not text or
objects have been selected.
l
Cut: Cut the selected text or object.
l
Copy: Copy the selected text or object.
l
Paste: Paste the most recently cut or copied text or object.
l
Link: Visible only when text or an object has been selected, opens the Insert/edit link pop-up
display. For more information, see How to Use Links.
l
Remove Link: Visible only when text or an object has been selected, removes any hyperlink. If
there are no links present in the selected item, this command does nothing.
l
Image: Add or edit an image. For more details, see Adding Images.
Blackboard Learn Release 9.1 - Help for Students - Page 95
© 2012 Blackboard Inc. Proprietary and Confidential. U.S. Patent No. 6,988,138. Additional Patents Pending.
Text Editor > Using the Content Editor
l
Alignment: Opens a submenu, allowing you to align text to the left margin
, or both margins .
, center
, right margin
l
Create Table: Open the Create/Modify Table pop-up display. For more details, see Working with
Tables and for a list of right-click contextual menu commands associated with tables only, see
Editing Tables.
Note: Cut, copy, and paste functions may not be available in all browsers.
Keyboard Shortcuts for the Content Editor
The Content Editor supports the keyboard shortcuts listed in the following table. Please note that Apple
computer users should use the COMMAND key instead of the CTRL key (in the table, these are indicated by
"MAC:", and COMMAND is abbreviated as CMD).
Note: If the shortcut keys that move selected items one character left, right, up, or down are used, the object
being moved will be absolutely positioned. An absolutely positioned element is determined by pixels, so moving
it up once will move it up one pixel.
Keyboard Shortcut
Description
RIGHT ARROW
Move one character to the right.
LEFT ARROW
Move one character to the left.
DOWN ARROW
Move down one line.
UP ARROW
Move up one line.
CTRL+RIGHT ARROW
MAC: CMD+RIGHT ARROW
Move right one word.
CTRL+LEFT ARROW
MAC: CMD+LEFT ARROW
Move left one word.
END
Move to the end of the line.
HOME
Move to the start of the line.
CTRL+DOWN ARROW
MAC: CMD+DOWN ARROW
Move down one paragraph.
CTRL+UP ARROW
MAC: CMD+UP ARROW
Move up one paragraph.
PAGE DOWN
Move down one page.
PAGE UP
Move up one page.
CTRL+HOME
MAC: CMD+HOME
Move to the beginning of the text.
CTRL+END
MAC: CMD+END
Move to the end of the text.
Selection
SHIFT+RIGHT ARROW
Extend the selection one character to the right.
SHIFT+LEFT ARROW
Extend the selection one character to the left.
CTRL+SHIFT+RIGHT
ARROW
MAC: CMD+SHIFT+RIGHT
ARROW
Extend the selection right one word.
Blackboard Learn Release 9.1 - Help for Students - Page 96
© 2012 Blackboard Inc. Proprietary and Confidential. U.S. Patent No. 6,988,138. Additional Patents Pending.
Text Editor > Using the Content Editor
Keyboard Shortcut
Description
CTRL+SHIFT+LEFT ARROW
MAC: CMD+SHIFT+LEFT
ARROW
Extend the selection left one word.
SHIFT+UP ARROW
Extend the selection up one line.
SHIFT+DOWN ARROW
Extend the selection down one line.
SHIFT+END
Extend the selection to the end of the current line.
SHIFT+HOME
Extend the selection to the start of the current line.
SHIFT+PAGE DOWN
Extend the selection down one page.
SHIFT+PAGE UP
Extend the selection up one page.
CTRL+SHIFT+END
Extend the selection to the end of the document.
CTRL+SHIFT+HOME
MAC: CMD+SHIFT+HOME
Extend the selection to the beginning of the document.
CTRL+A MAC: CMD+A
Select all elements in the document.
Editing
BACKSPACE
Delete the selection. Or, if there is no selection, delete the character to the left of the
mouse pointer.
CTRL+BACKSPACE
MAC: CMD+BACKSPACE
Delete all of a word to the left of the mouse pointer.
CTRL+C MAC: CMD+C
Copy the selection.
CTRL+V MAC: CMD+V
Paste cut contents or copied contents.
CTRL+X MAC: CMD+X
Cut the selection.
DELETE
Delete the selection.
INSERT
Toggle between inserting and overwriting text.
CTRL+Z
MAC: CMD+Z
Undo the most recent formatting command.
CTRL+Y
MAC: CMD+Y
Redo the most recent undone command.
CTRL+F
MAC: CMD+F
Find text.
SHIFT+F10
Display the context menu. This is the same as a right-click.
Formatting
CTRL+B
MAC: CMD+B
Select or clear bold formatting.
CTRL+I
MAC: CMD+I
Select or clear italic formatting.
CTRL+U
MAC: CMD+U
Select or clear underlining.
Blackboard Learn Release 9.1 - Help for Students - Page 97
© 2012 Blackboard Inc. Proprietary and Confidential. U.S. Patent No. 6,988,138. Additional Patents Pending.
Tools > About Course Tools
Tools
About Course Tools
Tools appear throughout Blackboard Learn. You can access tools from inside a course or from a tab.
Note: Your instructor controls which tools are available. If a tool is not available, your instructor may have
disabled it.
About Third Party and External Tools
Your school can choose to connect extra tools to Blackboard Learn. Many of these tools are created by
companies other than Blackboard.
If you have questions, your school's computing help desk is the best place to start.
For more information, click the links below to access the tool or company's website.
Blackboard Mobile™
Blackboard Learn Release 9.1 - Help for Students - Page 98
© 2012 Blackboard Inc. Proprietary and Confidential. U.S. Patent No. 6,988,138. Additional Patents Pending.
Tools > Announcements
Blackboard Collaborate™ (formerly Wimba and Elluminate)
Respondus® (including Respondus LockDown Browser™)
Turnitin ®
Announcements
Note: Your instructor controls which tools are available. If this tool is not available, your instructor may have
disabled it.
Users and course group members can view important messages from instructors in the My Announcements
module or through the Announcements tool. As a default module on the homepage, announcements are
typically one of the first things you see when accessing your course. When you click an announcement link on
the homepage, you are taken to the main Announcements page. Announcements are organized and displayed
by:
l
Institution
l
Courses and Organizations
l
All Course announcements
How to View Announcements
1. On the My Announcements module in the Home Page or in My Institution tab, click the
Announcements link.
-OROn the Tools panel, click Announcements.
Blackboard Learn Release 9.1 - Help for Students - Page 99
© 2012 Blackboard Inc. Proprietary and Confidential. U.S. Patent No. 6,988,138. Additional Patents Pending.
Tools > Blogs
Blogs
Note: Your instructor controls which tools are available. If this tool is not available, your instructor may have
disabled it.
A blog is your personal online journal. Each blog entry you make can include any combination of text, images,
links, multimedia, Mashups, and attachments. Blogs are an effective means of sharing knowledge and
materials created and collected by the group in the course. You can post entries and add comments to existing
blogs. Use your blog to express your ideas and share them with the class.
As the owner of a blog, you will create multiple entries over a period of time. Your instructor and course
members can add comments. A blog can also be owned by a course or a group. In the Group area, all members
of a group can create entries for the same blog, building upon one another. Any course member can read and
comment on a Group blog, but cannot make entries if they are not a member of the Group. Your instructor can
also offer comments and grade individual entries.
The Blog topic page is divided into two main sections. You can view the Instructions in the content frame.
Click the X to collapse the field. In the side panel, you can view information about the blog. You can expand and
collapse sections in the side panel using the double arrows.
Blackboard Learn Release 9.1 - Help for Students - Page 100
© 2012 Blackboard Inc. Proprietary and Confidential. U.S. Patent No. 6,988,138. Additional Patents Pending.
Tools > Blogs
Create Blog Entry: Create a blog entry using the Create Blog Entry function. You can create another blog
entry for a topic at any time. For example, your instructor may add a comment requesting that you clarify what
has been written before a grade is assigned or suggest a topic for another entry. View Drafts: Access any entries saved as drafts. Click View Drafts on the Action Bar.
Blog Entry: Blog entries appear in the content frame following the Instructions.
Comments: After posting an entry, you can see if comments were made. Click the link to view comments.
Comment: Add comments by clicking Comment.
About this Blog: In the side panel, view the blog information in the About this Blog section.
Blog Grade: The Blog Grade section appears if a blog is set to be graded. You can see if your blog entries
have been graded.
More Blogs: View other blog entries made by other course members in the More Blogs section.
Index: View the titles of your selected entries for either the week or the month in the Index section,
determined by the settings your instructor makes during blog creation. The most recent entry title appears first.
How to Access a Blog
There are three different types of blogs that you can access:
Blackboard Learn Release 9.1 - Help for Students - Page 101
© 2012 Blackboard Inc. Proprietary and Confidential. U.S. Patent No. 6,988,138. Additional Patents Pending.
Tools > Blogs
l
Course: All enrolled users are able to create blog entries. All enrolled users can add comments to
blog entries.
If you are removed from the course, you will not have access to any blogs. If you are removed from the
course after individual blogs have been created, all your entries and comments will be deleted. If you
are removed from a course after course blogs have been created, all your entries and comments will
be retained, but the name of the author or commenter will be changed to "Anonymous."
l
Individual: Only the owner of the blog is able to create blog entries. All other users enrolled in the
course are able to view and add comments.
l
Group: If your instructor enables the Blogs tool for the group, all group members can post blog
entries and make comments on blog entries. Any course member can view group blogs, but they only
have the option to add comments. Course members can only add posts to their Group blog.
Note: Your instructor can edit and delete entries in any of the three blog types and delete any user comments.
1. On the Course Menu, click Blogs.
-OROn the Course Menu, click Tools and then click Blogs.
Blackboard Learn Release 9.1 - Help for Students - Page 102
© 2012 Blackboard Inc. Proprietary and Confidential. U.S. Patent No. 6,988,138. Additional Patents Pending.
Tools > Blogs
2. On the Blogs listing page, click the name of the blog to open.
How to Create a Blog Entry
Only your instructor can create a blog, but once created, you can create entries. The blog topics appear in
alphabetical order on the Blogs page. On the Blogs page, under each blog title, you can see if the blog belongs
to a group, the course, or to individual students. Your instructor can use blog entries to provide structure for
discussions on class topics and other issues. If allowed by your school, you can add an avatar which will
appear with individual blogs.
1. On the Course Menu, click Blogs.
-OROn the Course Menu, click Tools and then click Blogs.
Blackboard Learn Release 9.1 - Help for Students - Page 103
© 2012 Blackboard Inc. Proprietary and Confidential. U.S. Patent No. 6,988,138. Additional Patents Pending.
Tools > Blogs
2. On the Blogs list page, click the name of the blog to open.
3. On the Blog topic page, click Create Blog Entry.
4. On the Create Blog Entry page, type an Entry Title.
5. Type the text in the Entry Message text box.
6. Alternatively, in the Attach File field, attach a file using one of the following options:
l
To upload a file from your computer, click Browse My Computer.
l
To upload a file from the course's storage repository:
If Course Files is the course's storage repository, click Browse Course.
o
-ORo
If your school licenses content management, click Browse Content
Collection.
Note: Files added by students are private and stored in a secure location. These files are not
accessible through the course.
7. Click Post Entry.
-OR-
Blackboard Learn Release 9.1 - Help for Students - Page 104
© 2012 Blackboard Inc. Proprietary and Confidential. U.S. Patent No. 6,988,138. Additional Patents Pending.
Tools > Blogs
Click Save Entry as Draft to save the entry for later posting.
Note: If your instructor has associated a rubric with the blog and made it available to students, click View
Rubric in the Blog Grade section to display grading criteria.
If there is no associated rubric or your instructor has not made it available, the View Rubric button will not be
visible.
Viewing Blog Drafts
You can save blog entries for later posting by clicking Save Entry as Draft. You can view these drafts by
clicking View Drafts on the main blog page, then click the name of the blog entry.
Blackboard Learn Release 9.1 - Help for Students - Page 105
© 2012 Blackboard Inc. Proprietary and Confidential. U.S. Patent No. 6,988,138. Additional Patents Pending.
Tools > Blogs
How to Comment on a Blog Entry
You can comment on one another’s blog entries, whether they belong to an individual, the course, or a group.
Your instructor determines if comments can be made anonymously and if you have the permission to delete
blog comments.
1. On the Course Menu, click Blogs.
-OROn the Course Menu, click Tools and then click Blogs.
2. On the Blogs page, click the name of the blog to open.
Blackboard Learn Release 9.1 - Help for Students - Page 106
© 2012 Blackboard Inc. Proprietary and Confidential. U.S. Patent No. 6,988,138. Additional Patents Pending.
Tools > Blogs
3. On the Blog topic page, select a blog to view by selecting the user’s name in the side panel under
More Blogs. The user’s blog entries open in the content frame.
4. Click Comment for the appropriate post.
5. Type a comment in the Comment field.
6. Click Add.
Blackboard Learn Release 9.1 - Help for Students - Page 107
© 2012 Blackboard Inc. Proprietary and Confidential. U.S. Patent No. 6,988,138. Additional Patents Pending.
Tools > Blogs
How to Edit a Blog Entry
Your instructor will determine if you are allowed to edit your blog entries. If you edit gradable blog entries, the
original graded entry will be lost. If you edit an entry be sure to mark it as New so others will know you changed
the post and read the new content.
1. On the Course Menu, click Blogs.
-OROn the Course Menu, click Tools and then click Blogs.
Blackboard Learn Release 9.1 - Help for Students - Page 108
© 2012 Blackboard Inc. Proprietary and Confidential. U.S. Patent No. 6,988,138. Additional Patents Pending.
Tools > Blogs
2. On the Blogs page, click the name of the blog to open.
3. On the Blog topic page, select Edit from the contextual menu for the blog entry.
Blackboard Learn Release 9.1 - Help for Students - Page 109
© 2012 Blackboard Inc. Proprietary and Confidential. U.S. Patent No. 6,988,138. Additional Patents Pending.
Tools > Blogs
4. On the Edit Blog Entry page, make the necessary changes.
5. Click Post Entry.
Blackboard Learn Release 9.1 - Help for Students - Page 110
© 2012 Blackboard Inc. Proprietary and Confidential. U.S. Patent No. 6,988,138. Additional Patents Pending.
Tools > Blogs
How to Delete a Blog Entry
Your instructor will determine if you are allowed to delete your blog entries. If you delete gradable blog entries,
the original graded entry will be lost.
1. On the Course Menu, click Blogs.
-OROn the Course Menu, click Tools and then click Blogs.
2. On the Blogs page, click the name of the blog to open.
Blackboard Learn Release 9.1 - Help for Students - Page 111
© 2012 Blackboard Inc. Proprietary and Confidential. U.S. Patent No. 6,988,138. Additional Patents Pending.
Tools > Blogs
3. On the Blog topic page, select Delete from the contextual menu for the blog entry. This action is
final and cannot be undone.
Viewing Blog Grades
When your blog entries have been graded, you can view your grade in two places. The grading information
appears under the Blog Grade section on the Blog topic page and in the My Grades tool. Any feedback and
the date the grade was assigned also appear in these areas.
If your instructor has used a rubric for grading and made it available to students, click View Rubric to display
detailed grading information.
Blackboard Learn Release 9.1 - Help for Students - Page 112
© 2012 Blackboard Inc. Proprietary and Confidential. U.S. Patent No. 6,988,138. Additional Patents Pending.
Tools > Calendar
If there is no associated rubric or your instructor has not made it available, the View Rubric button will not be
visible
Troubleshooting Blog Management
l
If your instructor deleted the blog while you are posting, the blog and all comments are deleted.
l
If a blog is made unavailable while you are posting, the blog remains visible to your instructor in Edit
view but is not displayed to you.
l
If the Allow Users to Edit and Delete Entries setting is changed, entries remain but you cannot
edit them.
l
If the Allow Users to Delete Comments setting is changed, comments remain but you cannot edit
them.
Related Tutorials
Creating a Blog Entry (Flash movie | 2m 35s | 8,225 KB)
Calendar
Note: Your instructor controls which tools are available. If this tool is not available, your instructor may have
disabled it.
The Calendar tool allows you to view events by day, week, month, or year. You can view and organize
upcoming and past events into categories.
You will see different options in the calendar depending on where you access it. When you access the calendar
outside of a course, you can view all items on your calendar and have the options to add and modify personal
events. When you access the calendar through a course only those calendar items that relate to your course
appear.
Course Calendar events appear to all members of the course. Common entries include upcoming tests, due
dates for assignments, or special lectures. If you access the calendar while in your course, you will only see
the entries you have added. If you access the calendar from the Tools panel in the My Institution tab, it
includes the following:
l
Your personal entries
l
Entries for all courses in which you are enrolled
l
Entries for any organizations in which you are enrolled
l
Institution-wide events
How to Open the Calendar
1. On the Course Menu, click Tools.
Blackboard Learn Release 9.1 - Help for Students - Page 113
© 2012 Blackboard Inc. Proprietary and Confidential. U.S. Patent No. 6,988,138. Additional Patents Pending.
Tools > Calendar
2. On the Tools page, click Calendar.
-OROn the Tools panel, select Calendar.
How to Create a Personal Event
1. On the Tools panel, click Calendar.
2. On the Personal Calendar page, click Create Personal Event.
Blackboard Learn Release 9.1 - Help for Students - Page 114
© 2012 Blackboard Inc. Proprietary and Confidential. U.S. Patent No. 6,988,138. Additional Patents Pending.
Tools > Calendar
3. On the Create Personal Event page, type the Event Name.
4. Type a Description.
5. Use the Date and Time fields to select an Event Time or use the Date Selection Calendar to
select the date, and Time Selection Menu to select the time.
6. Click Submit.
Blackboard Learn Release 9.1 - Help for Students - Page 115
© 2012 Blackboard Inc. Proprietary and Confidential. U.S. Patent No. 6,988,138. Additional Patents Pending.
Tools > Calendar
How to Delete and Edit a Personal Event
1. On the Tools panel, click Calendar.
2. To delete a personal event, on the Personal Calendar page, navigate to the date of the event to
delete. Select Delete from the contextual menu for the event.
-ORTo edit a personal event, on the Personal Calendar page, navigate to the date of the event to edit.
Select Edit from the contextual menu for the event.
Blackboard Learn Release 9.1 - Help for Students - Page 116
© 2012 Blackboard Inc. Proprietary and Confidential. U.S. Patent No. 6,988,138. Additional Patents Pending.
Tools > Calendar
How to View a Specific Date
Students can view the calendar by day, week, month, year, or by specific date. If viewed by month, only the
first few characters of the event title appear on the Calendar. Click the link for details.
1. On the Tools panel, click Calendar.
2. On the Personal Calendar page, click Jump To.
3. On the Calendar Quick Jump pop-up window, type a date in the Select a Date field (using the
mm/dd/yyyy format) or use the Date Selection Calendar to select a date.
4. Select the Month, Week, or Day options to Select the type of view.
Blackboard Learn Release 9.1 - Help for Students - Page 117
© 2012 Blackboard Inc. Proprietary and Confidential. U.S. Patent No. 6,988,138. Additional Patents Pending.
Tools > Collaboration Tools
5. Click Submit.
Collaboration Tools
About Collaboration Tools
The Collaboration tools allow you to participate in real-time lessons and discussions. Examples of these
sessions include real-time lessons, online discussions, TA sessions, and live question and answer forums.
Archives of previous sessions are also available for review. Guest speakers can lead sessions using the
Collaboration tools. You can search for and join Collaboration sessions and view session archives.
Course groups can also use the Collaboration tools for private sessions open only to course group members.
The following Collaboration tools are available.
l
Virtual Classroom: Virtual Classroom is a shared online environment where you can participate in a
real-time discussion with other users, access the web, and engage in question and answer sessions.
You may also access the whiteboard to display text and images.
l
Chat: Chat is an exchange of text messages online, and part of the Virtual Classroom. Access the
Chat separately from the Virtual Classroom. Chat allows you to open just the chat function.
Note: An accessible version of the Virtual Classroom tool is available. A link to this version appears when you
join a session on the Collaboration Sessions page.
Before You Begin
l
The Java 2 RunTime Environment is required to use the Collaboration tools. The plug-in may be
downloaded from the page that appears when you join a Collaboration session. You must enable popups to successfully run a Collaboration tool.
l
For those users that want to use Safari, you must disable the Pop-Up Window Blocking.
Accessing the Collaboration Sessions Area
On the Course Menu, select Tools. On the Tools page, select Collaboration.
Blackboard Learn Release 9.1 - Help for Students - Page 118
© 2012 Blackboard Inc. Proprietary and Confidential. U.S. Patent No. 6,988,138. Additional Patents Pending.
Tools > Collaboration Tools
Filter: You can filter the sessions listed on the page. Click the arrow next to the drop-down list and select
the type of session to display and click Go:
l
Show All: The default filter that displays all of the Collaboration sessions.
l
Available Sessions: Displays all of the sessions that are in use.
l
Session with Recordings: Displays completed sessions that have an archive.
l
Future Sessions: Displays sessions that are scheduled to take place in the future.
Search: You can search for a specific session by clicking the Session Name, Start Date, or End Date
option and then type a value in the field. Click Search.
Join: You can enter a session by clicking the Session Name.
Recordings: You can access the recordings for a session. Select Recordings from the contextual menu
for the session.
User Roles
By default, participants are Active Users when they enter a collaboration session. At any time, your instructor
can change your role to Passive. Passive Users can view the exchange, but can contribute only if they raise
their hands and are granted permission by the Moderator.
Your instructor might change your role to Passive if you are dominating the conversation or responding
inappropriately.
The following three roles are available in a collaboration session:
l
The Moderator is represented by a globe icon. The Moderator is typically the instructor. The
Moderator can modify participant roles, grant passive users permission to participate, expel users,
and record and end the session.
l
An Active User is represented by a full color icon. By default, Active Users can send messages as
often as they like during a chat session.
l
A Passive User is represented by a gray toned icon. Passive Users can observe the chat exchange,
but must raise their hands to request permission to send messages. If more than one student raises
their hands, numbers are assigned to the icons to represent the order they raised their hands.
Blackboard Learn Release 9.1 - Help for Students - Page 119
© 2012 Blackboard Inc. Proprietary and Confidential. U.S. Patent No. 6,988,138. Additional Patents Pending.
Tools > Collaboration Tools
Virtual Classroom
About Virtual Classroom
Note: Your instructor controls which tools are available. If this tool is not available, your instructor may have
disabled it.
You can ask questions, draw on the whiteboard, and participate in breakout sessions from the Virtual
Classroom.
Note: Before joining a Virtual Classroom session, follow the checklist below to make sure that your computer
is set up properly.
l
Be sure to turn off any pop-up blockers that may be enabled on your Internet browser. Don't forget to
disable any additional pop-up blockers that may be enabled in your browser toolbar, for example,
Yahoo or Google toolbars.
l
Make sure that you have the required Sun Java plug-in.
l
Try joining the Virtual Classroom session well in advance of the scheduled session to ensure that the
tool loads properly.
How to Open the Virtual Classroom
1. On the Course Menu, select Tools.
2. On the Tools page, click Collaboration.
Blackboard Learn Release 9.1 - Help for Students - Page 120
© 2012 Blackboard Inc. Proprietary and Confidential. U.S. Patent No. 6,988,138. Additional Patents Pending.
Tools > Collaboration Tools
3. On the Collaboration Sessions page, click the Session Name next to a Virtual Classroom
session.
Virtual Classroom Areas
When you launch the Virtual Classroom, it appears in a new window.
Blackboard Learn Release 9.1 - Help for Students - Page 121
© 2012 Blackboard Inc. Proprietary and Confidential. U.S. Patent No. 6,988,138. Additional Patents Pending.
Tools > Collaboration Tools
Menu Bar: Allows your instructor to control the Virtual Classroom. This includes managing participation,
selecting user access rights, ending the sessions, and monitoring breakout sessions.
Recording Tool: Allows you to record Virtual Classroom sessions.
Tools: Includes all the tools used during the Virtual Classroom session. This includes accessing the
Course Map, utilizing the Whiteboard, searching for websites, and asking and answering questions.
Chat: Allows you to compose messages, raise hand to ask questions, and activate private messages.
Virtual Classroom Menu Bar and Record Menu
Group Collaboration Sessions have additional Session Manager features including a Menu Bar and a Record
Menu.
Menu Bar
Only users with active privileges can access the options on the menu bar.
Blackboard Learn Release 9.1 - Help for Students - Page 122
© 2012 Blackboard Inc. Proprietary and Confidential. U.S. Patent No. 6,988,138. Additional Patents Pending.
Tools > Collaboration Tools
l
View: Choose an option for viewing personal messages in the Virtual Classroom. Select Show inline to view private messages within the chat area. Select Show in separate frame to view private
messages in a separate window.
l
Controls: Allows the session moderator to select the features each user may access.
l
Clear: Erase the user's chat display.
l
End: Ends the Collaboration session.
l
Breakouts: Create a breakout room for a group of users.
o
Select the check boxes for the users who will participate in the breakout session. You may
only join a breakout session if you are selected by the session's creator.
o
Users who enter a breakout session are still active in the main Virtual Classroom session.
If a breakout session is closed users are still active in the main session. Breakout sessions
default to the same settings as the main session. Record Menu
You can record and save the sessions created in groups. Recordings can be started, paused, and stopped
during the session. A session can have more than one archive.
The following table details the functions available with Record menu.
Function Action
Click Begins recording to create the transcript. Information is recorded as participants exchange
messages. More than one recording can be created per session.
Note: Clicking the Begins recording function again when recording is already in progress will stop the
recording.
Click Pauses Recording to temporarily stop the recording. The chat display panel and the transcript will
indicate the recording has been paused. Click it again to resume recording.
Click Stops Recording to end the recording. Once a chat session has been stopped, it is not possible to
add to the recording.
Tip: If you end a recording in error, simply click the Begins recording function to start another transcript.
Title the next recording "Part Two" or "Continued."
Click Bookmark to add comments to the recording. For instance, make a note that you are about to
introduce a new topic. When adding bookmark comments, remember students can view recordings.
Bookmarks will appear in a different color than the chat text.
Virtual Classroom Tools
If granted access to these tools by your instructor, you can view the Course Map, use the Whiteboard, access
websites, and ask questions.
Classroom tools appear on the left side of the Virtual Classroom. To begin using items in the Tools area, click
the name of the tool.
Blackboard Learn Release 9.1 - Help for Students - Page 123
© 2012 Blackboard Inc. Proprietary and Confidential. U.S. Patent No. 6,988,138. Additional Patents Pending.
Tools > Collaboration Tools
Virtual Classroom Course Map
The Course Map enables you to browse the course while in a Virtual Classroom. You must have active
privileges to use the Course Map in a Virtual Classroom.
Blackboard Learn Release 9.1 - Help for Students - Page 124
© 2012 Blackboard Inc. Proprietary and Confidential. U.S. Patent No. 6,988,138. Additional Patents Pending.
Tools > Collaboration Tools
The following table details the available functions in the Course Map.
Function
Action
Display an element on the
map to all users
Click the Content Area in the Map and select Display To Users in the drop-down list.
Click Go.
Display an element on the
map in a separate window
Click the Content Area in the Map and select Preview in New Window in the dropdown list. Click Go. The new window is only visible to the user who opens it.
Refresh the map during a
Collaboration session
Select Refresh Tree in the drop-down list. Click Go. This edits the map to match the
Course Menu.
Virtual Classroom Whiteboard
The Virtual Classroom Whiteboard enables you to present different types of information as you would on a
whiteboard in a classroom. Using the tools in the Whiteboard tools palette, you can draw images, type text, and
present equations. Your instructor determines whether these functions are available.
Blackboard Learn Release 9.1 - Help for Students - Page 125
© 2012 Blackboard Inc. Proprietary and Confidential. U.S. Patent No. 6,988,138. Additional Patents Pending.
Tools > Collaboration Tools
The following table details the tools available for use on the Whiteboard.
Function Description Action
Select an
item
Click the Arrow tool and then click on an item for selection. You can perform the following
options on selected items:
l
Enlarge: Click one of the small black boxes that surround the item and drag it to
the desired size.
l
Move: Click the item and move it to the appropriate location.
l
Cut: Click the Whiteboard item and then click the Cut icon.
l
Copy: Click the Whiteboard item and then click the Copy icon.
l
Paste: Click the Whiteboard item and then click the Paste icon.
l
Delete: Click the Whiteboard item, click the selected object, and then click the
Delete icon.
l
Group items: Click the Whiteboard items and then click the Group icon.
l
Ungroup: Click a Whiteboard item in a group and then click the Ungroup icon.
l
Bring front: Click the Whiteboard item, click the selected object, and then click
the Bring to front icon.
l
Bring back: Click the Whiteboard item, click the selected object, and then click
the Send to back icon.
l
Select all figures on the Whiteboard and then click the Selects all Figures icon.
Draw free
hand
Click the Pen tool. Choose the color of the pen in the Fill Color drop-down list.
Type text
using the
keyboard
Click the text tool (T) and then click the Whiteboard area. A Whiteboard Text Input box
appears. Type the text in the box and click Insert. Use the options in the Tools palette to
select color, font, and size.
Draw a
straight line
Click the Slanted Line tool.
Draw a
square
Click the Square tool. Choose the color of the square from the Fill Color drop-down list.
Draw a
circle
Click the Oval tool. Choose the color of the circle from the Fill Color drop-down list.
Input an
equation
Click The Math and Science Equation Editor icon (?). The Equation Editor appears. Input
the equation and click Insert Equation.
Blackboard Learn Release 9.1 - Help for Students - Page 126
© 2012 Blackboard Inc. Proprietary and Confidential. U.S. Patent No. 6,988,138. Additional Patents Pending.
Tools > Collaboration Tools
Virtual Classroom Group Browser
The Group Browser enables you to collaboratively browse the web. This tool opens a URL that is viewable by
all users. URLs used in the session are recorded in the archive if one is created. The Blackboard administrator
determines whether this function is made available to users.
How to Open a Website
Type the URL in the Enter Address field. Click Go.
How to Choose Where to Display the Website
Click Display To Users to display the website in the Whiteboard, or click Preview in New Window to open
the website in a new browser window. The preview window is only displayed to the user that opened it.
Blackboard Learn Release 9.1 - Help for Students - Page 127
© 2012 Blackboard Inc. Proprietary and Confidential. U.S. Patent No. 6,988,138. Additional Patents Pending.
Tools > Collaboration Tools
How to Ask a Question in the Virtual Classroom
If allowed by your instructor, you can ask questions during the session. As you submit questions during the
session, your instructor can view and respond to them.
1. On the Ask Question area, click Compose.
2. On the Submit Question pop-up window, type the question in the text box.
3. Click Send.
Blackboard Learn Release 9.1 - Help for Students - Page 128
© 2012 Blackboard Inc. Proprietary and Confidential. U.S. Patent No. 6,988,138. Additional Patents Pending.
Tools > Collaboration Tools
Virtual Classroom Question Inbox
Questions from users are sent to the Question Inbox during the Virtual Classroom session. The Question
Inbox is used to manage and respond to questions during a Collaboration session.
How to Respond to a Question
1. In the From list, click the username.
2. Click the Respond to Question icon.
3. On the Respond to Question pop-up window, type your message in the Response text box.
4. Click Send.
Blackboard Learn Release 9.1 - Help for Students - Page 129
© 2012 Blackboard Inc. Proprietary and Confidential. U.S. Patent No. 6,988,138. Additional Patents Pending.
Tools > Collaboration Tools
How to Delete a Question
1. In the From list, click the username.
2. Click the Delete icon.
How to View Unanswered Questions
Select the check box next to Show unanswered only.
Blackboard Learn Release 9.1 - Help for Students - Page 130
© 2012 Blackboard Inc. Proprietary and Confidential. U.S. Patent No. 6,988,138. Additional Patents Pending.
Tools > Collaboration Tools
Respond to Question Fields
When you click the Respond to Question icon, the Respond to Question window appears.
Question: Display the question that was submitted.
Response: Use to provide the response to the question.
Private: Select this check box to make the response to the question private. If marked private, the
response is only sent to the person who submitted the message.
Send: Send the response to the person who submitted the message.
Chat
Note: Your instructor controls which tools are available. If this tool is not available, your instructor may have
disabled it.
The Chat tool allows you to interact with other users using a text-based chat. Chat is part of the Virtual
Classroom. It can also be accessed separately. Some of the functions in the Chat are limited to those users
with an active role.
How to Join Chat
1. On the Course Menu, click Tools.
2. On the Tools page, click Collaboration.
Blackboard Learn Release 9.1 - Help for Students - Page 131
© 2012 Blackboard Inc. Proprietary and Confidential. U.S. Patent No. 6,988,138. Additional Patents Pending.
Tools > Collaboration Tools
3. On the Collaboration Sessions page, click the Session Name next to a Chat session.
How to Send a Chat Message
1. On the Course Menu, click Tools.
2. On the Tools page, click Collaboration.
Blackboard Learn Release 9.1 - Help for Students - Page 132
© 2012 Blackboard Inc. Proprietary and Confidential. U.S. Patent No. 6,988,138. Additional Patents Pending.
Tools > Collaboration Tools
3. On the Collaboration Sessions page, click the Session Name next to a Chat session.
4. On the Chat window, type your message in the Compose text box.
5. Click Send.
Blackboard Learn Release 9.1 - Help for Students - Page 133
© 2012 Blackboard Inc. Proprietary and Confidential. U.S. Patent No. 6,988,138. Additional Patents Pending.
Tools > Collaboration Tools
Sending a Private Message
You can send private messages to other users if your instructor enables this tool in the session controls.
Private messages are not recorded or archived.
Note: Only users who have an active role can send private messages.
Blackboard Learn Release 9.1 - Help for Students - Page 134
© 2012 Blackboard Inc. Proprietary and Confidential. U.S. Patent No. 6,988,138. Additional Patents Pending.
Tools > Collaboration Tools
Viewing User Information
The User Information pop-up window displays personal information about a user such as name, email address,
and any other information the user has chosen to add to their profile.
On the Participants column, click the name of the user. Click User Info in the Chat area and the User
Information pop-up window appears.
Blackboard Learn Release 9.1 - Help for Students - Page 135
© 2012 Blackboard Inc. Proprietary and Confidential. U.S. Patent No. 6,988,138. Additional Patents Pending.
Tools > Collaboration Tools
Chat Functions
The following table details the functions available in the Chat.
Function
Action
Enter a message for
the class to read
Type the message in the Compose field. Click Send. The message appears in the chat
area. There is 1000 character limit for chat messages.
Become an Active user Click the hand symbol. A hand appears next to the username. The moderator clicks on the
hand to make the user active.
View user information
Select a username in the participant list and click User Info.
Send a private
message to a user
Select a username in the participant list and click Private Message.
Blackboard Learn Release 9.1 - Help for Students - Page 136
© 2012 Blackboard Inc. Proprietary and Confidential. U.S. Patent No. 6,988,138. Additional Patents Pending.
Tools > Collaboration Tools
Accessing Recorded Collaboration Sessions
Note: Your instructor controls which tools are available. If this tool is not available, your instructor may have
disabled it.
Recording sessions allow you to review the discussions and questions raised during a Collaboration session.
Sessions are listed by date. Recordings created by groups using Collaboration tools can be deleted by any
group member.
How to Access Collaboration Session Recordings
1. On the Course Menu, select Tools.
2. On the Tools page, click Collaboration.
3. On the contextual menu for the session, select Recordings.
4. On the Session Recordings page, select the Recording Name of the recording that you want to
view.
Blackboard Learn Release 9.1 - Help for Students - Page 137
© 2012 Blackboard Inc. Proprietary and Confidential. U.S. Patent No. 6,988,138. Additional Patents Pending.
Tools > Collaboration Tools
How to Access Collaboration Session Recordings for a Group
1. Access your group in the Groups page, or in My Groups panel.
Blackboard Learn Release 9.1 - Help for Students - Page 138
© 2012 Blackboard Inc. Proprietary and Confidential. U.S. Patent No. 6,988,138. Additional Patents Pending.
Tools > Collaboration Tools
2. On the Group Tools, select Collaboration.
3. On the contextual menu for the session, select Recordings.
4. On the Session Recordings page, select the Recording Name of the recording that you want to
view.
Blackboard Learn Release 9.1 - Help for Students - Page 139
© 2012 Blackboard Inc. Proprietary and Confidential. U.S. Patent No. 6,988,138. Additional Patents Pending.
Tools > Collaboration Tools
How to Create a Recording
1. Access your group in the Groups page, or in My Groups panel.
Blackboard Learn Release 9.1 - Help for Students - Page 140
© 2012 Blackboard Inc. Proprietary and Confidential. U.S. Patent No. 6,988,138. Additional Patents Pending.
Tools > Collaboration Tools
2. On the Group Tools, select Collaboration.
3. On the Collaboration Sessions page, click the session name to join.
Blackboard Learn Release 9.1 - Help for Students - Page 141
© 2012 Blackboard Inc. Proprietary and Confidential. U.S. Patent No. 6,988,138. Additional Patents Pending.
Tools > Collaboration Tools
4. After joining the session, click the Begin recording function.
5. On the Name Recording pop-up window, type the name of the recording or the date it was
created.
6. Click OK.
How to Search for a Recording
1. Access your group in the Groups page, or in My Groups panel.
Blackboard Learn Release 9.1 - Help for Students - Page 142
© 2012 Blackboard Inc. Proprietary and Confidential. U.S. Patent No. 6,988,138. Additional Patents Pending.
Tools > Collaboration Tools
2. On the Group Tools, select Collaboration.
Blackboard Learn Release 9.1 - Help for Students - Page 143
© 2012 Blackboard Inc. Proprietary and Confidential. U.S. Patent No. 6,988,138. Additional Patents Pending.
Tools > Collaboration Tools
3. On the contextual menu for the session, select Recordings.
Blackboard Learn Release 9.1 - Help for Students - Page 144
© 2012 Blackboard Inc. Proprietary and Confidential. U.S. Patent No. 6,988,138. Additional Patents Pending.
Tools > Collaboration Tools
4. On the Session Recordings page, click the Recording Name or Date Created option in the
Search by field.
5. Type the name of the recording or the date it was created.
6. Click Search.
How to Edit a Recording
1. Access your group in the Groups page, or in My Groups panel.
Blackboard Learn Release 9.1 - Help for Students - Page 145
© 2012 Blackboard Inc. Proprietary and Confidential. U.S. Patent No. 6,988,138. Additional Patents Pending.
Tools > Collaboration Tools
2. On the Group Tools, select Collaboration.
Blackboard Learn Release 9.1 - Help for Students - Page 146
© 2012 Blackboard Inc. Proprietary and Confidential. U.S. Patent No. 6,988,138. Additional Patents Pending.
Tools > Collaboration Tools
3. On the contextual menu for the session, select Recordings.
Blackboard Learn Release 9.1 - Help for Students - Page 147
© 2012 Blackboard Inc. Proprietary and Confidential. U.S. Patent No. 6,988,138. Additional Patents Pending.
Tools > Collaboration Tools
4. On the Session Recordings page, select Edit from the contextual menu for the appropriate
recording.
5. On the Recording Properties page, type a name in the Recording Name field.
6. Choose whether to Permit Participants to View Recording.
7. Click Submit.
Blackboard Learn Release 9.1 - Help for Students - Page 148
© 2012 Blackboard Inc. Proprietary and Confidential. U.S. Patent No. 6,988,138. Additional Patents Pending.
Tools > Collaboration Tools
How to Delete a Recording
1. Access your group in the Groups page, or in My Groups panel.
2. On the Group Tools, select Collaboration.
Blackboard Learn Release 9.1 - Help for Students - Page 149
© 2012 Blackboard Inc. Proprietary and Confidential. U.S. Patent No. 6,988,138. Additional Patents Pending.
Tools > Collaboration Tools
3. On the contextual menu for the session, select Recordings.
Blackboard Learn Release 9.1 - Help for Students - Page 150
© 2012 Blackboard Inc. Proprietary and Confidential. U.S. Patent No. 6,988,138. Additional Patents Pending.
Tools > Contacts
4. On the Session Recordings page, select Delete from the contextual menu for the appropriate
recording.
5. On the Delete Recording page, click Delete to confirm the deletion.
Contacts
Note: Your instructor controls which tools are available. If this tool is not available, your instructor may have
disabled it.
You can store contact information in an address book. The address book is empty until you create contacts.
You must create a profile for anyone you want to add to your address book, even if the contact is a Blackboard
Learn user. Blackboard Learn Release 9.1 - Help for Students - Page 151
© 2012 Blackboard Inc. Proprietary and Confidential. U.S. Patent No. 6,988,138. Additional Patents Pending.
Tools > Contacts
How to View Contacts
1. On the Course Menu, click Tools.
2. On the Tools page, click Contacts.
-OROn the Tools panel, click Address Book.
How to Create or Edit a Contact
1. On the Tools panel, select Address Book.
2. On the Address Book page, click Create Contact.
Blackboard Learn Release 9.1 - Help for Students - Page 152
© 2012 Blackboard Inc. Proprietary and Confidential. U.S. Patent No. 6,988,138. Additional Patents Pending.
Tools > Contacts
-ORTo edit an existing contact, on the Address Book page, select Edit in the contextual menu for the
contact.
The following table lists the available fields that may appear. Fields can be changed by the
Blackboard administrator.
Field
Description
Personal Information
First Name [r]
Contact’s first name.
Last Name [r]
Contact’s last name.
Email
Contact’s email address.
Other Information
Company
Contact’s company.
Job Title
Contact’s job title.
Address
Contact’s address.
Blackboard Learn Release 9.1 - Help for Students - Page 153
© 2012 Blackboard Inc. Proprietary and Confidential. U.S. Patent No. 6,988,138. Additional Patents Pending.
Tools > Contacts
Field
Description
Address
(cont.)
Contact’s additional address information.
City
Contact’s city.
State/Province Contact’s state or province.
Zip/Postal
Code
Contact’s ZIP code or postal code.
Country
Contact’s country.
Website
URL of the contact’s personal website. When adding a URL, include the HTTP
protocol. For example: http://www.blackboard.com
Home Phone
Contact’s home phone number. The phone number displays exactly as entered.
Work Phone
Contact’s work phone number. The phone number displays exactly as entered.
Work Fax
Contact’s fax number. The fax number displays exactly as entered.
Mobile Phone
Contact’s mobile phone. The phone number displays exactly as entered.
3. Click Submit.
How to Delete a Contact
Note: This action is final and cannot be undone.
1. On the Tools panel, click Address Book.
2. On the Address Book page, click Delete in the contextual menu for a contact.
How to Search for a Contact
The Address Book contains a search function on the Action Bar. You may search using different variables
selected from the search tabs.
1. On the Tools panel, click Address Book.
2. On the Address Book page, search using the Last Name or Email options of your contact.
Blackboard Learn Release 9.1 - Help for Students - Page 154
© 2012 Blackboard Inc. Proprietary and Confidential. U.S. Patent No. 6,988,138. Additional Patents Pending.
Tools > Discussion Board
3. Click Go.
Discussion Board
Note: Your instructor controls which tools are available. If this tool is not available, your instructor may have
disabled it.
The Discussion Board is a tool for sharing thoughts and ideas about class materials. The main Discussion
Board page displays a list of available discussion forums that may appear anywhere in the course. A forum is
an area where a topic or a group of related topics are discussed. A Discussion Board can contain one or more
forums. For each forum, displays the total number of posts, the number of unread posts, and the number of
users who have participated in the forum.
Forum title: Click the forum title to view the messages. Forums containing unread posts appear in bold.
Total Posts / Total Participants: View data on the number of posts and participants.
Blackboard Learn Release 9.1 - Help for Students - Page 155
© 2012 Blackboard Inc. Proprietary and Confidential. U.S. Patent No. 6,988,138. Additional Patents Pending.
Tools > Discussion Board
Unread Posts: The Unread Posts column provides one-click access to the forum’s unread messages.
Within each forum, users can create multiple threads. A thread includes the initial post and any replies to it.
When creating a forum, your instructor has the option of allowing or not allowing you to start threads. Generally,
the purpose of the forum will dictate whether or not you can start threads. A moderated, graded forum used to
evaluate student performance will be tightly controlled, and you cannot create threads. Other forums are
designed for users to share opinions and thoughts on tangential or unrelated topics.
Course groups can have their own Discussion Boards that can be created using the Groups tool. Group
Discussion Boards are available only to users who are members of the group. If a group Discussion Board is
available, access it from the groups link in the Course Menu or in the My Groups area.
Note: When moving through the different parts of the Discussion Board, use the internal navigation, such as
the breadcrumbs, Course Menu, and other page links to return to a previous page. Using the browser navigation
controls can result in page load errors.
How to Access the Discussion Board
1. On the Course Menu, click Discussions.
-OROn the Course Menu, click Tools and then click Discussion Board.
Blackboard Learn Release 9.1 - Help for Students - Page 156
© 2012 Blackboard Inc. Proprietary and Confidential. U.S. Patent No. 6,988,138. Additional Patents Pending.
Tools > Discussion Board
Viewing a Discussion Forum
When you access a forum in the Discussion Board, a list of threads appears with the following information:
l
Date: Displays the date that the thread was created.
l
Thread: Displays the name of the thread.
l
Author: Displays the name of user who created the thread.
l
Status: Indicates whether the thread is published, locked, hidden, or a draft.
l
Unread Posts: Displays the number of posts not yet accessed.
l
Total Posts: Includes both read and unread posts.
Blackboard Learn Release 9.1 - Help for Students - Page 157
© 2012 Blackboard Inc. Proprietary and Confidential. U.S. Patent No. 6,988,138. Additional Patents Pending.
Tools > Discussion Board
Forum Features
Use the breadcrumbs to navigate to a previous page. Do not use the browser navigation controls; page load
errors may occur.
Use the Action Bar functions to perform various actions, including:
l
Create Thread: Add a new thread to a forum.
l
Search: Search for Discussion Board content. The search field is collapsed by default to save screen
space.
l
Thread Actions: Make a selection from the drop-down list. Edit the status of the selected threads
and perform other actions, such as marking threads read or unread and setting or clearing flags. Flags
mark threads for later attention.
l
Collect: Gather selected threads onto one page where posts can be sorted, filtered, or printed.
Select one or more threads or select the check box in the header row to select all threads for an action, such
as collecting.
Click a thread title to read the posts. Forum titles containing unread posts appear in bold type.
Click Edit Paging to determine the number of items to view per page. Type a number in the box and click
Go. Click the X to close the pop-up box.
Using List View and Tree View in Discussions
After you click a forum title, a page loads displaying all forum threads. You can view the page in either List
View or Tree View. This choice remains in effect until you change it and you may change it at any time. On the
forum page, in the upper-right corner, toggle between the two views.
Blackboard Learn Release 9.1 - Help for Students - Page 158
© 2012 Blackboard Inc. Proprietary and Confidential. U.S. Patent No. 6,988,138. Additional Patents Pending.
Tools > Discussion Board
List View
Click List View to present the threads in a table format. Threads containing any unread posts appear in bold
type.
From the Action Bar, you can create threads, or collect posts.
Depending on the settings your instructor made when creating the forum, different functions appear on the
Action Bar. For example, if your instructor allowed tagging, a Tags function appears.
To sort a column, click the column heading or caret.
Select a thread and make a selection from the Thread Actions drop-down list. You can select multiple
threads or select the check box in the header to select all threads. The actions include:
l
Marking threads read or unread.
l
Setting or clearing flags. Flags mark threads for later attention.
Tree View
Click Tree View to show the thread starter messages and their replies. From the Action Bar, you can create
threads, or collect posts.
Blackboard Learn Release 9.1 - Help for Students - Page 159
© 2012 Blackboard Inc. Proprietary and Confidential. U.S. Patent No. 6,988,138. Additional Patents Pending.
Tools > Discussion Board
You can expand and collapse threads by using the plus and minus icons next to the titles. If a thread starter
message contains unread posts, the thread starter title appears in bold type. On the Action Bar, use the
Collapse All and Expand All options to hide or view all posts included in all threads.
Select a thread and make a selection from the Message Actions drop-down list on the Action Bar. You can
select multiple threads or select the check box in the header to select all threads. Actions include marking
threads read or unread and setting or clearing flags. Flags mark threads for later attention.
Viewing a Discussion Thread
When you click a thread, the Thread Detail page appears. The page is divided into three sections:
Section 1:
The Action Bar contains functions that allow you to select, flag, mark read/unread, and collect posts.
Section 2:
The Message List contains a list of all the posts in a thread, beginning with the initial post. The selected post is
highlighted. Use the plus and minus icons to expand and collapse the posts.
Section 3:
The Current Post contains the text of the selected post and information about the post.
Blackboard Learn Release 9.1 - Help for Students - Page 160
© 2012 Blackboard Inc. Proprietary and Confidential. U.S. Patent No. 6,988,138. Additional Patents Pending.
Tools > Discussion Board
About the Thread Detail Page
On the Thread Detail page, you can navigate from post to post, adjust your view of the page, view information
about the selected post, and reply to others.
Blackboard Learn Release 9.1 - Help for Students - Page 161
© 2012 Blackboard Inc. Proprietary and Confidential. U.S. Patent No. 6,988,138. Additional Patents Pending.
Tools > Discussion Board
On the Action Bar, you can access functions such as Subscribe, Unsubscribe, or Search. When
subscribed to a thread, you receive an email alert when a post is updated or a reply is posted. Your instructor
must enable this function when creating a forum. The search field is hidden by default to save screen space. Select one or more threads and make a selection in the Message Actions drop-down list. Actions include
marking threads read or unread and setting or clearing flags. Flags mark threads for later attention. You can also
use the functions for collecting posts and selecting all posts.
Arrange your view using the icons on the Action Bar.
l
Swap Up or Down: Switches the message tree section and the reply section of the screen.
l
Hide or Restore to Minimum: Collapses or displays the message tree section of the screen.
l
Maximize or Minimize: Displays the message tree fully or just a portion of the message tree.
Use the Move to previous message or Move to next message arrows for navigating between messages
in the thread.
Blackboard Learn Release 9.1 - Help for Students - Page 162
© 2012 Blackboard Inc. Proprietary and Confidential. U.S. Patent No. 6,988,138. Additional Patents Pending.
Tools > Discussion Board
Click Parent Post to display or hide the parent message in the thread.
How to Create Threads in a Discussion Forum
Forums have many settings that control who can post, and what other types of actions you can take, such as
editing your own threads, posting anonymously, or rating posts. Depending on which forum settings your
instructor has selected, you may be allowed to create a new thread.
1. On the Course Menu, click Discussions.
2. On the Discussion Board page, click the name of the forum.
3. On the Forum page, click Create Thread.
4. On the Create Thread page, type a Subject.
5. In the Message text box, type your reply. You can use the Text Editor functions to format the text
and add files, images, web links, multimedia, and Mashups.
6. Alternatively, under Attachments, attach a file using one of the following options:
Blackboard Learn Release 9.1 - Help for Students - Page 163
© 2012 Blackboard Inc. Proprietary and Confidential. U.S. Patent No. 6,988,138. Additional Patents Pending.
Tools > Discussion Board
l
To upload a file from your computer, click Browse My Computer.
l
If your school licenses content management, click Browse Content Collection.
7. Click Submit to create the thread.
Result
The newly created thread appears in the forum.
Note: If your instructor has associated a rubric with the discussion forum or thread and made it available to
students, you can view grading criteria before beginning work. Click Grading Information to access the forum or
thread's Grade page.
Click View Rubric in the Forum Grade or Thread Grade section to display grading criteria.
Blackboard Learn Release 9.1 - Help for Students - Page 164
© 2012 Blackboard Inc. Proprietary and Confidential. U.S. Patent No. 6,988,138. Additional Patents Pending.
Tools > Discussion Board
If there is no associated rubric or your instructor has not made it available, the View Rubric button will not be
visible.
How to Save Posts as Draft and Submit Later
The Save Draft function is available if you need to return to your post at a later time. This function saves your
comments and files on the page.
When you finish your post, you must click Submit to publish the thread in the forum.
Saving a Post as Draft
1. On the Course Menu, click Discussions.
2. On the Discussion Board page, click the name of the forum.
3. On the Forum page, click Create Thread.
Blackboard Learn Release 9.1 - Help for Students - Page 165
© 2012 Blackboard Inc. Proprietary and Confidential. U.S. Patent No. 6,988,138. Additional Patents Pending.
Tools > Discussion Board
4. On the Create Thread page, type a Subject.
5. In the Message text box, type your reply. You can use the Text Editor functions to format the text
and add files, images, web links, multimedia, and Mashups.
6. Alternatively, under Attachments, attach a file using one of the following options:
l
To upload a file from your computer, click Browse My Computer.
l
If your school licenses content management, click Browse Content Collection.
7. Click Save Draft to store a draft of the post and continue working later.
Blackboard Learn Release 9.1 - Help for Students - Page 166
© 2012 Blackboard Inc. Proprietary and Confidential. U.S. Patent No. 6,988,138. Additional Patents Pending.
Tools > Discussion Board
Submitting a Draft Post
1. Return to the Forum page. On the Forum page, point to Display to access the drop-down list.
2. Select Drafts Only to view the saved post.
3. On the Thread column, click the name of the draft post.
Blackboard Learn Release 9.1 - Help for Students - Page 167
© 2012 Blackboard Inc. Proprietary and Confidential. U.S. Patent No. 6,988,138. Additional Patents Pending.
Tools > Discussion Board
4. On the Thread Detail page, click the post's title. The post appears in the Current Post portion of
the content frame. You can view the text of the post and information about the post, such as the
Author and Posted Date.
5. Click Edit.
6. On the Edit Post page, make the necessary changes in your post. You can use the Text Editor
functions to format the text and add files, images, web links, multimedia, and Mashups.
7. Click Submit.
Blackboard Learn Release 9.1 - Help for Students - Page 168
© 2012 Blackboard Inc. Proprietary and Confidential. U.S. Patent No. 6,988,138. Additional Patents Pending.
Tools > Discussion Board
How to Change the Displayed Threads
Your instructor sets the thread status as published, hidden, or draft, but you can choose which type of threads
will appear. By default, published threads appear.
1. On the Course Menu, click Discussions.
2. On the Discussion Board page, click the name of the forum.
Blackboard Learn Release 9.1 - Help for Students - Page 169
© 2012 Blackboard Inc. Proprietary and Confidential. U.S. Patent No. 6,988,138. Additional Patents Pending.
Tools > Discussion Board
3. On the Forum page, select List View.
4. On the Action Bar, point to Display to access the drop-down list.
5. Select the type of threads to view in the forum.
l
Published: A post with a Published status is available to users.
l
Hidden: A thread that is locked and not visible by default. You may choose to display
Hidden threads in List View. Hidden threads cannot be edited, even if editing has been
enabled for the thread. Hiding threads helps you find relevant content, as unneeded
content is hidden from view.
l
Draft: A Draft thread is saved to Blackboard Learn by the author for future editing, but is
not submitted for publication. It becomes available to other users when it is published.
Result
The forum page displays only those threads that have the status selected from the Display drop-down list.
How to Reply to Discussion Posts
Blackboard Learn Release 9.1 - Help for Students - Page 170
© 2012 Blackboard Inc. Proprietary and Confidential. U.S. Patent No. 6,988,138. Additional Patents Pending.
Tools > Discussion Board
Note: You can reply to published threads, but cannot reply to locked or hidden threads.
1. On the Course Menu, click Discussions.
2. On the Discussion Board page, click the name of the forum.
3. On the Forum page, click the name of the thread.
4. On the Thread Detail page, click a post's title. The post appears in the Current Post portion of the
content frame. You can view the text of the post and information about the post, such as the
Author and Posted Date.
5. Click Reply. Alternatively, click Quote to include the post's text as part of your reply.
Blackboard Learn Release 9.1 - Help for Students - Page 171
© 2012 Blackboard Inc. Proprietary and Confidential. U.S. Patent No. 6,988,138. Additional Patents Pending.
Tools > Discussion Board
6. On the Reply to Post page, click View Original Post on the Action Bar to include the original
message on the page while replying. Click Close Original Post to hide the original post from view.
If needed, edit the Subject.
7. In the Message text box, type your reply. You can use the Text Editor functions to format the text
and add files, images, web links, multimedia, and Mashups.
8. Alternatively, under Attachments, attach a file using one of the following options:
l
To upload a file from your computer, click Browse My Computer.
l
If your school licenses content management, click Browse Content Collection.
9. Click Save Draft to store a draft of the post or click Submit to post the reply. After submitting, you
cannot edit or delete your post unless your instructor has enabled those features for the forum. If
enabled, Edit or Delete appear next to Reply when viewing your post.
Blackboard Learn Release 9.1 - Help for Students - Page 172
© 2012 Blackboard Inc. Proprietary and Confidential. U.S. Patent No. 6,988,138. Additional Patents Pending.
Tools > Discussion Board
Result
Your reply appears on the Thread Detail page, indented under the parent post. If you attached a file, a paper
clip icon appears in the post's row. Click the title to open the post in the Current Post portion of the content
frame. Use the Move to previous and Move to next arrows to view another post or use the breadcrumbs to
return to the forum or the Discussion Board page.
How to Rate Discussion Posts
You can use the Discussion Board for peer review. Students start threads and include their work in their initial
posts. Other users review the work, assign a rating to the initial post, and may include comments in a response.
Blackboard Learn Release 9.1 - Help for Students - Page 173
© 2012 Blackboard Inc. Proprietary and Confidential. U.S. Patent No. 6,988,138. Additional Patents Pending.
Tools > Discussion Board
Rating posts also allows you to focus on messages considered informative or useful by others. Depending on
the forum settings, you can rate a post using a five star system. Your instructor can also rate posts.
1. On the Course Menu, click Discussions.
2. On the Discussion Board page, click the name of the forum.
3. On the Forum page, click the name of the thread.
4. On the Thread Detail page, click a post's title. The post appears in the Current Post portion of the
content frame.
Blackboard Learn Release 9.1 - Help for Students - Page 174
© 2012 Blackboard Inc. Proprietary and Confidential. U.S. Patent No. 6,988,138. Additional Patents Pending.
Tools > Discussion Board
5. For Your Rating, select one to five stars. You can add and delete stars at any time.
Result
Your rating is now included in the Overall Rating, which is the combined rating of all users. The individual
rating appears in Your Rating. Use the Move to previous and Move to next arrows to view another post.
How to Search Discussion Posts
You can search for specific text—a phrase, word, part of a word, or a name —in the Discussion Board. The
results appear on a Search Results page.
1. On the Course Menu, click Discussions.
2. On the Discussion Board page, click Search. The Search field expands.
3. In the Search text box, type search criteria, including any keywords or names you want to find.
4. In the drop-down list, select an area to search.
Blackboard Learn Release 9.1 - Help for Students - Page 175
© 2012 Blackboard Inc. Proprietary and Confidential. U.S. Patent No. 6,988,138. Additional Patents Pending.
Tools > Discussion Board
l
Current Discussion Board
l
All Forums in Course
5. To further narrow your search results, select the After and Before check boxes to enable the date
and time selections. Type dates and times in the boxes or use the pop-up Date Selection
Calendar and Time Selection Menu to select dates and times.
6. Click Go.
Result
On the Search Results page, you can read and print the results. On the Action Bar, click Print Preview to
open the page in a new window in printer-friendly format. Posts print in the order they appear on the page. To
select which posts appear and in which order, you can filter and sort posts using the Filter function and the Sort
by and Order drop-down lists on the Action Bar.
On this page, you can also reply to posts and mark messages read or unread. Click the Quote function to
include the post's text as part of your reply. To view the responses to a post, click the post's hyperlinked title to
navigate to the Thread Detail page.
You can also select the check box to collect multiple posts for reading or printing.
Blackboard Learn Release 9.1 - Help for Students - Page 176
© 2012 Blackboard Inc. Proprietary and Confidential. U.S. Patent No. 6,988,138. Additional Patents Pending.
Tools > Discussion Board
How to Collect Discussion Posts
On the Thread Detail page, you can read only one post at a time. Use the Collect function to read multiple
posts from the same page. Once posts are collected, you can filter, sort, and print them.
1. On the Course Menu, click Discussions.
2. On the Discussion Board page, click the name of the forum.
3. On the Forum page, click the name of the thread.
4. On the Thread Detail page, select the check boxes of the posts to collect. If a post has replies and
you want them to appear on the Collection page, click the plus sign to expand the post and select
the check boxes for those messages.
Note: To select all the posts in a thread, click Select: All above the Message List. All check boxes
for all the posts are selected whether they are expanded or collapsed.
5. On the Action Bar, click Collect.
Blackboard Learn Release 9.1 - Help for Students - Page 177
© 2012 Blackboard Inc. Proprietary and Confidential. U.S. Patent No. 6,988,138. Additional Patents Pending.
Tools > Discussion Board
Note: The Collect function is also available in the forum page, where it is used to gather all the
postings made to different threads. Once collected, sort the messages to further organize them.
Result
On the Search Results page, you can read and print the results. On the Action Bar, click Print Preview to
open the page in a new window in printer-friendly format. Posts print in the order they appear on the page. To
select which posts appear and in which order, you can filter and sort posts using the Filter function and the Sort
by and Order drop-down lists on the Action Bar.
On this page, you can also reply to posts and mark messages read or unread. Click the Quote function to
include the post's text as part of your reply. To view the responses to a post, click the post's hyperlinked title to
navigate to the Thread Detail page.
How to Filter Discussion Posts After Searching or Collecting
You can filter collected posts to narrow your search results or sort a collection. If you print the posts after
filtering, the posts print in the order they appear on the page.
Note: If the author or authors of some posts are no longer enrolled in the course, the posts may appear out of
order.
1. On the Course Menu, click Discussions.
2. On the Discussion Board page, click the name of the forum.
Blackboard Learn Release 9.1 - Help for Students - Page 178
© 2012 Blackboard Inc. Proprietary and Confidential. U.S. Patent No. 6,988,138. Additional Patents Pending.
Tools > Discussion Board
3. On the Forum page, click the name of the thread.
4. On the Thread Detail page, select the check boxes of the posts to collect.
5. On the Action Bar, click Collect.
Note: The Collect function is also available from the forum page, where it is used to gather all the
postings made to different threads. Once collected, sort the messages to further organize them.
Blackboard Learn Release 9.1 - Help for Students - Page 179
© 2012 Blackboard Inc. Proprietary and Confidential. U.S. Patent No. 6,988,138. Additional Patents Pending.
Tools > Discussion Board
6. On the Collection page, click the Filter function on the Action Bar to expand the field and select
options from the following drop-down lists:
l
Author: Select All or select an author.
l
Status: Show All or select a status.
l
Read Status: Select Show All, Read, or Unread posts.
l
Tags: Show All tags or select a tag.
7. Click Go to apply the selections. You can further organize the results using the Sort by and Order
drop-down lists.
8. Click the X to close the Filter field.
Note: You can select Tags if your instructor has enabled post tagging for the forum.
How to Sort Discussion Posts After Searching or Collecting
To narrow your search results or sort a collection, you can use the Sort by and Order drop-down lists. If you
print the posts after sorting, the posts print in the order they appear on the page.
Note: If the author or authors of some posts are no longer enrolled in the course, the posts may appear out of
order.
Blackboard Learn Release 9.1 - Help for Students - Page 180
© 2012 Blackboard Inc. Proprietary and Confidential. U.S. Patent No. 6,988,138. Additional Patents Pending.
Tools > Discussion Board
1. On the Course Menu, click Discussions.
2. On the Discussion Board page, click the name of the forum.
3. On the Forum page, click the name of the thread.
4. On the Thread Detail page, select the check boxes of the posts to collect.
5. On the Action Bar, click Collect.
Note: The Collect function is also available from the forum page, where it is used to gather all the
postings made to different threads. Once collected, sort the messages to further organize them.
Blackboard Learn Release 9.1 - Help for Students - Page 181
© 2012 Blackboard Inc. Proprietary and Confidential. U.S. Patent No. 6,988,138. Additional Patents Pending.
Tools > Discussion Board
6. On the Collection page, point to Sort by on the Action Bar to access the drop-down list. Select an
option:
l
Author's Last Name
l
Author's First Name
l
Subject
l
Date of Last Post
l
Thread Order
7. On the Action Bar, point to Order to access the drop-down list. Sort posts in ascending or
descending order.
How to View Discussion Board Grades
1. On the Course Menu, click Tools.
2. On the Tools page, click My Grades.
Blackboard Learn Release 9.1 - Help for Students - Page 182
© 2012 Blackboard Inc. Proprietary and Confidential. U.S. Patent No. 6,988,138. Additional Patents Pending.
Tools > Discussion Board
3. If your posts to the forum have not been graded, the Grade column contains a symbol indicating its
status. If your post has been submitted and graded, the grade appears in the Grade column. To
view more detail, click the link to see the post's Grade Forum page. This page includes:
l
Forum Statistics: This section shows information about your posts, such as Date of
Last Post, Average Post Length, and Average Post Position.
l
Forum Grade: This section provides information about your Grade, instructor's
Feedback, and Grading Notes.
l
Contributors: This section shows other users who participated in the forum.
Note: If you see feedback for an item but do not see a grade, contact your instructor.
Note: If your instructor has used a rubric for grading, click View Rubric to display detailed grading information.
If there is no associated rubric or your instructor has not made it available, the View Rubric button will not be
visible.
How to Moderate Discussion Board Content
As an discussion Moderator, your role is to facilitate the conversation and exchange of ideas on the Discussion
forum. You need to ensure that participants feel comfortable to share, while also monitoring responses and
keeping everyone focused and on track. At the same time, you want to be careful not to dominate or impede the
flow of the discussion.
Occasionally, participants may introduce material to the Discussion Board that is inappropriate for the class
discussion. Depending on the maturity and the sensitivity of the participants in your course, it can be important
to review participant posts for inappropriate content before sharing posts with the rest of the class.
Blackboard Learn Release 9.1 - Help for Students - Page 183
© 2012 Blackboard Inc. Proprietary and Confidential. U.S. Patent No. 6,988,138. Additional Patents Pending.
Tools > Discussion Board
When a moderated forum is created, all posts to the forum are added to a Moderation Queue. The Moderator
reviews each post and does one of the following:
l
Publishes the post.
l
Returns the post to the sender without a message.
l
Returns the post to the sender with a message.
The Moderator can delete, edit, and lock posts in a forum, even if the forum does not use the Moderation
Queue.
How to Moderate Posts
1. After posts have been submitted, access the forum. In the Moderator view, no posts appear
because the messages are waiting approval. On the Action Bar, click Moderate Forum.
Note: The Moderate Forum function appears only to those users who have a forum role of
Manager or Moderator. In the student view, the author can see the post in Tree View with a
reminder it is in the Moderation Queue.
2. On the Moderation Queue page, the posts appear in alphabetical order by title. Click the column
title or caret to sort by post title, author, or date. To review a post, click Moderate.
3. On the Moderate Post page, read the post and select the Publish or Return option. Published
messages are immediately posted to the thread.
Blackboard Learn Release 9.1 - Help for Students - Page 184
© 2012 Blackboard Inc. Proprietary and Confidential. U.S. Patent No. 6,988,138. Additional Patents Pending.
Tools > Discussion Board
4. Optionally, type feedback in the text box. You can use the Text Editor functions to format the text,
link to files in Course Files or the Content Collection, and include web links, multimedia, and
Mashups.
Note: Though feedback is optional, this is an opportunity to provide guidance, ask questions,
redirect a student's focus, and explain why a post was returned.
5. Click Submit.
Result
Returned posts no longer appear in the Moderation Queue. Students see their returned posts in the forum.
When returned posts are opened, students see an explanation, if feedback was included, and they can create
new threads as needed.
Blackboard Learn Release 9.1 - Help for Students - Page 185
© 2012 Blackboard Inc. Proprietary and Confidential. U.S. Patent No. 6,988,138. Additional Patents Pending.
Tools > Email
Related Tutorials
Creating a New Discussion Board Thread (Flash movie | 1m 52s | 4,750 KB) |
Replying to
a Discussion Board Thread (Flash movie | 1m 59s | 5,083 KB) |
Creating a Discussion Board Post (Flash movie | 2m
40s | 5,135 KB) |
Organizing Discussion Board Posts (Flash movie | 2m 27s | 4,624 KB) |
Viewing Discussion
Board Grades (Flash movie | 1m 38s | 3,181 KB)
Email
The Email tool allows you to send email to other people in your course from within Blackboard Learn without
launching an external email client, such as Gmail or Yahoo. Emails can be sent to individual users or to groups
of users. A copy of this email is sent to the sender by default.
IMPORTANT! Blackboard Learn keeps no record of sent or received emails. When you receive or send an
email, the email will appear in the Inbox of your external email client. Keep a copy of important messages in
case you need them at a later date.
Note: Your instructor controls which tools are available. If this tool is not available, your instructor may have
disabled it.
You can send email to the following people in a course:
l
All Users: Sends email to all users in the course.
l
All Groups: Sends email to all of the groups in a specified course.
l
All Teaching Assistant Users: Sends email to all of the Teaching Assistants in a specified course.
l
All Student Users: Sends an email to all students in the course.
l
All Instructor Users: Sends email to all of the instructors for a specified course.
l
Select Users: Sends email to select users.
l
Select Groups: Sends email to select groups.
Note: Recipients of each email will not see the email addresses of other recipients.
Before You Begin
l
Blackboard Learn will NOT recognize files or email addresses with spaces or special characters,
such as #, &, %, and $. In general, use only alphanumeric file names and addresses in Blackboard
Blackboard Learn Release 9.1 - Help for Students - Page 186
© 2012 Blackboard Inc. Proprietary and Confidential. U.S. Patent No. 6,988,138. Additional Patents Pending.
Tools > Email
Learn.
l
Do not send email through Blackboard Learn without content in the subject line. Leaving the subject
line blank can prevent the message from being delivered.
How to Send Email
1. On the Course Menu, click Tools.
2. On the Tools page, click Send Email.
Note: You can also access the Send Email feature for all of your courses through the Tools panel
on the My Institution tab. The Email tool may also be available directly from the Course Menu
when added by your instructor.
3. From the Select Users or Select Groups page, select the recipients in the Available to Select
box and click the right-pointing arrow to move them into the Selected box. A back arrow is available
to move a user out of the recipient list. Click Invert Selection and the selected users are no longer
highlighted and those users that were not selected will be highlighted.
Tip: For Windows, to select multiple users in a list, press the SHIFT key and click the first and
last users. To select users out of sequence, press the CTRL key and click each user needed. For
Macs, use the COMMAND key instead of the CTRL key. You can also use the Select All function to
send an email to all users.
4. Type your Subject.
5. Type your Message. A copy of the message is sent to the sender. A receipt page appears after the
message is sent listing all recipients. The receipt page does not confirm that users received the
message. It only confirms that the message was sent.
6. Click Attach a File to browse for files from your computer. You can attach multiple files. After you
add one file, the option to attach another file appears.
7. Click Submit.
Blackboard Learn Release 9.1 - Help for Students - Page 187
© 2012 Blackboard Inc. Proprietary and Confidential. U.S. Patent No. 6,988,138. Additional Patents Pending.
Tools > Journals
Troubleshooting
l
Your email address is not visible unless you choose to make it visible to course members. Find this
setting in the page header at: My Places > Personal Information > Set Privacy Options. From this
page, you can choose the information you want course members to see.
l
You can change your external email address used in your course. Change your email address by
going to My Places > Personal Information > Edit Personal Information. Type your preferred
email address and click Submit.
l
Email clients, such as Gmail or Yahoo, may identify email from Blackboard Learn as junk mail and
either automatically delete the email or move it to a junk mail folder. If you have problems, check your
user preferences or options for settings regarding the handling of junk email.
Journals
Note: Your instructor controls which tools are available. If this tool is not available, your instructor may have
disabled it.
Journals are a personal space for you to communicate privately with your instructor. You can also use a journal
as a self-reflective tool to post your opinions, ideas, and concerns about your course, or discuss and analyze
Blackboard Learn Release 9.1 - Help for Students - Page 188
© 2012 Blackboard Inc. Proprietary and Confidential. U.S. Patent No. 6,988,138. Additional Patents Pending.
Tools > Journals
course related materials. For example, you can describe problems you faced and how you solved them. Your
instructor can direct journal entries to be more formal in nature and narrower in focus by listing topics for
discussion.
Your instructor can choose to make journal entries public, allowing all course members to view all entries. You
can read what other students wrote and build on those ideas.
When used in the group area, members of a group can view and comment on each other’s entries for a group
journal. The group can communicate with their instructor as a whole and all members can benefit from the
comments made.
Your instructor can grade group journals and apply the grade to every member of the course group. Journal
entries can also be used specifically for communication. In either instance, you can make multiple entries for
one journal topic.
The Journal topic page is divided into two main sections. You can view the Instructions in the content frame.
Click the X to collapse the Instructions. In the side panel, you can view information about the journal. Expand
and collapse sections in the side panel using the double arrows.
Create Journal Entry: Create a journal entry using the Create Journal Entry function. You can make
another journal entry for a topic at any time. For example, your instructor may add a comment requesting that
you clarify what has been written before a grade is assigned or suggest a topic for another entry.
View Drafts: Access any entries saved as drafts. Click View Drafts on the Action Bar.
Journal Entry: Your journal entries appear in the content frame following the Instructions.
Comments: Following an entry, you can see if comments were made. Click the link to view comments.
Comment: You can add comments by clicking Comment.
About this Journal: In the side panel, view the journal information in the About this Journal section.
Blackboard Learn Release 9.1 - Help for Students - Page 189
© 2012 Blackboard Inc. Proprietary and Confidential. U.S. Patent No. 6,988,138. Additional Patents Pending.
Tools > Journals
Journal Grade: The Journal Grade section appears if a journal is set to be graded. You can see if your
journal entries have been graded..
More Journals: View other journal entries made by other course members in the More Journals section.
Index: View the titles of your selected entries for either the week or the month in the Index section,
determined by the settings your instructor selects during journal creation. The most recent entry title appears
first.
How to Access a Journal
1. On the Course Menu, click Journals.
-OROn the Course Menu, click Tools and then click Journals.
2. On the Journals listing page, select a journal to open.
Blackboard Learn Release 9.1 - Help for Students - Page 190
© 2012 Blackboard Inc. Proprietary and Confidential. U.S. Patent No. 6,988,138. Additional Patents Pending.
Tools > Journals
How to Create a Journal Entry
Only your instructor can create a journal topic, but once created, you can create entries. The journal topics
appear in alphabetical order on the Journals listing page. Create and post journal entries or save them in draft
form for later posting.
1. On the Course Menu, click Journals.
-OROn the Course Menu, click Tools and then click Journals.
Blackboard Learn Release 9.1 - Help for Students - Page 191
© 2012 Blackboard Inc. Proprietary and Confidential. U.S. Patent No. 6,988,138. Additional Patents Pending.
Tools > Journals
2. On the Journals listing page, select a journal to open.
3. On the Journal topic page, click Create Journal Entry.
4. On the Create Journal Entry page, type an Entry Title.
5. Type the text in the Entry Message text box.
6. Alternatively, in the Attach File field, attach a file using one of the following options:
l
To upload a file from your computer, click Browse My Computer.
l
To upload a file from the course's storage repository:
o
If Course Files is the course's storage repository, click Browse Course.
-OR-
o
If your school licenses content management, click Browse Content
Collection.
Blackboard Learn Release 9.1 - Help for Students - Page 192
© 2012 Blackboard Inc. Proprietary and Confidential. U.S. Patent No. 6,988,138. Additional Patents Pending.
Tools > Journals
Note: Files added by students are private and stored in a secure location. These files are not
accessible through the course.
7. Click Post Entry.
-ORClick Save Entry as Draft to save the entry for later posting.
Note: If your instructor has associated a rubric with the journal and made it available to students, click View
Rubric in the Journal Grade section to display grading criteria.
If there is no associated rubric or your instructor has not made it available, the View Rubric button will not be
visible.
Blackboard Learn Release 9.1 - Help for Students - Page 193
© 2012 Blackboard Inc. Proprietary and Confidential. U.S. Patent No. 6,988,138. Additional Patents Pending.
Tools > Journals
Viewing Journal Drafts
You can save journal entries to post later by clicking Save Entry as Draft. You can view these drafts by
clicking View Drafts on the main journal page.
How to Comment on a Journal Entry
You can create comments to journal entries if commenting is allowed by your instructor. You can add a
comment after your instructor comments on an entry to continue the conversation.
You cannot make comments on another user’s journal entry, even if the journal has been made public. Users
can only comment on another user’s entry when they are members of a group. For group journals, all group
members and their instructor are allowed to make comments on individual entries.
1. On the Course Menu, click Journals.
-OROn the Course Menu, click Tools and then click Journals.
Blackboard Learn Release 9.1 - Help for Students - Page 194
© 2012 Blackboard Inc. Proprietary and Confidential. U.S. Patent No. 6,988,138. Additional Patents Pending.
Tools > Journals
2. On the Journals listing page, select a journal to open.
3. On the Journal topic page, click Comment for the selected entry.
4. Type a comment in the Comment field.
5. Click Add.
Blackboard Learn Release 9.1 - Help for Students - Page 195
© 2012 Blackboard Inc. Proprietary and Confidential. U.S. Patent No. 6,988,138. Additional Patents Pending.
Tools > Journals
How to Edit a Journal Entry
You can edit your journal entries if your instructor allows it. However, if you edit gradable journal entries, the
original graded entry will be lost.
1. On the Course Menu, click Journals.
-OROn the Course Menu, click Tools and then click Journals.
Blackboard Learn Release 9.1 - Help for Students - Page 196
© 2012 Blackboard Inc. Proprietary and Confidential. U.S. Patent No. 6,988,138. Additional Patents Pending.
Tools > Journals
2. On the Journals listing page, select a journal to open.
3. On the Journal topic page, select Edit from the contextual menu for the journal entry.
Blackboard Learn Release 9.1 - Help for Students - Page 197
© 2012 Blackboard Inc. Proprietary and Confidential. U.S. Patent No. 6,988,138. Additional Patents Pending.
Tools > Journals
4. On the Edit Journal Entry page, make the necessary changes.
5. Click Post Entry.
Blackboard Learn Release 9.1 - Help for Students - Page 198
© 2012 Blackboard Inc. Proprietary and Confidential. U.S. Patent No. 6,988,138. Additional Patents Pending.
Tools > Journals
How to Delete a Journal Entry
You can delete your journal entries if your instructor allows it. However, if you delete gradable journal entries,
the original graded entry will be lost.
1. On the Course Menu, click Journals.
-OROn the Course Menu, click Tools and then click Journals.
Blackboard Learn Release 9.1 - Help for Students - Page 199
© 2012 Blackboard Inc. Proprietary and Confidential. U.S. Patent No. 6,988,138. Additional Patents Pending.
Tools > Journals
2. On the Journals list page, select a journal to open.
3. On the Journal topic page, select Deletefrom the contextual menu for the journal entry. This action
is final and cannot be undone.
Blackboard Learn Release 9.1 - Help for Students - Page 200
© 2012 Blackboard Inc. Proprietary and Confidential. U.S. Patent No. 6,988,138. Additional Patents Pending.
Tools > Journals
Viewing Journal Grades
When your journal entries have been graded, you can view your grade in two places .The grading information
appears under the Journal Grade section on the Journal topic page and in the My Grades tool. Any feedback
and the date the grade was assigned also appear in these areas.
Note: If your instructor has used a rubric for grading and made it available to students, click View Rubric to
display detailed grading information.
Blackboard Learn Release 9.1 - Help for Students - Page 201
© 2012 Blackboard Inc. Proprietary and Confidential. U.S. Patent No. 6,988,138. Additional Patents Pending.
Tools > Messages
If there is no associated rubric or your instructor has not made it available, the View Rubric button will not be
visible
Troubleshooting Journal Management
l
If your instructor deleted the journal while you are posting, the journal and all comments are deleted.
l
If a journal is made unavailable while you are posting, the journal remains visible to your instructor in
Edit view but is not displayed to you.
l
If the Allow Users to Edit and Delete Entries setting is changed, entries remain but you cannot
edit them.
l
If the Allow Users to Delete Comments setting is changed, comments remain but you cannot edit
them.
Messages
Note: Your instructor controls which tools are available. If this tool is not available, your instructor may have
disabled it.
The Blackboard Learn Messages tool provides you with a familiar, email-like environment that you can use for
course communication. Accounts are automatically created for each member of the course, and messages are
sent and received using that account. This provides additional privacy because external email addresses are
not used, so external factors will not affect course communication.
You cannot receive messages outside your course and you are not notified if you receive a new message, so
make routine checks for new messages.
Messages are usually accessed through the tools area of a course. However, your instructor can restrict
access or create a link on the Course Menu so that messages are directly accessible.
Blackboard Learn Release 9.1 - Help for Students - Page 202
© 2012 Blackboard Inc. Proprietary and Confidential. U.S. Patent No. 6,988,138. Additional Patents Pending.
Tools > Messages
Create Message: Use the Create Message function to create new messages. Create Folder: Use the Create Folder function to add a new folder. You can use folders to organize
messages.
Inbox: The Inbox folder opens with a list of messages received.
Sent: The Sent folder opens with a list of messages that you sent.
Delete Folder/Delete: The Delete Folder or Delete function in the folder contextual menu removes the
folder. To delete personal folders, select the check box next to each folder to delete. Then, click Delete Folder
on the Action Bar. The folders, and any messages in the folders, are deleted.
Edit: The Edit function changes the name of a personal folder. It is not possible to modify the name of the
Inbox folder or Sent folder.
How to Create a Message
You can send messages to course members using the Messages tool. Using the Messages tool instead of the
Email tool can also be more reliable. Incorrect or out-of-date student email addresses will not affect course
communication.
1. On the Course Menu, click Tools.
2. On the Tools page, click Messages.
Blackboard Learn Release 9.1 - Help for Students - Page 203
© 2012 Blackboard Inc. Proprietary and Confidential. U.S. Patent No. 6,988,138. Additional Patents Pending.
Tools > Messages
3. On the Messages page, click Create Message.
4. On the Compose Message page, click To, and a list of course members appears.
5. In the Select Recipients: To line box, select the recipients and click the right-pointing arrow to
move them to the Recipients box. You can use the Cc, and Bcc functions to send the message to
those users that may be interested in the message, but are not the primary recipients. When using
Bcc, other recipients do not know that the users listed in the Bcc field are receiving the message.
6. Type a Subject.
7. Type a message. Optionally, you can use the Text Editor to format the Body text.
8. Click Browse to select a file to attach to the message. If the message is a reply or a forward, you
have the option of including the original attachment.
9. Click Submit.
Blackboard Learn Release 9.1 - Help for Students - Page 204
© 2012 Blackboard Inc. Proprietary and Confidential. U.S. Patent No. 6,988,138. Additional Patents Pending.
Tools > Messages
Tip: For Windows, to select multiple users in a row, press the SHIFT key and click the first and
last names. To select users out of sequence, press the CTRL key and click each name needed. For
Macs, press the COMMAND key instead of the CTRL key. You can also select all course members
with the Select All function.
How to Create a Message Folder
You can create personal folders to help organize your messages. Personal folders are only for storing
messages. Messages received always appear in the Inbox folder first and messages sent always appear in the
Sent folder. Once a message appears, it can be moved into a personal folder.
Blackboard Learn Release 9.1 - Help for Students - Page 205
© 2012 Blackboard Inc. Proprietary and Confidential. U.S. Patent No. 6,988,138. Additional Patents Pending.
Tools > Messages
1. On the Course Menu, click Tools.
2. On the Tools page, click Messages.
3. On the Messages page, click Create Folder on the Action Bar.
4. On the Add Folder page, type the name of the new personal folder in the Name box.
5. Click Submit.
Blackboard Learn Release 9.1 - Help for Students - Page 206
© 2012 Blackboard Inc. Proprietary and Confidential. U.S. Patent No. 6,988,138. Additional Patents Pending.
Tools > Messages
How to View a Message
1. On the Course Menu, click Tools.
2. On the Tools page, click Messages.
3. On the Messages page, select a folder.
Blackboard Learn Release 9.1 - Help for Students - Page 207
© 2012 Blackboard Inc. Proprietary and Confidential. U.S. Patent No. 6,988,138. Additional Patents Pending.
Tools > Messages
4. On the Folder page, click the link in the message's Subject column.
Blackboard Learn Release 9.1 - Help for Students - Page 208
© 2012 Blackboard Inc. Proprietary and Confidential. U.S. Patent No. 6,988,138. Additional Patents Pending.
Tools > Messages
How to Reply to a Message
1. On the Course Menu, click Tools.
2. On the Tools page, click Messages.
3. On the Messages page, select a folder.
4. On the Folder page, click the link in the message's Subject column.
Blackboard Learn Release 9.1 - Help for Students - Page 209
© 2012 Blackboard Inc. Proprietary and Confidential. U.S. Patent No. 6,988,138. Additional Patents Pending.
Tools > Messages
5. On the View Message page, click Reply to compose a message to the sender or Reply All to
reply to the sender and all other recipients of the message already populated in the To: field.
Note: You can add other users to the message. The text of the message is already populated with
the text of the original message. You can add additional text.
6. On the Reply to Message page, compose your message.
7. Click Submit.
Blackboard Learn Release 9.1 - Help for Students - Page 210
© 2012 Blackboard Inc. Proprietary and Confidential. U.S. Patent No. 6,988,138. Additional Patents Pending.
Tools > Messages
How to Forward a Message
1. On the Course Menu, click Tools.
2. On the Tools page, click Messages.
Blackboard Learn Release 9.1 - Help for Students - Page 211
© 2012 Blackboard Inc. Proprietary and Confidential. U.S. Patent No. 6,988,138. Additional Patents Pending.
Tools > Messages
3. On the Messages page, select a folder.
4. On the Folder page, click the link in the message's Subject column.
Blackboard Learn Release 9.1 - Help for Students - Page 212
© 2012 Blackboard Inc. Proprietary and Confidential. U.S. Patent No. 6,988,138. Additional Patents Pending.
Tools > Messages
5. On the View Message page, click Forward to send a copy of the message to someone else.
6. On the Forward Message page, select the recipients in the Select Recipients: To line box and
click the right-pointing arrow to move them to the Recipients box.
7. Click Submit.
Blackboard Learn Release 9.1 - Help for Students - Page 213
© 2012 Blackboard Inc. Proprietary and Confidential. U.S. Patent No. 6,988,138. Additional Patents Pending.
Tools > Messages
Tip: For Windows, to select multiple users in a row, press the SHIFT key and click the first and
last names. To select users out of sequence, press the CTRL key and click each name needed. For
Macs, press the COMMAND key instead of the CTRL key. You can also select all course members
with the Select All function.
How to Move a Message
You can move messages from any folder to a personal folder. Using personal folders is a good way to organize
messages so they are easy to find later. Use the Move Message function to move messages from one folder to
another. Messages cannot be moved to the Sent folder or the Inbox folder.
1. On the Course Menu, click Tools.
2. On the Tools page, click Messages.
Blackboard Learn Release 9.1 - Help for Students - Page 214
© 2012 Blackboard Inc. Proprietary and Confidential. U.S. Patent No. 6,988,138. Additional Patents Pending.
Tools > Messages
3. On the Messages page, click a folder to view the messages in that folder.
4. On the Folder page, select the check box for each message and click Move.
Blackboard Learn Release 9.1 - Help for Students - Page 215
© 2012 Blackboard Inc. Proprietary and Confidential. U.S. Patent No. 6,988,138. Additional Patents Pending.
Tools > Messages
5. On the Move Message page, select a folder from the Select a Personal Folder drop-down list.
This is the folder where you will store your messages. The messages are removed from the old
folder after they are moved to the new folder.
6. Click Submit.
How to Delete a Message
1. On the Course Menu, click Tools.
2. On the Tools page, click Messages.
Blackboard Learn Release 9.1 - Help for Students - Page 216
© 2012 Blackboard Inc. Proprietary and Confidential. U.S. Patent No. 6,988,138. Additional Patents Pending.
Tools > Messages
3. On the Messages page, click a folder to view the messages in that folder.
4. On the Folder page, select the check box for each message and click Delete.
Note: This action is final and cannot be undone.
Blackboard Learn Release 9.1 - Help for Students - Page 217
© 2012 Blackboard Inc. Proprietary and Confidential. U.S. Patent No. 6,988,138. Additional Patents Pending.
Tools > Messages
How to Print a Message
1. On the Course Menu, click Tools.
2. On the Tools page, click Messages.
3. On the Messages page, select a folder.
Blackboard Learn Release 9.1 - Help for Students - Page 218
© 2012 Blackboard Inc. Proprietary and Confidential. U.S. Patent No. 6,988,138. Additional Patents Pending.
Tools > Messages
4. On the Folder page, click the link in the message's Subject column.
5. On the View Message page, click Print. The message is printed using the web browser's print
settings.
Blackboard Learn Release 9.1 - Help for Students - Page 219
© 2012 Blackboard Inc. Proprietary and Confidential. U.S. Patent No. 6,988,138. Additional Patents Pending.
Tools > My Grades
My Grades
Note: Your instructor controls which tools are available. If this tool is not available, your instructor may have
disabled it.
The My Grades page shows the status of gradable items, such as tests, assignments, journal and blog entries,
and discussion posts.
The My Grades page may include item names, details, due dates, student and instructor dates of activity,
posted grades, points possible, links to rubrics used for grading, and your instructor's comments about the
items.
How to Access My Grades
Accessing My Grades From Within Your Course
1. On the Course Menu, click Tools.
2. On the Tools page, click My Grades.
Accessing My Grades From Outside Your Course
1. On the My Institution tab, click My Grades on the Tools panel.
2. On the My Courses/Organizations page, click the name of your course.
Blackboard Learn Release 9.1 - Help for Students - Page 220
© 2012 Blackboard Inc. Proprietary and Confidential. U.S. Patent No. 6,988,138. Additional Patents Pending.
Tools > My Grades
How to View Grade Details
1. On the Course Menu, click Tools.
2. On the Tools page, click My Grades.
3. If your assignment has not been graded, the Grade column contains a symbol indicating its status.
If your assignment has been submitted and graded, the grade appears in the Grade column. To
Blackboard Learn Release 9.1 - Help for Students - Page 221
© 2012 Blackboard Inc. Proprietary and Confidential. U.S. Patent No. 6,988,138. Additional Patents Pending.
Tools > Search for Users
view more detail, click the link to see the assignment's Review Submission History page. This
page includes:
l
Instructor Feedback: This section lists your grade and any feedback provided by your
instructor.
l
Attached Files: This section provides links to open or download any files attached by you
or your instructor. For example, your instructor might provide comments in a file that you
submitted with your assignment.
Note: If you see feedback for an item but do not see a grade, contact your instructor.
My Grade Item Status
The following table describes the symbols appearing on the My Grades page.
Symbol
Description
-
Item has not been completed. No information is available.
Item is completed, but will not have a grade (for items such as surveys).
Item has been submitted. This item is waiting to be reviewed by your instructor.
-ORItem has been submitted. Your instructor may review this item but may not be provided a grade (for items
such as surveys).
Grade
Item has been graded. Click the grade to view detailed feedback.
Attempt is in progress. This item has not been submitted. To submit the item, see Submitting a Draft
Assignment.
Grade is exempted for this user. If you do not complete this assignment, it will not affect your grade.
Error has occurred. Contact your instructor.
Related Tutorials
Checking Your Grades (Flash movie | 2m 18s | 4,007 KB)
Search for Users
Note: Your instructor controls which tools are available. If these tools are not available, your instructor may
have disabled them.
To search for other students in your course, use the Roster. The name of each student is included in the Roster
automatically. You cannot remove your name from the Roster, but you can choose to make your email address
available.
To search for other students and instructors in the system, use the User Directory. You can choose whether to
be included and what information to share by setting your privacy options. To learn more, see How to Set
Privacy Options.
For your personal information to appear in the Roster or User Directory, it must be appear on the Edit Personal
Information page. To learn more, see How to Edit Personal Information.
How to Search for Other Students in Your Course Using the Roster
1. On the Course Menu, click Tools.
Blackboard Learn Release 9.1 - Help for Students - Page 222
© 2012 Blackboard Inc. Proprietary and Confidential. U.S. Patent No. 6,988,138. Additional Patents Pending.
Tools > Search for Users
2. On the Tools page, click Roster.
3. On the Roster page, use the following parameters to search for users, or click Go to list all
students:
l
First Name
l
Last Name
l
Contains
l
Equal to
l
Starts with
l
Not blank
4. Type a name or keyword in the text box.
5. Click Go.
How to Search for Users in the User Directory
1. On the Tools panel, click User Directory.
Blackboard Learn Release 9.1 - Help for Students - Page 223
© 2012 Blackboard Inc. Proprietary and Confidential. U.S. Patent No. 6,988,138. Additional Patents Pending.
Tools > Tasks
2. On the Users page, use the following parameters to search for users, or click Go to list all users:
l
Username
l
First Name
l
Last Name
l
Email
l
Contains
l
Equal to
l
Starts with
3. Type a name or keyword in the text box.
4. Click Go.
Tasks
Note: Your instructor controls which tools are available. If this tool is not available, your instructor may have
disabled it.
The Tasks page organizes projects (referred to as tasks), defines task priority, and tracks task status. Your
instructors can assign tasks to users participating in their course. Tasks can also be assigned to all members
of a course group.
From the Tools panel you can view all of your tasks, including those from the courses you are participating in,
tasks posted by the Blackboard administrator at your school, and your personal tasks. You can create your own
tasks and post them to the Tasks page. When you access tasks through the course, you view tasks for that
specific course.
Blackboard Learn Release 9.1 - Help for Students - Page 224
© 2012 Blackboard Inc. Proprietary and Confidential. U.S. Patent No. 6,988,138. Additional Patents Pending.
Tools > Tasks
Note: The Tasks tool is not the same as the To Do module. To learn more about the To Do module, see To Do
Module.
How to Open the Task List
1. On the Course Menu, click Tools.
2. On the Tools page, click Tasks.
-OROn the Tools panel, click Tasks.
How to Create or Edit a Personal Task
1. On the Tools panel, click Tasks.
Blackboard Learn Release 9.1 - Help for Students - Page 225
© 2012 Blackboard Inc. Proprietary and Confidential. U.S. Patent No. 6,988,138. Additional Patents Pending.
Tools > Tasks
2. To create a task, on the Tasks page, click Create Personal Task.
-ORTo edit an existing task, click Edit from the contextual menu for a particular task.
Blackboard Learn Release 9.1 - Help for Students - Page 226
© 2012 Blackboard Inc. Proprietary and Confidential. U.S. Patent No. 6,988,138. Additional Patents Pending.
Tools > Tasks
Note: You can only edit personal tasks.
3. On Create Personal Task page, type your Task Name.
4. Type a Description.
5. Type a Due Date or use the Date Selection Calendar to set the due date.
6. Select the level of priority for your task from the Priority drop-down list.
7. Click Submit.
Blackboard Learn Release 9.1 - Help for Students - Page 227
© 2012 Blackboard Inc. Proprietary and Confidential. U.S. Patent No. 6,988,138. Additional Patents Pending.
Tools > Tasks
How to Sort the List of Tasks
1. On the Tools panel, click Tasks.
2. On the Tasks page, click the drop-down arrow and select a task category. Categories include: All
Tasks, My Tasks, and By Course.
Blackboard Learn Release 9.1 - Help for Students - Page 228
© 2012 Blackboard Inc. Proprietary and Confidential. U.S. Patent No. 6,988,138. Additional Patents Pending.
Tools > Tasks
How to Change the Status of a Task
1. On the Tools panel, click Tasks.
2. On the Tasks page, select the tasks and click Status to select the current status: Set Not Started,
Set In Progress, and Set Complete.
Blackboard Learn Release 9.1 - Help for Students - Page 229
© 2012 Blackboard Inc. Proprietary and Confidential. U.S. Patent No. 6,988,138. Additional Patents Pending.
Tools > Tasks
How to Delete a Personal Task
Note: This action is final and cannot be undone.
1. On the Tools panel, click Tasks.
Blackboard Learn Release 9.1 - Help for Students - Page 230
© 2012 Blackboard Inc. Proprietary and Confidential. U.S. Patent No. 6,988,138. Additional Patents Pending.
Tools > Tasks
2. On the Tasks page, select Delete in the contextual menu for a task.
How to View Task Details
1. On the Tools panel, click Tasks.
2. On the Tasks page, select a task.
Blackboard Learn Release 9.1 - Help for Students - Page 231
© 2012 Blackboard Inc. Proprietary and Confidential. U.S. Patent No. 6,988,138. Additional Patents Pending.
Tools > Wikis
Related Tutorials
Stay Organized by Managing Your Course and Personal Tasks (Flash movie | 3m 02s | 4,994
KB)
Wikis
Note: Your instructor controls which tools are available. If this tool is not available, your instructor may have
disabled it.
A wiki is a collaborative tool that allows you to contribute and modify one or more pages of course related
materials. The wiki page is an area where users can collaborate on content. Users within a course can create
and edit wiki pages in the course or within a course group. Instructors and students can offer comments and
your instructor can grade individual work.
How to Create a Wiki Page
1. On the Course Menu, click Tools.
2. On the Tools page, click Wikis.
Blackboard Learn Release 9.1 - Help for Students - Page 232
© 2012 Blackboard Inc. Proprietary and Confidential. U.S. Patent No. 6,988,138. Additional Patents Pending.
Tools > Wikis
3. On the Wikis listing page, select a wiki title.
4. On the Wiki topic page, click Create Wiki Page.
Blackboard Learn Release 9.1 - Help for Students - Page 233
© 2012 Blackboard Inc. Proprietary and Confidential. U.S. Patent No. 6,988,138. Additional Patents Pending.
Tools > Wikis
5. On the Create Wiki Page, type a Name for the wiki page.
6. Type text in the Content text box. You can use the Text Editor functions to format the text and
include files, images, web links, multimedia, and Mashups.
7. Click Submit.
Note: If your instructor has associated a rubric with the journal and made it available to students, click My
Contributions page, click View Rubric in the Grade section to display grading criteria.
Blackboard Learn Release 9.1 - Help for Students - Page 234
© 2012 Blackboard Inc. Proprietary and Confidential. U.S. Patent No. 6,988,138. Additional Patents Pending.
Tools > Wikis
If there is no associated rubric or your instructor has not made it available, the View Rubric button will not be
visible.
How to Edit Wiki Content
Any course member can edit a course wiki page and any group member can edit a group wiki page. All course
members, including your instructor, edit in the same way.
When a wiki page is being edited by one user, it is locked to prevent others from editing the same page. If you
try to edit a page someone else is editing, you are informed that the page is currently being edited by another
user.
1. On the Course Menu, click Tools.
2. On the Tools page, click Wikis.
3. On the Wikis listing page, select a wiki title.
Blackboard Learn Release 9.1 - Help for Students - Page 235
© 2012 Blackboard Inc. Proprietary and Confidential. U.S. Patent No. 6,988,138. Additional Patents Pending.
Tools > Wikis
4. On the Wiki topic page, select the wiki page to edit.
5. Click Edit Wiki Content.
6. On the Edit Wiki Page, make the necessary changes.
7. Click Submit to save your work.
Blackboard Learn Release 9.1 - Help for Students - Page 236
© 2012 Blackboard Inc. Proprietary and Confidential. U.S. Patent No. 6,988,138. Additional Patents Pending.
Tools > Wikis
Note: If your instructor has associated a rubric with the journal and made it available to students, click My
Contributions, then click View Rubric in the Grade section to display grading criteria.
If there is no associated rubric or your instructor has not made it available, the View Rubric button will not be
visible.
How to Link to other Wiki Pages
If the wiki consists of many pages, it can be helpful to insert a link to that page right on the page currently being
viewed. You can only create links to other wiki pages when at least two pages exist. The link icon appears in
the text editor of the page you are working on.
1. On the Course Menu, click Tools.
2. On the Tools page, click Wikis.
Blackboard Learn Release 9.1 - Help for Students - Page 237
© 2012 Blackboard Inc. Proprietary and Confidential. U.S. Patent No. 6,988,138. Additional Patents Pending.
Tools > Wikis
3. On the Wiki listing page, select a wiki title.
4. On the Wiki topic page, select the wiki page where you want to place the link. The wiki page opens
in the content frame.
5. Click Edit Wiki Content.
Blackboard Learn Release 9.1 - Help for Students - Page 238
© 2012 Blackboard Inc. Proprietary and Confidential. U.S. Patent No. 6,988,138. Additional Patents Pending.
Tools > Wikis
6. On the Edit Wiki Page, position your mouse pointer where you want to add a link to another wiki
page.
7. Click the Link to Wiki page function in the Text Editor, represented by several sheets of paper. If
there is only one page in the wiki, this function is disabled.
8. On the Insert Wiki Page Link pop-up window, select the wiki page to link to from the drop-down
list.
9. Optionally, type a name for the link in the Rename Wiki Page Link text box. If you do not rename
the link, the original page title is used as the link.
10. Click Submit. The link appears in the Text Editor.
Blackboard Learn Release 9.1 - Help for Students - Page 239
© 2012 Blackboard Inc. Proprietary and Confidential. U.S. Patent No. 6,988,138. Additional Patents Pending.
Tools > Wikis
11. On Edit Wiki Page, click Submit. The new page with the link is added to the wiki.
How to Comment on a Wiki Entry
1. On the Course Menu, click Tools.
Blackboard Learn Release 9.1 - Help for Students - Page 240
© 2012 Blackboard Inc. Proprietary and Confidential. U.S. Patent No. 6,988,138. Additional Patents Pending.
Tools > Wikis
2. On the Tools page, click Wikis.
3. On the Wikis listing page, select a wiki title.
4. On the Wiki topic page, select the wiki page where you want to place your comment. The wiki page
opens in the content frame.
5. Click Comment following the user’s entry.
6. Type your comments in the Comment text box.
7. Click Add. To view all the comments, expand the Comments link.
Blackboard Learn Release 9.1 - Help for Students - Page 241
© 2012 Blackboard Inc. Proprietary and Confidential. U.S. Patent No. 6,988,138. Additional Patents Pending.
Tools > Wikis
How to View Your Contributions
You can view a list of all the pages and versions you have contributed or modified and determine if edits need to
be made.
1. On the Course Menu, click Tools.
2. On the Tools page, click Wikis.
Blackboard Learn Release 9.1 - Help for Students - Page 242
© 2012 Blackboard Inc. Proprietary and Confidential. U.S. Patent No. 6,988,138. Additional Patents Pending.
Tools > Wikis
3. On the Wikis listing page, select a wiki title.
4. On the Wiki topic page, click My Contribution on the Action Bar. On the My Contribution page,
you can view information about your contribution to the wiki in the content frame and the side panel.
Blackboard Learn Release 9.1 - Help for Students - Page 243
© 2012 Blackboard Inc. Proprietary and Confidential. U.S. Patent No. 6,988,138. Additional Patents Pending.
Tools > Wikis
The My Contribution Page
Display Pages: All pages and versions that you added and modified are listed in the Display
Pages. Use the Display Pages drop-down list on the Action Bar to narrow what is shown in the My
Contribution page.
Page Version: In the Page Version column, page titles appear with their corresponding version
numbers. Click a title to view the page without annotated changes. The page opens in a new
window. By default, the most recent page version is listed first.
Blackboard Learn Release 9.1 - Help for Students - Page 244
© 2012 Blackboard Inc. Proprietary and Confidential. U.S. Patent No. 6,988,138. Additional Patents Pending.
Tools > Wikis
User's Modification: In the User’s Modifications column, click a link to compare a page to its
previous version. The Page Comparison opens in a new window. Click the Legend tab to view the
comparison with a legend or explanation of the formatting used to communicate version differences.
About This Wiki: In the About This Wiki section, the you can view wiki information, how
many pages you added and edited, and how many comments you added to the wiki.
Participation Summary: In the Participation Summary section, you can view Words
Modified, which tallies any word added, deleted, or edited in all pages and each page’s versions,
available in number count and percentage. Total Page Saves includes any time Submit is clicked
on any Edit Wiki Page in the wiki—regardless of content being changed—available in number
count and percentage.
Grade: The Grade section appears if the wiki is set to be graded.
How to View Grades for Wiki Contributions
Once wiki contributions have been graded, you can view the grade in two places. The grading information
appears on the My Contribution page and in the My Grades tool.
1. On the Course Menu, click Tools.
2. On the Tools page, click Wikis.
3. On the Wikis listing page, select a wiki title.
Blackboard Learn Release 9.1 - Help for Students - Page 245
© 2012 Blackboard Inc. Proprietary and Confidential. U.S. Patent No. 6,988,138. Additional Patents Pending.
Tools > Wikis
4. On the Wiki topic page, click My Contribution on the Action Bar. On the My Contribution page's
Grade section, you can view the assigned grade for the contributions listed in the content frame,
feedback, and the date the grade was assigned.
Blackboard Learn Release 9.1 - Help for Students - Page 246
© 2012 Blackboard Inc. Proprietary and Confidential. U.S. Patent No. 6,988,138. Additional Patents Pending.
Tools > Wikis
Note: If your instructor has used a rubric for grading and made it available to students, click View Rubric to
display detailed grading information.
If there is no associated rubric or your instructor has not made it available, the View Rubric button will not be
visible
Blackboard Learn Release 9.1 - Help for Students - Page 247
© 2012 Blackboard Inc. Proprietary and Confidential. U.S. Patent No. 6,988,138. Additional Patents Pending.
Tools > Wikis
Related Tutorials
Creating and Editing a Wiki Page (Flash movie | 2m 40s | 4,329 KB) |
Pages (Flash movie | 2m 10s | 16,272 KB)
Linking Wiki
Blackboard Learn Release 9.1 - Help for Students - Page 248
© 2012 Blackboard Inc. Proprietary and Confidential. U.S. Patent No. 6,988,138. Additional Patents Pending.
Courses and Content > About Courses
Courses and Content
About Courses
Courses contain content and tools for your learning experience. Your instructor manages the course through the
Course Menu and Control Panel. While your instructor has control over the course, the Blackboard
administrator at your school can set defaults that can restrict or require specific features and tools.
A course consists of the Course Menu and a content frame. The Course Menu links to content and tools and
the content frame will display the feature you select.
Course Menu: The Course Menu appears on the left side of a course and contains links to materials and
tools within the course.
Content Frame: The content frame occupies most of the screen to display the current view. You will
interact with content from this screen.
Content Area: Content Areas are top-level containers that organize and store course content, such as
lecture notes, assignments, and tests. The content appears in the content frame.
About Course Content
A Content Item is any type of file, text, image, or link that appears to users in a Content Area, Learning Module,
Lesson Plan, or folder. Your instructors can add a number of different types of content to these course areas.
Types of Content
You can view different types of content in a Content Area. All content shares a few similarities. Each piece of
content has a name and description. Many types of content allow your instructor to set options, such as
availability and date restrictions.
Note: Icons may be different at your institution because the Blackboard administrator at your school has the
option to select which icons to use.
Blackboard Learn Release 9.1 - Help for Students - Page 249
© 2012 Blackboard Inc. Proprietary and Confidential. U.S. Patent No. 6,988,138. Additional Patents Pending.
Courses and Content > About Course Content
Content
Icon Type
Description
Item
A general piece of content, such as a file, image, text, or link. A description and other items may
be attached.
File
An HTML file to be used in the course. These files can be viewed as a page within the course
or as a separate piece of content in a separate browser window.
Audio
Audio file that can be played in a page. If Autostart and Loop are both set to Yes, the audio file
plays when you open the page and continues to play until you stop it or navigate away from the
page.
Image
Image file that can be shown on the page.
Video
Video file that you can view. The video player appears directly on the page.
URL
Link to a website or resource to provide a quick access point to relevant materials.
Learning
Module
A set of content that focuses on a specific subject that you can navigate at your own pace.
Instructors can set the path so students must view content in a specific order, or permit users to
view the content in any order. All types of content, including items, assignments, and tests can
be viewed in a Learning Module.
Lesson Plan A Lesson Plan is a special type of content that combines information about the lesson itself with
the curriculum resources used to teach it.
Syllabus
An outline of a course of study. It can contain course information, objectives, instructor contact
information, assignments, class meeting dates, and textbook information.
Course Link
A shortcut to an item, tool, or area in a course. A Course Link provides a quick access point to
relevant materials and tools.
Content
Folder
A Content Folder is a way of organizing content items. Content folders and subfolders set up a
hierarchy to group related material together. Content folders can be used to group material
based on a theme, such as media clips. Content folders can also be used to group material
based on a schedule, for example, placing all items for "week 1" together. Using folders to
organize content items can make materials easier to find and reduce the length of a Content
Area page.
Blank Page
A Blank Page can be added and customized based on the needs of the course..
Module
Page
Module Pages are specialized content pages that present content in a module box. The
modules that appear on this page can be arranged in any order. Module Pages can be
personalized by students if the instructor permits it.
Tool
A shortcut to a specific tool in the course, such as the Discussion Board or Blogs. The link
brings students to that tool and away from the content they are viewing. Instructors can also link
to the Tools page, which provides links to all available tools.
Flickr®
Photo
A link to a site for viewing and sharing photos and images.
SlideShare A link to a site for viewing and sharing Microsoft® PowerPoint®, Microsoft® OpenOffice, or
Presentation Adobe® PDF presentations.
YouTube™
Video
A link to a site for viewing and sharing online videos.
Content Availability
Your instructors can limit the availability of content items based on date, time, individual users, course groups,
and performance on graded items. This means that the content displayed in the Course Menu or Content Areas
can change over time. For example, your instructor restricts access to a piece content until you complete a unit
Blackboard Learn Release 9.1 - Help for Students - Page 250
© 2012 Blackboard Inc. Proprietary and Confidential. U.S. Patent No. 6,988,138. Additional Patents Pending.
Courses and Content > Course Content Areas
test. The content appears after you complete the test. There are further settings that can be added such as only
making the item appear after you complete the test and score at least a 70 percent. If you have questions about
content that your instructor mentions should be available, make sure to ask them if it has been made available
to everyone or based on specific criteria.
Review Status
Review Status allows your instructor to track interaction with specific content items and may affect the release
of additional content. For example, your instructor enables Review Status for an article added to a Content Area
and made the release of a quiz contingent upon you reviewing the article. After you mark the article Reviewed,
the quiz appears.
A Mark Reviewed option appears on the item when it is opened. After reviewing the item, select the option to
mark it as Reviewed.
Note: You can switch between Reviewed and Mark Reviewed. Use this option if you want to go back to a
content item and review it again. Your instructor only views the current setting. If the item is marked Reviewed,
then switched to Mark Review, your instructor does not see that the item was marked Reviewed at any time.
Course Content Areas
Content Areas are top-level containers that organize and store course content, such as lecture notes,
assignments, and tests. Content Areas that are available to users make up the Course Menu that appears as
links in the frame on the left side of the course. To access a Content Area, click its name on the Course Menu.
The content appears in the content frame. Typical Content Areas that you might see are Instructor Info,
Assignments, Tests, My Grades, and the names of units that correspond to the work you will complete
throughout your course.
Your instructor or administrator creates the names of the areas in a course, which may differ from the names
shown in this section. The Content Area names can also change course by course within your institution.
Content Area Organization
You can access a Content Area item by clicking its link in the course menu, such as a Discussion Board or a
file. Your instructors can further organize content using folders, subfolders, Learning Modules, or Lesson Plans.
Blackboard Learn Release 9.1 - Help for Students - Page 251
© 2012 Blackboard Inc. Proprietary and Confidential. U.S. Patent No. 6,988,138. Additional Patents Pending.
Courses and Content > Course Cartridges
Breadcrumbs
As items and links are viewed in a Content Area, use the breadcrumbs to navigate to previous pages.
Course Cartridges
Your instructors have the option of using Course Cartridge content in their courses. This content is created by
third party publishers and is available for instructors to download. When you access this content within a
course, you are prompted for an Access key. Cartridge content often includes:
l
Slides
l
Documents
l
Quiz questions
l
Lists of relevant links Accessing a Course Cartridge
To access a Course Cartridge, you must be enrolled in the course and have an Access Key to open the course
material. When you attempt to access Course Cartridge content the first time, you will be prompted for a key.
The publisher of the Course Cartridge provide the Access Key for a course. The Access Key for a Course
Cartridge may be found in the course text book or on the publisher’s website. After you enter the key, you can
open any content in the course that comes from that Course Cartridge.
Blackboard Learn Release 9.1 - Help for Students - Page 252
© 2012 Blackboard Inc. Proprietary and Confidential. U.S. Patent No. 6,988,138. Additional Patents Pending.
Courses and Content > Lesson Plans
Troubleshooting Course Cartridge Issues
If you are having difficulty with your Course Cartridge, you can contact any of the following resources for help.
l
The company that publishes the Course Cartridge.
l
Your school's computing help desk or bookstore (where you purchased the text or Access Key).
l
Your instructor.
While the publisher controls Access Keys and Cartridge content, your instructor, campus computing help desk,
or campus bookstore may be able to help you contact the publisher directly or provide other assistance.
Lesson Plans
A Lesson Plan is a container for content similar to a Content Area or folder. This allows you to view the lesson
profile, objectives, and content items you need to complete a lesson. Your instructor can provide you with
information on how your knowledge will be measured, the needed materials, the duration of the instruction, and
what you should have learned after the instruction.
Typically, Lesson Plans are added to Content Areas, but they can be added to Learning Modules and folders.
The Lesson Plan appears first in the content list and has its own unique icon. If a description was added to the
Lesson Plan when it was created, it appears following the title.
1. Select the Content Area from the Course Menu that holds the Lesson Plan. For example, Week 2.
2. Click the name of the Lesson Plan.
Blackboard Learn Release 9.1 - Help for Students - Page 253
© 2012 Blackboard Inc. Proprietary and Confidential. U.S. Patent No. 6,988,138. Additional Patents Pending.
Courses and Content > Lesson Plans
The Lesson Plan’s general information and content items are organized following the title. The top portion
contains general information about the lesson, while the bottom contains content items.
In this example, the content items for the lesson are shown with icons and text. Your instructor can select
Icons Only, Text Only, or Icons and Text for the content view. By default Lesson Plans have four sections:
l
Instructional Level
l
Instructor
Blackboard Learn Release 9.1 - Help for Students - Page 254
© 2012 Blackboard Inc. Proprietary and Confidential. U.S. Patent No. 6,988,138. Additional Patents Pending.
Courses and Content > Learning Modules
l
Subject Area
l
Objectives
Your instructor may customize the sections in the lesson plan, so you may see different sections.
Learning Modules
A Learning Module is an organized collection of content presented together. Learning Modules are shells in
which other content items such as files, folders and tools are added. It can support a course goal, a course
objective, a subject, a concept, or a theme. Learning Modules enable you to follow a structured path for
progressing through content.
Following a Sequential Path
The sequential path may be enforced or you may be allowed to access any item at any time. For example, your
instructor may set up a Learning Module on Astronomy. This unit walks you through a series of articles about
Astronomy, displays media files, and finally presents an assessment about the information covered. You must
move through the contents in this order if the sequential path is enforced. You will know if there is a set path
because only the link immediately following the page you are viewing is available. If the sequential path is not
enforced, all the links will be available.
Navigating within Learning Modules
To move from page to page within a module, click the right and left arrow buttons on the top right of the content
area.
Example:
The button will appear next to the "Page 1 of 3" text.
Note: The name of a folder or subfolder will count as a page. For example, if the Learning Module contains two
folders, each containing one file, there will be a total of 4 pages.
It is also possible to navigate by clicking the name of the page in the Table of Contents instead of clicking the
forward or back arrow buttons.
Blackboard Learn Release 9.1 - Help for Students - Page 255
© 2012 Blackboard Inc. Proprietary and Confidential. U.S. Patent No. 6,988,138. Additional Patents Pending.
Courses and Content > Mashups
Using the Table of Contents
The Table of Contents displays next to the Course Menu on the left-hand side of the page. It can also be moved
below the Learning Module content area.
There are three display options available on the header of the Table of Contents:
l
Minimize
l
Maximize
l
Move to the bottom or the left
How to Move the Table of Contents
Click the button with the arrow pointing down ( ) to move the Table of Contents to the bottom of the page. To
move the Table of Contents back to the left, click the left-facing arrow ( ). The move to the left option will
reposition the Table of Contents to the left of the content area.
Note: Your instructors can organize the Table of Contents however they see fit. The Table of Contents can be
displayed using roman numerals, numbers, letters, or any combination of the three.
Mashups
Note: Your instructor controls which tools are available. If this tool is not available, your instructor may have
disabled it.
A Mashup combines elements from two or more sources. When you view a YouTube™ video in a Blackboard
Learn course as part of the course content, you are experiencing a Mashup. Mashups can also include Flickr®
photos and SlideShare presentations.
You can use this content in a variety of ways within a course: a standalone piece of content, part of a test
question, a topic in a Discussion Board, or as part of an assignment. For example, you can include a clip of your
favorite movie in a journal entry.
Mashups are displayed in the following ways:
Blackboard Learn Release 9.1 - Help for Students - Page 256
© 2012 Blackboard Inc. Proprietary and Confidential. U.S. Patent No. 6,988,138. Additional Patents Pending.
Courses and Content > Mashups
l
Embed: The Mashup displays directly on the page.
l
Thumbnail: A small picture of the Mashup displays on the page with controls to launch it.
l
Text Link with Player: A link to the Mashup is displayed on the page. Click the link to launch the
Mashup.
Mashups are added through the Text Editor.
Default Mashup Types
Blackboard Learn supports any file type available on the following websites:
l
Flickr: A website for viewing and sharing photos and images.
l
SlideShare: A website for viewing and sharing slide presentations and documents.
l
YouTube: A website for viewing and sharing online videos.
The Blackboard administrator at your school may enable other types of Mashups.
How to Create a Mashup Item Using the Text Editor
1. Navigate to an assignment, journal, or other piece of content, for example, Lesson 1: Ocean
Exploration.
2. On the Upload Assignment page, click Add Mashup in the third row of Text Editor functions.
3. Select Flickr Photo, SlideShare Presentation, or YouTube Video.
Blackboard Learn Release 9.1 - Help for Students - Page 257
© 2012 Blackboard Inc. Proprietary and Confidential. U.S. Patent No. 6,988,138. Additional Patents Pending.
Courses and Content > Mashups
4. On the Search for Mashup pop-up window, search for content. Type the content name in the
Search box and click Go.
5. On the Search Results page, you can click Preview to examine the items, or click Select to
include the appropriate item.
Blackboard Learn Release 9.1 - Help for Students - Page 258
© 2012 Blackboard Inc. Proprietary and Confidential. U.S. Patent No. 6,988,138. Additional Patents Pending.
Courses and Content > Mashups
6. On the Create Mashup Item page, change the Name of the item. This is a required field.
7. Set the Mashup Options.
8. Click Submit.
Blackboard Learn Release 9.1 - Help for Students - Page 259
© 2012 Blackboard Inc. Proprietary and Confidential. U.S. Patent No. 6,988,138. Additional Patents Pending.
Courses and Content > Mashups
9. On the Upload Assignment page, click Submit.
Blackboard Learn Release 9.1 - Help for Students - Page 260
© 2012 Blackboard Inc. Proprietary and Confidential. U.S. Patent No. 6,988,138. Additional Patents Pending.
Courses and Content > Course Groups
Result
The Mashup appears with your content.
If the Mashup does not appear or displays an error after initially appearing, it is possible that the URL has
changed or the item was deleted from Flickr, SlideShare, or YouTube.
Course Groups
About Course Groups
Your instructor can create groups of students within a course. Groups usually consist of a smaller group of
users in a course, such as study groups or project groups. These course groups have their own area in the
course to collaborate. These spaces are equipped with tools that can assist each group member. Within Group
page, you may:
l
Send email
l
Exchange files
l
Enter discussion forums
l
Enter collaboration sessions
l
Change the position of individual modules by dragging and dropping
Blackboard Learn Release 9.1 - Help for Students - Page 261
© 2012 Blackboard Inc. Proprietary and Confidential. U.S. Patent No. 6,988,138. Additional Patents Pending.
Courses and Content > Course Groups
Your instructor can provide Communication and Collaboration tools that only group members can access, such
as a private File Exchange area, a Group Discussion Board, and a Group Journal.
Your instructor will either place you into a group by selecting your group for you, assigning students in random
groups or allowing you to select the group you want to join.
Frequently Asked Questions
How do I remove myself from a group?
Once you are enrolled in a group, only your instructor can remove you from the group.This applies to self-enroll
and student-created groups as well. Contact your instructor about leaving a group.
How can I add users to a group I created?
If you create a group within your course for other classmates to join, they will have to self-enroll in the group by
clicking Sign Up under the Group name in the list of Groups.
How do I join a group one of my classmates created?
Find the group listed on the Groups page and click Sign Up. The Group will display on your My Groups control
panel.
How do I remove someone from a group I created?
You do not have the ability to remove classmates from a group you created. Talk to your instructor about
removing a classmate that shouldn't be in your Group.
Accessing Groups
You can only access a group within a course, and there are several ways to access a group.
Blackboard Learn Release 9.1 - Help for Students - Page 262
© 2012 Blackboard Inc. Proprietary and Confidential. U.S. Patent No. 6,988,138. Additional Patents Pending.
Courses and Content > Course Groups
Groups page link: The Groups page link appears on the Course Menu or in a Content Area. The Groups
page lists all available groups and sign-up sheets for self-enroll groups.
My Groups panel: The My Groups panel appears following the Course Menu. The My Groups panel
provides direct links to the group space for each group you belong to. You can expand the panel to reveal all the
tools that are available for the group to use. If you are enrolled in a group, the panel appears automatically.
Group Link: A Group Link is a link to a single group, sign-up sheet, or the Groups page made available in a
course area.
Group Homepage
The group homepage is the center for group activity and can contain a description of the group, a list of
members, and tools. If your instructor permits, this page can be customized by adding a banner, selecting a
color scheme, and adding Personal Modules, such as My Calendar or Report Card, which are visible only to the
member who added the modules. Access Group Tools and Group Members here.
Blackboard Learn Release 9.1 - Help for Students - Page 263
© 2012 Blackboard Inc. Proprietary and Confidential. U.S. Patent No. 6,988,138. Additional Patents Pending.
Courses and Content > Course Groups
Group Tools
Each group has its own space in the course to work together. When inside your group, you will find the tools
your instructor has made available to you. Your instructor may not turn on all the available tools. Be sure to ask
about any tools you want to use but do not find on your groups page. Review any instructions provided by your
instructor on how to use these tools to complete group work. Tools that can be made available to a group
include:
l
Collaboration: Users within the group can create and attend chat sessions and virtual classroom
sessions.
l
File Exchange: Group members and your instructor can share files in this area. All members, as well
as your instructor, can add files. They can also delete files, regardless of who added them.
l
Group Blog: In the group area, all members of a group can create entries for the same blog, building
on one another. Any course member can read and comment on a group blog, but cannot make entries
if they are not a member of the group. Your instructor can select the grade option for group blogs.
Blackboard Learn Release 9.1 - Help for Students - Page 264
© 2012 Blackboard Inc. Proprietary and Confidential. U.S. Patent No. 6,988,138. Additional Patents Pending.
Courses and Content > Course Groups
l
Group Discussion Board: Users within the group can create and manage their own forums and
discuss topics with only the group members.
l
Group Journal: When used in the group area, all members of a group can view each other's entries,
but the group journal can only be viewed by the group and your instructor. Your instructor can select
the grade option for journals.
l
Group Task: Users within the group can create tasks that are distributed to all group members.
l
Group Wiki: Users within the group can edit, and view their group wiki. Your instructor can view and
edit a group wiki and can select the grade option for group wikis.
l
Send Email: Users within the group can email individual members or the entire group.
How to Open a Group Page
1. On the Course Menu, select the Content Area that holds the group.
2. On the Groups page, click the name of a group.
-OROn the My Groups panel, click the name of a group.
How to Create a Group
You can create course groups that other users in the course can sign up to join on the Groups page.
1. On the Course Menu, select the Content Area that holds the group.
2. On the Groups page, click Create Group.
Blackboard Learn Release 9.1 - Help for Students - Page 265
© 2012 Blackboard Inc. Proprietary and Confidential. U.S. Patent No. 6,988,138. Additional Patents Pending.
Courses and Content > Course Groups
3. On the Create Self-Enrollment Group page, type the group Name.
4. Type a Description of the group.
5. Type a Name of Sign-up Sheet.
6. Type Sign-up Sheet Instructions.
7. Type the Maximum Number of Members.
8. Click Submit.
Blackboard Learn Release 9.1 - Help for Students - Page 266
© 2012 Blackboard Inc. Proprietary and Confidential. U.S. Patent No. 6,988,138. Additional Patents Pending.
Courses and Content > Course Groups
Signing Up to Join a Course Group
Your instructor can choose whether to allow you to self-enroll in a course group. The instructor also has the
option to display the names of other members of the group to help you choose which group to join.
The instructor can choose whether to display the sign-up sheet on the groups listing page and add the sign-up
sheet as a link from other areas, such as a Content Area, folder, Learning Module, or Lesson Plan.
On the Groups page, click Sign Up to access the sign-up sheet. On the Sign Up Sheet page, when you click
Sign Up, you are automatically added to the group.
Blackboard Learn Release 9.1 - Help for Students - Page 267
© 2012 Blackboard Inc. Proprietary and Confidential. U.S. Patent No. 6,988,138. Additional Patents Pending.
Courses and Content > Course Groups
Managing Group Collaboration Sessions
The Group Collaboration Sessions have all of the same features as those in the course. All group members are
moderators in Group Collaboration Sessions. Therefore, all group members can manage sessions and access
all of the available tools.
Groups can schedule sessions for specific dates and times. The Create Collaboration Session page and Edit Collaboration Session page function in a similar manner.
The Create Collaboration Session page opens with empty fields while the Edit Collaboration Session
page opens an existing session.
Blackboard Learn Release 9.1 - Help for Students - Page 268
© 2012 Blackboard Inc. Proprietary and Confidential. U.S. Patent No. 6,988,138. Additional Patents Pending.
Courses and Content > Course Groups
How to Create or Edit Collaboration Sessions
1. Access your group in the Groups page, or in the My Groups panel.
2. On the group homepage, click Collaboration from Group Tools.
Blackboard Learn Release 9.1 - Help for Students - Page 269
© 2012 Blackboard Inc. Proprietary and Confidential. U.S. Patent No. 6,988,138. Additional Patents Pending.
Courses and Content > Course Groups
3. To create a new Collaboration session, click Create Collaboration Session.
-ORTo edit an existing Collaboration session, in the contextual menu for the session, click Edit.
Blackboard Learn Release 9.1 - Help for Students - Page 270
© 2012 Blackboard Inc. Proprietary and Confidential. U.S. Patent No. 6,988,138. Additional Patents Pending.
Courses and Content > Course Groups
4. On the Create Collaboration Session page, type or edit the name of the new session.
5. Select the dates of availability. A start and end date and time for the collaboration session can be
set but is not required. If these are not selected then the session is always open and available for
users.
Click the Start After check box to choose a date and time to begin the collaboration. Click the Date
Selection Calendar and select a date. Select the time to begin the session from the Time
Selection Menu. Click the End After check box to choose when the session ends. Click the Date Selection
Calendar and select a date. Select the time to end the session from the Time Selection Menu. 6. Select Yes to make the session available.
7. Select the Collaboration tool for this session: Virtual Classroom or Chat.
8. Click Submit.
Blackboard Learn Release 9.1 - Help for Students - Page 271
© 2012 Blackboard Inc. Proprietary and Confidential. U.S. Patent No. 6,988,138. Additional Patents Pending.
Courses and Content > Course Groups
How to Delete a Collaboration Session
1. You can access your group in the Groups page, or in the My Groups panel.
Blackboard Learn Release 9.1 - Help for Students - Page 272
© 2012 Blackboard Inc. Proprietary and Confidential. U.S. Patent No. 6,988,138. Additional Patents Pending.
Courses and Content > Course Groups
2. On the group homepage, click Collaboration from Group Tools.
Blackboard Learn Release 9.1 - Help for Students - Page 273
© 2012 Blackboard Inc. Proprietary and Confidential. U.S. Patent No. 6,988,138. Additional Patents Pending.
Courses and Content > Course Groups
3. To delete a Collaboration session, in the contextual menu for the session, click Delete. This action
is final and cannot be undone.
Blackboard Learn Release 9.1 - Help for Students - Page 274
© 2012 Blackboard Inc. Proprietary and Confidential. U.S. Patent No. 6,988,138. Additional Patents Pending.
Courses and Content > Course Groups
Exchanging Files within a Course Group
File Exchange enables you to exchange files with other members of a group, including the instructor.
How to Add a File to the File Exchange
1. On the Course Menu, select the Content Area that holds the group.
2. On the Groups page, click a group name.
3. On the Group Tools module, click File Exchange.
4. On the File Exchange page, click Add File.
Blackboard Learn Release 9.1 - Help for Students - Page 275
© 2012 Blackboard Inc. Proprietary and Confidential. U.S. Patent No. 6,988,138. Additional Patents Pending.
Courses and Content > Course Groups
5. On the Add File page, type the name of the file in the Name field.
6. In the Attach File field, click Browse My Computer and select the file to upload from your
computer. If you have access to the Content Collection, click Browse Content Collection and
select the file to upload.
7. Click Submit.
How to Delete a File
1. On the Course Menu, select the Content Area that holds the group.
2. On the Groups page, click a group name.
Blackboard Learn Release 9.1 - Help for Students - Page 276
© 2012 Blackboard Inc. Proprietary and Confidential. U.S. Patent No. 6,988,138. Additional Patents Pending.
Courses and Content > Course Groups
3. On the Group Tools module, click File Exchange.
4. On the File Exchange page, click Delete from a file's contextual menu.
Blackboard Learn Release 9.1 - Help for Students - Page 277
© 2012 Blackboard Inc. Proprietary and Confidential. U.S. Patent No. 6,988,138. Additional Patents Pending.
Courses and Content > Course Groups
Emailing a Course Group
Instructors and course group members can send email messages to selected group members or the entire
group.
IMPORTANT! Blackboard Learn keeps no record of sent emails. You will receive a copy of your email in
the Inbox of your external email account. Keep a copy of important messages in case you need them at a
later date.
How to Send an Email Message Within a Course Group
1. Access your group from the Groups page or from the My Groups panel.
2. On the Group Tools module, click Send Email.
Blackboard Learn Release 9.1 - Help for Students - Page 278
© 2012 Blackboard Inc. Proprietary and Confidential. U.S. Patent No. 6,988,138. Additional Patents Pending.
Courses and Content > Course Groups
3. On the Send Email page, select the recipients from the Available to Select box and click the
right-pointing arrow to move them into the Selected box.
Tip: For Windows, to select multiple users in a list, press the SHIFT key and click the first and last
users. To select users out of sequence, press the CTRL key and click each user needed. For Macs,
press the COMMAND key instead of the CTRL key.
Blackboard Learn Release 9.1 - Help for Students - Page 279
© 2012 Blackboard Inc. Proprietary and Confidential. U.S. Patent No. 6,988,138. Additional Patents Pending.
Courses and Content > Course Groups
4. Type a Subject.
5. Type the Message.
6. In the Attachments field, click Attach a file and select the file to upload from your computer.
7. Click Submit.
Group Assignments
You can submit your work to complete group assignments in the following ways:
l
Text typed on the Upload Assignment page.
l
Files attached from your computer or from the Content Collection.
l
A combination of both text and attached files.
Assignments list the name, description, and attachments for course work. You can also choose to include
comments for your instructor.
The grade provided by your instructor for the final assignment is given to every member of the group.
Frequently Asked Questions
Why can't I open our group assignment?
Please contact the computing help desk at your school. They can help you troubleshoot and download any
application you might need. If you’re not sure how to contact them, look for the technology office on your
school’s website or search the web for your school’s name + Blackboard + help or support. You may also check
to make sure you are using a supported Internet browser and operating system for the version of Blackboard
that your school is using.
Blackboard Learn Release 9.1 - Help for Students - Page 280
© 2012 Blackboard Inc. Proprietary and Confidential. U.S. Patent No. 6,988,138. Additional Patents Pending.
Courses and Content > Course Groups
Why can't I find our group assignment?
Your instructor might make an assignment unavailable until after a certain date or until other criteria has been
met. For example, you might have to mark a lecture as reviewed before you can access the assignment.
Please contact your instructor for more information.
My instructor did not receive our group assignment. What do I do?
You must discuss this issue with your instructor. To see the step-by-step instructions for submitting a group
assignment, see How to Submit Work for a Group Assignment.
How do I edit or resubmit a group assignment?
Editing a group assignment requires you to resubmit the assignment, and not all assignments can be
resubmitted. If your instructor has not allowed you to submit an assignment more than once and you made a
mistake when submitting the assignment, you must contact your instructor to ask for the opportunity to
resubmit the assignment.
If your instructor has allowed you to submit an assignment more than once, you will see a Start New
Submission function on the Review Submission History page. You access this page by clicking the
assignment link in your course. To learn more, see How to Edit or Resubmit a Group Assignment.
How do I know whether my assignment has been graded?
On the Course Menu, click Tools, and then click My Grades. If your assignment has not been graded, the
Grade column contains a symbol indicating its status. If your assignment has been submitted and graded, the
grade appears in the Grade column. To view more detail, click the link to see the assignment's Review
Submission History page.
To learn more, see How to View Group Assignment Grades and Feedback.
How to Submit Work for a Group Assignment
1. On the Course Menu, select the Content Area that holds the group assignment, for example, the
Group Assignments Content Area. Click the name of the assignment.
-OR1. In the My Groups panel, select your group name. On the group homepage, click the name of the
assignment in the Group Assignments section.
Blackboard Learn Release 9.1 - Help for Students - Page 281
© 2012 Blackboard Inc. Proprietary and Confidential. U.S. Patent No. 6,988,138. Additional Patents Pending.
Courses and Content > Course Groups
2. On the Upload Assignment page, review the instructions and download any files provided by your
instructor and complete the assignment using one or both of the following:
l
In the Submission box, type your response. You can use the Text Editor functions to
format the text and include files, images, web links, multimedia, and Mashups.
l
If your response to the assignment is in a separate file, click Browse My Computer and
select a file to attach. If you attach a file, type a Link Title. If the box is left blank, the file
name becomes the link. Follow any instructions that your instructor provided for naming
your file.
Note: The Do not attach option appears next to an uploaded file. If you have selected an
incorrect file, you can remove it with this option. If the same file is attached to your
assignment more than once, the new file is saved with a number appended to the name.
For example, history_assignment(1).doc.
Note: If your instructor is using a rubric and has made it available to students, click the
View Rubric button to view grading criteria.
3. Optionally, in the Comments box, type your comments.
Blackboard Learn Release 9.1 - Help for Students - Page 282
© 2012 Blackboard Inc. Proprietary and Confidential. U.S. Patent No. 6,988,138. Additional Patents Pending.
Courses and Content > Course Groups
WARNING! If your instructor has not allowed multiple attempts, assignments can be
submitted only once. Ensure that you have attached any required files to your assignment
before you click Submit.
4. Click Submit.
WARNING! When you finish your assignment, you must click Submit. If you do not, your
instructor will not receive your completed assignment.
Blackboard Learn Release 9.1 - Help for Students - Page 283
© 2012 Blackboard Inc. Proprietary and Confidential. U.S. Patent No. 6,988,138. Additional Patents Pending.
Courses and Content > Course Groups
How to Save a Group Assignment as Draft and Submit Later
The Save as Draft function is available if you need to return to your group assignment at a later time. This
function saves your comments and files on the page.
When you finish your assignment, you must click Submit. If you do not, your instructor will not receive your
completed assignment.
Blackboard Learn Release 9.1 - Help for Students - Page 284
© 2012 Blackboard Inc. Proprietary and Confidential. U.S. Patent No. 6,988,138. Additional Patents Pending.
Courses and Content > Course Groups
Saving a Group Assignment as a Draft
1. On the Course Menu, select the Content Area that holds the group assignment, for example, the
Group Assignments Content Area. Click the name of the assignment.
2. On the Upload Assignment page, download any files provided by your instructor and complete
the assignment using one or both of the following:
l
In the Submission box, type your response. You can use the Text Editor functions to
format the text and include files, images, web links, multimedia, and Mashups.
l
If your response to the assignment is in a separate file, click Browse My Computer and
select a file to attach. If you attach a file, type a Link Title. If the box is left blank, the file
name becomes the link. Follow any instructions that your instructor provided for naming
your file.
Note: The Do not attach option appears next to an uploaded file. If you have selected an
incorrect file, you can remove it with this option. If the same file is attached to your
assignment more than once, the new file is saved with a number appended to the name.
For example, history_assignment(1).doc.
3. Optionally, in the Comments box, type your comments.
4. Click Save as Draft to save your changes and continue working later.
Blackboard Learn Release 9.1 - Help for Students - Page 285
© 2012 Blackboard Inc. Proprietary and Confidential. U.S. Patent No. 6,988,138. Additional Patents Pending.
Courses and Content > Course Groups
5. When you reach the Review Submission History page, click OK.
Blackboard Learn Release 9.1 - Help for Students - Page 286
© 2012 Blackboard Inc. Proprietary and Confidential. U.S. Patent No. 6,988,138. Additional Patents Pending.
Courses and Content > Course Groups
Submitting a Draft Assignment
1. Return to the group assignment link in the Content Area that holds the assignment.
2. On the Review Submission History page, click Continue Current Submission.
Blackboard Learn Release 9.1 - Help for Students - Page 287
© 2012 Blackboard Inc. Proprietary and Confidential. U.S. Patent No. 6,988,138. Additional Patents Pending.
Courses and Content > Course Groups
3. On the Upload Assignment page, make the necessary changes in your assignment.
4. Optionally, in the Comments box, type your comments.
WARNING! If your instructor has not allowed multiple attempts, assignments can be
submitted only once. Ensure that you have attached any required files to your assignment
before you click Submit.
5. Click Submit. The Review Submission History page appears showing the information about
your submitted assignment.
WARNING! When you finish your assignment, you must click Submit. If you do not, your
instructor will not receive your completed assignment.
Blackboard Learn Release 9.1 - Help for Students - Page 288
© 2012 Blackboard Inc. Proprietary and Confidential. U.S. Patent No. 6,988,138. Additional Patents Pending.
Courses and Content > Course Groups
How to Edit or Resubmit a Group Assignment
Editing a group assignment requires you to resubmit the assignment, and not all assignments can be
resubmitted. If your instructor has not allowed you to submit a group assignment more than once and you made
a mistake when submitting the assignment, you must contact your instructor to ask for the opportunity to
resubmit the assignment.
Blackboard Learn Release 9.1 - Help for Students - Page 289
© 2012 Blackboard Inc. Proprietary and Confidential. U.S. Patent No. 6,988,138. Additional Patents Pending.
Courses and Content > Course Groups
Your instructor may allow you to submit a group assignment more than once for a variety of reasons. For
example, your instructor can provide comments on your first draft so that you can try to improve your work.
Your instructor can choose to use either the highest graded attempt or the last graded attempt for your grade.
If your instructor has allowed you to submit a group assignment more than once, you will see a Start New
Submission function on the Review Submission History page. You access this page by clicking the group
assignment link in your course.
1. Return to the group assignment link in the Content Area that holds the assignment.
2. Click the name of the assignment.
3. On the Review Submission History page, view the details of your first submission. Click Start
New Submission.
Blackboard Learn Release 9.1 - Help for Students - Page 290
© 2012 Blackboard Inc. Proprietary and Confidential. U.S. Patent No. 6,988,138. Additional Patents Pending.
Courses and Content > Course Groups
4. On the Upload Assignment page, download any files provided by your instructor and complete
the assignment using one or both of the following:
l
In the Submission box, type your response. You can use the Text Editor functions to
format the text and include files, images, web links, multimedia, and Mashups.
l
If your response to the assignment is in a separate file, click Browse My Computer and
select a file to attach. If you attach a file, type a Link Title. If the box is left blank, the file
name becomes the link. Follow any instructions that your instructor provided for naming
your file.
Note: The Do not attach option appears next to an uploaded file. If you have selected an
incorrect file, you can remove it with this option. If the same file is attached to your
assignment more than once, the new file is saved with a number appended to the name.
For example, history_assignment(1).doc.
5. Optionally, in the Comments box, type your comments.
WARNING! Ensure that you have attached any required files to your assignment before you
click Submit.
6. Click Submit.
Blackboard Learn Release 9.1 - Help for Students - Page 291
© 2012 Blackboard Inc. Proprietary and Confidential. U.S. Patent No. 6,988,138. Additional Patents Pending.
Courses and Content > Course Groups
WARNING! When you finish your assignment, you must click Submit. If you do not, your
instructor will not receive your completed assignment.
7. On the Review Submission History page, you can see all of your submissions listed by date and
time. To view the details of a submission, click the plus sign next to an attempt.
Blackboard Learn Release 9.1 - Help for Students - Page 292
© 2012 Blackboard Inc. Proprietary and Confidential. U.S. Patent No. 6,988,138. Additional Patents Pending.
Courses and Content > Course Groups
How to View Group Assignment Grades and Feedback
Blackboard does not score assignments automatically. Each assignment needs to be reviewed by your
instructor. You can review the information provided by your instructor in My Grades or on the assignment's
Review Submission History page.
Accessing My Grades From Within Your Course
1. On the Course Menu, click Tools
2. On the Tools page, click My Grades.
Blackboard Learn Release 9.1 - Help for Students - Page 293
© 2012 Blackboard Inc. Proprietary and Confidential. U.S. Patent No. 6,988,138. Additional Patents Pending.
Courses and Content > Course Groups
Accessing My Grades From Outside Your Course
1. On the My Institution tab, click My Grades on the Tools panel.
2. On the My Courses/Organizations page, click the name of your course.
Blackboard Learn Release 9.1 - Help for Students - Page 294
© 2012 Blackboard Inc. Proprietary and Confidential. U.S. Patent No. 6,988,138. Additional Patents Pending.
Courses and Content > Course Groups
Reviewing Your Grade
l
If your group assignment has not been graded, the Grade column contains a symbol indicating its
status.
l
If your group assignment has been submitted and graded, the grade appears in the Grade column.
You can also see your instructor's feedback in the Comments column.
Reviewing Your Grade From the Group Homepage
You can also view your grade and any feedback provided by your instructor in the assignment's Review
Submission History page. If your instructor attached a file, you must access it from the group assignment link
on the group homepage.
1. On the My Groups panel, click the name of your group.
2. On the group homepage, click the name of your group assignment. The Review Submission
History page includes:
l
Instructor Feedback: This section lists your grade and any feedback provided by your
instructor.
l
Attached Files: This section provides links to open or download any files attached by you
or your instructor. For example, your instructor might provide comments in a file that you
Blackboard Learn Release 9.1 - Help for Students - Page 295
© 2012 Blackboard Inc. Proprietary and Confidential. U.S. Patent No. 6,988,138. Additional Patents Pending.
Courses and Content > Course Groups
Blackboard Learn Release 9.1 - Help for Students - Page 296
© 2012 Blackboard Inc. Proprietary and Confidential. U.S. Patent No. 6,988,138. Additional Patents Pending.
Courses and Content > Course Groups
Accessing the Review Submission History Page from Group Assignments
1. Return to the group assignment link in the Content Area that holds the assignment.
2. Click the name of the assignment.
Note: If your instructor has used a rubric for grading and has made it available to students, click View Rubric
to display detailed grading information.
My Grades Item Status
The following table describes the symbols appearing on the My Grades page.
Symbol
Description
-
Item has not yet been completed. No information is available.
Item has been completed, but will not have a grade (for items such as surveys).
Item has been submitted. This item is waiting to be reviewed by your instructor.
-ORItem has been submitted. Your instructor may review this item but may not be provided a grade (for items
such as surveys).
Grade
Item has been graded. Click the grade to view detailed feedback.
Attempt is in progress. This item has not been submitted. To submit the item, see Submitting a Draft
Assignment.
Grade is exempted for this user. If you do not complete this assignment, it will not affect your grade.
Error has occurred. Contact your instructor.
Blackboard Learn Release 9.1 - Help for Students - Page 297
© 2012 Blackboard Inc. Proprietary and Confidential. U.S. Patent No. 6,988,138. Additional Patents Pending.
Tests and Assignments > Tests and Surveys
Tests and Assignments
Tests and Surveys
You can find tests and surveys (referred to collectively as assessments) in any Content Area, Learning Module,
Lesson Plan, or folder.
Tests are used to assess your knowledge. Your instructor assigns point values to questions. Your answers are
submitted for grading, and the results are recorded in the Grade Center.
Surveys can be used for polling purposes and evaluations. This type of assessment is not graded.
WARNING! Do not refresh the page, close the window, or click the browser's back button while taking an
assessment. If you experience problems during a test or survey, please contact your instructor.
Question Types
There are many types of questions that can be included in an assessment.
l
Calculated Formula: Contains a formula with a number of variables. The correct answer can be a
specific value or a range of values.
l
Calculated Numeric Response: Resembles a fill-in-the-blank question except a number is entered
to complete the statement. The correct answer can be a specific number or within a range of
numbers. The answer must be numeric (42 instead of forty-two) .
l
Either / Or: A statement with a pre-defined choice of two answers (Yes/No, On/Off).
l
Essay: A question where the answer must be typed in a text box.
l
File Response: Uploaded files are used to respond to the question.
l
Fill in Multiple Blanks: Multiple responses are inserted into a sentence or paragraph.
l
Fill in the Blank: A statement that requires an answer to complete it. Answers are evaluated based
on an exact text match.
l
Hot Spot: A specific point on an image is used to indicate the answer. For example, selecting all the
countries in South America by clicking on each one on a map.
l
Jumbled Sentence: A sentence with a number of variables within it.
l
Matching: Two columns of items where each item in the first column must be matched to an item in
the second column.
l
Multiple Answer: A number of choices with one or more correct answers.
l
Multiple Choice: Allows a number of choices with one correct answer. Indicate the correct answer
by selecting the correct answer.
l
Opinion Scale / Likert: A rating scale used to measure attitudes or reactions.
l
Ordering: A question that requires users to provide an answer by selecting the correct order of a
series of items.
l
Quiz Bowl: An answer appears; the users responds with a who, what, or where question to respond.
l
Short Answer: Similar to Essay questions; answer length is limited.
l
True / False: A statement with the option to choose either true or false. True/False answer options
are limited to the words True and False. Blackboard Learn Release 9.1 - Help for Students - Page 298
© 2012 Blackboard Inc. Proprietary and Confidential. U.S. Patent No. 6,988,138. Additional Patents Pending.
Tests and Assignments > Tests and Surveys
Grading Questions
The majority of questions in assessments are auto-graded. Your instructor defines the correct answers and
assigns a certain number of points to each question when the assessment is created. The system validates
your answers against the key and assigns the score. You may find out your score on an assessment
immediately after completing it if all questions are auto-graded and your instructor releases this information.
Essay questions, file response, and short answer questions are not auto-graded, meaning that your instructor
must grade these questions manually. After you submit an assessment, your instructor reviews these
questions and manually provides a score. If an assessment contains these question types, the grade for the
assessment is not immediately available after the assessment is submitted.
If your instructor has associated a rubric with an Essay, File Response, or Short Answer question and made it
available, a View Rubric button will appear next to the Save Answer button. Click View Rubric to review the
criteria your instructor has chosen.
How to Take an Assessment
Assessments are located within Content Areas in a course.
Note: Contact your instructor if you encounter issues or problems while taking your assessment.
1. Navigate to an assessment and click the link associated with it.
2. Click Begin to take the assessment.
3. Your instructor may choose to have you type a password to begin taking an assessment. If
necessary, type the valid password and click Submit to begin the assessment. The assessment
continues to prompt for a valid password until the correct one is provided.
Blackboard Learn Release 9.1 - Help for Students - Page 299
© 2012 Blackboard Inc. Proprietary and Confidential. U.S. Patent No. 6,988,138. Additional Patents Pending.
Tests and Assignments > Tests and Surveys
4. As you work, answers will be saved automatically, or you can click the Save button by each
question or the Save All Answers button at the top or bottom of the page as you work.
5. Click Save and Submit when you complete the assessment.
WARNING! Do not use the browser's Back button during an assessment. This may cause loss of data. If
you have difficulties while taking an assessment, contact your instructor.
Note: If your instructor has associated a rubric with an Essay, File Response, or Short Answer question on a
test, click View Rubric to display grading criteria.
Timed Assessments
If your instructor chooses a timed assessment, the scheduled time is included in the instructions before you
begin.
You will also be notified of the instructor's choice of Timer Setting, which determines whether the assessment
saves and submits automatically when time expires, or if you have the option to continue beyond the time limit.
Blackboard Learn Release 9.1 - Help for Students - Page 300
© 2012 Blackboard Inc. Proprietary and Confidential. U.S. Patent No. 6,988,138. Additional Patents Pending.
Tests and Assignments > Tests and Surveys
There is no automatic penalty for continuing beyond the time limit, however, final scoring decisions are made by
your instructor. Talk to your instructor if you have questions about this setting.
The total time you spend on the assessment is recorded and available to the instructor when the test is
submitted.
Note: If you save and exit the assessment, the timer continues running. If you start your test on Tuesday,
save and exit it, then complete it on Thursday the timer will show that it took you 48 hours to complete the
assessment.
If the auto-submit feature is selected, when the timer runs out, the test saves and submits and the Test
Submitted page displays. If the option is not selected, a pop-up window will appear with the choice to submit or
continue.
The remaining time appears on the assessment page. Click the chevron next to the timer to collapse or expand
it.
Timer warnings will appear when half the time, five minutes, one minute, and thirty seconds remain. When the
remaining time reads 1 minute, 30 seconds, the status bar will turn yellow. At 1 minute, the warning will be red,
and at 30 seconds, both the status bar and the warning will be red. If the timer is collapsed, the color changes
will not be visible.
Blackboard Learn Release 9.1 - Help for Students - Page 301
© 2012 Blackboard Inc. Proprietary and Confidential. U.S. Patent No. 6,988,138. Additional Patents Pending.
Tests and Assignments > Tests and Surveys
Feedback and Grades
The performance results you receive after completing a test depend on the options selected by your instructor.
For example, your instructor may only show the final score for one test, while for another test the final score and
correct answers are displayed. Feedback includes one or more of the following:
l
Final score for the test
l
Answers submitted
l
Correct answers
l
Feedback for the questions
To access Feedback and Grade information, select the test in the Content Area or use the My Grades tool.
Note: If your instructor has used a rubric for grading an Essay, File Response, or Short Answer test question
and has made it available to students, click View Rubric while viewing the graded test to display detailed
information.
Multiple Assessment Attempts
You may be allowed to take an assessment multiple times. If multiple attempts are allowed, this is noted at the
top of the assessment. Your instructor may also set a limit on the number of attempts, which will also be noted
at the top. A link to take the test again appears if the test is re-opened. Your instructor determines if one or more
of the test attempt scores are recorded in the Grade Center.
Presentation Option
Force Assessment Completion
If Force Completion is enabled, you must complete the assessment the first time it is launched. If Force
Completion is enabled, this is noted at the top of the assessment. You may not exit the assessment and
continue working on it at a later date. The Save function is available for you to save the assessment as you
work through it, but you may not exit and re-enter the assessment.
Backtrack Prohibited
You may not go back to questions you have already answered if backtracking is prohibited. If backtracking is
prohibited, this is noted at the top of the assessment. When you take an assessment that does not allow
backtracking, an error appears if you attempt to use the Back function within the assessment.
Assessment Presentation
Your instructor has two different options for presenting Assessments: all-at-once and one-at-a-time.
All-at-once assessments present all of the questions at the same time. The following options are available
while taking this type of assessment:
Function
Action
Store answers
Select Save All Answers. A Saved icon appears in the Question Status Indicator. Answers may
be changed after they are saved.
Finish the
assessment
Select Save and Submit. You receive a confirmation followed by a receipt page stating that the
assessment has been completed.
Blackboard Learn Release 9.1 - Help for Students - Page 302
© 2012 Blackboard Inc. Proprietary and Confidential. U.S. Patent No. 6,988,138. Additional Patents Pending.
Tests and Assignments > Submitting Assignments
One-at-a-time assessments present questions separately, only one question appears on the screen. You
decide when you are ready to move onto the next question. The following options are available while taking this
type of assessment:
Function
Action
Navigate
through
questions
Use the navigation arrows (<<, <, >, or >>). The Question/Section Indicator describes the current
location in the assessment and the overall number of questions. If backtracking is prohibited, these
arrows do not appear.
Save
answers
Select Save All Answers. Questions answered up to this point are saved.
Finish the
Select Save and Submit. You receive a confirmation followed by a receipt page stating the
assessment assessment has been completed.
Question Completion Status
The Question Completion Status indicator provides you with a quick up-to-date look at complete or incomplete
questions in an assessment at all times.
The status of which questions have been answered is displayed at the top of the page. Click the chevron next
to the Question Completion Status to collapse or expand it.
When you answer a question and move to the next question in a question-by-question assessment, the status
box is edited on the next page to show that the previous question was answered. If you do not answer a
question and move on to the next page in a question-by-question assessment, the status box will show on the
next page that the previous question was not answered. Navigate between questions by clicking on the
question number in the status indicator.
When you take an all-at-once assessment (an assessment where the questions all appear on the same page),
click Save Answer to save a specific question without scrolling to the bottom of the page to save. Saving
either a single question or all of the questions that have been answered (with the Save All Answers at the top
or bottom of the page) changes the status indicator to show which questions have been completed.
Submitting Assignments
The Assignments tool is used to present a variety of learning activities to you as a student, allowing you to view
and submit assignments from one location. You can submit assignments in the following ways:
l
Provide text on the Upload Assignment page.
l
Files attached from your computer or from the Content Collection.
l
A combination of both text and attached files.
Assignments list the name, description, and attachments for class work. Your instructor will provide you all the
information you need to complete the assignment. You can also choose to include comments for your instructor
before you submit your work.
Frequently Asked Questions
Blackboard Learn Release 9.1 - Help for Students - Page 303
© 2012 Blackboard Inc. Proprietary and Confidential. U.S. Patent No. 6,988,138. Additional Patents Pending.
Tests and Assignments > Submitting Assignments
Why can't I open my assignment?
Please contact the computing help desk at your school. They can help you troubleshoot and download any
application you might need. If you’re not sure how to contact them, look for the technology office on your
school’s website or search the web for your school’s name + Blackboard + help or support. Check to make sure
you are using a supported Internet browser and operating system for the version of Blackboard that your school
is using.
Why can't I find my assignment?
Your instructor might make an assignment unavailable until after a certain date or until other criteria has been
met. For example, you might have to mark a lecture as reviewed before you can access the assignment.
Please contact your instructor for more information.
How do I check to be sure my assignment was submitted?
After submitting an assignment, you can check to make sure it was uploaded and saved properly. Click the
name of the assignment as if you were going to submit it again.
Previous submission attempts are listed under Review Submission History.
If you have questions about your attempts or the assignment, contact your instructor for assistance.
My instructor did not receive my assignment. What do I do?
You must discuss this issue with your instructor. To see the step-by-step instructions for submitting an
assignment, see How to Submit an Assignment.
How do I edit or resubmit an assignment?
Editing an assignment requires you to resubmit the assignment. Not all assignments can be resubmitted. If
your instructor has not allowed you to submit an assignment more than once and you made a mistake when
submitting the assignment, you must contact your instructor to ask for the opportunity to resubmit the
assignment.
If your instructor has allowed you to submit an assignment more than once, you will see a Start New
Submission function on the Review Submission History page. You access this page by clicking the
assignment link in your course. To learn more, see How to Edit or Resubmit an Assignment.
How do I know whether my assignment has been graded?
On the Course Menu, click Tools, and then click My Grades. If your assignment has not been graded, the
Grade column contains a symbol indicating its status. If your assignment has been submitted and graded, the
grade appears in the Grade column. To view more detail, click the link to see the assignment's Review
Submission History page.
To learn more, see How to View Assignment Grades and Feedback.
How to Submit an Assignment
When you finish your assignment, you must click Submit. If you do not, your instructor will not receive your
completed assignment.
Blackboard Learn Release 9.1 - Help for Students - Page 304
© 2012 Blackboard Inc. Proprietary and Confidential. U.S. Patent No. 6,988,138. Additional Patents Pending.
Tests and Assignments > Submitting Assignments
1. On the Course Menu, select the Content Area that holds the assignment, for example, the
Assignments Content Area.
2. Click the name of the assignment.
3. On the Upload Assignment page, review the instructions and download any files provided by your
instructor and complete the assignment using one or both of the following:
l
In the Submission box, type your response. You can use the Text Editor functions to
format the text and include files, images, web links, multimedia, and Mashups.
l
If your response to the assignment is in a separate file, click Browse My Computer and
select a file to attach. If you attach a file, type a Link Title. If the box is left blank, the file
name becomes the link. Follow any instructions that your instructor provided for naming
your file.
Note: The Do not attach option appears next to an uploaded file. If you have selected an
incorrect file, you can remove it with this option. If the same file is attached to your
assignment more than once, the new file is saved with a number appended to the name.
For example, history_assignment(1).doc.
Note: If your instructor is using a rubric and has made it available to students, click the
View Rubric button to view grading criteria.
4. Optionally, in the Comments box, type comments to your instructor.
WARNING! If your instructor has not allowed multiple attempts, assignments can be
submitted only once. Ensure that you have attached any required files to your assignment
before you click Submit.
5. Click Submit.
Blackboard Learn Release 9.1 - Help for Students - Page 305
© 2012 Blackboard Inc. Proprietary and Confidential. U.S. Patent No. 6,988,138. Additional Patents Pending.
Tests and Assignments > Submitting Assignments
WARNING! When you finish your assignment, you must click Submit. If you do not, your
instructor will not receive your completed assignment.
6. A success message appears, confirming the assignment submission.
How to Save an Assignment as Draft and Submit Later
The Save as Draft function is available if you need to return to your assignment at a later time. This function
saves your comments and files on the page.
When you finish your assignment, you must click Submit. If you do not, your instructor will not receive your
completed assignment.
Saving an Assignment as Draft
1. On the Course Menu, select the Content Area that holds the assignment, for example, the
Assignments Content Area.
2. Click the name of the assignment.
Blackboard Learn Release 9.1 - Help for Students - Page 306
© 2012 Blackboard Inc. Proprietary and Confidential. U.S. Patent No. 6,988,138. Additional Patents Pending.
Tests and Assignments > Submitting Assignments
3. On the Upload Assignment page, download any files provided by your instructor and complete
the assignment using one or both of the following:
l
In the Submission box, type your response. You can use the Text Editor functions to
format the text and include files, images, web links, multimedia, and Mashups.
l
If your response to the assignment is in a separate file, click Browse My Computer and
select a file to attach. If you attach a file, type a Link Title. If the box is left blank, the file
name becomes the link. Follow any instructions that your instructor provided for naming
your file.
Note: The Do not attach option appears next to an uploaded file. If you have selected an
incorrect file, you can remove it with this option. If the same file is attached to your
assignment more than once, the new file is saved with a number appended to the name.
For example, history_assignment(1).doc.
4. Optionally, in the Comments box, type your comments.
5. Click Save as Draft to save your changes and continue working later.
Blackboard Learn Release 9.1 - Help for Students - Page 307
© 2012 Blackboard Inc. Proprietary and Confidential. U.S. Patent No. 6,988,138. Additional Patents Pending.
Tests and Assignments > Submitting Assignments
6. When you reach the Review Submission History page, click OK.
Blackboard Learn Release 9.1 - Help for Students - Page 308
© 2012 Blackboard Inc. Proprietary and Confidential. U.S. Patent No. 6,988,138. Additional Patents Pending.
Tests and Assignments > Submitting Assignments
Submitting a Draft Assignment
1. Return to the assignment link in the Content Area that holds the assignment.
2. On the Review Submission History page, click Continue Current Submission.
3. On the Upload Assignment page, make the necessary changes in your assignment.
4. Optionally, in the Comments box, type your comments.
WARNING! If your instructor has not allowed multiple attempts, assignments can be
submitted only once. Ensure that you have attached any required files to your assignment
before you click Submit.
5. Click Submit. The Review Submission History page appears showing the information about
your submitted assignment.
Blackboard Learn Release 9.1 - Help for Students - Page 309
© 2012 Blackboard Inc. Proprietary and Confidential. U.S. Patent No. 6,988,138. Additional Patents Pending.
Tests and Assignments > Submitting Assignments
WARNING! When you finish your assignment, you must click Submit. If you do not, your
instructor will not receive your completed assignment.
6. A success message appears, confirming the assignment submission.
Blackboard Learn Release 9.1 - Help for Students - Page 310
© 2012 Blackboard Inc. Proprietary and Confidential. U.S. Patent No. 6,988,138. Additional Patents Pending.
Tests and Assignments > Submitting Assignments
How to Edit or Resubmit an Assignment
Editing an assignment requires you to resubmit the assignment, and not all assignments can be resubmitted. If
your instructor has not allowed you to submit an assignment more than once and you made a mistake when
submitting the assignment, you must contact your instructor to ask for the opportunity to resubmit the
assignment.
Your instructor may allow you to submit an assignment more than once for a variety of reasons. For example,
your instructor can provide comments on your first draft so that you can try to improve your work. Your
instructor can choose to use either the highest graded attempt or the last graded attempt for your grade.
If your instructor has allowed you to submit an assignment more than once, you will see a Start New
Submission function on the Review Submission History page. You access this page by clicking the
assignment link in your course.
1. Return to the assignment link in the Content Area that holds the assignment.
2. Click the name of the assignment.
3. On the Review Submission History page, view the details of your first submission. Click Start
New Submission.
Blackboard Learn Release 9.1 - Help for Students - Page 311
© 2012 Blackboard Inc. Proprietary and Confidential. U.S. Patent No. 6,988,138. Additional Patents Pending.
Tests and Assignments > Submitting Assignments
4. On the Upload Assignment page, download any files provided by your instructor and complete
the assignment using one or both of the following:
l
In the Submission box, type your response. You can use the Text Editor functions to
format the text and add files, images, web links, multimedia, and Mashups.
l
If your response to the assignment is in a separate file, click Browse My Computer and
select a file to attach. If you attach a file, type a Link Title. If the box is left blank, the file
name becomes the link. Follow any instructions that your instructor provided for naming
your file.
Note: The Do not attach option appears next to an uploaded file. If you have selected an
incorrect file, you can remove it with this option. If the same file is attached to your
assignment more than once, the new file is saved with a number appended to the name.
For example, history_assignment(1).doc.
5. Optionally, in the Comments box, type your comments.
WARNING! Ensure that you have attached any required files to your assignment before you
click Submit.
6. Click Submit.
Blackboard Learn Release 9.1 - Help for Students - Page 312
© 2012 Blackboard Inc. Proprietary and Confidential. U.S. Patent No. 6,988,138. Additional Patents Pending.
Tests and Assignments > Submitting Assignments
WARNING! When you finish your assignment, you must click Submit. If you do not, your
instructor will not receive your completed assignment.
7. On the Review Submission History page, you can see all of your submissions listed by date and
time. To view the details of a submission, click the plus sign next to an attempt.
Blackboard Learn Release 9.1 - Help for Students - Page 313
© 2012 Blackboard Inc. Proprietary and Confidential. U.S. Patent No. 6,988,138. Additional Patents Pending.
Tests and Assignments > Submitting Assignments
How to View Assignment Grades and Feedback
Assignments are not graded automatically. Each assignment needs to be graded by your instructor. You can
review the information provided by your instructor in My Grades or on the assignment's Review Submission
History page.
Accessing My Grades From Within Your Course
1. On the Course Menu, click Tools.
2. On the Tools page, click My Grades.
Blackboard Learn Release 9.1 - Help for Students - Page 314
© 2012 Blackboard Inc. Proprietary and Confidential. U.S. Patent No. 6,988,138. Additional Patents Pending.
Tests and Assignments > Submitting Assignments
Accessing My Grades From Outside Your Course
1. On the My Institution tab, click My Grades on the Tools panel.
2. On the My Courses/Organizations page, click the name of your course.
Blackboard Learn Release 9.1 - Help for Students - Page 315
© 2012 Blackboard Inc. Proprietary and Confidential. U.S. Patent No. 6,988,138. Additional Patents Pending.
Tests and Assignments > Submitting Assignments
Reviewing Your Grade
l
If your assignment has not been graded, the Grade column contains a symbol indicating its status.
l
If your assignment has been submitted and graded, the grade appears in the Grade column. To view
more detail, click the link to see the assignment's Review Submission History page. This page
includes:
o
Instructor Feedback: This section lists your grade and any feedback provided by your
instructor.
o
Attached Files: This section provides links to open or download any files attached by you or
your instructor. For example, your instructor might provide comments in a file that you
submitted with your assignment.
Note: If your instructor has used a rubric for grading and has made it available to students, click View Rubric
to display detailed grading information.
Accessing the Review Submission History Page from the Assignment
1. Return to the assignment link in the Content Area that holds the assignment.
2. Click the name of the assignment.
My Grades Item Status
The following table describes the symbols appearing on the My Grades page.
Symbol
Description
-
Item has not yet been completed. No information is available.
Item has been completed, but will not have a grade (for items such as surveys).
Item has been submitted. This item is waiting to be reviewed by your instructor
-ORItem has been submitted. Your instructor may review this item but may not be provided a grade (for items
such as surveys).
Grade
Item has been graded. Click the grade to view detailed feedback.
Attempt is in progress. This item has not been submitted. To submit the item, see Submitting a Draft
Assignment.
Grade is exempted for this user. If you do not complete this assignment, it will not affect your grade.
Error has occurred. Contact your instructor.
Blackboard Learn Release 9.1 - Help for Students - Page 316
© 2012 Blackboard Inc. Proprietary and Confidential. U.S. Patent No. 6,988,138. Additional Patents Pending.
Tests and Assignments > Group Assignments
Related Tutorials
Submitting Assignments (Flash movie | 2m 43s | 5,775 KB)
Group Assignments
You can submit your work to complete group assignments in the following ways:
l
Text typed on the Upload Assignment page.
l
Files attached from your computer or from the Content Collection.
l
A combination of both text and attached files.
Assignments list the name, description, and attachments for course work. You can also choose to include
comments for your instructor.
The grade provided by your instructor for the final assignment is given to every member of the group.
Frequently Asked Questions
Why can't I open our group assignment?
Please contact the computing help desk at your school. They can help you troubleshoot and download any
application you might need. If you’re not sure how to contact them, look for the technology office on your
school’s website or search the web for your school’s name + Blackboard + help or support. You may also check
to make sure you are using a supported Internet browser and operating system for the version of Blackboard
that your school is using.
Why can't I find our group assignment?
Your instructor might make an assignment unavailable until after a certain date or until other criteria has been
met. For example, you might have to mark a lecture as reviewed before you can access the assignment.
Please contact your instructor for more information.
My instructor did not receive our group assignment. What do I do?
You must discuss this issue with your instructor. To see the step-by-step instructions for submitting a group
assignment, see How to Submit Work for a Group Assignment.
How do I edit or resubmit a group assignment?
Editing a group assignment requires you to resubmit the assignment, and not all assignments can be
resubmitted. If your instructor has not allowed you to submit an assignment more than once and you made a
mistake when submitting the assignment, you must contact your instructor to ask for the opportunity to
resubmit the assignment.
If your instructor has allowed you to submit an assignment more than once, you will see a Start New
Submission function on the Review Submission History page. You access this page by clicking the
assignment link in your course. To learn more, see How to Edit or Resubmit a Group Assignment.
How do I know whether my assignment has been graded?
On the Course Menu, click Tools, and then click My Grades. If your assignment has not been graded, the
Grade column contains a symbol indicating its status. If your assignment has been submitted and graded, the
Blackboard Learn Release 9.1 - Help for Students - Page 317
© 2012 Blackboard Inc. Proprietary and Confidential. U.S. Patent No. 6,988,138. Additional Patents Pending.
Tests and Assignments > Group Assignments
grade appears in the Grade column. To view more detail, click the link to see the assignment's Review
Submission History page.
To learn more, see How to View Group Assignment Grades and Feedback.
How to Submit Work for a Group Assignment
1. On the Course Menu, select the Content Area that holds the group assignment, for example, the
Group Assignments Content Area. Click the name of the assignment.
-OR1. In the My Groups panel, select your group name. On the group homepage, click the name of the
assignment in the Group Assignments section.
Blackboard Learn Release 9.1 - Help for Students - Page 318
© 2012 Blackboard Inc. Proprietary and Confidential. U.S. Patent No. 6,988,138. Additional Patents Pending.
Tests and Assignments > Group Assignments
2. On the Upload Assignment page, review the instructions and download any files provided by your
instructor and complete the assignment using one or both of the following:
l
In the Submission box, type your response. You can use the Text Editor functions to
format the text and include files, images, web links, multimedia, and Mashups.
l
If your response to the assignment is in a separate file, click Browse My Computer and
select a file to attach. If you attach a file, type a Link Title. If the box is left blank, the file
name becomes the link. Follow any instructions that your instructor provided for naming
your file.
Note: The Do not attach option appears next to an uploaded file. If you have selected an
incorrect file, you can remove it with this option. If the same file is attached to your
assignment more than once, the new file is saved with a number appended to the name.
For example, history_assignment(1).doc.
Note: If your instructor is using a rubric and has made it available to students, click the
View Rubric button to view grading criteria.
3. Optionally, in the Comments box, type your comments.
Blackboard Learn Release 9.1 - Help for Students - Page 319
© 2012 Blackboard Inc. Proprietary and Confidential. U.S. Patent No. 6,988,138. Additional Patents Pending.
Tests and Assignments > Group Assignments
WARNING! If your instructor has not allowed multiple attempts, assignments can be
submitted only once. Ensure that you have attached any required files to your assignment
before you click Submit.
4. Click Submit.
WARNING! When you finish your assignment, you must click Submit. If you do not, your
instructor will not receive your completed assignment.
Blackboard Learn Release 9.1 - Help for Students - Page 320
© 2012 Blackboard Inc. Proprietary and Confidential. U.S. Patent No. 6,988,138. Additional Patents Pending.
Tests and Assignments > Group Assignments
How to Save a Group Assignment as Draft and Submit Later
The Save as Draft function is available if you need to return to your group assignment at a later time. This
function saves your comments and files on the page.
When you finish your assignment, you must click Submit. If you do not, your instructor will not receive your
completed assignment.
Blackboard Learn Release 9.1 - Help for Students - Page 321
© 2012 Blackboard Inc. Proprietary and Confidential. U.S. Patent No. 6,988,138. Additional Patents Pending.
Tests and Assignments > Group Assignments
Saving a Group Assignment as a Draft
1. On the Course Menu, select the Content Area that holds the group assignment, for example, the
Group Assignments Content Area. Click the name of the assignment.
2. On the Upload Assignment page, download any files provided by your instructor and complete
the assignment using one or both of the following:
l
In the Submission box, type your response. You can use the Text Editor functions to
format the text and include files, images, web links, multimedia, and Mashups.
l
If your response to the assignment is in a separate file, click Browse My Computer and
select a file to attach. If you attach a file, type a Link Title. If the box is left blank, the file
name becomes the link. Follow any instructions that your instructor provided for naming
your file.
Note: The Do not attach option appears next to an uploaded file. If you have selected an
incorrect file, you can remove it with this option. If the same file is attached to your
assignment more than once, the new file is saved with a number appended to the name.
For example, history_assignment(1).doc.
3. Optionally, in the Comments box, type your comments.
4. Click Save as Draft to save your changes and continue working later.
Blackboard Learn Release 9.1 - Help for Students - Page 322
© 2012 Blackboard Inc. Proprietary and Confidential. U.S. Patent No. 6,988,138. Additional Patents Pending.
Tests and Assignments > Group Assignments
5. When you reach the Review Submission History page, click OK.
Blackboard Learn Release 9.1 - Help for Students - Page 323
© 2012 Blackboard Inc. Proprietary and Confidential. U.S. Patent No. 6,988,138. Additional Patents Pending.
Tests and Assignments > Group Assignments
Submitting a Draft Assignment
1. Return to the group assignment link in the Content Area that holds the assignment.
2. On the Review Submission History page, click Continue Current Submission.
Blackboard Learn Release 9.1 - Help for Students - Page 324
© 2012 Blackboard Inc. Proprietary and Confidential. U.S. Patent No. 6,988,138. Additional Patents Pending.
Tests and Assignments > Group Assignments
3. On the Upload Assignment page, make the necessary changes in your assignment.
4. Optionally, in the Comments box, type your comments.
WARNING! If your instructor has not allowed multiple attempts, assignments can be
submitted only once. Ensure that you have attached any required files to your assignment
before you click Submit.
5. Click Submit. The Review Submission History page appears showing the information about
your submitted assignment.
WARNING! When you finish your assignment, you must click Submit. If you do not, your
instructor will not receive your completed assignment.
Blackboard Learn Release 9.1 - Help for Students - Page 325
© 2012 Blackboard Inc. Proprietary and Confidential. U.S. Patent No. 6,988,138. Additional Patents Pending.
Tests and Assignments > Group Assignments
How to Edit or Resubmit a Group Assignment
Editing a group assignment requires you to resubmit the assignment, and not all assignments can be
resubmitted. If your instructor has not allowed you to submit a group assignment more than once and you made
a mistake when submitting the assignment, you must contact your instructor to ask for the opportunity to
resubmit the assignment.
Blackboard Learn Release 9.1 - Help for Students - Page 326
© 2012 Blackboard Inc. Proprietary and Confidential. U.S. Patent No. 6,988,138. Additional Patents Pending.
Tests and Assignments > Group Assignments
Your instructor may allow you to submit a group assignment more than once for a variety of reasons. For
example, your instructor can provide comments on your first draft so that you can try to improve your work.
Your instructor can choose to use either the highest graded attempt or the last graded attempt for your grade.
If your instructor has allowed you to submit a group assignment more than once, you will see a Start New
Submission function on the Review Submission History page. You access this page by clicking the group
assignment link in your course.
1. Return to the group assignment link in the Content Area that holds the assignment.
2. Click the name of the assignment.
3. On the Review Submission History page, view the details of your first submission. Click Start
New Submission.
Blackboard Learn Release 9.1 - Help for Students - Page 327
© 2012 Blackboard Inc. Proprietary and Confidential. U.S. Patent No. 6,988,138. Additional Patents Pending.
Tests and Assignments > Group Assignments
4. On the Upload Assignment page, download any files provided by your instructor and complete
the assignment using one or both of the following:
l
In the Submission box, type your response. You can use the Text Editor functions to
format the text and include files, images, web links, multimedia, and Mashups.
l
If your response to the assignment is in a separate file, click Browse My Computer and
select a file to attach. If you attach a file, type a Link Title. If the box is left blank, the file
name becomes the link. Follow any instructions that your instructor provided for naming
your file.
Note: The Do not attach option appears next to an uploaded file. If you have selected an
incorrect file, you can remove it with this option. If the same file is attached to your
assignment more than once, the new file is saved with a number appended to the name.
For example, history_assignment(1).doc.
5. Optionally, in the Comments box, type your comments.
WARNING! Ensure that you have attached any required files to your assignment before you
click Submit.
6. Click Submit.
Blackboard Learn Release 9.1 - Help for Students - Page 328
© 2012 Blackboard Inc. Proprietary and Confidential. U.S. Patent No. 6,988,138. Additional Patents Pending.
Tests and Assignments > Group Assignments
WARNING! When you finish your assignment, you must click Submit. If you do not, your
instructor will not receive your completed assignment.
7. On the Review Submission History page, you can see all of your submissions listed by date and
time. To view the details of a submission, click the plus sign next to an attempt.
Blackboard Learn Release 9.1 - Help for Students - Page 329
© 2012 Blackboard Inc. Proprietary and Confidential. U.S. Patent No. 6,988,138. Additional Patents Pending.
Tests and Assignments > Group Assignments
How to View Group Assignment Grades and Feedback
Blackboard does not score assignments automatically. Each assignment needs to be reviewed by your
instructor. You can review the information provided by your instructor in My Grades or on the assignment's
Review Submission History page.
Accessing My Grades From Within Your Course
1. On the Course Menu, click Tools
2. On the Tools page, click My Grades.
Blackboard Learn Release 9.1 - Help for Students - Page 330
© 2012 Blackboard Inc. Proprietary and Confidential. U.S. Patent No. 6,988,138. Additional Patents Pending.
Tests and Assignments > Group Assignments
Accessing My Grades From Outside Your Course
1. On the My Institution tab, click My Grades on the Tools panel.
2. On the My Courses/Organizations page, click the name of your course.
Blackboard Learn Release 9.1 - Help for Students - Page 331
© 2012 Blackboard Inc. Proprietary and Confidential. U.S. Patent No. 6,988,138. Additional Patents Pending.
Tests and Assignments > Group Assignments
Reviewing Your Grade
l
If your group assignment has not been graded, the Grade column contains a symbol indicating its
status.
l
If your group assignment has been submitted and graded, the grade appears in the Grade column.
You can also see your instructor's feedback in the Comments column.
Reviewing Your Grade From the Group Homepage
You can also view your grade and any feedback provided by your instructor in the assignment's Review
Submission History page. If your instructor attached a file, you must access it from the group assignment link
on the group homepage.
1. On the My Groups panel, click the name of your group.
2. On the group homepage, click the name of your group assignment. The Review Submission
History page includes:
l
Instructor Feedback: This section lists your grade and any feedback provided by your
instructor.
l
Attached Files: This section provides links to open or download any files attached by you
or your instructor. For example, your instructor might provide comments in a file that you
Blackboard Learn Release 9.1 - Help for Students - Page 332
© 2012 Blackboard Inc. Proprietary and Confidential. U.S. Patent No. 6,988,138. Additional Patents Pending.
Tests and Assignments > Group Assignments
Blackboard Learn Release 9.1 - Help for Students - Page 333
© 2012 Blackboard Inc. Proprietary and Confidential. U.S. Patent No. 6,988,138. Additional Patents Pending.
Tests and Assignments > About SafeAssign
Accessing the Review Submission History Page from Group Assignments
1. Return to the group assignment link in the Content Area that holds the assignment.
2. Click the name of the assignment.
Note: If your instructor has used a rubric for grading and has made it available to students, click View Rubric
to display detailed grading information.
My Grades Item Status
The following table describes the symbols appearing on the My Grades page.
Symbol
Description
-
Item has not yet been completed. No information is available.
Item has been completed, but will not have a grade (for items such as surveys).
Item has been submitted. This item is waiting to be reviewed by your instructor.
-ORItem has been submitted. Your instructor may review this item but may not be provided a grade (for items
such as surveys).
Grade
Item has been graded. Click the grade to view detailed feedback.
Attempt is in progress. This item has not been submitted. To submit the item, see Submitting a Draft
Assignment.
Grade is exempted for this user. If you do not complete this assignment, it will not affect your grade.
Error has occurred. Contact your instructor.
About SafeAssign
SafeAssign compares submitted assignments against a set of academic papers to identify areas of overlap
between the submitted assignment and existing works. Safe Assign is used to prevent plagiarism and to create
opportunities to help students identify how to properly attribute sources rather than paraphrase. SafeAssign is
effective as both a deterrent and an educational tool.
Blackboard Learn Release 9.1 - Help for Students - Page 334
© 2012 Blackboard Inc. Proprietary and Confidential. U.S. Patent No. 6,988,138. Additional Patents Pending.
Tests and Assignments > About SafeAssign
How SafeAssignments Work
SafeAssign is based on a unique text matching algorithm capable of detecting exact and inexact matching
between a paper and source material. SafeAssignments are compared against several different databases,
including:
l
Internet: Comprehensive index of documents available for public access on the Internet
l
ProQuest ABI/Inform database: More than 1,100 publication titles and about 2.6 million articles
from 1990s to present time, updated weekly (exclusive access)
l
Institutional document archives: Contains all papers submitted to SafeAssign by users in their
respective institutions
l
Global Reference Database: Contains papers that were volunteered by students from Blackboard
client institutions to help prevent cross-institutional plagiarism
Global Reference Database
Blackboard’s Global Reference Database is a separate database where students voluntarily donate copies of
their papers to help prevent plagiarism. It is separated from each institution’s internal database, where all
papers are stored by each corresponding institution, and students are free to select the option to check their
papers without submitting them to the Global Reference Database. Students submit their papers to the
database voluntarily and agree not to delete papers in the future. Submissions to the Global Reference
Database are extra copies that are given voluntarily for the purpose of helping with plagiarism prevention.
Blackboard does not claim ownership of submitted papers.
SafeAssign Originality Reports
After a paper has been processed, a report will be available detailing the percentage of text in the submitted
paper that matches existing sources. It also shows the suspected sources of each section of the submitted
paper that returns a match. Instructors can delete matching sources from the report and process it again. This
may be useful if the paper is a continuation of a previously submitted work by the same student.
Because SafeAssign identifies all matching blocks of text, it is important to read the report carefully and
investigate whether or not the block of text is properly attributed.
Interpreting SafeAssign Scores
Sentence matching scores represent the percentage probability that two phrases have the same meaning. This
number can also be interpreted as the reciprocal to the probability that these two phrases are similar by chance.
For example, a score of 90 percent means that there is a 90 percent probability that these two phrases are the
same and a 10 percent probability that they are similar by chance and not because the submitted paper includes
content from the existing source (whether or not it is appropriately attributed).
Overall score is an indicator of what percentage of the submitted paper matches existing sources. This score is
a warning indicator only and papers should be reviewed to see if the matches are properly attributed.
l
Scores below 15 percent: These papers typical include some quotes and few common phrases or
blocks of text that match other documents. These papers typically do not require further analysis, as
there is no evidence of the possibility of plagiarism in these papers.
l
Scores between 15 percent and 40 percent: These papers include extensive quoted or
paraphrased material or they may include plagiarism. These papers should be reviewed to determine
if the matching content is properly attributed.
Blackboard Learn Release 9.1 - Help for Students - Page 335
© 2012 Blackboard Inc. Proprietary and Confidential. U.S. Patent No. 6,988,138. Additional Patents Pending.
Tests and Assignments > About SafeAssign
l
Scores over 40 percent: There is a very high probability that text in this paper was copied from other
sources. These papers include quoted or paraphrased text in excess and should be reviewed for
plagiarism.
Grade Center Integration
SafeAssignments are created with associated Grade Center items. The score is then recorded in the Grade
Center.
How to Submit a SafeAssignment
Note: You can only submit a SafeAssignment once. If you would like to edit, delete, or resubmit a
SafeAssignment, contact your instructor and request that they clear your first submission.
1. On the Course Menu, select the Content Area that holds the SafeAssignment, for example, the
Assignments Content Area.
2. On the Assignments page, look for the SafeAssignment and click View/Complete.
3. On the Upload SafeAssignment page, optionally, type your comment in the Comment box.
4. Click Browse to select a file to attach as your submission.
5. Optionally, select the Global Reference Database check box to upload your paper to the Global
Reference Database.
Note: Submitting to the SafeAssign Global Reference Database allows papers from other
institutions to be checked against your paper to protect the originality of your work across
institutions.
6. Click Submit.
Blackboard Learn Release 9.1 - Help for Students - Page 336
© 2012 Blackboard Inc. Proprietary and Confidential. U.S. Patent No. 6,988,138. Additional Patents Pending.
Tests and Assignments > About SafeAssign
Note: After you submit SafeAssignments, there is a slight delay between the upload and the
availability of the SafeAssign report. Results are normally available within 10-15 minutes.
How to View SafeAssignment Submissions
Your submissions and the SafeAssign reports associated with submissions are viewable by accessing the
SafeAssignment after submitting your paper. Note: This option is only available if allowed by your instructor.
Viewing a SafeAssign Submission
1. Return to the assignment link in the Content Area that holds the SafeAssignment, for example, the
Assignments Content Area.
2. On the Assignments page, look for the SafeAssignment and click View/Complete. The View
SafeAssignment page appears. This page includes:
l
Assignment Information: This section displays the name of the SafeAssignment and its
description.
l
Submitted Work: This section provides link to the following :
o
Text: Select this option to view your paper and comments.
o
File: Select this option to download the submission.
Blackboard Learn Release 9.1 - Help for Students - Page 337
© 2012 Blackboard Inc. Proprietary and Confidential. U.S. Patent No. 6,988,138. Additional Patents Pending.
Tests and Assignments > About SafeAssign
o
Matching: The percentage listed is the percentage of your paper that matches
other sources. Read the full report to determine if the matching is properly
attributed.
o
SA Report: Select this option to view the full SafeAssign report.
l
View Grade: This section lists the grade given by your instructor.
l
Instructor's Feedback: This section lists any feedback, and provides links to open or
download any files attached by your instructor..
Viewing a SafeAssign Report
SafeAssign Report provides detailed information about the matches found between your submitted paper and
existing sources. The SafeAssign Report identifies all matching blocks of text. It is your and your instructor's
responsibility to investigate whether the matching text is properly referenced or not. Detailing every match
prevents detection errors due to differences in citing standards.
Blackboard Learn Release 9.1 - Help for Students - Page 338
© 2012 Blackboard Inc. Proprietary and Confidential. U.S. Patent No. 6,988,138. Additional Patents Pending.
Tests and Assignments > About SafeAssign
1. Return to the View SafeAssignment page.
2. On the View SafeAssignment page, click the green check mark link under SA Report. The SA
Report provides extensive information to help you determine whether you are appropriately citing
your works. This page includes:
l
Paper Information: This section lists data about the paper, such as the author, percent
matching, and when it was submitted. This section also includes options for downloading
the report, emailing the report, or viewing a printable version. Note that the printable
version may be the most effective view of the report for those users that rely on assistive
technologies to access Blackboard Learn.
l
Suspected Sources: This section lists the original sources that match sections of the
submitted paper.
l
o
To display the original work, click on the source title.
o
To display the related phrase within your paper, click the magnifying glass.
Paper Text: This section shows the submitted paper. All matching blocks of text are
identified and numbered. Click a phrase to display the Source Comparison Window which
provides a direct comparison between your paper’s phrase and the source document it
matches.
Blackboard Learn Release 9.1 - Help for Students - Page 339
© 2012 Blackboard Inc. Proprietary and Confidential. U.S. Patent No. 6,988,138. Additional Patents Pending.
Tests and Assignments > About SafeAssign
Blackboard Learn Release 9.1 - Help for Students - Page 340
© 2012 Blackboard Inc. Proprietary and Confidential. U.S. Patent No. 6,988,138. Additional Patents Pending.
Tests and Assignments > Digital Dropbox
Interpreting the Overall SafeAssign Score
The overall SafeAssign score indicates the percentage of the submitted paper that matches existing sources.
l
Scores below 15 percent: These papers typically include some quotes and few common phrases or
blocks of text matching other documents.
l
Scores between 15 percent and 40 percent: These papers include extensive quoted or
paraphrased material or they may include plagiarism.
l
Scores over 40 percent: There is a very high probability that text in this paper was copied from other
sources. These papers include quoted or paraphrased text in excess.
Digital Dropbox
The Digital Dropbox has been replaced by the Assignments tool in Blackboard Learn, Release 9.1.
If your instructor has asked you to submit something to the Digital Dropbox, please contact them for alternative
instructions.
Blackboard Learn Release 9.1 - Help for Students - Page 341
© 2012 Blackboard Inc. Proprietary and Confidential. U.S. Patent No. 6,988,138. Additional Patents Pending.