1
PROMAN-CPCL Rev. P • April. 2005
Proprietary Statement
This manual contains proprietary information of Zebra Technologies Corporation and its
subsidiaries (“Zebra Technologies”). It is intended solely for the information and use of
parties operating and maintaining the equipment described herein. Such propriety
information may not be used, reproduced, or disclosed to any other parties for any other
purpose without the expressed written permission of Zebra Technologies.
Product Improvements
Continuous improvement of products is a policy of Zebra Technologies. All specifications
and designs are subject to change without notice.
FCC Compliance Statement
Digital apparatus has been tested and found to comply with the limits for a Class B Digital
Device, pursuant to Part 15 of the FCC Rules. These limits are designed to provide
reasonable protection against harmful interference when the equipment is operated in a
commercial environment. This equipment generates, uses, and can radiate radio
frequency energy and, if not installed and used in accordance with the product manuals,
may cause harmful interference to radio communications. Operation of this equipment in
a residential area is likely to cause harmful interference in which case the user will be
required to correct the interference at his own expense.
The user is cautioned that any changes or modifications not expressly approved by Zebra
Technologies could void the user’s authority to operate the equipment. This unit was
tested with shielded cables on the peripheral devices. Shielded cables must be used with
the unit to insure compliance.
WARNING: EXPOSURE TO RADIO FREQUENCY RADIATION ON SOME MODELS. TO
CONFORM TO FCC RF EXPOSURE REQUIREMENTS THIS DEVICE SHALL BE USED
IN ACCORDANCE WITH THE OPERATING CONDITIONS AND INSTRUCTIONS
LISTED IN THE UNIT’S USER’S MANUAL.
Canadian DOC Compliance Statement
Digital apparatus does not exceed the Class A limits for radio noise emissions from digital
apparatus as set out in the radio interference regulations of the Canadian Department of
Communications.
Liability Disclaimer
Zebra Technologies takes steps to assure that its published Engineering specifications
and manuals are correct; however, errors do occur. Zebra Technologies reserves the right
to correct any such errors and disclaims liability resulting therefrom.
Limitation of Liability
In no event shall Zebra Technologies or anyone else involved in the creation, production
or delivery of the accompanying product (including hardware and software) be liable for
any damages whatsoever (including, without limitation, consequential damages including
loss of business profits, business interruption or loss of business information) arising out
of the use of or the results of use of or inability to use such product, even if Zebra
Technologies has been advised of the possibility of such damages. Some jurisdictions do
not allow the exclusion or limitation of incidental or consequential damages, so the above
limitation or exclusion may not apply to you.
Copyrights
The copyrights in this manual and the label printer described therein are owned by Zebra
Technologies. All rights are reserved. Unauthorized reproduction of this manual or the
software in the label printer may result in imprisonment of up to one year and fines of up
to $10,000 (17 U.S.C.506). Copyright violators may be subject to civil liability.
© 2005 ZIH Corp. All trademarks and registered trademarks are property of their
respective owners. All rights reserved.
TABLE OF CONTENTS
PROGRAMMING INTRODUCTION ......................... P1-1
PROGRAMMING LANGUAGE EMULATION ............................. P1-1
PROGRAMMING LANGUAGE RECOMMENDATIONS ............ P1-2
GETTING PRINTER INFORMATION ......................................... P1-3
GETTING PRINTER INFORMATION EXAMPLE ...................... P1-4
COMMUNICATIONS DIAGNOSTICS MODE ............................. P1-7
LABEL COORDINATE SYSTEM ................................................ P1-8
LABEL VISTA™ .......................................................................... P1-9
PRINTER COMMANDS ............................................ P2-1
PRINTER COMMANDS ............................................................. P2-2
PRINT COMMAND ..................................................................... P2-3
FORM COMMAND ...................................................................... P2-4
JOURNAL COMMAND ............................................................... P2-5
UNITS COMMANDS ................................................................... P2-6
USING COMMENTS ................................................................... P2-8
TEXT ......................................................................... P3-1
RESIDENT FONT SAMPLES ..................................................... P3-1
TEXT COMMANDS ..................................................................... P3-4
USING FONT GROUPS ............................................................. P3-6
TEXT CONCATENATION COMMANDS ..................................... P3-8
MULTILINE (ML) COMMANDS ................................................. P3-10
COUNT COMMAND ................................................................. P3-12
SETMAG COMMAND ............................................................... P3-14
SCALABLE TEXT .................................................... P4-1
SCALE-TEXT COMMANDS ....................................................... P4-2
SCALE-TO-FIT COMMANDS ..................................................... P4-4
SCALABLE CONCATENATION COMMANDS ........................... P4-6
ROTATE COMMANDS ................................................................ P4-8
LINEAR BAR CODES .............................................. P5-1
INTRODUCTION ......................................................................... P5-1
UPC AND EAN/JAN BAR CODES ............................................. P5-3
CODE 39 OR CODE 3 OF 9 BAR CODES ................................ P5-6
CODE 93 OR CODE 9 OF 3 BAR CODES ................................ P5-8
INTERLEAVED 2 OF 5 BAR CODES ......................................... P5-8
CODE 128 AND THE UCC-128 SHIPPING STANDARD ........... P5-9
CODABAR ................................................................................. P5-11
MSI PLESSEY BAR CODES .................................................... P5-12
POSTNET AND FACING IDENTIFICATION MARKS .............. P5-13
BAR CODE COMMANDS ......................................................... P5-15
BARCODE COMMAND ............................................................ P5-16
BARCODE-TEXT COMMAND .................................................. P5-18
Mobile Printer CPCLProgramming Manual
iii
TABLE OF CONTENTS (continued)
COUNT COMMAND ................................................................. P5-20
TWO-DIMENSIONAL BAR CODES ........................ P6-1
INTRODUCTION ......................................................................... P6-1
PDF417 ....................................................................................... P6-2
MAXICODE ................................................................................. P6-2
TWO-DIMENSIONAL BAR CODE COMMANDS ....................... P6-3
PDF417 (PORTABLE DATA FILE) ............................................. P6-4
GRAPHICS ............................................................... P7-1
BOX COMMAND ......................................................................... P7-1
LINE COMMANDS ...................................................................... P7-2
INVERSE-LINE COMMANDS ..................................................... P7-4
PATTERN COMMAND ................................................................ P7-6
GRAPHICS COMMANDS ........................................................... P7-8
PCX COMMANDS .................................................................... P7-10
ADVANCED COMMANDS ....................................... P8-1
CONTRAST COMMAND ............................................................ P8-1
TONE COMMAND ..................................................................... P8-2
JUSTIFICATION COMMANDS .................................................. P8-3
PAGE-WIDTH COMMAND ....................................................... P8-4
PACE COMMAND ...................................................................... P8-6
NO-PACE COMMAND ................................................................ P8-9
WAIT COMMAND ..................................................................... P8-10
REWIND COMMAND ................................................................ P8-11
TENSION COMMANDS ............................................................ P8-12
SPEED COMMAND .................................................................. P8-13
SETSP COMMAND ................................................................. P8-14
ON-OUT-OF-PAPER COMMAND ............................................. P8-15
ON-FEED COMMAND .............................................................. P8-16
PREFEED COMMAND ............................................................ P8-18
POSTFEED COMMAND .......................................................... P8-19
PRESENT-AT COMMAND ....................................................... P8-20
COUNTRY / CODE PAGE COMMAND ................................... P8-22
USING FORMAT FILES ............................................................ P8-24
BEEP COMMAND ..................................................................... P8-27
CUT COMMAND ...................................................................... P8-28
PARTIAL-CUT COMMAND ...................................................... P8-29
CUT-AT COMMAND ................................................................. P8-30
MCR COMMANDS .................................................................... P8-31
LINE PRINT MODE .................................................. P9-1
INTRODUCTION ......................................................................... P9-1
SPECIAL COMMANDS USING THE UTILITY FUNCTION ...... P9-2
UNITS COMMANDS ................................................................... P9-3
SETLP COMMAND ..................................................................... P9-4
iv
Mobile Printer CPCLProgramming Manual
SETLF COMMAND ..................................................................... P9-5
MOVING WITH X AND Y COORDINATES ................................. P9-6
LMARGIN COMMAND ................................................................ P9-7
SETBOLD COMMAND ............................................................... P9-8
SETSP COMMAND .................................................................... P9-9
PAGE-WIDTH COMMAND & PAGE-HEIGHT COMMAND ...... P9-10
SPECIAL ASCII CHARACTERS ............................................... P9-10
SETFF COMMAND ................................................................... P9-11
SET-TOF COMMAND ............................................................... P9-12
TEARING OR CUTTING THE PAPER ..................................... P9-14
BAR CODES, GRAPHICS AND LINES .................................... P9-15
SETLP-TIMEOUT COMMAND ................................................. P9-16
DESIGNING A RECEIPT .......................................................... P9-16
ADVANCED UTILITIES .......................................... P10-1
VERSION UTILITY .................................................................... P10-2
CHECKSUM UTILITY ............................................................... P10-3
DEL UTILITY ............................................................................. P10-4
DIR UTILITY .............................................................................. P10-5
DEFINE-FILE (DF) UTILITY ..................................................... P10-6
TYPE UTILITY .......................................................................... P10-8
BAUD UTILITY .......................................................................... P10-9
COUNTRY / CODE-PAGE UTILITY OR ................................ P10-10
CHAR-SET/CODE PAGE UTILITY ......................................... P10-10
ANNOUNCE UTILITY ............................................................. P10-12
TIMEOUT UTILITY .................................................................. P10-14
TIMEOUT UTILITY EXAMPLE ............................................... P10-14
BEEP COMMAND ................................................................... P10-15
BEEP COMMAND EXAMPLE ................................................ P10-15
ON-LOW-BATTERY COMMAND ............................................ P10-16
LT COMMAND ........................................................................ P10-17
LT COMMAND EXAMPLES .................................................... P10-17
SET-TIME UTILITY ................................................................. P10-18
GET-TIME UTILITY ................................................................. P10-19
SET-DATE UTILITY ................................................................ P10-20
GET-DATE UTILITY ................................................................ P10-21
PRINTING A TIME STAMP ..................................................... P10-22
PRINTING A DATE STAMP .................................................... P10-23
PAPER-JAM UTILITY ............................................................. P10-24
MAGNETIC CARD READER (MCR) COMMAND .................. P10-25
MCR-QUERY COMMAND ...................................................... P10-31
MCR-CAN COMMAND ........................................................... P10-33
S-CARD COMMAND .............................................................. P10-34
S-CARD COMMAND EXAMPLES .......................................... P10-37
DENSO BHT COMMANDS .................................. P10-38
SETTING THE DATA FORMAT .............................................. P10-38
Mobile Printer CPCLProgramming Manual
v
TABLE OF CONTENTS (continued)
IR OR CABLE INTERFACE SELECTION .............................. P10-40
BHT-BAUD COMMAND .......................................................... P10-40
SETTING THE MODE FOR IR DATA TRANSMISSION ........ P10-40
CONFIGURING THE BHT FOR IR TRANSMISSION ............ P10-41
BHT-IR FILE TRANSMISSION ............................................... P10-42
CONFIGURING THE BHT FOR CABLE TRANSMISSION .... P10-43
LOADING A .DAT FILE INTO THE BHT ................................. P10-44
INTERRUPTED TRANSMISSIONS ....................................... P10-45
EXAMPLE .DAT FILE .............................................................. P10-46
SRF-ACCESS AND END-SRF-ACCESS COMMANDS ........ P10-47
BHT-BAUD COMMAND .......................................................... P10-48
BHT MODE COMMANDS ....................................................... P10-49
BHT PROTOCOL COMMAND ................................................ P10-53
PRINTER ESCAPE COMMANDS ........................... P11-1
SET AND READ CODE COMMAND ........................................ P11-1
PRINTER ESCAPE COMMANDS FORMAT ............................ P11-2
STATUS/INFORMATION .......................................................... P11-3
USER LABEL COUNT .............................................................. P11-5
POWER OFF COMMAND ........................................................ P11-5
WIRELESS NETWORK PRINTERS ....................... P12-1
INTRODUCTION ....................................................................... P12-1
NETWORK PRINTER SAFETY CONSIDERATIONS .............. P12-1
LAN COMMAND ....................................................................... P12-1
SETTING THE IP ADDRESS FOR NETWORK PRINTERS .... P12-7
LAN COMMAND RESPONSE .................................................. P12-8
NETWORK PRINTER TROUBLESHOOTING ......................... P12-9
WIRELESS LAN REPORT EXAMPLE ................................... P12-10
PROGRAMMING FOR THE DISPLAY OPTION .... P13-1
INTRODUCTION: ...................................................................... P13-1
EXAMPLE 1: ............................................................................. P13-1
EXAMPLE 2: ............................................................................. P13-5
CONFIGURATION/CONTROL COMMANDS ......... P14-1
INTRODUCTION ....................................................................... P14-1
COMMAND FORMAT ............................................................... P14-1
COMMANDS / PARAMETERS ................................................. P14-3
BLUETOOTH® PARAMETERS ................................................ P14-5
COMM PORT PARAMETERS ................................................ P14-11
DEVICE PARAMETERS ......................................................... P14-13
DISPLAY PARAMETERS ....................................................... P14-15
FILE PARAMETERS ............................................................... P14-17
PRINTER MECHANISM PARAMETERS ............................... P14-19
INPUT PARAMETER .............................................................. P14-22
vi
Mobile Printer CPCLProgramming Manual
MEDIA PARAMETERS ........................................................... P14-24
MEMORY PARAMETERS ...................................................... P14-27
ODOMETER PARAMETERS ................................................. P14-28
POWER PARAMETERS ......................................................... P14-32
TEST FUNCTION PARAMETERS ......................................... P14-36
NETWORKING PARAMETERS ............................................. P14-37
USB PARAMETERS ............................................................... P14-59
WLAN PARAMETERS ............................................................ P14-63
WLAN.XXX FHSS COMPATIBILITY ....................................... P14-63
ZEBRA PRINTER MIRROR PROCESS ................................. P14-86
PRINTER CONFIGURATION AND SETUP ............ P15-1
USING LABEL VISTA FOR PRINTER CONFIGURATION ....... P15-1
USING LABEL VISTA FOR WIRELESS CONFIGURATION .... P15-3
POWER MANAGEMENT .......................................................... P15-4
BATCH FILES ........................................................................... P15-7
RUN.BAT COMMAND/FILE ...................................................... P15-8
RE-RUN COMMAND ................................................................ P15-9
GAP-SENSE & BAR-SENSE COMMANDS ........................... P15-10
INDEX ......................................................................... A-1
APPENDIX A-FREQUENTLY ASKED QUESTIONS . A-14
APPENDIX B- INTERFACE CABLES ...................... A-19
APPENDIX C- CHARACTER TABLES .................... A-24
APPENDIX D - FONT INFORMATION ..................... A-28
APPENDIX E- BAR CODE QUICK REFERENCE ... A-32
APPENDIX F - PRODUCT SUPPORT ..................... A-34
Mobile Printer CPCLProgramming Manual
vii
Programming Section
viii
Mobile Printer CPCLProgramming Manual
PROGRAMMING INTRODUCTION
This manual details the various commands in the CPCL
language which allow the programmer to utilize the built
in text, graphics, bar code printing and communications
capabilities of Zebra mobile printers. The following notation conventions are used throughout this manual::
{}
Required item
[]
Optional item
()
Abbreviated command
<>
Literal item
A space character is used to delimit each field in a command line.
Many commands are accompanied by examples of the
command in use. After the word 'Input' in each example,
the file name of that example will appear in parentheses.
This manual can also be found on the Accessories CD
(Part Number 46984 ) available from Zebra.
PROGRAMMING LANGUAGE EMULATION
Zebra Mobile Printers can emulate the EPL2™ and ZPL®
programming languages used by other types of Zebra
printers. Printers using emulation must be configured
with more memory and have a special emulation program
loaded. For more information on the appropriate uses of
these languages, refer to the following language comparison chart:
continued on next page
Mobile Printer CPCLProgramming Manual
P1-1
PROGRAMMING LANGUAGE RECOMMENDATIONS
Language
Native in
Reccommended Use
CPCL
Cameo®, Encore®
QL, RW and older
Comtec® models
• In new installations of
mobiles, where CPCL is easily
integrated into the host
application
• When older Comtec models
are being upgraded- so that the
customer can use existing
application without code
modifications
ZPL
(emulation
available on
QL series,
std. on
QL plus&
RW Series)
PA/PT Series mobile
printers, Zebra High
Performance/ Industrial
/Commercial printers,
R-140 RFID printer,
LP/TLP 2844-Z and
PAX applicator printers
• When an installation already
uses ZPL as a standard language
& needs to maintain a consistant
language for all thermal printers.
• When certain printer functions .
are not available in CPCL or
EPL, such as: (ZBI, Datamatrix,
Code 11, Micro PDF)
• When replacing a PA/PT 40x, or
another Zebra printer using ZPL,
with a Zebra mobile printer
EPL
(emulation
available on
QL, Encore,
or Cameo
series and
std. on RW
& QL plus
series)
Zebra Desktops, R402
(RFID printer), TR 220,
PS 21xx Series
• When an installation already
uses EPL- the most commonly
used Zebra language- as a
standard language and needs to
maintaina consistant language
for all thermal printers.
• If you are replacing Eltron
Transport or Xport mobile
printers, a Zebra mobile with an
EPL emulation will ease the
transition.
Note: QL Plus and RW Series printers have EPL and ZPL emulation
built into their operating system. See the “device.languages”
command under the “Device Parameters” topic in Section 14 for
more information on setting programming languages with these
products.
P1-2
Mobile Printer CPCLProgramming Manual
GETTING PRINTER INFORMATION
The printer can produce a report containing information
about the application resident in printer memory. A report
similar to the example printouts shown on the following
pages can be obtained from your printer by doing the following:
1. Turn the printer OFF.
2. While holding the FEED key down, turn the printer
ON.
3. When printing begins, release the FEED key.
The printer prints a line of interlocking “x” characters and
then produces two reports. The first report indicates the
printer model, ROM version, serial number, baud rate,
etc.
The second report contains application information. The
last digits in the application number indicate the software
version.(e.g. “Software: HTLK40d” indicates a software
version of 40.) If no second report appears, there is no
application loaded.
The Wireless Communications report will appear if a
Short Range Radio (SRRF), infrared (IrDA) or wireless
LAN (RF LAN) option has been installed in the printer. If
no wireless options are installed, the Wireless Communications Section will consist of a blank line.
The RF LAN Information section will only appear on Network Printers (units equipped with a WLAN card). Network printers are covered in detail in Section 12 of this
manual.
The Label section shown in the second report reports the
maximum size label that can be printed, based on a
printer resolution of 203 dots/inch (8 dots/mm).
In the example, the Label Height is 2224 dots, which
means for a label width of 576 dots (2.8 inches or 72
mm), you can print labels up to 10.9 inches (278 mm)
long. Reducing the label width results in a corresponding increase in the maximum label length.
Mobile Printer CPCLProgramming Manual
P1-3
GETTING PRINTER INFORMATION EXAMPLE
Printhead Test
End of First Report
Unit Serial Number
Application Number
Report appears only
on units with wireless
options installed. (see
RF LAN section below
and next page)
Units with no wireless
options will print an
empty line and
resume the report.
RF LAN Section
(Network Printers
only) Refer to
Section 12.
Second report continues on P1-5
P1-4
Mobile Printer CPCLProgramming Manual
GETTING PRINTER INFORMATION EXAMPLE, CONT.
Wireless Communications Section with Short Range Radio (SRRF)
Wireless Option Installed
SRRF Software version
SRRF settings
Wireless Communications Section with IR Wireless Option Installed
IR Software version
Mobile Printer CPCLProgramming Manual
P1-5
GETTING PRINTER INFORMATION EXAMPLE, CONT.
Continuation of Second Report
Flash Memory Size
Maximum Label Size
Refer to P1-7
Resident Fonts
Pre-scaled or
Scalable Fonts (if any)
loaded in Memory
Files Loaded in Printer
Memory (will include
Pre-scaled or
Scalable Fonts)
Amount of Memory
Available
Instructions on
entering
Communications
Diagnostics (Dump)
Mode. Refer to P1-6
P1-6
Mobile Printer CPCLProgramming Manual
COMMUNICATIONS DIAGNOSTICS MODE
To aid the user in diagnosing communications problems,
the printer features a Communications Diagnostics Mode
(Dump Mode). In the dump mode, the printer will print
the ASCII hex codes of the data sent to it, and their text
representation (or the period '.', if not a printable character). As a test of the printer the “ALL CHRS.LBL” file on
the MPU disk may be sent.
To enter Communications Diagnostics Mode:
1. Turn the printer OFF.
2. Hold FEED key down.
3. Turn the printer ON.
4. Release FEED key when printer starts printing the
diagnostics.
5. At the end of 2nd diagnostics report, the printer will
print: "Press FEED key to enter DUMP mode".
6. Now press the FEED key. The printer will print:
"Entering DUMP mode".
Note: If the FEED key is not pressed within 3 seconds, the printer will print "DUMP mode not entered"
and will resume normal operation.
7. At this point, the printer is in DUMP mode and will
print the ASCII hex codes of the data sent to it, and
their text representation (or "." if not a printable
character).
Additionally, a file with a “.dmp” extension containing the ASCII information will be created and stored
in the printer’s memory. It can be viewed, “cloned”
or deleted using the Label Vista application. (Refer
to pg. P1-8 and the Label Vista documentation for
more information.)
To cancel Communications Diagnostics Mode:
1. Turn the printer OFF.
2. Wait 5 seconds.
3. Turn the printer ON.
Mobile Printer CPCLProgramming Manual
P1-7
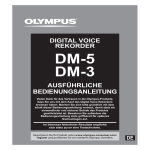
LABEL COORDINATE SYSTEM
(831,y)
[1246,y]
(575, y)
[862,y]
(831, 0)
(575, 0)
3" Printer [862,0]
(447, 0)
(383, y)
[574,y]
(447, y)
[670,y]
Print Direction
Label Height
(0,0)
2.25" Printer [670,0]
2" Printer [574,0]
(383, 0)
Label Width
4" Printer [1246,0]
The x and y coordinates are expressed here in terms of
dots. Coordinates in ( ) are for 200 dot per inch printers.
On 200 d.p.i. printers, 8 dots (either horizontally or vertically) equal 1 millimeter and 203 dots equate approximately to 1 inch.
Coordinates in [ ] are for 300 dot per inch printers. On
300 d.p.i. printers 12 dots equal 1 millimeter, and 305
dots equate approximately to 1 inch.
Notes:
1. Coordinates refer to the actual printing area of the printers.
2. ”y” =the available label height which can vary with the resident
application. (See Getting Printer Information, Page P1-3.)
P1-8
Mobile Printer CPCLProgramming Manual
LABEL VISTA™
Label Vista is a stand-alone program running in
Windows® 95/NT that allows users with little or no programming background to design labels which can be
printed on certain model Zebra portable printers. It combines an intuitive graphically based user environment
with powerful, but easily mastered, editing tools.
Label Vista allows the creation of printable, fixed-size
(pre-scaled) fonts derived from an included library of
TrueType™ fonts, which greatly enhances the versatility
of this program.
In addition, Label Vista allows the easy creation of format
files which can remain resident in the printer and be
merged with variable data files sent from the host. This
provides a very efficient method of printing labels that
have a mixture of data fields that change from label to label and elements that remain constant. Refer to Section
8 of this Manual for more information on format files.
Label Vista also provides a powerful set of diagnostics
tools. It is recommended that the Label Vista documentation package be consulted for a more detailed description of the printer diagnostics available in this program.
Label Vista utilizes a subset of the full Mobile Printing
Systems Programming Language described in this
manual. Files created in Label Vista are fully compatible
with any other label files created using the complete set
of Mobile Printer commands.
Label Vista requires an IBM compatible personal computer, running Windows 95 or later. A PC with the minimum configuration to run Windows 95 will have sufficient
memory to run Label Vista.
Note: Label Vista has proven to be compatible with Windows XP
in informal testing, however, compatibility problems with certain
unusual combinations of hardware and software may arise.
Mobile Printer CPCLProgramming Manual
P1-9
PRINTER COMMANDS
A label file always begins with the “!” character followed by
an “x” offset parameter, “x” and “y” axis resolutions, a label
length and finally a quantity of labels to print. The line containing these parameters is referred to as the Command
Start Line.
A label file always begins with the Command Start Line
and ends with the “PRINT” command. The commands that
build specific labels are placed between these two commands.
A space character is used to delimit each field in a command line.
Note: Every line in the command session must be terminated with both
carriage-return and line-feed characters. All Printer Commands must be in
uppercase characters ONLY.
Mobile Printer CPCLProgramming Manual
P2-1
PRINTER Commands
Format:
<!> {offset} <200> <200> {height} {qty}
where:
<!>:
Use '!' to begin a control session.
{offset}:
The horizontal offset for the entire label.
This value causes all fields to be offset
horizontally by the specified number of
UNITS.
<200>:
Horizontal resolution (in dots-per-inch).
<200>:
Vertical resolution (in dots-per-inch).
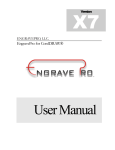
{height}:
The maximum height of the label.
The maximum label height is calculated by measuring from the bottom of the first black bar (or
label gap) to the top of the next black bar (or label
gap). Then 1/16” [1.5mm] is subtracted from this
distance to obtain the maximum height. (In dots:
subtract 12 dots on 203 d.p.i printers; 18 dots on
306 d.p.i. printers)
1st black bar or
gap
maximum ht. =
d - .062”
[1.5mm]
“d”
2nd black bar or
gap
{qty}:
P2-2
Quantity of labels to be printed.
Maximum = 1024.
Mobile Printer CPCLProgramming Manual
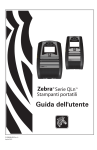
PRINTER Command Example
Input (HELLO.LBL):
! 0 200 200 210 1
TEXT 4 0 30 40 Hello World
FORM
PRINT
Output:
PRINT Command
The PRINT command terminates and prints the file. This
must always be the last command (except when in Line
Print Mode). Upon execution of the PRINT command,
the printer will exit from a control session. Be sure to
terminate this and all commands with both carriagereturn and line-feed characters.
Format:
{command}
where:
{command}:
PRINT
Mobile Printer CPCLProgramming Manual
P2-3
FORM Command
The FORM command instructs the printer to feed to top
of form after printing.
Format:
{command}
where:
{command}: FORM
In the following example, the printer will execute a form
feed after the label is printed. See the SETFF (set form
feed) command in the section on designing receipts and
lists for information on setting printer behavior when the
FORM command is executed.
Input: FORM.LBL
! 0 200 200 3 1
IN-CENTIMETERS
CENTER
TEXT 4 1 0 .5 Form Command
FORM
PRINT
P2-4
Mobile Printer CPCLProgramming Manual
JOURNAL Command
By default, the printer will check for correct media alignment if it encounters the eye-sense mark (black horizontal bars on back of media) during a print cycle (LABEL
mode). If necessary, the JOURNAL command can be
used to disable this automatic correction feature. The
user's program is responsible for checking and assuring
presence of paper in JOURNAL mode. Please refer to
the status inquiry command for details on checking for
out-of-paper condition.
Format:
{command}
where:
{command}: JOURNAL
Mobile Printer CPCLProgramming Manual
P2-5
UNITS Commands
The units commands are used to specify a measurement
system for all subsequent command fields in a control
session. Coordinates, widths, and heights for all control
commands can be entered with precision to four decimal
places. By placing a units command immediately after
the first line in a control session, the specified measurement system will also apply to the offset and height fields.
The printer measurement system will default to dots until
a units command is issued.
Format:
{command}
where:
{command}: Choose from the following:
IN-INCHES
Measurement in inches.
IN-CENTIMETERS Measurement in centimeters.
IN-MILLIMETERS Measurement in millimeters.
IN-DOTS
P2-6
Measurement in dots.
Mobile Printer CPCLProgramming Manual
UNITS Examples
Input 1 (UNITS1.LBL):
! 0.3937 200 200 1 1
IN-INCHES
T 4 0 0 0 1 cm = 0.3937"
IN-DOTS
T 4 0 0 48 1 mm = 8 dots
B 128 1 1 48 16 112 UNITS
T 4 0 48 160 UNITS
FORM
PRINT
Output 1:
Input 2 (UNITS2.LBL):
! 0 200 200 2.54 1
IN-CENTIMETERS
T 4 0 1 0 1" = 2.54 cm
IN-MILLIMETERS
T 4 0 0 6 203 dots = 25.4 mm
B 128 0.125 1 6 12 14 UNITS
T 4 0 16 20 UNITS
FORM
PRINT
Output 2:
Mobile Printer CPCLProgramming Manual
P2-7
USING COMMENTS
Comments can be added between the first line of a
command session and the “PRINT” command.
A comment is placed in the file by starting a line with the
';' character in the first column. Any remaining text to the
end of the line will be ignored. Comments are illegal
between the CONCAT and ENDCONCAT commands.
P2-8
Mobile Printer CPCLProgramming Manual
COMMENTS Example
Input (COMMENT.LBL):
! 0 200 200 25 1
IN-MILLIMETERS
JOURNAL
;
Center
justify
text
CENTER
; Print the words 'A COMMENT'
TEXT 5 1 0 5 A COMMENT
; Print the label and go to top
FORM
PRINT
of
next
Output:
Mobile Printer CPCLProgramming Manual
P2-9
fo
TEXT
RESIDENT FONT SAMPLES
Mobile Printer CPCLProgramming Manual
P3-1
RESIDENT FONT SAMPLES (continued)
P3-2
Mobile Printer CPCLProgramming Manual
RESIDENT FONT SAMPLES (continued)
Mobile Printer CPCLProgramming Manual
P3-3
TEXT Commands
The TEXT command is used to place text on a label. This
command and its variants control the specific font number and size used, the location of the text on the label,
and the orientation of this text. Standard resident fonts
can be rotated to 90˚ increments as shown in the example.
Format:
{command} {font} {size} {x} {y} {data}
where:
{command}:
P3-4
Choose from the following:
TEXT
(or T)
Prints text horizontally.
VTEXT
(or VT)
Prints text (vertically) rotated 90
degrees counterclockwise.
TEXT90
(or T90)
(Same as VTEXT above.)
TEXT180
(or T180)
Prints text (upside down) rotated
180 degrees counterclockwise.
TEXT270
(or T270)
Prints text (vertically) rotated 270
degrees counterclockwise.
{font}:
Name/number of the font.
{size}:
Size identifier for the font.
{x}:
Horizontal starting position.
{y}:
Vertical starting position.
{data}:
The text to be printed.
Mobile Printer CPCLProgramming Manual
TEXT Example
Input (TEXT.LBL):
! 0 200 200 210 1
TEXT 4 0 200 100 TEXT
TEXT90 4 0 200 100 T90
TEXT180 4 0 200 100 T180
TEXT270 4 0 200 100 T270
FORM
PRINT
Output:
Mobile Printer CPCLProgramming Manual
P3-5
USING FONT GROUPS
FONT-GROUP (FG) Command
The FG command gives a user the ability to group up to
10 pre-scaled font files into a single group. A user can
later specify the font group in a TEXT command. If a font
group is used in a text command, the printer will use the
largest font specified in the font group that will produce
the required text data and still remain within the available
width of the label for the text. When specified in the
TEXT command, the {font} parameter is specified as FG,
and the {size} parameter is specified as the {fg}. Note
that a user can also specify an FG command within a
CONCAT/ENCONCAT command.
Format:
{command} {fg fn fs} [fn fs] ...
where:
{command}: FG
{fg}:
Font group number. Up to 10 font
groups can be specified. Valid font
groups range from 0 to 9.
{fn}:
Name/number of the font.
{fs}:
Size identifier for the font.
NOTE: Up to 10 font number/font size pairs can be
assigned to a font group.
P3-6
Mobile Printer CPCLProgramming Manual
FG Example
In the example, the descriptions will be printed with the
largest font in the specified font group that is capable of
fitting the requested text in a 250 dot label field.
Input (FG.LBL):
! 0 200 200 250 1
; Specify fonts 0-0, 7-0, 5-0, 4-0 as members
; of font group 3.
FG 3 0 0 7 0 5 0 4 0
VT FG 3 10 250 Ketchup
VT FG 3 70 250 Fancy Ketchup
VT FG 3 120 250 Extra Fancy Ketchup
VT FG 3 180 250 Large Size Extra Fancy Ketchup
FORM
PRINT
Output:
Mobile Printer CPCLProgramming Manual
P3-7
TEXT CONCATENATION COMMANDS
Text concatenation allows you to assign different character styles to strings, printing them with uniform spacing on
the same text line. This command can be used in combination with scalable fonts. See Scalable Concatenation
Commands
Format:
{command} {x} {y}
{font} {size} {offset} {data}
“
“
“
“
{font} {size} {offset} {data}
<ENDCONCAT>
where:
{command}:
CONCAT
VCONCAT
Choose from the following:
Horizontal concatenation.
Vertical concatenation.
{x}:
Horizontal starting position.
{y}:
Vertical starting position.
{font}:
Name/number of the font.
{size}:
Size identifier for the font.
{offset}:
Unit-value to offset text from the
starting position. Used to align
individual text strings or create
superscript/subscript characters.
{data}:
Text to be printed.
<ENDCONCAT>: Terminates concatenation.
P3-8
Mobile Printer CPCLProgramming Manual
TEXT CONCATENATION Example
Input (CONCAT.LBL):
! 0 200 200 210 1
CONCAT 75 75
4 2 5 $
4 3 0 12
4 2 5 34
ENDCONCAT
FORM
PRINT
Output:
Mobile Printer CPCLProgramming Manual
P3-9
MULTILINE (ML) Commands
MULTILINE (ML) allows you to print multiple lines of text
using the same font and line-height.
Format:
{command} {height}
{text} {font} {size} {x} {y}
{data}
“
{data}
<ENDMULTILINE>
where:
{command}: Choose from the following:
MULTILINE Prints multiple lines of text.
(or ML)
{height}: Unit-height for each line of text.
{text}:
Text command (TEXT, VTEXT, etc.).
{font}:
Name/number of the font.
{size}:
Size identifier for the font.
{x}:
Horizontal starting position.
{y}:
Vertical starting position.
{data}:
Text to be printed.
<ENDMULTILINE>: Terminates MULTILINE.
(or ENDML)
P3-10
Mobile Printer CPCLProgramming Manual
MULTILINE Example
Input (MULTIL.LBL):
! 0 200 200
ML 47
TEXT 4 0 10
1st line of
2nd line of
:
Nth line of
ENDML
FORM
PRINT
210 1
20
text
text
text
Output:
Mobile Printer CPCLProgramming Manual
P3-11
COUNT Command
The COUNT command is used for printing multiple labels
where a numeric text field or numeric data encoded in a
bar code is to be incremented or decremented for each
label. The TEXT/BARCODE command string must contain this numeric data as the last characters of the string.
The numeric data portion can be up to 20 characters, and
can be preceded by the '-' sign. Incrementing or
decrementing the numeric data thru '0' is not allowed.
Leading zeros will be retained. Up to 3 COUNT commands can be used in a label file.
The numeric data incremented/decremented is contained
in the TEXT or BARCODE command that immediately
preceded the COUNT command.
Format:
{command} {numeric value}
where:
{command}: COUNT
{numeric value}:
P3-12
Any integer value up to 20 characters. The value can be preceded
by a '-' sign if decrementing of the
TEXT/BARCODE value is desired.
Leading zeros will be retained in
the output.
Mobile Printer CPCLProgramming Manual
COUNT Example
Input (COUNT.LBL):
! 0 200 200 210 3
; Print 3 labels
CENTER
TEXT 4 0 0 50 TESTING 001
COUNT 1
TEXT 7 0 0 100 Barcode Value is 123456789
COUNT -10
BARCODE 128 1 1 50 0 130 123456789
COUNT -10
FORM
PRINT
Output:
Mobile Printer CPCLProgramming Manual
P3-13
SETMAG Command
The SETMAG command magnifies a resident font to the
magnification factor specified.
Format:
{command} {w} {h}
where:
{command}: SETMAG
{w}:
Width magnification of the font.
Valid magnifications are 1 thru 16.
{h}:
Height magnification of the font.
Valid magnifications are 1 thru 16.
NOTE: The SETMAG command stays in effect after
printing a label. This means that the next label
printed will use the most recently set SETMAG
values. To cancel any SETMAG values and
allow the printer to use its default font sizes, use
the SETMAG command with magnifications of
0,0.
P3-14
Mobile Printer CPCLProgramming Manual
SETMAG Example
Input (SETMAG.LBL):
! 0 200 200 210 1
CENTER
SETMAG 1 1
TEXT 0 0 0 10 Font 0-0 at SETMAG 1 1
SETMAG 1 2
TEXT 0 0 0 40 Font 0-0 at SETMAG 1 2
SETMAG 2 1
TEXT 0 0 0 80 Font 0-0 at SETMAG 2 1
SETMAG 2 2
TEXT 0 0 0 110 Font 0-0 at SETMAG 2 2
SETMAG 2 4
TEXT 0 0 0 145 Font 0-0 at SETMAG 2 4
; Restore default font sizes
SETMAG 0 0
FORM
PRINT
Output:
Mobile Printer CPCLProgramming Manual
P3-15
SCALABLE TEXT
Scalable text allows a user to print text at any point size.
Point size can be specified for both the X and Y directions
to produce characters that are "stretched" in either their
width or height. Point sizes specified and text produced
will print at 72 points equating to one inch (25.4mm).
The printer can contain scalable font files as part of the
application, or scalable font files can be downloaded to
the printer using one of the utilities on the supplied disk.
A scalable text file must be present in your printer’s
memory in order to use scalable text features.
Mobile Printer CPCLProgramming Manual
P4-1
SCALE-TEXT Commands
The SCALE-TEXT commands allow the user to specify
the point size of both the width and height of the font.
Format:
{command} {name} {width} {height} {x} {y} {data}
where:
{command}:
Choose from the following:
SCALE-TEXT:
(or ST)
Prints scaled text horizontally.
VSCALE-TEXT: Prints scaled text vertically.
(or VST)
P4-2
{name}:
Font name.
{width}:
Font width (point size).
{height}:
Font height (point size).
{x}:
Horizontal starting position.
{y}:
Vertical starting position.
{data}:
Text to be printed.
Mobile Printer CPCLProgramming Manual
SCALE-TEXT Example
Input (SCALE.LBL):
! 0 200 200 300 1
CENTER
; Print using x and y scales of 10 points
SCALE-TEXT PLL_LAT.CSF 10 10 0 10 10 POINT FONT
; Print using x scale of 20 points and y scale
; of 10 points
SCALE-TEXT PLL_LAT.CSF 20 10 0 80 WIDER FONT
; Print using x scale of 10 points and y scale
; of 20 points
SCALE-TEXT PLL_LAT.CSF 10 20 0 150 TALLER FONT
FORM
PRINT
Output:
Mobile Printer CPCLProgramming Manual
P4-3
SCALE-TO-FIT Commands
The SCALE-TO-FIT commands automatically calculate
the scale in order to fit text inside a window.
Format:
{command} {name} {width} {height} {x} {y} {data}
where:
{command}:
P4-4
Choose from the following:
SCALE-TO-FIT:
(or STF)
Prints scaled text horizontally.
VSCALE-TO-FIT:
(or VSTF)
Prints scaled text vertically.
{name}:
Font name.
{width}:
Unit-width of the window.
{height}:
Unit-height of the window.
{x}:
Horizontal starting position.
{y}:
Vertical starting position.
{data}:
Text to be printed.
Mobile Printer CPCLProgramming Manual
SCALE-TO-FIT Example
Input (STF.LBL):
! 0 200 200 100 1
IN-MILLIMETERS
CENTER
; Fit a text string into an area 40mm wide by 10mm
; high
SCALE-TO-FIT PLL_LAT.CSF 40 10 0 10 SALE
; Fit a longer text string into the same 40mm wide
; by 10mm high area
SCALE-TO-FIT PLL_LAT.CSF 40 10 0 20 SALE PRICE
; Fit “SALE” text into a 40mm wide by 20mm high
; area
SCALE-TO-FIT PLL_LAT.CSF 40 20 0 30 SALE
FORM
PRINT
Output:
Mobile Printer CPCLProgramming Manual
P4-5
SCALABLE CONCATENATION Commands
Scalable concatenation allows you to assign different
character styles to strings, printing them with uniform
spacing on the same text line. Both scalable and bitmap
text can be combined between a CONCAT/ENCONCAT
command. See also Text Concatenation Commands
Format:
{command} {x} {y}
<ST> {name} {width} {height} {offset} {data}
“
“
“
“
“
“
<ST> {name} {width} {height} {offset} {data}
<ENDCONCAT>
where:
{command}:
CONCAT
VCONCAT
Choose from the following:
Horizontal concatenation.
Vertical concatenation.
{x}:
Horizontal starting position.
{y}:
Vertical starting position.
{name}:
Font name.
{width}:
Font width point size.
{height}:
Font height point size.
{offset}:
Unit-value to offset text from the
starting position. Used to align
individual text strings or create
superscript/subscript characters.
{data}:
Text to be printed.
<ENDCONCAT>: Terminates concatenation.
P4-6
Mobile Printer CPCLProgramming Manual
SCALABLE CONCATENATION Example
Input (STC.LBL):
! 0 200 200 210 1
CENTER
; Concatenate 3 scalable font strings and 1
; Resident font string
CONCAT 0 20
4 1 0 2/
ST PLL_LAT.CSF 20 20 15 $
ST PLL_LAT.CSF 40 40 0 22
ST PLL_LAT.CSF 20 20 0 99
ENDCONCAT
FORM
PRINT
Output:
Mobile Printer CPCLProgramming Manual
P4-7
ROTATE Commands
ROTATE commands are used to rotate all subsequent
scalable text fields at a specified angle. Rotation direction is counter-clockwise about the center point of the
text. This rotation remains in effect until another ROTATE
command is issued. Default angle is zero degrees.
Format:
{command} {angle}
where:
{command}:
ROTATE
(or R)
{angle}:
P4-8
Choose from the following:
Rotates scalable fonts.
Degree of rotation (ccw).
Mobile Printer CPCLProgramming Manual
ROTATE Example
Input (ROTATE.LBL):
! 0 200 200 440 1
CENTER
TEXT 4 1 0 50 Rotate
ROTATE 45
CONCAT 50 300
ST PLL_LAT.CSF 20 20
ST PLL_LAT.CSF 40 40
ST PLL_LAT.CSF 20 20
ENDCONCAT
FORM
PRINT
Strings
20 $
0 22
0 99
Output:
Mobile Printer CPCLProgramming Manual
P4-9
LINEAR BAR CODES
INTRODUCTION
Bar codes allow easy implementation of automated
identification, cataloging and processing of almost any
object. They have been successfully used on items
ranging in size from boxcars to bumblebees.
This overview of bar code symbologies will help when
programming Zebra mobile printers and/or designing
labels with Label Vista software.
If you plan to create software using these bar codes,
we recommend ordering the uniform symbology specification from AIM or the UCC to determine the uses and
limitations pertaining to that type of bar code. The information in this document is in no way complete.
The following discussions contain basic information
and some suggested applications for each type of bar
code. The quick reference table in Appendix E lists
specific data for each bar code in one location. All the
information on ideal widths and ratios comes directly from
the uniform symbology specification. Please note that all
measurements contained in this document are in printer
dots. On 200 dot per inch (dpi) printers, one dot is equal
to 0.005” or 0.13 millimeters, on 300 dpi printers one dot
is equal to 0.003” or 0.07 millimeters.
Mobile Printer CPCLProgramming Manual
P5-1
RESIDENT LINEAR BAR CODE SAMPLES
P5-2
UPC-A
UPC-E
EAN-13
EAN-8
UPC/EAN Plus 2
Extender
UPC/EAN Plus 5
Extender
CODE 39
CODE 93
I 2 OF 5
CODE 128
UCC-128
CODABAR
PLESSY MS110
POSTNET
Mobile Printer CPCLProgramming Manual
UPC AND EAN/JAN BAR CODES
UPC and EAN/JAN bar codes are typically used for
marking products with a unique code used to look up
prices and to track inventories of goods sold. They are
also used for store coupons, periodicals, and paperback
books. UPC and EAN/JAN bar codes are generally
rectangular, contain a fixed amount of data, and in most
cases are accompanied by human readable text printed
below them. For best results, this text should be an
OCR-A (resident font 2), a sans serif font (resident font 7)
or an OCR-B font.
The first number in the UPC/EAN bar code is the number system character. The specification lists use of
characters 0 through 9 as follows.
0 Regular UPC codes (UPC-A and UPC-E)
1 Reserved
2 Random weight items, like store packaged meat.
(UPC-A only)
3 National Drug Code and National Health Related
Items Code in current 10-digit code length (UPC-A
only)*
4 In-store marking of non food items without code
format restriction and with check digit protection
(UPC-A only)
5 Coupons (UPC-A only)
6 Regular UPC codes (UPC-A only)
7 Regular UPC codes (UPC-A only)
8 Reserved
9 Reserved
*
Number system 3 has the following note in the specification. “…the symbol
is not affected by the various internal structures possible with the NDC or
HRI codes.” The users should determine what effect this statement may
have on their program. It will not change how bar codes are printed.
Mobile Printer CPCLProgramming Manual
P5-3
The checksum is the last number in the bar code and
can be used to make certain that the bar code is decoded
properly. This digit is automatically calculated by the
printer. The UPC bar code specification has the full
instructions for calculating this checksum. The methodology is as follows:
For this example, the bar code will be 01234567890.
Step 1: Starting at the left, including the number system
character, add up all the numbers in the ODD positions. (0 + 2+ 4 + 6 + 8 + 0 = 20)
Step 2: Multiply this sum by 3. (20 x 3 = 60)
Step 3: Starting at the left again, add up all the numbers
in the EVEN positions. (1 + 3 + 5 + 7 + 9 = 25).
Step 4: Add the results from step 2 and step 3. (60 + 25
= 85)
Step 5: The checksum is the smallest number when
added to step 4 will equal a multiple of ten. In our
example: 85 + 5 = 90, which is a multiple of 10.
Therefore, the check digit should be 5. It is called a
modulo checksum because you take the modulo, or
remainder, of the sum. For the programmers, it is:
10 - (85 mod 10) = the checksum.
UPC-A and EAN13 bar codes can be created with and
without a checksum supplied. If the programmer supplies
a checksum digit, the printer will create the bar code with
that check digit, even if it is incorrect. Most laser scanning devices will not be able to decode the bar code if the
check digit is incorrect,
UPC-E bar codes, useful for small items like candy and
gum, are created through the method of “zero suppression.” For example, if you were to encode 01000000567,
the resulting bar code would be a compressed bar code
P5-4
Mobile Printer CPCLProgramming Manual
that only contains the data, the compression scheme,
and the checksum without all the extra zeros. For our
example, the bar code would decode to 1056707. Please
refer to the UPC Symbol Specification Manual from the
Uniform Code Council for more information on zero
suppression.
UPC-E and EAN8 bar codes have a few restrictions.
First, the number system character must be set to 0.
Number systems 1 through 9 do not support UPC-E and
EAN8 bar codes and may not be decoded by a laser
scanning device. In case your application requires it, the
number system may be set to something other than 0.
Second, if the programmer supplies a checksum digit, the
printer will create the bar code with that check digit, even
if it is incorrect. If the check digit is incorrect, most laser
scanning devices will not be able to decode the bar code.
Therefore, the programmer may send six digits (no number system, no checksum), seven digits (number system,
no checksum), or eight digits (number system and
checksum) and create a bar code.
Plus 2 and plus 5 bar code extensions are only used
for periodicals and paperback books. Specifically, the bar
code specification states that the plus 2 extension should
only be used for a periodical issue number. The plus 2
and plus 5 extensions do not contain any checksum
according to the bar code specification.
To create an extended bar code, place a space between the data that should go into the UPC/EAN bar
code and the data that should go into the extension. You
can also use the PLUS2 and PLUS5 bar code types to
create the extension separately. Remember to leave
ample space (about 9 times the ratio) between the UPC/
EAN bar code and the extension.
Mobile Printer CPCLProgramming Manual
P5-5
UPC/EAN SPECIFICATIONS
Bar code
Ideal
Wide/Narrow
Bar code
Ideal
Narrow Checksum
Symbology Type
Input Length
Characters Ratio
UPC-A
UPCA
UPC-A plus 2 UPCA2
11 or 12 digits
13 digits
0-9 only
0-9 only
2:1
2:1
Dot Width Calculation
2
2
mod 10
mod 10
UPC-A plus 5 UPCA5
16 digits
0-9 only
2:1
2
(UPC-A)
mod 10
UPC-E
UPCE
UPC-E plus 2 UPCE2
6, 7 or 11 digits 0-9 only
8 or 13 digits
0-9 only
2:1
2:1
2
2
mod 10
mod 10
UPC-E plus 5 UPCE5
11 or 16 digits
2:1
2
(UPC-E)
mod 10
(UPC-A)
0-9 only
(UPC-E)
EAN/JAN-13 EAN13
EAN/JAN-13
12 or 13 digits
0-9 only
2:1
2
mod 10
mod 10
plus 2
EAN132
14 digits
0-9 only
2:1
2
(EAN13)
EAN/JAN-13
plus 5
EAN135
17 digits
0-9 only
2:1
2
mod 10
(EAN13)
EAN/JAN-8 EAN8
EAN/JAN-8
6, 7 or 8 digits
0-9 only
2:1
2
mod 10
plus 2
EAN82
9 digits
0-9 only
2:1
2
mod 10 (EAN8)
EAN85
12 digits
0-9 only
2:1
2
mod 10 (EAN8)
EAN/JAN-8
plus 5
CODE 39 OR CODE 3 OF 9 BAR CODES
The Code 39 bar code is used for many applications
including inventories, hospital applications, or any other
place where the code length may change between items
being scanned (e.g. a bar code stating there were 420
pieces in one box and 20004 pieces in another box would
have a different physical length). This bar code can use
the characters 0 through 9, A through Z, ‘-’ (dash), “.”
(period), space, “$” (dollar sign), “/”(forward slash), “+”
(plus) and “%” (percent). There is also a special character called “S/S” used as a start/ stop character. The F39
and F39C types allow the use of carriage return, line
feed, and null characters.
The checksum for this bar code is located as the last
(or least significant) digit of the decoded bar code. To
assure data integrity in your application, use a bar code
with a checksum. The printer will automatically supply
P5-6
Mobile Printer CPCLProgramming Manual
this digit if the user selects a 39C or a F39C bar code.
Check Character Numerical Value Table
Char Value
0
1
2
3
4
5
6
7
8
9
A
B
Char Value
0
1
2
3
4
5
6
7
8
9
10
11
C
D
E
F
G
H
I
J
K
L
M
N
Char Value
12
13
14
15
16
17
18
19
20
21
22
23
O
P
Q
R
S
T
U
V
W
X
Y
Z
24
25
26
27
28
29
30
31
32
33
34
35
Char
Value
.
36
37
38
39
40
41
42
43*
44*
45*
46*
SPACE
$
/
+
%
$ (full)
% (full)
/(full)
+ (full)
* Full represents F39 or F39C for Full ASCII
Refer to the full bar code symbology specification for
complete information on checksum calculation. For a
short example, take an example bar code with the data
“CODE 39” .
Step 1: Assign a value to each character per the Character Numerical Value Table above . C=12, O=24,
D=13, E=14, space = 38, 3=3, 9=9.
Step 2: Add the values 12+24+13+14+38+3+9=113.
Step 3: Divide this number by 43. The remainder or
modulo, 27, is the checksum.
Step 4: Referring to the table, 27 is the character R.
Therefore, the checksum in the bar code should be R.
The final code reads “CODE 39R” when it is decoded.
CODE 39 (3 OF 9) SPECIFICATIONS
Bar code
Ideal
Wide/Narrow
Bar code
Symbology Type
Input Length
Characters Ratio
Code 39
Ideal
Narrow Checksum
Dot Width Calculation
39
Variable
Refer text
2.5:1
2
39C
Variable
Refer text
2.5:1
2
mod 43
F39
Variable
Refer text
2.5:1
2
none
F39C
Variable
Refer text
2.5:1
2
mod 43
Mobile Printer CPCLProgramming Manual
none
P5-7
CODE 93 OR CODE 9 OF 3 BAR CODES
The Code 93 bar code is used for applications that
require heavy error checking capabilities. To accomplish
this, the Code 93 bar code contains two separate error
checking checksums that are automatically calculated
and placed into the bar code. This bar code is used for
inventories, hospital applications, or any other place
where the length may change between items being
scanned. (See Code 39 above.) This bar code type can
use the entire ASCII 128 character set. It is useful for
encoding data and phrases like “Code 93”.
The two checksums in this bar code are located as the
last and second to last characters in the decoded bar
code. Code 93 has a complex checksum calculation.
Please see the bar code symbology specification for
information on how to create and decode this checksum.
Please also note that the bar code symbology specification does not state any ideal values for the ratio and the
width of the narrow bar.
CODE 93 SPECIFICATIONS
Bar code
Ideal
Wide/Narrow
Bar code
Symbology Type
Input Length
Characters Ratio
Code 93
Variable
128 ASCII
93
1.5:1
Ideal
Narrow Checksum
Dot Width Calculation
1
two mod 47
INTERLEAVED 2 OF 5 BAR CODES
The Interleaved 2 of 5 (or ITF) bar code is used for
applications that have a fixed data length for all items
scanned. A date, telephone number, or a SKU of fixed
length would be a good application for this bar code. The
symbology specification states that a ITF bar code may
be partially decoded without any recognizable difference.
Therefore, to prevent this problem, you must keep the
length of data to a constant and perform an error checking routine on the decoding program to determine if the
data is correct.
Only the digits 0-9 can be encoded, and there should
P5-8
Mobile Printer CPCLProgramming Manual
be an even number of digits in the data. If there is an
odd number of digits, the printer will automatically insert a
zero (0) at the beginning of the bar code.
There are two bar code varieties with a checksum:
Interleaved 2 of 5 “with checksum” and German Post
Code. German Post Code has fixed length – either 12 or
14 characters (including checksum).
Here is an example how to calculate modulo 10
checksum:
Step 1: To calculate the checksum, first ensure that you
are starting with an odd number of digits in the data.
If not, add a zero (0) to the beginning of the data.
Step 2: Multiply every other digit by 3, and add up the
numbers. So, if your data was “43827” your calculation should be (4 x 3) + 3 + (8 x 3) + 2 + (7 x 3) = 62.
Step 3: Divide this number by 10, resulting in 6 with a
remainder of 2. Subtract the remainder from 10. In
our example, 10 - 2 = 8. The checksum is this final
number, 8. Append this to the end of your data. Note
that if the remainder was a zero, your checksum
should be zero.
INTERLEAVED 2 OF 5 SPECIFICATIONS
Bar code
Bar code
Symbology Type
Interleaved 2 of 5
I2OF5
Input Length
Ideal
Ideal
Wide/Narrow Narrow Checksum
Characters Ratio
Dot Width Calculation
Varies
0-9 only
2.5:1
2
See text
Interleaved 2 of 5 I2OF5C
with checksum
Varies
0-9 only
2.5:1
2
See text
German Post
Code
11, 12,
13 or 14
0-9 only
2.5:1
2
mod 10,
weights 4,9
I2OF5G
CODE 128 AND THE UCC-128 SHIPPING STANDARD
Code 128 is used for applications that need to contain
a large amount of data such as shipping applications,
marking blood donations, and any other application that
can vary in length between bar codes being scanned.
The bar code also contains a checksum as the last charMobile Printer CPCLProgramming Manual
P5-9
acter in the code which ensures that data remains intact.
Code 128 can use the entire ASCII 128 character set
as well as other subsets available in the universal symbology specification. The three start and stop characters
determine which character set to use. The checksum for
this bar code is located immediately before the stop
character. The bar code symbology specification contains all the information on calculating this checksum.
For a short example, we desire to encode “BAR128” in a
bar code. We will use “A” as our start and stop character
in this example.
Step 1: The symbology specification assigns a numerical value for each character. Find the values of all the
characters in the data.
Step 2: Add the value of the start character and all the
data characters multiplied by its position in the bar
code. For our example, the calculation would be 103
+ (34 x 1) + (32 x 2) + (50x 3) + (17x 4) + (18x 5) +
(24 x 6) = 672.
Step 3: Divide this number by 103. The remainder or
modulo, 54, is the checksum. The character that
assigned to 54 in the specification is “V”. Our final
code will look like “ABAR128V” where “A” is the start
character, “BAR128” is the data, and “V” is the
checksum.
The UCC-128 Shipping Standard is part of a document
called Application Standard for Shipping Container Codes
available from the Uniform Code Council. This 90-page
guide contains the entire specification on marking any
shipment sent anywhere in the United States. Seventeen
pages are dedicated to the technical considerations of
using, placing, and printing these bar codes. We highly
recommend getting this information if your application
involves shipping.
P5-10
Mobile Printer CPCLProgramming Manual
CODE 128/ UCC-128 SPECIFICATIONS
Bar code
Bar code
Symbology Type
Code 128
128
/A/B/C/Auto
UCC-128Std. UCCEAN
Input Length
Ideal
Ideal
Wide/Narrow Narrow Checksum
Characters Ratio
Dot Width Calculation
Variable
Refer text
1.5:1
1
mod 103
Refer text
Refer text
3:1
3
mod 103
16
CODABAR
Codabar is ideal for applications that contain mostly
numeric symbols that may vary in length from bar code to
bar code. It can encode the digits from 0 to 9, the characters “-”(dash), “$”(dollar sign), “:” (colon), “/” (forward
slash), “.” (period), and “+” (plus) as well as start/stop
characters A through D.
One optional checksum is automatically appended as
the least significant digit in the bar code data directly
before the stop character. The bar code symbology
specification contains all the information on calculating
the checksum. As a short example, our data will be
“A37859B” where A and B are start/stop characters. The
characters 0 through 9 are assigned the numerical values
0 through 9 respectively. “-” is 10, “$” is 11, “:”is 12, “/” is
13, “.” is 14, “+” is 15, and start/stop characters A B C and
D are 16, 17, 18, and 19 respectively.
Step 1: Add the numerical value of all the characters.
16 + 3 + 7 + 8 + 5 + 9 + 17 = 65.
Step 2: Divide this number by 16 and use the remainder, or modulo. In our example, this is 1
Step 3: Subtract the modulo from 16. This is the smallest number that can be added to the sum in step 1 to
make a multiple of 16. (65 + 15 =80. 80 /16= 5)
Therefore, the check sum for our example is 15.
Step 4: The character that corresponds to 15 is “+” and
is added in before the stop character. Our final bar
code looks like “A37859+B”.
Mobile Printer CPCLProgramming Manual
P5-11
The bar code type NW7 is for reverse compatibility
only. We do not recommend using this command for new
systems. There is no difference between CODABAR and
NW7.
CODABAR SPECIFICATIONS
Bar code
Bar code
Symbology Type
Codabar
Input Length
CODABAR Variable
Ideal
Ideal
Wide/Narrow Narrow Checksum
Characters Ratio
Dot Width Calculation
0-9,A-D
2.5:1
2
none
2.5:1
2
mod 16
symbol
CODABAR Variable
0-9,A-D,
16
symbol
MSI PLESSEY BAR CODES
The MSI Plessey bar code is a fixed length code that
uses only numerical characters. It is primarily used for
grocery applications. Three different types of encoding
exist with different levels of data protection. Please see
the bar code symbology specification for more information on how to calculate these checksums.
The bar code type “PLESSEY” is used for reverse
compatibility only. We do not recommend using this
command for new systems. The PLESSEY type will force
a 2:1 ratio of the wide to narrow bar width.
MSI PLESSY SPECIFICATIONS
Bar code
Symbology Type
MSI Plessey
P5-12
Ideal
Wide/Narrow
Bar code
Input Length
Characters Ratio
Ideal
Narrow Checksum
Dot Width Calculation
MSI
13 digits max
0-9 only
2:1
2
MSI10
13 digits max
0-9 only
2:1
2
none
mod 10
MSI1010
13 digits max
0-9 only
2:1
2
two mod 10
MSI1110
13 digits max
0-9 only
2:1
2
mod 11 mod 10
Mobile Printer CPCLProgramming Manual
POSTNET AND FACING IDENTIFICATION MARKS
The US Postnet bar code is used only to help automate
mail delivery. To comply with postal regulations, set the
height of the bar code to 30 dots, the wide/narrow bar
ratio at 3.5:1, and the width of the narrow bar to 3 dots on
a 200 dpi printer. The data sent to the bar code can be 5,
9, or 11 digits long. For example, to send mail to 30 Plan
Way, Warwick, RI 02886-1234, the data would be
5 digits- ZIP Code only:
02886
9 digits - ZIP + 4 Code:
028861234
11 digits - ZIP + 4 Code and last two digits in address:
02886123430
The Postnet bar code also contains an automatically
calculated checksum as the last character in the
decoded bar code. As a short example, our data will
be “02881123430”
Step 1: Add the numerical value of all the characters.
0+2+8+8+1+1+2+3+4+3+0 = 32.
Step 2: Divide this number by 10 and use the remainder, or modulo. In our example, this is 2
Step 3: Subtract the remainder (or modulo) from 10 to
get the check sum. The check sum for our example
would be 8 (10 - 32 mod 10 for programmers).
A Facing Identification Mark (FIM) is the bar in the
upper right corner of an envelope near the stamp. To
comply with postal regulations, set the height of the bar
code to 125 dots, the ratio to 1.5:1 dots, and the width of
the narrow bar to 6 dots. There are three different characters you can send as data: A, B, and C.
FIM A: Courtesy Reply Mail with Postnet Bar code
FIM B: Business Reply Mail, Penalty Mail, or Franked
Mobile Printer CPCLProgramming Manual
P5-13
Mail without Postnet Bar code
FIM C: Business Reply Mail, Penalty Mail, or Franked
Mail with Postnet Bar code.
For more information, please see Publication 25 from
the USPS Postal Business Center. If you are making a
label with an address, try using resident font 7 or font 4
for best results with the optical character recognition
software used by the post office.
POSTNET AND FIM SPECIFICATIONS
Bar code
Bar code
Symbology Type
Postnet
Input Length
Ideal
Ideal
Wide/Narrow Narrow Checksum
Characters Ratio
Dot Width Calculation
POSTNET 5, 9, 11 digits
0-9 only
3.5:1
3
mod 10
FIM
A, B, or C
1.5:1
6
N/A
Facing
Ident Mark
P5-14
A, B, or C only
Mobile Printer CPCLProgramming Manual
BAR CODE COMMANDS
The following commands are used for the creation and
formatting of bar codes on labels. Insure that the bar
code symbology chosen agrees with its intended use,
and that it conforms to the guidelines in the previous
section.
A Quick Reference Guide for the linear bar code symbologies discussed in this manual can be found in Appendix “E”.
Note that the “COUNT” command is also discussed in
Section 3 of this manual.
Mobile Printer CPCLProgramming Manual
P5-15
BARCODE Command
The BARCODE command prints bar codes in both vertical and horizontal orientations at specified widths and
heights.
Standard Bar Codes
Format:
{command} {type} {width} {ratio} {height} {x} {y} {data}
where:
{command}:
Choose from the following:
BARCODE
(or B)
Prints bar code horizontally.
VBARCODE
(or VB)
Prints bar code vertically.
{type}:
Choose from the following table:
Symbology:
use:
UPC-A
UPC-E
EAN/JAN-13
EAN/JAN-8
Code 39
Code 93/Ext. 93
Interleaved 2 of 5
Interleaved 2 of 5
with checksum
German Post Code
Code 128 (Auto)
UCC EAN 128
Codabar
MSI/Plessy
Postnet
FIM
P5-16
UPCA, UPCA2, UPCA5
UPCE, UPCE2, UPCE5
EAN13, EAN132, EAN135
EAN8, EAN82, EAN 85
39, 39C, F39, F39C
93
I2OF5
I2OF5C
I2OF5G
128
UCCEAN128
CODABAR, CODABAR16
MSI, MSI10, MSI1010, MSI1110
POSTNET
FIM
Mobile Printer CPCLProgramming Manual
{width}:
Unit-width of the narrow bar.
{ratio}:
Ratio of the wide bar to the narrow bar.
Refer to the table in Appendix “E” for appropriate settings.
0 = 1.5 : 1
1 = 2.0 : 1
2 = 2.5 : 1
3 = 3.0 : 1
4 = 3.5 : 1
20 = 2.0:1
21 = 2.1:1
22 = 2.2:1
23 = 2.3:1
24 = 2.4:1
25 = 2.5:1
26 = 2.6:1
27 = 2.7:1
28 = 2.8:1
29 = 2.9:1
30 = 3.0:1
Note: The ratios in the Appendix are suggested for best results, however
any ratio can be assigned.
{height}: Unit-height of the bar code.
{x}:
Horizontal starting position.
{y}:
Vertical starting position.
{data}:
Bar code data.
BAR CODE Example
Input (BARCODE.LBL):
! 0 200 200 210 1
BARCODE 128 1 1 50 150 10 HORIZ.
TEXT 7 0 210 60 HORIZ.
VBARCODE 128 1 1 50 10 200 VERT.
VTEXT 7 0 60 140 VERT.
FORM
PRINT
Output:
Mobile Printer CPCLProgramming Manual
P5-17
BARCODE-TEXT Command
The BARCODE-TEXT command is used to label bar
codes with the same data used to create the bar code.
The command eliminates the need to annotate the bar
code using separate text commands. The text will be
centered below the bar code.
Use BARCODE-TEXT OFF (or BT OFF) to disable.
Format:
{command} {font number} {font size} {offset}
where:
{command}:
BARCODE-TEXT
(or BT)
{font number}:
The font number to use when
annotating the bar code.
{font size}:
The font size to use when annotating the bar code.
{offset}:
Unit distance to offset text away
from the bar code.
P5-18
Mobile Printer CPCLProgramming Manual
BARCODE-TEXT Example
Input (BARTEXT.LBL):
! 0 200 200 400 1
JOURNAL
CENTER
; Annotate bar codes using font 7 size 0
; and offset 5 dots from the bar code.
BARCODE-TEXT 7 0 5
BARCODE 128 1 1 50 0 20 123456789
VBARCODE 128 1 1 50 40 400 112233445
BARCODE-TEXT OFF
FORM
PRINT
Output:
Mobile Printer CPCLProgramming Manual
P5-19
COUNT Command
The COUNT command is used for printing multiple labels
where a numeric text field or numeric data encoded in a
bar code is to be incremented or decremented for each
label. The TEXT/BARCODE command string must contain this numeric data as the last characters of the string.
The numeric data portion can be up to 20 characters, and
can be preceded by the '-' sign. Counts of 9 ➝ 0 will
wrap to 9. Counts of 00 ➝ 99 will wrap to 00. Leading
zeros will be retained. Up to 3 COUNT commands can
be used in a label file.
The numeric data incremented/decremented is contained
in the TEXT or BARCODE command that immediately
preceded the COUNT command.
Format:
{command} {numeric value}
where:
{command}: COUNT
{numeric value}:
P5-20
Any integer value up to 20 characters. The value can be preceded
by a '-' sign if decrementing of the
TEXT/BARCODE value is desired.
Leading zeros will be retained in
the output.
Mobile Printer CPCLProgramming Manual
COUNT Example
Input (COUNT.LBL):
! 0 200 200 210 3
; Print 3 labels
CENTER
TEXT 4 0 0 50 TESTING 001
COUNT 1
TEXT 7 0 0 100 Barcode Value is 123456789
COUNT -10
BARCODE 128 1 1 50 0 130 123456789
COUNT -10
FORM
PRINT
Output:
Mobile Printer CPCLProgramming Manual
P5-21
TWO-DIMENSIONAL BAR CODES
Introduction
A two dimensional bar code can be regarded as a “portable database.” For example, if a package has a serial
number encoded with a linear bar code, you could scan
the serial number, look up the number in a computer
system, and gather the information about that package.
If the computer system was unavailable for any reason
the information you were looking for would also be unavailable A 2D bar code, however, can contain several
different fields of information in them, essentially a database attached to a package.
The first 2D bar code was just an extension of a onedimensional bar code. The user could stack several
Code 39 bar codes on top of another. These types of
codes are called “stacked symbology” or “multi-row
codes”. Development of scanners capable of 2D scanning allowed use of more compact and useful symbologies like PDF417 from Symbol and MaxiCode from the
United Parcel Service.
Zebra mobile printers have capabilities to print PDF417
and MaxiCode symbols. If your application requires the
use of PDF417 or MaxiCode symbols, we highly recommend acquiring the universal symbol specification to
assist your programming. The specifications include
suggestions on how to structure your data in the code to
make it easier to use.
Please note that you must load a special application
before using PDF417 or MaxiCode on your Zebra mobile
printer. The standard application loaded in your printer
does not support the ability to print these bar codes.
Contact the Help Desk for more information on how to
load this application.
Mobile Printer CPCLProgramming Manual
P6-1
PDF417
The PDF417 bar code is a 2D bar code that can contain
a very large amount of data in a small space. If you look
at a PDF417 bar code carefully, it is actually a stack of
smaller bar codes. The number and height of the stacks
are controllable by the user. The bar code can contain
the entire ASCII 255 set of characters, and has the capability to use different encoding schemes and different
levels of security to correct errors. The largest amount of
data that can be encoded is 2725 characters
MaxiCode
MaxiCode was originally designed by the United Parcel
Service to help them automate package delivery and sort
packages coming down a quick conveyor belt. It consists
of a bulls eye to help the imaging system “target” the bar
code and an array of hexagons to represent the data
stored in the bar code. It can contain a maximum of 93
alphanumeric characters or 138 numeric characters, has
two different error correction modes, seven different
storage modes, the capability to use character sets other
than ASCII, and the capability to “link” several MaxiCodes
together. Since there are so many different modes, it is
suggested that you contact AIM for the symbol specification. If you are developing software to be used with the
UPS MaxiCode shipping system, contact UPS for information on how to order the information on the Maxicode
shipping system.
P6-2
Mobile Printer CPCLProgramming Manual
TWO-DIMENSIONAL BAR CODE COMMANDS
The following commands are used for the creation and
formatting of two-dimensional bar codes. Insure that the
bar code symbology chosen agrees with its intended use.
We recommend acquiring the specification for the desired
code to supplement the discussions in this manual.
Note that Codablock “A” and “F” are not fully supported in
this release of the manual.
Mobile Printer CPCLProgramming Manual
P6-3
PDF417 (PORTABLE DATA FILE)
Format:
{command} {type} {x} {y} [XD n] [YD n] [C n] [S n]
{data}
<ENDPDF>
where:
{command}:
P6-4
Choose from the following:
BARCODE
(or B)
Prints bar code horizontally.
VBARCODE
(or VB)
Prints bar code vertically.
{type}:
PDF-417
{x}:
Horizontal starting position.
{y}:
Vertical starting position.
[XD n]:
Unit-width of the narrowest element.
Range is 1 to 32.
Default is 2.
[YD n]:
Unit-height of the narrowest element.
Range is 1 to 32.
Default is 6.
[C n]:
Number of columns to use. Data columns do not include start/stop characters and left/right indicators.
Range is 1 to 30.
Default is 3.
Mobile Printer CPCLProgramming Manual
PDF 417 (PORTABLE DATA FILE) continued
(continued)
[S n]:
Security level indicates maximum
amount of errors to be detected and/or
corrected.
Range is 0 to 8.
Default is 1.
{data}:
Bar code data.
<ENDPDF>: Terminates PDF-417.
Note: The BARCODE-TEXT command does not work with the PDF-417 bar
code type. Any desired human readable text must be entered seperately
with the TEXT command as in the example below.
PDF417 Example
Input (PDF.LBL):
! 0 200 200 210 1
B PDF-417 10 20 XD 3 YD 12 C 3 S 2
PDF Data
ABCDE12345
ENDPDF
T 4 0 10 120 PDF Data
T 4 0 10 170 ABCDE12345
FORM
PRINT
Output:
Mobile Printer CPCLProgramming Manual
P6-5
MAXICODE
Revised: Application Version 25 or higher
The Maxicode bar code now handles all the symbols
defined by the United Parcel Service as well as the basic
fields supported in the standard bar code. Maxicode
supports all standard printable characters with automatic
conversion of all lowercase letters in the secondary
message to uppercase. This revision supports only
Mode 2 bar codes.
Format:
{command} {type} {x} {y}
{tag} {options}
…
{tag} {options}
<ENDMAXICODE>
where:
{command}: BARCODE or B
Prints bar code.
{type}:
MAXICODE
{x}:
Horizontal starting position
{y}:
Vertical starting position
{tag}:
Tags not supplied will be filled with default values. Use
only the tags that you require. Tags can be in any order.
<ENDMAXICODE> Final tag in Maxicode bar code.
Tags encoded in the high priority message of all
Maxicodes:
Tag
POST
CC
SC
P6-6
Definition
Default Value
Postal or ZIP Code
Country Code
(from ISO 3166)
Service Class
-empty840 (USA)
1
Mobile Printer CPCLProgramming Manual
Tags to control the type of bar code created:
Tag
UPS5
ZIPPER
FILLC
Definition
Default Value
Use UPS5 tags to
create the low priority
message. (On: 1, Off: 0)
Turn the zipper and contrast
patterns on or off. (On: 1, Off: 0)
Low priority message fill character
(Messages shorter than 84
characters will be padded with
this character.)
0
0
!
Tags used when UPS5 is turned off:
Tag
MSG
Definition
Low priority message field
(maximum of 84 characters,
overwritten by UPS5 tags)
Default Value
-empty-
Tags used when UPS5 is turned on:
Tag
LPMS
HEAD
TN
SCAC
SHIPPER
PICKDAY
SHIPID
NX
WEIGH
VAL
STADDR
CITY
ST
EXTRA
EOT
GS
RS
Definition
Low priority message header
Transportation data
format header
Tracking Number
Standard Carrier Alpha Code
UPS Shipper Number
Julian day of pickup
Shipment ID Number
Package N of X (n/x)
Package weight
Address validation (Y or N)
Ship to street address
Ship to city
Ship to state
Extra user defined fields
End of transmission character
Field separator character [GS]
Format type separator [RS]
Mobile Printer CPCLProgramming Manual
Default Value
[)>[RS]
01[GS]98
[GS]
UPSN
[GS]
[GS]
[GS]
[GS]
[GS]
[GS]
[GS]
[GS]
[GS]
- empty 0x004h
0x01Dh
0x01Eh
P6-7
Please see the document “Guide to Bar Coding with UPS
OnLine: for Customers Generating Bar Code Labels,
Version 5” available from the United Parcel Service for
more information on creating labels for the UPS shipping
system.
MAXICODE Examples
Basic example with minimal required fields to print
a bar code:
! 0 200 200 600 1
JOURNAL
B MAXICODE 20 20
CC 12345
MSG This is a MAXICODE low priority message.
SC 12345
POST 02886
ENDMAXICODE
PRINT
Output:
Decodes to:
028860000[GS]057[GS]057[GS]This is a
MAXICODE low priority message.
P6-8
Mobile Printer CPCLProgramming Manual
Same example with zipper and contrast patterns:
! 0 200 200 600 1
JOURNAL
B MAXICODE 20 20
CC 12345
MSG This is a MAXICODE low priority message.
SC 12345
POST 02886
ZIPPER 1
ENDMAXICODE
PRINT
Output:
Mobile Printer CPCLProgramming Manual
P6-9
Example using tags for UPS:
! 0 200 200 600 1
JOURNAL
B MAXICODE 20 20
VAL Y
STADDR 30 PLAN WAY
WEIGH 210
SHIPID 42
PICKDAY 193
SHIPPER 12345
TN 1Z12345675
CC 860
SC 1
POST 02886
ZIPPER 1
SHIPPER 12345E
NX 1/2
UPS5 1
CITY WARWICK
ST RI
ENDMAXICODE
PRINT
Output:
Decodes to:
P6-10
Mobile Printer CPCLProgramming Manual
GRAPHICS
BOX Command
The BOX command provides the user with the ability to
produce rectangular shapes of specified line thickness.
Format:
{command} {x0 } {y0 } {x1} {y1} {width}
where:
{command}: BOX
{x0 }:
X-coordinate of the top left corner.
{y0 }:
Y-coordinate of the top left corner.
{x1}:
X-coordinate of the bottom right corner.
{y1}:
{width}:
Y-coordinate of the bottom right corner.
Unit-width (or thickness) of the lines
forming the box.
BOX Example
Input (BOX.LBL):
! 0 200 200 210 1
BOX 0 0 200 200 1
FORM
PRINT
○
0,0
○
○
○
Output:
200,200
Note: Text coordinates (in output) are shown for illustration
purposes only.
Mobile Printer CPCLProgramming Manual
P7-1
LINE Commands
Lines of any length, thickness, and angular orientation
can be drawn using the LINE command.
Format:
{command} {x0 } {y0 } {x1} {y1} {width}
where:
{command}: Choose from the following:
LINE
(or L)
Prints a line.
{x0 }:
X-coordinate of the top-left corner.
{y0 }:
Y-coordinate of the top-left corner.
{x1}:
X-coordinate of:
- top right corner for horizontal.
- bottom left corner for vertical.
{y1}:
Y-coordinate of:
- top right corner for horizontal.
- bottom left corner for vertical.
{width}: Unit-width (or thickness) of the line.
P7-2
Mobile Printer CPCLProgramming Manual
LINE Example
Input (LINE.LBL):
! 0 200 200 210 1
LINE 0 0 200 0 1
LINE 0 0 200 200 2
LINE 0 0 0 200 3
FORM
PRINT
Output:
0,0
○
○
○
0,200
○
○
○
○
○
○
○
200,0
200,200
Note: Text coordinates (in output) are shown for
illustration purposes only.
Mobile Printer CPCLProgramming Manual
P7-3
INVERSE-LINE Commands
The INVERSE-LINE command has the same syntax as
the LINE command. Previously created objects that lie
within the area defined by the INVERSE-LINE command
will have their black areas re-drawn white, and white
areas re-drawn black. These objects can include text,
bar codes and/or graphics, including downloaded .pcx
files. INVERSE-LINE has no effect on objects created
after its location, even if they fall within its covered area.
In example INVERSE2.LBL, portions of the text field
created after the INVERSE-LINE command remain black,
hence invisible, even though placed within the INVERSE-LINE area.
Format:
{command} {x0 } {y0 } {x1} {y1} {width}
where:
{command}: Choose from the following:
INVERSE-LINE
(or IL)
Prints a line over an existing
field to invert the image.
{x0 }:
X-coordinate of the top-left corner.
{y0 }:
Y-coordinate of the top-left corner.
{x1}:
X-coordinate of:
- top right corner for horizontal.
- bottom left corner for vertical.
{y1}:
Y-coordinate of:
- top right corner for horizontal.
- bottom left corner for vertical.
{width}: Unit-width (or thickness) of the inverse-line.
P7-4
Mobile Printer CPCLProgramming Manual
INVERSE-LINE Examples
Input 1 (INVERSE1.LBL):
! 0 200 200 210 1
CENTER
TEXT 4 0 0 45 SAVE
TEXT 4 0 0 95 MORE
INVERSE-LINE 0 45 145 45 45
INVERSE-LINE 0 95 145 95 45
FORM
PRINT
Output 1:
Input 2 (INVERSE2.LBL):
! 0 200 200 210 1
T 4 2 30 20 $123.45
T 4 2 30 70 $678.90
IL 25 40 350 40 90
T 4 2 30 120 $432.10
FORM
PRINT
Output 2:
Mobile Printer CPCLProgramming Manual
P7-5
PATTERN Command
The PATTERN command is used with the LINE and
SCALE-TEXT commands to change the patterns used to
fill these shapes. Valid pattern values are listed below.
Format:
{command} {pattern number}
where:
{command}: PATTERN
{pattern number}: Choose from the following:
100
101
102
103
104
105
106
P7-6
Filled (solid black/default pattern).
Horizontal lines.
Vertical lines.
Right rising diagonal lines.
Left rising diagonal lines.
Square pattern.
Cross hatch pattern.
Mobile Printer CPCLProgramming Manual
PATTERN Example
Input (PATTERN.LBL):
! 0 200 200 700 1
; Draw horizontal and vertical patterns
PATTERN 101
LINE 10 10 160 10 42
PATTERN 102
LINE 170 10 350 10 42
; Draw left and right diagonal patterns
PATTERN 103
LINE 10 65 160 65 40
PATTERN 104
LINE 170 65 350 65 40
; Draw square and cross hatch patterns
PATTERN 105
LINE 10 115 160 115 40
PATTERN 106
LINE 170 115 350 115 40
; Draw a scalable text character with cross
; hatch pattern
PATTERN 106
ST PLB_LAT.CSF 40 40 20 180 HELLO
FORM
PRINT
Output:
Mobile Printer CPCLProgramming Manual
P7-7
GRAPHICS Commands
Bit-mapped graphics can be printed by using graphics
commands. ASCII hex (hexadecimal) is used for expanded graphics data (see example). Data size can be
reduced to one-half by utilizing the COMPRESSEDGRAPHICS commands with the equivalent binary
character(s) of the hex data.
Format:
{command} {width} {height} {x} {y} {data}
where:
{command}: Choose from the following:
EXPANDED-GRAPHICS
(or EG)
Prints expanded
graphics horizontally.
VEXPANDED-GRAPHICS
(or VEG)
Prints expanded
graphics vertically.
COMPRESSED-GRAPHICS
(or CG)
Prints compressed
graphics horizontally.
VCOMPRESSED-GRAPHICS Prints compressed
(or VCG)
graphics vertically.
P7-8
{width}:
Byte-width of image.
{height}:
Dot-height of image.
{x}:
Horizontal starting position.
{y}:
Vertical starting position.
{data}:
Graphics data.
Mobile Printer CPCLProgramming Manual
GRAPHICS Example
Input (GRAPHIC.LBL):
! 0 200 200 210 1
EG 2 16 90 45 F0F0F0F0F0F0F0F00F0F0F0F0F0F0F0F
F0F0F0F0F0F0F0F00F0F0F0F0F0F0F0F
FORM
PRINT
Output:
Note:
Graphic output has been magnified. Actual size
is 1/4 of output shown.
Mobile Printer CPCLProgramming Manual
P7-9
PCX Commands
The PCX command gives a user the ability to send
".PCX" graphics formatted images to the printer. The
.PCX image MUST be encoded as a black and white
image.
Format:
{command} {x} {y}
{data}
where:
{command}: PCX
{x}:
X-coordinate of the top-left corner.
{y}:
Y-coordinate of the top-left corner.
{data}:
PCX image data.
P7-10
Mobile Printer CPCLProgramming Manual
PCX Examples
EXAMPLE 1
In the example below, the image is sent in three steps.
First, the printer is sent commands to expect a .PCX
formatted file. The second input to the printer is the .PCX
image. This image must be a 2 color (black and white)
image. The last step is to tell the printer to print the label.
Input 1 (STARTPCX.LBL):
! 0 200 200 500 1
PCX 0 30
Input 2 (IMAGE.PCX)
Input 3 (ENDPCX.LBL)
FORM
PRINT
Output:
Mobile Printer CPCLProgramming Manual
P7-11
PCX Examples continued
EXAMPLE 2
In this example , the PCX image has been loaded into the
printer’s flash file system and given the name
“IMAGE.PCX”. The “!<“ operator can now be used to
instruct the printer to get the data stored in the file
“Image.PCX” and use it for building the image.
Input 2 (IMAGE.LBL):
! 0 200 200 500 1
PCX 0 30 !<IMAGE.PCX
FORM
PRINT
Output:
P7-12
Mobile Printer CPCLProgramming Manual
ADVANCED COMMANDS
CONTRAST Command
The CONTRAST command is used to specify the print
darkness for the entire label. The lightest printout is at
contrast level 0. The darkest contrast level is 3. The
printer defaults to contrast level 0 on power up. Contrast
level must be specified for each label file.
In order to maximize printing efficiency, always use the lowest contrast level
possible .
Format:
{command} {level}
where:
{command}:
{level}:
CONTRAST
Contrast level.
0 = Default
1 = Medium
2 = Dark
3 = Very Dark
Mobile Printer CPCLProgramming Manual
P8-1
TONE Command
The TONE Command can be used instead of the CONTRAST command to specify the print darkness for all
labels. The lightest printout is at tone level -99. The
darkest tone level is 200. The printer defaults to tone
level 0 on power up. Tone level settings remain in effect
for all printing tasks until changed. The TONE and CONTRAST commands cannot be used in combination with
one another.
Format:
{command} {level}
where:
{command}:
{level}:
TONE
select a value from -99→200.
Contrast to Tone level equivalents.
Contrast 0 = Tone 0
Contrast 1 = Tone 100
Contrast 2 = Tone 200 Contrast 3 = No equivalent
P8-2
Mobile Printer CPCLProgramming Manual
JUSTIFICATION Commands
Alignment of fields can be controlled by using the justification commands. By default, the printer will left justify all
fields. A justification command remains in effect for all
subsequent fields until another justification command is
specified.
Format:
{command} [end]
where:
{command}: Choose from the following:
CENTER Center justifies all subsequent fields.
LEFT
Left justifies all subsequent fields.
RIGHT
Right justifies all subsequent fields.
[end]: End point of justification. If no parameter is
entered, justification commands use the
printhead’s width for horizontal printing or zero
(top of form) for vertical printing.
JUSTIFICATION Example
Input (JUSTIFY.LBL):
! 0 200 200 210 1
CENTER 383
TEXT 4 0 0 75 C
LEFT
TEXT 4 0 0 75 L
RIGHT 383
TEXT 4 0 0 75 R
FORM
PRINT
Output:
Mobile Printer CPCLProgramming Manual
P8-3
PAGE-WIDTH Command
The printer assumes that the page width is the full width
of the printer. The maximum height of a print session is
determined by the page width and the available print
memory. If the page width is less than the full width of
the printer, the user can increase the maximum page
height by specifying the page width.
Note: This command should be issued at the beginning
of a print session.
Format:
{command} {width}
where:
{command}:
Choose from the following:
PAGE-WIDTH
(or PW)
{width}:
P8-4
Specifies page width.
Unit-width of the page.
Mobile Printer CPCLProgramming Manual
PAGE-WIDTH Example
Input 1 (PW1.LBL):
! UTILITIES
SETLP 7 0 15
PW 300
PRINT
This text is printed with label memory width
set to 300 dots.
Output 1:
Input 2 (PW2.LBL):
! UTILITIES
SETLP 7 0 15
PW 200
PRINT
This text is printed with label memory width
set to 200 dots.
Output 2:
Mobile Printer CPCLProgramming Manual
P8-5
PACE Command
This command can be used with batch printing. When
PACE is activated, the user must depress the printer’s
“FEED” key to print additional labels until the batch quantity is exhausted. By default, pacing is disabled on power
up.
Format:
{command}
where:
{command}:
P8-6
PACE
Mobile Printer CPCLProgramming Manual
PACE Example
In the following example, the command file shown was
sent to the printer once. The two additional printouts
were produced by pressing the 'FEED' key once for each
additional printout.
Input (PACE.LBL):
! 0 200 200 210 3
; Tell printer to print a label
; after each 'FEED' key press
; until all 3 labels are printed
PACE
; Printer holds journal stock
JOURNAL
; Center the text
CENTER
TEXT 4 1 0 10 Print 3 labels
TEXT 4 1 0 90 Using PACE
PRINT
Output:
Mobile Printer CPCLProgramming Manual
P8-7
AUTO-PACE Command
This command can be used to instruct a printer equipped
with a label presentation sensor to delay printing until the
previously printed label is removed.
Format
{command}
Where:
{command}:
AUTO-PACE
AUTO-PACE Command Example
This example instructs the printer to print 10 labels. The
printer prints a label, and waits for that label to be removed before printing the next label.
Input (APACE.LBL):
! 0 200 200 250 10
CENTER
TEXT 7 0 0 10 AUTO-PACE EXAMPLE
AUTO-PACE
FORM
PRINT
P8-8
Mobile Printer CPCLProgramming Manual
NO-PACE Command
This command cancels the PACE and AUTO-PACE
mode, if the printer is already in PACE orAUTO-PACE.
The printer defaults to NO-PACE on power up.
format: {command}
where: {command}: NO-PACE
NO-PACE Command Example
This example instructs the printer to print 10 labels. The
printer prints a label, waits for the label to be removed
before printing the next label. The second set of 10
labels will be printed in batch mode and the printer will
not wait for the operator to remove the labels.
Input (NO-PACE.LBL):
! 0 200 200 250 10
TEXT 7 0 0 10 AUTO-PACE EXAMPLE
AUTO-PACE
FORM
PRINT
! 0 200 200 250 10
TEXT 7 0 0 10 NO-PACE EXAMPLE
NO-PACE
FORM
PRINT
Mobile Printer CPCLProgramming Manual
P8-9
WAIT Command
This command is used to introduce a delay after a label
is printed.
Format
{command} {delay-time}
where:
{command}: WAIT
{delay-time}: Delay time in 1/8 seconds.
WAIT Command Example
In the example below, the printer will pause 10 seconds
(10 * 8 = 80) after printing each label.
INPUT (WAIT.LBL):
! 0 200 200 150 5
WAIT 80
TEXT 5 0 0 20 DELAY 10 SECONDS
FORM
PRINT
P8-10
Mobile Printer CPCLProgramming Manual
REWIND Command
This command is used to turn the rewind (or take-up)
motor on or off. The printer defaults to REWIND-ON on
power up. The REWIND command is ignored by printers
that are not equipped with a motorized rewind.
format: {command}
where: {command}: Choose one of the following:
REWIND-OFF
REWIND-ON
REWIND Command Example
INPUT (REWIND.LBL):
! 0 200 200 150 1
REWIND-OFF
TEXT 5 0 0 20 TURNS REWIND OFF
PRINT
Mobile Printer CPCLProgramming Manual
P8-11
TENSION Commands
The tension commands are used to adjust the liner tension before and/or after printing a label by running the
rewind motor for a pre-specified length. This adjustment
improves peeler performance of printers equipped with a
motorized rewind mechanism. The TENSION commands
are ignored by printers not equipped with a motorized
rewind.
Format
{command} {length}
where:
{command}: Choose one of the following:
PRE-TENSION:
Perform tension adjustment prior
to printing the label.
POST-TENSION: Perform tension adjustment after
printing the label.
{length}: The unit length the rewind motor should
advance to tighten the liner tension. The re
wind motor will slip once tension is adjusted (it
will not pull the stock out of adjustment for the
next print cycle).
TENSION Command Example
In this example, the printer is instructed to run the rewind
motor for 30 dot-lines, removing any slack in the liner to
adjust the liner tension prior to printing the label.
Input (TENSION.LBL):
! 0 200 200 150 1
PRE-TENSION 30
TEXT 5 0 0 20 ADJUSTS TENSION
P8-12
Mobile Printer CPCLProgramming Manual
SPEED Command
This command is used to set the highest motor speed
level. Each printer model is programmed with a minimum
and maximum attainable speed. The SPEED command
selects a speed level within a range of 0 to 5, with 0 the
slowest speed. The maximum speed programmed into
each printer model is attainable only under ideal conditions. The battery or power-supply voltage, stock thickness, print darkness, applicator usage, peeler usage, and
label length are among the factors that could limit the
maximum attainable print speed.
WARNING: By exercising this command the user overrides the factory
programmed speed for the label being printed, which may adversely affect
print quality. If print quality suffers using the current SPEED setting, the
printer speed should be reduced.
Format
{command} {speed level}
where:
{command}: SPEED
{speed level}: A number between 0 and 5, 0 being the
slowest speed.
SPEED Command Example
Input (SPEED.LBL):
! 0 200 200 150 1
SPEED 4
TEXT 5 0 0 20 PRINTS AT SPEED 4
FORM
PRINT
Mobile Printer CPCLProgramming Manual
P8-13
SETSP Command
The SETSP command is used to change spacing between text characters.
Format:
{command} {spacing}
where:
{command}: SETSP
{spacing}:
Unit measurement between characters.
The default for spacing is zero. Note
that this command is affected by the
UNITS command setting.
SETSP CommandExample
Input (SETSP.LBL):
! 0 200
T 4 0 0
SETSP 5
T 4 0 0
SETSP 0
T 4 0 0
FORM
200 210 1
10 Normal Spacing
50 Spread Spacing
90 Normal Spacing
Output:
P8-14
Mobile Printer CPCLProgramming Manual
ON-OUT-OF-PAPER Command
This command can be issued to instruct the printer as to
the course of action to take when it encounters an error
while printing the label (such as running out of stock)
format: {command} {action} {number of retries}
where: { command}: ON-OUT-OF-PAPER
{action}: Choose one of the following:
PURGE: Discard the label if print error is
encountered after the specified number of
attempts.
WAIT:
Do not discard the label if print error is
encountered. In this mode the printer will
wait for the error to be corrected before
making the next print attempt.
{number of retries}: n:
Specify how many times the
printer should attempt to print
the label.
The default printer configuration is:
ON-OUT-OF-PAPER PURGE 2
ON-OUT-OF-PAPER Command Example
This example instructs the printer to attempt to print the
label twice.
Input (OOP.LBL):
! 0 200 200 150 1
ON-OUT-OF-PAPER WAIT 2
TEXT 5 0 0 20 MAKE TWO ATTEMPT
FORM
PRINT
Mobile Printer CPCLProgramming Manual
P8-15
ON-FEED Command
Your printer can be configured to ignore, form-feed, or
reprint the last label when the feed key is pressed or
when it receives a form-feed character (0x0c).
Format:
{command} {action}
where:
{command}: ON-FEED
{action}:
Choose from the following:
IGNORE
Don’t take any action when the feed
key is pressed or when the form-feed
character is received.
FEED
Feed to top-of-form when the feed
key is pressed or when the form-feed
character is received.
REPRINT
REPRINT the last label when the
feed key is pressed or when the
form-feed character is received.
In the following example, the command file shown was
sent to the printer only once. The two additional labels
were produced by pressing the printer 'FEED' key once
for each additional label.
P8-16
Mobile Printer CPCLProgramming Manual
ON-FEED Example
Input (ONFEED.LBL):
! 0 200 200 300 1
ON-FEED REPRINT
CENTER
JOURNAL
TEXT 4 1 0 20 PRESS FEED KEY
TEXT 4 1 0 100 TO REPRINT
TEXT 4 1 0 180 THIS TEXT
PRINT
Output:
Mobile Printer CPCLProgramming Manual
P8-17
PREFEED Command
The PREFEED command instructs the printer to advance
the media a specified amount prior to printing.
Format:
{command} {length}
where:
{command}:
PREFEED
{length}:
Unit length the printer advances media
prior to printing.
PREFEED Command Example
The following example sets up the printer for pre-feeding
40 dot-lines prior to printing.
Input (PREFEED.LBL):
! 0 200 200 210 1
PREEFEED 40
TEXT 7 0 0 20 PREFEED EXAMPLE
FORM
PRINT
P8-18
Mobile Printer CPCLProgramming Manual
POSTFEED Command
The POSTFEED command instructs the printer to advance the media a specified amount after printing.
Format:
{command} {length}
where:
{command}:
POSTFEED
{length}:
Unit length the printer advances media
after printing.
POSTFEED Command Example
The following example sets up the printer for post-feeding
40 dot-lines after printing.
Input (POSTFEED.LBL):
! 0 200 200 210 1
TEXT 7 0 0 20 POSTFEED EXAMPLE
FORM
POSTFEED 40
PRINT
Mobile Printer CPCLProgramming Manual
P8-19
PRESENT-AT Command
The PRESENT-AT command can be used to position the
media at the tear bar of the printer or at a location where
the printed label can be easily removed by the operator.
When a PRESENT-AT command is issued, the printer will
print a label and then, after a delay period, advance the
media a specified distance. It will then retract the media
the same distance before starting a new print job.
The “delay” parameter is used to avoid unnecessary
advance/retract operations when printing a batch of print
jobs. The PRESENT-AT command can be issued in a
label file or in a utilities command session
(!UTILITIES…PRINT)
Caution: When using this command an added buffer area of 18 dots should be
applied to the leading and trailing edges of the label. Registration between
any preprinting graphics on the media and the file being printed may vary
from label to label .
Format:
{command} {length} {delay}
where:
P8-20
{command}:
PRESENT-AT
{length}:
Unit length in dot-lines the media is
advanced after printing and retracted
before printing the next label.
{delay}:
The interval after printing the label the
printer waits prior to advancing the
media. Increments are in 1/8 of a
second. A delay of “1” is equivalent to
1/8th of a second. A delay of “4” is
equivalent to 1/2 second, etc.
Mobile Printer CPCLProgramming Manual
PRESENT-AT Command Example
The following example instructs the printer to wait 1/4
second and if there is no printer activity within this interval to then advance the media 80 dot-lines. The printer
will retract the media by the same amount before printing
the next label.
Input (PRESENT-AT.LBL):
! 0 200 200 250 1
TEXT 7 0 0 10 PRESENT-AT EXAMPLE
PRESENT-AT 80 2
FORM
PRINT
Mobile Printer CPCLProgramming Manual
P8-21
COUNTRY / CODE PAGE Command
The COUNTRY control command substitutes the appropriate character set for the specified country.
Format:
{command} {name}
where:
{command}: COUNTRY
{name}:
Choose from the following:
USA
GERMANY
FRANCE
SWEDEN
SPAIN
NORWAY
ITALY
CP850
UK
LATIN9
CP874 (Thai)
CHINA (Simplified Chinese, Double Byte Character Set- see Asian Fonts topic on Pg. 8-24)
KOREA (Korean, Double Byte Character Set- see
Asian Fonts topic on Pg. 8-24)
BIG5 (Traditional Chinese, Double Byte Character
Set- see Asian Fonts topic on Pg. 8-24)
JAPAN-S (S-JIS, Double Byte Character Set- see
Asian Fonts topic on Pg. 8-24)
P8-22
Mobile Printer CPCLProgramming Manual
COUNTRY / CODE PAGE Example
Input (COUNTRY.LBL):
! 0 200 200 80 1
IN-MILLIMETERS
JOURNAL
CENTER
; Set the country as USA
COUNTRY USA
; Now Print Text From ISO substitution Table
TEXT 4 0 0 8 COUNTRY IS USA
TEXT 4 0 0 15 #$@[\]^‘{|}~
; Set country for France and
print the same text
COUNTRY FRANCE
TEXT 4 0 0 28 COUNTRY IS FRANCE
TEXT 4 0 0 35 #$@[\]^‘{|}~
PRINT
Output:
Mobile Printer CPCLProgramming Manual
P8-23
Asian Fonts
Supported Combinations of Asian Fonts
Some mobile printer models do not offer complete support of Asian fonts in
every printer configuration. The table below applies to printers limited to 1M/
1M of memory.
Character Set
Japanese
Japanese
Chinese Simplified
Chinese Simplified
Chinese Traditional
Korean Myeong
Size
(h x w)
Country
Code
16 x 16
24 x 24
16 x 16
24 x 24
16 x 16
16 x 16
JAPAN-S
JAPAN-S
CHINA
CHINA
BIG5
KOREA
Connection Type
Cable IrDA Bluetooth
X
X
X
X
X
X
X
X
X
X
X
X
X
X
X
Note: If you are unsure of your printer’s memory configuration or which fonts
are loaded in your printer, perform a two-key reset as detailed in “Getting
Printer Information” in Section 1.
Input:
! 0 200 200 250 1
COUNTRY BIG5
SETSP 10
T 5 0 10 10 CHINESE TRADITIONAL SAMPLE
SETMAG 2 2
T 55 0 10
50 ÄØ
T 55 0 10
100 ı
SETMAG 1 1
PRINT
Output:
P8-24
Mobile Printer CPCLProgramming Manual
USING FORMAT FILES
The DEFINE-FORMAT and USE-FORMAT commands
are used to identify format and data respectively.
Format files eliminate having to re-send the same format
information for every label printed. By using a pre-loaded
format, only variable data (such as descriptions, price,
etc.) is sent to the printer.
Input (NOFORMAT.LBL):
! 0 200 200 210 1
CENTER
TEXT 4 3 0 15 $22.99
TEXT 4 0 0 95 SWEATSHIRT
BARCODE UPCA 1 1 40 0 145 40123456784
TEXT 7 0 0 185 40123456784
FORM
PRINT
Output:
The following pages illustrate separating the above
example into a format file and data.
Mobile Printer CPCLProgramming Manual
P8-25
USING FORMAT FILES (continued)
Defining a label format file is accomplished using the
DEFINE-FORMAT (or DF) command to mark the beginning of the format, and PRINT to mark the end. A '\\'
(double-backslash) acts as a place holder for data.
Input (FORMATF.LBL):
! DF SHELF.FMT
! 0 200 200 210 1
CENTER
TEXT 4 3 0 15 \\
TEXT 4 0 0 95 \\
BARCODE UPCA 1 1 40 0 145 \\
TEXT 7 0 0 185 \\
FORM
PRINT
The USE-FORMAT (or UF) command instructs the printer
to use a specified format file. The label will be created
using that format file with data supplied following the
USE-FORMAT command. After accessing the specified
format file, the printer substitutes the '\\' delimiters with
the data supplied, producing the desired label.
Input (FORMATD.LBL):
! UF SHELF.FMT
$22.99
SWEATSHIRT
40123456784
40123456784
P8-26
Mobile Printer CPCLProgramming Manual
USING FORMAT FILES (continued)
As with all print commands, each line in a format file and
its accompanying variables must be terminated with the
carriage-return and line-feed character sequence.
Once defined, a format will remain in the printer's nonvolatile memory for future reference. An existing format
can be changed by over writing the file. By using the
DEL command, the format file can be deleted.
Format file names can consist of no more than 8 letters
or digits, and format file extensions can be no more than
3 letters or digits. Any lowercase letter in the format file
name or extension will be converted to upper case.
Note: Every time a file is created on the printer using the
"! DEFINE-FORMAT...", "! DF..." or the Visual
Label Utility application, for example, the file
information is written to flash memory. Unlike
RAM, flash memory does not require battery for
retaining data, and is immune to data corruption
due to static discharge. Although flash memory is
superior to RAM for safe-guarding file contents, it
is limited to an average of 10,000 write cycles (i.e.
file creations). For this reason, the user should
exercise the file creation commands such that the
stated limit is not exceeded.
Mobile Printer CPCLProgramming Manual
P8-27
BEEP Command
This command instructs the printer to sound the beeper
for a given time length. Printers not equipped with a
beeper will ignore this command.
Format:
{command} {beep_length}
Where:
{command}:
{beep_length}:
BEEP
Duration of beep, specified in
.125 (1/8th) second increments.
BEEP Command Example
This example instructs the printer to beep for two seconds (16 x .125 seconds = 2 seconds
Input (BEEP.LBL):
! 0 200 200 210 1
CENTER
TEXT 5 0 0 10 BEEPS FOR TWO SECONDS
BEEP 16
FORM
PRINT
P8-28
Mobile Printer CPCLProgramming Manual
CUT Command
On printers equipped with cutters, this command will cut
the label after it is printed.
Format:
{command}
where:
{command}:
CUT
CUT Example
Input (CUT.LBL):
! 0 200 200 1.5 1
IN-INCHES
; Journal label 300 dots long
CENTER
; Print some text
TEXT 4 0 0 .15 CUT COMMAND
TEXT 4 0 0 .5 EXAMPLE
; After we print the label, cut it.
CUT
PRINT
Mobile Printer CPCLProgramming Manual
P8-29
PARTIAL-CUT Command
On printers equipped with cutters, this command will cut
the label after it is printed, leaving a portion of the label
uncut to facilitate easily tearing the remainder of the
label.
Format:
{command}
where:
{command}:
PARTIAL-CUT
PARTIAL-CUT Example
Input (PCUT.LBL):
! 0 200 200 1.5 1
IN-INCHES
; Journal label 300 dots long
JOURNAL
CENTER
; Print some text
TEXT 4 0 0 .15 PARTIAL CUT
TEXT 4 0 0 .5 EXAMPLE
; After we print the label, partially cut the
label.
PARTIAL-CUT
PRINT
P8-30
Mobile Printer CPCLProgramming Manual
CUT-AT Command
This command is used on printers equipped with a
cutter, in conjunction with the CUT or PARTIAL-CUT
commands. This command will instruct the printer to
retract the stock by a specified length. Printers not
equipped with a cutter will ignore this command. This
command should not be used on printers that use a
thermal transfer ribbon.
Format:
{command} {length}
Where: {command}:
CUT-AT
{length}: The unit length the
stock should be retracted after
performing a cut or partial cut.
CUT-AT Command Example
This example instructs the printer to print a label, perform
a form-feed, cut the label, and retract the stock by 100
dot-lines.
Input (CUTAT.LBL):
! 0 200 200 250 1
CENTER
TEXT 7 0 0 20 CUT-AT EXAMPLE
CUT
CUT-AT 100
FORM
PRINT
Mobile Printer CPCLProgramming Manual
P8-31
MCR Commands
These commands (MCR, MCR-QUERY and MCR-CAN)
can be used to configure and activate the optional Magnetic Card Reader (MCR). The MCR commands will be
ignored by printers that are not equipped with a Magnetic
Card Reader.
The MCR command can be issued in a label file (! 0
200 … PRINT), or in a utilities command session (!
UTILITIES … PRINT). Refer to the discussion of the
MCR commands in Section 10 (Advanced Utilitiies) of
this manual for complete information on using the MCR
option.
P8-32
Mobile Printer CPCLProgramming Manual
LINE PRINT MODE
Introduction
Besides printing labels, Zebra mobile printers can make
receipts, lists, and other variable length documents in line
printer mode. A printer in line print mode receives raw
ASCII text, and will print out your document in raw text.
In Windows 95, this is called the “Generic/Text Only”
printer.
A printer in line print mode can interpret special commands to change the font, the spacing of characters, or
even to print out bar codes and graphics. Receipts can
be just as ornate and detailed as your most complex label
design.
In line print mode, the printer will use the spacing, fonts,
and form-feed instructions in a raw text ASCII file. The
printer will interpret line feed and carriage returns as well
as form feed characters. It will not print tab characters.
In label mode, the user must provide a X and Y coordinate for every item on the label. In line print mode, the
printer can automaticaly calculate these coordinates or
use the ones the user provides.
This section explains how to use line print mode to its
full advantage. It covers the basics of how to use utility
commands and the most commonly used commands to
create receipts. The end of this section includes sample
files and results as well as how to design a unique and
professional receipt.
It is assumed that the user knows how to communicate
with the printer and how to create a basic ASCII file using
a text editor like DOS ‘EDIT’ or Windows™ Notepad.
Note: Line print mode is not available in devices running EPL (Eltron printer emulation), ZPL (Zebra printer
emulation) or PECTAB versions of printer applications.
Mobile Printer CPCLProgramming Manual
P9-1
Special Commands Using the Utility Function
The printer can execute several utility commands at
once or one at a time.
! U
SETLP 7 0 24
PAGE-WIDTH 720
PRINT
This line is printed as raw text.
These lines are in font 7 size 0
! U1 SETLP 7 0 24
! U1 PAGE-WIDTH 720
This line is printed as raw text.
These lines are in font 7 size 0.
The “! UTILITIES” command, or “! U” for short, must be
ended by the terminator “PRINT” followed by a CR/LF
(Carriage Return/Line Feed, or “Enter”) to end the utility
session. The “! U1” command only executes one utility
command and must be followed by a CR/LF. Also, the “!
U1” command can be placed ANYWHERE in a text line to
execute the command.
Example:
Although this text is all on the same
line, ! U1 SETLP 5 0 24 (CR/LF)
this font is new.
To change the default settings for the printer, any of
these commands can be placed in an AUTOEXEC.BAT
file. Please see the “Batch Files” section in “Printer
Configuration and Setup” in the Programming Manual
Section 13.
P9-2
Mobile Printer CPCLProgramming Manual
UNITS Commands
The units commands specify a measurement system for
all subsequent command fields in a utility session. Coordinates, widths, and heights for all utility commands can
be entered with precision to four decimal places. The
printer measurement system will default to dots until a
units command is issued.
Format:
<!> <UTILITIES>
{command}
<PRINT>
where:
{command}: Choose from the following:
IN-INCHES
Measurement in inches.
IN-CENTIMETERS Measurement in centimeters.
IN-MILLIMETERS Measurement in millimeters.
IN-DOTS
Measurement in dots. The
default unit of measurement is
in dots.
Mobile Printer CPCLProgramming Manual
P9-3
SETLP Command
Selecting the line printer font (the SETLP command)
will change the font the printer uses for line print mode. It
also chooses the amount of space the printer will move
down when the printer recieves a carriage return (hex
value 0x0d).
! U1 SETLP {font name or number} {size} {unit height}
The {unit height} value should be set to the actual
height of the font being used. Refer to Appendix C of this
manual for actual resident font height values.
SETLP allows you to use either the resident fonts or
pre-scaled fonts downloaded to the flash memory. The
Label Vista design software can create and upload a font
for the printer from any available TrueType1 font. Appendix D contains a table of all resident font heights and their
proper unit height.
You can set the printer font multiple times when using
the line printer to make a receipt. For example, to put the
company name in a larger font at the top of a label,
change to font 5 size 2 and then to font 7 size 0.
Example:
! U1 SETLP 5 2 46
AURORA’S FABRIC SHOP
! U1 SETLP 7 0 24
123 Castle Drive, Kingston, RI
(401) 555-4CUT
02881
1 TrueType is a trademark of Apple Computer, Inc.
P9-4
Mobile Printer CPCLProgramming Manual
SETLF Command
Use the SETLF command to change the height of each
line without changing the font.
! U1 SETLF {unit height}
The command “! U1 SETLF 40” will advance the paper
40 dots for every LF (line feed, hex value 0x0a) character
it receives.
SETLF Command Example
Input (SETLF2.LBL):
! U SETLP 4 0 40
SETLF 40
PRINT
Output 2
Text line
Text line
Text line
Output :
Mobile Printer CPCLProgramming Manual
P9-5
Moving With X and Y Coordinates
Even though the printer is in a line print mode, it can
still move down and across the paper using X and Y
values.
! U1 X {unit value}
! U1 Y {unit value}
! U1 XY {x unit value} {y unit value}
! U1 RX {unit x value to move relative to present
position}
! U1 RY {unit y value to move relative to present
position}
! U1 RXY{unit x value to move relative to present
position} {unit y value to move relative to present position}
This command is useful for moving across the paper
without using extra spaces or moving down the paper
without needing to set the SETLF command to a specific
value.
Negative values cannot be used for “Y” coordinates.
P9-6
Mobile Printer CPCLProgramming Manual
LMARGIN Command
The LMARGIN command sets the left margin in line
print mode. Instead of issuing several X commands or
inserting spaces, the LMARGIN command moves everything over the number of dots you choose.
! U1 LMARGIN {dots to offset from left}
This function can be used with the PAGE-WIDTH command. LMARGIN will move the left margin over the set
number of dots from the automatically calculated side of
the paper.
Mobile Printer CPCLProgramming Manual
P9-7
SETBOLD Command
The SETBOLD command will make text bolder and
slightly wider. The SETBOLD command takes one operand to set how black the text should be made.
! U1 SETBOLD {value}
where {value} is an offset number from 0 to 5.
Note that {value} will be in the units set by the UNITS
command.
The default UNITS setting is in dots. (203 dots= 1”)
If UNITS is in inches the offset value range is 0-.0246”.
If UNITS is in centimeters the offset value range is 0.0625 cm.
If UNITS is in millimeters the offset value range is 0.625 mm.
Be sure to issue a “! U1 SETBOLD 0” command to turn
the bolding off when done.
Example:
! U1 SETBOLD 2
This text is in bold ! U1 SETBOLD 0
but this text is normal.
P9-8
Mobile Printer CPCLProgramming Manual
SETSP Command
The SETSP command is used to change spacing
between text characters. Spreading out characters on a
line
makes the font appear wider. The SETSP command
can also be used to spread out the text across the line.
! U1 SETSP {unit to separate characters}
For example, “! U1 SETSP 5” will put five dots between
each character on the line. Try this command to make
fonts look larger for emphasis. Note that this command
is affected by the UNITS command setting. (Refer to the
SETBOLD command above.)
Example:
Normal Text ! U1 SETSP 5
SPREAD OUT TEXT
Mobile Printer CPCLProgramming Manual
P9-9
PAGE-WIDTH Command
PAGE-HEIGHT Command
The printer lets you control both the width and height of
the page through use of the PAGE-WIDTH and PAGEHEIGHT commands. The Encore four inch printers, for
example, will take any size stock up to four inches wide.
If the stock is three inches wide, use the PAGE-WIDTH,
or PW command.
! U1 PW {unit width}
If the size of the receipts should remain a constant and
the paper stock does not have a black bar to denote the
top of form, use the PAGE-HEIGHT, or PH command.
The printer will then partition the data you send into fixed
page sizes.
! U1 PH {unit height}
Special ASCII Characters
Form Feed
ASCII Character (0x0c) will advance the paper to either
the next index mark, or the length specified by the PAGEHEIGHT, SETFF or SET-TOF commands. (The index
mark is either a black line on the back of the stock, or the
gap between labels. See GAP-SENSE or BAR-SENSE
in Section 12 of this manual.)
Backspace
ASCII Character (0x08) acts as a non-destructive
backspace. The character after the backspace character
will appear on top of the previous character.
P9-10
Mobile Printer CPCLProgramming Manual
SETFF Command
The SETFF command is used to align top of media to
printhead. Once this command is executed, the alignment will occur when :
• feed key is pressed.
• form-feed character (0x0c) is issued.
• FORM command is issued.
Format:
<!> <UTILITIES>
{command} {max-feed} {skip-length}
<PRINT>
where:
{command}:
SETFF
{max-feed}:
Maximum unit-length the printer
advances searching for the next eyesense mark to align top of form. Valid
values are 0-20,000.
{skip-length}:
Unit-length printer advances past top
of form. Valid values are 5-50.
SETFF Command Example
The following example programs the printer to advance
the paper until the eye-sense mark is found, or the paper
has been advanced a maximum of 25 millimeters. If an
eye-sense mark is found, the paper will be advanced an
additional 2.5 millimeters.
Input (SETFF.LBL):
! UTILITIES
IN-MILLIMETERS
SETFF 25 2.5
PRINT
Mobile Printer CPCLProgramming Manual
P9-11
SET-TOF Command
This command is used to program the distance between the top-of-form and the end of the next (positive
value) or previous (negative value) eye-sense mark or
gap. The eye-sense-mark or gap that is closer to the topof-form should be used for top-of-form setting.
Format:
{command} {d}
where:
{command}: SET-TOF
{d}: The distance between the top of form and the
end of the next or previous eye-sense mark or gap,
which ever is closer. The specified value should be
negative if the previous eye-sense mark is used as
reference, or positive if the next eye-sense mark is
used.
The following are the maximum values (in DOTS) that
can be specified for each model in Zebra’s Mobile Printer
line:
Cameo 2 & 3 ................. 79
Encore 2& 3 .................. 119
Encore 4 ....................... 127
MP5022 & MP5033 ....... 101
MP5044 ........................ 133
QL 220 .......................... 89
QL 320 .......................... 116
QL 420 .......................... 106
RP3 ............................... 142
P9-12
Mobile Printer CPCLProgramming Manual
SET-TOF Command Example 1, label with eye-sense
mark
The following example sets the top-of-form to end of
next eye-sense mark to 101 dots (measured from the topof-form to the end of the next (lower) label’s eye-sense
mark.
Input (SETTOF.LBL):
! UTILITIES
SET-TOF 101
PRINT
SET-TOF Command Example 2, label with gaps
The following example sets the top-of-form to end of
next eye-sense-mark/gap to 0 dots (measured from the
top-of-form to the end of the next (lower) label’s gap.
Input (SETTOF2.LBL):
! UTILITIES
SET-TOF 0
PRINT
Mobile Printer CPCLProgramming Manual
P9-13
Tearing or Cutting the Paper
PRESENT-AT Command
CUT-AT Command
CUT Command
PARTIAL-CUT Command
Remember to add a few extra Carriage Return/Line
Feeds (CR/LF, or Enter) to the end of your receipt. This
will advance the paper enough to allow the receipt to be
torn off without ripping through the last line of text. After
the printer is done advancing the paper, tear the paper
off.
If your printer can move stock bi-directionally, the
PRESENT-AT command will advance the paper enough
to rip off the receipt and not tear through the last line of
text. Then, when the printer starts on the next item, it will
automatically retract the paper before printing to save on
paper. Using PRESENT-AT without an argument will set
the units to advance to the default for that printer.
Use caution when implementing the PRESENT-AT
command with preprinted media. The media may not
reposition itself exactly when it is retracted prior to resuming printing, and the amount of this error is not repeatable
from label to label . A buffer zone of 18 dots is recommended at the beginning and trailing edge of each receipt if PRESENT-AT is used.
! U1 PRESENT-AT {units to advance after print}
! U1 PRESENT-AT
For printers with a cutter, the CUT-AT command will
advance the paper, cut, then retract back to not waste
paper. Using CUT-AT without any argument will set the
units to advance to the default for that printer.
P9-14
Mobile Printer CPCLProgramming Manual
! U1 CUT-AT {units to advance after print}
! U1 CUT-AT
Alternatively, the printer can simply cut the paper or
partially cut the paper. (Partial cut is useful when the
receipt may fall to the floor when the user doesn’t grab it
immediately.) At the end of the receipt, put in a sufficient
amount of CR/LF characters, then issue the CUT or
PARTIAL-CUT command.
! U1 CUT
! U1 PARTIAL-CUT
These commands are discussed more fully in Section 8
of this manual)
Bar Codes, Graphics and Lines
Bar Codes:
The printer can create any 1-D bar code in line print
mode. The BARCODE command works just like it would
in a label file. See Section 5 of this manual on the BARCODE command for more details.
The BARCODE command is affected by the justification
commands like “! U1 CENTER”. See JUSTIFICATION
Commands in section 8 of the manual for more information.
Graphics:
The printer can print PCX formatted graphics files in
line print mode. This is not recommended, however, in
order to keep print times to a minimum. The graphic
should be loaded into the flash file system on the printer
to achieve maximum printing speed. Please see Section
7 of this manual for more information on graphics, lines,
boxes and PCX Commands.
continued on next page
Mobile Printer CPCLProgramming Manual
P9-15
Example:
! U1 PCX {x coordinate} {y coordinate} !<
{filename.pcx}
SETLP-TIMEOUT Command
If the printer does not receive any characters after a set
time, it will begin to print. This delay can be set with the
SETLP-TIMEOUT command.
! U1 SETLP-TIMEOUT {time in 1/8 second units}
Multiply the seconds to wait by 8 to get the correct time
for the command. The valid range of values is 0-255.
Designing a Receipt
It is now possible to create a receipt using the commands just described. First, list all the fields that you
want on the receipt. Will there be different types of receipts used in the business? Is this a receipt for picking
up goods, or is this an itemized list of products ordered
and paid for? Will there be a need to differentiate quickly
between different types of receipts to prevent errors? In
a nutshell, what do you need this thing to look like?
A sales receipt should contain a few basic fields to
prevent confusion. First, place the business name on the
top of the receipt, preferably in a font to differentiate it
from everything else. Choose a large font which is either
resident in the printer or custom created with the Label
Vista software package. Resident font 4 size 0 or 1 and
font 5 size 2 or 3 are perfect for this function. If you
desire to keep the receipt size small, font 7 size 1 is tall
enough to set the text apart from everything else, yet it
conserves space. Set a little space between your business name and the next line.
Next, put the address and telephone number of the
business under the name. Customers will appreciate not
P9-16
Mobile Printer CPCLProgramming Manual
having to flip through the phone book the next time they
want to buy something from you. Also, this helps track
which stores sell which items when dealing with returns
and special sales promotions. Set at least two lines of
space between the header and the rest of the receipt.
Consider other important items on the receipt. Add the
date and time of the sale, the ID number of the cashier or
salesperson. Is the action a sale, return, price adjustment, or a sales quote?
Next, the itemized bill of sale contains a SKU or UPC
code, a product description, and a price. Consider using
a fixed width font, or a monospaced font, for this section.
A monospaced font keeps the characters an even width
for every character. For example, an ‘I’ is the same width
as an ‘M’ character. The resident fonts 0 and 7 are
monospaced as well as other monospaced fonts available with the Label Vista software package.
Finally, at the end, many companies like to put a slogan
or advertisement of coming events. Be certain to put a
few CR/LF characters at the end after your final line to
ensure that the bottom of the receipt does not get torn off
through a printed part of the receipt.
Mobile Printer CPCLProgramming Manual
P9-17
Receipt Examples
The program must set up the file with all the spacing
already inserted. Use only spaces, not tab characters, to
make things line up correctly. Note that when you issue a
command like “! U1 SETSP 0,” it must be followed by a
CR/LF, or enter. This will not advance the printer to the
next line; it will only execute the utility command.
Example 1:
! U1 JOURNAL
! U1 SETLP 4 0 47
YOURCO RETAIL STORES
! U1 SETLP 7 0 24
14:40 PM
Thursday, 06/04/20
Quantity
1
Item
Babelfish
Tax:
Unit
$4.20
5%
Total
$4.20
$0.21
! U1 SETSP 5
Total:! U1 SETSP 0
$4.41
Thank you for shopping at YOURCO
P9-18
Mobile Printer CPCLProgramming Manual
The example on the next two pages is a more complex
design for a fabric shop. This receipt would print at the
cutting table where a salesperson measures out the
fabric. The cashier then scans the bar code at the bottom of the receipt to complete the sale.
Except for the utility commands, this receipt will print
out much as it looks. Your program must provide all the
correct number of spaces and text alignment.
Mobile Printer CPCLProgramming Manual
P9-19
Example 2 Input:
! U1 JOURNAL
! U1 SETLP 5 2 46
AURORA’S FABRIC SHOP
! U1 SETLP 5 0 24
123 Castle Drive, Kingston, RI
(401) 555-4CUT
! U1 SETLP 7 0 24
02881
4:20 PM Thursday, June 04, 2020
Order Number: #59285691
Status: ! U1 SETSP 10
INCOMPLETE ! U1 SETSP 0
Store: 142
Item
Description
Subtotal
1211
Z121
Z829
45" Buckram 5 yds @ $3.42/yd $17.10
Y
60" Blue Silk 10 yds@ $15.00/yd $150.00 N
60" Muslin
20 yds@ $1.00/yd $20.00
Y
Quant.
Price
SUBTOTAL: $187.10
RHODE ISLAND SALES TAX 7.00%:
TOTAL:
$189.70
Tax
$2.60
! U1 SETLP 7 1 48
PLEASE BRING THIS RECEIPT TO THE CASHIER
WITH THE REST OF YOUR PURCHASES.
! U1 CENTER
! U1 B 128 1 2 100 0 0 59285691 ST 187.10 T 2.60
P9-20
Mobile Printer CPCLProgramming Manual
Example 2 Output:
Mobile Printer CPCLProgramming Manual
P9-21
ADVANCED UTILITIES
The Advanced Utilities are used to manage the flash file
system, obtain information about firmware and printer
applications, configure the printer for use in other countries, and to set several operating parameters.
The following example illustrates the use of some of the
commands you will find in this section. The example
assumes that the printer is connected to a host computer
capable of full duplex serial communication. Comments
to the right are not part of the session. Comments in
UPPERCASE are commands sent from the host to the
printer. Comments in lower case are printer responses to
the host. These commands are further explained as you
read through this section.
! UTILITIES
VERSION
6001
CHECKSUM
F723
DIR
START A UTILITIES SESSION
GET THE FIRMWARE VERSION
firmware version is 60.01
GET APPLICATION CHECKSUM
checksum is F723
GET DIRECTORY OF THE
FLASH FILE SYSTEM
Directory
directory has the following 3 files
17306
17306 byte file
PLL_LAT.CSF
PLL_LAT.CSF
18423
18423 byte file
AUTOEXEC.BAT
9 6 96 byte file
TYPE AUTOEXEC.BAT
WHAT'S IN AUTOEXEC.BAT?
! UTILITIES
autoexec.bat line 1
SETLP 5 1 40
autoexec.bat line 2
PRINT
autoexec.bat line 3
DEL AUTOEXEC.BAT
DELETE THE AUTOEXEC.BAT FILE
DIR
GET A DIRECTORY OF THE FLASH
FILE SYSTEM
Directory
PLL_LAT.CSF
PLB_LAT.CSF
PRINT
Note:
directory has the following 2 files
17306
18423
CLOSE THE UTILITIES SESSION
Text printed in italic type refers to data sent to the printer.
Text printed in bold type refers to data sent from the printer.
Mobile Printer CPCLProgramming Manual
P10-1
VERSION Utility
This command reports the firmware version as a four
character null-terminated ASCII string.
Format:
<!> <UTILITIES>
{command}
<PRINT>
where:
{command}:
VERSION
VERSION Example
Input (VERSION.LBL):
! UTILITIES
VERSION
PRINT
P10-2
Mobile Printer CPCLProgramming Manual
CHECKSUM Utility
This command reports the application checksum as a
four character null-terminated ASCII string.
Format:
<!> <UTILITIES>
{command}
<PRINT>
where:
{command}:
CHECKSUM
CHECKSUM Example
Input (CHECKSUM.LBL):
! UTILITIES
CHECKSUM
PRINT
Mobile Printer CPCLProgramming Manual
P10-3
DEL Utility
The DEL command deletes the specified file.
Format:
<!> <UTILITIES>
{command} {name.ext}
<PRINT>
where:
{command}: DEL
{name.ext}: Name of file to be deleted. Note: DEL*.*
may be used to globally delete all files.
P10-4
Mobile Printer CPCLProgramming Manual
DIR Utility
The DIR command sends the file directory to a host.
Format:
<!> <UTILITIES>
{command}
<PRINT>
where:
{command}:
DIR
Mobile Printer CPCLProgramming Manual
P10-5
DEFINE-FILE (DF) Utility
The DF command defines a file name for a file to be
loaded into the printer. If a file with the same name
already exists in the printer, it will be overwritten with the
new file. The contents of the file must contain ASCII
characters. To transfer binary files to the printer, use the
utility provided in the Label Vista application.
Format:
<!> {command} {filename.ext}
{data}
{terminator}
where:
{command}:
DF
{filename.ext}:
Name of file to be created.
{data}:
The contents of the file. The file
must be ASCII and cannot contain
any {terminator} keyword.
{terminator}:
Choose from the following:
P10-6
PRINT:
If the PRINT terminator is
used, it is also written to
the file.
END:
If the END terminator is
used, it is not written to the
file.
Mobile Printer CPCLProgramming Manual
DEFINE-FILE Example
Input (DF.LBL):
! DF AUTOEXEC.BAT
! UTILITIES
SETFF 200 20
PRINT
In this example the file AUTOEXEC.BAT is created in the
printer flash file system. The file contents are:
! UTILITIES
SETFF 200 20
PRINT
Note: Every time a file is created on the printer using the
"! DEFINE-FORMAT...", "! DF..." or the Visual Label
Utility application, for example, the file information
is written to flash memory. Unlike RAM, flash
memory does not require battery for retaining data,
and is immune to data corruption due to static
discharge. Although flash memory is superior to
RAM for safe guarding file contents, it is limited to
an average of 10,000 write cycles (i.e. file creations). For this reason, the user should exercise
the file creation commands such that the stated
limit is not exceeded.
Mobile Printer CPCLProgramming Manual
P10-7
TYPE Utility
The TYPE command allows you to read a text file by
sending it from the printer to a host.
Format:
<!> <UTILITIES>
{command} {name.ext}
<PRINT>
where:
{command}: TYPE
{name.ext}: Name of text file to be sent to host.
P10-8
Mobile Printer CPCLProgramming Manual
BAUD Utility
The BAUD command enables you to set the printer serial
port baud rate. Note: this command will take effect
immediately and the requested baud rate will remain in
effect when the printer is powered down.
Format:
<!> <UTILITIES>
{command} {baud}
<PRINT>
Note that <PRINT> must be sent at the new baud rate
where:
{command}: BAUD
{baud}:
Choose from the following:
1200
4800
9600
19200
38400
57600
115200
BAUD Example
Input (BAUD.LBL):
! UTILITIES
BAUD 19200
PRINT
Mobile Printer CPCLProgramming Manual
P10-9
COUNTRY / CODE-PAGE Utility or
CHAR-SET/CODE PAGE Utility
The COUNTRY or CHAR-SET utility command substitutes the appropriate character set for the specified
country. The two commands can be used interchangebly.
See Section 8, page 22 for more information on the
COUNTRY or CHAR SET command.
Format:
<!> <UTILITIES>
{command} {name}
<PRINT>
where:
{command}: COUNTRY or CHAR-SET
{name}:
Choose from the following:
USA
GERMANY
FRANCE
SWEDEN
SPAIN
NORWAY
ITALY
CP850
UK
LATIN9
CP874 (Thai)
CHINA (Simplified Chinese, Double Byte Character Set)
KOREA (Korean, Double Byte Character Set)
BIG5 (Traditional Chinese, Double Byte Character
Set)
JAPAN-S (S-JIS, Double Byte Character Set)
P10-10
Mobile Printer CPCLProgramming Manual
COUNTRY / CODE-PAGE Utility Example
Input (COUNTRY1.LBL):
! UTILITIES
; Tell the printer to use font 4 size 0
; for line printer mode with 5 millimeters
; line spacing
IN-MILLIMETERS
SETLP 4 0 5
COUNTRY USA
; or CHAR-SET USA
PRINT
This is text with
Country set to
USA
#$@[\]^‘{|}~
! UTILITIES
COUNTRY ITALY
; or CHAR-SET ITALY
PRINT
This is text with
Country set to
ITALY
#$@[\]^‘{|}~
Output:
Note: The printer must be configured with fonts that contain the
extended character sets used in the selected country.
Mobile Printer CPCLProgramming Manual
P10-11
ANNOUNCE Utility
The ANNOUNCE command is used to activate preprogrammed sounds in the printer. A space character is
required between each code. This command will be
ignored by printers that are not equipped with a speaker
and voice circuit.
Format:
<!> <UTILITIES>
{command} {message}
<PRINT>
where:
{command}:
ANNOUNCE
{message}:
Choose from the following:
Code:
''
'.'
'0'
'1'
'2'
'3'
'4'
'5'
'6'
'7'
'8'
'9'
'^'
'{'
'|'
'}'
'~'
P10-12
Spoken Messages:
pauses between sounds
"point"
"zero"
"one"
"two"
"three"
"four"
"five"
"six"
"seven"
"eight"
"nine"
"version"
"go to aisle"
"latch is open"
"battery is low"
"out of paper"
Mobile Printer CPCLProgramming Manual
ANNOUNCE Utility Example
Input (ANNOUNCE.LBL):
! UTILITIES
ANNOUNCE 1 2 . 2 5
PRINT
Output:
The speaker will play the message "one two
point two five.
Mobile Printer CPCLProgramming Manual
P10-13
TIMEOUT Utility
The TIMEOUT command allows you to set the time the
printer will remain on without receiving data. If no data is
received after the specified timeout, the printer will turn
itself off to save energy and preserve battery life. You
can disable the timeout feature by setting the timeout
value to 0.
Format:
<!> <UTILITIES>
{command} {time}
<PRINT>
where:
{command}: TIMEOUT
{time}:
Time in 1/8 seconds of inactivity before
printer will turn itself off.
TIMEOUT Utility Example
Input (TIMEOUT.LBL):
! UTILITIES
TIMEOUT 960
PRINT
This example sets the printer to turn off after 2 minutes of
inactivity (120 seconds X 8 = 960).
P10-14
Mobile Printer CPCLProgramming Manual
BEEP Command
This command instructs the printer to sound the beeper
for a given time length. Printers not equipped with a
beeper will ignore this command.
Format:
{command} {beep_length}
Where:
{command}:
{beep_length}:
BEEP
Duration of beep, specified in
.125 (1/8th) second incre
ments.
BEEP Command Example
This example instructs the printer to beep for two seconds (16 x .125 seconds = 2 seconds)
Input (BEEP.LBL):
! UTILITIES
BEEP 16
PRINT
Mobile Printer CPCLProgramming Manual
P10-15
ON-LOW-BATTERY Command
This command can be issued to instruct the printer as to
what action to take when the battery voltage falls below
the level set by the “low battery shut-down” setting.
format: {command} {options}
where: {command}: OLB
{options}: Choose from the following:
ALERT: The printer will transmit any message included between quote marks out the serial
port.
ALARM: Sounds the printer’s beeper in 1/8 second
increments. Printers not equipped with a
beeper will ignore this option.
ON-LOW-BATTERY Command Example
This example instructs the printer to transmit the message “LOW BATTERY ALERT!” and sound the beeper for
5 seconds. (1/8 second x 40).
Input :
!UTILITIES OLB ALERT “LOW BATTERY ALERT!” ALARM
40
P10-16
Mobile Printer CPCLProgramming Manual
LT Command
This command specifies the command line terminator
character(s). The default terminator characters are CR/
LF or LF. The printer can be programmed to accept a
different character sequence to terminate command lines.
This command does not apply to data sent to the printer
when it is in line print mode.
Format
{command} {mode}
\
Where:
{command}: LT
{mode}: Choose from the following.
CR:
Carriage-return (0x0D) character is the
line terminator.
LF :
Line-feed (0x0A) character is the line
terminator.
CR-LF: Carriage-return/line-feed (0x0D 0x0A)
characters are the line terminator.
CR-X-LF: Line terminator is a carriage-return
(0x0D) followed by any number of characters followed by the line-feed (0x0A)
character. Characters found between the
carriage-return and line-feed characters
are discarded.
LT Command Examples
Set the printer to require line-feeds only as a terminating
character.
! UTILITIES LT LF PRINT
Set the printer to ignore any characters found between a
carriage return character and a line-feed character.
! UTILITIES LT CR-X-LF PRINT
Mobile Printer CPCLProgramming Manual
P10-17
SET-TIME Utility
This command sets the time in the real time clock module. Time should be a valid time and be given in the
specified format. This command will be ignored by printers that are not equipped with a real time clock module.
Format:
<!> <UTILITIES>
{command} {time-stamp}
<PRINT>
where:
{command}:
SET-TIME
time-stamp}:
hh:mm:ss
hh = hours (00 – 23)
mm = minutes (00 – 59)
ss = seconds (00 – 59)
P10-18
Mobile Printer CPCLProgramming Manual
GET-TIME Utility
This command reports the current time, if valid, as an
eight character null-terminated ASCII string. This command will be ignored by printers that are not equipped
with a real time clock module.
Format:
<!> <UTILITIES>
{command}
<PRINT>
where:
{command}: GET-TIME
Printer output:
hh:mm:ss\0
hh = hours (00 – 23)
mm = minutes (00 – 59)
ss = seconds (00 – 59)
\0 = null terminator (00H)
Mobile Printer CPCLProgramming Manual
P10-19
SET-DATE Utility
This command sets the date in the real time clock module. Date should be a valid date and be given in the
specified format. This command will be ignored by printers that are not equipped with a real time clock module.
Format:
<!> <UTILITIES>
{command} {date-stamp}
<PRINT>
where:
{command}: SET-DATE
{date-stamp}: mm-dd-yyyy
mm = month (01 – 12)
dd = day (01 – 31)
yyyy = year (1990 – 2089)
P10-20
Mobile Printer CPCLProgramming Manual
GET-DATE Utility
This command reports the current date, if valid, as an
eight character null-terminated ASCII string. This command will be ignored by printers that are not equipped
with a real time clock module.
Format:
<!> <UTILITIES>
{command}
<PRINT>
where:
{command}: GET-DATE
Printer output:
mm:dd:yyyy\0
mm = month (01 – 12)
dd = day (01 – 31)
yy = year (1990 – 2089)
\0 = null terminator (00H)
Mobile Printer CPCLProgramming Manual
P10-21
Printing a Time Stamp
To print a time stamp on a label, use any text command
and insert
[!<TIME] in place of the text to be printed.
Example:
Input (TIME.LBL)
! 0 200 200 210 1
TEXT 4 0 0 100 !<TIME
FORM
PRINT
Output:
14:47:23
P10-22
Mobile Printer CPCLProgramming Manual
Printing a Date Stamp
To print a date stamp on a label, use any text command
and insert
[!<DATE] in place of the text to be printed.
Example:
Input (DATE.LBL)
! 0 200 200 210 1
TEXT 4 0 0 100 !<DATE
FORM
PRINT
Output:
02-24-1998
Mobile Printer CPCLProgramming Manual
P10-23
PAPER-JAM Utility
This command establishes the parameters that allow the
printer to report a paper jam. This command works in
conjunction with the “Get Extended Printer Status” escape command detailed in Section 11
Format:
<!> <UTILITIES>
{command} {method} {bar distance} {alert “message”}
<PRINT>
where:
{command}: PAPER-JAM
{method}: PRESENTATION
BAR
GAP
This parameter establishes which sensor will be used to detect a paper jam.
{bar-distance}: Maximum distance within which
index mark of next label is expected
{alert “message”} ALERT “Paper jam detected” :
The {alert} parameter is optional.
Once the PAPER-JAM command has been set (for example as part of a config.sys file) the “Get Extended
Printer Status” escape command will report back any
conditions that do not meet the {bar-distance} parameter
and the printer will send the message defined in the
{alert} parameter.
P10-24
Mobile Printer CPCLProgramming Manual
Magnetic Card Reader (MCR) Command
This command can be used to configure and activate the
Magnetic Card Reader (MCR). The MCR command will
be ignored by printers not equipped with a Magnetic Card
Reader.
The MCR command can be issued in a label file (! 0
200 … PRINT), or in a utilities command session (!
UTILITIES … PRINT). This command activates the
MCR. When the printer is turned on , the MCR is not
active by default until the MCR command is received. To
make the MCR active on power-up, the MCR command
can be issued from autoexec.bat or run.bat files.
The RXD LED of the printer will blink while the MCR is
active. When the MCR times out or after a successful
read (provided the MCR is not in MULTIPLE read mode,)
the MCR will deactivate, thereby returning the RXD LED
back to its normal state.
Format
{command} {time-out} {options}
Where:
{command}:
MCR
{time-out}: time-out is the inactivity shutdown time, in 1/8th of a sec ond. For
example, timeout=80 for a 10second inactivity time-out(10 * 8), or
time-out=160 for a 20-second inactivity
time-out(20 seconds * 8). The MCR
timer starts ticking once the last option
of MCR command is received by the
printer. When MCR times out, it will not
read a new card until a new MCR comMobile Printer CPCLProgramming Manual
P10-25
mand is issued. The only exception to
this rule is when MCR is in MULTIPLE
read mode. See below for description of
MULTIPLE read mode. A time-out of 0
will instruct the printer to never time-out,
and wait for a successful read.
{options}: The options listed below can be
specified in any order, and must be
separated with spaces. The last option
must be terminated with cr/lf (carriagereturn / line-feed) characters. Options
are accumulative, meaning that “MCR
10 ERRORS T1” and “MCR 40 T2” are
equivalent to “MCR 40 ERRORS T1 T2”.
The time-out field is not accumulative,
and only the last specified time-out is
used. Select from the following options:
Track Options:
T1 :Read Track 1. (can specify one or
more tracks to read).
T2 :Read Track 2.
T3: Read Track 3. (Currently not supported)
Frequency Options:
MULTIPLE: Read multiple swipes. MCR
will continue to read and report card
swipes until the MCR times out.
SINGLE read is the default mode.
SINGLE: Read and report one successful card swipe. No data will be reported
continued
P10-26
Mobile Printer CPCLProgramming Manual
if the MCR times out before a successful
read. SINGLE read is the default read
frequency mode.
Data Reporting Options
QUERY: Report MCR data when queried (In response to MCR-QUERY
command, see MCR-QUERY.). By
default, the printer will report MCR data
when valid MCR data is decoded before
the MCR times out.
Debugging Options
ECHO: The printer will print the MCR
data by internally routing it to the lineprinter module, forcing the data to be
printed, as well as being transmitted to
the host computer.
Track Data Transmit Options
PREFIX prefix: This option specifies the
track data prefix. The printer defaults to
no prefix. The PREFIX command should
be followed by the data that needs to be
sent from the printer to the host, up to
10 characters, and terminated with
space or carriage-return/line-feed characters. An example of a typical prefix
option is “PREFIX START:”.
POSTFIX postfix: This option specifies
the track data postfix. The printer defaults to no postfix. The POSTFIX command should be followed by the data
Mobile Printer CPCLProgramming Manual
P10-27
that needs to be sent from the printer to
the host after all track data have been
transmitted, up to 10 characters, and
terminated with space or carriagereturn/line-feed characters. An example
of a typical postfix option is “POSTFIX
END”.
DEL lr: Defines the track number delimiters, where “l” is the left delimiter character, and “r” is the right delimiter character. Default delimiters for the printer are
“DEL T:”, meaning that the printer will
transmit T, followed by the track number
if track number reporting is specified via
the TN option, and the ‘:’. The transmitted data will be, “T1:” or “T:”, or “T2:”,
depending on the options selected.
DELAY nnn: This option specifies the
inter-character delay of data sent from
the printer to the host, in milliseconds.
This command is typically used where
the host computer can not collect data
transmitted from the printer fast enough,
resulting in missed characters. The
default DELAY is 0. An example of the
DELAY option is: “DELAY 15” which
instructs the printer to observe a 15millisecond delay before sending the
next character data to the host.
TN: This option enables the reporting of
track number between the delimiters
(see “DEL lr” command). The printer will
report the track number by default.
continued
P10-28
Mobile Printer CPCLProgramming Manual
NTN:This options disables the reporting
of the track number, inserted between
the delimiters. The printer enables track
number reporting by default.
Error Reporting Options
ERRORS: This option turns error reporting on.
Error reporting is turned off by default.
The following is a list of the error messages (Please note that the following
error messages will be transmitted only
if error reporting is turned on, via the
ERRORS option in the MCR command):
READ ERROR: This error is reported
when the card could not be read due to
errors such as parity check, LRC checksum, no end-sentinel, or invalid characters. It indicates that either: (1) the card
is bad, or (2) the card was not swiped
correctly. The printer will leave the MCR
on and will continue to try to read future
card swipe retries by the user until it
times out or until a successful read,
whichever occurs first.
CANCEL: This error is reported when a
MCR-CAN command is received. This
error message will confirm that the MCR
is turned off.
TIME-OUT: This error is reported when
the printer MCR times out before a
successful read.
Mobile Printer CPCLProgramming Manual
P10-29
EPREFIX: This option is similar to the PREFIX
command, but applies to error messages. Error messages, if error reporting
is turned on, will be preceded by the
specified eprefix. For example,
“EPREFIX ERROR:” instructs the printer
to prefix error messages with “ERROR:”.
The default error prefix is “Error:”
MCR Command Examples
Example 1: This example sets the MCR in the printer for
reading tracks one and two, with a timeout of 10 seconds
(10 / 1/8th seconds = 80). The last option of the MCR
command must be terminated with cr/lf.
! U1 MCR 80 T1 T2
Once the card is swiped successfully, the following is
sent to host:
T1:B4000001234562^PUBLIC JR/JOHN Q.MR^9209101999999999
<cr/lf>
T2:4000001234562=9209101999999999<cr/lf>
If the printer times out or the card can not be read, the
printer will not return anything to the host (because ERRORS option is not specified in this example).
Example 2: This example sets the MCR in the printer for
reading tracks one and two, with a timeout of 10 seconds
(10 / 1/8th seconds = 80). The ECHO command will
instruct the printer to print the MCR data (in addition to
sending that data to the host). The ERRORS option
instructs the printer to report read errors, time-outs, or
cancellations, if any. The last option of the MCR command must be terminated with cr/lf.
continued
P10-30
Mobile Printer CPCLProgramming Manual
! U1 MCR 80 ECHO T1 T2 ERRORS
Once the card is swiped successfully, the following is
sent to host and printed:
T1:B4000001234562^PUBLIC JR/JOHN
Q.MR^9209101999999999
<cr/lf>
T2:4000001234562=9209101999999999<cr/lf>
If the printer times out before a successful read, it will
send the following message to host and printed on the
printer:
Error:T1:Time-out
Error:T2:Time-out
Example 3: This example illustrates the PREFIX,
EPREFIX, POSTFIX, and DEL (DELimiter) options:
! U1 MCR 80 ECHO T1 T2 ERRORS PREFIX START
EPREFIX ERR POSTFIX END DEL ()
Once the card is swiped successfully, the following is
sent to host and printed:
START(1)B4000001234562^PUBLIC JR/JOHN
Q.MR^9209101999999999END<cr/lf>
START(2)4000001234562=9209101999999999END<cr/lf>
If the printer times out before a successful read, it will
send the following message to host and printed on the
printer:
ERR(1)Time-out<cr/lf>
ERR(2)Time-out<cr/lf>
MCR-QUERY Command
The MCR can be put in a query mode by specifying the
“QUERY” option in the MCR command, where it will
report MCR data only when it is asked to via the MCR-
Mobile Printer CPCLProgramming Manual
P10-31
QUERY command. By default, the printer will report card
swipe data immediately after a successful read.
The printer will not respond to MCR-QUERY if it does not
have any data, either the track data or an error message.
Multiple MCR-QUERY commands may be issued, keeping in mind that the response, or lack thereof, to the
MCR-QUERY reflects the card swipe data at the moment
MCR-QUERY is issued.
Format
{command}
Where:
{command}:
MCR-QUERY
MCR-QUERY Command Example
In this example the printer is instructed to report the MCR
read operation results.
! U1 MCR-QUERY
P10-32
Mobile Printer CPCLProgramming Manual
MCR-CAN Command
The MCR-CAN command will terminate the current MCR
activity, and if error message reporting is enabled via the
MCR command ERROR option, will transmit the “Cancel”
error message to host.
Format
{command}
Where:
{command}:
MCR-CAN
MCR-CAN Command Example
In this example the printer is instructed to deactivate the
printer MCR and cancel any pending read operations.
! U1 MCR-CAN
Mobile Printer CPCLProgramming Manual
P10-33
S-CARD Command
The S-CARD command can be used to access the
Towitoko Smartcard reader embedded within Zebra “SC”
model mobile printers. The smart card library implements
the T=1 protocol for IS07816 compliant cards. This
allows users to send ASCII commands to the printer and
the printer will in turn forward this command to the smart
card with the appropriate header and checksum information. The printer then returns the card’s response.
The S-CARD command set is only valid on “SC” model
printers with a printer application at version 41h or above.
The software version can be verified by performing a twokey reset as described in Section 1 of this manual. The
number in the “Software:” listing on the second report
must end in 41h or above (e.g. “Software: HTLK41h”)
Format
{Command } { Operation } { Options }
where:
{command}: S-CARD
The ‘Operation’ argument indicates how to access the
reader. All options must be separated by a space unless
stated otherwise. The options may appear in any order.
The S-CARD command must be issued using the printer
utility session command (!U1...) and terminated by a
CRLF pair (0x0D0x0A).
Operation
The Operation command is a required element. An error
will be returned if an invalid operation is specified (see ‘SCARD Command Response’ for error codes). The possible Operation commands are:
CT_ATR: Each smart card has a unique ‘Answer
To Reset’, or ATR. This ATR contains
continued
P10-34
Mobile Printer CPCLProgramming Manual
information relevant to data transmission and the card itself. This command/
response has the following form:
Command:
! U1 S-CARD CT_ATR
Response:
<ACK><LENGTH><ATR DATA>
CT_DATA: This command is used to send a command to the smart card. The response
from the card is returned. A command
of this type has the following form:
<CT_DATA> <Length of command>
<card command in ascii form>
Example:
! U1 S-CARD CT_DATA 10 8010000008
Description: CT_DATA: indicates the command is
to go to the smart card.
10 = length of command
8010000008 = Command to go to the
card in ascii form. This command is
converted to binary and sent to the card.
Response for successful command:
<ACK><LENGTH><DATA><SW1><SW2>
Explanation of response:
<ACK> = Successfully send command to
the card and received a response.
<LENGTH> = The response length. This
length is for data only (i.e. SW1 and
SW2 are not included in response
length).
<DATA> = This is the response from the
continued
Mobile Printer CPCLProgramming Manual
P10-35
card (in binary form).
<SW1> = Status byte from card
<SW2> = Status byte from card
Note: See ISO-7816-3 for an explanation of SW1 and SW2
Response for an unsuccessful command:
<NAK><ERROR CODE>
See ‘Error Codes’ below for an explanation of possible error codes.
CT_CLOSE: This command will power down the
reader and turn off the red LED on the
smartcard module. This command
should be used after communicating to
the card with the CT_DATA command.
DEBUG-ON: Enables debug on the printer. This
will cause some messages to print out
as the printer configures itself for passthrough mode. The messages printed
relate to port parameters for the internal
communication port communicating with
the Smartcard reader and a message
will also print out when the printer has
been taken out of pass-through mode.
Once in ‘pass-through’ mode, no debug
messages are printed.
Error Codes
Errors from the S-CARD command are of the following
format:
<NAK><ERROR CODE>
Where any of the following are possible error codes:
<0x02> = Protocol not supported (card is
not using T=1 protocol)
<0x10> = No card detected
continued
P10-36
Mobile Printer CPCLProgramming Manual
= Invalid drive type (currently
only the Towitoko CHIPDRIVE micro is
supported)
<0x12> = Invalid operation
<0x16> = Invalid command length in SCARD command
<0x11>
S-CARD COMMAND EXAMPLES
This section provides some examples for using the SCARD command to communicate with the internal
Smartcard reader from the ‘External Terminal’.
Read card ATR
! U1 S-CARD CT_ATR
Response:
<ACK><0X0D>< 3B E3 00 FF 91 81 71 26 44 00
54 54 54>
Traceability command:
! U1 S-CARD CT_DATA 10 8010000008
Note: When the printer actually sends
this command to the printer, it converts
the command to binary, adds the appropriate T=1 header and computes the
overall command checksum. Then the
printer sends this command to the smart
card.
Response:
<ACK><08>< C9 1C 92 AA 66 19 A0 00><90><00>
CT_CLOSE command
! U1 S-CARD CT_CLOSE
Mobile Printer CPCLProgramming Manual
P10-37
DENSO BHT COMMANDS
NOTE: All commands in this section are compatible with ACKNAK-IT v
6.1 or greater.
Zebra mobile printers can have an application downloaded which will support communications to the Denso
Barcode Handy Terminal (BHT).
The different methods of communications between a BHT
and a Zebra mobile printer are per the table below:
Connection/protocol type
Cable
Refer to
IR
Cable w/BHT
IR w/BHT
Cable w/BHT-IR
IR w/BHT-IR
Autoexec.bat File
pg. no
PROBHT.CBL
P10-52
PROBHT.IR
P10-52
PROBHTIR.CBL
P10-53
PROBHTIR.IR
P10-53
Data is sent to the printer formatted as a BHT .DAT file.
The printer will check for the “.DAT” filename extension.
Since the format of data using this protocol is not always
what the printer requires, there are several modes of
operation that can be set within the printer to specify how
record data fields delivered by the protocol are interpreted.
Setting the Data Format
If the default mode (strip trailing spaces then add CR/LF
for each data field) is not desired, any of the operating
modes can be set by loading an AUTOEXEC.BAT command file into the printer’s flash memory.
Note that any commands intended to modify the BHT
operating modes must be placed between the SRFACCESS and the END-SRF-ACCESS command lines.
continued
P10-38
Mobile Printer CPCLProgramming Manual
Mode 1: (Default) Strip trailing spaces and add CR/LF
Each data field in a record has any trailing spaces
stripped and a CR/LF (carriage return/line feed) pair
added. The data field (stripped of trailing spaces and
with an appended CR/LF pair) is then passed to the
printer for processing. This is the default way to handle
data sent to the printer.
Mode 2: Include all characters in each field (RAW)
The second mode accepts all characters that make up
each data field. Using this method, any trailing spaces in
a data field will be INCLUDED as data for the printer to
process.
Mode 3: Use the first byte as a count of characters to
send to the printer.
This mode is based on the first character of a data field
being interpreted as a count of data bytes that follow. It is
similar to a ‘counted string’ as found in the Pascal programming language String data type. In the ‘counted
string’ mode, the number of bytes specified by the count
will be transferred into the printer. The count byte’s maximum value is limited to the data field size minus 1.
Note that in this example the count byte is shown as
ASCII, but would actually be sent as a binary number.
Mode 4: Strip trailing spaces
This mode eliminates trailing spaces in each data field of
a record. Note that unlike Mode 1 no CR/LF pair is added
to the data after stripping the trailing spaces.
Refer to pgs. P10-44 thru P10-47 for examples using the
BHT-MODE commands
continued
Mobile Printer CPCLProgramming Manual
P10-39
IR or Cable Interface Selection
The printers are normally self configuring for IR or cable
data transmission. Plugging in the communications cable
will disable the IR interface; removing the cable will make
it active. This default method of interface selection can
be overridden by means of a BHT-PROTOCOL command
in an autoexec. bat file. (Refer to the examples at the end
of this section on setting the mode for IR or cable data
transmissions.) BHT-PROTOCOL CABLE enables BHT
or BHT-IR protocol via cable. If the BHT-PROTOCOL
CABLE command is not present, data is sent “raw” over
the serial cable; if it is detected BHT-PROTOCOL BHT
sends data in the BHT mode; BHT-PROTOCOL BHTIR
sends data in the BHT-IR mode. Performing a two-key
reset of the printer will return it to its normal, automatic
selection mode. (Refer to pg. P1-2 in this manual for the
reset procedure.)
BHT-BAUD Command
The printers support 9600 and 19200 BPS baud rates.
The default baud rate for communication with Zebra
mobile printers is 9600 BPS. Configuring a BHT baud
rate will set both the IR and the cable transmit speeds to
that rate. You must insure that both the printer and the
BHT are set to the same baud rate. This can also be
changed in an AUTOEXEC.BAT file with the BHT-BAUD
<baud-rate> command. (Refer to the BHT-BAUD command example at the end of this section. )
Setting the Mode for IR Data Transmission
Autoexec.bat files can configure the printer for IR data
transmission modes. The following notes apply:
• Unless specified otherwise with a BHT-PROTOCOL
CABLE command, communication over a serial cable
continued
P10-40
Mobile Printer CPCLProgramming Manual
does not use the BHT or BHT-IR protocol. In this
default (‘raw”) mode, any Zebra mobile printer utility
for reprogramming, adding or deleting files will be in
effect.
• If the printer has been configured to include the BHT
or BHT-IR protocol with the serial cable the following
procedure may be used to force the printer to communicate “raw” (i.e. using no protocol) for the purposes of reprogramming, or the adding or deleting of
files.
1. Connect the printer to a host terminal loaded
with the desired communications software.
2. Turn the printer on by starting the terminal’s
communications program.
3. Turn the printer off, then, while holding the
“Feed” key down, turn the printer back on.
4. The printer will print a status report. When the
printout is complete, the communications protocol
will be in the “raw” mode.
(Refer to the BHT-MODE Commands examples at the
end of this section.)
Configuring the BHT for IR transmission
The BHT must also be configured correctly to communicate with Zebra mobile printers using the BHT or BHT-IR
protocol. All parameters that must be set are found in the
BHT Set System → Communication menu area. The
following notes apply:
• The pulse width for optical communications must be
set to 1.63µS.
• The protocol is set to match the protocol in the
printer. Default for the printer is BHT-IR unless
continued
Mobile Printer CPCLProgramming Manual
P10-41
•
•
•
•
specified as BHT by an AUTOEXEC.BAT file.
The baud rate (if the printer uses the default) is set to
9600 BPS
The Serial Number is set to ON.
Zebra mobile printers use a ID number of 9. You
should avoid using this ID value for the terminal.
The Com port is set to OPTICAL.
BHT-IR File Transmission
Assume that a label file CIS.DAT has been loaded into
the BHT. (Refer to pg. _ for details on loading a *.DAT
file.) The steps to transmit this file via IR are as follows:
1. Depress the 1 / PW / SF keys all at once, then
release. The SYSTEM MENU should be displayed. This
menu has 6 options. This power on sequence must be
performed every time to boot to the SYSTEM MENU. A
regular power on (PW key) will boot into the BHT application.
2. Select option 3:UPLOAD. Press the ENT key.
The UPLOAD menu should now be displayed. Select
option 1:DRIVE A. Press the ENT key.
Use the arrow keys, F5, and F6, to scroll through the
menu options to the desired file. (CIS.DAT in our example) When CIS.DAT is highlighted, press the ENT key.
3. The IR on the BHT should be pointed towards the IR
window on the printer. The transfer of data will power on
the printer if it is not already on. When file transfer is
complete, ** Completed ** is displayed for the user and a
beep sounds. The file will then print. Press the C key to
exit this screen.
4.
Continue to press the C key to exit back 1 menu at a
continued
P10-42
Mobile Printer CPCLProgramming Manual
time (if desired). The SYSTEM MENU is the top-level
menu.
5. After a successful UPLOAD, the CIS.DAT file must
be re-selected again to transfer to the printer.
NOTES:
The arrow keys or a numeric keypress can be used to
select a menu option. The arrow keys are F5 through F8. A press of
the ENT key usually needs to accompany the option selection. Hold
down the PW key for 1 – 2 seconds to turn the BHT off, or let it power
down automatically.
Communication errors can occur infrequently during BHTIR transmission. If a transmission is unsuccessful, the data.
should be re-sent.
Configuring the BHT for Cable Transmission
The BHT can also be configured for cable communications with Zebra mobile printers using either the BHT or
the BHT-IR protocol. All parameters that must be set are
found in the BHT Set System Æ Communication menu
option. The following notes apply:
• The protocol type is set to BHT or BHT-IR protocol.
Printer default is BHT-IR
• The SET CONNECTOR menu options:
1. The TRANSMIT SPEED (if the printer uses
the default) is set to 9600 BPS
2. The PARITY BIT is set to NONE
3. The DATA BIT is set to 8 BITS
4. The STOP BIT is set to 1 BIT
5. The Serial Number is set to ON
6. The Horizontal Parity is set to ON
• The COM PORT is set to IFC (on the BHT-5000 set
COM DEFAULT to CONNECTOR)
continued
Mobile Printer CPCLProgramming Manual
P10-43
Loading a .DAT file into the BHT
Zebra mobile printers will only print files with the .DAT
extension sent from the BHT. The following example file
CIS.DAT contains a label file that can be loaded from a
PC into the BHT via a serial cable using the TU3.EXE
utility provided by DENSO. The file can then be sent to a
Zebra mobile printer to produce a label. Files with a .DAT
extension contain records composed of one or more
record fields. For CIS.DAT, each record will be specified
as having only one field with a width of 40 bytes. The 40
byte width was chosen because no single line in the
example CIS.DAT file exceeds 40 bytes. The resulting
records transferred to the BHT will each contain a single
field 40 bytes wide. The BHT and BHT-IR protocol will
add space characters as needed to any field containing
less than 40 bytes. Thus the CIS.DAT file contains 24
lines that will be interpreted as 24 records containing a
single field of 40 bytes.
Note that while the example uses the TU3.EXE utility to
download the file from a PC, these files could also be
created under control of an application program executing directly on the BHT.
The command line that will transfer this file into the BHT
is: TU3 +MPC +B9600 CIS.DAT +F40
The BHT will now contain the file CIS.DAT.
continued
P10-44
Mobile Printer CPCLProgramming Manual
Sending The Example Label File to the Printer
Zebra mobile printers with the BHT application will print
files with the .DAT extension. As noted before, the default
action of the printer when a record is received is to strip
all trailing spaces from all record fields, then append a
carriage return/line feed pair to the data. Using this default, the trailing spaces in every field of the example
CIS.DAT file will be stripped, and a CR/LF pair will be
added.
Interrupted Transmissions
If a transmission from the terminal to the printer is interrupted, the user should wait at least five seconds before
attempting another transmission. During this delay, the
printer will discard any partial data received from the
interrupted transmission and reset itself to receive a new
transmission.
continued
Mobile Printer CPCLProgramming Manual
P10-45
Example .dat File
Input (CIS.DAT)
! 0 200 200 581 1
;MEDIA P/N LD-E9QT7S
LABEL
CONTRAST 0
TONE 0
SPEED 3
PAGE-WIDTH 240
BAR-SENSE
;// PAGE 0000000002400600
;// TEXT 0 1 3 560 DEPT 34
TEXT90 4 3 36 288 $22.88
TEXT90 5 2 163 273 SWEATSHIRT
VBARCODE UPCA 2 1 45 139 576 04364503284
TEXT90 7 0 191 511 043645032841
TEXT90 5 0 4 524 COMPARE AT
TEXT90 4 0 30 508 $ 30.00
TEXT90 5 0 115 575 ZD-180-KL
TEXT90 5 2 119 269 ALL COTTON
TEXT90 7 0 114 389 01/17/98
TEXT90 0 0 208 173 EA00-732-00560
TEXT90 5 0 82 519 ELSEWHERE
BOX 189 358 217 527 1
FORM
PRINT
Output:
P10-46
Mobile Printer CPCLProgramming Manual
SRF-ACCESS and END-SRF-ACCESS Commands
Commands intended to modify the BHT operating modes
must be placed between the SRF-ACCESS and the
END-SRF-ACCESS command lines.
SRF- and END-SRF-ACCESS Command Example
This autoexec.bat file uses the SRF-ACCESS and ENDSRF-ACCESS command pair to establish BHT communication via the BHT-CABLE protocol.
Input: PROBHT.CBL
! DF AUTOEXEC.BAT
! UTILITIES
SRF-ACCESS
BHT-PROTOCOL BHT
BHT-PROTOCOL CABLE
BHT-BAUD 19200
BHT-MODE STRIP-ADD-CRLF
END-SRF-ACCESS
PRINT
continued
Mobile Printer CPCLProgramming Manual
P10-47
BHT-BAUD Command
This command will set both the IR and the cable transmit
speeds. You must insure that both the printer and the
BHT are set to this same baud rate. This can also be
changed in an AUTOEXEC.BAT file with the BHT-BAUD
<baud-rate> command.
Format:
{command} {baud rate}
where:
{command}: BHT-BAUD
{baud rate}: 9600,19200. Default value for Zebra
mobile printers is 9600 BPS.
BHT-BAUD Command Example
The following example sets BHT-IR communications to
use a baud rate of 19200 BPS and to strip spaces from
received data fields.
! DF AUTOEXEC.BAT
! UTILITIES
SRF-ACCESS
BHT-MODE STRIP-SPACES
BHT-BAUD 19200
END-SRF-ACCESS
PRINT
P10-48
Mobile Printer CPCLProgramming Manual
BHT MODE Commands
This command sets one of several modes of operation to
specify how record data fields delivered by the BHT
protocol are interpreted.
Format:
{command} {mode}
where:
{command}: BHT-MODE
{mode}:
STRIP-ADD-CRLF
Each data field in a record has any
trailing spaces stripped and a CR/LF
(carriage return/line feed) pair added.
The data field (stripped of trailing
spaces and with an appended CR/LF
pair) is then passed to the printer for
processing. This is the default way to
handle data sent to the printer.
RAW
The RAW mode accepts all characters
that make up each data field. Using this
method, any trailing spaces in a data
field will be INCLUDED as data for the
printer to process.
COUNTED STRING
This mode is based on the first character of a data field being interpreted as a
count of data bytes that follow. In the
‘counted string’ mode, the number of
bytes specified by the count will be
transferred into the printer. The count
byte's maximum value is limited to the
data field size minus 1.
STRIP-SPACES
This mode eliminates trailing spaces in
continued
Mobile Printer CPCLProgramming Manual
P10-49
each data field of a record. Note that
unlike the STRIP-ADD-CRLF mode, no
CR/LF pair is added to the data after
stripping the trailing spaces.
BHT MODE Command Examples
In the following examples a record is defined to be made up of 3
data fields. Fields 1, 2 and 3 are 10, 8 and 20 bytes long, respectively.
The "^" character indicates a space character. Other combinations
of fields and field lengths can be used as long as they conform with
the BHT protocol's data file record field formats.
Example 1: Strip Spaces and Add CR/LF:
Input: ADDCRLF.BAT
! DF autoexec.bat
! UTILITIES
SRF-ACCESS
BHT-MODE STRIP-ADD-CRLF
END-SRF-ACCESS
PRINT
Output:
Data Record:
|----10----|---8----|--------20---------|
Comtec^^^^ ^Info^^^ ^Systems^^^^^^^^^^^^
Data Sent to printer:
|Comtec<CR><LF>^Info<CR><LF>^Systems<CR><LF>|
continued
P10-50
Mobile Printer CPCLProgramming Manual
BHT MODE Command Examples (continued)
Example 2: Send Raw Data
Input: SENDRAW.BAT
! DF autoexec.bat
! UTILITIES
SRF-ACCESS
BHT-MODE RAW
END-SRF-ACCESS
PRINT
Output:
Data Record:
|----10----|---8----|--------20---------|
Comtec^^^^ ^Info^^^ ^Systems^^^^^^^^^^^^
Data Sent to printer:
Comtec^^^^ ^Info^^^ ^Systems^^^^^^^^^^^^
Example 3: Counted String
Input: COUNTED.BAT
! DF autoexec.bat
! UTILITIES
SRF-ACCESS
BHT-MODE COUNTED-STRING
END-SRF-ACCESS
PRINT
Data Record:
|----10----|---8----|--------20---------|
6Comtec^^^ 6^Info^^ 7Systems^^^^^^^^^^^^
Data Sent to printer:
Comtec^Info^Systems
continued
Mobile Printer CPCLProgramming Manual
P10-51
BHT MODE Command Examples (continued)
Example4: Strip Spaces
Input: SSPACES.BAT
! DF autoexec.bat
! UTILITIES
SRF-ACCESS
BHT-MODE STRIP-SPACES
END-SRF-ACCESS
PRINT
Output
Data Record
|----10----|---8----|--------20---------|
Comtec^^^^ ^Info^^^ ^Systems^^^^^^^^^^^^
Data Sent to printer
|Comtec^Info^Systems|
continued
P10-52
Mobile Printer CPCLProgramming Manual
BHT PROTOCOL Command
This command placed in an autoexec. bat file overrides
the default method of communication.
BHT-PROTOCOL CABLE enables BHT or BHT-IR protocol via cable. If the BHT-PROTOCOL CABLE command
is not present, data is sent "raw" over the serial cable, if it
is detected the BHT-PROTOCOL BHT command sends
data in the BHT mode; BHT-PROTOCOL BHTIR sends
data in the BHT-IR mode.
Format: {Command} {mode}
where:
{Command}: BHT-PROTOCOL
{mode}:
BHT
This mode establishes that data will be
sent in BHT protocol mode
CABLE
This mode enables BHT or BHT-IR
protocol via cable. If the BHT-PROTOCOL CABLE command is detected the
BHT-PROTOCOL BHT command sends
data in the BHT mode
BHTIR
Sends data in the BHT-IR mode.
continued
Mobile Printer CPCLProgramming Manual
P10-53
BHT PROTOCOL Command Examples
Example: Cable printing with BHT protocol
Using Cable with BHT protocol
Input: PROBHT.CBL
! DF AUTOEXEC.BAT
! UTILITIES
SRF-ACCESS
BHT-PROTOCOL BHT
BHT-PROTOCOL CABLE
BHT-BAUD 19200
BHT-MODE STRIP-ADD-CRLF
END-SRF-ACCESS
PRINT
EXAMPLE: IR printing with BHT protocol
Print using IR communications with BHT protocol
INPUT: PROBHT.IR
! DF AUTOEXEC.BAT
! UTILITIES
SRF-ACCESS
BHT-BAUD 19200
BHT-PROTOCOL BHT
BHT-MODE STRIP-ADD-CRLF
END-SRF-ACCESS
continued
P10-54
Mobile Printer CPCLProgramming Manual
BHT PROTOCOL Command Examples (continued)
Example: Cable printing with BHT-IR protocol
Print using cable BHT-IR protocol
Input: PROBHTIR.CBL
! DF AUTOEXEC.BAT
! UTILITIES
SRF-ACCESS
BHT-BAUD 19200
BHT-PROTOCOL BHTIR
BHT-PROTOCOL CABLE
BHT-MODE STRIP-ADD-CRLF
END-SRF-ACCESS
PRINT
Example: IR printing with BHT-IR protocol
Print using IR with BHT-IR protocol
Input: PROBHTIR.IR
! DF AUTOEXEC.BAT
! UTILITIES
SRF-ACCESS
BHT-BAUD 19200
BHT-PROTOCOL BHTIR
BHT-MODE STRIP-ADD-CRLF
END-SRF-ACCESS
PRINT
Mobile Printer CPCLProgramming Manual
P10-55
PRINTER ESCAPE COMMANDS
SET AND READ CODE COMMAND
Printer command sessions normally start with the '!'
character. When the printer is used in Generic Text Mode
(or Line-Print Mode) and if the user expects to print the '!'
character in that mode, then the CCL code must be
changed. This is done via the Redefine CCL Code command.
Send the following sequence to redefine the code:
Set CCL Code: ESC (0x1b) '}' (0x7D) 'W' (0x57) '1' (0x31) <new code>
(SETCCL.LBL)
Where {new CCL code} is a one-byte character representing the new CCL code.
Once the CCL Code is changed, all CCL sessions should
be started with the new CCL code. For example, if CCL
code is changed to '~', then instead of issuing a '! UTILITIES' command to the printer, '~ UTILITIES' should be
issued.
The printer will retain the new CCL code for as long as it
remains powered. If the printer is powered off and back
on again, it will revert back to normal operations and will
expect '!' as the CCL code.
Send the following sequence to read the CCL code:
Read CCL Code: ESC (0x1b) '}' (0x7D) 'R' (0x52) '1' (0x31)
(READCCL.LBL)
After the above command is issued, the printer will return
the one-character CCL code.
Mobile Printer CPCLProgramming Manual
P11-1
PRINTER ESCAPE COMMANDS FORMAT
Format:
{escape} {command} [parameters]
where:
{escape}:
The ESC character (0x1b).
{command}:
Choose from the escape commands in
this section.
[parameters]: Parameters for the escape commands.
Note: The escape commands should not be used while
in a control/utility session ("! UTILITIES... PRINT"
OR "! 0... PRINT").
P11-2
Mobile Printer CPCLProgramming Manual
STATUS/INFORMATION
Get Printer Status ESC (0x1b) 'h' (0x68)
This command requests a status byte from the printer.
If one is returned, it indicates that the printer is operational and has finished processing the previous label.
It should be called before loading or printing a label in
order to make sure that the host software is synchronized with the printer. If bit 3 of the status byte is high,
it indicates that the battery is low. If bit 4 is high, it
indicates that the printer has been powered on and
reset (see the Reset Status function). This command
requests a status byte from the printer with the following format:
Bit
4
3
2
1
0
Description
Printer reset (0=reset cleared, 1=printer reset)
Battery status (0=voltage OK, 1=low battery)
Latch status (0=latch closed, 1=latch open)
Paper status (0=paper present, 1= out of paper)
Printer status (0=printer ready, 1=printer busy)
Acknowledge Printer Reset ESC (0x1b) 'N' (0x4e)
This command clears the reset bit that is set on
power-up and reported by the 'get printer status'
function. The reset information returned by ESC 'h'
may be used by the host to perform its printer powerup initializations, such as form-feeding. Once the host
completes its initialization of the printer, it may call this
function to tell the printer to clear its reset bit.
Mobile Printer CPCLProgramming Manual
P11-3
STATUS/INFORMATION (continued)
Get Printer Information (GPI.LBL)
ESC (0x1b) 'v' (0x76)
This command instructs the printer to return a nullterminated string containing its model number, firmware revision and serial number. In practice, a
search for the NUL character should be used, since
the length of the string returned may change.
Get Extended Printer Status ESC(0x1b) ‘i’ (0x69)
This command requests the extended status byte
from the printer. Printer program versions 24 and
higher respond to this command. The extended status
byte returned from the printer is in the following format:
Bit Description
7 Ribbon status: 0=ribbon detected, 1=no ribbon
detected
6 Paper supply status: 0=paper supply is OK
1=paper supply is low
5 Presentation (peeler) sensor: 0=last label re
moved, 1=last label not removed yet
4 Paper-jam: 1= detected, 0 = not detected2
3 Reserved
2 Reserved
1 Reserved
0 Reserved
Notes: 1. Mask all reserved bits when reading status.
2. The PAPER JAM command must be issued prior to
requesting the paper jam status.
P11-4
Mobile Printer CPCLProgramming Manual
USER LABEL COUNT
Get User Label Count (GULC.LBL)
ESC (0x1b) 'J' (0x4a) 'R' (0x52) 'U' (0x55)
This command requests the current user label count
from the printer. The response consists of two bytes,
most significant byte first. This count represents the
total number of labels printed since the last time the
count was reset to zero.
Reset User Label Count (RULC.LBL)
ESC (0x1b) 'J' (0x4a) 'W' (0x57) 'a' (0x61) 'c' (0x63)
'c' (0x63) 'N' (0x4e) 'V' (0x56) 'M' (0x4d) 'U' (0x55)
This command instructs the printer to clear its user
label count to zero.
POWER OFF COMMAND
Off Command (OFF.LBL)
ESC (0x1b) 'p' (0x70)
This function instructs the printer to shut off. This
function can be used instead of lowering DTR causing
the printer to shut down.
Mobile Printer CPCLProgramming Manual
P11-5
WIRELESS NETWORK PRINTERS
Introduction
Zebra Cameo 3N and Encore 3N Network Printers are
equipped with a WLAN (Wireless Local Area Network)
card. Network printers allow wireless communication as
a node within a local area network, and its wireless capabilities allow communications from any point within the
LAN’s perimeter.
The following section details commands used with Network Printers to configure various characteristics and to
interrogate the printer for its network settings.
Note: If you are using a WLAN enabled QL series
printer, you should use the “get, set,do” parameters
detailed in Section 14 rather than the LAN command
detailed below.
Network Printer Safety Considerations
WARNING: Use of the Network Printers will result in
exposure to Radio Frequency radiation. To conform to
FCC RF exposure requirements these printers must be
used only in the intended orientation and in the intended manner.
Refer to the User’s Manual for the Network Printer in use
for more specific safety instructions. In all cases, avoid
prolonged exposure closer than 5 cm. (2 in.) to the radiating area around this unit’s antenna.
LAN Command
Format:
LAN { Operation } { Options }…{ Operation } { Options }
The LAN command can be used to interrogate and configure the Wireless LAN (WLAN) card in a Zebra Network
Printer. The entire LAN command must be terminated by
a CRLF pair (0x0D0x0A).
Mobile Printer CPCLProgramming Manual
P12-1
{Operation} is a required element. An error will be returned if an invalid operation is specified (see ‘LAN Command Response’ for error codes). Any desired number of
Operations can be entered after the LAN command.
The possible Operations are:
IPADDR – This operation allows manual specification
of the printer’s TCP/IP address. (See the DHCP operation for a description of automatic address assignment.) The option to this operation must be a valid
TCP/IP address in the typical dot notation. i.e., a set
of four decimal numbers between 0 and 255 separated by dots. E.g., 100.150.200.150 is a valid address. This value will most likely need to be assigned
by the administrator of the network the printer will operate on. If an invalid address is specified, this operation has no effect other than to print an error message.
Syntax: IPADDR {IP-Address}
Where {IP-Address} = nnn.nnn.nnn.nnn. Each nnn
may range from 0 to 255.
Example: ! U1 LAN IPADDR 90.80.70.60
GATEWAY-IPADDR- This command can be used to
set the gateway IP address of the printer. (Available
in printer application versions 30A and higher.)
Syntax: GATEWAY-IPADDR {IP-Address}
Where {address} is the dotted decimal representation of the address. For example, 10.14.2.25
Example: ! U1 LAN GATEWAY-IPADDR 12.15.10.3
REMOTE-IPADDR- This command can be used to set
the remote IP address of the printer. (Available in
printer application versions 30A and higher.)
Syntax: REMOTE-IPADDR {IP-Address}
P12-2
Mobile Printer CPCLProgramming Manual
Where {address} is the dotted decimal representation of the address. For example, 10.14.2.25
Example: ! U1 LAN REMOTE-IPADDR 12.15.10.3
SUBMASK- This command can be used to set the
subset mask of the printer. (Available in printer application versions 30A and higher.)
Syntax: SUBMASK {IP-Address}
Where {address} is the dotted decimal representation of the subset mask. For example, 10.14.2.25
Example: ! U1 LAN SUBMASK 12.15.10.3
SSID- This operation allows the assignment of an RF
SSID (Radio Frequency System Set ID). This ID allows several RF networks to operate independently
in the same area without interference. The printer
must have the same SSID as the RF Access Point to
which it is supposed to link. The option for this operation may be any string up to 32 characters long.
Syntax: SSID {SSID string}
Where {SSID string} = 32 characters.
Example: ! U1 LAN SSID ZebraNet
MODE – This operation sets the operating mode of the
printer. The two options are LPD and TCP. LPD is the
standard printer protocol used by Unix and available
for Windows NT. TCP affords the ability to allow bare
sends using only the TCP protocol.
Syntax: MODE {option}
Where {option} = LPD or TCP.
Example: ! U1 LAN MODE LPD
GET-STATUS – This operation causes the printer to
report its current WLAN status. The two options are
PRINT and REPLY. If PRINT is used, the status
dump is printed. If REPLY is used, the status dump is
sent out over the CABLE. The status report is of the
Mobile Printer CPCLProgramming Manual
P12-3
following form:
LAN Status report:
ipAdr = nnn.nnn.nnn.nnn
userName = {the user name}
fwVersion = {LAN firmware version}
swVersion = {LAN software version}
MAC addr = hh:hh:hh:hh:hh:hh
associated = {link state}
Where:
nnn.nnn.nnn.nnn
{the user name}
= a typical TCP/IP address.
= a descriptive username set in the
radio.
{LAN firmware version}
= a descriptive firmware ver-
sion set in the radio.
{LAN software version}
= a descriptive software ver-
sion set in the radio.
= the IEEE network address of the
LAN card.
{link state} = YES or NO
Syntax: GET-STATUS {option}
Where {option}= PRINT or REPLY.
Example: ! U1 LAN GET-STATUS PRINT
hh:hh:hh:hh:hh:hh
GET-CONFIG – This operation causes the printer to
report its current WLAN configuration. The two options are PRINT and REPLY. If PRINT is used, the
configuration dump is printed. If REPLY is used, the
configuration dump is sent out over the CABLE. The
configuration report is of the following form:
LAN Config report:
ipAdr = nnn.nnn.nnn.nnn
powerMode = {power mode state}
quiet = {quiet state}
protocol = {protocol selected}
essID = {SSID string}
DHCP = {DHCP state}
DHCP_SAVE = {DHCP_SAVE state}
P12-4
Mobile Printer CPCLProgramming Manual
Where:
nnn.nnn.nnn.nnn = a typical TCP/IP address.
{power mode state} = SAVE or FULL.
{quiet state} =YES or NO. YES means the radio
only transmits normal data, NO means the radio
transmits link status information on power up and status change.
{protocol selected} = LPD or TCP.
{SSID string} = the System Set ID string.
{DHCP state} = ON or OFF
{DHCP_SAVE state} = ON or OFF
Syntax: GET-CONFIG {option}
Where {option} = PRINT or REPLY.
Example: ! U1 LAN GET-CONFIG PRINT
SOFT_RESET – This operation resets the WLAN card.
If the application determines that the WLAN card is
not responding (e.g., if a GET_STATUS query goes
unanswered), it may try to reset the card.
SOFT_RESET should be tried first, and if it fails then
RESET should be used.
Example: ! U1 LAN SOFT_RESET
RESET – This operation performs a “hard” reset of the
WLAN card. If the application determines that the
WLAN card is not responding (e.g., if a
GET_STATUS query goes unanswered), it may try to
reset the card. The SOFT_RESET command
should be tried first, and if that fails then RESET
should be used
Example: ! U1 LAN RESET
DHCP – This operation allows for control over setting
of the WLAN card’s IP address. The options for this
operation are enabled (ON) or disabled (OFF). If
Mobile Printer CPCLProgramming Manual
P12-5
DHCP is enabled, the WLAN card will attempt to obtain an IP address from a DHCP server. If DHCP is
disabled, the WLAN card will use the IP address programmed into its non-volatile storage.
Syntax: DHCP {option}
Where {option} = ON or OFF
Example: ! U1 LAN DHCP ON
DHCP-SAVE – This operation allows for control of the
storing of addresses obtained by DHCP. If ON, a new
address obtained from DHCP will be stored. If OFF,
the new address will be used for this session only,
leaving the previously stored address unchanged.
Syntax: DHCP-SAVE {option}
Where {option} = ON or OFF
Example: ! U1 LAN DHCP-SAVE ON
DHCP-TIMEOUT – This operation allows for control of
number of times the DHCP client will attempt to obtain an address from the DHCP server. The argument
is the number of times the client will make a request
before giving up. The client can be told to never give
up by making the argument 0.
Syntax: DHCP-TIMEOUT {0 – 15}
Example: ! U1 LAN DHCP-TIMEOUT 5
PORT – This operation allows for setting of the TCP
port that the printer will listen on while in TCP mode.
Syntax: PORT {PortNumber}
Example: ! U1 LAN PORT 515
P12-6
Mobile Printer CPCLProgramming Manual
Setting the IP Address for Network Printers
1. Create the following document in a text editor such as
Notepad, replacing (192.0.11.195) with your Network
Printer’s address, and (ZebraNet) with the SSID of your
RF Access Point. It may be necessary to obtain this information from your network administrator:
! UTILITIES
LAN IPADDR 192.0.11.195 SSID ZebraNet MODE LPD
PRINT
Insure each line, including the last, is terminated with
<CRLF>. Save the file in a convenient location.
2. Using a serial communications cable (p/n BL11757000), connect the printer to the serial port of a PC loaded
with the Label Vista™ program. Open Label Vista and select the “Diagnostic Send” utility under the Printer menu.
3. Use the “Browse” button to navigate to the file you created in step 1 and click on the “Send” button. The file will
be sent to the printer, and the dialog box will indicate the
download progress.
Once the IP address has been downloaded successfully,
it will stay resident in the printer’s memory until a new IP
address is sent. The IP address can be verified by performing a “2 key reset” on the printer.
The “2 key reset” is initiated by the following key sequence:
1. Press the "FEED" key,
2. While still holding down the "FEED" key, press and release the "ON/OFF" key (Cameo 3N) or the “On” key (Encore 3N).
3. Keep the "FEED" key depressed until printing starts.
The printer will produce a line of interlocking “x” characters to insure all elements of the printhead are working,
and then print out a status report.
The resulting printout should include a Wireless Communications section. You should verify that the following lines
are included, with your IP address and SSID:
Mobile Printer CPCLProgramming Manual
P12-7
ipAdr = (your IP address)
associated = YES
protocol = LPD
essID = (Your SSID)
DHCP = OFF
If there is no Wireless Communications section or the parameter values do not match what is expected, please refer to the Network Printer Troubleshooting discussion at
the end of this section.
Details of this method of setting the IP address are covered earlier in this section in the discussions of the
IPADDR, SSID and MODE operations.
LAN Command Response
If an operation unsupported by the LAN command is
given, the printer will generate the following message:
***Invalid LAN option {operation}
where {operation} is the invalid operation
If an operation with an option unsupported by the LAN
command is given, the printer will print the following message:
Illegal{operation}option {option}
where {option} is the invalid option.
P12-8
Mobile Printer CPCLProgramming Manual
Network Printer Troubleshooting
If the printer does not behave as described in this section, please take the following diagnostic steps:
1. Perform a 2 key reset on the printer. I.e., turn
the printer off, depress and hold the FEED key,
press the POWER key, and then release the
FEED key. The printer will produce a line of interlocking “x” characters to insure all elements
of the printhead are working, and then print out
a status report. Refer to next page for an annotated sample of a status report.
2. Under the status report’s Program heading, the
software should have a label similar to
HTLANxxx. If not, the LAN application is not
loaded on this printer and LAN operation is not
supported. Call Zebra tech support.
3. Under the RF LAN INFORMATION section, if
you see: "Could not get WLAN status" or "Could
not get WLAN config" the internal radio is not
responding. If you repeat step 1 with the same
result, call Zebra tech support.
4. Under the RF LAN INFORMATION section,
verify that the SSID and IP address are set to
the values you expect as described in the
Printer Setup section above. If not, repeat the
printer setup. If the information is still not correct, call Zebra tech support.
5. Verify that the printer is associating with the RF
Access Point. Bring the printer as close as you
can to the RF Access Point you are using and
do a 2 key reset. Check that the value for the
associated parameter under RF LAN INFORMATION is YES. If not, call Zebra tech support .
6. If you do not get a label when you try printing,
verify that the printer is on.
Mobile Printer CPCLProgramming Manual
P12-9
Wireless LAN Report Example
Unit Serial Number
Application: Network
Printers will have
“HTLAN “prefix.
I.P Address
Radio Software
Version
Unit is associated with
LAN : Yes/No
SSID Address
I.P Address
P12-10
Mobile Printer CPCLProgramming Manual
PROGRAMMING FOR THE DISPLAY OPTION
Introduction:
Printers with the LCD control panel option use the WML
language to create screens or “cards” for the display. This
section explains the WML tags and commands used to
create a menu for the LCD. The file should be named
INDEX.WML. This file can be sent to the printer via an
FTP session or by using Label Vista. By using a line like
$(vnd.zo.parameter name) you can display the
value of that parameter name as seen in example 1.
Refer to Section 14 of this manual for complete information on available parameters.
Refer to Table 1 at the end of this section for information
on WML tags used by printers with the display option.
The first card to be displayed should always be called
“main”. The following example demonstrates the timer
function and uses this to refresh the LCD to give a current battery voltage, head latch status, and paper out
status. In the example each line is followed by a CR/LF
(0x0D/0x0A).
Example 1:
This is a complete menu that demonstrates most of
the tags from Table 1 at the end of this section. The
<do> tag is shown is Example 2.
Language Tag
<wml>
Direct output to the LCD screen
<display>
Begin card named netset, with no title and a 10-second delay go
back to the main card.
<card id=”netset” title=” “ ontimer=”#main”>
<timer value=”100"></timer>
Display the IP address
<p>IP:$(vnd.zo.ip.addr)</p>
Line Break
<br/>
continued on next page
Mobile Printer CPCLProgramming Manual
P13-1
Display the PORT number
<p>TCP Port:$(vnd.zo.ip.port)</p>
Line Break
<br/>
Display the ESSID
<p>eSSID:$(vnd.zo.wlan.current_essid) </p>
Line Break
<br/>
Display the associated status
<p>Associated:$(vnd.zo.wlan.associated) </p>
Display a link back to the main card
<p><a href=”#main”>back</a></p>
Close the card tag
</card>
Begin a card named “main”, with a title and refresh
rate of 1 second.
<card id=”main” title=”Zebra QL 320,Status”
ontimer=”#main”> <timer value=”10"></timer>
Line Break
<br/>
Display battery voltage and battery status.
<p>Battery:$(vnd.zo.power.voltage)V($(vnd.zo.power.status))
</p>
Line Break
<br/>
Display head latch status
<p>Latch:$(vnd.zo.head.latch)</p>
Line Break
<br/>
Display paper out status and put a space after it.
<p>Paper:$(vnd.zo.media.status) </p>
Insert four spaces and put a link to the card netset
<p>
<a href=”#netset”>more</a></p>
Close the card tag
</card>
Close the display tag
</display>
Close the WML tag
</wml>
P13-2
Mobile Printer CPCLProgramming Manual
Example 1 looks like this:
<wml>
<display>
<card id=”netset” title=” “ ontimer=”#main”>
<timer value=”100"></timer>
<p>IP:$(vnd.zo.ip.addr)</p>
<br/>
<p>TCP Port:$(vnd.zo.ip.port)</p>
<br/>
<p>eSSID:$(vnd.zo.wlan.current_essid) </p>
<br/>
<p>Associated:$(vnd.zo.wlan.associated)
</p>
<p><a href=”#main”>back</a></p>
</card>
<card id=”main” title=”Zebra QL 320,Status”
ontimer=”#main”><br/>
<timer value=”10"></timer>
<p>Battery:$(vnd.zo.power.voltage)
V($(vnd.zo.power.status)) </p>
<br/>
<p>Latch:$(vnd.zo.head.latch)</p>
<br/>
<p>Paper:$(vnd.zo.media.status) </p>
<p>
<a href=”#netset”>more</a></p>
</card>
</display>
</wml>
continued on next page
Mobile Printer CPCLProgramming Manual
P13-3
LCD Output for Example 1:
Zebra QL 320
Status Battery:7.80V(ok)
Latch:ok Paper:ok
more
IP:10.14.4.97
TCP Port:6101
eSSID: ZebraNet
Associated:yes back
Note: The LCD screen is 20 characters across and 4 lines.
P13-4
Mobile Printer CPCLProgramming Manual
Example 2:
This example is not a complete menu setup, it is a
sample card. It is meant as a tool to break down the
tags and explain their use.
Comments
<!— *************************************** —>
<!— ******** Setup Comm Baud Card ********* —>
<!— *************************************** —>
Begin card, the card name is baud, the title is “Com,Baud”, when
the 20 second timer expires go to the card called status.
<card id=”baud” title=”Com,Baud”
ontimer=”#status”> <timer value=”200"></timer>
Display the current baud rate after four spaces.
<p> $(vnd.zo.comm.baud)</p>
Do a line break
</br>
Display 9600 and put three spaces after it, if 9600 is selected then
execute the setvar command to change the baud rate to 9600 in
the <do> ... </do> and refresh the display.
<do type=”accept” label=”9600">
<setvar name=”vnd.zo.comm.baud” value=”9600"/
><refresh/>
</do><p> </p>
Display 19200, if 19200 is selected then execute the setvar
command to change the baud rate to 19200 in the <do> ... </
do> and refresh the display.
<do type=”accept” label=”19200">
<setvar name=”vnd.zo.comm.baud” value=”19200"/
><refresh/>
</do>
Do a line break
</br>
Link the card back to the previous menu.
<p><a href=”#comm”>Back</a>
</p>
Link the card back to the main menu.
<p><a href=”#main”>Main</a></p>
End the card
</card>
continued on next page
Mobile Printer CPCLProgramming Manual
P13-5
Example 2 looks like this:
<!— *************************************** —>
<!— ******** Setup Comm Baud Card ********* —>
<!— *************************************** —>
<card id=”baud” title=”Com,Baud”
ontimer=”#status”>
<timer value=”200"></timer>
<p>
$(vnd.zo.comm.baud)</p>
</br>
<do type=”accept” label=”9600">
<setvar name=”vnd.zo.comm.baud”
value=”9600"/><refresh/>
</do><p>
</p>
<do type=”accept” label=”19200">
<setvar name=”vnd.zo.comm.baud”
value=”19200"/><refresh/>
</do>
</br>
<p><a href=”#comm”>Back</a>
</p>
<p><a href=”#main”>Main</a></p>
</card>
LCD Output for Example 2:
Com, Baud
9600 19200
Back
Main
19200
Note: The LCD screen is 20 characters across and 4 lines.
P13-6
Mobile Printer CPCLProgramming Manual
Mobile Printer CPCLProgramming Manual
P13-7
Sends output to LCD
<DISPLAY> … </DISPLAY>
Line Break, on the display this will do a the equivalent
to a CR/LF also please note that the display is 20
characters long the 21st character will display at the
first position of the next line.
Paragraph
Hyper-link to another card (screen)
Gets printer option similar to the GETVAR command.
Where printer_option is an option from the previous
section that the GETVAR command is valid.
Comments
Sets the timer value nnn = duration to wait in 10ths of a
second for the check to be press before going to the
card specified in the ontimer option of the card tag.
</br>
<p> … </p>
“<a href = “”#cardname””> …. </a>”
$(vnd.zo.printer_option)
<!— … —>
<timer value=nnn></timer>
“<card id=””cardname”” title=””titlename”” ontimer=””#main””> … </card>” Declares a card (or screen)
Declares a WML document
Table 1: WML Tags used on Printers with the LCD Option
Comments
<wml> … </wml>
Tag
P13-8
Mobile Printer CPCLProgramming Manual
“<do type=””accept”” label=””xxx””> <setvar name=””vnd.zo.{option}”
value=””yyy””/><refresh/> </do>”
Tag
Preforms specific action when label “”xxx”” is selected ”
from the menu. The {option} is specified the same way
as the SETVAR command detailed in the Section 14.
The value is the new value desired. The tag <refresh/>
is used to refresh the screen after the command is
issued.
Comments
CONFIGURATION/CONTROL COMMANDS
Introduction
The following section covers a set of commands to configure and query printer parameters and perform various
printer control functions. Examples of this set of commands include setting printer’s IP address, querying
printer’s baud rate, or instructing the printer to advance
its media to top of form. This set of commands is referred
to as the set/get/do commands, and is available in the
printer applications version 40 and above. The software
version can be ascertained by performing a two-key reset
as described in Section 1 of this manual. The number in
the “Software:” listing on the second report must end in
40 or above (e.g. “Software: HTLK40d”)
These commands follow a standard format as described
below.
Note: All commands must be terminated with a CR/LF (0x0D, 0x0A). Actions
and parameter names must be specified in lower-case. Parameter values
should be specified in lower-case unless the parameter value itself is case
sensitive, such as a printer’s WLAN eSSID.
Command Format
Three commands are available: setvar, getvar, and do.
“setvar” commands are used to configure printer
operating parameters to specified values.
“getvar” commands are used to query the printer
for its parameter values.
“do” commands are used to instruct the printer to
perform various functions.
Entering the line !<[parameter] in a label file will print
the value of the parameter specified between “[ ]”
The formats of these commands are as follows:
continued on next page
Mobile Printer CPCLProgramming Manual
P14-1
getvar Command
The getvar command is used to get the current value of
printer parameters. This command must be terminated by
a CR/LF (0x0D, 0x0A). The printer will respond with the
parameter value of “?” if the parameter does not exist
(usually due to incorrect spelling of the parameter name)
or it has not been configured yet. The parameter name
should be specified in lower case.
Format:
getvar “{parameter name}”
{Parameter name}
The name of the parameter to
be retrieved. Please refer to the parameter list for
valid parameter names.
setvar Command
The setvar command is used to set parameter values in
the printer. This command must be terminated by a CR/
LF (0x0D, 0x0A). The parameter name must be in lower
case. Parameter values must be specified in lower case,
unless the parameter value itself is case sensitive, such
as a printer’s WLAN eSSID.
Format:
setvar “{Parameter name}” “{Value}”
{Parameter name}
The name of the parameter to
be set. Please refer to the parameter list for valid
parameter names.
{Value} The new value to assign to the specified
parameter above.
do Command
The do command can be used to instruct the printer to
perform predefined actions. Some do commands require
one or more parameters. These parameters should be
P14-2
Mobile Printer CPCLProgramming Manual
enclosed in double quotes. This command must be terminated by a CR/LF (0x0D, 0x0A). The printer will perform
the specified function immediately after receiving the
command.
Format:
do “{Action name}” “{parameter}”
{Action name} The action to perform. Please refer
to the parameter list for valid action names.
{parameter}
some actions require one or more
parameters. The parameters should be specified
as required by the corresponding action, enclosed
within double quotes. For actions that do not require a parameter an empty parameter list should
be specified, i.e. “”.
Commands / Parameters
Following are descriptions of each set/get/do command
in detail, including the required parameters, if any, and
possible choices for parameter values. Each set/get/do
command described below also includes examples to
demonstrate proper syntax and usage.
continued on next page
Mobile Printer CPCLProgramming Manual
P14-3
appl.date
type: getvar
This parameter refers to the printer’s application date.
getvar result
Example:
Printer will respond with the applications date in
the mm/dd/yy format
Description Get printer application’s date.
Syntax
! U1 getvar “appl.date”
Result
“01/29/02”
appl.name
Type: getvar
This parameter refers to the printer’s application name.
getvar result
Example
Printer’s application name will be returned.
Description Get printer application name.
Syntax
! U1 getvar “appl.name”
Result
“htstd40a.hex
“
appl.version
Type: getvar
This parameter refers to the printer’s application version.
getvar result
Example
P14-4
Printer application version as a 4-digit (hex)
number.
Description Get printer application’s version.
Syntax
! U1 getvar “appl.version”
Result
“7940”
Mobile Printer CPCLProgramming Manual
Bluetooth® Parameters
The following parameter names are only available with
Bluetooth enabled applications. Changes made using the
setvar command with Bluetooth parameters will be set in
the printer, but will not take effect until a new link is established, power is cycled or the device.reset command is
issued. If a link already exists the change will not effect
the current connection and will not cause a disconnect.
bluetooth.address
type: getvar
This parameter is the Bluetooth device address - programmed into each radio.
getvar result
Example
Returns the printer’s Bluetooth address.
Description Get printers Bluetooth address.
Syntax
! U1 getvar “bluetooth.address”
Result
“00:80:37:16:87:71”
continued on next page
Mobile Printer CPCLProgramming Manual
P14-5
bluetooth.authentication
type: getvar; setvar
This parameter sets Bluetooth authentication mode and
works in combination with the “bluetooth.bluetooth_pin”
parameter. When authentication is set to “default” a PIN
is required to connect to the printer that is based on the
friendly-name. Contact your printer supplier to obtain the
algorithm that generates this PIN.
When authentication is set to “setpin”, the PIN required to
connect is set in the “bluetooth.bluetooth_pin” parameter.
NOTE this parameter and the following “bluetooth.bluetooth_pin” parameter
apply only when Bluetooth library versions 1.2.3 or later are installed in the
printer. Refer to “Getting Printer information” in Section 1 for information on
obtaining installed printer software versions
getvar result
Example
setvar choices
Example
P14-6
Current authentication mode setting, “off”, “de
fault”, “setpin”.
Description Get the current Bluetooth authentication mode.
Syntax
! U1 getvar
“bluetooth.authentication”
Result
“off”
“off”, “default”, “setpin”
Default
“off”
Description Enable Bluetooth authentication.
Syntax
! U1 setvar
“bluetooth.authentication” “default”
Result
Printer will enable Bluetooth
authentication with user defined
PIN set in the
“bluetooth.bluetooth_pin” parameter.
Mobile Printer CPCLProgramming Manual
bluetooth.bluetooth_pin
type: getvar, setvar
This parameter is used to connect to the printer only
when the “bluetooth.authentication” parameter is set to
“setpin”.
This parameter is not used when the
“bluetooth.authentication” parameter is set to “default” or
“off”. See “bluetooth.authentication”.
getvar result
Example
setvar choices
Example
returns the printer’s bluetooth PIN value
Description Instructs the printer to respond with
the Bluetooth PIN value
Syntax
!U1 getvar
“bluetooth.bluetooth_pin”
Result
“MyPin”
text string up to 10 characters
Default
““
Description Instructs the printer to change the
Bluetooth PIN value
Syntax
!U1 setvar
“bluetooth.bluetooth_pin” “MyPin”
Result
Changes password to “MyPin”
continued on next page
Mobile Printer CPCLProgramming Manual
P14-7
bluetooth.date
type: getvar
This parameter is the release date of the Bluetooth module.
getvar result
Example
Printer’s Bluetooth library release date in the
format “mm/dd/yy”
Description Get printer’s Bluetooth module
release date.
Syntax
! U1 getvar “bluetooth.date”
Result
“02/12/02”
bluetooth.discoverable
type: getvar; setvar
This parameter sets the Bluetooth discoverable mode.
getvar result
Example
Current discoverable mode setting, “off” or “on”
Description Get the current Bluetooth discover
able mode.
Syntax
! U1 getvar
“bluetooth.discoverable”
Result
“on”
setvar choices
“on”, “off”
Default
“on”
Example
Description Disable discoverable mode.
Syntax
! U1 setvar“bluetooth.discoverable”
“off”
Result
Printer will disable discoverable
mode.
P14-8
Mobile Printer CPCLProgramming Manual
bluetooth.friendly_name
type: getvar, setvar
This parameter sets the friendly_name, which is part of
the local_name used during service discovery and also
affects authentication. The friendly_name is a string of
up to 20 characters long; it will default to the printer serial
number if not set by the user.
Changes to local_name and authentication will not occur
until power is cycled or the device.reset command is issued.
getvar result
Example
set var choices
Example
Returns the friendly_name
Description Get printer friendly_name
Syntax
! U1 getvar
“bluetooth.friendly_name”
Result
“SYGN01-11-0389”
any string of 20 characters or less.
default
printer serial number
Description Set the friendly_name
Syntax
!U1 setvar “bluetooth.friendly_name”
“16314A”
Results
Friendly_name will become:
“16314A”
Local_name will become:
“Encore 3 16314A”
Authentcation PIN will change.
bluetooth.local_name
type: getvar
This parameter is the local name that will be provided
during service discovery. It is a combination of the printer
model name and the friendly_name
getvar result
Example
Returns the printer’s name.
Description Get printers local name.
Syntax
! U1 getvar “bluetooth.local_name”
Result
“Encore3 XXEN02-01-0317”
continued on next page
Mobile Printer CPCLProgramming Manual
P14-9
bluetooth.version
type: getvar
This parameter is the Bluetooth library version number.
getvar result
Example
P14-10
Bluetooth module version in the format “x.y.z”
Description Get Bluetooth module version.
Syntax
! U1 getvar “Bluetooth.version”
Result
“1.1.0”
Mobile Printer CPCLProgramming Manual
Comm Port Parameters
comm.parity
type: getvar; setvar
This parameter refers to the printer’s comm. parity.
Note: Once the printer’s communications port parameters have been changed,
the host terminal must also be configured to match the new printer settings
before the host can communicate again.
getvar result
Example
setvar choices
Example
Printer’s comm. port parity. See setvar choices for
possible values.
Description Get printer’s comm. parity setting.
Syntax
! U1 getvar “comm.parity”
Result
“n”
“n” (none), “e”even), and “o”(odd)
Default
“n”
Description Set printer’s comm. port parity to
None (no parity).
Syntax
! U1 setvar “comm.parity” “n”
Result
Printer will change its comm. port’s
parity to None.
comm.baud
type: getvar; setvar
This parameter refers to the printer’s comm (cable) baud
rate.
Note: Once the printer’s comm. port parameters have been changed, the host
terminal must also be configured to match the new printer settings before the
host can communicate again
getvar result
Example
setvar choices
Example
Printer baud rate.
Description Get printer’s comm.
port baud rate
Syntax
! U1 getvar “comm.baud”
Result
“19200”
“9600”, “19200”, “38400”, “57600”, “115200”
Default
“19200”
Description Set printer’s comm. baud rate
to 19200 BPS.
Syntax
! U1 setvar “comm.baud” “19200”
Result
Printer will change its comm. baud
rate to 19200 BPS.
continued on next page
Mobile Printer CPCLProgramming Manual
P14-11
comm.stop_bits
type: getvar; setvar
This parameter refers to the printer’s comm. port stop
bits.
Note: Once the printer’s comm. port parameters have been changed, the host
terminal must also be configured to match the new printer settings before the
host can communicate again
getvar result
Example
setvar choices
Example
to
Stop bits.
Description
Syntax
Result
“1”, “2”
Default
Description
Syntax
Result
P14-12
Get printer’s comm. port stop bits.
! U1 getvar “comm.stop_bits”
“1”
“1”
Set printer’s comm. port stop bits
1.
! U1 setvar “comm.stop_bits” “1”
Printer will configure the comm.
port for 1 stop bit.
Mobile Printer CPCLProgramming Manual
Device Parameters
device.friendly_name
type: getvar;setvar
This parameter refers to the device’s friendly name. The
printer will report its serial number as friendly name if a
name has not been assigned to it yet.
getvar result
Example
setvar choices
Example
The friendly name assigned to the printer.
Description Retrieve the current friendly name
of the printer.
Syntax
! U1 getvar”device.friendly_name”
Result
Printer will respond with the current
friendly name, for example:
“XXQT02-02-0555”.
A string of up to 16 characters enclosed in double
quotes.
Default
Printer’s serial number enclosed in
double quotes.
Description Assign “station 2” to the printer as
its friendly name.
Syntax
! U1 setvar “device.friendly_name”
“station 2”
Result
The printer friendly name will be
changed to “station 2”
continued on next page
Mobile Printer CPCLProgramming Manual
P14-13
device.languages
type: getvar; setvar
NOTE: This command is only valid with RW & QL Plus series (SH3 based)
printers.
This parameter sets the programming language recognized by the printer. (Refer to the programming languages topics in Section 1 for more information) Please
note that CPCL is ALWAYS active and that line_print is
ONLY active when selected.
getvar result
Example
setvar choices
Example
The programming language currently used by the
printer.
Description Retrieve the current programming
language used by the printer.
Syntax
! U1 getva r”device.languages”
Result
Printer will respond with the current
language in use, for example:”ZPL”.
EPL, ZPL, epl_zpl, line_print
Default
line_print
Description Set language to ZPL
Syntax
! U1 setvar “device.languages”
“ZPL”
Result
programming language set to ZPL
device.reset
type: do
Instructs the printer to perform a soft reset.
do parameters
Example
P14-14
None
Description
Syntax
Result
Perform a soft reset.
! U1 do “device.reset” “”
The printer will perform a soft
reset.
Mobile Printer CPCLProgramming Manual
device.restore_defaults
type: do
Instructs the printer to restore factory default values for
the specified category of parameters.
do parameters
Example
Printer parameter category: “wlan”, “ip”, “display”,
or “power”.
Description Restore the network card’s wlan
parameters to their default values.
Syntax
! U1 do “device.restore_defaults”
“wlan”
Result
Printer will restore “wlan” parameters to their factory default values
(eSSID = “247”, etc)
Mobile Printer CPCLProgramming Manual
P14-15
Display Parameters
display.contrast
type: getvar; setvar
This parameter refers to the contrast level on the printer’s
display. (Valid only on printers with an optional display installed)
getvar result
Example
setvar choices
Example
Display’s contrast level, “0” through “14”
Description Get the current display contrast
level.
Syntax
! U1 getvar “display.contrast”
Result
“7”
“0” through “14”, “up”, “down”
Default
“7”
Description Set display contrast level to 8
Syntax
! U1 setvar “display.contrast” “8”
Result
Printer will set the display contrast
to 8.
display.backlight
type: getvar; setvar
This parameter refers to the printer display backlight.
getvar result
Example
setvar choices
Example
State of backlight control, “on” or “off”
Description Get current backlight setting.
Syntax
! U1 getvar “display.backlight”
Result
“on”
“on”, “off”
Default
“on”
Description Turn backlight off.
Syntax
! U1 setvar “display.backlight” “off”
Result
Printer will turn display backlight
off.
continued on next page
P14-16
Mobile Printer CPCLProgramming Manual
display.text
type: getvar; setvar
This parameter refers to the display’s text content. The
display text size is four lines of text, 20 characters per
line.
getvar result
Example
setvar choices
Example
The text currently displayed on the printer.
Description Get the current text displayed.
Syntax
! U1 getvar “display.text”
Result
“Zebra QL 320 “
Text to be displayed. The tab character will move
text position to next line. Specifying more than 80
characters will result in text to wrap.
Default
“Zebra” followed by printer model
e.g. “QL 320”
Description Change the displayed text
Syntax
! U1 setvar “display.text” “Please
pickup the printed SKU list and
bring to customer service desk.”.
Result
Printer will display “Please pickup
the printed SKU list and bring to
customer service desk.”.
Mobile Printer CPCLProgramming Manual
P14-17
File Parameters
file.delete
type: do
This command can be used to delete printer files.
Please exercise caution when deleting files and insure factory installed files
are not deleted.
do parameters
Example
Name of file to be deleted.
Description This command instructs the printer
to delete a specified file.
Syntax
! U1 do “file.delete” “abcd.cpf”
Result
Deletes abcd.cpf from the printer.
file.dir
type: getvar
This parameter refers to the printer file directory.
getvar result
Example
Printer directory.
Description Get printer file directory.
Syntax
! U1 getvar “file.dir”
Result
Directory
INDEX .WML
631
CONFIG .SYS
19
1793000 Bytes Free
“ok”
file.print
type: do
This command can be used to print the contents of
printer files.
do parameters
Example
File name.
Description
Syntax
Result
This command instructs the printer
to print the contents of the file
called config.sys.
! U1 do “file.print” “config.sys”
Contents of the config.sys file will
be printed.
continued on next page
P14-18
Mobile Printer CPCLProgramming Manual
file.rename
type: do
This command can be used to rename printer files.
do parameters
Example
Original filename and new filename
Description Rename file abc.cpf to efg.cpf.
Syntax
! U1 do “file.rename” “abc.cpf
efg.cpf”
Result
File abc.cpf will be renamed to
efg.cpf.
file.run
type: do
This command can be used to execute a batch file or label file stored in the printer’s file system.
do parameters
Example
File to execute
Description This command instructs the printer
to execute the file called ftn.bat.
Syntax
! U1 do “file.run” “ftn.bat”
Result
The file ftn.bat will be executed.
file.type
type: do
This command can be used to retrieve contents of a file.
do parameters
Example
Filename to display contents
Description This command instructs the printer
to respond with the contents of the
file called config.sys.
Syntax
! U1 do “file.type” “config.sys”
Result
!U
BEEP 2
PRINT
Mobile Printer CPCLProgramming Manual
P14-19
Printer Mechanism Parameters
head.latch
type: getvar
This parameter refers to the status of the printer head
latch. The head latch must be closed for printing.
getvar result
Example
“ok”, “open”
Description
Syntax
Result
Get current status of printhead
latch.
! U1 getvar “head.latch”
“ok”
media.width_sense.enable
getvar; setvar
This parameter turns the Media Width Sensing option
“on” or “off”. This parameter only applies to printers
equipped with the Media Width Sensing option, other s
will ignore this command.
getvar result
Example
“on”, “off”
Description
Syntax
setvar choices
Example
Result
on,off
Default
Description
Syntax
Result
Get current status of media width
sensing option
! U1 getvar
“media.width_sense.enable”
“on’
off
Change the media widt hsense enable status
! U1 setvar
“media.width_sense.enable” “on”
Media width sensing is enabled
continued on next page
P14-20
Mobile Printer CPCLProgramming Manual
media.width_sense.in_mm
getvar
This parameter returns the current media width installed
in the printer measured in millimeters. The
“media.width_sense.enable” parameter must be set to
“on”.
Note: The media width sensing mechanism has a tolerance of ± 2.5 mm
getvar result
Example
Media width as measured in millmeters
Description Get width of installed media
Syntax
! U1 getvar
“media.width_sense.in_mm”
Result
104.0
media.width_sense.in_cm
getvar
This parameter returns the current media width installed
in the printer measured in centimeters. The
“media.width_sense.enable” parameter must be set to
“on”.
Note: The media width sensing mechanism has a tolerance of ± .25 cm
getvar result
Example
Media width as measured in centimeters
Description Get width of installed media
Syntax
! U1 getvar
“media.width_sense.in_cm”
Result
10.4
Mobile Printer CPCLProgramming Manual
P14-21
media.width_sense.in_dots
getvar
This parameter returns the current media width installed
in the printer measured in dots. The
“media.width_sense.enable” parameter must be set to
“on”.
Note: The media width sensing mechanism has a tolerance of ± 21 dots (at the
standard resolution of 200 d.p.i.)
getvar result
Example
Media width as measured in dots
Description Get width of installed media
Syntax
! U1 getvar
“media.width_sense.in_dots”
Result
832
media.width_sense.in_inches
getvar
This parameter returns the current media width installed in the
printer measured in inches. The “media.width_sense.enable”
parameter must be set to “on”.
Note: The media width sensing mechanism has a tolerance of ± .1”.
getvar result
Example
P14-22
Media width as measured in inches
Description Get width of installed media
Syntax
! U1 getvar
“media.width_sense.in_inches”
Result
4.098
Mobile Printer CPCLProgramming Manual
Input Parameter
input.capture
getvar;setvar
This parameter allows capturing input data in diagnostics
mode. Input capture has three modes: "print", "run", and
"off". The "print" and "run" modes can be used to examine data received by the printer.
When in "print" mode the printer will save incoming data
to files named “in???.dmp”, where ??? is a number between 001 to 999. The printer will then print the text and
hexadecimal representation of data bytes received.
When in "run" mode the printer will save captured incoming data to files as above, but will otherwise run the incoming data/commands normally.
The capture files should be deleted from printer memory
after retrieving them. Leaving the printer in "print" or "run"
mode and not deleting the capture files will reduce the
printer's available flash memory.
The "off" mode is the printer's normal operating mode.
Cycling power will also return the printer to "off" mode.
continued on next page
Mobile Printer CPCLProgramming Manual
P14-23
getvar result
Example
mode
setvar choices
Default
Example 1
Example 2
P14-24
The current input capture mode.
Description Get current staus of input capture
Syntax
! U1 getvar “input.capture”
Result
“off”
"print", "run", "off"
"off"
Description Place the printer in
"print" input capture mode.
Syntax
! U1 setvar "input.capture" "print"
Result
Printer will enter diagnostics cap–
ture mode. Any data received by
the printer will be saved to files
named “in???.dmp” The data’s text
& hexadecimal representation will
be printed.
Description Place the printer in "run" input capture mode.
Syntax
! U1 setvar "input.capture" "run"
Result
Printer will enter diagnostics capture mode. Any data received by
the printer will be saved to files
named “in???.dmp” prior to being
processed by the printer.
Mobile Printer CPCLProgramming Manual
Media Parameters
media.sense_mode
type: getvar; setvar
This parameter refers to media sense mode.
getvar result
Example
setvar choices
Example
Media sense mode.
Description Get current media sense mode.
Syntax
! U1 getvar “media.sense_mode”
Result
“bar”
“bar”, “gap”
Default
“bar”
Description Set media sense mode to bar
(black index mark).
Syntax
! U1 setvar “media.sense_mode”
“bar”
Result
Printer will switch to bar sense
mode.
media.status
type: getvar
This parameter refers to the paper status.
getvar result
Example
“ok”, “out”
Description
Syntax
Result
Get current media status.
! U1 getvar “media.status”
“ok”
Mobile Printer CPCLProgramming Manual
P14-25
media.tof
type: getvar; setvar
This parameter refers to the print’s top-of-form setting.
The TOF setting is used to program the distance between
the top-of-form and the end of the next (positive value) or
previous (negative value) eye-sense mark or gap. The
eye-sense-mark or gap that is closer to the top-of form
should be used for top-of-form setting. Refer to the SETTOF command in Section 9 for more detailed information
on the TOF setting.
getvar result
Example
setvar choices
Example
Current top-of-form setting.
Description Get current top-of-form setting
Syntax
! U1 getvar “media.tof”
Result
“0”
“0” through “119”
Default
“119”
Description This parameter sets the printer’s
top of form.
Syntax
! U1 setvar “media.tof” “119”
Result
Printer will set top-of-form to 119.
continued on next page
P14-26
Mobile Printer CPCLProgramming Manual
media.type
type: getvar; setvar
This parameter refers to the media type that is being
used.
By default, the printer will check for correct media alignment if it encounters the eyesense mark (black horizontal bars on back of media) during a print cycle (LABEL
mode). The JOURNAL command can be used to disable this automatic correction
feature. The user’s program is responsible for checking and assuring presence of
paper when the printer is set to JOURNAL mode. Please refer to the status inquiry
command (Get Extended Printer Status) for details on checking for out-of-paper
condition.
getvar result
Example
setvar choices
Example
Current media type.
Description Get current media type.
Syntax
! U1 getvar “media.type”
Result
“label”
“label”, “journal”
Default
“label”
Description Set media type to journal.
Syntax
! U1 setvar “media.type” “journal”
Result
Printer will set media type to
journal.
Mobile Printer CPCLProgramming Manual
P14-27
Memory Parameters
memory.flash_size
type: getvar
This parameter refers to the total amount of Flash
memory.
getvar result
Example
Flash memory size.
Description Get Flash memory size.
Syntax
! U1 getvar “memory.flash_size”
Result
“2097151 Bytes”
memory.flash_free
type: getvar
This parameter refers to the amount of available Flash
memory.
getvar result
Example
Flash memory available.
Description Get current availably Flash
memory.
Syntax
! U1 getvar “memory.flash_free”
Result
“1345000 Bytes Free”
memory.ram_size
type: getvar
This parameter refers to the total amount of Random Access Memory.
getvar result
Example
RAM size.
Description
Syntax
Result
Get RAM size.
! U1 getvar “memory.ram_size”
“2097151 Bytes”
memory.ram_free
type: getvar
This parameter refers to the amount of available RAM.
getvar result
Example
P14-28
Available RAM.
Description Get current availably RAM.
Syntax
! U1 getvar “memory.ram_free”
Result
“456000 Bytes Free”
Mobile Printer CPCLProgramming Manual
Odometer Parameters
odometer.label_dot_length
type: getvar
Reports the length of the last label printed (or fed), in
dots. The label dot-length is set to zero when the printer
is turned on. This parameter is updated every time the
printer feeds or prints a label and detects a marker, either
gap or bar, while printing or feeding.
getvar result
Example
This will return the length of the last label
printed (in dots)
Description This command instructs the printer
to respond with the length of the
last label printed.
Syntax
! U1 getvar
“odometer.label_dot_length”
Result
“416”
Mobile Printer CPCLProgramming Manual
P14-29
odometer.latch_open_count
type: getvar; setvar
This parameter refers to the number of times the printer’s
latch has been opened. The latch open count can be set
to an initial value and incremented every time the latch is
opened. Typically the latch is opened each time a roll of
media is loaded.
getvar result
Example
setvar choices
Example
P14-30
This will return the number of times the printer’s
latch has been opened
Description This command instructs the printer
to respond with the latch_open
count.
Syntax
! U1 getvar
“odometer.latch_open_count”
Result
“100”
“0” - “65535”
Default
“0”
Description This command instructs the printer
to set the latch_open count to “0”.
Syntax
! U1 setvar
“odometer.latch_open_count” “0”
Result
The user latch open count odometer will be set to 0.
Mobile Printer CPCLProgramming Manual
odometer.media_marker_count
type: getvar; setvar
This parameter refers to the media marker count. The
media marker counter keeps track of how many labels
have passed through the printer, (if they have been
printed or not) by counting the bar sense marks on the
back of the media. (Contrast this to the
“odometer.user_label_count parameter below.) The media marker count can be set to an initial value and is
incremented every time a label is printed or fed.
getvar result
Example
setvar choices
Example
This will return the number of bar sense marks
that have passed through the printer
Description This command instructs the printer
to respond with the media marker
count.
Syntax
! U1 getvar
“odometer.media_marker_count”
Result
“105”
“0” - “65535”
Default
“0”
Description This command instructs the printer
to set the media marker count to 0.
Syntax
! U1 setvar
“odometer.media_marker_count”
“0”
Result
The media marker count odometer
will be set to 0.
Mobile Printer CPCLProgramming Manual
P14-31
odometer.user_label_count
type: getvar; setvar
This parameter refers to the user label count. The user
label counter keeps track of how many labels have been
printed.since the last re-set of the counter. The user’s label count can be set to an initial value and incremented
every time a label is printed.
Note the difference from this command to the
”odometer.media_marker_count” parameter above.
getvar result
Example
setvar choices
Example
P14-32
This will return the number of labels printed by
the printer
Description This command instructs the printer
to respond with the user label
count.
Syntax
! U1 getvar
“odometer.user_label_count”
Result “100”
“0” - “65000”
Default
“0”
Description This command instructs the printer
to set the user label count to 0.
Syntax
! U1 setvar
“odometer.user_label_count” “0”
Result
The user label count odometer will
be set to 0.
Mobile Printer CPCLProgramming Manual
Power Parameters
power.ascii_graph
type: getvar
This parameter refers to the battery status depicted by
ASCII graphics characters.
getvar result
Example
The battery graph, represented by ASCII graphics
characters.
Description Get current battery status graph.
Syntax
! U1 getvar “power.ascii_graph”
Result
power.dtr_power_off
type: getvar; setvar
This parameter refers to the remote printer power control.
DTR power off is used for power management. When
DTR is enabled the printer can be powered on and off via
the DSR signal. When DTR-power off is enabled, a low to
high transition will cause the printer to turn ON and a high
to low transition will cause the printer to turn OFF. The
printer will stay ON as long as DSR is high unless it
reaches low battery shutdown or receives a command to
shut down.
NOTE: The inactivity time-out is disabled while DSR is active.
getvar result
Example
setvar choices
Example
Current DTR power-off setting.
Description Get current DTR power-off setting.
Syntax
! U1 getvar “power.dtr_power_off”
Result
“on”
“on”, “off”
Default
“on”
Description Enable DTR power-off.
Syntax
! U1 setvar “power.dtr_power_off”
“on”
Result
Printer will enable DTR power-off.
Mobile Printer CPCLProgramming Manual
P14-33
power.inactivity_timeout
type: getvar; setvar
This parameter refers to the inactivity timeout.
getvar result
Example
setvar choices
Example
Current inactivity timeout in seconds.
Description Instructs the printer to respond with
the inactivity timeout value.
Syntax
! U1 getvar
“power.inactivity_timeout”
Result
“120 Seconds”
“0” through “65535”. Values are specified in
seconds. A value of “0” disables inactivity timeout.
Default
“120”
Description Set inactivity timeout to 120
seconds.
Syntax
! U1 setvar “power.inactivity_timeout”
“120”
Result
Printer inactivity timeout will be set
to 120 seconds.
power.low_battery_timeout
type: getvar; setvar
This parameter refers to the low battery timeout. When
the printer reaches the low battery state this timeout will
become active. The printer will shut down after the specified low battery time out
getvar result
Example
setvar choices
Example
P14-34
Current low-battery timeout in seconds.
Description Get current low-battery timeout.
Syntax
! U1 getvar
“power.low_battery_timeout”
Result
“60”
“0” through “65535”. Values are specified in
seconds. A value of “0” disables low-battery
timeout.
Default
“60”
Description Set low-battery timeout to 60
seconds.
Syntax
! U1 setvar
“power.low_battery_timeout” “60”
Result
Printer low-battery timeout will be
set to 60.
Mobile Printer CPCLProgramming Manual
power.low_battery_shutdown
type: getvar
This parameter refers to the low battery shutdown level.
getvar result
Example
Current low-battery shutdown level in volts.
Description Get current low-battery shutdown
level.
Syntax
! U1 getvar
“power.low_battery_shutdown”
Result
“6.47(166)”
power.low_battery_warning
type: getvar
This parameter refers to the low battery warning level.
getvar result
Example
Current low-battery warning level in volts.
Description Get current low-battery warning
level.
Syntax
! U1 getvar
“power.low_battery_warning”
Result
“6.86(176)”
power.percent_full
type: getvar
This parameter refers to the battery status.
getvar result
Example
Battery status as percent full.
Description Get current battery status.
Syntax
! U1 getvar “power.percent_full”
Result
“ 43% Full”
power.status
type: getvar
This parameter refers to the battery status.
getvar result
Example
“ok”, “low”
Description
Syntax
Result
Get current battery status.
! U1 getvar “power.status”
“ok”
continued on next page
Mobile Printer CPCLProgramming Manual
P14-35
power.voltage
type: getvar
This parameter refers to the battery voltage.
getvar result
Example
P14-36
Battery voltage.
Description Get current battery voltage.
Syntax
! U1 getvar “power.voltage”
Result
“7.25”
Mobile Printer CPCLProgramming Manual
Test Function Parameters
test.feed
type: do
This command can be used to advance media to top-ofform.
do parameters
Example
None.
Description
Syntax
Result
Perform form feed.
! U1 do “test.feed” “”
Printer will advance to top-of-form.
test.print_diags
type: do
This command can be used to print a diagnostics report.
do parameters
Example
None.
Description
Syntax
Result
Print diagnostics report.
! U1 do “test.print_diags” “”
Printer will print a diagnostics
report.
test.report_diags
type: do
This command can be used to retrieve a diagnostics report from the printer.
do parameters
Example
None.
Description
Syntax
Result
Retrieve diagnostics report.
! U1 do “test.report_diags” “”
Zebra QL 320 V79.40 02/01/02
CHK FFFF
...
...
End of report.
Mobile Printer CPCLProgramming Manual
P14-37
Networking Parameters
The following parameter names can be used only with
the network application versions 40 and above. Any
changes made using the setvar command will not take
effect until the printer’s power has been cycled or the
device.reset command is issued.
card.mac_addr
type: getvar
This parameter refers to the MAC address of the network
card.
getvar result
Example
MAC address of the printer
Description This parameter instructs the printer
to respond with the MAC address.
Syntax
! U1 getvar “card.mac_addr”
Result
“00A0F83AA589”
ip.addr
type: getvar; setvar
This parameter refers to the IP address of the printer. The
DHCP setting (“ip.dhcp.enable” parameter) must be “off”
to change the printer’s IP address.
getvar result
Example
setvar choices
Example
The printer’s IP address
Description Instructs the printer
to respond with its current IP
address
Syntax
! U1 getvar “ip.addr”
Result
“10.14.4.159”
Any valid IP address
Default
0.0.0.0
Description Instructs the printer to change its
IP address to 10.14.4.235.
Syntax
! U1 setvar “ip.addr” “10.14.4.235”
Result
The IP address will
change to 10.14.4.235 upon
cycling the power or issuing the
device.reset
continued on next page
P14-38
Mobile Printer CPCLProgramming Manual
ip.bootp.enable
type: getvar; setvar
This parameter will turn BOOTP on or off. BOOTP is a
method for acquiring an IP address, netmask, and gateway automatically on printer power-up. It requires a
BOOTP server on the local network.
If you are using static ip addressing, BOOTP must be
"off".
NOTE: It is not recommended that BOOTP and DHCP both be enabled at the
same time since this may increase the printer power-up initialization time. If
both BOOTP and DHCP are enabled at the same time, the printer will first try
BOOTP and if it does not receive a response after several seconds, it will then
try DHCP. You should contact your network administrator to determine
whether your network supports either BOOTP or DHCP and enable only the
proper parameter on the printer.
getvar result
Example
setvar choices
Example
The current BOOTP setting.
Description Instructs the printer to respond with
the current BOOTP setting.
Syntax
! U1 “getvar” “ip.bootp enable”
Result
“off”
“on” – Printer will use BOOTP to get its IP information on startup.
“off” – Printer will not use BOOTP.
Default
“off”
Description Turn the BOOTP feature on
Syntax
! U1 setvar “ip.bootp.enable” “on”
Result
On power-up, the printer will use
the BOOTP protocol to receive its
IP settings from a network server.
Mobile Printer CPCLProgramming Manual
P14-39
ip.dhcp.enable
type: getvar; setvar
This parameter refers to DHCP setting. DHCP must be
set to “off” before setting a static IP address.
NOTE: It is not recommended that BOOTP and DHCP both be enabled at the
same time since this may increase the printer power-up initialization time. If
both BOOTP and DHCP are enabled at the same time, the printer will first try
BOOTP and if it does not receive a response after several seconds, it will then
try DHCP. You should contact your network administrator to determine
whether your network supports either BOOTP or DHCP and enable only the
proper parameter on the printer.
getvar result
Example
setvar choices
Example
P14-40
The printer printer’s DHCP status (on or off)
Description This command instructs the printer
to respond with DHCP setting.
Syntax
! U1 getvar “ip.dhcp.enable”
Result
“on”
“on”, “off”
Default “on”
Description This command instructs the printer
to enable DHCP
Syntax
! U1 setvar “ip.dhcp.enable” “off”
Result
The printer’s DHCP will be off upon
cycling printer power or issuing the
device.reset
Mobile Printer CPCLProgramming Manual
ip.dhcp.cid_prefix
type: getvar; setvar
This parameter defines the prefix to be prepended to the
DHCP client identifier (option 61) when DHCP is enabled
and “ip.dhcp.cid_type” is set to “0”.
NOTE: This parameter is only applicable if “ip.dhcp.enable” is set to “on”.
getvar result
Example
setvar choices
Example
The current client identifier prefix.
Description This command instructs the printer
to respond with the client identifier
prefix.
Syntax
! U1 getvar “ip.dhcp.cid_prefix”
Result
“”
Any text string up to 10 characters in length
Default
“”
Description Change CID prefix to “ZEB”.
Syntax
! U1 setvar “ip.dhcp.cid_prefix”
“ZEB”
Result
The next time the printer sends a
DHCP request, if “ip.dhcp.cid_type”
is “0”, the client identifier sent will
be prefixed with the string “ZEB”.
e.g., if “ip.dhcp.cid_value” is
“PRT001”, the actual client identifier sent will be “ZEBPRT001”.
continued on next page
Mobile Printer CPCLProgramming Manual
P14-41
ip.dhcp.cid_type
type: getvar; setvar
This parameter defines the type of Client Identifier (option
61) that will be sent if DHCP is enabled. A value of “1”
means the type is “Ethernet” and the printer’s MAC address will be used. A value of “0” means the type is “synthetic” and the client identifier sent will be
“ip.dhcp.cid_prefix” concatenated with
“ip.dhcp.cid_value”.
NOTE: This parameter is only applicable if “ip.dhcp.enable” is set to “on”.
getvar result
Example
setvar choices
Example
P14-42
The current Client Identifier type to be used with
DHCP.
Description This command instructs the printer
to respond with the client identifier
type.
Syntax
! U1 getvar “ip.dhcp.cid_type”
Result
“1”
• “0”: synthetic string
• “1”: use printer’s MAC address
Default
“1”
Description Enable “synthetic” Client Identifier.
Syntax
! U1 setvar “ip.dhcp.cid_type” “0”
Result
The next time the printer is pow
ered-on and DHCP is enabled, the
Client Identifier (option 61) sent will
be a “synthetic” type.
Mobile Printer CPCLProgramming Manual
ip.dhcp.cid_value
type: getvar; setvar
This parameter defines the unique value to be used as
the client identifier (option 61) if DHCP is enabled and
“ip.dhcp.cid_type” is “1”.
NOTE: This parameter is only applicable if “ip.dhcp.enable” is set to “on”.
getvar result
Example
setvar choices
Example
The current client identifier value.
Description This command instructs the printer
to respond with the client identifier
value.
Syntax
! U1 getvar “ip.dhcp.cid_value”
Result
“_”
Any text string up to 20 characters in length
Default
• If “ip.dhcp.cid_type” is “0” - the
default is the printer’s friendly
name (see “device.friendly_name”)
• If “ip.dhcp.cid_type” is “1” - the
default is the printer’s MAC address
Description Change CID value to “PRT001”.
Syntax
! U1 setvar “ip.dhcp.cid_value”
“PRT001”
Result
The next time the printer sends a
DHCP request, if “ip.dhcp.cid_type”
is “0”, the client identifier sent will
be “ip.dhcp.cid_prefix” plus
“PRT001”
e.g., if “ip.dhcp.cid_prefix” is “ZEB”,
the actual client identifier sent will
be “ZEBPRT001”.
continued on next page
Mobile Printer CPCLProgramming Manual
P14-43
ip.ftp.enable
type: getvar; setvar
This parameter refers to the FTP protocol setting.
getvar result
Example
setvar choices
Example
Returns printer’s FTP status (on or off)
Description This command instructs the printer
to respond with the FTP setting.
Syntax
! U1 getvar “ip.ftp.enable”
Result
“on”
“on”, “off”
Default
“on”
Description This command instructs the printer
to disable FTP.
Syntax
! U1 setvar “ip.ftp.enable” “off”
Result
FTP service will be disabled upon
cycling the power or issuing the
device.reset
ip.gateway
type: getvar; setvar
This parameter refers to the gateway address. This value
is ignored if DHCP is enabled.
getvar result
Example
setvar choices
Example
P14-44
This will return the gateway setting in the printer.
Description
This command instructs the printer
to respond with the gateway
address.
Syntax
! U1 getvar “ip.gateway”
Result
“10.19.5.1”
Any valid gateway address.
Default
“0.0.0.0”
Description This command instructs the printer
to change the gateway address to
38.10.4.1
Syntax
! U1 setvar “ip.gateway” “38.10.4.1”
Result
This will set the gateway address
to 38.10.4.1 upon cycling the
power or issuing the device.reset.
Mobile Printer CPCLProgramming Manual
ip.http.enable
type: getvar; setvar
This parameter refers to the HTTP protocol / web sever
setting.
getvar result
Example
setvar choices
Example
This will return the HTTP protocol status. (on or
off)
Description This command instructs the printer
to respond with the HTTP setting.
Syntax
! U1 getvar “ip.http.enable”
Result
“on”
“on”, “off”
Default
“on”
Description This command instructs the printer
to enable the HTTP protocol.
Syntax
! U1 setvar “ip.http.enable” “on”
Result
The HTTP protocol will be turned
on upon cycling the power or
issuing the device.reset.
ip.lpd.enable
type: getvar; setvar
This parameter refers to the LPD protocol setting.
LPD communications from the host should be directed to
port 515.
getvar result
Example
setvar choices
Example
This will return the LPD protocol status. (on or off)
Description This command instructs the printer
to respond with the LPD value.
Syntax
! U1 getvar “ip.lpd.enable”
Result
“on”
“on”, “off”
Default
“on”
Description This command instructs the printer
to enable the LPD protocol.
Syntax
! U1 setvar “ip.lpd.enable” “on”
Result
The LPD protocol will be turned on
upon cycling the power or issuing
the device.reset.
continued on next page
Mobile Printer CPCLProgramming Manual
P14-45
ip.netmask
type: getvar; setvar
This parameter refers to the subnet mask address. This
value is ignored if DHCP is enabled.
getvar result
Example
setvar choices
Example
This will return the printer’s subnet mask.
Description This command instructs the printer
to respond with the subnet mask.
Syntax
! U1 getvar “ip.netmask”
Result
“255.255.255.0”
Any valid netmask.
Default
“255.255.255.0”
Description This command instructs the printer
to change the subnet mask to
255.255.0.0.
Syntax
! U1 setvar “ip.netmask”
“255.255.0.0”
Result
The subnet mask will be set to
255.255.0.0 upon cycling the
power or issuing the device.reset.
ip.ping_remote
type: do
This parameter directs the printer to ping a specified address “x” number of times. The address to be pinged is
set by setvar ip.remote.
do parameters
Example
P14-46
ip address; number of times to ping
Description This command instructs the printer
to ping the address set by the
ip.remote parameter ten times,
Syntax
! U1 do “ip.ping_remote “10”
Result
Printer creates a report similar to
the following:
Pinging 10.14.4.162 10 times
Results: 10 of 10 succeeded
Min:20 Max:40 Avg:22
(min/max times in mSec.)
Mobile Printer CPCLProgramming Manual
ip.pop3.enable
type: getvar; setvar
This parameter refers to whether the printer will query a
POP3 mailbox for mail.
getvar result
Example
setvar choices
Example
This will return the POP3 enable status (on or off)
Description This command instructs the printer
to respond with the POP3 setting
Syntax
! U1 getvar “ip.pop3.enable”
Result
“on”
“on”, “off”
Default
“off”
Description This command instructs the printer
to disable the POP3 querying.
Syntax
! U1 setvar “ip.pop3.enable” “on”
Result
This will turn on the POP3 querying upon cycling the power or
issuing the device.reset.
ip.pop3.password
type: getvar; setvar
This parameter refers to the POP3 mailbox password .
This only applies if ip.pop3.enable is set to “on”.
getvar result
Example
setvar choices
Example
Returns the POP3 password set in the printer.
Description Instructs the printer to respond with
the POP3 password value
Syntax
! U1 getvar “ip.pop3.password”
Result
“password”
Text string up to 19 characters in length
Default
“password”
Description Instructs the printer to change the
POP3 password.
Syntax
! U1 setvar “ip.pop3.username”
“new_password”
Result
Changes the password to
new_password. This change will
take effect upon cycling the power
or issuing the device.reset.
continued on next page
Mobile Printer CPCLProgramming Manual
P14-47
ip.pop3.poll
type: getvar; setvar
This parameter refers to the frequency (in seconds) that
the printer will query a POP3 mailbox for new mail. This
only applies if the ip.pop3.enable is set to “on”.
NOTE: A poll value of less then thirty seconds is not recommended. The
printer is unresponsive for several seconds when polling for email depending
on data transfer time from the server to the printer.
get var results
Example
set var choices
Example
P14-48
This will return the poll frequency in seconds
Description This command instructs the printer
to respond with the POP3 poll frequency (in seconds).
Syntax
! U1 getvar “ip.pop3.poll”
Result
“240”
“0” through “65535” A value of “0” will cause the
printer to only query the POP3 mailbox once on
printer power up.
Default
“240”
Description This command instructs the printer
to poll the POP3 mailbox every four
minutes.
Syntax
! U1 setvar “ip.pop3.poll” “240”
Result
This will set the pop3 polling fre
quency to 240 seconds (4 minutes).
Mobile Printer CPCLProgramming Manual
ip.pop3.print_body
type: getvar; setvar
This parameter refers to whether the email body will be
printed when the email is retrieved via POP3. This only
applies if the ip.pop3.enable is set to on.
getvar result
Example
set var choices
Example
Returns the pop3 print body status (on or off)
Description Instructs the printer to respond
whether or not the it will print the
body of email retrieved via POP3.
Syntax
! U1 getvar “ip.pop3.print_body”
Result
“on”
“on”, “off”
Default
“Off”
Description Instructs the printer
not to print the body of the email
retrieved via POP3.
Syntax
! U1 setvar “ip.pop3.print_body”
“off”
Result
Turns off the pop3 print body parameter.
ip.pop3.print_headers
type: getvar; setvar
This parameter refers to whether the headers (From,
Date, and Subject fields) of the email are to be printed.
This only applies if the ip.pop3.enable is set to “on”.
getvar result
Example
setvar choices
Example
Returns the status of the pop3 printheaders (on
or off).
Description Instructs the printer to respond with
the POP3 print_headers value.
Syntax
! U1 getvar
“ip.pop3.print_headers”
Result
“off”
“on”, “off”
Default
“off”
Description Instructs the printer to enable the
POP3 print_headers.
Syntax
! U1 setvar “ip.pop3.print_headers”
“on”
Result
Turns the pop3 printheaders on.
Mobile Printer CPCLProgramming Manual
P14-49
ip.pop3.save_attachments
type: getvar; setvar
This parameter refers to whether email attachments are
to be saved to the flash file system in the printer. This
only applies if the ip.pop3.enable is set to on.
Note: attachment file names will be truncated to 11 characters (8 characters,
with a 3-character extension.)
getvar result
Example
setvar choices
Example
This will return the pop3 save attachments status
(on or off)
Description This command instructs the printer
to respond with the POP3 save attachments value
Syntax
! U1 getvar
“ip.pop3.save_attachments”
Result
“off”
“on”, “off”
Default
“on”
Description This command instructs the printer
to disable POP3 save attachments.
Syntax
! U1 setvar
“ip.pop3.save_attachments” “off”
Result
This will turn the pop3 save attachments off.
ip.pop3.server_addr
type: getvar; setvar
This parameter refers to the POP3 server IP address the
printer contacts when checking for new mail. This only applies if ip.pop3.enable is set to on.
getvar result
Example
setvar choices
Example
P14-50
This will return the POP3 server address setting.
Description Instructs the printer to respond with
the server address.
Syntax
! U1 getvar “ip.pop3.server_addr”
Result
“0.0.0.0”
Any valid POP3 server address
Default
“0.0.0.0”
Description Instructs the printer to change the
POP3 server address to 10.19.3.1.
Syntax
! U1 setvar “ip.pop3.server_addr”
“10.19.3.1”
Result
Sets the POP3 server address to
10.19.3.1
Mobile Printer CPCLProgramming Manual
ip.pop3.username
type: getvar; setvar
This parameter refers to the POP3 username. This only
applies if the ip.pop3.enable is set to on.
getvar result
Example
setvar choices
Example
This command instructs the printer to respond
with the POP3 username value.
Description This command instructs the printer
to respond with the POP3
username value.
Syntax
! U1 getvar “ip.pop3.username”
Result
“user”
Text string up to 19 characters in length
Default
User
Description This command instructs the printer
to change the POP3 username to
user1.
Syntax
! U1 setvar “ip.pop3.username”
“user1”
Result
This will change the pop3
username to user1.
ip.pop3.verbose_headers
type: getvar; setvar
This parameter refers to whether all the email headers of the
email will be printed. This only applies if ip.pop3.enable and
ip.pop3.print_headers are set to “on”.
getvar result
Example
setvar choices
Example
This will return the pop3 verbose headers status
(on or off).
Description This command instructs the printer
to respond with the POP3 verbose
header value.
Syntax
! U1 getvar
“ip.pop3.verbose_headers”
Result
“off”
“on”, “off”
Default
“off”
Description Instructs the printer to enable
POP3 verbose headers.
Syntax !
U1 setvar
“ip.pop3.verbose_headers” “on”
Result
Turns POP3 verbose headers on.
All email headers will be printed.
Mobile Printer CPCLProgramming Manual
P14-51
ip.port
type: getvar; setvar
This parameter refers to the port number that the TCP
and UDP print service is listening on. Normal TCP communications from the host should be directed to this port.
getvar result
Example
setvar choices
Example
Returns current TCP/UDP port setting.
Description Instructs the printer to respond with
the TCP/UDP port number.
Syntax
! U1 getvar “ip.port”
Result
“6101”
“1” -”65535"; excluding 20, 21 (used for FTP), 23
(used for telnet), 80 (used for HTTP), and 515
(used for LPD).
Default
“6101”
Description Instructs the printer to set
the TCP/UDP port number to 6102.
Syntax
! U1 setvar “ip.port” “6102”
Result
Changes the TCP/UDP listening
port to 6102.
ip.remote
type: getvar; setvar
This parameter refers to the remote server address or
name.
getvar result
Example
setvar choices
Example
P14-52
Returns the current remote server address
or name.
Description Instructs the printer to respond with
the currently stored remote server
address or name.
Syntax
! U1 getvar “ip.remote”
Result
“0.0.0.0”
Any IP Address or name up to 39 characters long.
Default
“0.0.0.0”
Description Instructs the printer to change the
remote IP address to 10.14.4.235.
Syntax
! U1 setvar “ip.remote”
“10.14.4.235”
Result
This will change the remote server
to 10.14.4.235.
Mobile Printer CPCLProgramming Manual
ip.remote_autoconnect
type: getvar; setvar
This parameter will determine whether the printer will attempt to automatically initiate a TCP connection to a remote server on power-up. If the parameter "ip.remote"
has a valid server address and "ip.remote_autoconnect"
is set to "on", the printer will initiate a TCP connection to
the address defined by "ip.remote" using the destination
port number defined by "ip.remote_port". If
"ip.remote_autoconnect" is "on", the printer will attempt to
maintain a constant connection to this server address.
Anytime the connection is lost, the printer will attempt to
re-establish the connection to the remote address.
getvar result
Example
setvar choices
Example
The current auto-connect setting
Description Instructs the printer to respond with
the currently stored
“ip.rermote_autoconnect” status
Syntax
! U1 getvar
“ip.remote_autoconnect”
Result
“off”
“on”, “off”
Default
“off”
Description Instructs the printer to change the
Ip.remote_autoconnect status to
“on”.
Syntax
! U1 setvar
“ip.remote_autoconnect” “on”
Result
On power up, the printer will initiate
a TCP socket connection to the
address defined by “ip.remote”,
connecting to the TCP port number
defined by “ip.remote_port.” Anytime the connection is lost, the
printer will automatically attempt to
re-establish it.
continued on next page
Mobile Printer CPCLProgramming Manual
P14-53
ip.remote_port
type: getvar; setvar
This parameter defines the destination TCP port number
to connect to when used in conjuction with
“ip.remote_autoconnect” and “ip.remote” parameters.
getvar result
Example
setvar choices
Example
Returns the current TCP port number.
Description Instructs the printer to respond with
the currently stored TCP Port number.
Syntax
! U1 getvar “ip.remote_port”
Result
“10013”
“0” - “65535”.
Default
“10013”
Description Instructs the printer to change the
TCP port number to “6000”.
Syntax
! U1 setvar “ip.remote”
“6000”
Result
If “ip.remote _autoconnect” is “on”,
the printer will attempt to connect
to TCP port 6000 of the remote
server.
ip.smtp.enable
type: getvar; setvar
This parameter refers to the SMTP protocol.
getvar result
Example
setvar choices
Example
P14-54
This will return the status of the SMTP protocol
(on or off)
Description Instructs the printer to return the
SMTP setting.
Syntax
! U1 getvar “ip.smtp.enable”
Result
“off”
“on”, “off”
Default
On
Description Instructs the printer to enable the
SMTP protocol.
Syntax
! U1 setvar “ip.smtp.enable” “on”
Result
This will turn on the smtp protocol
in the printer.
Mobile Printer CPCLProgramming Manual
ip.smtp.server_addr
type: getvar; setvar
This parameter refers to the IP address of the SMTP
server used for sending email.
getvar result
Example
setvar choices
Example
Returns the IP address of the SMTP server
used for sending email.
Description Instructs the printer to respond with
the current SMTP server address.
Syntax
! U1 getvar “ip.smtp.server_addr”
Result
“0.0.0.0”
Any valid IP address assigned to the SMTP
server.
Default
“0.0.0.0”
Description Instructs the printer to change the
SMTP server address to
10.10.10.10.
Syntax
! U1 setvar “ip.smtp.server_addr”
“10.10.10.10”
Result
Changes the SMTP server
address the printer uses to
send email to 10.10.10.10
ip.snmp.enable
type: getvar; setvar
This parameter refers to the SNMP protocol. Enabling
this parameter will allow the printer to be monitored and
managed remotely via network management programs
supporting SNMP.
getvar result
Example
setvar choices
Example
Returns the SNMP status (on or off).
Description Instructs the printer to respond with
the SNMP setting.
Syntax
! U1 getvar “ip.snmp.enable”
Result
“on”
“on”, “off”
Default
“on”
Description Instructs the printer to disable the
SNMP protocol.
Syntax
! U1 setvar “ip.snmp.enable” “off”
Result
Turns off the SNMP protocol.
continued on next page
Mobile Printer CPCLProgramming Manual
P14-55
ip.snmp.get_community_name
type:getvar; setvar
This parameter is used when making SNMP queries. The
SNMP client must supply the get community name that
matches the printer’s get community name in order to
query any SNMP data.
getvar result
Example
setvar choices
Example
P14-56
Returns the SNMP community name.
Description Instructs the printer to get the
SNMP get community string.
Syntax
! U1 getvar
“ip.snmp_get_community_name”
Result
“public”
Any string up to 20 characters long
Default
“public”
Description Instructs the printer to set the
SNMP set community string.
Syntax
! U1 setvar
“ip.snmp_get_community_name”
“private”
Result
Changes the community name to
“private”.
Mobile Printer CPCLProgramming Manual
ip.snmp.set_community_name
type: getvar; setvar
This parameter is used when changing SNMP data remotely. The SNMP client must supply the set community
name that matches the printer’s set community name in
order to alter any SNMP data.
getvar result
Example
setvar choices
Example
This will return the SNMP set community name
value.
Description This command instructs the printer
to return the printer’s SNMP “set”
community string.
Syntax
! U1 getvar
“ip.snmp.set_community_name”
Result
“private”
Valid values : Any string up to 20 characters
long
Default
“private”
Description This command instructs the printer
to set the SNMP set community
string.
Syntax
! U1 setvar
“ip.snmp_set_community_name”
“private1”
Result
“private1”
continued on next page
Mobile Printer CPCLProgramming Manual
P14-57
ip.snmp.create_mib
type: do
This parameter refers to creating a file of the printer’s
MIB.
do parameters
Example
Filename (NOTE: The filename is up to eight
characters in length with a three-character extension. )
Description This command instructs the
printer to create an SNMP MIB file
based in the current set/get parameters in the printer’s application.
The file will be stored on the
printer’s file system with the
filename supplied as the parameter
in the do command. The MIB file
can then be retrieved (via Label
Vista, FTP, or other wired / wireless
connection to the printer) and
passed onto any SNMP-based utility to provide a means to monitor
and configure all the printer’s parameters via SNMP.
Syntax
! U1 do “ip.snmp.create_mib”
“EXAMPLE1.MIB”
Result
EXAMPLE1.MIB will be created in
the printer’s file system with the
printer MIB information stored in it.
ip.tcp.enable
type: getvar; setvar
This parameter refers to the TCP socket protocol.
getvar result
Example
setvar choices
Example
P14-58
Returns the TCP protocol status. (on or off)
Description Instructs the printer to respond with
the TCP setting.
Syntax
! U1 getvar “ip.tcp.enable”
Result
“on”
“on”, “off”
Default
“on”
Description Instructs the printer to enable the
TCP protocol.
Syntax
! U1 setvar “ip.tcp.enable” “on”
Result
The TCP protocol will be turned on
upon cycling the power or issuing
device.reset.
Mobile Printer CPCLProgramming Manual
ip.telnet.enable
type: getvar; setvar
This parameter refers to the TELNET protocol.
getvar result
Example
setvar choices
Example
Returns the TELNET protocol status. (on or off)
Description Instructs the printer to respond with
the TELNET setting.
Syntax
! U1 getvar “ip.telnet.enable”
Result
“on”
“on”, “off”
Default
“on”
Description Instructs the printer to enable the
TELNET protocol.
Syntax
! U1 setvar “ip.telnet.enable” “on”
Result
The TELNET protocol will be
turned on upon cycling the power
or issuing the device.reset.
ip.udp.enable
type: getvar ;setvar
This parameter refers to the UDP socket protocol.
getvar result
Example
setvar choices
Example
Returns the UDP protocol status. (on or off)
Description This command instructs the printer
to respond with the UDP setting.
Syntax
! U1 getvar “ip.udp.enable”
Result
“on”
“on”, “off”
Default
“on”
Description This command instructs the printer
to enable the UDP protocol.
Syntax
! U1 setvar “ip.UDP.enable” “on”
Result
The UDP protocol will be turned on
upon cycling the power or issuing
the device.reset.
Mobile Printer CPCLProgramming Manual
P14-59
USB Parameters
NOTE: The following “usb.xxx” parameters are applicable only on Zebra
“QL plus” and RW series printers equipped with the USB communications option. They cannot be used on Cameo and Encore series printers which do not
support USB communications.
usb.device.device_id_string
type: getvar
This parameter refers to the manufacturer assigned
IEEE1284 Device Identification string used to describe a
particular USB product.
getvar result
Example
Returns the Device ID String stored in the USB
library.
Description This example retrieves the device’s
Device ID string.
Syntax
! U1 GETVAR
“usb.device.device_id_string”
Result
“MFG:Zebra ;CMD:CPCL;MDL:QL
420 ;”
usb.device.device_version
type: getvar
This parameter refers to the version of the USB device
being queried.
getvar result
Example
P14-60
Returns the device version stored in the USB
library.
Description This example retrieves the device
version value from the printer.
Syntax
! U1 GETVAR
“usb.device.device_version”
Result
“0.1”
Mobile Printer CPCLProgramming Manual
usb.device.manufacturer_string
type: getvar
This parameter refers to the string containing the name of
the manufacturer of the USB device.
getvar result
Example
Returns the Manufacturer String stored in the
USB library.
Description This example retrieves the device’s
Manufacturer string.
Syntax
! U1 GETVAR
“usb.device.manufacturer_string”
Result
“Zebra”
usb.device.product_id
type: getvar
This parameter refers to the Product Identification number that a manufacturer has assigned to a particular
product. This number, along with the Vendor ID, allows a
USB host to distinguish one device from another.
getvar result
Example
Returns the Product ID stored in the USB library.
Format is hexadecimal.
Description This example retrieves the device’s
product ID.
! U1 GETVAR
Syntax
“usb.device.product_id”
Result
“003D”
Mobile Printer CPCLProgramming Manual
P14-61
usb.device.product_string
type: getvar
This parameter refers to the manufacturer assigned
string describing a particular USB product.
getvar result
Example
Returns the Product String stored in the USB
library.
Description This example retrieves the device’s
vendor ID.
Syntax
! U1 GETVAR
“usb.device.product_string”
Result
“QL420”
usb.device.serial_string
type: getvar
This parameter refers to the manufacturer assigned serial
number string describing a particular USB product. This
string should be unique to a particular device.
getvar result
Example
P14-62
Returns the Serial Number String stored in the
USB library.
Description This example retrieves the device’s
serial number string.
Syntax
! U1 GETVAR
“usb.device.serial_string”
Result
“1234567890”
Mobile Printer CPCLProgramming Manual
usb.device.vendor_id
type: getvar
This parameter refers to the Vendor Identification number
that the USB organization has assigned to a particular
group. This number, along with the Product ID, allows a
USB host to distinguish one device from another.
getvar result
Example
Returns the Vendor ID stored in the USB library.
Format is hexadecimal.
Description This example retrieves the device’s
vendor ID.
Syntax
! U1 GETVAR
“usb.device.vendor_id”
Result “
0a5f”
Mobile Printer CPCLProgramming Manual
P14-63
WLAN Parameters
NOTE: The following “wlan.xxx” parameters cannot be used on Cameo and
Encore series printers. Cameo”N” and Encore “N” series printers must use
the “LAN” comand set detailed in section 12.
Frequency Hopping Spread Spectum (FHSS) Radio
Compatibility.
The following “wlan.xxx” commands currently either do
not support FHSS radios, or have limited support. Refer
to the individual commands for more detail.
WLAN.XXX FHSS COMPATIBILITY
wlan.current_essid : currently not reported
(wlan.essid can be used instead)
wlan.encryption_mode : only 40 bit encryption supported. 128 bit encryption is not supported, 40 bits will be used instead.
wlan.kerberos.kdc: not supported.
wlan.kerberos.mode: not supported.
wlan.kerberos.password: not supported.
wlan.kerberos.realm: not supported.
wlan.kerberos.username: not supported.
wlan.leap_mode: not supported.
wlan.leap_password: not supported
wlan.leap_username: not supported
wlan.operating_mode : infrastructure option
only. Ad Hoc is not supported.
wlan.power_save : currently not supported.
Support is under development.
wlan.preamble: not supported.
wlan.tx_power: not supported.
wlan.tx_rate : choices supported are : 1 and
2.
P14-64
Mobile Printer CPCLProgramming Manual
wlan.associated
type: getvar
This parameter refers to whether the printer is associated
with an access point (AP).
getvar result
Example
This will return “yes” if the printer is associated
and “no” if the printer is not associated with the
access point.
Description This command instructs the printer
to respond with yes or no.
Syntax
! U1 getvar “wlan.associated”
Result
“yes”
wlan.auth_type
type: getvar;setvar
This parameter selects the authentication service to be
used between the printer and the Access Point. Open
System and Shared Key are the two types of authentication services.
getvar result
Example
setvar choices
Example
Current authentication type.
Description This command instructs the printer
to retrieve the current
authentication type.
Syntax
! U1 getvar “wlan.auth_type”
Result
“open”
“open”, “shared”
Default
“open”
Description This command instructs the printer
to set the authentication type to
Shared Key.
Syntax
! U1 setvar “wlan.auth_type”
“shared”
Result
The authentication type will be set
to Shared Key after power cycle.
Mobile Printer CPCLProgramming Manual
P14-65
wlan.bssid
type: getvar
Returns the MAC address of the access point with which
the printer is associated. This value is only relevant
when “wlan.associated” returns “yes”.
getvar result
Example
MAC address of access point
Description Get the MAC address of the AP
Syntax
! U1 getvar “wlan.bssid”
Result
“00:d0:f2:57:13:3d”
wlan.current_essid
type: getvar
This parameter refers to the eSSID of the network currently associated with the printer. The eSSID is returned
only if the printer is associated with an access point.
getvar result
Example
This will return the eSSID that the printer is associated with in Infrastructure mode. When the
printer is in Ad Hoc mode it will return the stored
eSSID. (For more information on Infrastructure
and Ad Hoc modes see wlan.operating_mode.)
Description This command instructs the printer
respond with the current eSSID.
Syntax
! U1 getvar “wlan.current_essid”
Result
“ZebraNet”
Note: This parameter is not supported in units using a Frequency Hopping
Spread Spectrum (FHSS) radio. The “wlan.essid” parameter can be used instead.
P14-66
Mobile Printer CPCLProgramming Manual
wlan.current_tx_rate
type: getvar
This parameter retrieves the current transmit (tx) rate
(mbps). This rate will vary depending on several factors
such as the Access Point’s settngs and the printer’s distance from the AP. Possible values are “1”, “2”, “5.5”,
and “11”.
getvar result
Example
Current transmit rate
Description This command instructs the printer
to respond with the current tx rate.
Syntax
!U1 getvar “wlan.current_tx_rate”
Result
“11”
wlan.encryption_index
type getvar; setvar
This parameter refers to the WEP (Wired Equivalent Privacy) encryption key index. This parameter determines
which one of the four encryption keys is to be used by the
client (printer).
getvar result
Example
setvar choices
Example
This will return the current encryption key index
that is in use by the printer.
Description This command instructs the printer
respond with the encryption key
index value.
Syntax
! U1 getvar “wlan.encryption_index”
Result
“1”
“1”, “2”, “3”, or “4”
Default
“1”
Description Instructs the printer to set the encryption key index.
Syntax
! U1 setvar “wlan.encryption_index”
“1”
Result
Sets the encryption key index to 1.
continued on next page
Mobile Printer CPCLProgramming Manual
P14-67
wlan.encryption_key1
type: getvar; setvar
This parameter refers to the first indexed WEP encryption
key. The WEP encryption key is a hexadecimal string
that is either 10 or 26 characters long depending on encryption method (40-bit or 128 bit). This key should
match the wireless network WEP encryption key 1.
getvar result
Example
setvar choices
Example
This will return the encryption first encryption key.
Description This command instructs the printer
respond with the encryption key
value. (This example assumes that
the printer is using 40-bit
encryption.)
Syntax
! U1 getvar “wlan.encryption_key1”
Result
“0000000000”
10 hexadecimal characters for 40-bit encryption
26 hexadecimal characters for 128-bit encryption
Default
All zeros
Description This command instructs the printer
to set the encryption key value.
(This example assumes that the
printer is using 40-bit encryption.)
Syntax
! U1 setvar “wlan.encryption_key1”
“A1B2C3D4F5”
Result
The first encryption key will be set
to A1B2C3D4F5
continued on next page
P14-68
Mobile Printer CPCLProgramming Manual
wlan.encryption_key2
type: getvar; setvar
This parameter refers to the second indexed WEP encryption key. The WEP encryption key is a hexadecimal
string that is either 10 or 26 characters long depending
on encryption method (40-bit or 128 bit). This key should
match the wireless network WEP encryption key 2.
getvar result
Example
setvar choices
Example
This will return the encryption second encryption
key.
Description This command instructs the printer
respond with the encryption key
value. (This example assumes that
the printer is using 40-bit
encryption.)
Syntax
! U1 getvar “wlan.encryption_key2”
Result
“0000000000”
10 hexadecimal characters for 40-bit encryption
26 hexadecimal character for 128-bit encryption
Default
All zeros
Description This command instructs the printer
to set the encryption key value.
(This example assumes that the
printer is using 40-bit encryption.)
Syntax
! U1 setvar “wlan.encryption_key2”
“A1B2C3D4F5”
Result
The first encryption key will be set
to A1B2C3D4F5
continued on next page
Mobile Printer CPCLProgramming Manual
P14-69
wlan.encryption_key3
type: getvar; setvar
This parameter refers to the third indexed WEP encryption key. The WEP encryption key is a hexadecimal
string that is either 10 or 26 characters long depending
on encryption method (40-bit or 128 bit). This key should
match the wireless network WEP encryption key 3.
getvar result
Example
setvar choices
Example
This will return the encryption third encryption
key.
Description This command instructs the printer
respond with the encryption key
value. (This example assumes that
the printer is using 40-bit
encryption.)
Syntax
! U1 getvar “wlan.encryption_key3”
Result
“0000000000”
10 hexadecimal characters for 40-bit encryption
26 hexadecimal character for 128-bit encryption
Default
All zeros
Description This command instructs the printer
to set the encryption key value.
(This example assumes that the
printer is using 40-bit encryption.)
Syntax
! U1 setvar “wlan.encryption_key3”
“A1B2C3D4F5”
Result
The third encryption key will be set
to A1B2C3D4F5
continued on next page
P14-70
Mobile Printer CPCLProgramming Manual
wlan.encryption_key4
type: getvar; setvar
This parameter refers to the fourth indexed WEP encryption key. The WEP encryption key is a hexadecimal
string that is either 10 or 26 characters long depending
on encryption method (40-bit or 128 bit). This key should
match the wireless network WEP encryption key 4.
getvar result
Example
setvar choices
Example
This will return the encryption fourth encryption
key.
Description This command instructs the printer
respond with the encryption key
value. (This example assumes that
the printer is using 40-bit
encryption.)
Syntax
! U1 getvar “wlan.encryption_key4”
Result
“0000000000”
10 hexadecimal characters for 40-bit encryption
26 hexadecimal character for 128-bit encryption
Default
All zeros
Description This command instructs the printer
to set the encryption key value.
(This example assumes that the
printer is using 40-bit encryption.)
Syntax
! U1 setvar “wlan.encryption_key4”
“A1B2C3D4F5”
Result
The fourth encryption key will be
set to A1B2C3D4F5
Mobile Printer CPCLProgramming Manual
P14-71
wlan.encryption_mode
type: getvar; setvar
This parameter refers to WEP (Wired Equivalent Privacy)
encryption. This parameter enables and disables the
printer’s WEP encryption. When using WEP encryption
make sure that the encryption key matches the wireless
network WEP encryption key.
NOTES: 1. When using encryption, make sure that the encryption key is set
properly. The encryption key and the encryption index should match the encryption key and encryption index of the access point (or the other network
devices when in AD HOC mode). When all settings are changed the printer
must be wlan.kerberos.mode
2. 128 bit encryption is not supported on units with Frequency Hopping Spread Spectrum (FHSS) radios. 40 bit encryption will be used instead.
getvar result
Example
setvar choices
Example
P14-72
Returns the type of encryption that is currently
being used by the printer.
Description Instructs the printer to respond with
the encryption value.
Syntax
! U1 getvar
Result
“wlan.encryption_mode”
“off”, “40-bit”, and “128-bit”
Default
“off”
Description This command instructs the printer
to turn encryption off.
Syntax
! U1 setvar
“wlan.encryption_mode” “off”
Result
Sets the encryption mode to off.
Mobile Printer CPCLProgramming Manual
wlan.essid
type: getvar; setvar
This parameter refers to the printer’s stored eSSID. Setting the eSSID to “” will set the printer in a “broadcast”
mode, where it will search for an access point to associate with.
Example: ! U1 setvar “wlan.essid” “”
getvar result
Example
setvar choices
Example
Returns the stored eSSID.
Description Instructs the printer to respond with
the stored eSSID value.
Syntax
! U1 getvar “wlan.essid”
Result
“247”
26 character text string (can be alpha-numeric)
Default
“247”
Description Instructs the printer to set the
eSSID to ZebraNet.
Syntax
! U1 setvar “wlan.essid” “ZebraNet”
Result
This will set the eSSID to
ZebraNet.
Mobile Printer CPCLProgramming Manual
P14-73
wlan.international_mode
type: get var; set var
This parameter refers to International mode in 802.11
FH(Frequency Hopping) and 802.11b wireless cards. Setting this parameter to “on” allows a printer to operate in
wireless networks with settings different from standard
US/Canada wireless network settings. Setting this parameter to “off” instructs printer to operate according to
US/Canada wireless network standards. Two radio cards
are currently supported: Symbol Spectrum24 802.11b
and Symbol Spectrum24 802.11 Frequency Hopping
(FH). Cisco radio cards are not currently supported.
NOTE: This parameter must be set according to the wireless network infrastructure used. Setting this parameter to “on” for an 802.11b card without having active wireless access points with non US/Canada settings stops the
printer from communicating via its 802.11b card. Setting this parameter to
“on” for 802.11 FH radios causes the printer to take an additional 4 seconds to
initiate the 802.11 FH card.
getvar result
Example
setvar choices
Example
P14-74
Returns the International mode.
Description This command instructs printer to
respond with current International
mode.
Syntax
! U1 getvar
“wlan.international_mode”
Result
“off”
“on”, “off”
Default
“on” for 802.11 FH, “off” for 802.11b
Description This command instructs the printer
to turn on International mode.
Syntax
! U1 setvar
“wlan.international_mode” “on”
Result
Sets the International mode to “on”.
Mobile Printer CPCLProgramming Manual
wlan.kerberos.kdc
type: getvar; setvar
This parameter refers to the Kerberos Key Distribution
Center (KDC). The KDC is a trusted server which maintains a database with account information for all security
principals (users) for a particular site or administrative domain (realm).
This parameter is not supported on units with a Frequency Hopping Spread
Spectrum (FHSS) radio
getvar result
Example 1
setvar choices
Example 2
This will return the current Kerberos KDC.
Description This command instructs the printer
to respond with the current
Kerberos KDC.
Syntax
! U1 getvar “wlan.kerberos.kdc”
Result
“krbtgt”
0-32 ASCII characters.
Default
“krbtgt”
Description This command instructs the printer
to set the Kerberos KDC to “krbtgt”.
Syntax
! U1 setvar “wlan.kerberos.kdc”
“krbtgt”
Result
The Kerberos KDC will be set to
“krbtgt”.
Mobile Printer CPCLProgramming Manual
P14-75
wlan.kerberos.mode
type: getvar; setvar
This parameter refers to the Kerberos network authentication protocol. Kerberos provides secure mutual authentication for a wireless client through a Symbol Access
Point, based on user information stored on a Kerberos
KDC (Key Distribution Center) server.
This parameter is not supported on units with a Frequency Hopping Spread
Spectrum (FHSS) radio
getvar result
Example
setvar choices
Example
P14-76
This will return the current Kerberos mode.
Description This command instructs the printer
to respond with the current
Kerberos mode.
Syntax
! U1 getvar “wlan.kerberos.mode”
Result
“off”
“on”, “off”
Default
“off”
Description This command instructs the printer
to turn on Kerberos mode.
Syntax
! U1 setvar “wlan.kerberos.mode”
“on”
Result
This will set the Kerberos mode to
“on”.
Mobile Printer CPCLProgramming Manual
wlan.kerberos.password
type: getvar; setvar
This parameter refers to the Kerberos password. The
password must correspond to a user profile established
on the Kerberos KDC server in use.
This parameter is not supported on units with a Frequency Hopping Spread
Spectrum (FHSS) radio
getvar result
Example
setvar choices
Example
This will return the Kerberos password.
Description This command instructs the printer
to respond with the current
Kerberos password.
Syntax
! U1 getvar
“wlan.kerberos.password”
Result
“password”
0-32 ASCII characters
Default
“password”
Description This command instructs the printer
to set the Kerberos password to
“password”.
Syntax
! U1 setvar
“wlan.kerberos.password” “pass–
word”
Result
The Kerberos password will be set
to “password”.
Mobile Printer CPCLProgramming Manual
P14-77
wlan.kerberos.realm
type: getvar; setvar
This parameter refers to the Kerberos realm, an administrative domain with its own Kerberos server (KDC). Note:
realm must be all upper-case if using a Windows 2000
Server.
This parameter is not supported on units with a Frequency Hopping Spread
Spectrum (FHSS) radio.
getvar result
Example
setvar choices
Example
P14-78
This will return the current Kerberos realm.
Description This command instructs the printer
to respond with the current
Kerberos realm.
Syntax
! U1 getvar “wlan.kerberos.realm”
Result
“zebra”
0-64 ASCII characters.
Default
“zebra”
Description This command instructs the printer
to set the Kerberos user name to
“zebra”.
Syntax
! U1 setvar “wlan.kerberos.realm”
“zebra”
Result
The Kerberos realm will be set to
“zebra”.
Mobile Printer CPCLProgramming Manual
wlan.kerberos.username
type: getvar; setvar
This parameter refers to the Kerberos user name. The
user name must correspond to a user profile established
on the Kerberos KDC server in use.
This parameter is not supported on units with a Frequency Hopping Spread
Spectrum (FHSS) radio.
getvar result
Example
setvar choices
Example
This will return the Kerberos user name.
Description This command instructs the printer
to respond with the current
Kerberos user name.
Syntax
! U1 getvar
“wlan.kerberos.username”
Result
“user”
0-32 ASCII characters.
Default
“user”
Description This command instructs the printer
to set the Kerberos user name to
“user”.
Syntax
! U1 setvar
“wlan.kerberos.username” “user”
Result
The Kerberos user name will be set
to “user”.
Mobile Printer CPCLProgramming Manual
P14-79
wlan.leap_mode
type: getvar; setvar
This parameter refers to Cisco LEAP (Lightweight Extensible Authentication Protocol). LEAP provides secure
mutual authentication for a wireless client through a
Cisco Aironet Access Point, based on user information
stored on a backend RADIUS (Remote Authentication in
Dial-Up User Service) /AAA (Authentication, Authorization, and Accounting) server.
This parameter is not supported on units with a Frequency Hopping Spread
Spectrum (FHSS) radio.
getvar result
Example
setvar choices
Example
P14-80
Returns the LEAP mode.
Description This command instructs the printer
to respond with the LEAP mode.
Syntax
! U1 getvar “wlan.leap_mode”
Result
“off”
“on”, “off”
Default
“off”
Description This command instructs the printer
to turn on LEAP mode.
Syntax
! U1 setvar “wlan.leap_mode” “on”
Result
Sets the LEAP mode to “on”.
Mobile Printer CPCLProgramming Manual
wlan.leap_password
type: getvar; setvar
This parameter refers to the LEAP password. The password must correspond to a user profile established on the
RADIUS/AAA server in use.
This parameter is not supported on units with a Frequency Hopping Spread
Spectrum (FHSS) radio.
getvar result
Example
setvar choices
Example
Returns the LEAP password.
Description Instructs the printer to respond with
the LEAP password.
Syntax
! U1 getvar “wlan.leap_password”
Result
“password”
4-32 ASCII characters
Default
“password”
Description Instructs the printer to set the
LEAP password to “password”.
Syntax
! U1 setvar “wlan.leap_password”
“password”
Result
The LEAP password will be set to
“password”.
Mobile Printer CPCLProgramming Manual
P14-81
wlan.leap_username
type: getvar; setvar
This parameter refers to the LEAP user name. The user
name must correspond to a user profile established on
the RADIUS/AAA server in use.
This parameter is not supported on units with a Frequency Hopping Spread
Spectrum (FHSS) radio.
getvar result
Example
setvar choices
Example
P14-82
This will return the LEAP user name.
Description This command instructs the printer
to respond with the LEAP user
name.
Syntax
! U1 getvar “wlan.leap_username”
Result
“user”
0-32 ASCII characters.
Default
“user”
Description This command instructs the printer
to set the LEAP user name to
“user”.
Syntax
! U1 setvar “wlan.leap_username”
“user”
Result
The LEAP user name will be set to
“user”.
Mobile Printer CPCLProgramming Manual
wlan.operating_mode
type: getvar; setvar
This parameter refers to the network operating mode. Infrastructure mode means that the printer will try to associate with an access point. Ad hoc mode means that the
printer will try to associate with a device other than an access point and join a stand alone network.
To use “ad hoc” mode configure the printer as follows:
• Set the eSSID to the new network’s eSSID.
• Turn off the DHCP and assign an IP Address to
the printer.
• Set the Subnet mask on the printer to the new
network’s Subnet mask.
• Change the operating mode on the printer to “ad
hoc”.
The “ad hoc” setvar option is not supported on units with a Frequency Hopping Spread Spectrum (FHSS) radio.
getvar result
Example
setvar choices
Example
Returns the current operating mode.
Description Instructs the printer to respond with
the value of the network-mode.
Syntax
! U1 getvar “wlan.operating_mode”
Result
“infrastructure”
“ad hoc”, “infrastructure”
Default
“infrastructure”
Description This command instructs the printer
to change the network-mode to
infrastructure.
Syntax
! U1 setvar “wlan.operating_mode”
“infrastructure”
Result
This will set the printer’s operating
mode to infrastructure.
Mobile Printer CPCLProgramming Manual
P14-83
wlan.power_save
type: getvar ; setvar
This parameter refers to the power save modes which affect power consumption of the network radio card in the
printer. Two radio cards are currently supported: SYMBOL and CISCO. The SYMBOL radio has a range of
power save modes from “1” (best throughput) to “best”
(best power save).
The CISCO radio has a fast power save mode and a full
power save mode (“best”). Any setting other than “best”
(“1”-”4”) sets the radio to fast power save and is not scalable. The “off” setting puts either radio into CAM (Constant Awake Mode).
This parameter is not supported on units with a Frequency Hopping Spread
Spectrum (FHSS) radio as of this writing. Support is pending.
getvar result
Example
setvar choices
Example
P14-84
The printer responds with current power save
mode setting.
Description Instructs the printer to respond with
the value of the wlan.power_save
mode.
Syntax
! U1 getvar “wlan.power_save”
Result
“off”
“off”, “1”, “2”, “3”, “4”, “best”
Default
“best”
Description Instructs the printer to set the value
of the power save mode.
Syntax
! U1 setvar “wlan.power_save” “2”
Result
Changes the power save mode to
“2” if a Symbol radio is used, or
fast power save mode if a Cisco
radio is used.
Mobile Printer CPCLProgramming Manual
wlan.preamble
type: getvar; setvar
This parameter selects the radio preamble length to be
used.
This parameter is not supported on units with a Frequency Hopping Spread
Spectrum (FHSS) radio.
getvar result
Example
setvar choices
Example
Current preamble length.
Description This command instructs the printer
to retrieve the current preamble
length.
Syntax
! U1 getvar “wlan.preamble”
Result
“long”
“long”, “short”
Default
“long”
Description This command instructs the printer
to set the authentication type to
short.
Syntax
! U1 setvar “wlan.preamble” “short”
Result
The preamble length will be set to
short after power cycle.
wlan.signal_strength
type: getvar
Returns the signal strength of the connection to the access point as a percentage value between zero (not connected) and 100 (strongest signal). Values below 40%
represent a very poor signal and radio communication
will not be reliable.
getvar result
Example
value between 0 and 100
Description Query the current signal strength
Syntax
! U1 getvar “wlan.signal_strength”
Result
“100”
Mobile Printer CPCLProgramming Manual
P14-85
wlan.station_name
type: getvar
This parameter refers to the station name. The station
name reported is the printer’s serial number.
getvar result
Example
P14-86
The printer will return its station name. The
station name is the printer’s serial number.
Description Instructs the printer to respond with
the value of its station name.
Syntax
! U1 getvar “wlan.station_name”
Result
“XXQT02-02-0001”
Mobile Printer CPCLProgramming Manual
Zebra Printer Mirror Process
Zebra “alpha series” mobile printers (e. g. QL 220,
RW 420) support a file mirroring process that allows the
printer to synchronize files with those stored on an FTP
server. Since the process relies solely on the FTP standard, no other special utilities are required. The files on
the FTP server can be printer firmware files, fonts, as well
as lists of printer configuration commands (such as commands to change the printer’s WEP key). In order for this
file synchronization process to work properly, it is only required that the FTP server support “Unix style” directory
listings and that the modification time stamps of the files
stored on the FTP server are accurate.
Printer set up to support mirror process
In order to enable the mirror process on the printer, the
following set/get variables are available:
ip.mirror.auto: on/off
If “on”, printer will automatically perform a mirror
“fetch” command on power-up, and subsequently
every “freq” minutes. (see ip.mirror.freq, below)
ip.mirror.username: 20 bytes (string)
Username to use for FTP login
ip.mirror.password: 20 bytes (string)
Password for FTP account
ip.mirror.server: 40 bytes (string)
Server ip address or name (if DNS server info is
provided via DHCP).
ip.mirror.path: 50 bytes (string)
Path on the FTP server where the mirror directory
is located. Defaults to “companyname/model” (e.g.
“/Zebra/QL 320”).
NOTE: this must be an absolute path (i.e. it must start with / or ~)
ip.mirror.freq: 0-65535 minutes
Number of minutes to wait before performing another mirror fetch. If this value is “0”, the mirror process will only be performed once immediately on
Mobile Printer CPCLProgramming Manual
P14-87
power-up. This parameter only applies if
ip.mirror.auto is “on”. Caution should be used if setting a low value - otherwise the printer may spend
most of its time performing the mirror process.
ip.mirror.fetch:
Force the mirror process to be run immediately.
This variable can be set via SNMP, allowing the
mirror process to triggered via SNMP.
Example of printer configuration for mirror
The following is an example of using the above mirror
set/get variables to configure the printer for the mirror
process. These commands could be put in a text file and
sent to the printer as in the following example:
!
!
!
!
!
!
U1
U1
U1
U1
U1
U1
setvar
setvar
setvar
setvar
setvar
setvar
“ip.mirror.path” “/Zebra/QL320”
“ip.mirror.server” “10.14.4.12”
“ip.mirror.freq” “0”
“ip.mirror.auto” “on”
“ip.mirror.username” “brian”
“ip.mirror.password” “password”
In the above example, the printer will only perform the
mirror process once on power-up, since the
“ip.mirror.freq” variable is set to 0.
Server Settings
On the server, the mirror directory structure should look
like this:
<mirror path>/appl/files/commands/
Appl/
Appl/ will contain only one file - the current printer app.
The file name should be the exact printer app name followed by .hex. If the file in the appl/ subdirectory is
named differently than the current printer version, the
printer will download the new application and will automatically re-program itself with this new firmware.
Files/
Files/ will be a flat directory (no subdirectories) that contains all the files that should be installed on the printer.
P14-88
Mobile Printer CPCLProgramming Manual
File names must be in 8.3 format. Any new files, or those
with more recent time stamps, will be automatically copied to the file system on the printer.
commands/
The commands/ directory will contain files with CPCL
commands. (For example, “! U1 setvar “wlan.essid”
“myessid””.) This will allow the changing of printer settings automatically. Command file names must be in 8.3
format. The time stamp of any files in the commands/
subdirectory will be compared to those of commands
which were last executed on the printer. Any command
files that have never been run or have a more recent time
stamp than those on the printer will be downloaded and
executed on the printer.
It may be useful to put a label command in the most recent command file. This will provide visual feedback that
the printer successfully performed the mirror process.
For example, the example opposite could be the contents
of a command file:
! U1 setvar “wlan.essid” “myessid”
! U1 setvar “wlan.encryption_mode” “128bit”
! U1 setvar “wlan.auth_type” “shared”
! U1 setvar “wlan.encryption_index” “1”
! U1 setvar “wlan.encryption_key1”
“12345678901234567890123456”
! U1 setvar “wlan.encryption_key2”
“23456789012345678901234567”
! U1 setvar “wlan.encryption_key3”
“34567890123456789012345678”
! U1 setvar “wlan.encryption_key4”
“45678901234567890123456789”
! U1 setvar “ip.mirror.auto” “off”
! 0 200 200 240 1
LABEL
PAGE-WIDTH 600
T 0 3 84 17 Network settings updated
FORM
PRINT
continued on next page
Mobile Printer CPCLProgramming Manual
P14-89
In this example the printer will print a label with the text
“Network settings updated” after it downloads this file and
updates its network settings.
Refer to the following pages for exposition of the ip.mirror
variables.
P14-90
Mobile Printer CPCLProgramming Manual
ip.mirror.auto
type: getvar, setvar
This parameter is used to enable or disable the file mirroring process on the printer for the initial power-up sequence and at repeating intervals defined by
“ip.mirror.freq”.
getvar result
Example
setvar choices
Example
The current mirror setting.
Description Instructs the printer to respond with
the value of the FTP mirror mode
Syntax
!U1 getvar “ip.mirror.auto”
Result
“off”
“off”: mirror will not be performed automatically
“on”: mirror will be performed automatically when
the printer is first powered-on and at the interval
defined by “ip.mirror.freq”
Default
“off”
Description Enable the mirror process
Syntax
! U1 setvar “ip.mirror.auto” “on”
Result
The printer will perform the mirror
process on initial power-up and at
the repeated interval defined by
“ip.mirror.freq”
ip.mirror.fetch
type: do
This command will force the mirror process to be performed immediately.
do choices
Example
Any text string.
Description Perform the mirror process
Syntax
! U1 do “ip.mirror.fetch” “yes”
Result
The printer will immediately contact
the FTP server defined by
“ip.mirror.server”, log on
with the defined username and
password and look for mirror
file updates.
Mobile Printer CPCLProgramming Manual
P14-91
ip.mirror.freq
type:getvar; setvar
This parameter defines how frequently (in minutes) the
mirror process will be performed.
This parameter only applies if “ip.mirror.auto” is set to
“on”.
getvar result
Example
setvar choices
Example
P14-92
The current mirror frequency in minutes.
Description Instructs the printer to respond with
the frequency the mirror
process is performed.
Syntax
!U1 getvar “ip.mirror.freq”
Result
“0”
Any value between “0” and “99”. A value of
“0” means the mirror process will only be performed on power-up.
Default
“0”
Description Change mirror frequency to “25”
Syntax
! U1 setvar “ip.mirror.freq” “25”
Result
If “ip.mirror.auto” is “on”, then the
mirror process will be performed on
initial power-up and every 25 minutes thereafter.
Mobile Printer CPCLProgramming Manual
ip.mirror.password
type: getvar; setvar
This parameter defines FTP password that will be used
for the mirror process.
getvar result
Example
setvar choices
Example
The current mirror password – masked with asterisks.
Description Instructs the printer to respond with
the value of the FTP password
Syntax
!U1 getvar “ip.mirror.password”
Result
“********”
Any text string up to 20 characters in length
Default
“password”
Description Change mirror password to “secret”
Syntax
! U1 setvar “ip.mirror.password”
“secret”
Result
The next time the mirror process is
performed, the printer will use the
FTP password “secret”.
ip.mirror.path
type:getvar; setvar
This parameter defines the path on the FTP where the
mirror directories are located. This can be a relative path
based on the FTP username or an absolute path based
on the FTP root directory.
getvar result
Example
setvar choices
Example
The current mirror path.
Description Instructs the printer to respond with
the FTP path to the mirror directories.
Syntax
!U1 getvar “ip.mirror.path”
Result
“Zebra/QL 320”
Any text string up to 50 characters in length.
Default
“Zebra/QL 320”
Description Change mirror path to “zebra/ql”
Syntax
! U1 setvar “ip.mirror.path” “zebra/
ql”
Result
The next time the mirror process is
performed, the printer will look for
the updates in the “zebra/ql” relative directory.
Mobile Printer CPCLProgramming Manual
P14-93
ip.mirror.server
type:getvar; setvar
This parameter defines the FTP server that will be used
for the mirror process.
getvar result
Example
setvar choices
Example
The current mirror server address
Description Instructs the printer to respond with
the FTP server used for the mirror
process
Syntax
!U1 getvar “ip.mirror.server”
Result
“0.0.0.0”
Either an IP address or any DNS resolvable name
up to 40 characters in length
Default
“0.0.0.0”
Description Change mirror server to
“192.168.1.1”
Syntax
! U1 setvar “ip.mirror.server”
“192.168.1.1”
Result
The next time the mirror process is
performed, the printer will connect
to the FTP server at address
192.168.1.1.
ip.mirror.username
type: getvar; setvar
This parameter defines FTP username that will be used
for the mirror process.
getvar result
Example
setvar choices
Example
P14-94
The current username.
Description Instructs the printer to respond with
the value of the FTP user name
Syntax
!U1 getvar “ip.mirror.username”
Result
“username”
Any text string up to 20 characters in length
Default
“username”
Description Change mirror username to “test”
Syntax
! U1 setvar “ip.mirror.username”
“test”
Result
The next time the mirror process is
performed, the printer will use the
FTP username “test”.
Mobile Printer CPCLProgramming Manual
PRINTER CONFIGURATION AND SETUP
Using Label Vista for Printer
Configuration
The Label Vista label creation
application can also be used to reconfigure the printer by sending new
application, font or .bat files to the
printer. The Label Vista utilities are
located under the Printer Menu.
You should first establish communications between your printer and a
PC running label vista by using the
Com Port Setup menu detailed
below:
Port Sets up the communications
port via the ComPort dialog box. The
user may select from several different
methods of communicating with the
printer and select the rate at which
data is transferred.. The Com1 or
Com2 selections allow bi-directional
serial communications with the
printer.
Note: The LPT1 write/
COM1 read or LPT1
write/COM2 read
options are only used
with the Bravo series
of desk top printers.
Two network
protocols are
available to talk to
Zebra printers
equipped with
wireless network
capabilities: NETWORK TCPIP and
Mobile Printer CPCLProgramming Manual
P15-1
NETWORK LPD. In order to communicate with the
printer, choose the protocol that the printer is configured
for. If you are unsure as to which protocol the printer is
setup for, turn the printer off and while holding the feed
key down turn the printer back on. This will print the
printer’s 2-key report. The protocol that the printer is
configured to use is listed under the RF-LAN section. If
the printer is using a Symbol MOM card choose the
NETWORK SYMBOL MOM CARD option. This is a TCP
protocol that does not close the network connection.
In order to talk to a network printer the IP address and
port must also be entered. The printer’s current IP address and port are also listed on the 2-key report.
Baudrate allows selection of the rate at which data is
sent over either COM port. Baud rates range from 2400
to 115200 b.p.s.
Checking the Set Printer Baud Rate box allows Label
Vista to automatically set the Baud rate for the program
and the printer.
Once Communications have been established between
Label Vista and the printer you can send files to the
printer with the various “Send” options:.
1 Send File
Downloads a file to the printer. Clicking on the
“Browse” button allows the user to select a file to be
downloaded via the standard Windows interface. A bar
at the bottom of the dialog box monitors downloading
process. This interface is common to all of the file
download utilities.
2 Send Font
Downloads a font file (.CSF, .CPF extensions) to the
printer. (Refer to the Fonts Menu selection for more
information.)
3 Send Picture
Downloads a picture file (.PCX) to the printer. Note:
Any picture file placed in the label with the Picture tool
must also be downloaded to the printer by means of
this command.
P15-2
Mobile Printer CPCLProgramming Manual
4 Send Autoexec.
Downloads an autoexec.bat file to the printer. If a .lbl
type file is downloaded using this command, It will be
converted from an .lbl file into an autoexec.bat type file.
The printer will execute this file on power up (i.e. print
the label described in the file).
5 Send as Run.bat
Sends either a label or a format file to the printer as a
RUN.BAT file. Upon power up, and after running any
resident AUTOEXEC.BAT files, the printer will automatically execute a RUN.BAT file.
6 Send as FF.BAT
Sends a selected label file to the printer as a FF.BAT
file. The printer will automatically execute a FF.BAT file
whenever its “Feed” key is pressed.
7 Send all Files in Label
This command will send all fonts and pictures associated with the current label file to the printer. There
must be sufficient memory in the printer to accept all of
the files, and they must all be located in the current
Label Vista working directory.
8 Diagnostic Send
Downloads a file without checking for status or validity.
This function is usually used when the printer has been
placed in the Communications Diagnostics Mode.
Refer to Section 1 of this manual for complete information on utilizing the Communications Diagnostic Mode.
Label Vista has an extensive set of context-sensitive
help files which will aid you in using the various file utilities available.
Using Label Vista for Wireless Configuration
Label Vista can also be used to configure the various
versions of Mobile Wireless Printers. A Wireless Configuration Guide is available in the Zebra Web site at:
http://www.zebra.com/SS/manuals/WirelessQuickStart.pdf
Mobile Printer CPCLProgramming Manual
P15-3
POWER MANAGEMENT
The printer contains the following power management
features:
1.
Synchronized On/Off control via DTR line from the
attached host (DTR On/Off Control).
Programmable inactivity timeout.
Programmable low-battery timeout.
Shutdown command.
Enters low-power mode when idle.
2.
3.
4.
5.
SYNCHRONIZED ON/OFF CONTROL VIA PRINTER’S DSR LINE
The DSR line is an input to the printer and is controlled
by the attached host’s DTR line. The DSR line controls
the power on/off and the operation of the short-range
radio module.
1.Power On/Off Control
A low (inactive) to high (active) transition on this line will
cause the printer to turn ON. A high (active) to (low)
transition on this line will cause the printer to turn OFF
only if it is configured to do so. The factory default configuration enables power-off on high to low transition on
DSR. This setting can be changed using the MP Utilities
program.
NOTE: A minimum of 500 milliseconds delay is required after
DTR has been set high to allow the printer to power up and fully
initialize prior to sending data. This is true regardless of the
state of CTS if hardware handshaking is used. Failure to provide
this delay may cause missed characters at the start of the file.
The printer will stay ON for as long as DSR is high (active) unless it reaches low-battery shut down point, or it
receives a command to shut down. Please note that the
inactivity time-out is disabled while DSR is high (active).
P15-4
Mobile Printer CPCLProgramming Manual
POWER MANAGEMENT (continued)
2.Short-Range Radio Control
The short range radio is enabled when DSR line is low
(inactive) or when the host-to-printer cable is disconnected. In this case, the printer will attempt to communicate to the host over the short-range radio if the printer is
so equipped. In its active (high) state, the DSR line will
disable the short-range radio, if any, and will communicate over the RX/TX line of the serial port. For printers
that are not equipped with a short-range radio, the host
terminal must still keep the DSR line at an active state.
The printer can be programmed to time-out, and shut
itself off, upon reaching a predefined inactivity period.
The factory default inactivity time-out is 2 minutes. This
setting can be changed using the MP Utilities program ,
the Label Vista application or by sending the following
command to the printer.
! UTILITIES
TIMEOUT n
END
Where n is the inactivity timeout in 1/8 of a second. For
example, n=960 for a 2 minute inactivity timeout (120
seconds X 8).
A timeout of 0 disables inactivity timeout.
PROGRAMMABLE LOW-BATTERY TIMEOUT
The printer can be programmed to timeout, and shut itself
off, upon reaching a predefined period after low battery
condition is detected. The factory default low battery
timeout is 1 minute. This setting can be changed using
the MP Utilities program or the Label Vista application.
Mobile Printer CPCLProgramming Manual
P15-5
POWER MANAGEMENT (continued)
SHUTTING OFF THE PRINTER REMOTELY
The printer can be turned off by sending the following
shut down command:
Off Command ESC (0x1b) 'p' (0x70)
This function can be used instead of lowering DTR causing the printer to shut down.
ENTERING LOW-POWER MODE WHEN IDLE
The printer automatically enters low-power mode when it
is idle in order to conserve power. All resident data and
images will be preserved while the printer is in low-power
mode.
P15-6
Mobile Printer CPCLProgramming Manual
BATCH FILES
The printer flash file system can be used to store a startup file titled AUTOEXEC.BAT. When the printer is powered on, this file will be searched for and, if present, the
printer will execute the commands found in this file. The
following example shows how to create an
AUTOEXEC.BAT file and load it into the printer.
! DF AUTOEXEC.BAT
! UTILITIES
SETLP 5 1 40
PRINT
Line one uses the (D)efine (F)ile command to label this
file as AUTOEXEC.BAT. The end of an AUTOEXEC.BAT
file is indicated by a PRINT command as shown in line
four.
When this file is executed, the printer will select font
number 5, size 0 as the default front for line printer mode,
and the printer will advance 40 dots for every carriagereturn (0x0d) received.
Note: Every time a file is created on the printer by using
the "! DEFINE-FORMAT..." or "! DF..." the file
information is written to flash memory. Unlike
RAM, flash memory does not require battery
power for retaining data, and is immune to data
corruption due to static discharge. Although flash
memory is superior to RAM for safeguarding file
contents, it is limited to an average of 10,000 write
cycles (i.e. file creations). The user should use the
file creation commands only when needed to
ensure this write cycle limit is not exceeded.
Mobile Printer CPCLProgramming Manual
P15-7
RUN.BAT Command/File
The printer will execute the RUN.BAT file on power-up,
if one exists. This file may be a format or label file. The
only time RUN.BAT file is not executed is after a two-key
reset (hold feed key down, turn printer on, release feed
key when printer starts printing).
The following example demonstrates the use of the
RUN.BAT file for an application that uses a bar code
scanner connected to the printer's serial port for data
input. The scanner must be set to the same baud rate as
the printer, and be configured for 8 data bits, 1 stop bit,
no parity. Scanned data must be terminated with both
carriage return and line feed (0x0D 0x0A) characters.
The following RUN.BAT file is first sent to the printer's
flash file system. When the printer is turned ON this file
is found and executed. The keyword RE-RUN is used in
the file to instruct the printer to execute this file repeatedly. In this case, the BARCODE command data will be
taken from the serial input.
The printer will produce a label each time a bar code is
scanned.
P15-8
Mobile Printer CPCLProgramming Manual
RUN.BAT Example
Input (RUN.LBL):
! DF RUN.BAT
! 0 200 200 210 1
CENTER
BARCODE-TEXT 7 0 5
BARCODE 128 1 1 50 0 90 \\
RE-RUN
FORM
PRINT
Input from scanner (SCANRUN.LBL)
Output:
RE-RUN Command
The RE-RUN command instructs the printer to execute
the current file after an end-of-file is encountered. Any
format or command file in the printer, with the exception
of AUTOEXEC.BAT and CONFIG.SYS, may use the RERUN command.
Mobile Printer CPCLProgramming Manual
P15-9
GAP-SENSE & BAR-SENSE Commands
These commands are used to instruct the printer as to
which means of top-of-form detection should be employed. Printers default to BAR-SENSE if no command is
specified. Printers that are not equipped with a gapsensor will attempt a pseudo gap-sense.
Format:
{command}
where:
{command}: Choose one of the following:
GAP-SENSE # (0-255)
BAR-SENSE # (0-255)
Gap and Bar Sense commands can be followed by a
number to adjust sensitivity. This is useful for gap sense
stock from vendors other than Zebra.
GAP-SENSE Command Example:
The following example configures the printer for gapsensing. In addition, it specifies that the distance from
top-of-form to the gap is zero.
Input (GAPSENSE.LBL):
! UTILITIES
GAP-SENSE
SET-TOF 0
PRINT
P15-10
Mobile Printer CPCLProgramming Manual
Index
INDEX
Symbols
! U1 Command. See UTILITIES Command
.cpf files. See fonts: pre-scaled
A
Accessories CD P1-1
Acknowledge Printer Reset P11-3. See also Printer Escape Commands
Advanced Control Commands P8-1
Advanced Utilities
examples P10-1
ALL CHRS.LBL P1-7
ANNOUNCE Command P10-12
AUTOEXEC.BAT P9-2, P10-38, P15-7
B
Backspace P9-10
BAR-SENSE Command P9-10, P15-10
BARCODE Command P5-16, P9-15
BARCODE-TEXT P5-18, P6-5
Barcodes, standard
samples P5-2
BATCH FILES P15-7. See also AUTOEXEC.BAT
BAUD Command P10-9
BEEP Command P8-28, P10-15
BHT MODE Commands P10-49
COUNTED STRING P10-49
RAW P10-49
STRIP-ADD-CRLF P10-49
STRIP-SPACES P10-49
BHT PROTOCOL Command P10-53
BHT Mode P10-53
BHTIR Mode P10-53
CABLE Mode P10-53
BHT Terminal P10-38
configuring for cable communications P10-43
BHT-BAUD command P10-40, P10-48
BHT-PROTOCOL Command P10-40
BlueTooth commands
using set/get/do parameters P14-5
BOX command P7-1
Mobile Printer CPCLProgramming Manual
Index- 1
INDEX (continued)
C
CENTER. See Justification Commands
CHAR-SET Command P10-10
CHECKSUM P10-3. See also Advanced Utilities
Checksum calculation,
Codabar P5-11
Code 128 P5-10
Code 39 P5-6
Code 93 P5-8
Postnet P5-13
UPC/EAN P5-4
Codabar barcode P5-11
Code 128 barcode P5-9
Code 39 barcode P5-6
Code 93 barcode P5-8
Comments P2-8
Communications Diagnostics P1-7
COMPRESSED-GRAPHICS Command. See Graphics Commands
CONCAT P3-8. See TEXT Concatenation Commands
CONTRAST Command P8-1
COUNT command P3-12, P5-20
COUNTRY Command P8-22, P10-10
CUT Command P8-29, P9-15
CUT-AT Command P8-31, P9-14
D
Date stamp
Printing P10-23
DEFINE-FORMAT. See Format File Commands
DEL P10-4. See also Advanced Utilities
Denso Barcode Handy Terminal. See BHT Terminal
DF Command P10-6
DIR P10-5. See also Advanced Utilities
do Command P14-2
do parameters
device.reset P14-14
device.restore_defaults P14-15
file.delete P14-18
file.print P14-18
file.rename P14-19
file.run P14-19
file.type P14-19
Index-2
Mobile Printer CPCLProgramming Manual
ip.mirror.fetch P14-91
ip.ping_remote P14-46
ip.snmp.create_mib P14-58
test.print_diags P14-37
test.report_diags P14-37
E
Error messages
LAN P12-8
EXPANDED-GRAPHICS. See Graphics Commands
F
Facing Identification Mark (FIM) P5-13
FEED. See ON-FEED Command
FG command P3-6
FHSS. See Frequency Hopping Spread Spectum Radios: compatibility with command parameters; Frequency Hopping Spread
Spectum Radios: parameters
file mirroring P14-87
printer set up P14-87
server settings P14-88
Flash Memory P8-27
Font
monospaced P9-17
TrueType™ P9-4
Font group. See FG command
Fonts
Asian P8-24
double byte encoded. See Fonts: Asian
fonts
pre-scaled P1-9
FORM command P2-4
Form Feed P9-10
Format File Commands P1-9, P8-25, P8-26, P8-27
Frequency Hopping Spread Spectum Radios
compatibility with command parameters P14-64
G
GAP-SENSE Command P9-10, P15-10
German Post Code. See Interleaved 2 of 5 barcode: German Post
Code
Get Extended Printer Status P10-24, P11-4, P14-27
Get Printer Information P11-4. See also Printer Escape Commands
Get Printer Status P11-3. See also Printer Escape Commands
Mobile Printer CPCLProgramming Manual
Index- 3
INDEX (continued)
GET-DATE command P10-21
GET-TIME command P10-19
getvar Command P14-2
getvar parameters
appl.date P14-4
appl.name P14-4
appl.version P14-4
bluetooth.address P14-5
bluetooth.authentication P14-6
bluetooth.baud P14-8
bluetooth.bluetooth_pin P14-7
bluetooth.discoverable P14-8
bluetooth.friendly_name P14-9
bluetooth.local_name P14-9
bluetooth.version P14-10
card.mac_addr P14-38
comm.baud P14-11
comm.parity P14-11
comm.stop_bits P14-12
device.friendly_name P14-13
device.languages P14-14
display.backlight P14-16
display.contrast P14-16
display.text P14-17
file.dir P14-18
head.latch P14-20
input.capture P14-23
ip.addr P14-38
ip.bootp.enable P14-39
ip.dhcp.cid_prefix P14-41
ip.dhcp.cid_type P14-42
ip.dhcp.cid_value P14-43
ip.dhcp.enable P14-40
ip.ftp.enable P14-44
ip.gateway P14-44
ip.http.enable P14-45
ip.lpd.enable P14-45
ip.mirror.auto P14-91
ip.mirror.freq P14-92
ip.mirror.password P14-93
ip.mirror.path P14-93
ip.mirror.server P14-94
ip.mirror.username P14-94
Index-4
Mobile Printer CPCLProgramming Manual
ip.netmask P14-46
ip.pop3.enable P14-47, P14-48, P14-49, P14-50, P14-51
ip.pop3.password P14-47
ip.pop3.poll P14-48
ip.pop3.print_body P14-49
ip.pop3.print_headers P14-49, P14-51
ip.pop3.save_attachments P14-50
ip.pop3.server_addr P14-50
ip.pop3.username P14-51
ip.pop3.verbose_headers P14-51
ip.port P14-52
ip.remote P14-52
ip.remote_autoconnect P14-53
ip.remote_port P14-54
ip.smtp.enable P14-54
ip.smtp.server_addr P14-55
ip.snmp.enable P14-55
ip.snmp.get_community_name P14-56
ip.snmp.set_community_name P14-57
ip.tcp.enable P14-58
ip.telnet.enable P14-59
ip.udp.enable P14-59
media.sense_mode P14-25
media.status P14-25
media.tof P14-26
media.type P14-27
media.width_sense.enable P14-20
media.width_sense.in_cm P14-21
media.width_sense.in_dots P14-22
media.width_sense.in_inches P14-22
media.width_sense.in_mm P14-21
memory.flash_free P14-28
memory.flash_size P14-28
memory.ram_free P14-28
memory.ram_size P14-28
odometer.label_dot_length P14-29
odometer.latch_open_count P14-30
odometer.media_marker_count P14-31
odometer.user_label_count P14-32
power.ascii_graph P14-33
power.dtr_power_off P14-33
power.inactivity_timeout P14-34
power.low_battery_shutdown P14-35
power.low_battery_timeout P14-34
Mobile Printer CPCLProgramming Manual
Index- 5
INDEX (continued)
power.low_battery_warning P14-35
power.percent_full P14-35
power.status P14-35
power.voltage P14-36
test.feed P14-37
usb.device.device_id_string P14-60
usb.device.device_version P14-60
usb.device.manufacturer_string P14-61
usb.device.product_id P14-61
usb.device.product_string P14-62
usb.device.serial_string P14-62
usb.device.vendor_id P14-63
wlan.associated P14-65, P14-66
wlan.auth_type P14-65
wlan.bssid P14-66
wlan.current_essid P14-66
wlan.current_tx_rate P14-67
wlan.encryption_index P14-67
wlan.encryption_key1 P14-68
wlan.encryption_key2 P14-69
wlan.encryption_key3 P14-70
wlan.encryption_key4 P14-71
wlan.encryption_mode P14-72
wlan.essid P14-73
wlan.international_mode P14-74
wlan.kerberos.kdc P14-75
wlan.kerberos.mode P14-72, P14-76
wlan.kerberos.password P14-77
wlan.kerberos.realm P14-78
wlan.kerberos.username P14-79
wlan.leap_mode P14-80
wlan.leap_password P14-81
wlan.leap_username P14-82
wlan.operating_mode P14-66, P14-83
wlan.power_save P14-84
wlan.preamble P14-85
wlan.signal_strength P14-85
wlan.station_name P14-86
Graphics Commands P7-1, P7-8
I
IGNORE. See ON-FEED Command
IN-CENTIMETERS. See Units Utility Commands
IN-DOTS. See Units Utility Commands
IN-INCHES. See Units Utility Commands
IN-MILLIMETERS. See Units Utility Commands
Interleaved 2 of 5 barcode P5-8
German Post Code P5-9
INVERSE-LINE command P7-4
J
JOURNAL Command P14-27
JOURNAL command P2-5
Justification Commands P8-3, P9-15
L
Label Coordinate System P1-8
Label Height P1-3
Label Height,
maximum P2-2
Label Vista P1-9, P5-1, P9-4, P9-16, P13-1, P15-1
LAN Command P12-1. See also Network Printers
error messages. See Error messages: LAN
gateway IP address
setting P12-2
getting configuation settings P12-4
getting status of P12-3
hard resetting WLAN card P12-5
IP address P12-2, P12-5, P12-7
obtaining P12-6
saving P12-6
Mode setting
LPD P12-3, P12-7
TPC P12-3
Remote IP address
setting P12-2
soft resetting WLAN card P12-5
SSID setting P12-3, P12-7
subnet mask
setting P12-3
TCP port
setting P12-6
Language
programminmg
CPCL P1-1
EPL II P1-1
setting P1-2
Mobile Printer CPCLProgramming Manual
Index- 7
INDEX (continued)
ZPL P1-1
LEFT. See Justification Commands
LINE command P7-2
line print mode P9-1, P11-1
Line-terminator characters P10-17
LMARGIN Command P9-7
Low-Battery Timeout P15-5. See POWER MANAGEMENT
Low-Power Mode P15-6
LT command P10-17
M
MaxiCode P6-2, P6-6
encoded tags P6-6–P6-8
publication: Guide to bar Coding P6-8
MCR Command P8-32, P10-25
Data Reporting Options P10-27
Debugging Options P10-27
Error Reporting Options P10-29
Frequency Options P10-26
Track Data Transmit Options P10-27
Track Options P10-26
MCR-CAN Command P10-33
MCR-QUERY Command P10-31
Messages, resident P10-12. See also ANNOUNCE Command
MSI Plessey barcode P5-12
MULTILINE Commands P3-10
N
Network Printers P12-1. See also LAN Command
QL series
FTP sessions P13-1
safety considerations P12-1
setting IP address P12-7
WLAN operating modes
infrastructure mode P14-83
WlLAN operating modes,
ad hoc mode P14-83
Networking commands
using set/get/do parameters P14-38
NO_PACE Command P8-9
NW7 barcode P5-12
Index-8
Mobile Printer CPCLProgramming Manual
O
Odometer Parameters P14-29
Off Command P15-6
ON-FEED Command P8-16
ON-OUT-OF-PAPER Command P8-15
P
PACE Command P8-6
PAGE-HEIGHT Command P9-10
PAGE-WIDTH Command P8-4, P9-7, P9-10
PAPER JAM Command P11-4
Paper supply status. See Get Extended Printer Status
PAPER-JAM Command P10-24
PARTIAL-CUT Command P8-30, P9-15. See also CUT-AT Command
PATTERN command P7-6
PCX Command P7-10, P9-15. See also Graphics Commands
PDF (Portable Data File) Bar Code. See Two Dimensional Barcode
Commands
PDF417 Barcode P6-2
Plus 2 & plus 5 extensions. See UPC and EAN/JAN barcodes
POST-TENSION. See TENSION Commands
POSTFEED Command P8-19
Postnet barcode P5-13
USPS Publication 25 P5-14
Power Management P15-4
and Short-Range Radio Control P15-5
Off Command P11-5. See also Printer Escape Commands
using DSR P15-4
Power On/Off Control. See Power Management
PRE-TENSION. See TENSION Commands
PREFEED Command P8-18
PRESENT-AT Command P8-20, P9-14
Presentation(peeler) sensor. See Get Extended Printer Status
PRINT command P2-3
Printer Configuration and Setup P15-1
Printer Control Commands P2-2
Printer Escape Commands P11-1, P11-2
Printer Information P1-3
Programming Language
setting P14-14
Programming Language Emulation P1-1
recommended use of P1-2
Mobile Printer CPCLProgramming Manual
Index- 9
INDEX (continued)
Q
QL series printers
LCD control panel P13-1
R
RE-RUN command P15-9
READCCL.LBL P11-1
REPRINT. See ON-FEED Command
REWIND Command P8-11
REWIND-OFF. See REWIND Command
REWIND-ON. See REWIND Command
Ribbon status. See Get Extended Printer Status
RIGHT. See Justification Commands
ROTATE Commands P4-8
RUN.BAT Command P15-8
S
S-CARD Command P10-34
Scalable Concatenation Commands P3-8, P4-6
SCALE TO FIT Commands P4-4
SCALE-TEXT Commands P4-2
SET-DATE command P10-20
SET-TIME command P10-18
SET-TOF Command P9-12, P14-26
set/get/do commands P14-1
Bluetooth parameters P14-5
networking parameters P14-38
SETBOLD Command P9-8
SETCCL.LBL P11-1
SETFF Command P2-4, P9-11
SETLF Command P9-5
SETLP. See SETLP command
SETLP Command P9-4
SETLP-TIMEOUT Command P9-16
SETMAG command P3-14
SETSP Command P8-14, P9-9
setvar Command P14-2
setvar parameters
bluetooth.authentication P14-6
bluetooth.bluetooth_pin P14-7
bluetooth.discoverable P14-8
bluetooth.friendly_name P14-9
Index-10
Mobile Printer CPCLProgramming Manual
comm.baud P14-11
comm.parity P14-11
comm.stop_bits P14-12
device.friendly_name P14-13
device.languages P1-2, P14-14
display.backlight P14-16
display.contrast P14-16
display.text P14-17
input.capture P14-23
ip.addr P14-38
ip.bootp.enable P14-39
ip.dhcp.cid_prefix P14-41
ip.dhcp.cid_type P14-42
ip.dhcp.cid_value P14-43
ip.dhcp.enable P14-40
ip.ftp.enable P14-44
ip.gateway P14-44
ip.http.enable P14-45
ip.lpd.enable P14-45
ip.mirror.auto P14-91
ip.mirror.freq P14-92
ip.mirror.password P14-93
ip.mirror.path P14-93
ip.mirror.server P14-94
ip.mirror.username P14-94
ip.netmask P14-46
ip.pop3.enable P14-47, P14-49, P14-50, P14-51
ip.pop3.password P14-47
ip.pop3.poll P14-48
ip.pop3.print_body P14-49
ip.pop3.print_headers P14-49, P14-51
ip.pop3.save_attachments P14-50
ip.pop3.server_addr P14-50
ip.pop3.username P14-51
ip.pop3.verbose_headers P14-51
ip.port P14-52
ip.remote P14-52
ip.remote_autoconnect P14-53
ip.remote_port P14-54
ip.smtp.enable P14-54
ip.smtp.server_addr P14-55
ip.snmp.enable P14-55
ip.snmp.get_community_name P14-56
ip.snmp.set_community_name P14-57
ip.tcp.enable P14-58
Mobile Printer CPCLProgramming Manual
Index- 11
INDEX (continued)
ip.telnet.enable P14-59
ip.udp.enable P14-59
media.sense_mode P14-25
media.tof P14-26
media.type P14-27
media.width_sense.enable P14-20
odometer.latch_open_count P14-30
odometer.media_marker_count P14-31
odometer.user_label_count P14-32
power.dtr_power_off P14-33
power.inactivity_timeout P14-34
power.low_battery_timeout P14-34
wlan.auth_type P14-65
wlan.encryption_index P14-67
wlan.encryption_key1 P14-68
wlan.encryption_key2 P14-69
wlan.encryption_key3 P14-70
wlan.encryption_key4 P14-71
wlan.encryption_mode P14-72
wlan.essid P14-73
wlan.international_mode P14-74
wlan.kerberos.kdc P14-75
wlan.kerberos.mode P14-72, P14-76
wlan.kerberos.password P14-77
wlan.kerberos.realm P14-78
wlan.kerberos.username P14-79
wlan.leap_mode P14-80
wlan.leap_password P14-81
wlan.leap_username P14-82
wlan.operating_mode P14-83
wlan.power_save P14-84
wlan.preamble P14-85
Short-Range Radio Control. See POWER MANAGEMENT
SmartCard reader. See S-CARD command
software version, ascertaining P14-1
SPEED Command P8-13
Synchronized On/Off Control P15-4
T
TENSION Commands P8-12
TEXT Command P3-4, P6-5
Text Concatenation Commands P3-8, P4-6
Index-12
Mobile Printer CPCLProgramming Manual
Time stamp
Printing P10-22
TIMEOUT Command P10-14
TONE Command P8-2
top-of-form. See SET-TOF Command. See SET-TOF Command
Two Dimensional Barcode Commands P6-1
two-key reset. See Printer Information
TYPE P10-8. See also Advanced Utilities
U
UCC-128 Shipping Standard P5-10
Units Commands P2-6, P9-3, P9-8
UPC and EAN/JAN barcodes
number system character P5-3
Plus2 and Plus 5 Extensions P5-5
UPC-E barcode P5-4
USE-FORMAT. See Format File Commands
UTILITIES Command P9-2
V
VBARCODE. See BARCODE command
VCOMPRESSED-GRAPHICS Command. See Graphics Commands
VCONCAT P3-8. See TEXT Concatenation Commands
VERSION P10-2. See also Advanced Utilities
VEXPANDED-GRAPHICS Command. See Graphics Commands
VSCALE-TEXT. See SCALE-TEXT Commands
VSCALE-TO-FIT. See SCALE TO FIT Commands
W
WAIT Command P8-10
Wireless Network Printers. See Network Printers
WML language P13-1
tags used for LCD display P13-7
X
X and Y Values,
moving with P9-6
Mobile Printer CPCLProgramming Manual
Index- 13
Appendices
APPENDIX A-Frequently Asked Questions
These FAQ’s are in no particular order. They cover the
most commonly encountered questions asked about our
portable printers.
Q.
The first label I print is fine, but the next one starts
printing not as close to the top of the label form,
then sometimes skips a label, then prints a good
label.
A.
Make sure that you only have one carriage return/
line feed pair after the PRINT statement in your
label. If there is more than one CR/LF pair, the
printer prints the label, then sees the extra CR/LF
pairs as data to be printed in line print mode. This
advance causes the next label to be registered
incorrectly when a new label file is sent.
Q.
I send a label to the printer, and the label begins
to print. Before all of the label is printed, there is a
feed to the next label. This happens for 2 attempts
before the printer stops.
A.
Make sure that the label length specified in your
command line is shorter than the distance between
your eye sense marks on the label stock. If you are
asking to print, say a 400 dot long label and the
label stock eye sense marks are 300 dots apart, the
printer ‘sees’ an eye sense mark before the entire
label has printed and assumes the label stock was
not at top of form. It then feeds to the next top of
form and tries again. After 2 tries, the printer advances to the next top of form and stops.
Q.
When I send a label to the printer , the label file
gets printed, and not the label itself.
Mobile Printer CPCLProgramming Manual
A-15
APPENDIX A (continued)
A.
If you are getting the label file printed instead of
the label, the syntax of the first line may be incorrect. Check that the syntax is something like: ! 0 200
200 210 1 where the 210 is the label length and 1 is
the quantity. If the printer detects an invalid first line,
the command mode is not entered. Instead, the
printer acts as a generic line printer, and the remaining lines are treated as raw text to be printed.
Q.
My printer doesn’t seem to respond when I send
anything to it.
A
Make sure that you have the same communications parameters for both the printer and the device
connected to it. You can determine the printer’s
settings by turning the printer off, then while holding
the feed key down, turning the printer back on. It
should respond by printing a report, pause for about
3 seconds, then print a second report. If you look
through these reports, you will find an entry for the
current baud rate setting. A good progression for
finding problems like this is to use the MPU.EXE
utility. Connect the cable, then turn the printer off.
Now run the MPU utility. When this utility starts, it
should turn the printer on. If the printer will not turn
on, check the com port and cable. Now select option
2 (Get printer status) from the menu. If there is no
response, you probably have mismatched baud
rates.
Q.
There seems to be missing or garbled characters
sent to the printer.
A.
Some systems may alter characters before they
are sent to the printer. The ‘\’ character for example
A-16
Mobile Printer CPCLProgramming Manual
APPENDIX A (continued)
may be taken as an escape for the following character. You can place the printer in a ‘DUMP’ mode to
see exactly what characters are being received. In
this mode, any character that comes into the printer
is printed in both its ASCII form and as a hex value.
To place the printer in dump mode, turn the printer
off, hold down the FEED key, and turn the printer
on. When a report begins to print, release the feed
key. After the first report there will be a pause, then
a second report. At the end of this report, you will
have about 3 seconds to press the feed key to enter
Communications Diagnostic (DUMP) Mode. (Refer
to pg. P1-6) If you are successful, you will see the
message “Dump Mode Entered” on the label along
with the Com port settings. You can now send your
data to the printer, then examine the resulting label
to determine if all characters received are as expected.
Q.
The labels I am producing have fields missing, but
the command syntax to produce these fields
seems to be correct.
A.
Insure that the entire text or bar code fields you
are trying to print are positioned within the label
borders when printed. Some commands will print
the requested field only if it will ‘fit’ on the label.
Also insure that the requested font and size specified in your label file is resident in the printer. Some
applications make use of the flash file system to
store custom fonts. If these fonts are missing, the
result is a blank field. This also applies for any .PCX
image files that may be used in your label files.
Mobile Printer CPCLProgramming Manual
A-17
APPENDIX B- Interface Cables
BIDIRECTIONAL SERIAL INTERFACE CABLE
Part Number BL13402-1
Use only with Bravo printers configured with standard DB9 serial I/O
connector
10'
Pin 9
Pin 1
DB-9 Pin
Female Plug
(to PC)
1
2
3
4
5
6
7
8
9
Signal Names
(Vcc)
(TXD)
(RXD)
(DSR)
(GND)
(DTR)
(CTS)
(RTS)
No Connect
1
2
3
4
5
6
7
8
9
Pin 9
Pin 1
DB-9 Pin
Male Plug
(to Printer)
UNIDIRECTIONAL PARALLEL INTERFACE CABLE
Part Number BL13403-1
Use only with printers configured with parallel Centronics type I/O
connector
Pin 18
10'
Pin 36
Pin 1
Pin 25
Pin 14
Pin 13
DB-25 Pin
Male Plug
(to PC)
A-18
Pin 19
Centronics 36 Pin
Male Plug
(to printer)
Pin 1
Mobile Printer CPCLProgramming Manual
APPENDIX B (continued)
BIDIRECTIONAL SERIAL INTERFACE CABLE
Part Number BL11757-000
8-Pin DIN to 9-Pin DB PC Cable
Use to connect all Zebra Mobile Printers to a P.C.
Pin 9
PC Signals
(TXD)
(RXD)
(RTS)
Pin 1 (CTS)
(GND)
DB-9 Pin
(DTR)
Female Plug
(DSR)
(to P.C.)
Shield
3
2
7
8
5
4
6
Printer Signals
1 (RXD)
2 (TXD)
3 (CTS)
4 (RTS)
5 (GND)
7 (DSR)
8 (DTR)
Shield
3
5
7
2
8
6
1
4
8 Pin
Male Plug
(to printer)
Part Number BL16555-1 (Molded Right Angle DIN Housing to 9-Pin DB)
For use on Zebra "Alpha" Series Printers (e.g. QL 220)
PIN 9
DB-9 PIN FEMALE
(PC Signals)
(TXD) 3
(RXD) 2
(RTS) 7
(CTS) 8
(GND) 5
PIN 1 (DTR) 4
(DSR) 6
SHIELD
Mobile Printer CPCLProgramming Manual
8 PIN DIN
(Printer Signals)
1 (RXD)
7
6
2 (TXD)
1
8
3 (CTS)
3
4 (RTS)
5 2 4
5 (GND)
7 (DSR)
8 (DTR)
8 Pin Male Plug
SHIELD
(to printer)
A-19
APPENDIX B (continued)
USB INTERFACE CABLE
Part Number AT17010-1; USB A to USB Mini B Cable
For use with QL Plus and RW Series only.
A-20
Mobile Printer CPCLProgramming Manual
Mobile Printer CPCLProgramming Manual
PDT3100/3500
/6100 Series
PDT3100 Series
BL11391-000
BL11757-000
SYMBOL
PDT3300 Series
PDT4100 Series
8’ /Coiled
8’ /Coiled
BL12093-1
BL12093-2
8’ /Coiled
6’ /Straight
6’/Straight
BL11757-000
8’/Coiled
BL12093-1
8’ /Coiled
12’/Coiled
8’ /Coiled
8’ /Coiled
8’ /Coiled
8’ /Coiled
6’/Straight
BL11537-1
BL11537-2
BL12803-1
BL12804-1
BL13298-1
BL13309-1
6’/Straight
BL17757-000
8’ Coiled
Cord
Lgth/Type
BL17757-000
BL12093-3
Cable
Part Number
NORAND
RT1100/1700 Series
RT1100/1700 Series
RT5900 Series
RT1100/1700 Series
RT1100/1700 Series
RT1100/1700 Series
6400
LXE
MX1,MX3
1380,1390,1590
2325
COMPSEE
Apex II
Terminal
RJ45
RJ45
DB25 male
9 Pin DB Fem.
9 Pin DB
8 Pin DIN
8 Pin DIN
8 Pin DIN
8 Pin DIN
Percon Falcon
Power On/Off (DTR Line)
Must be used with Symbol RS232
Adapter - Symbol PN#25-12059-01
a. Power On/Off (+5V) b. Used for the
8 Pin DIN Over-molded
8 Pin DIN
8 Pin DIN -Locking
8 Pin DIN Over-molded Auto ON/OFF
8Pin DIN
Auto ON/OFF
8 Pin DIN
6 Pin Mini DIN
8 Pin DIN Over-molded
Power On/Off (+5V)
Notes
6 Pin MiniDIN
15 Pin D-Sub
6 Pin MiniDIN
6 Pin MiniDIN
8 Pin DIN
8 Pin DIN
8 Pin DIN
8 Pin DIN
Printer
Connector
6 Pin MinDIN
9 Pin DB
RJ45
9 Pin DB
RJ45
Terminal
Connector
APPENDIX B (continued)
INTERFACE CABLES
A-21
A-22
TELXON
960
960SL Adapter
for BL11122-1
960 (BL11122-1)
& 960SL (CC13711-1)
960
860 & 912
TEKLOGIC
7030 ILR
7025 ILR
SYMBOL (CONT.)
SPT1700 Series
SPT2700 Series
LRT/LDT3800 Series
LRT/LDT3800 Series
(2 Way)
LRT/LDT3800
& 6800 Series
LRT/LDT3800
& 6800 Series
Terminal
Coiled
n/a
8’ /Coiled
8’ /Coiled
CP74005
BL12996-1
CL11314-000
8’ /Coiled
n/a
CC13711-1
BL11122-1
Coiled
6’ / Coiled
CC11371-15
BL13285-1
6’ / Coiled
CC11371-14
BL13285-2
PIM Optical
6’ / Coiled
RJ45
DB25
n/a
RJ45
n/a
15 Pin DB male
36 Pin IDC Fem
PIM Optical
PIM Optical
8 Pin DIN
8 Pin DIN
8 Pin DIN-Locking
8 Pin DIN
n/a
8 Pin DIN
n/a
8 Pin DIN
8 Pin DIN
8 Pin DIN
8 Pin DIN
8 Pin DIN
8 Pin DIN
Cradle
PIM Optical
Printer
Connector
Cradle
Terminal
Connector
9’ /Coiled
9’ /Coiled
6’ /Coiled
Cord
Lgth/Type
BL15483-1
BL15482-1
CC11371-3
CC11371-14
Cable
Part Number
“S” Printers Only
“S” Printers Only
Power On/Off (DTR Line)
“S” Printers Only
“S” Printers Only
No Power On/Off (DTR Line)
Notes
APPENDIX B (continued)
INTERFACE CABLES
Mobile Printer CPCLProgramming Manual
APPENDIX B (continued)
DENSO BHT CABLE INTERFACE
3
5
7
2
8
6
1
1
2
4
3
Mobile Printer CPCLProgramming Manual
A-23
APPENDIX C- Character Tables
ASCII TABLE HEX VALUES
INTERNATIONAL ISO SUBSTITUTION CHARACTERS
This table references the ISO symbol set substitutions performed for various
countries. The ISO symbol set contains the same characters as the ASCII symbol
set except for the character values listed in the table.
A-24
Mobile Printer CPCLProgramming Manual
APPENDIX C (continued)
CP-850 CHARACTER SET
Mobile Printer CPCLProgramming Manual
A-25
APPENDIX C (continued)
LATIN 1 CHARACTER SET
A-26
Mobile Printer CPCLProgramming Manual
APPENDIX C (continued)
LATIN 9 CHARACTER SET
Mobile Printer CPCLProgramming Manual
A-27
APPENDIX D - Font Information
FONT NAMES
Name
Font Number
Standard .................................. 0
Script ..................................... 1
OCR-A .................................... 2
Unison .................................... 4
Manhattan ................................. 5
MICR ..................................... 6
Warwick ................................... 7
FONT HEIGHTS
The following table contains the font heights. The height values are in pixels.
FIXED-WIDTH FONTS
The following table contains the font widths for the fixed-width fonts. Only one width
is given for each font/size combination since every character in that font/size
combination has the same width. The proportional-width fonts follow, with a
separate table for each. The space character will be substituted for empty values in
these tables.The width values are in pixels.
A-28
Mobile Printer CPCLProgramming Manual
APPENDIX D (continued)
PROPORTIONAL WIDTH FONTS
FONT WIDTH IN DOTS-FONT 1, SIZE 0
FONT WIDTH IN DOTS-FONT 4, SIZES 0-1
Mobile Printer CPCLProgramming Manual
A-29
APPENDIX D (continued)
FONT WIDTH IN DOTS-FONT 4, SIZES 2-7
FONT WIDTH IN DOTS-FONT 5, SIZES 0-1
A-30
Mobile Printer CPCLProgramming Manual
APPENDIX D (continued)
FONT WIDTH IN DOTS, FONT 5, SIZES 2-3
Mobile Printer CPCLProgramming Manual
A-31
APPENDIX E-BAR CODE QUICK REFERENCE
Ideal
Wide/Narrow
Ideal
Narrow Checksum
Bar code
Bar code
Symbology
Type
Input Length
UPC-A
UPC-A plus 2
UPCA
UPCA2
11 or 12 digits* 0-9 only
13 digits*
0-9 only
2:1
2:1
2
2
mod 10
mod 10
UPC-A plus 5
UPCA5
16 digits*
0-9 only
2:1
2
(UPC-A)
mod 10
UPC-E
UPC-E plus 2
UPCE
UPCE2
6, 7 or 11 digits* 0-9 only
8 or 13 digits* 0-9 only
2:1
2:1
2
2
mod 10
mod 10
UPC-E plus 5
UPCE5
11 or 16 digits* 0-9 only
2:1
2
(UPC-E)
mod 10
EAN/JAN-13
EAN/JAN-13
EAN13
12 or 13 digits* 0-9 only
2:1
2
plus 2
EAN132
14 digits*
2:1
2
(EAN13)
Characters Ratio
Dot Width Calculation
(UPC-A)
(UPC-E)
EAN/JAN-13
plus 5
0-9 only
mod 10
mod 10
EAN135
17 digits*
0-9 only
2:1
2
mod 10
(EAN13)
EAN/JAN-8
EAN/JAN-8
EAN8
6, 7 or 8 digits* 0-9 only
2:1
2
mod 10
plus 2
EAN82
9 digits*
0-9 only
2:1
2
mod 10 (EAN8)
EAN85
12 digits*
0-9 only
2:1
2
mod 10 (EAN8)
Variable
See notes* 2.5:1
2
none
39C
Variable
See notes* 2.5:1
2
mod 43
F39
Variable
See notes* 2.5:1
2
none
F39C**
Variable
See notes* 2.5:1
2
mod 43
Code 93 (9 of 3) 93
Interleaved
Variable
128 ASCII
1.5:1
1
two mod 47
2 of 5
I2OF5
Interleaved 2 of 5
See notes*
0-9 only
2.5:1
2
See notes*
w/check digt
Industrial
I2OF5C
INDUST
See notes*
0-9 only
2.5:1
2
mod 10
2 of 5
2OF5
Industrial 2 of 5 INDUST
w/ check digit
2OF5C
Code 128
See notes*
0-9 only
2.5:1
2
See notes*
See notes*
0-9 only
2.5:1
2
mod 10
Variable
See
See notes* 1.5:1
See
3:1
1
3
mod 103
mod 103
notes*
0-9,A-D
2.5:1
2
none
2.5:1
2
mod 16
EAN/JAN-8
plus 5
Code 39 (3 of 9) 39
/A/B/C/Auto
UCC-128Std.
128
UCCEAN
Codabar
16
notes*
CODABAR Variable
symbol
A-32
CODABAR Variable
0-9,A-D,
16
symbol
Mobile Printer CPCLProgramming Manual
APPENDIX E (continued)
Bar code
Symbology
Bar code
Type
Input Length
Ideal
Ideal
Wide/Narrow Narrow Checksum
Characters Ratio
Dot Width Calculation
MSI Plessey
MSI
13 digits max
0-9 only
Postnet
2:1
2
none
MSI10
13 digits max
0-9 only
2:1
2
mod 10
MSI1010
13 digits max
0-9 only
2:1
2
two mod 10
MSI1110
13 digits max
0-9 only
2:1
2
mod 11 mod 10
POSTNET 5, 9, 11 digits
0-9 only
3.5:1
3
mod 10
FIM
A, B, or C
1.5:1
6
N/A
Facing
Ident Mark
A, B, or C only
* Refer to the discussion of this particular bar code in Section Five for more information.
**To make a HIBCC compliant bar code, use bar code type F39C. See the document "The
Health Industry Bar Code (HIBC) Supplier Labeling Standard" from the Health Industry Business
Council, 5110 N. 40th Street, Suite 250, Phoenix, Arizona 85018.
Mobile Printer CPCLProgramming Manual
A-33
APPENDIX F - Product Support
MEDIA SUPPLIES
To insure maximum printer life and consistent print quality
and performance for your individual application, it is
recommended that only media produced by Zebra be
used. These advantages include:
•
Consistent quality and reliability of media products.
•
Large range of stocked and standard formats.
•
In-house custom format design service.
•
Large production capacity which services the needs
of many large and small media consumers including
major retail chains world wide.
•
Media products that meet or exceed industry standards.
For more information call Zebra Technologies Corporation at 1-866-230-9495 and ask to speak to a Media
Sales Representative.
A-34
Mobile Printer CPCLProgramming Manual
APPENDIX F (continued)
MAINTENANCE SUPPLIES
In addition to quality media provided by Zebra, it is recommended that the print head be cleaned as prescribed
in the User's Manual for individual models. The following
items are available for this purpose:
•
Print Head Cleaning Pads (10 pack),
Reorder No. AN11207-1
(For use with all Zebra mobile printers.)
•
Print Head Cleaning Cards (10 pack),
Reorder No. AN11208-1
(Recommended for use with MP50XX, M2, and M4 printers.)
•
Cleaning Kit with Alcohol, Cleaning Card, and Cotton
Swabs, Reorder No. AT700
(Recommended for use with MP50XX, M2, and M4 printers.)
•
Cleaning Kit with Alcohol, Cleaning Pad, and Cotton
Swabs, Reorder No. AT700-2
(Recommended for use with RP3 printer.)
•
Cleaning Kit with Cleaning Pen and and (5) Cleaning
Swabs, Reorder No. AT702-1
(Recommended for use with Bravo and QL series printers)
•
Cleaning Pen 10 Pack, Reorder No. AN11209-1
(Recommended for use with all Zebra mobile printers.)
Mobile Printer CPCLProgramming Manual
A-35
APPENDIX F (continued)
TECHNICAL SUPPORT
For product support, contact Zebra Technologies at:
www.zebra.com
Zebra Technologies International, LLC
333 Corporate Woods Parkway
Vernon Hills, Illinois 60061-3109 USA
Phone: +1.847.793.2600 or +1.800.423. 0422
Fax: +1.847.913.8766
Zebra Technologies Europe Limited
Zebra House
The Valley Centre, Gordon Road
High Wycombe
Buckinghamshire HP13 6EQ, UK
Phone: +44.1494.472872
Fax: +44.1494.450103
Zebra Technologies
Latin American Sales Office
9800 NW 41Street
Suite 220
Doral, Florida 33178 USA
Phone: +1.305.558.8470
Fax: +1.305.558.8485
Zebra Technologies Asia Pacific, LLC
16 New Industrial Road
#05-03 Hudson TechnoCentre
Singapore 536204
Phone: +65-68580722
Fax: +65-68850838
A-36
Mobile Printer CPCLProgramming Manual