1
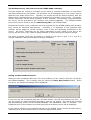
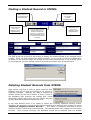
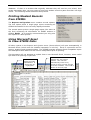
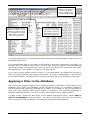
STEMS 2008
For High Schools (7-10/12)
Designed & Developed by Stuart Hasic
NOTE: This database system is subject to the guidelines and conditions of
the Privacy and Personal Information Protection Act 1998 and the Education
Act 1990. It is intended for internal NSW DET use only. Individual school
Principals, authorised users and the District Superintendent are responsible
for maintaining the private nature of this data.
School Transition Enterprise Management System for High Schools
Page 1
The School Transition Enterprise Management System User Manual for 7-12 Schools
Fifth Edition published July 2008
STEMS Software and Documentation is
Copyright 2002-2008 by Stuart Hasic:
Australian and International Copyright Laws protect this document
and accompanying software. No part of this document or accompanying
software may be reproduced or transmitted in any form by any means
without written permission from Stuart Hasic.
DISCLAIMER:
Steps have been taken to ensure that the information contained in this
document is correct as at the time of publication. However, it is possible
that changes to the software in the future may make this document
out-dated. No responsibility will be taken for damage to or loss of data
caused directly or indirectly as a result of the use of the information
in this document.
Licence Agreement
This is a legal agreement between you, the end user and Stuart Hasic hereafter referred to as the DEVELOPER. By installing the ‘School Transition
Enterprise Management System’ (STEMS), you are agreeing to be bound by the terms of this agreement as set out below.
DEVELOPER’s Software Licence
1. GRANT OF LICENCE – Upon payment of the specified licence fee, the DEVELOPER grants an entire School District the right to use a specially
personalised copy of the STEMS software program (the 'SOFTWARE') on as many computers as is required in district schools covering years
Kindergarten through to year 12, as well as the District Office. This licence does NOT cover State Office use of the SOFTWARE. Both the licenced
District’s schools and the District Office are granted the right to use a networked installation of the SOFTWARE on any number of networked
workstations at a single site concurrently. A personalised copy of STEMS will not work for an unlicenced school district.
2. COPYRIGHT - The SOFTWARE is owned by the DEVELOPER and is protected by Australian Copyright laws and international treaty provisions.
Therefore, you must treat the SOFTWARE like any other copyrighted material (e.g. a book or musical recording) except that you may make one
copy of the SOFTWARE solely for backup or archival purposes. You may not copy the written materials accompanying the software for use of any
type outside the school campus.
3. OTHER RESTRICTIONS - You may not rent, lease or transfer the SOFTWARE and/or accompanying written materials on either a temporary or
permanent basis. You may not reverse engineer, decompile or disassemble the SOFTWARE.
Limited Warranty
The DEVELOPER warrants that the SOFTWARE will perform substantially in accordance with the accompanying written materials for a period of
90 days from the date of receipt. The DEVELOPER and his Authorised Distributors’ entire liability and your exclusive remedy shall be, at the
DEVELOPER’s option, (a) return of the price paid for the licence or (b) repair or replacement of the SOFTWARE that does not meet the
DEVELOPER’s Limited Warranty and which is returned to the Authorised Distributor with a copy of your invoice. This Limited Warranty is void if
failure of the SOFTWARE has resulted from accident, abuse, or misapplication. Any replacement SOFTWARE will be warranted for the remainder
of the original warranty period or 30 days, whichever is longer.
NO OTHER WARRANTIES – The DEVELOPER and the Authorised Distributor disclaim all other warranties, either expressed or implied, including
but not limited to implied warranties of merchantability and fitness for a particular purpose, with respect to the SOFTWARE and the accompanying
written materials. This limited warranty gives you specific legal rights. You may have others which vary from state to state and country to country.
NO LIABILITY FOR CONSEQUENTIAL DAMAGES - In no event shall The DEVELOPER nor the Authorised Distributor be liable for any damages
whatsoever (including, without limitation, damages for loss of business profits, business interruption, loss of business information, or other
pecuniary loss) arising from the use of or inability to use this product, even if the DEVELOPER or the Authorised Distributor have been advised of
the possibility of such damages. Because some states do not allow the exclusion or limitation of liability for consequential or incidental damages,
the above limitation may not apply to you.
This Agreement is governed by the laws of the State of New South Wales, Australia. Should you have any questions concerning this Agreement, or
if you wish to contact the DEVELOPER for any reason, please write to - Stuart Hasic via eMail at: [email protected]
How to Get User Support for the STEMS Software:
If you have encountered a problem with using STEMS, you should first take note of exactly what you were trying to do
and what messages displayed or symptoms evident. The following resources should be used - in order - in obtaining
support for the STEMS software:
This user documentation
http://stuhasic.com/stems
Your Region’s STEMS Coordinator
If there is still an unresolved problem, the District STEMS
Coordinator should take full detail of the problem and
report it to the DEVELOPER for prompt attention.
School Transition Enterprise Management System for High Schools
Page 2
Introduction:
The School Transition Enterprise Management System (STEMS) has been designed to provide
individual schools, entire school districts and education departments with necessary
information about students progressing from Primary school (year 6) to High school (year 7).
This single application is able to run in various modes:
Primary School Mode:
•
•
•
•
•
•
•
•
•
•
•
•
•
Allows for the easy data entry of details of all students - K through 6
Exports base student details from OASIS and imports into the STEMS
Import from OASIS whenever necessary to generate new STEMS records for new
enrolments
Specific K-6 student tracking form with Accident and Miscellaneous Info Registers
Archives STEMS data for students that have left the school - archives can be reopened
easily
Includes a STEMS Photo Studio utility for the quick and easy taking of photographs of
students and attaching them to each student's STEMS record
Prints a data collection form for easy gathering of data
Stores data covering student, academic and support profiles as well as comprehensive
K-6 tracking information
Prints a single page report for each student after data has been entered
Allows for storage of user-definable student survey responses
Dozens of reports and filters interact with MS Excel for customised reporting and
evaluation of data - the perfect management tool
Easy nomination of High School for year 6 students - all DET schools included
Compresses, encrypts and electronically transfers completed year 6 data to the District
Office
District Office Mode:
•
•
•
•
•
•
•
•
Receipt, decompression and import of all year 6 data from all primary schools in the
District
Automatic sorting of all students into groups based on their nominated high school
Creation of separate databases of new year 7 students for each high school
Compresses and electronically transfers all new year 7 data to each high school,
respectively. (i.e. each high school only receives details about their new students)
Identifies year 6 students enrolling in schools in other districts and transfers their
details to the respective district office
Identifies all students enrolling in religious and other non-government high schools, as
well as those students moving interstate or overseas
Provides a range of inquiries, filters and reports for management purposes
Export of data and reports to MS Excel
High School Mode:
•
•
•
•
•
•
•
•
Receipt, decompression and import of all new year 7 data from various District Offices
Import of student enrolment information for all students (7-12) from OASIS
Manual STEMS data entry of students whose details were not automatically imported
from Primary Schools
Archives STEMS data of students that have left the school - archives can be reopened
easily
Includes a STEMS Photo Studio utility for the quick and easy taking of photographs of
students and attaching them to each student's STEMS record
Searching, sorting and reporting of data
Export of data and reports to MS Excel
Provides excellent planning information for school leaders and teachers
School Transition Enterprise Management System for High Schools
Page 3
What Data is Collected with STEMS ?
STEMS stores information about all students, including:
Student Profile:
Cultural background, year, teacher, special talents, attendance, date of birth, etc.
Academic Profile:
Achievement in Maths and English, all BST Bands, ESL Phase, Behaviour/Attitude, etc.
Support Profile:
Health issues, Diagnosed Disorders, Special Placements, Itinerant Support, Therapy, etc.
Issues/Comments:
General comments that about each student, etc.
Student Survey:
Six user definable questions to assist schools to gauge students’ attitude to school.
K-6 Tracking:
Repetition, Immunisation, Class Placements, Absences, ESL Scales, Student photo, Student
Accident Register, Miscellaneous Information Register, etc.
STEMS - System Requirements:
STEMS is only available for Windows computers including all of the following Windows
platforms - 98/ME/NT/2000/XP. There are no plans to develop an Apple Macintosh version. It
is recommended for Primary Schools that the program be installed on the local hard disk of a
computer connected to the school network (i.e. with DET Intranet access). A Pentium II or
better computer with 64MB RAM or better is recommended. Adobe Acrobat Reader should be
available. Complete System Requirements are listed at the STEMS Website.
If your school has a server available, STEMS can be installed to the server and shared across
the network with multiple simultaneous users. Instructions for installing STEMS to a Windows
or Netware server are available on request. It is strongly recommended that the screen
resolution on STEMS workstations be set to 800x600, but 1024x768 is preferred.
How to get STEMS:
The STEMS is available as a single file download via the Internet from the STEMS website:
http://stuhasic.com/stems
STEMS is personalised to each District. In other words, all schools in St George district,
including the District Office can only use the St George district version of STEMS. Schools in
other districts must obtain their own district’s version before it can be used.
The single file download, STEMSSETUP.EXE is a self-contained program that extracts and
installs itself onto your computer or server.
Installing STEMS:
Download the STEMSSETUP.EXE file to your Desktop and then run it. The following screen will
be displayed:
School Transition Enterprise Management System for High Schools
Page 4
specify the server path where you want STEMS installed into.
displayed.
Read the screen then
click the OK button to
continue. The following
screen will then be
displayed. For a standalone installation, it is
recommended that you
leave the path to extract
the STEMS program to
as C:\STEMS.
For a
fileserver
installation,
The following screen will be
When ready, click the Extract button.
Do not remove the tick from the “run
setup.exe” prompt.
A folder called STEMS will be created on
your C: drive (local hard disk), or in your
specified path, with several programs
and support files and sub-folders
extracted to it. One extracted program,
SETUP.EXE will automatically be run after
the extraction process is complete.
SETUP.EXE is used to create a desktop
shortcut to the STEMS program, transfer
support libraries to the Windows System folder and register the libraries for use by your
computer. If you have performed a server installation, you MUST run SETUP.EXE for each
workstation that is to run STEMS.
When SETUP.EXE is being run, if your
computer is using Windows 98, NT or
2000 and does not have recent
Windows patches applied, you may
have to install the latest version of the
Windows Scripting Host. This will be
determined automatically, and the
installation will start automatically. If
the Scripting Host is updated, you will
be forced to reboot your computer to
enable the changes. After rebooting,
you will need to restart the SETUP.EXE
program by opening My Computer,
then opening the C: drive hard disk (or
server path you specified), then
opening the STEMS folder and doubleclicking the SETUP.EXE icon (looks like
a spanner). The Setup program screen
is displayed on the left:
A successful installation should result with both windows shown above and a new
shortcut icon for the STEMS program on your desktop. The icon is shown at the right.
Click the OK button to close the SETUP program, and you are ready to run the STEMS
program for the first time.
School Transition Enterprise Management System for High Schools
Page 5
Running STEMS for the First Time:
After successful installation, double-click the
STEMS shortcut on the desktop. The first time
STEMS is run, it will ask for the mode to set up.
STEMS can be set up separately for Primary
schools, High schools and the District Office.
The screen at right will be displayed. As this
documentation refers to High School use of
STEMS, select the High School option, then find
and select your school from the pull-down list
of school names. When ready, click the OK
button to continue.
NOTE: It is not possible to change the District name displayed. Each copy of STEMS is
personalised to a specific district. The following screen will be displayed:
A “Getting Started” message box will alert you that there is no student data in STEMS.
Your new Year 7 data will be provided by the District Office who use the STEMS to collect and
sort all year 6 data from each Primary school into each respective high school. The District
Office e-mails each high school their data to the school e-mail address. This data is then
imported into your STEMS to ensure consistency of data and save an enormous amount of rekeying time for your staff.
School Transition Enterprise Management System for High Schools
Page 6
The instructions below explain how to import this data into the STEMS.
Importing Data from Regional Office into STEMS:
Before you can import data from the Regional Office into the STEMS, you must first save the
data attachment from the e-mail message sent by the district office to the school.
The attachment will be called nnnn.zip where “nnnn” is the school code of your high school.
The file is compressed and will be uncompressed automatically by the STEMS program when
you import it. All you must do is save the attached zip file into the DATA folder inside the
STEMS folder.
Save the nnnn.zip file that
was attached to the e-mail
message from Regional
Office into the Data folder
inside STEMS
Once saved in the correct location,
choose “Import Student Data
from Regional Office…”
The import process is very quick. The STEMS will first uncompress the zipped database then
open it for display. A message will be displayed to show if the import was successful. If the
zipped database was not copied to the data folder, a message like the one shown below will be
displayed:
You will need to find the zipped database and copy it into the Data folder before trying again.
If you are attempting to import the zipped database after it has already been imported
successfully, the following message will be displayed.
As you can see, subsequent imports will OVERWRITE all records in the database, including any
manually entered records. You should only reimport your database under instruction from the
Regional Office.
Finally, to maintain privacy all imported records are READ-ONLY and cannot be changed. The
STEMS database is a record of student profiles as at the transition period and is to be used for
management and planning purposes only.
School Transition Enterprise Management System for High Schools
Page 7
The STEMS Database Form:
The High
Schools menu
contains some
useful items
Fields filled in
with gray text
have come
from OASIS
The district
this student
came from in
Year 6
The school
this student
came from in
Year 6
The tabs all
contain
simple
check
boxes, pull
down picklists, option
buttons or
text fields
for easy
data entry
Each of these
tabs contain
information
about this
student
When
you’ve
finished,
just click
here to Exit
STEMS
Simple controls
move between
each student in
the database
alphabetically
Or click here
to find a
student by
surname
Once your school’s data has been imported into the STEMS from the Regional Office, it is ready
for use. For students that have enrolled in your school from another district or from a nongovernment school, it is possible to manually enter their details into the STEMS. But before
you can enter the information, you must collect it first.
On the next page is a data collection form for the STEMS. It is recommended you photocopy
this page and supply it to the Primary schools in the other districts (or to the non-government
schools), and request the forms be completed for each new student. The form is quite selfexplanatory (as you can see on the next page), containing a series of tick boxes, options and
text entry fields. When a form is completed, the primary school Principal should sign it off
before it is sent to the high school. All paper copies of the data collection forms should be
retained for future referral if required. The STEMS is not intended to “label” students. The
information included should assist high schools to provide the best education for all students.
IMPORTANT NOTE: This form is an important part of each student’s transition to high
school and should be treated as such. Similarly, when transposing the data from the form
into the STEMS itself using keyboard and mouse, it is vital that all care be taken to ensure
the accuracy of data entry. Re-checking of data entered is also recommended.
School Transition Enterprise Management System for High Schools
Page 8
Manually Entering New Student Records:
All new Year 7 students from within the district will be imported automatically into the STEMS
through the database supplied by Regional Office. But students from other schools not in the
district and from non-government schools will need to be entered manually. Once you have
received the completed STEMS data collection forms from each school, you are ready to enter
the students into your STEMS.
The entry procedure is simple. From the High Schools
menu, choose “Manually Enter a New Student
Record…”. Because the STEMS offers no way or
editing or modifying existing student records, you must
be prepared to FULLY enter the details for new
students in one go. In other words, you cannot enter
part of the record then go back and fill in the rest. The
whole record must be completed in the one sitting. When you choose to enter a student
manually, the following message will be displayed before you can enter a new record.
You must click the Yes button before you can manually enter a new student record. The form
will be cleared, ready for data entry, as shown below.
School Transition Enterprise Management System for High Schools
Page 9
Note that the command buttons at the bottom right of the screen have changed to “Save New
Record” and “Cancel”. The Cancel button will immediately exit data entry mode and revert to
data view mode. The Save New Record button will become active immediately upon entry of a
student Surname. You should not click the Save New Record button until you have
completed all necessary data entry for the student on all tabs.
Each student record consists of five “tabs” of information covering: Student Profile, Academic
Profile, Support Profile, Issues/Comments and Student Survey. If you are entering data by
transcribing from the printed data collection form, the first thing to do is enter the name
details at the top of the screen. From there, choose the District that the student came from
and the Primary school from the list. If the student came from a non-government primary
school, then choose N/A in the PS District pull-down and select Non-Government Primary
School from the Primary School pull-down. If desired, you can type in the actual nongovernment Primary school’s name. Once the header details have been filled in, you are ready
to complete the various tabs of information.
The Student Profile Tab:
The Academic Profile Tab:
School Transition Enterprise Management System for High Schools
Page 10
The above tab contains details of Academic Achievement in English and Maths as well as
Behaviour and Attitude. Primary Schools that offer Languages can list the LOTE studied and
the ESL Phase can be selected for students from a Non-English Speaking Background.
The Support Profile Tab:
This tab contains details of Support requirements and provisions for the student. For the vast
majority of students, most of this form will be left blank. For other students, select all check
boxes that apply. If it is known that the student has a Guidance file, but its number is
unknown, simply tick the box, but leave the number field empty.
The Issues/Comments Tab:
This tab allows you to type in any additional information about this student, relevant to the
high school - for example, details of allergies, sporting restrictions, student management
issues and so on. If there is a need to discuss sensitive issues about this student, it is best to
flag it by ticking the check box at the bottom.
There is a limitation of 350 characters in the large box, so abbreviations may be necessary.
School Transition Enterprise Management System for High Schools
Page 11
The Student Survey Tab (removed from STEMS 2005 onwards):
This tab records the results of a student survey which is normally undertaken in conjunction
with data collection for the STEMS. The questions can be changed and in your version may be
different from those shown here. Typically, the schools across the district together with the
district office would determine and set the questions to be asked in the survey. All Primary
schools would then ask the same questions of their students. For manually entered students,
the survey can be provided to the students and entered separately. The STEMS Student
Survey form can be found in the file stemssurvey.pdf in you STEMS folder.
Because the student survey responses are to be entered into the STEMS against each student,
they cannot be answered anonymously. Therefore, it is important to ask questions that
students will be happy to answer honestly, even if they are identifying themselves in the
survey. Of course, responses can be wholly dependent on their mood on the day of the
survey, but this tool is very useful to gauge attitude to school during the transition period.
The same questions could then be asked in a similar survey later in year 7 or in year 8 to
provide comparison data and develop necessary strategies.
Saving the New Student Record:
When you have completed data entry for a new student, you are ready to save the record into
the STEMS database. This is simply done by clicking the Save New Record button. When
you do so, the following message will be displayed.
If you have not yet completed data entry for that student, click No and continue the entry. If
you are certain you have completed everything, click the Yes button. The record will be saved
and automatically sorted into the STEMS database into alphabetical order on surname. The
STEMS will then revert to data view mode and the first student’s record will be displayed.
If you need to add more new students manually to the STEMS, simply choose the same option,
“Manually Enter a New Student Record” from the High Schools menu.
School Transition Enterprise Management System for High Schools
Page 12
Finding a Student Record in STEMS:
This button will
always take you
one student back
(alphabetically)
This button will
always take you
to the first
student’s record
(alphabetically)
This button will
always take you
one student
forward
(alphabetically)
Click anywhere in this
area to search for a
particular student by
surname. An input box
will be displayed asking
for the desired student’s
surname
This button will
always take you
to the last
student’s record
(alphabetically)
The area at the top of the form will change to display the student details of the selected record
number. When you have selected the desired student, you are ready to enter the STEMS data.
As shown on the previous page, by clicking on the record number area, or by pressing Ctrl-S
on the keyboard, you can request a search by student surname input as shown below.
Deleting Student Records from STEMS:
High schools may find a need to delete students from
STEMS if they do not end up enrolling at the school as
originally intended. Because the data is supplied by
Primary schools by the end of week 3 of Term 4, there is
the possibility that students will change their minds
about their chosen high school and your school may end
up with data about students that do not enrol.
In the High Schools menu is an option to delete the currently displayed student record.
Therefore, the process is to first find the desired student to be deleted, then choose the option
“Delete the Displayed Student Record…”. This option is password protected to avoid
relevant student records from being deleted. The password has been supplied to the school
Principal. Once entered correctly, the displayed record will be deleted from the STEMS
School Transition Enterprise Management System for High Schools
Page 13
database. If there is a student that originally indicates they will enrol at your school, then
enrols somewhere else, you may want to print their student record to pass onto their new high
school. The following section describes this process.
Printing Student Records
from STEMS:
The Reports and Queries menu contains several options.
The first option prints a single page report containing all
STEMS information for the currently displayed student.
The second option prints a single page report (the same as
the first) containing all information for EVERY student in
STEMS. NOTE: It is strongly recommended you only print
the reports to a laser printer.
Using Microsoft Excel
to View STEMS Data:
All other reports in the Reports and Queries menu (shown above) will open automatically in
Microsoft Excel (which must be installed separately on the PC). Excel is a powerful tool for
sorting, graphing and presenting data. The STEMS program produces Excel-compatible report
files and opens them with Excel for further manipulation prior to printing.
This document will not attempt to explain how to use Microsoft Excel, however, some useful
tips when first opening a report are:
1. Click here to
select the entire
spreadsheet. It
will all then be
highlighted
School Transition Enterprise Management System for High Schools
2. Then click on the vertical line
between any two column
headers. This will then
automatically resize every
column so they are wide enough
to fit their contents. The result is
shown on the next page
Page 14
You can use the Chart
Wizard to produce pie
charts, bar charts,
column charts and so
on from STEMS data.
The file exported from the
STEMS is a CSV file. If you
decide you want to keep
any spreadsheet you have
customised, you should
save it as an XLS file.
You can now format
cells as you like, delete
unnecessary columns,
sort columns, produce
charts and graphs etc.
All reports opened in Excel include base student information including gender, date of birth and
designated high school.
It is recommended that you try each of the reports to see what information is included. All
students will be included in each report, unless a Filter has been applied. Filtered databases
restrict the number of records shown, and as a result, all reports only use records that match
the desired filter. More details on filtering in the next section.
If you wish to save reports opened in Excel, it is recommended you change the file type to
save as to XLS format from the original CSV format. It is also recommended you save the file
into a different folder. By default, Excel will open the report file in the Temporary Files folder.
Applying a Filter to the Database:
One of the more powerful features in the STEMS program is the ability to apply filters to the
database. Every field in the database can be used when filtering. It is therefore possible to
find all students that match any selected set of criteria. For example, it may be interesting to
know how many students have special talents in Computers, and what the breakdown is
between males and females. This type of query can be performed by applying filters.
To apply a filter, choose the last option in the Reports and Queries menu, called “Apply a
Filter to the Database”, as shown above. You can also hold down the Ctrl key and press the
letter F to start the filtering process. The following message will be displayed:
School Transition Enterprise Management System for High Schools
Page 15
Click the Yes button, or press Enter. The form will be cleared and you can choose any
combination of check boxes, option buttons or text settings to apply the filter. Any field that
comprises text will match the text from left to right, and it is only necessary to type enough
text to make the field unique. The Date of Birth (D.O.B.) field and the Issues and Comments
field will search for the selected text anywhere within the data field. With these fields, it is
possible to find all students with a birthday in May, by entering /05/ as the filter in the D.O.B
field, or all students with the word “disruptive” in the Comments field.
When you have set all filter criteria, click the Apply Filter
button. The STEMS program will search through the database
for all records that match the criteria. If there are no matching
records, you will be notified and allowed to change your
filtering and try again.
If records are found, the record
navigation tool will change to reflect the number of matches. Clicking the arrow buttons will
alphabetically scroll through those matching records. All of the reports in the Reports and
Queries menu will reflect only those matching records. When finished with this filtered
database, to return to the entire school STEMS database, click the Cancel button once. Use
Ctrl-F to apply a new filter.
The STEMS Photo Studio:
The STEMS Photo Studio is a utility built into STEMS which allows schools to very quickly take
photos of each of their students and attach them automatically to each student's STEMS
record, displaying the correct photo whenever a student's record is retrieved. This aids in the
quick identification of student records. With the STEMS Photo Studio, it is possible to take
photos and attach them to STEMS at the rate of two students per minute.
In order to use the STEMS Photo Studio, a computer camera is required. Virtually any USB
WebCam will work. Recommended WebCams include the Logitech Express WebCam (approx
$90) and the Swann VersaCam Mini (approx $75). Both of these colour WebCams offer up to
640x480 (VGA) resolution, making them useful for other applications within the school. Less
expensive cameras are available, offering lesser resolution, and these are still suitable as
STEMS only takes 160x120 resolution photographs (about passport size). Newer Firewire
(IEE1394) web cameras may also work, but have not been extensively tested. The minimum
requirement is that they must be "Video for Windows" compatible.
To access the STEMS Photo Studio, open the High
Schools menu and choose STEMS Photo Studio… as
shown at right.
Your compatible WebCam must be
plugged into the USB port of your workstation and the
WebCam’s driver for Windows must have been
previously installed. If the workstation you are running
STEMS on does not have a camera, the STEMS Photo
Studio utility will not work.
With a compatible WebCam installed and connected, the STEMS Photo Studio should start up
and you are ready to take photos of students.
School Transition Enterprise Management System for High Schools
Page 16
The STEMS Photo Studio automatically attaches the taken photo to the CURRENTLY displayed
STEMS student record. You MUST remember to change to the appropriate student’s record in
STEMS before taking the photograph.
The Photo Preview on the right is
actually a moving video image. Click
the Take Photo button to capture a
frame of the video as a photograph.
You can click the "Take Photo" button
as many times as you like until you
are satisfied with the photo. You can
also replace "old" photos each year if
you like.
Hovering the mouse over the photo in
STEMS (not in the Photo Studio) will
show you the date the stored photo
was taken.
It’s a good idea to consider setting up
an area of your school as a STEMS
Photo Studio. All that is required is a
STEMS workstation with a web camera
connected, located in a suitable area
where students can be brought to in
groups to have their photos taken. A
stool should be setup in front of a plain backdrop, positioned such that there will be little
movement of the camera required for framing purposes. It could be similar to the type of
setup used at the motor registry when driver’s licences are renewed. The stool should be as
close as necessary to the camera to enable a "head-shot" only (around one metre). It may be
necessary to consider using a lamp to provide extra light on the student. Avoid any light from
behind the student. Consider photographing students of similar age groups together. This
way there shouldn't be major adjustments of camera position between shots due to vast
differences in height. Remember to call up each student's STEMS record in the
database BEFORE taking their photograph.
If the video preview is too dark or too bright,
there are options you can take to ensure a
better quality photo.
First consider the
lighting of the student as well as the room
lighting. There should be a solid (usually
dark coloured) backdrop immediately behind
the student. If this does not improve the
video preview quality sufficiently, you can
click the Image Properties button to call up
the properties window (as shown at right).
You should move the properties window so
that you can see the Preview video frame that
is has covered. Once you can see both the
properties window and the Preview video
frame on the screen at the same time, adjust
the brightness, contrast and colour sliders
until the preview video is acceptable.
It is not necessary to make adjustments to
neither the Banding Filter section, nor any
settings on the Advanced or Zoom tabs.
School Transition Enterprise Management System for High Schools
Page 17
When you have finished taking photos, click the Close button on the STEMS Photo Studio.
Photos taken with the STEMS Photo Studio will automatically be displayed whenever a student
record that has a photo attached is called up. Photos will be displayed on all STEMS
workstations, not just those with a WebCam.
The STEMS Student Accident Register:
STEMS can create and attach a Student Accident Register to each student’s record by using
the option in the Reports and Queries menu. If a student’s record does not yet have an
Accident Register attached, the menu option will state: “Create Accident Register for THIS
Student…”. If the register has already been created, the menu option will state: “Open
Accident Register for THIS Student…”. It is important to note that the Accident Register
created/opened is related directly to the currently displayed student’s STEMS record.
The STEMS Accident Register is a template opened in MS Word 2000 or later. When an
Accident Register is first created for a student, it is blank and ready for data entry. It is
important that the student’s name be typed into the section on the template as it is not
transferred automatically. Type the accident entry into the template table including all
necessary details. When complete, click the Save button on the toolbar, or select File…Save.
The filename for the Accident Register is automatically specified and MUST NOT be changed.
This register can also be accessed by pressing Ctrl-A on the keyboard.
The STEMS Miscellaneous Information Register:
STEMS can also create and attach a Student Miscellaneous Information Register to each
student’s record by using the option in the Reports and Queries menu. If a student’s record
does not yet have a Miscellaneous Information Register attached, the menu option will state:
“Create Misc Info Register for THIS Student…”. If the register has already been created, the
menu option will state: “Open Misc Info Register for THIS Student…”. It is important to note
that the Miscellaneous Information Register created/opened is related directly to the currently
displayed student’s STEMS record.
The STEMS Miscellaneous Info Register is a template opened in MS Word 2000 or later. When
a Miscellaneous Info Register is first created for a student, it is blank and ready for data entry.
It is important that the student’s name be typed into the section on the template as it is not
transferred automatically. Type the miscellaneous entry into the template table including all
necessary details. When complete, click the Save button on the toolbar, or select File…Save.
The filename for the Miscellaneous Info Register is automatically specified and MUST NOT be
changed. This register can also be accessed by pressing Ctrl-M on the keyboard.
Backing Up STEMS:
Like any database system, backing up STEMS and its data is very important. The
simplest way to do this is to copy the entire STEMS folder from its installed path to a
local hard disk regularly. If available, Zip disks, CD R/W or other external media can
also be used. Backups must be kept in a secure location to maintain privacy.
Basically, you need to ensure that you are not forced to duplicate data entry because
a computer has been stolen or the hard disk has become faulty.
School Transition Enterprise Management System for High Schools
Page 18
How to Get User Support for the STEMS Software:
If you have encountered a problem with using STEMS, you should first take note of exactly
what you were trying to do and what messages were displayed or symptoms evident. The
following resources should be used - in order - in obtaining support for the STEMS software:
This user documentation
http://stuhasic.com/stems
Your Region’s STEMS Coordinator
If there is still an unresolved problem, the District STEMS
Coordinator should take full detail of the problem and
report it to the DEVELOPER for prompt attention.
School Transition Enterprise Management System for High Schools
Page 19