1
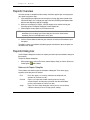
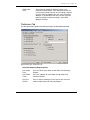
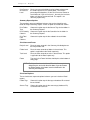
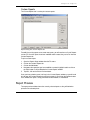
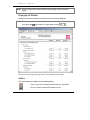
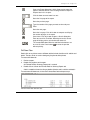
Chapter 5
Reports
BSD CostLink/AE provides clean reports for presentation to clients. The Summary report
can display costs at the folder level you choose. A Detailed Estimate is also available to
itemize the assemblies and line items in your project.
This chapter describes BSD CostLink/AE's reporting capabilities.
•
Reports overview
•
Reports dialog box
•
Report preview
•
Report descriptions
•
Creating electronic files from reports
BSD CostLink/AE User Manual
71
Chapter 5 : Reports
Reports Overview
Once the estimate is complete and the markups have been applied, you are ready to print
your reports using these steps:
1. If you would like your logo to print on the reports in the top right corner instead of the
CostLink/AE logo, save a copy of your logo in the CostLink AE\System\Reports folder
with the name logo.bmp, logo.gif, or logo.jpg.
2. When you are ready to run reports, select the reports to run and the level for your
Summary report in the Reports dialog box, Select Reports tab.
3. Choose options for the reports on the Preferences tab.
NOTE: Once you have established the report formats for an estimate, CostLink/AE
remembers the last settings you used so that you can use the same formats
repeatedly. You can make adjustments at any time.
4. Click the Preview button to look over your selections and click the Print button to print
the reports.
The options, reports, and methods of producing paper and electronic copies of reports are
described in this chapter.
Reports Dialog box
Use the Reports dialog box to choose the reports you want to print and to define settings for
those reports.
To open the Reports dialog box:
•
With a project open, from the File menu choose Reports Setup, or click the Select and
format reports
toolbar button.
Buttons on the Reports Dialog Box
These buttons and controls appear at the bottom of dialog box. Their actions apply
regardless of the tab you have selected.
72
Print
Prints the reports as currently selected and configured (not
available on Preferences tab).
Preview
Opens a print preview window showing how the currently
selected reports will look when printed on the default Windows
printer (not available on Preferences tab).
Setup
Opens the Print Setup dialog box, which you can use to choose
a different default printer or change printer settings.
BSD CostLink/AE User Manual
Chapter 5: Reports
Save as
Default
Saves current configuration as default.
OK
Closes the Reports dialog box and saves any changes you have
entered, but does not print the reports.
Cancel
Closes the Reports dialog box and cancels any changes you
have entered.
Select Reports Tab
Use this tab to select the level of the summary you want to print, and whether or not to print
the Detail report.
Reports dialog box, Select Reports tab
For more information on the report types, see “Report Descriptions” later in this chapter.
Organization
Name
Name of your company that will appear in the header on
reports.
NOTE: This defaults to the Company Name entered in
the Permissions dialog box when the software was
installed. To change the default Company Name, close
all open projects and from the File menu choose
Permissions. Enter the new Company Name and click
OK.
BSD CostLink/AE User Manual
73
Chapter 5 : Reports
Report Header
Enter an optional report description in this field (for
example “Estimate at 60%”). It will print as the second
line of the header on each page of the report.
Project Summary Report
In this area, select options for the Project Summary Report.
Levels to show in
Summary
Select the number of levels of folders that you would like
to print in the Project Summary Report. Either click the
up and down arrows, or type the number directly in the
field.
Include Level 1
Summary
In addition to the report at the number of levels you
specified above, you may also print a Project Summary
Report that summarizes the Level 1 folders only by
selecting this option.
NOTE: This option is not available if only one level is
selected for Levels to show in Summary.
Show Summary
Costs
Select how you would like Markups shown in the Project
Summary Report. If you would like to print the costs
before markups for each folder in the summary, and
then have the markups added at the end, select
Excluding Markups. If you would like the costs for each
folder to already include the markups, select With
Markups Included.
Other Reports
Use this area to select any other reports you would like to print.
74
Print Title Page
When selected, prints a title page that includes
information entered on the General tab of the Summary
Info dialog box.
Table of Contents
Check this option to include a table of contents for the
report. The table of contents prints last. After you print
you can put the table of contents after the title page.
Detailed Estimate
Report
Choose this option to print a detail report of the
estimate. This report shows the costs for every task and
folder in the estimate. See the preferences tab for
options on what to include in the costs.
BSD CostLink/AE User Manual
Chapter 5: Reports
Show Detail
Costs
Select how you would like Markups shown in the
Detailed Estimate Report. If you would like to print the
costs before markups for each task and folder, and then
have the markups added at the end, select Excluding
Markups. If you would like the costs for each task and
folder to already include the markups, select With
Markups Included.
Preferences Tab
Use this tab to choose options that affect how reports are formatted and printed.
Reports dialog box, Preferences tab
Detail and Summary Report Options
Print Folder
Titles
Prints the title of each folder on both Detail and Summary
Reports.
Print Folder
Totals
Prints the subtotals for each folder on both Detail and
Summary Reports.
Unit Cost
Column
Prints a column showing the Unit Cost for each task and
folder on both Detail and Summary Reports.
BSD CostLink/AE User Manual
75
Chapter 5 : Reports
Print Percent
of Parent to
Level
Prints a percent at the folder level to indicate what percent
this folder represents of its parent folder. To leave the
percentage off altogether, set the Print Percent of Parent to
Level field to 0. If you set it at level 1, then only the level one
folders will display the percent field. This option is for
Summary reports only.
Summary Report Options
These options represent additional columns that can be printed for each
folder on Project Summary reports. Check an option to include that column.
Print Folder
Tags
Choose this option to print the Source Tags for the folders in
the Summary Reports.
Print Quantity
Columns
Choose this option to print the Quantities for the folders in
the Summary Reports.
Print Total
Cost
Columns
Choose this option to print the subtotals for each folder.
Print Notes and Footer
Project Level
Prints the notes entered in the Summary Info dialog box on
the Project Notes tab.
Folder Level
Prints the notes entered on folders in the estimate. This
option is applicable to the Detail report only.
Task Level
Prints the notes entered on tasks in the estimate. This option
is applicable to the Detail report only.
Footer
Type text in the Footer field that should print at the bottom of
every page.
NOTE: The Project Number on the General Tab of the Summary Info
dialog box prints on the left side of the footer. If you do not want
the Project Number in the footer, leave that field blank in the
Summary Info dialog box.
Print Detail Options
These check boxes represent optional columns you can include on Detail
reports.
76
Folder Tags
Choose this option to print the tags or database IDs entered
for each folder.
Source Tags
Choose this option to print the source tags (database IDs)
associated with each task.
BSD CostLink/AE User Manual
Chapter 5: Reports
Custom Reports
The Custom Reports tab is used to print custom reports.
Reports dialog box, Custom Reports tab
To modify the existing reports or to create new reports, you will need to use Crystal Reports
version 8.5. Once the reports have been modified and/or created, they can be run from the
Custom Reports tab.
To print a custom report:
1.
2.
3.
4.
Open the Reports Setup window from the File menu.
Click on the Custom Reports tab.
Click on the Add button.
Navigate to the report that you have modified or created, highlight it and then click on
the Open button. It will be added to the Custom Reports window.
5. To print it, click on the Print or Preview button.
Once you have printed a report, it will stay in the Custom Reports window, so you will need
only to open the Custom Report tab and print the report. If you click on the Remove button
in this window, the report is simply removed from the window; it is not deleted.
Report Preview
The report preview window shows the currently selected reports as they will look when
printed on the selected printer.
BSD CostLink/AE User Manual
77
Chapter 5 : Reports
NOTE: You must have a printer driver installed on your computer in order to preview
reports.
Displaying the Window
You display the preview window by clicking Preview on the Reports dialog box.
NOTE: If the preview is too small, maximize the preview window using the Maximize button
in the upper right
, and/or zoom in using the zoom selector
.
Preview of summary report, with logo added as described later in this chapter
Actions
The report window has a toolbar with the following buttons:
Close current view. Available for drill-down only. See below.
Prints the report to the default Windows printer.
78
BSD CostLink/AE User Manual
Chapter 5: Reports
Opens the Export dialog box, which allows you to export the
report in different formats. See Creating Electronic Copies of
Reports later in this chapter.
Click the down arrow to zoom in or out.
Go to the first page of the report.
Go to the previous page.
Type the number of the page you want to view and press
Enter.
Go to the next page.
Go to the last page. Click this button to compute and display
the number of pages in the report.
Search text. Click this button to open a Search dialog box.
Enter text and click Find Next. Matching text on the current
page will display with a red selection box around it.
The standard Windows Minimize and Maximize buttons can
be used. Use the Close button ( ) to close the preview
without printing.
Drill-Down Tabs
Double-click on any title to create a drill-down tab that includes that title and its subtitles and
details. The tabs are for on-screen viewing only; they do not affect printout.
To create a drill-down tab:
1. Preview a report.
2. Double-click anywhere on the report.
An Estimate Detail or Summary Reports tab is created.
3. Double-click on a title on the Estimate Detail or Summary Reports tab.
A tab is created that shows the title you double-clicked on and its subtitles and details.
To create more drill-down tabs, click on the Estimate Detail tab and repeat step 3.
Preview window with drill-down tabs
BSD CostLink/AE User Manual
79
Chapter 5 : Reports
To remove the drill-down tabs, click the Close Current View button
.
Report Descriptions
BSD CostLink/AE produces a detailed cost report and a presentation-style summary report.
Project Summary
The Project Summary Report summarizes cost information at each folder in an estimate,
and does not list the tasks. Choose to include the markups in the costs for each folder, or to
print the direct costs for each folder with the markups listed at the end. Select the level of
breakdown using the Select Reports tab.
Detailed Estimate Report
The Detailed Estimate Report provides a complete listing of all tasks in an estimate. The
costs are totaled at each folder in the estimate, with the tasks and their totals listed below
each folder. Specify the formatting of this report using the Preferences tab of the Reports
dialog box. The Detailed Estimate Report can print the notes you attach to tasks and folders
if you select the Folder Level or Task Level options in the Preferences tab of the Reports
dialog box.
The detail report contains the following information:
•
Quantity, Unit of Measure, Unit Cost, and Total Cost for each task
•
Markups “Tail” at the end of the report, adding the Contractor Fees and Other Costs
(optional)
•
Detail costs as either Cost to Prime (Excluding Markups, the default) or Total Project
Cost (Including Markups), using the Show Detail Costs options on the Select Reports
tab
•
Assemblies as a single task, rather than line listing each assembly member
•
Folder Tags and/or Source Tags (optional)
•
Notes added to folders and/or tasks (optional)
Inserting Your Company Logo
Customize your reports by inserting a logo in the upper right corner of the reports. When
you do not have a logo, the time that you printed the reports prints in the upper right.
To insert a logo, save a copy of the logo in your CostLink AE\System\Reports folder with the
name logo.bmp, logo.gif, or logo.jpg and print the report(s).
80
BSD CostLink/AE User Manual
Chapter 5: Reports
Creating Electronic Copies of Reports
Reports can be exported to a number of file formats using the Export button in the Print
Preview window
. Exported files can be emailed to individuals who do not have
CostLink/AE, saved as archive copies of estimates, published on websites, or edited.
NOTE: If someone wants you to email an electronic copy of the estimate and they have
CostLink/AE, you can use the File > Save to Compressed feature (described in
Chapter 6) to create a zipped file that you can attach to an email. They can then
open the estimate in CostLink/AE, make edits, and send it back.
Some of the more popular export options include:
•
Adobe Acrobat Portable Document Format (PDF) - can be opened and viewed in
Acrobat Reader which can be downloaded for free from Adobe Acrobat's website
www.adobe.com. PDF files can be minimally edited in the full version of Adobe Acrobat
which is available for purchase at the same website.
NOTE: If you own the full version of Adobe Acrobat, you can choose Acrobat as your printer
in the Print Setup dialog box (available on the File menu). Print to the Acrobat
printer to generate pdf files instead of using the Export button in the Preview
window.
•
Excel (XLS) - can be opened and edited in Microsoft Excel. Formulas do not export,
just text and dollars.
•
Rich Text (Exact) Format - can be opened and edited in any word processor except
WordPerfect 5.1.
•
Word for Windows Format - can be opened and edited in Microsoft Word.
BSD CostLink/AE User Manual
81
Chapter 5 : Reports
82
BSD CostLink/AE User Manual