1
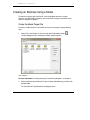
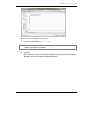
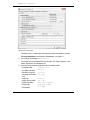
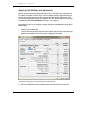
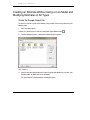
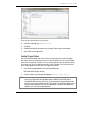
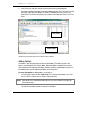
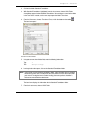
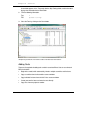
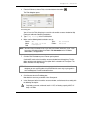
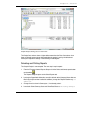
Chapter 2
Tutorial
This chapter contains a tutorial that will walk you through creating a small estimate in
CostLink/AE. Where helpful, references to later chapters in this manual are made so that you
can look up information that is more detailed.
Tasks you will perform include:
•
Creating a project using one of the RS Means building models
•
Creating another project, copying costs from the RS Means Assemblies and Line
Items databases
•
Adding assemblies and line items to your estimate
•
Adding folders
•
Creating a new line item in your estimate
•
Copying costs from another estimate
•
Applying markups
•
Printing reports
NOTE: For installation instructions, directions for moving the software, and system
requirements information, see the Installation document available in the Download
Center at www.bsdsoftlink.com.
BSD CostLink/AE User Manual
11
Chapter 2 : Tutorial
Creating an Estimate Using a Model
To create the estimate, open CostLink/AE - from the Windows Start menu, choose
Programs, then BSD SoftLink Products, then CostLink AE. An empty CostLink/AE screen
opens. Do not open any projects.
Create the Model Project File
To create a model estimate in CostLink/AE, you create a new project using the following
steps.
1.
Choose File > New Project, or click the Create New Project toolbar button
.
The New dialog box opens, showing the available project templates.
New dialog box
For more information on creating new projects and choosing templates, see chapter 4.
2.
Click the template called Uniformat II Project Template with Models.mpj, and then click
the New button.
The Save New AE Project Database As dialog box opens.
12
BSD CostLink/AE User Manual
Chapter 2 : Tutorial
Save New AE Project Database As dialog box
3.
In the File name field, type Model Project.
NOTE: For later estimates you can use the Save in drop-down box to save your project in any
folder on your computer or network.
4.
Click Save.
BSD CostLink/AE creates the new Project Database using the template. When the Save
operation is finished, the Summary Info dialog box opens.
BSD CostLink/AE User Manual
13
Chapter 2 : Tutorial
Summary Info dialog box
The General tab is used to display and edit general information about the estimate.
For more information on the Summary Info dialog box, see chapter 4.
5.
In the Project Title field type Model Project.
The Project Title can be different from the File Name. The Project Title prints in the
reports, whereas the File Name does not.
6.
14
Using the Tab key to go from field to field, fill in the following fields:
(Today’s Date)
Preparation Date:
1/1/2014
Escalation Index Date:
1/1/2014
Effective Pricing Date
Estimated Construction 240 Days
Time
2014-5-10
Project No.
11000 SF
Project Size and UOM
Fire
Station Model
Project Description:
Architect's Name
Designed By:
Your Name
Estimated By:
BSD CostLink/AE User Manual
Chapter 2 : Tutorial
Prepared By:
Consulting Firm Name and Location
Leave the Summary Info dialog box open for the next exercise.
Creating the Model Estimate
You use the Cost Models tab of the Summary Info dialog box to choose the model
and enter key parameters about the building.
1.
Click the Cost Models tab.
BSD CostLink/AE displays the tab.
2.
Under Cost Models, click the button for Commercial. Then, from the drop-down list,
select Fire Station, 2 Story.
3.
The building size has been automatically filled in from the information you entered on the
General tab, although you can also enter or edit the area here. For the Building
Perimeter, type in 310.
NOTE: The model building parameters are listed at the bottom of the Cost Models tab. If the
building being designed differs drastically from the parameters listed, the cost
estimate is unlikely to be highly accurate.
4.
Select exterior closure and framing assemblies by clicking on the arrow for the pull-down
list and choosing Decorative Concrete Block / Steel Joists.
5.
Review other model building parameters at the bottom of this tab. Note that several of
these parameters may be adjusted, but RS Means strongly suggests that these not be
modified, because significant alterations may invalidate the cost estimate results. For
example, changing the number of floors from 2 to 3 could change the model results in
unpredictable ways.
Model Additives
Next, you use the Model Additives tab of the Summary Info dialog box to select additional
cost items for this Cost Model.
1.
Click the Model Additives tab.
2.
Select appropriate additives for this project by inputting a quantity in the quantity field. For
example, you may want to add kitchen appliances, clothes lockers, and an elevator. Note
that the cost for each additive is automatically computed.
BSD CostLink/AE User Manual
15
Chapter 2 : Tutorial
Applying Cost Markups and Adjustments
Markups are the estimated costs beyond the direct costs. The direct costs copied from the
R.S. Means Assemblies and Unit Prices resource windows already include overhead and
profit for the installing contractor. All other markups including Location Adjustments, Sales
Tax, and Prime Contractor markups are applied on the Cost Summary tab of the Summary
Info dialog box. For more information on markups, see Chapter 4.
In the following exercise, you will apply a location adjustment and additional markups to the
Model Project:
1.
Click the Cost Summary tab.
The Cost Summary displays with markup percentages that have been copied from the
template and extended costs that have been computed by the model.
Summary Info dialog box, Cost Summary tab for Model project
2.
16
Next to the State field, click the pull down arrow and choose PA for Pennsylvania.
BSD CostLink/AE User Manual
Chapter 2 : Tutorial
NOTE: Instead of scrolling through entire list of states, after clicking the pull down arrow, type
the first letter of the state or province. The list will scroll to the first state or province
with that letter.
The City field updates to list cities in Pennsylvania.
3.
To the right of the City field, click the pull down arrow and choose Pittsburgh.
Using the RS Means Location Adjustment factors, the software calculates a location
adjustment for that location and will adjust all of the RS Means costs by that percentage.
4.
Click in the percent field for Sales Tax. Change the sales tax to 7.00%.
5.
Change the Architect’s Fees to 8%, in accordance with the suggested architectural fees
on the Cost Models tab.
6.
Click in the percent field for Contingency, enter 4.0, and press Tab to change the
Contingency to 4.0%.
7.
Click the Apply button.
The project costs are recalculated and the Cost Summary tab updates.
8.
Click OK to close the Summary Info dialog box.
The costs in the Sheet panel update to show the building costs with the adjusted
markups.
9.
Click on the Tree menu, and then click on Show Data in Tree to add a cost breakdown
view to the Tree panel.
10. Right click on the Fire Station Folder and choose Expand Branch to fully expand the
folders for an overall view the building project costs. You can also click on Preview to take
a look at the completed cost estimate report.
11. For a more detailed look at any folder, click on the folder in the tree, then double click on
any of the assemblies that show up in the sheet panel below. For example, click on
Standard Foundations and double click on the Strip Footings assembly in the sheet panel
to open the Tasks form for that assembly. You can stretch the Tasks form to see all of the
Assembly members. In this case, note that the single assembly includes ten separate
tasks.
12. Unlike other "square foot" cost estimating systems based on historical data or simple
relationships, BSD CostLink/AE provides a fully detailed model-driven cost estimate that
can be modified and updated all the way through the Construction Documents phase of
the project. See the next section for instructions on modifying your model estimate by
copying assemblies and line items from the RS Means databases included with BSD
CostLink/AE.
BSD CostLink/AE User Manual
17
Chapter 2 : Tutorial
Creating an Estimate Without Using a Cost Model and
Modifying Estimates of All Types
Create the Sample Project File
To create an estimate in CostLink/AE without using a model, create a new project using the
following steps.
1.
Close any open projects.
Choose File > New Project, or click the Create New Project toolbar button
2.
.
The New dialog box opens, showing the available project templates.
New dialog box
3.
Click the template called Uniformat II Project Template with Models.mpj, and then click
the New button (or double click on the template).
The Save New AE Project Database As dialog box opens.
18
BSD CostLink/AE User Manual
Chapter 2 : Tutorial
Save New AE Project Database As dialog box
4.
In the File name field, type Sample Project.
5.
Click Save.
6.
Complete the General tab and the Cost Summary Tab using your own location.
7.
Input 18,555 as the Project Size.
Adding Project Notes
You use the Project Notes tab of the Summary Info dialog box to add any global
descriptive notes for the estimate. Notes on specific folders or tasks can be added
either here or within the estimate. You can also update the notes at different phases
of the project as you save different versions of the estimate. If you choose to print
them, Project Notes print after the Title Page in the reports.
1.
In the Summary Info dialog box, click the Project Notes tab.
BSD CostLink/AE displays the tab.
2.
Click in the Notes area and enter the following: Sample Project Notes.
NOTE: In addition to typing notes directly into the Notes area, you can copy text from a word
processor, or copy notes from the Notes tab of a different CostLink/AE project.
CostLink/AE does not have spell check, so you may want to copy text to your word
processor and use your word processor's spell check. To copy the text, drag across it
with your mouse and press Ctrl+C on your keyboard. Then click in the Notes area
and press Ctrl+V on your keyboard to paste.
BSD CostLink/AE User Manual
19
Chapter 2 : Tutorial
3.
Click OK to save all of your changes and close the Summary Info dialog box.
Your Project window should look similar to the following picture. The Tree Panel is the top
half of the screen where the folders are shown. The bottom half of the screen is the
Sheet Panel. The Sheet Panel displays the contents of the folder you click on in the Tree
Panel.
Tree Panel
Sheet Panel
Sample Project window with Tree and Sheet Panels labeled
Adding Folders
The folders in the Tree panel represent the cost breakdown. The folders will print in the
reports, summarizing the costs at each folder. Most of the folders needed for this estimate
were copied from the Uniformat II template. However, not all the needed folders are there. In
the following steps, you will add two new folders to the Tree panel.
For more information on adding folders, see chapter 4.
1. In the Sample Project window, right-click on the Substructure folder in the Tree
Panel. From the context menu, choose Expand Branch.
NOTE: If you do not see a Substructure folder, from the Tree menu choose Use Single Tab.
Then perform step 1.
The Substructure folder expands to show all its subfolders.
20
BSD CostLink/AE User Manual
Chapter 2 : Tutorial
2.
Click on the folder Standard Foundations.
3.
With Standard Foundations highlighted, from the Insert menu choose Child Folder.
A new folder appears below Standard Foundations. You could type a name for the folder
in the Tree Panel. Instead, use the next step to open the folder’s item form.
4.
From the View menu, choose Tree Items Form, or click the button on the toolbar
.
The item form opens.
Item form for New Folder
5.
Using tab to move from field to field, enter the following information:
Tag:
Title
6.
1
Strip Footings
Leaving the item form open, click on the Standard Foundations folder.
NOTE: If you cannot see the Standard Foundations folder, move the folder form by dragging
the title bar (the bar across the top of the form that shows the name of the form) with
your mouse. To drag the form instead of resizing, the mouse pointer should be a
white arrow, not a double-headed arrow.
The item form displays the information for the Standard Foundations folder.
7.
From the Insert menu, choose Child Folder.
BSD CostLink/AE User Manual
21
Chapter 2 : Tutorial
A new folder appears in the Tree panel after the Strip Footings folder, and the item form
displays the information for the New Folder.
8.
Fill in the following information:
Tag:
Title
9.
2
Spread Footings
Close the Form by clicking on the Close button.
Sample Project with two new folders added under Standard Foundations
Adding Costs
There are five methods of adding tasks and their associated Direct Costs to an estimate in
BSD CostLink/AE:
22
•
Begin with a model, which automatically includes multiple assemblies and line items.
•
Copy assemblies from the Assemblies resource window.
•
Copy individual line items from the Unit Prices resource window.
•
Create your own line items and enter the costs directly.
•
Copy costs from one project to another.
BSD CostLink/AE User Manual
Chapter 2 : Tutorial
The Assemblies resource window contains assemblies, which are groupings of line items that
are defined in the estimate as individual tasks. The Unit Prices resource window contains line
items. The assemblies and line items are from RS Means.
For more information on the RS Means cost data, see chapter 1.
NOTE: The RS Means models included in CostLink/AE generally include all the assemblies
and line items required for the base building. The quantities required for all these cost
items are driven by a small number of parameters, such as the total square footage
and the number of floors.
For more information on Models, see chapter 4.
In the following steps you will open the Assemblies resource window, use Find to locate a
particular assembly, and use drag and drop to copy the assembly to your project:
NOTE: Assemblies contain all the line items required to perform a particular piece of the job.
For example, an assembly representing 6-inch concrete slab on grade includes all
the tasks required to prepare for, form, pour, and finish the slab. The assembly unit of
measure is square feet. The Assemblies resource window stores the unit costs
(Labor, Equipment, Material, and Total) and quantities of each task required to
construct one square foot of 6-inch slab.
After copying the assembly into the Project, enter the quantity of square feet of slab
needed for the estimate. CostLink/AE then computes the total quantities and resulting
costs of all items required for slab on grade construction.
For more information on Assemblies, see chapter 4.
1.
Click the Open Assemblies resource window button on the toolbar
.
The Assemblies resource window opens in a separate database window within BSD
CostLink/AE.
2.
Click the Tile windows vertically button on the toolbar
.
The Project and Assemblies resource windows appear side-by-side. It is easier to copy
assemblies if the windows are positioned side-by-side.
NOTE: If you are still displaying the cost data in the project Tree Panel, the numbers may
overwrite the folder names in your project. To change this, click on the title bar of your
project window, click on the Tree menu and then Show Data in Tree to hide the cost
data in the tree.
BSD CostLink/AE User Manual
23
Chapter 2 : Tutorial
Assemblies resource window and Sample Project tiled side-by-side
For more information on managing multiple windows, see chapter 4.
NOTE: When you have more than one window open, the window with the more brightly
colored title bar (
) is the active window. When
you choose commands from the menus or toolbars such as Show Folder Tags,
folder tags will toggle on or off in the active window. In step 3 below, make sure the
Assemblies window is active before choosing the command. To make a window
active, click anywhere in the window or on the window's title bar.
3. With the Assemblies resource window active (its title bar is more brightly colored
than that of the Sample Project), from the Tree menu, choose Show Folder Tags,
or click the button on the toolbar
.
The folder tags are the numbers and letters displaying between the folder icons and the
folder names in the Assemblies resource window. If you are familiar with Uniformat II,
you may find it easier to navigate with the folder tags turned on.
NOTE: Show Folder Tags is a toggle. Click it again to turn the folder tags off, and again to
turn them back on. For this tutorial, leave the folder tags on.
24
BSD CostLink/AE User Manual
Chapter 2 : Tutorial
4. From the Edit menu, choose Find, or click the button on the toolbar
.
The Find dialog box opens.
Find dialog box
You will use the Find dialog box to search the Assemblies resource window for Strip
Footings to add under Standard Foundations.
5. Type strip footings in the Find What field.
6.
Make sure the following default selections are set:
All
Search
Tasks
Any Part of Field
Match
Folders
Description
Field
Not selected
Selected
NOTE: You will usually have better results if you search for Folders rather than Tasks. Tasks
have many more abbreviations than folders. For information on the RS Means
abbreviations, see Appendix B.
7.
Click the Find First button or press Enter on your keyboard.
CostLink/AE searches the Assemblies resource window from the beginning. The first
folder containing strip footings in its Description field is selected in the Tree panel. This
folder should be 110 Strip Footings.
NOTE: Find searches for exactly the characters you type, but it is not case sensitive. If the
database you are searching does not spell the word the same way as you typed it in
the Find dialog box, Find will not locate the item.
8.
Click Close to close the Find dialog box.
Note that there are many assemblies in the Sheet panel.
9.
In the Sheet panel of the Assemblies resource window, scroll to locate the assembly with
the following description:
Strip footing, concrete, reinforced, load 11.1 KLF, soil bearing capacity 6 KSF, 12"
deep x 24" wide
BSD CostLink/AE User Manual
25
Chapter 2 : Tutorial
10. Drag the assembly to the Strip Footings folder in the Sample Project.
NOTE: To drag the assembly, hold your mouse pointer over any part of the assembly in the
Sheet panel. Click and hold the left mouse button while you move your mouse to the
Strip Footings folder in your project. Between the Sheet panel and the folder, the
mouse pointer becomes a circle/bar symbol
. When the Strip Footings folder is
highlighted, the mouse pointer becomes a hand with a sheet of paper symbol
Release the mouse button to drop the task on the folder.
.
Click OK if BSD CostLink/AE prompts you to confirm copying the task.
11. In the Sample Project click on the Strip Footings folder.
The copied assembly is in the Sheet panel.
12. In the Quantity field for the copied assembly in the Sheet Panel, type 580, and then
press Tab.
NOTE: If necessary, scroll the Sheet panel to the right to see the Quantity field. You can also
make the Description column smaller by holding your mouse over the line between
the Description and Quantity column headings so that your mouse pointer becomes a
double-headed arrow. Then click and hold while you drag the line to the left.
Scroll to the right in the Sheet panel to see that the cost fields updated.
13. Click the title bar of the Assemblies resource window to make it the active window.
NOTE: If you do not make the Assemblies resource window active, then in the next step
when you open the Find dialog box, Find will be searching the Sample Project
window instead of the Assemblies resource window.
14. Referring to steps 4-7 above as necessary, use Find to locate the folder Spread
Footings, which contains the assembly with the following description:
spread footings, 3000 PSI concrete, load 50K, soil bearing capacity 3 KSF, 4' - 6"
square x 12" deep
NOTE: You will probably need to scroll to the left in the Assemblies resource window Sheet
panel to see the name of the assembly. Drag assemblies with the right mouse button
instead of the left, or drag from the gray box to the left of the assembly in the Sheet
panel so that the Sheet panel will not scroll.
26
BSD CostLink/AE User Manual
Chapter 2 : Tutorial
15. Referring to step 9 above, drag the assembly to the Spread Footings folder in your
project.
16. Referring to steps 10-11 above, enter a quantity of 20 for the Spread ftgs assembly.
17. In the Assemblies resource window, find the assembly with the following description (it
should be in the same folder as the last assembly you copied):
spread footings, 3000 PSI concrete, load 50K, soil bearing capacity 6 KSF, 3' - 0"
square x 12" deep
18. Drag the assembly to the Spread Footings folder in the Sample Project.
19. Enter a quantity of 35 for the assembly.
Reviewing Adding Folders and Copying Assemblies
The following exercise contains less step-by-step directions than the previous exercises. As
necessary, refer to the exercises on Adding Folders and Copying Assemblies to create the
following folders and copy the Assemblies to them.
1.
Click on the Slab on Grade folder in the Tree panel.
2.
Add the following folders as subfolders of Slab on Grade (make sure you click on the
Slab on Grade folder before choosing Insert > Child Folder for each folder):
Tag
1
2
Title
4” Slab
8” Slab
When done, your Tree Panel should look similar to the following picture.
Sample Project with new folders under Slab on Grade
NOTE: If you add a folder in the wrong location, move the folder to the correct location by
dragging it with your right mouse button (not the left) to the folder that it should be
before. Then choose Move Above Folder from the context menu.
BSD CostLink/AE User Manual
27
Chapter 2 : Tutorial
3.
Locate the following assembly in the Assemblies resource window, drag it to the 4” slab
folder, and enter the quantity.
Slab on grade, 4" thick, industrial, reinforced
4.
14,755 SF
Locate the following assembly in the Assemblies resource window, drag it to the 8” slab
folder, and enter the quantity.
Slab on grade, 8" thick, heavy industrial, reinforced
3,400 SF
Adding User-Defined Costs
If cost items you need are not included in the resource windows, add your own. To create
user-defined tasks, in the Tree Panel of your project, click on the folder that the task belongs
in. Then from the Insert menu choose Task. Enter the description, quantity, unit of measure,
and unit cost in the sheet panel or in the item form.
In the following exercise, you will add an additional cost to the 8” Slab folder:
1.
With 8” Slab highlighted in the Tree panel, from the Insert menu choose Task.
A task called New Item appears in the Sheet panel.
2.
Click once on the Description (New Item) so that the words are highlighted and then type
the new description below. Click in each of the following fields in the same manner to
enter the following information. The Unit Cost field will display $10.00 after you enter the
10 and press Tab.
Description
Add for Turndown
Quantity
UOM
Unit Cost
240
LF
10
NOTE: You can also open the item form for the new task by double-clicking on it, to enter the
information there. The difference is that you can use the Tab key to move from field to
field in the item form (instead of having to click in each field before typing). For more
information on user-defined tasks, see chapter 4.
Adding Line Items from the Unit Prices Resource Window
If you do not find an assembly to suit your needs, you can search the Line Items in the Unit
Prices resource window. The Line Items are from RS Means and are categorized in the 50
Division CSI 2004/12 MasterFormat. For more information on the supplied RS Means data,
see chapter 1.
In the following exercise, you will copy several line items from the Unit Prices resource
window to the Sample Project, adding new folders as necessary:
28
BSD CostLink/AE User Manual
Chapter 2 : Tutorial
1.
Close the Assemblies resource window by clicking the Windows close button on the
Assemblies window title bar .
2.
Use Find to locate the Floor Construction folder in the Sample Project.
3.
Click the Open Unit Prices resource window button on the toolbar
.
The Line Items from the Means AE Assemblies resource window opens in a separate
window within CostLink/AE.
4.
Click the Tile Windows Vertically button on the toolbar
.
The Line Items resource window displays side-by-side with your project.
5.
In the Line Items resource window, use Find to locate the following line item:
Column, structural tubing, heavy section, 7" to 10" W, incl shop primer, cap & base plate,
bolts
HINT: Search for Columns. The first folder located will not be the correct folder. Click Find
Next to locate the next folder. Continue to click on Find Next until you find the correct
folder.
6.
Drag the line item to Floor Construction in your project and enter a quantity of 8600.
7.
Find the Roof Construction folder in your project.
8.
In the Line Items window, find and copy the following line items (
Construction folder and input the following quantities:
) into the Roof
Structural steel project, industrial buildings, steel bearing, 100-ton project, 1 story, A992
steel, shop fabricated, incl shop primer, bolted connections
41.6 TON
HINT: Search for Steel Projects. The folder has 56 tasks in it. Instead of looking
through the folder task by task, you can use Find to search within the folder. To
search within the folder, in the Sheet panel, click on the first task in the folder (this is
just so CostLink/AE’s focus is in the Sheet panel, not the Tree). Then open Find
again, deselect Folders, and select Tasks. Search for Industrial. Use Find Next
(not Find First). Keep clicking Find Next until you locate the correct item.
Open web bar joist, 40-ton job lots, spans up to 30', K series, shop fabricated, incl shop
primer, horizontal bridging, average
4.3 TON
HINT: Search for Web Joists. Make sure you deselect Tasks and re-select Folders.
Metal decking, steel, open type, wide rib, galvanized, under 50 Sq, 1-1/2" D, 20 ga
3,420 SF
HINT: Once you locate the Steel Decking folder, notice that it contains 3 subfolders. Look in
the Steel Roof Decking folder for this task.
BSD CostLink/AE User Manual
29
Chapter 2 : Tutorial
Metal decking, steel, open type, wide rib, galvanized, 50 to 500 Sq, 1-1/2" D, 22 ga
15,481 SF
9.
Use Insert > Task to add the following user-added line item to the same folder:
Description
Misc. Plates and Angles
Quantity
UOM
Unit Cost
7
TON
1300.00
Copying Costs From One Project To Another
If a previously created CostLink/AE estimate is similar to a new estimate you are creating,
you can copy folders and tasks from the older project to the new project. In the following
steps you will first remove the empty folders from the Sample Project, and then copy folders
and tasks from the Fire Station Sample project that is installed with the software.
1.
Close the Unit Prices resource window by clicking the Windows close button on the Unit
Prices window’s title bar .
2.
From the Tools menu, choose Delete Empty Folders.
A confirmation message opens asking if you want to delete the folders.
3.
Click Yes.
All empty folders, except those at Level One, are removed.
Up to this point, the project has been displaying Level One folders on separate tabs:
Building and Sitework. In the next step, you will display all folders on one tab.
4.
From the Tree menu, choose Use Single Tab, or click the Use single tab for table button
on the toolbar
.
There is now only one tab – Sample Project. BUILDING and SITEWORK are subfolders
beneath the Sample Project folder.
Sample Project in single tab mode
NOTE: Use Single Tab is a toggle. Click it again to return to multi-tab mode, and again for
single tab mode. Multi-tab mode can help when navigating complicated estimates.
For the rest of this sample, remain in single tab mode.
30
BSD CostLink/AE User Manual
Chapter 2 : Tutorial
The SITEWORK folder is empty. It was not deleted by the Delete Empty Folder
command because it is a Level One folder.
5.
Click on the SITEWORK folder and then click the Delete Selected Item button on the
toolbar
.
A message opens asking you to confirm deleting the folder.
NOTE: Read confirmation messages when deleting to make sure CostLink/AE is deleting
the correct item. You cannot Undo to restore an accidentally deleted folder or task.
6.
Click Yes.
The SITEWORK folder is deleted.
7.
From the File menu, choose Open, and then choose Open Project Database.
The Open Database dialog box opens.
8.
Select and Open the Fire Station Sample Project.
The Fire Station Sample project opens in its own database window.
9.
If necessary, click the Tile Windows Vertically button on the toolbar
.
10. In your project (the title bar says Sample Project or Project Title if you have not yet closed
and reopened your project), click the plus sign next to BUILDING.
The subfolders, SUBSTRUCTURE and SHELL, display.
11. Click the plus sign next to SHELL.
The subfolder SUPERSTRUCTURE, completed in the previous exercises, displays.
12. In the Fire Station Sample Project, click the plus sign next to FIRE STATION.
The subfolders display.
13. Click the plus sign next to SHELL.
The subfolders display.
14. From the Fire Station Sample project, with your right mouse button, drag the
EXTERIOR CLOSURE folder to the SHELL folder in your project (Sample Project).
When you release the mouse button, a context menu opens.
15. From the context menu, choose Copy All Here.
The EXTERIOR CLOSURE folder and all its subfolders and tasks are copied under the
SHELL folder in your project.
BSD CostLink/AE User Manual
31
Chapter 2 : Tutorial
NOTE: Additional options in the context menu were Copy Folders Here and Copy Tasks
Here. Copy Folders Here copies only folders, not tasks. Copy Tasks Here copies all
tasks (assemblies and line items). These options can only be accessed by dragging
with the right mouse button.
16. Using the same technique, copy the ROOFING folder from the Fire Station Sample
project to the SHELL folder in your project (Sample Project).
17. Using the same technique, copy the following folders to the BUILDING folder:
INTERIORS
SERVICES
18. Copy the SITEWORK folder to the Sample Project folder at the top of your project.
19. Close the Fire Station Sample project.
20. Maximize your project (by clicking the Maximize button on the project’s title bar
21. Click the Show folder data in tree button on the toolbar
command from the Tree menu.
).
, or choose the same
Your project will look something like the following picture. (Your project will have different
costs, due to the Location Adjustment you selected.)
32
BSD CostLink/AE User Manual
Chapter 2 : Tutorial
Sample Project showing costs in Tree Panel
The Project Cost column shows a higher dollar amount than the Base Cost column since
there are already some markups being applied to the project’s costs by the default cost
markup and adjustment settings in the Summary Info dialog box.
Selecting and Printing Reports
The Sample Project is now complete. The next step is to print reports.
1.
From the File menu choose Reports Setup or click the Select and format reports button
on the toolbar
.
The Reports dialog box opens to the Select Reports tab.
2.
Leaving the Organization Name the same (this defaults to the Company Name that was
filled in by the person who installed the software), change the Report Header to say 65%
Submittal.
3.
Change Levels to show in Summary to 3, if not already set to 3.
4.
Leave both Show Summary Costs and Show Detail Costs as Excluding Markups.
BSD CostLink/AE User Manual
33
Chapter 2 : Tutorial
This will display the Direct Costs in the body of the report, with the Contractor and Other
Markups added at the end of the report.
5.
Click to select Print Title Page and Detailed Estimate, if they are not already selected and
Deselect Table Of Contents.
The Select Reports tab should now look like the following picture, except for the
Organization Name.
Reports dialog box with reports selected for tutorial
6.
Click the Preferences Tab.
7.
Make sure that all options are checked under Detail and Summary Report Options,
Summary Report Options, and Print Detail Options.
8.
Make sure that no options are checked under Print Notes and Footer.
Notice that the Print and Preview buttons are grayed out on this tab.
9.
Click the Select Reports tab.
10. Click Preview.
CostLink/AE creates the reports and displays them in a Print Preview window.
11. Once the reports appear, maximize the Print Preview window either by double-clicking on
the title bar of the window, or click the Maximize button .
34
BSD CostLink/AE User Manual
Chapter 2 : Tutorial
12. To zoom in, click the arrow on the zoom selector and choose 100%
13. Click the Next Page button on the toolbar
.
, to view the report page by page.
14. To export your reports to Adobe Acrobat portable document format (PDF), Word, or
Excel file format, click on the Envelope button on the toolbar
.
For more information on exporting your reports, see chapter 5.
15. To print the reports to your default Windows printer, click the printer button in the Print
Preview window
.
16. To close the Print Preview window click the Windows close button on the preview
window’s title bar .
17. Open the Reports Setup dialog box, and select or deselect other options. Preview to see
how the options change the report.
For more information on reports and report options, see chapter 5.
18. When finished, close the Sample Project by going to the File menu and choosing Close.
To close BSD CostLink/AE, from the File menu choose Exit.
You have now completed the BSD CostLink/AE tutorial. See the other chapters in the User
Manual, or use the Help in the software for additional information on other options.
BSD CostLink/AE User Manual
35
Chapter 2 : Tutorial
36
BSD CostLink/AE User Manual