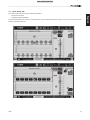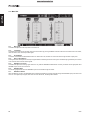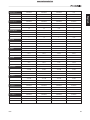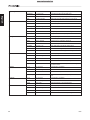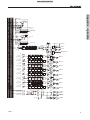
1
IS16v1 User's Manual Manual del Usuario English IS16v1 Intuitive 16-Channel 8-Bus Digital Mixing console Consola de Mezcla Digital Intuitivo 16-Canales 8 Buses Español ENGLISH . . . . . . . . . . . . . . . . . . . . . . . . . . . . . . . . . . . . . I ESPAÑOL . . . . . . . . . . . . . . . . . . . . . . . . . . . . . . . . . . . . . II V1.1 10/31/2012 2 IS16 English USER'S MANUAL CONTENTS PART ONE: OVERVIEW ..................................................................................................1 Introduction...............................................................................................................................................1 Features....................................................................................................................................................1 System Components..................................................................................................................................1 Operational Requirements........................................................................................................................1 Maintenance.............................................................................................................................................1 Power Connections..................................................................................................................................1 Analog and Digital Audio Connections.....................................................................................................1 Digital Synchronization.............................................................................................................................2 Glossary...................................................................................................................................................2 PART TWO: CONTROLS AND CONNECTIONS....................................................................2 Basic Setup..............................................................................................................................................2 Analog Controls and Settings...................................................................................................................3 Analog Input Section...........................................................................................................................3 Monitoring & Headphones...................................................................................................................3 2 Track Send and Return.....................................................................................................................3 Channel Strips......................................................................................................................................3 Mode Buttons.......................................................................................................................................3 Display.................................................................................................................................................4 Control Section ...................................................................................................................................4 Rear Panel...........................................................................................................................................4 Rack-mounting Kit....................................................................................................................................5 Installing The Optional FireWire + USB Expansion Card.........................................................................6 PART THREE: NAVIGATING AND SELECTING.............................................................7 User Interface.........................................................................................................................................8 System Restore .....................................................................................................................................29 Networking ...........................................................................................................................................29 Troubleshooting ...........................................................................................................................................30 How Do I...? ...........................................................................................................................................31 FireWire + USB Operation...............................................................................................32 Presets...........................................................................................................................................34 Digital Effect Table................................................................................................................................41 Specifications.........................................................................................................................................43 Appendix Application..............................................................................................................................................1 Dimensions .................................................................................................................................................3 Block Diagram ..............................................................................................................................................4 Phonic preserves the right to improve or alter any information within this document without prior notice IS16 3 IMPORTANT SAFETY INSTRUCTIONS English The apparatus shall not be exposed to dripping or splashing and that no objects with liquids, such as vases, shall be placed on the apparatus. The MAINS plug is used as the disconnect device, the disconnect device shall remain readily operable. Warning: the user shall not place this apparatus in the can be easily accessible. area during the operation so that the mains switch 1. Read these instructions before operating this apparatus. CAUTION 2. Keep these instructions for future reference. RISK OF ELECTRIC SHOCK DO NOT OPEN 3. Heed all warnings to ensure safe operation. 4. Follow all instructions provided in this document. 5. Do not use this apparatus near water or in locations where condensation may occur. 6. Clean only with dry cloth. Do not use aerosol or liquid cleaners. Unplug this apparatus before cleaning. 7. Do not block any of the ventilation openings. Install in accordance with the manufacturerís instructions. 8. Do not install near any heat sources such as radiators, heat registers, stoves, or other apparatus (including . 9. Do not defeat the safety purpose of the polarized or grounding-type plug. A polarized plug has two blades with one wider than the other. A grounding type plug has two blades and a third grounding prong. The wide blade or the third prong is provided for your safety. If the provided plug does not into your outlet, consult an electrician for replacement of the obsolete outlet. 10. Protect the power cord from being walked on or pinched particularly at plug, convenience receptacles, and the point where they exit from the apparatus. 11. Only use attachments/accessories manufacturer. CAUTION: TO REDUCE THE RISK OF ELECTRIC SHOCK, DO NOT REMOVE COVER (OR BACK) NO USER SERVICEABLE PARTS INSIDE REFER SERVICING TO QUALIFIED PERSONNEL The lightning flash with arrowhead symbol, within an equilateral triangle, is intended to alert the user to the presence of uninsulated ìdangerous voltageî within the productí magnitude to constitute a risk of electric shock to persons. The exclamation point within an equilateral triangle is intended to alert the user to the presence of important operating and maintenance (servicing) instructions in the literature accompanying the appliance. WARNING: To reduce the risk of or electric shock, do not expose this apparatus to rain or moisture. CAUTION: Use of controls or adjustments or performance may result in of procedures other than those hazardous radiation exposure. by the 12. Use only with a cart, stand, tripod, bracket, or by the manufacturer, or sold with table the apparatus. When a cart is used, use caution when moving the cart/apparatus combination to avoid injury from tipover. 13. Unplug this apparatus during lighting storms or when unused for long periods of time. 4 service personnel. 14. Refer all servicing to Servicing is required when the apparatus has been damaged in any way, such as power-supply cord or plug is damaged, liquid has been spilled or objects have fallen into the apparatus, the apparatus has been exposed to rain or moisture, does not operate normally, or has been dropped. IS16 PART ONE: OVERVIEW Introduction Any AUX mix or input channel can be assigned directly to one of the digital effect processors, each of which offers at least 8 effects with multiple user-definable parameters. Effect Processor 1 also offers an additional 24 reverb effects with up to 7 adjustable parameters each. Each effect processor furthermore offers its own multi-band graphic equalizer. Gate, Expander, Compressor and Limiter dynamic processes can be assigned to all input channels. Also available on each input and output channel is a 4-band semiparametric EQ and a delay function. While the IS16 was designed to be intuitive and user-friendly, there is still more than likely a thing or two you’ll need a bit of help with. That being the case, we suggest you take the time to read through this user’s manual and keep it handy for future reference. Features • 16 mono mic/line with insert points and grouped phantom power • Internal digital sampling rate up to 96 kHz in 24-bit resolution • Compact design achieved through 16 faders encompassing three layers (Channel, AUX/Group, Multi) • 17 ultra-smooth 100 mm motorized faders arranged in a familiar analog mixer arrangement • High quality GUI interface onboard accessed through a full color touch-screen • 31-band GEQ available on EFX 1 and Main out and 15band GEQ on EFX 2 • 4-band parametric EQs can be found on all input channels, multi outputs and main outputs • Digital AES/EBU input and output • Eight balanced 1/4" phone jack 'multi' outputs • 8 AUX and 8 Group buses assignable to ‘multi’ outputs • Dual true algorithm-based multi-effects processor. Effects can be applied to any input channel, aux send or group, and the stereo effect signals can be assigned to main stereo mix or all eight multi outputs • 4-band parametric EQ, variable delay and dynamic processors available on all input and output channels • Internal 96 kHz sampling rate in 24-bit resolution • Intuitive user interface • 25 dynamic processors available on input channels, ‘multi’ outputs and main mix • Save and instantly recall scenes at the touch of a button • Processing accomplished through a high quality 40-bit floating point digital signal processor • Built-In 16x16 FireWire/USB 2.0 multi-track recording on PC and Mac computers • Wi-Fi USB dongle UTD-10 included IS16 Optional mREC expansion card featuring a standalone 16-channel PCM WAV recorder and a FireWire/USB 2.0 multi-track recording audio interface; USB 3.0 flash drives compatible • Audio Interface compatible with Windows XP, Windows Vista, Windows 7, Windows 8 and Mac OSX operating systems • Wireless operation through Wi-Fi connection and Ethernet remote control • VGA D-Sub output: Progressive scan up to 1024 x 768 @60Hz (XGA) • All features and functions of the IS16 can be accessed through the use of a USB 2.0 wireless or wired mouse • Rack mounting kit included System Components The IS16 packaging includes the following: • IS16 Console • 16x16 FireWire / USB Expansion Card (installed) • Power Supply (100V to 240V, 50–60 Hz) • Rack mount ears • UTD-10 USB WiFi dongle • User’s manual The following components are optional and may be purchased separately: • mREC Expansion Card (16-in, 16-out with USB Recording) • SD Card (Secure Digital Memory Card) • Headphones with ¼” phone jack • Condenser or dynamic microphones Operational Requirements During operation, the front and rear panels of IS16 should be exposed to ambient air. Please do not block the ventilation holes on the rear panels of IS16 console. Please do not operate in direct sunlight or at any extreme temperature. The ideal operating environment is from 10 to 38 degrees Celsius (or 50 to 100 degrees Fahrenheit). Maintenance Please do not use any alcohol cleaning solutions on the surface of IS16. Use a non-abrasive dry cloth only. Power Connections Each IS16 requires its own power supply unit. The IS16’s PSU is capable of operating at 50 to 60 Hz across a voltage range of 100 to 240 V. In addition, a power-conditioner (not included) is highly recommended. Analog and Digital Audio Connections The IS16 analog inputs and outputs (with exception to the headphone outputs) are balanced XLR and balanced ¼” TRS connections. The headphone outputs are unbalanced stereo ¼” TRS jacks. Digital audio input and output is achieved through AES/EBU (XLR) connections. Please use only 110-ohm cables for digital connections. 1 English Congratulations on your purchase of the IS16 digital mixer, the first full-digital mixing console from Phonic. With ultra lownoise circuitry, including high quality, low-loss analog to digital converters, the IS16 offers everything a digital mixer should in a sleek, attractive design. The IS16 offers 16 mono input channels – offering XLR Mic and 1/4” Line inputs – all of which can be assigned to any of the 8 AUX or 8 Subgroup mixes. A total of 8 ‘Multi’ outputs are offered in addition to the main stereo output. AES/EBU digital inputs and outputs can be used to send and receive signals to and from the Main mix. • Digital Synchronization English A word clock is provided to sync external digital devices, such as DAT player. A master clock (e.g. Aardsync) is highly recommended, which maintains the word clock on a network. Please make sure to use only 75-ohm BNC cables for proper transmission of the word clock signal. Typical Setup: connect the Word Clock Out on the “Master Clock Device” to the Word Clock In of IS16. Then enter the Setup menu and set the Clock Source section to “Word Clock” to allow the incoming word clock signal. Glossary The following are a few words that may serve you well while reading this manual. These aren’t in depth explanations, but should hopefully give you the basics and a place to start. AUX–Auxiliary – an auxiliary is anything that is supplementary or additional to the main mix. LPF – Low Pass Filter – a low pass filter will cut all audio signals above a particular user-defined frequency, allowing low frequency sounds to pass through. This is significantly useful when using subwoofer speakers on particular outputs. Low Shelf Filter – the low shelf reduces or increases the level of audio signals below a particular frequency selected by the user. The level at which the signal is altered is also set by the user. Noise Gate – a noise gate is a dynamic process that turns off or significantly attenuates the audio signal passing through it when the signal level falls below a user adjustable threshold. PFL – Pre-Fader Listen – this is a form of signal monitoring where the signal is taken prior to the level control/fader. TRS – Tip-Ring-Sleeve – this is the name given to the type of audio jack/plug that can accept signals through its tip, ring and sleeve. Unbalanced Connections – unlike balanced connections, unbalanced connections only have 2 conductors: one for the signal and one for the grounding. This, unfortunately, makes them more susceptible to noise and interference. AFL – After Fader Listen – exactly as the name suggests, this is a monitor signal that is taken after the signal has passed through the fader/level control. Balanced Connections – balanced connections offer three conductors, carrying a ground, an in-phase signal, and an outof-phase signal. Once the two signals are sent from one device to another, the out-of-phase signal has its phase inverted and the two signals are combined. Any interference picked up along the way is removed through to phase cancellation. This allows cables to be run over long distances without collecting excessive noise on the way. Compressor – a Compressor reduces signals over a user-defined threshold by a user-defined amount/ratio. Dynamic Processor – is any kind of processor that dynamically – or in real time – adjusts signal properties. EQ – Equalizer – is a device or process that allows users to boost or attenuate audio signals at specific frequencies. Expander – an expander is a type of dynamic processor that helps to make background noise (such as humming) inaudible by reducing low-amplitude signals. GEQ – Graphic Equalizer – is in essence the same as an equalizer, but this title is reserved for equalizers with more ‘bands’ than the typical EQ. While a typical channel EQ may only allow for 3 or 4 frequencies to be adjusted, a graphic equalizer may allow for 31 different frequencies. GUI – Graphical User Interface – this is the software that is featured on the IS16’s LCD display. Throughout this manual, this will be referred to as the GUI. HPF – High Pass Filter – a high pass filter will cut or significantly reduce all audio signals below a particular user-defined frequency, allowing – as the name suggests – high frequency sounds to pass through. High Shelf Filter – the high shelf filter will reduce or increase all audio signals below a particular frequency. The level at which the signal is boosted/attenuated is determined by the user. PART TWO: CONTROLS AND CONNECTIONS Basic Setup 1. Make sure the IS16’s power is off. To fully ensure this, disconnect the power supply from the unit. 2. Connect your various input and output devices to the IS16. This may include microphones, guitars, keyboards, synthesizers, and so forth. 3. Be sure to turn all your equipment on in the following order: input devices/audio sources, multi-track recorders, IS16 digital mixer, followed by amplifiers, monitors and active speakers. This will help avoid loud pops, clicks, thumps and such from damaging your equipment. 4. Connect the power supply, using the cable retaining clip to hold it in place, and push the power button. 5. The IS16’s routing is all accomplished through the control software, therefore it’s necessary to enter the VIEW menu to adjust input and output levels. 6. If using a digital device through the AES/EBU connectors, enter the “Setup” menu and define the clock source (whether internal, digital or through the word clock inputs). If Digital or Word Clock is selected, the sampling rate will be determined by the external source. Digital equipment can be activated by pushing the DIGI IN and DIGI OUT buttons in the main stereo mix’s setup page in the VIEW menu. 7. Users can check instrument input levels in the VIEW or FADER menus, as both of these offers a level meter for each of the individual input channels. Adjust the virtual faders (or the physical faders, on the IS16) to set levels correct. Turn channels on and off as required. Layers – when we refer to layers, we refer to the function of the faders on the hardware section of this mixer. Imagine your mixer had 32 faders in total, the 16 you see and another 16 sitting right on top of them (on a different layer). This is basically the case. However, instead of two or three actual physical layers of faders, users are able to change the functionality of the 16 faders available. Limiter – work just as compressors do; however with an input to output signal ratio permanently set to infinity-to-1. 2 IS16 Channel Strips Analog Input Section 12. Select Button This button allows you to select the current channel. The channel is selected (whether it’s the input channel or the corresponding AUX, Group or Multi mix) will depend on your layer settings. The Main channel strip also features a select button, allowing users to adjust the properties of the Main mix. The select button will light up when the corresponding channel is selected. 1. XLR Mic Inputs These XLR microphone inputs can be used in conjunction with a wide range of microphones, such as professional condenser, dynamic or ribbon microphones, with standard XLR male connectors. With seriously low-noise preamplifiers, these inputs serve for crystal clear sound replication. NB. When using an unbalanced microphone, it’s best to ensure that phantom power is switched off. However, when using condenser microphones the phantom power should be activated. Check your microphone’s user manual for information on whether to use phantom power or not. 1 2 3 4 5 6 2. 1/4” Line Inputs These 1/4” TRS phone jack inputs accept signals from both balanced and unbalanced line-level sources. Channels 1 through 16 all feature a single line input jack. It should be noted that phantom power is not fed to these inputs. 3. Insert Jacks This 1/4” TRS phone jack can be used in conjunction with a split- or y-cable to allow an external device (effects processor, compressor, etc) to be used in conjunction with the corresponding channel’s signal. The TRS jack’s tip will send the signals to the external device, while the ring will receive the return signal back to the mixer. The sleeve acts as the grounding. 4. PAD Switch Pushing the PAD switch in will attenuate the signal of the corresponding channel 20 dB. The PAD button can be found on channels 1 through 16. 5. Gain Control The Gain control allows users to adjust the input sensitivity of the corresponding input. Line level signals can be adjusted between -10 and 40 dB (when the PAD button is engaged), whereas mic signals can be adjusted between 10 and 60 dB (when the PAD button is released). 6. Peak Indicator This LED indicator will light up when the corresponding channel reaches 0 dB on the respective channels meter. Monitoring & Headphones 7. Phones Output This 1/4” TRS phone jack is for sending stereo signals to a pair of headphones, allowing signals to be monitored. 8. Phones Control This control will adjust the level of the Phones Output. 9. Control Room Rotary Control This control will adjust the signal level of the Control Room outputs, found on the rear of the IS16. 13. Solo Button Push this button to ‘solo’ the corresponding channel, sending it to the Control Room mix. The solo button will light up when a solo is activated on a channel. 14. On Button These buttons will activate the current channel. Activation will be accompanied by an illuminated LED within the button. 15.Faders These faders will adjust the level of the currently selected Channel / AUX / Group / Main mix. They are completely automated, so will revert to their appropriate positions when layer settings are altered. They will also automatically adjust their position when virtual faders are altered through the GUI. 11 10 12 13 14 9 8 15 7 Mode Buttons 16. AUX (Sends) Fader Mode Buttons Any one of these AUX buttons (from 1 to 8) will allow users to assign AUX send on to channel faders. This will allow you to adjust the signals sent from each input channel to the selected AUX mix. 17. Layer Mode Buttons These three buttons determine which signals the channel strips will control. When “CHANNEL” is selected, the channel strips will control the main input signals (channels 1 through 16), whereas if “AUX/GP” is selected, the channel strips will control the AUX 1 to 8 and Group 1 to 8 mixes. When “MULTI” is selected the channels strips will control the AES/EBU In, Effect 1 and 2, and Multi 1 through 8. The CHANNEL and AUX/GP buttons both have an LED that indicates when the layer is selected (not featured on the MULTI button). 18. Meter Button The Meter button allows users to jump immediately to the meter function in the touchscreen’s GUI. 2 Track Send and Return 10. Channel 15/16 / 2TR In Button This button changes the input source of input channels 15 and 16. Pushing it in will allow channels 15 and 16 to use the signal taken from the RCA 2TR inputs found on the rear of the IS16. When this button is disengaged, the XLR or 1/4” line input jacks will be used for these input channels. 11. Control Room / 2TR In Button Pushing this button in allows users to monitor the RCA 2TR inputs through the Control Room outputs. When released, users will be able to monitor their main stereo signal or Solo signals. IS16 16 17 18 3 English Analog Controls and Settings Display English 19. LCD Touch Screen This color LCD touch screen allows users to view and access various functions on the IS16. The touch screen display has a power-save feature where it will become dim after 5 minutes of non-operation. When this occurs, simply use the mouse or touch the screen to reactivate the screen. 20. Function Buttons These buttons allow users to skip directly to another page/tab of options on the onscreen display. There may be any number of pages/tabs available on any given function of the IS16. While the on-screen display can be used to jump directly to these tabs/pages, these buttons are available for users who prefer hardware buttons, or just want to use them for one or another reason. 21. Up and Down Buttons 24. Enter Button This button is used to select the currently highlighted property or to confirm edited values within the GUI software. The Enter button can also be used when adjusting tap delay time when the Tap Delay effect is selected. 25. Directional Buttons These buttons are used to move through the menu on the GUI. Users can scroll through the various parameter controls and faders within each individual function menu. Rear Panel 26. Phantom Power Switches These grouped phantom power switches allow users to activate +48V of to feed the Microphone inputs. Phantom Power is grouped as follows: channels 1 through 4, 5 through 8, 9 through 12 and 13 through 16. 26 27. Main Outputs These balanced XLR outputs are for sending the Main Left and Right signal of the IS16 out to external devices. 19 28. Multi Outputs These balanced 1/4” TRS phone jack outputs are for sending any of the input signals or other bus signals out to external devices. The signal sources of these multi outputs are decided through the onboard control software. 29. Control Room Outputs These balanced 1/4” TRS phone jacks are for sending the monitor signals to external devices such as active monitors. These jacks can also output the 2TR input signal, depending on the selection of the Control Room / 2TR In button. 21 20 21 These buttons will help users scroll or run through all of the available functions of the IS16, the icons of which can be found on the top right-hand site of the GUI. 22. FireWire / USB Indicators These LED indicators will illuminate when a connection is established through either the USB 2.0 or FireWire connection. The mREC FireWire + USB 2.0 Expansion Card will need to be installed for this to be possible, however. 31. SD Card Slot The SD card slot is used for saving and loading presets, as well as updating the IS16’s firmware. Firmware updates are accomplished by inserting an SD Card and selecting the appropriate Firmware update option in the Setup menu of the GUI. For the latest firmware, log on to www.phonic.com. 32. AES/EBU In & Out These connectors accept and send digital signals from AES/EBU enabled devices. The AES/EBU input can be assigned to the Main mix by pushing the AES/EBU button within the GUI software, while the main signal will be sent to the AES/EBU output. 25 22 23 30. Stereo 2TR Inputs and Outputs These stereo RCA inputs and outputs are for sending and receiving signals to and from consumer-level audio devices such as CD players, MP3 players and the like. The 2T Input signal can be assigned to channels 15 and 16 or the Control Room as required, and the Outputs are taken directly from the Main stereo mix. 33. Word Clock In & Out These BNC connectors send and receive word clock signals to and from external devices. 24 Control Section 23. Jog Wheel This jog wheel is used when adjusting any parameter within the GUI software. Turning the control clockwise will increase the value of the parameter, while turning it counter-clockwise will decrease the value. 33 4 32 31 30 29 28 27 IS16 Rack-mounting Kit 1. Remove the IS16’s side-panels by unscrewing the six screws holding them in place. English 34. VGA Connector This VGA connector is available for customers to connect external computer monitors to their IS16. This will allow you to view the IS16’s user interface on a large screen. Customers can enter the Utility menu to adjust the aspect ratio of the screen’s signal. 2. Attach the rack ears and screw them into place. 35. USB Mouse Connector Connect any mechanical or optical USB mouse to this connector, allowing for adjustment of GUI properties when an external monitor is in use. In addition to pointing and clicking, the mouse will allow you to adjust the levels of virtual rotary controls by hovering the curser over the control and adjusting the scroll wheel. 36. Ethernet Connection Use this RJ45 connection to connect to your local computer network. This will allow users to control the IS16’s software via a HTML5 protocol on any PC, Mac or tablet. In addition to pointing and clicking, the mouse will allow you to adjust the levels of virtual rotary controls by hovering the curser over the control and adjusting the scroll wheel. 37.WiFi Connect a Wifi dongle to this USB port to access any local wireless network. As is the case with the Ethernet connection, this will allow remote operation of the GUI via the network. 37 35 34 36 38. Power Button Use this button to turn the IS16 on and off. 39. DC Power In Connect the DC head of the included power supply to this port. The other end of the power supply should be connected to a suitable AC power source. When connecting the DC head of the power supply to the IS16, ensure to lock it into place using the retaining clip to ensure the supply is not inadvertently removed. 40. Expansion Card Slot This slot is for users to install the optional FireWire + USB expansion card. 41. 12V Lamp Socket This XLR socket is for the connection of the included 12V gooseneck lamp. This allows the illumination of the face of the mixer when operating in dark areas. 40 41 IS16 39 38 5 Installing the Optional mREC Expansion Card 1. First ensure all power is off on your IS16 mixer and the power cable is disconnected. English 2. Remove the included 16x16 FireWire / USB card on the IS16 by unscrewing the two support screws. 3. Remove the free end of the ribbon cable located within the expansion card slot. 4. Connect the ribbon cable to the appropriate connection on the expansion card. 5. Insert the expansion card into the expansion card slot and screw into place. 6 IS16 PART THREE: NAVIGATING AND SELECTING Start-up The IS16 takes around two minutes to start up. The first screen users will see on the display is a red Phonic logo with a blue status bar indicating the status of the start up process. After this is done, the display will show the status of the DSP check. Power-On Self Test As soon as you turn on IS16, its central processing unit begins to carry out the programming instructions contained in the basic input/output system. The CPU is responsible for the following system and diagnostic functions: • Loading software • Performing initial hardware DSP checks If you see any error codes pop up during the testing phase, please turn off the unit and remove the power supply. Wait a minute, then replace the power supply and restart. This could rectify the problem. If the problem persists, however, please perform a system restore. When turning the system on you will be prompted to recall the settings from your previous session. You can opt to recall the last session’s settings or select no to revert back to default settings. User Interface IS16 7 English Operation of the IS16 is made easy through the use of the full color touch screen. When first activated, the main menu of the IS16 will appear and users can jump directly to any particular function by touching the appropriate onscreen icon. Touch Screen The touch screen is used for accessing a number of different functions, menus, settings, tabs and so forth. English Menus: To access any of the functions on the above menu, simply touch the corresponding onscreen icon. Users can also use the directional controls and ENTER button on the face of the mixer. Virtual Controls: To adjust virtual rotary controls and level faders, first select the appropriate control icon on screen. You can then use the IS16’s large jog wheel to increase and decrease the levels. Virtual faders cannot be adjusted by sliding a stylus up and down on screen. This helps avoid sudden and accidental alteration of signal levels. To turn on channels, solos, and so forth, simply push the onscreen icons. Header and Footer Header In the function header, users can jump directly to any of IS16’s functions by simply touching the appropriate icon. The icons are self- explanatory, but don’t worry if you can’t quite make out each and every one; it’ll be clear before too long. The icons listed above are, from left to right, View, Meter, Fader, Patch, Delay, Effect, EQ, Dynamics, Utility and Setup. To return to the main menu, simply touch the screen around the top left-hand corner (where the function title is displayed). When a name is set for a channel, this will also be displayed within the header bar. Footer The function footer features up and down arrows that allow users to scroll through the various functions (listed on the header), as well as brightness control to adjust the overall brightness of the LCD display. The tabs can be used to see further options on functions that offer multiple pages. The final icon, what looks like 2 level meters, is used to activate a peak hold on all meters. When the peak hold is active, a small red indicator will remain on all level meters to indicate the peak position of the meter. IMPORTANT: You may see a small yellow or red dot beside the brightness icon in the footer section. A yellow dot indicates that changes have been made to your settings that are yet to be saved by the IS16. In this instance, settings that have recently been altered will not be saved in the event that you turn off the IS16. Simply push this yellow dot to save the current settings. These will be retained in the event that you power down the IS16. When the yellow dot is selected, it will then revert back to a red dot to indicate that settings have not been altered. 8 IS16 Saving, Loading and Deleting Presets/Scenes Preset: Users are able to load one of the factory presets. For a list of available presets for each function, please see the Preset Tables at the end of this manual. Save: Push the Save button to save the current settings of the function you’re currently using. If in the Utility > Scenes menu, users will be saving the settings of all of the selected channels. Users can save their settings to the IS16’s onboard memory. When the save function is selected, users can select the keyboard icon to bring up the virtual keyboard and enter a name for their file. Naturally, ’OK’ should be selected to confirm. Load: Select Load to load any of your previously saved settings or scenes (as the case may be). Delete: Users can select Delete to delete any of their saved files from the IS16’s memory. Reset: Pushing reset will return all settings on the currently selected function to their default values. Initialize: Selecting the initialize button (found in the Utility menu) allows users to reinitialize the IS16 while still retaining all settings. Be sure to initialize your unit after performing a firmware update. 1.View The view function will give users an overview of channel properties, from the level and panning of signals, to dynamic processes, EQs and other properties. When the View menu is activated, users can select the channel they wish to view/adjust the properties of using either the channel select option (onscreen) or by simply pushing the appropriate SEL button on the channel/AUX/Group itself (on the face of the IS16 itself). As with most functions, an activated button is indicated in blue. When an AUX send is set to pre-fader, however, it will be highlighted in brown when active. 1.1 Channel Tab 13 12 11 14 15 16 17 18 IS16 9 English In the Effect, Equalizer, Dynamic Processor and Scenes functions, the above bar will allow users to save, load, delete and reset the settings for that particular function. 1.1.1 Off / On Button This button will turn the currently selected channel on and off. English 1.1.2 Solo Button This will activate the solo function on the currently selected channel. When a channel is soloed, the signal will be diverted to the control room mix for monitoring. If the current channel has safe soloing applied, the word SAFE will appear within this button. 1.1.3 Pan Control Select the pan control and use the onboard jog wheel to adjust the left and right pan of the input signal. 1.1.4 Channel Select Pushing this icon will display a list of all 16 available input channels. Users can then select the channel they wish to view the properties of. When the currently selected channel is paired with another channel, the word PAIR will appear underneath this icon. 1.1.5 Pair Indicator When the currently viewed channel is paired with another channel, the word PAIR will appear here to indicate as such. 1.1.6 Channel Fader Users can use this virtual fader to adjust the level of the currently selected input channel. This fader will also follow alterations that are made via the corresponding onboard fader. Please note that faders cannot be adjusted on screen, instead they must be selected and the rotary control used to adjust their levels. This helps avoid any level setting mishaps. 1.1.7 Channel Meter This meter provides real-time updates on the signal level of the currently selected channel. The meter displays the input or output signal level, depending on how the Pre/Post Meter button is set. 1.1.8 Pre/Post Meter Button This button will change the level meter between a pre-fader (Input) meter to a post-fader meter. 1.1.9 DAW Button (FireWire or USB) Pushing this button will replace the currently selected channel’s signal with the signal returned from the corresponding output channel in your computer’s digital audio workstation software. In this event, the input channel’s signal is cut off completely and replaced by the return signal. Your input signal is still sent through the FireWire or USB interface. 1.1.10 Invert Phase Button This button inverts the phase of the current signal. 1.1.11 To Main Button Pushing this button sends the currently selected channel’s signal to the main mix. 1.1.14 Dynamic Processor Selection and On/Off Buttons With these buttons, users can activate and deactivate the corresponding dynamic processor functions, as well as view their properties on the Master Dynamic Processor Display (located to the left of these buttons). Available Dynamic Processors are: Gate, Expander, Compressor and Limiter. The buttons will turn yellow when their corresponding dynamic process is being triggered (ie. when the threshold has been passed). 1.1.15 Delay Function Push the delay button to activate and deactivate the delay function for the currently selected channel. Users can also adjust the delay time, the saturation (mix) of the signal, and the amount of delay feedback (FB.). 1.1.16 Processing Order Use this function to select the order that the audio signal will pass through the Dynamic Processor, EQ and Delay. Any order made up of the three processes can be selected. 1.1.17 AUX Send Controls These virtual rotary controls can be used to adjust the level of the currently selected channel that is sent to the corresponding AUX mix. To change the AUX sends from POST to PRE, hold the ENTER button and push the control you wish to change. Postfader AUX sends are blue, whereas pre-fader sends are green. Post-fader sends are post-EQ, post-dynamics, post-fader. 1.1.18 Group Assignment Push any of these buttons to send the currently selected channel to the corresponding group mix. The signal level of the group mix will also be displayed in the button (in decibels). A Note About Group Sources and Panning It is important to note that the IS16 has an Intelligent Group Panning System (IGPS) programmed into its DSP. When channel sources for the group signal are panned set dead center, the Group signal will simply be a mono signal. In the event one or more of your Group sources (from the channels) is panned left or right, the IS16’s IGPS will divide these for Group mixes. Signals panned left on channels will be sent to odd-numbered Groups (1, 3, 5 or 7) when selected as a destination, while selecting even numbered Groups (2, 4, 6 or 8) will allow these to receive signals that are panned to the right. When sending Group mixes to the Main mix, panning is automatically set dead-center and can be adjusted to the left and right as necessary. However Group mixes that are assigned to Multi outputs are once again restricted to the left-odd, right-even rule mentioned above. Group mixes panned left can only be sent out through odd-numbered Multi outputs, while those panned right are sent out even-numbered outputs (as assigned). 1.1.12 EQ On/Off and Display This button will allow users to turn on the channel’s EQ. If left inactive, the EQ will be bypassed. The accompanying display will show the channel’s currently selected EQ curve (as selected by the user within the Equalizer function). Pushing the display window will jump directly to the Equalizer function and allow users to immediately adjust EQ properties. An output level meter for the EQ can also be found next to the EQ curve chart. 1.1.13 Master Dynamic Processor On/Off and Display This button will turn the Dynamic Processor on and off. As with the EQ, all dynamic processors will be bypassed if this button is left inactive. Also like the EQ function, the accompanying graph will display the properties of the currently selected Dynamic Processor. Select the display to jump immediately to the dynamic processor setup. Immediately next to the display, users can find an output level meter for the channel’s dynamic processor. 10 IS16 1.2 AUX / Group Tab This section explains the following AUX and Group operations: Configuring AUX Sends • Configuring AUX/Group Masters AUX and Group Masters can be fed by any input channels, and can be assigned to MULTI outputs 1 to 8. The Group mixes can also be assigned to the Main stereo mix. IS16 11 English • English 1.2.1 Channel Send Rotary Controls Each of these level controls will determine the level of signal from the corresponding input channel that will be sent to the currently selected AUX mix. 1.2.2 Channel Send Selects These buttons will allow users to select which channels will be sent to the currently selected group mix. 1.2.3 Channel Send Level Meters These level meters will display the level of the corresponding input channel that is sent to the currently selected AUX or Group submix. 1.2.4 Channel Send Meter Pre/Post Button This button adjusts the AUX and group send meters between pre-fader and post-fader meters. 1.2.5 On/Off Button This button is used to activate and deactivate the currently selected AUX or Group mix. 1.2.6 Solo Button Pushing the Solo button will send the currently selected AUX or Group mix to the Control Room mix. If the selected mix is set to ’solo safe’, the words SAFE | SOLO will appear below the channel select option. 1.2.7 AUX/Group Mix Select This button and the subsequent menu will allow users to select which of the AUX or Group mixes they wish to adjust the properties of. 1.2.9 EFX Assign Buttons (not pictured) Push either of these buttons to assign the output from the corresponding EFX processor to the currently selected AUX or Group mix. The EFX1 and/or EFX2 buttons will only appear in the corresponding view page when the corresponding aux or group mix is selected as the source signal for the EFX processor. 1.2.10 To Main Button Pushing this button will send the currently selected Group mix to the Main stereo mix. 1.2.11Fader This fader will adjust the final output level of the currently selected AUX or Group mix. Users are also able to use the hardware faders, provided the Master selection is chosen on the Layer selection section of the IS16. Note that faders cannot be adjusted on screen, instead they must be selected and the rotary control used to adjust their levels. This helps avoid any level setting mishaps. 1.2.12 Level Meter This meter will display the level of the currently selected AUX or Group mix. The level displayed will be either pre- or post-fader, depending on the status of the Pre/Post Button. 1.2.13 Meter Pre/Post Button Use this button to select whether the level meter displays the pre-fader or post-fader signal. When dark, the post-fader signal will be displayed. When users push this button and it becomes highlighted, the pre-fader signal will appear. 1.2.8 Pan Control This control will adjust the left and right balance of the Group mix that sent to the Main mix, Multi mixes and Control Room mix (when soloed as an AFL). When the corresponding Group mix is assigned to a Multi output, the panning is very important. Signals panned left can only be sent to Multi 1, 3, 5 and 7, while those panned right can only be sent to Multi 2, 4, 6 and 8. 12 IS16 1.3 Control Room Tab English 1.3.1 Global Buttons These buttons allow users to turn all of the Control Room source signals to either AFL or PFLs. 1.3.2 Solo Safe Button Push the Solo safe button to select solo safe on any of the solo sources (1.3.4). Here users will be able to select which channels they wish to activate the solo safe function on. Channels that are set to solo safe will be sent to the Main stereo mix regardless of any Solos that are activated on other channels. The SAFE indicator within the solo source buttons will light up when a Solo Safe is activated on a channel. 1.3.3 Solo & Clear All Buttons Pushing the Solo button will allow users to ‘solo’ any of the channels in the ‘Solo Source’ section (1.3.4). A red headphone icon will appear within the button when a Solo is activated on a mix. The ‘Clear All’ button that accompanies the Solo button will clear all currently active solos IS16 1.3.4 Solo Source Buttons Push any of these buttons to select whether the signal taken from the appropriate channel inputs, AUXs or Groups, Main or EFX processor will be pre-fader listens (PFLs) or after-fader listens (AFLs). AFLs will be blue, while PFLs are green. When soloed, a red headphone icon will be displayed within the button. The word SAFE within the icon indicates that the channel has had a safe solo applied. 1.3.5 Control Room Level Meter This level meter displays the final output signal level for the Control Room outputs on the rear of the IS16. 1.3.6 Control Room Mono On/Off Button Pushing this button will combine the left and right signals of the Control Room mix to create a dual mono output signal. When deactivated, the Control Room signal will be stereo. 1.3.7 Control Room Trim Control This control adjusts the final output level of the control room mix, the signal of which is taken from the individual solos activated on channels. This control also affects the output level of the headphones mix, which can then be controlled further by using the Phones control beside the headphones output jack. 13 1.4 Main / Multi Tab English 1.4.1 On / Off Button This button will turn the currently selected output channel on and off. 1.4.2 Main Mono/Stereo Select Using this option users are able to select whether the Main mix is a stereo or mono mix. When mono is selected, the left and right channels will be combined as a mono channel. 1.4.3 Channel Select Using this button – and the resulting pop-up menu – users are able to select from any of the Multi Output channels as well as the Main stereo mix. Once selected, the channel’s properties will then appear on screen. 1.4.4Fader This fader determines the final output level of the currently selected output channel. 1.4.5 Level Meter This level meter displays the final output level of the appropriate Multi or Main output. When monitoring the Main mix, a stereo level meter will be displayed. 1.4.6 EFX Assign Buttons Push either of these buttons to assign the output from the corresponding Effect processor to the main or multi output. The EFX1 and EFX2 buttons will only appear in the corresponding view page when the corresponding multi output or the main mix is selected as the source signal for one or both of the Effect processors. 1.4.7 Meter Pre/Post Button Pushing this button will allow users to adjust the level meter between a pre-fader meter and a post-fader meter. 1.4.8 AES/EBU In SOLO Button This will activate the solo function on the AES/EBU Input signal. When the AES/EBU input is set to SOLO SAFE, the word SAFE will appear within this button. 1.4.9 AES/EBU On Button When the Main mix is selected, the AES/EBU button will allow the Digital input signal (received through the AES/EBU input) to be sent to the main mix. The Digital output signal (sent from the AES/EBU output), taken from the main stereo mix out, will always be activated. 1.4.10 AES/EBU Trim This parameter enables you to trim the level of the AES/EBU input signal in the digital domain. 1.4.11 EQ On / Off and Display The EQ button will turn the equalizer of the currently selected output channel on and off. The graph that accompanies it will display the current EQ properties of that channel. A level meter can be found beside the graph. Clicking on / selecting the graph will allow users to jump directly to the EQ function screen. 14 1.4.12 Dynamic Processor On / Off and Display Pushing this button turns the dynamic processor on and off. The display that accompanies it gives a quick visual representation of the dynamic processes currently set. A level meter can be found to the left of the dynamic processor graph. To jump to the dynamic processor function, simply click the graph onscreen. 1.4.13 Dynamic Processor The buttons situated to the right turn the individual dynamic processes on and off. There is a single button for each the Gate, Expander, Compressor and Limiter. When a process is activated (ie. the threshold is passed) the corresponding button will light up yellow. 1.4.14 Delay Function The delay button allows users to activate and deactivate a delay on the currently selected output. Users are also able to adjust the possible delay time from 1 millisecond to 1 second. Adding a delay to output channels can help to compensate for distance between speakers in large multi-speaker setups. A delay time of one millisecond per foot (or 3 milliseconds per meter) that the speaker is away from the stage is the general rule of thumb in this application. 1.4.15 Processing Order Selection Users are able to select in which order the currently selected output channel will pass through the EQ and Dynamic Processor functions. 1.4.16 Source Assign Buttons These buttons allow users to immediately assign any of the listed channels to the currently selected mix. The buttons will also show the output level for the corresponding mix (expressed in decibels). When the Main mix is selected, any of the input channels and the Group mixes can be assigned. When viewing the channel properties of any of the Multi outputs, users are able to select the source from any of the Group or AUX mixes. A Note on Group Sources and Panning It is important to note that the IS16 has an Intelligent Group Panning System (IGPS) programmed into its DSP. When channel sources for the group signal are panned set dead center, the Group signal will simply be a mono signal. In the event one or more of your Group sources (from the channels) is panned left or right, the IS16’s IGPS will divide these for Group mixes. Signals panned left on channels will be sent to odd-numbered Groups (1, 3, 5 or 7) when selected as a destination, while selecting even numbered Groups (2, 4, 6 or 8) will allow these to receive signals that are panned to the right. When sending Group mixes to the Main mix, panning is automatically set dead-center and can be adjusted to the left and right as necessary. However Group mixes that are assigned to Multi outputs are once again restricted to the left-odd, right-even rule mentioned above. Group mixes panned left can only be sent out through odd-numbered Multi outputs, while those panned right are sent out even-numbered outputs (as assigned). IS16 2.Metering 2.1 Channel Tab English This tab allows users to view the levels of all input channels, as well as the main stereo mix. Users can view peak levels by taking note of the red mark at the top of the meters. The meters can be changed between pre-fader and post-fader meters by pushing the pre/post buttons located below the meters. The input channels’ meters can be adjusted to display the input signal (post-gain, pre-on/off), pre-fader (post-gain, post-on/off) and post-fader (post-fader, -EQ, -dynamics, -delay). You can also view the status of dynamic processors assigned to the corresponding channels by viewing this window. Each the expander, gate, compressor and limiter have their own indicator for each channel as well as the main output. A red light indicates that the corresponding dynamic process is clipping; a blue light indicates that the corresponding dynamic process is turned on, and; a yellow light indicates that the corresponding dynamic process is currently active (ie. the set threshold has been passed). 2.2 AUX / Group Tab The AUX/Group meter page allows users to view the output levels of each of these mixes, as well as the main mix – all on a single page. A small red mark will hold high peaks for a short time. Users are able to adjust these meters between pre- and post-fader meters by pushing the Pre/Post Meter buttons. The post-fader signal displayed is post-fader, -equalizer, -dynamics and -delay. IS16 15 2.3 Meter / Fader Tab English The Meter section in the Meter / Fader Tab allows users to easily adjust levels of each input channel and AUX and Group mix, as well as the main mix. Found directly next to each of these virtual faders is a level meter. Level meters can be changed between pre and post by pushing the appropriate pre/post buttons on the right-hand side of the display. The input channels’ meters can be adjusted to display the input signal (post-gain, pre-on/off), pre-fader (post-gain, post-on/off) and post-fader (post-fader, -EQ, -dynamics, -delay). If any two input channels are paired (achieved through the Setup menu) these will be indicated as such by a small chain image located between the two channels’ controls/meters. When two channels are paired this is indicated in the menu FADER by a red triangle in the upper right corner of both channels, and the “slave” channel is grey. 2.4 Multi Tab The Multi tab of the meter function displays the input and output signals of the Multi signals, EFX signals, the AES/EBU signals, and Control Room output. The menu also provides a number of different controls to users. All Multi outputs can be turned on and off and have their levels adjusted. The main stereo mix can have its level adjusted. The EFX signals can be turned on and off and have their output levels adjusted. The Control Room trim can be adjusted. The trim can be adjusted on the AES/EBU input, which can also be turned on and off within this menu. If no digital device is connected to the input, users will not be able to activate the AES/EBU inputs. You can also view the status of dynamic processors assigned to the corresponding multi outputs by viewing this window. Each the expander, gate, compressor and limiter have their own indicator for each multi output. A red light indicates that the corresponding dynamic process is off; a blue light indicates that the corresponding dynamic process is turned on, and; a yellow light indicates that the corresponding dynamic process is currently active (ie. the set threshold has been passed). 16 IS16 3.Faders 3.1 Channel Tab 3.2 AUX & Group Tabs The AUX and Group tabs in the Fader function are, for all intents and purposes, the same. This section will combine the two. English 3.1.1 Channel Select Select this button to choose the channels that are displayed on screen. Users can select channels 1 through 4, 5 through 8, 9 through 12, or 13 through 16. 3.1.2 Channel Off/On Button Push this button to activate and deactivate the corresponding channel. 3.1.3 Solo Button Pushing the solo button will send the corresponding channel to the Control Room mix. If a channel is set to ’solo safe’, the word SAFE will appear within this button. This means the channel will still be sent to the main mix when soloed. Check section 1.3.2 for more information. 3.1.4 Pan Control This control will adjust the level of signal that is sent to the left and right channels of the main mix. 3.1.5 Channel Fader This fader will adjust the final output level of the corresponding channel. Users are able to use the virtual faders or the faders located on the mixing console itself. 3.2.1 Channel Select Push this button to bring up the range of channels you wish to view the properties of. Users can select 1 through 4 or 5 through 8. 3.2.2 Channel On/Off Button Select this button to activate/deactivate the corresponding AUX or Group channel. 3.2.3 Solo Button Pushing this button will SOLO the corresponding channel. When the word SAFE appears within the button, this means the corresponding AUX or Group mix has been set to ’safe solo’ and will still be sent to the main mix when soloed. 3.2.4 Pan Control (Group Tab only) This control adjusts the level of the signal will be sent to the right and left channels of the Main mix. 3.2.5 Level Fader This fader will adjust the final output level of the currently selected AUX or Group channel. Users are able to use these virtual faders, or can also opt to use the faders located on the mixing console itself (ensure the Master option is selected in Layer Mode). 3.1.6 Level Meter The levels of the current signal will be displayed here. 3.2.6 Level Meter The level meter will display the pre- or post-fader output signal for the corresponding channel. 3.1.7 Meter Pre/Post Button This button changes the channel’s meter between that of a prefader meter to a post-fader, meter. 3.2.7 Meter Pre/Post Button This button will turn the accompanying meter from post-fader to a pre-fader. 3.1.8 To Main Button Activating this button will send the channel to the main stereo mix. 3.2.8 To Main Button (Group Tab only) Found in the group tab only, this button allows users to send the corresponding group signal to the main mix. 3.1.9 USB/FireWire Button Pushing this button will replace the currently selected channel’s signal with the corresponding signal returned from your digital audio workstation software. The icon on this button will automatically change depending on the type of connection detected by the IS16 (FireWire or USB). 3.1.10 Invert Phase Activating this button will invert the phase of the corresponding channel. IS16 17 3.3 Main Tab English 3.3.1 Main Fader This fader will adjust the final output level of the Main mix. 3.3.2 Level Meter This stereo level meter shows the final output level of the Main. By pushing the Meter Pre/Post button that is included next to this meter, users are able to also view the pre-fader signal. 3.3.3 On/Off Button This button will activate and deactivate the Main mix. When set to off, the Main mix will not be sent through the Main output jacks. 3.3.4 Stereo / Mono Button Pushing this button will adjust the main output signal between a stereo signal and a mono signal. This effectively bypasses the pan controls on all channels and combines stereo signals. 3.3.5 AES/EBU Level Fader This fader will adjust the incoming signal level from any external AES/EBU-enabled device currently connected to the appropriate XLR AES/EBU inputs on the rear of the IS16. 3.3.6 AES/EBU Meter The incoming signal levels from the AES/EBU input can be viewed through this meter. 3.3.7 AES/EBU In Button When the Main mix is active, the AES/EBU button will allow the Digital input signal (received through the AES/EBU input) to be sent to the main mix. The Digital output signal, taken from the main stereo mix, will always be activated. 18 IS16 4.Patch IS16 19 English Each of tabs in the Patch function provides the same options, allowing for users to set the processing order of the equalizer, dynamic processor and delay functions for each individual signal. Users can also activate and deactivate any of these individual processes using the accompanying buttons. The tabs allow users to view channels 1 through 8, 9 through 16, all multi outputs, or the main output. 5.Delay English In the Delay function, users can adjust the delay time, mix (saturation) and feedback gain of the delay that is applied to the individual input channels. A delay can be applied to any of the 16 input signals. Use the tab buttons on the bottom of the screen to select which signals you’d like to view/adjust the delay properties of. The maximum delay time that can be applied is 1 second. The mix can be adjusted between 0% (no effect) to 100% (completely saturated). Feedback gain can be adjusted between 0 and 99%. Multi and Main outputs can only have their delay time adjusted. In addition to the delay itself, you are able to adjust both the scale used and the current ambient temperature. Users are able to adjust the delay scale between milliseconds, meters or feet. Adjusting the delay in meters and feet helps users to overcome the distance between the main stage and rear speakers in larger setups. When adjusting the delay by meter or feet, Phonic suggests using the distance between the main stage and the speakers. Entering an accurate temperature will allow the IS16 to calculate the best delay time based on the distance between the stage and speakers. 20 IS16 6.Effect 6.1 EFX 1 & 2 6.1.1 Input Selection Here users can select which signals they wish to apply the digital effect to. Two inputs can be selected in total for stereo effects. The EFX source can be selected between the input channels, auxiliary mixes or group mixes. 6.1.2 Effect Type There are at least 8 built-in effects to select from. Available effect types on EFFECT 1 are: Reverb Room, Reverb Hall, Reverb Plate, Tap Delay, Flanger, Chorus, Echo, Auto Pan, Tremolo, Vibrato and Phaser. On EFFECT 2, users are able to select the following effects: Ping Pong Delay, Flanger, Chorus, Echo, Auto Pan, Tremolo, Vibrato and Phaser. Effect 1 also offers a stereo 31-band graphic equalizer while Effect 2 has a stereo 15-band graphic equalizer. 6.1.3 Output Destination This button allows users to view and select where the EFX signal will be sent after leaving the effect processor. Each effect processor has two channels, the first of which is sent to either the left or odd-numbered mixes, and the second of which is sent to right and even-numbered mixes. Possible destinations include Main and Group mixes or the Multi outputs. Please note that the available output destinations for each EFX channel can be mixed and matched as required. 6.1.4 Level Meters These level meters show the input and stereo output signal levels of the IS16’s digital effect processor. Adjusting the level control of your EFX’s input signal can affectively adjust the incoming audio signal, and the EFX level control (6.6) will input and output gain controls on the selected effect can help adjust these levels as necessary. IS16 6.1.5 On/Off Button This button will turn the effect processor on and off. When set to “Off“, the currently selected effect processor will be effectively bypassed. 6.1.6 Solo Button This button allows the user to activate a solo on the current effect processor, effectively sending the signal to the Control Room mix. 6.1.7 EFX Level This control will adjust the final output level of the digital effect processor. 6.1.8 Dry/Wet Control Offered on every effect, the dry/wet control adjusts the effectsaturation of the chosen input source. 6.1.9Parameters Each of the built-in effects has a number of parameters that can be adjusted by the user to better refine their sound. These parameters can be adjusted by users using any one of the onscreen rotary controls (adjusted using the jog wheel). The number of parameters available for each effect may depend on the effect itself. For a list of parameters, and their user-adjustable ranges, please see the digital effects table. Reverb Effects, on EFX 1, offer a Gate function with Threshold and Hold controls. When the tap delay effect is selected, a tap button will appear on screen and users can use this to adjust their tap delay time. Users can also opt to use the enter button to adjust their tap delay time. 6.1.10 Reverb Select (Effect 1 only) When one of the three reverb effects is selected, this menu will allow users to select from 8 further refined reverb effects. For example, if Reverb Hall is selected, users can then choose from Hall Large, Hall Medium, Hall Small, Hall Concert, Hall Dark, Hall Wonder, Hall Jazz, and Hall Vocal, each with their own unique spin on the Hall Reverb and with their own unique parameters. More detail on these reverb effects can be found within the digital effect table. 21 English Any of the IS16’s input channels or AUX mixes can be assigned to the built in digital effect processor. To apply an effect to any particular channel, select the channel within the EFX menu’s input selection section. To apply an effect to a few different channels (or a mix of a few different channels) simply send the channel(s) to an AUX mix and apply the desired effect to that mix. The output of the EFX processor can then be selected between the Main, Groups and Multi. The effects menu also offers access to Networking features. 6.2Network Users can adjust their network settings in this menu. By using either the Wifi or Ethernet capabilities of the IS16, you are able to control the internal software. This can be utilized on most major tablet computers and smart phones. Available in 2013.. English 6.2.1 Mode Buttons To the left of the Network tab’s main screen you can find 3 buttons: Off, Wifi and Ethernet. When set to off, the networking capabilities of the IS16 will be essentially disabled. Users can select Wifi or Ethernet when wanting to use either of these protocols. When Wifi is selected the USB Wifi dongle must be connected to the Wifi port on the rear of the IS16. 6.2.7Authentication Users can select the kind of authentication used by their wireless router, whether it’s WPA2 or WEP. By setting authentication to “Open” on your router you are essentially opening your network up to anybody with a Wifi device. Phonic recommends setting your router to one of the available authentication types to ensure your privacy. 6.2.2 DHCP Server / Client When your local network runs off a DHCP protocol, the network will automatically assign your IS16 an IP address. If your network runs off a DHCP server, you can turn it on here. 6.2.8Encryption Select the encryption mode when open or shared authentication is selected. The encryption is selectable between 64 and 128 bit. 6.2.3 IP Address When not using a DHCP server, you can enter an IP address for your IS16 here. 6.2.4 Net Mask The subnet mask for your IS16 can be entered into this field. For most networks – and particularly if you’re unsure what it is – this should be kept set as “255.255.255.0”. 6.2.5Gateway A gateway is a device that can connect other devices in a network that use different types of protocols. This is typically your router, but a computer could also serve as a gateway. 6.2.9Key Enter the security key for your wireless network here. Without this, the IS16 will not be able to connect to the wireless network. The default key is 87654321. When connecting directly to the IS16 through the wifi connection you will be prompted to enter the key as your wifi password. 6.2.10Password Enter a password for your IS16 here. This will ensure that anybody within the general area of your wireless area cannot make unauthorized adjustments to your IS16’s properties. Passwords are case-sensitive. The default password is phonic. 6.2.6SSID SSID stands for Service Set Identifier. This is essentially the name of your mixer as it relates to your IEEE 802.11 wireless local area network (WLAN) and must be entered for the IS16 to connect to your network. (SSID: PHONIC-IS16). 22 IS16 7.Equalizer The IS16 provides a 4-band parametric equalizer on each input channel, Multi 1 to 8 outputs and Main Mix. All parameters are adjusted using the data encoders or touch-screen. Users are able to select a boost or cut of up to 18 dB on frequencies between 20 Hz and 20kHz. 7.1 Signal Source Here users can select which channel’s EQ to set. An equalizer can be applied to any of the input channels, any of the Multi outputs and the main mix. 7.2 EQ On/Off Button This button can turn the Equalizer for the currently selected channel on and off. 7.3 EQ Grid/Curve Here users can view the EQ curve. The small circles that appear on the graph represent one of the four bands, and can help to effectively adjust the frequency and boost/cut properties of that particular band. The touch screen can be used to help adjust the bands. 7.4 EQ Band On and Off Use these buttons to turn the corresponding EQ bands on and off. While not named specifically, these bands can be thought of as the low, low-mid, high-mid and high frequency bands on your average 4-band EQ. 7.5 EQ Type For the first and fourth bands on the EQ, users can select the type of curve used for the EQ. Band 1: EQ Band (PEAK), Low Shelf Filter (SHELF), High Pass Filter (CUT) Band 4: EQ Band (PEAK), High Shelf Filter (SHELF), Low Pass Filter (CUT) The Low/High Pass Filters will cut frequencies above and below the selected frequencies at 18 dB per octave. High and Low Shelf filters act similarly, but cut frequencies below the selected frequency by the preset level determined by the user. 7.6 EQ Parameters The EQ offers users the ability to view or edit various parameters/properties of their EQ bands, including the Gain, the frequency and the ‘Q’ of the EQ frequency. The following parameter table offers details on the range available to users on each parameter. Parameter 1 (Low) 2 (Low-Mid) 3 (High-Mid) Gain -18 dB to 18 dB Frequency 20 Hz to 20 kHz Q 10 to 0.1, HPF, Shelf 10 to 0.1 4 (High) 10 to 0.1, LPF, Shelf 7.7 EQ In / Out Level Meters These level meters give visual representations of levels going into and out of the equalizer. IS16 23 English A 31-band equalizer is also available on the Main output, and can be selected by entering the Patch menu and changing the Order settings to include the GEQ instead of the EQ.The Q of these signals can also be adjusted to give a wider or narrower band, as necessary. 8.Dynamics English The IS16 provides a built-in Gate, Expander, Compressor and Limiter on each input Channel, Multi 1 to 8 outputs and Main Mix. Dynamics are not limited by DSP resources, and can be configured as pre- or post-EQ/Delay for each channel. All built-in dynamics parameters are adjusted using the touch-screen and onboard controls. A noise Gate is a dynamic process that turns off or significantly attenuates the audio signal passing through it when the signal level falls below a user adjustable threshold. An Expander helps to make troublesome background noise (such as humming) inaudible by reducing signals with low amplitudes. A Compressor reduces signals over a user-defined threshold by a user-defined amount/ratio. Limiters work just as Compressors do, with a ratio permanently set to infinity-to-1. To bypass the dynamics processor, simply push the ON/OFF button or press the “GATE”, “EXP”, “COMP” and “LIM” buttons to toggle the individual processes on and off. Each of the pages/tabs in the Dynamics menu is essentially the same, providing similar attributes for the individual processes. 8.1 Channel Select Use this button and the subsequent menu to select the channel you wish to apply the dynamic effect to. Users can select from any of the input channels, any of the multi outputs, and the main stereo mix. 8.2 Dynamic Processor On/Off Use this button to turn dynamic processor on and off for the currently selected channel. 8.3 Gate/Expander/Compressor/Limiter On/Off This button turns the currently selected dynamic process on and off. 8.4 Output Level Meter This meter gives the final output level of the dynamic effect for the currently selected channel. 8.5 Gain Reduction Meter This meter shows the amount of gain reduction that is applied to the currently selected dynamic process. This is essentially the decrease in gain applied when the signal crosses the selected threshold of the dynamic process. 8.6Parameters Each of the dynamic processes has its own user-definable parameters. Please consult the table below for details on each parameter. Parameter What It Does Ratio Adjusts the compressor or expander input to output signal ratio. Thresh Adjusts the threshold of the gate, compressor, and expander effects. Attack Adjusts the time it will take for the effect to kick in after the signal rises above the set threshold. Release Adjusts the time it will take for the effect to deactivate after the signal falls below the set threshold. Output Gain Increases the final output signal of the compressor. Range On the gate function, the range parameter allows users to select the level (in decibels) by which the signal will attenuate. 8.7 Dynamic Chart This graph gives a visual representation of the dynamic processor’s function. Currently active processes will be indicated in orange, while the process you’re currently adjusting is indicated in blue. Users are able to adjust the threshold and ratio of functions using the appropriate onscreen icons. 24 IS16 9.Utility 9.1Scene English In the scene menu, users can select which channels they wish to save the current settings of. Select one or more of the available input channels, AUX channels, Group channels or the Main mix, and select Save. Users are also able to select and unselect all channels with the included buttons. The saved settings for each are: select, fader levels, on/off, panning, equalizer, dynamics, effects, AUX sends, delay and routing. 9.2Naming This function will allow users to assign names to each of the input channels and the multi outputs. Names can be up to 9 characters long and contain letters, numbers, parenthesis, dashes and underscores. Simply click the display window of the appropriate channel to bring up a digital keyboard. Users can use this to key in a name for the channel. This can be anything from the name of the instrument/input source, to the name of the person playing said instrument. For the Multi Outputs, users can – for example – enter the destination of the signal (the name of a performer monitoring the signal, recording device’s model number, and so on). IS16 25 9.3 Generator / VGA English Through the Signal Generator, users are able to send a Sine wave (100 Hz, 1 kHz or 10 kHz) or a pink noise signal to any of the AUX or group mixes, as well as the main mix if need be. The On/Off button allows users to turn the signal generator on and off, and the accompanying level control (virtual rotary control) will allow adjustment of the signal level. At the bottom of this screen, users can find two aspect ratio options for the monitor connected to the IS16’s VGA output. Users can select either full screen (4:3) or wide screen (16:9) mode depending on the aspect ratio of their monitor. To the right of the ASPECT RATIO selection the user can find options for the touch screen dimming. Users can select the time that it will take for the screen to go dim, or opt to disable the function all together. 26 IS16 10.Setup 10.1Link/Pair English 10.1.1 Link Mode Users are able to link the level controls of any of the input channels together using the Link Mode function. Users are able to link up to 4 groups of channels together, and each group is color-coded. The link groups are labelled A, B, C and D and are colored orange, green, purple and brown, respectively. If users link channels together, adjusting one fader within the link group will allow users to control all the others, while maintaining their relative level differences. 10.1.2 Channel Pair Activating pair mode on any combination of the channels will copy the fader settings and parameters from one channel to another. All odd-numbered channels can have their parameters copied over to the evenly numbered channels that succeed them (or vise-versa). The parameters copied do not include the invert phase or DAW functions. Paired channels’ linked parameters are: Select, On/Off, Panning, Equalizer, Dynamics, Effects and AUX Send On/Off. Within the Setup menu’s Link/Pair tab you will also find three additional buttons: IDV, GANG and INV GANG. “IDV” is short for “Individual” and allows users to adjust the panning of each channel independent of other channels, regardless of “pair” settings. “GANG” will allow users to adjust the panning of two channels simultaneously when they are paired together. “INV GANG” is short for “Inverse Gang”, and allows the panning of two channels to be adjusted simultaneously, however in opposite directions (fantastic for stereo inputs). IS16 27 10.2 Clock Source English In the Clock Source tab of the Utility menu, users are able to select the clock source of the AES/EBU input and output. The clock source can be selected from Internal (with sampling rates of 44.1 kHz, 48 kHz, 88.2 kHz and 96 kHz), the digital device, or the Word Clock input/output. The selected Sampling Rate – or that set by the external device – is displayed at the bottom of this menu. The Enter button must be pushed to confirm new Clock Source settings. 10.3 LCD Calibration Select this tab to calibrate the IS16’s color touchscreen. When the LCD Calibration tab is selected, crosshairs will appear onscreen and users should select these one by one to calibrate the touchscreen. If the screen becomes uncalibrated for whatever reason, and the appropriate menu cannot be selected, users should use the IS16’s onboard controls to navigate the GUI and bring up the LCD Calibration function. If it becomes necessary to calibrate the screen, users can use the tab buttons, directional buttons and ENTER button on the IS16 to allow them to access the calibration function. 28 IS16 10.4Update English The update function allows users to update the IS16’s firmware to the latest version. This is done by inserting an SD card containing the latest firmware update into the SD card slot on the rear of the mixer, then selecting the Update tab. Be sure to check your current version before updating to avoid updating to an out-of-date firmware version. Phonic recommends that you format your SD card in the FAT file system for best results. WARNING: Do not power off the IS16 when in the process of updating the firmware. Doing so will render the unit virtually useless unless you perform a system restore. System Restore In the event that starting up your IS16 becomes impossible due to corruption of one or more of the DSPs, there is a relatively simply way to get it up and running again. First, visit www.phonic.com to download our IS16 System Restore Software. Place the software on a blank SD card. Ensure the card is otherwise blank – it is important that the Restore Software is the only file on the card. Place the SD card into the IS16’s SD card reader and turn the system on. The unit should automatically restore itself, although start up may take a minute longer than usual. NOTE: Be sure to read and carefully follow the system restore instructions as detailed in the txt file provided along with the restore software. IS16 29 Troubleshooting English LCD needs calibration o When the LCD Calibration tab is selected, crosshairs will appear onscreen and users should select these one by one to calibrate the touchscreen. If the screen becomes uncalibrated for whatever reason, and the appropriate menu cannot be selected onscreen, users should use the IS16’s onboard controls to navigate the GUI and bring up the LCD Calibration function. Firmware updates and version check o Please always delete your old firmware from the SD card and check the firmware version before updating the unit. Firmware updates are accomplished by inserting an SD Card and selecting the appropriate Firmware update option in Setup menu of the GUI. I cannot see the screen properly o You can adjust the brightness of LCD. o Move the unit out of direct sunlight. The power won’t turn on o Is the power supply connected to the unit, and the AC-end to an appropriate source? o Is the optional expansion card installed properly? o Have you performed a system restore? o If the power still does not turn on, contact your nearest Phonic dealer for service. After a firmware update, my firmware version is left unchanged o Don’t forget to reinitialize your system. The system restore doesn’t work o Did you format your SD card as a FAT file system? o After an initial restore failure, the entire restore must be performed from the beginning. There is no output signal o Is the optional expansion card installed properly? o Is the “On” key indicator of the Main channel lit? o Is an output assigned to the output channel? o Is the level of that output too low? 30 Sound is too soft o Is the GAIN of the mic preamplifier or external preamplifier set to an adequate level? o Is the fader of the input channel raised? o Please check the EQ settings as you may be excessively cutting signals. o Check the Dynamics setting for the same reason as above. o Enter the Meter function to check both input and output levels simultaneously. Sound is distorted o Is the Master Clock setting correct? o Is the GAIN of the mic preamplifier or external preamplifier set to an appropriate level? o Could the fader of the input and output channels be raised too high? o Could the Main fader be raised too high? o Could the EQ/DYN gain be set to an extremely high setting? o Have you inadvertently applied a digital effect or reverb to any of the channels? Digital glitches o Is the Master Clock set correctly? o Could the digital input signal be unsynchronized? o Could onboard test generator be turned on? Can’t save to external SD card o Is the SD card write protected? o Ensure your card is either an SD or SDHC card. o Does the SD card have enough free space to save the data? o Ensure the card is formatted in FAT32 or FAT16? NTFS is not supported. o For best results, try a SD-HC card between 2GB and 4GB in size. Can’t perform a system restore o Is the SD card formatted as a FAT file system? o Were both steps in the restore process followed precisely? o Did you reinitialize the unit after the restore was completed? IS16 How Do I…? …Drag faders and rotary controls to adjust levels on screen? On screen rotary controls and faders can be adjusted by touching the control on screen and using the onboard jog wheel. The ability to drag these controls and adjust the levels was disabled by design. To leave incorporate this function would open up the possibility of levels being inadvertently and excessively adjusted by accident. …Adjust levels of rotary controls and faders easily? While you can’t use your finger or mouse to drag faders up and down within the IS16 software, you are able to use the connected mouse to adjust these levels with greater speed. Provided your mouse has a scroll wheel, you can simply place your mouse over the control you wish to adjust and rotate the scroll wheel up or down to adjust the level. …Connect an instrument or microphone? Users are able to use the XLR or 1/4” inputs on the front of the mixer to connect their various devices. To do so, use an appropriate XLR cable or 1/4” TRS (balanced) cable. Microphones are typically connected via XLR connectors, while instruments like guitars can be connected via 1/4”. If connecting low impedance devices like guitars to the IS16 ensure you push the PAD button to attenuate the signal. If you are using a microphone that requires phantom power, be sure to turn on the appropriate Phantom Power switch, found on the back. Remember that phantom power is grouped, so activating one of these groups will add phantom power to all of the XLR inputs in the corresponding channels. …Set channel levels? With level meters on each and every input channel, setting your levels is a cinch. Go into the view menu and bring up your channel’s properties. You may want to set the meter to “INPUT” so you can get a better idea of input levels only. Produce a signal through this channel (for best results, play the instrument or sing/talk into the microphone at the normal level) and check the incoming levels. For best results, adjust the gain control (and push in the PAD button, if necessary) so that the level meter sits below the -10 dB mark, occasionally peaking up to about -5 dB. It is best if the signal does not go much higher than this. …Send a channel to my main mix? After setting your levels, it should be as simple as pushing the “ON” and “TO MAIN” buttons within your channel’s settings. These can all be found in the “VIEW” menu. …Adjust the onscreen controls? Okay, selecting a menu and turning the channel on and off is easy enough – but what about these rotary controls? To adjust these, simply select them onscreen (as you would the on/off buttons), then use the IS16’s large jog wheel to adjust the value. As you would expect, clockwise will increase the value, while anticlockwise decreases the value. The onscreen faders are adjusted the same way. …Monitor a signal? There are a number of ways to monitor a signal using the IS16. The easiest is of course to solo the signal by pushing the SOLO button in the channel’s View screen. This will immediately send the signal to your Control Room and Headphones mix. However a normal solo will cut the signal sent to your Main mix. If you do not wish for it to do so, go into the Control Room View menu section and set the Solo to “SOLO SAFE”. IS16 …Add a stereo device? You may have noticed all of the IS16’s inputs are seemingly mono. However, this does not mean that the unit is not flexible to stereo inputs! First of all, pick 2 input channels that you wish to connect your stereo input to. These should be an odd-numbered channel and the even-numbered channel that directly follows it. It is advisable to use the odd-numbered channel as the left input and the even-numbered as the right. Enter the System menu and go to the Link/Pair tab. Here you can link the properties of your two mono channels. Paired channels’ linked parameters are: Select, On/Off, Panning, Equalizer, Dynamics, Effects and AUX Send On/Off. You can then go into your channels’ View menus and pan your inputs’ respective signals to the left and right, as necessary. Panning can also be accomplished within the Faders menu. By panning the input signals to their respective destinations you’ve effectively made these two channels a single stereo channel. …Add an effect? Adding effects has been made extremely simple with the Effects menu. There are two effect processors in total, each of which is independent of the other. To add an effect to any input signal, you simply need to go into the Effects menu and select the desired input channel as your EFX’s input. …Correctly set up my EFX, Compressor, Limiter, Gate, Expander, and so forth? While we can’t suggest any particular settings for your various functions – everybody has different tastes, different requirements – we have included a range of presets for each function that you may want to try. In the Effects menu or in the various Dynamic Processor menus, the header bar at the top of the display will offer a preset selection window. Test these out to see if you like the settings. If not, play around with the available parameters slightly to see if you can find settings you like. …Get my signal to the computer? Any time your computer is connected via the USB and FireWire interface (which is optional, we must remind you), the signals from your IS16’s input channels are automatically sent to the computer for recording. Just select the IS16’s ASIO driver as your audio device in your software, then setup your tracks and you should be good to go. In Cubase, you will need to push F4 to assign your input channels to buses and then assign these buses to your project’s tracks. This process may differ on other programs. …Get a signal back from my DAW software? But how do you get a signal back to your computer? That’s easy: as well as the 16 inputs you can select, there are also 16 outputs. You can assign any one of these outputs to your tracks, and monitor or playback these in your software. Each of these outputs corresponds with an input channel on the IS16. To activate the return signal from the computer, you just need to push the button with the FireWire or USB logo in the corresponding View menu. For example, if you assign one of your tracks to output 4, then go into the IS16’s CH4 properties (in the View menu) and push the appropriate FireWire or USB button, your input signal will be cut off and replaced by your return signal. TIP: With the above in mind, if you want to play your original signal through your main speakers, yet get the return signal (from your DAW software) back for monitoring, you will have to assign the track in your DAW to a different – preferably unused – output channel. Then go into this channel’s properties, activate the return signal and monitor it from there. 31 English …Connect a monitor to the IS16? You can connect any modern display device to the VGA connector on the back of the IS16. While you can do this alone, by connecting a USB mouse to the mouse connector will enable you to gain better control of the software when using a screen. …Add a delay to my guitar? Again, the delay is available in each channels’ View screen (although it also has its own independent menu). Users can turn the delay on here; then adjust the delay time, the mix and the feedback level. English …Connect an amplifier to the IS16? The easiest way to use the IS16 in live situations is to connect the Main XLR outputs on the rear of the IS16 to an amplifier’s input, or else to the input of a couple of active speakers. For a surround system, you may also want to use the 1/4” Multi outputs. You can assign any of your AUX or Group mixes to the Multi outputs, so making a submix for your rear speakers should be a piece of cake. …Solo without cutting off the Main Mix? When you typically solo a signal, the channel’s send to the main mix is effectively cut off and the signal is redirected to the Control Room mix. To avoid this, you need to set this channel to SOLO SAFE. This is done by entering the View menu, then going into the Control Room tab. Here you can push the SOLO SAFE button and then select the channels you wish to set as safe solos. When SOLO SAFE is active on a channel, the word SAFE will appear within the solo button. How to aggregate two or more devices: 1. Open “Audio MIDI Setup” 2. Select in menu bar “Audio” “Open Aggregate Device Editor” 3. Add a new aggregate device with “+” and name it 4. Select the devices 5. Select “done” 6. You can then select the aggregate device in the Audio MIDI Setup Please find a detailed description on the Apple website: http:// www.apple.com/ca/pro/techniques/aggregateaudio/ For Windows, simply ensure that you have installed the device driver once for each instance of the IS16 that will be used on the computer. After doing so, you should be able to connect both units in a daisy-chain and have them recognized by the Phonic Control Panel. FireWire + USB Operation After connecting multiple units to your computer, you need to create proper synchronization setup. One unit has to be a master device, and everything else must be a slave to this. Software Installation Guide • Windows It is important to follow the correct installation procedure to ensure software installs successfully. The following method is for Windows users. • 1. 2. Start the driver installation (setup.exe). Please note that the FireWire and USB drivers are separate and you will need to install the appropriate driver depending on which connection you wish to use. Connect the device to the PC only when asked to by the installer. If you try connecting the device before the installer runs, Windows’ own installer may take over and try to install standard Windows drivers – which naturally will not work. Once the device driver has been properly installed, you should be able to disconnect and reconnect the same unit at a later date and have it recognized by the Phonic Control Panel. It is important to note that for multi-device support you should run the driver installer for each new device you wish to connect to your computer, even if it is an identical device (e.g. a second IS16 digital mixer). This is because the installer will add registry entries that contain the device’s GUID – or, in other words, its identification number. Mac OSX Mac users who are using Garageband or Logic Pro will simply need to connect the IS16 to their Mac via FireWire or USB and the unit will be automatically recognized. If using other programs, such as Cubase, users will need to create an aggregated device to make full use of the unit. This process is discussed in the Daisy-Chaining section. Set the "Clock Source" to e.g. IS16 (make sure it is not the PC or Mac) Setup the other IS16 to sync to ‘SYT’ Please note that daisy-chaining is not possible through USB, as it is not a real bus – rather a point-to-point connection. FireWire/USB Compatibility Microsoft Windows XP, Vista and 7 are supported through use of the ASIO driver. Microsoft have also enhanced the audio stack from Windows 7 to support S800, therefore Windows 7 users with an S800 interface will be able to run their IS16 on this system provided they have the latest updates and hotfixes installed. The FireWire + USB 2.0 expansion card is also compatible with Mac OSX 10.6.2 Core Audio and later. Please ensure all available updates from Apple have been installed to ensure flawless operation. Also, if using an S800 FireWire connector, be sure to use an appropriate S400 adapter. IS16 Control Panel The IS16 control panel can be accessed at any time by entering choosing the shortcut from your Programs menu. This program will not only allow users to alter their device and channel names and properties, but will also let them correct for latency issues, change sampling rates, and so forth. When opening the software, a number of options will be available for users to select from, allowing them to adjust the available properties. Devices Daisy-Chaining FireWire is a ‘real’ bus, connecting all daisy-chained devices into one big network. The devices are distinguished by their GUID. Devices with only one FireWire port can only be so-called ‘leafs’ on the bus (the far end of the chain; the bus ends there). For the Mac’s FireWire port, there is no restriction as far as daisychaining of FireWire devices is concerned. For example, when connection two IS16 mixers to a Mac, these can be controlled by means of an aggregated driver. In the Devices section, users are able to view and edit the name of the Phonic Device connected to their computer. 32 IS16 Input Channels Having two clock sources has the potential to cause undesireable results to your audio, so it is best avoided. If the IS16 is the only piece of digital audio equipment attached to the computer, there is no reason this option should be changed. Settings The Input Channels section allows users to view and edit the name of the various input channels received from the USB/FireWire input. Output Channels By entering the Output Channels section, users can view and edit the names of the sixteen return channels from the computer to the IS16 digital mixer. Synchronization Users are able to adjust various buffer times in the Settings section. The Stream Buffer Depth is adjustable between 0.5 and 20 milliseconds. It adjusts the buffer used when streaming a signal from the IS16. If the depth is set too high, an obvious latency will become evident. If the depth is too low, various clicks and pops may become obvious. It is best to set the Stream Buffer Depth to a level that allows users to get the lowest latency, while still maintaining an optimal performance. The default settings are ideal for most computers. The ASIO Buffer Depth is adjustable between 4 and 40 milliseconds. This allows users to adjust the latency of the stream received by ASIO driver-based software (including Steinberg Cubase LE). The WDM (Windows Driver Model) Sound Buffer Depth is adjustable between 4 and 40 milliseconds. This allows users to adjust the latency of the stream received by WDM based programs. Also in this section, users are able to view their "drop out statistics", where the number of times either the USB or FireWire connections have been interrupted can be viewed. Streams In the Synchronization section, users can adjust the sampling rate and other synchronization properties. Many of these adjustable properties, as they are, are set for optimum performance and, unless you are sure of what you need to change, are probably best left alone. First off, the synch mode can be altered, though making this alteration is not recommended for novice users. The sync mode is basically the way the computer determines what the 'clock source' (ie. device that your computer will use to determine the timing of all digital signals received) will be. The default setting for this feature is "CSP", meaning the IS16 is the "master" clock source of the device. The other options allow users to make the IS16 follow the "timing" of whichever device is the clock source. IS16 In the Streams section, the IS16 device properties can be viewed. Each input and output stream can be scrutinized, and the isochronous stream number and its supported sampling rates can be viewed. 33 English Users are also able to change between automatic and manual sampling rate settings. When the sampling rate is manually set, users can select between sampling rates of 44.1, 48.0, 88.2 and 96.0 kHz per second. Many devices have sampling rates that do not surpass 44.1 kHz per second, therefore, when using multiple digital devices, users are advised not to exceed this level unless they are sure the secondary device's sampling rate can match the sampling rate. PRESETS Dynamic Presets English Gate Program Range Hold Threshold Attack Release Default -40 125mS -50 6.3mS 400mS Gate 1 -30 1.6Sec -50 12.5mS 2sec Gate 2 -40 1.6Sec -50 12.5mS 2sec Gate 3 -40 2.00Sec -50 6.3mS 400mS Expander Program Ratio Threshold Attack Release Default 2:1 -51 50mSec 400mSec Expander 1 1.5:1 -20 3.15mSec 63.0mSec Expander 2 1.7:1 -10 4.0mSec 80.0mSec Expander 3 2:1 -20 5.0mSec 400mSec Compressor Program Ratio Threshold Attack Release Output Gain Default 1.5 : 1 -2 31.5mS 315mSec 1.5 Speech 2:1 -20 5.0mSec 20.0mSec 4 Voice 2:1 -10 4.0mSec 80.0mSec 0 1.3:1 -20 12.5mSec 63.0mSec 0 Classic 2:1 -20 10.0mSec 100mSec 0 Snare 1.3:1 -20 31.5mSec 315mSec 0 Piano 3:1 -8 12.5mSec 125mSec 1.5 String 2:1 -11 12.5mSec 800mSec 1.5 Guitar 3:1 -9 12.5mSec 250mSec 1.5 Bass Drum Limiter Program Threshold Attack Release Output Gain Default -3 1.6mS 500mS 0 Limiter -1 1.6mS 400mS 0 EQ Presets EQ LOW L-MID H-MID HIGH PEAKING PEAKING PEAKING PEAKING G 0 dB 0 dB 0 dB 0 dB F 87.9 122.1 2066.9 9699.4 Q 2 2 2 2 PEAKING PEAKING PEAKING H.SHELF G +2.5 dB –2.5 dB 0.0 dB +2.5 dB F 100.2 260.2 1002.4 5365.4 Q 2 10 1 — Default Bass Drum 1 34 IS16 Bass Drum 2 PEAKING PEAKING G +3.0 dB –3.0 dB +3.0 dB F 82.3 399.1 2517.9 13041.1 Q 2 4 2 — PEAKING PEAKING PEAKING H.SHELF G –0.5 dB 0.0 dB +2.0 dB +4.0 dB F 132 Hz 1.00 kHz 3.15 kHz 5.00 kHz Q 1.5 4.5 0.35 — Snare Drum 2 L.SHELF PEAKING PEAKING PEAKING G +1.0 dB –3.0 dB +2.5 dB +4.0 dB F 130.4 338.5 2357.5 3990.5 Q — 10 1 0.35 PEAKING PEAKING PEAKING PEAKING G +1.0 dB –3.0 dB +1.0 dB +1.0 dB F 213.6 675.5 4551.7 6324.6 Q 1.5 10 1.5 0.35 L.SHELF PEAKING PEAKING H.SHELF G –3.0 dB 0.0 dB 0.0 dB +3.0 dB F 107.1 426.2 1070.5 13041.1 Q — 8 1 — L.SHELF PEAKING PEAKING H.SHELF G –3.0 dB –2.5 dB +1.0 dB +0.5 dB F 93.9 426.2 2779 7455.2 Q — 0.9 1 — L.SHELF PEAKING PEAKING H.SHELF G –3.0 dB 0.0 dB +2.0 dB 0.0 dB F 100.2 399.1 2779 16966 Q — 5 0.35 — L.SHELF PEAKING PEAKING H.SHELF G –5.5 dB +4.5 dB +2.5 dB 0.0 dB F 35 110.6 2000 3990.5 Q — 5 5 — PEAKING PEAKING PEAKING H.SHELF G +3.0 dB 0.0 dB +2.5 dB +0.5 dB F 110.6 118.2 2000 3990.5 Q 0.35 6 6.5 — PEAKING PEAKING PEAKING H.SHELF G +2.5 dB +4.5 dB 0.0 dB 0.0 dB F 93.9 969.6 3990.5 12619.1 Q 0.35 9 6 — Snare Drum 1 Tom-tom Cymbal High Hat Percussion E. Bass 1 E. Bass 2 Syn. Bass 1 IS16 LPF English PEAKING 35 Syn. Bass 2 English PEAKING PEAKING PEAKING H.SHELF G +2.5 dB 0.0 dB +1.5 dB 0.0 dB F 130.4 181.2 1181.6 12210.8 Q 1.5 8 6 — L.SHELF PEAKING PEAKING H.SHELF G –4.0 dB 0.0 dB +2.0 dB +4.0 dB F 93.9 969.6 3990.5 7455.2 Q — 8 1 — PEAKING PEAKING PEAKING H.SHELF G +2.0 dB –4.0 dB +2.0 dB +3.0 dB F 228.1 612 3169.8 5365.4 Q 6 10 1 — PEAKING PEAKING PEAKING H.SHELF G +2.0 dB –5.5 dB +0.5 dB +2.5 dB F 251.8 399.1 1347.7 4551.7 Q 0.35 10 6.5 — PEAKING PEAKING PEAKING PEAKING G +2.0 dB 0.0 dB +2.0 dB +2.0 dB F 139.3 1002.4 1935.3 5730.2 Q 9 5 0.35 10 PEAKING PEAKING PEAKING H.SHELF G +2.0 dB +1.5 dB +2.0 dB 0.0 dB F 126.2 455.2 3385.3 19352.8 Q 9 0.5 0.35 — E. G. Dist. 1 L.SHELF PEAKING PEAKING H.SHELF G +5.0 dB 0.0 dB +3.5 dB 0.0 dB F 355 Hz 950 Hz 3.35 kHz 12.5 kHz Q — 10 10 — E. G. Dist. 2 L.SHELF PEAKING PEAKING H.SHELF G +2.0 dB –7.5 dB +2.0 dB +2.0 dB F 349.9 1070.5 4261.9 12619.1 Q — 10 6 — PEAKING PEAKING PEAKING H.SHELF G –2.0 dB 0.0 dB +1.0 dB +2.0 dB F 103.6 1070.5 1872.7 5365.4 Q 1.2 5 4 — L.SHELF PEAKING PEAKING H.SHELF G –3.5 dB –2.0 dB 0.0 dB +2.0 dB F 306.7 745.5 2000 3498.5 Q — 10 5 — Piano 1 Piano 2 E. G. Clean E. G. Crunch 1 E. G. Crunch 2 A. G. Stroke 1 A. G. Stroke 2 36 IS16 Digital Effect Presets Reverb Program Name Default LPF_Freq HPF_Freq Reverb_ Pre_Delay Time Early_ Delay Hi_Ratio Density Level Gate Thresh Gate Hold Time 5K 22 2.45s 0 57% 96% 45 100 -70dB 1mS -70dB 1mS Preset Large Room 9K 25 1.2s 23ms 72% 69% 55 49 Preset Medium Room 8K 28 1.0s 23ms 72% 68% 55 49 Preset Small Room 5.6K 25 300ms 1ms 72% 67% 60 50 Preset Live Room 9K 45 1.15s 21ms 88% 68% 60 67 Preset Bright Room 16K 50 300ms 2ms 88% 77% 67 67 Preset Wood Room 2.24K 224 50ms 0ms 40% 80% 40 81 Preset Heavy Room 14K 50 1.0s 10ms 78% 77% 40 76 Preset Opera Room 16K 50 3.15 1ms 78% 79% 64 72 Early_ Delay Hi_Ratio Density Level Hall Default Program Name Default LPF_Freq HPF_Freq Reverb_ Pre_Delay Time 14 28 1.75s 23ms 79% 87% 89 60 Preset Large Hall 9K 20 2.4s 23ms 79% 87% 89 66 Preset Medium Hall 16 K 20 1.75s 23ms 79% 87% 89 60 Preset Small Hall 8K 28 1.0s 10ms 79% 87% 80 55 Preset Concert Hall 2.24K 20 2.3s 23ms 83% 79% 93 66 Preset Dark Hall 5.6K 20 1.15s 23ms 87% 79% 93 66 Preset Wonder Hall 14K 56 2.45S 54ms 80% 79% 97 76 Preset Jazz Hall 9K 20 3,15s 1ms 78% 77% 64 76 Preset Vocal 8K 45 1.0s 1ms 80% 79% 64 72 Early_ Delay Hi_Ratio Density Level Plate Default Program Name Default LPF_Freq HPF_Freq Reverb_ Pre_Delay Time 16K 20 1.15 0 100% 87% 79 55 Preset Large Plate 16K 20 1.15 0 100% 87% 79 55 Preset Medium Plate 16K 20 100ms 11ms 100% 87% 79 50 Preset Small Plate 10K 20 50ms 8ms 100% 87% 79 75 Preset Flat Plate 9K 20 150ms 5ms 100% 87% 79 50 Preset Light Plate 20K 63 1 4ms 46% 87% 79 50 Preset Thin Plate 16K 28 1.15 3ms 51% 87% 79 36 Preset Perc Plate 20K 20 1.3s 35ms 61% 87% 79 40 Preset Industrial Plate 20K 280 50 0 100% 99% 79 60 Delay1 time Delay2 time Dealy FB1 Dealy FB2 FB_HPF FB_LPF 190ms 310ms 50% 50% 180 5.6K 5.6K 190ms 310ms 50% 50% 180 5.6K 5.6K Echo Delay Default Program Name Default Preset IS16 Echo 37 English Room Default Chorus English Chorus Default Program Name Default LFO_Freq LFO_ Phase LFO_Type Depth Pre_Delay LPF_Freq 0.2Hz 90degree Triangle 45% 4ms 10K Chorus 0.2Hz 180degree Triangle 50% 4ms 10K Chorus 1 3Hz 180degree Triangle 20% 8mS 10K Chorus 2 1.4Hz 90degree Triangle 20% 6mS 10K Chorus 3 2.2Hz 180degree Triangle 25% 8mS 10K Preset Flanger Flanger Default Program Name Default Preset Flanger LFO_Freq LFO_ Phase LFO_Type Depth Pre_Delay LPF_Freq FB 0.01 90degree Triangle 50% 9.6 5K 57% 10Hz 180degree Triangle 73% 9.6 5K 57% Depth Freq Stage_No Phaser Phaser Default Program Name Default Preset Phaser LFO_Freq LFO_Type 19.95Hz Sine 100% 5K 2 19.95Hz Triangle 100% 5K 6 Depth Freq Vibrato Vibrato Default Program Name Default Preset Vibrato LFO_Freq LFO_Type 16.4Hz Triangle 50% 100Hz 16.4Hz Triangle 100% 100Hz Tremolo Tremolo Default Program Name Default Preset Tremolo LFO_Freq LFO_Type Depth 6.1Hz Sine 60% 6.1Hz Sine 45% Auto Pan Auto Pan Default Program Name Default Preset Auto Pan LFO_Freq LFO_Type Depth Way 2.35Hz Triangle 79% L<->R 2.35Hz Triangle 79% L<->R Tap Delay Tap Delay Default Program Name Delay time FB HPF LPF Default Tap Delay 200ms 40% 90 Hz 7.1K 38 IS16 Digital Effect Presets Room Default LPF HPF Reverb Pre_Delay Early_Delay Hi_Ratio Density Level Large Room 9K 25 1.2s 23ms 72% 69% 55 49 Medium Room 8K 28 1.0s 23ms 72% 68% 55 49 5.6K 25 40ms 1ms 72% 67% 60 50 Live Room 9K 45 1.15s 21ms 88% 68% 60 67 Bright Room 16K 50 300ms 2ms 88% 77% 67 67 Wood Room 2.24K 224 50ms 0ms 40% 80% 40 81 Heavy Room 14K 50 1.0s 10ms 78% 77% 40 76 Opera Room 16K 50 3.15 1ms 78% 79% 64 72 LPF HPF Reverb Pre_Delay Early_Delay Hi_Ratio Density Level Large Hall 9K 20 2.35s 23ms 79% 87% 89 66 Medium Hall 16 20 1.75s 23ms 79% 87% 89 60 Small Hall 8K 28 1.0s 10ms 79% 87% 80 55 Concert Hall 2.24K 20 2.3s 23ms 83% 79% 93 66 Dark Hall 5.6K 20 1.15s 23ms 87% 79% 93 66 Wonder Hall 14K 56 2.45S 54ms 80% 79% 97 76 Jazz Hall 9K 20 3,15s 1ms 78% 77% 64 76 Vocal 8K 45 1.0s 1ms 80% 79% 64 72 Name LPF HPF Reverb Pre_Delay Early_Delay Hi_Ratio Density Level Large Plate 16K 20 1.15 0 100% 87% 79 55 Medium Plate 16K 20 100ms 11ms 100% 87% 79 50 Small Plate 10K 20 50ms 8ms 100% 87% 79 75 Flat Plate 9K 20 150ms 5ms 100% 87% 79 50 Light Plate 20K 63 1 4ms 46% 87% 79 50 Thin Plate 16K 29 1.15 3ms 51% 87% 79 36 Perc Plate 20K 20 1.3s 35ms 61% 87% 79 40 Industrial Plate 20K 280 50 0 100% 99% 79 60 Name Delay1 Delay2 FB1 FB2 HPF LPF Echo 190ms 310ms 50% 50% 180 5.6K Small Room Hall Default Name Plate Default Echo Delay Default Ping Pong Delay Default Name Delay1 Delay2 FB1 FB2 HPF LPF Ping Pong 320ms 540ms 45% 40% 90 7.1K Name LFO Phase Type Depth Pre_Delay LPF Chorus 0.2Hz 180degree Triangle 50% 4ms 10K Chorus 1 3Hz 180degree Triangle 20% 8mS 10K Chorus 2 1.4Hz 90degree Triangle 20% 20mS 10K Chorus 3 2.2Hz 180degree Triangle 25% 40mS 10K Chorus Default IS16 39 English Name Flanger Default English Name LFO Phase Type Depth Flanger 0Hz 180degree Triangle 73% Pre_Delay 9.6 LPF FB 5K 57% Phaser Default Name Phaser LFO Type Depth Freq Stage_No 19.95Hz Triangle 100% 5K 6 Name LFO Type Depth Freq Freq Vibrato 16.4Hz Triangle 100% 10Hz 10Hz LFO Type Depth Depth 6.1Hz Sine 45% 45% LFO Type Depth Way Way 2.35Hz Triangle 79% L<->R L<->R Stage_No 6 Vibrato Default Tremolo Default Name Tremolo Auto Pan Default Name Auto Pan 40 IS16 DIGITAL EFFECT TABLE Parameter Range Description Reverb Room (Large Room, Medium Room, Small Room, Live Room, Bright Room, Wood Room, Heavy Room, Opera Room) H.P.F. 20 Hz to 20 kHz Adjusts the high pass filter cut off frequency L.P.F. 20 Hz to 20 kHz Adjusts the low pass filter cut off frequency Rev Time 50 ms to 10 sec Adjusts the reverb time of the effect Pre Delay 0 to 100 ms Adds a delay prior to the effect being applied Early Out 0 to 100% Adds a delay between early reflections and the reverb Hi Ratio 0 to 100% High frequency reverb ratio Density 0 to 100% Reverb density Level 0 to 100% Determines the level of reverb applied to the signal Reverb Hall (Large Hall, Medium Hall, Small Hall, Concert Hall, Dark Hall, Wonder Hall, Jazz Hall, Vocal Hall) Reverb Plate (Large Plate, Medium Plate, Small Plate, Flat Plate, Light Plate, Thin Plate, Perc Plate, Industrial Plate) Echo IS16 English Effect Gate Threshold -70 to 0 dB Adjusts the gate threshold Gate Hold Time 1 ms to 8 sec Adjusts the time the gate will hold after the threshold is passed H.P.F. 20 Hz to 20 kHz Adjusts the high pass filter cut off frequency L.P.F. 20 Hz to 20 kHz Adjusts the low pass filter cut off frequency Rev Time 50 ms to 10 sec Adjusts the reverb time of the effect Pre Delay 0 to 100 ms Adds a delay prior to the effect being applied Early Out 0 to 100% Adds a delay between early reflections and the reverb Hi Ratio 0 to 100% High frequency reverb ratio Density 0 to 100% Reverb density Level 0 to 100% Determines the level of reverb applied to the signal Gate Threshold -70 to 0 dB Adjusts the gate threshold Gate Hold Time 1 ms to 8 sec Adjusts the time the gate will hold after the threshold is passed H.P.F. 20 Hz to 20 kHz Adjusts the high pass filter cut off frequency L.P.F. 20 Hz to 20 kHz Adjusts the low pass filter cut off frequency Rev Time 50 ms to 10 sec Adjusts the reverb time of the effect Pre Delay 0 to 100 ms Adds a delay prior to the effect being applied Early Out 0 to 100% Adds a delay between early reflections and the reverb Hi Ratio 0 to 100% High frequency reverb ratio Density 0 to 100% Reverb density Level 0 to 100% Determines the level of reverb applied to the signal Gate Threshold -70 to 0 dB Adjusts the gate threshold Gate Hold Time 1 ms to 8 sec Adjusts the time the gate will hold after the threshold is passed Time 1 0 to 640 ms Adjusts the delay time of input 1 Time 2 0 to 640 ms Adjusts the delay time of input 2 Feedback 1 0 to 99% Feedback gain of input 1 Feedback 2 0 to 99% Feedback gain of input 2 FB HPF 20 Hz to 20 kHz Feedback High Pass Filter FB LPF 20 Hz to 20 kHz Feedback Low Pass Filter 41 Tap Delay English Chorus Flanger Phaser Vibrato Tremolo Auto Pan Feedback 0 to 99% Adjusts the feedback gain of input signal Tap Button 1 ms to 5 sec Push twice to adjust the tap delay time LPF 20 Hz to 20 kHz Adjusts the low pass filter frequency of the signal HPF 20 Hz to 20 kHz Adjust the high pass filter frequency of the signal L.F.O. 0.1 to 20 Hz Low frequency oscillation Phase 0 to 180∘ Modulation phase adjustment Mode Type Sine / Triangle Determines the modulation waveform Depth 0 to 100% Chorus depth/density Pre Delay 0 ms to 1 sec Early delay before the chorus effect begins LPF 20 Hz to 20 kHz Low pass filter cut-off frequency L.F.O. 0.1 to 20 Hz Low frequency oscillation Phase 0 to 180∘ Modulation phase adjustment Wave Sine / Triangle Determines the modulation waveform Depth 0 to 100% Modulation depth Pre Delay 0 ms to 1 sec Early delay before the flanger effect begins LPF 20 Hz to 20 kHz Determines the flanger low pass filter cut-off frequency FB 0 to 99% Determines the feedback gain of the flanger effect L.F.O. 0.1 to 20 Hz Low frequency oscillation Wave Sine / Triangle Determines the modulation waveform Depth 0 to 100% Adjusts the depth of the Phaser effect Frequency 20 Hz to 20 kHz Determines the modulation frequency of the Phaser Stage Number 2, 4, 6, 8 Determines the number of all-pass filters, or stages, in the Phaser effect L.F.O. 0.1 to 20 Hz Low frequency oscillation Wave Sine / Triangle Modulation waveform of the Vibrato effect Depth 0 to 100% Determines the depth of the Vibrato effect Frequency 20 Hz to 20 kHz Determines the modulation frequency of the Vibrato effect L.F.O. 0.1 to 20 Hz Low frequency oscillation Wave Sine / Triangle Determines the modulation waveform Depth 0 to 100% Adjusts the depth of the Tremolo Effect L.F.O. 0.1 to 20 Hz Low frequency oscillation Mode Sine / Triangle Determines the modulation waveform Depth 0 to 100% Adjusts the depth of the Auto Pan effect Way LR / L R / R L Determines the direction of the panning effect Note: Reverb Effects are found on EFFECT 1 only. 42 IS16 SPECIFICATIONS Insert I/O Mic In : 16 x XLR Balanced (ch 1-16) Line In : 16 x TRS Balanced jacks (Ch 1-16) 16 x Phone jacks (Unbalanced) 2TR IN Analog 2 x RCA (Unbalanced) Stereo Output 2 x XLR Balanced 2 x RCA (Unbalanced) Main Output 2 x XLR Balanced Control Room Output 2 x XLR Balanced Multi Outputs 8 x TRS Balanced AUX/Group Output 8 x TRS Balanced (Shared through Multi) Phones 1 x Stereo Phone jack (TRS Unbalanced) Digital I/O Sampling Frequency Signal Delay (CH INPUT to STEREO OUT) Faders Word Clock I/O Distortion (THD + N) Frequency Response (CH INPUT to STEREO OUT) Hum & Noise Optional Expansion Card VGA Monitor output Ethernet 10/100 Base USB 2.0 (Mouse and Wi-Fi) Power Supply Unit Dimensions (H x W x D) Weight IS16 English Analog Inputs (AES/EBU) 2 x XLR Balanced 44.1 kHz, 48 kHz, 88.2 kHz, 96 kHz (40-Bit Floating Point Mixing) Fs=48 kHz <1.2ms, Fs=96 kHz <0.6ms 17 x 100mm motorized faders 2 x BNC Connectors THD+N less than 0.007%, +4 dBu, 20-20 kHz, unity gain, 20 kHz BW Fs=48, 96kHz, 0/-1.5dBu, 20 Hz – 20 kHz @ +4dBu into 600Ω (20 Hz – 20 kHz), Rs=150, -128dBu (EIN), -90dBu (residual output noise) A standalone 16-channel PCM WAV recorder and a Firewire/USB 2.0 multitrack recording audio interface; USB 3.0 flash drives compatible D-Sub 15 pin: Progressive scan up to 1024x768p@60Hz (XGA) RJ45 Type A x 2 100V – 240V, 50/60 Hz, 90W 169 x 495 x 534 mm (6.65” x 19.49” x 21.02”) 17.0 kg (37.5 Ibs) 43 SERVICE AND REPAIR English For replacement parts, service and repairs please contact the Phonic distributor in your country. Phonic does not release service manuals to consumers, and advice users to not attempt any self repairs, as doing so voids all warranties. You can locate a dealer near you at http://www.phonic.com/where/. WARRANTY INFORMATION Phonic stands behind every product we make with a no-hassles warranty. Warranty coverage may be extended, depending on your region. Phonic Corporation warrants this product for a minimum of one year from the original date of purchase against defects in material and workmanship under use as instructed by the user’s manual. Phonic, at its option, shall repair or replace the defective unit covered by this warranty. Please retain the dated sales receipt as evidence of the date of purchase. You will need it for any warranty service. No returns or repairs will be accepted without a proper RMA number (return merchandise authorization). In order to keep this warranty in effect, the product must have been handled and used as prescribed in the instructions accompanying this warranty. Any tampering of the product or attempts of self repair voids all warranty. This warranty does not cover any damage due to accident, misuse, abuse, or negligence. This warranty is valid only if the product was purchased new from an authorized Phonic dealer/distributor. For complete warranty policy information, please visit http://www.phonic.com/warranty/. CUSTOMER SERVICE AND TECHNICAL SUPPORT We encourage you to visit our online help at http://www.phonic.com/support/. There you can find answers to frequently asked questions, tech tips, driver downloads, returns instruction and other helpful information. We make every effort to answer your questions within one business day. [email protected] http://www.phonic.com 44 IS16 APPLICATION APLICACIÓN Appendix Live Setup MIC GUITAR Apéndice KEYBOARD BASS BAJAS TECLADO DRUM SET BATERIA 6 x iSK or aSK HEADPHONES STAGE MONITORS MONITORES DE ESCENA AURICULARES 6 x iSK o aSK FOH SPEAKERS ALTAVOZES FOH AMPLIFIER CD or MP3 PLAYER ACTIVE MONITORS MONITORES ACTIVOS AMPLIFICADOR REPRODUCTOR CD o MP3 IS16 1 Recording Grabación Appendix MIC GUITARS KEYBOARD TECLADO BASS BAJAS Apéndice HEADPHONES AURICULARES DRUM SET BATERIA DIGITAL RECORDER GRABADOR DIGITAL Volver través de la entrada canales para monitoreo Producer’s Booth Productor Booth MASTER CLOCK 2 CD or MP3 PLAYER REPRODUCTOR CD o MP3 Return through input channels for monitoring MULTITRACK RECORDER GRABADOR MULTIPISTAS IS16 DIMENSIONS DIMENCIONES Appendix Apéndice Measurements are shown in mm/inches Las medidas se muestran en mm / pulgadas IS16 3 BLOCK DIAGRAM Appendix GP1 GP2 DIAGRAMA DE BLOQUES A +48V off on METER PAD B CH1 SOLO PFL/AFL Gain CH 1L PAN 0dB -20dB INSERT To Main L R Peak ADC Apéndice Digital in 1 Digital out 1 Phase Digital CH2~CH14 Same METER METER METER Analog 4BAND EQ Noise Gate Dynamic Expander Order as METER Compressor METER Limit Order CH15 ON Fader Order CH1 PRE/POST AUX2 2T IN L AUX3 AUX4 AUX5 PRE/POST Digital in 15 Digital out 15 METER METER Phase Digital 4BAND EQ Noise Gate METER Dynamic Expander Order R METER Compressor Order Limit Delay METER as AUX8 ON AES/EBU IN Fader Solo GP1 GP2 GP4 Solo Safe GP5 GP6 GP7 GP8 SOLO L RX PRE/POST SOLO R METER Solo Safe PRE/POST ON Main L PRE/POST Main R PRE/POST CH 1L~~16L DRY/WET METER Master AUX 1~~8 Master GP 1L~~8L IN L METER METER IN R OUT L EFX 1 METER METER METER METER METER METER To Main L CH 15R GP3 LEVEL METER R CH15 METER METER SOLO PFL/AFL Order PAN Same AUX7 PRE/POST METER CH 15L CH16 AUX6 PRE/POST Analog METER AUX1 PRE/POST 0dB -20dB ADC METER GP8 PRE/POST Peak METER GP6 Gain CH15/16 2T IN METER GP7 PAD INSERT METER GP5 Solo Safe PRE/POST B METER GP4 PRE/POST A METER GP2 GP3 Delay +48V off on METER GP1 CH 1R /WN V K 5GN GEV QT Solo Safe ON LEVEL PRE/POST MULTI 1,3,5,7 GP 1,3,5,7 MAIN L PRE/POST PRE/POST MULTI 2,4,6,8 GP 2,4,6,8 MAIN R OUT R CH 1R~~16R PRE/POST AUX1 AUX2 AUX3 AUX4 AUX5 AUX6 AUX7 AUX8 METER METER METER METER METER METER METER METER METER METER METER METER METER METER METER METER SOLO Master AUX 1~~8 METER Master GP 1R~~8R CH 1L~~16L DRY/WET Master AUX 1~~8 Master GP 1L~~8L IN L METER METER IN R OUT L EFX 2 METER Solo Safe LEVEL /WN V K 5GN GEV QT ON MULTI 1,3,5,7 GP 1,3,5,7 MAIN L MULTI 2,4,6,8 GP 2,4,6,8 MAIN R OUT R CH 1R~~16R SOLO AUX 1~~8 METER GP 1R~~8R MAIN L MAIN R WORDCLOCK IN GP1 OSCILLATOR OUT Sine Sine Sine Pink SD HC ON GP5 GP6 GP7 GP8 AUX1 AUX2 AUX4 AUX5 CPU USB WIFI GP3 GP4 LEVEL AUX3 USB MOUSE 100Hz 1kHz 10kHz Noise GP2 AUX6 AUX7 AUX8 LED LAMP VGA GP1 GP2 ETHERNET EXPANSION CARD USB Digital in 1~16 16 16 Digital out 1~16 USB Firewire Firewire Firewire 4 IS16 GP2 GP3 GP4 GP5 GP6 GP7 GP8 Main L Main R SOLO L SOLO R AUX1 AUX2 AUX3 AUX4 AUX5 AUX6 AUX7 AUX8 Appendix Master GP1 PRE/POST ON SUM To Main Solo Safe Fader L METER Solo Safe PAN R PFL/AFL SOLO Master GP1 L Master GP2~GP8 Same as Master GP1 7 7 Apéndice Master GP1 R Master GP2 L~GP8 L Master GP2 R~GP8 R Master AUX1 PRE/POST ON SUM SOLO METER Fader Solo Safe Master AUX1 PFL/AFL Master Same as Master AUX1 AUX2~AUX8 7 METER Master AUX2~AUX8 EFX INSERT SUM EFX INSERT Main R L PRE/POST Main L METER METER METER METER 4BAND EQ Noise Gate Expander Compressor Dynamic Order STEREO/MONO METER Delay Limit R ON Fader (L+R)/2 ON Order DAC Main L DAC Main R TX METER Multi 1 GP1 L ~ GP8 L Master AUX1~AUX8 8 8 8 8 Master AUX1~AUX8 GP1 L ~ GP8 L 8 Master AUX1~AUX8 8 8 GP1 R ~ GP8 R 8 Master AUX1~AUX8 METER METER METER METER 4BAND EQ Noise Gate Expander Compressor METER METER METER METER 4BAND EQ Noise Gate Expander Compressor Dynamic Dynamic METER METER METER 4BAND EQ Noise Gate Expander Compressor Dynamic 8 GP1 R ~ GP8 R 8 METER METER Dynamic Noise Gate Expander 8 GP1 L ~ GP8 L 8 Master AUX1~AUX8 8 GP1 R ~ GP8 R 8 Master AUX1~AUX8 8 8 SUM Compressor METER METER METER METER Noise Gate Expander Compressor Dynamic Delay Fader METER Limit Delay ON Fader Delay Limit Delay ON Fader Delay METER METER 4BAND EQ Noise Gate Expander Compressor Dynamic METER Limit Delay Fader METER METER METER METER 4BAND EQ Noise Gate Expander Compressor Dynamic METER Limit Delay STEREO/MONO LEVEL DAC Control Room 2T IN DAC DAC DAC DAC ON DAC LEVEL (L+R)/2 GP2 GP3 GP4 GP5 GP6 GP7 GP8 Main L Main R SOLO L SOLO R AUX1 AUX2 AUX3 AUX4 AUX5 AUX6 AUX7 AUX8 GP1 R ~ GP8 R Master AUX1~AUX8 IS16 8 8 SUM DAC 2T IN L R MULTI 4 MULTI 5 MULTI 6 MULTI 7 METER Fader Order MULTI 3 METER ON Order DAC METER ON Fader METER MULTI 2 METER ON METER Limit DAC METER Fader METER MULTI 1 METER METER Limit DAC METER ON Order METER Order GP1 L ~ GP8 L Master AUX1~AUX8 METER 4BAND EQ Order Multi 8 Limit Order Order Multi 7 Fader METER AES/EBU OUT METER ON Order Order Multi 6 Delay Order METER 4BAND EQ 8 Limit Order METER 8 METER Order Order Multi 5 Master AUX1~AUX8 METER Compressor Dynamic Order Multi 4 Master AUX1~AUX8 METER Expander Order Multi 3 GP1 L ~ GP8 L METER Noise Gate Order Multi 2 GP1 R ~ GP8 R METER 4BAND EQ 2T OUT LEVEL MULTI 8 Control Room L Control Room R PHONES 5