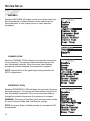
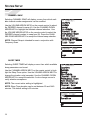
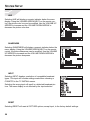
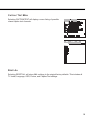
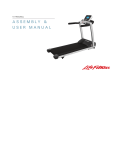
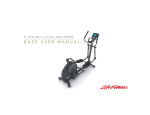
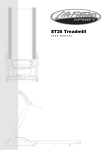
1
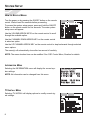
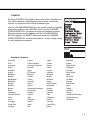
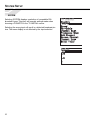
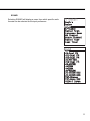
Attachable LCD Entertainment System
User
manual
CORPORATE HEADQUARTERS
5100 North River Road
Schiller Park, Illinois 60176 • U.S.A.
847.288.3300 • FAX: 847.288.3703
800.735.3867 (Toll-free within U.S.A., Canada)
www.lifefitness.com
INTERNATIONAL OFFICES
LIFE FITNESS ASIA PACIFIC LTD
Room 2610, Miramar Tower
132 Nathan Road
Tsimshatsui, Kowloon
HONG KONG
Telephone: (+852) 2891.6677
FAX: (+852) 2575.6001
LIFE FITNESS ATLANTIC BV
LIFE FITNESS BENELUX
Bijdorpplein 25-31
2992 LB Barendrecht
THE NETHERLANDS
Telephone: (+31) 180.646.666
FAX: (+31) 180.646.699
LIFE FITNESS BENELUX NV
Parc Industriel de Petit-Rechain
4800 Verviers
BELGIUM
Telephone: (+32) 87.300.942
FAX: (+32) 87.300.943
LIFE FITNESS DO BRAZIL
Av. Dr. Dib Sauaia Neto 1478
Alphaville, Barueri, SP
06465-140
BRAZIL
Telephone (+55) 11.4193.8282
FAX: (+55) 11.4193.8283
LIFE FITNESS AUSTRIA
Vertriebs GmbH
Hintschiggasse 1
1100 Vienna
AUSTRIA
Telephone: (+43) 1.61 57 198
FAX: (+43) 1.61 57 198.20
LIFE FITNESS EUROPE GMBH
Siemensstrasse 3
85716 Unterschleissheim
GERMANY
Telephone: (+49) 89.31 77 51.0
FAX: (+49) 89.31 77 51.99
LIFE FITNESS ITALIA S.R.L.
Via San Pieretto
37010 AFFI (Verona)
ITALY
Telephone: (+39) 045.7238204
FAX: (+39) 045.7238197
LIFE FITNESS LATIN AMERICA
and CARIBBEAN
5100 North River Road
Schiller Park, Illinois 60176
U.S.A.
Telephone: (+1) 847.288.3300
FAX:(+1) 847.288.3762
LIFE FITNESS UK LTD
Queen Adelaide
Ely, Cambs CB7 4UB
UNITED KINGDOM
Telephone: (+44) 1.353.666 017
FAX: (+44) 1.353.666 018
LIFE FITNESS JAPAN
Nippon Brunswick Bldg., #8F
5-27-7 Sendagaya
Shibuya-Ku, Tokyo
Japan 151-0051
Telephone: (+81) 3.3359.4309
FAX: (+81) 3.3359.4307
LIFE FITNESS IBERIA
Pol. Ind. Molí dels Frares. c/C, nº 12
08620 Sant Vicenç dels Horts (Barcelona)
España
Telephone: (+34) 93.672.4660
FAX: (+34) 93.672.4670
M051-00K32-A065
06/05
1
INSTALLATION
NOTE: This equipment has been tested and found to comply with the limits for a Class B digital
device pursuant to Part 15 of the FCC Rules. These limits are designed to provide reasonable
protection against harmful interference in a residential installation. This equipment generates,
uses, and can radiate radio frequency energy and, if not installed and used in accordance with
the instructions, may cause harmful interference with radio communications. However, there is
no guarantee that interference will not occur in a particular installation. If this equipment does
cause harmful interference to radio or television reception, which can be determined by turning
the equipment off and on, the user is encouraged to try to correct the interference by one or
more of the following measures:
•
Reorient or relocate the receiving antennas.
•
Increase the separation between the equipment and receiver.
•
Connect the equipment into an outlet on a circuit different from that to which the receiver is connected.
•
Consult the dealer or an experienced radio/TV technician for help.
CAUTION: Any changes or modifications to this equipment could void the
product warranty.
Mise en garde : tout changement ou toute modification de ce matériel peut
annuler la garantie du produit.
Any service, other than cleaning or user maintenance, must be performed by an authorized
service representative. There are no user serviceable parts.
2
TABLE
Section
OF
CONTENTS
Description
Page
1.
Important Safety Instructions . . . . . . . . . . . . . . . . . . . . . . . . . . . . . . . . . . . . . . . . . . . . . .4
2.
TV Cable Connections . . . . . . . . . . . . . . . . . . . . . . . . . . . . . . . . . . . . . . . . . . . . . . . . . .7
3.
System Setup . . . . . . . . . . . . . . . . . . . . . . . . . . . . . . . . . . . . . . . . . . . . . . . . . . . . . . . . .7
Basic Functions . . . . . . . . . . . . . . . . . . . . . . . . . . . . . . . . . . . . . . . . . . . . . . . . . . . .7
How to Access Menus . . . . . . . . . . . . . . . . . . . . . . . . . . . . . . . . . . . . . . . . . . . . . . .8
Information Menu . . . . . . . . . . . . . . . . . . . . . . . . . . . . . . . . . . . . . . . . . . . . . . . . . . .8
TV Install Menu . . . . . . . . . . . . . . . . . . . . . . . . . . . . . . . . . . . . . . . . . . . . . . . . . . . .8
Language Menu . . . . . . . . . . . . . . . . . . . . . . . . . . . . . . . . . . . . . . . . . . . . . . . . . . .15
OSD Control Menu . . . . . . . . . . . . . . . . . . . . . . . . . . . . . . . . . . . . . . . . . . . . . . . . .15
Picture Menu . . . . . . . . . . . . . . . . . . . . . . . . . . . . . . . . . . . . . . . . . . . . . . . . . . . . . .17
Caption/Text Menu . . . . . . . . . . . . . . . . . . . . . . . . . . . . . . . . . . . . . . . . . . . . . . . . .19
Reset All . . . . . . . . . . . . . . . . . . . . . . . . . . . . . . . . . . . . . . . . . . . . . . . . . . . . . . . . .19
4.
Other Information . . . . . . . . . . . . . . . . . . . . . . . . . . . . . . . . . . . . . . . . . . . . . . . . . . . . . .20
Troubleshooting . . . . . . . . . . . . . . . . . . . . . . . . . . . . . . . . . . . . . . . . . . . . . . . . . . .20
Specifications . . . . . . . . . . . . . . . . . . . . . . . . . . . . . . . . . . . . . . . . . . . . . . . . . . . . .21
Service Contacts . . . . . . . . . . . . . . . . . . . . . . . . . . . . . . . . . . . . . . . . . . . . . . . . . . .21
© 2005 Life Fitness, a division of Brunswick Corporation. All rights reserved.
3
IMPORTANT SAFETY INSTRUCTIONS
•
DANGER:
To reduce the risk of electrical shock, always unplug this Life Fitness
product before cleaning or attempting any maintenance activity.
WARNING:
•
To reduce the risk of burns, fire, electric shock, or injury, it is imperative to connect each product to a properly grounded electrical outlet.
•
•
To prevent injury, this product must be securely attached in accordance with the installation instructions.
Never operate a Life Fitness product if it has a damaged power cord or electrical plug, or if it
has been dropped, damaged, or even partially immersed in water. If this occurs, contact Life
Fitness Customer Support Services as outlined in Service Contacts at the end of this manual.
•
Position this product so that the AC power cord plug is accessible to the user.
•
Keep the power cord away from heated surfaces. Do not pull the equipment by the power
cord or use the cord as a handle.
•
If the electrical supply cord is damaged, it must be replaced by the manufacturer, an authorized service agent, or a similarly qualified person to avoid a hazard.
•
Always follow the product instructions for proper operation.
•
Never insert objects into any opening of the Life Fitness product. If an object should drop
inside, unplug this Life Fitness product and carefully retrieve it while the unit is not in use. If
the object cannot be reached, contact Life Fitness Customer Support Services.
•
Do not use this product outdoors, near swimming pools or in areas of high humidity. Do not
expose this product to dripping or splashing liquids. If the product should be exposed to liquid, contact Life Fitness Customer Support Services.
•
Never operate a Life Fitness product with the air openings blocked. Keep air openings free
of lint, hair, or any obstructing material.
•
Use this product only for its intended use as described in this manual. Do not use attachments that have not been recommended by the manufacturer.
WARNING:
SAVE THESE INSTRUCTIONS FOR FUTURE REFERENCE.
4
CONSIGNES
•
DE
SECURITE IMPORTANTES
DANGER: Pour réduire les risques de décharge électrique, toujours débrancher cet
appareil Life Fitness avant le nettoyage ou toute mesure d'entretien.
AVERTISSEMENT
•
: Pour réduire les risques de brûlures, d'incendies, de
décharges électriques ou de blessures, chaque appareil doit absolument être branché sur
une prise électrique correctement mise à la terre.
•
Pour prévenir les blessures, ce produit doit être solidement fixé, conformément aux instructions d'installation.
•
Ne jamais faire fonctionner un produit Life Fitness dont la fiche ou le cordon d'alimentation
est endommagé, ni aucun appareil qui serait tombé ou aurait été endommagé ou même
partiellement plongé dans l'eau. Si cela se produit, communiquer avec le service à la clientèle de Life Fitness de la manière indiquée à la rubrique Coordonnées des réparateurs
agréés à la fin du présent guide.
•
Placer l'appareil de façon à ce que l'utilisateur ait accès à la fiche du cordon d'alimentation.
•
Tenir le cordon d'alimentation à l'écart de toute surface chauffée. Ne pas tirer l'appareil par
le cordon d'alimentation; ne pas utiliser le cordon comme poignée.
•
Si le cordon d'alimentation électrique est endommagé, il doit être remplacé par le fabricant,
par un réparateur agréé ou par une personne qualifiée afin d'éviter tout danger.
•
Toujours suivre les instructions sur le produit pour s'assurer de son fonctionnement adéquat.
•
Ne jamais insérer aucun objet dans les ouvertures du produit Life Fitness. Si un objet tombe
à l'intérieur du produit Life Fitness, le débrancher et extraire l'objet soigneusement pendant
que l'appareil est débranché. S'il est impossible d'atteindre l'objet, communiquer avec le
service à la clientèle de Life Fitness.
•
Ne pas utiliser ce produit à l'extérieur, près d'une piscine ou dans des endroits très humides.
Ne pas exposer ce produit à des liquides qui s'égouttent ni à des éclaboussures. Si le produit est en contact avec des liquides, communiquer avec le service à la clientèle de Life
Fitness.
•
Ne jamais faire fonctionner d'appareil Life Fitness dont les orifices d'aération seraient bloqués. Les garder exempts de peluches, de cheveux ou de toute obstruction.
•
Utiliser ce produit uniquement pour les fins auxquelles il est destiné et de la manière décrite
dans le présent manuel. Ne pas utiliser d'accessoires qui ne sont pas recommandés par le
fabricant.
AVERTISSEMENT
CONSERVER CES INSTRUCTIONS POUR TOUT USAGE ULTÉRIEUR.
5
IMPORTANT SAFETY INSTRUCTIONS
Note to the CATV Installer:
This reminder is provided to call the CATV system installer’s attention to Article 820-40 of the NEC that
provides guidelines for proper grounding and, in particular, specifies that the cable ground shall be
connected to the grounding system of the building as close to the point of cable entry as practical.
Antenna Grounding According to the NEC
Antenna Grounding According to the National Electrical Code, ANSI/NFPA 70.
1.
Antenna lead in wire
2.
Antenna discharge unit (NEC Section 810-20)
3.
Grounding conductors (NEC Section 810-21)
4.
Ground clamp
5.
Power service grounding electrode system (NEC
Article 250, Part H)
6.
Ground clamp
7.
Electric service equipment
TV CABLE CONNECTIONS
1
3
2
4
1. Coaxial Cable Input (from cable / antenna)
2. Power Adapter Input
3. EZ Input
4. Remote Control Cable Input
6
SYSTEM SETUP
BASIC FUNCTIONS
Turn the power on by pressing the ON/OFF button (1) on the remote control. On EZ model Bike, CrossTrainer and Stairclimber products, begin pedaling to power the console before using the ON/OFF button.
The volume can be increased or decreased by pressing the up or down VOLUME ARROW KEYS (2). A
volume indicator will appear on the TV while the volume is being adjusted. The volume indicator will disappear after five seconds of inactivity. Headphones are necessary to hear any volume adjustments. Plug
headphones into the HEADPHONE JACK (3) located on the remote control. On EZ products, the HEADPHONE JACK is located on the bottom of the console.
Channels can be selected by using the NUMERIC KEYPAD (4) or by scrolling up or down through available channels pressing the up or down CHANNEL ARROW KEYS (5). A channel indicator will appear on
the TV while the channel is being selected. The channel indicator will disappear after five seconds of inactivity.
The PREVIOUS BUTTON (6) can be used to select the channel viewed immediately prior to the current
channel. Repeatedly pressing the PREVIOUS BUTTON can be used to toggle between two channels.
2
4
3
5
6
1
7
SYSTEM SETUP
HOW
TO
ACCESS MENUS
Turn the power on by pressing the ON/OFF button on the remote
control. Wait at least five seconds before proceeding.
To access the system setup menus, press and hold the ON/OFF
button on the remote control for five seconds. The main system
setup menu will appear.
Use the VOLUME ARROW KEYS on the remote control to scroll
through the available option.
Use the CHANNEL DOWN ARROW KEY on the remote control
to select an option.
Use the UP CHANNEL ARROW KEY on the remote control to step backwards through selected
menu options.
The menu(s) will automatically close after ten second of inactivity.
NOTE: The menu duration time can be modified. See OSD Control Menu, Duration for details.
INFORMATION MENU
Selecting the INFORMATION menu will display the current system settings.
NOTE: No information can be changed from this menu.
Information
Source NTSC
H Freq 15.7 khz
V Freq 60
hz
Usage 12.0 hrs
F/W Rev 163
TV INSTALL MENU
Selecting TV INSTALL will display options to modify current signal settings.
8
COUNTRY
Selecting COUNTRY will display a menu from which available coun- TV Install
tries can be selected. Selecting the proper country ensures the
Country
receiver is configured for the correct broadcast type.
Use the VOLUME ARROW KEYS on the remote control to highlight
either next or back in the COUNTRY menu. Use the CHANNEL
DOWN ARROW KEY to progress through the available countries.
When the desired country appears, use the VOLUME ARROW
KEYS to highlight the SELECT option and press the CHANNEL
DOWN ARROW KEY to accept the selection. A color change occurs
to verify selection acceptance.
System
Sound
Air/Cable
Channel Scan
Frequency Scan
Add Channel
Revove Channel
Channel Swap
Sleep Timer
Available Countries:
USA HRC
USA
Argentina
Aruba
Australia
Austria
Bahamas
Bahrain
Bangladesh
Barbados
Belgium
Bonaire
Bosnia
Brazil
Caribbean
Cayman Islands
Chile
China
Colombia
Costa Rica
Curacao
Cyprus
Czech Republic
Dominican Republic
Ecuador
Egypt
El Salvador
Ethiopia
Finland
France
Germany
Ghana
Greece
Guatemala Honduras
Hong Kong
Hungary
Iceland
India
Indonesia
Ireland
Israel
Italy
Japan
Jordan
Kenya
Korea
Kuwait
Lebanon
Malaysia
Mexico
Moldova
Nepal
New Zealand
Nicaragua
Norway
Pakistan
Panama
Peru
Philippines
Poland
Portugal
Puerto Rico
Qatar
Romania
Russia
Saudi Arabia
Singapore
Slovakia
South Africa
Spain
Sri Lanka
St. Martin
Sweden
Switzerland
Syria
Taiwan
Thailand
Turkey
United Arab Emirates
United Kingdom
Venezuela
9
SYSTEM SETUP
SYSTEM
Selecting SYSTEM displays a selection of compatable PAL
broadcast types. This input will override settings made when
choosing a COUNTRY in the TV INSTALL menus.
Selecting the wrong input will result in a distorted broadcast picture. The menu display is not affected by the input selection.
TV Install
Country
System
Sound
Air/Cable
Channel Scan
Frequency Scan
Add Channel
Revove Channel
Channel Swap
Sleep Timer
System
M/N
B/G
I
D/K
L,
L
10
SOUND
Selecting SOUND will display a menu from which specific audio
formats can be selected as the input preference.
TV Install
Country
System
Sound
Air/Cable
Channel Scan
Frequency Scan
Add Channel
Revove Channel
Channel Swap
Sleep Timer
Sound
Auto
B/G-Dual FM
D/K1-Dual FM
D/K2-Dual FM
D/K-FM HD3
D/K3-Dual FM
B/G-NICAM
L-NICAM
I-NICAM
D/K-NICAM
D/K-NICAM HD2
D/K-NICAM HD3
BTSC-Stereo
BTSC-Mono SAP
M-EIA-J Japan
11
SYSTEM SETUP
AIR/CABLE
Selecting AIR/CABLE will display a menu from which either standard air broadcast or cable television can be selected as the
input preference. A color change occurs to verify selection
acceptance
TV Install
Country
System
Sound
Air/Cable
Channel Scan
Frequency Scan
Add Channel
Revove Channel
Channel Swap
Sleep Timer
Air/Cable
AirTV
CableTV
CHANNEL SCAN
Selecting CHANNEL SCAN will begin the automatic channel discovery sequence. The system will automatically seek and lock
onto all available channels. When the screen stops flashing
through the available channels, the sequence is complete.
NOTE: Channel Scan is the typical signal setup procedure for
NTSC configurations.
TV Install
Country
System
Sound
Air/Cable
Channel Scan
Frequency Scan
Add Channel
Revove Channel
Channel Swap
Sleep Timer
FREQUENCY SCAN
Selecting FREQUENCY SCAN will begin the automatic frequency
discovery sequence. The system will automatically seek and lock
onto all available frequencies. When the screen stops flashing
through the available frequencies, the sequence is complete.
WARNING: Performing a Frequency Scan will erase and override
all current Channel Swap, Add, and Remove settings.
NOTE: Frequency Scan is utilized primarily for international PAL
configurations.
12
TV Install
Country
System
Sound
Air/Cable
Channel Scan
Frequency Scan
Add Channel
Revove Channel
Channel Swap
Sleep Timer
ADD CHANNEL
Selecting ADD CHANNEL will add an available channel that has
been previously removed from the viewable listing. ADD CHANNEL can also be used to add channels with weak signal strength
that the TV tuner cannot automatically find. Use the ADD selection to add a channel. Use the next selection to advance to the
NEXT available channel. Continue adding as necessary until finished. Use the SAVE selection to save the channel additions.
TV Install
Country
System
Sound
Air/Cable
Channel Scan
Frequency Scan
Add Channel
Revove Channel
Channel Swap
Sleep Timer
REMOVE CHANNEL
Selecting REMOVE CHANNEL will remove a channel from the
viewable listing. Use the REMOVE selection to remove a channel. Use the next selection to advance to the NEXT available
channel. Continue removing as necessary until finished. Use the
SAVE selection to save the channel removals.
TV Install
Country
System
Sound
Air/Cable
Channel Scan
Frequency Scan
Add Channel
Revove Channel
Channel Swap
Sleep Timer
13
SYSTEM SETUP
CHANNEL SWAP
Selecting CHANNEL SWAP will display a menu from which available channel number assignments can be modified.
Use the VOLUME ARROW KEYS on the remote control to selectthe DESIRED channel to swap (A). Use the CHANNEL DOWN
ARROW KEY to highlight the alternate channel selection. .Use
the VOLUME ARROW KEYS on the remote control to select the
DESIRED channel number to swap from (B). Press the CHANNEL DOWN ARROW KEY to accept the channel swap selection.
NOTE: Channel Swap is intended for use in conjunction with
Frequency Scan.
TV Install
Country
System
Sound
Air/Cable
Channel Scan
Frequency Scan
Add Channel
Revove Channel
Channel Swap
Sleep Timer
Channel Swap
A
B
Swap
2
10
SLEEP TIMER
Selecting SLEEP TIMER will display a menu from which available
sleep paramaters can be set.
Use the CHANNEL ARROW KEYS on the remote control to highlight the Sleep Timer option. Use the VOLUME ARROW KEYS to
change the duration units (seconds). Use the CHANNEL DOWN
ARROW KEY to accept the selection. A color change occurs to
verify selection acceptance.
NOTE: The current active setting is highlighted.
NOTE: Sleep Timer duration can be set between 20 and 1440
minutes. The default setting is 60 minutes.
TV Install
Country
System
Sound
Air/Cable
Channel Scan
Frequency Scan
Add Channel
Revove Channel
Channel Swap
Sleep Timer
Sleep Timer
Off
Duration
60
14
LANGUAGE MENU
Selecting LANGUAGE will display a menu from which available
languages can be selected in which to display setup menus.
Use the VOLUME ARROW KEYS on the remote control to highlight the DESIRED language. Select the NEXT option to view
additional language choices. Use the CHANNEL DOWN ARROW
KEY to accept the selection.
OSD (ON SCREEN DISPLAY) CONTROL MENU
Selecting the OSD CONTROL menu will display options to modify
current On Screen Display settings including VERTICAL
POSITION, HORIZONTAL POSITION, HALFTONE, and
DURATION.
VERTICAL POSITION
Selecting VERTICAL POSITION will display a numeric indicator
below the menu display. Using the VOLUME ARROW KEYS on
the remote control, the vertical position of where the setup menus
appear can be modified. Use the VOLUME UP ARROW to move
the menu upward and the VOLUME DOWN ARROW to move the
menu downward on the screen.
OSD Control
V Position
H Position
Halftone
Duration
Reset
26
15
SYSTEM SETUP
HORIZONTAL POSITION
Selecting HORIZONTAL POSITION will display a numeric indicator below the menu display.
Using the VOLUME ARROW KEYS on the remote control, the horizontal position of where the
setup menus appear can be modified. Use the VOLUME UP ARROW to move the menu to the
right and the VOLUME DOWN ARROW to move the menu to the left on the screen.
HALFTONE
Selecting HALFTONE will display a numeric indicator below the
menu display. Using the VOLUME ARROW KEYS on the remote
control, the density of the setup menus can be modified. Use the
VOLUME UP ARROW to increase the transparency and the VOLUME DOWN ARROW to decrease the transparency of the menus
on the screen.
OSD Control
V Position
H Position
Halftone
Duration
Reset
26
DURATION
Selecting DURATION will display a numeric indicator below the
menu display. Using the VOLUME ARROW KEYS on the remote
control, the display duration time of the setup menus can be
modified. Use the VOLUME UP ARROW to increase the display
duration time and the VOLUME DOWN ARROW to decrease the
display duration time of the menus on the screen.
NOTE: Duration can be set between 5 and 20 seconds. The
default setting is 10 seconds.
OSD Control
V Position
H Position
Halftone
Duration
Reset
26
RESET
Selecting RESET will reset all OSD Control Menu options to the factory default settings.
16
PICTURE MENU
Selecting the PICTURE menu will display options to modify current display quality settings including CONTRAST, BRIGHTNESS, SATURATION, HUE and SHARPNESS. The broadcast
input type can be modified as well.
CONTRAST
Selecting CONTRAST will display a numeric indicator below the
menu display. Using the VOLUME ARROW KEYS on the remote
control, the picture contrast can be modified. Use the VOLUME
UP ARROW to increase and the VOLUME DOWN ARROW to
decrease the contrast.
BRIGHT
Selecting BRIGHT will display a numeric indicator below the
menu display. Using the VOLUME ARROW KEYS on the remote
control, the picture brightness can be modified. Use the VOLUME
UP ARROW to increase and the VOLUME DOWN ARROW to
decrease the brightness.
SATURATION
Selecting SATURATION will display a numeric indicator below the
menu display. Using the VOLUME ARROW KEYS on the remote
control, the picture saturation can be modified. Use the VOLUME
UP ARROW to increase and the VOLUME DOWN ARROW to
decrease the saturation.
17
SYSTEM SETUP
HUE
Selecting HUE will display a numeric indicator below the menu
display. Using the VOLUME ARROW KEYS on the remote control, the picture color hue can be modified. Use the VOLUME UP
ARROW to increase and the VOLUME DOWN ARROW to
decrease the picture color hue.
SHARPNESS
Selecting SHARPNESS will display a numeric indicator below the
menu display. Using the VOLUME ARROW KEYS on the remote
control, the picture sharpness can be modified. Use the VOLUME
UP ARROW to increase and the VOLUME DOWN ARROW to
decrease the picture sharpness.
INPUT
Selecting INPUT displays a selection of compatable broadcast
types. This input will override settings made when choosing a
COUNTRY in the TV INSTALL menus.
Selecting the wrong input will result in a distorted broadcast picture. The menu display is not affected by the input selection.
Input
NTSC
PAL
SECAM
PAL M
PAL CM
PAL 60
NTSC 443
Auto
RESET
Selecting RESET will reset all PICTURE options, except input, to the factory default settings.
18
CAPTION / TEXT MENU
Selecting CAPTION/TEXT will display a menu listing of possible
closed caption text channels.
RESET ALL
Selecting RESET ALL will return ALL settings to the original factory defaults. This includes all
TV Install, Language, OSD, Picture, and Caption/Text settings.
19
OTHER INFORMATION
TROUBLESHOOTING
If you are having a problem with your TV, try the suggestions below. If the problem persists, contact Life
Fitness Customer Support Services as outlined in Service Contacts at the end of this manual.
Problem
Possible Solutions
Reset the TV to factory settings
Refer to the System Setup section for instruction on how to access the
Reset All option.
No picture, no sound
Make sure the power cord is plugged in.
Be sure the power is on by pressing the ON/OFF button on the remote
control or start pedalling on EZ Bike, Cross-Trainer and Stairclimber products.
Choose an alternate channel using the CHANNEL UP/DOWN
ARROW KEYS.
Poor or no picture, good sound
Refer to the System Setup section for instruction on how to access the
Picture Menu. Adjust the options as instructed to improve the picture quality.
Check the antenna and/or cable connections.
Good picture, no sound
Ensure headphone jack is fully seated.
Press the volume up key on the remote control.
(headphones are required to hear sound)
No color
Check the antenna and/or cable connections.
Confirm the correct country is selected. Refer to the System Setup
section for instruction on how to access the country option within the
TV Install Menu.
Refer to the System Setup section for instruction on how to access the
Picture Menu. Adjust the Contrast, Hue and/or Saturation options as
instructed to improve the picture quality.
Only snow appears on the screen
Check the antenna and/or cable connections.
Make sure the channel selected is currently broadcasting.
Confirm the correct Air/Cable option is selected. Refer to the System Setup
section for instruction on how to access the Air/Cable option within the
TV Install Menu.
Dotted lines or stripes
Adjust the antenna.
Move the TV away from other electronic equipment. Some electronic
equipment creates electrical noise, which can interfere with TV reception.
Double images or ghosts
Check your outdoor antenna or call your cable service.
Unable to switch to a particular
TV channel
Confirm the correct Air/Cable option is selected. Refer to the System Setup
section for instruction on how to access the Air/Cable option within the
TV Install Menu.
Perform a channel scan or add a channel manually. Refer to the System
Setup section for instruction on how to access the channel scan or Add
Channel option within the TV Install Menu.
20
SPECIFICATIONS
Channel coverage
VHF: 2-13/UHF: 14-69/CATV: 1-125
Antenna
75-ohm external antenna terminal for VHF/UHF
(>43dBuV (@75ohm) or > 65.8dBm)
Screen Size
12.1 in. Diagonal, 800 x 600 TFT LCD
Power requirements
100V-240v, 50-60 Hz
External Power Supply
12v. DC
Headphone Jack
300 milliwatt, 3.5mm Stereo
Power Consumption
12 v. 1.5 amp DC
Broadcast Capabilities
NTSC : NTSC-Japan, NTSC-HRC, NTSC-M, PAL-M and PAL-N.
PAL/SECAM : PAL B/G, PAL-I, PAL-D/K, SECAM-L and SECAM-D/K.
Headphone Jack:
300 milliwatt, 3.5mm Stereo
LCD Dimensions:
Console
Height
Screen
-
10.5 in. (27 cm)
Height
-
7.37 in. (19 cm)
Width
-
9.75 in. (25 cm)
Width
-
12.25 in. (31 cm)
Depth
-
3 in. (7.6 cm)
Weight
-
10 lbs. (4.5 kg)
SERVICE CONTACTS
For Product Service within the United States and Canada:
Telephone: (+1) 847.451.0036
FAX: (+1) 847.288.3702
Toll-free telephone: 800.351.3737
21
M051-00K32-A065
Life Fitness World Headquarters
5100 North River Road
Schiller Park, IL 60176