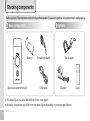
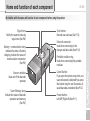
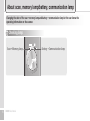
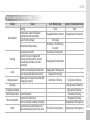
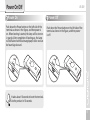
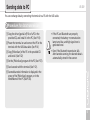
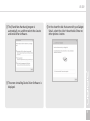
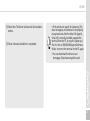
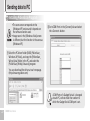
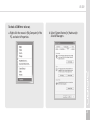
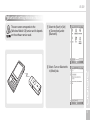
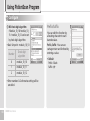
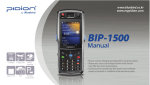
1
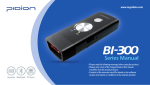
Thank you for purchasing BI-300 of Bluebird Soft.
BI-300 is the latest wireless barcode scanner in that it is not just a data collector, but it also has a
Bluetooth function. We ensure that BI-300 can save high capacity of information with
1D, 2D (PDF417 only supported), and it is easy to carry and use because of its ultra light and
hand-held simple design, which gives you the best satisfaction.
• This User’s Manual is protected under copyright laws.
• This User’s Manual is produced by Bluebird Soft Inc. We made every effort to avoid wrong editing and missing
information. Some parts, however, may not completely reflect actual case. We ask for your positive understanding
about this.
• The programs installed in this Product are protected under related laws and regulations; they cannot be copied,
moved or deleted without notice.
• Depending on users’ environments, used programs or peripherals, some parts of this Product may not work normally.
• This wireless device may cause propagation interference, and so, it cannot be involved with life-saving services.
Trade mark
PIDION aims for leading brand in the future mobile industry.
As a global brand representing the image of reliability, representativeness, and cutting-edge
technologies, this mark has been registered by Bluebird Soft Inc. around the world to be
protected under trademark-related laws.
Content
2 Warnings and Cautions
BI-300
Power On/Off
1. Power On
2. Power Off
Scanning barcode
Sending data to PC
5 Name and function of each
1. P
rocedures for data transmission
component
2. Installing Driver
6About scan, memory lamp/
- Windows XP
battery, communication lamp
3. Installing Driver
1. Checking lamp
- Windows Vista
2. Indication of lamp status
4. Installing PidionScan Program
8 About signal tone
25 Sending data by PDA
1. Procedures for data transmission
9 Changing a battery
2. Installing ActiveSync
1. Removing a battery
3. Installing PidionScan Program
2. Inserting a battery
4. Bluetooth Power On/Power Off
10 Charging a battery
5. Bluetooth setting
1. C
harging with a charging cable
- Windows Mobile
2. Charging with a charger
6. Bluetooth Setting
(option)
- Windows CE
4 Checking components
1. Basic components
2. Options
11
12
13
37
47
48
49
50
52
53
53
54
Using PidionScan Program
1. Connect
2. Download
3. Setting
4. Configure
5. About
Product Specifications
Q&A
Customer Service
Service Center Information
Certificate of Guarantee
MIC Certification
CE Mark and EEA
Laser device
1
Warnings and Cautions
These instructions are to protect the user’s safety and prevent property loss. Please, read the instructions and use the product properly.
If you do not observe this sign, it may cause a physical
damage or property loss.
If you do not observe this sign, it may cause property
loss or product damage.
Warning
• Do not direct the scanner window toward eyes of a man • animal. (It may cause damage to the retina and eyesight damage.)
• For product operation, do not press the button with a pointed or sharp tool or do not touch metallic materials with the connector while
the product is operating. (It may lead to electric shock or fire, or product damage or malfunction.)
• Do not give a strong shock on the product or battery, or do not drop the product. (It may cause an explosion or fire.)
• Do not pull the cord or touch the power cord with a wet hand. (It may cause electric shock or product damage.)
• To remove the product from the power cord, do not pull the power cable or do not touch the power cord with a wet hand. (It may
cause an electric shock or product fault.)
• Do not use the product while charging. (It may cause an electric shock or fire.)
• Do not use the product at a place with much humidity (bathroom), or with the possibility of snow • rain. (It may cause a product
malfunction or electric shock.)
• If there is strange sound, smell or smoke, unplug the power cord immediately and contact the Customer Service Center. (It may cause
fire or electric shock.)
• Keep the terminal, battery, charger and other accessories out of reach of the animals or children. (It may cause product damage or
physical injury.)
• This product conforms to Rules of Electromagnetic Wave Emission prescribed by the Government, but do not use the product for a long
time since it may cause a physical damage due to electromagnetic waves. (Note that using the product for a long time may cause a
physical pain or convulsions due to excessive motion.)
• Do not put the product in a heater, microwave oven, heating cooker and high-pressure vessels. (It may cause explosion or fire.)
2
BI-300 Series Manual
BI-300
Caution
• Do not explode • repair • remodel the product. If you suspect a fault, contact the Customer Service Center. (It may cause electric shock
or malfunction.)
• Power on the product at a place where products are forbidden to use or at an explosion hazard area in terms of radio. (It may cause
malfunction of other equipment or explosion.)
• Do not use a charger and other components together with electric appliances of other manufacturers, and be sure to use a qualifying
product. (We are not responsible for any damage due to non-use of a qualifying product.)
• Do not bend or twist the power cable too much, and do not put the cable under heavy materials. (It may cause fire or product damage.)
• Keep the product off a place with strong vibration or magnetic field. (It may cause product damage or malfunction.)
• When clearing the product, do not use toxic chemicals or strong detergent, but clean with a soft dry cloth. (It may cause product
damage.)
• Do not shake or turn the hand-held necklace. (If dropped, it may cause abrasion or product damage.)
• Do not keep the product at too high or too low temperature. (It may cause product damage or malfunction.)
• Prevent sand or foreign substance from entering into the product. (It may cause product damage or malfunction.)
• Do not paint the product. (It may cause appearance damage and product defect.)
• Do not use the product for purposes other than those specified in the manual. (It may cause product damage and physical injury.)
Battery Precaution
• Do not give shock (e.g., fall of a battery) to the product and do not explode the product without permission. (It may cause product
defect or short lifetime, or overhead leading to danger.)
• Do not place the battery around fire, a heater or microwave oven. (It may cause an explosion.)
• Use a designated qualifying battery and charger only. (It may cause an explosion and fire, leading to short lifetime of a battery.)
• Note that do not connect (short) a necklace, coin and other conductors(metal) to the battery terminal. (Overheating of a battery and
short object may cause fire.)
• Do not place the battery around the car window with direct sunrays and at a closed place with high temperature. Keep the battery
indoor at the normal temperature. (It may cause explosion.)
• Keep the battery out of reach of the children or animals. (It may cause product damage and physical injury)
• Even if the battery is charged sufficiently, the lifetime of a battery may be shortened due to a low voltage of internal characteristics.
3
Checking components
Before use, check if the components match with the purchased product. (If you want to purchase more, please contact a nearby agency.)
1 Basic components
2 Options
[Battery]
[Barcode scanner(terminal)]
[Portable necklace]
[USB cable]
[Car charger]
[Charger]
※ The above figure may be a little different from a real object.
※ Accessory components may differ from the above figure depending on purchase specifications.
4
BI-300 Series Manual
[Case]
Name and function of each component
BI-300
Be familiar with the name and function of each component before using the product.
Signal tone
Notify the scanner status by
signal tone (See P-8)
Battery • communication lamp
Indicate the status of battery
charging, Indicate the status of
communication connection
(See P-6)
Scanner window
Beam exit if the barcode
operates
Scan• Memory lamp
Indicate the status of barcode
operation and memory
(See P-6)
Scan button
Barcode scan and save (See P-12)
External connector
Used when connecting to the
charger and data cable (See P-10)
Portable necklace ring
Used when connecting the portable
necklace
Cancel button
If you press the button once short, one
scanned barcode is deleted/If you press
the button long for over 6 seconds, all
saved barcodes are deleted (See P-12)
Power button
Left-OFF, Right-ON (See P-11)
5
About scan, memory lamp/battery, communication lamp
Changing the color of the scan • memory lamp and battery • communication lamp let the user know the
operating information on the scanner.
1 Checking lamp
Scan • Memory lamp
6
BI-300 Series Manual
Battery • Communication lamp
BI-300
2 Indication of lamp status
Division
Basic operation
Status
Booting
Power supply, scanner initialization
complete, barcode scan enabled
Lack of memory storage
Default mode (Sleep mode×)
Scanning
Cancel
Charging required
Charging
Charging completed
Radio communication
Wire communication
Others
Barcode scan successful
Input error occurs, wrong barcode
scanning, invalid input item, incorrect
barcode setup procedure, set mode
maintained
Delete one successfully scanned barcode
Clear all saved barcodes (memory clear)
Battery level of a scanner is less than 20%
(charging is required)
Connect Bluetooth
Connect with USB or Serial
Rx error and reject to attempt connecting
Barcode scan is successful during wire •
radio communication, but Rx error occurs
Scan • Memory lamp
Violet
Battery • Communication lamp
Violet
Orange/blue/violet conversion
Orange/blue/violet conversion
Turn orange
Violet lamp 1 time/flickering
5 seconds
Blue lamp is flickering once
-
Orange lamp is flickering twice
-
Orange lamp is flickering once
Orange (while clearing)
-
-
Violet lamp is flickering
Violet lamp is flickering
-
Orange lamp is flickering
Blue lamp is flickering
Blue lamp is flickering
Blue lamp is flickering
Orange lamp is flickering twice
Blue lamp is flickering once
Orange lamp is flickering twice
7
About signal tone
Notifies the operating information of the scanner to the user by tone volume or sequence.
Division
Basic operation
Scanning
Cancel
Radio
communication
Status
Signal tone
Power supply, scanner initialization complete, barcode scan enabled
Low/medium/high once
Lack of memory storage
High 3 times
Barcode scan successful
High once
Input error occurs, wrong barcode scanning, invalid input item,
incorrect barcode setup procedure, set mode maintained
Low twice
Delete one successfully scanned barcode
Low /high/low once
Clear all saved barcodes (memory clear)
Low /high/low/long once
Bluetooth is connected
Bluetooth is disconnected
Connect with USB or Serial
Wire
communication
Others
8
BI-300 Series Manual
Wire communication is disconnected
High once
High /low once
High once
High/low once
Rx error and reject to attempt connecting
Low twice
Barcode scan is successful during wire•radio communication, but Rx
error occurs
High once
Changing a battery
BI-300
1 Removing a battery
2 Inserting a battery
1 Power the terminal
off.
1 Connect the battery
connection cable
to the connection
terminal.
2 Unscrew the screw
of a battery cover
counterclockwise.
3 Lift up the battery
cover in the arrow
direction and remove.
4 Separate the battery
connection cable
from the connection
terminal.
2 Insert the battery.
3 Fit the battery cover
to the bottom groove
and close.
4 Tighten the screw
clockwise.
If the lifetime of a battery is reduced more than half of a finished product, replace by a new battery.
9
Charging a battery
1 Charging with a charging cable
2 Charging with a charger (option)
Before charging, connect the charge-USB cable to the
external connector at the bottom of the terminal.
Before charging, connect the charger connector to
the external connector at the bottom of the terminal.
• If two lamps are violet-flickering it means a
lack of battery. Please charge the battery.
• You should purchase charge- USB cable
separately.
10
BI-300 Series Manual
Power On/Off
1 Power On
Push down the Power button on the left side of the
terminal as shown in the figure, and then power is
on. When booting is started, the lamp will be turn on
in purple. After completion of booting up, the lamp
will be flashed with blue/orange/purple color and can
be heard signal sound.
BI-300
2 Power Off
Push down the Power button on the left side of the
terminal as shown in the figure, and then power
is off.
It takes about 10 seconds to boot the terminal.
Use the product in 10 seconds.
11
Scanning barcode
Face the scanner
window toward the
barcode at intervals
of approximately 10
seconds, and press the
Scan button to read
the barcode.
appropriate scan degree
inappropriate scan degree
Cancel
button
• When scanning barcode, do not direct the scanner
window toward eyes of a man • an animal. It may
cause damage to the retina and eyesight damage.
• If you use the product at a place with a big
difference in ambient temperature, barcode can’t
be recognized temporarily due to moisture or
frost in the barcode window.
• If the scanner window is perpendicular (0°) to the
barcode, it is impossible to read barcode due to
characteristics of the laser barcode engine. Thus,
scan at a little inclined angle, not a right angle.
12
BI-300 Series Manual
Status
Cancel button
Clear scanned
barcode
Press the Cancel button short while
scanning barcode to be cleared
Clear all saved
barcodes (Clear All)
Press the Cancel button for
6 seconds while scanning one
unspecific barcode
Sending data to PC
BI-300
You can exchange data by connecting the terminal to a PC with the USB cable.
1 Procedures for data transmission
1C
opy the driver [gserial.inf] file of a PC in the
provided CD, and install it in the PC. (See P-14)
2P
ower the terminal on and connect the PC to the
terminal with the UBS data cable. (See P-14)
3C
opy [PidionScan] of the PC in the provided CD
and install. (See P-22)
4 S et the [PidionScan] program of the PC (See P-37).
• If the PC and Bluetooth are properly
connected, the battery • communication
lamp turns blue, and high signal tone is
generated once.
• Even if the Bluetooth transmission fails
after barcode scanning, the barcode data is
automatically stored in the scanner.
5 S can barcode with the terminal (See P-12).
6 S canned barcode information is displayed in the
screen of the [PidionScan] program, or in the
Word/Memo of the PC (See P-38).
13
Sending data to PC
2 Installing Driver- Windows XP
If Microsoft ActiveSync is installed in a PC, set
[Microsoft ActiveSync] ▶ <File> ▶ <Connection
Setup> ▶ <Permit USB Connection> as
inactivate. Driver is not installed if USB
connection is permitted.
1 Select the PC driver folder [BI300_PidionScan_
Windows XP, Vista], and copy the driver file
[gserial_XP.inf] in the PC.
You can download the driver at our homepage.
(http://www.mypidion.com)
14
BI-300 Series Manual
2 Power the terminal on and connect it to the PC
using the USB cable.
BI-300
3T
he [Found New Hardware Wizard] program is
automatically run, and select <No, not this time>,
and select the <Next> button.
4 Select the <Install from a list or specific location
[Advanced]> menu and select the <Next> button.
15
Sending data to PC
2 Installing Driver- Windows XP
5 Select the <Include this location in the search>
menu and select the <Search> button, and select
a folder in which the driver file [gserial_XP.inf] is
saved, and then select the <Next> button.
16
BI-300 Series Manual
6 After the <Install Hardware> window appears,
press the <Continue> button.
BI-300
7 If you check <Finish> in the [Found New Hardware
Wizard], the program is successfully installed.
• If the window to search for [usbser.sys]
file does not appear, or the device is not
properly recognized even after the driver
file [gserial_XP.inf] is normally installed,
separate the terminal from the PC, ▶ copy
the [usbser.sys] file of in the <C:\WINDOWS\
system32\drivers> folder, ▶ connect the
terminal to the PC again.
• You can download the driver at our
homepage. (http://www.mypidion.com)
17
Sending data to PC
3 Installing Driver- Windows Vista
If Microsoft ActiveSync is installed in a PC,
set [Microsoft ActiveSync] ▶ <File> ▶
<Connection Setup> ▶ <Permit USB
Connection> as inactivate.
Driver is not installed if USB connection is
permitted.
1 Select the PC driver folder [BI300_PidionScan_
Windows XP, Vista], and copy the driver file
[gserial_XP.inf] in the PC.
You can download the driver at our homepage.
(http://www.mypidion.com)
18
BI-300 Series Manual
2 Power the terminal on and connect it to the PC
using the USB cable.
BI-300
3T
he [Found New Hardware] program is
automatically run, and then selects the <Locate
and install driver software>.
5 In the <Insert the disc that came with your Gadget
Serial>, select the <I don’t have the disc Show me
other options.> button.
4T
he screen <Installing Device Driver Software> is
displayed.
19
Sending data to PC
3 Installing Driver- Windows Vista
6 In the <Windows couldn’t find driver software for
your device>, select the <Browse my computer for
dirver software> button.
20
BI-300 Series Manual
7 Select the <Browse...> button, and select a folder
in which the driver file [gserial_Vista.inf] is saved,
and select the <Next> button.
BI-300
8 S elect the <This driver software will be installed.>
button.
9D
river software installation is completed.
• If the window to search for [usbser.sys] file
does not appear, or the device is not properly
recognized even after the driver file [gserial_
Vista.inf] is normally installed, separate the
terminal from the PC, ▶ copy the [usbser.sys]
file of in the <C:\WINDOWS\system32\drivers>
folder, ▶ connect the terminal to the PC again.
• You can download the driver at our
homepage. (http://www.mypidion.com)
21
Sending data to PC
4 Installing PidionScan Program
• The seen screen corresponds to the
[Windows XP] version and it depends on
the software version used.
• Image seen in the [Windows Vista] screen
is different, but the function is the same as
[Windows XP].
2 Set <COM Port> in the [Connect] tab and select
the <Connect> button.
1 Select the PC driver folder [BI300_PidionScan_
Windows XP, Vista], and copy the [PidionScan_
Winxp,Vista] folder in the PC, and select the
[PidionScan_WinXp,Vista.exe] program.
You can download the driver at our homepage.
(http://www.mypidion.com)
<COM Port> of <Gadget Serial> is changed
at each PC, so that check the number to
which the Gadget Serial COM port is set.
22
BI-300 Series Manual
BI-300
To check <COM Port> to be set,
a. R
ight-click the mouse in [My Computer] of the
PC, and select <Properties>.
b. Select [System Restore] ▶ [Hardware] ▶
<Device Manager>.
23
Sending data to PC
4 Installing PidionScan Program
c. If you select <POrt (COM and LPT)> in <Device
Manager>, you can check <Gadget Serial>.
3 For how to use the [PidionScan] program, refer to
<Use PidionScan Program> on page 37.
Image seen in the PC screen is different, but
the function is quite similar to PDA.
24
BI-300 Series Manual
Sending data by PDA
BI-300
You can exchange data by connecting the terminal to the PDA supporting Bluetooth, without the USB cable.
1 Procedures for data transmission
1 Install [Microsoft ActiveSync] in a PC. (See P-26)
2C
onnect the PDA and PC with the USB cable and
install [PidionScan] in PDA, and disconnect.
(See P-28)
3P
ower the terminal on. (See P-11)
4 S et <Bluetooth> of the PDA. (See P-31)
5 S et the [PidionScan] program of the PDA.
(See P-37)
6 S can barcode with the terminal. (See P-12)
7 S canned barcode information is displayed in the
screen of the [PidionScan] program or in the
Word/Memo of the PDA. (See P-38)
• If the PDA and Bluetooth are properly
connected, the battery • communication
lamp turns blue, and high signal tone is
generated once.
• Even if the Bluetooth transmission fails
after barcode scanning, the barcode data is
automatically stored in the scanner.
• Because the Bluetooth interworking is
disconnected while PDA is in Power Save
mode, do not use Power Save mode when
interworking with Bluetooth.
25
Sending data by PDA
2 Installing ActiveSync
To install the [PidionScan] program in the
PDA, install the [MicroSoft ActiveSync]
program in a PC.
If the [ActiveSync] program is already installed
in the PC, you need not install the program
separately.
The seen screen corresponds to the [Microsoft
ActiveSync 4.5] version and it depends on the
software version used.
26
BI-300 Series Manual
1 Access the Microsoft’s Website, and download
[Microsoft ActiveSync], and install.
BI-300
2 Select the <Accept> button in the [License
Contract] window, and ▶ fill in the <User ID>
<Organization> in the [Customer information]
window, and ▶ set <Installation Location> in the
[Target Folder] window.
3 If ready to install, [Microsoft ActiveSync] is
installed.
4 [Microsoft ActiveSync] installation is completed.
27
Sending data by PDA
3 Installing PidionScan Program
• The seen screen corresponds to the
[Windows Mobile] version and it depends
on the software version used.
• Image seen in the [Windows CE] screen is
different, but the function is the same as
[Windows Mobile].
1 Connect the PDA and the PC using the USB cable.
28
BI-300 Series Manual
2 Execute [Microsoft ActiveSync], and select the
<Browse> button.
BI-300
3 Copy the [BI300_Pidion-Scan_Windows Mobile]
folder in the provided CD in the [Mobile Device]
folder.
• Depending on software version used in
PDA, install the [BI300_PidionScan_Windows
CE] folder for Windows CE, and install the
[BI300_PidionScan_Windows Mobile] folder
for Windows Mobile.
• The <PidionScan_WinCE.exe, PidionScan_
WinMobile.exe> file and the <BI300SdkDll.
dll> file and the <BIDevSearch.dll> file are
enabled only if they are installed in the
same folder.
29
Sending data by PDA
4 Bluetooth Power On/Power Off
If you want to connect other equipment using the Bluetooth, execute the Bluetooth function first.
Bluetooth Power On/
Power Off - 1
Bluetooth Power On/
Power Off - 2
1 Select the [Start] ▶ [Set] ▶
[Connect], and ▶ [Wireless
Administrator].
1 Select
at the top
of the screen and select
[Wireless Administrator].
2 Select <Bluetooth>.
2 Select <Bluetooth>.
: Bluetooth on (set)
: Bluetooth off(release)
Terminal equipped with Bluetooth can be
connected without setting Bluetooth.
30
BI-300 Series Manual
BI-300
5 Bluetooth setting-Windows Mobile
The seen screen corresponds to the
[Windows Mobile 5.0] version and it depends
on the software version used.
1 S elect the [Start] ▶ [Set]
▶ [Connections] and ▶
[Bluetooth].
2 Select <Turn on Bluetooth>
in [Mode] tab.
31
Sending data by PDA
5 Bluetooth setting-Windows Mobile
3 Select <Add New Device> in
the [Device] tab.
5 Enter password and select
<Next> button.
※ If the PDA and the terminal
are connected for the first
time, enter password to
register.
Default password is 1234,
and the user can change the
password.
4 Select <BI-300> among the
searched Bluetooth devices,
and select the <Next>
button.
※ It is possible to search for
<BI-300> only if the terminal
power is on.
32
BI-300 Series Manual
6 Select <Serial Port> and
select the <Finish> button.
BI-300
7 S elect <New Outgoing Port>
in the [COM Port] tab.
9 Select an unused port address
and select the <Finish>
button.
8 S elect <BI-300> and select
the <Next> button.
Unavailable if a port in use is selected and
available only if a port not in use is selected.
33
Sending data by PDA
6 Bluetooth Setting-Windows CE
The seen screen corresponds to the
[Windows CE 5.0] version and it depends on
the software version used.
1 Select [Start] ▶ [Set] ▶
[Bluetooth Device
Attributes].
2 <Bluetooth Administrator>
and select the <Search
Device> button.
34
BI-300 Series Manual
BI-300
3 S elect the searched <BI-300>,
and select <Trusted>.
5 If the PIN entry window
appears, enter PIN, and
select the <OK> button.
※ If the PDA and the terminal
are connected for the first
time, enter PIN to register.
Default PIN is 1234, and the
user can change the PIN.
4 If the Device Authentication
window appears, press the
<Yes> button.
6 If the device is set, the red
<X> mark disappears.
35
Sending data by PDA
6 Bluetooth Setting-Windows CE
7 Select <BI-300>, and select
<Activate>.
8 Red <✓> mark is displayed in
the device list.
36
BI-300 Series Manual
Using PidionScan Program
Using the program named PidionScan, you can perform
data communication with the PDA/PC, and set the
function of a terminal.
Image seen in the PC screen is different from that of
PDA, but the function is quite similar each other.
The seen screen depends on software version
used.
Click [PidionScan] installed in
PDA/PC to execute the program.
In case of PDA, go to [Start] ▶
[File Browser], and then search
for the folder saving PidionScan.
Select [PidionScan] in the folder.
BI-300
1 Connect
You can connect/disconnect
communication between the
terminal and PC/PDA through
Connect/Disconnect.
Connect : Connect to the ticked
device in the list.
Disconnect : Disconnect to the
ticked device in the list, among
connected devices.
Device Name
It is possible to distinguish many devices by the
terminal serial number.
Status
Display the progress status and results.
- Connected : Connected normally.
- Connecting : Attempting to connect.
- Connect Fail : Fail in connection.
- Disconnected : Disconnect.
37
Using PidionScan Program
2 Download
You can download data stored
in the terminal.
Real-time data sync : If ticked
off, barcode values read in all
connected devices are displayed
in data sheet in real time.
Data sheet
• Possible to adjust the width of each row by drag.
• Scroll is automatically created if an item goes
beyond the window.
• Unless otherwise, size only is left as blank.
Download data saved in the device
Reset
If you press Reset, barcode values read as Real-time
data sync is cleared only from the screen.
If too many barcode values are displayed in
a data sheet in Real-time data sync state,
sometimes, there may be a problem with
program performance.
38
BI-300 Series Manual
1 If you press the <Start>
button in the [Download]
tab, the <Downloading>
popup window appears (If
the Popup window appears,
the Download button is
deactivated, and activated
again after the completed
Popup window disappears)
BI-300
2 Device IDs of all connected
devices are displayed in the
Popup window, and the
download status per device is
progressed by %.
IF download is completed, the
<Done!> message is displayed,
and the download of the next
device gets started.
4 File name of download
location is saved as <Device
name_scandata.extension>.
For PDA, downloaded files
are saved in the <Device(my
device)> folder, and for PC,
downloaded files are in a
folder where the EXE file of
[PidionScan] exists.
3 If download of all devices is
completed, the <Download
Completed!> message is
displayed, and automatically
disappears in one second.
39
Using PidionScan Program
3 Setting
Auto re-connect
Time Stamp
•A
utomatically re-connect
if Bluetooth connection is
disconnected.
Used to display date and time in the barcode
information.
•Y
ou can set the maximum
number of attempt.
- Time interval default is
5 seconds, the maximum
number of attempt is 0~10
(impossible to automatically
re-connect if 0)
•D
efault : 3times
Auto Real-time mode
• If you select the checkbox, barcode values read by
If you click the check box, the barcode data from
the terminal will be indicated on the exe window of
notepad or word at your PC or PDA in real time.
• If you do not select the checkbox, barcode values
are not displayed in real time.
40
BI-300 Series Manual
example) 2008/11/20 19:26:13 01223334
date
time Barcode information
If you select the <Auto Real-time mode>
checkbox, the <Time Stamp> checkbox is
activated.
BI-300
4 Configure
You can configure the
environment such as terminal
volume, memory.
For multiple accesses, you can
select many terminals and apply
set value at a time.
If you select the checkbox of a
target terminal and click the
<Configure Selected Setting>
button, you can move to the
submenu of Configure.
General
Beep Volume : You can adjust
the beep volume to level 4
(Off/Low/Medium/High).
(Default : High)
Battery Level : Battery level is
displayed as High/Medium/Low.
Data Store : Memory usage is
displayed and available memory
is indicated as %.
Change settings in each submenu, and check
<Configure this tab>, and select the <OK>
button at the right top, and then settings are
applied.
41
Using PidionScan Program
4 Configure
Symbology
1 Supplementcode
You can set a barcode symbol.
Select the checkbox of a
barcode symbol.
• Basic Set Point : 0
Default : Default barcode is
selected.
Among the barcode symbols, Supplement code,
Interleaved 2 of 5 Length Min, Interleaved 2 of 5 Length
Max, MSI check digit, MSI check digit algorithm are
needed to put the default value of symbol.
If you click the check box of barcode symbol, Sub Option
which you can input the default value will pop up. Then,
input the default value as below and push Set button.
42
BI-300 Series Manual
Number
Description
0
Disable :
Will not recognize
supplement code
1
Decode :
Must recognize
Supplementcode in
order to be recognized
as correct bar code.
2
Autodiscriminat :
With or without the
Supplementcode, will
recognize bar code.
• Only the numbers 0~2 to be entered otherwise
setting will be cancelled.
BI-300
2 Interleaved 2 of 5 Length Min
: Set up minimum cognition
length.
• Basic Set Point : 3
• Numbers 0~255 to be entered
otherwise setting will be
cancelled.
3 Interleaved 2 of 5 Length Max
: Set up Maximum cognition
length.
4 MSI check digit
: Set up Check Digit. It is the
method to inspect whether
the barcode is correct.
• Basic Set Point : Check_1
Number
Check Digit
0
check_1
1
check_2
• Numbers 0~1 to be entered otherwise setting will
be cancelled.
• Basic Set Point : 30
• Enter numbers 0~255
otherwise setting will be
cancelled.
43
Using PidionScan Program
4 Configure
5 MSI check digit algorithm
: Modulo_10_10/ modulo_10_
11 / modulo_10_12 can be set
by check digit algorithm.
Prefix/Suffix
• Basic Set point : modulo_10_10
Prefix, Suffix : You can use
carriage return and linefeed by
entering a value.
Number
Check digit
algorithm
0
modulo_10_10
1
modulo_10_11
2
modulo_10_12
• Enter numbers 0~2 otherwise setting will be
cancelled.
44
BI-300 Series Manual
You can edit the function by
allocating character to each
barcode value.
• Default
Prefix : Blank
Suffix : ₩r
BI-300
Trigger
System
You can the Scan mode of the
Scan button.
Single : Scans one barcode each
time you press the Scan button
once.
Continuous : If you press the
Scan button once, the laser is
continuously emitted, so that
barcodes are read in a row.
If you press the Scan button once again, laser
emission is stopped. If you scan the barcode, after
a certain period of time, even if it is read once,
additional data can be read. You can set a certain
period of time, and the range is 0~9999, unit is
ms(1/1,000 of 1 second), Default is 2222ms.
Multiple : If you press the Scan button once, laser is
continuously emitted, so that barcodes can be read
in a row, but a read barcode is not read again.
If you press the Scan button one more time, laser
emission is stopped.
You can change the Power Save
mode and password of the
terminal.
Power Save Mode : Set to the
Power Save mode for saving
power. If you do not use a
terminal for a certain period of
time (minute), the terminal is
changed to the Power Save mode.
Security Setting : Set password.
• Password is up to 4 numeric characters.
• PIN Code : Set password.
•Confirm : Confirm password to be set.
• Press the Change button and turn off and on the
terminal again, then, password is changed.
Default Setting : All settings for the terminal are
initialized to default setting. If you execute this, the
terminal reboots as initialization.
Erase all data : Clear all barcode values saved in the
terminal.
45
Using PidionScan Program
4 Configure
PIN Code should be the same as a 4 digit
password entered in Confirm.
46
BI-300 Series Manual
5 About
Information on software
version and copyright is
displayed.
Product Specifications
Classification
Physical
Functionality
BI-300
Specification
Size
36 x 85 x 19 mm
Weight
Battery (included) : 54g
Main body (battery excluded)
: 38g
CPU
Samsung
OS
Linux
RAM
16MB
ROM
32MB
Interface
24pin Connector used
RS-232C, USB Client
Wireless
Bluetooth Class 2,
Max. distance 10m,
Bluetooth 1.2
Electrical
Temperature
in operation
Temperature
Environmental in storage
Humidity
Protection
Battery capacity Built-in 720mAh Li-Ion Battery
Electrical
Charging time
Approx. 2 ~ 3 hours
Battery lifetime
after one-time
charging
Continuous Barcode Scan 15,000
or more
Bluetooth
Optical
Decode
Capability
Barcode
recognition
notice
Frequency : 2402MHz ~ 2480MHz
Output : 20uW
Emission type : F1D
Modulation mode : GFSK method :
Number of channels repeated : 79
Type of public line : Chip ANT
Gain of public line : 1.1 dBi
Active circuit is not added
-5 ~ +40℃
-20 ~ +60℃
0 ~ 95% (non-condensing)
IP30
1D : UPC-A, UPC-E, EAN-13,
EAN-8, EAN-128, BookLand,
Supplement Code,
UCC Coupon Extended Code,
Code 128, Code39, Code 93,
Interleaved 2 of 5, CodeBar,
MSI.
2D : MaxiCode, Data Matrix, Code
39, UPC, Postnet, QR Code,
OCR-A, OCR-B
Notify by the change of scanning
lamp color, tone volume or
sequence
47
Q&A
If the terminal does not operate normally, please refer to:
Q Water comes into the barcode scanner. What shall I do?
A First, remove the battery from the barcode scanner, and
dry it up at the dry place for a certain period of time.
Q Power is not on.
A Check if the battery is inserted properly and use after
charging the battery for a certain period of time.
Q A battery is not charged.
A Check if the barcode scanner is properly connected to
the charger.
Q Barcode is not scanned.
A 1 Angle of scan many be incorrect. Scan at a right angle.
2 Barcode cannot be read if you scan barcode too far.
Move close and scan barcode.
3 The barcode may be damaged. Scan other barcodes
for check.
Q Barcode data scanned by PDA is not transmitted.
A 1 When transmitting Bluetooth, check if PDA supports
the Bluetooth function.
2 Check if the Bluetooth of PDA is set properly.
3 When sending Bluetooth through data cable, check if
cable is connected correctly.
Q Data is not sent from PC.
A 1 Check if data cable is connected properly.
2 Check if the connection program is correctly installed
in a PC.
Q Heat is generated in the barcode scanner
A If you use the product for a long time, heat is generated
sometimes. Use the product in relief because product
performance is not affected.
Q Lifetime of a battery is reduced.
A Batteries are consumables. Lifetime may be reduced
depending on period of use. Please, replace by a new
battery.
※ If a problem still remains even if you check the above items, please contact a nearby Customer Service Center.
※ The warranty period (one year after the purchase date) for the product is one year.
48
BI-300 Series Manual
Customer Service
BI-300
For any enquires of problems or inconveniences while using the product please call +82-2-1588-1380.
[Before asking for after-sales service]
[How to ask for after-sales service]
• Before requesting after-sales service, the user needs
to back up data in the device in person.
• For after-sales service, please contact your local dealer
or our customer care center.
• We do not backup products registered at the
customers service center. Therefore, we are not
responsible for any damage or loss of data.
• Do not remove the label of the product on purpose.
• Make sure to deliver the product in a safe way.
Bluebird Soft is not liable for device loss during
delivery.
[Customer care center of Bluebird Soft Inc.]
• Phone : +82-2-1588-1380
• Fax : +82-2-548-0870
• E-Mail : [email protected]
• Address : 1242, Gaepo-dong, Gangnam-gu,
Seoul, Korea
[Work hours]
• Mon.-Fri. : 9 A.M. ~ 6 P.M. (GMT Time: +9 Hours)
• We do not work on Saturday, Sundays and National
Holidays.
49
Service Center Information
[Regulations on Free/Charging Repairs]
Type of Customer Damage
Contents of Compensation
Within the Term of Guarantee
After term of guarantee
When requesting important repairs within 10 days of
Exchange or Repayment
purchase
Requesting important repairs within 1 month since purchase Exchange or Repair Free of Charge
date
An important repair is needed after 1 month of exchange
Exchange or Repair Free of Charge
When it is impossible to exchange within 1 month
Repayment
The same problem occurs 3 times
Repair Free of Charge
Charged Repair
Possible The same problem occurs 4 times
Repairs
Exchange or Repayment
Charged Repair
5 problems in all different parts
When the manufacturer has lost the product in
Exchange after depreciation of
which the customer has requested for a repair
Exchange or Repayment
the fixed price.
Impossible When it is impossible to repair within 1 month.
Repairs
Exchange after adding 10% to the
Impossible to exchange.
Repayment
depreciated price of the fix price (the
highest price-purchased price).
• Abiding to the Regulations of Customer Damage Repayment, Terms of Component Possession: 3 years
• Exchange will be made to the same product. If an exchange for the same product is impossible, then it will be exchanged for a similar
product. However, there should be a repayment if the customer does not want an exchange for a similar product.
• Repayment amount should be the amount written in the receipt
• If the price on the receipt is higher than the price, than the usual price will be used as a standard, considering that other incidental
expenses had been added to the higher price.
50
BI-300 Series Manual
BI-300
[Charged Service]
1. If it is not a default, it will be charged when
requesting for after-sales service.
- Service request due to inappropriate use of the
customer
- Loss of a PIN number
- Use of programs that might effect the program
(over-clock, forceful changes in the input of the
system, personal developments)
2. Default due to a mistake on the part of the customer
- Default due to inappropriate or careless use of the
product (dropping, submersion under water, shock,
damage, unreasonable operations, etc).
- Default due to a repair or unauthorized technician.
- Default caused intentionally or by carelessness of
the customer.
- Default due to the use of fraudulent parts or
components.
3. Other cases
- Default due to nature (fire, damage due to sea
wind, flood damage, etc.).
- Expendable parts have exhausted there life
(batteries, antenna, or other component parts).
4. Regulations of treatment after charged service
- If the same default occurs on the part that had been
repaired within a 2 months(60 days) period, it will be
provided with free of charge repair service.
There will be no returning of goods or repayment
upon the following situation:
• Removal of the sealing of the product if it had been
sealed.
• If the product has been damaged due to careless
use by the customer or due to a natural disaster
(floods, rain, fire, etc.).
• Loss of product or other components (CD, diskette,
manual, connecting cables, etc).
• Damage to the product after 10 days of purchase,
the product will either be exchanged or provided
with after-sales service (note, returning of goods or
repayment is not allowed).
51
Certificate of Guarantee
Thank you for purchasing a product from Bluebird Soft Inc.
• If a circumstance arises where you lose a receipt or the
certificate of guarantee, then the term of guarantee
will be calculated 3 months (certified by the number
of the manufacture, a certificate of inspection) after
the date of manufacture.
• In case of accessories (such as batteries), only those
that match the sales list managed by the service
center will be eligible for customer service.
• A repair or an exchange of batteries that does not
match the sales list of the service center due to the
carelessness of the customer will be fully charged.
Name of Product
Barcode scanner
Name of Model
Date of Purchase
Manufacture Number
Place of Purchase
Term of Guarantee
BI-300
1 year from
purchase
[Guarantee of the Product]
1. Due to the regulations of the customer damage
compensation, Bluebird Soft Inc. (hereafter Bluebird) will
guarantee the products as follows.
52
BI-300 Series Manual
2. If Bluebird had been notified of the defaults within the
term of the guarantee and the extent of guarantee,
Bluebird will repair or exchange those products according
to the guarantee policies.
3. If Bluebird cannot repair or exchange defaulted products
that had been sent within the term of the guarantee,
but falls within the coverage of the guarantee policies,
Bluebird will compensate for the products.
4. B
luebird does not have any responsibility to repair,
exchange, or repay products until the customer returns
the defaulted product. The exchanged product will be
provided with one that has a quality equal to that of the
brand new product.
5. B
luebird will guarantee those products that are from
countries in which Bluebird rightfully distributed the
guaranteed products.
6. B
luebird products may include parts, composition,
accessories, and materials that have the same capability as
a brand new product.
7. If it is a software product, guaranteed service will be
offered only in cases where the programming commands
cannot be launched. Bluebird cannot guarantee that the
product will never stop or there will never be an error
when using the product.
MIC Certification
CE Mark and EEA
BI-300
The following information on this class B equipment is
provided for the users:
This equipment is home appliances
registered as EMI/EMS/EMC, and is
available in all areas including residential
district.
BBS-BI-300
BBS-BI-300A(B)
You can use a life safety-related service
because radio equipment corresponding
to the following has a possibility of radio
interference.
53
Laser device
Class 1 laser device is considered to be not dangerous if
used for its intended purposes. The following description
is a requirement required for compliance with U.S. and
international rules.
If you use the control operation, coordination or
procedures other than items specified herein, you
may be exposed to dangerous laser beam.
Class 2 laser scan uses low-power visible light diode.
Users should not directly look at light of quite bright light
source such as sunlight. Instantaneous exposure to class 2
laser is considered to be not harmful.
54
BI-300 Series Manual
The following information is provided for the users
according to Article 5, IEC 825 and EN60825.
Customers Service Center
Hours
Mon.- Fri. : 9 A.M. ~ 6 P.M.
(GMT Time: +9 Hours)
We are not open on Saturday,
Sundays and National Holidays.
Address : 1242, Gaepo-dong,
Gangnam-gu, Seoul, Korea
Bluebird constantly strives to bring utmost satisfaction to all our customers.