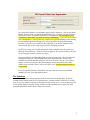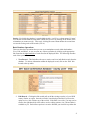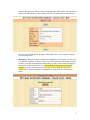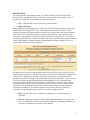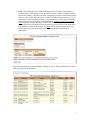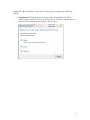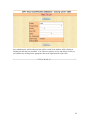
1
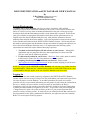
ISSUE IDENTIFICATION and EPC DATABASE USER’S MANUAL By J. Rey Santos (Updated 01/19/2012) Software Development Group Texas Agrilife Information Technology System Requirements: The ISSUE ID and EPC Database web sites use cookies, JavaScript, ASP, and SAS technologies to process the information submitted to the system. It uses session variables (also known as "cookies") to keep track of submitted information as they move from page to page. JavaScript checks that the information provided is in the format that is expected. It also ensures (and gives reminders as appropriate) that required check boxes and/or option buttons are not skipped before the data get submitted and processed. ASP grabs the information from the submitted form and posts them in the database. ASP is the engine that executes actions invoked by the clickable menu links inside the ISSUE ID-EPC Database Systems. SAS in turn pulls out the numbers and string data from the database and processed them according to the option(s) you have selected from the Report Generator menu. It is important that the following system requirements are satisfied to ensure enhanced browsing experience: 1. You must use Internet Explorer (IE) 8.0 or better as your browser – Although the applications may run using other browsers, these applications have been tested and proved to work with IE without any problem. 2. Cookies must be enabled in your browser. Check here if the cookie option is enabled in this browser. Please click here for instruction on enabling cookies. 3. Scripting (JavaScript) must be enabled in your browser. Please consult http://support.microsoft.com/gp/howtoscript on how to enable scripting in your browser. NOTE: By design, both the ISSUE ID and EPC Database web sites have very similar interfaces and functionalities. While this user’s manual focuses on the use of the ISSUE ID web site, most of functionalities and logic applies to the use of the EPC Database web site as well. Logging In As in other web sites that contain proprietary information, the ISSUE ID and EPC Database systems require each user to log in, using a User ID (email address) and a password before he/she can enter any data or view the database. As an added precaution, the system uses an SSLprotected web site so user-entered information gets encrypted as it passes from the workstation to the server. Initially, all users would be issued a one-time use password by the Project Coordinator so they can log in to the system after which they would be required to change them to another one that conforms to a high level of security. As you enter a new password using the “Change Password” option, the system would let you know if your proposed password had passed its security screening (or not). It would only let you submit passwords that conform to its pre-programmed security policy (minimum of 8 characters, one uppercase letter and 1 number). Below is a screen capture of the log in panel: 1 The log in panel has several options: Remember me? - If you checked the box associated with this option, the system would remember your User ID and password the next time you log in. It would pre-fill the two log in boxes for you, thus saving you time and possible headache. Change Password – At any time that you feel a need to change your existing password, click on this link. You are expected to know your current password in order to use this feature. Lost Password – In the event that you forgot your password, you can click this link, which would prompt you for your “registered” email address in the system. After verification that the email address you provided matches one in the system, it would send you your password that you can use for logging in. Admin – If available, this link is for authorized web site and system administrator’s use only. This is the place where administrators can add, modify and/or delete users of the system. New User Registration All CEA-level users MUST register using the "New User Registration" form. District, regional and statewide-level administrators have an initial password of “xxxxxxxxxx” to be assigned by the Project Coordinator. On login, the system would tell them that the password has expired so they would be forced to change password. Strong password policy, similar to that of TExAS, will be enforced with the following requirements: a. All User ID (email) must contain "tamu.edu" domain extension (turned off) b. Minimum 8 characters (combined letters, number and special characters) c. No. of numeric digits: 1 d. At least 1 capital letter e. At least 1 special character (!@#$%^&*()_-) (turned off) f. No maximum length required g. Required 6 months password renewal; email notification will be sent several days before expiration 2 On successful registration, a confirmation page would be displayed. Click on the button labeled “Provide county credentials/Exit/Close Browser" to provide your role (position) and county, district, or regional responsibility or assignment. The information is very important as it determines your mode of access to the database. You would not be able to access the database if you skip this step. Exit the user registration database after entering the information which would bring you to the log in panel of the Issue ID Database. From the log in panel, you would have the option/link to go the EPC Database and to other features such as retrieving lost passwords or changing passwords. NOTE: If you want your User ID and password to be remembered by the system, just check the "Remember me?" check box before logging in. The system would pre-fill your User ID and password the next time you log in. On successful log in and depending upon your access mode (role), a list of records will be displayed with view, edit, and delete links at the right-hand side of each record. Visibility of each link depends upon your role or access mode. Use the "view" link to display a selected record; the "edit" link to display and edit all or some of the fields within a record; and the "delete" link to erase the record. Note that deleted records are irrecoverable. It is by design that both Issue ID and EPC web sites share the same user and admin databases for ease of use and administration. The Database The database contains rows that represent all the records entered in the database. It also has columns each of which stands for every distinct metric variable related to each record. Usually there are several variables (columns) associated with each record (row). On successful log in, the system would display a complete listing of all the records submitted to the system from each geographical location (below shows county level records). 3 Sorting - By default, the database is sorted alphabetically (A to Z) by a column named “County”. You can also sort the database using other column and you do it by clicking on the header of the column that you want to sort by. Conversely, clicking the same column header the second time reverses the sorting order of the records (Z to A). Basic Database Operations There are three basic operations that you can use to manipulate records within the database: View, Edit, and Delete. A user accesses any of these operations by clicking on the appropriate link located at the right-hand side of each record in the displayed table. The following describes each of the operation: 1. View Record – This link allows the user to retrieve and view individual records from the database. To edit any information within the displayed record, click on the “Edit” link located at the top menu. 2. Edit Record – Clicking this link would pull out all the existing record(s) of your OWN county, district, or region. Once the record(s) is/are displayed and listed, you have the option to view, edit or delete any of the records. If the table is too wide, you may need to scroll to the right-hand side of the table to see the editing options (view, edit and delete) available to you. Each of these options is an active link that you can click to perform the 4 operation that you want. Below is the record listing under “Edit” mode. The Edit Record panel for the EPC database will be slightly different but similar to the one shown below. Once you are satisfied with the changes you had made, click on the “Update” button to save the edited record 3. Delete Data - When record gets outdated and information in it turns stale, it is time for it to be deleted or updated. A “Delete” link is provided dedicated to eliminating unwanted record(s). Just click on the link and confirm that you really want to delete the displayed record and it would be deleted forever. Once deleted, records cannot be recovered anymore. Instead of deleting the record, you may want to update the information contained in it. Such can be easily accomplished by using the “Edit” link discussed earlier. 5 Database Menu Several items made up the database menu: Exit, Issue ID Report Generator, Reset, Print, ExportToExcel, and Add New Record. This menu is depicted in the screen capture above, 2nd row from top of the table. Details about each menu item follows: 1. Exit – Click this link when you want to log off the database. 2. Report Generator Data (including records in databases) are only useful when the metrics in them get analyzed for trends and/or use for comparisons. This is where Report Generator (RG) comes in. RG is nothing but a simple web form that harvests specific user requests using various form elements such as text boxes, option buttons, pull down menus and checkboxes. The requests are then forwarded to a program that retrieves all records satisfying the specified criteria. The same or another program crunches the numbers associated with each record which then generates statistics useful in translating the crunched numbers to understandable layman’s language. Below is a screen capture of Issue ID’s Report Generator. RG allows the user to select the geographical entity (county, district, region or state) for which reports will be generated for. Alternatively, reports can also be produced based on Program Area or Issue Status. Regardless of what type of reports gets requested, a user should select the appropriate response by clicking on the option button for the desired operation. The user should also select an item from the pull down menu located immediately below (within the same column) the option button that was selected earlier. Should the user wants to retrieve reports based on specific keywords, RG also provides a text box to capture those keywords which are then passed to the program that use them to screen and further whittle down the number of records that gets retrieved. An option to generate reports in RTF format is provided for convenience in exporting the report output to any word processing application. 3. Reset - Restores table view configuration existing prior to a search or order (by) operations. 4. Refresh - Triggers an internal procedure which implements another view request. The new view includes the newly entered/edited data and/or the remaining records after one or several records had been deleted from the database. 6 5. Print - This option opens up a window that allows for the selection of the number of records to print. It also provides a way to include/exclude variables (columns) from the table before printing. Check the box of the variable that you want to include and uncheck the box for the variable that you want to exclude (see sample Print menu below). If you plan to print a table with many columns, it may be necessary to adjust paper orientation (using your browser's Print menu) to landscape mode. Selecting a range of records to print: Physically count the starting row and ending row of the range that you want to print and enter those row numbers in the record range selection boxes of the print menu. Use Ctrl-P to print the selected range. You also have the option to print a table using your browser's Print feature setting the paper orientation mode and margins as appropriate. After the Print settings have been configured, clicking the “Next” button will bring up a ready-toprint page similar to the following: 7 Clicking the “OK, Print Page(s)” button will route the output to your printer for a hard copy printout. 6. ExportToExcel - Displays and allows saving of table as an MS Excel file. When prompted where to save the file to, point to a directory or a disk drive, and then choose a name for the file using xls as the extension. Click on "Save". 8 8. dB-Help – This invokes a page containing Issue ID-EPC Database User’s Help Page (see screen capture below). The Help page essentially provides the user some information on how to navigate the database system pages using the various links and options available on each page. 7. Add New Record – Displays the ISSUEID’s Add New Record Form (screen capture below) that you can submit after providing some information. The Add New Record Form for the EPC database will be slightly different but similar to the one shown below. 9 After submitting the Add New Record form, all the records in the database will be displayed including the one that was just added. You’ll have the option to review and edit the record you just submitted by clicking on the appropriate links at the right-hand side of the table. /*========================= END OF MANUAL ==========================*/ 10