1
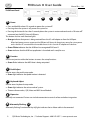
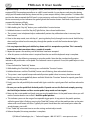
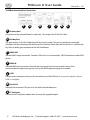
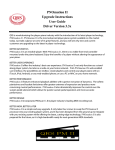
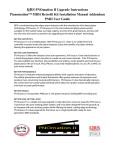
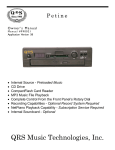
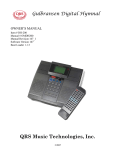
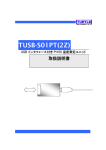
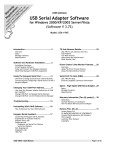
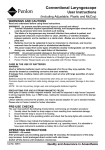
QRS Music Technologies, Inc.
PNOscan II
User Guide
Item # 79217
Manual # OM79217
Rev. 1.00
Warnings
FCC INFORMATION
1.IMPORTANT NOTICE: DO NOT MODIFY THIS UNIT!
This product, when installed as indicated in the Installation Manual, meets FCC requirements. Modifications not expressly approved
by QRS Music Technologies, Inc. may void your authority, granted by the FCC, to use this product.
2.IMPORTANT: When connecting this product to accessories and/or another product use only high quality shielded cables. Cables supplied with this product MUST be used. Follow all installation instructions. Failure to follow instructions could void your FCC authorization to use this product in the United States of America.
3.NOTE: This product has been designed to comply with the requirements listed in the FCC Regulations, Part 15 for Class “B” digital devices. Compliance with these requirements provides a reasonable level of assurance that your use of this product in a residential
environment will not result in harmful interference with other electronic devices. This equipment generates/uses radio frequencies
and, if not installed and used according to the instructions found in the Installation Manual, may cause interference harmful to the
operation of other electronic devices. Compliance with FCC regulations does not guarantee that interference will not occur in all
installations. If this product is found to be the source of interference, which can be determined by turning the unit “OFF” and “ON”,
please try to eliminate the problem by using one of the following measures:
•Relocate either this product or the device that is being affected by the interference.
•Utilize power outlets that are on different circuits (circuit breaker or fuse) or install AC line filters.
If these corrective measures do not produce satisfactory results, please contact the local authorized distributor, or contact QRS
Music Technologies, Inc. 2011 Seward Ave. Naples, FL 34109.
INSTRUCTIONS PERTAINING TO A RISK OF FIRE, ELECTRIC SHOCK, OR INJURY TO PERSONS
The lightning flash with arrowhead symbol, within an equilateral triangle, is intended to alert the user to the presence of
un-insulated “dangerous voltage” within the product’s enclosure that may be of sufficient magnitude to constitute a risk
of electric shock to persons.
The exclamation point within an equilateral triangle is intended to alert the user to the presence of important operating
and maintenance (servicing) instructions in the literature accompanying the product.
GROUNDING INSTRUCTIONS: This product must be grounded. If it should malfunction or breakdown, grounding
provides a path of least resistance for electric current to reduce the risk of electric shock. This product is equipped with a
cord having an equipment-grounding conductor and a grounding plug. The plug must be plugged into an appropriate
outlet that is properly installed and grounded in accordance with all local codes and ordinances.
DANGER - Improper connection of the equipment-grounding conductor can result in a risk of electric shock. Check with
a qualified electrician or serviceman if you are in doubt as to whether the product is properly grounded. Do not modify
the plug provided with the product. If it will not fit the outlet, have a proper outlet installed by a qualified electrician.
P N O s c a n I I Us er G uide
Manual Rev. 3.01
Table of Contents
Welcome
Operating Modes
TUSB Front Panel
Keyboard and Pedal Setup
TUSB Rear Panel Interface Connections
Connection Diagram
Warranty
4
5
6
7
8
9
10-11
Welcome
Congratulations on your purchase of the QRS PNOscan II key sensor / MIDI system. The PNOscan II system
represents the best value and highest performance key sensing / MIDI transmit system available today.
What does the PNOscan II do? The PNOscan II is a simple MIDI interface for your acoustic piano. The
PNOscan II allows you to use your piano as a MIDI controller. The PNOscan II MIDI OUT jack can be
connected to any synthesizer, sequencer, or computer having a MIDI IN jack.
With the PNOscan II system installed under the keys of your keyboard instrument, you will enjoy the great
benefit of the latest high tech designs. Benefits such as absolute high resolution key sampling, virtually no
mechanical contact with keys or action, highly accurate DSP algorithms for outstanding performance
reproduction and seamless integration into the QRS product line.
After the initial installation the PNOscan II system was electronically setup to the piano
action. As your piano action wears it may be necessary to repeat this setup procedure
periodically. If the piano action is regulation or repaired, follow the Keyboard Setup
instructions below to re-calibrate the system.
⇒ See the Keyboard and Pedal Setup sections on page 7 of this manual for details.
P N O s c a n I I Us er G uide
Manual Rev. 3.01
Operating Modes
Mode 4
Modes 1, 2 & 3
Repeatedly tap the “Key Adj” button to select one of the following modes:
1. QRS Mode - Light blinks once, then a pause.
• MIDI output is optimized for Pianomation acoustic record and playback.
2. MIDI Sound Module Mode - Light blinks twice, then a pause.
• MIDI output is optimized for playback through a sound module.
• The output level of this mode is greater that that of the Record Mode.
3. Mute Mode: Light flashes steadily.
• Stops MIDI output from PNOscan II.
Tapping the Power button places the unit in System Mute mode:
4. System Mute: The “Key Adj” light flashes steadily.
• Stops MIDI output from PNOscan II and also sends an “All Notes Off” command.
Tap the “Key Adj” button to exit the Mute mode.
QRS Music Technologies, Inc. / Technical Support - 800-247-6557 / www.qrsmusic.com
5
P N O s c a n I I Us er G uide
Manual Rev. 3.01
TUSB Front Panel
A
A
B
C
D
E
Power
• Press and hold for about 2.5 seconds to power the system off.
• Pressing when the system is off, powers the system on.
• Pressing this button for less than 2 seconds places the system in mute mode and sends a "all notes off"
command out the MIDI Out and USB ports.
This button also has multi function lights:
• Orange indicates that power is being received from the AC wall adaptor or from the USB port.
When both power sources are present the USB port will always be the primary source for system power
unless the host PC cannot deliver the needed current. In this case the AC adaptor will take over.
• Green-Flicker indicates that the USB host has recognized PNOscan II.
• Green indicates that the USB host application is launched and is ready for use.
B
Function
Used in conjunction with other buttons to access the setup functions.
• Green flicker indicates that MIDI date is being outputted.
C
Pedal Adjust
Used to access the pedal setup mode.
• Green light indicates that pedal motion is detected.
D
Keyboard Adjust
Used to access keyboard setup mode.
• Green light indicates the active mode of system.
• There are three modes; QRS, Mute and MIDI Sound Module
E
Expansion
Normally not connected. Future uses include connection to control surface and other integration.
B
Alternately Flashing
D
Alternately flashing Function and Key Adj lights indicates that a ribbon cable is disconnected.
6
QRS Music Technologies, Inc. / Technical Support - 800-247-6557 / www.qrsmusic.com
P N O s c a n I I Us er G uide
Manual Rev. 3.01
Keyboard Setup: To make the setup process easier, connect the MIDI Output of PNOscan II to a soundcard
equipped QRS Pianomation controller or to a MIDI sound module. As you depress each piano key during
setup you will need to hold the key down until the system accepts the key's down position. To indicate the
position has been accepted, the PNOscan II system outputs a midi note. Alternately if you don't have a MIDI
device connected, you can reference the green light on the Function button. Each time a key position is
accepted this button will light.
1. Press and hold the "Key Adj" button.
2. While holding the “Key Adj” button, press and hold the Function button.
3. Hold both buttons in until the 'Key Adj" light flashes, then release both buttons.
• The system is now in keyboard adjust mode and all previous key calibration values in memory have
been erased.
4. Once in the setup mode, start with key # 1, pressing the key firmly through its entire travel. Hold the key
down until you either hear the note play through the speaker or until the Function button lights
momentarily.
⇒ It is very important that you hold the key down until it is accepted as a position. This is normally
instantaneous but sometimes takes a couple of seconds.
5. Repeat this process for each key until all 88 notes have been accepted.
• After this process no further action is required from the user and the keyboard setup is complete.
Pedal Setup: Use the following sequence to setup the pedals. Note that the standard configuration
includes a soft pedal and a sustain pedal. The Sostenuto sensor is optional. If used, this pedal adjusts in the
same way.
1. Press and hold the “Pedal Adj” button.
2. While holding the “Pedal Adj” button, press and hold the "Function" button.
3. Hold both buttons until the "Pedal Adj" button starts flickering, then release both buttons.
• The system is now in pedal setup mode and all previous pedal values in memory have been erased.
4. Firmly press the sustain pedal fully down and hold. Watch the "Function" button for a quick green flash
and then release the pedal.
5. Firmly press the soft pedal fully down and hold. Again watch for a quick green flash and then release the
pedal.
⇒ Be sure you see the quick flash for both pedals. If you do not see this flash exit setup by pressing
the Pedal Adjust button and then reenter pedal setup mode and start again.
6. Return to the sustain pedal and slowly start pressing the pedal down. As the pedal moves down you will
see the Function button start to flash. Hold this pedal position.
• This indicates you are in the range of a acceptable trigger point. At any point in the pedals position,
while the green light is flashing, pressing the "Pedal Adj" button will set that pedal position as the point
where midi sustain event will occur. Typically this point should be at the same exact point where the
actual dampers start to lift.
7. Press "Pedal Adj" one more time to save the settings and exit adjust mode.
8. Release the pedal, the setup procedure is complete.
QRS Music Technologies, Inc. / Technical Support - 800-247-6557 / www.qrsmusic.com
7
P N O s c a n I I Us er G uide
Manual Rev. 3.01
TUSB Rear Panel Interface Connections
F
F
G
H
I
J
K
L
Primary Port
Connection to the soft pedal board is made here. This accepts the 10-Pin Flex Cable.
G
Alt Key Port
This port accepts a 6-Pin Flex Cable from the Key Scan Assembly. This port is normally not connected,
although it can be used along with the Primary Port if desired. When only the Primary Port is used then the
Key Scan Assembly gets connected to the Soft Pedal Board.
H
MIDI OUT
Standard MIDI output connection. Connects PNOscan II to sound modules, QRS Pianomation or other MIDI
device.
I
MIDI IN
Standard MIDI input connection. Normally not connected. Used in more complex setups when
communication to diagnostic programs such as the MIDI9 alignment program is needed.
J
USB
Connect a host computer to this port for convenient use of the PNOscan II system and computer software.
USB 2.0 compliant
K
Serial I/O
Normally not connected. This port is for use with future development.
L
5 Volt Input
Connect the AC wall power adapter here. Use only the supplied adapter.
8
QRS Music Technologies, Inc. / Technical Support - 800-247-6557 / www.qrsmusic.com
P N O s c a n I I Us er G uide
Manual Rev. 3.01
Connection Diagram
Key Scan Assembly
This cable connects the optical sensor boards,
located under the keys, to the rest of the system. The
cable extends from the treble end of the keyboard.
The Flex Cable Coupler provides a quick
disconnect of the Key Scan Assembly
when the keys are removed for service.
Sustain Pedal Circuit Board
Soft Pedal Circuit Board
TUSB
AC Power Adapter
The Key Scan Assembly cable, currently connected
to the “Key Scan” port on the “Soft Pedal Circuit
Board”, may be connected to the “Alt Key Port”.
QRS Music Technologies, Inc. / Technical Support - 800-247-6557 / www.qrsmusic.com
9
PNOscan II™ Limited Warranty
PNOscan II Electronics Limited Warranty
QRS Music Technologies, Inc. (“QRS”) warrants to you for the Warranty Period that there are no defects in the
materials of this Product (as identified at the end of this warranty certificate). The “Warranty Period” expires (except
as explained below) Two (2) years from the date of your purchase of the Product. In order to determine the date of
your purchase of the Product, you will need to provide to us a credit card receipt, a purchase agreement, a sales
slip, a warranty registration or some other form of proof that you are the original purchaser and the date of your
purchase of the Product.
If you are not able to provide us with some form of proof of purchase date, the Warranty Period will be a
shorter period (the “Shorter Warranty Period”) which is two years from the date that your dealer purchased the
Product from QRS. If you cannot provide a proof of purchase date, you may contact us in the manner described
below and we will assist you in determining the date that your dealer purchased the Product from us and
determining the Shorter Warranty Period. This is a warranty is for parts only and does not include shipping or labor.
This warranty does not apply to any accessories you may have purchased with the Product and does not apply to
any piano or components of the piano with which the Product is used or any Piano in which the Product is
installed. In addition, this warranty does not cover scratches, dents or other defects in the cosmetic finish of the
Product.
The warranty is issued solely to the original purchaser of the Product. THIS WARRANTY IS NOT TRANSFERABLE. If,
during the Warranty Period, parts incorporated in this Product are found to be defective in material or
workmanship, and the original purchaser provides Purchase Documents to QRS, then QRS or its authorized dealer
will provide replacement parts without charge. We may, at our discretion, provide reconditioned parts or
assemblies as warranty replacements. You as the original purchaser will be responsible to pay labor costs incurred
in connection with any repair.
LIMITATION IN CONNECTION WITH OBSOLETE PRODUCTS
If at the time you make a claim pursuant to this warranty, we no longer manufacture or sell the same
model of Product, we may, at our discretion, rather than repair or replace defective parts in the Product, offer to sell
you a more current version of a similar Product. If we offer to sell you a more current model of the Product, you will
be responsible to pay the difference between the Manufacture’s Suggested Retail Price (“MSRP”) of the more
current version of a similar Product and the price you paid for the Product you purchased. If you choose not to
accept such offer, we will have no further obligations pursuant to this warranty.
THIS WARRANTY IS IN LIEU OF ANY OTHER WARRANTY, EXPRESS OR IMPLIED, MADE BY THE MANUFACTURER IN
CONNECTION WITH THIS PRODUCT. INCLUDING, BUT NOT LIMITED TO, WARRANTIES OR MERCHANTABILITY OR
FITNESS FOR A PARTICULAR PURPOSE. TO THE EXTENT ALLOWED BY THE LAW, QRS SHALL NOT BE RESPONSIBLE
FOR LOSS OF THE PRODUCT, LOSS OF TIME, INCONVENIENCE, COMMERCIAL LOSS, SPECIAL OR CONSEQUENTIAL
DAMAGES, EVEN IF THE MANUFACTURER HAS BEEN ADVISED OF THE POSSIBILITY OF SUCH DAMAGES.
This warranty gives you specific legal rights. Some states provide other rights, and some states do not allow
excluding or limiting liability for incidental or consequential damage. Consequently, the limitations and exclusions
in this warranty may not apply to you. In addition, some jurisdictions have consumer protection rules, regulations
and statutes that may apply to you.
10
Exclusions
There is no express warranty on the Product and this warranty is void if:
1) You did not purchase this Product from an authorized Pianomation reseller
2) This Product has been serviced, modified or tampered with by anyone other than an QRS Authorized Service
Representative
3) The name, trademark or serial number has been modified, defaced or removed from the product,
4) This Product has been damaged as a result of abuse, abnormal force or strain, failure to reasonably maintain
and protect, modification, accident or exposure to extreme temperature or humidity,
5) Parts, supplies or other accessories which have not been approved by QRS have been used with this Product,
6) Radio frequency interference is generated by uncertified and/or illegal equipment,
7) This Product has been moved or delivered without reasonable preparation and packaging or
8) QRS reasonably determines, after inspection that there has been modification of this Product which adversely
affects the reliability of the product or component.
Owner’s Responsibility
In order to have rights under this warranty, you have the following responsibilities:
1) Retain your proof of purchase and purchase date and send in your Warranty Registration Card
2) Notify QRS or any authorized dealer of any warranty claim within ten (10) days after discovery and provide a
detailed explanation of the problem.
General
If any provision herein shall be unlawful, void or for any reason unenforceable, then that provision shall be deemed
severable from this warranty certificate and shall not affect the validity of and enforceability of the remaining
provisions.
QRS reserves the right to make changes in design and/or improvements to its products without any obligation to
retrofit products previously manufactured.
INSTRUCTIONS FOR OBTAINING WARRANTY SERVICE
1) If you cannot provide proof of purchase, contact QRS at 800-247-6557 and we will attempt to determine the
date on which your dealer purchased the Product and assist you in determining the Shorter Warranty Period.
For warranty service, contact the dealer from whom you purchased the product, or your nearest dealer.
2) If no dealer is near you, contact QRS by phone at 800-247-6557.
3) Do not ship the product without prior written Return Authorization from QRS. Do not attempt to repair or
disassemble the product yourself.
4) Please record your model number and serial number and your date of purchase below for your records. Keep
this information with your proof of purchase in case your product requires service. Do not dispose of the
warranty after it expires. In the event your product ever requires service, these instructions should be helpful
in enabling you to obtain proper service.
Product Model #______________________
Product Serial #_______________________
Date of purchase_______________
11
QRS Music Technologies, Inc.
2011 Seward Ave.
Naples, FL 34109
239-597-5888
239-597-3936 Fax
Copyright © 2008 QRS Music Technologies, Inc.
All rights reserved