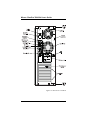
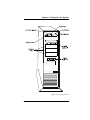
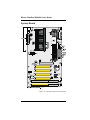
1
ClientPro 766Xi/Xe
System User’s Guide
MAS001532-00, 11/97
Copyright and Trademarks
The information in this document is subject to change without notice.
Micron Electronics, Inc. makes no warranty of any kind with regard to this
material, including, but not limited to, the implied warranties of
merchantability and fitness for a particular purpose.
Micron Electronics, Inc. shall not be liable for errors contained herein or for
incidental or consequential damages in connection with the furnishing,
performance, or use of this material.
Micron Electronics, Inc. assumes no responsibility for the use or reliability of
its software on equipment that is not furnished by Micron Electronics.
This document contains proprietary information that is protected by copyright.
All rights are reserved. No part of this document may be photocopied,
reproduced, or translated to another language without the prior written consent
of:
Micron Electronics, Inc. 900 E. Karcher Road, Nampa, Idaho 83687
Printed in the United States.
© 1997 Micron Electronics, Inc. All rights reserved.
The Micron logo, ClientPro, Millennia and Powerdigm are trademarks of
Micron Electronics, Inc.
Pentium is a registered trademark, and MMX is a trademark of Intel
Corporation. Microsoft, MS-DOS, Windows, and Windows NT are registered
trademarks of Microsoft Corporation. VESA is a registered trademark of the
Video Electronics Standards Association.
All other brand or product names appearing in this publication are used for
identification purposes only and may be trademarks or registered trademarks
of their respective companies.
Micron ClientPro 766Xi/Xe User's Guide
Revision MAS10106-MAN-00 11/97.
P/N MAS001532-00 (Atlanta/Augusta)
CJG
ii
Safety Information
The following instructions pertain to the risk of fire, electric shock, or bodily
injury. Please read all of these instructions carefully.
1.
Save these instructions for later use.
2.
Follow all of the instructions and warnings marked on this
product or included in this manual.
3.
Do not use this product on an unstable cart, stand or table. The
product may fall, causing serious damage to the product.
4.
Slots and openings in the cabinet and the back are provided for
ventilation. To ensure the reliable operation of your product, and
to protect it from overheating, these openings must not be blocked
or covered. Do not use this product on a bed, sofa, rug, or other
similar surface. This product should never be placed near or over
a radiator or heat register. This product should not be placed in
a built-in installation unless proper ventilation is provided.
5.
Never push objects of any kind into the product through the
cabinet openings, as they may touch dangerous voltage points
or short out parts that could result in fire or electric shock. Never
spill liquid of any kind on the product.
6.
This product should only be connected to the AC power source
indicated on your product system’s information label. If you are
not sure of the type of AC power available, consult your dealer
or local power company. Only connect this product to a power
outlet that matches the power requirements of this product.
7.
Do not allow anything to rest on the power cord. Do not locate
this product where people may walk on the cord.
8.
If you have to use an extension cord with this product, make
sure that the total amperage rating of all equipment plugged
into it does not exceed the amperage rating of the extension cord.
Also, make sure that the total of all products plugged into the
main AC power outlet does not exceed 15 amps.
9.
Unplug your product from the main electrical power outlet before
cleaning. Do not use liquid cleaners or aerosol cleaners. Use a
damp cloth for cleaning.
10. Do not use this product near water.
iii
11. Unplug this product from the main power outlet and call for
service under any of the following conditions:
A. If the power cord or plug is damaged or frayed.
B.
If liquid has been spilled into the product.
C.
If the product has been exposed to rain or water.
D. If the product has been dropped or the cabinet has been
damaged.
E.
If the product exhibits a distinct change in performance,
indicating a need for service.
Power Supply Warning
Do not open the power supply cover as hazardous voltages may be present.
There are no serviceable components inside.
Battery Warning
Caution
There is danger of explosion if the battery is replaced incorrectly. Replace only
with the same or equipment type recommended by the manufacture. Discard
used batteries according to the manufacturer’s instructions.
Attention
II y a danger d'explosion s'il y a remplacement incorrect de la batterie.
Remplacer uniquement avec une batterie de meme type ou d'un type
recommande par le constucteur. Mettre au rebutled batteries' usagees
conformement aux instructions du fablicant.
Vorsicht
Explosionsgefahr bei unsachgemaB em Austausch der Batterie. Ersatz nur
durch denselben oder einen vom Hersteller empfohlenen ahnlichen Typ.
Entsorgung gebraushter Batterien nach Angaben des Herstellers.
iv
Ergonomic Notice
Now that you have your Micron computer, you will probably spend many
hours exploring the capabilities of this machine, and personalizing it for your
use. But the computer is only part of the larger picture of ergonomics.
Ergonomics is a science that addresses human performance and well-being in
relation to various types of jobs, tools, equipment and environment.
As you begin to personalize your working environment, it is important to
keep in mind your body’s needs to make your computer time more productive
with less physical and mental stress. And an effective work area will begin
from the ground up. Here are some suggestions:
•
Use an adjustable chair, and try different seated postures to find
what is most comfortable and produces the least fatigue. The
backrest should be adjustable to fit the small of your back.
•
Use an adjustable keyboard support. You want to keep your
wrists straight, your hands lower than your forearms and your
forearms parallel to the floor. Use a light touch on the keyboard.
•
Alternate mouse and keyboard use, and keep the mouse within
easy reach.
•
Place the monitor 18-30 inches from your eyes (arm’s length is
also a good distance). The top of the monitor should be level
with your eyes.
•
Take breaks from both the keyboard and looking at the monitor.
Performing simple exercises while at your work area will increase
your productivity. Shrug your shoulders...take a deep
breath...change your focus...massage your hands...stretch....let
your arms fall relaxed at your sides.
No two work areas will ever be the same. Find the combinations that work for
you, and keep in mind that proper work area planning will make your
computer time more effective, and less stressful on your body.
v
COMPLIANCE INFORMATION STATEMENT
DECLARATION OF CONFORMITY
Responsible Party:
Micron Electronics, Inc.
Address:
900 E. Karcher Road
Nampa, Idaho 83687
USA
Telephone:
FAX:
(208) 463-3434
(208) 463-3424
Type of Equipment:
ATX Desktop/Mini-Tower/Tower
Personal Computer
Model Name:
AL440LX
This device complies with Part 15 of the FCC Rules. Operation is subject to the
following conditions:
1)
this device may not cause harmful interference, and
2)
this device must accept any interference received including
interference that may cause undesired operation.
See user manual instructions if interference to radio reception is suspected.
vi
FCC Information
Class B Digital Device: This device complies with Part 15 of the FCC rules.
These limits are designed to provide reasonable protection against harmful
interference when the equipment is operated in a residential installation. This
equipment generates, uses, and can radiate radio frequency energy and, if not
installed and used in accordance with the instruction manual, may cause
harmful interference to radio communications. However, there is no guarantee
that interference will not occur in a particular installation. If this equipment
does cause harmful interference to radio or television reception, which can be
determined by turning the equipment off and on, the user is encouraged to try
to correct the interference by one of the following measures:
Reorient or relocate the receiving antenna.
Increase the separation between the equipment and receiver.
Connect the equipment into an outlet on a circuit different from that
to which the receiver is connected.
Consult an experienced radio/TV technician for help.
Note: Shielded interface cables must be used in order to comply with the
emission limits.
Caution: Changes or modifications not expressly approved by the party
responsible for compliance could void the user's authorization to operate the
equipment.
vii
DECLARATION OF CONFORMITY
APPLICATION OF COUNCIL DIRECTIVE(S) 89/336/EEC and 72/23/EEC
Standard(s) to which Conformity is Declared:
EN55022
EN50082-1
EN60950
Manufacturer's Name:
Micron Electronics, Inc.
Manufacturer's Address:
900 E. Karcher Road
Nampa, Idaho 83687
USA
Micron Electronics, Inc., hereby declares Micron systems bearing the
marking are in compliance with the EMC (Electromagnetic Compatibility)
directive of the European Community and conform to the Directive(s) and
Standard(s) listed above.
A "Declaration of Conformity" for each system can be found on file at any
authorized European Micron Dealer/Distributor. For a list of authorized
dealers/distributors, please contact Micron Electronics, Inc. at 208-893-8970.
When requesting a "Declaration of Conformity," please refer to the FCC ID
number on the system label.
viii
Table of Contents
Chapter 1
Setting Up Your System
Unpacking ........................................................................................................... 1-2
Setup .................................................................................................................. 1-3
Maintenance ..................................................................................................... 1-12
Removing the System Cover ........................................................................... 1-14
Chapter 2
Technical Information
Overview ............................................................................................................. 2-2
System Board ..................................................................................................... 2-4
Jumper Settings ................................................................................................. 2-6
DIMM Modules ................................................................................................. 2-10
Chapter 3
The BIOS Setup Program
Setup .................................................................................................................. 3-2
How to Run the Setup Program ......................................................................... 3-3
Exit/Saving the CMOS Selections ................................................................... 3-26
Chapter 4
Common Problems
Introduction ......................................................................................................... 4-2
Appendix A:
Appendix B:
Appendix C:
Appendix D:
Contacting Technical Support
Beep Codes and Error Messages
Glossary
Micron PowerSM Warranty
ix
Chapter 1: Setting Up Your System
Chapter 1
Setting Up Your System
Unpacking .................................................................................... 1-2
Check the Packaging ......................................................................................... 1-2
Unpack Your System ......................................................................................... 1-2
Check Your Packing List .................................................................................... 1-2
Setup ............................................................................................ 1-3
Getting Started ................................................................................................... 1-3
What You Need .................................................................................................. 1-3
Putting It All Together ......................................................................................... 1-3
Desktop Case ..................................................................................................... 1-5
Mini Tower Case ................................................................................................ 1-7
Tower Case ........................................................................................................ 1-9
Running Your System for the First Time ......................................................... 1-11
Turning Off Your System ................................................................................. 1-11
Maintenance ............................................................................... 1-12
Operating Environment .................................................................................... 1-12
Transporting ..................................................................................................... 1-12
Cleaning ........................................................................................................... 1-12
Protecting ......................................................................................................... 1-13
Backing Up ....................................................................................................... 1-13
Removing the System Cover .................................................... 1-14
Desktop Case ................................................................................................... 1-14
Mini Tower Case .............................................................................................. 1-15
Tower Case ...................................................................................................... 1-16
Micron Electronics, Inc.
1-1
Micron ClientPro 766Xi/Xe User’s Guide
Unpacking
Check the Packaging
As soon as the packages containing your new system arrive, carefully inspect
them for any signs of damage. In particular, look for wrinkled or bent corners,
holes, or other signs of bad handling or abuse. If you notice any damage to the
packaging, immediately open the boxes and inspect the contents for damage.
Pay close attention to the components near the area where the packing material
was damaged.
Unpack Your System
Caution: If your system arrives in cold weather, do not unpack the computer
or the monitor until they have been allowed to come to room temperature.
Immediately exposing them to the warm room may cause condensation to
occur, which may damage the units. If condensation does occur, allow the
units to completely dry before operating them.
Follow these steps after you have determined that the packaging is undamaged:
1.
Taking care not to damage the packing material, carefully open
the cardboard box containing the computer and remove the
system unit, keyboard and any other accessories that you may
have ordered.
2.
Carefully unpack the monitor and all accessories from the
monitor package. Be careful not to damage the packing material.
3.
Inspect all items for damage that may have occurred during
shipment.
For your protection, report any damage to the shipper
immediately.
We highly recommend that you save the packaging in the event that you need
to move or ship the system some time in the future.
Check Your Packing List
Now that you have everything out of the packages, take the time to check the
packing list to be sure you received everything. If you discover that an item is
missing, call Micron Electronics, Inc. immediately to receive a replacement.
Refer to Appendix A for contact information.
1-2
Micron Electronics, Inc.
Chapter 1: Setting Up Your System
Setup
Getting Started
Before your new system left the factory, Micron configured the hardware. The
display adapter was set to work with your monitor and the hard disk was
partitioned and formatted with DOS using the standard default settings for
your machine. Your computer system is ready to go. All you have to do is
plug it in.
What You Need
o
o
o
A grounded power outlet
Phillips-head screwdriver
Power filter/suppressor protector (recommended)
Putting It All Together
To complete your setup, refer to the following steps:
1.
Take a moment and review the case figures on the following
pages to acquaint yourself with the front and back of your system.
2.
Check the voltage selector on the rear of the unit. Be sure it is
switched for the proper voltage (115V in the United States and
Canada).
3.
Place the monitor where you wish, as long as its cable can still
reach the video connector at the rear of the computer.
4.
Unpack the power cable for the computer and plug the
appropriate end into the power inlet at the back of the system.
Insert the other end into a grounded power outlet. We highly
recommend that you obtain a protection device such as an
uninterruptable power supply (UPS), power filter or surge
suppressor. In this way you will be providing the utmost
protection for your system and data.
5.
Ensure that the system is turned OFF before proceeding.
Attaching peripherals while the power is on may damage the
unit or the peripheral.
6.
Locate the monitor’s power cable and plug the appropriate end
into the monitor (if not already attached). Insert the other end
into the grounded outlet or protection device.
Micron Electronics, Inc.
1-3
Micron ClientPro 766Xi/Xe User’s Guide
7.
Find the video cable and attach the appropriate end into the
monitor (if not already attached) and attach the other end into
the video connector (located in one of the expansion slots at the
rear of the unit). If the connection is loose on either end, tighten
the integrated screws at both ends of the cable for a secure
connection. For more information about the setup, use, and
maintenance of your video monitor, please refer to the manual
that was supplied with it.
8.
Insert the ends of the keyboard and mouse cables into the
keyboard and mouse connectors at the rear of the computer
system. Take care, for the connectors are keyed in such a way
that the plugs can only be inserted if oriented correctly. Refer to
the case drawings on the following pages for the location of the
proper connector. If it does not plug in easily, do not force it.
Your system should now be ready to use. You may have other devices or
peripherals to install, but it is best to ensure the basic system is operating
correctly before adding any options.
1-4
Micron Electronics, Inc.
Chapter 1: Setting Up Your System
Figure 1-1. Desktop Case-Front
Micron Electronics, Inc.
1-5
Micron ClientPro 766Xi/Xe User’s Guide
Figure 1-2. Desktop Case-Rear
1-6
Micron Electronics, Inc.
Chapter 1: Setting Up Your System
Figure 1-3. Mini Tower Case-Front
Micron Electronics, Inc.
1-7
Micron ClientPro 766Xi/Xe User’s Guide
Figure 1-4. Mini Tower Case-Rear
1-8
Micron Electronics, Inc.
Chapter 1: Setting Up Your System
Figure 1-5. Tower Case-Front
Micron Electronics, Inc.
1-9
Micron ClientPro 766Xi/Xe User’s Guide
Figure 1-6. Tower Case-Rear
1-10
Micron Electronics, Inc.
Chapter 1: Setting Up Your System
Running Your System for the First Time
1.
Power up the monitor. If you are unsure about this, please refer
to the monitor’s manual for more information.
2.
Remove any floppy disks from the floppy drive.
3.
Power up the computer system by firmly pushing and releasing
the On/Off button on the front panel of the system. The power
indicator should light up and the fan and hard drive should begin
to run.
The system diagnostics begins at this time. The keyboard is initialized indicated
by the keyboard LEDs blinking momentarily. The Num Lock LED remains
on. Next, the screen initializes and a message indicating what type of video
adapter is installed. The memory will be counted and tested.
Finally, the system is booted.
If you experience any problems during the power up sequence, please refer to Chapter
4, "Common Problems."
Turning Off Your System
Micron recommends that you power down your system in the following order:
1.
Exit all applications you are running and save any changes.
2.
Make sure that ALL disk activity has completely stopped. The
floppy and hard drive indicator lights should be off and the
floppy drive motors should stop. Hard disks continue to spin
until the system power is shut off.
3.
Turn off the computer system, then the monitor.
Micron Electronics, Inc.
1-11
Micron ClientPro 766Xi/Xe User’s Guide
Maintenance
Operating Environment
Your Micron computer has been manufactured to the highest standards. With
proper care, it should provide years of trouble-free service.
To ensure that your system has the longest life possible, it should be placed in
an area with good ventilation and low humidity, out of direct sunlight and
away from heat sources or lamps. Be sure the rear cooling-fan opening is not
obstructed as it is necessary to keep the system cool. Never expose the system
to any moisture. This could lead to fire or shock hazard. Stay away from areas
with high levels of dust, dirt, or smoke.
Transporting
Always shut the system off before moving it. Any sudden jar or shock may
permanently damage the hard drive. Hard drives are more resistant to shock
if they are shut down.
If you are transporting the system over a distance, it is a good idea to completely
repackage it in its original packing material. If the original packaging is
unavailable, pack all components with as much padding as reasonably possible
to ensure that the units are not exposed to excessive vibration or shock.
Cleaning
If the case becomes dirty through constant use or handling, use only a damp,
dust-free cloth for cleaning. Do not use abrasives or solvents as these may mar
or scratch the case. Window cleaner and a cloth can be used to clean the monitor,
if the monitor has been turned OFF first. Never apply the window cleaner
directly to the monitor screen. Always spray the cloth first, then wipe down
the screen.
Cleaning kits designed to clean floppy drives are available from most computer
stores and should be used periodically.
If you are operating your system in an environment heavy with smoke or
dust, you should occasionally open the unit and with great care, clean the
components with a vacuum (special vacuums are available just for this
purpose). Be careful to not loosen any of the components.
If liquid is spilled into the keyboard, immediately unplug it, allow the fluid to
drain out by tipping the keyboard upside down, and dry the keyboard
overnight before using it again.
1-12
Micron Electronics, Inc.
Chapter 1: Setting Up Your System
Protecting
To prevent normal electrical problems such as spikes or surges, install a power
surge/filter between the power outlet and all of the connected components. If
even one component is not connected, the entire system could be at risk.
If a severe storm enters your area, completely unplug the entire system from
all electrical sources, including phone lines. Lightning can travel in on any
line and destroy all connected components.
If possible, do not turn the system on and off frequently. This stresses the
power supply and may shorten the life of some components. To restart the
system, press the reset button located in the front of the case. If applications
are open and the system is reset or if the hard drive is active, data loss will
most certainly occur. If you do not use the reset button to restart the system, be
sure the hard drive has come to a complete stop before turning the computer
on again.
Backing Up
Even with today’s technology, data loss can occur at any time. We highly
recommend that you back-up often. There are a large number of backup systems
available from retail and mail-order outlets, including floppy drive backup
systems, tape backup systems, and optical backup systems. Any of these
alternatives are highly recommended. Complete, frequent backups can save
years of data from total and irretrievable destruction. If you require additional
information about backup systems or options, please contact Micron
Electronics, Inc.
Micron Electronics, Inc.
1-13
Micron ClientPro 766Xi/Xe User’s Guide
Removing the System Cover
Desktop Case
Refer to the figures below. No tools are required. It is not necessary to disconnect
the cable connectors on the back of the computer before opening the cover.
However, note where the cables connect to the back for future reference. (If
you have a video camera, a quick scan of the rear case is helpful).
1. Remove the thumb screw located in the top rear center of the lid. While
standing in front of the computer, use your right thumb to press in on the
right rear release tab. At the same, time place your left hand on the right
rear corner of the lid. Push down and rearward about ¾ of an inch, AS
SHOWN ABOVE.
2. Next, use your left thumb to press in on the left rear release tab. At the same
time, place your right hand on the left rear corner of the lid. Push down and
rearward, about ¾ of an inch, AS SHOWN ABOVE.
3. Grasp the two rear corners of the lid and lift it straight up.
To replace the cover, gently lower the top latching hooks into the top chassis
channels before pushing the rear of the cover into place. When the cover is
pushed forward, the flexible release tabs will lock into place and the thumb
screw can be fully tightened.
1-14
Micron Electronics, Inc.
Chapter 1: Setting Up Your System
Mini Tower Case
Refer to the figures below. No tools are required. It is not necessary to disconnect
the cable connectors on the back of the computer before opening the cover.
However, note where the cables connect to the back for future reference. (If
you have a video camera, a quick scan of the rear case is helpful). Lay the
computer on its right side by rotating it clockwise 90 degrees.
1. Remove the thumb screw located in the top rear center of the lid. While
standing in front of the computer, use your right thumb to press in on the
right rear release tab. At the same, time place your left hand on the right
rear corner of the lid. Push down and rearward about ¾ of an inch, AS
SHOWN ABOVE.
2. Next, use your left thumb to press in on the left rear release tab. At the same
time, place your right hand on the left rear corner of the lid. Push down and
rearward, about ¾ of an inch, AS SHOWN ABOVE.
3. Grasp the two rear corners of the lid and lift it straight up.
To replace the cover, gently lower the top latching hooks into the top chassis
channels before pushing the rear of the cover into place. When the cover is
pushed forward, the flexible release tabs will lock into place and the thumb
screw can be fully tightened.
Micron Electronics, Inc.
1-15
Micron ClientPro 766Xi/Xe User’s Guide
Tower Case
Refer to the Figure on page 1-7. Use a #2 Phillips-head screwdriver or a 1/4"
hex driver.
1.
It is not necessary to disconnect the cable connectors on the back
of the computer before opening the cover. However, note where
the cables connect to the back for future reference . (If you have
a video camera, a quick scan of the rear case is helpful).
2.
Remove the screws from the back of the case cover. Keep these
screws together (they are a different size than the other screws
in your system) for they are not to be interchanged.
3.
With flat palms placed on each side of the cover, pull the cover
back until the cover's front top lip clears the chassis channel
(about 3/4"). Grasp the top-rear of the cover and lift up in one
smooth motion until the cover clears the chassis.
To replace the cover, gently lower the top lip of the cover into the chassis
channel at an angle before lowering the rear into place. With the lip inserted
in the channel, push the rear of the cover forward to seat it flush and replace
the screws. Note the metal rail guides located inside the bottom of the cover
which must fit over the bottom metal case frame when the cover is replaced.
1-16
Micron Electronics, Inc.
Chapter 1: Setting Up Your System
Figure 1-7. Tower Cover Removal
Micron Electronics, Inc.
1-17
Chapter 2: Technical Information
Chapter 2
Technical Information
Overview ...................................................................................... 2-2
System Features ................................................................................. 2-2
Memory ............................................................................................... 2-3
System Board .............................................................................. 2-4
Jumper Settings .......................................................................... 2-6
Configuration ...................................................................................... 2-6
Installing Add-On Peripherals ............................................................. 2-8
DIMM Modules ........................................................................... 2-10
Installing DIMM Modules .................................................................. 2-11
Removing DIMM Modules ................................................................ 2-12
Micron Electronics, Inc.
2-1
Micron ClientPro 766Xi/Xe User’s Guide
Overview
Micron's ClientPro 766Xi/Xe features a high-performance system board
designed to be the basis for your personal computer or workstation. The
ClientPro 766Xi/Xe is based on the PCI local bus and the Intel 440LX chip set.
System Features
2-2
o
ATX form factor.
o
Two ISA slots, three PCI local bus slots with one ISA/PCI slot
being shared. Slot 1 for Klamath processor card.
o
One accelerated graphics port. Two USB (Universal Serial Bus)
ports.
o
512K L2 Synchronous Cache support.
o
Support for up to 384MB of ECC or non-ECC on-board system
SDRAM memory.
o
Support for Ultra DMA/33. IDE Mode 4 support.
o
Two high-speed 16550 compatible serial ports.
o
Bidirectional parallel port that is EPP (Extended Parallel Protocol)
and ECP (Extended Capabilities Port) compatible.
o
lntel’s 440LX chip set.
o
Integrated PCI bus mastering controller.
o
Three 168-pin DIMM sockets.
o
Floppy controller for two floppy drives (Supports 2.88MB,
1.44MB, 1.2MB, 720KB, and 360KB floppy drives).
o
2MB Flash Phoenix EEPROM BIOS.
o
Management Extension Component (LM79) which provides lowcost instrumentation capabilities designed to reduce the total cost
of owning a PC when used with LANDesk Client Manager.
Features include: an integrated temperature sensor; fan speed
sensors; power supply voltage monitoring; and remote reset
capabilities from a remote peer or server through LANDesk
Client Manager.
Micron Electronics, Inc.
Chapter 2: Technical Information
Memory
The ClientPro 766Xi/Xe system board has SDRAM arranged in three sockets,
which provide 384MB maximum memory using on-board DIMMs. This section
explains the type of DIMMs supported, lists the rules of adding memory to
the system, gives some examples of common memory configurations, and
shows how to install the new DIMMs.
The ClientPro 766Xi/Xe supports the following 168-pin DIMMs (3.3V only):
8MB
16MB
32MB
64MB
128MB
Non-ECC config.
(1Mbitx64)
(2Mbitx64)
(4Mbitx64)
(8Mbitx64)
(16Mbitx64)
ECC config.
(1Mbitx72)
(2Mbitx72)
(4Mbitx72)
(8Mbitx72)
(16Mbitx72)
The following is a list of rules to follow when upgrading DIMMs. If you follow
these rules, your upgrade should be trouble free:
o
Refer to the section entitled "DIMM Modules" on page 2-10 for
more information on upgrading your memory.
o
Questions and purchases for memory expansion may be directed
to Micron Memory Module sales (1-800-438-3343).
Micron Electronics, Inc.
2-3
Micron ClientPro 766Xi/Xe User’s Guide
System Board
Figure 2-1. ClientPro 766Xi/Xe System Board
2-4
Micron Electronics, Inc.
Chapter 2: Technical Information
Figure 2-2. Back Panel Connector Layout
Figure 2-3. J8H2 Connector Layout
Micron Electronics, Inc.
2-5
Micron ClientPro 766Xi/Xe User’s Guide
Jumper Settings
Configuration
The jumpers on the Micron ClientPro 766Xi/Xe are preset at the factory and in
most cases do not need to be changed. However, if certain functions need to be
changed, the jumpers may need to be reconfigured. The following figure shows
an example of a jumper.
Figure 2-4. Example of a Jumper and Jumper Block
2-6
Micron Electronics, Inc.
Chapter 2: Technical Information
Refer to the following tables to set the jumpers.
Configuration Jumper
J8B2
Function
JumperJ8B2
Configuration
Normal
1-2
The BIOS uses current configuration
information and passwords for booting
Configure
2-3
After the POST runs, Setup runs
automatically. The maintenance menu
is displayed.
Recovery
none
The BIOS attempts to recover the BIOS
configuration. A recovery diskette is
required.
Figure 2-5. Jumper Settings
Normal Mode
This mode is for normal computer booting and operations. Connect pins 1
and 2 with a jumper on J8B2 to enable the mode. The BIOS uses the current
bus/processor frequency ratio, configuration information, and passwords to
boot the computer. Access to the Setup program can be restricted using an
administrative password.
Configure Mode
This mode is for configuring the processor speed and clearing passwords.
Connect pins 2 and 3 to enable this mode. Setup will automatically execute
after the POST runs, and no password is required. Setup provides the
Mainenance menu with options for setting the processor speed and clearing
passwords. For configuration changes to take effect after exiting the Setup
program, power down the computer, set the configuration jumper to normal
mode and reboot the computer.
Recovery Mode
This mode is for upgrading or modifying the BIOS data. Beep codes indicate
the recovery status: one beep indicates the start of recovery, multiple beeps
indicate a failed recovery. For changes to take place set the jumper back to
normal and reboot.
Micron Electronics, Inc.
2-7
Micron ClientPro 766Xi/Xe User’s Guide
Installing Add-On Peripherals
The ClientPro 766Xi/Xe accommodates ISA and PCI Local Bus cards. Extra
SDRAM can also be added to the system board. The following describes how
to install the PCI card and SDRAM memory.
PCI Local Bus Card
PCI Local Bus slots accommodate most PCI-approved Local Bus cards. To install
a PCI Local Bus card:
1.
Power OFF the computer system.
2.
Locate an unused PCI slot on the system board.
3.
Insert the card with the bottom edge level. Never insert the card
at an angle.
4.
Holding the card at the center of the top edge, gently push straight
in. Do not force the card into place. If it does not fit, take it out
and try again.
5.
Make sure the card is fully inserted.
6.
Secure the card with a bracket screw.
Accelerated Graphics Port
The ClientPro 766Xi/Xe also comes with an Accelerated Graphics Port (AGP).
This is a high-performance interconnect for graphic-intensive applications,
such as working with 3D graphics. AGP is independent of the PCI bus and is
intended for exclusive use with graphical-display devices. AGP provides these
performance features:
•
Pipelined-memory read and write operations that hide memory
access latency.
•
Demultiplexing of address and data on the bus for near-100%
efficiency.
•
AC timing for 133MHz data transfer rates, allowing data
throughput of 500 MB per second.
AGP complies with the 66MHz PCI specification.
2-8
Micron Electronics, Inc.
Chapter 2: Technical Information
Figure 2-6. Installing a PCI Local Bus Card
NOTE: The ISA slot (J4B2) and the PCI slot (J4B1) are “shared slots.” When a
PCI card is installed into the (J4B1) PCI slot, the (J4B2) ISA slot is disabled.
Conversely, when a peripheral card is installed into the (J4B2) ISA slot, the
(J4B1) PCI slot is disabled.
Micron Electronics, Inc.
2-9
Micron ClientPro 766Xi/Xe User’s Guide
DIMM Modules
The memory in this system can be increased up to a maximum of 384MB by
installing DIMMs (dual in-line memory modules). To install DIMMs, first locate
the memory banks on the system board (refer to Figure 2-1). Follow the table
on page 2-3 for the possible installation combinations.
CAUTION: Modules are Electrostatic Sensitive.
Even a small electrostatic discharge could damage the module. A damaged
module might not fail immediately, but over time it will become worse,
possibly causing an "intermittent" problem. Be very careful to handle the
boards ONLY by the edges. DO NOT touch the gold/silver edge-connectors
or any of the components on the board. Leave the module in the antistatic
bag until ready for installation.
1.
Switch the computer off. Leave the computer plugged in to the
outlet to provide an electrical ground to discharge static
electricity.
2.
Touch the metal case of the power supply or the metal lining
inside the computer case. This will drain the static charge from
your body and will keep the modules from being electrically
damaged.
3.
Keep body movement to a minimum as you remove and handle
the modules. Antistatic wrist straps with clip-on ends are
commercially available.
Installing DIMM Modules
The ClientPro 766Xi/Xe has three, 168-pin DIMM sockets on-board and can
accommodate ECC or non-ECC SDRAM memory from 8MB up to 348MB using
the DIMM combinations on page 2-3.
There are no jumper settings required for the memory size or type, which is
automatically detected by the system BIOS. Gold leaded DlMMs are required
to be used when adding system memory.
2-10
Micron Electronics, Inc.
Chapter 2: Technical Information
Step 1: Using both hands, carefully set the DIMM into the center of
the left and right latching levers. Center the module over the socket
so that the notches are aligned with the socket keys. Do not force it in
or damage may result. Note that the DIMM modules are keyed in
such a way that they cannot be inserted incorrectly (refer to the
figure below). If you are having difficulty placing them into the
socket, check to see that you are not attempting to insert them
backwards.
Do not lock the module into position at this time.
Step 2: Check to make sure the module is centered in the socket, and
that the connector pins of the module line up with the socket connector
pins.
A)
Be sure the module is centered and connector pins are
aligned.
B)
When the module is locked in place, be sure both latching
levers are fully seated into latching notches in the sides of
the DIMMs.
Step 3: Using both hands and applying equal pressure on each end
of the module, lock the module into the socket by pushing downward
with the thumbs and squeezing inward with the forefingers. Make
sure both latching levers have seated fully into the modules latching
notch. The module should now be standing upright in the socket.
Refer to the fully seated drawing on the following page.
WARNING: Failure to observe proper insertion guidelines may result in damage
to the DIMM and/or the socket.
Figure 2-7. Proper DIMM Insertion
Micron Electronics, Inc.
2-11
Micron ClientPro 766Xi/Xe User’s Guide
Figure 2-8. DIMM Fully Seated
Removing DIMM Modules
To remove DIMM modules, simply reverse the installation procedure with
the following differences. Using the thumbs of both hands, gently pry the
latching levers open so they no longer hold the module in the socket. Gently
lift the module upward to clear the latching levers.
2-12
Micron Electronics, Inc.
Chapter 3: The BIOS Setup Program
Chapter 3
The BIOS Setup Program
Setup ........................................................................................... 3-2
BIOS Setup ...................................................................................................... 3-2
When Setup Should Be Run ............................................................................ 3-2
How to Run the Setup Program ................................................. 3-3
Setting
Setting
Setting
Setting
Setting
the CMOS Main Menu ......................................................................... 3-5
the CMOS Advanced Menu ................................................................. 3-9
the CMOS Security Menu .................................................................. 3-19
the CMOS Power Menu ..................................................................... 3-20
the CMOS Boot Menu ........................................................................ 3-21
Exiting/Saving the CMOS Selections ...................................... 3-26
Micron Electronics, Inc.
3-1
Micron ClientPro 766Xi/Xe User’s Guide
SETUP
BIOS Setup
Every AT-compatible computer has a battery supported CMOS memory
location that stores information about the system and peripheral configuration.
Because of the attached battery, the CMOS is constantly provided with power,
even when the computer has been turned off.
During the boot sequence, a special software application called the BIOS (Basic
Input Output System), located in read-only memory (ROM) on the system
board, reads the information contained in the CMOS and configures the CPU
and other peripheral devices. If the CMOS information is incorrect, the system
may not operate correctly until accurate information is stored in the CMOS.
The Setup program has been built into the system to provide the means for
changing the CMOS.
When Setup Should Be Run
Although your system arrives fully configured, the system may need to be
adjusted to fit your needs.
Whenever peripherals are added or removed from the system (for example, if
you add a hard disk or more memory), you must run Setup to inform the
system about the new configuration.
If the information in CMOS is lost, the system will not operate properly unless
Setup is used to restore the system configuration.
3-2
Micron Electronics, Inc.
Chapter 3: The BIOS Setup Program
How to Run the Setup Program
The Setup program is used to configure the computer’s BIOS (Basic Input/
Output System). The computer’s BIOS is responsible for configuring the
motherboard and providing hardware information to the operating system.
In order for the computer to run properly, run the Setup procedure after first
installing the system board and whenever you make a hardware change to
the system.
After the system is turned on and goes through a memory test, the Power-Up
Screen (Figure 3-1) appears on your monitor:
Figure 3-1. Power-Up Screen
When “Press <F2> to enter SETUP” appears in the bottom of the screen, press
the <F2> key to begin the Setup procedure. The CMOS Main Screen (Figure 32) should appear. The Setup procedure can only be activated during the boot
sequence.
Micron Electronics, Inc.
3-3
Micron ClientPro 766Xi/Xe User’s Guide
The Micron ClientPro 766Xi/Xe system board has the following CMOS
configuration screens and subscreens:
o
o
Main Screen
o
Floppy Options
o
Primary IDE Master
o
Primary IDE Slave
o
Secondary IDE Master
o
Secondary IDE Slave
Advanced
o
Resource Configuration
o
Peripheral Configuration
o
Keyboard Configuration
o
Video Configuration
o
DMI Event Logging
o
Security
o
Power
o
Boot
o
Exit
Each screen configures specific parameters for the Micron ClientPro 766Xi/Xe
system board. The following section is an overview of each screen, subscreens
and their functions.
3-4
Micron Electronics, Inc.
Chapter 3: The BIOS Setup Program
Setting the CMOS Main Menu
The CMOS Main Menu (Figure 3-2) is used to set the time and date, to set the
floppy drive types and to configure the hard disks. To move between the
categories, use the up arrow and the down arrow keys.
Figure 3-2. Main Menu
Processor Type
Displays processor type.
Processor Speed
Displays processor speed
Cache RAM
Displays size of second-level cache
Total Memory
Displays the total amount of RAM on the motherboard.
BIOS Version
Displays the version of the BIOS.
Micron Electronics, Inc.
3-5
Micron ClientPro 766Xi/Xe User’s Guide
Language
Selects the default language used by the BIOS.
System Time
Specifies the current time.
System Date
Specifies the current date.
Floppy Options submenu
When selected, displys the Floppy Options submenu (see Fig. 3-3)
Figure 3-3. Floppy Options submenu
Diskette A: and Diskette B:
Specifies the capacity and physical size of diskette drives A or B.
Floppy Write Protect
Disables or enables write protect for the diskette drive(s).
3-6
Micron Electronics, Inc.
Chapter 3: The BIOS Setup Program
Primary/Secondary IDE Master/Slave Submenus
When selected, displays the appropriate submenu. Reports type of connected
IDE device (see Fig. 3-4).
Figure 3-4. Primary IDE Master submenu
Type
Specifies the IDE configuration mode for IDE devices. Selecting “User” allows
the cylinders, heads, and sectors fields to be changed. Selecting”Auto”
automatically fills in the values for these fields. Options are: Auto, None,
ATAPI Removable, CD-ROM, IDE Removable, and User.
Cylinders
Specifies the number of disk cylinders.
Heads
Specifies number of disk heads.
Sectors
Specifies number of disk sectors.
Micron Electronics, Inc.
3-7
Micron ClientPro 766Xi/Xe User’s Guide
Maximum Capacity
Reports the maximum capacity for the hard disk. This value is calculated
from the number of cylinders, heads and sectors.
Multi-Sector Transfers
Specifies number of sectors per block for transfers from the hard drive to
memory. Check your hard drive’s specifications for the optimum setting.
LBA Control Mode
Enables or disables logical block addressing (LBA) in place of the Cylinders,
Heads, and Sectors fields.
CAUTION:
Changing the LBA Mode Control after a hard drive has been
formatted can corrupt data on the drive.
Transfer Mode
Specifies the method for transferring data between the hard drive and system
memory.
Ultra DMA
Specifies the ultra DMA mode for the hard drive.
3-8
Micron Electronics, Inc.
Chapter 3: The BIOS Setup Program
Setting the CMOS Advanced Screen
The CMOS Advanced Screen (Figure 3-5) is used to set the advanced features
that are available through the chipset. If you select certain options from the
Advanced screen (such as Peripheral Configuration), the Setup program
switches to a subscreen for the selected option. Subscreens are described in
the sections following the description of the Advanced screen options
Figure 3-5. Advanced Screen
Plug & Play O/S
Specifies if a Plug and Play operating system is being used. Selecting “No”
lets the BIOS configure all the devices. The “Yes” option lets the operating
system configure Plug and Play devices.
Reset Configuration Data
Clears the BIOS configuration data on the next boot.
Memory Cache
Enables or disables the memory cache.
Micron Electronics, Inc.
3-9
Micron ClientPro 766Xi/Xe User’s Guide
ECC Configuration
Specifies ECC memory operation.
Resource Configuration, submenu
When selected, displays the Resource Configuration submenu (see Fig. 3-6).
Peripheral Configuration, submenu
When selected, displays the Peripheral Configuration submenu (see Fig. 3-9).
Keyboard Features, submenu
When selected, displays the Keyboard Features submenu (see Fig. 3-10).
Video Configuration, submenu
When selected, displays the Keyboard Features submenu (see Fig. 3-11).
DMI Events Logging, submenu
When selected, displays the DMI Events Logging submenu (see Fig. 3-12).
Figure 3-6. Resource Configuration submenu
3-10
Micron Electronics, Inc.
Chapter 3: The BIOS Setup Program
Resource Configuration Submenu
Figure 3-6. Resource Configuration submenu
Memory Reservation
When selected, displays the Memory Reservation submenu (see Fig. 3-7).
IRQ Reservation
When selected, displays the IRQ Reservation submenu (see Fig. 3-8).
Micron Electronics, Inc.
3-11
Micron ClientPro 766Xi/Xe User’s Guide
Memory Reservation Submenu
Figure 3-7. Memory Reservation submenu
This submenu allows you to reserve specific upper memory blocks for use by
legacy ISA devices.
Setting “Memory hole” to Enabled frees address space in RAM for legacy ISA
boards.
3-12
Micron Electronics, Inc.
Chapter 3: The BIOS Setup Program
IRQ Reservation Submenu
Figure 3-8. IRQ Reservation submenu
This submenu allows you to reserve specific IRQs for use by legacy ISA devices.
An * (asterisk) displayed next to an IRQ indicates an IRQ conflict.
Note:
IRQ 14 and IRQ 15 are only available on SCSI systems.
Micron Electronics, Inc.
3-13
Micron ClientPro 766Xi/Xe User’s Guide
Peripheral Configuration Submenu
This section describes the setup options for the Peripheral Configuration
submenu.
Figure 3-9. Peripheral Configuration submenu
Serial port A
Configures serial port A. “Auto” assigns the first free COM port, normally
COM 1, the address (3F8), and the interrupt (IRQ 4). An * (asterisk) displayed
next to an address indicates a conflict with another device.
Serial port B
Configures serial port B. “Auto” assigns the first free COM port, normally
COM 2, the address (2F8), and the interrupt (IRQ 3). An * (asterisk) displayed
next to an address indicates a conflict with another device.
Note:
If either serial port address is set, that address will not appear in the list of
options for the other serial port.
Mode
Specifies the mode for Serial Port B for normal (COM 2) or infrared applications.
3-14
Micron Electronics, Inc.
Chapter 3: The BIOS Setup Program
Parallel port
Configures the parallel port. “Auto” assigns LPT1 the address 378 and the
interrupt IRQ 7. An * (asterisk) displayed next to an address indicates a conflict
with another device.
Mode
Selects the mode for the parallel port. “Output Only” operates in ATcompatible mode. “Bi-directional” operates in bi-directional PS/2-compatible
mode. “EPP” stands for Extended Parallel Port mode, a high-speed bidirectional mode. “ECP” stands for Enhanced Capabilities Port mode, also a
high-speed bi-directional mode.
Floppy Disk Controller
“Enable” allows you to configure the floppy disk controller.
IDE Controller
Configures the IDE controller. “Both” specifies both the primary and secondary
channels are used.
Legacy USB Support
The Universal Serial Bus (USB) connectors allow any of several USB devices to
be attached to the computer. This option enables or disables legacy USB devices.
Micron Electronics, Inc.
3-15
Micron ClientPro 766Xi/Xe User’s Guide
Keyboard Configuration Submenu
This section describes the setup options for the Keyboard Features submenu.
Figure 3-10. Keyboard Configuration submenu
Numlock
Specifies the power-on state of the Numlock feature on the numeric keypad.
Key Click
Enables or disables the key click option.
Keyboard auto-repeat rate
Selects the key repeat rate, from 30 per second to 2 per second.
Keyboard auto repeat delay
Selects the amount of time before the key will repeat, from 1/4 of a second to
1 second.
3-16
Micron Electronics, Inc.
Chapter 3: The BIOS Setup Program
Video Configuration Submenu
This submenu is for configuring video features.
Figure 3-11. Video Configuration submenu
Palette Snooping
Controls the ability of a primary PCI graphics controller to share a common
palette with an ISA add-in video card.
Micron Electronics, Inc.
3-17
Micron ClientPro 766Xi/Xe User’s Guide
DMI Event Logging Submenu
This submenu is for configuring DMI event logging..
Event log capacity
Figure 3-12. DMI Event Logging submenu
Advises the user if there is sufficient space available space for further events.
Event log validity
Indicates if the contents of the event log are valid.
View DMI event log
Enables viewing of DMI event log.
Clear all DMI event logs
If set to “Yes,” clears the DMI Event Log after rebooting.
Event Logging
Enables or disables logging of DMI events.
ECC Event Logging
Enables or disables logging of ECC events.
Mark DMI events as read
Marks all DMI events as read.
3-18
Micron Electronics, Inc.
Chapter 3: The BIOS Setup Program
Setting the CMOS Security Menu
This section describes the passwords you can set to restrict access to the Setup
program and to restrict who can boot the computer.
Figure 3-13. Security menu
User Password Is
Reports if there is a user password set
Supervisor Password Is
Reports if there is a supervisor password set.
Set User Password/Set Supervisor Password
Passwords can be up to seven alphnumeric characters in length.
Unattended Start
Enables or disables the unattended start feature. When enabled, the computer
boots, but the keyboard is locked. The user must enter a password to unlock
the computer or boot from a floppy disk.
Micron Electronics, Inc.
3-19
Micron ClientPro 766Xi/Xe User’s Guide
Setting the CMOS Power Menu
This menu is used to set power management features.
Power Mangement
Figure 3-14. Power menu
Enables or disables the BIOS power management feature.
Fan Always On:
When set to “Yes,” will keep the fan on when the system is in a power-managed
state.
Inactivity Timer
Specifies the amount of time before the computer enters standby mode.
Hard Drive
When set to Enable, allows power management for hard disks during standby
and suspend modes.
VESA Video Power Down
When set to Enable, allows power management for video during standby and
suspend modes.
3-20
Micron Electronics, Inc.
Chapter 3: The BIOS Setup Program
Setting the CMOS Boot Menu
This menu is used to set the boot features and the boot sequence.
Figure 3-15. Boot menu
Restore on AC/Power Loss
This setting determines how your computer will respond following a power
failure. “Stay Off” keeps power off until the power button is pushed. “Last
State” restores previous power state before power failure occured. “Power
On” restores power without restoring previous power state.
On Modem Ring
Specifies how the computer will respond to an incoming call on an installed
modem when the power is off.
On LAN
Specifies how the computer responds to a LAN wakeup event when the power
is off.
On PME
Specifies how the computer responds to a PCI power management enable event
when the power is off.
Micron Electronics, Inc.
3-21
Micron ClientPro 766Xi/Xe User’s Guide
Quick Boot
“Enable” allows computer to boot without running certain POST tests.
Scan User Flash Area
Scans the user Flash area for an executable binary to be executed during POST.
The options are Disabled, and Enabled.
First/Second/Third/Fourth Boot Device
These settings specify the boot sequence from the available devices. Select the
device with the “up” or “down” arrow keys. Press <+> to move the device up
the list or press <-> to move the device down the list.
The operating system assigns a drive letter to each boot device in the order
listed. Changing the order of the device changes the drive lettering.
Hard Drive, submenu
When selected, displays the Hard Drive submenu (see Fig. 3-16).
Removable Devices, submenu
When selected, displays the Removable Devices submenu (see Fig. 3-17).
Removable Format, submenu
When selected, displays the Removable Format submenu (see Fig. 3-18).
3-22
Micron Electronics, Inc.
Chapter 3: The BIOS Setup Program
The Hard Drive Submenu
This section describes the setup options available on the Hard Drive submenu.
Figure 3-16. Hard Drive submenu
This allows you to specify the boot sequence for the hard drives attached to
the computer. Select the boot device with the “up” or “down” arrow keys.
Press <+> to move the device up the list or press <-> to move the device down
the list.
The operating system assigns a drive letter to each boot device in the order
listed. Changing the order of the device changes the drive lettering.
Micron Electronics, Inc.
3-23
Micron ClientPro 766Xi/Xe User’s Guide
Removable Devices Submenu
This submenu is for configuring the boot sequence for removable devices.
Figure 3-17. Removable Devices submenu
This allows you to specify the boot sequence for the removable devices attached
to the computer. Select the boot device with the “up” or “down” arrow keys.
Press <+> to move the device up the list or press <-> to move the device down
the list.
The operating system assigns a drive letter to each boot device in the order
listed. Changing the order of the device changes the drive lettering.
3-24
Micron Electronics, Inc.
Chapter 3: The BIOS Setup Program
Removable Format Submenu
Certain removable devices can be designated as either “Removable” or “Hard.”
Figure 3-18. Removable Format submenu
Micron Electronics, Inc.
3-25
Micron ClientPro 766Xi/Xe User’s Guide
Exiting/Saving the CMOS Selections
This section describes how to exit Setup with or without saving the changes
you have made.
Figure 3-19. CMOS Exit Screen
Exit Saving Changes
Exits Setup and saves the changes in CMOS RAM. You can also press the
<F10> key anywhere in the Setup program to do this.
Exit Discarding Changes
Exits Setup program without saving any changes. This means that any changes
you have made while in Setup are discarded and not saved. Pressing the
<Esc> key in any of the four main screens will also exit and discard changes.
Load Setup Defaults
Returns all of the Setup options to their defaults. The default Setup values are
loaded from the ROM table. You can also press the <F9> key anywhere in
Setup to load the defaults.
3-26
Micron Electronics, Inc.
Chapter 3: The BIOS Setup Program
Load Custom Defaults
Loads the custom defaults for Setup options
Save Custom Defaults
Saves the current values as custom defaults. Normally, the BIOS reads the
Setup values from flash memory. If this memory if corrupted, the BIOS reads
the custom defaults. If no custom defaults are set, the BIOS reads the factory
defaults.
Discard Changes
Discards any changes made up to this point in Setup without exiting Setup.
This selection loads the CMOS RAM values that were present when the
computer was turned on.
Micron Electronics, Inc.
3-27
Chapter 4: Common Problems
Chapter 4
Common Problems
Introduction .............................................................................................. 4-2
Problems During Boot ........................................................................................ 4-2
System Problems ............................................................................................... 4-6
Hard Disk Problems ........................................................................................... 4-9
Micron Electronics, Inc.
4-1
Micron ClientPro 766Xi/Xe User’s Guide
Introduction
Occasionally while setting up and configuring a computer system, an error
may occur or an important element may be forgotten. This section provides
information regarding the most frequently encountered problems, as well as
many quick and simple solutions. If you continue to experience problems and
this section fails to provide solutions, please feel free to contact Micron technical
support (see Appendix A: Contacting Technical Support).
Problems During Boot
Problem
When the power switch is turned on, the system does not power up
(i.e., the exhaust fan does not run, the power indicator light is not
illuminated, the hard disk does not begin to spin, etc.), and no audible
"beep" is heard.
Possible Cause
o The power cable is unplugged or defective.
o Voltage switch is improperly set.
o No power at outlet.
o Bad power supply.
Solution Checklist
o Check to ensure the power cable is plugged in correctly and
firmly. Try a second power cable, if available, or test the cable
for continuity. Replace original cable if it is found to be defective.
4-2
o
Check the red voltage switch (located at the rear of the unit near
the fan) and ensure that it is set for the proper voltage (115V in
the U.S. and Canada).
o
Check the outlet with another appliance (e.g., a lamp).
o
If a surge suppressor or Uninterruptable Power Supply (UPS) is
being used, temporarily bypass the surge suppressor and plug
the unit directly into the wall outlet. The surge suppressor or
UPS may be faulty.
Micron Electronics, Inc.
Chapter 4: Common Problems
Problem
When the power switch is turned on, the system has power (i.e., the
exhaust fan runs, the power indicator light is illuminated, the hard
disk begins to spin, etc.), but the system appears dead. Generally the
keyboard LEDs will stay on.
Possible Cause
o The monitor may not be turned on or plugged in.
o A peripheral card may not be seated correctly on the system
board.
o A peripheral card may be defective.
o A floppy drive may be defective.
Solution Checklist
o Check to make sure the monitor power cable is plugged into the
wall outlet and the back of the monitor. Also verify the monitor
video cable is plugged into the video card in the back of the
computer. Check the monitor to ensure that the power is on. If
you suspect a problem with the monitor, please refer to the
manual that was provided with it.
o
Carefully open the system unit. Press down firmly on all
peripherals in the expansion slots.
o
With the system power shut off, remove one peripheral card,
power up the system, and wait a few moments to see if the
keyboard lights turn off. If they don’t turn off, repeat the above
steps with the next peripheral card until all have been removed.
After this has been completed, contact Micron technical support
for further assistance.
o
With the system power shut off, completely disconnect one of
the floppy drives and power up the system. If the keyboard lights
do not turn off after a few moments, repeat the above procedure
until all drives are disconnected. After this has been completed,
contact Micron technical support for further assistance.
o
Contact Micron technical support if none of the above procedures
is effective.
Micron Electronics, Inc.
4-3
Micron ClientPro 766Xi/Xe User’s Guide
Problem
System powers on, the display works, but the system does not
complete the boot process or you see one of the following error
messages:
“Hard Disk Controller Failure.”
“Fixed Disk Configuration Error.”
“Operating System Not Found.”
Possible Cause
o Hard drive is incorrectly set up in CMOS.
o Hard drive cable may not be properly connected.
o CMOS may have lost settings.
o SCSI controller card may have lost settings.
o Files on hard drive may be corrupted.
o Hard drive may be defective.
Solution Checklist
o If you have a SCSI hard drive, make sure that the CMOS says
Not Installed for all hard disk drives. For help in getting to your
CMOS settings, see Chapter 3 - The BIOS Setup Program.
4-4
o
For an IDE drive - check the parameters of the hard drive. Have
the system re-Autodetect the settings of the drive. To do this,
highlight the first hard disk from the MAIN screen of your CMOS
Setup (labeled Primary IDE Master) and press the <Enter> key.
On the next screen press <Enter> again and select AUTO
CONFIGURED. Press <Enter> and the system should reassign
the proper values to the hard drive. You will also want to make
sure that the primary IDE controller is enabled. To verify, move
to the ADVANCED section of CMOS and press <Enter> on the
line that says PERIPHERAL CONFIGURATION. Press <Enter>
again and select AUTO. Exit and save your changes.
o
With the power OFF, carefully open the system unit. Reset the
gray ribbon cable that is connected to the hard drive and to the
motherboard or SCSI Controller Card. To assist you, the colored
stripe going down the side of the gray controller cable signifies
pin one and should be connected to pin one of the controller and
drive. Also, check to ensure that the power connector in the Hard
Drive is secure. Power the system back up and perform an
AUTODETECT of the hard drive again.
Micron Electronics, Inc.
Chapter 4: Common Problems
Problem
The system displays the error message “Non-system Disk or Disk
Error” or “Operating System Not found.”
Possible Cause
o The System files are missing from the Boot Sector of the hard
drive.
o The diskette in Drive A: is not bootable.
o CMOS is incorrectly configured.
Solution Checklist
o Your system is designed to first check the floppy drive for a
bootable diskette. If there is a diskette in the floppy drive when
you reset your system the above error message will appear unless
the diskette is a bootable system diskette. Remove the diskette
from drive A: and reboot your computer. If the computer still
does not boot up, you may have to restore system files to the
hard drive.
o
To restore system files:
Make sure your hard drive information is correct in CMOS (see
above for help in correctly setting up your CMOS). Insert the
DOS or Windows 95 Boot Diskette provided with your Micron
system and either reset or power on your system with the disk
in the floppy drive.
o
If you boot to a setup utility, exit out so that your computer is at
the A: prompt. From the A:\ prompt type SYS C:\ and press the
<Enter> key. Remove the Boot Diskette and reboot your system
by pressing the Reset button on the front of your PC.
Micron Electronics, Inc.
4-5
Micron ClientPro 766Xi/Xe User’s Guide
System Problems
Problem
A large number of damaged sectors are encountered when attempting
to format diskettes.
Possible Cause
o
Typically, Micron computers are provided with a 1.44MB 3.5"
floppy drive. An attempt may have been made to format a lowdensity disk in one of the Micron high-density floppy drives.
Solution Checklist
o Please refer to the DOS manual for more information about how
to format low-density diskettes in high-density floppy drives.
Problem
The IDE CD-ROM is not being recognized by the system.
Possible Cause
o CMOS is configured incorrectly.
o The connection to the CD-ROM is improper or loose.
Solution Checklist
o Check in the system’s CMOS Setup to ensure that the
PERIPHERAL CONFIGURATION mode is set to Auto. For help
in getting to your CMOS settings, see Chapter 3 - The BIOS Setup
Program.
o
4-6
With the power OFF, carefully open the system unit. Reconnect
the CD-ROM ribbon cable on the motherboard and at the back
of the CD-ROM. To assist you, the colored stripe going down
the side of the gray controller cable signifies pin one and should
be connected to pin one of the controller and drives. Also, check
to ensure that the power connector in the CD-ROM is secure.
Micron Electronics, Inc.
Chapter 4: Common Problems
Problem
The system displays the error message COM Port 2F8 conflict during
boot, or the system beeps, and displays the message “Press F1 to
Continue, F2 for Setup.”
Possible Cause
o System CMOS has been reset to defaults, and you have a modem
installed on COM 2.
Solution Checklist
o Check that the modem settings are set correctly and not
conflicting with any other devices.
On Windows 95™ systems Serial/Com Port B should be set
to COM 4. For DOS and Windows for Workgroups™, Serial/
Com Port B should be set to Disabled or None. For help on
CMOS settings, refer to Chapter 3- The BIOS Setup Program.
o
If you are using Windows 95™ and the CMOS is set correctly,
remove the checkmark from Use Original Configuration
(Current) under the properties section for your Communications
Port (Com 4) in device manager. Then, remove your modem from
device manager and have the Windows 95™ operating system
re-detect your modem.
Problem
The monitor is flickering noticeably or the video is distorted.
Possible Causes
o Interference
o Invalid or corrupt video drivers.
Solution Checklist
o Check for high power-draining devices, or high noise devices in
the area. Examples include heaters, air conditioners, other
monitors, other computers, fluorescent lights, printers,
microwaves, or televisions. Any of these devices could cause a
flickering in your display because of the interference they can
put into the power lines or the environment. Also, temporarily
unplug any other devices that are in the same outlet or surge
protector that the monitor and computer are using. This could
be amplified speakers, or one of the devices listed above.
o
Temporarily switch your video display to use default standard
VGA drivers. Your display will not have the clarity or color
definition that it usually does, however, check to see if everything
appears normal. If it does, try reinstalling the video drivers
specific to your video card that shipped with your system, or
check the Micron Electronics Internet Site for updated video
drivers.
Micron Electronics, Inc.
4-7
Micron ClientPro 766Xi/Xe User’s Guide
Problem
After installing a new peripheral card, an unrelated part of the system
suddenly stops working.
Possible Cause
o The new card may be attempting to use some of the same system
resources, such as address space, I/O ports, interrupt lines, etc.,
and may be conflicting with the failing part of the system.
o When installing the new card, a different peripheral card or a
cable may have been knocked loose.
Solution Checklist
o Remove the new card and retry system.
If it works, you will need to change the I/O ports, interrupt lines
or address regions the new card uses. Most cards have jumpers
or switches that can be changed to reconfigure the settings. Refer
to the documentation that came with the card to determine how
to change the settings. If you have any questions, contact the
card’s manufacturer.
o
4-8
Double check all the gray ribbon cables and power connectors to
ensure that they are plugged in correctly and securely.
Micron Electronics, Inc.
Chapter 4: Common Problems
Hard Disk Problems
Problem
System has to be booted from a floppy disk. Hard drive is either
unrecognized or unreadable.
Possible Cause
o The connections between the drive and the controller may be
defective or loose.
o
The hard drive’s root directory or file allocation table may be
corrupted. The controller or hard drive may also be defective.
Solution Checklist
o Check that the hard drive and controller are connected properly.
o
If hard drive recovery software is available, use it to repair the
damage. The only other solution is to attempt a high-level (DOS)
format on the drive.
Do not attempt to low-level format the drive!
If the drive cannot be formatted, either the drive or the controller
may be defective. Contact Micron technical support.
Problem
System has to be booted from a floppy disk. Hard disk is completely
functional, but cannot be used for boot-up.
Possible Cause
o The hard drive’s boot sector may be corrupted.
Solution Checklist
o If hard drive recovery software is available, attempt to use it to
repair the damaged boot sector. The only other solution is to
attempt a high-level (DOS) format on the drive and transfer the
DOS system to the boot sector.
Do not attempt to low-level format the drive!
Backup your data before formatting your drive.
Micron Electronics, Inc.
4-9
Micron ClientPro 766Xi/Xe User’s Guide
Problem
Read/write, sector, data, or seek errors occur when attempting to
access files on the hard drive.
Possible Cause
o The format may be fading.
o The hard drive may be developing media errors.
o The file allocation table may be corrupted.
Solution Checklist
o Using a file-by-file backup method, backup as much data as you
can, then reformat the drive. If the format is successful, use a
disk diagnostic software application to test the media of the drive
(make sure the application locks out any errors it finds to make
them inaccessible from DOS). Finally, restore your files from the
backup tape or diskettes.
4-10
Micron Electronics, Inc.
Appendix A: Contacting Technical Support
Introduction
If you are experiencing problems with your Micron system and Chapter 4,
"Common Problems" does not provide the information needed to correct your
problem, feel free to contact Micron Technical Support at 1-800-877-8856.
Additional areas of support may be found by contacting the Micron Technical
Support BBS at 1-800-270-1207, Technical Support Internet Mail:
[email protected], Compuserve: GO MICRON or GO
PCVEND-21, and Micron Electronics Home Page: http://
www.mei.micronpc.com. But before you do, take a few minutes to read this
section for information about the equipment and information you might need
to help the technical support representative diagnose the problem.
Before You Call
Before contacting Micron Technical Support, please follow the next few steps.
These steps are designed to prepare you for any of the questions the technical
support representative might ask or any procedures he or she may need you
to do. This will help solve your problem in the shortest possible time.
1. Make sure your system is plugged into a grounded power outlet.
2. Locate the failing system as near a telephone as possible, preferably
close enough so that you can simultaneously talk with the technical
support representative while you work on the system.
3. Have a medium- to small-sized Phillips-head screwdriver available.
It’s possible you may need to open your system to correct the
problem.
4. Write down all error information you can remember, including
error messages, software used (with version numbers), and other
relevant information.
We hope Micron Technical Support will be able to solve your problem over
the telephone. However, in extreme cases, your system may need to be returned
to Micron Electronics, Inc. for repair. The next section describes what to do if
this is the case.
Micron Electronics, Inc.
A-1
Micron ClientPro 766Xi/Xe User’s Guide
Returning Equipment to Micron Electronics
If it is determined that your system needs to be returned to Micron for repair
or replacement, please observe the rules listed below. Failure to follow any of
these rules may result in long delays in repair or the simple return of the
system without repair.
1.
Contact Micron Technical Support at 1-800-877-8856 to obtain
an RMA (Return Material Authorization) number and to obtain
shipping instructions before returning any portion of your
system.
2.
Make sure all printed-circuit boards or static-sensitive peripherals
are completely enclosed in anti-static bags or foam.
3.
Print the RMA number in large, legible numbers in black ink on
the outside of the shipping boxes.
4.
Enclose a note describing the problem as well as the name of the
technical support representative who authorized the return.
Micron also highly recommends that you follow these additional steps for
your protection:
1.
Make a complete backup of your hard drive(s) before returning
the system.
2.
Use the original packing material that came with your system.
Please ship to the following address:
Micron Electronics, Inc.
Attn: RMA #xxxx
1400 Shilo Drive
Nampa, ID 83687
A-2
Micron Electronics, Inc.
Appendix B: POST and BOOT Messages
POST and Boot Messages
POST (Power On Self Test) has two kinds of messages; those messages are the
Error message and the Informational message. The following tables list these
messages, their causes, and their solutions.
MESSAGE
POSSIBLE CAUSE
SOLUTION
Diskette Drive A Failure
Drive A failed or is
missing.
Check Setup and cable
connections.
Diskette Drive B Failure
Drive B failed or is
missing.
Check Setup and cable
connections.
Extended Ram Failed at
Offset: nnnn
Extended memory not
working or configured
properly.
Replace defective
memory.
Failing Bits: nnnn
Memory failure in System
Extended or Shadow
memory.
Replace defective
memory.
Fixed Disk X Failure
(where X=0 or 1)
The hard disk is not
configured or not working
properly.
Rerun SETUP and check
connections or replace
hard disk.
Fixed Disk Controller
Failure
The controller has failed.
Check configuration and
connections or replace
system board.
Incorrect Drive A Type
Floppy drive A: not set
correctly in Setup.
Run Setup.
Incorrect Drive B Type
Floppy drive B: not set
correctly in Setup.
Run Setup.
Invalid NVRAM
NVRAM chip is bad.
Requires replacement of
system board.
Keyboard Error, Keyboard
Controller Error or
Keyboard Error: nn
The keyboard or keyboard
controller failed. A key is
jammed or was held down
during boot.
Check connections. You
may have to replace the
keyboard or system board
Make sure keys are not
jammed or dirty.
Keyboard Locked
Keyswitch on the front of
the case is locked.
Unlock the keyswitch.
Table B-1. Post and Boot Messages
Micron Electronics, Inc.
B-1
Appendix C: Glossary
Glossary
Accelerated Graphics Port (AGP): A bus specification by Intel aimed to help low-cost
3D graphics cards provide high quality by providing the graphic card fast
access to main memory.
Application: A software program that operates under an operating system to perform
a specific task.
BIOS:
Basic Input/Output System. Programs that are permanently stored ithe
system board’s ROM chips providing functions such as the power-on self
test. Also see ROM.
Boot:
To start the computer system and load the operating system.
Bus:
The set of address or data lines used to transfer information between different
components within a computer (such as memory, the microprocessor, and
the expansion slots).
Cache:
Provides fast, local storage for frequently accessed instructions and data to
provide the processor with the fastest stream of information possible, while
keeping main memory current.
Clock:
A circuit that sends a consistent, periodic signal used to synchronize the
computer and to step information through the system.
Closed:
A circuit that is complete. Usually accomplished by placing a jumper over
two pins on the system board or a peripheral card. Also see “Open” and
“Jumper.”
CMOS:
Complementary Metal Oxide Semiconductor. A logic circuit family that uses
very little power. Sometimes used to store information by applying constant,
uninterrupted power through the use of an external battery.
Co-processor: A microprocessor device that performs specialized computations (such
as floating-point arithmetic) much more efficiently than the microprocessor
alone.
CPU:
Central Processing Unit. The integrated circuit chip that performs the actual
computing functions of the computer. Other chips perform support functions
like storing data and controlling peripherals. Also see microprocessor.
DIMM:
Dual In-line Memory Module. Small circuit boards carrying memory
integrated circuits, with signal and power pins on both sides of the board.
Disk:
See “Floppy Disk” and “Hard Disk.”
DMA:
Direct Memory Access. A method for transferring data directly to and from
system memory, bypassing the microprocessor.
DOS:
See “Operating System.”
Micron Electronics, Inc.
C-1
Micron ClientPro 766Xi/Xe User’s Guide
DRAM: Dynamic Random Access Memory. Memory that requires a periodic refresh
cycle to keep the stored information from being lost. Loss of power causes
loss of data in this memory.
EISA:
Extended Industry Standard Architecture.
Expansion Slot: A connector on the motherboard for holding a peripheral card.
Floppy Disk: A 3.5 inch or 5.25 inch removable storage medium used for storing
programs and files externally from the computer system.
Format: A process that prepares a disk to hold data. For hard disks, there are two
formatting process: low-level and high-level.
Hard Disk: An internal or external, high-capacity, high-storage medium.
Hertz (Hz): A unit of frequency equal to one cycle per second.
I/O Port: A connector that allows external and some internal peripherals to
communicate with the computer system (e.g., serial ports and parallel ports).
I/O:
Input/Output. A generic term that refers to the devices and processes involved
in the computer’s reading and writing data.
IDE:
Integrated Drive Electronics. Currently the most popular type of hard drive
used in PCs. A standard IDE adapter can handle a maximum of two hard
drives.
Integrated Circuit: An electronic device that combines thousands of transistors on a
small chip of silicon or other semiconductor. Such devices are the building
blocks of computers.
Interface: The connection between the computer and its human operator, or between
the computer and peripheral device.
ISA:
Industry Standard Architecture. The standard bus interface that was
implemented in the IBM AT.
Jumper: On a printed circuit board, a patch cable or wire used to establish a circuit.
LBA:
Logical Block Addressing. Allows the system to address more than 528MB
on the hard drive.
Megahertz (MHz): A frequency of 1 million cycles per second.
Memory: Devices used to hold information and programs while they are being accessed
by the microprocessor. See also RAM and ROM.
Microprocessor: An integrated circuit that contains the circuits the computer needs to
calculate and to communicate with the other parts of the system. See also
CPU.
Modem: A device designed to allow computers to communicate over standard phone
lines.
C-2
Micron Electronics, Inc.
Appendix C: Glossary
Motherboard: See “System Board.”
Non-Volatile Memory: Memory that is maintained even when power is not on.
On-Board Floppy: A floppy disk drive controller that is incorporated into the system
board.
Open:
A circuit that is not complete. Usually accomplished by removing a jumper
from two pins on the system board or a peripheral card. Also see “Closed”
and “Jumper.”
Operating System: The software the provides a link between application programs
and the computer hardware (e.g., disks, memory).
PCI:
Peripheral Component Interface. A form of local bus architecture that provides
high-speed interconnection without directly interfacing with the processor.
Page Mode: Special function in DRAM that saves up to about 30% in cycle time by not
re-loading RAS bits.
Page:
Sections of memory consisting of sets of consecutive bytes. Pages begin on 4KB boundaries.
Peripheral Card: A printed circuit board that gives the computer added capability,
such as more memory or control of a new device. A card plugs into one of
the expansion slots located on the system board.
Peripheral: Any device that is connected to the computer system (e.g., printers,
keyboard, plotters, etc.).
Pin:
Any of the leads on a device, such as an integrated circuit, that plug into a
socket and connect to a system.
POST (Power On Self Test): Check-out procedures that the BIOS runs automatically
when the system is turned on. These procedures verify that all computer
hardware is functioning properly. If the test detects problems, the computer
displays error codes before (or instead of) starting the operating system. The
error codes can help a service person determine what is wrong with the
computer.
Program: A set of instructions that a computer interprets to perform some task. Also
see “Application” and “Operating System.”
RAM:
Random-Access Memory. The type of computer memory that can be used to
store information while a program is running. RAM consists of a number of
small integrated circuits that are plugged into the system board or an external
memory card.
ROM:
Read-Only Memory. The type of computer memory that is used to
permanently store the information vital to computer operation, including
some parts of the operating system. ROM is permanent and the contents will
not be lost when the computer is turned off.
Micron Electronics, Inc.
C-3
Micron ClientPro 766Xi/Xe User’s Guide
SDRAM:
Synchronous DRAM. A form of DRAM which adds a separate clock signal
to the control signals. SDRAM chips can contain more complex state
machines, allowing them to support "burst" access modes that clock out a
series of successive bits.
Setup Program: Used to inform the computer about installed peripheral, memory,
configuration information, date and time, etc.
Shadow RAM: A method of copying BIOS routines from slower ROM chips to much
faster RAM, increasing system performance.
Software:
A general term that describes a program or set of programs.
SRAM:
Static Random Access Memory. Does not require periodic refreshing that
dynamic memory requires.
System Board: The large printed-circuit board in a computer on which most electronic
devices are mounted; the primary board in a computer. All other interfaces
receive control signals or information from the motherboard. Also
commonly referred to as the “mainboard” or “motherboard.”
System Unit: The description for the computer case and all internal components (e.g.,
the system board, expansion cards, disk drives, power supply, etc.).
System:
The assembly of basic components (e.g., power supply, motherboard,
memory, video monitor, etc.) united by some form of communication to
form an organized whole.
VESA:
Video Electronics Standard Association. A group of standards developed
for the purpose of defining video resolutions greater than VGA.
VGA:
Video Graphics Array. The most widely accepted graphics hardware
standard and the lowest common denominator for all graphics cards and
monitors manufactured to date.
Wait State: A delay in the computer’s information processing cycle caused by a
difference in speed between a faster processor and slower memory. A 0wait state means the processor does not have to “wait” for memory, and
can access data as fast as needed.
Write Precompensation: In a hard disk, the varying of the timing of the read/write
head current on the inner tracks of the disk to maintain a constant signal.
C-4
Micron Electronics, Inc.