1
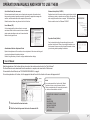
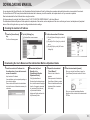
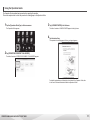
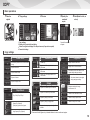
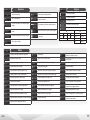
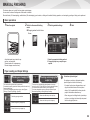
DIGITAL FULL COLOUR MULTIFUNCTIONAL SYSTEM Model: MX-6500N/MX-7500N QUICK START GUIDE BEFORE FIRST USE.......................................2 INFORMATION ON DISPOSAL.......................4 CAUTIONS.......................................................5 OPERATION MANUALS AND HOW TO USE THEM..............................7 DOWNLOADING MANUAL ............................8 PART NAMES.................................................11 TURNING THE POWER ON AND OFF..........12 HOME SCREEN..............................................13 MAINTENANCE..............................................14 PRINTER.........................................................15 COPY..............................................................16 SCAN..............................................................18 DOCUMENT FILING.......................................20 COPY OUTPUT...............................................22 MANUAL FINISHING......................................24 SPECIFICATIONS...........................................26 SUPPLIES.......................................................32 ADMINISTRATOR...........................................33 Keep this manual close at hand for reference whenever needed. SIZES AND TYPES PAPER THAT CAN BE SET IN EACH TRAY.................................34 TROUBLESHOOTING....................................36 BEFORE FIRST USE Caution! For complete electrical disconnection, pull out the main plug. The socket-outlet shall be installed near the equipment and shall be easily accessible. Shielded interface cables must be used with this equipment to maintain compliance with EMC regulations. The equipment should be installed near an accessible socket outlet for easy disconnection. Each instruction also covers the optional units used with these products. EMC (this machine and peripheral devices) WARNING: This is a Class A product. In a domestic environment this product may cause radio interference in which case the user may be required to take adequate measures. This warning does not apply to the products for South Africa. This machine contains the software having modules developed by Independent JPEG Group. This product includes Adobe® Flash® technology of Adobe Systems Incorporated. Copyright© 1995-2007 Adobe Macromedia Software LLC. All rights reserved. This product includes the Adobe® PostScript®3™ of Adobe Systems Incorporated. This product uses "InstantBoot" provided by IT Access Co., Ltd., Japan. The machine includes the document filing function, which stores document image data on the machine's hard drive. Stored documents can be called up and printed or transmitted as needed. If a hard drive failure occurs, it will no longer be possible to call up the stored document data. To prevent the loss of important documents in the unlikely event of a hard drive failure, keep the originals of important documents or store the original data elsewhere. With the exception of instances provided for by law, Sharp Corporation bears no responsibility for any damages or loss due to the loss of stored document data. SOFTWARE LICENCE The SOFTWARE LICENCE will appear when you install the software from the CD-ROM. By using all or any portion of the software on the CD-ROM or in the machine, you are agreeing to be bound by the terms of the SOFTWARE LICENCE. The explanations in this manual are based on American English and the North American version of the software. Software for other countries and regions may vary slightly from the North American version. • The explanations in this manual assume that you have a working knowledge of your Windows or Macintosh computer. • For information on your operating system, please refer to your operating system manual or the online Help function. • The explanations of screens and procedures in this manual are primarily for Windows 7® in Windows® environments. The screens may vary depending on the version of the operating system. • Considerable care has been taken in preparing this manual. If you have any comments or concerns about the manual, please contact your dealer or nearest authorised service representative. • This product has undergone strict quality control and inspection procedures. In the unlikely event that a defect or other problem is discovered, please contact your dealer or nearest authorised service representative. • Aside from instances provided for by law, SHARP is not responsible for failures occurring during the use of the product or its options, or failures due to incorrect operation of the product and its options, or other failures, or for any damage that occurs due to use of the product. Products that have earned the ENERGY STAR® are designed to protect the environment through superior energy efficiency. The products that meet the ENERGY STAR® guidelines carry the ENERGY STAR® logo. The products without the logo may not meet the ENERGY STAR® guidelines. Warranty While every effort has been made to make this document as accurate and helpful as possible, SHARP Corporation makes no warranty of any kind with regard to its content. All information included herein is subject to change without notice. SHARP is not responsible for any loss or damages, direct or indirect, arising from or related to the use of this operation manual. © Copyright SHARP Corporation 2013. All rights reserved. Reproduction, adaptation or translation without prior written permission is prohibited, except as allowed under copyright laws. MATERIAL SAFETY DATA SHEET The MSDS (Material Safety Data Sheet) can be viewed at the following URL address: http://www.sharp-world.com/corporate/info/index.html. For Sharp multifunctional devices/copiers/printers that have been awarded the German environmental label "Blue Angel" you can find more information on our homepage http://www.sharp.de. 2 Notice for users in the UK MAINS PLUG WIRING INSTRUCTIONS The mains lead of this equipment is already fitted with a mains plug which is either a non-rewireable (moulded) or a rewireable type. Should the fuse need to be replaced, a BSI or ASTA approved fuse to BS1362 marked or and of the same rating as the one removed from the plug must be used. Always refit the fuse cover after replacing the fuse on the moulded plug. Never use the plug without the fuse cover fitted. In the unlikely event of the socket outlet in your home not being compatible with the plug supplied either cut-off the moulded plug (if this type is fitted) or remove by undoing the screws if a rewireable plug is fitted and fit an appropriate type observing the wiring code below. DANGER: The fuse should be removed from the cut-off plug and the plug destroyed immediately and disposed of in a safe manner. Under no circumstances should the cut-off plug be inserted elsewhere into a 13A socket outlet as a serious electric shock may occur. To fit an appropriate plug to the mains lead, follow the instructions below: IMPORTANT: The wires in this mains lead are coloured in accordance with the following code: GREEN-AND-YELLOW: Earth BLUE: Neutral BROWN: Live As the colours of the wires in this mains lead may not correspond with coloured markings identifying the terminals in your plug, proceed as follows: The wire which is coloured GREEN-AND-YELLOW must be connected to the terminal in the plug which is marked with the letter E, or by the safety earth symbol greenand-yellow. The wire which is coloured BLUE must be connected to the terminal which is marked with the letter N or coloured black. The wire which is coloured BROWN must be connected to the terminal which is marked with the letter L or coloured red. The wire which is coloured BROWN must be connected to the terminal which is marked with the letter L or coloured red. , or coloured green or If you have any doubt, consult a qualified electrician. WARNING: THIS APPARATUS MUST BE EARTHED. BEFORE FIRST USE 3 INFORMATION ON DISPOSAL Information on Disposal for Users (private households) In the European Union Attention: If you want to dispose of this equipment, please do not use the ordinary dust bin! Used electrical and electronic equipment must be treated separately and in accordance with legislation that requires proper treatment, recovery and recycling of used electrical and electronic equipment. Following the implementation by member states, private households within the EU states may return their used electrical and electronic equipment to designated collection facilities free of charge*. In some countries* your local retailer may also take back your old product free of charge if you purchase a similar new one. *) Please contact your local authority for further details. If your used electrical or electronic equipment has batteries or accumulators, please dispose of these separately beforehand according to local requirements. By disposing of this product correctly you will help ensure that the waste undergoes the necessary treatment, recovery and recycling and thus prevent potential negative effects on the environment and human health which could otherwise arise due to inappropriate waste handling. In other Countries outside the EU If you wish to discard this product, please contact your local authorities and ask for the correct method of disposal. For Switzerland: Used electrical or electronic equipment can be returned free of charge to the dealer, even if you don’t purchase a new product. Further collection facilities are listed on the homepage of www.swico.ch or www.sens.ch. Attention: Your product is marked with this symbol. It means that used electrical and electronic products should not be mixed with general household waste. There is a separate collection system for these products. Information on Disposal for Business Users In the European Union If the product is used for business purposes and you want to discard it: Please contact your SHARP dealer who will inform you about the take-back of the product. You might be charged for the costs arising from take-back and recycling. Small products (and small amounts) might be taken back by your local collection facilities. For Spain: Please contact the established collection system or your local authority for take-back of your used products. In other Countries outside the EU If you wish to discard of this product, please contact your local authorities and ask for the correct method of disposal. 4 CAUTIONS Symbols in this manual WARNING To ensure safe use of the machine, this manual uses various safety symbols. The safety symbols are classified as explained below. Be sure you understand the meaning of the symbols when reading the manual. Meaning of the symbols CAUTION! HOT PINCH POINT KEEP CLEAR PROHIBITED ACTIONS Indicates a risk of death or serious injury. DO NOT DISASSEMBLE CAUTION Indicates a risk of human injury or property damage. MANDATORY ACTIONS Handling precautions WARNING If you notice smoke, a strange odor, or other abnormality, do not use the machine. If used in this condition, fire or electrical shock may result. Immediately switch off the main power and remove the power plug from the power outlet. Contact your dealer or nearest authorised service representative. Do not use a flammable spray to clean the machine. If gas from the spray comes in contact with hot electrical components or the fusing unit inside the machine, fire or electrical shock may result. Do not make any modifications to this machine. Doing so may result in personal injury or damage to the machine. Do not look directly at the light source. Doing so may damage your eyes. Do not block the ventilation ports on the machine. Do not install the machine in a location that will block the ventilation ports. Blocking the ventilation ports will cause heat to build up in the machine, creating a risk of fire. The fusing unit and paper exit area are hot. When removing a misfeed, do not touch the fusing unit and paper exit area. Take care not to burn yourself. Do not remove the machine casing. High-voltage parts inside the machine may cause electrical shock. Do not place a container of water or other liquid, or a metal object that might fall inside, on the machine. If the liquid spills or the object falls into the machine, fire or electrical shock may result. If a thunder storm begins, switch off the main power and remove the power plug from the outlet to prevent electrical shock and fire due to lightning. When loading paper, removing a misfeed, performing maintenance, closing the front and side covers, and inserting and removing trays, take care that your fingers are not pinched. The machine includes the document filing function, which stores document image data on the machine's hard drive. Stored documents can be called up and printed or transmitted as needed. If a hard drive failure occurs, it will no longer be possible to call up the stored document data. To prevent the loss of important documents in the unlikely event of a hard drive failure, keep the originals of important documents or store the original data elsewhere. With the exception of instances provided for by law, Sharp Corporation bears no responsibility for any damages or loss due to the loss of stored document data. Laser information Wave length 788 nm + 12 nm / -13 nm Pulse times MX-6500N (330 mm/s): (3.773 μs ± 0.015 μs) / 7 mm MX-7500N (360 mm/s): (3.458 μs ± 0.014 μs) / 7 mm Heavy paper mode (220 mm/s): (5.659 μs ± 0.023 μs) / 7 mm Output power Max 1.4 mW (LD1 + LD2 + LD3 + LD4) Caution Use of controls or adjustments or performance of procedures other than those specified herein may result in hazardous radiation exposure. This Digital Equipment is CLASS 1 LASER PRODUCT (IEC 60825-1 Edition 2-2007) 5 Power notes WARNING Do not insert or remove the power plug with wet hands. If you will not use the machine for a long time, be sure to remove the power plug from the outlet for safety. This may cause electrical shock. When removing the power plug from the outlet, do not pull on the cord. Be sure to connect the power cord only to a power outlet that meets the specified voltage and current requirements. Also make certain the outlet is properly grounded. Do not use an extension cord or adapter to connect other devices to the power outlet used by the machine. Using an improper power supply may cause fire or electrical shock. * For the power supply requirements, see the name plate in the lower left corner of the left side of the machine. Pulling on the cord may cause damage such as wire exposure and breakage, and may result in fire or electrical shock. Installation notes WARNING Do not install the machine in a location with poor air circulation. A small amount of ozone is created inside the machine during printing. The amount of ozone created is not sufficient to be harmful; however, an unpleasant odor may be noticed during large copy runs, and thus the machine should be installed in a room with a ventilation fan or windows that provide sufficient air circulation. (The odor may occasionally cause headaches.) Do not install the machine on an unstable or slanted surface. Install the machine on a surface that can withstand the weight of the machine. Risk of injury due to the machine falling or toppling. Be sure to connect the power cord only to a power outlet that meets the specified voltage and current requirements. Also make certain the outlet is properly grounded. Do not use an extension cord or adapter to connect other devices to the power outlet used by the machine. Using an improper power supply may cause fire or electrical shock. Locations exposed to direct sunlight Plastic parts may become deformed and dirty output may result. Locations with ammonia gas Installing the machine next to a diazo copy machine may cause dirty output. * For the power supply requirements, see the name plate of each machines and devices. Near a wall Be sure to leave the clearances shown right between the unit and the nearest wall or other surface. For easy maintenance, you should also leave the clearances shown right around the unit. Locations subject to vibration. Vibration may cause failure. 30 cm 30 cm CAUTION 30 cm Locations that are excessively hot, cold, humid, or dry. (near heaters, humidifiers, air conditioners, etc.) The paper will become damp and condensation may form inside the machine, causing misfeeds and dirty output. The machine includes a built-in hard drive. Do not subject the machine to shock or vibration. In particular, never move the machine while the power is on. • The machine should be installed near an accessible power outlet for easy connection. • Connect the machine to a power outlet which is not used for other electric appliances. If a lighting fixture is connected to the same outlet, the light may flicker. About consumables WARNING Do not throw a toner cartridge into a fire. Store a toner cartridge out of the reach of children. Toner may fly and cause burns. CAUTIONS 6 OPERATION MANUALS AND HOW TO USE THEM Quick Start Guide (this document) Software Setup Guide (CD-PDF) Features important safety notes, names of parts and components, information about the power-on procedure, operation overviews, information for people who manage the machine, and information about other aspects of this machine. Read this section before using the machine for the first time. Explains how to install the various drivers needed when using this machine as a printer, or network scanner. Refer to this document when using this machine from a computer. The Software Setup Guide can be found on the “Software CD-ROM”. User's Manual (PC) Can be downloaded from the machine to a computer and viewed. Refer to this document to learn more about printer mode and settings mode, and to learn about the details of each type of mode. Operation Guide (Built-in) Can be viewed by touching the operation guide icon on the machine’s touch panel. When you are using this machine, use this document to see an overview of a particular mode or when you are having trouble operating the machine. Administrator Machine Adjustment Guide Explains fine adjustment of the machine, such as adjustment of the colour and fusing unit current, and adjustment of peripheral devices. Refer to this guide when you need to configure detailed machine settings. User's Manual Detailed explanations of the functions that can be used on the machine can be found in the "User's Manual". The User's Manual can be downloaded from the machine to a computer, and viewed with a Web browser. To download the User’s Manual, see “DOWNLOADING MANUAL” on page 6. To view the explanation of a function, click the appropriate tab and then click the function in the menu that appears at left. 1 2 1Click the tab of the desired mode. 2Click the item that you want to view in the menu at left. Hints You can also search for a function in the Table of Contents or Index, or using the search function. This is convenient when you know what you want to do, but do not know where to look for it. - OPERATIONS COMMON TO ALL MODES - COPY - PRINTER - IMAGE SEND - DOCUMENT FILING - MANUAL FINISHING - SETTING MODE - APPENDIX 7 DOWNLOADING MANUAL You can download the [User's Manual] or the [Administrator Machine Adjustment Guide] by following the procedures below while the machine is connected to the network. The User's Manual in HTML format provides detailed information that is necessary to use the machine, and explains what to do if you encounter a problem. Read and understand the User's Manual before using the machine. For the procedures for using the User's Manual, refer to "HOW TO USE THE USER'S MANUAL" in the User's Manual. The Administrator Machine Adjustment Guide explains fine adjustment of the machine, such as adjustment of the colour and fusing unit current, and adjustment of peripheral devices. Refer to this guide when you need to configure detailed machine settings. Checking the machine's IP address 1Press the [Home Screen] key. The Home Screen appears. 2Tap the [Settings] key. The Settings Mode screen appears. 3Confirm the machine's IP address (1)Tap the [System Settings] key in the left menu. (2)Tap the [List Print: (User)] key in the left menu. (3)Tap the [Print] key in the [All Custom Setting List]. Downloading the User's Manual and the Administrator Machine Adjustment Guide 1Insert the machine’s IP address into the address bar of your web browser to access the machine. http://machine’s IP address/ User verification may be required depending on the machine’s settings. Please check with the machine’s administrator to obtain the account information necessary for verification. 2Download the [User's Manual] or the [Administrator Machine Adjustment Guide] Click [Operation Manual Download] on the displayed page. Next, select the desired language from the “Language to download” list, and select [User's Manual] or [Administrator Machine Adjustment Guide] and then click the [Download] button. 3Expand the downloaded "User's Manual". When the User's Manual is selected: When expansion is finished, the [User's Manual] folder is created. When the Administrator Machine Adjustment Guide is selected: Go to step 5. 4View the downloaded [manual]. When you view the User's Manual, open the [User's Manual] folder and double-click "index. htm". When you view the Administrator Machine Adjustment Guide, double-click the downloaded PDF files. 8 Using the Operation Guide The Operation Guide explains basic procedures for operating the machine. This section explains how to check the procedure for loading paper in the Operation Guide. 1Tap the [Operation Guide] key in the home screen. The Operation Guide appears. 3Tap [LOADING PAPER] in the left menu. The table of contents of LOADING PAPER appears in the right menu. 4Tap the desired tray. The explanation for loading paper in the tray you tapped appears. 2Tap [OPERATIONS COMMON TO ALL MODES]. The table of contents of OPERATIONS COMMON TO ALL MODES appears. For detailed explanations and information not contained in the Operation Guide, refer to the User's Guide and Administrator Machine Adjustment Guide. OPERATION MANUALS AND HOW TO USE THEM 9 Settings Mode "Settings Mode" can be used to manage functions that make it easier to use the machine, including specifying default settings for each function, configuring network connection settings, and viewing operation logs. Settings Mode can also be used from a Web browser on a computer connected to the same network as the machine. Paper properties, which allow fine adjustment of the machine to match the quality of the paper, can also be set in "Paper Tray Settings" in the system settings of Settings Mode. To view the items that can be set in Settings Mode and the current settings of the items, you can print lists of the machine settings and the Web settings by selecting "Administrator Settings List" or "Web Settings List" in "List Print (Administrator)" in the system settings (administrator) of Settings Mode. The procedure for printing an Administrator Settings List or the Web Settings List is explained below. 1Tap the [Settings] key in the home screen. Settings Mode appears. 2Tap [System Settings] in the left menu. 3Tap [List Print (Administrator)] in the left menu. OPERATION MANUALS AND HOW TO USE THEM 4Enter the password in the administrator login screen. To log in as an administrator, consult the administrator of the machine. After login is completed, the List Print (Administrator) screen appears. 5Tap [Print] in Administrator Settings List or Web Settings List. In Administrator Settings List, you can print a list of the setting items and settings of each function (copy, scan, etc.) from the pull-down menu. To print a list of all setting items and settings, select [All Administrator Settings List]. In Web Settings List, you can print a list of all setting items and settings in the Web menu. 10 PART NAMES Output tray (Centre tray)* [Power Save] button/indicator [POWER] button Main power indicator Front cover (Lower) Keyboard* Front cover (Upper) Automatic document feeder Operation panel Right Tray* Bypass-Tray* Main power switch Saddle finisher * Curl correction unit * Tray 1 Tray 3 USB port (A type) [Home Screen] button/indicator Touch panel Tray 5 (MX-LC12)* Tray 2 Tray 4 11 TURNING THE POWER ON AND OFF This machine has a main power switch, found at the bottom left after the front cover is opened, and a power button ( ), located on the operation panel. Turning on the power • Switch the main power switch to the “ ” position. • After the main power indicator lights in green, press the power button ( [POWER] button ). Turning off the power Main power indicator (1)Press the power button ( ) to turn off the power. (2)Switch the main power switch to the “ ” position. Restarting the machine In order for some settings to take effect, the machine must be restarted. If a message in the touch panel prompts you to restart the machine, press the power button ( ) to turn off the power and then press the key again to turn the power back on. Main power switch CAUTION • When turning off the power, make sure that the indicators on the operation panel turn off as well. • If the machine suddenly turns off, such as in the event of a power failure, turn the machine on again, and then turn off the machine following the correct procedure for turning off the machine. In some states of the machine, pressing the power button ( ) to restart will not make the settings take effect. In this case, use the main power switch to switch the power off and then on. Switching off the main power switch or removing the power cord from the outlet while any of the indicators are lit or blinking may damage the hard drive and cause data to be lost. • Switch off both the power button ( ) and the main power switch and unplug the power cord if you suspect a machine failure, if there is a bad thunderstorm nearby, or when you are moving the machine. 12 HOME SCREEN This screen appears first. When you touch an icon, the corresponding screen appears. Pressing the [Home Screen] button on the operation panel also displays this screen. * The screen may differ from the actual one depending on the model or customization. Copy The scanned original is printed. HDD File Retrieve The scanned original is saved on the hard disk drive of the machine or an external memory device. This icon can also be tapped to edit or operate the stored data. Action panel Tap an item to edit Home Screen or other operation. Job Management Tap this icon to check the status of the job currently being executed. CLOUD PORTAL When the machine is connected to the Internet, the "CLOUD PORTAL" icon can be tapped to access a site for login to CLOUD PORTAL. The CLOUD PORTAL site lets you use Cloud services provided by SHARP. In some countries and regions, the contents of the Home screen are different and CLOUD PORTAL cannot be accessed. Scrolling area Up to 12 icons are displayed. Icons that are not displayed can be displayed by scrolling horizontally. Fixed area Up to 10 icons are always displayed. Operation Guide See this document if you are experiencing problems while operating the machine. Settings In setting mode, various settings can be configured to suit the aims and needs of your application. Machine Adjustment The procedures for fine adjustment of the machine, such as adjustment of the color and fusing unit current, and adjustment of peripheral devices, are explained below. For advanced settings, refer to the Administrator Machine Adjustment Guide. Page switch keys Use these keys to view a hidden page in the scrolling area. Operating the touch panel In addition to the conventional “single tap” operation, you can also operate the touch panel using presses, flicks, and slides. Tap Touch and then quickly release the finger. Used to select keys, tabs, checkboxes, etc. Double tap Touch the screen twice. Drag Use this operation to enlarge or reduce the image in the preview. Press Touch a key and keep the finger on the key for a short time. Flick Flick (quickly swipe with the finger) to scroll the preview image. Slide Drag (slide the finger in the desired direction) to rotate or delete original pages displayed as a preview. Pinch Touch the screen with two fingers and move them toward each other. This is used to reduce the browser and preview display. Slide the finger on the scroll bar to move up or down through a long list. Spread Touch the screen with two fingers and move them away from each other. This is used to enlarge the browser and preview display. 13 MAINTENANCE Replacing a toner cartridge When toner runs low, the colour and the message “Prepare a new toner cartridge.” appears. Prepare a new toner cartridge for the indicated colour. When toner runs out, the colour and the message “Replace the toner cartridge.” appears. Replace the toner cartridge for the indicated colour. Example: Replacing the yellow toner cartridge 1 Old toner cartridge New toner cartridge 3 4 Gently pull straight out with both hands Shake 5 or 6 times Gently insert straight into Close the machine until it locks 2 Open 5 Caution • Do not throw toner cartridges into a fire. Toner may fly and cause burns. • Store toner cartridges out of the reach of small children. • Always store toner cartridges on their sides. If toner cartridges are stored on end, the toner may harden and become unusable. • Please use SHARP-recommended toner cartridges. If toner cartridges other than SHARP-recommended toner cartridges are used, the machine may not attain full quality and performance and there is a risk of damage to the machine. • Do not dispose of used toner cartridges. Place them in a plastic bag and keep them. The technician will collect the used toner cartridges when performing maintenance. • To view the approximate amount of toner remaining, continually touch the [Home Screen] key during printing or when the machine is idle. The percentage of toner remaining will appear in the display while the key is touched. • When the percentage falls to “25-0%”, obtain a new toner cartridge and keep it ready for replacement. • Depending on your conditions of use, the colour may become faint or the image blurred. Removing misfeeds When a paper misfeed occurs, the message “A misfeed has occurred.” will appear in the touch panel and printing and scanning will stop. In this event, touch the [Check how to remove misfeeds] key in the touch panel. When the key is touched, instructions for removing the misfeed will appear. Follow the instructions. When the misfeed is cleared, the message will automatically clear. Caution • The fusing unit and the output unit are hot. • Take care not to touch the fusing unit when removing a misfeed. • There is a risk of burning. Replacing the waste toner box When waste toner box becomes full, the message “Please replace the waste toner box.” will appear in the touch panel and printing and scanning will stop. In this event, touch the [Information] key in the touch panel. When the key is touched, instructions for replacing the waste toner box will appear. Follow the instructions. When the waste toner box is replaced, the message will automatically clear. Caution • Do not throw the waste toner box into a fire. Toner may splatter and cause burns. • Store the waste toner box out of the reach of small children. • Keep the removed waste toner box in a plastic bag (do not discard them). Your service technician will collect the removed waste toner box. 14 PRINTER Basic printing In a Windows environment This section explains how to print a document from "WordPad", which is a standard accessory application in Windows. 1 Select [Print] from the [File] 2Select the printer driver for menu the machine and click the [Preferences] button 3Click the [Paper] tab and select 4Click the [OK] button to the paper size start printing     *Make sure the paper size is the same as the paper size set in the application. For Mac OS X environments The following example explains how to print a document from the standard accessory application "TextEdit" in Mac OS X. 1Select [Page Setup] from the [File] menu and select the printer  2Configure paper and click the [OK] button  3Select [Print] from the [File] menu. Make sure that the correct printer is selected. 4Print settings 5 Click the [Print] button to start printing  • Different types of paper sheets can be inserted for covers, etc. • For Windows environments, different paper can be inserted into the specified page, or the paper can be inserted as inserts. 15 COPY Basic operations 1Place the 2Copy settings original 3Preview 4Specify the 5Start (Black & white, or number of copies colour)  1 Copy settings 2 Displays the [Function Review] dialog 3 Scans the original and displays it in the preview area (if preview is required) 4 Cancels all settings Corrects the number of copies Copy settings Colour mode Automatically identifies colour or black & white to copy Copies in full colour Copies in black & white Copies in 2 colours Copies in a single colour Paper Select Tray 1/Tray 2/Tray 3/Tray 4 Bypass Tray (Optional)* Specify the type and size of paper. Large Capacity Tray (Optional) 2-sided copy Copy Ratio 1-sided copy Displays the basic ratio menu. Outputs two 1-Side original sheets to one 2-Side sheet Displays the XY Zoom ratio menu. Outputs one 2-Side original sheet to one 2-Side sheet Automatically sets the ratio based on the original settings and paper settings. Outputs one 2-Side original sheet to two 1-Side sheets Sets the ratio based on the original settings and paper settings. Output Outputs to the middle tray of the machine Enlarges or reduces the image in increments of 1% Outputs to the offset tray of the finisher Transits to the "Other Ratio" screen Outputs by sorting on a set basis Transits to the "by Paper" screen Outputs by sorting on a page basis Transits to the "by Size" screen Outputs to the output tray on the right of the machine *Please note that the Bypass-tray is standard feature in some countries and regions. 16 Original Exposure Selects automatically Best for maps containing fine text Selects automatically Best for text originals Best for faint coloured originals such as those written using pencil Displays inch size list Prioritizes the quality of text and printed photo images Tap a darker or lighter area to adjust shading Displays the direct entry screen Displays AB size list Displays the custom size list Best for text originals to which photos are pasted Select this option for copied or printed originals Prioritizes the quality of printed photo images Select this option to enhance the colour of a colour copy AB A5 A5R B5 B5R A4 A4R B4 A3 216 × 340 216×343 51/2×81/2 81/2×11 81/2×13 11×17 Best for photo originals Inch 51/2 x 81/2 R 81/2 x 11R 81/2×14 81/2×132/5 Others Copying a multi-page original to a single sheet Adds margins Specify the edge erase (centre erase) and erase width of the original for copies Arranges a pamphlet format Inserts cover or insertion sheets Outputs transparency films in a way that they do not stick together Skipping blank pages in an original Copies both sides of a card as a single page Specify the image print position Copies captions onto tab paper Copies each facing page Copies a pamphlet Splits a pamphlet original by page in a copy Prints dates, the number of pages, and stamps Adds a registered image to an original Padding unauthorised copy deterrent data Repeats the same image on one sheet in a copy Making a poster-sized copy Inverts the original into a mirror image Copies originals with no edge cut-off Copying in the centre of the paper Reverses white and black Copies many originals at once Using two machines to copy in parallel Check the number of scanned original sheets Copies originals of different sizes together This mode switches document feeder controls for originals with thin paper thickness Adjust the sharpness of an image Specify the resolution of the original Adjusting red/green/blue in copies Suppresses light background area in copies Adjust the colour of a copy image Adjust the brightness of a colour copy image Adjust the intensity (saturation) of a colour copy image Uses document filing Temporarily saves the scanned data on the hard disk drive of the machine Displays a preview image after selection COPY 17 SCAN Basic Operations (Scan to E-mail) 1Place the 2Scan settings original 3Preview 4Specify the destination 5Start 1 Scan settings 2 Displays the [Function Review] dialog 3 Scans the original and displays it in the preview area (if preview is required) 4 Cancels all settings Scan settings Touch to input Address Address Book Tap this to display the address book screen to select a destination. Enter an address directory. Tap this to switch between To and Cc. Exposure Selects automatically Touch a darker or lighter area to adjust shading Resolution Searches a destination Best for text originals File Name Select a file name or enter it directly. 100 x 100 dpi 150 x 150 dpi 200 x 200 dpi 300 x 300 dpi 400 x 400 dpi 600 x 600 dpi Prioritizes the quality of text and printed photo images Best for text originals to which photos are pasted Prioritizes the quality of photo images Subject Select a subject or enter it directly. Best for photo originals Best for maps containing fine text 18 File Format This function sets the file format and compression mode (ratio) of send data. File format Compression mode Colour/Greyscale Transmittable formats: TIFF, XPS, JPEG, PDF, PDF/A B/W Transmittable formats: TIFF, XPS, PDF, PDF/A Creates an encrypted PDF file Colour/Greyscale Number of pages setting B/W Colour/Greyscale/Black & white Compressible modes: Compressible modes: None, MH (G3), MMR Low, Medium, High, Bk Letter Emphasis (G4) Creates an encrypted PDF file Specify the number of pages per file Sends data by reducing its size Displays the number of pages per file Sends data by reducing its size but without reducing the image quality Increases or decreases the number of pages per file Others SCAN Tap this to switch the job build mode on or off. Setting it to On scans a large number of originals in segments. Scans a thin original Scans originals of different sizes together Tap this to switch the original count setting on or off. Setting it to On checks the scanned number of original sheets. Specify the edge erase (centre erase) and erase width of the original to be sent Scans an original as two separate pages Sends a pamphlet original by splitting it by page Sends both sides of a card as a single page Automatically performs transmission at the specified time Stamps scanned originals Scans originals by suppressing light background area Erases blank pages mixed in an original after scanning Removes chromatic colours from the scanned original before transmission Adjust the sharpness of an image to produce a sharper or softer image. Adding contrast to the scanned original before transmission. Saves the send data on the hard disk drive of the machine. Temporarily saves the send data on the hard disk drive of the machine 19 DOCUMENT FILING This function saves the original scanned on the machine, or print data from a PC on the hard disk drive of the machine or on an external memory device. The saved data can be printed or sent. Editing of the stored files, for example combining, is also possible. Basic operations 1HOME SCREEN 2Select the folder 3Place the original 4Start Folder select screen Main Folder Use this to save the original you wish to share among users. Quick File Folder Custom Folder Saves files temporarily. The folder for the registered user. HDD Status The usage of the machine's hard disk drive is displayed in graphical format, separately for Main Folder, Custom Folder, and Quick File Folder. • Files stored using [Quick File] are provided with the "Sharing" property that can be accessed by any person for output and sending. Therefore, do not store sensitive documents or documents that you do not want to be used by others using the [Quick File] function. 20 File list view File thumbnails view You can select the method to display files. List view or thumbnails view can be selected. Viewing by folder Viewing by job Job settings menu Select a file you wish to retrieve, then select a desired operation. The following operations are displayed on the action panel. The [Print Now] operation is not displayed on the action panel but displayed as a button in the trigger area. Prints a file from the reprint screen This item changes to [Print] when multiple files are selected. Select this item if you wish to delete data after printing. Moves a file You can also edit the file name using this option. Select this item if you wish to print all in black & white This item is not displayed when multiple files are selected. Merges the selected two files into a single file This item is not displayed when only one file or three or more files are selected. Prints the selected file immediately Check the content of the original file by image This item is not displayed when multiple files are selected. Deletes data Views property change and file detail information This item is not displayed when multiple files are selected. DOCUMENT FILING 21 COPY OUTPUT Configure the output settings for copies using Sort, Group, Offset, Staple, Punch, or Fold. Basic operations 1Select [Output] 2Copy output settings 3Check the preview image 4Start (Black & white, or colour)  1 Specify the output tray 2 Select the output and paper output type 3 Specify the details of output mode Output tray settings Output tray settings Specify the destination to output copies. The output tray currently selected is indicated by an arrow. (When a finisher (100-sheet stapling) or saddle finisher (100-sheet stapling) is installed) The [Middle Tray] key can be selected. Outputs to the offset tray Outputs to the right tray If the offset, staple sort, saddle stitch, fold, or punch function is specified, the right tray is not available. Sort/Group function This function sets the sorting method when copying a scanned original. Sort staple (When a finisher or saddle finisher is installed) This function staples the output copies and deliver them to the tray. Sorts the scanned original on a set basis, and outputs them 1 staple in back Groups the scanned original on a page basis, and outputs them. 1 staple in front Offset function (When a finisher or saddle finisher is installed) Select this function when you wish to output copies while shifting them set by set. Selecting the staple function clears the Offset checkmark automatically. 2 Staples Copies can be folded at the centre, stapled, and output. This function is only available when a saddle finisher is installed. 22 Trimmer Setting Saddle Stitch (When a saddle finisher is installed) Copies can be folded at the centre, stapled, and output. (When a trimming module is installed on the saddle finisher) For saddle folding, it trims a side drop, offering a good-looking output image. Releases saddle stitch Scanning 2-Sided originals (When a trimming module is installed on the saddle finisher) Enabling "Saddle Stitch" allows you to configure the trimmer settings. Tap this to switch the cover setting Off or On, or to configure the paper tray settings. Turns off the trimmer setting Scans 1-Sided originals Turns on the trimmer setting This selects left binding Specify the trimming width within the range of 2.0 to 20.0 mm This selects right binding Folding function Detail setting screen for each folding type Selects saddle fold Folds paper so that the print side faces upward during output Select the size of paper to be folded with Z-fold (One of either A3, B4, A4R, 11” x 17”, 8-1/2” x 14” and 8-1/2” x 11”R can be selected) Selects Z-fold Select this option to fold multiple sheets together Folds paper for left binding during output Selects C-fold Displays a folding image Folds paper for right binding during output (When a saddle finisher or folding unit is installed) Copies can be folded and output. Folds paper so that the print side faces downward during output Selects accordion fold Selects double fold Selects half fold Punch function (When a punch module is installed) This function punches copies and outputs them. It is available for paper sizes B5R to A3. Punches holes during output COPY OUTPUT 23 MANUAL FINISHING This function allows you to set for finish on copied or printed pages. You can select the manual finishing mode if the inserter is installed. When the finisher (100-sheet stapling), saddle finisher (100-sheet stapling), punch module, or folding unit is installed, finishing operations, such as stapling, punching or folding, can be performed. Basic operations 1Place the original 2Switch to the manual finishing mode Changing modes from the Home Screen Adjust the inserter tray guide to the paper size, and load paper. (Special media such as transparency film and tab paper cannot be used.) 3Finishing method settings 4Start 1 Select the appropriate finishing method 2 Change the paper tray or output tray as required Paper Loading and Output Settings Checking and changing the output tray You can check the type and size of paper loaded. As needed, the paper type and size can be specified for each of the upper and lower trays. If you wish to change the paper sizes or types, select [System Settings] > [Paper Tray Settings] > [Inserter]. Check the paper type and size Checking and changing the output tray The output tray is automatically selected based on the output function you set. If Z-Fold, Half Fold, or Punch is selected, however, you can select the middle or offset tray for the output tray. If you have changed the output tray, the output function may be deselected depending on the original output settings. Selects the middle tray as the output tray Selects the offset tray as the output tray Selects the upper tray as paper tray Orientation of placed original For stapling or punching on the desired position, place the paper as shown in the following: • For staple function, place the paper face up and align text with the direction of the touch panel display. (For the saddle stitch function, place the paper so that middle surface faces up. • When using punch or folding function, place the paper face up, and align text horizontally and upward with the scan (right) direction. Selects the lower tray as paper tray 24 Staple (When a finisher installed) This function staples the loaded paper sheets into a sheaf. 1 staple in back Saddle Stitch Folding function (When a saddle finisher (100-sheet stapling) is installed) This function staples each set of copies at two positions in the centre of paper, folds them in half, and outputs them. (When a trimming module is installed on the saddle finisher) For saddle stitch, it trims a side drop, offering a good-looking output image. (When a folding unit is installed) This function folds paper in Z-fold, C-fold, or other types of shapes. (When a saddle finisher (100-sheet stapling) is installed) Paper can be folded in a saddle fold. * The paper sizes that can be selected vary depending on the type of paper fold. * Special media such as transparency film and tab paper cannot be used. 1 staple in front Staples each set of copies at two positions in the centre of paper, and folds them in half during output 2 Staples Trims a side drop for saddle folding during output Specify the trimming width within the range of 2.0 to 20.0 mm Setting the number of copies (number of pages) This function loads previously sorted sheets and outputs multiple sets at once. Number of copies setting Enter the number of output copies (from 1 to 999) Checking and changing the output tray The output tray is automatically selected based on the output function you set. If Z-Fold, Half Fold, or Punch is selected, however, you can select the middle or offset tray for the output tray. If you have changed the output tray, the output function may be deselected depending on the original output settings. Allowable paper sizes: A3W, A3, B4, A4R, SRA3, 12”x18”, 11”x17”, 8-1/2”x14”, 8-1/2”x11”R, 8K The fold settings can be configured in [Detail]. Allowable paper sizes: A3, B4, A4R, 11” x 17”, 8-1/2”x14”, 8-1/2”x11”R This can be used with staple or punch function only when the A3, B4 or 11"x17" paper is used. Allowable paper sizes: A4R, 8-1/2”x11”R Allowable paper sizes: A4R, 8-1/2”x11”R Allowable paper sizes: A4R, 8-1/2”x11”R Selects the middle tray as the output tray Selects the offset tray as the output tray Allowable paper sizes: A4R, 8-1/2”x11”R Number of pages setting Select this to set all pages as one set * If this setting is enabled, set the [Number of Copies] to "1". Select this to specify the number of page for each set Punch function (When a punch module is installed) This function punches holes in paper. It is available for paper sizes B5R to A3. You cannot use A3W (12” x 18”) size paper, and special media such as transparency film and tab papers. Enter a numeric value when [Manual] is selected. (from 1 to 200 pages) Punches holes during output If the paper size used is A3, B4 or 11”×17”, this function can be used with saddle stitch or folding function for Z-fold. MANUAL FINISHING 25 SPECIFICATIONS Basic Specifications / Copier specifications Name MX-6500N/MX-7500N Copy ratios Same size: 1:1 ± 0.5 % Enlarge: 115 %, 122 %, 141 %, 200 %, 400 % Reduce: 25 %, 50 %, 70 %, 81 %, 86 % Zoom range: 25 to 400 % (25 - 200 % using DSPF) in 1 % increments, total 376 increments. Can calculate zoom rate when mm is specified. Type Console Colour Full colour Copier system Laser electrostatic copier Useable paper See "SIZE AND TYPES PAPER THAT CAN BE SET IN EACH TRAY" (page 32) Scanning resolution Scan (B/W): 600 × 400 dpi, 600 x 600 dpi Scan (full colour): 600 × 600 dpi Print: 600 × 600 dpi, 1200 x 1200 dpi equivalent to 9,600 dpi × 600 dpi Paper feed / capacity 1,200 plus 800 plus 500 plus 500 sheets in 4 trays plus 100-sheet multi-bypass tray 2 Using 80 g/m . (21 lbs) weight paper Gradation Scan: equivalent to 256 levels / Print: equivalent to 256 levels Original paper sizes Max. A3 (11" × 17”) for sheets and bound documents Max. paper feed / max. capacity 1,200 plus 800 plus 500 plus 500 sheets in 4 trays plus 500-sheet multi-bypass tray plus 5,000 sheets in large capacity trays plus 5,000 sheets in large capacity trays (total 13,500 sheets) 2 Using 80 g/m . (21 lbs) weight paper Continuous copy Max. 9,999 copies Memory Standard: 5 GB HDD: 1 TB SD card: 4GB 1 GB = One billion bytes when referring to hard drive capacity. Actual format capacity is less. Copy sizes A3 wide (13" x 19", 12" x 18") to A5R, 5-1/2" × 8-1/2"R, Transparency film, Heavy paper, Envelopes Tray 1: A4, B5, 8-1/2" x 11" Tray 2: A4, 8-1/2" × 11" Tray 3: A3 wide (12" × 18"), A3, B4, A4, A4R, B5, B5R, 8K, 16K, 16KR, 11" × 17", 8-1/2" × 14", 8-1/2" × 13-1/2", 8-1/2" × 13-2/5", 8-1/2" × 13", 8-1/2" × 11", 8-1/2" × 11"R, 7-1/4 × 10-1/2"R, 9" x 12", Tray 4: A3 wide (12" × 18"), A3, B4, A4 wide, A4, A4R, B5, B5R, A5R, 11" × 17", 8-1/2" × 14", 8-1/2" × 13-1/2", 8-1/2" × 13-2/5", 8-1/2" × 13", 8-1/2" × 11", 8-1/2" × 11"R, 7-1/4 × 10-1/2"R, 5-1/2" × 8-1/2"R, Multi-bypass tray:A3 wide (13" × 19") to SRA3, SRA4, A5R, 8K, 16K, 16KR, 5-1/2" × 8-1/2"R,Transparency film, Heavy paper, Envelopes Lost margin (leading edge): 4 mm (11/64") ± 1 mm (± 3/64") Lost margin (trailing edge): 2 mm (6/64") - 5 mm (- 13/64") Leading edge / trailing edge: total 8 mm (21/64") or less Near edge / far edge: total 4 mm (11/64") ± 2 mm (± 6/64") or less Maximum print area: 319 mm x 480 mm Image quality assurance range: 303 mm Ambient environment Operating environment 10 °C (54 °F) to 35 °C (91 °F) (20 % to 85 % RH) (Humidity is 60% or below while the temperature is 35°C (91°F), and the temperature is 30°C (86°F) or below while the humidity is more than 85%.) 590 - 1,013 hpa Standard environment 20 °C (68 °F) to 25 °C (77 °F) (65 ± 5 % RH) Required power supply AC 220-240V, 8A + 8A, 60 Hz (2 × 220-240V power supplies) Power consumption Max. 1.92 kW + 1.92 kW Dimensions 982 mm (W) × 768 mm (D) × 1,530 mm (H) (38-43/64" (W) × 30-1/4" (D) × 60-1/4" (H)) Weight Approx. 229 kg (505 lbs.) Overall dimensions With multi-bypass tray extended 1,245 mm (W) × 768 mm (D) (49-1/32" (W) × 30-1/4" (D)) Warm-up time 90 seconds This may vary depending on the ambient conditions. First-copy time MX-6500NMX-7500N Full colour: 5.6 seconds 5.1 seconds B/W: 4.0 seconds 3.7 seconds This may vary depending on the state of the machine. Continuous copying speeds* (when shifter is not in operation) MX-6500NMX-7500N A4, B5, 8-1/2" × 11": 65 copies/min. 75 copies/min. A4R, B5R, 8-1/2" × 11"R, 7-1/4" × 10-1/2"R: 42 copies/min. 47 copies/min. A5R, 5-1/2" x 8-1/2"R: 43 copies/min. 47 copies/min. B4, 8-1/2" × 14": 36 copies/min. 41 copies/min. A3, 11" × 17": 32 copies/min. 36 copies/min. * Continuous speed for same original source. Output may be temporarily interrupted to stabilize image quality. 26 Automatic document feeder (Standard equipment) Name Duplex Single Pass Feeder (DSPF) Document feeder types Duplex Single Pass Feeder (DSPF) Original paper sizes A3 (11" × 17") to A5 (5-1/2" × 8-1/2") 2 Original paper types 2 Paper weightThin paper 35 g/m (9 lbs. Bond) to 49 g/m (13 lbs. Bond) Plain paper 50 g/m2 (13 lbs. Bond) to 128 g/m2 (34 lbs. Bond) Two-sided50 g/m2 (13 lbs. Bond) to 128 g/m2 (34 lbs. Bond) Paper storage capacity 150 sheets (21 lbs. (80 g/m2)) (or maximum stack height of 49/64" (19.5 mm)) Scan speed (copy) B/W: 75 one-sided sheets/minute (A4 (8-1/2" × 11") horizontal) (600 × 400 dpi) Colour: 51 one-sided sheets/minute (A4 (8-1/2" × 11") horizontal) (600 × 600 dpi) Large Capacity Trays MX-LC13 MX-MF11 Name Large Capacity Trays Name Multi Bypass Tray Paper sizes See "SIZE AND TYPES PAPER THAT CAN BE SET IN EACH TRAY" (page 32) Paper sizes See "SIZE AND TYPES PAPER THAT CAN BE SET IN EACH TRAY" (page 32) Useable paper See "SIZE AND TYPES PAPER THAT CAN BE SET IN EACH TRAY" (page 32) Useable paper See "SIZE AND TYPES PAPER THAT CAN BE SET IN EACH TRAY" (page 32) Paper capacity 5,000 sheets (2,500 × 2) Paper capacity 500 sheets Required power supply AC 230V, 10 A Required power supply Supplied from large capacity trays Dimensions 895 mm (W) × 763 mm (D) × 986 mm (H) (35-1/4" (W) × 30-1/32" (D) × 38-13/16" (H)) Weight Approx. 131 kg (288 lbs.) Dimensions When output paper tray is stored 705 mm (W) × 556 mm (D) × 203 mm (H) (27-3/4" (W) × 21-7/8" (D) ×8" (H)) When output paper tray is extended 878 mm (W) × 556 mm (D) × 203 mm (H) (34-9/16" (W) × 21-7/8" (D) × 8" (H)) Weight Approx. 18 kg (39 lbs.) Large Capacity Tray MX-LC12 MX-LCX3 N Name Large Capacity Tray Name Large Capacity Tray Paper sizes See "SIZE AND TYPES PAPER THAT CAN BE SET IN EACH TRAY" (page 32) Paper sizes See "SIZE AND TYPES PAPER THAT CAN BE SET IN EACH TRAY" (page 32) Useable paper See "SIZE AND TYPES PAPER THAT CAN BE SET IN EACH TRAY" (page 32) Useable paper See "SIZE AND TYPES PAPER THAT CAN BE SET IN EACH TRAY" (page 32) Paper capacity 3,500 sheets Paper capacity 3,000 sheets Dimensions 376 mm (W) × 576 mm (D) × 524 mm (H) (14-51/64" (W) × 22-43/64" (D) × 20-5/8" (H)) Dimensions 670 mm (W) x 570 mm (D) x 525 mm (H) (26-3/8" (W) x 22-7/16" (D) x 20-43/64" (H)) Weight Approx. 28.5 kg (63 lbs.) Weight Approx. 50 kg (110 lbs.) SPECIFICATIONS 27 Finisher Saddle stitch finisher MX-FN21 MX-FN22 Name Finisher (100-sheet stapling) Name Saddle Stitch Finisher (100-sheet stapling) Paper sizes Depends on feeder specifications Paper sizes Depends on feeder specifications Useable paper 55 to 300 g/m Index (16 lbs. Bond to 170 lbs.) Useable paper 55 to 300 g/m2 Index (16 lbs. Bond to 170 lbs.) No. of trays 3 No. of trays 4 Tray capacity (21 lbs. (80 g/m2)) Upper tray Non-stapled A3W (13" x 19", 12" × 18") / A3 (11" × 17") /B4 (8-1/2" × 14"), SRA3: 750 sheets A4 (8-1/2" × 11") / A4R, B5 (8-1/2" × 11"R) / B5R (7-1/4" × 10-1/2"R) / A5R (5-1/2" × 8-1/2"R): 1,500 sheets Staple function A3 (11" × 17") / B4 (8-1/2" × 14"): 50 units or 750 sheets A4 (8-1/2" × 11") / A4R, B5 (8-1/2" × 11"R): 100 units or 1,500 sheets Centre tray Non-stapled A3W (13" x 19", 12" × 18") / A3 (11" × 17") / B4 (8-1/2" × 14"), SRA3: 125 sheets A4 (8-1/2" × 11") / A4R (8-1/2" × 11"R), B5 / B5R (7-1/4" × 10-1/2"R) / A5R (5-1/2" × 8-1/2"R): 250 sheets8-1/2" × 11"R Lower tray Non-sortA3W (13" x 19", 12" × 18") / A3 (11" × 17") / B4 (8-1/2" × 14"), SRA3: 750 sheets A4R (8-1/2" × 11"R) / B5R (7-1/4" × 10-1/2"R) / A5R (5-1/2" × 8-1/2"R): 1,500 sheets A4 / B5 / 8-1/2" x 11": 2,500 sheets Staple functionA3 (11" × 17") / B4 (8-1/2" × 14"): 50 units or 750 sheets A4 (8-1/2" × 11") / A4R, B5 (8-1/2" × 11"R): 100 units or 1,500 sheets Saddle stitch tray Non-stapled 60 to 105 g/m2 (16 lbs. Bond to 28 lbs. Bond): 5 sheets Staple function 60 to 81.4 g/m2 (16 lbs. Bond to 21 lbs. Bond): 5 units (16 to 20 sheets), 10 units (11 to 15 sheets),15 units (6 to 10 sheets), 25 units (1 to 5 sheets) 81.4 g/m2 over to 105 g/m2 (21 lbs. Bond over to 28 lbs. Bond): 15 units (6 to 10 sheets), 25 units (1 to 5 sheets) Staple function in cover mode 60 to 81.4 g/m2 (16 lbs. Bond to 21 lbs. Bond): 5 units (16 to 20 sheets), 10 units (11 to 15 sheets) 81.4 g/m2 over to 105 g/m2 (21 lbs. Bond over to 28 lbs. Bond): 10 units (1 to 10 sheets) • Offset output is not available for A3W (12" × 18") / B5R (7-1/4" × 10-1/2"R) / A5R (5-1/2" × 8-1/2"R). Max. no. of stapled sheets (24 lbs. (90 g/m2)) Max. no. of 100 sheets (A4 (8-1/2" × 11"), B5) Max. no. of 50 sheets (A3 (11" × 17"), B4 (8-1/2" × 14"), A4R (8-1/2" × 11"R)) Tray capacity (21 lbs. (80 g/m2)) 2 Upper tray Non-stapled A3W (13" x 19", 12" × 18") / A3 (11" × 17") / B4 (8-1/2" × 14"), SRA3/ SRA4: 750 sheets A4 (8-1/2" × 11") / A4R, B5 (8-1/2" × 11"R) / B5R (7-1/4" × 10-1/2"R) / A5R (5-1/2" × 8-1/2"R): 1,500 sheets Staple function A3 (11" × 17") / B4 (8-1/2" × 14"): 50 units or 750 sheets A4 (8-1/2" × 11") / A4R, B5 (8-1/2" × 11"R): 100 units or 1,500 sheets Centre tray Non-stapled A3W (13" x 19", 12" × 18") / A3 (11" × 17") / B4 (8-1/2" × 14"), SRA3 / SRA4: 125 sheets A4 (8-1/2" × 11") / A4R, B5 (8-1/2" × 11"R) / B5 (R7-1/4" × 10-1/2"R) / A5 (R5-1/2" × 8-1/2"R): 250 sheets Lower tray Non-stapled A3W (13" x 19", 12" × 18") / A3 (11" × 17") / B4 (8-1/2" × 14"), SRA3 / SRA4: 750 sheets A4 (8-1/2" × 11") / A4R, B5 (8-1/2" × 11"R) / B5R (7-1/4" × 10-1/2"R) / A5R (5-1/2" × 8-1/2"R): 1,500 sheets A4 / B5 / 8-1/2" x 11" Non offset: 2,500 sheets Staple function A3 (11" × 17") / B4 (8-1/2" × 14"): 50 units or 750 sheets A4 (8-1/2" × 11") / A4R, B5 (8-1/2" × 11"R): 100 units or 1,500 sheets • Offset output is not available for A3W (12" × 18") / B5R (7-1/4" × 10-1/2"R) / A5R (5-1/2" × 8-1/2"R). Max. no. of stapled sheets (90 g/m2 (24 lbs.)) Max. no. of 100 sheets (A4 (8-1/2" × 11"), B5) Max. no. of 50 sheets (A3 (11" × 17"), B4 (8-1/2" × 14"), A4R (8-1/2" × 11"R)) Staple position 1 bottom, 1 top, 2 middle Staple position 1 bottom, 1 top, 2 middle Staple method (for saddle stitch) Centred fold with stapling in 2 centre places Required power supply AC 230V, 10A Saddle stitch fold position Centred fold Saddle usable sizes A3 (11" × 17") / B4 (8-1/2 × 14") / A4R (8-1/2" × 11"R) / A3W (12" × 18") 8K, 8-1/2" x 13-1/2", 8-1/2" x 13-2/5", 8-1/2" x 13" Dimensions When output paper tray is stored (654 mm (W) × 765 mm (D) × 1040 mm (H)) 25-3/4" (W) × 30-1/8" (D) × 40-15/16" (H) When output paper tray is extended 782 mm (W) × 765 mm (D) × 1040 mm (H) (30-51/64" (W) × 30-1/8" (D) × 40-15/16" (H)) Saddle usable paper weight 60 g/m2 (16 lbs. Bond) to 300 g/m2 Index (170 lbs.) Paper weighting 106 g/m2 (28 lbs. Bond) to 300 g/m2 Index (170 lbs.) is only able to be used in cover mode and for single sheet fold. Max. no. of saddle-stitched sheets Max. no. of 30 sheets (80 g/m2 (21 lbs.)): 29 sheets (80 g/m2 (21 lbs.)) + 1 sheet (256 g/m2 (68 lbs. Bond)) Max. no. of 20 sheets (90 g/m2 (24 lbs.)):19 sheets (90 g/m2 (24 lbs.)) + 1 sheet (256 g/m2 (68 lbs. Bond)) Required power supply AC 230V, 10A Dimensions When output paper tray is stored 767 mm (W) × 765 mm (D) × 1040 mm (H) (30-13/64" (W) × 30-1/8" (D) × 40-15/16" (H)) When output paper tray is extended 896 mm (W) × 765 mm (D) × 1040 mm (H) (35-9/32" (W) × 30-1/8" (D) × 40-15/16" (H)) Weight Approx. 108 kg (238.1 lbs.) Weight Approx. 61 kg (134.5 lbs.) 28 Curl Correction Unit Name Curl Correction Unit (MX-RB15) Dimensions 214 mm (W) × 760 mm (D) × 986 mm (H) (8-7/16" (W) × 29-59/64" (D) × 38-13/16" (H)) Paper size Depends on feeder specifications Useable paper Depends on feeder specifications Weight 16.4 kg (36.2 lbs) Name Relay Unit (MX-RB13) Weight 14.5 kg (32.0 lbs) Dimensions 214 mm (W) × 760 mm (D) × 986 mm (H) (8-7/16" (W) × 29-59/64" (D) × 38-13/16" (H)) Required power supply AC 100V-240V 50/60Hz Dimensions 915 mm (W) × 758 mm (D) × 986 mm (H) (36-1/64" (W) × 29-27/32" (D) × 38-13/16" (H)) Weight High Capacity Stacker: 100 kg (220 lbs) Cart: 15 kg (33 lbs) Relay Unit High Capacity Stacker Name High Capacity Stacker (MX-ST10) Paper sizes A3W (13" x 19") to 5-1/2" × A5R (8-1/2"R), SRA3, SRA4 2 Useable paper 55 to 300 g/m index (16 lbs bond to 170 lbs) No. of trays 2 Tray capacity (21 lbs (80 g/m2)) Upper tray A3W (13" x 19") to A5R (5-1/2" × 8-1/2"R) / SRA3 / SRA4: 250 sheets Lower tray * A3W (13" x 19", 12" × 18") / A3 (11" × 17") / B4 (8-1/2" × 14") / A4 (8-1/2" × 11") / A4R (8-1/2" ×11"R) / SRA3 / SRA4: 5,000 sheets B5 (7-1/4" × 10-1/2") / B5R (7-1/4" × 10-1/2"R) / A5R (5-1/2" × 8-1/2"R): 2,500 sheets SPECIFICATIONS *Do not load sheets of different sizes. 29 Punch module (MX-PN13A, MX-PN13B, MX-PN13C, MX-PN13D) Name Punch module MX-PN13A, MX-PN13B, MX-PN13C, MX-PN13D Paper size for punch module A3 (11" × 17") to B5R (7-1/4" × 10-1/2"R) Holes MX-PN13A: 2 holes MX-PN13B: 3 holes MX-PN13C: 4 holes MX-PN13D: 4 holes (wide) Required power supply Supplied from finisher/saddle stitch finisher Dimensions 95 mm (W) × 715 mm (D) × 392 mm (H) (3-3/4" (W) x 28-9/64" (D) x 9-7/16" (H)) Weight Approx. 3.7 kg (8.6 lbs.) Network Printer Specifications Type Built-in type Internal fonts (options) 80 fonts for PCL, 136 fonts for Adobe® PostScript®3 Continuous print speed Same as continuous copy speed Memory Machine system memory and hard disk Resolution Data processing: 600 × 600 dpi, 1,200 × 1,200 dpi Print: 600 × 600 dpi, equivalent to 9,600 dpi × 600 dpi, 1,200 × 1,200 dpi Interface 10BASE-T/100BASE-TX/1000BASE-T, USB 1.1, USB 2.0 (high speed mode) Page description language Standard: PCL6 emulation, Adobe® PostScript®3 *There are cases when a connection cannot be established. Please contact your local dealer for more information. Compatible protocols TCP/IP (IPv4/IPv6), IPX/SPX, IPP, EtherTalk Compatible OS Windows XP, Windows Server 2003, Windows Vista, Windows Server 2008, Windows 7, Windows Server 2008R2, Windows 8, Windows Server 2012* Macintosh (Mac OS x 10.4 to 10.8) Network Scanner Specifications Type Colour scanner Scan resolution (main × vertical) 100 × 100 dpi, 150 × 150 dpi, 200 × 200 dpi, 300 × 300 dpi, 400 × 400 dpi, 600 × 600 dpi (push scan) 50 to 9,600 dpi *1 (pull scan) Scan speed (8-1/2" × 11" (A4)) B/W: 75 sheets/minute (one-sided) Colour: 75 sheets/minute (one-sided) When in standard mode using Sharp standard paper (A4 (8-1/2" × 11") size with 6% coverage) and the auto colour detector is turned off. The speed varies depending on the data volume of the original. Interface 10BASE-T/100BASE-TX/1000BASE-T, USB 2.0 (during USB memory scanning) Compatible protocols TCP/IP (IPv4) Compatible OS *2 Pull scan (TWAIN)Windows XP, Windows Server 2003, Windows Vista, Windows Server 2008, Windows 7, Windows Server 2008R2 *2, Windows 8, Windows Server 2012 Output format (B/W) TIFF, PDF, PDF/A, encrypted PDF, XPS *3 Compression method: decompression, G3 (MH), G4 (MMR) (Grey scale/colour) TIFF, JPEG, PDF, PDF/A, encrypted PDF, high compression PDF, XPS *3 Compression method: JPEG (high, mid, and low compression, Emphasis black letter) Driver TWAIN compliant *1:You must decrease the scan size when increasing the resolution. *2:There are cases when a connection cannot be established. Please contact your local dealer for more information. *3: XPS (XML Paper Specification) Trimming Module Name Trimming module (MX-TM10) Required power supply Supplied from saddle stitch finisher Useable size for trimming module A3W (13" x 19", 12" × 18"), A3, B4, A4R, 8K , 11" × 17", 8-1/2" × 14", 8-1/2" × 13-1/2", 8-1/2" × 13-2/5", 8-1/2" × 13", 8-1/2" × 11"R, SRA3 Dimensions 251 mm (W) × 625 mm (D) × 403 mm (H) (9-7/8" (W) × 24-15/32" (D) × 15-7/8" (H)) Weight Approx. 32 kg (70.6 lbs.) Max. no. of sheets to be trimmed 2 to 20 sheets (60 g/m2 to 81.4 g/m2 (16 lbs. Bond to 21 lbs. Bond)) 2 to 10 sheets (81.4 g/m2 over to 105 g/m2 (21 lbs. Bond over to 28 lbs. Bond)) 2 to 3 sheets (105 g/m2 over to 220 g/m2 Index (28 lbs. Bond over to 56 lbs.)) • When plain paper trimmed. Including one front cover of 300 g/m2 Index (170 lbs.) or less. 30 Folding Unit Name Folding unit (MX-FD10) Folding types Z-Fold, C-Fold, Accordion Fold, Double Fold, Half Fold. Useable size for folding unit Z-Fold: A3, B4, A4R, 11" × 17", 8-1/2" × 14", 8-1/2" × 11"R C-Fold, Accordion Fold, Double Fold, Half Fold: A4R, 8-1/2" × 11"R Useable paper 55 g/m2 to 105 g/m2 (16 lbs. Bond to 28 lbs. Bond)) Tray capacity (80 g/m (21 lbs.)) C-Fold/Accordion Fold/Double Fold 60 mm (2-23/64") (Equivalent to 40 sheets. (Equivalent to 25 sheets for Double Fold)) • Copies made in Z-Fold or Half Fold are output to the tray of the finisher (large stacker) or saddle stitch finisher (large stacker). Required power supply Supplied from finisher / saddle stitch finisher Dimensions 336 mm (W) × 770 mm (D) × 1050 mm (H) (13-15/32" (W) × 30-5/16" (D) × 41-11/32" (H)) Weight Approx. 66 kg (145.5 lbs.) Tray capacity (80 g/m2(21 lbs. )) Upper tray: 200 sheets Lower tray: 200 sheets Required power supply Supplied from the machine Dimensions 540 mm (W) x 760 mm (D) x 1276 mm (H) (21-17/64" (W) x 29-59/64" (D) x 50-7/32" (H)) Weight Approx. 45 kg (99.2 lbs.) 2 Inserter Name Inserter (MX-CF11) Useable size for inserter A3W (13" x 19", 12" × 18"), A3, B4, A4, A4R, B5, B5R, A5R, SRA3, SRA4, 8K, 16K, 16KR, 11" × 17", 8-1/2" × 14", 8-1/2" × 13-1/2", 8-1/2" × 13-2/5", 8-1/2" × 13", 8-1/2" × 11", 8-1/2" × 11"R, 7-1/4 × 10-1/2"R, 5-1/2" × 8-1/2"R, A4W(9" x 12" ) Useable paper 60 g/m2 to 220 g/m2 Cover (16 lbs. Bond to 80 lbs.)) No. of trays 2 Noise emission Noise emission values The following shows noise emission values as measured according to ISO7779. Sound power level LWAd Sound pressure level LpAm MX-6500N Operating (continuous printing) Standby (low power level mode) MX-7500N 7.77 B 7.80 B - MX-6500N/MX-7500N Operating (continuous printing) Bystander positions 60 dB Standby (low power level mode) Bystander positions - • Operating: With options MX-FN21, MX-RB12, MX-RB15, and MX-MF10. • Standby: “ -” = less than background noise. SPECIFICATIONS 31 SUPPLIES Standard supplies for this product that can be replaced by the user include paper, toner cartridges, and staple cartridges for the finisher. Be sure to use only SHARP-specified products for the toner cartridges, finisher staple cartridge, and transparency film. GENUINE SUPPLIES For best copying results, be sure to use only Sharp Genuine Supplies which are designed, engineered, and tested to maximize the life and performance of Sharp products. Look for the Genuine Supplies label on the toner package. Storage of supplies Proper storage Storing toner cartridges 1.Store the supplies in a location that is: Store a new toner cartridge box horizontally with the top side up. Do not store a toner cartridge standing on end. If stored standing on end, the toner may not distribute well even after shaking the cartridge vigorously, and will remain inside the cartridge without flowing out. • clean and dry, • at a stable temperature, • not exposed to direct sunlight. 2.Store paper in the wrapper and lying flat. 3.Paper stored in packages standing up or out of the wrapper may curl or become damp, resulting in paper misfeeds. Staple cartridge The finisher and saddle finisher require the following staple cartridge: MX-SCX1 (for saddle stitch of saddle stitch finisher (large stacker)) Approx. 5000 per cartridge x 3 cartridges MX-SCX2 (for finisher (large stacker) and saddle stitch finisher (large stacker)) Approx. 5000 per cartridge 3 cartridges Supply of spare parts and consumables The supply of spare parts for repair of the machine is guaranteed for at least 7 years following the termination of production. Spare parts are those parts of the machine which may break down within the scope of the ordinary use of the product, whereas those parts which normally exceed the life of the product are not to be considered as spare parts. Consumables too, are available for 7 years following the termination of production. 32 ADMINISTRATOR Forwarding all sent data to the administrator (document administration function) This function is used to forward all data sent by the machine to a specified destination (Scan to E-mail address, Scan to FTP destination, or Scan to Network Folder destination). This function can be used by the administrator of the machine to archive all sent data. To configure the document administration settings, click [Application Settings] and then [Document Administration Function] in "Settings mode". (Administrator rights are required.) The forwarding data, exposure, and resolution settings of sent data remain in effect. Setting mode password An administrator password is required to configure the machine settings using administrator rights. The settings can be configured from either the operation panel or by using a computer web browser. After setting up the machine, refer to "Settings mode" in the User’s Manual to set a new password. The same administrator password is used for the operation panel and the Web page. If the administrator changes a password on the operation panel, the password will be valid when logging in to the Web page. Password for logging in from a computer As factory default, "Administrator" is the only account allowed to log in from a Web browser. By setting user authentication, "System Administrator" will also be allowed to log in from the Web browser. You can also specify a device account as a login user. The factory default passwords for respective accounts are shown in the following. Logging in as an "Administrator" or "System Administrator" allows you to manage all the settings available via Web browser. Account Password User user users Administrator admin admin System administrator sysadmin sysadmin Do not forget the new administrator password. 33 SIZES AND TYPES PAPER THAT CAN BE SET IN EACH TRAY Tray 2 Tray 1 Bypass-Tray Tray 7 Tray 8 Tray 3 Tray 5 Tray 4 Tray 6 Tray 1 Tray 2 Tray3 Tray 4 MX-LC13 Bypass Tray (MX-MF10) Tray 5 Tray 6 Tray 7 Tray 8 Bypass Tray (MX-MF11) Tray 5 (MX-LCX3 N) Tray 5 (MX-LC12) Min. Papaer Weight 60g/m2 (16lbs.Bond) 60g/m2 (16lbs.Bond) 60g/m2 (16lbs.Bond) 60g/m2 (16lbs.Bond) 55g/m2 (16lbs.Bond) 55g/m2 (16lbs.Bond) 55g/m2 (16lbs.Bond) 55g/m2 (16lbs.Bond) 55g/m2 (16lbs.Bond) 60g/m2 (16lbs.Bond) 60g/m2 (16lbs.Bond) 60g/m2 (16lbs.Bond) Max. Papaer Weight 105g/m2 (28lbs.Bond) 105g/m2 (28lbs.Bond) 220g/m2 (58lbs) 220g/m2 (58lbs) 300g/m2 (79lbs) 300g/m2 (79lbs) 300g/m2 (79lbs) 300g/m2 (79lbs) 300g/m2 (79lbs) 220g/m2 (58lbs) 220g/m2 (58lbs) 220g/m2 (58lbs) No Paper Size Paper Type Thin Paper No No No Yes Yes Yes Yes Yes Yes No No Plain (60-105g/m2 (16lbs.Bond to 28lbs.Bond)) Yes Yes Yes Yes Yes Yes Yes Yes Yes Yes Yes Yes Recycled Yes Yes Yes Yes Yes Yes Yes Yes Yes Yes Yes Yes Colour Yes Yes Yes Yes Yes Yes Yes Yes Yes Yes Yes Yes Letter Head Yes Yes Yes Yes Yes Yes Yes Yes Yes Yes Yes Yes Pre-Printed Yes Yes Yes Yes Yes Yes Yes Yes Yes Yes Yes Yes Pre-Punched Yes Yes Yes Yes Yes Yes Yes Yes Yes Yes Yes Yes Heavy Paper 1 (106-176g/m2 (28lbs to 46lbs)) No No Yes Yes Yes Yes Yes Yes Yes Yes Yes Yes Heavy Paper 2 (177-220g/m (47lbs to 58lbs)) No No Yes Yes Yes Yes Yes Yes Yes Yes Yes Yes Heavy Paper 3 (221-256g/m2 (59lbs to 68lbs)) No No No No Yes Yes Yes Yes Yes No No No Heavy Paper 4 (257-300g/m2 (69lbs to 79lbs)) No No No No Yes Yes Yes Yes Yes No No No Embossed No No No Yes Yes Yes Yes Yes Yes No No No Tab Paper No No No Yes Yes Yes Yes Yes Yes Yes No No Transparency No No No Yes Yes Yes Yes Yes Yes Yes No No Labels No No No Yes Yes Yes Yes Yes Yes No No No Glossy Paper No No No No Yes Yes Yes Yes Yes No No No User Type 1-11 Yes Yes Yes Yes Yes Yes Yes Yes Yes Yes Yes Yes 2 330mm x 483mm 13” x 19” No No No No Yes Yes Yes Yes Yes Yes Yes No 305mm x 457mm A3W (12” x 18”) No No Yes Yes Yes Yes Yes Yes Yes Yes Yes No 279mm x 432mm 11” x 17” No No Yes Yes Yes Yes Yes Yes Yes Yes Yes No 216mm x 356mm 8-1/2" x 14" No No Yes Yes Yes Yes Yes Yes Yes Yes Yes No 216mm x 343mm 8-1/2" x 13-1/2" No No Yes Yes Yes Yes Yes Yes Yes Yes No No 216mm x 340mm 8-1/2" x 13-2/5" No No Yes Yes Yes Yes Yes Yes Yes Yes No No 216mm x 330mm 8-1/2" x 13" No No Yes Yes Yes Yes Yes Yes Yes Yes Yes No 279mm x 216mm 8-1/2" x 11" Yes Yes Yes Yes Yes Yes Yes Yes Yes Yes Yes Yes 34 Paper Size Tray 1 Tray 2 Tray3 Tray 4 MX-LC13 Bypass Tray (MX-MF10) Tray 5 Tray 6 Tray 7 Tray 8 Bypass Tray (MX-MF11) Tray 5 (MX-LCX3 N) Tray 5 (MX-LC12) 216mm x279mm 8-1/2" x 11"R No No Yes Yes Yes Yes Yes Yes Yes Yes Yes No 140mm x 216mm 5-1/2" x 8-1/2"R No No No Yes Yes No No No No Yes No No 184mm x 266mm 7-1/4" x 10-1/2"R No No Yes Yes Yes Yes Yes Yes Yes Yes No No 305mm x 229mm A4W (9" x 12") No No Yes Yes Yes Yes Yes Yes Yes Yes No No A3 297mm x 420mm No No Yes Yes Yes Yes Yes Yes Yes Yes Yes No B4 257mm x 364mm No No Yes Yes Yes Yes Yes Yes Yes Yes Yes No A4 297mm x 210mm Yes Yes Yes Yes Yes Yes Yes Yes Yes Yes Yes Yes A4-R 210mm x 297mm No No Yes Yes Yes Yes Yes Yes Yes Yes Yes No B5 257mm x 182mm Yes No Yes Yes Yes Yes Yes Yes Yes Yes Yes Yes B5-R 182mm x 257mm No No Yes Yes Yes Yes Yes Yes Yes Yes No No A5-R 148mm x 210mm No No No Yes Yes No No No No Yes No No SRA3 320mm x 450mm No No No No Yes Yes Yes Yes Yes Yes No No SRA4 320mm x 225mm No No No No Yes Yes Yes Yes Yes Yes No No 8K 270mm x 390mm No No Yes Yes Yes Yes Yes Yes Yes Yes No No 16K 270mm x 195mm No No Yes Yes Yes Yes Yes Yes Yes Yes No No 16K-R 195mm x 270mm No No Yes Yes Yes Yes Yes Yes Yes Yes No No Monarch 98mm x 191mm No No No No Yes No No No No No No No COM10 105mm x 241mm No No No No Yes No No No No No No No DL 110mm x 220mm No No No No Yes No No No No No No No C5 229mm x 162mm No No No No Yes No No No No No No No No No No Yes Yes Yes Yes Yes Yes Yes No No Min X No No No 148mm /5.875inch 140mm /5.5inch 182mm /7.2inch 182mm /7.2inch 182mm /7.2inch 182mm /7.2inch 140mm /5.5inch No No Max X No No No 457mm /18inch 488mm /19.2inch 488mm /19.2inch 488mm /19.2inch 488mm /19.2inch 488mm /19.2inch 488mm /19.2inch No No Min Y No No No 100mm /4inch 90mm /3.625inch 182mm /7.2inch 182mm /7.2inch 182mm /7.2inch 182mm /7.2inch 100mm /4inch No No Max Y No No No 305mm /12inch 330mm /13inch 330mm /13inch 330mm /13inch 330mm /13inch 330mm /13inch 330mm /13inch No No No No No No Yes No No No No No No No Width: 90mm-305mm (5.5inch-12inch) No Length: 458mm-1200mm (18inch-47.244inch) No No No Yes No No No No Yes No No ExtraCustom Size Custom Range ExtraSize Unknown Long Size SIZES AND TYPES PAPER THAT CAN BE SET IN EACH TRAY 35 TROUBLESHOOTING Canceling an operation and redoing settings To change a setting or cancel printing, follow these steps: To restore all settings to the default settings Tap the [CA] key. To cancel a job To cancel printing or transmission Tap the [Cancel Print] or [Sending Canceled] key, or delete the job being executed in the [Job Management] screen. Delete the job waiting in the [Job Management] screen. To redo entry of a numeric value Tap the [C] key. When a problem occurs If a problem occurs while using the machine, check the following: Only problems that occur frequently are described here. For other problems, refer to Troubleshooting in the User’s Guide. Some or all functions cannot be used Have functions been dis- Some functions may have been disabled in the setting mode. abled by the administra- Check with your administrator. tor? When user authentication is enabled, the functions that you can use may be restricted in your user settings. Check with your administrator. Auto selection of colour mode does not take place correctly Are you scanning one When Black & White cannot be selected: of the following types of • Are there colors or colouring in the paper? originals? When Colour cannot be selected: • Is the colour in the original very light? • Is the colour in the original very dark, almost black? • Is only a very small area of the original coloured? In this event, specify the colour mode manually. Colours are off Did you perform [Registration Adjustment]? Line appear in the scanned image Are the scanning areas Clean the scanning areas of the document glass or automatic of the document glass document feeder. or automatic document feeder dirty? Ask your administrator to perform [Registration Adjustment]. => “Setting mode (administrator)” → [System Settings] → [Device Control] → [Registration Adjustment “Execute”] button. If the colour tones are off, perform [Auto Colour Calibration] after finishing registration adjustment. (If the colours are still off after calibration, repeating calibration may improve the results.) Copy mode: => “Setting mode (administrator)” → [System Settings] → [Copy Settings] → [Colour Adjust] → [Auto Colour Calibration]. Printer mode: => “Setting mode (administrator)” → [System Settings] → [Printer Settings] → [Auto Colour Calibration]. 36 Machine can not to be send or transmitted to computer Is your PC Make sure that the cable is connected securely to the LAN connected connector or the USB port of your PC and that of the machine. correctly to the machine? If you are connected to a network, make sure that the LAN cable is securely connected to the hub as well. Is the IP address selected Check the IP address setting. correctly? If the machine does not have a permanent IP address (the machine receives an IP address from a DHCP server), printing will not be possible if the IP address changes. To check the IP address of this machine, select "Setting mode" → [System Settings] → "All Custom Setting List", and print the setting. If the IP address is changed, reconfigure the port setting for the printer driver. => “Setting mode” → [System Settings] → [List Print (User)] → [All Custom Setting List]. See also the Software Setup Guide. If the IP address changes frequently, it is recommended that a permanent IP address be assigned to the machine. => “Setting mode (administrator)” → [Network Settings] The fold position is not correct Is the original placed face Check the orientation for loading the original or the orientation of up or face down the paper to be folded, and take appropriate actions. correctly? Transmission does not take place Did you select the correct Make sure that the correct information is stored for the destination destination? Is the corand that the destination is correctly selected. rect If delivery by e-mail (Scan to E-mail) is unsuccessful, an error information (e-mail admessage such as "Undelivered Message" may be sent to the dress or FTP server infor- designated administrator's e-mail address. This information may mation) stored for that help you determine the cause of the problem. destination? The paper misfeeds Is a torn piece of paper remaining in the machine? TROUBLESHOOTING Are you using a paper type that has a specific front and reverse side? The paper folding function cannot be used with pre-printed paper, letterhead paper, or other paper that has specific front or reverse sides. When folding paper, use a paper type such as plain paper that does not have specific front or reverse sides. Make sure all paper is removed. 37 MX-6500N/MX-7500N QUICK START GUIDE SHARP CORPORATION PRINTED IN FRANCE TINSE5198GHZZ