1
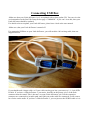
Gotharman’s
USB-box
USB transfer box for Little deFormer
User Manual
Contents Of This Manual
Important
3
Introduction
4
Connecting
5
Functions:
Open
7
Import
7
Back-up samples
9
Export samples
9
Back-up presets
10
Make directory
10
Delete file
10
Update USB box
11
USB drives that can be used
12
IMPORTANT
The Gotharman bank of samples that came pre-installed on your Little deFormer, are only licenced
for use with your Little deFormer. You may also export these for use on your other gear, as long as
you are the owner of a Little deFormer.
Any re-selling or distrubution of these samples on medias or via the internet will be prosecuted.
Introduction
Thank you very much for purchasing/consider to purchase a Gotharman’s USB box.
Please, before you do anything else with this box, back up your work!
When using USB box together with your Little deFormer, it is possible to back-up and restore your
work, both samples and presets, to import .wav files generated/recorded on other gear, and to export
your Little deFormer’s samples as .wav files.
I hope you will enjoy it.
Connecting USB Box
-Make sure that your Little deFormer 1 or 2 are updated with at least update 558. You can view the
version number on the first Edit Group Select page “COMMON”. If you can’t view this, then your
Little deFormer should be updated.
For details on how to update your Little deFormer, please have a look at the user manual.
-Make sure, that your Little deFormer is turned off.
For connecting USB box to your Little deFormer, you will need the 180 cm long cable, that was
supplied with it.
If you should need a longer cable, or if your cable one day gets lost, you can use a 1:1, 9-pin SUBD cable. If you have a Little deFormer 1, just notice, that like on the picture, pin 5 of the male
connector must be cutted. This is because, on some Little deFormers, pin 5 on the expansion
connector are connected to its audio path, and if this pin on the cable are connected, it will create a
lot of noise on the audio. If you have a Little deFormer 2, you can just use the SUB-D cabel as it is.
Preparing a USB drive
Now, when you have the USB box connected, you can power on your Little deFormer. If you, right
after power on, hit the “Edit” button, to enter the Edit Group Select pages, then push and hold down
the “Inc” button, until you reach the page, that says “USB box”.
Hit the “Edit” button to enter the USB box pages.
You should now see a page, that looks something like this:
No Disk / XXXXXXXXXXXXXXX
0 Files
To get any use of USB box, you must have a USB disk drive connected to the USB connector of it.
This should be FAT formatted, either by a PC or a MAC, and have a size of maximum 32 GB. A
USB FLASH stick is the ideal thing.
USB box will recognize a maximum of 1024 files at a time, so it is advisable to arrange samples
you would like to import in directories.
If you have already placed a USB drive in the USB connector, or if you do it now, you will see the
first file that is placed in the root directory. If this is a directory, it might look like something like
this:
D: /
TR_909_1.DIR
55 Files
If it is a file:
D: /
MINIWAVE.WAV
347 KB
55 Files
As you might already have noticed, directories are represented ending with .DIR, and their size is
not visible. Instead of size, 4 squares are shown, to make it easier to see, that this is a directory.
Files are shown with their original ending, and their size are shown.
In the bottom of the display, the number of files and directories in the currently open directory (in
this case the root directory) are shown.
By pushing the “Inc” and “Dec” buttons, you can select the files and directories, of the currently
open directory.
If you hit the “Edit” button, a menu will show up, where you can select a number of functions,
using the “Inc” and “Dec” buttons. These are:
-Open ? (only for directory)
-Import ?
-Back-up Sample ?
-Back-up All Samples Bank A ?
-Back-up All Samples Bank B ?
-Export Sample ?
-Export All Samples Bank A ?
-Export All Samples Bank B ?
-Back-up Preset ?
-Back-up All Presets ?
-Make Directory ?
-Delete File ?
-Update USB box ?
By hitting the “Edit” button again, you will select the displayed function. By hitting the “Exit”
button, you will exit to the root directory.
Open
If you select a directory, hit the “Edit” button, make sure that “Open” is selected as the function,
and then hit “Edit” again, the selected directory will be opened, and you will be able to view and
select the files inside of it.
It might look like something like this:
/ TR_909_1 /
909CLAP.WAV
50 KB
247 Files
The “D:” has now been replaced by the name of the open directory. You can now use the “Inc” and
“Dec” buttons to select the files and sub-directories inside the open directory. To close the directory
and exit, simply hit the “Exit” button.
Import
Use this function to import samples and presets to your Little deFormer.
If a sample file is selected, .WAV or .LDS (Little deFormer sampling), the sample will be imported
as the next available sample on Little deFormers FLASH memory, just like when you are recording
a sample. If you own a Little deFormer 2 Xpanded, the sampling will be imported to the bank
selected as the Quick recording bank – the “Bank” parameter in the “COMMON” section.
If you import samples generated on other gear, you will get the best results if these are standard
44.1 KHz, 16 bit, mono .wav files.
If a preset file is selected, .LDP (Little deFormer preset), the preset will be loaded to Little
deFormers preset ram. If you want to keep the preset, you will have to save it.
If a directory is selected, it will ask:
Import All Samples/Presets from Dir?
Hit “Edit” to confirm, or “Exit” to regret.
When importing all samples/presets from a directory, the samples will be placed on the next
available sample locations on the FLASH memory, in the bank selected as the Quick recording
bank. Presets will be saved from the location of the currently selected preset.
When importing, the display should look like this:
Importing… TR909KIK.WAV
With a progress bar in the bottom of the display, showing the progress in 32 steps.
When importing samples that was backed up or exported from a Little deFormer, the original
sample name and the chop points will be restored.
If you would like to import a group of samples, the easiest way to do it, is to create a directory,
place all the samples into this (max 512 per bank), and then just import all the samples from this
directory.
Backing up versus Exporting samples
When backing up samplings they are stored in Little deFormer’s original format as an .LDS file.
When exporting samplings they are stored in 44.1 KHz, 16 bit .WAV format.
If you plan to use your samplings on other gear, that can import .WAV files, you should clearly
export them. If you just wants to back up your work, or transfer your samplings to another Little
deFormer, you should back them up.
If there are any difference between the .WAV format and Little deFormer’s .LDS format, it is very
little. If you export samples as .WAV files, you can still import them again, with the original sample
name and chop points restored, so you don’t nescessarily HAVE to use the back up function. I
personally just think, that it is nice to know, that my work is backed up in its original format ☺.
Back-up Sample
Back-up All Samples Bank A
Back-up All Samples Bank B
Export Sample
Export All Samples Bank A
Export All Samples Bank B
These functions will export your samples to the USB drive. If you have a directory opened, the
samples will be exported to this. If you have no directory opened, they will be exported to the root
directory (D:) .
You should notice though, that USB box can handle a maximum of 1024 files at a time, so it is
advisable, to store your Bank A samples in one directory, your bank B samples in another (if you
own an expanded LD2), and your presets in a third.
When backing up/exporting a single sampling, a screen will pop up, to let you select the sample,
you want to export:
Export single Sample, Bank A:
12 [606 Kick]
You can now use the trigger and step buttons to select the samples of the currently selected preset,
or you can use the “Inc” and “Dec” buttons, to select any sampling.
Hit the “Edit” buttom to start exporting. The display should now look like this:
Exporting… 606 Kick.WAV
The file names of the samples will be constructed like this, with 8 characters:
-The first letter will show if the sample was from bank A or B.
-The next four letters will be the number of the sample.
-The last 3 letters will be the first 3 letters of the sample name.
If you are trying to export a sample, that already exists in the open directory, it will ask:
-Overwrite 606 Kick?
Hit “Edit” to overwrite, or “Exit” to keep the sample already exported.
When exporting all samples from a bank, it will only ask this, for the first sample it finds, that are
already there. If it finds more, it will assume to take the same action, so you will only have to
answer this question once.
When pushing “Exit” not to overwrite, it will not abort. It will continue, and still export the
samples, that does not already exist.
A known error:
In very rare occasions, when exporting all samples from a bank, the USB drive utilizes an:
“ERROR: Bad Command”, out of the blue. I do not yet know why it is doing that, but I am working
on it.
Until this is fixed, there are a workaround:
Turn your Little deFormer off and on again. Go to the USB box menu, and open the same directory
as you were exporting all bank samples to earlier, and start exporting all samples bank x again.
It will now ask if it should overwrite the first sampling. Push the “Exit” button when it does this. It
will now skip through all the samples that are already exported to this directory, and continue by
exporting all the rest of them.
Back-up Preset
This function will export the currently selected preset to the currently open directory.
The file names of the presets will be constructed like this, with 8 characters:
-The first 3 letters will show the preset number.
-The last 5 letters will be the first 5 letters of the preset name.
Back-up All Presets
This function will export all programmed presets to the currently open directory.
The file names of the presets will be constructed like this, with 8 characters:
-The first 3 letters will show the preset number.
-The last 5 letters will be the first 5 letters of the preset name.
Make Directory
This function will create a new directory inside the currently open directory, or in the root directory,
if no directories are open.
When you first hit “Edit”, it will open a page, that lets you name the new directory. You can use the
8 edit knobs for this, and hit “Edit” again, to create the directory.
Delete File
This function will delete the currently selected file from the USB drive. Only files can be deleted. If
you would like to delete a directory, you should do this on a PC or a Mac.
Update USB box
When a new update becomes available for the USB box, you can download it from
www.gotharman.dk , to a PC or a Mac.
Create a directory on a USB drive, that must be named “UPDATE”. Place the update file inside this
directory.
Connect the USB drive to USB box, while connected to your Little deFormer, and select the
function “Update USB box”, and hit “Edit”.
USB box will now look for the UPDATE directory and the update file. If is doesn’t find one or the
other, it will respond: “No Update Files”. If it does this, please retry the operation.
If it finds both the UPDATE directory and the update file, it will ask:
-Update USB box?
Hit “Edit” and update process will start. When it has finished, you will have to turn your Little
deFormer off and on again, to complete the update.
USB drives that can be used
-USB box will accept USB drives on sizes up to 32 GB.
-The drive must be DOS formatted from a PC or a Mac, before it can be used.
-You shold keep the count of files and directores in each subdirectory and the root directory blow
1024.
-It doesn’t matter how long the names of the files and directories are, but because of the V-drive
system USB box uses, only the first 8 characters of the names will be shown. If many files or
directories has almost the same name, V-drive will rename these, and that sometimes look really
odd ☺.
Written by
Flemming Christensen
”Gotharman”
2015
www.gotharman.dk