1
User Manual
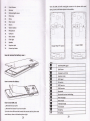
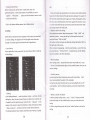
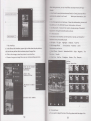
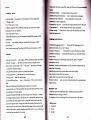
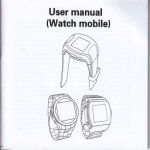
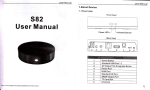
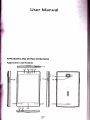
APPEARANCE AND KEYPAD OPERATIONS
Apperrence and buttons
01 0? 0304
6
-6
09
ffi
#
-r-5
I
,0
06
I
0102.
0304.
05.
05.
07.
08.
09.
10.
11.
12.
13.
74.
15.
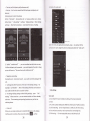
4,Put the slM card with metal. gide connect to the phone with metal
dome, show as the below picture in the middle .
Frmt CameE
Receirer
r
Disbnce/Lightsensor
Pilot lamp
Menu
f:o
Main sreen
Return
Volume button
Micrcphone
USB
port
Rear camera
Flash
light
Speaker
Earphonejack
lnse* SIM
lnsert tho ?F card
Power key button
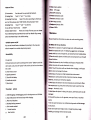
How to remove the battery cover :
!
E
I
I
E
How to remove the battery:
IE
E!
It
I
I
How to insert SIM
L, Remove
E
E
erd:
the back coven
2, Remove the battery if you have install
it
3,Put the micro SIM card with metal side connect to the phone with
metal dome, show as the below picture right.
28
I
I
E
&
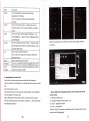
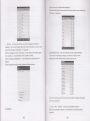
GSM/WcDMA Sisnal
GSM Roam
EmerPencv call only
Airplane mode
Wifi sisnal
3G sewice
GPRS
service
EDGE
seruice
Bluetooth
Bluetooth devices interlinking
New messages
New emails
Vibration mode
Clock alarm
Charging
3G
talking
29
Keys
home
Functions
Press
this button to return home from any
appiication or interface.
Press it
to open recently opened application
window.
menu
Press it
to start the menu, which allows you to
perform actions in the current interface or options'
men u.
back
Press
it to return to the previous interface, or to
close dialog box . options'menu, notification panel
or the kevpad.
power
Press
it to open the phone's menu, then you could
choose to lock the screen.turn offthe phone, or set
it to the silent mode
up
.
Press it
to increase the volume
Press it
to turn the phone to vibration mode from
III
After the connection can be directly in the
PC
check images captured
on camera.
the silent mode.
down
Press it
P-Serson
Cover it, and then the phone's backlisht will turn off
to decrease the volume.
front
Entering the camera interface, switched to the front
camera
camera can photo yourself.
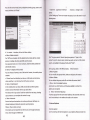
2. Using Memory Card as U Disk
lf you want to send music, pictures or other files to the phonet
memory card from the computer, you should set memory card as u disk
first.
Set memory card as u disk
1)Connect the phone to the computer with USB cable. The notification
icon will appear in the status box.
2)Use USB mobile transmission line will connected to the computer
3)ln the notification panel, touch USB is connected
the
USB
Storage Device"
.
,
then touch"Open
.
Notice: different
PC
operating system to how to operate to normal
use
the U disk.
1)
WlNT Can directly use
2) XP update windows media playerto
3) tnstall wpdmtp.inf driver
4) vista Unconfirmed
.Notice :on the
PC
operation assistant tool such as mobile phone, Must
be open the USB debugging.
30
11
31
search automatically, that is, phofle needn't to perform additional steps
to connect Wi-Fi networks.
Wi-Fi
pmid6
netrcrtarc.
as far as 3oofeet
connecttothewirelessaccesspointor
' Notic:
numh[
wireless
should
lhotspotsl
.
(100M) range of
lf you use cell phone to connect wifi, you
the
signal.
The aEilability and coverage of Wi-Fi signal depend on
infrastructure and other obiects penetrated by the
Notices:
Unless you choose not
to reserve the network with password,
]
'l
when next time connecting to the previously encrypted wireless
I
t
network. Wi-Fi will search automatically, that is, phone needn't to
perform additional steps to connect Wi-Fi networks.
otherwise,thereisnoneedtore-enterthecorrespondingpassword
Open Wi-fi and to connect to the wireless network
l)Presshome>menu'
thentouchsettings>wifiandinternet
.ConnecttootherWi-Finetworks
2)Selectthewi-fibox,
toopenWi-Fi.Phonewillautomaticallyscanfor
1)lntheinterfaceofwirelessandnetwork,touchWi-Fisettings.The
available wireless
networks.
founded Wi-Fi networks will show on the Wi-Fi network list.
the
founded network name and security settings. (open network or WEP.
WPA,/WPA2withpassword).lfyouenablethenotificationin Wi-Fi
settings, The status box will show this icon ( ) when open available
wirelessnetworkfounded,
3)Touch Wi-Fi settings. Then a list of Wi-Fi network will show
2)Touch other Wi-Fi networks, and then you can connect to this
network.
.Notices: inaddition,youcansurftheinternetviaGPR5.Wedefault
that the
4)TouchoneoftheWi-Fichoicestoconnectthenetwork.Whenyou
choose open network, phone will connect to it automatically. lf
you
GPRS in
SlMl
is opened
after started, users can select
manually,thespecificlocationis "settings>wirelessandinternet>data
connection",touch "slMl.slM2,nodataconnection",whenthedot
turns green,
itt
already opened.
choose WEP. WPA/WPA2 with password, you should type the password
first, then touch to connect
. Noticesr when
it.
Bluetooth
the'phone is connected to the wireless network,
rhe status box wir show this wi-Fi i"on
<f
r
, and
the
approxima,"
connected
will display the name of Wi-Fi network, status, speed,
signal itrengthen (the number of lit bars).lf touch the
network,
signal,
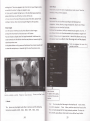
strength, security, information and lP
Bluetooth function. After started, the status box will show this icon
reserue"
asintherightpicture.lfyouwanttoconnecttothisnetwork,you
should re-enter these
2)Touch wireless and internet, then choose Bluetooth box to open the
i
J
address.
lf you want to delete the wireless settings, please touch "not
settings.
I;;::l;":"Ht:fl"."^#:I:;i*'"*"'
:)touch Bluetooth settings, all the devices founded will display
J
.
not to reserue the network, otherwise, there is
no
e
connecting to the previously encrypted wireless network. Wi-Fi
32
the
,rut".,,tebox "canbedetected",setittobedetected,theother
importantr the maximum detecting time of the phone
need to re-enter the coiresponding password when next tim
in
list under the icon,
Bluetooth devices will be able to find the phone. )
' Notices:
Unless you choose
(1.
rouch "scan for devices"the it starts to scan for all devices within range.
is 2 minutes.
Pairing and connection of Bluetooth headset
1) Press home>menu, then touch settings.
2)Touch wireless and internet>Bluetooth settings, then select Bluetooth
will
box, then your phone will scan for the Bluetooth devices within
-l
-l
shilthe
range,and
founded devices in the list under the icon.
ilbmatically
for testing.
. Tips:
a.fthe list
en't
.
find your equipment, touch scanning equipment to
1
re-sGn it.
b.Make sure that the devices wanted are under the detected mode.
3) Touch headset in
the equipment list to finish the connection.
. Notic6: generally
Bluetooth devices need password to be paired,
often use [0OOOj as the default password.4)The pairing and conneding
Lmding mail account
Op€n Gmail skip introduction screen>loading interface appeare
xelect load
b. Enter name, password then load
Eflail
account initialization, prompting "login successful" All Google
mnts
will be synchronized.
status will show under the headset in the Bluetooth devices list. When
the headset conneded to your phone, the status box will show this icon
{
! ) ,""n,
.onnected. Then you can use the headset to make or
.
Geating and sending,mails
lvhen creating mails, select mail > creating mails. Enter the
addrs(recipient). theme and
receive callings.
'append'.'Addcc/Bcc',
.
Cut
contents. Press MENU you could
selectsend ordiscarded.
the connedion to the Bluetooth
1)Press home>menu>settings>wireless
and internet>Bluetooth settings.
.
Receive mails
2)ln the list of Bluetooth equipment, touch or tap and hold the
There is tone for new mails, in the status box will show this
connected hand-free headset.
Uuttm
3)Press and
.
select'tancel the pairing".
$
,
Press
Menu > 'refresh' , refresh and update the number
ofthe unread mails in
a proper way.
Bluetooth proximity sensor
After pairing the two device,you can test out the signal is strong or
weak by the Bluetooth proximity sensor device
. Delete
mails
When loading a mail account, if you want to delete
restore factory settings. When loading a second
it,
one,
you need to
you could press
5.Mail
the menu button to delete it.
5.1Gmail
Noticesr many functions depend on Gmail Account, for example:
Electronic Market. Google Talk. Sync Contact and Calendar.
.
Create an electronic mail account
Select mail> settings. You can activate or edit existing e-mail accounts
as
well as create a new e-mail account.
a. Select mail, Google account
setting interface appears. Then touch
'next step' > create account>enter name, last name and e-mail
5.2 Email
.
c
Load Email.
Open network connection,
d. ln setting the account interface, input the correct email address and
password and click next mobile phone automatically complete the
account.
srver
Settings. Pop-up mail find frequency, and
b. Google servers determine whether the name can be used, if so, new
interface appeaG prompting enter password, then judge the password'
sending and receiving
security, useE who doesn't meet the requirements need to re-enter the
e. For account creation name, the editor ofthe law that email user
password.
name, and click next, Complete set, synchronous mailbox.
user Settings interface, complete Settings, click next.
c. Successfully register a new Gmail account, a messenger created
34
35
.
Create and send Email
When creating mails, select mails > create mails. Enter the
. iideo call: video call usually refers to the lnternet and mobile lnternet
address(recipient). theme and contents. Press MENU you could
'append'.'AddCc/Bcc', selectsendordiscardedorsaveasdraft
:a:ed on (3 G lnternet) end, through the phone between the speech of
.
::e
Check
the Email files
real-time transmission and image {user of bust, photographs, items,
.:..J of
Click on
the bottom folder options, list all folder options
:
-.
'
5. Dialling
a way
to communicate. Only 3 G to support this function. lnput
- J mber click video dial-up, each other answers the phone after both
through camera for video calls.
elephone calls in the call log
Every
telephone number called and received in
phone'
When the icon of internet server appears in the screen, you could dial
reserued in
or receive callings. The signal bar on the top right corner show the
'ecord will show
strength of network signal (the maximum with 4 signal bars)
A,l numbers in
.
s menu of call log. On
"slMl
"slM1, slM2"
will
thetop left of everycall
or SlM2"
the call log can be dialed by clicking the button "dial" on
:1e right side of the screen.
.
ivhen number list appearing, click it to catch details! press it for long
Start dialing
2",
Open application's main menu>dial. You could choose SlMl or SlM2 to
1oucoulddialvia "51M1orslM
do the dialing.
rave the number or do other operations.
.
meanwhileyoucanedit,delete,
Receive callings
,Yhen callingcomes (top leftwill showfrom which SIM card) press
-Answer"and slide towards right until the middle button, then you can
.eceive callings.
.
Proximity sensor
According to the distance between phone and human
body, it will
adjust automatically the switch of the backlight.
During the call, close the phone to the ear, the backlight will turn off
automatically, which could
save batteries and prevent
inadvertently
touching.
.
At
Dialling
the dialing Keboard
,
enter the phone number, and then click the
dialing key, after that,you should choose one SIM card or internet call.
in the
lf needed to call the extension,you could click the " dial pad
"
bottom of the screen to open the interface or press menu key to select
"delay2seconds", andthen enterthe numberof theextension.
The diatup keyboard input number, click Menu can lP dialup or speed
36
'
Refuse
to answer the phone
a, When standbv, calling
comes, press "refuse" button and slide
towards left side until the middle button, then you could refuse the
ca I li
b.
ng.
When using,calling comes,click on the "refuse"button to refuse the
ca I li
ng.
37
. Two-way call/multiparty call(conference call)
. Notices: this
=-c
E:e
the video call.
function needs that SIM card open multiparty call
Jeatures.
1)Already exist a call in the phone
2)Click "Add
default open
settings
),
calls",
"
dial another call (or receive another
call waiting" (settings
-
dialing settings
call, phone
- other dialing
after both connected, could view the status of calling.
XUI
3)
select "combine
call"
-
Itr€- the menu
=-:acts,then
of applications>contacts,
press long
press
one contact of the
the phone number,and select the" video call".
you can combine two calls into one way.
4)after multiparty call connected , you could separate the calls or hang
up one of themvia "thesmall arrowof conference call" .
.
Telephone recording
Duringthe call, more>start record, you could record the dialog of the
call.
1)
settings>set otherfunctions of the call in the dialing settings, for
example;
Call Transfer
-
after all the settings finished and turned on,
. Call settings
you could transfer the call to a certain number
2)
lnsettin8s>dialingsettings>otherdialingsettings,
open
"call
waiting" .Afterturned on, you can receive anothercallwhen already
exist
one,
The answering and rejecting functions are just like the
voice call
1) Voice Mail:The voice mailbox in
setting in the input voicemail
number
ordinary phone.
2) I P prefix number:Setting the different of SIM cards I P prefix numbers
. Video call
3) Call
When you use video call,ensure to install 3G SIM card. in the dialing
interface,enter numbers,then pressthe symbo!
38
@,ro tt"t
forwarding:
Can set respectively 2 a Sll\4 card,
the line is busy,
and no one has to receive, not be connect four connectinB way
3) Call
barring,
Can set respectively
39
two to the SIM card call
restrictions
4)
Additional Settings: a.My phone number b.Call waiting.
m :c iart input method, in that way you can enter characters.
:. onctthe button of "send from SiMl or SlM2" to start sending.
Video Call
1
,
Local video
replacement: Set a picture to display when camera off
si
MMs to certain phone number
Arm seating message,
u5e.
2) Display peer video: Display picture for replacing peer video when it is
it was defaulted as SMS, it will be turned to
rrlLts when following operations were done. you can send MMS via
unavailable.
:[ci:ng'send"
3)
:sn tlE interface
Peervideo replacement: Set a pictureto displaywhen appearvideo
afterediting.
of "edit",
Click
the button
of
.,
Menu,,:
unavailable.
2Crcl'append", youcanspendthefollowingattachments, thenil
4)
r;rll be turned to MMS automatically,
Enable backcamera: Availableto switch cameras if turn on.
5) Bigger Peervideo: Turn on to make peervideo biggerthan local
video,
6)
7)
Auto drop
back'
Drop backto voice call connectingautomatically
outgoingvideo call: Displaylocal videowhen make
a
video call.
8) lncoming video call: Display local video when accept an incoming
video call.
9) other settings : a. call
forwarding
b.Call
barring c.Additional
n
.'.f
stid.1
s[d!
2
l.,
side 4
l:t
sid.s
n
slidcT
rJ
slid.s
settings
lnternet call
1)Account
2)Use lnternet calling
Other Settings
1)
Fixed Dialing Numbers
2)
Minute Reminder: Turn on minute reminderatSos of every minute.
3)
Quick Response: can editthetext messagesrejected bythe
information when content.
Xoti6:
a. Ffyou want send MMS
with many pages, you should select "append
PPT'in the "append" interface.
b- You can append 10 pictures, with the form of GtF, JPEG.
c. Click "adding theres", the box of "theme" will appear under
7. MessaginB
of "recipient", meanwhile it
.lmportant: the
message
title of this phone isthe phone number, will
be reserved in ssimilarfor of dialog, instead of the usual folder
structure. MessaBes with blue background are those received, and
messages
.
with white background are those sent.
Send SMS to certain phone number
1)Press
I
of
Send messages to multiple numbers
Enter multiple numbers in the box of entering, each number is divided
by
the comma in English.
Click on
the right side ofthe head with the receiver plus icon, can
choose contact group in the address book
"edit":
a. Click "recipient"boxto start input method,you can also click'enter"
I
40
I
the box
turned to MMS automatically.
home>messaging, touch "new messages"
2)ln the interface
i
.
is
41
m of applications>cifi tacts
$rb
phone contacts and SIM card contacts,
Edf,ay
Ekrdalphabet.
sort contacts by
I
. Notices: For nowthis phone can mass messagesto almost 20
numbers, the correct number depends on the characters, you can only
enter 312 characters in the box of "recipient" .
When a message is sent or sent again, a little yellow letter will appear.
Fd
The number 1 or 2 on the letter refeB to SlMl or SlM2.
ab6rterthe
When message sending
failed,
a red
triangle with exclamation will
Search lcons, You can enter the contact search interface.
amnt,
Numbers or letters and the list of names of the
which will be shown in the search results.
appear
when editing information other functions of Menu button
.
.1$dq&te. r-:::-
,
:l..e;tci,i,i!a{
.i
r'i:,:i:a:.r'..ia I
.i,tl:.:tt,.,l
i@did.,,.:-i: ,
0li*e!!: i a.,"1;.;:: lF
b-lf it were not so search to match of the contact, interface will appear
'mt find any
3)
8. Contacts
Click
contact:
"Add Contact"
lcons,Can create New Contacts
Select save contacts to phone or a a SIM card, into contact editing
hterface.
42
43
You
cn
edit contact head, name, telephone number, group, save to and
Qa dE
-
more, and then click "finish".
application interface
>Contact, change to the
arulP.
L,ftf
Add group "lcons can create new group, Just to be saved in a cell
drale trup
Ptso
i!11
Lesl
_ilt: _'-'.
,*
1
4)
ln
contact
interface, click on the Menu button
a. Menu >Delete contacts
can 'All"lcons checked, click the delete button, delete all the contact
person, including cell phone and SIM card of contact.
Can separate check one or more contacts, click
the delete, delete the
b. Menu> To display of the contact
slM card of contact, the mobiie phone
contacts
c. Choose
"the group name" column input group name, in "type in the
utacfs
sdr,
name" column input contact key word, can be in all of contact
and added to the group.Finally click "finish".
-
selected all contacts.
You can choose all contact, one a
Ziltrr
from the definition, but also on a SIM card and cell phone
choice whether or not to show that all the lone contacts.
3) h a group, click on the Menu button,
a lrlenu>Update
E
ln the mobile phone can local, SIM card and SD card three parties
achieve contact information of the copy each othen
First choose the "copy source" and then select the next step, selecting
copy contact to, can complete the contact's copy.
Gn modify the group name, delete or add Broup of contacts
b. Menu >Delete
fbu @n delete the group, and will not delete the contact itself.
c
d. Menu >lmport/export
Menu functions
Menu >Send messaglng by group.
Artomatic new information, and the group added to contact the
address bar recipients
d-
Menu >Send Email by group
tf @ntact group have the same email address, the automatic new mail,
and E-mail address in the address bar add to the receiver
e. Menu >Accounts
Account and synchronization set routine synchronous Settings, can
choose background data and automatic synchronization.
9. lnternet Explorer
f.Menu >5hare visible contacts
All contacts can be imported into the SD card, or through bluetooth,
email, text message or MMS share
44
hernet explorer
llln the interface of internet explorer, touch
45
address filed and enter the
' i i :::: ::
U RL,
:::: :-:wall the contentdownloaded,
- ::-, j-:o your browsing history, andviewthe
the screen. You can touch it directly go to the page or continue to enter
"
URL.
',i-
Homepage
ect the Bluetooth or SMS to share the current page.
: r {-
2)Use keypad to enter URL. The appropriate web sites will appear on
'-:
-::
mostvisited pages
:-.
-: ::^:3ints a varietyof browsersettings.
Select " homepage ", you could load in the set homepage. lf you do not
set it, vou will use the
vendor'
s
:.:. ;-Jrd€ r
pre-set sites.
s
- t
:.^ .eco.d voice, and send it quickly via Bluetooth or MM5 as
=.i :: -:<e it as ring tone.
,:- ::: -:cordercan onlysavethe audiofiles asAMRformat.
. : :r :-a -ecorder application.
. .::: :-e ohone'smicrophonenearthevoicesource.
f.$
: :( -::crder to record voices ,and click to stop or Recordinglist.
. ':::-: rgs save in my recording folder in the default music program.
.
(
*I
::..
{a f,f
'Functions of menu
1)Menu>Backward
After browsing through multiple pages, will return to the previous
page
the current page.
2)Menu>Farward
After browsing through multiple pages, will move to a web page after
the current page.
3)Menu>Windows
view all open windows to the current.
You can
4)Menu>Bookmarks
a. Click
the "Bookmarks"to make the current URL as a bookmark saved.
b. Click
the bookmark under the bookmarks list,will open the
URL.
5) Menu>More
a.Add bookmarks,save the current URL as bookmark.
b . Find on page,search what you need in current page.
c. Select
text,in the text, click and drag to select a piece of text.
d.Page info,display page address and
:
:
f,pen the menu of application, click
alick screen except the alarm at any position, screens, black, time
* :. white shows, this time the standby time to screen will not
:,: rguish screen. Click again on the screen, and restore normal
-:
a
: aiick screen set alarm button and enter the alarm clock set interface
other information of the current
browsing.
46
clock
-fa ce.
4'7
I
-1,:'F
-:":zIrE
-rm rF: -, -.d before using the camera or video camera. All your
*rr:- :r ,':ecs taken by the phone are stored in memory card.
'Alarm
Afterfunctions set, phone will arrives in the setting time to alert you by
ringing or vibrating to achieve
it'
s
function. Press Menu to add alarm,
you can also add it from the adding interface. You could set the alarm
according to your needs. ln the interface of alarm will show three
:ff =-e=
LE 'c-E ::tch menu, select camera. Take pictures
, {- ,€-- ccject with the screen.
- l:r-:-:ia -shutter" button on the screen.
f- - < ^g. photos will save to the camera' s galley folder with the
-d** :r
=( .g time.
- a:,- -. view the photos by touching the preview box button.
:i-:- settings
a ! ;- :: -.r the button of "setting Menu" in the interface of camera
-
--
1:-inoc
-i
closed alarms (two alarm clocks are Mondayto Friday 8:30,9:00)
.":e. --ere
Edit
.-
You can edit
the current alarm, you could edit
time.
ringing tones.
vibration. repeat form and tabs.
--
-'-:
viewfindermode, press Menu, you can switchtovideo
d:ll6rv
: - :E :::
j-?r : -: :
r: ,:.- !i
'lght of camera viewfinder mode, display the preview of the
!ture. Touch preview box, the photo display on full screen
enlarge it to view details.
'Caculator
this function can turn your phone into calculator, it can do some
simple calculations.
.Touch the number keys to make it appear in the blank box
ln
the interface of calculator, press MENU button or hold down the
screen to the left, then the senior panel appears.
-:'ed
Settings of Camera and Video camera
Flash
mode: Auto, On. off.
,Vhite balance: Auto. lncandescent. Daylight. Fluorescent. Cloudy.
m :ght. Shade. Warmfluorescenl
:
Coioreffectr None. Mono. Sepia. Negative. Aqua, Blackboard.
49
Whiteboard.
4)
Scenemode, Auto. Night, Sunset.
Party. Portrait.
Landscape.
'
la.: ::-:- settrngs
r'',:-:- :-: olttonof
"set" inthe interfaceof cameratodothe
Night portrait. Theatre. Beach. Snow. Steady Photo. Fireworks. Sport.
candle light.
5)
othersettings: storelocation, exposure, imageproperties,
anti-flicker
Camera Settings
1)
2)
3)
4)
capturemode: normal. HDR, Facebeauty. Panorama
selftimer: off , 2seconds , loseconds
continuous shot: 40 shots , 90 shots
picturesize: QVGA, vGA, lMpixels, 1.3Mpixels, 2Mpixels,
3M pixels, 5M pixels, 8M pixels, 12M pixels
3.2
Video camera
' - .: -:- , :J.frnder mode, press Menu. you can switch to video
' j_:_:: a: ery.
" :* -:: - :-: clcamera viewfindermode, displaythe previewof the
) i - . :.. -uch preview box, the video will display on full screen
: ,: - ::- ::-:h the play button to view it.
, -: ri: -is cf Camera and Videocamera
i r:_ -::e: Auto. On, off.
- -: :: ::ce: Auto, lncandescent. Daylight. Fluorescent. Cloudy,
r ;-- :-::e, Warmfluorescent.
-::-:-.ct: None. Mono, Sepia. Negative, Aqua. Blackboard.
aa':
. Prior preparation
Install memory card before using the camera or video camera. All your
photos or videos taken by the phone are stored in memory card.
i-: -sde, Auto. Night. Sunset. Party . Portrait. Landscape.
,i-' :,::-:. Theatre, Beach. Snow, Steady Photo, Fireworks. Sport
."1. !-:
.ake video
| @r lettings
'/ :_aaione: off, on
. :-: ::cde: meeting, normal
- -. 3pse interval: off, 1s, 1.5s, 2s, 2.5s, 3s, 5s,
- , ::l q!ality: low, medium, high, fine
10s
:Ee.^ images
:-::i -.me, touch label ofapplications, then touch photos' galley.
- :-:
"rerface of camera, Press menu to open it, then touch to
1 ) Aim your object with the screen.
2) Touch the "shutter" button on the screen.
3 ) After taking, photos will save to the camera' s galley folder with the
name oftakingtime.
4)
You can view
the videos by touching the preview box button.
50
51
fir'-r]r
fcJrs,
you can view them and share them with your
ffi
{ luE a.@i
Mcl.r
be&6!w
Ff1'nr!q.f
)
r:
Files lnterface
a. ln
the library the interface, upper right
a
slide show the play button,
click on the way to the sllde circulation play all image files.
b. Click on
the images, enter the picture to see interface.
c. Choose a long press image files, pop-up corresponding
Iict
operation'
E pnd
pictures:choose Gmail or E-mail, pictures will be
added to an
E-mail.
Write your information, click
GI
I IE lreas€rng to send pictures: Select the informatlon, pictures will
t @inqE :e the MMS.Write your information, click send.
: e 3€s$:
Bluetooth list, select already pairing of bluetooth
@r:hrcugh bluetooth send a picture.
{ rca fftires
1r sc rqE yiew interface, on the screen or so slip, can forward or
ffi
rw photosEdit picture.
. irr
Fill LiSht HighliShts shadows Auto-Fix.
'8r:
!. :rt rag€effects : Cross-process posterize Lomo
lErmfi? y and so on.
i :er aqe(ts: Warmth Saturation B &W Sepia Negative Tint
!u-Be
D@dle.
a lf,ira!9
Red Eye Straighten Rotate Flip Sharpen.
@ the irag€3
s*tLinss
drl€te
the
sa1?atRa filag
iEtures ts Bhar*
Ssls6ted file
muber
:
i
Crop pictures:
iyou wanttoadjustthesizeof the clip, pleaseholdthe
edgeof the
53
cutting tools. The arrow appears clip, from the trim your fingers inside
or outside the center to drag, can adjust its size.
b. lf you want to adjust the big hours in the clip that keep proportion,
please hold down any of the four corners of the one.
you move to the clip of the picture area of the other, please hold
cutting is internal, then move to drag the fingers to the position.
c. lf
view images
1) ln the picture interface, touch photo album to view images.
2) Touch
the thumbnail to view pictures on full screen.
You can choose
to display small or large thumbnails. Hold down the
screen towards the left side to view the next photo or towards right to
mlk
rhqr @E 3r the label of applications, touch
mm'[E r Mlsc Media appears.
tunda
M . 6 are classified according to the following four
re{@6 ,iisa, albums, songs and play lists. Touch one of these
,t|i!'"_ €,_ cn viewthe list inside.
iffiru :€ *Gtions, until your wanted music appears. Such as, if
@ :rre &-tsts a list of artists sorted by the numbers in English will
,|E }rc€ any on to open the list, then all the albums and songs
sl @n Setect one album, then the songs in it will be played.
ttur
view the previous one.
le& &? &lxsx. al|B op.ft rh.
*e&d ed* ft!*
the photo album or tist, press and hold down the picture towards left
to view the next picture, or towards right to view the previous one.
ln
lrrricte
schadute .oatrol
Plaved or pad6e buttm
music. Then the
Screm sciline IcoE
5. Music
The
phone can play digital audio files in memorY cardJhe following
formatsareavailable:AMR. M4A' MlDl. MP3. WAV.
54
OGG.
E: You can play all of the songs in the interface of music media,
sequence . Press Menu, and then touch the party Shuffle.
=adom
-'r will start playing the first song randomly selected . To close the
:'m Shuffle, press Menu, then touch to turn off the party Shuffle.
55
Albm at
--Touch to vies thc
p1
Ilold ca retreat
quickly songs orset to at the
sonrs
ayli st
ick it display
i
Tmch ca
chrye
off
pl.t
:re oi activity in the activities, box.
i i:mffi
"re
l(m
ac 4 rxcial occasions such as birthday or a day with events,
, iE 1-?r lca,on to Yes. lf the activity is at a certain time period,
ilffir ,|1l+
=: : ne and end time.
ll l"E:e sE.r l4ation, description, guests, repeat, remind time.
.eturn to calendaf,
llt iirm insi
=
:r.ffiMo
I
.EHr
I
Hold fasl tu sdti
\s[{i
rcn
rmrq
nts Songs sr
to lhe
*itch
sang
K@ertsire of tot.l
duati@
llas lmg played
Touclr €m stop
Propess bx
plltr
md drag the ebile t0 ey of
Tggch
fo€t agE
9On8S
16. Calender
Enter the calender aPPlication
Load Goggles accounts, enter the application, ln the interface of month
or week will use gray to highlight the day. Display default the date on
the current month.
tntheinterface, pressmenu, 4displaymodeswillappear:
1) Schedule lntrface shows a
certain schedule(click on the initial time
and view forward,click the final time to view backwards )
lnterface displays a day's schedule (last clicked date),slide
2)
day
: s snogEm, you may listen to FM radio on the device, FM
&:e dired headset as an antenna to receive signals, before
rM -{ : i logmm ,you can install the original
iwlurmm--€adphones, when listening, you can switch it manually to
,fim*E :r:ie
b ryr.db
IM :rs .:c€l
mode with wired headphones.
to open the application of FM radio.
" :riicr :r --re "search", automatic scanning search FM channel, and
nme - 5t anterface, list allchannels
.i :,(r '.rr{ recording", Iistening to the radio to the current can be
@:
-le tape recording to default file name can be arbitrary
s,-.rened input filename. Save to FM recording the default file.
'*it" closed FM radio, cannot listen to in the background.
11 :a
{4 qilLq * insert cable headphones as antenna, but click on the horn
:Lftr
put the FM radio.
=r
:l :,8< Jr the frequencyof the rear of thefive-pointed star icon,
:r-e was added tothe collection channel list.
around to turn Page accoring daY.
3)
week
lnterface displays
a
week's schedule (last clicked date),Slide
around to turn page accoring week.
4)
today
Interface displays a day's schedule, In the interface of month
or week use gray to highlight the day.
5)
month
nterface displays
a
month's schedule (last clicked date)
Slide around to turn page accoring month.
'-er
: i:r :r return to key, the radio program moved to the background, right
rfr €u can still continue to listen to the show and can also carry out
B-, :fer program.
'15€ttings
t'-.
New activities
1) Press menu, more < touch new activities.
56
to FM radio background
service provider may default some device settings, so you may not
:E:f,le to change these settings.
57
.slM manatement
1) Touch it
to choose or to disable the SIM card, the card
is
grey when
disabled, the flight mode displays on status bar
2) The default SIM card ,you can choose Voice call,Video
tillllfG lEtifiGtion and feedback ( Button operation tone, seleri
hil, m lock tone, touch ) .To adapt every environment.
i[@5 -Standard / Mute / Conference / Outdoor, Touch the spd o
f rtm ffi turns green ,it opens.
f,lltturrc= Huding the ring volume and alarm clock settings, you a
ltmrdp
call,Messaging,Data connection.
Ctole
to slect.
{h
.Wireless and internet
mode
1) Flight
2) Wi-Fi and Wi-Fi
Touch
to open or close.
settings
Touch
Wi-Fi
to
open
.
Open
Wi-Fi,it can search for available networks automatically' networks
without password can be used directly, othe6 need to enter the
password
fi6t.
Open Wi-Fithen the flight mode, Wi-Fiwill close
automatically! Open flight modethen connectWi-Fi, it can be used
tr
lialrcls
0
frG Ttating screen
r
8ffinon
Adjust the brightness
Choose
Rotate phone to change direction
to display animations
il, fuE1]rE@ut Adjust the delay before the screen automatically
(@ft
Notice:
iqt
normally.
* :T ffi the SD card and cell phone memory usage.
II !m !ffiunt SO card or Erase SD card.
.Bluetooth
r [rr
el@s€ the default memory.
Bluetooth switch and setting up the touch bluetooth open, will
automatically be search nearby bluetooth open the equipment
frm:ft
.Data usage
1. Data
usage
frri
set up mobile data traffic limit, flow more than limit will
that use and each module to use power in general
rtt&tions
be close mobile data seruices.
llt -mmwn sources
2. More
@Hbns
fl i4..age applications Manage and delete the installed
@btions.
31 ftffing seruices Touch any of the seruices listed in> pop
Wireless & networks
a.
Airplane mode
b. VPN
c.
tuFdE
Tethering&portable hotspot
Ea*r
d. Mobile networks
e. GPRS
Allow to install non-electronic market
q
transfer prefer mode
up ,to
seryice?'two-button operation box, touch the ,Stop ,the
is stopped, and disappear
gDrage
use
from the ,,running services', list.
you can view the program of downloaded,all,on
sd
rd d running how many memory space they occupy
5 Bstteryuse youcanseetheusingpowersituationofcell
Audion profiles
3andyby,Phone idle,Display and Browser.
This option gives the phone
tones'
settings under the status of
receiving calls or notification. lncluding: Vibration, volume, ring tones,
58
6i
ddelopment
crelop
a. USB debug: USB debug only apply in the
process. This function allows copy data in comDuter and mobile
59
'iliir[r FG.
devices.
wrong PUK code, the SIM card will be
10 times
pemfrr*
rffi.
.Lo€tion
1) Use
(
access
wireless
Google map
)
Use wireless
to find locations in the application
.
the
satellite positioning, set accuracy to street
GPS
level(cancel it to save batterY),
Touch
itto
GG iiGr pasilords.
open or close
3) GPS EPO assistance,use GPS assistance data(EPolto speed uo GPS
poditioning
4)
A-GPS
Use
auxiliary data can accelerate the process of
lrfqsand
Open it and remind you"it produce GPRS flows when using A-GPS"'
$ hrcrE l-anguage District lnclude all the languages on the
ffirc rd totally amount of 12 kinds.
ll :r!@r Dictionary Add words to custom dictionary or delete.
S laEoard
.Security
et up screen
locks
Use images. PIN
or password to lock the screen'
"images", thefirsttimetherewill beasimple unlock
instructions and examples, click "next step" to continue the step
a.Touch
to unlock the screen.
c. Touch
password
set password to unlock the screen.
d. Touch
"no"
this application.
StoP
2) Set up SIM card
lock
Enter
(
-Snumbers) PIN to set the lock of
mrqfEne
*r@rdl,
slM card PIN (Personal ldentification Number) is to prevent
unauthorized use of SIM cards.PlN code provided with slM. The service
Vibrating when buttons are pressed, Playing
automatically, Speech lnput(by
on the
lnputting words(speech can be altered by sliding finger on
rsy), Displaying
ttErtiEte
predictive function when you input words);
*@-rst(Automatically input certain
mids when press space key or specified
{l miltmethod
filut
srM.
Settings
nnc rlen
' - ,s are pressed, Capitalizing
rc
"make the unlocking image".
b. Touch PIN Enter PIN numbers
keyboard
GPS
positioning.
1)
ild m SD card lnstall the encrypted certificate from SD 6rd.
]i,s mrd
Set or change Certificate store password
S,E s:Drage Clear all the contents of the certificate store and
S
Touch it to open or close
2) When using
UlfiErtrd yisible Password visible when enter it
fl '*
ilevke administration Add or delete device manager.
$,1[E wity credentials Allow application visit security
ffintuirs tr other credentials-
method.
provider gives the initial value.
HIl& reset
: gadup ldata
Change a blocked PtN code, you need to open the "SlM Lock ", then go
SEirBs backup to Google's servers
to Change Password screen, the phone will automatically prompt enter
the otd PIN code and asked to enter a new PIN code twice,finally the
f
phone will prompt that change the code successfully. lf you enter the
PIN with errorfor three times, SIM card PIN codes will be automatically
locked, PUK codes is usually supplied with SIM card. lf no, you should go
to the service provider for the codes.
60
keys)
youcanselectAndroidkeyboardorgooglepinyin
willapplication data, WLAN password and other
RE€tting to Factory Settings, Clear all data stored on the phone.
.ld account
i. Corporate
:. Email
:. Google
61
lilr,Slmupdates
.. fur
CpU usage
.Date and Time
1)
Automation
2) Setting
Date
3) Selecting Time
Use date and
time provided by Network.
Touch "+" and 'a" to set date.
Zone
Select
Tire
Zone according to where you
are. For China please select "GMT+08:00, China Standard Time".
4) sefting
Time
Touch "+" and
'r" to
f,maGPU rendering
animation scale:
trilEEir
animation scale
.,
furt
m
n,
set time.
Format ON/OFF
6) Select Date Format There are 3 kinds of formats
t,
* ffrdbr
Hgmnd
you can choose
from: Month-Day-Year, Day-Month-Year and Year-Month-Day, among
t.rftone
which Year-Month-Day is the default setting.
You can set
process limit
a EffidAPR5
5) Use 24 HourTime
.Sch€dule power
lEep activities
tlb,
a
0f
triE
dl€ck the information on status bar and remaining power.
on/off
time of boot or shutdown by touching it. You may also
select to repeat it or a certain day during a week.
ror the use of phone
hrrs*me
tuOd
.Accessibility
rElrv
L) Large text
dryd
2) Power button ends call: According to the "power" button to end the
Il trrp
is a
product of superior design and craftsmanship and
treated with care. The following suggestions can help you
with the terms of repair kits, to extend the life of mobile phooe.
be
q f,eE the mobile phone and their parts and components
out of readt
call to open, call, press the "power" will end the call and not shut down
the screen
3)
mln
q lqr't
eEric
Auto-rotate screen
children.
the phone dry, rain, humidity and all types of liquids which
minerals will corrode electronic circuits.
touch the phone with wet hands when charging, it will cause
shock or damage the phone.
S A(il place the device in high temperature environment.
IlmEeratures will shorten the life of electronic devices, damage
4) Speak passwords
5) Touch & hold delay
frEs,
6) lnstall web scripts
and warp or melt certain plastics.
!l ,rrcilrl place the device in too low temperature environment. When
ltcE nperature rises, the phone will produce water vapor that may
7) quick boot
,hi'Ege electronic circuit,
tloi6 O;".",n" Ohone in dusty,
.Developer options
5i
a. UsB Debugging: UsB debugging only
b. Stay awake:Screen
c.
will never sleep while charging.
dirty places, otherwise parts may be
tu0aged.
6i Io ryoid the phone in a lit cigarette, near open flame or any heat
rc.
- Do not open the device,
Alow mock locations
d. Desktop backup password
e.
for development and USB disk.
non-professional approach will do damage
E dE phone.
strict mode enabled
0
Do not throwit from height, knock or shake the phone,'rough
landling can damage internal circuit boards.
f. Pointer location
g. how touches
62
63
9) Do not paintthe phone, because the paint will block headphones,
mimptFn6 or other removable parts, and lead it not work.
10) Use den, soft, dry cloth to clean the cameE, light sensor
lenses.
Prohibitthe use of harmful chemicals and cleaning agents, cleaning
lluids to clean the phone
11)
f
mobile phone, battery charger, or mobile phone accessories are
deHiw,
send
to the nearest qualified service center for inspection.
12) lf nessary seruice Centre staffwill assist you and will arrange for
phone repai6.
i.: