1
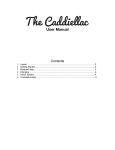
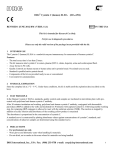
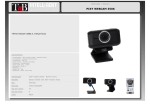
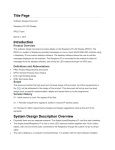
DJ Spatial Tracking and Gesture Recognition for Audio Effects and Mixing Andrew Hamblin, Evan Leong, and Theo Wiersema Adviser: Dr. Jose Sanchez Department of Electrical and Computer Engineering October 28, 2015 EXECUTIVE SUMMARY Today there is great demand for new technology in the field of music. However, sometimes there is a disconnect between the technology and the user. This is especially true when it comes to disc jockeys (DJ). While new technology can bring added benefits to DJs, it also brings a higher level of complexity. To achieve the highest level of performance, DJ’s should have a natural connection to their equipment so they can directly express their passion through their music. The DJ Glove will bridge the gap between the DJ and their equipment by utilizing natural gestures to produce audio effects. The DJ Glove has two main subsystems, the glove and the gesture recognition system. The glove will be equipped with tri-color light-emitting diodes (LED). The DJ will be able to switch between several glove modes by a button on the glove which will change the color of the LEDs on the glove. This color and the gesture performed will determined the effect performed by the DJ software. Adafruit Trinket Pro, a compact microcontroller, will control the color of the LEDs through the adjustment of the duty cycle of three pulsewidth modulated (PWM) signals. The gesture recognition subsystem will consist of three separate parts that work together to produce the indicated DJ effect. These three parts are the camera, the algorithm processing system and the computer on which the DJ software will run. The camera used will be the Pixy. Pixy includes a camera and a dedicated processor that processes the image data to find the position and size of detected objects in the image frame. This information will be sent to the algorithm processing system, which will be a Raspberry Pi. The algorithm that was selected to analyze and predict the DJ’s gesture was the hidden Markov model (HMM). This was chosen because of its success rate in recognizing gestures of various speeds as well as being able to cope with missing data points. Once the HMM recognizes a gesture, the Raspberry Pi will send a command to the DJ software Mixxx, which is an open source DJ program. A plugin will be written for Mixxx that will read the command from the Raspberry Pi and map it to an audio effect. The cost of the DJ Glove will be approximately $180. The majority of this comes from the Pixy ($69.99) and Raspberry Pi ($35.00). The remaining elements of the DJ Glove are each less than $15 and consist of the Trinket, tri-color LEDs, battery pack, communication methods and the batteries to power the glove system. More information on costs can be seen in the Economic Analysis section of this proposal. There are two primary performance requirements for the DJ Glove. The first is that the system must maintain at least an 85% success rate of recognizing defined gestures. The second is that it must have a latency of less than 160 ms. Latency is defined as the time from when the gesture is completed to when the audio effect is executed. i ABSTRACT In the music production world, there is a disconnect between a DJ and their software. A team was formed with the goal of bridging this gap through the creation of a DJ glove system that increases gesture recognition reliability in realistic settings. The system must use tri-color LEDs, a camera, and a glove that weighs less than 1 lb. The system must also operate in real time. The glove will have controllable modes, identified by the color of the LEDs. Based on the glove’s mode and the gesture performed, the system will trigger an audio effect through DJ software. The DJ Glove should be easy to use and portable. The Trinket microcontroller will be used to control the LEDs as it provides the necessary number of PWM channels and is small enough to mount on a glove. The recognition system will acquire gesture information from the Pixy camera and process this information using the HMM running on a Raspberry Pi. This device will send the pre-mapped command to the open source DJ software, Mixxx, to trigger the audio effect. ii CONTENTS I. Introduction ........................................................................................................................................... 1 A. Problem Background ......................................................................................................................... 1 B. Problem Statement............................................................................................................................. 2 C. Constraints ......................................................................................................................................... 2 D. Scope ................................................................................................................................................. 2 II. Statement of Work ................................................................................................................................ 2 A. System Description............................................................................................................................ 2 1) System Block Diagram ................................................................................................................. 2 2) Subsystem Block Diagram ............................................................................................................ 3 3) System State Diagram ................................................................................................................... 3 4) Nonfunctional Requirements ........................................................................................................ 4 5) Functional Requirements .............................................................................................................. 4 B. Design Approach and Method of Solution ........................................................................................ 5 C. Economic Analysis ............................................................................................................................ 9 D. Project Timeline ................................................................................................................................ 9 E. Division of Labor .............................................................................................................................. 9 F. Societal and Environmental Impacts ................................................................................................. 9 III. Summary and Conclusions ................................................................................................................... 9 IV. References.............................................................................................................................................. i V. Appendix ............................................................................................................................................... ii A. HMM Explanation ............................................................................................................................. ii B. Project Timeline ............................................................................................................................... ix C. Nonfunctional Requirements ............................................................................................................ xi D. Project Cost ..................................................................................................................................... xii E. Division of Labor ........................................................................................................................... xiii F. Test Procedures ............................................................................................................................... xv 1) LED Glove .................................................................................................................................. xv 2) Pixy Camera ................................................................................................................................ xv 3) Raspberry Pi ............................................................................................................................... xvi 4) HMM Algorithm ........................................................................................................................ xvi 5) Mixxx Software ........................................................................................................................ xvii iii I. INTRODUCTION A. Problem Background The following information has been drawn from [1]. Hand-based gesture recognition for computer control originated from the use of sign language for human communication. Early systems used a glove to track the position of the hand. The methods for tracking have varied widely over the years. The first glove systems were developed using technologies such as accelerometers and fiber-optic bend sensors. These could be programmed to record the motion of the hand. Because of limited processing power, these solutions were effective. Instead of having to perform intensive image processing, the motions could simply be mapped to gestures. The Sayre Glove [1] was one of the first gloves to perform gesture recognition. Light sensors were placed on the fingertips and were connected to light sources through a tube that ran down the finger. The user would control the amount of light hitting the sensors by bending their fingers. While the number of possible commands was limited, it was lightweight and inexpensive. Another early system, the Z Glove [1], used multiple sensors including touch, inertial, and tilt. This combination of sensors gave it the ability to recognize up to 80 unique gestures. However, the glove was tethered to the computing system, limiting mobility and was never released to the public. These required the sensor system to be attached to the glove. Newer systems have been developed that include the use of multiple sensors on the hand and wireless communication with the computing system. With the increase of processing power, however, some newer systems have been designed without sensors in the glove at all. Instead, the glove is equipped with lights or multicolored fingers. These offer the benefit of being wireless and remove the processing from the body to a stationary device. In the 1980’s, the Massachusetts Institute of Technology (MIT) developed the MIT LED glove [1]. This included an image recognition system that could track LEDs placed on the fingertips of a glove. This however faced many issues due to overlap of the LEDs and the variability of gestures. Ten years later, work was begun on a glove system that used colored finger tips to identify gestures. This was the first successful image recognition system in use for gesture control and showed that it was potentially a better solution than wired sensors on a glove. In the past 10 years, there have been several gesture recognition techniques. One of the most used techniques is the hidden Markov model (HMM) [2]. In this model, the system is assumed to be a Markov process, which means that the system can predict future performance based on its present state and history. This method was used by Hyeon-Kyu Lee and Jin H. Kim in their attempt to use gesture recognition to control a PowerPoint presentation [3]. Another commonly used method is dynamic time warping (DTW) which compares the similarity of two signals and has the advantage of dealing with differences in time or speed. G.A. ten Holt, M.J.T. Reinders and E.A. Hendriks worked on developing DTW for use in gesture recognition [4]. Currently, GECO has designed a gesture control system that works in conjunction with Leap Motion. GECO’s system allows the user to manipulate music by tracking the position of their hands. No glove or sensors are needed on the hand as the Leap Motion controller is able to accurately track the position of two hands in 3D space [5]. 1 B. Problem Statement The goal of the DJ glove is to provide an interactive system that allows for a seamless communication of expression between the performer and the DJ software. Non-ideal lighting environments hinder the ability of a device to recognize gestural input. The DJ glove bridges the gap between performance and technology by increasing gesture recognition reliability in realistic settings. A glove equipped with tri-color LEDs will be tracked by a single camera interfaced with a processing system. Operating in various lighting conditions, the system will acquire and recognize a user’s gestures. These gestures, in combination with the LED colors, will indicate and trigger a specific sound effect in real-time. C. Constraints Table 1 lists the constraints for the DJ Glove. These are requirements that the DJ Glove must meet. TABLE I. CONSTRAINTS Must have tri-color LEDs Must have real-time execution Must have maximum weight of glove less than 0.45 kg (1 lb.) Must use one camera Note that real-time execution has been defined as 160 ms: the response time of the human ear. D. Scope The scope for the DJ Glove is shown in Table 2. This is defined in order to establish boundaries. TABLE II. SCOPE Out of Scope In Scope 3 Dimensional Image Acquisition 2 Dimensional Image Acquisition User Gesture Training Predefined Gestures II. STATEMENT OF WORK A. System Description 1) System Block Diagram Figure 1 is the system block diagram which shows the inputs and output of the system. The first input is the gesture that the DJ will be performing. The second input is the mode select. This will be a button on the 2 glove that allows the DJ to select which color the LEDs on the glove will emit. This color will be detected by the system and used to determine the output which is the audio effect executed through the DJ software. Fig. 1. System block diagram 2) Subsystem Block Diagram Figure 2 is the subsystem block diagram which includes the inputs and output of the system as well as those of the subsystems. The gesture performed by the DJ will be acquired by the camera system. The mode select will be read by an embedded device on the DJ glove which will display the selected color on the glove’s LEDs. The camera system will also acquire the color of the LEDs. The camera system will send this information to an embedded device which will determine the gesture being performed. Based on the gesture detected, the embedded device will send a command (which had been previously mapped to the gesture) to the DJ software. The DJ software will then execute the effect that corresponds to the gesture performed. Fig. 2. Subsystem block diagram 3) System State Diagram The top-level state diagram, Fig. 3, illustrates the overall flow of the system. The system will start with an initialization, and then begin to track the glove’s LEDs in search for a predefined hand motion and color combination. When a gesture is recognized, the system then moves on to the next state where the audio effect is executed. Once the audio effect has been executed, the system will begin searching for another gesture. 3 Fig. 3. Top-level state diagram The glove component introduces a separate process to be considered; therefore, the glove component has its own state diagram illustrated in Fig. 4. Upon initialization, the DJ can select a predefined LED mode. At any time, the DJ can select another mode. The mode will select the color of the LEDs displayed by the glove. Fig. 4. Glove state diagram 4) Nonfunctional Requirements The nonfunctional requirements are listed in Table 3. These requirements are included to minimize complexity and inconvenience for the DJ. The glove and gesture recognition system should be lightweight and small in form factor to ensure portability. The DJ should be able to quickly learn how to use the gesture and color combinations to carry out an audio effect. See Appendix C for metrics and comparison of nonfunctional requirements. TABLE III. NONFUNCTIONAL REQUIREMENTS The system must be easy to use The system must be portable 5) Functional Requirements The functions stated in Table 4 describe the operational requirements for the DJ glove. Beneath each function are the unique specifications that determine how well the system will perform. These specifications are required for the DJ glove to be considered fully functional. 4 TABLE IV. FUNCTIONAL REQUIREMENTS Subsystem Function Specification Glove The system shall display Embedded device will send the appropriate predefined color schemes signals to LEDs in order to display selected through tri-color LEDs. color scheme. Pixy Camera [6] The system shall acquire DJ’s Acquires gesture at 10 frames/second at a 400 x gestures. 240 pixel resolution for an 85% success rate under ambient light up to 250 cd [7] [8] [9]. HMM The system shall recognize Maintains a 75% success rate while staying DJ’s gestures. below 160 ms of latency [10]. Mixxx Software [11] The system shall trigger sound The Raspberry Pi [12] will send a command to effects specified by gesture Mixxx that is dictated by the gesture and LED and LED color combination. color combination. B. Design Approach and Method of Solution Our design approach consists of five main components: the LED glove, Pixy camera, Raspberry Pi, HMM algorithm and Mixxx software. A DJ will perform a gesture while wearing the glove. The gesture and color of the LEDs on the glove will be acquired by the Pixy camera. Using its own onboard image processing, the Pixy will send information about the size, position, and color of the LEDs that it detects to the Raspberry Pi which will be running the HMM algorithm. The HMM will attempt to recognize a gesture from the data provided by the Pixy. Once a gesture has been detected, the Raspberry Pi will send the appropriate command to Mixxx, the DJ software, which will be running on the DJ’s computer. A plugin on Mixxx will receive the command and execute the appropriate mapped effect. The first main component, the LED glove subsystem, will be worn by the DJ. The subsystem includes a black, form-fitting glove, tri-color LEDs, the Adafruit Trinket Pro [13] embedded device, a battery pack, and various circuitry. The DJ can choose the color the LEDs will emit by a button on the glove. This color will be acquired by the camera subsystem and used to determine the audio effect. As the glove has an objective of portability, the glove will need to be an independent unit apart from the rest of the design. To achieve this objective, a battery will power the subsystem. The tri-color LEDs have four leads: red, green, blue, and ground. The red, green, and blue LED leads receive PWM signals, and the duty cycles of the PWM signals determine the color that is emitted. The PWM signals will be sent from the Adafruit embedded device. To meet specifications, the glove must meet the following requirements. It must display predefined color schemes correctly and allow the DJ to switch between these color schemes. The first test to perform is to ensure the color schemes are displayed as unique and visually correct colors. These colors have not been 5 decided upon yet, but there will be three distinct variations such as red, green and blue. The PWM duty cycle to the pins corresponding to a certain color will be measured and compared to the desired duty cycle. There must be a less than 10% difference in duty cycles between the two for the system to be successful. Additionally, we will test the color mode selection on the glove. A person wearing the glove will attempt to switch modes repeatedly at least 50 times. To be successful, the mode select must switch the color of the LEDs correctly 95% of the time. Detailed test procedures for the LED glove are found in Appendix F. The second main component, the Pixy camera, allows for DJ spatial tracking for gesture recognition through a robust image acquisition and processing system. At 10 frames per second with a 400 x 240 pixel resolution, the Pixy (Charmed Labs, Austin, TX) will acquire the size, position and color of the LEDs on the DJ’s glove. This gesture and color pair is mapped to a specific audio effect. Color-based object detection requires that the Pixy be trained on the desired color signatures, such as red, green, and blue. Pixy allows a user to define up to seven color signatures at a time. Using the Pixymon [14] software, provided with the Pixy, a DJ may manually train a color within a captured frame. Once Pixy is trained, its image processor will search each frame for objects of a signature color. If a color is recognized, the processor will place a virtual box around the object. The size and location of this box give insight into where and how big the object is within the frame. The signature associated with the box signifies the color of the LED, and in turn, the color to be matched with the gesture being performed. Because there will be five tri-colored LEDs, we will calculate an average center using the rectangular coordinates. This center will serve as the approximate location of the DJ’s glove within the frame. From frame to frame, the glove’s rectangular coordinates will be passed on to the Raspberry Pi for use in the gesture recognition system through serial peripheral interface (SPI) communication [15]. The color signature will also be transmitted for its pairing with the performed gesture. The image acquisition system has four specifications that must be met for successful implementation. The images captured from the Pixy camera will have 400 x 240 pixel resolution. Pixy’s default image acquisition meets the criteria. This specification can be validated by importing the image into MATLAB® (Mathworks, Natick, MA) [16] and analyzing the image width and height. The Pixy will provide information about the images to the Raspberry Pi at a minimum rate of 10 frames per second. For testing, an interrupt-based program can be coded to list the set of coordinate locations sent by the Pixy. To accommodate various lighting conditions, the image acquisition and processing system must reliably track the LEDs under ambient light of up to 250 cd. This lighting condition will be measured using a candela photometer. This will ensure that the DJ’s gestures can be acquired by the Pixy in a “lights on” or “lights off” environment. Several trials will be held to ensure that Pixy can acquire the gestures in both conditions. Under the aforementioned conditions, this system must reliably recognize and track the LED colors with an 85% success rate. Thus, out of 20 trials in each “lights on” and “lights off” condition, 17 trials of the 20 must be successful. Detailed test procedures for the Pixy camera are found in Appendix F. In the event that the Pixy camera processor does not meet these specifications, alternative solutions have been considered. A video graphics array (VGA) color camera [17] with 400 x 240 pixel resolution can be interfaced with a TMS320C6657 digital signal processor (DSP) [18] to parallel the functions of the Pixy. Through SPI communication, the images acquired from the VGA camera are sent to the DSP where custom processes will detect the color and location of the DJ glove. These processes include red-green-blue (RGB) to hue-saturation-value (HSV) conversion, background subtraction, and blob detection. The HSV value of 6 the LED color along with the rectangular coordinates of the average center of the blob are then communicated to the Raspberry Pi through SPI communication. In the event that the Pixy camera cannot quickly and reliably send color and location data to the Raspberry Pi, the design team will require sufficient digital signal processing knowledge to write a robust object tracking algorithm in C code. The facilities and equipment at Bradley University provide the necessary laboratories and code compilers to realize this alternative solution. The third main component is the Raspberry Pi. As stated before, the Raspberry Pi will receive block information from the Pixy through SPI communication. There has been some successful work performed in this area which will be utilized. Namely, C code that allows the Raspberry Pi to read data from the Pixy camera [19]. This code also utilizes Wiring Pi [20], a general-purpose input/output (GPIO) interface library for the Raspberry Pi. The Raspberry Pi and Pixy communication must meet the following requirements. As defined in the functional requirement specifications, the Pixy will be capturing images at a minimum of 10 frames per second. Thus the Raspberry Pi must receive all block information from the captured frame before it begins receiving the next set of block information. This will be tested by logging the timestamps from each set of block information and comparing it to the timestamps of the next set of block information. The time between each set should be less than 1/10 second as per the 10 frame per second specification. Pixy is able to capture and send information at 50 frames per second, so the specifications are met. Detailed test procedures for the Raspberry Pi are found in Appendix F. The fourth main component is the HMM algorithm which will be run as a C program on the Raspberry Pi. The HMM will initially be developed in MATLAB, and once the algorithm is complete it will be transferred to C. The Raspberry Pi runs the Linux operating system and is able to compile and run C programs using GCC, the GNU compiler [21]. For more information on how the HMM works, see Appendix A. There are two specifications for the algorithm to be successful. First, a 75% success rate in recognizing the defined gestures performed by a DJ. The success rate is dependent on the Pixy following the specifications which have been discussed earlier and will be tested by performing each of the three defined gestures at least 50 times (50 times that the gestures meet the specifications of the Pixy.) The percentage of these gestures that are recognized by the HMM must be equal to or greater than 75% for the HMM to meet specifications. In this case, recognizing a gesture does not necessarily mean trigger an effect on the DJ software. Recognizing a gesture merely means that the Raspberry Pi attempts to send a signal to the DJ software whether the DJ software is functional or not at the time of testing. The second specification that must be met for success is a latency of 160 ms from when the beginning of a gesture is acquired by the Raspberry Pi to when the gesture is recognized for a defined gesture. The latency will be tested by measuring the timestamp of the block information from the beginning of the gesture and comparing it to the timestamp from when the gesture was recognized. The difference between these will be less than 160 ms for the system to be successful. Note that the difference will only be found on gestures that were recognized (gestures from the first specification.) Detailed test procedures for the HMM algorithm are found in Appendix F. 7 The alternative solution to the HMM is DTW. This is the secondary solution due to the DTW having issues recognizing gestures of different speeds as well as it having trouble recognizing gestures that have missing data points. Should the simulation of the HMM fail to work by the deadline imposed in the Project Timeline section found in Appendix B, research and work will begin on DTW and the HMM will not be used. DTW will still have to meet the same specifications set forth for the HMM in order to be successful. The final aspect of the Raspberry Pi system is the communication with the Mixxx software. Once a gesture has been recognized, a command will be sent to the Mixxx software through a universal serial bus (USB) to transistor-transistor logic (TTL) serial cable. For this to be successful, the effect mapped to the gesture performed must be executed once a gesture has been recognized. Should the Raspberry Pi fail to provide the necessary results, the alternative solution selected is the BeagleBone Black [22]. While both the Raspberry Pi and BeagleBone Black are very similar devices, the BeagleBone Black has a more extensive set of GPIO pins. The BeagleBone Black will subject to the same specifications as the Raspberry Pi. The final main component is the DJ software. In order to select and control audio effects through gesticulation, the system requires the means to map signals from the Raspberry Pi to some DJ software. Mixxx, an open-source DJ software, allows for custom routing of musical instrument device interface (MIDI) signals to any of the available effects. After a gesture and color combination has been recognized, the resulting MIDI signal is sent from the Raspberry Pi to the Mixxx software. A Javascript plug-in determines how the MIDI signals will be mapped to the effects. For these signals to be received by the software on the DJ’s computer, a USB to TTL cable will be used. It is desired that the DJ connect the DJ Glove console into the computer with no previous engineering knowledge. Using the USB connection to the computer ensures that the console is capable with any desktop or laptop computer. This plugin is the final component that connects the DJ’s gesture to the effect executed. In order to ensure that the correct signals are being sent out of the Raspberry Pi, the signals will be observed through a MIDI monitor. These monitors accept MIDI information and display the signal in a graphical user interface. After validating the signal through visual assessment, the corresponding audio effect must be applied. Evaluation and debugging of the Javascript code will confirm the connection between the MIDI signal and the audio effect. Detailed test procedures for the HMM algorithm are found in Appendix F. The DJ Glove is the first of its kind to use open source DJ software to apply audio effects through gesticulation. Traditionally, Mixxx accepts commands from name-brand company DJ controller boards. There is a possibility for incompatibilities between Mixxx MIDI mapping conventions and the rest of the system. If Mixxx is unable to accept commands from the console, digital signal processing will supply the system with custom audio effects. Custom filter effects can be designed in C code to be performed on the Raspberry Pi that will parallel certain effects from the Mixxx software. The music performance portion of the system requires basic knowledge over DJ audio effects. However, Mixxx is user-friendly and can be understood with little research. Some research over Javascript and MIDI signal mapping will be necessary for the design of the plug-in. The alternative solution calls for real time 8 digital signal processing design. Bradley University’s laboratories provide the tools for each of these solutions to be realized. C. Economic Analysis An exact list of parts and their prices can be seen in Appendix D. The cost of the DJ Glove is approximately $180. This is assuming that all devices in the primary solution work as expected. The most expensive item is the Pixy, at $69.99. In the case that the Pixy does not function well as an image recognition system, the secondary solution will cost approximately $434. The next most expensive item was the Raspberry Pi, at $35.00. The alternate solution to Raspberry Pi costs $56. Another major component in the design is the DJ glove which costs $17.98. To reduce cost, several of the lower cost items such as the glove, wire sleeving and USB cables could be bought for lower prices, albeit at the loss of quality. The DJ Glove will be funded by the Electrical and Computer Engineering Department of Bradley University. D. Project Timeline Details about the project timeline can be found in Appendix B. E. Division of Labor See Appendix E for division of labor. F. Societal and Environmental Impacts The DJ Glove will not be intended for public use due to time constraints. Thus, this limits the potential dangers that could be a threat. The only issues that can be foreseen are the inherent dangers of batteries and as well as the risk of shock, albeit at rather low current. There are also no known effects on human welfare from this project. Although there are no potential dangers of misuse, any use of the DJ Glove for unlawful or unethical purposes is prohibited. Users of the DJ Glove should be also be aware of the possibility of injuring bystanders when performing gestures since collisions between persons can occur. III. SUMMARY AND CONCLUSIONS In the last several decades, music technology has shifted toward the digital realm, bringing the tools required for music creation and manipulation within the reach of more artists than ever before. DJs, in particular, rely on computer software to carry out the audio effects that enhance performances. The system proposed in this document aims to integrate the natural expressions and movements of an artist with the software used during a performance. A glove equipped with tri-color LEDs not only enhances the aesthetic aspect of a performance but also allows for more reliable image tracking. These LEDs will also provide the artist with additional audio effect options by pairing color with movement. Image recognition provides the means to capture these expressions, while the embedded system maps them to the appropriate audio effect. 9 IV. REFERENCES [1] P. Premaratne, Human computer interaction using hand gestures. New York: Springer-Verlag, 2014. [2] 2015. [Online]. Available: http://www.cs.sjsu.edu/~stamp/RUA/HMM.pdf. [Accessed: 14- Oct- 2015]. [3] Hyeon-Kyu Lee and J. Kim, “An HMM-based threshold model approach for gesture recognition”, IEEE Trans. Pattern Anal. Machine Intell., vol. 21, no. 10, pp. 961-973, 1999. [4] G. ten Holt, M. Reinders and E. Hendriks, “Multi-Dimensional Dynamic Time Warping for Gesture Re”. [5] Uwyn.com, “GECO - Music and sound through hand gestures”, 2015. [Online]. Available: http://uwyn.com/geco/. [Accessed: 07- Apr- 2015]. [6] J. French, R. LeGrand, 'blog', Charmed Labs, 2015. [Online]. Available: http://charmedlabs.com/default/. [Accessed: 14- Oct2015]. [7] Americandj.eu, “Snap Shot LED”., 2015. Web. 13 Apr. 2015. [8] Avagotech.com, “High Brightness Tricolor PLCC-6 Black Body LED”., 2015. Web. 13 Apr. 2015. [9] Charmed Labs, “Pixy (Cmucam5)”., 2015. Web. 13 Apr. 2015. [10] Biology.clemson.edu, “Literature Review on Reaction Time”, 2015. [Online]. Available: http://biology.clemson.edu/bpc/bp/Lab/110/reaction.htm. [Accessed: 07- Apr- 2015]. [11] Mixxx DJ Software, 'Mixxx - Free MP3 DJ Mixing Software', 2015. [Online]. Available: http://mixxx.org. [Accessed: 14Oct- 2015]. [12] Raspberry Pi, 'Raspberry Pi - Teach, Learn, and Make with Raspberry Pi', 2015. [Online]. Available: https://www.raspberrypi.org/. [Accessed: 14- Oct- 2015]. [13] T. others, 'Adafruit Pro Trinket - 3V 12MHz ID: 2010 - $9.95: Adafruit Industries, Unique & fun DIY electronics and kits', Adafruit.com, 2015. [Online]. Available: https://www.adafruit.com/products/2010. [Accessed: 14- Oct- 2015]. [14] Cmucam.org, 'CMUcam5 Pixy', 2015. [Online]. Available: http://cmucam.org/projects/cmucam5/wiki/Latest_release. [Accessed: 14- Oct- 2015]. [15] D. Kalinsky, 'Introduction to Serial Peripheral Interface', Embedded, 2002. [Online]. Available: http://www.embedded.com/electronics-blogs/beginner-s-corner/4023908/Introduction-to-Serial-Peripheral-Interface. [Accessed: 14- Oct- 2015]. [16] Mathworks.com, 'MATLAB - The Language of Technical Computing', 2015. [Online]. Available: http://www.mathworks.com/products/matlab/. [Accessed: 14- Oct- 2015]. [17] Robotshop.com, 'VC0706 UART VGA Camera', 2015. [Online]. Available: http://www.robotshop.com/en/vc0706-uartvgacamera.html. [Accessed: 14- Oct- 2015]. [18] Element14.com, 'TMS320C6657 Lite Evaluation Module | element14', 2015. [Online]. Available: http://www.element14.com/community/docs/DOC-67655/l/tms320c6657-lite-evaluation-module. [Accessed: 14- Oct- 2015]. [19] GitHub, 'omwah/pixy_rpi', 2014. [Online]. Available: https://github.com/omwah/pixy_rpi. [Accessed: 14- Oct- 2015]. [20] Wiringpi.com, 'WiringPi', 2015. [Online]. Available: http://wiringpi.com/. [Accessed: 14- Oct- 2015]. [21] Gcc.gnu.org, 'GCC, the GNU Compiler Collection- GNU Project', 2015. [Online]. Available: https://gcc.gnu.org/. [Accessed: 22- Oct- 2015]. [22] Beagleboard.org, 'BeagleBoard.org - black', 2015. [Online]. Available: http://beagleboard.org/black. [Accessed: 14- Oct2015]. [23] Lee, Hyeon-Kyu, and Jin Kim. A HMM-Based Threshold Model Approach for Gesture Recognition. 1st ed. 2015. Web. 15 Oct. 2015. [24] Ramage, Daniel. Hidden Markov Model Fundamentals. 1st ed. 2015. Web. 15 Oct. 2015. [25] Mixxx.org, '4. Configuring Mixxx — Mixxx User Manual', 2015. [Online]. Available: http://mixxx.org/manual/latest/chapters/configuration.html#latency. [Accessed: 15- Oct- 2015]. i V. APPENDIX A. HMM Explanation The HMM is a complex subject. To introduce the topic, an example has been created. Suppose there is a large gumball factory as seen in Fig. 5. Inside the gumball factory are three large gumball machines, each with three different colors of gumballs: blue, green, and purple. Every second one of these machines drops a gumball. Fig. 5. Gumball factory Dwight, the friendly gumball factory worker, stands outside the factory and watches as gumballs roll out the factory door. However, he can only see the gumballs on the conveyer belt – he cannot see the machines dropping the gumballs since the gumballs are behind the factory wall. Dwight’s goal is to guess the sequence of machines that dropped the sequence of gumballs in front of him. He can make an intelligent guess about this because he knows two important sets of probabilities concerning the gumball machines. ii Fig. 6. Gumball machine emission probabilities He knows that each machine has a probability of dropping a certain color gumball. In Fig. 6, the probabilities of the three gumball machines are illustrated by the thickness of the lines. For example, machine 1 has the highest probability of dropping a blue gumball; machine 2, purple; and machine 3, green. Each machine will have its own unique set of output probabilities. These are commonly called the emission probabilities. There is also another set of probabilities that Dwight is aware of. Fig. 7. Gumball machine transition probabilities Once a machine drops a gumball, there are certain probabilities for where the next gumball will come from. It could come from any of the three machines, including the machine that dropped the previous gumball. These are called the transition probabilities. iii Dwight knows both the emission and transition probabilities, and he can use these to determine the sequence of machines that dropped the sequence of gumballs in front of him. However, remember that he still cannot see the machines dropping the gumballs. It is important to him that he determines the sequence of machines since this tells him about an important part of his day – it tells him what he will have for lunch. Fig. 8. Possible outcomes For example, if Dwight finds that the sequence of machines is “1 3 2”, then this means he will be getting hamburgers for lunch. If he finds the sequence of to be “2 1 3”, then he will have pizza for lunch, and if he finds “3 2 3”, then he will be having nothing for lunch. While there are other sequences of machines that could be observed, these other sequences have no meaning to Dwight. However, this project is about gesture recognition, not gumballs. In order to connect the HMM with gesture recognition, some definitions must first be made. Gumballs can be called observations. The gumballs on the conveyor belt can be thought of as the observation sequence. Gumballs machines are states and the succession of machines dropping gumballs can be thought of as a sequence of states. Finally, food is the result of the observations. With regard to gesture recognition, the DJ will perform a gesture, and throughout the gesture the image recognition system will be collecting trajectory information. This information, in the form of a sequence of angles will serve as the observations. The states are more difficult to understand but can be thought of as hidden or abstract representations of angles. The sequence of states would therefore be an abstract representation of an entire gesture. Finally, the result of the observation would be the audio effect applied by the DJ software. There are several important things to note about the HMM. iv States transition with time. With the gumball machines, once a gumball had been dropped, there is a certain probability that determines which machine would drop the next gumball. Since the gumball machines represented states, these can be thought of as transitioning with time. The goal of the HMM is to estimate the state sequence. Remember that Dwight was trying to guess the sequence of machines that dropped the sequence of gumball on the conveyer belt in front of him. States are always hidden. Dwight could not see inside the factory where the machines were located. The HMM correlates observations with a state sequence. Dwight was trying to correlate the sequence of gumballs in front of him with the sequence of machines that dropped them. The HMM consist of three primary matrices. The transition matrix, A, which contains the state transition probabilities, the emission matrix, B, which contains the output probabilities, and the initial condition matrix, π, which contains the initial state distribution. These three matrices need to be trained beforehand for the HMM to perform optimally. On a more theoretical basis, the HMM can be illustrated as shown in Fig. 9. Fig. 9. HMM example The states are the circles labeled as x1, x2, and x3. The observations are the squares labeled as y1 and y2. The state transition probabilities are the arrows going between the circles (states) and the emission probabilities are the lines going from the circles (states) to the squares (observations.) The image recognition system will be recording the position of the hand. The angle between every two frames captured will be used as the observation data. These angles will need to be quantized for use for the HMM. The following figure illustrates how angles will be quantized. v Fig. 10. Quantized angle bins Angles will be rounded into “bins” with bins being equally divided among 360°. To demonstrate this, test gesture data was entered into MATLAB – three loop gestures and three left-to-right swipes. Fig. 11. Test gestures From these gestures the angles between every two points were extracted. vi Fig. 12. Gesture angles The angles were then quantized using 12 bins. This means that the angles were rounded to the nearest 30 degrees. These angles can now be used by the HMM to determine the gesture performed. Fig. 13. Quantized gesture angles There are three problems that have to be solved when working with HMMs. They are as follows. 1) Classifying: finding the probability of observing a sequence of observations 2) Decoding: finding the best sequence of states that explains the observed sequence of observations 3) Training: training parameters from the observations vii A description of the algorithms that make up these steps are as follows. The Baum-Welch algorithm [23] is used to find the unknown parameters of a HMM. It uses the forward and backward algorithms to do this. These work from opposite ends of the gesture to find the probability of seeing a sequence of observations and being in some state at a certain time. Using both these algorithms, update transition and emission matrices can be generated. The second algorithm used is the Viterbi algorithm [23]. This is used to find the most probable sequence of states based on the sequence of observations. The final algorithm used is the expectation maximization algorithm [23]. This is used to find the values of the transition and emission matrices that make the observation data most likely. This is used in conjunction with the threshold model. [23] To demonstrate the threshold model, see Fig. 14. Fig. 14. Threshold model The black line is the threshold for determining the end of a gesture. The other three lines are the probabilities of the gestures. These are all changing as the actual gesture is performed. Note that at time “4”, the probability of gesture 2 rises of the threshold. This means that the HMM can begin looking for the end point of this gesture. viii B. Project Timeline Figure 15 shows the important components of the project and the time they will take to complete. Also in this figure, indicated by the darkened boxes, is the critical path which is the sequence of project components that add up to the longest overall duration. The critical path consists of developing the HMM, as well as the communication between the Pixy and the Raspberry Pi. Fig. 15. Critical path Table 5 lists the major project deadlines. These dates have been taken from the Gantt chart in Fig. 16. Table V. PROJECT DEADLINES Glove completed 9-Nov Pixy calibrated for LED detection 10-Nov MATLAB HMM simulation 10-Dec Mixxx plugin 12-Dec System Communication 20-Jan C HMM implementation 20-Feb Figure 16 is the Gantt chart which illustrates the timeline for the each component of the project. ix Fig. 16. Gantt chart x C. Nonfunctional Requirements Table 6 compares the two nonfunctional requirements for this project. Note how the easy-to-use objective has a higher score than portable, indicating that the easy-to-use objective has the highest priority. TABLE VI: COMPARISON OF OBJECTIVES Easy-to-Use Easy-to-Use Portable Portable Score 1 1 0 0 Each nonfunctional requirement has been given a metric below along with a corresponding quantifiable measurement. Objective: Easy to Use Units: Ratings of design team’s assessment of ease of use Metric: Assign points according to the following scale ● Very easy to use (greater than 75% gesture recognition success) ● Easy to use (between 65% to 75% gesture recognition success) ● Can be used (between 50% to 65% gesture recognition success) ● Hard to use (between 20% to 50% gesture recognition success) ● Very hard to use (less than 20% gesture recognition success) 5 points 4 points 3 points 2 points 1 point Objective: Portable Units: Ratings of design team’s assessment of portability Metric: Assign points according to the following scale ● Very portable (between 0 lb to 3 lb) ● Portable (between 3 lb to 5 lb) ● Semi-portable (between 5 lb to 7 lb) ● Little-portability (between 7 lb to 10 lb) ● Not portable (greater than 10 lb) 5 points 4 points 3 points 2 points 1 point xi D. Project Cost Table 7 lists the components of the primary solution for the project and their individual costs. TABLE VII. PARTS LIST AND COST FOR PRIMARY SOLUTION Device Item Cost Adafruit Pro Trinket $9.95 10 Red-Green-Blue (RGB) LEDs $14.90 Glove $17.98 Miscellaneous $40.00 Pixy $69.00 Raspberry Pi $35.00 Mixxx Software $0 Total Cost $171.93 xii E. Division of Labor Table 8 shows the division of labor. Note that this table uses the tasks from the Gantt chart in Fig. 16. TABLE VIII. DIVISION OF LABOR TW: Theo Wiersema AH: Andrew Hamblin EL: Evan Leong Create HMM in MATLAB (forward algorithm) AH Create HMM in MATLAB (backward algorithm) TW Create HMM in MATLAB (Viterbi algorithm) TW Create HMM in MATLAB (combine all previous work) TW Initialize HMM in MATLAB TW Test/Debug HMM in MATLAB with recognition success rate All Test/Debug HMM in MATLAB with garbage data All General testing/debugging of HMM in MATLAB All Transfer MATLAB algorithm to C (Forward) TW Transfer MATLAB algorithm to C (Backward) TW Transfer MATLAB algorithm to C (Viterbi) TW Transfer MATLAB algorithm to C (Misc) All Test/debug gesture recognition All Research communication Methods All Send block information from Pixy EL Receive block information on Raspberry Pi TW Send MIDI command from Raspberry Pi AH Research Mixxx MIDI Scripting AH Writing JavaScript plugin for Mixxx AH Test JavaScript plugin for Mixxx AH Receive MIDI command in Mixxx AH Construct LED circuitry EL Design current amplification circuitry AH Construct current amplification circuitry EL Test/Debug LED drive circuit EL xiii Write code for Trinket TW Test code for Trinket TW Build glove System EL Test glove System EL Research Pixy object detection AH Train Pixy to recognize LEDs AH xiv F. Test Procedures 1) LED Glove Oscilloscope PWM analysis 1. Send 50% duty cycle PWM signal from pin 9 of the Adafruit Trinket Pro 2. Connect oscilloscope lead to the wire that transfers the signal 3. Ground the oscilloscope 4. Assess the oscilloscope reading to ensure correct duty cycle and voltage level 5. Repeat this step for pins 10 and 11 of the Adafruit Trinket Pro 6. Repeat entire test procedure for 25%, 75%, and 100% duty cycle signals Battery life 1. Measure current through the collector junction of the transistor 2. Measure current of the three PWM signals from the Adafruit Trinket Pro 3. Calculate power draw of the entire circuit 4. Calculate battery life to ensure a life suitable for a DJ performance of approximately two hours Power rating 1. Measure collector current of transistor 2. Measure collector-emitter voltage 3. Calculate power draw of the transistor to ensure power draw of less than 500 mW (max rating of transistor) Mode select 1. Begin in mode one 2. Switch to mode two 3. Switch to mode one 4. Repeat steps 2 and 3 for 50 iterations 5. If 48 iterations are successful, continue test 6. Repeat steps 4 and 5 for switching between mode one and three and mode two and three 2) Pixy Camera Ambient light setup: 1. Turn on lights 2. Set up candela photometer 3. Read measurement and adjust lighting until photometer measures 250 cd LED color signature detection: 1. Complete ambient light setup procedure 2. Connect Pixy to computer 3. Open Pixymon application 4. Turn on glove circuit 5. Emit one color from the LEDs 6. Use Pixymon train function to train color signature 7. Assess detection of color signature 8. Repeat procedure for light environment measuring great than 250 cd xv LED trajectory tracking: 1. Complete LED color signature detection test procedure 2. Record data output from Master output, Slave input (MOSI) pin of the SPI cable 3. Acquire trajectory data from Pixymon 4. Compare the output data from Pixy to the saved data from Pixymon 5. Repeat procedure for light environment measuring great than 250 cd 3) Raspberry Pi Validate trajectory calculation: 1. Complete LED trajectory tracking test procedure 2. Import data into MATLAB 3. Perform distance calculation on data 4. Save sequence of vector calculations from Raspberry Pi to file 5. Compare calculations to Raspberry Pi calculations Evaluate computation time: 1. Connect oscilloscope lead to data-received flag pin of Raspberry Pi 2. Connect oscilloscope lead to MIDI-signal-sent flag pin of Raspberry Pi 3. Execute test script for computation time 4. Record when trajectory data is received from Pixy 5. Record when MIDI signal is sent from Raspberry Pi 6. Calculate time difference Analyze MIDI signal output 1. Connect oscilloscope to MIDI signal output TTL pin 2. Perform specific gesture 3. Evaluate MIDI signal voltage, baud rate, and data bits 4. Compare experimental signal with theoretical signal 4) HMM Algorithm Gesture recognition rate: 1. Connect oscilloscope lead to MIDI signal output TTL pin 2. Perform gesture one 3. Compare captured signal to theoretical signal 4. Repeat steps 2 and 3 for 50 iterations 5. Repeat steps 2-4 for gestures two and three 6. Evaluate if 75% gesture recognition rate is met Latency: 1. Connect oscilloscope lead to data-received flag pin of Raspberry Pi 2. Connect oscilloscope lead to MIDI signal output TTL pin 3. Perform gesture one 4. Evaluate time difference between data input and output 5. Repeat steps 3 and 4 for gestures two and three 6. Evaluate if 160 ms latency is met xvi 5) Mixxx Software Confirm effect execution 1. Complete Analyze MIDI signal output test procedures from Raspberry Pi 2. With captured MIDI signal, validate mapping of specified signal to audio effect 3. Observe audio effect applied and assess whether audio effect is correct Evaluate processing time 4. Complete Confirm effect execution test procedures 5. Record latency of effect execution through Mixxx 6. Assess whether latency is in the range of 36-64 ms [25] xvii