1
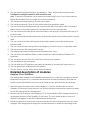
Title Page Software Design Document Raspberry PI LED Display RPLD Team March 4, 2013 Introduction Product Overview This software design document provides details on the Raspberry Pi LED Display (RPLD). The RPLD is a system of displaying animated messages on one or more 32x32 RGB LED matrices using a Raspberry PI and custom desktop software. The desktop software allows the user to edit the messages displayed on the matrices. The Raspberry PI is connected to the network to listen for messages from the desktop software, and drives the LED matrices through it's GPIO pins. Definitions and Abbreviations PRD: Product Requirements Document GPIO: General Purpose Input Output LED: Light Emitting Diode RGB: Red Green Blue Scope This document will list the high level and mid level design of the product. All of the requirements in the PRD will be addressed in the design of the product. This document will not go over low level design such as specific implementation details and leaves them up to the programmer. Version History 0.1: Initial version by Josh. Not signed off by Bob. 0.1.1: Revised OutputFrame signature, added in manual IP address option. 0.2: Revised to reflect requirements changes and design suggestions made at the end of the semester System Design Description Overview Physically there are two separate systems: The display board/Raspberry PI, and the user's desktop. The display board/Raspberry PI is one or more LED matrices chained together with 16-pin ribbon cables, with one end of the chain connected to the Raspberry through the custom 16-pin to 26-pin cable. The user's desktop is a computer running Windows 7 or greater with the client software installed. The user's desktop and the raspberry will be connected to the same local area network. The display board and the Raspberry PI will be powered separately. The communication between the two programs will be facilitated by the sockets library provided in Qt. The client and server service will communicate using the protocol outlined in next section. The server service will be always listening for communication from the client The server service will make user of a library written to facilitate displaying frames on the the display, given a specific matrix configuration. Use Cases Setting up and configuring a single matrix with scrolling text Goal: To display the message 'Hello, World!' scrolling across on LED matrix Scenario: 1. The user connects the LED matrix with the 16-pin to 26-pin ribbon cable. 2. The user plugs both LED matrix and the Raspberry PI into the wall for power. a. The power light on the Raspberry PI turns on. 3. The user connects an ethernet cable attached to the local network to the Raspberry PI. a. The network activity light on the Raspberry PI turns on. 4. On their desktop computer, the user installs the client software. 5. Once the software is installed, the user opens the software and observers that the software is connected to the Raspberry PI. 6. The user types in 'Hello, World!' into a text box in the software. 7. The user accepts the default matrix configuration of one matrix by itself. 8. The user changes the scroll speed to something > 0. 9. The user presses the Upload button in the software. a. 'Hello, World' scrolls across the matrix. Configuring multiple matrices with scrolling text Goal: To add two LED matrices onto an existing one matrix setup to form a row of three matrices. Display the message 'Three is a crowd' across the three matrices. 1. The user disconnects the existing LED matrix from power. 2. The user disconnects the 16-pin to 26-pin ribbon cable from the existing matrix. 3. The user connects the existing matrix with a second matrix with 16-pin ribbon cable, from the port labeled output on the existing matrix to the port labeled input on the second matrix. 4. The user connects the output port of the second matrix to the input port of the third matrix with a 16pin ribbon cable. 5. The user connects the second matrix's power to the existing matrix's power with the power extension cable. 6. The user connects the third matrix's power to the existing matrix's power with another power extension cable. 7. The user reconnects the existing matrix to the Raspberry PI with the 16-pin to 16 pin ribbon cable. 8. The user reconnects the existing matrix's power. 1. The existing matrix starts scrolling the previously entered text, if any. 9. The user opens the installed software on their computer and observes that the Raspberry PI is connected. 10. The user enters the text 'Three is a crowd' into a text box in the software. 11. The user selects a text scroll speed. 12. The user adds two LED matrices to the matrix configuration by increasing the matrix count to 3. 13. The user presses the upload button in the software. 1. The text 'Three is a crowd' scrolls across the three matrices. Detailed description of modules Desktop Client Software The desktop client software is user-installable software that runs on the user's computer. It shall be implemented using the Qt C++ framework and have these six basic functionalities. Note that this section contains specifications and not low level design choices, which are left to the developer. 1. Show the current connection status of the Raspberry Pi. The user should be able to tell if the Raspberry Pi is detected on the network or not. See the following communications section for details on how this communication is accomplished. 2. Manually edit the IP address of the Raspberry Pi. On some networks UDP broadcast is blocked, so the automatic discovery of the Raspberry Pi won't work. The user should be able to enter an IP address if this happens, or edit the IP address that was discovered. 3. Edit the scrolling text. It should have controls to input the text, the scrolling speed, and color of text displayed. After changing these settings the user should be able to upload the new settings to the Raspberry Pi. See the following communications section for details on how this communication is accomplished. 4. Change the number LED matrices that are connected to the Raspberry Pi. 5. Display a user manual. 6. Send a shutdown message to the Raspberry Pi. When the user clicks the connect button the software should try to establish a connection to the server. If a connection is not established a message box with a helpful error message should pop up. Setting new values happens when the user clicks on a Upload button. If the Raspberry Pi is not connected then all settings controls should not show any values and the Upload button should be grayed out. Raspberry PI Service The Raspberry PI service is a program that is preinstalled on the Raspberry PI. It will constantly run, both running the animations on the display and listening for messages from the desktop client software. It will be implemented using C++ and the Qt framework and run as a Linux daemon. It has the following responsibilities: 1. Listen for communication messages from the desktop software. 2. Respond to those messages, specifically: 1. Get all settings message: Respond with all current settings values. Three settings are defined: Text, scrolling speed, and text color. 2. Set a new setting value: Save a new setting value sent from the desktop software. Do not save the value if the value is a valid value for that setting. 3. Ping message: A simple ping message that establishes the Raspberry Pi's presence on the network. 4. Shutdown message: A message that tells the Raspberry Pi to shutdown. 3. Display output on the LED matrices, based on the setting values. It does this with the help of the LED Matrix Driver Library. It will have to calculate the size of the frames based on the matrix configuration setting. The content of the frame will be calculated based on the text, scrolling speed and color settings. It will send these frames to driver library. Note that the 25 frames per second requirement is not implemented here (it is in the LED Display Driver), and frames should be sent out as needed. LED Display Driver The LED Display Driver is a library that provides functionality for frames to be output on the LED matrices connected to the Raspberry Pi. It operates by interfacing with the GPIO pins on the Raspberry PI. It shall be implemented as C++ library and take advantage of the wiringPi library for interfacing with the GPIO pins. This library will expose the following classes and functions: LEDDriver Abstract Base Class This base class is used so that in the future more hardware can be supported. It guarantees that all hardware drivers will support at the least the following abstract virtual functions it defines: int OutputFrame(uint8_t *frame, unsigned long width, unsigned long height) =0; o frame: The frame data. This points to the first item in an array of unsigned 8 bit values. The array must be width * height * 3 items long. The array is the frame laid out in row-major order, with every three bytes begin the red, green and blue values of a pixel, respectively. The data that this pointer points to is owned by caller, so it is the driver implementation's responsibility to copy the data before the function returns. o width: The width of the frame. o height: The height of the frame. o Description: This function outputs the frame and guarantees that it will be displayed until the next time the function is called. Even though the red, green and blue values are 8-bit values, it is not guaranteed that the output will show the appropriate brightness. The only requirement is that colors equal to zero are turned off and colors greater than zero are turned on. void start() =0; o Description: This function causes the driver to start displaying frames that are sent to OutputFrame. void stop() =0; o Description: This function causes the driver to stop display frames. These three function are implemented as Qt slots and should only be called with Qt's signal-slot system to ensure thread safety. LEDMatrixDriver Class: This class inherits from the LEDDriver abstract base class. It implements the OutputFrame specifically for the LED Matrices that are used in this project. It is recommended that a new thread is created to keep the matrices updated and allow receiving new frames at the same time. The framerate must be at least 25 frames per second. This class also defines a new function: void SetMatrixCount(int count); o count: The number of matrices that connected in a row. o Description: This function sets the number of matrices that are connected in a row. This is need to shift in right number of pixel to the matrices. Communication, Desktop client <-> Raspberry Pi Server Communication between the desktop client and the Raspberry Pi server is done using Qt sockets and QDataStream. A message is serialized using QDataStream and then sent over a connection made using QTcpServer, QDataStream and QTcpSocket. The communication functions should be defined in a separate library that is linked from the the client and server applications. The library should have the following functionalities: Client side: o Send Setting: Sends a setting from the client to server to be set. o Request Setting: Requests a setting to be retrieved from the server. o Connect/Disconnect: Connects or disconnects from the server, specified as a host string. This functions should provide some mechanism to return an errors that occurred. Server side: o Received New Setting: This signal is emitted when a setting is set from the client. o Setting Requested: This signal is emitted when the client requests the current value of a setting. o Return Setting Value: This slot should be called when a value is ready to be returned to the client, as a result of the Setting Requested signal. User Interface Description of the User Interface The user interface is desktop application running on a Windows 7 or higher computer. Through the interface the user can specify what to display on the LED matrices and how the LED matrices are setup. The interface should show whether the the software detects the Raspberry PI on the network or not. Screen Images The following are mockups of the user interface for the client software. They are not hard set specifications, the user interface should contain all of the elements shown however. The developer should organize the user interface in a way that is at least as natural to use the screenshots here are. NOTE: These versions conform to the original requirements specification. They do not have a text box to enter a host name or IP address of the Raspberry Pi and have the matrix configuration widget instead of the simpler matrix count textbox. Version 1 This includes all the required features specified in the PRD. Version 2 This version includes a button to insert special images into the text. This is not required and is an extra feature. Version 3 This version includes an option to use a video file instead of the scrolling text. This is not required and is an extra feature. Additional Material Raspberry Pi - Matrix connection The Raspberry Pi will need to be connected to the matrices via some the GPIO pins. The following layouts suggest a way to breadboard that connection and a possible PCB layout.