1
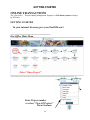
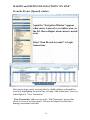
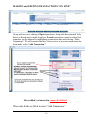
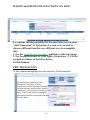
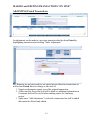
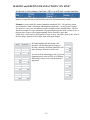
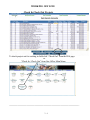
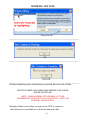
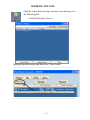
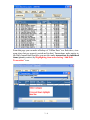
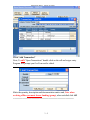
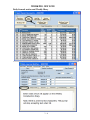
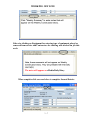
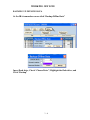
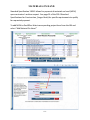
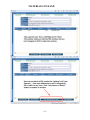
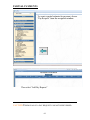
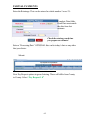
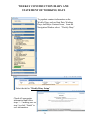
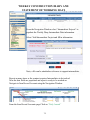
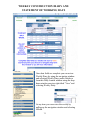
OneOffice User Manual
CONSTRUCTION PROJECT MANAGEMENT
A Web Based System
of Contract Record
Keeping &
Project Documentation
USER MANUAL FOR HENNEPIN COUNTY
GETTING STARTED
ONLINE TRANSACTIONS
The “One Office” TM Project Funding Management Program is a Web based system developed
by RTVision.
GETTING STARTED
In your internet browser go to your OneOffice.url
__________________________________
One Office Main Menu
Select “Open Project”
______________________________________________________
Enter Project number
or select “View All Projects”
Then Continue.
1-1
GETTING STARTED
GETTING AROUND
Your Project is now open “ON LINE”
A pop up “Navigation Window” on the left
appears when curser is moved over window
area, then collapses when curser is moved
away.
1-2
GETTING STARTED
Shows the active, OPEN, project number.
The first two Data Buttons are primarily used by Design and we
will not go into their use at this time.
The following are the navigation buttons that you will wish to
become familiar.
The areas we will use most are Construction Data and eMedia.
Construction Data three main areas.
Construction- a form to tack and post project information
and status.
Project Item Management which is further subdivided
Agreements,
Request Permits,
Track Permits.
Item Testing Management
Consultants List of Consultants on this project.
Item Record Accounts Quantity record keeping.
Contract Changes Where Change Order, Work Order, Back
sheet adjustment and Supplemental agreements are added.
Pay Requests Process and view Partial Payments.
Intermediate Projects Record Intermediate contract
requirements, accessed for Weekly Diaries.
State Aid Pay Requests
RBA/AA Request for Board Action /
Suspension of Work
Weekly Diary
1-3
GETTING STARTED
Completion Data, as it describes, is the location
contract completion is reported and project is moved
from Construction. Caution until Project is finalized it
is best not to navigate here. Once information is
updated entries in IRA are no longer allowed, and
restoration will require your Administrator to move
project back to Construction.
Project Item Sketcher this is the same tool as
connected to IRA entries however drawings do not
attach directly to an entry.
eMedia portal to a list of readable / printable reports.
Most of these portals open limited interactive reports;
the exceptions are Document Creation, Document
eApproval, and Final Item Documentation.
We will explore just a few in this manual, later looking
at Final Item Documentation and Open IRA in Excel.
1-4
GETTING STARTED
Glossary
IRA
TRANSACTIONS
OPEN TRANSACTIONS
POSTED TRANSACTIONS
USED
ON LINE
OFF LINE
CHECKED IN
CHECKED OUT
PAY REQUEST
Item Record Account
Making entries into the “Item Record Account” (IRA)
Entries that have not been incorporated into a pay request.
Entries that have been incorporated into a pay request.
Total of Posted and Open Transactions
Web based.
Stand alone, disconnected from Web.
Working in project, on line.
Working in project, off line.
Partial Estimate
1-5
MAKING and EDITING TRANSACTIONS “ON LINE”
From the Project [Opened] window.
Again the “Navigation Window” appears
when curser is moved over window area, on
the left, then collapses when curser is moved
away.
Select “Item Record Accounts” to begin
transactions.
Here project items can be accessed either by double clicking on desired line
item or by highlighting the desired line selecting “Add Transaction,” however;
a third option is “View Transaction.”
“View Transaction” adds one step to the “Add Transaction” process that
allows a review of previous entries. This may be helpful for items that a
naming convention is desirable.
2-1
MAKING and EDITING TRANSACTIONS “ON LINE”
Along with a review, editing of Open transactions, along with their attached Tally
Sheet or Sketch may be made from here. Posted transactions cannot be edited, but
quantities can be adjusted by highlighting a transaction line and selecting “Make
Adjustment.” We will return to this later. Once review of previous transactions has
been made, select “Add Transaction.”
Once added, a transaction cannot be deleted.
When data fields are filled in select “Add Transaction.”
2-2
MAKING and EDITING TRANSACTIONS “ON LINE”
To continue entering quantities for the same item you can select
“Add Transaction” at the bottom of screen or if you wish to
choose a different item there are different ways to accomplish
this;
1. Use the “Item Record Accounts” pull down at the top of page.
2. Use the pull down arrow to the right of item above. 3. Use the
navigation window on the left as before.
Partial Estimate
EDIT TRANSACTION
To edit a transaction highlight entry line and select “Edit Transaction.”
All data fields are editable since this
transaction is still Open. To make
modifications simply select data field make
revisions and once satisfied select “Modify
Transactions.” If at any time you choose to exit
select “Cancel” and without saving altered
information OneOffice will return to the Item
Record window.
2-3
MAKING and EDITING TRANSACTIONS “ON LINE”
ADJUSTING Posted Transactions
An adjustment can be made to a previous transaction that has been Posted by
highlighting transaction and selecting “Make Adjustment.”
Pay Requests are not processed for our tutorial project therefore transactions do
not become Posted, but a few things to take note of;
1. Negative adjustments cannot exceed the original transaction.
2. At this time the Stn-to Stn field will be blank so additional information in
Comments field will be useful when auditing entries for finalizing
project.
3. Again once “Add Adjustment” is selected a transaction line will be added
that cannot be deleted only edited.
2-4
MAKING and EDITING TRANSACTIONS “ON LINE”
At the top of each column of an Item’s IRA you will find a sorting function.
These can be very useful, on larger projects, in checking entries, but a naming convention
must be set up in the Stn-to-Stn field from when the first transactions is made.
Example, a project with fifty sanitary manholes numbered 200 – 249 and sixty storm
sewer structures, both catch basins and manholes numbered 1 - 60 all get new castings.
The project is a two year job and there maybe multiple persons making entries. The sort
function can make it easy to determine if a particular structure has been account, if care is
taken at time of entry with an understanding of how OneOffice sorts data.
Unlike Xcel, which sorts by full numerical value of entry, OneOffice sorts by the value of
the first intiger, numeric before alpha, then subsequent intigers.
EXCEL
1
2
3
9
10
11
12
13
14
20
25
212
235
240
A22
OneOffice
1
10
11
12
13
14
2
20
25
212
235
240
3
9
A22
OneOffice
By understanding this and taking a few
moments, when making the first entry, to
001
develop a naming convention OneOffice will
002
make sorting a much more useful tool.
003
It works well for stationing as well. Use of an
alignment prefix such as LEB, or LEB Main,
followed by station verses just the station is
suggested.
2-5
009
010
011
012
013
014
020
025
212
235
240
A22
WORKING OFF LINE
Check In Check Out Projects
To check project out for working in field click “Check Out” from the IRA page
or
“Check In / Check Out” from One Office Main Menu.
____________________________________________________________________
3-1
WORKING OFF LINE
Then click OK
____________________________________________________________________
OK
____________________________________________________________________
Click OK
____________________________________________________________________
This has loaded the project information to your hard drive for work off line.
MULTIPLE USERS CAN WORK CONCURRENTLY ON THE IRA
ONLINE OR OFFLINE.
NOTE: WHEN WORKING OFFLINE BACK UP YOUR
INFORMATION IN THE FIELD TO A FLASH DRIVE, FLOPPY OR
EXTERNAL DRIVE HOURLY.
Working off line is used when you can not use VPN to connect to
the Network or if you think you will be disconnected often.
3-2
WORKING OFF LINE
Click the yellow RtVision Logo located on your desk top or at
the following path.
C:\WINDOWS\RtQRB_Offline.exe
Highlight requested project and then select “Open Project”
_____________________________________________________________________
Select (Re)Query IRA
_____________________________________________________________________
3-3
WORKING OFF LINE
From this page you can make a Backup of “Offline Data” to a flash drive, view
open (since last pay request), posted and (to date) Transactions, make entries to
the Daily Journal and from here you can also make transactions for individual
items (quantity entries) by Highlighting item and selecting “Add/Edit
Transaction” icon.
3-4
WORKING OFF LINE
Click “Add Transaction”
Note; To edit “Open Transactions” double click on the cell and retype entry.
Program will prompt you if cell can not be edited.
Make the quantity, description and documentation entries and, Note when
working offline you must choose funding (group), when satisfied click OK
___________________________________________________________
3-5
WORKING OFF LINE
Daily Journal entries and Weekly Diary
________________________________________________________________
3-6
WORKING OFF LINE
Like wise clicking on Equipment for entering type of equipment placed or
removed from service and Contractors for entering who worked on job this
week.
The notes will appear on eMedia/Daily Diary
When complete click save and close to complete Journal Entries
3-7
WORKING OFF LINE
BACKING UP OFFLINE DATA
At the IRA transaction screen click “Backup Offline Data”
Insert flash drive, Check “Choose Drive”, Highlight the flash drive, and
Click “Backup”
3-8
MATERIALS ON HAND
Standard Specification 1906.2 allows for payment of materials on hand (MOH)
upon contractor’s written request. See page 91 of the 2014 Standard
Specifications for Construction, (Larger Book) for specific requirements to qualify
for requested payment.
To add MOH to OneOffice Select corresponding project item from the IRA and
select “Add Material On Hand.”
4-1
MATERIALS ON HAND
4-2
MATERIALS ON HAND
As you enter for payment, quantities in IRA OneOffice will deduct from the MOH
corresponding units. This will show up on Pay Estimate.
If contractor submits additional invoices with requests for further payment of
materials on hand for items already listed in MOH, navigate to MOH list by
selecting Materials On Hand from upper right of IRA.
Highlight the appropriate item. If original additions are still OPEN
transactions select “Edit Material On Hand” if they are POSTED select
“Make Adjustment.”
Keep in mind that the total amount cannot exceed the contract amount, as per
Standard Specifications, and the quantity cannot exceed proposal quantity.
4-3
Contract Changes
OneOffice has provisions to add Pay Items for modifications to the Contract by Supplemental
Agreements, Change Orders and for work covered by Standard Specification through Backsheets.
BACKSHEET
In the Original Bid there will be Pay Item Lines not included that the basis of payment is covered in
Standard Specifications, and therefore do not require further negotiations to establish payment . They
may include Bituminous Incentive/Disincentive; hold back for erosion control maintenance, among
others.
Example: Contract does not have pay item for Water for Dust Control. Standard Specification 2130.5
states “The Department will pay for water applied to aggregate surfaces for dust control caused by the traveling public on
portions of the project open to traffic as directed or approved by the Engineer at a unit price of $20 per 1,000 gal [$5.45 per cu.
m] in the absence of the Contract Pay Item 2130.501.”
To add a Backsheet move to the navigation window and select “Contract Changes”
Then select “Add Contract
Change”
5-1
Contract Changes
From the drop down window pick the
REQUEST TYPE: Backsheet
Enter the DATE: you wish to enact the change,
using the pop up calendar.
Leave STATUS: “Pending” We will return to this.
From the drop down window select a name to
assign as REQUESTER:
Add a narrative to EXPLANATION:
Even though the window allows for more keep
wording to one line.
I suggest copying or abbreviate description to
the Short Explanation/Title. Not required.
Accounting Project Number is not required.
You need not check changes in contract time
except when adding a Change Order.
Select “Submit”
A Backsheet has now been created, however, not Backsheet Items.
Think of a Backsheet similar to that of Microsoft Excel’s Workbook . As a
Workbook has multiple sheets so can a Backsheet have many Backsheet Items.
To add Backsheet Items select the edit button
5-2
at the left of Backsheet 1.
Contract Changes
Note this page looks a lot like the
previous Add Contact Change but it
has two distinct differences.
Window title identifies what we are
editing. “Edit Backsheet 1”
New Navigational Options appear
at the bottom of window.
Select Add/View Items
____________________________________________________________________________________
Since we have not created an item there is none listed.
Select Add Item
5-3
Contract Changes
To find an authorized pay item you can search using a pay item
number or any part of an item’s description. You can narrow a
search to any one of the Origin: (Pay Item Table), Units of measure
or if needed Metric.
For this exercise enter 2130 in the box right of Number: and select
“Search” or simply use the Enter button on your keyboard.
This returns every item in all
available pay item tables. Note
that an item may appear on
multiple Origins. Always select
the one on the most recent
table. In this case MNDOT 2014
Highlight the top Item and
select “Select Item.”
5-4
Contract Changes
This window may come in handy
when negotiating prices for an
SA we will close it at this time.
A few tips here. Keep the QUANTITY: to “1” so
that the backsheet will not erroneously inflate
the Amount of the Contract, which is used in
computing percentage of contract competed on
each partial payment.
Enter 20 for UNIT PRICE:
Specifications 2130.5 set the price OF $20.00 in
absence of a bid price.
Having an extended Description all though not
required is useful when finalizing or explaining
the pricing to the contractor.
Most of the time leaving the Funding
Information at the Match total is preferable.
You can enter the Quantity in the correct group
and OneOffice will fill in the percent or viseversa.
Once you are satisfied information is complete
select Add Item.
5-5
Contract Changes
This returns us to a window we have seen
previously, with an added Item Description and
additional functions. From here we can Delete
the Item we just created or return to Modify it.
We can also add more Items to the Backsheet.
This function will come in handy when items are
similar and should be grouped together.
A good example is for creating a Backsheet for Bituminous Incentives and Disincentives. You will create
two Items Incentives with a positive unit price and Disincentives with a negative unit price. Negative
quantities are only accepted in the “Make Adjustment” in the IRA which we will discuss later.
At this time select Back to Backsheet 1
From the STATUS: drop down
window choose “Approved”
Then Submit
You will see this message as a reminder to check Funding of added items. Select “OK”
5-6
Contract Changes
A quick review indicates we have an approved backsheet with one Item with price of $20.00
for Water.
There are a few navigational buttons on this page to be familiar with. The Edit
we have
already used. The Review button, next to it, takes you to a window showing more detail
of the Backsheet listed. The button at the top of page “Add Contract Change” will take you
to the window where you can make additional changes. Mn/DOT Construction Tools is a
hyperlink to the State’s construction web site.
For now using the Pop-up Navigation Window, on the left, you can go to “Item Record
Account” and begin entering quantities to this item as to any other contract item.
5-7
PARTIAL PAYMENTS
To create a partial estimate for payment, choose
“Pay Request” from the navigation window.
______________________________________________________________
Then select “Add Pay Request”
CAUTION!!! REMOVAL OF A PAY REQUEST CAN NOT BE REVERSED.
6-1
PARTIAL PAYMENTS
Enter the Retainage. This can be entered as whole number 5 or as 5%
Complete Data fields.
From Date must match
the date from last
estimate.
Check the retainage each time
you prepare an estimate!
Enter a “Processing Date” OPTIONAL this can be today’s date or any other
that you choose.
Submit.
Note Pay Request options in green lettering. These will differ from County
to County. Select “Pay Request 1.0”
6-2
WEEKLY CONSTRUCTION DIARY AND
STATEMENT OF WORKING DAYS
To populate contract information on the
Weekly Diary such as Start Date, Working
Days, and Major Contract Items, from the
Navigation Window select “Weekly Diary”
Select the tab for “Weekly Diary Setup”
Check off appropriate
information and follow
steps 1 – 5 making sure on
step 5 to click “Finish” to
save information.
7-1
WEEKLY CONSTRUCTION DIARY AND
STATEMENT OF WORKING DAYS
From the Navigation Window select “Intermediate Projects” to
populate the Weekly Diary Intermediate Date information.
Select “Add Intermediate Project and fill in information.
Note; a file can be attached as reference to support intermediate.
Repeat as many times as the contract requires Intermediates to be tracked.
Now the data fields are populated and report is ready to be worked on.
Navigate to Item Record Account using the Navigation Window.
From the Item Record Accounts page Click on “Daily Journal”
7-2
WEEKLY CONSTRUCTION DIARY AND
STATEMENT OF WORKING DAYS
Once data fields are complete you can review
Weekly Diary by using the navigation window
and selecting Weekly Diary under eMedia or
from this Daily Journal window using the drop
down window near top right titled “View” and
selecting Weekly Diary.
At any time you can review the weekly by
pulling up the navigation window and selecting
eMedia
7-3