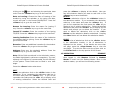
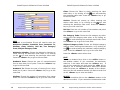
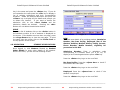
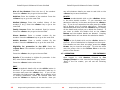
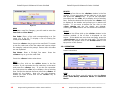
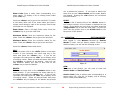
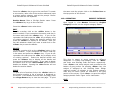
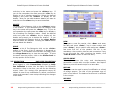
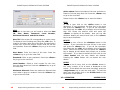
1
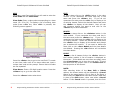
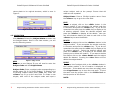
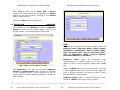
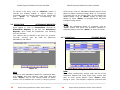
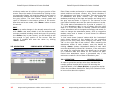
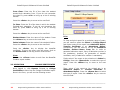
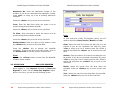
Retail Expert Software Private Limited
CAMPUS MANAGEMENT
SOFTWARE SYSTEM
Empowering Customer with a Future Vision
Refer this brochure for any help regarding software navigation or
clarification. Check for latest updates in company’s website.
Version 1
Retail Expert Software Private Limited
This user manual is considered suitable for almost all users
of Campus Management software. For advanced features
and updations, please contact Retails Experts© over
customer support number. For any queries and clarifications
contact us at 040-27676033 or write to us at
[email protected]. Check for latest updates and version at
www.rexperts.in
Some Conventions:
1) Terms in ‘<>’ refer to buttons and keys.
2) Command button with binocular symbol
could be
invoked using <F4> Key.
3) List of items is as per the menu list in the software.
4) The basic function of the elementary buttons viz.,
<New>, <Edit>, < Save >, <Print> and <Close> remain
same throughout the software though their usage might
differ in some of the forms.
5) Buttons with dull colour indicate disabled state.
6) On clicking a button, the status gets changed to ‘Cancel’.
In order to perform a different operation, click on the
‘Cancel’ state of the button and click the required button.
Privacy Policy:
This user manual is the property of Retail Experts Software
Pvt. Ltd. and cannot be used by any other person other
than the licensed client. In case of any copying, duplication,
tampering and unauthorized usage/reproduction shall be
dealt with sternly.
Use document map option of MS-Word and PDF for reaching
the exact operation.
-------------------------------------------------------------------------------------------------------------------------1
Empowering Customer with a Future Vision
2
Empowering Customer with a Future Vision
Retail Expert Software Private Limited
Retail Expert Software Private Limited
Contents
1. Masters Module
1.1 Class
1.2 Subject
1.3 Employee
1.4 Admission
1.5 Student Master
1.6 Student Other Details
1.7 Fee Category
1.8 Exam Type
1.9 Holiday Master
1.10 Section Master
1.11 Subject Category
2. Transactions Module
2.1 Fee Structure
2.2 Daily Fee Collection
2.3 Attendance Register
2.4 Student Marks
2.5 Period wise Attendance
3. Reports Module
3.1 Bonafide Certificate
3.2 College Certificates
3.3 Daily Fee Register
3.4 Attendance Register Report
3.5 Fee Ledger
3.6 Progress Report
4. System Administration Module
4.1 System Setup
4.2 Add User
4.3 Access Level
5. Quit Module
5.1 Quit
5.2 Logout
1. MASTERS MODULE
1.1. OPERATION
CLASS
Once the program is executed a login screen appears.
This is shown below:
Figure 1 Login Screen
Enter your login details. The first time login for the
administrator is ADMIN with the password as ADMIN
Press the <Enter> key twice to log in, or click on the
Login button.
Once logged in, click Masters followed by Class Master
to enter into the Class Master. Once in the class master,
you will see the following screen.
Figure 2 Class Master
-------------------------------------------------------------------------------------------------------------------------3
Empowering Customer with a Future Vision
4
Empowering Customer with a Future Vision
Retail Expert Software Private Limited
Retail Expert Software Private Limited
NEW
To create a new Class code/ID you will need to enter the
Class Code and the Class Name
EDIT
To edit a class click on the <Edit> button in the class
module. If you remember the class code key in the
same and press the <Enter> key.
If you do not
remember the code press the <F4> key to display a list
of existing classes. Select the desired classes and press
the <Enter> to display all the details. Now you can
edit whatever details you want to and click on the
<Save> key to save the details.
Class Code: Enter a class code corresponding to a class
name (Ex. 9 for IX). To display a list of existing class
codes press <F4> key. Once <F4> is pressed, the
following screen appears.
DELETE
To Delete a class click on the <Delete> button in the
class module. If you remember the class code key in
the same and press the <Enter> key. If you do not
remember the code press the <F4> key to display a list
of existing classes. Select the desired class and press
the <Enter> key to display all the details and prompt
you to delete the location. If you want to delete the
class click on the <Yes> Button and the class details
are deleted. Pressing the <No> Button will not delete
the class details.
PRINT
To print a list of classes click on the <Print> button in
the Location module. A list of Location is displayed on
the screen. If the details are more than one page, press
the <Page Down> key to view the next page. To print
the same onto the printer click on the Printer Icon on
the top portion of the Screen.
Figure 3 Class Listing
Press the <Enter> key to go to the next field. To create
a new class, take note of the class codes and input a
unique class code at the prompt. Ensure that old codes
are not repeated.
NOTE:
After selecting either of the New, Edit or Delete
options, the chosen button will be replaced by a Cancel
button at the same location. This is seen in the figure 4
below where the Edit button has been chosen. Note that
in place of the Edit button, there now exists a Cancel
button. If this Cancel button is pressed, then the form
Class Name: Enter a 20-digit Location name. Press the
<Enter> key to go to the next field.
Press the <Save> button when done.
-------------------------------------------------------------------------------------------------------------------------5
Empowering Customer with a Future Vision
6
Empowering Customer with a Future Vision
Retail Expert Software Private Limited
Retail Expert Software Private Limited
returns back to its original structure, which is seen in
Figure 2.
unique subject code at the prompt. Ensure that old
codes are not repeated.
Subject Name: Enter a 20-digit Location name. Press
the <Enter> key to go to the next field.
EDIT
To edit a subject click on the <Edit> button in the
subject module. If you remember the subject code key
in the same and press the <Enter> key. If you do not
remember the code press the <F4> key to display a list
of existing subjects. Select the desired subjects and
press the <Enter> to display all the details. Now you
can edit whatever details you want to and click on the
<Save> key to save the details.
Figure 4 Class form in edit mode
1.2. OPERATION
SUBJECT
Click Masters followed by Subject Master to enter into
the Subject Master. Once in the class master, you will
see the following screen.
DELETE
To delete a subject click on the <Delete> button in the
subject module. If you remember the subject code key
in the same and press the <Enter> key. If you do not
remember the code press the <F4> key to display a list
of existing subjects. Select the desired subject and
press the <Enter> key to display all the details and
prompt you to delete the location. If you want to delete
the subject click on the <Yes> Button and the subject
details are deleted. Pressing the <No> Button will not
delete the subject details.
Figure 5 Subject form
NEW
To create a new Subject ID you will need to enter the
Subject Code and the Subject Name
PRINT
To print a list of subjects click on the <Print> button in
the Location module. A list of Location is displayed on
the screen. If the details are more than one page, press
the <Page Down> key to view the next page. To print
the same onto the printer click on the Printer Icon on
the top portion of the Screen.
Subject Code: Enter a subject code corresponding to a
subject name (Ex. 6 for Social Studies). To display a list
of existing subject codes press <F4> key. Press the
<Enter> key to go to the next field. To create a new
subject, take note of the subject codes and input a
NOTE:
-------------------------------------------------------------------------------------------------------------------------7
Empowering Customer with a Future Vision
8
Empowering Customer with a Future Vision
Retail Expert Software Private Limited
Retail Expert Software Private Limited
After selecting either of the New, Edit or Delete
options, the chosen button will be replaced by a Cancel
button at the same location. Clicking on the Cancel
button resets the form.
Press the <Save> button when done.
1.3. OPERATION
EMPLOYEE
Once logged in, click Masters followed by Employee
Master to enter into the Subject Master. Once in the
subject master, you will see the following screen.
Figure 7 Employee Form: Other Details
NEW
To create a new Employee ID you will need to enter the
Employee Code, Employee Name, Father’s Name,
Designation, Qualification, Date of Birth (DOB),
Date of Joining (DOJ), Date of Increment (DOI),
Date of Retirement (DOR), Present Address,
Permanent Address and Remarks.
Employee
Code:
Enter
an
employee
code
corresponding to a subject name (Ex. 9 for IX). To
display a list of existing employee codes press <F4>
key.
Figure 6 Employee Form: Employee Details
Press the <Enter> key to go to the next field. To create
a new employee, take note of the employee codes and
input a unique employee code at the prompt. Ensure
that old codes are not repeated.
The Employee form is split into two tabs, Employee
Details and Other Details. Both of these are required
to be completed before a new employee ID can be
created. Do not re-click underlying buttons on shifting to
alternate tab.
Employee Name: Enter a 20-digit Employee name.
Press the <Enter> key to go to the next field.
-------------------------------------------------------------------------------------------------------------------------9
Empowering Customer with a Future Vision
10
Empowering Customer with a Future Vision
Retail Expert Software Private Limited
Father’s Name: Enter the employee’s father’s name.
Press the <Enter> key to go to the next field.
Designation: Enter the designation of the employee
within the institution. Press the <Enter> key to go to
the next field.
Qualification: Enter the designation of the employee
within the institution. Press the <Enter> key to go to
the next field.
Date of Birth (DOB): Choose the DOB of the employee
by using the calendar or by typing the date, month and
year in the format DD/MM/YYYY. Press the <Enter> key
to go to the next field
Date of Joining (DOJ): Choose the DOJ of the
employee by using the calendar or by typing the date,
month and year in the format DD/MM/YYYY. Press the
<Enter> key to go to the next field
Date of Increment (DOI): Choose the DOI of the
employee by using the calendar or by typing the date,
month and year in the format DD/MM/YYYY. Press the
<Enter> key to go to the next field
Date of Retirement (DOR): Choose the DOR of the
employee by using the calendar or by typing the date,
month and year in the format DD/MM/YYYY. Press the
<Enter> key to go to the next field
Present Address: Enter details of the employee’s
present address, such as Address 1, Country, Pin
Code, Phone Numbers, Mobile Number, Email. After
entering each field, press the <Enter> key to progress
to the next field.
Retail Expert Software Private Limited
Permanent Address: Enter details of the employee’s
permanent address, such as Address 1, Country, Pin
Code, Phone Numbers, Mobile Number, Email. After
entering each field, press the <Enter> key to progress
to the next field. If the present and permanent
addresses are the same, this field may be omitted
Remarks: Enter any other remarks pertinent to the
employee. Press the <Enter> key once done.
Press the <Save> button when done.
EDIT
To edit a employee click on the <Edit> button in the
employee module. If you remember the employee code
key in the same and press the <Enter> key. If you do
not remember the code press the <F4> key to display a
list of existing employees. Select the desired employees
and press the <Enter> to display all the details. Now
you can edit whatever details you want to and click on
the <Save> key to save the details.
DELETE
To Delete a employee click on the <Delete> button in
the employee module. If you remember the employee
code key in the same and press the <Enter> key. If
you do not remember the code press the <F4> key to
display a list of existing employees. Select the desired
employee and press the <Enter> key to display all the
details and prompt you to delete the location. If you
want to delete the employee click on the <Yes> Button
and the employee details are deleted. Pressing the
<No> Button will not delete the employee details.
PRINT
To print a list of employees click on the <Print> button
in the Location module. A list of Location is displayed on
the screen. If the details are more than one page, press
-------------------------------------------------------------------------------------------------------------------------11
Empowering Customer with a Future Vision
12
Empowering Customer with a Future Vision
Retail Expert Software Private Limited
the <Page Down> key to view the next page. To print
the same onto the printer click on the Printer Icon on
the top portion of the Screen.
NOTE:
After selecting either of the New, Edit or Delete
options, the chosen button will be replaced by a Cancel
button at the same location. This is seen in the figure 4
below where the Edit button has been chosen. Note that
in place of the Edit button, there now exists a Cancel
button. If this Cancel button is pressed, then the form
returns back to its original structure, which is seen in
Figure 2.
1.4 OPERATION
ADMISSION
Once logged in, click Masters followed by Admission
Master to enter into the Admission Master. Once in the
subject master, you will see the following screen.
Retail Expert Software Private Limited
NEW
To create a new Admission ID you will need to enter the
Admission Number, Student Name, Father’s Name,
Mother’s Name, Tongue, Date of Birth, Nationality,
Religion, Caste, Name of Guardian, Occupation,
Previous Institution, Previous Class, Date of
Admission, Study Type, Gender, Number and Date
of ESIC or TC (if submitted), Personal Identification
Marks, Medium, Class on Leaving, Date on Leaving,
Reason for Leaving, Issued TC number, Leaving
Institution, Remarks, Address
Admission Number: Enter a admission code
corresponding to a class name (Ex. 9 for IX). To display
a list of existing class codes press <F4> key.
Press the <Enter> key to go to the next field. To create
a new admission, take note of the admission codes and
input a unique employee code at the prompt. Ensure
that old codes are not repeated.
Student Name: Enter the name of the student. Press
the <Enter> key to go to the next field.
Father’s Name: Enter the name of the student’s father.
Press the <Enter> key to go to the next field
Mother’s Name: Enter the name of the student’s
mother. Press the <Enter> key to go to the next field
Mother Tongue: Enter the name of the student’s
mother tongue. Press the <Enter> key to go to the
next field
Date of Birth: Choose the DOB of the student by using
the calendar or by typing the date, month and year in
Figure 8
-------------------------------------------------------------------------------------------------------------------------13
Empowering Customer with a Future Vision
14
Empowering Customer with a Future Vision
Retail Expert Software Private Limited
Retail Expert Software Private Limited
the format DD/MM/YYYY. Press the <Enter> key to go
to the next field.
icon and selecting the particular class code. Press
the
the <Enter> key to go to the next field.
Nationality: Enter the nationality of the student. Press
the <Enter> key to go to the next field.
Study Type: Choose the study type of the student by
using the drop down list. Press the <Enter> key to go
to the next field.
Religion: Enter the nationality of the student. Press the
<Enter> key to go to the next field
Caste: Enter the Caste status of the student. Press the
<Enter> key to go to the next field
Name of Guardian: Enter the name of the Guardian for
the student. Press the <Enter> key to go to the next
field. Ignore this field if the names of the mother or
father have been entered.
Occupation: Enter the occupation of the parent(s) or
guardian of the student. Press the <Enter> key to go to
the next field.
Previous Institution: Enter the name of the previous
institution in which the student studied. Press the
<Enter> key to go to the next field.
Previous Class: Choose the previous class by either
entering the previous class code value, or by clicking on
icon and selecting the particular class code. Press
the
the <Enter> key to go to the next field.
Date of Admission: Choose the Date of Admission of
the student by using the calendar or by typing the date,
month and year in the format DD/MM/YYYY. Press the
<Enter> key to go to the next field.
Class on Admission: Choose the Class of Admission by
either entering the class code value, or by clicking on
Gender: Choose the study type of the student by using
the drop down list. Press the <Enter> key to go to the
next field.
Number and Date of ESIC or TC (if submitted): If an
ESIC or a TC has been submitted, their corresponding
check boxes must be ticked. To tick any of the check
boxes, press the <Spacebar>. Then, enter the ESIC/TC
number of the student. Press the <Enter> key to go to
the next field.
Choose the date of the ESIC/TC by using the calendar or
by typing the date, month and year in the format
DD/MM/YYYY. Press the <Enter> key to go to the next
field.
Protection from Small Pox: If the student has been
protected from Small Pox, press the <Spacebar>.
Press the <Enter> key to go to the next field.
Personal Identification Marks: Enter any personal
identification marks of the student. Press the <Tab>
key to enter further details in the 2nd field. Press the
<Enter> key to go to the next field
Medium: Choose the medium of instruction from the
drop down list. Press the <Enter> key to go to the next
field
Class on Leaving: Choose the class on leaving by
either entering the previous class code value, or by
-------------------------------------------------------------------------------------------------------------------------15
Empowering Customer with a Future Vision
16
Empowering Customer with a Future Vision
Retail Expert Software Private Limited
icon and selecting the particular class
clicking on the
code. Press the <Enter> key to go to the next field
Date on Leaving: Choose the Date of Leaving of the
student by using the calendar or by typing the date,
month and year in the format DD/MM/YYYY. Press the
<Enter> key to go to the next field.
Reason for Leaving: Enter the reason for leaving if
any. Press the <Enter> key to go to the next field.
Issued TC number: Enter the number of the issuing
TC/ESIC. Press the <Enter> key to go to the next field
Leaving Institution: Enter the name of the institution
the student shall be joining. Press the <Enter> key to
go to the next field
Remarks: Enter any additional remarks for the student.
Press the <Enter> key to go to the next field.
Address: Enter any the student’s address. Press the
<Enter> key to go to the next field
Retail Expert Software Private Limited
press the <Enter> to display all the details. Now you
can edit whatever details you want to and click on the
<Save> key to save the details.
DELETE
To elete a admission click on the <Delete> button in
the admission module. If you remember the admission
code key in the same and press the <Enter> key. If
you do not remember the code press the <F4> key to
display a list of existing admissions. Select the desired
admission and press the <Enter> key to display all the
details and prompt you to delete the location. If you
want to delete the admission click on the <Yes>
Button and the admission details are deleted. Pressing
the <No> Button will not delete the admission details.
PRINT
To print a list of admissions click on the <Print> button
in the admissions module. A list of admissions is
displayed on the screen. If the details are more than
one page, press the <Page Down> key to view the
next page. To print the same onto the printer click on
the Printer Icon on the top portion of the Screen.
1.5 OPERATION
Note: Of the fields mentioned in the Admission master,
the fields highlighted in yellow are compulsory. The rest,
although not required is recommended for the efficiency
of the system. These fields can be filled in at a later
stage.
STUDENT
Once logged in, click Masters followed by Student
Master to enter into the Student Master. Once in the
student master, you will see the following screen.
Press the <Save> button when done.
EDIT
To edit an admission click on the <Edit> button in the
admission. If you remember the admission code key in
the same and press the <Enter> key. If you do not
remember the code press the <F4> key to display a list
of existing admissions. Select the desired code and
-------------------------------------------------------------------------------------------------------------------------17
Empowering Customer with a Future Vision
18
Empowering Customer with a Future Vision
Retail Expert Software Private Limited
Retail Expert Software Private Limited
Class: Choose the Class by either entering the class
icon and selecting
code value, or by clicking on the
the particular class code. Press the <Enter> key to go
to the next field
Section: Choose the section by either entering the
section code value, or by clicking on the
icon and
selecting the particular class code. Press the <Enter>
key to go to the next field
Roll No: Enter the roll number of the student and press
the <Enter> to go to the next field
Figure 9
NEW
To create a new Student ID you will need to enter the
Admission Number, Academic from, Academic To,
Medium, Class, Section, Roll No, Fee Category
Code, Subject Category Code
Admission Number: Choose the Admission Number by
either entering the admission code value, or by clicking
on the
icon and selecting the particular class code.
Press the <Enter> key to go to the next field.
Academic from: Choose the year of commencement
from a drop down list of years. Press the <Enter> key
to go to the next field
Academic To: Choose the year of leaving from a drop
down list of years. Press the <Enter> key to go to the
next field
Medium: Choose the medium of instruction from a drop
down list. Press the <Enter> key to go to the next field
Fee Category Code: Choose the fee category by either
entering the fee category code value, or by clicking on
the
icon and selecting the particular class code. Press
the <Enter> key to go to the next field.
Subject Category Code: Choose the Subject category
code by either entering the code value, or by clicking on
the
icon and selecting the particular subject category
code. Press the <Enter> key to go to the next field
Press the <Save> button when done.
EDIT
To edit an student form click on the <Edit> button in
the student master. If you remember the admission
code key in the same and press the <Enter> key. If
you do not remember the code press the <F4> key to
display a list of existing admissions. Select the desired
code and press the <Enter> to display all the details.
Now you can edit whatever details you want to and click
on the <Save> key to save the details.
DELETE
To delete a student click on the <Delete> button in the
admission module. If you remember the admission code
-------------------------------------------------------------------------------------------------------------------------19
Empowering Customer with a Future Vision
20
Empowering Customer with a Future Vision
Retail Expert Software Private Limited
Retail Expert Software Private Limited
key in the same and press the <Enter> key. If you do
not remember the code press the <F4> key to display a
list of existing admissions and their corresponding
students. Select the desired admission and press the
<Enter> key to display all the details and prompt you
to delete the location.
If you want to delete the
admission click on the <Yes> Button and the
admission details are deleted.
Pressing the <No>
Button will not delete the admission details.
PRINT
To print a list of students click on the <Print> button in
the students module. A list of students is displayed on
the screen. If the details are more than one page, press
the <Page Down> key to view the next page. To print
the same onto the printer click on the Printer Icon on
the top portion of the Screen.
1.6. OPERATION
STUDENT OTHER DETAILS
Once logged in, click Masters followed by Student
Other Details to enter other details of the student.
Once in the form, you will see the following screen
Figure 10
NEW
To create new details of an existing student, Admission
Number, Bus Pass facility, Employed, Aim of the
Student, Hobbies, Medical History, Family Income,
Phone Number, Mobile Number, eligibility for
promotion in the BIE.
Admission Number:
Enter
a
admission
code
corresponding to a student name (Ex. 9 for IX). To
display a list of existing admissions press <F4> key.
Press the <Enter> key to go to the next field.
Bus Pass facility: Press the <Space bar> to check if
the student has a bus pass.
Press the <Enter> key to go to the next field.
Employed: Press the <Space bar> to check if the
student is employed.
Press the <Enter> key to go to the next field.
-------------------------------------------------------------------------------------------------------------------------21
Empowering Customer with a Future Vision
22
Empowering Customer with a Future Vision
Retail Expert Software Private Limited
Retail Expert Software Private Limited
Aim of the Student: Enter the aim of the student.
Press the <Enter> key to go to the next field
can edit whatever details you want to and click on the
<Save> key to save the details.
Hobbies: Enter the hobbies of the student. Press the
<Enter> key to go to the next field
DELETE
To delete student details click on the <Delete> button
in the other details module.
If you remember the
admission code key in the same and press the <Enter>
key. If you do not remember the code press the <F4>
key to display a list of existing admissions. Select the
desired admission and press the <Enter> key to display
all the details and prompt you to delete the location. If
you want to delete the details click on the <Yes>
Button and the student details are deleted. Pressing
the <No> Button will not delete the admission details.
Medical History: Enter the medical history of the
student (if any). Press the <Enter> key to go to the
next field
Family Income: Enter the student’s family’s income.
Press the <Enter> key to go to the next field
Phone Number: Enter a contact number for the
student. Press the <Enter> key to go to the next field
Mobile Number: Enter a mobile number for the
student. Press the <Enter> key to go to the next field
Eligibility for promotion in the BIE: Press the
<Space bar> if the student is eligible for promotion in
the BIE.
Press the <Enter> key to go to the next field
Details: If the student is eligible for promotion in the
BIE, enter further details here.
Press the <Save> button when done.
PRINT
To print a list of details click on the <Print> button in
the form. A list of admissions is displayed on the screen.
If the details are more than one page, press the <Page
Down> key to view the next page. To print the same
onto the printer click on the Printer Icon on the top
portion of the Screen.
1.7. OPERATION
FEE CATEGORY
Once logged in, click Masters followed by Fee
Category Master to enter into the Fee Category Master
.Once in the Fee master, you will see the following
screen
EDIT
To edit a student’s details click on the <Edit> button in
the form. If you remember the admission code key in
the same and press the <Enter> key. If you do not
remember the code press the <F4> key to display a list
of existing admissions. Select the desired code and
press the <Enter> to display all the details. Now you
-------------------------------------------------------------------------------------------------------------------------23
Empowering Customer with a Future Vision
24
Empowering Customer with a Future Vision
Retail Expert Software Private Limited
Figure 11
NEW
To create a new Fee Category, you will need to enter the
Fee Code and Fee Name.
Fee Code: Enter a fee code corresponding to a fee
name (Ex. 9 for IX). To display a list of existing fee
codes press <F4> key.
Press the <Enter> key to go to the next field. To create
a new fee, take note of the fee codes and input a unique
fee category code at the prompt. Ensure that old codes
are not repeated.
Retail Expert Software Private Limited
DELETE
To Delete a fee click on the <Delete> button in the fee
module. If you remember the fee code key in the same
and press the <Enter> key. If you do not remember
the code press the <F4> key to display a list of existing
fees. Select the desired fee and press the <Enter> key
to display all the details and prompt you to delete the
location. If you want to delete the fee click on the
<Yes> Button and the fee details are deleted.
Pressing the <No> Button will not delete the fee details.
PRINT
To print a list of fees click on the <Print> button in
Location module. A list of fees is displayed on
screen. If the details are more than one page, press
<Page Down> key to view the next page. To print
same onto the printer click on the Printer Icon on
top portion of the Screen.
1.8. OPERATION
the
the
the
the
the
EXAM TYPE
Insert instructions
Fee Name: Enter a 20-digit Fee name. Press the
<Enter> key to go to the next field.
Press the <Save> button when done.
EDIT
To edit a fee, click on the <Edit> button in the fee
module. If you remember the fee code key in the same
and press the <Enter> key. If you do not remember
the code press the <F4> key to display a list of existing
fees. Select the desired fees and press the <Enter> to
display all the details. Now you can edit whatever
details you want to and click on the <Save> key to
save the details.
Figure 12
NEW
To create a new Exam, you will need to enter the Exam
Code, Exam Name, Maximum Marks and Minimum
Marks.
-------------------------------------------------------------------------------------------------------------------------25
Empowering Customer with a Future Vision
26
Empowering Customer with a Future Vision
Retail Expert Software Private Limited
Exam Code: Enter a exam code corresponding to a
exam name). To display a list of existing exam codes
press <F4> key.
Press the <Enter> key to go to the next field. To create
a new exam, take note of the exam codes and input a
unique exam category code at the prompt. Ensure that
old codes are not repeated.
Exam Name: Enter a 20-digit Exam name. Press the
<Enter> key to go to the next field.
Maximum Marks: Enter the maximum marks for the
exam. Press the <Enter> key to go to the next field.
Minimum Marks: Enter the minimum marks for the
exam. Press the <Enter> key to go to the next field.
Retail Expert Software Private Limited
you to delete the location. If you want to delete the
exam click on the <Yes> Button and the exam details
are deleted. Pressing the <No> Button will not delete
the exam details.
PRINT
To print a list of exams click on the <Print> button in
the Location module. A list of exams is displayed on the
screen. If the details are more than one page, press the
<Page Down> key to view the next page. To print the
same onto the printer click on the Printer Icon on the
top portion of the Screen.
1.9. OPERATION
SECTION MASTER
Once logged in, click Masters followed by Section
Master to enter into the Section Master. Once in the
Section master, you will see the following screen
Press the <Save> button when done.
EDIT
To edit an exam click on the <Edit> button in the exam
module. If you remember the exam code key in the
same and press the <Enter> key.
If you do not
remember the code press the <F4> key to display a list
of existing exams. Select the desired exams and press
the <Enter> to display all the details. Now you can
edit whatever details you want to and click on the
<Save> key to save the details.
DELETE
To Delete an exam click on the <Delete> button in the
exam module. If you remember the exam code key in
the same and press the <Enter> key. If you do not
remember the code press the <F4> key to display a list
of existing exams. Select the desired exam and press
the <Enter> key to display all the details and prompt
Figure 13
NEW
To create a new Section, you will need to enter the
Section Code and Section Name.
Section Code: Enter a section code corresponding to a
section name (Ex. 9 for IX). To display a list of existing
section codes press <F4> key.
-------------------------------------------------------------------------------------------------------------------------27
Empowering Customer with a Future Vision
28
Empowering Customer with a Future Vision
Retail Expert Software Private Limited
Press the <Enter> key to go to the next field. To create
a new section, take note of the section codes and input
a unique section category code at the prompt. Ensure
that old codes are not repeated.
Retail Expert Software Private Limited
the same onto the printer click on the Printer Icon on
the top portion of the Screen.
1.10. OPERATION
Section Name: Enter a 20-digit Section name. Press
the <Enter> key to go to the next field.
SUBJECT CATEGORY
Once logged in, click Masters followed by Subject
Category to enter into the subject category Master.
Press the <Save> button when done.
EDIT
To edit a section click on the <Edit> button in the
section module. If you remember the section code key in
the same and press the <Enter> key. If you do not
remember the code press the <F4> key to display a list
of existing sections. Select the desired sections and
press the <Enter> to display all the details. Now you
can edit whatever details you want to and click on the
<Save> key to save the details.
DELETE
To Delete a section click on the <Delete> button in the
section module. If you remember the section code key
in the same and press the <Enter> key. If you do not
remember the code press the <F4> key to display a list
of existing sections. Select the desired section and
press the <Enter> key to display all the details and
prompt you to delete the location. If you want to delete
the section click on the <Yes> Button and the section
details are deleted. Pressing the <No> Button will not
delete the section details.
PRINT
To print a list of sections click on the <Print> button in
the Location module. A list of sections is displayed on
the screen. If the details are more than one page, press
the <Page Down> key to view the next page. To print
Figure 14
This form is meant to group subjects as different
categories. To create new category, click on <New>
and enter new SubCatg Code and name respectively.
Press <Enter> and select subject code provided at the
bottom of grey portion. On pressing <Enter> key, the
subject is assigned to the SubCatg Code. Assign
required number of subjects to the subject category
code and the same would be reflected in the grey
portion of the screen. Click <Save> to save the subject
category details. Refer Figure 14 for clarification.
EDIT
-------------------------------------------------------------------------------------------------------------------------29
Empowering Customer with a Future Vision
30
Empowering Customer with a Future Vision
Retail Expert Software Private Limited
Click <Edit> to update/edit records by entering or by
selecting the subject category code using <F4> key.
This form is essential in transaction forms for generation
of reports. Click <Save> to save/store the entry.
2. TRANSACTIONS MODULE
2.1. OPERATION
FEE STRUCTURE
Once logged in, click Transactions followed by Fee
Structure to enter into the Section Master. Once in the
Section master, you will see the following screen
Retail Expert Software Private Limited
To create a new Fee Structure, you will need to enter
the Fee Category Code, Fee Category Name, along
with single or multiple Fee Codes and Fee Amounts.
Fee Category Code: Enter a Fee Category Name code
corresponding to a Fee name (Ex. 9 for IX). To display a
list of existing Fee codes press <F4> key. Once <F4>
is pressed, the following screen appears. To create a
new Fee category code, take note of the Fee codes and
input a unique code at the prompt. Ensure that old
codes are not repeated.
Fee Category Name: Enter a 20-digit Location name.
Press the <Enter> key to go to the next field.
Fee Code: To add Fees to a specific Fee Category, enter
the appropriate Fee Code. This is done by clicking on the
and selecting the appropriate fee. Press the <Enter>
key to go to the next field.
Fee Amount: Enter a numerical value for the amount of
fees that will be charged. Press the <Enter> key to add
this fee to the selected fee category.
Repeat the above instructions to add more fees to the
selected fee category.
If you have added a wrong Fee code to a
select the Fee code, and then click on the
Row> to delete the corresponding entry. To
entries in the Fee Category, press the <Clear
button.
category,
<Delete
delete all
Entries>
Press the <Save> button when done.
Figure 15
EDIT
To edit a Fee Category click on the <Edit> button in the
employee module. If you remember the Fee Category
NEW
-------------------------------------------------------------------------------------------------------------------------31
Empowering Customer with a Future Vision
32
Empowering Customer with a Future Vision
Retail Expert Software Private Limited
Retail Expert Software Private Limited
code key in the same and press the <Enter> key. If
you do not remember the code press the <F4> key to
display a list of existing categories. Select the desired
category and press the <Enter> to display all the
details. Now you can edit whatever details you want to
and click on the <Save> key to save the details.
DELETE
To delete a Fee Category click on the <Delete> button
in the module. If you remember the Fee Category code
key in the same and press the <Enter> key. If you do
not remember the code press the <F4> key to display a
list of existing Fee Category codes. Select the desired
code and press the <Enter> key to display all the
details and prompt you to delete the location. If you
want to delete the Category click on the <Yes> Button
and the details are deleted. Pressing the <No> Button
will not delete the details.
PRINT
To print a list of Fee Categories click on the <Print>
button in the form. A list of categories is displayed on
the screen. If the details are more than one page, press
the <Page Down> key to view the next page. To print
the same onto the printer, click on the Printer Icon on
the top portion of the Screen.
2.2. OPERATION
DAILY FEE COLLECTION
Once logged in, click Transactions followed by Daily
Fee Collection to enter into the Daily Fee Collection
transaction. Once in the form, you will see the following
screen. Note: Fee receipt once generated cannot be
edited. In case of any modification or refund, use Refund
option and generate a new receipt reflecting the changes
to be made.
Figure 16
NEW
To prepare a new fee receipt, click <New> and enter
fee date and press <Enter>, key-in class number and
press <Enter>, key-in section code and press <Enter>
and enter Roll No. of the student. Roll No. is not
mandatory. Also mention late fee and concession if any
to get the total fee. After checking the details, click
<Save & Print> button to save the entry.
SAVE & PRINT
This option saves the entry and simultaneously
generated a receipt with a unique number. Use Reprint
option to print the saved receipt on a later date.
REFUND
This option can be used in case of modification or refund
of receipt amount. The title of the generated copy of
print is Fee Refund. The balance fee amount is reflected
in the receipt.
REPRINT
-------------------------------------------------------------------------------------------------------------------------33
Empowering Customer with a Future Vision
34
Empowering Customer with a Future Vision
Retail Expert Software Private Limited
To reprint a fee entry, click on <Reprint> button if
records are already loaded. A reprint window is
prompted, enter the receipt number of the receipt and
click
<Print>
to
generate
corresponding
fee
receipt/refund.
2.3. OPERATION
ATTENDANCE REGISTER
Once logged in, click on Transactions followed by
Attendance Register to go into the Attendance
Register. Once inside the transaction, the following
form will be seen.
Four options can be availed in this form viz., present,
morning, evening (can be used for afternoon
attendance) and absent.
Figure 17
NEW
In order to enter attendance details for a particular date,
click <New> and enter medium, class code, date and
press <Enter> key to see records based on above
entries. List of students can be seen in the grey portion
Retail Expert Software Private Limited
of the screen. Click on ‘Attendance Status’ column of the
table and make necessary change. Note: 1) If a student
is present fully on the subject date, do not change the
default status. Click on <Save> button to store the
details. 2) Press <Enter> to navigate within the form
instead of using mouse.
EDIT
To edit the attendance status of a student, click on
<Edit> button and follow the procedure detailed in
preceding section and click <Save> to save the entries.
2.4. OPERATION
STUDENT MARKS
Figure 18
NEW
Enter Class number/code, section code, Roll No of the
subjective student and enter Exam type, month and
year to enter marks details. Press <Enter> after
keying-in ‘year’. The subjects, respective maximum and
-------------------------------------------------------------------------------------------------------------------------35
Empowering Customer with a Future Vision
36
Empowering Customer with a Future Vision
Retail Expert Software Private Limited
minimum marks are all visible in the grey portion of the
screen. Enter the marks of the student by clicking on the
corresponding ‘Marks’ cell and the status of the result is
automatically reflected the adjacent ‘Result’ column in
the grey portion. The total marks, overall grade and
result is reflected in the bottom portion of the screen.
After due entries are made, click <Save> button to save
the entries.
EDIT
In order to make changes in the already entered record,
click <Edit> and enter details in all the textboxes and
controls provided including month and year. On pressing
the <Enter> key in year control, you will be able to see
the records in grey portion of the screen. Edit the
records if needed and save the same by clicking
<Save> button.
2.5. OPERATION
PERIOD WISE ATTENDANCE
Retail Expert Software Private Limited
Enter Class number and section in respective text boxes and
select medium and press <Enter> key. Check checkbox if
the attendance entry date is a holiday. Then enter the date
of attendance and press <Enter> key. The details of
students pertaining to the class and section are listing out in
the grey area as shown in Figure 19. The columns to the
right side of student name are the period numbers in a day.
The initial state of attendance for a period is ‘present’ i.e.,
‘1’ if the attendance date is not a holiday else the initial
state is ‘0’ if the entry date is a holiday. However the status
of the attendance can be changed accordingly and saved. In
order to change the attendance status, click on respective
student name and a cluster of check boxes for different
periods is visible.
A ‘tick’ mark shows ‘present’ status while the ‘unchecked’
mark shows absence of the student for the respective
period of the entry date. After changing the status, click
‘OK’ on the right side of last column. After reviewing the
attendance status of each student, save the details by
clicking <Save> button. Attendance details of each class
must be saved daily without fail. However, if the entries are
not saved for a particular date, the details can be enlisted
on a different date and saved for the missed out date.
Period wise attendance report is generated only if the
entries are made for all the dates of academic year.
2.6. OPERATION
GENERAL RECEIPT
In order to generate receipts other than standard fee
receipt, general receipt can be used. On entering the
required details, click <Save & Print> to generate receipt.
Follow the procedure detailed for ‘Daily Fee Collection’ form
to know more about the options.
Figure 19
-------------------------------------------------------------------------------------------------------------------------37
Empowering Customer with a Future Vision
38
Empowering Customer with a Future Vision
Retail Expert Software Private Limited
3. REPORTS MODULE
3.1. OPERATION
BONAFIDE CONDUCT
Once logged in, click Reports followed by Bonafide
Conduct to enter into the Bonafide Conduct report.
Once in the form, you will see the following screen.
Two types of bonafide viz., General and Consolidated
have been provided at the top of screen. General
bonafide refers to the report which is often issued to
current student for different occasions like for
competition representation, bus pass application etc.,
and the consolidated report is issued only if the student
leaves the institutions after completion of course or due
to any other reason. Before taking a print, check the
details visible on the screen. The details retrieved on the
screen are different for the above two options. In order
to issue consolidated bonafide, check/enter leaving
details in 'Admissions’ forms.
Retail Expert Software Private Limited
Print
To view and print a bonafide conduct report, you will
need to enter in the Admin No, Roll No, From Class,
To Class, From Year, To Year, Student Name,
Father’s Name
Select if the report to be printed out is General or
Consolidated. Press the <Space bar> to select the
type of report. Press the <Enter> key to move to the
next field.
Admin No: Enter the Admission number of the student.
If you do not remember the Admission number, press
<F4> to bring up a list of existing admission numbers.
Press the <Enter> key to move to the next field.
Roll No: Enter the Roll number of the student. If you do
not remember the Roll number, press <F4> to bring up
a list of existing Roll numbers.
Press the <Enter> key to move to the next field.
-------------------------------------------------------------------------------------------------------------------------39
Empowering Customer with a Future Vision
40
Empowering Customer with a Future Vision
Retail Expert Software Private Limited
Retail Expert Software Private Limited
From Class: Enter the ID of the class the student
started their education from. If you do not remember
the class ID, press <F4> to bring up a list of existing
classes.
Press the <Enter> key to move to the next field.
To Class: Enter the ID of the class in which the student
finished their education. If you do not remember the
class ID, press <F4> to bring up a list of existing
classes.
Press the <Enter> key to move to the next field
Student Name: Enter the name of the student. Press
the <Enter> key to move to the next field.
Father’s Name: Enter the name of the student’s father.
Press the <Enter> key to move to the next field.
Press the <Print> key to display the bonafide
certificate. To print the same onto the printer click on
the Printer Icon on the top portion of the Screen.
Close
Click on the <Close> button to exit from the Bonafide
Conduct report module.
3.2. OPERATION
COLLEGE CERTIFICATES
Once logged in, click Reports followed by College
Certificates to enter into the College Certificates report.
Once in the form, you will see the following screen
Print
To view and print report for a particular range of years,
you will need to select the School or College Report
and further select if the report is an Admission Report,
Transfer Certificate or an Attendance Report.
Furthermore, you will have to fill out the Admission
Number, Student Name, From, To. In order to
generate admission report, entry of admission number is
not mandatory; however, for generation of transfer
certificate, entry of admission number is mandatory.
Firstly select if the report to be printed out is School or
College. Press the <Space bar> to select the type of
report. Press the <Enter> key to move to the next
field.
Then, select if the report to be printed out is an
Admission Report or Transfer Certificate or
Attendance Report. Press the <Space bar> to select
the type of report. Press the <Enter> key to move to
the next field.
-------------------------------------------------------------------------------------------------------------------------41
Empowering Customer with a Future Vision
42
Empowering Customer with a Future Vision
Retail Expert Software Private Limited
Retail Expert Software Private Limited
Admission No: Enter the Admission number of the
student. If you do not remember the Admission number
press <F4> to bring up a list of existing admission
numbers.
Press the <Enter> key to move to the next field.
From: Enter the date from which the report is to be
printed using the drop down calendar.
Press the <Enter> key to move to the next field.
To Class: Enter the date to which the report is to be
printed using the drop down calendar.
Press the <Enter> key to move to the next field
Student Name: Enter the name of the student. Press
the <Enter> key to move to the next field.
Press the <Print> key to display the bonafide
certificate. To print the same onto the printer, click on
the Printer Icon on the top portion of the Screen.
Close
Click on the <Close> button to exit from the Bonafide
Conduct report module.
3.3. OPERATION
Print
To view and print a Daily Fee Register report, you will
need to select the Class, Section, Month and Year.
Class: Enter the class ID of which the daily fee is to be
printed. If you do not remember the class ID, press
<F4> to bring up a list of existing class IDs. Select a
class ID and press the <Enter> key to move to the next
field.
Section: Enter the section ID of which the daily fee is to
be printed. If you do not remember the section ID, press
<F4> to bring up a list of existing section IDs. Select a
section ID and press the <Enter> key to move to the
next field.
DAILY FEE REGISTER
Once logged in, click Reports followed by Daily Fee
Register to enter into the Daily Fee Register report.
Once in the form, you will see the following screen
Month: Select the month from the drop down list
provided. Press the <Enter> key to move to the next
field.
Year: Select the year from the drop down list provided.
Press the <Enter> key to move to the next field.
-------------------------------------------------------------------------------------------------------------------------43
Empowering Customer with a Future Vision
44
Empowering Customer with a Future Vision
Retail Expert Software Private Limited
Retail Expert Software Private Limited
Press the <Print> key to display the Daily Fee
collection Report. To print the same onto the printer
click on the Printer Icon on the top portion of the
Screen
3.4. OPERATION
REPORT
PERIOD WISE ATTENDANCE
Enter class number, section, and date range to generate
period wise report. It is mandatory to have
uninterrupted entry of attendance from the first day of
academic year to generate correct report. If the
continuity of the attendance appears to be broken in the
report preview, check the date on which the attendance
status is reset to (0,1) and make corresponding entries
in the Period wise attendance form of the transactions
module for that date.
If attendance report is to be generated irrespective of
class and section, keep the corresponding text boxes
blank, give the date range and click <Print> button.
‘From date’ cannot be edited as it is the starting date of
academic year.
3.5. OPERATION
REPORT
ATTENDANCE
REGISTER
This report can be used to generate the attendance report
for a particular month. Enter class code and section code
and the month of report to generate report.
Note: Reports shall be generated only in the forward
direction; i.e report cannot be regenerated for a particular
month.
Eg. Consider a case wherein report is already generated for
the months of june, july, august. Report for june cannot be
regenerated for the month of june. In order to regenerate
reports, clear the previous data and regenerate reports for
all the preceding months. For eg., to regenerate report for
the month of july, clear attendance register report data for
all the months and regenerate attendance report of
preceding months.
3.6. OPERATION
FEE LEDGER
‘Fee ledger’ can be used to generate fee collection related
reports. Two options have been provided; one shows the
‘summary’ statement wherein the details of fees are shown
student wise and the other – ‘detailed’ option shows the
report – receipt number wise. If class and section numbers
are not mentioned, the overall report is generated
irrespective of class and section. The detailed report is
classified based on fee receipt and refund.
-------------------------------------------------------------------------------------------------------------------------45
Empowering Customer with a Future Vision
46
Empowering Customer with a Future Vision
Retail Expert Software Private Limited
Retail Expert Software Private Limited
4. SYSTEM ADMINISTRATION
MODULE
4.1. OPERATION
SYSTEM SETUP
Once logged in, click System Administration followed
by System Setup to enter into the System Setup. Once
in the setup, you will see the following screen.
3.6. OPERATION
PROGRESS REPORT
This form/report can be used to generate progress report of
students in the prescribed format. Mention medium, class,
section, date range to generate scholastic and attendance
report. Student admission number is optional.
Note: Press <Enter> key after each entry in controls.
Click on any field you wish to change. Press the
<Enter> key to scroll through other fields. To save the
changes press the <Save> key.
4.2. OPERATION
DEFINE USER
Once logged in, click System Administration followed
by Define User to enter into the form. You will then see
the following screen:
-------------------------------------------------------------------------------------------------------------------------47
Empowering Customer with a Future Vision
48
Empowering Customer with a Future Vision
Retail Expert Software Private Limited
Retail Expert Software Private Limited
Active status: Select the status of the user as Active or
Inactive from the drop down list. Press the <Enter> key
to go to the next field.
Please click on the <Save> key to save the details.
NEW
To create a new User you will need to enter the User
ID, User Name, Password, Level Number,
Maximum Discount, and Active status.
User ID: Enter a User ID corresponding to a user name.
To display a list of existing user IDs press <F4> key. To
create a new User, take note of the User IDs and input a
unique user ID at the prompt. Ensure that old IDs are
not repeated. Press the <Enter> key to go to the next
field.
User Name: Enter the name of the User. Press the
<Enter> key to go to the next field.
Password: Enter a user password. Press the <Enter>
key to go to the next field.
Level Number: Select a level number for the user,
from the drop down list. Press the <Enter> key to go to
the next field.
Maximum Discount: Enter the maximum discount that
one is able to give to a student. Press the <Enter> key
to go to the next field.
EDIT
To edit a User click on the <Edit> button in the
admission. If you remember the User key in the same
and press the <Enter> key. If you do not remember
the code press the <F4> key to display a list of existing
User IDs. Select the desired code and press the
<Enter> to display all the details. Now you can edit
whatever details you want to and click on the <Save>
key to save the details.
DELETE
To delete a user, click on the <Delete> button in the
module. If you remember the user ID key in the same
and press the <Enter> key. If you do not remember
the code press the <F4> key to display a list of existing
users. Select the desired user and press the <Enter>
key to display all the details and prompt you to delete
the location. If you want to delete the user click on the
<Yes> Button and the user details are deleted.
Pressing the <No> Button will not delete the user
details.
PRINT
To print a list of users, click on the <Print> button in
the ‘users’ module. A list of users is displayed on the
screen. If the details are more than one page, press the
<Page Down> key to view the next page. To print the
same onto the printer click on the Printer Icon on the
top portion of the Screen
4.3. OPERATION
ACCESS LEVEL
-------------------------------------------------------------------------------------------------------------------------49
Empowering Customer with a Future Vision
50
Empowering Customer with a Future Vision
Retail Expert Software Private Limited
Once logged in, click System Administration followed
by Access Level to enter into the User Level definition.
Once in the subject master, you will see the following
screen
Retail Expert Software Private Limited
<Save> button. To cancel, click on the <Cancel>
button.
5. QUIT MODULE
5.1 OPERATION
QUIT
On clicking on the quit option, the software is unloaded.
5.2. OPERATION
LOGOUT
On clicking on this option on menu list, the user is
prompted to exit or to continue with the software
operation. This could be used to shift the user login or to
exit the software.
Enter a Level Number to determine if it already exists.
If so, you may edit the permissions for that level.
To create a new level, key in a Level Number and
press the <Enter> key to go to the Level Description
field. Enter a level description and press the <Enter>
key to go to the next field. You may now set user access
permissions for the forms by expanding on each of the
headings, by clicking on the
icon. The status of
accessibility of forms can be changed by using
<Spacebar> key on keyboard. Once done, click on the
-------------------------------------------------------------------------------------------------------------------------51
Empowering Customer with a Future Vision
52
Empowering Customer with a Future Vision