1
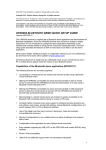
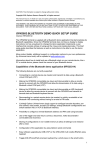
!
!
MA Club
Martial Arts Manager Software
!
OPTICON OPN2001
How to use the OPN2001 USB Companion Barcode Scanner
with MA Club to record student attendance
Version 1.02
MA CLUB
!1
© 2014 David Kell (Martial Arts Manager Software). All rights reserved.
!
Document Version 1.01
!
Martial Arts Manager Software
c/o 1 Praeds Lane, Marazion, Cornwall, TR17 0AT.
!
Martial Arts Manager Software is copyrighted. You are not authorised to make additional
copies of distribute this document without written permission of Martial Arts Manager
Software. You may use this documentation solely with a valid licensed copy of Martial Arts
Club (MA Club) software.
!
All individuals, organisations and associated data used in the examples are purely fictitious
and any resemblance to existing persons or organisations is purely coincidental.
MA CLUB
!2
OPTICON OPN2001
!
The USB OPN2001 Companion Scanner makes barcode data collection simple. Scan a
barcode and it is automatically stored within the device. The scanner is suitable for scanning
student attendance where you either can’t or choose not to take your copy of MA Club to
each training session.
To use, all your students must have an appropriate membership card that contains a readable
barcode. The barcode must contain a value unique to each student. In turn each student
barcode must be recorded against the relevant record in MA Club (Student Details) in the
Barcode field.
MA CLUB
!3
!
The system uses this unique reference to identify each student.
Importing scanned data into MA Club is done by allocated class. This means this method of
recording student attendance is not suitable where you choose to record attendance at more
than one class before processing. The system is not able to determine by barcode only the
class where attendance was recorded.
Guidance on how to use the OPN2001 scanner can be obtained from the Opticon website
Quick Start Guide or User Manual. We found the scanner to be easy to use with little setup
needed.
Before you can use the scanner you will also need to download the appropriate software again
from the Opticon website. In the case of using a Windows PC, you will also need to
download and install the necessary Windows USB divers:
• Windows software utility here.
• Windows USB drivers here.
• Mac OS software utility here.
Install the relevant software before connecting your scanner to your computer.
!
How To Setup Your OPN2001 - Windows PC
1. Open the OPN200X application on your computer.
2. Connect your scanner using the USB cable that came with it.
3. The Software should recognise the scanner (this can take a few seconds).
4. To set your scanner for use with MA Club, you need to make the following settings:
4.1.Ensure the Save to file check box is ticked.
4.2.Click the button to the right of the Save to file check box. This will open the Save As
screen. Navigate to your Desktop (as this is where you need to save this file for MA
Club to find it). Give the fine a name (BarcodeDate.csv) and indicate to Save as type
= Comma Separated Values (*.csv). Click Save.
4.3.Under Display (bottom left of the screen) check to display Symbology, Time of Scan
and Date of Scan. Uncheck all other items, you don’t need them.
4.4.Under Formatting Options (bottom right of screen) select CSV and Comma from the
drop down list.
4.5.Under Date select the right option for your region. For UK select EU.
!
4.6.Under Time select 24Hr.
MA CLUB
!4
How To Setup Your OPN2001 - Mac OS
1. Open the OPN_Demo application on your Mac.
2. Connect your scanner using the USB cable that came with it.
3. The software should recognise the scanner (this can take a few seconds, shows Connected
top right).
4. To set your scanner for use with MA Club, you need to make the following settings:
4.1.Select the File tab (top of screen).
4.2.On the File tab (image below) set the File Type to CSV.
4.3.Select Overwrite (though we found it made no difference as the system appended new
data to the existing data file).
4.4.File Path should show as default the path to your Desktop and have named the file for
you (BarcodeDate.csv). If no select Change File Path and Crate new file to save the
file to the Desktop.
4.5.Under Data To Be Written To File, select Symbology, Date Stamp (set Date Format
Display Sample as required for your region, e.g. for UK select Short DD/MM/YY),
and Time Stamp (set Time Format Display Sample to 24 hour).
5. Return to the Main tab (image shown below). Set Save to file is ticked, Data
Manipulation and Auto Collect to OFF.
MA CLUB
!5
!
MA CLUB
!6
Using The OPN2001
You are now ready to use your scanner. Disconnect from your computer. Read the
instructions on how to scan barcodes if not sure. However to scan a barcode, press the large
button, run the laser over the barcode and the scanner should beep to indicate it has
recognised it and stored it.
!
How To Download The OPN2001 Data File - Windows PC
1. Delete any previous data file from your Desktop (BarcodeData.csv). We advise this as we
note the system tends to append each new scanned data set to the existing datafile. This
could result in duplicate registration records in MA Club. Deleting the datafile before
importing a data set will avoid this issue.
2. Open the OPN200X application on your computer.
3. Connect your scanner. Wait for it to connect.
4. Click Get barcodes (top left of screen under Options).
5. The system displays each scanned barcode value in the Barcode data field (centre of
screen).
6. The system will automatically create the data file using the name you gave it above, and
save it to your Desktop.
7. Select the Delete barcodes button (located top left of the Barcode data field). This will
clear the scanner of all data. You may choose to do this one you have imported the data
into MA Club, and or checks the data file contains the right information and records.
Remember you can’t reverse this action!
!
How To Download The OPN2001 Data File - Mac OS
1. Delete any previous data file from your Desktop (BarcodeData.csv). We advise this as we
note the system tends to append each new scanned data set to the existing datafile. This
could result in duplicate registration records in MA Club. Deleting the datafile before
importing a data set will avoid this issue.
2. Open the OPN_Demo application on your Mac.
3. Connect your scanner. Wait for it to connect.
4. Click Get barcodes (top left of screen on the Main tab).
5. The system displays each scanned barcode value.
6. The system will automatically create the data file using the name you gave it above, and
save it to your Desktop.
MA CLUB
!7
7. Select the Clear Barcodes button (located top right). This will clear the scanner of all
data. You may choose to do this one you have imported the data into MA Club, and or
checks the data file contains the right information and records. Remember you can’t
reverse this action!
!
!
MA CLUB
!8
How To Import OPN2001 Data File In To MA Club
1. Open MA Club.
2. From the Home screen select Registration. This will take you to the Registration Setup
screen.
3. Set the registration date to the date the records were scanned if a single date applies.
4. Select the appropriate Class from the drop down list in the Set Class field.
5. Click the Scanning button under section 4. This will take you to the Registration table
screen.
MA CLUB
!9
6. Click the Functions button located top right on the Navigation Bar.
7. Click the Import button.
8. The system will prompt you to confirm you want to proceed. Click OK.
9. The system will open the Open File window for you to select the csv file you saved to your
Desktop. Select the file on your Desktop and click Open. The Import Field Mapping
screen will open.
10. Ensure Add new records is selected (Import Action bottom left of screen).
MA CLUB
!10
11. Ensure Don’t import first record (contains field names) is not selected (Import Action
bottom left of screen).
12. Click Import. This will add the scanned records to the Registration table, assigning each
entry to the appropriate student record based on the barcode value scanned (as stored
against the student record in Student details).
You need to import scanned records by Class. This does mean you will need to use a different
scanner for different classes etc, unless you are able to download each set of data into a
separate data file between classes.
!
!
!
MA CLUB
!11
Getting Started
Installing MA Club
Before attempting to install MA Club, you should check its compatible with your operating
system (Appendix A page 21), then follow the instructions below.
!
Mac OS
The zip file downloaded from our website, contains a folder called MA Club, which contains
all the elements needed to run the database. Copy the MA Club folder into your Applications
folder, then:
1. Open the MA Club folder.
2. Drag the MA Club executable icon (Application file) to your Dock.
3. Click the MA Club button on your Dock to open the database.
4. Refer to Logging In below.
!
Windows PC
The zip file downloaded from our website, contains a single setup.exe file.
1. Copy the setup file to your computer (i.e. your desktop).
2. Double click the Setup.exe file to install MA Club to your computer. The database installs
to a MA Club folder within your Documents folder.
3. The installation process will install a button to your desktop and programmes menu under
startup. Select either button to open the database.
4. Refer to Logging In below.
!
Logging In
On opening the database, you will be asked for a user name (account) and password. To
access the database for the first time you need to use the following settings:
Account Name = Master
Password = master (i.e. the same as account but in lower case).
Having gained access to the database, you should consider deactivating the default Master
account and creating a new account in your own name and with your own password. For
instructions on how to do this, please refer to page 17 below.
Note: Not deactivating the Master account and creating your own, allows anyone who
knows the default account settings to access your data.
MA CLUB
!12
MA Club
The application on opening directs you to the main Home menu screen, the central point for
navigating your way around the many different modules that exist within the MA Club
application.
You are advised to familiarise yourself with how MA Club works using the test data currently
stored in the database. Once familiar you can choose to remove all test data by clicking the
Reset button located top right in the Settings screen on the Secondary Navigation Bar.
Next you should visit both the Settings screen (page 7), and the Company screen (page 13) to
configure the database to meet your own requirements.
To configure the rest of the database, we suggest you consider the following elements in
order:
• Styles (martial art styles) - create a new entry for each style you teach.
• Grades - create a new entry for each grade and style combination you need to record
individual student grades.
• Schools - you need to create at least one school.
• Classes - create a record for each class you teach (minimum of one).
Having set the above, you have done the bare minimum necessary to start using the database
and adding students to the Student Details module.
As you become more familiar with how the database works you should refer to the User
Guide for how to use specific components and take time to understand how they work.
MA CLUB
!13
Settings
The system has a number of standard settings that can be customised to dictate how the
database works. In addition there are a number of values that need setting in order to
identify the database as yours, relating to your organisation. These elements should be
updated and or amended before you begin using the database in earnest. In certain cases
information provided is extracted on documents printed from within the application. This
functionality is split between the Company (page 13) and Settings data entry screens.
Note: Not all setting options are available when the database is used on an iOS device.
To modify this information, from the Home screen first select Settings.
The Settings screen contains a number of registration fields top left; some staff access
restriction perimeter fields top right and a number of tab panels:
• Settings - general system settings.
• Cards - membership card defaults.
• Certificates - grading certificate defaults.
• Renewal - membership renewal letter defaults.
• Slips - membership slip defaults.
!
Registration Fields
Registration Fields are listed at the top left of the settings screen. They are used to unlock the
database following registration with Martial Arts Manger Software. These include:
MA CLUB
!14
• Licence ID
• Registered To - name of individual who owns and registered the database.
• Company - set in the Company module.
• Key Code
• Status - populated based on the values entered above.
All the above fields should be populated as per instructions from Martial Arts Manager
Software following registration.
On entering the correct information as registered with Martial Arts Management Software
the status will change to “Registered” and the “Trial Version” text will disappear from the
screen header.
Care should be taken when entering values to ensure no hidden character returns are added.
This sometimes happens when you copy and paste values into a field.
Caution!
!
Failure to register this product within the trail period (14 days) will cause the
database to lock. If this happens you will not be able to gain access to this
version of the database or any data within it. The database will have to be
returned to us at Martial Arts Manager Software to be unlocked.
Staff Restriction Fields
Located top right, these are a number of check boxes that allow you to apply a number of
access restrictions to system users whose access level has been set to Staff. They include:
• Accounts - when checked a staff member won’t be able to see financial details.
• Communications - when checked a staff member won’t be able to see communication
records.
• Gradings - when checked a staff member won’t be able to see a students grading history.
• Memberships - when checked a staff member won’t be able to see a students membership
history.
• Restrict Staff to Registration Module Only - means a staff member will only be able to
access those areas of the database to allow them to record student attendance.
!
Settings Tab
The settings tab contains the following fields on the left:
• Backup Interval - used to determine how often the database should perform a system
backup. Backups are performed on closing the database a number of times as indicated.
Backup files are saved to the Data folder within the database directory. Each new backup
file is annotated with the current date. Over time you should monitor this folder and
remove unwanted backups to save storage capacity on your computer.
MA CLUB
!15
• Barcode Font - the name of the font the database should use when printing membership
cards. Must be entered exactly as listed in your Fonts folder. See the user guide MA Club
Barcode Font (downloaded from our website).
Note: If you want to download a barcode font, we recommend the free font supplied
royalty free by Matt Welch. This can be downloaded from a number of websites.
For example http://www.barcodelabelhk.com/tool/free-code-39-barcode-fontdownload-english.htmor http://www.squaregear.net/fonts/
• Display Barcode On Registers - a check box, that when checked tells the system to print a
barcode to the right of each students name listed on printed class registers.
• Enforce Proper Text - a check box, used to ensure that values entered into the First and Last
Name fields are converted to proper text. This ensures each part of the name begins with a
capital letter.
• Ext ID Capitals - a check box, when checked the system will automatically convert any
values entered into the Ext ID field in Student Details to capitals.
• Ext ID Trim - a check box, when checked the system will automatically remove any spaces
or carriage returns from text entered into the Ext ID field in Student Details.
• Fiscal Day/Month/Year - used to tell the database when your financial year begins. Enter
the day and month, the system will calculate the current year. The system uses this
information to summarise and report on certain financial activity.
• iOS Barcode Scan Format - allows you to specify how the kiosk registration format works
when used on an iOS device.
• Maximise Screen Size - a check box, when checked the system will maximise each screen
within the database to fill your computer monitor. Fields are adjusted to fill out each screen.
Note: Windows only allows for one screen to be maximised and visible at the same time.
Therefore when used on a Windows PC accessing popup or document screens will
cause the main screen to adjust. This can cause the screen to flicker.
• Region - tells the system the regional format you want to use. Options include:
• Default - designed specifically with the UK in mind.
• Australasia
• Canada
• New Zealand
• USA
• Show Picture on Student List - check if you want to replicate the student picture on the list.
• Show Special Needs - check if you want to show student needs on certain registration
screens. For example, where students my be registering themselves, you may not want
special needs to show.
MA CLUB
!16
• Unit - the currency unit you want the database to use. A general text field, just enter the
currency symbol required.
To the right of the setting tab there are a number of default field settings. When populated,
the system will apply the indicated value as a default within the indicated data field in Student
Details. These include:
• Default Class - applied when creating student class records.
• Default County - applied when creating a new student record.
• Default Country - applied when creating a new student record.
• Default School - applied when creating a new student record.
• Default Style - applied when creating a new grading record.
• Default Tax - applied to account entries.
• Rate - visible when Default Tax checked, allows you to select the default rate to be applied.
• Terms - the number of day grace allowed from invoice date to payment due date.
• Fees - check if you want terms to be applied to student fees (doesn’t apply to attendance
fees).
• Memberships - check if you want terms to be applied to membership fees.
• Training Status - allows you to set the number of days that can lapse before a student is
deemed to be inactive or lapsed.
• Vouchers - allows you to set the number of vouchers awarded to each student for both
attendance and entering competitions.
Note: For default fields, you select the value required from the drop down list provided. It
therefore means that before you can set these values, you must have populated the
relevant area of the database first, e.g. before you can set a default school, you must
have listed all your schools in the Schools module.
Note: It isn’t necessary to amend any of the fields outlined above, however you may wish to
experiment to get the most out of your copy of the database.
!
!
Cards Tab
To access and preview membership card settings, select the cards tab. Here you can
determine from a limited set of values what elements are displayed on system generated
membership cards. The field options include:
• Barcode - check to show barcode.
• DoB - check if you want each students date of birth to be displayed.
MA CLUB
!17
• Ext ID - check if you want each students External ID to be displayed (this should only be
checked where Membership ID is set to Student and you also want the Ext ID to show as
well).
• Logo - check to display the logo set in Company (page 13 below).
• Photo - check to display each students photo (requires a photo for each student record).
• Default Image - if you save an image here, the system will display this in place of a student
photo where he/she doesn’t have one.
• Logo - any image saved here is displayed on the card.
• Company Font Size - determines the size of the company/organisation label.
• Format - select the type of cards to be printed, i.e. the stationary being used. Options
include:
• Card Printer
• Business Cards
• Name Cards
• Header - allows you to add text above the student photo. Designed to allow you to
distinguish between certain card users, e.g. Staff, Instructor, Coach etc. For students, should
be left blank.
• Membership ID - select between Barcode, Ext ID or Student.
• Valid Till Month Only - when checked, instead of showing the full date, only the day and
month are used, e.g. 01/04/2014 will show as 1st April.
• Valid Till Date Highlighted in Red - does what it says.
• Version - select between version 1 or 2 for your preferred layout.
Note: Changes are reflected in the example cards displayed.
!
Certificates Tab
To access and view grading certificate settings. The certificates tab is dominated by the
certificate body field where you can amend what information is displayed. A number of
available merge fields are listed to the top right. In addition you can determine the page
layout between landscape and portrait, and whether to show the student photo (only available
when page layout is set to landscape).
There are three button located to the bottom right of the body field. The first of these allows
you to preview the template; the second will clear the body field and the last will restore the
body to the database default.
!
Renewal Tab
MA CLUB
!18
To access and view the template used to produce membership renewal letters. The renewal
tab is dominated by the body field where you can amend what information is displayed on the
letter. A number of available merge fields are listed to the top right.
There are three button located to the bottom right of the body field. The first of these allows
you to preview the template; the second will clear the body field and the last will restore the
body to the database default.
!
Slips Tab
To access and preview membership slip settings. Here you can determine from a limited set
of values what elements are displayed on system generated membership slips. The field
options include:
• Organisation - how your company/organisation name appears on the slip.
• Slogan
• Header - header text, i.e. your address.
• Footer - footer text, i.e. web address.
• Statement
• Header Font Size - enter a number corresponding to the font size required.
• Slip ID - select the primary ID you want displayed on the slip. Options include:
• Barcode
• Ext ID
• Student
• Slip Logo - save an image into the logo field to have it display on each slip.
• Slip Cover - used to apply a background image to each slip.
Note: Changes are reflected in the displayed example slip.
!
Functions
There are a number of system functions that can be run from the Settings screen. These are
accessed by clicking the Functions button located top right on the Navigation Bar. They
include:
• Backup - create a backup copy of your database file to your desktop.
• Reset - reset the database. This removes all test data from the database.
• Restore - replaces existing data with data from the backup copy of the database
(MAMClubBackup.st6) found on your desktop.
Caution!
MA CLUB
Both reset and restore functions remove existing data from the database. This
can not be reversed, so care should be taken before using them.
!19
In addition to the functions outlined above, the Settings screen also allows you to import data
from a copy of our MA Master 2 database (see page 15 below). These options are accessed
from the Menu Bar at the top of the screen under Help. Then select Restore followed by
Restore from MAM2. It will import your data from a backup file of your MA Master 2
database, stored to your desktop.
!
Company
You use the Company screen to set your Company Name (or club, school, organisation etc,
the name you want displayed on all documentation printed from the database, as well as any
logo you want to appear, and where applicable the header (address details), and footer
(contact details) text.
The company screen shows a list of all students recorded in the database under Student
Details. Where a student’s status is set to “Left” they are show in grey italics; where status is
set to “Recovery” they are shown in red and where status is set to “Suspended” they are
shown in amber. Click an entry to access that record in Student Details.
The rest of the screen comprises a Company field at the top, used to enter your company
name as outlined above. The name entered here must match the name used when registering
MA CLUB
!20
your copy of the database with Martial Arts Manager Software. The the following tab
options:
• Details - company specific settings.
• Expenditure - used to record company expenditure (a simple solution).
• Income - a facility to record additional company income unrelated to your students.
The primary details tab contains the following data field:
• Primary Contact - first point of call.
• Email
• Phone (Day)
• Phone (Evening)
• Association - where you are a member of a larger organisation.
• Address - line one.
• Line 2 - address line two.
• City
• County
• Postcode
• Company Header Font Size - used on certain system generated documents.
• Address Header Font Size - used on certain system generated documents.
• Documents Logo - printed on certain system generated documents.
• System Logo - allows you to change the logo that displays on the startup and Home menu
screens to your own logo.
• Notes - general notes relating to your company.
• Header - information replicated on certain system generated documents.
• Footer - information replicated on certain system generated documents.
!
MA CLUB
!21
Transfer Data From
MA Master 2
If you currently or previously used a copy of our MA Master 2 database, you can transfer
your existing data into a new copy of MA Club should you choose to switch systems.
However, it should be noted that MA Club is not an upgrade to MA Master 2. It is a
completely new database, designed from the bottom up, as an alternative for those who may
prefer it. So whilst there is much familiar about it to its predecessor, it is also significantly
different. Therefore, it simply isn’t possible to transfer all data across, and it will be necessary
for you to reenter some data yourself.
Some changes include:
• MA Club doesn’t have the Calendar function or use Sessions. Both sessions and the
calendar were added to MA Master 2 as a means to summarise student non-attendance at
certain training classes. MA Club treats this differently. In MA Club you instead record
non-attendance by flagging a student as absent or even giving them a “let”, i.e. where their
absence is agreed, and you want the attendance to still count towards their next grade.
• MA Club doesn’t use subscription or subscription plans, i.e. schedules. Instead the new
system merges payment plans, invoices etc into a new accounts module. Here income
streams can be set to repeat, or you can choose to create schedules.
• MA Club doesn’t include the Grading Manager module.
• Commission in MA Master 2 could only be applied to subscriptions. In MA Club it can be
applied to attendance fees and any accounting transaction.
• Insurance functionality has been merged into the accounts module already mentioned.
• The reports menu has gone. Instead reports are distributed throughout the database in
those areas relevant to the information being reported on.
• Many system tables have been done away with. Where in MA Master 2 tables were used to
store lookup values, MA Club simply uses the values entered into relevant fields to populate
associated lookup lists.
Having transferred your data across from your copy of MA Master 2, you are still able to
access it for reference. But be aware you will need to spend time checking your data and
reconfiguring MA Club to meet your needs. Specifically you will need to redo:
• Communication Templates will have transferred across, but some merge values have
changed and where used you will need to reflect these changes in your own templates.
• Payment Plans, Subscription Levels, Insurance Details, Products etc have all been merged
into a new Income Streams module, you should review the user guide section on using
Income Steams.
MA CLUB
!22
!
Transfer Data
The transfer process uses a backup file of your current version of MA Master 2. It is
therefore necessary that you perform a backup before attempting to transfer data.
To transfer data from your backup file:
1. Navigate to the Settings screen from the Home menu.
2. Perform a system reset by clicking the Functions button (located top right on the
Navigation Bar) then the Reset button. This will remove all test data from the database.
3. Select Help on the Menu Bar at the top of the screen, then choose Restore, then choose
Restore from MAM2 (see page 12 above). The system will import data from your backup
copy of the MA Master 2 database, stored on your systems desktop.
4. Review your data, familiarising yourself with how MA Club may have reconfigured it.
5. Determine what hasn’t been brought across and consider how you can use MA Club to
record it manually.
6. Familiarise yourself with the user guides.
MA CLUB
!23
Security
Access to the database is through the creation of user accounts (Users from the Home screen).
Initially when you open the database for the first time there is only one user account:
• Master
To access the database for the first time use the following settings:
Account Name = Master
Password = master (i.e. same as account but in lower case).
However prior to entering your own data into the database you should create a user account
in your own name with your own password, and disable the generic Master account.
Caution!
Failure to disable the Master account leaves your database and data open to
access by anyone who is aware that this is a generic account for this database.
Caution!
Don’t attempt to deactivate the Master account whilst logged in as that
account. The system will warn you and prevent this from happening.
To deactivate the Master account and create your own, follow the steps below:
1. Select Users from the Home screen.
2. Create a new record.
3. Enter the user name you want (this can be a single name, nickname or full name). This
will be the name you have to enter when opening the database in the Account field.
MA CLUB
!24
4. Select Master from the drop down list in the Level field. This is to ensure you have the
same and fullest access rights to the database.
5. Check the Active field - this will create a new account for you using the details just
entered.
6. The system asks you to confirm you want to create a new account for the named user.
Click OK.
7. The system acknowledges the creation of a new account, and confirms the password set.
Click OK.
8. Make a note of your new account name and password.
9. Close the database and reopen it to test your new account works. If it doesn’t log in again
using the Master account and repeat the above steps. Assuming it does work, you can
now deactivate the Master account.
10. Return to the Users screen, then for the existing Master account, to deactivate it, uncheck
the Active field.
11. The system will ask you to confirm you want to perform this action. Click OK.
Though you can delete the Master entry from the Users table, we sternly advise against this.
All future upgrades to MA Club will come with the single Master account enabled. You will
MA CLUB
!25
therefore need to reactivate the Master account in your copy of the database before starting
the upgrade process. Without an active Master account you won’t be able to upgrade your
database, and may loose your existing data.
Caution!
Do not delete the Master account from the Users table. However, do
deactivate it.
Note: When creating a new account, the system always sets the first name (or if only one
name used the single name) to form the password, but always in lower case, e.g. John
Smith would generate a password of john.
!
Changing Your Password
When logging into the database, you are given the opportunity to change your password. On
the Open MA Club login screen, click the Change Password… button located bottom left.
The system will show the Change Password screen.
Enter your old password (as outlined above), then your new password then your new
password again to confirm it. To confirm the change, click OK.
The database will open normally. However the next time you access the database remember
to use your new password.
!
MA CLUB
!26
Change The Default User Name
If when opening the database the system doesn’t default the account name to yours or the
one you want, you can set this from within the database. To do this, from the Home screen
select Help on the Menu Bar at the top of the screen then choose Preferences. This opens
the Preferences window. To change the default user name, just type the new name in the
Other field at the bottom of the screen. Make sure you type it correctly, or the system won’t
recognise it. Click OK to confirm the change.
Note: The Preferences screen in Windows is slightly different. To change the default user
name in windows, you will need to amend the User Name field located on the
General tab.
!
!
!
MA CLUB
!27
Appendix A
FileMaker Pro 13 and FileMaker Pro 13 Advanced databases only work with other FileMaker
12 and FileMaker 13 software. MA Club has been developed using FileMaker Pro 13
Advanced and can only be used as a runtime system (format provided by Martial Arts
Manager Software), or when used with a full and licensed copy of FileMaker Pro 13 or
FileMaker Pro 13 Advanced.
Operating System:
Windows 8.1, and Windows 8.1 Pro*
Windows 8, and Windows 8 Pro*
Windows 7 Ultimate, Professional, Home Premium*
OS X Mavericks v10.9
OS Mountain Lion v10.8
OS Lion v10.7
* Version stated is the minimum requirement. This software may also work with later
versions certified by FileMaker Inc. Operating systems not listed above have not been tested
and are not supported.
Hardware Requirements
Minimum Requirements
Recommended Requirements
Window
CPU: Intel Pentium 4 / AMD
CPU: Intel Pentium 4 / AMD
Athlon 64 or newer!
Athlon 64 or newer!
RAM: 1 GB
RAM: 2 GB
CPU: 64-bit Intel-based Mac!
CPU: 64-bit Intel-based Mac!
RAM: 2 GB
RAM: 4 GB
Mac
Note: Not compatible with Windows XP or Vista.
MA CLUB
!28