1
HF+f[
User's manual
Py r o B o.E,c r
B
o n or b 3 o B a
r en tl
Precaution
Pls be well look thrcugh the following guidetines before you use this DVR.
a
a
a
a
a
Pls refer to manual instruction to operate the camera corecfly_ lllegal operation may
cause damage to internal @mponenb.
Do notfall or hit the cameE, it may damage the internal @mponents.
Do notalter or dismantle the camera, to avoid the damage to the 6amera.
The tempeEture rise is
nomalwhen DVR in use fora long time
Do nottouch the lens when recording which will affect the video quality
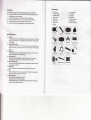
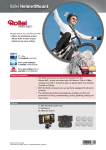
Accessories
1. Bike bracket
9.
2. Unive6al bracket
3. Pedestal bracket
4. Helmetmount
5. Basemount
6. Base bracket
7. Elastic band
8.
Nylon belt buckle
10. AC charger
11. USB cable
12. HDMI cable
13. Remote
mntoller
14. Waterproof @se
15. GPS module (Option)
3M pads
Special Features:
a
G-Sensoa
Camera will save videos as undeletable files when gravity acceleation, any accident
happ€ns. lt,can be set "off', "Low sensitivity", "Medium sensitivitf, "High sensitivity"
a
Itg default is "OFF". Once set it io 'ON" in the system menu, the i@ns and image in
the screen is inverted, you need to rotate the €me€ 180 degree to make the image
upright.
.
SOS
fundion
lJnder re@rding mode, prcss UP button momentarily to activate SOS function, the
cureni video will be saved as undeletable lile.
o
Auto porer on/off
When @nnectto vehicle ign-ltei the
automatically; when the igniter
a
emeE will power
on and start recording
of, the camera will ofi and sve videos.
SilentMde Recording
Under recordlng mode, press DOWN button momentarily to orfmicrophone. Do not
worry about your secret talk.
.
WDR
.
GPS
function
When it is overexposure or underexposure, WDR makes the image clearen
When set GPS option "ON' in the menu and input GPS, when the @mera get the
signal, the gren GPS i@n light up in the screen.
o
Plate numberinput
Two input methods: Engl,sh letters and digits.
Press Mode button to switch input language.
Press UP/DOWN button to select the English letteG or digits, press OK button to
@nfim, then press lvlenu button to exit.
=O!'4il
L:@3 t j:*'l_J
i
in Mdeo Menu.
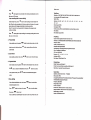
lmage Rohtion function
ll
liubl]dd
ll
Til6tri{t
"** t*l
L"**J |
J
L
,.1
ry:-I
I
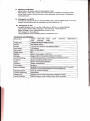
Camera lnlerface
Button Funclion
O
tu@M
l. Lens
2, LCD sc@n
3. Broce button
4, Menu b{tlon
5. UPbutton
5. Irdn Button
7. Re*t butbn
8, Micrcphone
L Working indtebr
10. lR Remote @llrol tlecelver
11. Charging indi@tor
12.
ScEw port
13. Speaker
14.
Porer button
15. tdode button
'16.
porer button: shodprc
ilEl{U gs6q but on; ghort
Mode menu and
S!6isn milu.
A
Urd*
Up button:
to enter menu setting:
p6s
it
twi@ to switch
stand5y mod€, z@m in the image;
Under vi@o mode, short
Selec{ lhe last
V
emem, long pess to turn oficamem
to tum on
pts it ore
pt6
to adivate SOS re@rding
fib under menu eting/ptayback mode.
OoM button: Under standby mode, Z@m out lhe image;
Select the next file undtr menu setting/ playback mode:
lJnder vid@ mode, sho.t
to dieble the microphone
pl$
RECrConfrm button: Satu$op
'
@rding:
to
bke pictures; lo confrm menu
sning; Under platback modo press it to shrrstop playbac*.
ffiE
E
sitch
Mode button: to
Brcw*
RESET
Vid6o mode/photo mode/playback mode
uutton: to enter Ptayback mode
p616qibn1
press
it to
Btart
DVR 9n@ its system is dead.
REC/,Confim button
Basic Opgation
l. Poweronoff
Piler
plw 0
on: Slut
buton, you hear
bep
sound, the btue working
indi€tor witl light up, @rera enteE standby mode.
Porer ofE
Lorg
pres O
button, you frea. beep
$und, the blue working
indi@tor will be off.
NOE: Whs @nrEcted to earChargoi DVR wiil tum on automali€lly when the
@r ignites; will tum ofi when the @r stalls.
2. Batbrycharging
darging, th€ charging indi€tor is red; when charged tull, the red indietor
When
will be
(
ofl
3. Video liode
Nomd rctording
Under standby mode.
pes O
button to start re@rding, the blue
indi€torwill
System menu.
flash.
Press
button again to stop
'
lefr @mer ol LCO
@rding. The remaining @rding
timo is on lhe
sen.
O
under standby mode,
p*
@rded
€me6
will
When TF
sre
€rd
button ,o
"on.
€6ding, the blue indietor wll
up to the time you
*t
(say 3 minutes or 5 minutes).
the foolage autmatj@lly and @ntinue
B@ding.
ovoMrite lho liBt footage by time sequon@ and
is tull, it will
@ntinue recording.
Press
button again to stop r@rding, tho @maining @ording time
'
lefr comer of LCD
4.
i6 on
lhe
sc@n.
p6E
to shoot and
LEilu bdton b enler
pes
automati€lly.
picture modo, aim at the
bulton, @meE will sa@ the picture
'
5. Zoom in/out
Under standby or
6.
pictuc mode,
p6s A /V
button to zoom in/out the image.
Playb8ck Mode
button to
*ea
Under playback mode,
p*
the
E]
button to enter playback mode, ancl press
vid6/pic{ue, 0en
p*o A lV
button to
pess'
button to play back.
foMrdbac*Mrd
playback
vid@s.
7.
Menu Setting
Under vid@/phot
'/playtack
video/photo/playback
p*"" A/Y
short
128/J.720P @11280.720p
30 /&t0.480p 30
Exposure:+2.0+5/3 +413 +1.0
-513 -2.0
+23 +1/3 +o.o -1l3 -2t3 _1.0.4t3
[email protected] Audio: Of,/On
Dale stamp: Ofi/On
G€vity sensing: Ofi/Lq snsitivity/Medium snsitjvityfl-ligh sensitivity
GPS: Ofi/On
Plate Numbe, Input Ofi/On
2O48Xl536
Sequen@: Ofi,/On
Quality: Fin€y'NomauE@rcmy
Sharpnes: Slrcng/Nomausoft
White Balan@: Auk/DaylighUCloudy/Tungsten/Fluocs@nl
Color: Colo/Black & White/Sepia
ISO: Auto/100/200/400
Exposure:+2.0 +1.0+0.0 -1.0 -2.0
Anli+hake: Ofi/On
Date &: Ofi/Date/Date &Time
Playback Menu:
Under standby mode, long
A/V
W
Capture mode: Single/2s limer/ss fimer/10S Emer
Resolution: 12M 4032X302418M 3264X244815M 2592X1944/3M
under standby mode, lons
Mnt
1920'1080P
Photo Menu:
Picture Mode
object you
Re$lulio:
L@p r@rding: Otr/3 minub6i/5 minutes
WDR: Otr/On
Loop recording (refer to menu setting)
flash. When the video
Vld@ Menui
pros fE[U
button to enter elative
let menu, then p€ss
drenrDelete All
Prcted: Loc*
dren/unl@k
Slide Show: 2
s@nds/s s@nds/8 seonds
currenuLock Alrunlock All
Systom lrenu:
Oatetfire: 2O1U0711811021/06 YY/MM/DD
B@p sund: Otr/On
Language:English/Deubch/French/Spanish/ltalian./portugese/Chine$(simplmedy
Chine(tradiliomlyJapanes€/Russian
Fr€q@ncy 50HzI60Hz
lmage rctatbn: Ofi/On
menu.
button lo
pess mru
mode, shorl
Oelete: Delete
Fomat CaneUOK
'
button to confim setting.
button to exit.
Mdeo mode/Picture mod€/Playback mode oach has two menus: Mode menu and
S@
Saren Ofi/30
Delayed
shutdM: Ot/s *@nds/l 0 *conds/3o s4onds
stting: Can@UOK
Detault
VeFion: 4T90.201
e@nds/l minutes2 minutes
3091 3.V0.01
8.
Remolecontroller
Mode buttonr tp switch video/photo/playback mode
REC button: undervid@ mode, press REC button lo starustop re@ding; under
photo mode, press it to take pictures; under playback mode,
pres
it to playback
videos/picture6.
"
9.
Playback on HDTV
Connec't the @mera to HD TV with the HDMI @ble, choose HDMI mode on TV. The
€meE $Ben will be of, all operalions €n bo chec.ked on TV.
10. Playbackon PC
€rera to a PC via thg USB €ble, it will tum on automati@lly.
shore "L,lass StoEge', 'PC Camera", Video Re@rdl.
LCD ffi
"Mass stoEge' is fq videotpictures check on PC.
conned
'PC
Camf
is
"Vids R@rd-
Re$ldon
forreb€m.
is for
@rding when @nnected to PC.
1080P 1920'1080 30Ds 720P '1280'720
VGA 640'480
lmaoe
sia
Sener
S(M
File
3ofps/60fps
30fDs
fomat
3M CMOS
*ner
l SindTtr
170 de@
270 d
rohlion
MOV H.264/JPEG
Diqital zoom
4X
Baturu
Built in
liion battery 1000mAh
Suomrt Mi@ SD
€rd
to 32c(not included)
lv re@rdinq ,automati@lly oveMdte function,
Cvcle
t. builGin oEvitv
sensr
Built-in Micrcohone/SDeake,
USB2.O/HDMI/GPS
Menu hnguage
English/F@nch/ltaliarrRusian/Geman/Japanese/Porluge*/
SMnirh/ Chinesf simolffi edyChinesettreditional'l
Rffiob@tu|
Ys.
lR Emole @ntaoller
50H"J60Hz
WaterprcoI
Other funalions
to 60
Mtea@of €s)
WDR funclion. Ptat6 number inout. SOS re@rdinq