1
FULL HD SPORTS CAMERA
User Manual
Contenb
Precaution
Produc'tAccessodes
DVR lnterface
Builton func'tion
DVROperation
tum on and off
BatteryCharging
Mdeo Mode
Normal recoding
Loop rcoording
PicturcMode
PlaybackMode
Menu Setting
Remota ConEol Desoiplion
lnstall and useWFi
connededW
Playbackon PC
Technical specifi cation
Precaution
Pls be well look through the following guidelines before you
use this DVR.
Pls refer to manual instruction to operate the camera correctly.
.
o
.
.
.
lllegal operation may cause damage to internal components.
Do notfall orhitthe DVR, it maydamage the internal components.
Do not alter or dismantle the DVR, to avoid the damage to the DVR.
The temperature rise is normal when DVR in use for a long time
Do not touch the lens when recording which will affect the video
quality.
DVRSpecial Features:
lnversion Mode
lf need to invert dvr while using,you can choose an option named
"inversion mode" in the menu, then the machine can rotate 180
degrees,but characters and images on the screen can be normal
as a positive direction.
-1-
WiFi Function
Open WiFi button within the menu,it will be more convenient to
operate the machine at a distance of 30 meters using a mobile phone.
2.4G wireless remote control
waterproof watch remote control
Mount Method
The mount accessories are the same as Gopro.
Product Accessories
Accessory 1 Accessory
2
USB Cable Charger
HDMI cable Accessory 5
Accessory 3
Accessory 4
Accessory 6
Waterproof Case WristRemoteController 3M Pads
User
Manual
Accessory
7
Battery
"?
r
3
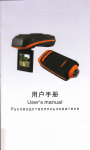
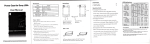
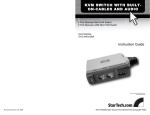
l.working indicator
2.Charge indicator
3.working indicator
4.Camera lens
S.USB port
6.TF card slot
I sL
ot s
{x p u
t,.I
*
,
T.HDMlport
8.Power button
9.menu button
10.Ok button
11 .Screw hole
w
Button function
Power button: Long press to turn on and off DVR, short press to
switch video/picture/playback mode, page up when setting menu.
Menu bufton: Short press to enter menu and confirm thehenu
option, long press to exit menu.page down when playback.support
capture under video mode.
Ok button: Start / stop recording when under the video mode,take
pictures,StarVpause playback.Page down when setting menu.
DVR lnterface
n
DVROperation
Poweron/ofl
Power on; Long press Power button,the lcd screen shows the
startup picture,two blue working indicators will light up, DVR enters
standby mode.
Poweroff:When camera is on,long press Power button,the lcd
screen shows the shutdown picture,two blue working indicators
will be off,DVR powers off.
t
-3-
When connected to Car Charger, DVR will turn on automatically
when the car ignites; will turn off when the car stalls.
BatteryCharging
Connect DVR with power charger via USB cable,the red light will
light up.if you want to charge faster,turn off the machine when charging.
Mdeo mode
Video interface:
l.record icon 2.exposure Compensation 3.white balance
6.cards remaining time
4.frame rate
9.time
7.battery icon 8.Year/Month /
Picture Mode
Picture interface:
l.picture icon 2.exposure Compensation 3.white balance
4.picture
size 5.Remain photos
7.Year i Month /
Day
6.battery icon
8.time
L23
4
5
S.resolution
Day
L2 3
Normal recording
Closing "seamless"in the video mode menu,Press OK button,
DVR starts recording till the card is full.Press OK button again to
stop recording.
Loop recording(refer to menu sefting)
Press ok button to start recording Under standby mode, DVR will
segment automatically and store the recorded files when the video
recorded up to the time you set.When card is full, DVR will overwrite
the first footage by time sequence and continue recording.
-4-
The DVR default setting is Video mode.Under standby mode, long
press ok button to enter picture mode, aim at the object you want
to shoot and press ok button, DVR will save the picture automatically.
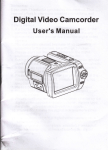
Playback Mode
'l .playback icon
2.fi1e number / total number of files
3. select the file you want to play
4. file Preview
5.fi1e length
6.7.date stamp
ln standby mode, press the OK button to switch to playback mode,
press the Menu button and select the video / picture you need,press
the OK button to Preview / playback.Press the OK button to stop
playing.
-5-
Menu Setting
ln standby mode,press the Menu button to enter the menu mode,
then press the menu key can switch mode menu and System menu.
Press the OK button to page down,press the power button to page
up,press the Menu button to confirm. Long press the menu button
to exit the menu.
Video mode/Picture mode/Playback mode each has two menus:
Mode menu and System menu.
Mdeo Menu:
Movie Size: 1920 - 1080P 30/1280 720P 6011280.720P 30
Video quality: super fine / fine / normal
Seamless : OFF/ 1 minute/3 minutes/5 minutes
White Balance: Auto / Daylight / Cloudy / Tungsten / Fluor
Exposure: -2.0 -1 .0 +0.0 +1.0 +2.0
Motion detect: OFF / ON
Date stamp: Off / Date / Date & Time
picture menu:
Resolution: VGA/2MI3M / 6M/8M/10M
White Balance: Auto / Daylight / Cloudy / Tungsten / Fluor
Exposure: -2.0 -1 .O +0.0 +1.0 +2.0
Driver Mode: Off / 25 / 10s / Double
Photo Burst: off/ 1 0fps/20fps/30fps
Playback mode menu:
Please select File tyPe!
VIDEO
JPG
i
System
Sounds: Beep (on / off ) / Volume (O I 1 I 21 3) Y oice Rec (on / off)
Power Save: Off /'t min / 3 mln / 5 min
Date & Time: 021061201219:17 Year I Month / Day
Language; English / Traditional Chinese / Simplified Chinese /
.
German / French / Spanish / Russian/ltalian
Stabilizer: OFF / ON
lnvert Mode: OFF / ON
Time Zones: -12-11-10-9-8 -7-6-5-4-3-2-1 +O +1 +2 +3 +4 +5
+6 +7 +8 +9 +10 +11 +12
USB: MSDC/ PC CAM
Remote Pair: Off/On
menu:
-6-
WiFi:Off /On
WiFi.password: rtwap_evb 1 2 3 4 5 6 7 8
Format: Yes / No
FW Update: Yes / No
System: Factory Reset/ System lnfo / Card lnfo
Remote Control Description:
There are two buttons on the remote control, press the video
button to starUstop the recording.Press the picture button to take
pictures.press the picture button to capture under video mode.
Matching the remote control:
Set "Remote Pair" in the menu to On,keep pressing the two buttons
on the remote control,you can see blue light of Remote control flashing,
release the two buttons after 3 seconds. press the power button of the
DVR to exit the Remote Pair and return to preview mode,take video or
pictures via the remote control. lf you can operate it is successful, if not,
please repeat above operation. Please keep the camera and remote
control within one meter when matching.
lnstall and useWFi
l.search ismart dv or icatch on Google orApple Store,then download
andinstallthissoftware
EI
onyourphone.
:,mi
2.open simultaneously "WiFi; of the phone and DVR
3.find the "rtwap-evb" in the phone'WiFi", open and enterthe password
(the default password is 12345678), the DVR and phone WiFi password
should be same.
4.when the DVR screen displays "Connected" ,it indicates that the phone
has successfully connected to the machine.
S.find"isma( DV'software on the phone,then you can operate the DVR
and download the files..
ConnecfedW
Connect the DVR to the W via our HDMI cable, all operations can be
displayed in high-definition TV screen.
Playbackon PC
Connect DVR to a PC via the USB cable, DVR will tum on automatically.
Then you €n open My Computer and the removable disk.lt has two
-7-
[
,o,o"o,rou can open the file you need or copy
T
Product specifications
57.44*28.5mm
/veight
About 8Sq(include battery)
Sensor
5 Meoa CMOS
Lens
6G+lR
View anqle
170 deoree
Resolution
1
lmaoe size
lOM 8M 6M 3M 2M VGA
e20.1
F=1.6
o8o(a30hs. 280.720@60bs.
rideo file formats
MOV H.264
richrre file formats
JPG
1
280-720@30hs
Vlemorv card
4GB to 32GB.(Micro SD Card Class6 above)
Audio
USB port
Buitt-in mimohone / sDeaker
screen
Seamless loop recordint
HD 1.s'TFT
ontional 1/3/5 minutes
lDMloutput
Real-time transmission
r'/hite balance
srromrl
ixposure Compensatiot
suooort
laDture
Srromrt bv DVR and remote control
Sontinuous
suooort
PC CAM
suDoort
maoe lnvert
suooort
uSB2.0 hioh-sDeed interface for charqinq and data transfer
WiFidistance
WiFifreouencv
30m
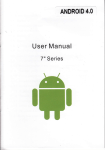
WiFi suoDort ohone syster
1c)56 1 and above. Android 4.0 and above
WiFitunction
)
AGHz-2 A835GHz
lmaoe transmission. remote control, settings, sync and sharing albums
y'Uireless mode
direct
ruireless transmission
IEEE 802.11b/q/n
3afterv capacitv
_anquaqe
I ithium-ion batteries can be chanqed.l0somAh,recordinq for over 3 hr
simnlifi*tChinrc/TndilimlChinmi
y'Vatencroof
50 meters
Remote control frequenc!
2.4GHz
Remote control watemnoo
6 Meters
Remote control distanq
15m
-8-
L
1
Enolish/Russian/Frendr/SDanish/lhlian/Germa