1
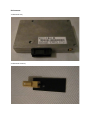
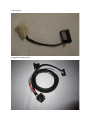
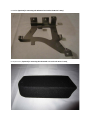
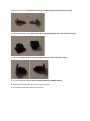
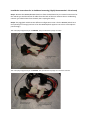
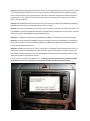
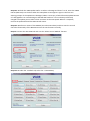
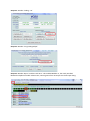
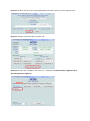
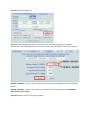
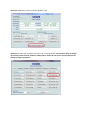
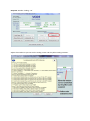
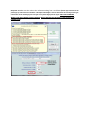
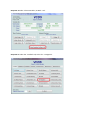
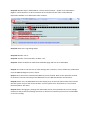
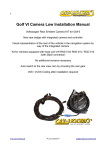
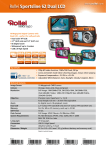
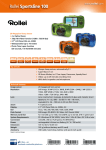
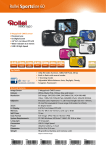
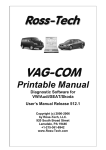
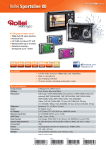
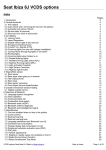
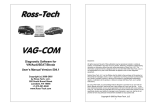
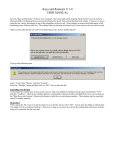
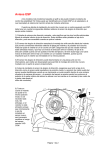
Installation instructions for 1Z0035729 based Bluetooth kits into
Volkswagen vehicles equipped with the RNS510 or RCD510 head
unit.
Please note, this is a Genuine Volkswagen Parts based kit that provides the best possible voice
quality and the widest support for Bluetooth Enabled phones. When properly installed and
configured, it offers the following features:
RNS510
Touch Screen Control;
Control and display via the MFD (White MFD only – Red MFD requires version ‘B’ of this unit, which
is no longer in production, nor is it supported);
Support for up to 5000 contacts/numbers;
Automatic Address Book upload (some Nokia’s require a free software add on from Nokia);
Voice Dialling (using the automatically uploaded address book);
Control via the Steering wheel mounted buttons;
Voice control of the RNS510’s functions (with the correct firmware update and coding. Minimum
firmware required is v2660).
RCD 510
Touch Screen Control;
Control and display via the MFD (White MFD only – Red MFD requires version ‘B’ of this unit, which
is no longer in production, nor is it supported);
Support for up to 5000 contacts/numbers;
Automatic Address Book upload (some Nokia’s require a free software add on from Nokia);
Voice Dialling (using manually created voice tags);
Control via the Steering wheel mounted buttons;
Kit Contents:
1: Bluetooth Unit;
2: Bluetooth Antenna;
3: Microphone;
4: Piggyback Wiring Harness;
5: Bracket (optional for mounting the Bluetooth unit under the Driver’s Seat);
6: Carpet Cover (optional for mounting the Bluetooth unit under the Driver’s Seat);
7: Bracket Torx Screws (optional for mounting the Bluetooth unit under the Driver’s Seat);
8: Bracket Plastic Nut Inserts (optional for mounting the Bluetooth unit under the Driver’s Seat);
9: Bracket clips (optional for mounting the Bluetooth unit under the Driver’s Seat);
10: Firmware upgrade CD/DVD (Only to update RNS510 to v2660 firmware);
11: Bluetooth Kit Installation Instructions (this document);
12: Bluetooth kit and voice control user manual.
Installation Instructions for in dashboard mounting (Highly Recommended – 20 minutes)
Step 1: Remove the RNS510/RCD510 head unit from the dashboard as per removal instructions for
the vehicle type and disconnect all cables from the back of the unit. Remove the air conditioning
controls (just unbolt them from the dash, don’t unplug the wires)
Step 2: The piggyback cable has two different configurations. One is for the RNS510 (which has a
microphone pass-through) and one is for the RCD510 (which appears not to have a microphone
pass-through).
This is the plug configuration for the RNS510. The quick disconnect plugs are inline:
This is the plug configuration for the RCD510. The quick disconnect plugs are crossed on one side:
Once you have selected a configuration (RNS510 or RCD510), please tape the quick disconnect
connectors in place to ensure there are no exposed wires.
Step 2 A – For cars with the overhead microphone already in place: For cars such as the MKVI Golf,
some of these cars are factory fitted with an overhead microphone. For these vehicles, you can
either replace the overhead microphone and cable with the one provided, or you can remove the
pins from the 12 pin housing and move them to the 12 pin housing on the piggyback cable. The pins
used are 1 and 7, with 1 being the sheath wire and 7 being the centre wire. You would need to
remove the microphone wire in these pins on the piggyback cable and then plug in the pins from the
preinstalled microphone cable. If you are unsure on how to do this, please contact Steve at
Volkstronic. Photos will come in the next update.
Step 3: If the vehicle has a CD changer or Media Device Interface unit, there will be a 12 pin plug
(typically blue) that needs to be unplugged from the large square locking connector.
Unplug this 12 pin Blue plug (from the radio square locking connector on the original harness):
Step 4: Connect the 12 pin plug that was unplugged into the free slot on the large square locking
connector on the piggyback harness.
Plug the blue plug into here (the radio square locking connector on the piggyback harness):
So that it looks like this:
Step 5: Connect the other end of the piggyback harness into the original large square locking
connector and lock it in place.
Plug this end of the piggyback harness into the original harness:
Step 6: Run the tail of the piggyback harness to the space behind the air conditioning controls. This is
where the Bluetooth unit will sit. Using a long stiff wire, run the microphone cable behind the dash.
Depending upon the vehicle, this will be easier on the left or the right side. On the Passat, the right
side provides a path. On the Golf, Tiguan, EOS, Jetta, etc, the left hand side provides a clear path
behind the dash..
Air Conditioning controls removed and Bluetooth unit inserted in space behind controls:
The driver’s side fuse box access panel (Passat). Other models are better accessed on the opposite side.
Step 7: Connect the Bluetooth Unit to the end of the piggyback harness located behind the Air
Conditioning controls. You may mount the Bluetooth unit first before connecting the cable, or you
may connect the cable first. Whichever works for you. Please make sure that the Bluetooth units is
wrapped in the provided foam. This prevents rattles. If the piggyback part of the harness is too long,
please coil it up, secure it with tape and tuck it in with the Bluetooth unit.
Step 8: Connect all of the cables to the head unit and remount the head unit into the dash. Check
that it powers up ok. Secure the head unit back into the dash, reattach the Air conditioning control
panel (making sure there are no cable snags) and then put the dashboard back together again.
Step 9: Remove the overhead console. You will need to remove the grille and then remove the light
fixture carrier/sunroof control.
Removing the microphone cover from the overhead console with a plastic card:
The overhead console ready to be removed. Held in place by two Torx screws:
The overhead console removed (with microphone already attached in bottom right):
Step 10: Using a wire chasing tool (a stiff wire, like fencing wire) pull the end of the microphone
cable through the roof lining to the hole where the overhead console is located. Be careful not to
damage any of the flat wires in the roof lining. Leave approximately 10 - 15cm of slack in the
microphone cable at the overhead fixture.
Step 11: Tuck the microphone wire into the edge of the headlining and A-Pillar cover, down to the
side of the dashboard where the microphone wire starts. Loop the extra wire and tape it or zip tie it.
Tuck it into the side of the dashboard and secure it. Replace any removed trim and make sure the
rubber door seal is sitting ok on the trim.
Step 12: Plug the supplied microphone into the slot in the light fixture carrier/sunroof control. There
is a rectangular gap on the driver’s side of this carrier that is designed for this microphone. It may
have a black foam plug in the space that will need to be removed. The felt side of the microphone
points down. There is only one way to correctly install the microphone. Connect the microphone
wire to the microphone.
Step 13: Reassemble the overhead console. You may wish to wrap felt tape (VW Adhesive webbing
000 979 950) around the microphone plug to ensure no rattles.
Step 14: If the unit is an RCD510, you are done and it is time to recode the car electronics. If the unit
is an RNS510, you should update the firmware to v2660 before recoding the car electronics. This will
allow voice control of the RNS510 and the Bluetooth unit.
Step 14.1: To update the firmware on the RNS510 to v2660, you should first check the following:
Step 14.1.1: Using VAS/VCDS/VAGCOM, check the firmware revision of the RNS510. It should be at
least v1100. If it is not, then it should be updated to v1100 before updating to v2660. Otherwise, a
power drain condition may ensue.
Step 14.1.2: Make sure that the car clock is set to 24hr, via the MFD controls. Remove the key from
the ignition. Power on the RNS510 and then press the ‘Setup’, ‘Information’ and ‘Eject’ buttons on
the RNS510 simultaneously. This will put the RNS510 into a forced firmware update mode and will
allow downgrade and upgrade of the unit.
Forcing a firmware update on the RNS510 (in Red). Warning: do not press these unless you want to update
the firmware and you have a CD ready. The unit will be unusable until the update is performed:
Step 14.1.3: Check the v2660 update CD for scratches or damage and then if it is ok, insert the v2660
FW CD (NOT DVD) into the drive when the FW update screen appears. Agree to the next two
warning prompts. If the update CD is damaged, obtain a new copy. A failed firmware update because
of a damaged disc can cause damage to the RNS 510 head unit. Is the car battery sufficiently
charged? The update process takes 1 hour and must not be interrupted. When it is complete,
remove the update disk and the RNS 510 will restart.
Step 14.1.4: Perform a restart of the RNS510 (see red arrows above) and then start the car and
check the functionality of the RNS 510. Ensure the unit functions normally.
Step 15: Connect the VAG COM tool and start the ‘Select Control Module’ function.
Step 15.1.0: Under the ‘Installed’ tab, select ’19 – CAN Gateway’
Step 15.1.1: Select ‘Coding – 07’
Step 15.1.2: Select ‘Long Coding Helper’
Step 15.1.3: Select ‘Byte 5’ and then tick ‘Bit 2’. This enables Module 77, the newly installed
Bluetooth telephone module. Please note, counting starts from 0. So Byte 5 is the 6th Byte along.
Step 15.1.4: select ‘exit’ from the Long Coding Helper and select ‘Do It!’ from the coding screen.
Step 15.1.5: Select ‘Close Controller, Go Back - 06’.
Step 15.2.0: Under the ‘Installed 2’ tab, select ’77 – Telephone’ (It may be under a different tab if
the CAN gateway is different).
Step 15.2.1: Select ‘Coding – 07’
Step 15.2.2: For the RNS510, make sure the code in the ‘Software Coding’ line is ‘0013002’.
Alternatively, code ‘0013022’ disables voice control of BT via the RNS510. Use this for the RCD510.
RNS510 = 0013002 – This uses the voice control functionality of the RNS510 with firmware v2660 or
greater.
RCD510 = 0013022 – This uses the voice control functionality of the Bluetooth unit. The RCD510
does not have voice control.
Step 15.2.3: Select ‘Do It!’ in the coding window.
Step 15.2.4: Select ‘Adaptation – 10’. If changing a setting below, test each setting and then save it.
This is an optional step.
(will add a screen shot here of adaptation settings)
Step 15.2.4.1: Check that channel 128 = 0
Step 15.2.4.2: Check that channel 129 = 6
Step 15.2.4.3: Check that channel 130 = 2
Step 15.2.4.4: Check that channel 131 = 0
Step 15.2.4.5: Check that channel 133 = 1
Step 15.2.4.6: Check that channel 134 = 0
Step 15.2.4.7: Check that channel 135 = 1234
Step 15.2.4.8: Check that channel 136 = 101
Step 15.2.4.9: Check that channel 137 = 0
Step 15.2.4.10: Select ‘Done, Go Back’.
Step 15.2.4.11: Select ‘Close Controller, Go Back – 06’.
Step 15.3.0: Under the ‘Installed’ tab, select ’16 – Steering Wheel’. You shouldn’t have to change
this setting unless the ‘Star’ button or ‘Microphone’ button do not start a voice prompt. So the
following steps are optional.
Step 15.3.1: Select ‘Coding – 07’
Adjust this window so you can see the coding screen and the yellow coding assistant:
Step 15.3.2: Make sure the code in the ‘Software Coding’ line is as follows (Please pay attention to the
yellow pop up code assistance window. It identifies which digit is used to determine the steering wheel type.
It will either be the third digit from the right or the fourth digit from the right. ONLY THE STEERING
WHEEL TYPE DIGIT NEEDS TO BE CHANGED. WRITE DOWN THE ORIGINAL CODE BEFORE YOU
CHANGE THIS).
List of steering wheel codes: (This may be different for different vehicles. Please contact Volkstronic
if yours is not listed. The list will be updated as cars are tested).
Model
EOS
EOS
EOS
Golf V
Golf V
Golf V
Golf VI
Golf VI
Golf VI
Jetta
Jetta
Jetta
Passat
Passat
Passat
Passat
Passat
Passat
Passat
Passat
Passat
Passat
Tiguan
Tiguan
Tiguan
Tiguan
Other
Other
Other
Body
All
All
All
All
All
All
All
All
All
All
All
All
Sedan
Sedan
Wagon
Wagon
Sedan
Sedan
Wagon
Wagon
CC
CC
All
All
All
All
Steering Wheel
New Style
New Style
New Style
Old Style
Old Style
Old Style
New Style
New Style
New Style
Old Style
Old Style
Old Style
Old Style
Old Style
Old Style
Old Style
New Style
New Style
New Style
New Style
New Style
New Style
Old Style
New Style
Old Style
New Style
Step 15.3.3: Select ‘Do It!’
Paddle Shift
No
Yes
N/A
No
Yes
N/A
No
Yes
N/A
No
Yes
N/A
No
Yes
No
Yes
No
Yes
No
Yes
No
Yes
No
No
N/A
N/A
Gearbox
DSG/Auto
DSG/Auto
Manual
DSG/Auto
DSG/Auto
Manual
DSG/Auto
DSG/Auto
Manual
DSG/Auto
DSG/Auto
Manual
DSG/Auto
DSG/Auto
DSG/Auto
DSG/Auto
DSG/Auto
DSG/Auto
DSG/Auto
DSG/Auto
DSG/Auto
DSG/Auto
DSG/Auto
DSG/Auto
Manual
Manual
Code
0013122
0001732
0001832
0001411
0001412
Step 15.3.4: Select ‘Close Controller, Go Back – 06’.
Step 15.4.0: Under the ‘Installed’ tab, select ’37 – Navigation’.
Step 15.4.1: Select ‘Coding – 07’
Step 15.4.2: Select ‘Long Coding Helper’
Step 15.4.3: Select Byte 3 and enable bit 1 ‘Microphone Diagnostics Active’
Step 15.4.4: Select Byte 7 and disable bit 1 ‘Voice Control Inactive’. Set Bit 4-5 to either 00 for
Highline, 10 for Sportsline or 20 for Premium. Bit 4-5 determines the colour of the RNS 510.
Experiment with Bit 4-5 to determine colour schemes.
Step 15.4.5: Exit the Long Coding Helper
Step 15.4.6: Select ‘Do It!’
Step 15.4.7: Select ‘Close Controller, Go Back – 06’.
Step 15.5: Select Go Back from VCDS Control Module page and exit out of VAG COM.
Step 16: You need to reset the unit to make settings take. To do this, use the Yellow key combination
from the RNS510 diagram in 14.1.2 above.
Step 17: Once the unit has started and stabilised, you are finished. Refer to the operations manual
for features, functions and setup of the Bluetooth unit, the RNS 510 and the new functions.
Step 18: Please note, the MFD (Multi Function Display) may not show all menus after this work and
the Nav system may lose the current location. Let the system sit for 30 minutes to 1 hour and all
functions/menus will return.
Step 19: Before changing any settings with VAG COM, ensure you write down the current settings.
Volkstronic will not warrant damage caused to car electronics caused by incorrect use of VAG COM
or incorrect coding.
TO BE ADDED:
Coding for the RCD510 (Ignore steps 15.4.0 to 15.4.7)
Under seat mounting (Harder than in-dash install – 120 minutes ?)
More steering wheel codes that are car specific (enable or disable PTT – push to talk – buttons)
VAS coding.
All testing has been carried out on an MY09 Tiguan 147 and an R36 Wagon. Other models
may have different coding requirements/settings. If there is any confusion, please contact
Steve at Volkstronic Pty Ltd on 0439 602 543.