1
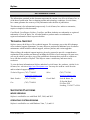
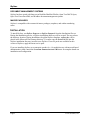
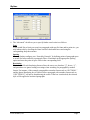
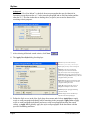
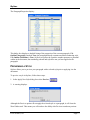
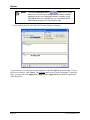
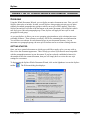
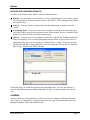
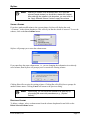
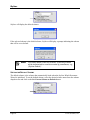
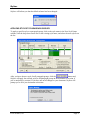
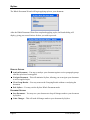
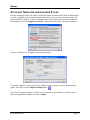
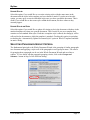
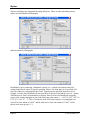
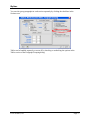
STYLIZER
USER MANUAL
Version 5.0
September 26, 2014
- ii -
Stylizer
TABLE OF CONTENTS
Page
INTRODUCTION .................................................................................................................. 1
Technical Support ................................................................................................................ 1
Supported Platforms ............................................................................................................ 1
Word versions ............................................................................................................... 1
Operating System versions ........................................................................................... 1
Document Management Systems ................................................................................. 2
Macro Packages ........................................................................................................... 2
Installation ............................................................................................................................ 2
WHAT IS STYLIZER? .......................................................................................................... 3
How Stylizer Works .............................................................................................................. 3
Intelligently Apply Styles................................................................................................ 3
Paragraph Wizard ......................................................................................................... 4
Whole Document Wizard............................................................................................... 4
Preparing the Document ...................................................................................................... 4
USING THE STYLIZER PARAGRAPH WIZARD ........................................................................ 5
Overview .............................................................................................................................. 5
Styling a Document .............................................................................................................. 5
Choosing a Style to Apply ............................................................................................. 9
Character Formatting .................................................................................................... 9
Empty Paragraphs ........................................................................................................ 9
Leading Tabs/Spaces.................................................................................................... 9
Working in Navigate Mode ................................................................................................... 9
Attaching Templates and Choosing Styles ......................................................................... 10
Update Styles ....................................................................................................... 12
Update Styles on Open ........................................................................................ 12
Viewing Paragraph Property Details................................................................................... 12
Previewing a Style.............................................................................................................. 13
USING THE STYLIZER WHOLE DOCUMENT WIZARD ............................................................. 15
Overview ............................................................................................................................ 15
Getting Started ............................................................................................................ 15
Analyzing the Document or Section ................................................................................... 16
Options For Grouping Results ..................................................................................... 17
Schemes ..................................................................................................................... 17
Applying a Scheme .............................................................................................. 18
Saving a Scheme ................................................................................................. 19
Deleting a Scheme ............................................................................................... 19
Setting the Default Scheme .................................................................................. 20
Applying Styles to Paragraph Groups.......................................................................... 21
Results Options .................................................................................................... 22
Document Options ............................................................................................... 22
Attaching Templates and Choosing Styles ......................................................................... 23
Update Styles ....................................................................................................... 25
Update Styles on Open ........................................................................................ 25
- iii -
Stylizer
Selecting Paragraph Group Criteria ................................................................................... 25
- iv -
Stylizer
INTRODUCTION
The information contained in this document represents the current view of Levit & James, Inc. as
of the date of publication. Due to changing market and technology conditions, Levit & James,
Inc. cannot guarantee the accuracy of any information after the date of publication.
This document is for informational purposes only. Levit & James, Inc. makes no warranties,
express or implied, in this document.
CrossWords, CrossFingers, Stylizer, CrossEyes, and Best Authority are trademarks or registered
trademarks of Levit & James, Inc. All other brands or product names are trademarks or
registered trademarks of their respective holders.
TECHNICAL SUPPORT
Stylizer comes with 90 days of free technical support. We encourage you to take full advantage
of our technical support department. You may choose to purchase an additional year of software
maintenance which includes technical support, software patches, and version upgrades.
When calling with technical support inquiries, please be prepared to provide a comprehensive
explanation of the problem encountered, including the full text of error messages. In some cases,
you may be asked to provide a copy of the problematic document that you believe exhibits an
error with the execution of Stylizer. This helps to ensure a satisfactory and more timely
resolution.
To view the latest information on Stylizer and other Levit & James, Inc. products, visit the Levit
& James, Inc. web site at http://www.levitjames.com. You may also send an e-mail for sales
and/or technical support inquiries.
Technical Support: (703) 771-8185
[email protected]
Sales:
(703) 771-1549
[email protected]
Main Number:
(703) 771-1549
Postal Mail:
Fax:
(703) 779-0304
Levit & James, Inc.
50 Sycolin Road
P.O. Box 2503
Leesburg, VA 20177 • USA
SUPPORTED PLATFORMS
WORD VERSIONS
Stylizer is certified for use with Word 2007, 2010, and 2013
OPERATING SYSTEM VERSIONS
Stylizer is certified for use with Windows Vista, 7, 8, and 8.1.
Levit & James, Inc.
Page 1
Stylizer
DOCUMENT MANAGEMENT SYSTEMS
Stylizer has been tested with Interwoven DeskSite/MailSite/FileSite, Open Text DOCS Open,
Open Text PowerDocs/DM, and Worldox document management systems.
MACRO PACKAGES
Stylizer is compatible with commercial macro packages, templates, and outline numbering
suites.
INSTALLATION
To install Stylizer, run Stylizer Setup.exe or Stylizer Setup.msi from the distribution files set.
During the installation process, a Stylizer installation directory will be created. The user selects
the directory location. During installation, the global Stylizer template, stylizer.dot, will be
placed in the Microsoft Word startup directory. You must copy the license.ini file into the
Stylizer installation directory in order to use Stylizer. If service packs are available for this
version of Stylizer, apply the latest service pack.
If you are installing Stylizer as an enterprise product (i.e., for multiple users with network-based
administration), then consult the STYLIZER ADMINISTRATOR’S MANUAL for complete details on
installation and configuration.
Page 2
Levit & James, Inc.
Stylizer
WHAT IS STYLIZER?
Stylizer was developed to assist users in quickly reformatting Word documents by intelligently
applying Styles that reflect firm standard template designs. This includes e-mail attachments,
documents that have been scanned, or those that were converted from WordPerfect to Word with
Levit & James’s popular CrossWords Document Conversion Utility.
Stylizer can accomplish these tasks quickly and accurately, by automating formatting tasks that
users would otherwise have to complete manually. Stylizer will also reduce the risk that you will
miss paragraphs or inconsistently apply styles to new paragraphs.
Stylizer can also be useful when you wish to update a document based on an entirely different set
of styles. Using Stylizer, it is very easy to apply Style A to all paragraphs with Style B currently
applied.
HOW STYLIZER WORKS
INTELLIGENTLY APPLY STYLES
The Paragraph Wizard and Whole Document Wizard both offer the following advantages over
Word’s native “Find and Replace” utility:
Microsoft Word only has the capacity to identify one style and globally replace it with
another style. Stylizer can identify the different attributes of paragraphs and assign several
styles based on those attributes.
When using Word’s global replacement of styles, it will often remove the direct character
formatting (i.e., bold, italic, underlining) in the paragraph. Stylizer provides an option to the
user to preserve direct character formatting.
Word will not remove leading spaces and tabs in paragraphs when applying styles. First line
indentation should always be implemented through the use of proper style definitions.
Stylizer provides an option to delete leading spaces and/or tabs when applying new styles.
Stylizer will remove extra outline numbers that either have been manually typed into the
document, or are the product of a converted document that contained numbering in an
unknown format. The Word “Find and Replace” feature will leave a residual number that
users must manually delete.
Stylizer can search on several paragraph attributes not available in the native Word “Find and
Replace” utility, such as Number Format, leading spaces (yes/no), and leading tabs (number).
Stylizer will classify a paragraph, based on two kinds of properties:
paragraph formatting such as line spacing, justification, indentations, etc., and/or
any form of paragraph numbering.
The combination of these two kinds of paragraph properties is what makes a paragraph unique,
and is the basis for grouping paragraphs in the Whole Document Wizard and for setting search
Levit & James, Inc.
Page 3
Stylizer
criteria in the Paragraph Wizard using “Search by Example.” Stylizer will then let you apply a
new style to this paragraph, using a set of rules not available in Word. When Stylizer applies a
style to a paragraph, these rules allow you to:
protect direct formatting for bold, italic and underline;
remove extra paragraph marks before and after the paragraph; and
remove extra spaces and tabs at the beginning of the paragraph.
PARAGRAPH WIZARD
Use the Paragraph Wizard if you wish to make a paragraph-by-paragraph decision regarding
what style to apply to each paragraph and/or are unsure what style to apply. This mode works
analogously to Word’s own Find and Replace. Simply click in a paragraph, and apply styles to
all similar paragraphs, using search criteria that you specify. There is even a built-in Preview to
let you see what the paragraph looks like BEFORE you apply the new style.
After Stylizer has applied the new style to the selected paragraph, it will immediately take you to
the very next paragraph in the document that has the same formatting properties as the original
based on the specified search criteria. You may choose to quickly replace all paragraphs in the
documents containing these properties with your selected style, or to replace one paragraph at a
time.
WHOLE DOCUMENT WIZARD
Use the Whole-Document Wizard if you wish to apply styles to the entire document at once.
Stylizer will allow you to group paragraphs by criteria you specify, select new styles to apply
and apply styles to groups of paragraphs in the document with one mouse click. You can even
teach Stylizer what styles to use for distinct paragraph grouping criteria through the use of
schemes.
After Stylizer has analyzed the document, it will display each paragraph group in a grid display
showing the paragraph group attributes and the new style options. With one button click, Stylizer
will apply the new styles to every paragraph in every group.
PREPARING THE DOCUMENT
Once you have opened the document you wish to style in Word format, follow these steps:
1. Familiarize yourself with the document. Refer to the Microsoft Word Help Menu or the Style
drop down menu on the Formatting toolbar to determine what styles best meet your
formatting requirements.
2. Style the entire document using the Stylizer Paragraph Wizard or Whole Document Wizard.
The objective is to have every paragraph in the document associated with a style. This
ensures a consistent “look and feel” and will make future edits much simpler.
Page 4
Levit & James, Inc.
Stylizer
USING THE STYLIZER PARAGRAPH WIZARD
OVERVIEW
The Paragraph Wizard will allow you to apply styles to your document either to one paragraph or
to all paragraphs matching user-selected search criteria based on the currently-selected
paragraph. When launching the Paragraph Wizard, you will first be asked to select search criteria
from a list of attributes that are pre-filled with the currently-selected paragraph’s attributes. Once
you have selected your search criteria, you will be prompted to select a new style to apply for all
paragraphs matching those search criteria.
The Paragraph Wizard will need to be run for every paragraph type in the document. After you
have finished applying styles to a particular paragraph type, you may navigate to a new example
paragraph using Stylizer’s Navigate feature.
Using the Paragraph Wizard is best when you wish to closely monitor the application of styles to
individual paragraphs and/or paragraph types.
STYLING A DOCUMENT
Once you have opened a document to which you would like to apply styles, you may wish to
first review the document appearance. This will help you select styles that are most compatible
with the paragraph structure in your document.
1. To begin styling a document, place your cursor inside the paragraph you wish to apply a style
to, and click on the flashlight icon in the Stylizer toolbar.
Note:
Be aware that when running the Paragraph Wizard, it is
important to verify whether your cursor is inside or outside a
table. If the cursor IS NOT in a table, Stylizer will skip all
tables; if the cursor IS in a table, Stylizer will only detect
paragraphs that are in tables.
2. If Hidden Paragraph marks are present in the document, you will receive a warning that the
hidden paragraphs will be temporarily visible. This prevents mistakenly styling two
paragraphs as one.
Levit & James, Inc.
Page 5
Stylizer
Note:
The Hidden Paragraph warning will only display if you have
Hidden Text and All unchecked in your viewing options. To
verify these settings, click on the Tools menu and select
Options. On the View tab, find the Formatting Marks options.
3. The Stylizer Search dialog box displays the formatting detected in the selected paragraph. If
the selected paragraph contains either automatic or manually entered paragraph numbering,
the numbering format and style will be reflected in the “Search by Example” options.
The “Search by Example” dialog box:
Clear resets all options in the “Search
by Example” dialog box
Reset resets the “Search by Example” dialog box
Cancel exits Stylizer without any
changes to the document
About displays
? Displays
information about
Stylizer Help
the Stylizer
Program
Navigate will allow
you to find new
example paragraphs in
the document without
exiting Stylizer
Next displays the Apply New Style
dialog box
4. Select the “Search by Example” attributes you wish to use for Stylizer criteria by checking
desired boxes.
5. In addition to choosing attributes such as style, numbering, indentation, spacing, etc., you
may use the “Snap” tab to set criteria for setting Snap Interval values for specific grouping
criteria. The Snap Interval, if specified, will place select paragraphs if they meet the other
specified criteria and fall within the specified snap interval. For example, if the Snap Interval
for First Line Indent is set to 0.1 inches, then paragraphs which are exactly the same in all
other respects, yet some may have a First Line indent of 1.0965” and others a First Line
indent of 1.10003”, these paragraphs will be selected to apply the specified style.
Page 6
Levit & James, Inc.
Stylizer
6. The “Advanced” tab allows you to specify further search criteria as follows:
Font
If you would like to limit your search to paragraphs with specific fonts and/or point size, you
may indicate this by checking the Name and Size checkmark boxes and using the
corresponding drop-down menus.
Spacing
You may further configure your “Search by Example” by defining points of paragraph space
to search for before and after a paragraph. Place a checkmark in the appropriate Spacing
option and enter the point of space value in the corresponding field.
Bracketing
The Advanced Search bracketing feature allows the user to use brackets “[]”, braces “{}”,
and parentheses to ignore leading text strings when searching for paragraphs by number
format. For instance, if the example paragraph has a number format such as “SECTION I.”
and the Ignore Bracketing box is checked, then a paragraph with a number format such as
“[SECTION II.]” will not be found during the search. If the box is unchecked, the selected
style will be applied to bracketed paragraphs.
Levit & James, Inc.
Page 7
Stylizer
Advanced
If “Effective First Line Indent” is checked, then two paragraphs that may be identical in
formatting except that one has a ½” tab to start the paragraph and no first line indent and the
other has a ½” first line indent but no leading tabs (or spaces) are treated as identical for
searching criteria purposes.
7. After selecting all desired search criteria, click Next.
8. The Apply New Style dialog box displays:
New allows you to create a new style
Mod allows you to modify a selected style
Styles displays the Style Chooser dialog box
Find Next locates the next paragraph
matching the search criteria. Does NOT
apply the new style to the current paragraph
Apply/Stay will apply the selected New Style to
the current paragraph without moving to the next
paragraph matching the criteria
Apply/Next will apply the selected New Style
to the current paragraph and move to the next
paragraph matching the criteria
Apply All quickly applies the style to all
paragraphs matching the search criteria
Details displays the paragraph formatting
properties in detail
Preview displays a before and after style
snapshot of the selected paragraph
9. Define the Style to use in the New Style drop-down menu and click on Apply/Stay to apply
a style to each paragraph individually while remaining in the paragraph, Apply/Next to apply
a style to each paragraph individually and move to the next paragraph meeting the search
criteria, or Apply All to globally apply the style to all paragraphs in the document with the
specified formatting attributes.
Page 8
Levit & James, Inc.
Stylizer
10. Style the entire document by repeating the steps above for each set of paragraphs with similar
paragraph properties. When your entire document is styled as desired, click
in the
Apply New Style dialog box.
The Apply New Style dialog box shows the name of the new style to be applied to selected
paragraphs in the document. The list box contains the names of all of the available styles that can
be applied.
CHOOSING A STYLE TO APPLY
If the document requires outline numbering, you must select a style associated with a numbering
scheme prior to using Stylizer. Once you have chosen an appropriate numbering scheme, the
style you choose will be the style that corresponds with the desired level of outline numbering.
For example, the Heading 1 style may indicate level 1 outline numbering; Heading 2 style may
indicate level 2, etc.
For all other styles, refer to the Microsoft Word Help Menu or the Style drop-down menu on the
Formatting toolbar to determine the style that meets your formatting requirements.
CHARACTER FORMATTING
Direct formatting can be re-created when applying new styles through the Stylizer. By default,
the Preserve All box is checked. When unchecked, you can select which formatting is to be recreated when the new style is applied.
EMPTY PARAGRAPHS
Empty paragraphs before and/or after the current paragraph can be removed by checking either
one of these boxes. Both boxes are checked by default.
Note:
If the document to which you are applying styles has been
converted from WordPerfect to Word, the Empty Paragraphs
feature of Stylizer will remove any extra hard returns that may
be present in your document.
LEADING TABS/SPACES
Often users will manually format first line indentation with tabs or spaces. This is a function that
should be handled in a style definition e.g., Body Text First Indent. Therefore, when applying
new styles to a document, you can tell Stylizer to delete extra tabs and spaces at the beginning of
the paragraph. Note that if these options are selected and a paragraph has a manually entered
paragraph number, all tabs or spaces following the paragraph number will be deleted.
WORKING IN NAVIGATE MODE
The Navigate function allows you to view and navigate through your Word document in a
normal screen size in order to determine which paragraphs to select for Stylizer to analyze. To
work with the Navigate function, follow these steps:
Levit & James, Inc.
Page 9
Stylizer
1. Click on the
button in the Stylizer “Search by Example” dialog box.
2. Stylizer will compact to a small window that will be visible from your document:
3. Navigate through your document to identify paragraphs to be styled.
4. To return to Stylizer, click the flashlight in the Stylizer Navigate toolbar.
5. Stylizer will analyze the paragraph containing your cursor and display the “Search by
Example” dialog box.
6. Identify the desired paragraph properties in the “Search by Example” dialog box, designate
the New Style to apply, and choose Apply/Stay, Apply/Next or Apply All.
ATTACHING TEMPLATES AND CHOOSING STYLES
The Stylizer Paragraph Wizard provides built-in functionality to attach a template to the current
document and/or select styles to copy into the document and make available to Stylizer. To
attach a template and/or select which styles to make available to the document, select the Styles
button in the Apply New Style dialog box.
Page 10
Levit & James, Inc.
Stylizer
Stylizer will display the Templates and Styles dialog box:
To attach a template or copy styles from a template to the document, click on the appropriate
option. Then click on the Template Lookup button.
The Attach Template dialog box will allow you to browse to the template you wish to attach.
Select the appropriate template and click on Open.
Stylizer will return to the Templates and Styles dialog box. There are several options you may
wish to consider.
The options selected in the “Select Styles” section determine what styles will appear in the
New Style drop-down menu on the Apply New Style dialog box. This allows the user to
select the set of styles to be added to the Apply New Styles drop-down menu.
Styles In Use is always checked, as these are styles that are currently being used in the
document.
The All Styles in Document option allows the user to select from all styles contained in the
document.
Levit & James, Inc.
Page 11
Stylizer
Additional Styles from Attached Template allows you to associate styles present in
specific templates, such as Litigation Court Cover Letters, Estate Planning Instruments, etc.
to the current document. Normal.dot, the Word global document template, is attached to all
Word documents by default. If you have attached a template to the document because the
template contains styles you wish to use, then you should check this option.
The Update Styles and Update Styles on Open options will direct Stylizer when and if to
update the styles in the document from the attached template.
UPDATE STYLES
Select this option if you would like to overwrite existing styles with the same name in the
document with the styles in the template you have chosen to attach. If you do not select this
option, you may opt to overwrite individual styles once you have opened the document. This is
useful if you would like to alter some styles within the document, but leave others as they
currently appear.
UPDATE STYLES ON OPEN
Select this option if you would like to update all existing styles in the document with those in the
attached template each time you open the document. This is useful if you use a template that
contains several standard form styles. Each time a template style is altered, the change(s) will be
reflected in the documents to which the template is attached. Checking this option is equivalent
to checking the “Automatically Update Document Styles” option in Word’s Templates and
Add-ins native dialog.
VIEWING PARAGRAPH PROPERTY DETAILS
Stylizer allows you to view the formatting details of the paragraph containing your cursor. From
the Apply New Style dialog box, choose Details.
Page 12
Levit & James, Inc.
Stylizer
The Paragraph Properties display:
This dialog box displays a detailed listing of the properties of the current paragraph. If Is
Outline Paragraph is marked True, the paragraph already contains an outline numbering style.
If Is Outline Candidate is True, Stylizer recognizes the repetitive number pattern as a potential
outline in the document, but numbering scheme and style have not yet been applied to the
paragraph.
PREVIEWING A STYLE
Stylizer allows you to preview your paragraph with a selected style prior to applying it to the
document.
To preview a style in Stylizer, follow these steps:
1. In the Apply New Style dialog box select Preview.
2. A warning displays:
Although the Preview option will not apply the selected style to a paragraph, it will clear the
Word Undo stack. This means you will not have the ability after Preview to undo any actions.
Levit & James, Inc.
Page 13
Stylizer
Note:
The Word Undo/Redo feature
allows you to correct
errors. If you do not wish to empty the Undo stack, consider
applying a style to your paragraph without a preview. If the
style appearance is not satisfactory, you can use the Word
Undo feature to restore it to the previous style.
3. If you wish to proceed, click Yes. The Preview dialog box displays:
You can Preview several styles by selecting them in the New Style drop-down menu. To close
the Preview window, click Cancel. This will not apply the style to the paragraph. To apply the
style, you must select the Apply/Stay, Apply/Next or Apply All button from the Apply New
Style dialog box.
Page 14
Levit & James, Inc.
Stylizer
USING THE STYLIZER WHOLE DOCUMENT WIZARD
OVERVIEW
Using the Whole Document Wizard, you can Stylize an entire document at once. First, you tell
Stylizer what styles to include. Second, you tell Stylizer what grouping criteria to use to place
similarly-formatted paragraphs into groups to which a new style will be applied. Third, once
Stylizer has analyzed a section of the document or the entire document, you tell Stylizer which
new Style goes with each paragraph group. Then, Stylizer will apply the new style to each
paragraph in each group.
As you run Stylizer, it allows you to save grouping criteria and new style selections into userselectable Schemes. These schemes are simply ASCII files containing the saved information.
You will have one scheme for each document type in your document inventory. As you
encounter new paragraph groups, the new style selections can be saved into existing schemes.
GETTING STARTED
Once you have opened a document to which you would like to apply styles, you may wish to
first review the document appearance. This will help you select styles that are most compatible
with the paragraph structures in your document. If you have already established schemes for
documents such as the current document, then you will simply have to review the new style
settings for correctness.
To begin using the Stylizer Whole Document Wizard, click on the lighthouse icon on the Stylizer
toolbar
.
The Welcome dialog box displays:
Levit & James, Inc.
Page 15
Stylizer
From this dialog, you can choose one of several actions by clicking on the appropriate button.
Whether you can click on the Analyze Section button or the Analyze Document button depends
on the default Scheme in use.
You may skip this dialog completely and analyze the document by checking the box “Skip
Welcome dialog at startup; automatically Analyze Document.” If you check this box, the other
functions will be available from the Stylizer Grid dialog box. You can load the default settings
for the Templates and Styles dialog in the Stylizer configuration file and the default Scheme will
be the current scheme. See a detailed discussion on Schemes below.
ANALYZING THE DOCUMENT OR SECTION
The Whole Document Wizard allows you to analyze by section or the entire document. Whether
you choose to analyze only a section or the entire document, the options in the Results dialog are
the same.
If the Analyze Document button is selected, Stylizer will analyze the entire document and then
display the Grouping Results dialog. The dropdown will display the scheme that will be used
when analyzing the document/section. Change the scheme as appropriate (see discussion on
schemes below).
Page 16
Levit & James, Inc.
Stylizer
OPTIONS FOR GROUPING RESULTS
You have several options from which to choose in this dialog box:
Scheme –You may apply a saved scheme, save any setting changes as a new scheme, delete
the selected scheme, or set the current scheme as the default. These settings are described in
more detail below.
Analyze – You may choose to analyze the entire document again or analyze a specific
section.
New/Modify Styles – You may create a new or modify an existing style without having to
exit Stylizer and re-analyze the document/section. When finished, the new or modified style
will be auto-selected for the selected paragraph group.
Options – You may select a new template or styles to be applied (the Templates and Styles
dialog will display), view or modify paragraph grouping criteria, or preview the selected
paragraph group. You may also change the “Skip Welcome” setting. To preview how the
chosen style will affect a paragraph group, select the group and click on “Preview Selected
Para Group.” The Preview dialog will open:
Choose the style you would like applied to this paragraph group. You may also choose to
preserve font formatting and/or delete leading tabs or spaces as Stylizer applies the selected
style.
SCHEMES
Stylizer Schemes are the mechanism by which you can store settings for different document
types. That is, you should have a separate scheme for each type of document that will be run
through the Stylizer Whole Document Wizard.
Levit & James, Inc.
Page 17
Stylizer
A Scheme will contain two types of information: 1) paragraph grouping criteria, and 2) new style
application information.
The paragraph grouping criteria will be comprised of grouping criteria for numbered and nonnumbered paragraphs, snap settings, a flag for analyzing the entire document or the current
section, and settings for tables. The new style application information will be comprised of new
style settings that correspond to each paragraph group found in the document.
When the document is analyzed based on the specified grouping criteria, paragraph groups are
constructed based on the paragraphs found in the document. Each paragraph will be contained in
one of the paragraph groups.
When displaying the grouping results, Stylizer will search through each group found in the
document and compare with those stored in the Scheme. When a group in the document matches
a group in the Scheme, Stylizer will pre-set and display the corresponding new style application
settings for that group. For any group in the document that is not found in the Scheme, you can
set the new style application information and store the new group in the Scheme. The next time a
paragraph group matching the new group information is found in a document, Stylizer will
autofill the new style application information.
Note:
You can develop schemes for your organization’s documents
by running several documents and saving any changes to the
Schemes. Once the Schemes are set, they may be pre-loaded
onto any computer and put into use. The Schemes are stored
in ASCII text files with .INI extensions in the Schemes
subdirectory of the Stylizer program directory. Once the
Schemes are set, they may be copied to the Schemes
subdirectory on any computer and put into use.
When a change is made to any of these settings, either in the Paragraph Grouping dialog box or
in the Grouping Results dialog box, the Scheme will be considered unsaved and will display as
“<Custom>.” When you save the Scheme, you can either enter a new name for the scheme (i.e.,
“Save As”) or use the same name as the previous scheme (i.e., “Save”).
APPLYING A SCHEME
To apply a scheme, select the desired scheme name from the dropdown list and click on the
Apply Selected Scheme button. If the current scheme has not been saved, Stylizer will tell you
and ask you if you want to continue. If the current scheme has been saved, the new scheme will
be applied and the settings on the form will be modified appropriately.
Page 18
Levit & James, Inc.
Stylizer
Note:
Selecting a scheme in the dropdown WILL NOT apply the
scheme (maybe instead you would like to delete the scheme).
After selecting the scheme in the dropdown, you must click on
the “Apply Selected Scheme” button to apply the scheme.
SAVING A SCHEME
If you have made modifications to the current scheme, Stylizer will display the word
“<Custom>” in the scheme dropdown. This will tell you that the scheme is unsaved. To save the
scheme, click on the Save Scheme button.
Stylizer will prompt you to enter the scheme name:
If you enter/keep the same scheme name, i.e., you are changing the information in an alreadysaved scheme, then Stylizer will prompt you to overwrite the existing scheme:
Clicking Yes will overwrite the existing scheme. Clicking No will tell Stylizer to prompt for
another scheme name. Clicking Cancel will return to the previous dialog.
Note:
Upon saving, you can cause the scheme to be read-only by
surrounding the name with parentheses, e.g., “(Stylizer
Default)”.
DELETING A SCHEME
To delete a scheme, select a scheme name from the scheme dropdown list and click on the
Delete Selected Scheme button:
Levit & James, Inc.
Page 19
Stylizer
Stylizer will display the deleted scheme:
If the selected scheme is the default scheme, Stylizer will display a prompt indicating the scheme
that will be set as default:
Note:
You cannot delete a read-only scheme. A read-only scheme
will be indicated with a name surrounded by parentheses, e.g.,
“(Stylizer Default)”.
SETTING THE DEFAULT SCHEME
The default scheme is the scheme that automatically loads when the Stylizer Whole Document
Wizard is initialized. To set the default scheme, select the desired scheme name from the scheme
dropdown list and click on the Set Current Scheme as Default button:
Page 20
Levit & James, Inc.
Stylizer
Stylizer will inform you that the default scheme has been changed:
APPLYING STYLES TO PARAGRAPH GROUPS
To apply a specific style to a paragraph group, click on the style name in the New Style Name
column, click the drop down arrow next to the existing style name, and select the new style from
the list.
After you have chosen a style for all paragraph groups, click the
button and
Stylizer will apply the selected styles to all paragraph groups in the document (or section, if
you’re analyzing by section). If you have not saved changes to your document, Stylizer will
prompt you to save your document at this time:
Levit & James, Inc.
Page 21
Stylizer
The Whole Document Wizard will begin applying styles to your document:
After the Whole Document Wizard has completed applying styles, the Results dialog will
display, giving you several choices for how you wish to proceed:
RESULTS OPTIONS
Analyze Document – You may re-analyze your document again to review paragraph groups
after the styles have been applied.
Navigate Document – This will minimize Stylizer, allowing you to navigate your document
to review applied styles.
View Group Results – You may return to the Grouping Results without re-analyzing the
document.
Exit Stylizer – You may exit the Stylizer Whole Document mode.
DOCUMENT OPTIONS
Save Document – You may save your document to keep all changes made to your document
by Stylizer.
Undo Changes – This will undo all changes made to your document by Stylizer.
Page 22
Levit & James, Inc.
Stylizer
ATTACHING TEMPLATES AND CHOOSING STYLES
Like the Paragraph Wizard, the Stylizer Whole Document Wizard provides built-in functionality
to attach a template to the current document and/or select styles to copy into the document and
make available to Stylizer. To attach a template and/or select which styles to make available to
the document, select the Template and Styles... button from the Stylizer Welcome dialog box:
Stylizer will display the Templates and Styles dialog box:
To attach a template or copy styles from a template to the document, click on the appropriate
option. Then click on the Template Lookup button.
The Attach Template dialog box will allow you to browse to the template you wish to attach.
Select the appropriate template and click on Open.
Levit & James, Inc.
Page 23
Stylizer
Stylizer will return to the Templates and Styles dialog box. There are several options you may
wish to consider.
The options selected in the “Select Styles” section determine what styles will appear in the
New Style drop-down menu on the Apply New Style dialog box. This allows the user to
select the set of styles to be added to the Apply New Styles drop-down menu.
Styles In Use is always checked, as these are styles that are currently being used in the
document.
The All Styles in Document option allows the user to select from all styles contained in the
document.
Additional Styles from Attached Template allows you to associate styles present in
specific templates, such as Litigation Court Cover Letters, Estate Planning Instruments, etc.
to the current document. Normal.dot, the Word global document template, is attached to all
Word documents by default. If you have attached a template to the document because the
template contains styles you wish to use, then you should check this option.
The Update Styles and Update Styles on Open options will direct Stylizer when and if to
update the styles in the document from the attached template.
Page 24
Levit & James, Inc.
Stylizer
UPDATE STYLES
Select this option if you would like to overwrite existing styles with the same name in the
document with the styles in the template you have chosen to attach. If you do not select this
option, you may opt to overwrite individual styles once you have opened the document. This is
useful if you would like to alter some styles within the document, but leave others as they
currently appear.
UPDATE STYLES ON OPEN
Select this option if you would like to update all existing styles in the document with those in the
attached template each time you open the document. This is useful if you use a template that
contains several standard form styles. Each time a template style is altered, the change(s) will be
reflected in the documents to which the template is attached. Checking this option is equivalent
to checking the “Automatically Update Document Styles” option in Word’s Templates and Addins native dialog.
SELECTING PARAGRAPH GROUP CRITERIA
The fundamental principle to the Whole Document Wizard is the grouping of similar paragraphs
in a document and applying a style to all of the paragraphs in each group en masse. The criteria
for grouping these paragraphs can be set in the Whole Document Wizard and saved into a
scheme. To view and/or edit the paragraph grouping criteria, click on the Groups and
Schemes... button in Step 2 of the Welcome dialog:
Levit & James, Inc.
Page 25
Stylizer
Stylizer will display the Paragraph Grouping dialog box. There are tabs containing separate
criteria for both Numbered Paragraphs:
and Non-Numbered Paragraphs:
In addition to style, numbering, indentation, spacing, etc., each tab will contain criteria for
setting Snap Interval values for specific grouping criteria. The Snap Interval, if specified, will
place the values for each paragraph into “bins” separated by the specified snap interval. For
example, if on the Non-Numbered tab, the Snap Interval for First Line Indent is set to 0.1 inches
AND the box for First Line Indentation is checked, then all of the Non-Numbered paragraph
groups will contain paragraphs in one of the following value ranges: [..., -0.05” to 0.05”, 0.05” to
0.15”, 0.15” to 0.25”, ...]. Thus, if exactly the same in all other respects, two paragraphs, one
with a First Line indent of 1.0965” and the other with a First Line indent of 1.1003” will be
placed in the same group (1.1”).
Page 26
Levit & James, Inc.
Stylizer
You can also group paragraphs in each section separately by clicking the checkbox in the
Sections area.
Tables can be handled separately or not at all by checking or unchecking the options in the
Tables section of the Paragraph Grouping dialog.
Levit & James, Inc.
Page 27