1
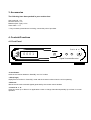
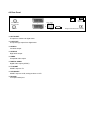
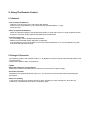
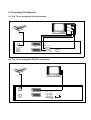
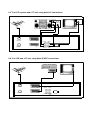
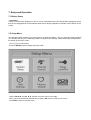
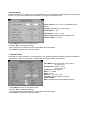
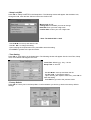
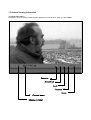
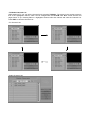
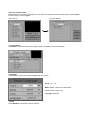
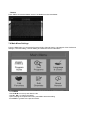
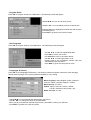
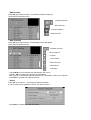
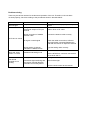
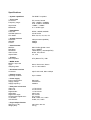
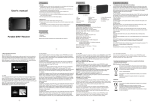
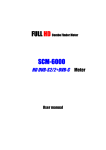
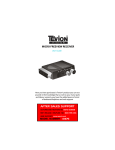
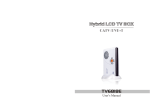
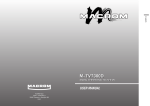
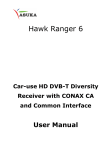
TERRA X
Digital Terrestrial
Receiver
User's Manual
1. Introduction
1.1 Overview
This terrestrial receiver was designed for digital free-to-air (unencrypted) signals. It enables you to
tune in on the hundreds of digital television and radio channels broadcasting to your region, with
the highest video, audio and data quality attainable with current technology. It performs numerous
functions to provide you with a variety of services.
1.2 Main Features
- Fully Compliant with MPEG-2 and DVB-T Standards
- Digital Audio Output (S/PDIF)
- Built-in Teletext Decoder (STV/VBI)
- Multiple OSD Language
- MPEG-2 Video (MP@ML), MPEG-1 Audio Layer1, Layer2
- 3000 TV and 1000 Radio Programmable Channels
- QPSK, 16QAM, 64QAM demodulation
- Digital Tuner with Loop-Through Output
- Manual PID Insertion
- Direct Channel Selection from EPG
- 8 Colour OSG with 16 Levels of Transparency
- 4 digit 7 segment LED
- Variable Screen Aspect Ratio (4:3, 16:9)
- Favorite Channel and Parental Lock Functions
- RS-232C Port for Additional Information Service and System Software Upgrading
2. Safety/Precautions
2.1 Safety
- Be sure to read this manual before you start operating the unit.
- Do not touch the power cord with wet hands, as that may cause electric shock.
- Never open the cover. It is very dangerous to touch the inside of the unit, due to possible electric
shock.
- Place the unit in an adequately ventilated and cool environment.
- When not in use for a long time, it is recommended that the power cord be disconnected from the
mains. Also, make sure you do not use the unit with a damaged power cord, as this may cause
electric shock or fire.
- A professional installation is required. If reception is interrupted, contact your authorized local
service center.
2.2 Precautions
When installing the unit
- Install the unit on a level horizontal plane. Unleveled installation may cause damage to the unit.
- Do not put heavy items, such as a TV, on top of the unit. That may cause damage to the unit.
- Do not install the unit where:
it may be subject to vibrations
it is exposed to direct sunlight
there is humidity
temperature may be too high or too low
there is no adequate ventilation
- Moving the unit from a cold area to a hot one will cause condensation. In such a case, leave the
unit to dry for a couple of hours, before you operate it.
3. Accessories
The following have been packed in your receiver box:
User's manual: 1 Pc.
Remote control: 1 Pc.
Batteries (AAA Type): 2 Pcs.
Scart Cable : 1 Pc.
* If any accessory listed above is missing, contact the point of purchase.
4. Controls/Functions
4.1 Front Panel
terra x
0001
!
"
Digital Terrestrial Receiver
- Power Button
switches the receiver between “Stand-By” and “On” modes
- LED (4 Digit)
displays the time when in “Stand-By” mode and the channel number when the unit is operating.
- IR Sensor
detects the infra-red command signals generated by the remote control handset
- Channel ▲ & ▼
move the cursor Up or Down in an application screen or change channels sequentially Up or Down in normal
operation.
4.2 Rear Panel
ANT INPUT
VHF: 177~228 MHz
TV
UHF: 474~858 MHz
90~250V ~
50/60Hz, 30W
AUDIO VIDEO
L
R
LOOP OUT
VCR
#. ANT IN PUT:
IF input from Antenna to digital tuner
#. LOOP OUT
IF loop-through output from digital tuner
#. AUDIO-L
Left audio output
#. AUDIO-R
Right audio output
#. VIDEO
Composite video output
#. DIGITAL AUDIO
Digital audio output (S/PDIF)
#. TV SCART
SCART output to TV
#. VCR SCART
SCART output to VCR, analog receiver or Hi-Fi
#. RS-232C
Low speed serial port
DIGITAL
AUDIO
RS-232C
Designed and Assembled in Germany
4.3 Remote Control Handset
SETUP
TXT
Power:
power: switches the receiver between StandBy & On modes
TXT:
displays the teletext contents of the viewed
channel, if teletext is transmitted
MUTE
MENU
SETUP
EXIT
Mute:
mutes the audio output
INFO
RECAL
LANG
MENU:
accesses the main menu
SETUP:
accesses the receiver set-up menu
EXIT:
to return to previous status or menu
INFO:
displays the available information on the
viewed channel
RECALL:
goes back to the previously viewed channel
LANG
select sound mode or audio language
TV/RADIO:
switches between TV & Radio channels lists
CH (▲ /▼ ):
change channels sequentially up or down in
viewing mode and move the cursor up or
down in an application screen
VOL (!/"):
alter the audio output level up or down in
viewing mode and change the selected item’s
setting in an application screen
OK:
selects an item or confirms a choice
FAV:
to view your personal channel list
EPG (Electronic
Program Guide):
provides programme content information.
Press again to return to viewing mode
Numeric Keys
(0~9):
for direct entry of channel number or input of
alphanumeric characters
TV
RADIO
CH "
VOL
OK
VOL
º
¢
¢̧
CH !
FAV
EPG
1
2
3
4
5
6
7
8
9
0
5. Using The Remote Control
5.1 Batteries
- How to insert the batteries
. Open the cover at the top of the rear side of the handset
. Insert two 'AAA' type batteries (1.5V), respecting the indicated polarity +/- signs
. Close the cover
- When to replace the batteries
. When the operational range of the handset gets smaller, or when the receiver no longer responds to each
and every command. Always replace both batteries at the same time.
- Accident prevention
. Do not recharge, heat or disassemble the batteries
. Make sure the intended polarity alignment is respected
. If the handset is not going to be used for some time, take the batteries out. If not, the batteries may leak
and cause damage to the handset
5.2 Range Of Operation
. The operating range of the handset is within +/- 30 degrees on both the vertical and horizontal planes of the
Infra Red sensor
. Transmission distance does not exceed 7m
* Notes
- When the handset is not operational
Replace the batteries and make sure the receiver is connected to the power supply
- Abnormal operation
Disturbance from peripheral devices may occur. You will need to move the object that is generating the
disturbance.
- Notes for handling
In the event the receiver is exposed to heat or water, operating it could be dangerous. Have the unit
checked by a qualified technician prior to operating it again
6. Connecting The Receiver
6.1 To a TV set, using both A/V connections
VIDEO
AUDIO L
AUDIO R
ANT INPUT
VHF: 177~228 MHz
TV
AUDIO L VIDEO
UHF: 474~858 MHz
LOOP OUT
VCR
AUDIO R
DIGITAL
AUDIO
RS-232C
6.2 To a TV set, using both SCART connections
ANT INPUT
LOOP OUT
TV
VCR
AUDIO L
VIDEO
AUDIO R
DIGITAL
AUDIO
RS232C
6.3 To a Hi-Fi system and a TV set, using both A/V connections
VIDEO IN
AUDIO IN
L
DIGITAL
AUDIO IN
R
ANT INPUT
LOOP OUT
TV
VCR
AUDIO L
VIDEO
AUDIO R
DIGITAL
AUDIO
RS232C
6.4 To a VCR and a TV set, using both SCART connections
ANT INPUT
LOOP OUT
TV
VCR
AUDIO L
VIDEO
AUDIO R
DIGITAL
AUDIO
RS232C
7. Setup and Operation
7.1 Before Setup
- Information
A menu is a field of text, displayed on the TV screen. Selectable menu items are generally highlighted. Items
that are not highlighted cannot be selected. Most menus display explanatory information at the bottom of the
screen.
7.2 Setup Menu
To install the receiver properly you have to perform a "Setup Procedure". After you finish the setup procedure,
you can start watching TV or listening to Radio. During the basic settings, a short information is displayed at
the bottom of the menu screen.
. Turn on your TV and receiver
. Press the SETUP button to display the setup mode.
. Use the CH "/!, and Vol ◀/▶ buttons to move across a menu page.
. When you have reached the required item, press the OK button to confirm your choice.
. Press EXIT to return to quit the mode.
- System Setup
Press the OK button on 'System Setup' in the Setup Menu. The following window will appear. Set the Video
Format, TV Type, Scart RGB output, GMT Offset, TTX Type and Antenna Power.
Video Format: PAL I, B, G or K/ SECAM/ NTSC/
MULTI
TV Type: Standard (4:3) / Wide (16:9)
Scart RGB: On / Off
GMT Offset: +12:00 ~ -12:00
Teletext Type: STB (Normal TV Mode) / VBI
Antenna Power: On / Off
. Use CH "/! to move up and down the list.
. Use Vol ◀/▶ to change the setting.
. Upon reaching the required menu line, press OK to enter the setting.
. Press EXIT to go back to the previous mode.
- Channel Search
Press OK on 'Channel Search' in the Setup Menu. The following window will appear. Set the Tune Method,
Transponder, Frequency, Bandwidth, COFDM Spectrum Mode, Guard, and Function.
Tune Method: ALL (Free+Scr) / ALL (Free) /
TP (Free+Scr)
Transponder: VHF 05~12 CH
UHF 21~69 CH
Frequency: Auto / Manual
BW: 6 / 7 / 8 MHz
Mode: 2k / 8k
Guard: 1/4, 1/8, 1/16, 1/32
Function: Append / Delete / Change
Signal Quality:
AGC: Indicates received signal strength level.
. Use CH "/! to move up and down the list.
. Use Vol ◀/▶ to change the setting.
. Upon reaching the required menu line, press OK to enter the setting.
. Press EXIT to go back to the previous mode.
- Setup Lock/PIN
Press OK on 'Setup Lock/PIN' in the Setup Menu. The following window will appear. Set the Menu Lock,
Change the PIN, enter the New PIN and confirm the Confirm PIN.
Menu Lock: On/Off
Change PIN: Press OK if you want to change.
New PIN: Enter your new 4-digit code
Confirm PIN: Confirm your new 4-digit code
* Note: The default PIN is '1234'
. Use CH "/! to move up and down the list.
. Use Vol ◀/▶ to change the setting.
. Upon reaching the required menu line, press OK to enter the setting.
. Press EXIT to go back to the previous mode.
- Time Setting
Press OK on 'Time Setting' in the Setup Menu. The following window will appear. Set the Local Time, Sleep
Time, Timer Status and Program the Timer.
Local Time: dd/mm/yyyy - day – hh:mm
Sleep Time: 0~180 min
. Use CH "/! to move up and down the list.
. Use Vol ◀/▶ to change the setting.
. Upon reaching the required menu line, press OK to
enter the setting.
. Press EXIT to go back to the previous mode.
- Factory Default
Press OK on 'Factory Set' in the Setup Menu. Confirm whether you wish to go back to the factory default
settings.
7.3 General Viewing Information
- Program Information
Information on the currently viewed program appears for a few seconds, when you press INFO.
Favorite
Scrambled
Lock
Teletext
Clock
Channel name
Channel number
- TV/Radio Channels List
While watching TV you can call the channel list by pressing TV/Radio. The picture in the preview screen is
that of the highlighted channel, which can be changed with the CH "/!. Vol ◀/▶ scrolls Channel List
pages Down or Up. Pressing OK on a highlighted channel calls that channel and exits the Channel List.
Press EXIT to close the Channel List.
<TV Channel List>
<Radio Channel List>
- Favorite Channels Lists
While watching TV or listening to Radio you can call the respective favorite channels list by pressing FAV. If
the list is empty, it will not appear.
<Favorite TV>
<Favorite Radio>
- Program Guide
Press EPG to access the electronic program guide, if available from the broadcaster.
- Language
Press LANG to access the audio language selection screen.
Track: 1 of 1,2...
Mode: Stereo / Mono Left / Mono Right
Level: Normal / High / Low
Language: unknown
- Recall
Press RECALL to recall the previous channel.
- Teletext
Press TXT to access the teletext service if available from the broadcaster.
7.4 Main Menu Settings
From the Main Menu you access the Program Guide, Channel Sorting, Language & Color Preference
Settings, Favorites Editing, Channel Editing and Software Version information.
. Press MENU
. Use CH "/! to move up and down the list.
. Use Vol ◀/▶ to change the setting.
. Upon reaching the required menu line, press OK to enter the setting.
. Press EXIT to go back to the previous mode.
- Program Guide
Press OK on 'Program Guide' in the Main Menu. The following window will appear.
Use CH "/! to move up and down the list.
Use Vol ◀/▶ to move sideways across a channel line.
Pressing OK on the highlighted channel calls that channel
to the background.
Press EXIT to go back to the previous mode
.
- Sort Programs
Press OK on 'Program Search' in the Main Menu. The following window will appear.
Use Vol ◀/▶ to select an alphabetical letter.
Press OK to confirm your choice.
Use CH "/! to move up and down the list.
Use Vol ◀/▶ to scroll pages Down or Up.
Pressing OK on the highlighted channel calls that
channel and closes this menu.
Press EXIT to go back to the previous mode.
- Languages & Colours
Press OK on the 'Language Preference'. The following window will appear. Select the menu language,
default audio language, menu opacity, palette and Radio Ch Logo setting.
Menu Language: Select English / Arabic / Deutsch /
François / Italian / Russian / Spanish / Turkish
Menu Opacity: 20~100 %
Palette: Spring / Summer / Autumn / Winter
/ Jungle / Undersea / Sun Flower / Sky
Radio CH Logo: On / Off
. Use CH "/! to move upwards and downwards in the menus.
. Use Vol ◀/▶ to change the values in the alternatives.
. When you have reached the required subject menu, press OK to confirm your selection.
. Press EXIT to go back to the previous mode.
-. Edit favorites
Press OK on the 'Edit Favorites'. The following window will appear.
Select the Edit favorites menu.
TV/Radio Favorite
Move Favorite
Favorite category
Delete Favorite
-. Edit Channels
Press OK on the 'Edit Channel'. The following window will appear.
Select the Edit channel menu.
TV/Radio Channel
Move Channel
Favorite
Lock Channel
Delete Channel
Add Channel
Edit Name
. Use CH "/! to move upwards and downwards in the menus.
. Use Vol ◀/▶ to change the values in the alternatives.
. When you have reached the required subject menu, press OK to confirm your selection.
. Press EXIT to go back to the previous mode.
-. About
Press OK on the 'About'. The following window will appear.
It shows model name, application version, and device version.
. Press EXIT to go back to the previous mode.
Problem solving
There may be various reasons for the abnormal operation of the unit. Therefore, if the unit does
not work properly, check it according to the procedures shown in the table below:
Problem
LED on front panel
does not light.
Possible causes
AC power cord disconnected
Wrong connection of the
video/audio output to TV input
terminal
Remedy
Connect power cord properly into the power
socket
Connect two terminals correctly with scart
cable or RCA or RF cable
Wrong connection of satellite
antenna cable
Connect the antenna cable correctly
No signal or weak signal
Check the cable connections, LNB and
other equipment connected between the
LNB and the receiver or adjust the antenna
Wrong setting of channel
information n MENU screen
Your TV mode is different from
satellite broadcasting mode
Type the setting value correctly
No Picture or sound
Black-and- white
screen or V-Hold
Battery exhausted
The remote
controller is not
working
Fluorescent light interfering with
the remote controller Remote
controller is incorrectly aimed
Use same mode as TV
Use the NTSC/PAL converter connected to
the receiver and TV
Change the batteries
Switch off the light
Aim the remote control at the receiver
Specifications
-. System capabilities
-. Tuner input
Connector:
Frequency range:
Full DVB-T compliant
Signal level:
Bandwidth:
IEC 169-24, female
VHF: 178MHz ~ 228MHz
UHF: 474MHz ~ 858MHz
-90dBm ~ -35dBm
6 / 7 / 8 MHz type.
-. Demodulator
Front end:
COFDM Spectrum:
FEC Mode:
QPSK, 16QAM, 64QAM
2k, 8k Carrier
Rate 1/2, 2/3, 3/4, 5/6, 7/8
-. System resource
Processor:
SDRAM:
FLASH:
32bit processor (60MHz)
8Mbyte
2Mbyte
-. Video Decoder
MPEG 2:
Data Rate:
Resolution:
Video format:
Aspect Ratio:
Main Profile @ Main Level
Up to 15Mbit/s
720x576(PAL), 720x480(NTSC)
NTSC, PAL, MULIT
4:3, 16:9
-. Teletext
DVB compliant:
STV (Normal TV) / VBI
-. MPEG Audio
MPEG 1 layer 1&2
Type :
Sampling rates:
Mono, Dual mono, Stereo
32, 44.1 and 48KHz
-. Serial data interface
Connector:
9pin D-sub male, Max 115Kbps
-. Remote control
Operating condition:
Up to 7 Meter
-. Power supply
Power consumption:
Supply voltage:
Supply frequency:
Max 30W
90-250V/AC
50/60Hz
-. Rear panel connectors
Video out:
Audio L/R:
Digital Audio:
Serial data:
Digital tuner input:
Loop-through Digital tuner:
TV SCART:
VCR SCART:
1 x RCA cinch
2 x RCA cinch
1 x RCA cinch:
9pin D-sub
IEC 169-24
IEC 169-24
RGB, CVBS, Y/C, Audio
CVBS, Y/C, Audio
-. Physical Specification
Size (W x H x D):
Weight (Net):
260 x 60 x 185 mm
2.0 Kg