1
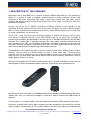
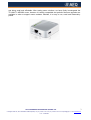
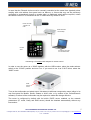
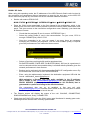
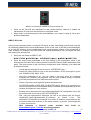
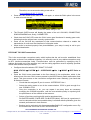
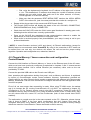
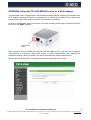
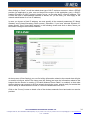
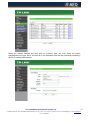
AEQ PHOENIX AUDIOCODECS. APPLICATION NOTE NA5B
Connecting Phoenix IP audiocodecs to 3G/4G networks
Ed. 1.0 (15/7/15)
TABLE OF CONTENTS:
1. DESCRIPTION OF THE SCENARIO.............................................................................2
2. TP-LINK TL-MR3020 ROUTER CONFIGURATION ......................................................4
2.1 Connecting it to the Phoenix Ethernet port...............................................................4
2.2 Accessing TP-LINK router configuration ..................................................................6
2.3. Configuring a PC for Phoenix remote control using Wi-Fi connection .....................8
3. CONNECTING AND SETTING UP ZTE MF823 4G USB MODEM: ............................10
4. CONNECTION TO PHOENIX AUDIOCODECS ..........................................................13
4.1. Phoenix Studio / Stratos connection and configuration .........................................13
4.2. Phoenix Mercury / Venus connection and configuration. ControlPhoenix ...........17
4.3. Phoenix Alio connection and configuration............................................................19
4.3. Phoenix Mobile connection and configuration .......................................................21
APPENDIX: Using the TP-LINK MR3020 router as a Wi-Fi adapter................................23
APLICACIONES ELECTRONICAS QUASAR S.A.
1
C/ Margarita Salas 24, 28919 LEGANÉS. MADRID (SPAIN) Tel.:(34) 91 686 13 00 * FAX: (34) 91 686 44 92 .E-mail: [email protected] . Web: www.aeq.eu
N.I.F. :A-28620649
1. DESCRIPTION OF THE SCENARIO
Application note 5 described how to connect a Phoenix Mobile audiocodec to a 3G network by
means of a modem in order to establish communications in mobile scenarios. Even if that
document is still valid, technology has made a great leap forward and now many service
providers are offering mobile internet accesses that are not only faster, but also more and more
reliable and affordable.
Actually, one of the 3G or “UMTS” technology limitations consists on the reduction of the
bandwidth when the number of active users on the same cell grows up, what in practice means
that it is nearly impossible to broadcast events where a large audience is present, as in the case
of sports competitions, live concerts, etc.
4G (or “LTE”, Long Term Evolution) technology appears to reduce this issue by, among many
other things, a complete redesign of the radio interface and, at the same time, manages to
provide larger available data bandwidths, that can get up to 300 Mb/s downstream, and 80 Mb/s
upstream for a certain type of high-end terminals. By using readily available modems that are
even provided by the ISP, up to 100Mb/s downstream with 50Mb/s upstream can be achieved
with good coverage conditions, what means more than 100 times higher bitrate than what you
really need to transmit two full-duplex high quality audio channels.
This application note explains the way to connect a Phoenix audiocodec (Mobile, Studio, Stratos,
Mercury, Venus or Alio) to a 3G/4G network in order to make audio calls. The most typical
scenario could be a reporter using the latest-generation Phoenix Alio audiocodec to transmit
audio via IP to a remote studio that counts with an AEQ Phoenix stationary audiocodec, such as
Studio, Stratos, Mercury or Venus.
We have homologated the ZTE MF823 USB modem, due to its wide availability, the fact that it is
homologated by many international network operators, its small size and reasonable price.
All Phoenix devices count with a 10/100Mbps Ethernet port (except for Phoenix Mobile that has a
10Mbps port, only), so some kind of adaptor is required in order to connect this USB modem to
that port.
For this purpose, a portable 3G/4G router that supports the used 4G USB modems is proposed.
At the time of writing this manual, after a market survey we reached the conclusion that very little
routers support auto-detection of LTE modems while at the same time offering an Ethernet port
APLICACIONES ELECTRONICAS QUASAR S.A.
2
C/ Margarita Salas 24, 28919 LEGANÉS. MADRID (SPAIN) Tel.:(34) 91 686 13 00 * FAX: (34) 91 686 44 92 .E-mail: [email protected] . Web: www.aeq.eu
N.I.F. :A-28620649
and being small and affordable. After testing some solutions, we have finally homologated the
TP-LINK TL-MR3020 router, because it is widely compatible and periodic firmware upgrades are
available in order to support newer modems. Besides, it is easy to use, small and reasonablypriced.
APLICACIONES ELECTRONICAS QUASAR S.A.
3
C/ Margarita Salas 24, 28919 LEGANÉS. MADRID (SPAIN) Tel.:(34) 91 686 13 00 * FAX: (34) 91 686 44 92 .E-mail: [email protected] . Web: www.aeq.eu
N.I.F. :A-28620649
2. TP-LINK TL-MR3020 ROUTER CONFIGURATION
This router can operate in several different modes:
-
-
-
Providing Internet connectivity by means of a 3G/4G network to some devices, one of
them connected through the Ethernet port, and the rest via Wi-Fi. This is the most
interesting application for us at the portable audiocodec arena. In 3G/4G mode, the TLMR3020 TP-LINK router is not only used as a bridge between the modem USB interface
and the Ethernet port at the AEQ codec, but it is also able to detect, configure and
negotiate a 4G connection with the modem by itself, while providing its power supply.
Also, it can generate a Wi-Fi hotspot to which other devices featuring this kind of wireless
connection can connect in order to access the Internet through the 4G modem. Wi-Fi can
be deactivated if not required in order to save bandwidth and guarantee that all of it is
available for the audio through the Internet port.
Connecting to an existing ISP Wi-Fi and acting as a client by means of the Ethernet port.
That is, it can be used as a wireless network adapter for devices not featuring this
capability, such as Phoenix codecs. This mode is also interesting to communicate from
hotels or public places where a Wi-Fi access is available (it must be open for the required
ports and SIP protocol needs to be transparently passed) NA1 application note explains
how to do this by means of a PC with Wi-Fi used as a gateway, but with the TP-LINK
router, the PC is no longer needed (unless it is required for audiocodec remote control).
Acting as a Wi-Fi repeater, extending the range of an existing Wi-Fi network, allowing
some devices to connect to it in a managed way (NAT, port-forwarding, permission
assignments, etc.) as we are in front of a very flexible and manageable router.
The complete router user’s manual can be downloaded in English at:
http://www.TP-LINK.com/resources/document/TL-MR3020_V1_User_Guide_1910010551.pdf
Its quick installation guide can be found here:
http://uk.TP-LINK.com/resources/document/TL-MR3020_V1_QIG_7106503718.pdf
2.1 Connecting it to the Phoenix Ethernet port
Either if we want to use the MR3020 as a 3G/4G access or, on the other hand, we want to use it
as a Wi-Fi client, we must connect the router to the audiocodec Ethernet port using a normal (non
crossover) cable, as the one provided with the router.
Next we must provide a power supply to the router. In order to do that, it features a Mini USB
connector where the provided cable, ending in two USB A connectors, is plugged. This can be
connected in several ways (plugging one of the USB A connectors is enough):
-
When working with Phoenix Studio, Venus or Mercury audiocodecs, a back USB A-type
port is available that can be used to feed the modem.
If an audiocodec without USB port (Stratos or ALIO) is used, the AC/DC adaptor provided
by the manufacturer can be used.
If a laptop PC is at hand, we can use one of the free USB ports to connect the router.
We can always use an external “powerbank” (external battery) or UPS such as the one
homologated for Phoenix Alio, which has both 12V to power the audiocodec, and 2 USB
ports to feed the router.
APLICACIONES ELECTRONICAS QUASAR S.A.
4
C/ Margarita Salas 24, 28919 LEGANÉS. MADRID (SPAIN) Tel.:(34) 91 686 13 00 * FAX: (34) 91 686 44 92 .E-mail: [email protected] . Web: www.aeq.eu
N.I.F. :A-28620649
In case that the Phoenix device must be remotely controlled at the same time (specially when
working with units without front panel such as Mercury or Venus that may not be previously
configured to automatically launch or receive calls), an additional switch will be required, unless
the remote control PC is connected to the TP-LINK router by means of Wi-Fi:
Router TP-LINK
+ Modem 4G
USB
Ethernet Switch
10/100 Mbps
Phoenix
ALIO
PC without Wi-Fi that
runs ControlPhoenix
Connecting a PC without WiFi adapter for remote control
In order to use the router as a 3G/4G together with the USB modem, place the mode selector
switch to the “3G/4G” position and turn it on. If you want to use it as a Wi-Fi client, select the
“WISP” mode.
Mode
selector
switch
Turn on the audiocodec and select DHCP ON within its Ethernet configuration menu (either in its
own front panel for Mobile, Studio, Stratos or ALIO units, or by means of the ControlPhoenix
software). A reboot of the audiocodec may be required to make this change effective.
The router is configured by default with its built-in DHCP server enabled, so the network
parameters (IP, mask, Gway and DNS server) should be obtained automatically without any
intervention.
APLICACIONES ELECTRONICAS QUASAR S.A.
5
C/ Margarita Salas 24, 28919 LEGANÉS. MADRID (SPAIN) Tel.:(34) 91 686 13 00 * FAX: (34) 91 686 44 92 .E-mail: [email protected] . Web: www.aeq.eu
N.I.F. :A-28620649
2.2 Accessing TP-LINK router configuration
Open a web browser and type the IP address marked in the router side in the URL bar:
192.168.0.254 (by default), then press Enter. The following authentication screen will appear:
Router login screen
In case that this screen doesn’t show up, and you use to connect to an Internet network by
means of a Proxy server, or you are simply unsure, please do this:
•
•
•
•
•
•
Open your preferred web browser (Explorer, Chrome, Firefox, Safari…)
In Tools / Internet Options, open the Connections tab (this may vary slightly from
one browser to another).
Click on the LAN configuration button.
In the Automatic configuration tab, the Automatically Detect Configuration
checkbox must be checked.
In the Proxy Server area, make sure that the Use a Proxy Server for local
connections… is disabled.
Accept, apply changes and close the browser.
Next, reopen the browser, which should now show the login screen after typing the router’s IP
address in the URL bar. Type the user and password (admin / admin by default, they can be
changed later on)
User name: admin.
Password: admin
The general router status screen will appear now.
APLICACIONES ELECTRONICAS QUASAR S.A.
6
C/ Margarita Salas 24, 28919 LEGANÉS. MADRID (SPAIN) Tel.:(34) 91 686 13 00 * FAX: (34) 91 686 44 92 .E-mail: [email protected] . Web: www.aeq.eu
N.I.F. :A-28620649
3G/4G mode status screen
The following information can be found in this screen:
a) Router firmware version (the one shown is the latest version available at the time of writing this
application note).
b) LAN port status (the one connected to the Phoenix), with the TP-LINK router MAC and its
administration IP (192.168.0.254).
c) Wi-FI status (enabled, its SSID and type of radio link).
d) 3G/4G connection status (in this example, the USB modem was already connected, it is
properly identified and the connection is active with good signal level).
The left column menu allows for detailed configuration such as changing the default IP, activating
and deactivating the Wi-Fi interface, change its SSID or password, enabling access rules, port
mapping and many other options as expected in an advanced router.
As a caution, it is worth to go to the Security Menu and deactivate the SIP ALG option (although
tests have worked out well without performing this operation), as depicted below:
APLICACIONES ELECTRONICAS QUASAR S.A.
7
C/ Margarita Salas 24, 28919 LEGANÉS. MADRID (SPAIN) Tel.:(34) 91 686 13 00 * FAX: (34) 91 686 44 92 .E-mail: [email protected] . Web: www.aeq.eu
N.I.F. :A-28620649
SIP ALG mode deactivation
… Next, click on the Save button. This way, we avoid any possibility that the router alters the
contents of the SIP packets exchanged between the connected codecs.
2.3. Configuring a PC for Phoenix remote control using Wi-Fi
connection
In case that you have a PC at hand and configuration of the router or the Phoenix is required, the
easiest option is to connect that PC to the TP-LINK Wi-Fi hotspot.
a) Enable DHCP:
If you are currently connected to local network with a manually-assigned IP, please do the
following, first making sure that your control panel is in “classic view” mode:
•
•
•
•
•
At Start/Control Panel/Network connections, right-click on the Wireless Networks
and select Properties.
In the General tab, look for Internet Protocol (TCP/IP) in the large window.
Click on the Properties button.
In the General tab, check the “Obtain IP address automatically” checkbox.
Accept, apply changes and close the Control Panel (sometimes a PC reboot is
required).
APLICACIONES ELECTRONICAS QUASAR S.A.
8
C/ Margarita Salas 24, 28919 LEGANÉS. MADRID (SPAIN) Tel.:(34) 91 686 13 00 * FAX: (34) 91 686 44 92 .E-mail: [email protected] . Web: www.aeq.eu
N.I.F. :A-28620649
b) Enable Wi-Fi connection and open Wireless Networks window (the steps required to arrive
there depend a bit on the operating system). Search / update wireless networks. A new one with
this name (SSID) should be found:
“TP-LINK_POCKET_3020_xxxxxx”. (let xxxxxx be the latest digits of the router MAC,
unique for each unit).
If you try to connect to it, the network password will be asked for. It can be read in a
sticker at the side of the router (for example: KEY: 04919277). Please note that each unit
has a different password.
NOTE: This same connection can be made using any portable device (Smartphone,
tablet, iPad, etc), only by looking for the mentioned wireless network, entering the
password and opening the browser (for example, Safari in iOS) in order to manage the
router without the need for a PC.
APLICACIONES ELECTRONICAS QUASAR S.A.
9
C/ Margarita Salas 24, 28919 LEGANÉS. MADRID (SPAIN) Tel.:(34) 91 686 13 00 * FAX: (34) 91 686 44 92 .E-mail: [email protected] . Web: www.aeq.eu
N.I.F. :A-28620649
3. CONNECTING AND SETTING UP ZTE MF823 4G USB MODEM:
The very first step consists on inserting a SIM (a regular
sized one) that has a 4G data plan enabled into the USB
modem. In order to do that, just slide its cover and insert the
card in the position depicted in the modem itself, with the
contacts facing down, and then slide the cover back again.
Next, and only for the first time, we should connect the 4G modem to a PC in order to access its
management application and deactivate the SIM PIN, so the router can automatically activate the
4G connection without the need for entering a PIN manually.
The modem can be purchased either through a certain ISP or free. In any case, it is selfinstalling. After plugging it, the required drivers are automatically installed and a webpage for
configuration is launched after a while. This page offers some possibilities, PIN deactivation
among them. As an example, we depict the configuration screens of the modem, as offered by
Movistar.
APLICACIONES ELECTRONICAS QUASAR S.A.
10
C/ Margarita Salas 24, 28919 LEGANÉS. MADRID (SPAIN) Tel.:(34) 91 686 13 00 * FAX: (34) 91 686 44 92 .E-mail: [email protected] . Web: www.aeq.eu
N.I.F. :A-28620649
Select the “Ajustes SIM” tab and deactivate the PIN (the current PIN will be asked for). In order to
access this option, first we may need to deactivate the connection by means of the adequate
button.
If the modem is bought free (without association to any ISP) the presentation changes slightly:
APLICACIONES ELECTRONICAS QUASAR S.A.
11
C/ Margarita Salas 24, 28919 LEGANÉS. MADRID (SPAIN) Tel.:(34) 91 686 13 00 * FAX: (34) 91 686 44 92 .E-mail: [email protected] . Web: www.aeq.eu
N.I.F. :A-28620649
The SIM PIN configuration screen looks like this:
This is also a good moment to verify that our data plan works properly. In order to do this,
disconnect the modem, plug it again, make sure that its status is CONNECTED after approx 45
seconds (the ZTE logo should blink green) and then the connection should be active. We can
make sure about this by opening our favorite page on a web browser, or by issuing a PING to
google.es (without any other active Wi-Fi or LAN connections that could fool us)
If everything works ok, we don’t need to configure anything else with the modem connected to the
PC, so we can remove it.
NOTE: The ZTE modem provided by Movistar can also be used with other operators by simply
inserting the adequate SIM and typing its PIN (that we can disable afterwards in just the same
way) The operator, if it is not automatically detected, can be specified in the “Conexión móvil” tab,
by disconnecting, changing to Manual mode and selecting it from the list. However, our tests with
Orange in the Automatic mode worked perfect by just inserting this company’s card and typing its
corresponding new PIN.
4G modem connection to the router becomes as simple as plugging it into its USB port, and the
router will manage (provided that it has the correct firmware version, that was 3.17.2 Build
140610 Rel.65031n during our successful tests), to detect and configure the modem and
establish the connection to the network, so its logo will blink in green (indicating a correct 4G
connection) or blue (indicating 3G if this type of connection is enabled). The default configuration
of the modem, “3G/4G” (as determined by the lateral mode selection switch) allows for sharing a
4G connection with the LAN port and Wi-Fi, with default SSID and password. Proxy SIP calls
have been successfully established without any further changes.
APLICACIONES ELECTRONICAS QUASAR S.A.
12
C/ Margarita Salas 24, 28919 LEGANÉS. MADRID (SPAIN) Tel.:(34) 91 686 13 00 * FAX: (34) 91 686 44 92 .E-mail: [email protected] . Web: www.aeq.eu
N.I.F. :A-28620649
4. CONNECTION TO PHOENIX AUDIOCODECS
Next, we will explain how the TP-LINK TL-MR3020 is connected to the different kinds of AEQ
audiocodecs, as well as how the basic equipment configuration is performed either locally or by
means of the ControlPhoenix remote control software, so a 4G connection can be achieved that
allows us to perform high-quality audio communications.
4.1. Phoenix Studio / Stratos connection and configuration
Connect the LAN1 Ethernet port at Phoenix Studio to the 4G router, which was previously
configured as explained in chapters 2 and 3, and once proper connection has been checked, by
using a not-crossed straight Ethernet cable such as the one provided by TP-LINK.
In order to feed the router, connect the provided USB cable to the Phoenix Studio USB port (for
Phoenix Stratos, please feed the router by means of the provided AC/DC adaptor or by means of
a laptop)
No more connections are needed (apart from the required audio inputs / outputs, of course).
When a Phoenix is connected to a network, we must have a free IP for the unit within the valid
range of the network. The easiest way is to activate the DHCP (Dynamic Host Configuration
Protocol), a network protocol that allows the nodes of an IP network to obtain their parameters
automatically). This way, with activated DHCP, the router will assign the Phoenix a valid IP
configuration.
In order to activate DHCP in Phoenix Studio/Stratos, go to MAIN MENU Æ SYSTEM Æ
8.SETTINGS Æ ETHERNET SETTINGS Æ ETHERNET MODULE 1, where DHCP will be set to
ON. The rest of screen parameters are filled up automatically:
IP address configuration screen
Next we will explain how to make calls in the different Phoenix supported modes: SIP (with and
without Proxy) and plain RTP.
APLICACIONES ELECTRONICAS QUASAR S.A.
13
C/ Margarita Salas 24, 28919 LEGANÉS. MADRID (SPAIN) Tel.:(34) 91 686 13 00 * FAX: (34) 91 686 44 92 .E-mail: [email protected] . Web: www.aeq.eu
N.I.F. :A-28620649
PROXY SIP Calls
When using this operating mode, the IP addresses of the AEQ Phoenix Studio units involved in
the connection are parameters without importance as seen by the end user, as the AEQ SIP
server resources (sip.aeq.es) are used to act as an automatic address translator.
•
Set the call mode to PROXY SIP:
MAIN STATUS Æ SYSTEM Æ 5. INTERFACES Æ Net 1 Æ MODE Æ PROXY SIP
•
Press the CALL button associated to the first channel in the audiocodec, which is the
leftmost one of the two CALL buttons present in the AEQ Phoenix Studio audiocodec front
panel. This gives access to the connection configuration menu. Basically, just check that
all fields are correct:
o
Check that the assigned IP port is correct:: INTERFACE: Net 1
o
Select the coding profile to use in the communication. For just a test, G722 is
enough: CODING (List): ONLY G722
o
Once the connection is ok, you can repeat it as many times as necessary
modifying the CODING (list) algorithm, until the most suitable quality is required
given the performance of the network at that moment:
Coding profile selection screen
o
Select a fixed size receiving buffer and its associated size:
RX BUFFER MODE: FIXED SIZE. RX BUFFER (MAX): 500 (ms) is a good start, it
can be reduced until the best possible delay is reached without problems given the
network performance in that moment.
o
Backup can be activated, with its corresponding BACK UP configuration menu. By
the moment this can be left as OFF NO INTERFACE
o
Enter, using the alphanumeric keyboard, the destination equipment URI with the
format: <destination_name>@sip.aeq.es
AEQ maintains a Phoenix unit with audio available in the IP address:
195.77.55.204 or URI [email protected] for test purposes, and a
PROXY SERVER (sip.aeq.es) is also available (at 213.149.249.6) that is
guaranteed to operate according to the official standard.
We recommend that you try to establish a first test call with:
[email protected]. Press the CALL button at the unit front panel or select
the DIAL option in the menu to launch the call.
•
The Phoenix screen will display the status of the call: CALLING, CONNECTING,
SYNCHRONIZING and, finally, CONNECTED.
•
Check that the SYNC LED under the CALL button gets illuminated in steady-green color,
indicating that the call has been correctly synchronized.
APLICACIONES ELECTRONICAS QUASAR S.A.
14
C/ Margarita Salas 24, 28919 LEGANÉS. MADRID (SPAIN) Tel.:(34) 91 686 13 00 * FAX: (34) 91 686 44 92 .E-mail: [email protected] . Web: www.aeq.eu
N.I.F. :A-28620649
Detail of a successfully established & synchronized call
•
•
Press on the ON AIR key associated to that communications channel to enable the
transmission of audio over that interface in full-duplex mode.
When audio is received properly from phoenixMaster, your setup is ready to call to your
preferred destination.
DIRECT SIP Calls
In this second operating mode, no external SIP server is used, and dialing is performed using the
IP addresses between the involved audiocodecs. Even in this case, it still has some advantages,
as it uses SIP protocol for the establishment and synchronization phases of the connection in
order to define, for example, the audio ports and coding algorithms to use, and signal call start
and ending from a single end.
•
Set up the call mode as DIRECT SIP:
MAIN STATUS Æ SYSTEM Æ 5 – INTERFACES Æ Net 1 Æ MODE Æ DIRECT SIP
•
Press the CALL button associated to the first channel in the audiocodec, which is the
leftmost one of the two CALL buttons present in the AEQ Phoenix Studio audiocodec front
panel. This gives access to the connection configuration menu. Basically, just check that
all fields are correct:
o
Check that the assigned IP port is correct:: INTERFACE: Net 1
o
Select the coding profile to use in the communication. G722 is enough for just a
test: CODING (List): ONLY G722
o
Once the connection is ok, you can repeat it as many times as necessary
modifying the CODING (list) algorithm, until the most suitable quality is required
given the performance of the network at that moment.
o
Select a fixed size receiving buffer and its associated size:
RX BUFFER MODE: FIXED SIZE. RX BUFFER (MAX): 500 (ms) is a good start, it
can be reduced until the best possible delay is reached without problems given the
network performance in that moment.
o
Backup can be activated, with its corresponding BACK UP configuration menu. By
the moment this can be left as OFF NO INTERFACE
o
Dial, using the alphanumeric keyboard, the URI of the partner with the format:
<destination_name>@<destination_IP_address> en format
x.x.x.x. This
destination’s IP address must always be a public IP address, private address are
not valid (unless both units are in the same network, of course). Check Appendix
C of the user manual)
AEQ
maintains
a
Phoenix
codec
available
[email protected] for testing purposes
APLICACIONES ELECTRONICAS QUASAR S.A.
with
audio
at:
15
C/ Margarita Salas 24, 28919 LEGANÉS. MADRID (SPAIN) Tel.:(34) 91 686 13 00 * FAX: (34) 91 686 44 92 .E-mail: [email protected] . Web: www.aeq.eu
N.I.F. :A-28620649
Therefore, we recommend making a test call to:
[email protected].
•
Press the CALL button at the front of the unit again, or select the DIAL option in the menu
in order to launch de call:
Detail of an AEQ Phoenix Studio calling on CH1
•
The Phoenix OLED screen will display the status of the call: CALLING, CONNECTING,
SYNCHRONIZING and, finally, CONNECTED.
•
Check that the SYNC LED under the CALL button gets illuminated in steady-green color,
indicating that the call has been correctly synchronized.
•
Press on the ON AIR key associated to that communications channel to enable the
transmission of audio over that interface in full-duplex mode.
When audio is received properly from phoenixMaster, your setup is ready to call to your
preferred destination.
•
RTP POINT TO POINT connections
This is the most simple connection mode, which implies that the call must be established from
both ends, as there is no additional signaling. It is normally used in very stable connections such
as STL (studio-to-transmitter links). Communication must be performed by specifying the IP
address and audio port of the opposite end, and the coding algorithm must be explicitly specified
at both ends and be exactly the same *
•
Configure the call method to RTP POINT TO POINT:
MAIN STATUS Æ SYSTEM Æ 5 - INTERFACES Æ Net 1 Æ MODE. Æ RTP Point to
Point
•
Press the CALL button associated to the first channel in the audiocodec, which is the
leftmost one of the two CALL buttons present in the AEQ Phoenix Studio audiocodec front
panel. This gives access to the connection configuration menu. Basically, just check that
all fields are correct:
o
Check that the assigned IP port is correct:: INTERFACE: Net 1
o
Select the coding mode to use in the communication. G722 is good enough for a
test: CODING: G722
o
Once the connection is ok, you can repeat it as many times as necessary
modifying the CODING algorithm, until the most suitable quality is required given
the performance of the network at that moment.
o
Select a fixed size receiving buffer and its associated size:
RX BUFFER MODE: FIXED SIZE. RX BUFFER (MAX): 500 (ms) is a good start, it
can be reduced until the best possible delay is reached without problems given the
network performance in that moment.
o
Backup can be activated, with its corresponding BACK UP configuration menu. By
the moment this can be left as OFF NO INTERFACE
APLICACIONES ELECTRONICAS QUASAR S.A.
16
C/ Margarita Salas 24, 28919 LEGANÉS. MADRID (SPAIN) Tel.:(34) 91 686 13 00 * FAX: (34) 91 686 44 92 .E-mail: [email protected] . Web: www.aeq.eu
N.I.F. :A-28620649
o
Dial, using the alphanumeric keyboard, the IP address of the other unit in format
x.x.x.x. This destination’s IP address must always be a public IP address, private
address are not valid (unless both units are in the same network, of course).
Check Appendix C of the user manual)
o
Make sure that the parameter DEST MEDIA PORT matches the LOCAL MEDIA
PORT of the other unit, (and vice-versa) and that this number is a multiple of 4.
•
Repeat all the above steps in the remote end AEQ Phoenix Studio.
•
The Phoenix OLED screen will display the status of the call: CALLING, CONNECTING,
SYNCHRONIZING and, finally, CONNECTED.
•
Check that the SYNC LED under the CALL button gets illuminated in steady-green color,
indicating that the call has been correctly synchronized.
•
Press on the ON AIR key associated to that communications channel to enable the
transmission of audio over that interface in full-duplex mode.
When audio is received properly from phoenixMaster, your setup is ready to call to your
preferred destination.
•
* NOTE: In recent firmware versions (v4.20 and above), all Phoenix audiocodecs (except for
Mobile) feature a new automatic mode, SmartRTP. By using it, the connection in RTP mode can
be started from one end only; the receiver will answer the call and set the proper coding
algorithm. Operation and configuration are, otherwise, identical.
4.2. Phoenix Mercury / Venus connection and configuration.
ControlPhoenix
Connect the LAN interface at Phoenix Mercury or Venus to the Ethernet port of the 4G router,
which must have been previously configured as explained in chapters 2 and 3. Internet access
should also been checked. Use a normal Ethernet (not crossover) cable, such as the one
provided by TP-LINK.
Connect the provided USB cable to the Phoenix rear USB port.
Next, operation with audiocodecs lacking front panel, such as Mercury and Venus, is explained,
by means of ControlPhoenix remote control software. However, explanations provided are
equally valid for any other Phoenix family member supported by this software (all of them except
Mobile). Sometimes it can be more convenient to configure the devices from this application than
from its front panel.
First of all, we must ensure that connectivity is ready. When using TP-LINK router, the easiest
way is to connect the PC running ControlPhoenix to it via Wi-Fi, as explained in chapter 2.3
(Configuring a PC for Phoenix remote control using Wi-Fi connection). If the PC lacks Wi-Fi
connection, the only way to connect it is by using an external switch to the TP-LINK router, were
we will connect both the control PC and the Audiocodec (both of them should have DHCP
enabled).
The audiocodec to control must be in the same network as the PC. Otherwise, please change
both of them to DHCP in the front panel (audiocodecs that don’t feature front panel are
configured with DHCP on by default, and in any case they can be reverted to factory settings
without the need for ControlPhoenix. Please check each model’s manual).
APLICACIONES ELECTRONICAS QUASAR S.A.
17
C/ Margarita Salas 24, 28919 LEGANÉS. MADRID (SPAIN) Tel.:(34) 91 686 13 00 * FAX: (34) 91 686 44 92 .E-mail: [email protected] . Web: www.aeq.eu
N.I.F. :A-28620649
Run the application, which will, by default, search all compatible audiocodecs within the PC
network/s. If it doesn’t, the option must be enabled by launching the program, and, under the
Settings Æ General Application Values, menu, unchecking the “Avoid auto discovering on starting
application” checkbox. Next, restart the application.
Once the audiocodec that we want to control is discovered, we have to deselect any other, if
detected, and add the desired one, giving it a name as depicted in the following captures:
Units can also be manually added for remote control by means of the Equipment Æ New dialog:
APLICACIONES ELECTRONICAS QUASAR S.A.
18
C/ Margarita Salas 24, 28919 LEGANÉS. MADRID (SPAIN) Tel.:(34) 91 686 13 00 * FAX: (34) 91 686 44 92 .E-mail: [email protected] . Web: www.aeq.eu
N.I.F. :A-28620649
Once the device is added to ControlPhoenix, we will see a graphical representation of it (this
example depicts a two-channel Studio unit):
From now on we refer to each model user manual in order to obtain information about how to
configure the different operating modes (DIRECT SIP, PROXY SIP, RTP Raw), how to make
calls, configure the receiving buffer, enabling call automation, etc. using the application.
4.3. Phoenix Alio connection and configuration
Connect Phoenix Alio LAN interface to the 4G router Ethernet port. The router must have been
previously configured as explained in chapters 2 and 3, and Internet connection must have been
checked. Use a normal (non crossover) Ethernet cable such as the one provided by TP-LINK.
Connect the provided USB cable to the AC/DC adapter or to a laptop in order to provide power
supply to the router. Alternatively, a small UPS can be used, such as the one homologated for
ALIO in order to feed both the audiocodec (it features as 12V DC output) and the router:
XTPower MP-10000. This UPS has several USB ports, labeled as “OUT S” and “OUT 1”. Just
connect one of the USB connectors to any of these:
12V output to
feed Phoenix
ALIO
5V USB
output for
router, etc.
APLICACIONES ELECTRONICAS QUASAR S.A.
19
C/ Margarita Salas 24, 28919 LEGANÉS. MADRID (SPAIN) Tel.:(34) 91 686 13 00 * FAX: (34) 91 686 44 92 .E-mail: [email protected] . Web: www.aeq.eu
N.I.F. :A-28620649
Next, turn the unit on and press the MENU key. Select the ETHERNET option in order to enable
DHCP. The unit will reboot once the change is confirmed (by going back using the ESC/DEL
button or the BACK menu option). It will then obtain its IP configuration automatically from the
TP-LINK router.
Once the unit restarts after about 15 seconds, it must have 4G connectivity, so it should be ready
to be configured to make calls as if it was connected to any other network.
First of all, select the channel we want to make the call from (PROG / COORD, provided that the
audiocodec has this option enabled) by means of the NAVI / Ch encoder pushbutton. After that,
choose the calling mode (SIP / RTP) by using the “SIP” or “IP” keys, respectively, and properly
set up the SIP parameters if applicable. Choose the coding algorithm (or PROFILE in SIP modes)
by using the CODEC key…
Finally, press the CALL / OK button to make a call:
(In order to get more information, please check Phoenix Alio user’s manual).
APLICACIONES ELECTRONICAS QUASAR S.A.
20
C/ Margarita Salas 24, 28919 LEGANÉS. MADRID (SPAIN) Tel.:(34) 91 686 13 00 * FAX: (34) 91 686 44 92 .E-mail: [email protected] . Web: www.aeq.eu
N.I.F. :A-28620649
4.3. Phoenix Mobile connection and configuration
Connect Phoenix Mobile LAN interface to the 4G router Ethernet port. The router must have been
previously configured as explained in chapters 2 and 3, and Internet connection must have been
checked. Use a normal (non crossover) Ethernet cable such as the one provided by TP-LINK.
Connect the provided USB cable to the AC/DC adapter or to a laptop in order to provide power
supply to the router.
As it has been explained before, we must have a free IP address for the audiocodec within the
network range. Thus, we need to activate DHCP (a protocol allowing the nets within a network to
automatically obtain their IP configuration). This way, the router acts as a DHCP server and will
assign an IP address to the Phoenix Mobile.
Please enable the following option to activate DHCP:
Menu Æ Advanced Æ Communications Æ Ethernet Config, DHCP (ON)
If the firmware is not upgraded to the latest versions, you may need to turn off and then on the
unit at this point for the changes to take effect.
Next, connect Phoenix Mobile and configure it to operate in SIP mode, as if we were directly
connected to a network:
Go to Menu Æ Advanced Æ Communications Æ SIP Config Æ Proxy
Check and change if necessary:
“Activate”: ON
“Address”: sip.aeq.es
“Realm” and “Domain”: sip.aeq.es
“User” and “password” are alphanumeric fields that should be filled-in.
If the above operations have been successfully performed, the background of the icon at the top
left corner will turn blue.
Go back to main screen (the one having 5 faders, which you can access by selecting BACK
several times and CLOSE at the end). If you can read Coord in the bottom central area, press the
Channel soft-key to change to Program.
Make sure that the used channel (either Program or Coord) are assigned to the Ethernet slot.
Please do the following:
Menu Æ Advanced Æ Modules Config, verify that Program channel uses Ethernet.
In order to exit, press the BACK and Close button until you reach the main screen displaying five
faders.
Press the CHN key (at the right area of the unit panel) in order to select PhoenixMaster test unit
address and launch the call.
APLICACIONES ELECTRONICAS QUASAR S.A.
21
C/ Margarita Salas 24, 28919 LEGANÉS. MADRID (SPAIN) Tel.:(34) 91 686 13 00 * FAX: (34) 91 686 44 92 .E-mail: [email protected] . Web: www.aeq.eu
N.I.F. :A-28620649
This is what you should type in:
URI: [email protected]
P: G722
Max Rx Buffer Size (ms): 500*
Press the green CALL key to launch the call.
If you have a set of headphones and the incoming audio is
properly routed to them, you should hear some music or
message from the phoenixMaster test unit.
Please replace the “Call to: contact” field in the Phoenix
Mobile main screen by your partner URI and press the green
CALL key to establish a communication with it.
*This value can be changed afterwards in order to reduce latency provided that the network
performance allows for that.
APLICACIONES ELECTRONICAS QUASAR S.A.
22
C/ Margarita Salas 24, 28919 LEGANÉS. MADRID (SPAIN) Tel.:(34) 91 686 13 00 * FAX: (34) 91 686 44 92 .E-mail: [email protected] . Web: www.aeq.eu
N.I.F. :A-28620649
APPENDIX: Using the TP-LINK MR3020 router as a Wi-Fi adapter
The presented router is quite flexible, and another interesting options it offers is its utilization as a
Wi-Fi adapter, allowing an Ethernet connected unit to access any existing Wi-Fi network that,
having proper connectivity and permissions, can connect it to Internet.
In order to configure the router in this mode, move the operating mode switch, located at a side of
the unit, to the “WISP” position.
Mode selector
switch
Next, connect it using a straight (non crossed) Ethernet cable to a PC, and open the IP address:
192.168.0.254 in a browser, what gives access to router administration. After entering the
credentials (admin / admin by default), we will be presented the general status screen.
Select the Quick Setup option (it appears by default anyway) and click on Next.
APLICACIONES ELECTRONICAS QUASAR S.A.
23
C/ Margarita Salas 24, 28919 LEGANÉS. MADRID (SPAIN) Tel.:(34) 91 686 13 00 * FAX: (34) 91 686 44 92 .E-mail: [email protected] . Web: www.aeq.eu
N.I.F. :A-28620649
After clicking on “Next”, we will be asked what type of Wi-Fi we have access to: either a PPPoE
provider (its application is quite rare and beyond the scope of this application note), a DHCPenabled (Dynamic IP) Wi-Fi (typical in hotels, etc) or, on the other hand, a fixed IP address. This
is often the case in administrated networks at offices, etc. (in this case, you must apply to the
network administrator for a free IP address).
In case you choose a fixed IP address, we must specify all the network parameters (IP, Mask,
Gateway and Primary/Secondary DNS servers). Otherwise, if you have selected Dynamic IP,
please specify “Don’t clone MAC address” in the following screen and click on Next, where you
will need to configure the wireless networks:
At the top area (Client Setting) you can find all the information related to the network that will give
us access to Internet, while in the lower area (AP Setting) we have the information related to the
hotspot that the Router is creating (if “Enable Wireless Router Radio” is enabled) so that other
wireless devices can connect to the first network through the router, what is really not needed but
can be handy to administrate the router or control the Audiocodec from a PC.
Click on the “Survey” button to obtain a list of the wireless networks found and select our service
provider:
APLICACIONES ELECTRONICAS QUASAR S.A.
24
C/ Margarita Salas 24, 28919 LEGANÉS. MADRID (SPAIN) Tel.:(34) 91 686 13 00 * FAX: (34) 91 686 44 92 .E-mail: [email protected] . Web: www.aeq.eu
N.I.F. :A-28620649
Select the desired network and then click on Connect. Next, we must select the proper
authentication Key type: WPA, and then fill in the Password field with the password provided by
the Wi-Fi network administrator.
APLICACIONES ELECTRONICAS QUASAR S.A.
25
C/ Margarita Salas 24, 28919 LEGANÉS. MADRID (SPAIN) Tel.:(34) 91 686 13 00 * FAX: (34) 91 686 44 92 .E-mail: [email protected] . Web: www.aeq.eu
N.I.F. :A-28620649
When you click on the Next button, you will be asked to reboot the router, what you will need to
confirm several times.
From then on, you only need to test the Internet connection from the PC by opening your favorite
Web page or by issuing a PING to, for example, google.es. If it works, just connect the Ethernet
cable to the Phoenix, activate DHCP in it, and the network will grant it a valid IP configuration.
The unit should be ready to access the Internet and establish communications as described in
former paragraphs.
The router can be reverted to its factory settings at any time by pressing on the top WPS/RESET
button for longer than 10 seconds.
APLICACIONES ELECTRONICAS QUASAR S.A.
26
C/ Margarita Salas 24, 28919 LEGANÉS. MADRID (SPAIN) Tel.:(34) 91 686 13 00 * FAX: (34) 91 686 44 92 .E-mail: [email protected] . Web: www.aeq.eu
N.I.F. :A-28620649