1
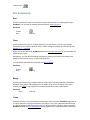
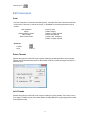
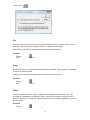
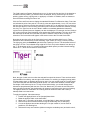
SewWhat User Manual V4.4.1 FEBRUARY 18, 2013 S & S COMPUTING OAK RIDGE, TN 37830 Table of Contents Introduction ...................................................................................................................................... 1 Getting Started ............................................................................................................................ 1 Contacting Us .............................................................................................................................. 2 Frequently Asked Questions ....................................................................................................... 2 Menus .............................................................................................................................................. 4 File menu commands .................................................................................................................. 4 Edit menu commands.................................................................................................................. 4 View menu commands ................................................................................................................ 4 Tools menu commands ............................................................................................................... 5 Options menu commands ........................................................................................................... 5 Window menu commands ........................................................................................................... 5 Help menu commands ................................................................................................................ 6 File Commands................................................................................................................................ 7 New ............................................................................................................................................. 7 Open ............................................................................................................................................ 7 Merge .......................................................................................................................................... 7 Close ........................................................................................................................................... 7 Save ............................................................................................................................................ 8 Save As ....................................................................................................................................... 8 Email............................................................................................................................................ 8 Print ............................................................................................................................................. 8 Print Preview ............................................................................................................................... 9 Printer Setup ............................................................................................................................... 9 Page Setup .................................................................................................................................. 9 Exit............................................................................................................................................. 10 Edit Commands ............................................................................................................................. 11 Undo .......................................................................................................................................... 11 Delete Threads .......................................................................................................................... 11 Join Threads .............................................................................................................................. 11 Cut ............................................................................................................................................. 12 Copy .......................................................................................................................................... 12 Paste ......................................................................................................................................... 12 All Objects ................................................................................................................................. 13 Next Object ................................................................................................................................ 13 Previous Object ......................................................................................................................... 13 View Commands............................................................................................................................ 14 Jumps ........................................................................................................................................ 14 Grid Lines .................................................................................................................................. 14 Grid Labels ................................................................................................................................ 14 Stitch Points .............................................................................................................................. 14 Texture ...................................................................................................................................... 14 Album Icons ............................................................................................................................... 14 Main Toolbar ............................................................................................................................. 15 Sew/Show Bar ........................................................................................................................... 15 Status Bar .................................................................................................................................. 15 Rotation Bar .............................................................................................................................. 15 Tools Commands........................................................................................................................... 16 Batch Conversion ...................................................................................................................... 16 Create D1 Floppy ...................................................................................................................... 16 Sew Lettering ............................................................................................................................ 17 Sew and Show .......................................................................................................................... 19 Center Pattern ........................................................................................................................... 19 Fabric Color ............................................................................................................................... 20 Zoom In ..................................................................................................................................... 20 Zoom Out .................................................................................................................................. 20 Options Commands ....................................................................................................................... 21 Album Filter ............................................................................................................................... 21 D1 Drives ................................................................................................................................... 21 File Save ................................................................................................................................... 21 Grid ............................................................................................................................................ 21 Hoop Size .................................................................................................................................. 21 Image ........................................................................................................................................ 22 Units .......................................................................................................................................... 22 Windows Commands ..................................................................................................................... 23 New ........................................................................................................................................... 23 Cascade .................................................................................................................................... 23 Tile ............................................................................................................................................. 23 1, 2, ... command....................................................................................................................... 23 Help Commands ............................................................................................................................ 24 Tip of the Day ............................................................................................................................ 24 Help Topics ............................................................................................................................... 24 Auto-Update .............................................................................................................................. 24 About SewWhat......................................................................................................................... 24 Change (History) Log ................................................................................................................ 24 Sewing Topics ............................................................................................................................... 25 Resize ....................................................................................................................................... 25 Rotate ........................................................................................................................................ 25 Reflect ....................................................................................................................................... 25 Dialogs ........................................................................................................................................... 26 File Open ................................................................................................................................... 26 File Save As .............................................................................................................................. 27 Print ........................................................................................................................................... 27 Printer Setup ............................................................................................................................. 27 Thread Color ............................................................................................................................. 28 Toolbars ......................................................................................................................................... 29 Main Toolbar ............................................................................................................................. 29 Status Bar .................................................................................................................................. 30 Sew-and-Show .......................................................................................................................... 30 Title Bar ..................................................................................................................................... 31 Scroll Bars ................................................................................................................................. 31 Print Preview ............................................................................................................................. 31 Rotation ..................................................................................................................................... 32 Thread Color ............................................................................................................................. 32 Miscellaneous ................................................................................................................................ 33 Context Help .............................................................................................................................. 33 Purchase SewWhat ................................................................................................................... 33 SewWhat Manual Introduction Getting Started Welcome to the SewWhat! embroidery file editor and conversion tool. You may use it to merge, rotate, and resize (to a limited degree) existing embroidery patterns, as well as convert from one embroidery format to another. Batch conversion of large numbers of embroidery files between different formats is also available. Additional information about using SewWhat! is available by accessing the Tip of the Day feature at any time. The SewWhat! screen is shown below. The title bar displays information about the file that is currently open. Below the title bar is the menu bar containing drop-down menu commands for various features that control your interaction with the application. (Links to descriptions of the menu commands may be found in FAQ.) Below the menu is the main SewWhat! toolbar, which contains iconic buttons that can be clicked to implement many of the menu commands. Also shown is the rotation toolbar for reflecting and rotating the selected pattern (a pattern is "selected" by left-clicking on it in the workspace). Below the main toolbar is the Sew and Show toolbar. This is used to emulate an actual stitch-out of the pattern on your screen. The remaining work area of the SewWhat! screen is divided into two panels consisting of the main panel (or view) and an information panel. In the figure below, the embroidery file "Bearina.art" has been opened and is displayed in the main workspace. The hoop associated with the pattern is shown, together with optional grid lines. You may also open a SewWhat! editing session by starting the lettering editor, even without importing an existing embroidery file. The various tools available for editing embroidery files are described in the Edit and Tools menus. Once your editing session is completed (or at various time during an editing session), you should save your work to a new or existing file, using the File Save command. The information panel is located to the right of the workspace (where embroidery files are displayed and edited). It may be toggled from the View menu to display either the information shown below or an album icon view of the files in the present working folder. In the figure below, the information panel contains detailed information about the file, including the number of stitches for each thread and the total thread length. In addition, graphical information about the length distribution of threads may also be shown. Note that the user can move or resize this graph anywhere within the info panel. The information in this panel is updated whenever the file is edited in the work pane or when a new file is opened. To view information about a single thread, click either the next or previous object buttons to scroll through the list of threads in the pattern. The relative sizes of the panels can be changed by dragging the vertical separator bar with the mouse. 1 SewWhat Manual Contacting Us Any questions or comments regarding SewWhat should be sent to the S & S Computing support email: [email protected] Frequently Asked Questions How To . . . Resize a pattern Merge a pattern Change Thread Color Purchase SewWhat Menus File Menu Edit Menu View Menu 2 SewWhat Manual Tools Menu Options Menu Window Menu Help Menu 3 SewWhat Manual Menus File menu commands The File menu offers the following commands: New Open Merge Close Save Save As Email Print Print Preview Page Setup Exit Creates a new blank sewing pattern file. Opens an existing sewing pattern file. Merge a pattern file from disk with the presently active (opened) file. Closes the presently active pattern file. Saves an opened pattern file, using the same file name. Saves an opened pattern file to a specified file name. Email active pattern. Prints the pattern and design information. Displays the pattern on the screen as it would appear printed. Selects printing options. Exits SewWhat! application. Edit menu commands The Edit menu offers the following commands: Undo Del Threads Join Threads Cut Copy Paste All Objects Next Object Prev Object (undo) previous editing operation. Deletes threads based on length or number of stitches. Joins threads of a given color. Deletes presently selected pattern from the document and moves it to the clipboard. Copies presently selected pattern from the document to the clipboard. Pastes a pattern from the clipboard into the document. All objects (threads) available for editing. Makes next (thread) object available for editing. Makes previous (thread) object available for editing. View menu commands The View menu offers the following commands: Jumps Grid Lines Grid Labels Stitch Points Texture Album Icons Displays Jump-stitch Dialog for adjusting appearance of jump stitches on screen. Shows or hides grid lines useful for positioning pattern. Shows or hides grid labels for the grid lines (only visible when grid lines are displayed). Shows or hides stitch end points. Displays the pattern on screen (and in print) in a textured, 3D appearance. Toggles between the album icon view (checked) and the info-pane view 4 SewWhat Manual Main Toolbar Sew/Show Bar Status Bar Rotation Bar (unchecked, the default). Shows or hides the main toolbar. Shows or hides Sew and Show toolbar. Shows or hides the status bar. Shows or hides the pattern rotation toolbar. Tools menu commands The Tools menu offers the following commands: Batch Convert Create D1 Floppy Sew Lettering Sew & Show Begin batch conversion dialog. Write or modify a Designer 1 floppy diskette or create a D1 Zip file archive. Insert lettering/monograms into an embroidery pattern. Simulates stitches sewn in real time. Center Pattern Fabric Color Zoom In Zoom Out Center pattern in hoop. Display fabric color in hoop. Magnifies pattern on screen. Reduces size of pattern on screen. Options menu commands The Options menu offers the following commands: Album Filter D1 Options File Save Grid Hoop Size Image Units (Length) Select file type(s) to display when Album Icon view is in effect. Select the default floppy drive for writing D1 files and the directory for storing zipped D1 files. Select options to be in effect when saving embroidery files. Select the thickness and color of the grid lines displayed on the screen. Select hoop size and position it on the screen. Set quality settings for JPEG images saved from SewWhat!. Set measurement units (metric or American) for displaying lengths in SewWhat! Window menu commands The Window menu offers the following commands, which enable you to arrange multiple views of multiple documents in the application window: New Window Cascade Tile Window 1, 2, ... Creates a new window that views the same document. Arranges windows in an overlapped fashion. Arranges windows in non-overlapped tiles. Goes to specified window. 5 SewWhat Manual Help menu commands The Help menu offers the following commands, which provide you assistance with SewWhat: Tip of the Day Help Topics Displays a useful suggestion for using SewWhat. Offers you an index to topics on which you can get help. AutoUpdate Toggles on/off the auto-update feature in SewWhat. About SewWhat Displays the version number of this application, as well as helpful Web addresses related to the development of this software. Change (History) Log 6 SewWhat Manual File Commands New Use this command to create a new document (which will be saved as a sewing pattern file) in SewWhat. You can open an existing document with the Open command . Shortcuts Toolbar: Keys: CTRL+N Open Use this command to open an existing pattern file in a new window. You can open multiple documents at once. Use the Window menu to switch among the multiple open documents. See Window 1, 2, ... command. When you use this command, SewWhat displays the File Open dialog box so you can select the pattern file(s) to open. Alternatively, you can open an existing document by selecting it from the most recently used (MRU) file list in the File menu, if it was recently opened. You can create new blank documents with the New command. Shortcuts Toolbar: Keys: CTRL+O Merge Use this command to merge a pattern from an existing (but unopened) embroidery file with the presently active pattern. This appends the new pattern to the end of the design in the active window. Use paste to copy a pattern from already opened file into the present pattern. Shortcuts Keys: CTRL+M Close Use this command to close all windows containing the active document. SewWhat suggests that you save changes to your document before you close it. If you close a document without saving, you lose all changes made since the last time you saved it. Before closing an untitled document, SewWhat displays the Save As dialog box and suggests that you name and save the document. 7 SewWhat Manual You can also close a document by using the Close icon on the document's window, as shown below: Save Use this command to save the active document to its current name and directory. When you save a document for the first time, SewWhat displays the Save As dialog box so you can name your document. If you want to change the name and directory of an existing document before you save it, choose the Save As command . Shortcuts Toolbar: Keys: CTRL+S Save As Use this command to save and name the active document. SewWhat displays the Save As dialog box so you can name your document. To save a document with its existing name and directory, use the Save command. Email Use this command to send the active pattern to someone via Email. Shortcuts Toolbar: Print Use this command to print a SewWhat! document. This command presents a Print dialog box, where you may specify the range of pages to be printed, the number of copies, the destination printer, and other printer setup options. When the Info Pane is selected in the View menu, then the pattern displayed in the workspace, together with the information summary, will be printed. When the Album (or Icon) view is selected (by unchecking Info Pane on the view menu), an album of all the embroidery files in the present directory will be printed. 8 SewWhat Manual Shortcuts Toolbar: Keys: CTRL+P Print Preview Use this command to display the active document as it would appear when printed. When you choose this command, the main window will be replaced with a print preview window in which one or two pages will be displayed in their printed format. The print preview toolbar offers you options to view either one or two pages at a time; move back and forth through the document; zoom in and out of pages; and initiate a print job. Printer Setup Use this command to select a printer and a printer connection. This command presents a Print Setup dialog box, where you specify the printer and its connection. Page Setup The following options allow you to select the page properties that will effect how the SewWhat! screen will be printed. Edit View Album Click this button to edit the Album Layout items. Here, you can enter the number of columns and rows for displaying the album icons. The page preview shows how the margin and column/row selections will affect the printed document. Also, check the box beside "Include Zip Files" if you wish to view embroidery files in the present directory that are in Zip archive files. This option will slow down the printing (and display) of the icon view if there are many archived files. Design Click this button to edit the Design Layout items. You can choose to combine the design and thread information on a single page, or to print them separately. If a pattern is too large to fit onto a single page, then choosing the "separate" option will allow the design to be automatically split over several pages. Paper Size Select the size of paper that the document is to be printed on. Paper Source Some printers offer multiple trays for different paper sources. Specify the tray here. Orientation Choose Portrait or Landscape. Margins Enter the page margins here. 9 SewWhat Manual Printer Displays a dialog box for selecting the printer you want to use. Choose the Default Printer, or choose the Name option and select one of the currently installed printers shown in the box. You install printers and configure ports using the Windows Control Panel. Choose the Properties option to further refine the printer properties. Exit Use this command to end your SewWhat session. You can also use the Close command on the application Control menu. SewWhat prompts you to save documents with unsaved changes. Shortcuts Mouse: Keys: Click the application's Exit (close) menu button. ALT+F4 10 SewWhat Manual Edit Commands Undo Use this command to reverse the last editing action, if possible.The Undo command is dimmed on the menu if there are no actions to reverse. In SewWhat!, the following operations may be undone: Undo Operation Merge Delete pattern or object Color change Move, scaled rotate Effect of Undo pattern deleted pattern or object restored thread color restored position, size, orientation pattern or object restored Shortcuts Toolbar: Keys: CTRL+Z Delete Threads Choose this option from the Edit menu to popup a dialog for deleting threads from your design. Threads may be deleted either based on the number of stitches and/or the length of thread in a particular color. Join Threads Choose this option from the Edit menu to popup a dialog for joining threads of the same color in your design. Threads may be joined either based on being adjacent or by specifying their number on the thread tool bar. 11 SewWhat Manual Cut Use this command to remove the currently selected pattern from the document and put it on the clipboard. This command is unavailable if there is no data currently selected. Cutting data to the clipboard replaces the contents previously stored there. Shortcuts Toolbar: Keys: CTRL+X Copy Use this command to copy the selected pattern onto the clipboard. This command is unavailable if there is no pattern selected. Copying data to the clipboard replaces the contents previously stored there. Shortcuts Toolbar: Keys: CTRL+C Paste Use this command to insert a copy of the pattern in the clipboard at the insertion point. This command is unavailable if the clipboard is empty. A bitmap of the pattern is also stored in the clipboard, allowing you to paste the clipboard contents into other standard applications, such as a word processor. Shortcuts Toolbar: 12 SewWhat Manual Keys: CTRL+V All Objects This is activated by default. Threads (objects) are grouped into patterns. By left-clicking with the mouse anywhere within a pattern, the entire pattern can be edited (deleted, resized, moved, reflected, scaled). In contrast, by selecting the next object (or previous object) button or menu item, individual thread objects can be edited. Shortcuts Toolbar: Keys: CTRL+A Next Object When this button is activated, the user can select an individual thread object for customized editing. This is useful, for example, if only certain (but not all) thread colors require removal or resizing. Pressing this button scrolls through all the thread colors in increasing order of appearance on the thread selection bar. Shortcuts Toolbar: Keys: CTRL+N Previous Object See the description of the next object option. In contrast to the next object button, pressing this button scrolls through the thread colors backwards. Shortcuts Toolbar: Keys: CTRL+R 13 SewWhat Manual View Commands Jumps This menu launches a dialog box which allows the user to choose the manner in which jump stitches (needle-up) are viewed on screen. The default is for these stitches to be hidden, but the user can override this behavior and show the jumps as dashes or thick lines to distinguish them from the ordinary (needle-down) stitches. Grid Lines Grid lines can be shown (or hidden) to help place a pattern accurately within the hoop. Use the grid options dialog to set the spacing of the grid lines (in units of mm or inches). Grid Labels This View menu item is used to display (checked) or hide (unchecked) labels for the grid lines. Stitch Points This View menu item displays (checked) or hides (unchecked) the end points for each stitch. This is useful for locating a particular stitch in the pattern. You may have to resize the pattern (magnify the on screen display) to see the stitch points. Texture This View menu item can be selected to display the stitched pattern on screen (and in print mode) in a textured (sometimes called "3D") appearance. Album Icons This View menu item toggles the information pane, which shows pattern information for the presently active pattern (information pane), and the icon (or album) view, which displays thumbnails of the embroidery files in the present directory. (The present directory is the one in which the last file was opened by SewWhat!) The album (icon) view is useful for a number of purposes: 1. 2. it gives an iconic display of the embroidery files in the present directory it provides a graphical (point and click) method to merge existing embroidery files with the present pattern. By first selecting a New file from the File menu, the icon of the pattern file can be loaded into a new SewWhat! window. The choice of Info Pane or Album (Icon) view also determines what will be printed. The number of 14 SewWhat Manual rows and columns that will be printed can be set in the Page Setup dialog. There, it is also possible to choose whether or not to display embroidery files that are stored in Zip-archived files. Shortcuts Toolbar: Main Toolbar Use this command to display and hide the main Toolbar, which includes buttons for some of the most common commands in SewWhat!, such as File Open. A check mark appears next to the menu item when the Toolbar is displayed. Sew/Show Bar Use this command to display and hide the Sew and Show toolbar, which includes buttons for controlling the stitching feature of SewWhat. A check mark appears next to the menu item when the Toolbar is displayed. Status Bar Use this command to display and hide the Status Bar, which describes the action to be executed by the selected menu item or depressed toolbar button, and additional information about the pattern. A check mark appears next to the menu item when the Status Bar is displayed. Rotation Bar This toggles the rotation toolbar between visible (hidden) states. 15 SewWhat Manual Tools Commands Batch Conversion The batch conversion utility allows the user to convert multiple embroidery files of possibly different types to another embroidery file type. Launching the batch utility initiates a sequence of dialogs that collect the various files to be converted, determine where the converted files should be stored, and choose what the converted file type should be. Options include (1) automatically centering converted patterns; (2) overwriting existing files of the same name; and (3) preserving (in the batch directory) the directory tree structure of the original files. The Batch pane in the status bar is enabled when batch conversion is in progress. A progress bar shows the completion status of the submitted job. Note that batch conversion runs as a background job, so the user may continue editing or viewing patterns even while conversion is in progress. Detailed instructions for using this utility follow. Open the batch converter and use the Windows Explorer© dialog to select files - or directories of files – that you want to convert. Hold down the Shift (or Control) key to select multiple contiguous (or separate) files. Drag the files – by holding down the left mouse button while you move the mouse cursor over the list box - into the File Conversion list box and drop them there (by releasing the mouse button). You may select Zip file archives containing embroidery files, as well. When you are finished selecting the embroidery files for conversion, press the "Next" button to reveal the batch conversion dialog. On the first line, you may enter the path of the directory where the converted files will be placed. If you want to choose an existing directory, click the "Browse" button to see a directory tree to choose from. When choosing a conversion directory, you may also check the button "Preserve directory tree", which will store the converted files in the conversion folder with a tree structure similar to the source tree. Alternatively, you may choose the option "Store files in source directory". With this option selected, the converted files will be stored in the same directory (or directories) as the original files. Next, select the file filter type (that is, the type of embroidery file) that the selected files should be converted to by scrolling through the combo box. Finally, select the remaining conversion options by checking the appropriate boxes, and press the “Convert” button to start the batch conversion process. The conversion occurs in the background, so if you have a lot of files to convert, you can continue other editing tasks with SewWhat! in the meantime. When the conversion of the selected files is finished, a batch log file will appear, showing some details of the files that were converted. If you want to save this file, go to the "File, Save As" menu button of Notepad © and enter a new name for the batch log file (the original batch log file will be automatically deleted, in order to preserve disk space). Shortcuts Toolbar: Keys: CTRL+B Create D1 Floppy This Tools menu item allows you to copy Designer 1 (D1) embroidery stitch files (files with the extension .shv) to a floppy diskette, for use with the Husqvarna-Viking Designer 1 © embroidery 16 SewWhat Manual machine. The files can also be compressed to a Zip archive file (*.zip format) for subsequent redistribution (by email, for example) or decompression. You may enter an informative name for this set of files in the "Disk Project Title" edit box. This name will be used to uniquely label the Zip archive file and the D1 diskette. Existing D1 floppy disks can be modified by adding (or deleting) files to the various menu lists, as described below. Also, you can choose to view icons of the files in the menu lists (or hide them) by clicking the "Show Icons"/"Hide Icons" button. The first time this utility is used, a dialog will automatically appear for choosing the default D1 floppy drive location and Zip-archive directory (where the zip files will be stored on the hard drive). You may change these default settings at any time from the D1 Options item on the Options menu item. If you insert a floppy diskette that already contains D1 files and menus, SewWhat! will automatically read it and the existing D1files will appear in their proper menu lists in the D1 disk creation dialog. Any files which are not D1-compatible files will be automatically erased from the diskette prior to writing the new D1floppy information. It is therefore not necessary to use a clean diskette. Note that any files on the diskette that are NOT D1 (*.shv) files will be erased. The first step in the creation of the D1 Floppy (or Zip archive) is to copy existing D1 embroidery files to the menu folders in this dialog. (The embroidery files must be converted to (.shv) file format prior to using this utility.) Click the "Browse" button on the right of the D1 dialog. This will open an Explorer-style window for locating the D1 files to be included in the project and eventually either written to a floppy diskette or Zip archive file. (Alternatively, the standard Windows Explorer window can be opened for file selection. However, the advantage of using the Browse-button Explorer is that only D1 embroidery files will be displayed.) Use the mouse (or arrow keys) to select files in the Explorer window. Hold down the Shift key to select multiple contiguous files (or Ctrl key to select multiple separate files). The selected files can be dragged and dropped into one (or several) of the four menu folders in the dialog. To delete files from the lists, select them with the mouse and press the "Delete" key. It is important to note that the process of copying files to the D1 menu folders does not move the original files on your hard drive or CD. After filling the menu(s) with the desired embroidery files, click the "Accept" button on the Explorer dialog. Then click one of the buttons "Write Floppy" or "Write Zip". This will write the files, together with all the required D1 menu files, to either a floppy disk or a Zip archive file, respectively. At this point, if the floppy disk is not empty and it is not already an existing D1compatible disk, a message will appear to inform you that all files on the floppy will be deleted if you continue. (Remember that if you write to a zip archive file, the name of the file will be taken from the Project Title and the file will be stored in the default Zip-file directory you chose earlier. Note: you must decompress any D1 Zip archive files to a fresh floppy diskette, in order to use that disk in the Designer 1 machine. Simply copying the zip archive files to a floppy disk will not work!) The D1-compatible diskettes or Zip archive files created by SewWhat! may be freely distributed, subject to any license restrictions associated with the original pattern files. This explicit license accompanies all D1 diskettes or Zip files created with the SewWhat! utility. Shortcuts Toolbar: Sew Lettering This Tools menu item allows you to add lettering and monogramming (or more generally, any alphabetical or "dingbat" icon) to an embroidery pattern. 17 SewWhat Manual The "Add Lettering to Pattern" dialog allows you to (1) choose the font and size of the lettering to be stitched into the pattern; (2) enter the text to be stitched; and (3) select the type of outline stitching (either running, zig-zag satin, or applique) or fill stitch. In addition, there are buttons to Save and Retrieve settings for future use. Click the Font and Size button to display the standard Windows Font Selection dialog. Font sizes are indicated in points. One point is 1/72 inch (3 points are approximately 1 mm). You can select the font size by clicking on the font size selection (combo) box, or by typing the size (in points) in the font-size edit box. The font family (face name) can be chosen from the font selection (combo) box. Any True Type font can be used. Note in addition to standard alphabetical characters, various iconic symbols (boxes or dingbats) can also be displayed. For example, the font Holidays MT in lower case has many interesting icons representing various holidays. The color of the font will determine the thread color used and may also be selected. Choose OK to accept your selections. The font and size will appear in the text box next to the Font and Size button. Note that the text size refers to the font height (in mm) and text-string width (in mm). These dimensions are indicated below for the text string "Tiger" written in a 72-pt (~24 mm) font size. The light gray grid is the SewWhat! grid which has a spacing of 10 mm. The horizontal extent of the string is 47 mm. The indicated string height of 25 mm is not just the distance from the top of the "T" to the bottom of the "g", but also includes some blank space (so-called internal leading) above the "T", which can be used for accent marks. Next, the type of stitch used to outline the selected font should be chosen. There are three stitch types available for outlining, and two types of fill stitches. For outlining, a straight (running) stitch, a zigzag (satin) stitch, or appliqué stitch may be used. You may set the length of a running stitch (in 0.1mm units) with the associated up/down arrows. For satin outline stitches, both the length and height of the stitch may be set. To keep a fixed stitch density, you should change these dimensions proportionately with the size of the font. Note that if you resize the text after it has been converted to stitches, the stitch density will change in proportion to the amount of resizing. The appliqué stitch is a combination of a running stitch to outline the fabric and a satin (or blanket) stitch to trim the border. To apply the appliqué, follow these steps: 1. Position the appliqué fabric on the (hooped) base fabric. 2. Baste the appliqué fabric to the base fabric. 3. Stitch color 1, the outline of the letter, to hold the fabric in place along its border. 4. Remove hoop from machine without moving the embroidery arm or unhooping. 5. Cut out the appliqué around the stitching line. Cut just outside of, and as close as possible to, the stitching line. 6. Reinsert the hoop onto machine (without moving the embroidery arm) and stitch color 2, 18 SewWhat Manual the satin stitch outline. Either the fil(area)l or satin(column) stitch option will produce a solid filled pattern (rather than an outline). Checking one of the border option boxes will outline the filled pattern with either a straight or satin stitch. The stitch-separation spin control can be used to adjust the fill stitch density from highest (smallest separation, produces a stitch-out with the most stitches) to lowest. Finally, the angle spin control allows you to choose the angle – with respect to the vertical – at which the stitches will be sewn. It is recommended – especially for wider letters and large fonts – that the underlay stitches box be checked. Underlay consists of sparse satin stitches which are added to the pattern underneath the final fill stitches, to ensure good registration (alignment) of the final stitches by preventing bunching or pulling of the fabric. The monogramming options apply to any of the various stitch types and can be chosen by clicking on the appropriate icon. For some of the monogram features, additional adjustment of the letter height and/or the letter position can be done with the two scroll-controls located at the bottom of the monogram panel. For example, to increase (decrease) the size of the one enlarged letter, click the "scale factor" spin-control button up (down). To adjust the vertical position of the enlarged letter, click the "Adjust-position" button. As you type text into the edit box at the top of this dialog, it will appear in the preview box at the bottom of the dialog. You may edit this text (backspace to delete letters) in the edit box. Properties of the text pattern that will eventually be stitched - including its size, the total number of normal stitches and jump stitches - are also displayed. By increasing the length (width) of the stitches, you can reduce the total number of stitches, while maintaining a nearly constant thread length. To enter a monogram consisting of variable height letters, you will have to enter each letter separately using this dialog box. Finally, when all text editing is completed, click the "OK" button to sew the text into the pattern file and return to the SewWhat! workspace (if none is presently open, a new file will be opened). Shortcuts Toolbar: Sew and Show The "Sew-and-Show" feature allows the pattern to be viewed on screen as it would appear to be "stitched" in time. This simulates on screen the activity of a real embroidery machine. It is activated either from the main toolbar by pressing the "Sew-and-Show" button, or by selecting the "Sew-and-Show" item on the Tools menu, or by pressing the "Sew" button on the main toolbar . Shortcuts Toolbar: Keys: CTRL+W Center Pattern This toolbar button or tools menu item can be used to center a pattern in the hoop. 19 SewWhat Manual Shortcuts Toolbar: Fabric Color Displays color selection dialog for choosing the "fabric color", which is the background color against which the pattern is shown on the screen. This is helpful for visualizing how a pattern will appear on a given fabric and for selecting appropriate thread colors. You can also press the “Set Default“ button to set the fabric color in this dialog as the default color that will be used for all future patterns. The Fabric Color Palette provides 48 standard colors and permits the addition of another 16 custom colors. Click on the "Define Custom Colors" button to reveal the color picker. Existing custom colors can readily be changed as required. Shortcuts Toolbar: Keys: CTRL+F Zoom In This magnifies the on screen size of the pattern. This might be useful for viewing individual stitches. Note that zooming has no effect on the pattern size (unlike resizing); rather, it only affects the size of the viewed image on screen. Shortcuts Toolbar: Zoom Out This reduces the on screen size of the pattern. This is useful for viewing at once a larger portion of the design. Note that zooming has no effect on the pattern size (unlike resizing); rather, it only affects the size of the viewed image on screen. Shortcuts Toolbar: 20 SewWhat Manual Options Commands Album Filter This Options menu item will display a dialog for selecting the type(s) of embroidery files that will be displayed by SewWhat! when the Album Icon view is visible. The file types – denoted by their particular file extensions – to be displayed can be chosen by clicking their associated checkboxes. For example, to limit the files shown in the album view to types produced for Brother machines, select the check-box labeled Brother. D1 Drives This Options menu item allows you to select various options used when creating Designer (D1) diskettes (floppy disks) or writing D1 Zip archives. A dialog will appear which displays the removable- media drives detected on your system. Click the drive to use for writing the D1 floppy diskettes. You may also choose the directory for storing any Zip archive files (*.zip) that you create using the D1floppy utility. File Save This Options menu item is used to select various options which will be applied when files are saved. These include: Default file–type extension. This is the file extension that will appear when the Open/File Save As menu item is selected. Various options for splitting files (depending on their type), based on maximum allowable colors or stitches. Maximum hoop size. Patterns exceeding this will be automatically resized to fit into the maximum hoop. Grid This Options menu item is used to set the thickness and color of the grid lines displayed on the screen. Hoop Size This displays the dialog for selecting the hoop size and positioning the hoop on the screen. A choice of units - inches or millimeters - is available. Use the vertical (horizontal) spin control to change the vertical (horizontal) position of the hoop on the screen. Select from the available hoops for this pattern type from the drop-down list. You may enter a custom hoop size by typing in the edit box. The selected hoop size can be set to be the default for this pattern type by pressing the "Set Default" button (clear the default hoop size with the "Clear 21 SewWhat Manual Default" button). Shortcuts Toolbar: Keys: CTRL+H Image This Options menu item displays a dialog for setting the quality (from low quality to hi quality) for saving embroidery file images as JPEG files. Units Use this Options menu item to choose either American (inches and yards) or metric (millimeter or meter) units for displaying lengths in SewWhat! 22 SewWhat Manual Windows Commands New Use this command to open a new window with the same contents as the active window. You can open multiple document windows to display different parts or views of a document at the same time. If you change the contents in one window, all other windows containing the same document reflect those changes. When you open a new window, it becomes the active window and is displayed on top of all other open windows. Cascade Use this command to arrange multiple opened windows in an overlapped fashion. Tile Use this command to arrange multiple opened windows in a non-overlapped fashion. 1, 2, ... command SewWhat! displays a list of currently open document windows at the bottom of the Window menu. A check mark appears in front of the document name of the active window. Choose a document from this list to make its window active. 23 SewWhat Manual Help Commands Tip of the Day When SewWhat! initially runs, a brief message appears with a helpful suggestion for using this application. By clicking this menu item, you can view these initial "tip of the day" messages whenever the application is open. You can add your own tips to the "swtips.txt" file and they will appear as additional "Tip of the Day" messages. Help Topics Use this command to display the opening screen of Help. From the opening screen, you can jump to step-by-step instructions for using SewWhat and various types of reference information. Once you open Help, you can click the Contents button whenever you want to return to the opening screen. Auto-Update Use this command to toggle (turn on/off) automatic updating of SewWhat software. When this menu item is checked (unchecked), auto-updating is allowed (prevented). With auto-updating allowed, the S & S website will be checked whenever the application is opened (but not more than once daily) for available updates. If there is an update available, the user will be given the opportunity to install it. The installation will automatically close the SewWhat workspace, remove the older version, install the update, and restart the application. About SewWhat Use this command to display the copyright notice, registration information and version number of your copy of SewWhat! Change (History) Log Use this command to display the history of changes made to SewWhat. 24 SewWhat Manual Sewing Topics Resize Note: It is often helpful to display grid lines before resizing or moving a pattern. To move the pattern within the hoop: 1. Select it by clicking anywhere in the pattern with the left mouse button. A resizing rectangle will appear around the pattern, and the cursor will change to a four-headed arrow. 2. To move the pattern, either hold down the left mouse button and drag it to a new position or use the keypad arrow keys. To resize the pattern: 1. Perform step 1 as above. 2. Position the mouse at one of the resize button of the selection rectangle. The cursor changes to a diagonal two-headed resizing arrow. 3. Move one of the corners (or sides) with the mouse, dragging the pattern in or out to its final desired size. Use the corners to preserve the pattern aspect ratio (relative height to width ratio). Use the side buttons to stretch or shrink the pattern either horizontally or vertically. Observations: 1. Both these operations affect the size and position of the pattern as it is stitched out. This is in contrast to the zooming operations , which simply change the apparent size of the pattern on the screen without affecting the real stitch-out. 2. Resizing a design in SewWhat! does not preserve the stitch density of the design. Therefore resizing a design more than 10 - 15% may not produce satisfactory sewn results (unless a lighter or heavier embroidery thread is used to compensate). Ideally, resizing should maintain the stitch density by adding (or subtracting) stitches. Rotate You can use the freehand rotation knob to rotate the selected pattern. Alternatively, use the rotation toolbar to rotate (counter-clockwise) the selected pattern by 90, 10, or 1 degree increments. Reflect On the rotation toolbar, press the reflect radio button to reflect the pattern left to right. To reflect the pattern up-down, first rotate the pattern by 90 degrees. 25 SewWhat Manual Dialogs File Open The following options allow you to specify which file to open: File Name Type or select the name of the embroidery file you want to open. This box lists files with the extension you select in the List Files of Type box. Embroidery files that have been “zipped” into an archive (*.zip file) will appear in their uncompressed format. List Files of Type Select the type of file you want to open, depending on the file extension, as described below: Extension .10o .art .csd .dst,dsb,dsz .emd .exp .hus .jef .ksm .pcd .pcq .pcs .pcm .pes, .pec .phb, .phc .sew .shv .sst .stx .tap .u?? .vip .vp3 .xxx .zsk .zip Manufacturer Toyota Bernina Artista Poem, Singer Tajima Elna Melco (DOS-Expanded) Husqvarna Janome, New Home, Memory Craft Pfaff Professional Pfaff 9mm stitches (Prodigy) Pfaff 6mm MAXI stitches Pfaff Home Pfaff on Macintosh Brother, Baby Lock, Bernina Deco Brother Kenmore, Elna, Janome Viking Designer 1 Sunstar Datastitch Happy Barudan (?? is a number) Husqvarna/New Pfaff Viking Designer SE Singer, Compucon ZSK Zip Archive Choosing a zip archive file that contains one of the preceding sewing pattern files will automatically extract that file to your hard disk when you click the "open" button. Once a file is selected, a preview of its contents is shown in the dialog box. Drives Select the drive in which SewWhat stores the file that you want to open. Directories Select the directory in which SewWhat stores the file that you want to open. 26 SewWhat Manual File Save As The following options allow you to specify the name and location of the file you're about to save: File Name Type a new filename to save a document with a different name. SewWhat adds the extension you specify in the Save File As Type box. Drives Select the drive in which you want to store the document. Directories Select the directory in which you want to store the document. Print The following options allow you to specify how the document should be printed: Printer This is the active printer and printer connection. Choose the Setup option to change the printer and printer connection. Setup Displays a Print Setup dialog box, so you can select a printer and printer connection. Print Range Specify the pages you want to print: All Prints the entire document. Selection Prints the currently selected text. Pages Prints the range of pages you specify in the From and To boxes. Copies Specify the number of copies you want to print for the above page range. Collate Copies Prints copies in page number order, instead of separated multiple copies of each page. Print Quality Select the quality of the printing. Generally, lower quality printing takes less time to produce. Printer Setup The following options allow you to select the destination printer and its connection. Printer Select the printer you want to use. Choose the Default Printer, or choose the Specific Printer option and select one of the current installed printers shown in the box. You install printers and configure ports using the Windows Control Panel. Orientation Choose Portrait or Landscape. Paper Size Select the size of paper that the document is to be printed on. Paper Source Some printers offer multiple trays for different paper sources. Specify the tray here. Options Displays a dialog box where you can make additional choices about printing, specific to the 27 SewWhat Manual type of printer you have selected. Network... Choose this button to connect to a network location, assigning it a new drive letter. Thread Color The thread color dialog box is shown below. It is shown whenever a color button on the thread color toolbar is clicked. Click on one of the "palette" colors in this dialog to select a new thread color to be used for the selected group of stitches. The palette of colors shown is associated with the type of embroidery file being edited. There are different palettes for PES, JEF, and HUS/SHV files. Some other file types allow you to "mix" custom colors, or to choose colors from a Brother-style palette. To mix a custom color, click the "Custom Color" button. This will initiate a dialog for choosing a color with arbitrary values of Red/Green/Blue pigments or Hue/Saturation/Luminance. Note: the custom color option will only be shown for those types of embroidery files that support it (ART, EMB, CSD, PCS, VIP, VP3, XXX). Finally, the recommended Sulky© or Madeira© thread ID is also displayed to help in selecting a thread that closely matches the displayed color. 28 SewWhat Manual Toolbars Main Toolbar The main toolbar is displayed across the top of the application window, below the menu bar. The toolbar provides quick mouse access to many tools used in SewWhat! To hide or display the main toolbar, choose Toolbar from the View menu (ALT, V, T). Click To Open a new document. Open an existing document. SewWhat displays the Open dialog box, in which you can locate and open the desired file. Save the active document or template with its current name. If you have not named the document, SewWhat displays the Save As dialog box. Email the active pattern. Remove selected pattern from the document and stores it on the clipboard. Copy the selected pattern to the clipboard. Insert the pattern stored in the clipboard into the active window. Undo the last editing operation. Print the active document. Perform batch conversion of multiple embroidery files. Toggle between icon and information view. Add Lettering/monogramming to pattern. Write files to a D1 readable floppy disk. Renders the stitches as they would be sewn (in time) to simulate embroidering on a machine. 29 SewWhat Manual Select hoop size to fit pattern. Select fabric color. Select ALL embroidery (thread) objects in workspace. Select NEXT embroidery (thread) object in workspace. Select PREVIOUS embroidery (thread) object in workspace. Center pattern in hoop. Enlarges view on screen (zoom-in) without changing pattern dimensions. Decreases screen size (zoom-out) without changing pattern dimensions. Status Bar The status bar is displayed at the bottom of the SewWhat window. To display or hide the status bar, use the Status Bar command in the View menu. The left area of the status bar describes actions of menu items as you use the arrow keys to navigate through menus. This area similarly shows messages that describe the actions of toolbar buttons as you depress them, before releasing them. If after viewing the description of the toolbar button command you wish not to execute the command, then release the mouse button while the pointer is off the toolbar button. Furthermore, when moving the mouse over the thread toolbar, the color number of the thread is displayed here. The right part of the status bar indicate information about the pattern status: Indicator Description BATCH Shows status of batch job running in background. LOCATION X and Y position, in mm, of the top left corner of the pattern, relative to the top left of the hoop (at X=0, Y=0) ROTATION The rotation angle, in degrees, of the pattern, measured counter-clockwise from its initial angle (0 degrees). STITCHES The number of stitches in the selected pattern. Sew-and-Show 30 SewWhat Manual The Sew and Show floating dialog bar allows the user to control certain properties of the realtime pattern stitching feature. User-selectable properties include (1) the stitch rate (stitches per second), which may be adjusted to speed-up or slow-down the on screen rendering of the pattern (note: this can be changed even while the pattern is stitching); (2) pattern stop, which terminates the sew-and-show rendering; (3) pattern pause, to temporarily suspend the rendering until the sew button is pressed to restart the stitching; and (4) pattern options, which include auto-pausing (or continuous rendering) after each thread color change. Finally, there is a color-box to indicate the color of the thread being presently stitched. Title Bar The title bar is located along the top of a window. It contains the name of the working embroidery "document" as well as the number of stitches and patern size. To move the window, drag the title bar. Note: You can also move dialog boxes by dragging their title bars. A title bar may contain the following elements: Application Control-menu button Document Control-menu button Maximize button Minimize button Name of the application Name of the document Restore button Scroll Bars These are displayed at the right and bottom edges of the document window. The scroll boxes inside the scroll bars indicate your vertical and horizontal location in the document. You can use the mouse to scroll to other parts of the pattern. Print Preview The print preview toolbar offers you the following options: Print 31 SewWhat Manual Bring up the print dialog box, to start a print job. Next Page Preview the next printed page. Prev Page Preview the previous printed page. One Page / Two Page Preview one or two printed pages at a time. Zoom In Take a closer look at the printed page. Zoom Out Take a larger look at the printed page. Close Return from print preview to the editing window. Rotation This toolbar allows the user to select the angle increments by which the selected pattern will be rotated in a counter-clockwise direction, or to reflect the pattern about the vertical axis (Reflect L/R) or the horizontal axis (Reflect T/B). Thread Color The floating thread color toolbar is used to display a list of the thread colors (in order of appearance) in the current pattern. (A slider bar will appear if more colors exist than can be displayed in this bar. The user may then move the slider to display selected portions of the color list.) By clicking with the left mouse button on a colored button on this toolbar, the thread color dialog box will appear. After choosing a new color from this dialog, the thread color will be changed on screen. The new color will be permanently stored only when the pattern is saved. 32 SewWhat Manual Miscellaneous Context Help Use the Context Help command to obtain help on some portion of SewWhat!. When you choose the Toolbar's Context Help button, the mouse pointer will change to an arrow and question mark. Then click somewhere in the SewWhat! window, such as another Toolbar button. The Help topic will be shown for the item you clicked. Shortcut Toolbar: Keys: SHIFT+F1 Purchase SewWhat You may run the installer for SewWhat from the S & S website: http://sandscomputing.com Just click the SewWhat link at the top of the main page, and then scroll down to the "Download Links" table. On the left are links for the 32 and 64-bit installers. Run the one appropriate for the Operating System on your computer. There is a 30 day DEMO period during which you may run the software (with only a restriction on the number of file saves during that time). After that, you can either uninstall the software or purchase from the "Add-to-Cart" button to the right of the download links on the SewWhat web page. After you purchase the license, the registration information will be emailed to you and you can register the DEMO to make it a licensed copy. Note: you DO NOT have to uninstall the DEMO if you want to keep the software, but only register it after purchasing the license. 33