1
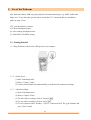
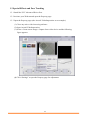
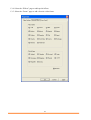
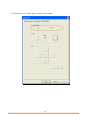
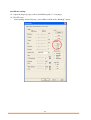
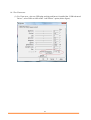
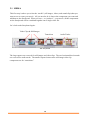
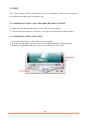
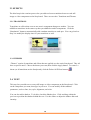
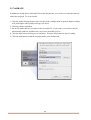
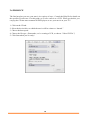
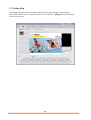
User’s Manual
UVC 2MP Webcam
Table of Contents
1. Use of the Webcam............................................................... 2
1.1 Getting Started............................................................. 2
1.2 Install UVC Advanced Driver ..................................... 3
1.3 Special Effects and Face Tracking............................... 4
1.4 Anti-Flicker Setting ...................................................... 7
1.5 Auxiliary LED Setting (Optional Function) ............... 11
1.6 Focus Adjusting (Optional Function) ........................ 12
2. Getting Started With VideoImpression.............................. 13
3. Getting Started With PhotoImpression ............................. 20
4. Getting Started with MSN® Messenger ............................ 22
5. Minimum System Requirements........................................ 22
1
1. Use of the Webcam
This Webcam features USB easy plug-and-play for Instant Messenger (e.g. MSN, Yahoo and
Skype etc). To use the other special effects, install the UVC Advanced Driver (installation
guide on page 3) first.
UVC Advanced Driver features:
(1) Effects and digital frames
(2) Face tracking and digital zoom
(3) Anti-flicker (50/60Hz) setting
1.1 Getting Started
1.1.1 Plug Webcam’s cable to the USB port on your computer.
1.1.2 Set the Focus
(1) Start VideoImpression.
(2) Select “Capture Video”
(3) Camera would adjust lens automatically to reach the best sharpness of image.
1.1.3 Video Recording:
(1) Start VideoImpression.
(2) Select “Capture Video”
(3) To start video recording, click on “Record
”.
(4) To stop video recording, click on “Stop
”.
(5) To save captured video, Produce → Drive → Microsoft AVI file, type filename and
press ”Start” button
2
1.2 Install UVC Advanced Driver
(1) Insert the CD into your CD-ROM drive; the installer screen will automatically come up.
(2) Click the “Install UVC Advanced Driver” button to start installation.
(3) Plug Webcam’s cable to the USB port on your computer.
Note:
If the installer screen does not come up automatically, click Start, then
run and execute the file “launch.exe” on the CD to start the installer
program.
3
1.3 Special Effects and Face Tracking
1.3.1 Install the UVC Advanced Driver first.
1.3.2 Activate your Webcam and open the Property page.
1.3.3 Open the Property page (take Arcsoft VideoImpression as an example):
(1) Close any active video browsing software
(2) Open Arcsoft VideoImpression
(3) Select->Create a new image->Capture from video device and the following
figure appears:
(4) Click “Settings” to open the Property page for adjustment.
4
1.3.4 Select the “Effects” page to add special effects.
1.3.5 Select the “Frame” page to add a favorite video frame.
5
1.3.6 Select the “Face Track” page to enable face tracking.
6
1.4 Anti-Flicker Setting
When the flickers, the rolling horizontal (vertical) bands, appear on the screen, change the power
frequency setting.
Note:
(1) Anti-flicker setting can not be adjusted under Windows XP. Install the
UVC Advanced Driver and follow the steps below if there are flickers
on the screen.
(2) Set 50Hz or 60Hz according to your region.
50Hz : Europe, Australia, Africa, Asia, China and Japan(East).
60Hz: America, Taiwan, Korea and Japan (West).
7
Anti-Flicker setting:
1.4.1 Open the Property page (refer to installation guide 1.3.3 on page):
1.4.2 For XP users:
After opening Stream Property, select 50Hz or 60Hz in the “Banding” option.
8
1.4.3 For Vista users:
(1) For Vista users , who use USB plug and play and haven’t installed the “USB Advanced
Driver”, select 50Hz or 60Hz in the “Anti Flicker” option (below figure).
9
(2) For Vista users, who have installed the “USB Advanced Driver”. After opening Stream
Property, select 50Hz or 60Hz in the “Banding” option (below figure).
10
1.5 Auxiliary LED Setting (Optional Function)
This camera is equiped with auxiliary LED which can be controlled by firmware automatically
according to environment lighting condition or be controlled manually by end-user during video
preview.
Note: This function is only supported by the certain device, which has a built-in auxilary LED.
There're 3 options
"AUTO": Auxiliary LED turn on & off automatically.
"ON": Auxiliary LED always turn on
"OFF": Auxiliary LED always turn off
11
1.6 Focus Adjusting (Optional Function)
Auto focus is a key function of “Auto–Focus Series Webcam.” Camera would adjust
lens automatically to reach the best sharpness of image.
You could also adjust the focus manually via unchecking the “auto-focus enable”
checkbox and towing “manual focus” scroll bar to reach the best focusing point.
12
2. Getting Started With VideoImpression
When you first run the program, a window will appear that lets you choose the type of project
you want to make (you can also open previously saved projects). Choose “Create a New
Video.” A new window will appear. It will contain multiple options for gathering your video
content.
For this walk-though, choose “Get From Album.” Even if you choose one of the other options,
you’ll end up at your albums soon or later. Albums contain shortcuts to files stored on your
system. You’ll grab most of your “media” for movie construction from your albums.
13
2.1 MEDIA
This first step is where you select the “media” (still images, videos, and sound clips) that you
want to use to create your movie. All you need to do is choose the components you want and
add them to the Storyboard. When you save—or “produce”—your movie, all the components
on the Storyboard will be combined together into a single video file.
Let’s look at the Storyboard again:
Video Clips & Still Images
Transitions
Audio Tracks
The Storyboard
The large squares are reserved for still images and video clips. The two horizontal bars beneath
are reserved for audio tracks. The smaller squares between the still image/video clip
components are for “transitions.”
14
2.2 EDIT
You’re now ready to touch up and modify your movie components. Different editing options
are available depending on the component type.
2.2.1 MODIFYING IMAGE AND VIDEO BRIGHTNESS/CONTRAST
1. Single-click the desired still image or video clip on the Storyboard.
2. Click and drag the sliders to your liking. You can preview the effect within the Player.
2.2.2 TRIMMING VIDEOS AND AUDIO
1. Select the desired video or audio clip on the Storyboard.
2. Drag the Starting Mark to the spot where you would like the clip to begin playback.
3. Drag the Ending Mark to the spot where you would like the clip to end.
15
2.3 EFFECTS
The third step in the creation process lets you add cool scene transitions between each still
image or video component on the Storyboard. There are two tabs: Transitions and Themes.
2.3.1 TRANSITIONS
Transitions are effects that occur as one movie component changes to another. You can
add/delete transitions in the same way that you add/delete media components. Click the
“Randomize” button to automatically add a random transition to each spot. You can go back to
Step 2 to modify the display time for your transitions as well.
2.3.2 THEMES
“Themes” consist of transitions and effects that are applied over the entire Storyboard. They all
have a specific motif. Choose the theme you want, then click the Apply button. To remove a
theme (or all transitions on the Storyboard), click the Delete All Effects button (
).
2.4 TEXT
This step lets you add text over any still image or video component on the Storyboard. Click
on the component you want, then type in your text. You can modify all the standard
parameters, such as font, size, style, alignment, and color.
You can also add a shadow. To do this, check the Shadow box. Click and drag within the
preview to position the shadow behind the text. Use the sliders to adjust the shadow blur and
intensity.
16
2.5 NARRATE
In addition to being able to add audio files to the Storyboard, you can also record audio directly
within the program. To record audio:
1. Click the Audio Settings button and verify the audio configuration (in general, higher settings
will yield higher audio quality but larger file sizes).
2. Click the red Record button.
3. Set the file name and save location for the recorded file. If you want, you can have the file
automatically added to an album for easy access in another project.
4. Click the Start button and begin your narration. Press the Stop button to stop recording.
5. Click the Add button to add the recorded audio to the Storyboard.
17
2.6 PRODUCE
The final step lets you save your movie in a variety of ways. Consult the Help file for details on
the specifics of each case. For this guide, we’ll save a movie as a VCD. When you do this, you
can pop the CD into most commercial DVD players to see your movie on your TV!
1. Click on the CD tab.
2. Select the device/drive to which the movie will be written or “burned.”
3. Choose the burn speed.
4. Choose the file type. (Remember, we’re creating a VCD, so choose “Video CD File.”)
5. Click Start when you’re ready!
18
2.7 Getting Help
VideoImpression provide an extensive online help. If you need more information or
instructions on how to use a specific feature or tool, click the [Help] button on the upper
corner of the screen.
19
3. Getting Started With PhotoImpression
3.1.1 Connect your camera and your PC with the supplied USB cable.
3.1.2 Click StartÆ Select ProgramsÆ PhotoImpression
3.1.3 PhotoImpression main Screen will appear on your desktop.
3.2 Viewing Camera Images through PhotoImpression
3.2.1 To capture a video from the camera to the PhotoImpression main screen .
] button.
3.2.2 Click the [Digital Camera/Scanner
3.2.3 Click the [USB2.0 2MP UVC Camera
20
] button.
3.3 PHOTO VIEW OPTIONS
When viewing a single photo, use the set of tools along the top of the screen to zoom
in/out, skip to other photos stored in the same location, and rotate the current picture left
or right.
3.4 ENHANCING PHOTOS
When you’re ready to edit a photo, bring it up on the screen and then proceed to the
Enhance module. From there, you can perform various types of modifications.
3.5 Getting Help
PhotoImpression provide an extensive online help. If you need more information or
instructions on how to use a specific feature or tool, click the [Help] button on the upper
corner of the screen.
21
4. Getting Started with MSN® Messenger
4.1 Plug the PC camera into your PC first.
4.2 Click the “Messenger”
4.3 Click the Webcam icon
to go to the main screen
during a conversation.
–or–
Click the Actions menu on the main window, click Start a Webcam Conversation, select
the name of the person you want to send video to, and then click OK.
For a 2-way webcam conversation, both participants must have a Web camera and each
person must invite the other.
4.4 To stop sending your video image during a conversation, click the arrow under your video
window, and then click Pause Webcam or Stop Webcam. You can continue to receive the
other person's image, but your image will freeze in your contact's conversation window.
5. Minimum System Requirements
z
Windows XP (Service Pack 2) / VISTA
z
Pentium III 800MHz or higher processor
z
Available USB port & CD-ROM Drive
z
256MB RAM or higher
z
Hard drive with 1GB free space
z
16-bit Color Display
22