1
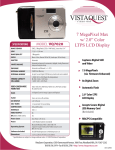
]
User's Manual
020606
Contents
1. Package Includes
Page
--------------------------------------------------------
2. System Requirements
1
--------------------------------------------------
1
-----------------------------------------------------------
2
4. Adjusting Camera Lens Position -----------------------------------------
2
5. Installing Driver and Software
3
3. Names of Parts
--------------------------------------------------------------------
4
7. Setting the Microphone ----------------------------------------------------
5
8. Uninstalling Driver and Software
------------------------------------
6
9. ArcSoft PhotoImpression 5 --------------------------------------------10. ArcSoft VideoImpression 2 -------------------------------------------------------------------------------------------------11. Internet Video Conference ----------------------------------------------
7
12
12. Specifications -------------------------------------------------------------
13
6. Checking Connection of Your Camera
9
1. Package Includes
• PC Camera
• User’s Guide
(With USB cable)
• CD Installation Disc
2. System Requirements
• Personal computer, laptop, desktop, or IBM compatible with Pentium 1GHz
minimum, and with an active USB (Universal Serial Bus) port.
• Windows 2000 / XP /Vista, CD ROM drive, color monitor, mouse and
keyboard.
• For video conference, your computer must have modem and communication
software for Internet connection.
1
3. Names of Parts
4. Adjusting Camera Lens Position
1.Regular Mode:
You can swivel the camera body up and down to adjust
its angle for picture taking or video recording.
2.Storage Mode
You can swivel the camera body down when you
need storing the camera to protect its lens and save
space.
2
5. Installing USB Driver and Software
• Installing Driver
1.Turn on the computer.
2.Insert installation CD into the CD-ROM drive and
the installation CD menu will appear.
3.When you see the following screen, choose
“Install Driver”.
4.Follow the on-screen instructions.
5.Restart the computer.
• Installing Software
1.Insert installation CD into the CD-ROM drive and the installation CD menu
should appear.
2.When you see the following screen, choose “ArcSoft Software Suite” to
install the software.
3.Follow the on-screen instructions.
4.The installed software will automatically create “PhotoImpression 5” or
“VideoImpression 2” shortcut icons on your desktop.
3
6. Checking the Connection of Your Camera
Plug one end of the USB cable into your camera then
another end to the computer's USB Port.
For Windows 2000/XP/Vista only:
• Double click “My Computer” icon
(Windows 2000) or go to Start Button and
select “My Computer” (Windows XP) ->
Control Panel -> System -> Hardware ->
Device Manager -> Imaging Device;
when you see " USB PC CAMERA "
that means now the camera is installed.
4
7. Setting the Microphone
The microphone of the camera (for Windows 2000 / XP /Vista) works
independently from the sound card.
1. Insert the plug of PC camera to a
computer sound card at front/rear to the
corresponding symbol (normally in pink).
2. Double click the icon
from the task
bar and you will see the menu as below.
Note: Do not tick on Mute option.
3. Click properties from the menu Option and you will see the dialog box as
below; tick on microphone option.
4. Adjust the microphone on the PC camera close to your mouth, then start
using.
5
8. Uninstalling Driver and Software
For Windows XP/2000/Vista:
• Uninstalling Software
1. Click "Start" from the task bar and choose "Control Panels."
2. Double click "Add or Remove Programs."
3. Select the program to be uninstalled " ArcSoft Software Suite."
4. Click on "Remove" and follow the on-screen instructions.
• Uninstall Camera's Driver
1. Click "Start" from the task bar and choose "Control Panels."
2. Double click "Add or Remove Programs".
3. Select the program to be uninstalled " USB 2.0 CAMERA."
4. Click on "Remove Program" and follow the on-screen instructions.
6
9. Arcsoft PhotoImpression 5
ArcSoft PhotoImpression 5 is a complete digital
image editing application designed with real people
in mind. Easy-to-use “Getting Start” guides,
user-friendly UI, complete image editing functionality,
give users wonderful experience to organizing,
viewing, enhancing, editing, printing and sharing
photos.
Click “Start” “Program” “ArcSoft Software Suite“ “PhotoImpression 5” to
launch PhotoImpression 5 or double click PhotoImpression 5 icon on the
desktop and you will see a window as the screenshot above.
Select the picture source. For example: 1. Click “Folder”
for acquiring
photos from your computer 2. Select the file path. 3. You can start editing them.
7
1.
2.
3.
4.
5.
6.
Note
Get Photo – Choose how to view or acquire photos.
Enhance – Crop, brighten, rotate, resize and modify photos.
Create – Add clip art, special effects, frames and more.
Project – Make calendars, photo books and greeting cards.
Print – Print multiple images per page and multiple pages at one time.
Send – Email photos or upload them to online photo sharing accounts.
For more detailed information, please refer to the Help of the program.
8
10. Arcsoft VideoImpression 2
ArcSoft VideoImpression 2 creates
home movies and slide shows by
combining existing videos, still images,
exciting scene transitions, and multiple
audio tracks. Though simple to use, the
program provides intense and broad
video editing and export options perfect
for owners of digital still cameras,
desktop and digital video cameras, and
camcorders.
Click “Start” “Program” “ArcSoft Software Suite“ “VideoImpression 2” to
launch VideoImpression 2 or double click VideoImpression 2 icon on the
desktop and you will see a window as the screenshot above.
Open a Project – Let you browse the project files in the VideoImpression
system folder. By “project,” we mean to say a file that contains all of the
settings and each individual component on the Storyboard. When you save
your work as a project, you can go back and swap components, add and
remove them, alter audio, etc.
Create a Video – Create a new video project. You can retrieve media
materials from the device connected or choose media files from system
folder. You can choose video materials from your photo album as well.
Create a Slide Show – Create a slide show project. You can retrieve media
materials from the device connected or choose media files from system
9
folder. You can choose slide show materials from your photo album as well.
If the box “Always show this wizard when VideoImpression starts.” at the
bottom of the wizard is checked, the wizard will appear each time you run the
program. If you'd like to skip the wizard the next time, uncheck the box.
Select the item you desire and the picture and videos you need then you will
enter the editing interface as below.
You can use the six steps in the Function Menu to create video clips and
slide shows.
1. Media - Select the videos and images that will comprise your final movie or
slide show.
2. Edit - Modify video and image color and adjust the duration of each movie
component. Only available for video projects.
3. Effects - Add neat special effect transitions between each component, or
apply a pre-made theme.
10
4. Text - Place animated text on any movie component. Only available for video
projects.
5. Narrate - Record audio directly from the program and add it to your movie.
6. Produce - Combine all components to create your final video; save it in a
variety of ways or email it to friends.
The Storyboard - The backbone of the creation process, it's where you
assemble your movie.
The Player - Preview and modify your movies in this area.
Working with Albums - Albums let you organize your media for easy access.
Note: For more detailed information, please refer to the Help of the program.
11
11. Internet Video Conference
To run video conference with another person, you and the person must have
the computer station configured with web camera, microphone, speakers, and
have access to the Internet.
You have to download video conference software, purchased or free, basic
software as I-phone or Microsoft NetMeeting.
For example: to download Windows NetMeeting, go to www.microsoft.com
search for NetMeeting and follow downloading procedure.
Starting NetMeeting, you have to follow the simple set up procedure
on the computer screen, enter your personal information and adjust the
microphone volume. Here are the simple steps to receive and send video.
Receive video:
1.Call the person you want to see/hear.
2.On the Tools menu, choose Video, then click Receive.
Send video:
1.Call the person you want to see/hear.
2.You can click the Start Video button under screen directly or you can also
click the Tools menu, choose Video, then Send.
Note: As the video starts, the Start/Stop Video button will switch to Stop Video.
If you want to stop the video, click Start/Stop Video button again.
12
12. Specifications
Interface:
Image Sensor:
Lens:
Frame Rate (Max.):
Focus Range:
Exposure Control:
Color Balance:
Video Capture Res.:
Still Image Capture
Res.:
Snap Shot Button:
Video Format
Flicker Control:
Power:
Software Compatibility:
USB Port (Universal Serial Bus)
2.36*1.76mm color progressive CMOS,
640 x 480 pixels, 8 bit RGB raw data
F2.8, f = 5.0 mm, View Angle 52 degree
800x600@15 fps; 640x480@30 fps;
320x240@30 fps; 160x120@30 fps
Manual focus, 10 cm to infinity
Automatic
Automatic
640x480, 352x288, 320x240, 176 x144.
Up to 800x600
Hardware (for Windows XP / 2000 /Vista)
AVI
50Hz and 60Hz
Powered form USB port
TWAIN / VFW / Directly Show Driver, Windows 98 SE/
ME / 2000 / XP /Vista
Rev2.0
13