1
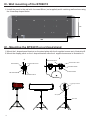
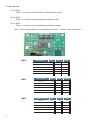
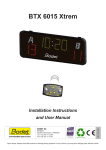
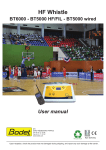
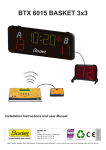
BTX 6015
www.bodet-sport.com
BODET SA
BP30001
49340 Trémentines I FRANCE
Tél. +33 241 71 72 00
Fax +33 241 71 72 01
Réf : 607444D
Installation Instructions and User Manual
Upon receipt, always check the product for damage during shipment. If any is found, you may file a damage claim with the carrier.
1
Summary
I-
Checking the equipment upon reception.......................................................................................3
II -
Overall presentation of the product...............................................................................................3
III - Wall mounting ot the BTX6015 .....................................................................................................4
IV - Mounting the BTX6015 on a tripod stand.....................................................................................4
V-
Electric connexions of the BTX6015.............................................................................................5
VI - Dips setting...................................................................................................................................5
VII - How to use the Pocket keyboard..................................................................................................7
Electrical and mechanical safety standards
-
-
-
-
-
-
-
-
-
2
Installation and maintenance of this equipment should only be carried out by qualified and authorized personnel.
Since BT6000 scoreboards are connected to a 110/240VAC supply, they must be installed in compliance with standard IEC 364.
Indoor use (protected against mechanical shocks according to DIN18032.3 Standard).
The 110/240VAC supply line for the shot clock panel must include a neutral/phase circuit breaker, rapidly accessible. This circuit
breaker must be switched off during maintenance operations.
The installation must be completed before the equipment can be powered up.
It is prohibited and dangerous to immerse the scoreboard in to water or clean it with a water jet.
Installation ground connection as per EE or EN (earth/earth or earth/neutral) power supply diagram.
Bodet shall not be held responsible for any use not in compliance with these instructions.
Any modification to the product shall void the warranty.
I - Checking the equipment upon reception
The kit contains the display panel BTX6015 and the Pocket keyboard.
BTX6015
Pocket keyboard
II - Overall presentation of the product
Timer (minutes / seconds)
or time of day (hour /minutes)
display (yellow LEDs)
Score Home and Guest
from 0 to 99 (red LEDs)
The maximum distance for HF communication between the keyboard and the panel is 100 metres in line of sight.
3
III - Wall mounting of the BTX6015
1/ Install the panel to the wall with 4 screws Ø6mm (not supplied) and 4 matching wall anchors using
the 4 teardrop shaped holes.
317
800
IV - Mounting the BTX6015 on a tripod stand
1/ Mount the L shaped panel bracket on the stand plate with the 4 supplied screws as in illustration B.
2/ Mount the display panel on the L shaped bracket withe the 4 supplied screws as in illustration A.
B
A
Nut HU M6 Zn
Flat washer Ø8 Zn
Screw H M8 X 20 ZI
Screw H M6 X 20 ZI
Flat washer Ø8 Zn
Nut HU M8 Z
Flat washer Ø6 Zi
Flat washer Ø6 Zi
A
C
L shaped panel bracket
B
Stand plate
Tripod stand
4
V - Electrical connexions of the BTX6015
1/ Connect the 110/230V AC power plug of the display panel to the wall socket.
BTX6015
AC power plug
VI - DIPs Stetting
1/ Display panel electronic card
First DIP bank
Second DIP bank
1.1/ On the first DIP bank:
- Dips 1 to 4 are used for the factory setting of the panel.
Dip 1
Dip 2
Dip 3
on ↑ off ↓ off ↓ Dip4
off ↓ - Dips 5 to 7 are used to set the panel number (if several panels are to be controlled on
the same site, each panel needs to have its own number).
Pannel number
Dip 5
Dip 6
Dip 7
1
off ↓
on ↑
on ↑
2
on ↑
off ↓
on ↑
3
off ↓
off ↓
on ↑
4
on ↑
on ↑
off ↓
5
off ↓
on ↑
off ↓
6
on ↑
off ↓
off ↓
1.2/ On the second DIP bank :
- Dips 1 to 3 are used to determined the installation number.
- Dips 4 to 8 are not used.
Installation number
Dip 1
Dip 2
Dip 3
1
off ↓
on ↑
on ↑
2
on ↑
off ↓
on ↑
3
off ↓
off ↓
on ↑
4
on ↑
on ↑
off ↓
5
off ↓
on ↑
off ↓
6
on ↑
off ↓
off ↓
5
1/ Keyboard card
1.1/ On SW1:
- Dips 1 to 3 used to set the number of the panel to control.
1.2/ On SW2 :
- Dips 1 to 3 used to set the operating channel number.
1.3/ On SW3 :
- Dips 1 to 3 used to set the operating installation number.
Nota : the Pocket keyboard is set by default to Panel 1, Channel 1 and installation 1.
SW1
SW2
SW3
6
Panel number
Dip 1
Dip 2
Dip 3
Panel 1
off ↓
off ↓
on ↑
Panel 2
off ↓
on ↑
off ↓
Panel 3
off ↓
on ↑
on ↑
Panel 4
on ↑
off ↓
off ↓
Panel 5
on ↑
off ↓
on ↑
Panel 6
on ↑
on ↑
off ↓
Chanel number
Dip 1
Dip 2
Dip 3
Channel 1
off ↓
off ↓
on ↑
Channel 2
off ↓
on ↑
off ↓
Channel 3
off ↓
on ↑
on ↑
Channel 4
on ↑
off ↓
off ↓
Channel 5
on ↑
off ↓
on ↑
Channel 6
on ↑
on ↑
off ↓
Installation number
Dip 1
Dip 2
Dip 3
Installation 1
off ↓
off ↓
on ↑
Installation 2
off ↓
on ↑
off ↓
Installation 3
off ↓
on ↑
on ↑
Installation 4
on ↑
off ↓
off ↓
Installation 5
on ↑
off ↓
on ↑
Instllation 6
on ↑
on ↑
off ↓
VII - How to use the Pocket keyboard
1
4
3
5
2
7
6
8
9
11
10
12
11’
12’
Designation
Indice
Time of day or turn off the keyboard
1
Turn on keyboard or start the stopwatch / timer
2
Adjustment of panel luminosity
3
Horn
4
Reset the stopwatch
5
To validate a parameter and start a new game
6
Next parameter or addition of a second during a game
7
Previous menu or subtraction of a minute during a game or attribution of a time-out
8
Next menu or addition of a minute during a game or attribution of a time-out
9
Previous parameter or subtraction of a second during a game
10
Add one point to the Home and Guest scores
11 et 11’
Subtract one point to the Home and Guest scores
12 et 12’
7
1. How to turn ON the keyboard?
Press the START/STOP (2) key for 3 seconds.
2. How to turn ON the keyboard?
Press ther OFF (1) key for 3 seconds. The game clock must be stopped.
3. How to start a game?
By default, the keyboard is programmed to start a «3x3 basket» game.
The game can be started.
Nota : There is no parameter setting to be performed if the user chooses this kit dfr «3x3 basket», the game is ready to
be started as soon as the display panel is ON.
4. How to modify the parameters of a sport?
Press the ◄ (8) and ► (9) keys simultaneously for 3 seconds during a game (the game clock must
be stopped). Scroll through the menus with the ◄ (8) and ► (9) keys and modify the parameters with
the + (7) ou - (10) keys.
Validate with the OK (6) key.
For programs P1 to P8:
Period duration (1 to 99).
Period number (1 to 99).
Stopwatch (UP) or Timer (do) mode of the game clock.
Cumulative period duration: Yes (Y) or No (n). (e.g. by chosing Yes for a 2 x 10mn periods
game, the game clock will count from 10 to 20 in the second period; however if the choice is
No, the game clock will count from 0 to 10 in the second period.
This applies also for the Extra-time periods.
Extra-time duration (1 to 99). (Et = Extra-time).
Number of Extra-times (1 to 99).
Time-out duration (0 to 60 sec)
.
Time-out activation: Yes (y) or No (n)
8
Maximum number of points per game (1 to 99).
DS = 0, no score management.
DS > 0, timer/stopwatch stops when the scrore of a team reaches DS, the timer / stopwatch
may be restarted.
Horn activation : Yes (y) or No (n)
For the P9 program (basque pelota) :
Number of points per game (1 to 99).
5. Default parameters
The default parameter settings for the P1 program are as follow:
P1
Designation
tP
Period duration
45
nP
Number of period
2
Co
Stopwatch (count up)
or Timer (count down)
UP
CP
Cumulative period
duration
n
Et
Extra-time duration
15
nE
Number of Extra-time
2
Number of extra-time
To
Time-out duration
0
Time-out duration
nt
Time-out activation
y
Time-out activation (yes or no)
DS
Time + Score
CS
Hn
Horn enabled
y
nS
21
Game period duration
Number of play period per game
In Timer mode, during the last minute the count up is displayed in
1/10 of seconds.
For a two 10mn periods game:
Yes (Y) - the game clock counts from 10 to 20 in the second period
No (n) - the game clocks counts from 0 to 10 in the second period.
Et = Extra-time
CS: game clock + score
TS : Time + score
-S : only score
Enables the sounding of the horn at the end of the period
Number of points per match.
If score = 21, end of match
If time = tP, stops the game clock but possibilty to continues by
pressing the START key.
To reset the parameters to the default values, press the OFF (2) key to go into time mode.
Press the + (7) and - (10) keys simultaneously for 3 seconds.
Select Yes (Y) or No (n) with the + (7) and - (10) keys.
Validate with the OK (6) key.
6. How to start / stop the game clock?
During a game, press the START/STOP (2) key to start the game clock press again to stop it.
7. How to add one point to the Home or Guest score?
Press the + HOME (11) key or the + GUEST (11’) key.
9
8. How to subtract one point to the Home or Guest score ?
Press the - HOME (12) key or the - VISITEURS (12’) key.
9. How to sound the horn?
Pess the Horn
(4) key.
10. How to stop the horn?
Press the Horn (4) key while it is sounding.
11. How to start a new game?
Presse the OK (6) key for 3 seconds.
12. How to reset the game clock?
Press the RESET (5) key for 3 seconds, the game clock sets it value to the beginning of the period.
13. How to grant a Time-out (TO)?
Press the ◄ (8) key for a HOME time-out, or press the ► (9) key for a GUEST time-out.
Nota : Only one time-out per period and per team.
14. How to add or subtract seconds to/from the game clock?
With the game clock stopped, press the + (7) key for 3 seconds, the display panel blinks.
With the + (7) and - (10) keys, add or subtract seconds within the limit of the period.
Validate with the OK (6) key.
15. How to toggle from Game Clock mode to Time of Day clock?
During a game, game clock stopped, press the OFF (1) key, the display panel display the time of day. .
When the time of day is displayed press the OFF (1) key to display the game clock.
16. How to adjust the panel luminosity?
Press the light-bulb (3) key. The luminosity changes every time the key is pressed.
10
17. How to adjust the Time of Day clock?
Press the OFF (2) key to display the time of the day.
Press the ◄ (8) and ► (9) keys simultaneously, the minutes blink.
Adjust the minutes with the + (7) et - (10) keys.
Press the ◄ (8) or ► (9) key, the hours blink.
Adjust the hours with the + (7) et - (10) keys.
Validate with the OK (6) key.
18. Test mode
Select the time of day mode by pressing the OFF (2) key.
Press the RESET (5) key for 3 seconds.
The test mode performs to following operations:
1/ Display of the program version number.
2/ Test of the cabling.
3/ Test of each module.
4/ All LEDs ON.
5/ All LEDs OFF.
6/ Display of the keyboard channel number.
7/ All Leds OFF.
19. Technician menu
Press the + (7) and - (10) keys together for 3 seconds.
Choice of parameter with +(7) and - (10) keys.
Validate with the OK (6) key.
dF : if yes (y), reset the values of the parameters as provided in the application service of the scoreboard. (n = NO).
Ec : if yes (y), if no activity : off the scoreboard.
if no (n), the scoreboard display the time.
THE DOCUMENT IS CONCERNING THE FOLLOWING PRODUCT :
915795
BTX6015
11