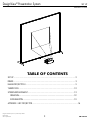
1
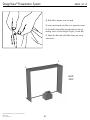
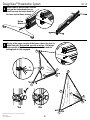
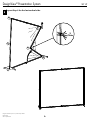
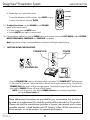
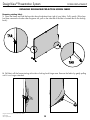
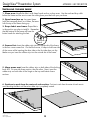
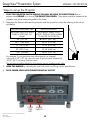
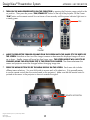
DesignView® Presentation System
SET UP
Instructions
Table of Contents
Set Up............................................................................................................ 2
Drape............................................................................................................. 3
Image Projection........................................................................................ 5
tAKEDOWN................................................................................................. 10
Screen Replacement.................................................................................. 12
Removal....................................................................................................... 12
Installation................................................................................................ 13
APPENDIX - NEC PROJECTOR................................................................................14
DesignView Presentation System is a product of Skyline Exhibits
Patents Pending
©2011 Skyline Exhibits
1
PN 32675-F
DesignView® Presentation System
SET UP
Before setting up the DesignView Presentation System for the first time,
read these instructions carefully. Although this product has been designed
for safety, injury could occur if certain precautions are not followed.
1
Unpack parts.
Put feet aside.
Long Sections are
horizontals
Corners
Hinges
Short Sections
are verticals
Frame Orientation
Lay frame and fabric on a drop
cloth or clean area to avoid
soiling the fabric.
180º
1
Lift up on the top 2 corners
2 and unfold the unit 180º.
Corners
2
4
5
3
4
5
Hinges
When unfolded in this
manner, the front of the
unit with the fabric, will
be on top
1
2
DesignView Presentation System is a product of Skyline Exhibits
Patents Pending
©2011 Skyline Exhibits
2
DesignView® Presentation System
Drape SET UP
FABRIC DRAPE: Recommended for brighter venues. (optional) The drape will be installed after the frame is unfolded, before it’s tipped up to put the feet on.
22
55
Place frame with the graphic side down
5
5
1) Clean frame where the brackets will be installed
with alcohol swab.
2) Remove tape from both brackets (first time only),
and press firmly to install on corners numbered 2
and 5. Make sure the bracket is not protruding past
the corners.
For best adhesion results, apply corner
brackets 24-72 hrs before using the DesignView System.
5
3) Thread the first pole into the nut, making
sure it is straight, or cross threading may occur.
Tighten pole down.
DesignView Presentation System is a product of Skyline Exhibits
Patents Pending
©2011 Skyline Exhibits
3
DesignView® Presentation System
Drape SET UP
4) Slide fabric banner over first pole
5) Insert second pole into fabric on opposite corner.
6) Proceed to thread the second pole into the nut,
making sure it is both straight & tight. (Corner #2)
7) Attach the feet and unfold the frame per set-up
instructions.
2
5
Back
view
DesignView Presentation System is a product of Skyline Exhibits
Patents Pending
©2011 Skyline Exhibits
4
DesignView® Presentation System
3
SET UP
Rotate frame so that the fabric is to the
front and the button heads face up.
Install feet onto the button heads of
the lower vertical frame sections
Button
Heads
Lift one of the upper corners of the frame (above the feet) to
to the outside of the frame until you hear 2 clicks and the
locking knob is fully engaged.
2
3
2
Clicks
Up
p
4 unfold that side. Only unfold one side at a time. Pull hinge
e
orn
rC
5
6
er
2
4
1
3
6
5
4
Yes
No
1
DesignView Presentation System is a product of Skyline Exhibits
Patents Pending
©2011 Skyline Exhibits
5
DesignView® Presentation System
5
SET UP
Repeat Step 4 for the last vertical side.
2
5
2
Clicks
3
6
4
1
DesignView Presentation System is a product of Skyline Exhibits
Patents Pending
©2011 Skyline Exhibits
6
DesignView® Presentation System
Image projection
Dukane 8101H Projector Support Resources:
1. These quick Start instructions are meant to serve as a supplemental reference during your trade show set up. Please
refer to the instructions enclosed with your projector before you set it up for the first time as they include more
detailed information on how to set up and operate your projector safely and more effectively.
• Dukane provides directions in a Concise User manual as well as in a more comprehensive booklet and CD
formats.
2. If you are unable to resolve issues by reviewing these instructions please review the Dukane website at
http://www.dukane.com/av/service/default.asp
3. Call Toll-free Support During Business Hours 800-676-2487.
Emergency Technical Support After hours 630-632-5244 or 630-464-0783
Steps to set up the Dukane Projector
1. Place the projector on the surface you will be using to project from (floor or projector case) behind (or
in front of) the projection screen. The projector should be centered on the projection area (white space) and
parallel to the screen.
2. Determine the distance between the projector and the projection screen by referring to the set up grid below.
CHOOSE YOUR VIDEO
SIZE
APPROXIMATE EXHIBIT SPACE NEEDED - DISTANCE
FROM SCREEN TO FAR SIDE OF PROJECTOR
Diagonal Video Size When
Fabric Is Stretched On Frame
Projector On Floor
Projector On Case
50” (127 cm)
N/A
17” (43 cm)
66.7” (169 cm)
N/A
23” (58 cm)
75” (191 cm)
N/A
26” (66 cm)
92” (234 cm)
31” (79 cm)
N/A
100” (254 cm)
34” (86 cm)
N/A
For example, if your projection area (white space) is a diagonal video
size of 100” (254 cm), place the rear of your projector (distance A)
34” (86 cm) away from the screen.
(14”)
A
The projector should be placed on the case for the three smallest screen sizes.
3. Plug power cord into projector and AC outlet.
DesignView Presentation System is a product of Skyline Exhibits
Patents Pending
©2011 Skyline Exhibits
7
DesignView® Presentation System
Image projection
4. Connect the projector to your image source, such as a computer or DVD player.
Desktop PC
RS-232C
RGB OUT
Laptop
AUDIO
OUT
AUDIO
OUT
RGB OUT
Speakers
(with an amplifier)
AUDIO IN
RGB IN
COMPUTER IN2
MONITOR OUT
COMPUTER IN1
1
CONTROL
S-VIDEO
Monitor for
Desktop PC
Y
CB/PB CR/PR
COMPONENT VIDEO OUT
Y
CB/PB CR/PR
VIDEO
L
2
AUDIO IN
AUDIO
OUT
R
AUDIO IN3
L
R
AUDIO OUT
VIDEO
OUT
L
R
AUDIO OUT
S-VIDEO
OUT
L
R
AUDIO OUT
VCR/DVD
players
5. Prepare the remote control by making sure it has batteries. Always point the remote control to the active
sensor in the front of the projector, to assure it receives the signal. (For details, review the Operating Guide on the
DesignView Presentation System is a product of Skyline Exhibits
Patents Pending
©2011 Skyline Exhibits
8
DesignView® Presentation System
Image projection
CD.)
6. Turn on the main power switch by pressing the projector Power Switch to the “I” position. Then
press the Power “STANDBY/ON” button on the top of the projector OR the Power “ON”
button on the remote control for a minimum of two seconds, until the power indicator light turns green.
Wait a couple seconds after the power indicator lights up to use the control buttons.
7. Move the projector closer to or farther from the screen, until the image fits outside
of the screen borders. Note that as the size of the image increases or decreases, the displayed
image will move up or down. Smaller images will move less than larger ones. The screen
height may have to be changed using the adjustable feet, if the projector is moved.
The distance between the screen and projector cannot be changed without changing image size.
8. To Display and switch the image, press the VIDEO or COMPUTER
button on the remote to see the image from one of the active input ports.
Each time you press the button, the port is switched (when there are two or
more signals going into the projector.) Make sure that the remote control
is pointed at the sensor in the projector to assure it receives the signal.
NOTE: If screen proportion is off, press function key F8 on the computer
(the function key used may vary, depending on the computer.) The most
common resolution is 1024 x 768.
9. To adjust from front to rear projection:
DesignView Presentation System is a product of Skyline Exhibits
Patents Pending
©2011 Skyline Exhibits
9
VIDEO
COMPUTER
DesignView® Presentation System
Image projection
• Press the MENU button on the remote to access the
EASY MENU.
• Select the MIRROR option and use the up/down
arrow buttons to choose H-Invert.
FOCUS –
FOCUS +
10.ADJUST THE PROJECTOR FOCUS AS NEEDED.
Use the FOCUS + and FOCUS – buttons on the projector or remote control to adjust the
screen focus.
11.SELECT THE ASPECT RATIO.
Press the ASPECT button on the remote control to switch to the
appropriate aspect ratio. Standard DesignView screens
D-ZOOM –
D-ZOOM +
are set up for a 4:3 ratio.
12.ZOOM by using the D-ZOOM + and the D-ZOOM - buttons on the remote control to adjust the
screen size.
13.Adjust the projected picture position by pressing the POSITION button on the remote control
& using the arrow buttons. Press the POSITION button when finished.
(NOTE: If your image size is at 100%, the image position may not shift.)
KEYSTONE
MY BUTTON
1
Arrow buttons
FOCUS
-
ENTER
RESET
ESC
Arrow buttons
K
AN
BL
ME
LU
CH
VO
AR
TE
MU
ZE
+
NU
ME
OO
M
D-Z
T
SE
+
S
RE
CU
EN
N
TE
R
FO
SIT
IO
ES
C
PO
YS
OF
TO
F
NE
-
1
MY
BU
MA
TT
GN
ON
IFY
2
AS
FR
PE
EE
CT
VID
EO
AU
TO
CO
MP
SE
UT
ER MY
DO SO
C.C UR
AM CE
ER /
A
ENTER
KE
10
MENU
+
MENU
POSITION
a. Choose the corner to adjust using the arrow buttons & press ENTER.
b. Use the arrow buttons to adjust the position of the corner.
c. Press ENTER when you reach the desired location to exit the adjustment of the corner.
DesignView Presentation System is a product of Skyline Exhibits
Patents Pending
©2011 Skyline Exhibits
MUTE
D-ZOOM
-
ON
14.FITTING THE PROJECTED IMAGE TO THE PROJECTION AREA IN YOUR
SCREEN:
Press the MENU button on the remote to access the EASY MENU (pictured
below left.) Select the PERFECT FIT option and press ENTER. You will see the
adjustment dialog box (pictured below right.)
+
2
DesignView® Presentation System
Image projection
VOLUME +
d. Repeat steps a-c to adjust other corners.
VOLUME -
To reset the adjustment of all the corners, select RESET using up
or down arrow buttons and press ENTER.
MUTE
15.To adjust the volume, use the VOLUME+ and VOLUMEbuttons on the remote control.
• To mute, simply press the MUTE button.
• Press the MUTE button again to restore sound.
16. If image appears washed-out, press the MENU button on the remote to access the EASY MENU & adjust PICTURE
MODE, BRIGHTNESS, SHARPNESS and CONTRAST, as needed.
Note: High-contrast content is recommended for environments with bright ambient lighting.
17. SHUTTING DOWN THE PROJECTOR:
STANDBY/ON
LAMP
POWER
indicator
TEMP
POWER
VIDEO
ASPECT
MAGNIFY
STANDBY/ON
MY SOURCE/
COMPUTER DOC.CAMERA
AUTO
SEARCH
FREEZE
BLANK
VOLUME
ON
+
OFF
ー
KEYSTONE
-
FOCUS
MY BUTTON
1
+
-
POSITION
2
MUTE
D-ZOOM
+
INPUT
MENU
ENTER
ESC
RESET
STANDBY/ON
Power Switch
Press the STANDBY/ON button on the remote control or projector. The “POWER OFF?” dialog appears
on the screen for 5 seconds. Confirm that the lens door will not hit anything when closing. Then press the
STANDBY/ON button again while the message appears. The projection lamp will go off, lens door will
close, and the POWER indicator will begin to blink orange.
NOTE: To cool the projector, wait until the POWER indicator turns a steady orange before
turning the Power Switch off.
These abbreviated instructions are provided for your convenience, but should not
be used as a replacement for carefully reading all the manuals for this product.
Please note that the manufacturer provides a concise user manual and a more
complete manual, in both booklet and CD formats. Follow all the instructions in
those manuals, or on the product, for optimum performance.
DesignView Presentation System is a product of Skyline Exhibits
Patents Pending
©2011 Skyline Exhibits
11
DesignView® Presentation System
1
Takedown
The hinges have a tension lock.
To release the tension, brace the bottom of the frame with your foot, and push outward on the section of
the frame above the hinge while pulling the locking pin of the hinge out.
When hinge
releases, hold onto
upper section and
fold the side down.
Push
frame
out
while
pulling
pin to
release
hinge
Fold
frame
inward
Brace
2
2
Repeat with the second side.
3
1
6
5
DesignView Presentation System is a product of Skyline Exhibits
Patents Pending
©2011 Skyline Exhibits
12
4
DesignView® Presentation System
Takedown
Make sure to lay frame and fabric on a drop cloth
or clean area to avoid soiling the fabric.
Remove Feet by lifting up on
3 locking pin and sliding feet
off of button heads.
Turn frame so that the fabric (front) side is
4 down. Applying slight downward pressure on
the horizontal hinges to release tension, pull
both locking pins out.
Lift up with the locking pins
5 to fold the frame. Frame can
then be packed in the case.
DesignView Presentation System is a product of Skyline Exhibits
Patents Pending
©2011 Skyline Exhibits
13
DesignView® Presentation System
SCREEN REPLACEMENT
Replacing DesignView Projection Screen Fabric
Removing existing fabric
1. Open the frame and find the loop tab along the bottom front right of your fabric. Pull it gently. (If the loop
has been removed or broken after long-term use, pull on the side tab of the fabric located next to the locking
knob.)
2. Pull fabric off the frame starting at the tab or locking knob hinge area. Remove the fabric by gently pulling
until it is no longer attached.
DesignView Presentation System is a product of Skyline Exhibits
Patents Pending
©2011 Skyline Exhibits
14
DesignView® Presentation System
Installing
APPENDIX - NEC PROJECTOR
the new fabric
1. Clean area: Handle the fabric with clean hands and on a clean area. Use the enclosed drop cloth
below the frame and be sure to wear the white gloves provided with your purchase.
2.Open frame face up: Lay open frame
(with feet removed) down on a clean, flat area
with the top of the frame facing up.
3. Drape fabric over frame: Drape fabric
in the position you plan to install it. Remember
that the bottom of the frame will have the
button heads for attaching the feet.
Button
Heads
4. Corners first: Insert the rubber strip into the outside slot of the frame
in the four corner areas first. On the final corner, it helps to hold one side
of the corner while inserting the other side so the first side does not slip.
Make sure you insert the rubber strip into the outside slot of the frame.
5. Hinge areas next: Insert the rubber strip on both sides of the locking
knob first. Do one side frame section, then the other. Next, insert the
rubber strip on both sides of the hinge on the top and bottom frame
sections.
6. Continue to work from the center of each section: Continue to work from the center of each area to
avoid bunching the fabric until the entire rubber strip is completely inserted.
DesignView Presentation System is a product of Skyline Exhibits
Patents Pending
©2011 Skyline Exhibits
15
DesignView® Presentation System
APPENDIX - NEC PROJECTOR
Steps to set up the Projector
1. PLACE THE PROJECTOR ON THE SURFACE YOU WILL BE USING TO PROJECT FROM (floor or
projector case) BEHIND (or in front of) THE PROJECTION SCREEN. The projector should be centered to the
projection area (white space) and parallel to the screen.
2. Determine the distance between the projector and the projection screen by referring to the set up
grid below.
CHOOSE YOUR VIDEO SIZE
SETUP FLOOR INFO
DIAGONAL VIDEO SIZE WHEN
FABRIC IS STRETCHED ON
FRAME
APPROXIMATE EXHIBIT SPACE
NEEDED - DISTANCE FROM SCREEN
TO FAR SIDE OF PROJECTOR
50” (127 cm)
A 18.00” (45.7 cm)
66.7” (169.4 cm)
24.25” (61.6 cm)
75” (190.5 cm)
27.50” (69.9 cm)
92” (233.7 cm)
33.38” (84.8 cm)
100” (254 cm)
36.50” (92.7 cm)
For example, if your projection area (white space) is a diagonal
video size of 50” (127 cm), place the rear of your projector (distance A)
18.00” (45.7 cm) away from the screen.
The projector should be placed on the case for the two smallest screen sizes.
A
3. OPEN THE MIRROR by unlocking the cover lock switch and lifting it to the open position.
4. PLUG POWER CORD INTO PROJECTOR AND AC OUTLET
Power
Cord
Inlet
DesignView Presentation System is a product of Skyline Exhibits
Patents Pending
©2011 Skyline Exhibits
Power
Switch
16
DesignView® Presentation System
APPENDIX - NEC PROJECTOR
5. TURN ON THE MAIN POWER SWITCH ON THE PROJECTOR by pressing the Projector power switch to the
on position. Then press the power “ON/STAND BY” button on the top of the projector OR the Power
“ON” button on the remote control for a minimum of two seconds, until the power indicator light turns to
a steady green.
ON
ON/
STANDBY
6. MOVE THE PROJECTOR TOWARD OR AWAY FROM THE SCREEN UNTIL THE IMAGE FITS THE WIDTH OF
THE SCREEN. Note that as the size of the image increases or decreases the displayed image will move
up or down. Smaller images will move less than larger ones. THE SCREEN HEIGHT WILL HAVE TO BE
CHANGED USING THE ADJUSTABLE FEET IF THE PROJECTOR IS MOVED. The distance between the
screen and projector cannot be changed without changing image size.
7. PRESS THE MENU BUTTON TO SEE THE MENU DISPLAY ON THE SCREEN. Each menu tab includes
different menu selections. You must hit the tab to access each of its selections. (It is generally easier
to use the remote control than the control panel on the projector.) Make sure that the remote control is
pointed at the sensor in the projector to assure it receives the signal.
Sensor Location
DesignView Presentation System is a product of Skyline Exhibits
Patents Pending
©2011 Skyline Exhibits
17
DesignView® Presentation System
APPENDIX - NEC PROJECTOR
8. IT IS VERY IMPORTANT TO SQUARE THE PROJECTOR relative to the projection screen. The
projector needs to be centered horizontally relative to the projection area (white space) and parallel to
the screen. Leveling feet can be adjusted to account for floor variability.
Align centers of
projector and
screen
Parallel
90º
9. ENSURE THAT THE PROJECTOR IS LEVEL by selecting “SET-UP” from the screen menu, then select
“TILT INDICATOR”. If the projector needs to be leveled adjust the projector feet until both tilt indicators
are centered. Tilting the projector will move the indicators. The indicators will turn green when the
projector is level.
DesignView Presentation System is a product of Skyline Exhibits
Patents Pending
©2011 Skyline Exhibits
18
DesignView® Presentation System
APPENDIX - NEC PROJECTOR
10. ADJUST THE PROJECTOR FOCUS AND KEYSTONE AS
NEEDED.
a. Bring up the test pattern by selecting MENU, SOURCE, TEST
PATTERN
b. Adjust focus by selecting the focus button until the pattern is
clear
c. Ensure the image is squared by selecting MENU, SET UP,
KEYSTONE
d. Repeat 2 and 3 as necessary
e. If focus is acceptable but image is not square, go back to step
10 to ensure the projector is squared.
f. To clear these adjustments and start over, depress the 3D
Reform button for 3 seconds.
MENU
FOCUS
11. CONNECT THE PROJECTOR TO YOUR COMPUTER (OR DVD PLAYER) Connect the VGA cable
from your computer (or DVD player) select input source (Computer Input or S-Video Input) and start your
presentation.
S-VIDEO INPUT
COMPUTER INPUT
12. SHUTTING DOWN THE PROJECTOR. Press the Power button twice. Wait until the power indicator
light is red before closing the mirror lid.
Projector Support Resources:
1. Please refer to the instructions enclosed with the projector as they include additional information on how to set up and operate the projector.
2. If you are unable to resolve your questions by reviewing these instructions you may review NEC’s website at http://www.necdisplay.com/Products/Product/.
3. If you are still having trouble you may call NEC directly at 1-800-836-0655 (7am - 7pm central standard time Monday through Friday).
4. Should you have trouble after hours you may call our vendor CompView at 1-800-248-1090.
5. If you are unable to get the help you need from these resources please call Skyline Customer Service at 1-800-328-2725.
DesignView Presentation System is a product of Skyline Exhibits
Patents Pending
©2011 Skyline Exhibits
19
DesignView® Presentation System
APPENDIX - NEC PROJECTOR
FREQUENTLY ASKED QUESTIONS - Part 1 (obtained from NEC’s website)
1. Where do I plug in my PC or DVD player?
NEC projector input panels feature RGB computer inputs, a composite video input (yellow RCA type plug)
and an S-Video input. The RGB computer input (blue) and can also be used with an optional component
video adapter for connection to a DVD player or other video source, if desired.
2. How do I turn on/off the projector?
The projector can be turned on with either the remote control, the control panel on the projector or via a
control system via RS232. With some projectors there is a Main Power Switch that also has to be turned
on.
3. How do I get the image from my computer to my projector (hot swap of pc)?
Function F* (this varies from computer to computer)
4. How do I mute the picture?
Press “Picture Mute” on the Remote Control, with the HTML page over the LAN or when using a control
system via RS232.
5. How do I magnify the image?
On models with this feature, image magnification can be controlled by pressing the + or – magnification
button on the remote control.
6. How do I set up the Auto adjust in the menu?
The auto adjust feature can be activated by pressing the “auto adj.” button on the projector control panel
or on the remote control.
7. How do I set up or use the picture management in the menu?
On most NEC remotes there is a button labeled “picture”, by pressing this button the menu automatically
goes to the picture adjustment screen. Another way to access picture management is to first press “menu”,
then “adjust” and then go to the picture management tab in the menu.
8. How do I change from a blue screen to black when there is no signal to the projectors?
This can be done by going into the OSM and making the change there or by sending a specific RS232
command to the projector from a computer.
DesignView Presentation System is a product of Skyline Exhibits
Patents Pending
©2011 Skyline Exhibits
20
DesignView® Presentation System
APPENDIX - NEC PROJECTOR
Frequently asked Questions - Part 2 (obtained from Skyline Dealers)
1. What do I do if the projected image is displayed backward?
a. Switch to rear projection (if the projector is behind the screen).
1. Press the menu button.
2. Go to the “Basic” tab.
3. Highlight “Desktop rear”.
b. Switch to front projection (if the projector is set up in front of the screen).
1. Press the menu button.
2. Go to the “Basic” tab.
3. Highlight “Desktop front”.
2. What do I do if my projected image is getting worse as I make adjustments?
a. Reset the projector to its original settings.
•Go to Menu and select RESET.
3. What do I do if the image is not displaying on the screen but is displaying in your
computer?
a. Press Function F8 (this varies from computer to computer).
b. Adjust the screen proportion (see directions below).
4. What do I do if the image displayed “Screen Proportion” appears to be the wrong.
a. Check the Screen Ratio.
b. Open Display, click START, point to SETTINGS, click CONTROL PANEL, and then double-click
DISPLAY.
c. On the Settings tab, under Screen Resolution, drag the slider to the second screen, and then click
APPLY.
•Select Screen ratio to 1024 x 768 for the correct projector resolution.
d. When prompted to apply the settings, click OK. Your screen will turn black for a moment.
e. Once your screen resolution changes, you have 15 seconds to confirm the change. Click YES to
confirm the change; click NO or do nothing to revert to your previous setting.
DesignView Presentation System is a product of Skyline Exhibits
Patents Pending
©2011 Skyline Exhibits
21