1
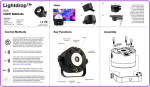
Diffusors
Contents
SpotMax™
SpotMax
2x Diffusors
Power Cord
Manual
AX10
USER MANUAL
Contents
Contents
Key Functions
Battery Icon & Status LED
SpotMax
2x Diffusors
Power Cord
Manual
Diffusors
What the display indicates
Controlling the SpotMax™
Key Functions
13° Spot
(without diffusor)
Manual Version: 1.0
Date of Issue: 30/01/14
Wide Angle
(30° diffusor)
Wall Wash
(diffusor sheet)
Battery Icon & Status LED
Power In
Diffusor Clip
The Battery Status LED is designed for being used before an event. All fixtures should have a green Status LED to ensure that the battery lasts for your upcoming
event. If it is another color, recharging is recommended.
Diffusor Slot
Power Out
The legs of the SpotMax™ have a U-shaped
enclosure to rest the leg latch into so that
when closed, the legs remain together, and
when open, the legs remain open. The legs
also contain a hole to attach a truss clamp.
ATTACH
The Diffusor must be placed into
the Diffusor Slot, then pressed
down so that Diffusor Clip will
keep it in place.
RF Antenna
REMOVE
The Diffusor Clip should be pressed
in, and the Diffusor Sheet should be
lifted out via the thumb hole.
While the battery is charging the green Status LED will be flashing on and off. Also, the Battery Icon will start the charging sequence. Once the battery is fully
charged the battery icon on the display will show all 3 bars while the power cord is connected. When the battery is fully charged, there will be 3 charging bars on
the battery icon (as below). If the battery is already fully charged and the power cord is plugged in, the display will show a flashing battery icon for approx. 30-60
seconds after which flashing will stop and the icon will show 3 charging bars. When the SpotMax™ is turned off and the power cord is connected, the charging
process will begin. This is indicated by the LCD display turning on and the battery icon in the top right corner flashing. When the power cord is disconnected the
battery symbol disappears.
Less than 30mins runtime
remaining; recharge
Up to 30mins runtime have
been used
Over 30mins runtime have
been used
Charging
Control Panel
30%
Full
Empty
70%
Battery
Icon & LED
Hole for Clamp
IR Sensor
Leg Latch
Current Effect
On/Off
Controlling the SpotMax™
Set a color or basic effect through the control pad on the AX10’s backside. Press the MENU/COLOR button and use the + and – buttons to
display different colors. Confirm with the ENTER button. Press the ENTER/PROG button and use the + and – button to display different p
rograms. Confirm with ENTER button.
Group Number
DMX Address
IR
Use Astera’s ARC1 remote control, point at individual lights and press the desired effect. Note that the IR sensor is on the AX10 rearside
although the IR signal should bounce of walls and floor.
RF
Astera’s remote control and the AsteraTouch tablet can group several lights together, address individual lights or groups of lights and
send complex effects to all lights in range. For additional information refer to the manual and quick start guide of ARC2 and ARC6 at
www.astera-led.com/downloads.
W-DMX
Connect an ART3 (Wireless DMX Transmitter) to your DMX desk to send wireless DMX signals to the AX10. You can set the AX10s DMX
address on its control pad or send it from a remote control. For additional information refer to the ART3 manual at
www.astera-led.com/downloads.
Set Number
Control Pad
See Legend on Reverse
Key Functions
Diffusor Slots
13° Spot
(without diffusor)
Thumb
Hole
Wall Wash
(diffusor sheet)
The Battery Status LED is designed for being used before an event. All fixtures should have a green Status LED to ensure that the battery lasts for your upcoming
event. If it is another color, recharging is recommended.
Diffusor Clip
Power Out
3
15/05/14
Wide Angle
(30° diffusor)
Battery Icon & Status LED
Power In
The legs of the SpotMax™ have a U-shaped
enclosure to rest the leg latch into so that
when closed, the legs remain together, and
when open, the legs remain open. The legs
also contain a hole to attach a truss clamp.
ATTACH
The Diffusor must be slid into
the Diffusor Slots, then pressed
down and clipped in under the
Diffusor Clip.
RF Antenna
While the battery is charging the Status LED will be blue. Also, the Battery Icon will start the charging sequence. Once the battery is fully charged the battery icon
on the display will show all 3 bars while the power cord is connected. When the battery is fully charged, there will be 3 charging bars on the battery icon (as below).
If the battery is already fully charged and the power cord is plugged in, the display will show a flashing battery icon for approx. 30-60 seconds after which flashing
will stop and the icon will show 3 charging bars. When the SpotMax™ is turned off and the power cord is connected, the charging process will begin. This is
indicated by the LCD display turning on and the battery icon in the top right corner flashing. When the power cord is disconnected the battery symbol disappears.
Less than 30mins runtime
remaining; recharge
Up to 30mins runtime have
been used
Over 30mins runtime have
been used
Connected to AC
30%
Full
Empty
70%
U-Shaped
Enclosure
REMOVE
The Diffusor Clip should be pressed
in, and the Diffusor Sheet should be
lifted out via the thumb hole.
315°
Control Panel
Battery
Icon & LED
Hole for Clamp
IR Sensor
Leg Latch
Current Effect
On/Off
Controlling the SpotMax™
Set a color or basic effect through the control pad on the AX10’s backside. Press the MENU/COLOR button and use the + and – buttons to
display different colors. Confirm with the ENTER button. Press the ENTER/PROG button and use the + and – button to display different p
rograms. Confirm with ENTER button.
Group Number
DMX Address
IR
Use Astera’s ARC1 remote control, point at individual lights and press the desired effect. Note that the IR sensor is on the AX10 rearside
although the IR signal should bounce of walls and floor.
RF
Astera’s remote control and the AsteraTouch tablet can group several lights together, address individual lights or groups of lights and
send complex effects to all lights in range. For additional information refer to the manual and quick start guide of ARC2 and ARC6 at
www.astera-led.com/downloads.
DMX
Connect an ART3 (Wireless DMX Transmitter) to your DMX desk to send wireless DMX signals to the AX10. You can set the AX10s DMX
address on its control pad or send it from a remote control. For additional information refer to the ART3 manual at
www.astera-led.com/downloads.
AX10’s
Metal Ring for Hanging
Screw Thread for Bolt/Clamp
Set Number
Control Pad
See Legend on Reverse
Astera LED Technology
Karl Schmid Str. 14
81829 München
Germany
+49 (0)89 215522530
[email protected]
Hold the MENU/COLOR button for 1-2 seconds
to enter the Menu Structure (this can only be
used when on the Status screen as seen below).
ONE COLOR STATIC
G01 S000 DMX:001
FROM THE STATUS SCREEN, PRESS THE ABOVE BUTTONS TO:
ADJUST
SPEED
ADJUST
COLOR
ADJUST
BRIGHTNESS
CHANGE
PROGRAM
HOLD THE ABOVE BUTTON FOR 3SECS TO ASSIGN LIGHT TO:
GROUP 1
GROUP 2
GROUP 3
GROUP 4
5-15 hours*
DMX signal
the DMX signal
DMX signal
7.87kg (17lbs)
normal
current
current
* depending on chosen power scheme
For more help, please visit our website
support section at www.astera-led.com
The fixture does not turn on.
The battery may be empty. Connect it to the AC and try again. If there is still no power, consult our website.
The fixture turns on and the display is on, but the LEDs do not emit light.
The fixture could be set to BLACKOUT mode or set to display black color. If set to BLACKOUT, use the remote control to adjust the intensity or color. If this does
not solve the problem, do a FACTORY RESET to wipte all settings.
The fixture is not working correctly - it does not display the color or effect chosen.
The fixture may still be operating under a previous setting. Do a FACTORY RESET to completely wipe all settings.
After completing a FACTORY RESET, the fixture still cannot be controlled.
Make sure the RADIO PIN of the fixture and controller are the same. If it still cannot be controlled, consult our website.
The fixture has a shorter runtime than 8 hours.
The LED POWER default setting is HIGH BRIGHTNESS. To achieve a greater battery runtime, set the LED POWER to NORMAL or MAXIMISE RUNTIME, which
will guarantee either 8 hrs or 24 hrs of operation. Alternatively, program the fixture to only display colors that use less power, such as Red, Green and Blue.
The power cable is connected but the fixture is not charging.
The battery may be fully charged. Refer to the Battery Icon section of this User Manual for more details. The fixture will only commence charging when it
has a temperature of 45° or less. Turn the fixture off and let it cool down, then resume charging. If it still not charging, consult our website.
current