1
BRC7F632F
10
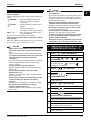
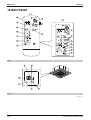
TEMPERATURE SETTING BUTTON
Use this button for SETTING TEMPERATURE
(Operates with the front cover of the remote controller
closed.)
11
PROGRAMMING TIMER BUTTON
Use this button for programming “START and/or
STOP” time. (Operates with the front cover of the
remote controller opened.)
12
TIMER MODE START/STOP BUTTON
Refer to page 7.
13
TIMER RESERVE/CANCEL BUTTON
Refer to page 7.
14
AIR FLOW DIRECTION ADJUST BUTTON
Refer to page 6.
15
OPERATION MODE SELECTOR BUTTON
Press this button to select OPERATION MODE.
16
FILTER SIGN RESET BUTTON
Refer to the section of MAINTENANCE in the operation
manual attached to the indoor unit.
17
INSPECTION/TEST OPERATION BUTTON
This button is used only by qualified service persons for
maintenance purposes.
18
EMERGENCY OPERATION SWITCH
This switch is readily used if the remote controller does
not work.
19
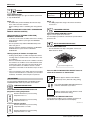
RECEIVER
This receives the signals from the remote controller.
20
OPERATING INDICATOR LAMP (Red)
This lamp stays lit while the air conditioner runs. It
flashes when the unit is in trouble.
21
TIMER INDICATOR LAMP (Green)
This lamp stays lit while the timer is set.
22
AIR FILTER CLEANING TIME
INDICATOR LAMP (Red)
Lights up when it is time to clean the air filter.
23
DEFROST LAMP (Orange)
Lights up when the defrosting operation has started.
(For cooling only type this lamp does not turn on.)
NOTE
• For the sake of explanation, all indications are shown on
the display in Figure 1 contrary to actual running
situations.
• Fig. 1-2 shows the remote controller with the front cover
opened.
• If the air filter cleaning time indicator lamp lights up, clean
the air filter as explained in the operation manual provided
with the indoor unit.
After cleaning and reinstalling the air filter, press the filter
sign reset button on the remote controller. The air filter
cleaning time indicator lamp on the receiver will go out.
• The Defrost Lamp will flash when the power is turned on.
This is not a malfunction.
Si20-501A
3. HANDLING FOR WIRELESS
REMOTE CONTROLLER
Precautions in handling remote controller
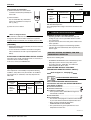
Direct the transmitting part of the remote controller to the
receiving part of the air conditioner.
If something blocks the transmitting and receiving path of the
indoor unit and the remote controller as curtains, it will not
operate.
2 short beeps from the
receiver indicates that
the transmission is
properly done.
Transmitting distance is approximately 7 m.
Do not drop or get it wet.
It may be damaged.
Never press the button of the remote controller with a
hard, pointed object.
The remote controller may be damaged.
Installation site
• It is possible that signals will not be received in rooms that
have electronic fluorescent lighting. Please consult with the
salesman before buying new fluorescent lights.
• If the remote controller operated some other electrical
apparatus, move that machine away or consult your dealer.
Placing the remote controller in the remote controller
holder
Install the remote controller holder to a wall or a pillar with the
attached screw. (Make sure it transmits)
Placing the remote
controller
Removing the
remote controller
Slide from above
Pull it upward
Remote
controller
holder
3P107422-11J
166
Control System and Indoor Units