1
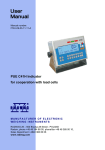
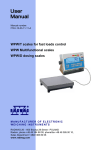
Maxcom MM431 BB
1
2
If you need technical assistance, please contact the hotline
on
(+48) 32 325 07 00 or [email protected]
Our website:
http://www.maxcom.pl/
The content of the set
GSM Phone
Charger
Rechargeable 800mAh
User manual
Warranty Card
Do not lose the package,it can be
useful for eventual transport.
Please keep the receipt, it is an
integral part of the warranty.
3
Note - The phone operates in GSM 900/1800. Before
turning to properly insert the SIM card.
4
Mobile phone GSM 900/1800
Large backlit keys
128x64 pixel display resolution
SOS button (emits an alarm and automatically calls and
sends SMS to a predefined number)
Large font, easy to Menu
Hands-free
Phone book entries -200
The function of sending and receiving SMS
Speed dial 10 numbers
Displaying call duration
Loud ringer (10 melody)
torch
calculator
alarm
Lock Switch
Standby time: Up to 200 h. *.
Talk time Up to 3 hours. *
Weight: 80g
Dimensions: 110x47.6x15.7mm
5
Table of Contents
1 Location of the buttons 7
2 Principles of safe use 9
2.1 GSM network 9
3 Installing the elements 10
3.1 Installing the SIM card and battery 10
3.2 Charging the Battery 13
3.3 Low Battery Alarm 15
4 Using your phone 15
4.1 Turning on the phone 15
4.2 Turning off 17
4.3 Standby Mode 17
4.4 The icons on the display 18
4.5 Basic functions of the buttons 20
4.6 Key Lock 24
4.7 Torch 24
5. Operation MENU 24
6. Connections 25
6.1 Making a call 25
6.2 The emergency call 25
6.2.1 Number 25 SOS
6.2.2 Information about the owner of 26
6
6.2.3 Entering and modifying the alarm contacts 26
6.2.4 The text of the alarm 27
6.2.5 Emergency 27
6.2.6 The SIM card is inserted 28
6.2.7 The SIM card is not inserted 29
6.3 Answering a call 29
6.4 Key hands-free 29
6.5 Conference 30
6.5.1 Method 1 30
6.5.2 Method 2 31
6.6 Adjusting the volume 31
7. SMS 31
7.1 Writing and sending SMS 32
7.2 Read and reply to SMS messages 34
7.3 SMS Box 35
7.3.1 Inbox 35
7.4 Sent items 35
7.5 Drafts 36
7.6 SMS Templates 36
7.7 Deleting messages 37
7.8 Voice Mail 37
7.9 SMS Center Number 37
7.10 Report service 38
7.11 Memory Status 38
7
8 Phone Book 38
8.1 Overview of contacts 39
8.2 Creating a new contact 40
8.3 Deleting contacts 40
8.4 Copying contacts 41
8.5 Setting the phone book 41
8.5.1 Memory 41
8.5.2 Memory status 41
8.6 Emergency calls 42
8.7 Speed dialing 42
8.7.1 Programming the keys 42
8.7.2 Implementation of high-speed 43
9 Call Log 43
9.1 Delete all entries 44
9.2 Call time 44
10 Extras 45
10.1 SIM services 45
10.2 Alarm 45
10.2.1 Setting the clock 45
10.2.2 Clearing the alarm 46
10.3 Notes 47
10.3.1 Saving a memo 47
10.3.2 Deleting a note 47
10.4 Birthday Reminders 48
8
10.4.1 Saving the birth of 48
10.4.2 Deleting, editing notes, 48
11 Calculator 49
12 Settings 50
12.1 Quiet Mode 50
12.2 Setting up the phone 50
12.2.1 Sound 50
12.2.2 Alarm clock 50
12.2.3 Voice prompts dialed number 51
12.2.4 Change in Volume 51
12.2.5 Changing the display 52
12.2.6 Language 52
12.2.7 Setting the time and date 53
12.3 Network Settings 53
12.3.1 Call Waiting 54
12.3.2 Transferring a call 54
12.3.3 Call barring 55
12.3.4 Selection of Network 56
12.3.5 Hiding own number 56
12.4 PIN 57
12.5 The factory settings 57
13. FAQ (Troubleshooting) 58
14 Terms of Use and safety of 61
9
15 Disclaimer 62
16 Battery information 62
17 Information on SAR 64
18 Environmental Information 66
10
1. Location of keys
Speake
rrrrr
The entrance
to the menu
navigation
button
"Up"
Screen
The connection
/
confirmation
Handsfree Button
Disconnect button /
cancel the function
Press and hold
button to turn
on/off phone
The entrance
to the Books
Tel.
Navigation
button
"Down"
11
Holding the panel
will include a
procedure
Call the defined
number and send
SMS
S OS butt on
Left 2.
side
Right side
Torch button
Volume control
buton +/-
Alarm clock button
Lock keyboard
button
12
Important safety measures
Read the following rules will minimize the
risk of improper use of the phone. In the
following rules are discussed in detail.
USE - Do not use the phone to an area where
it is prohibited such as gas stations or
hospitals. Using the phone in such places may
put others at risk.
TORCH - Do not look directly into the beam
of light
Hearing Aid-If you have a hearing aid, you
must carefully choose the volume of the
phone and set the sensitivity of the hearing
aid.
WATER - the phone is not waterproof. Keep
it dry.
GSM network
The phone is designed to operate on the GSM 900/1800.
13
Before using the instructions available on the phone
features, you should check with your GSM operator
whether features are available.
Note: Not all operators allow you to send Polish characters
in text messages. Check with your operator.
1 Installing the components
Before turning on the phone, you should install a SIM card.
Pay attention not to damage the card when inserted.
SIM cards out of reach of children.
3. Installing the elements
Installing the SIM card and battery
Before inserting the SIM card, make sure the phone is
turned off. Charger should be disconnected. To insert the
SIM card you must first remove the battery in accordance
with the drawings and description:
14
Slide
down
1. First When the phone is off, press the top cover
and slide it in the direction shown in Figure
Second Remove the battery as shown.
15
2. Insert the SIM card into the "SIM" as shown.
3. Insert the battery so that terminals + /-were
directed to the top of the phone.
16
4. First After inserting the battery, slip cover. After the
correct assumption is characteristic audible snap.
3.2 Charging the battery
Note! Replace the battery contained in the set. Use of
another battery may damage the phone and will void the
warranty.
Do not connect the charger when the rear cover is
removed.
To charge the phone:
1.First Connect the charger to the socket at the bottom of
the phone.
17
2. First Insert the plug into the socket. The display shows
information about the charge.
Charging
Charged
3. First When the battery is fully charged, unplug the
charger from the electrical outlet and cable from the
phone.
3.3 Low Battery Alarm
Your phone will alert you when the battery is too low. Also
18
displays a message on the screen. Recharge your
batteries when you see this message. If the message
appears during a call, also connect the phone to power not
to lose the connection.
4. Using your phone
4.1. Turning on the phone
Press and hold the red button on disconnect
activate the phone.
, to
If the phone requests a PIN code you must enter it. You'll
find it in the startup kit card.
After entering the code to confirm it by pressing the green
handset
.
4.2.Warning:
TurningWhen
off you enter an incorrect PIN code
three times in a row, the SIM card is blocked
19
You can unlock it with the PUK code. 10 times
wrong PUK code to enter the SIM lock permanently
To turn the phone off, press and hold the disconnect
.
When you first start you see the "Set Phone", select
edit
, to set SOS number, time, date and information
about the owner. Choose cancel
to start using the
phone and make these settings later through the MENU
4.3. Standby
When the phone is turned on, but take no actions that it is
in standby mode.
20
Description of display:
5
1 3
6
4 2
7
1.First network signal
2.Second battery Level
3.Third Icons showing different features
4. Icons showing different features
5. Name of operator
6. Time
7. Date
4.4 The icons on the display
Batery level
Network signal strength
21
Alarm
New message
Message memory is full
Transfer talk
missed call
Sileni mode
Icon is displayed in a signal network
if the phone is in roaming
Keyboard locked
Headset
22
4.5. The basic functions of the buttons
Button
the call button
(green
handset)
Disconnect
button (red
handset)
Function
Making and receiving calls
Standby: Press to enter the
outgoing call history.
Navigating the menu: "Confirm"
Press to confirm the function of
your choice.
Turn on / off the phone.
Navigating the menu: "Back"
button Press to return to the
previous menu
23
Navigation
button
"UP"
Navigation
buton
„ DOWN”
Button #
24
Standby: Press to enter the main
menu
Navigating through the MENU:
Press to move cursor up
Standby: Press to go to browse
the phone book
Navigating through the MENU:
Press to move the cursor down
Viewing the call: press to select
the type (Incoming / Missed /
Dialled)
Standby: Press and hold to select
pre-programmed speed dial
number. If no number has not yet
been assigned, press "#" and
confirm to assign.
Button
The loudspeaking
+ / - Button
volume
Standby: Press and hold to select
pre-programmed speed dial
number.; Press to enter *, P, +.
Edit mode: Press to use symbols.
During a call: Press and hold to
turn the speakerphone
Press the "+" to increase the
volume or "-" button to decrease
volume
(Adjust the volume during calls
can be used)
Press and hold "-" to turn on / off
silent mode
25
Flashlight and
alarm
switch
Lock
Switch
Orange
emergency
button (SOS)
4.6. Key lock
26
Slide the switch up to turn on the
flashlight. To disable, set in the
middle position
Move the switch down to enter the
clock menu to exit the clock
menu, move the switch to the
middle position
Move the switch down to lock the
keypad. Up to unlock.
Emergency calls are enabled:
Press and hold to call the
emergency number
To lock the keypad, slide the lock switch down to
. To
unlock the keyboard, move the switch up. No need to
unlock the keyboard to answer the call.
4.7. Torch
To activate the flashlight torch, move the switch up. To
turn off the flashlight, move the switch down.
5. Operation menu
To access the menu in standby mode press
UP.
To navigate through the menu use the keys UP
and
DOWN
.
To confirm the function, press the call button
To return to the previous menu (back), press
6. Connections
6.1. Making a call
27
1. First Enter the phone number you wish to call
2. Press
green button
First to to
call
the number
For
international
calls are required
enter
"00"
or "+" before the number. To enter "+", twice
3. To end the call press the red handset
press ""
6.2. Emergency call
6.2.1. SOS Number
Confirm 112 green handset
. You will be able
dodzwonienia under the European emergency number,
even without a SIM card, provided that you are in any
GSM network coverage
Set time
Use the numeric keys or the UP to enter the current hour
and minute HH MM.
Set the date
Use the numeric keys to enter the current day of DD, MM,
and YYYY months
To confirm that use the key
, to return to the settings,
for example, use the month
Inf about the owner-Select Edit and enter your details and
28
confirm
If when you first start your SOS incorrectly entered a
number, you can modify
Enter the main menu by pressing the up arrow
.
Next choose:
Contacts> Emergency Calls> No SOS
Press button
, To edit the number. You can only enter
three characters.
112 is the European Emergency Number.
6.2.2 Information about owner
You can enter up to 160 characters
6.2.3 Entering and modyfing the alarm contacts
Enter the main menu by pressing the up arrow
Next choose:
.
29
Contacts> Emergency calls> Emergency Contacts
Press button
, Select an option:
Create to add a new emergency number
Delete to delete the emergency number
Change the order to change the order dialing emergency
numbers.
You can select up to five emergency numbers. To be preprogrammed numbers to maintain contact in the
phonebook, p.40 pair create a new contact
When adding the number is displayed, send an SMS alert?
Select YES to your contacts to be sent an SMS with the
text of the emergency
6.2.4 The text of emergency
You can change the text of the SMS message that is sent
during an emergency. The default is entered in the text:
"An emergency, please call me!"
6.2.5 Emergency buton
Enter the main menu by pressing the up arrow. Then
30
select:
Contacts> Emergency calls> alarm button and
select On or Off
If the feature is enabled phone will automatically start
an emergency call by pressing and holding down the
SOS. If the function is disabled, the SOS button is
pressed the message "SOS key off, turned on?
To activate it, press
and select turn on
To cancel
6.2.6 SIM card is inserted
1. First When the emergency call function is
activated: press the SOS button on the back of the
phone. The phone will sound an alarm, send a
message to a pre-set alarm contacts and
automatically call them one by one. Three
attempts will be calling to each set of contact. The
phone call the next contact if he fails to connect to
the preceding.
31
The phone call to your local emergency number
for SOS if no alarm contact has not been set.
2. The phone turns on an audible alarm when
sending messages and calling.
Second After pressing the enter key, the alarm
mode for one hour. This means that the phone
automatically answers incoming calls and
automatically turns on the speakerphone.
To cancel the emergency call is long press the red
handset
a short press will only interrupt the current dial
the number.
6.2.7 The SIM card is not inserted
Press the green handset. The phone displays "emergency
call?"
Press the green handset
, to confirm
The phone will automatically select the emergency number
(default is set to 112th)
32
6.3 Answering calls
To answer an incoming call, press the green handset
6.4 Hands-free
To activate the loudspeaker.
If you want to back off the loudspeaker, press and hold
again
key .
During a call, Press and hold
6.5 Conference
The conference is a service provider that enables threeway conversation. There are two ways to create a
conference:
6.5.1 Method 1
1. person calling on your phone, and you are calling to
another.
First Receive your first call
2.d Press the green handset and dial the conference call
3. Call the third party. You can do this by simply typing the
33
number into the phone and pressing the green handset or
through the phone book. You can find it by pressing the
green handset. When you select a new number will be
your first call on hold. To build a conference press green
button and select Conference.
34
6.5.2 Method 2
Two incoming calls.
1. Receive your first call
2. Answer the second call: When there is a second
incoming call appears on the screen information about it.
Answer the call by pressing the green handset. To create
a conference then press the SEND button and select
Conference.
6.6 Adjusting the volume
You can press "+" and "-" in the left side of the housing to
increase and decrease the volume during a call.
7. SMS
You can send and receive SMS text messages. The phone
memory can store 100 * simultaneous messages. When
the screen displays an icon
this means that there is at
least one unread message. But when the icon appears
this means that the message memory is full and you
need to delete unwanted messages.
To access the SMS messages in standby mode press
35
UP and next
(green phone).
* The phone has a memory for 100 SMS messages. SMS
messages can also be saved on the SIM card (memory
depends on the type of SIM card)
7.1 Writing and sending SMS
1. In the SMS menu, select Create SMS. . To open the
message editor.
2. Type in your message.
3. Press the call button (green phone) if you want to
insert a number, contact phone book or want to change
text input method
• Changing the text input: To change text input method
press "#", or press the call key and select the input mode if
you want to type a symbol, press "". With the 2,4,6,8 keys
to select the symbol and confirm the 5 key
1. Sending a message (to one person): Press the call
button to access the options and select Send, if you want
the message is recorded, select Send and save. You can
then press the call button to select the recipient from the
phone book and accept it by pressing the call button. Or
you can simply enter the number using the keyboard.
36
When you dial a call button to send your message.
2. Sending messages (many people): Press the call button
and select Send to many. After sending one message you
can type the number of the next recipient, or select it from
the phone book. Repeat these steps until you are done
sending messages to certain people.
3. Saving messages To save a message written just press
the call key, and then choose a work, or Save as a
template if you want to add your message to the
templates.
37
If the display shows Sending SMS failed. Try
again? If you press the disconnect message is
automatically saved to the drafts.
7.2 Reading and replying on SMS
1. When the display shows a new SMS message you can
press
(green handset) to read the message or the
, First not to read messages and return to standby
mode. You will see a message wait icon.
To view received messages from the MENU to enter
the SMS inbox by selecting the Inbox. Inbox. To read
the message, press the call, while reading you can use
the additional options by pressing the call key.
2. Icon
the message indicates that a message is
unread.
7.3.1 Inbox
38
Shows the messages received, sorted the date of receipt.
To navigate in the Inbox, use the keys
DOWN and call button
UP and
to see the message.
When reading the message the call, press
(green
phone) in order to select one of the options: Reply, Call
Back, Delete, Forward, Save the phone book sent items
If you are using the Send option and save the sent
messages are saved in "Sent items".
To navigate in the Inbox, use the keys
UO and
DOWN and call button
to see the message.
When reading the message the call, press
(green
phone) in order to select an option: Callback, edit / send
SMS, Forward, Delete, Save the phone book
7.4 Sent items
7.5 Drafts
You can save unsent messages in the folder "Drafts". To
do so write your message and when you press the call
39
button, select Save to Drafts.
7.6 Templates SMS
The phone includes 5 default message templates. You
can delete, edit, send, and then used for new messages.
When editing a message, press the call button to access
options and choose Add Template.
7.7 Deleting message
To delete the selected type of message, go to the option to
Delete the message and select the type of messages you
want to delete.
7.8 Voicemail
Voicemail is a service provider allows us to leaving voice
recordings, when someone fails to connect. To learn more,
contact your carrier. If you would like to change your voice
mailbox number, select Menu> SMS >> Voicemail
Voice mailbox number can be obtained from your service
provider.
40
7.9 SMS Center Number
Mediates between subscribers when sending SMS
messages. To send an SMS from a mobile phone, you
should have typed the correct SMS center number.
MENU> SMS> No service center number from your
service provider.
7.10 Report sernice
You can set the phone to receive SMS text message your
reply That message was Delivered to the sender (network
service).
MENU> SMS> service report, select Enable to activate
7.11 Memory status
This feature can check the status of memory on the SIM
card and phone.
8. Phone book
You can save names and numbers of contacts in the
phone memory and SIM card. Contact icon
the phone, and contact with the icon
is stored in
is saved on the
41
SIM card.
To get to browse the phone book contacts in Idle mode,
press
DOWN.
options
and press
Then using the key
, arrow DOWN
and confirm the connection
select CONTACTS
Select the desired option
.
8.1 Overview of contacts
Method 1
1. First Select Menu> Contacts> Search
Second Type the first letter of the name you are
looking
The phone will go to the names on this letter. You can
scroll through the navigation keys
.
pressing the "#" change text entry mode
Method 2
1. In standy mode, press
42
DOWN.
Type the first letter of the name you are looking
The phone will go to the names on this letter. You can
scroll through the navigation keys
.
pressing the "#" change text entry mode
8.2 Creating a New contact
1. Select Menu> Contacts> New Contact to enter a new
contact.
2. Enter the phone number you want to save
3. Enter the name under which the number shall be
recorded
By pressing the "#" change text entry mode.
You can change the place of your contacts (phone / SIM
card) when entering the options menu> Contacts>
Settings book. Phone> Memory. To change the storage
location of contacts is required for the SIM card inserted.
8.3 Deleting contacts
If you want to delete a contact from the phone or SIM card,
43
follow these steps:
1. Select: Menu> Contacts> Delete entry
2. You can now choose whether you want to delete a
single entry (one) or all (All)
3. If you want to delete all entries will be asked whether
you want to remove the SIM card or phone.
Confirm by pressing
8.4 Copy contacts
To copy contacts from SIM card to phone or from phone to
SIM card:
1. Select: Menu> Contacts> Copy entry, and then select
where you want to copy your contacts.
2. Choose whether you want to copy all contacts, or
individual entries.
3. If you choose to be confirmed
the call key
.
8.5 Setting the phone book
8.5.1 Memory
This option allows you to select where to save your
44
contacts (the SIM card or phone memory)
Select: Menu> Contacts> Settings book. Phone>
Memory:
8.5.2 Memory status
This option allows you to check the status of the card and
phone memory
Select: Menu> Contacts> Settings, Fr. Phone>
Memory status:
8.6 Emergency calls
. The precise functions are alarm contacts on page 25
8.7 Speed dialing
The phone can be programmed 8 number keys (2-9) and
two buttons (, #) speed dial to perform immediate
connection.
Key 1 is reserved for voice mail.
8.7.1 Programming the keys
To program speed-dial buttons to advance to maintain
45
contact in the phonebook
1. Go to Menu> Contacts> Speed dials confirm with
2. Using the keys
and
choose button, under which
you want to assign a contact, press
3. Select Open, there will be entries from the phonebook.
4. First Find the contact using the keypad and the up /
down Confirm with
5. Likewise assign other keys.
6. Press
to leave MENU.
8.7.2 Perform high-speed
Press and hold the key to which is assigned a number.
Phone will automatically select a pre-programmed number.
9. Call log
To access the call log, go to Main Menu> Call register.,
Then select:
Missed. Connect. (To view the missed calls).
Dialled numbers (to display the dialed numbers).
Received call. (To view the calls received)
46
To register, you can enter numbers dialed in standby
mode by pressing the call key
The phone saves with
10 dialed, missed and received calls.
9.1 Delete all entries
To delete all entries from the call log, select:
Menu> Call register. > Remove all
Then select the type of entries that you want to delete.
9.2 Call time
You can see the time of last call and time of all calls by
selecting:
Menu> Call register. > Call duration. To remove all
times, select Clear counters.
47
10. Extras
10.1 SIM services
SIM services are additional services offered by the SIM
card (usually paid). Due to the limited functionality of the
phone (eg no GPRS, no access to the Internet), some
services can not start using the phone, MM430.
10.2 Alarm clock
10.2.1 Alarm lock settings
Select: Menu> Extras> Clock> Set alarm.
Select one of the three fields to store the alarm, confirm
with the connection. Select Set the alarm clock. Once
nstępnie choose to set a single alarm or Repeat to set a
recurrent alarm.
1. If you select One time, enter the alarm time, accept
the call button, then select an alarm signal and confirm
the connection.
2. If you choose Repeat the first call by pressing the
select days of the week in which the alarm will be
activated.
3. Call button, select Confirm selected.
48
Then set the alarm time and alarm.
10.2.2 Clearing alarm clock
To delete all alarms, select:
Menu> Extras> Clock> Delete all
The screen will ask you if you cancel the alarm.
Press the call key to confirm.
. To delete one, select:
Menu> Extras> Clock> Set the alarm clock, then move
your cursor over the selected alarm, press the call button
and choose Delete, or Disable (to disable it only).
Warning: Alarm only supports up to 24 hours
10.3 Notes
You can save three notes for things to do
10.3.1 Saving a memo
Choose:
Menu> Extras> Note> Edit
1. Choose one time to set a single alarm or Repeat
to set a recurrent alarm, confirm with the
connection.
49
2.
Using the numeric keys and the UP, DOWN Enter
day, month, year to remind, confirm the call key
(green phone).
3. Set the hour, minute and confirm the connection.
4. Enter the note. Press "#" you can change text
entry mode. When you type text to confirm a call
button, then select a sound reminder.
10.3.2 Deleting notes
To delete all alarms, select:
Menu> Extras> Notes> Delete all
The screen will ask you if you cancel the alarm. Press the
call button to confirm
10.4 Birthday Reminders
You can enter up to your note about the upcoming
birthday.
Phone at a specified time to remind you about this
Audio features, set in: MENU> Settings>. Phone>
Sounds> Prov. Birthday
10.4.1 Saving birthday
50
Choose:
Menu> Extras> Prov. Birthday> New. Enter the note,
confirm with the connection.
Using the number keys, UP, DOWN and
1.
2.
Enter day, month, year, reminders, confirm with the
connection.
Set the hour, minute and confirm the connection.
10.4.2 Deleting, editing notes
To delete / edit select
Menu> Extras> Prov. Birthday
then tap the selected entry, press the call button and
select Edit / Remove guide
11. Calculator
The phone is a simple calculator. You can perform
operations on the addition, subtraction, multiplication and
division.
Select MENU> Calculator
51
1. Enter the first number on the screen when there is only
0
Select the symbol you want to perform operations using
the keys
.
1. Enter the second number and press
First (green
phone).
To delete the last digit or character of the arithmetic
operation, press
(red phone).
2. To exit the calculator, press repeatedly
phone).
(red
12. Settings
To enter the settings, open the main menu by pressing
GÓRA, i następnie wybierz opcję Settings
12.1 Quiet mode
You can change the phone mode to silent mode
Choose:
MENU> Settings> silent mode
52
12.2 Setting up the phone
12.2.1 Sounds
You can set a ringing tone for incoming calls (Bells),
sounds, buttons, sound, text messages and birthday
reminders.
Select MENU> Settings>. Phone> Sounds>
Select the sound you want to change
Select the desired ringtone and confirm the connection
12.2.2 Alarm clock
You can enable or disable the alarm clock.
Choose:
MENU> Settings> Sounds> Vibrate> Enable / Disable
12.2.3 Voice prompts dialed number
To disable, select Menu> Settings>. Phone> Tones>
Press> Voice.
12.2.4 Chang the volume
You can change the volume during a call, ringer volume,
53
the volume of SMS, the volume keys, the volume and turn
off the melody.
1. Select MENU> Settings>. Phone> Volume. Select
the volume you want to change.
To change the volume, press the keys +/- on the side
of the phone, or the UP and DOWN. Confirm the call
key.
Caution. You can not mute the volume of calls, the ringer
volume and the volume keys with this menu item.
To mute the ringing tone, select Menu> Settings> silent
mode
To mute keys, select Menu> Settings>. Phone> Sound
Buttons> Disable
12.2.5 Changing the display
You can change the contrast according to your needs.
First Select MENU> Settings> Phone> Contrast View.
Second To change the contrast, press the keys UP and
DOWN.
Third Confirm the call key.
54
12.2.6 Language
The phone can be installed in different languages. The
default setting is automatic language selection.
To change the language, select Menu> Settings>.
Phone> Language or proceed as shown below:
In standy mode press:
1x button
, 5x button
1x button
, confirm by button
3x button
, confirm by button
,confirm by button
then select the desired language and confirm with
12.2.7 Settings date and time
To set the clock / date, select:
MENU> Settings>. Phone> Date & Time> Set Time /
Date Set.
Using the numeric keys and the UP, DOWN, enter the
correct time / date
You can also change the format for date and time.
55
Choose:
MENU> Settings>. Phone> Date and Time> Format the
time / date format
For navigation use the UP, DOWN and call button
(confirm).
12.3.1 Call waiting
It is a network service. If the operator offers this service,
make the appropriate configuration.
After entering the options menu> Settings>. Network>
Connect. waiting you can check availability and select
whether you want to activate this feature.
If call waiting is enabled, a user is talking, each next
incoming call will be signaled by the output signal of the
second connection (every 5 seconds), you will also see the
caller's number. It is possible to receive a second call, and
the suspension of the first.
12.3.2 Transfering a call
It is a network service. If the operator offers this service,
make the appropriate configuration. You can divert your
56
incoming calls directly to voicemail or to another phone
number.
1.To set the call forwarding service, enter: MENU>
Settings>. Network> Call Forward.
2. Then choose when you want to forward calls from the
available list: 1 All Talk (Divert all incoming calls to the
dialed number), 2 If busy (Call Forwarding, the incoming
call when you are driving now), 3 if not answered
(Forwards incoming calls if not answered phone), 4 When
out of range (forwards calls when you're off the phone or
you're out of range).
3. Click Activate and enter the number you want to forward
calls to activate the service, or Cancel to close the service.
To see what is currently selected service status, select
Check status
12.3.3 Call Barring
It is a network service. If the operator offers this service,
make the appropriate configuration. This feature allows
you to block various types of connections.
First Go to:
MENU> Settings>. Network> Call
From the list select the type of connection that you want to
block. You can block all outgoing calls, all international
57
outgoing calls, international calls (except calling home), all
incoming calls and incoming calls when roaming.
12.3.4 Selection of network
You can change the dialing mode network between
manual and automatic mode. Choose:
MENU> Settings>. network>
network selection
When you select the manual mode to display all available
networks.
12.3.5 Hiding own number
It is a network service. If the operator offers this service,
make the appropriate configuration. This feature allows
you to hide your number when you call.
Choose:
MENU> Settings>. Network> Hide number
Navigation keys to select the desired option and confirm
the connection.
12.4 PIN code
You can enable or disable the PIN code request when
58
turning phone. This will help protect your phone against
unauthorized use.
First Select MENU> Settings> PIN request
Then select whether you want to enable or disable the PIN
code request on startup of the phone. If you select Turn on
the phone asks you to enter a PIN code (PIN code is
available, along with a starter kit).
12.5 Factory settings
With this option, you can restore the factory settings.
Choose:
MENU> Settings> Restore. Factory, and then enter a
security password. Finally, confirm with the connection.
Warning: The default security password is 0000
13. FAQ (Troubleshooting)
Making phone repair is possible only on and off by an
authorized service. Do not make repairs or modifications
themselves under the threat of loss of warranty!
59
"Unable to
connect"
Please check whether the dialed number is
correct. Choosing the number of another
country, you should always add the
appropriate prefix (eg Germany 0049 or 49)
If you have a prepaid card (supply card),
check whether there are funds in your
account to make a call.
"The SIM card Make sure the SIM card is properly installed.
is inserted,
you can only
carry out
emergency
call (112)"
The phone
Perhaps the phone is off, turn on the phone
does not
by pressing the power button on (red
work,
handset) for about 3 seconds.
When no longer use the phone while the
When you
battery may be able to so. "Deep discharge"
connect the to restore the proper operation of the
charger is not charger should remain connected even
charging
though the display shows nothing.
60
"Can I make
calls while
abroad?"
If you are located outside the country, the
phone automatically logs on to a foreign
network, if it was included roaming. Check
with the operator.
"Is it possible You can not take any calls, if the phone is in
to cover
range.
emergency
calls in a
If you do not have funds in your account is
place where possible to perform an emergency call, dial
there is
112
coverage or if
your account
does not have
the
resources?"
"How can I
If the display shows "not running" indicates
increase the that no relevant input or funds in your
range?"
account. However, in this case, it is possible
to perform an emergency call 112, provided
that we are in the range of a network of
another operator.
Sites such as buildings limited range, should
be closer to the window or go outside of the
grouping of many buildings.
61
"The display is Key lock is on, slide the lock switch (located
a key icon, the on the right side of the phone) up
keys do not
work."
"What is the Center number operator are stored text
message
messages. The number is stored on the SIM
center?"
card but the phone menu can change it and
enter another.
When a fee is The fee is charged immediately after the
charged for connection. Check with the operator, what is
the call?"
the mode of counting.
How to check The report should enable the service. After
if the SMS
delivery of SMS messages you receive
has reached feedback, indicating that the message
the recipient? delivered (network service).
62
14. Terms of use and safety
• Do not turn on if the phone can cause interference to
other devices!
• Do not use the phone without proper kit while driving.
• The phone emits an electromagnetic field that can
have a negative impact on other electronic devices
including, for example medical equipment.
• Do not use your phone in hospitals, aircraft, at petrol
stations and nearby combustible materials.
• Do not make repairs or alterations. Any defects
should be removed by a qualified service technician.
• Your phone is not waterproof, do not put it to action
of water or other liquids.
• The device and its enhancements may contain small
parts. The phone and its components must be
protected from children.
• Do not clean the phone chemicals or corrosive.
• Do not use the phone a short distance from the
payment and credit cards - can cause loss of data on
the card.
15. Warranty
63
The phone is the warranty, which is an integral part of the
proof of purchase.
For repairing phones damaged by improper use, static
electricity or lightning, will be charged. If the user has
attempted to self-repair or alteration will void the warranty!
The above information is included for information.
16. Battery information
The phone comes with a rechargeable battery that can be
recharged with the charger attached to the unit. Shortly
after purchasing the phone, you should format the battery
that is fully charge and discharge it, the cycle repeated
three times. Due to formatting, the battery will have the
best performance.
Time the phone is dependent on various conditions.
Significantly shorter work affects how far it is from the relay
station and the length and number of the talks. During
movement, the phone kept switching between relay
stations, which also has a large impact on working time.
The battery recharges after a few hundred and
rozładowniach naturally loses its properties. If you
observed a significant loss of performance, you should
64
buy a new battery.
Use only the battery off and recommended by the
manufacturer. Do not leave the charger connected for
longer than 2-3 days.
Do not hold the phone in areas with too high a
temperature. This could have a negative impact on the
battery and the phone itself.
Never use a battery with visible damage. This can lead to
short circuit and damage the phone. Insert the battery with
correct polarity.
Leaving the battery in places that are too high or low
temperatures will reduce its life. The battery should be
stored at 15 ° C to 25 ° C. If your battery is inserted in the
cold, the phone may not work properly and there is a risk
of damage.
Included is a rechargeable Li-ion. Used batteries are
harmful to the environment. Should be stored in specially
designated for this point, in container, in accordance with
applicable regulations. Batteries and accumulators must
not dispose of municipal waste, but hand it to your
65
collection.
Never throw a battery or batteries in a fire!
17. Information on SAR
Information about the impact of radio waves and a
coefficient of absorption rate (SAR)
This model meets international guidelines for exposure to
radio waves. The device is a radio transmitter and
receiver. It is designed not to exceed limits for exposure to
radio waves recommended by international guidelines.
These guidelines were developed by independent
scientific organization ICNIRP and include safety margins
designed to assure the protection of all persons regardless
of age and health. These guidelines use a unit of
measurement known as Specific Absorption Rate (SAR) proper absorption.
Appointed by the ICNIRP SAR limit for mobile devices is
2.0 W / kg.
SAR is measured at maximum transmission power, the
actual size of the device while operating is typically below
the level indicated above.
This is due to automatic changes in power equipment, to
ensure that the device uses only the minimum required
66
to connect to the network.
Although there may be differences in SAR values for
different phone models and even for different positions of
use - all of which are in accordance with the provisions for
the safe level of radiation.
World Health Organization concluded that current studies
have shown that there is no need for any special
restrictions in the use of mobile devices. Also notes that if
you want to reduce the impact of radiation should limit the
length of calls or during a conversation using the headset,
or speakerphone would not hold the phone close to your
body or head.
18. Environmental information
Note: This appliance is marked according to European
Directive 2002/96/EC and Polish Act on Waste Electrical
and Electronic waste container.
This marking indicates that the equipment, after its use,
can not be placed together with other waste from
households.
Note: This equipment must not be disposed of in municipal
waste! The product should be disposed of through the
selective collection of items prepared for this.
Proper disposal of your old electrical and electronic
67
equipment helps to avoid harmful to human health and
environmental consequences of the presence of
hazardous components, and improper storage and
processing of such equipment.
Some of the information in this manual may differ from
those that display the phone, it depends on the installed
software and service providers
MM430 ULC3 V1-11-2011
Ver2 10 2010
68