1
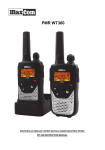
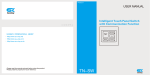
MX-862R-2
HFC Optical Receiver
MX862R-2
USER MANUAL
Provided by: Mega Hertz 800-883-8839 [email protected] www.go2mhz.com
CONTENT
1.0
PRODUCT SUMMARY ........................................................................ 3
2.0
INSTALLATION ................................................................................ 3
2.1
Unpacking ...................................................................................... 3
2.2
Receiver Mounting and Power Connection ........................................... 3
2.3
RF connection ................................................................................. 3
2.4
Optic connection .............................................................................. 4
3.0
3.1
RECEIVER CONTROLS, INDICATORS, AND ALARMS ......................... 5
The operation of the panel ................................................................ 5
4.0
ANNOUNCEMENTS ........................................................................... 7
5.0
ERROR AND REMEDY ....................................................................... 8
6.0
SPECIFICATIONS ......................................................................... 8-9
7.0
GUARANTEE AND REPAIR ITEMS ................................................... 10
Page 2 of 10
1.0
PRODUCT SUMMARY
The MX862R-2 CATV Fiber Optic receivers are designed high reliability with
optical AGC, high level RF output, ease of use, easy to read LED indicators,
and suitable for high-level applications.
2.0
INSTALLATION
2.1
Unpacking
Inspect the shipping boxes for any obvious damages.
Unpack the unit from all packaging boxes.
Inspect the appearance of the unit for any shipping damages.
Document and inform the shipping company and your local representative,
as seen in section 1.2, of the damages.
Save the shipping boxes and their inserts for any future reshipment for
upgrade or repair.
2.2
Receiver Mounting and Power Connection
Place the unit into a 19-inch wide rack or cabinet. Make sure to leave a
1.75-inch (about 4.5cm) space above and below the unit.
Climate
0°C~50°C ( 32°F~122°F ) temperature
range.
We
recommend 25°C(77°F)environment temperatures.
Humidity not higher than 95% in a dust free environment.
Equipment powered by AC or optional DC voltage.
Request of power supply:
AC input
94-245VAC, 50-60Hz
DC input
36-60VDC, floating
Power consumption
Maximum 50W
The DC power supply of the equipment must be the SELV supply
stipulated as CAN/CSA C22.2 No.950-95 standard.
The unit should be grounded, grounding resistance < 4Ω. According to
international standards.
Before connecting circuit, please use spec (#20AWG and larger) electrical
wire to connect the grounding screw on the bottom and the grounding frame.
When use DC input power supply, the equipment chassis must be grounded.
2.3
RF connection
Connect the RF cable & the connector on RX rear panel. RF connector is F
type plug. The resistance is 75Ω.
Page 3 of 10
2.4
Optic connection
1. For your protection & safety, all the fiber optic connectors need protective
covers during transportation.
In order to ensure the insertion loss & return loss, the end-face of the
fiber optic connector is polished. Connector should be clean. Dust will
affect the transmission quality. When not using the fiber optic
connector, please place the protection cover over the connector.
Clean all fiber patch cords before connecting to the receiver.
Cleaning Guidelines:
Fiber Patch cord connectors
- Remove the fiber connectors dust cap and wipe the fiber connector tip
with a dry lint-free cloth (such as Kim wipes). Inspect for scratches or
debris on connector surface by using a microscope (ie.100x or 200x).
Fiber Bulkhead connectors
- Compressed air may be used to clean fiber bulkhead connectors. Use
compressed air with at least the following specifications:
- Non-residue, inert gas for precision dust removal
- Ultra-filtered to < 0.2 microns
- Recommended for optical systems
- Using compressed air as listed above, remove the bulkhead dust
cover and hold the can of compressed air about 6 inches from the
connector. After spraying a few short bursts into the bulkhead, the
connector should be clean and ready for connection.
- If compressed air is not available, the receiver fiber bulkhead
connector may be cleaned by a 2.5 mm cotton swap or connector plate
may be removed to clean the internal fiber patch cords.
- Slowly remove the optical connector plate from the rear panel and
disconnect each fiber connector from the bulkhead mounted on the
plate.
- Clean each fiber connector according to section A of the fiber cleaning
guidelines.
2. Connect the optic patch cord with output 1 port on real panel.
3.0
CAUTION: Use caution when handling fibers.
Do not exceed fiber manufacturers pulling tension or bend radius
specifications when removing fiber bulkhead connector plate.
Page 4 of 10
Receiver Controls, Indicators, and Alarms
This section of the manual will give an overview of the available menus in the
MX862R-2 series optic receiver and their descriptions. All instructions in Section
2.0 refer to the representation of the front panel shown in the diagram below. The
user scrolls through the menus using the push bottoms found on the front panel,
these are located just to the right of the LCD screen.
The operation of the panel
3.1
Open menu
3.1.1
A.
Plug in 110V power supply
B.
Turn on power switch in the rear panel
Unit enters the self-check mode, after validating, it enters working status,
and will display “Forward optic receiver”.
RX1
Status lamp Red
RX2
Status lamp Red
TEMP
Status lamp Green
POWER1
Status lamp Green
AGC
Status lamp Green
If the equipment operates with dual power supply, status indicator
of “POWER2” is in green.
If the status is changed from “AGC” to “MGC”, its status indicator
turns to green.
3.1.2
Start-up main menu
Press “STATUS” button will display below menu in sequence.
Menu # 1 - S/N
Read-only menu, indicates the serial-number
Menu # 2 - INPUT
Read-only menu, indicates the input optical power
Page 5 of 10
Menu # 3 - UNIT TEMP
Read-only menu, indicates the system temperature
Menu # 4 - RF LVL
Read-only menu, indicates the RF input level
Menu # 5 - RF MODE
Current RF mode, display AGC/Manual
If it appears RF Mode = AGC, while it was in the state of AGC
If it appears RF Mode = Manual, while it was in the state of MGC
Menu # 6 - +5V Reads
Read-only menu, display the voltage +5V
Menu # 7 - -5V Reads
Read-only menu, display the voltage -5V
Menu # 8 - +24V Reads
Read-only menu, display the voltage +24V
Menu # 9 - IP
Adjustable list, display the IP address of SNMP (optional)
Menu # 10 -
Subnet
Adjustable list, display the address of net mask (optional)
3.1.3
Menu assistant manual
Press STATUS key for 1 or 2 seconds to amend the address menu that you
wish to change, press STATUS for 1 or 2 seconds to choose the amend
location, push STATUS currently value +1, press STATUS to the end of the
address to enter into save and exit.
For example, amend IP setup menu, IP: 192.168.000.015; if changing 5 to
6, use STATUS key to choose the place of 5, then press STATUS key to
change 5 to 6, then press STATUS to save amended IP: 192.168.000.016
The default control mode is AGC. When the OMI modulation menu displays
RF Mode=AGC, press "▲" key and the menu will display RF Mode=AGC (AGC
flicker). Then press "▼", the menu will display RF Mode=Manual and the
change from AGC to MGC has been completed. If you want to change the
current control mode back into AGC, press "▲" key when the current menu
displays RF Mode=Manual, then the menu will display RF Mode=AGC (AGC
flicker). Then press "▼", the change from Manual to AGC will be complete
and the menu will display RF Mode=AGC.
Page 6 of 10
4.0
A.
ANNOUNCEMENTS
Received power: the received power should be between -12~+2dBm (1- to 0
is optimal), received power too low also may continue to operate, but CNR will
rapidly deteriorate. Received power too high will cause CTB, CSO deterioration.
When received power>3dBm(2mW) may damage optical receive module.
B.
RF output level: optical receiver’s RF output level related to receive power
and optical receiver’s RF drive level (that is modulation coefficient). Received
power to increase or reduce 1 dB, optical receiver of the RF output level would
increase or decrease 2 dB (1:2). Optical receiver RF drive level to increase or
reduce 1 dB, optical receiver RF output level would increase or decrease 1 dB (1:1).
When received power is –2dBm, RF output level is 35dBmV±1dB. RF working
output level can modulate through ATT1. *(Note, for high output models, there is
an additional RF level control <red know> on top of receiver <top of chassis> that
should be used to adjust the RF output level).
C.
CTB and CSO: RF output level too high will cause CSO and CTB index to
experience deterioration. Output level increase 1dB, CTB deteriorates 2dB, CSO
deteriorates 1.5dB.
D.
When properly adjusted, the optical receiver RF output level should ensure
the distortion index CTB≤-65dB, CSO≤-60dB.
Page 7 of 10
5.0
1.
ERROR AND REMEDY
No RF output
a)
Check the power supply of the unit to determine whether it is normal.
b)
Insert optical connector, if the RX-Low is showing a red light, or no optical
power, you should use an optical power meter to measure the optical
power of the optical cable output connector. If optical power is normal, it
may not be seated well into the optical connector, (this unit adopts
SC/APC), or optical receiver module may be damaged, If damage is
suspected,
you
should
contact
Maxcom
and
return
for
factory
maintenance.
c)
Insert optical connector, if the RX-Low is still showing a green light, and
optical power is within normal range, you may check FL, EQ, ATT1, or red
RF adjustment knob on top of the units chassis .
2.
RF output level too low(<20dBmV)
a)
Check received optical power to determine if too low. (<-12dBm)
b)
If optical power is normal you may check all connections. If all are normal,
power double module BGD702 may be damaged. When BGD702 working
in high current (435mA) such as the units installation of grounding is poor,
electrostatic may lead to damaged module (may need to be returned for
factory maintenance)
c)
Check FL, EQ, ATT1, or red RF adjustment knob on top of the unit’s
chassis .
3.
RF output level too high causing the distortion index to be deteriorated
a)
Check received optical power to determine if too high, such as >3dBm
you should install an optical attenuator.
b)
Check the head-end optical receiver’s RF drive level whether too high.
Optical receiver’s RF drive level determines the modulation, it also
determines the system index (CNR, CTB, CSO). Designing should meet
optical receiver manufacture requirement.
c)
Manufacture presented RF drive level Si when in full channel (NTSC/77ch,
PAL-D/59ch). When system transfer N channel practice, RF drive level SiN
should amend as follows:
d)
SiN=Si+10Lg(77/N)
(NTSC/77ch)
SiN=Si+10Lg(59/N)
(PAL-D/59ch)
If received optical power and optical receiver RF drive level are all normal,
optical receiver RF output power can modulated through ATT1, or red RF
adjustment knob on top of the units chassis
Page 8 of 10
6.0
Specifications
Technical index
Performance
Optic feature
wavelength
(nm)
Input power
(dBm)
Working mode
Return wave loss
Output level
-5~+3
Optical AGC
(dB)
Optical connector
Bandwidth
1310 / 1550
≥55
SC/APC
(MHz)
(dBmV)
45~862
53
Flatness
(dB)
≤±0.5
Output level adjustable
(dB)
0~20(MGC)
Reflect loss
(dB)
≥16(750MHz)
(Ω)
75
RF feature
Output impedance
Test channel
PAL-D/60ch
CNR
(dB)
≥52(10Km fiber, -1dBm receive)
CTB
(dB)
≤-70
CSO
(dB)
≤-63
Link feature
Network management interface
RJ45,RS232(support IE and SNMP)
option
General
feature
Power supply
(V)
110VAC
Power Consume
(W)
≤50(single power work)
Work temp.
(℃ )
Storage temp.
(℃ )
-40~85
Relative humidity
(%)
5~95
Size (W)x(D)x(H)
-5~65(Machine temp. Control
automatically)
19×10×1.75 ( " )
483×254×44 ( mm )
Page 9 of 10
7.0
GUARANTEE AND REPAIR ITEMS
1.
Each unit is packaged with a Products Qualification label, with the series
number providing one-year’s guarantee.
2.
In case of Red indicator LED blinking (Alarm). Please return for repair. User
should not open the top cover for repair, or warranty will be voided.
Provided by: Mega Hertz 800-883-8839 [email protected] www.go2mhz.com
Page 10 of 10