1
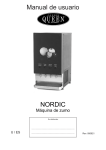
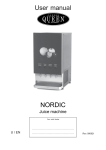
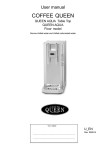
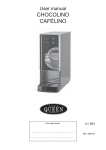
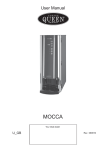
User manual
Juice machine
Torn
Your retail dealer
...............................................................................
...............................................................................
U / EN
Rev. 090914
List of contents
List of contents
Dispenser description
Installation
Cleaning instructions
Trouble shooting
Notes
Technical data
page 2
page 3 -7
page 8 - 9
page 10
page 11-12
page 13
page 14
2.
Dispenser description Torn
General description Torn juice machine
Please read this manual before you take the machine into operation
for the first time. The manual contains important instructions for a safe and proper use of the
machine. Always keep this manual within reach for the user!
The juce machine should be installed and serviced by trained staff.
Tower is a dispenser for mixing water and juice concentrate to a ready drink product.
The dispenser is for 2 to 3 drinks.
OPTIONS
Bag shelf.For 2 - 3 boxes.Fitted with 2 - 3 pinch solenoids.
Prevents the silicon tube to kink and makes the
handling of bag and box easy.
Note! Not for bag-in-box with vitop connection.
Trolly for tower..Built in bag shel fitted with 2 - 3 pinch solenoids.
Fitted with 4 wheels, .2 lockabled wheels.
3.
Dispenser description Torn
Picture
description
Water regulator
The water-regulator can be adjusted up to 6 bar.
The minimum pressure is 2,7 - 3,2 bar.
Note! When adjusting the pressure, dispense product.
If a water cooler is used shall the water regulator be fitted
before the cooler.
In the trolly is the water regulator located under the
bag shelf.
Ejector
The mixing ratio is adjusted on the ejectors. When water
flows through the ejector, the concentrate mixes with the
water.
Turn the adjustment screws according to the label on the
ejector in order to increase or decrease the amount of
concentrate.
Ejector
Water valve
Water valve
The Water valve is connected to the ejector and opens the
water-flow. Parallel connected to the water valve is cables
to the pinch solenoid connected.
4.
Dispenser description Torn
Picture
Push-buttons
description
Push-button
The push button on the tower control the water valves and
the pinch solenoid.
Transformer
The transformer is a 230 / 24 V (32 VA).
The transformer supplies 24 V to the magnetic-valves.
Mount the transformer on the wall, and connect it to the
wallsocket.
One way valve
At the end of each product tube there is a one way valves
pushed in to the tube.
If the tube is shortened make sure that the one way valve
is put back in to new shorter tube.
5.
Dispenser description Torn
Picture
description
Drip tray
Stainless steel drip tray with possibility to connect
drainage. can been cleaned in a dishwasher.
Water cooler.
Is cooling water to the tower.
Can be fitted external for stand alone tower or
be fitted in to the trolly for tower.
Air circulation
Make sure that the cooler has enough air circulating through the unit.
The cooler can not be installed in a cabinet unless it has plenty of air circulating through
the cabinet.
This is hard to get in most cabinets. Install the cooler in a open space not covering the
ventilation holes of the cooler.
Make sure to have at least 30 cm of free space around the cooler.
Large particle-filter
A large particle-filter is fitted between the cooling block
and the water valves.
It is possible to rinse the filter if needed.
6.
Dispenser description Torn
Picture
description
Bag shelf
Install the bag shelf as close to the tower as possible.
The length of the product tubes can newer be extended
longer then it is from factory.
Connect the product tubes to its connectors located at the
inside of the bag shelf with tube clambers.
Pinch solenoid
Rectifier.
Connect the cables from the water valve to its pinch
solenoid.
Do not forget the rectifier.
Pinch solenoid
7.
Installation Torn
Separate tower with or without water cooler.
1.
Connect the water hose from the tower to the water regulators out going line.
Please observe If a water cooler is used this tube shall be fitted to the cooler coil number 1 first
and then from the other side of number 1 coil on the cooler to the water regulator. (Connect the
particle filter on to this tube).
2.
Connect the in going line to the regulator to the water main (cold water). It is strongly
recommended to use some sort of water stop in case of a emergency leakage.
Flush the water main line before connecting the hose to get rid of any particles in the main lines.
3.
Turn on water and look for leaks.
4.
Connect the product tubes from the tower on to the bag connectors with a tube clamps.
Make sure that they go on to the right ones left to left and so on.
5.
6.
7.
8.
Connect the pinch solenoid cables from the tower to the pinch solenoids (left to left and so on).
Connect power to the transformer and the cooler if used.
Take out water from the tower by pushing on one button.
Check the water pressure while taking out water from a product button. (2,7 bar on the gage at
the water regulator).
9.
10.
11.
12.
Connect a bag to the bag connector and through the pinch solenoid.
Draw out product up to the tower by pressing its push buttons.
Adjust the brix, use the adjustment screw on the ejector.
The dispenser is now ready to use.
8.
Installation Torn
Tower on trolley with or without water cooler
1.
Connect the water hose from the water main to the trolley. Connection on trolley is located
underneath the trolley. It is strongly recommended to use some sort of water stop in case of
a emergency leakage. Flush the water main line before connecting the hose to get rid of
any particles in the main lines.
2.
3.
4.
5.
Turn on water and look for leaks.
Connect the power to the trolley.
Take out water from the tower by pushing on one button.
Check the water pressure while taking out water from a product button. (2,7 bar on the gage
at the water regulator).
6.
7.
8.
9.
Connect a bag to the bag connector and through the pinch solenoid.
Draw out product up to the tower by pressing its push buttons.
Adjust the brix, use the adjustment screw on the ejector.
The dispenser is now ready to use.
9.
Cleaning instructions Tower
Connecting the BIB.
1.
Open the box at the perforation underneath, pull out the tube
and the coupling. (See fig 1). Open the seal to the box by screwing
in the part with the tube in the coupling into the box.
Make sure to fit the couplings completely into each other.
2.
Place the box on the BIB-stand. Press the button on the pinch
solenoid valve and place the tube in the slot. (See fig 2).
Fig. 1.
3.
Push the tube coupling into the grey coupling and turn the knob
on the tube coupling to open.
4.
Press each push button to allow the concentrate into the tower.
The dispenser is now ready to use.
Fig. 2.
Cleaning
1.
The system shall be rinsed once a day by hot water.
2.
Close the knob on the tube coupling to the bag and disconnect the
coupling from the BIB stand.
3.
Fill a bucket with lukewarm water. Put the hose into the bucket
and connect the hose to the coupling on the BIB-stand. Flush
with at least 3 litres of water through each product by pressing
respective push button. (See fig 4).
4.
Dismount the outlet and clean pipes with a brush.
Fig. 3.
5.
Rinse the pinch solenoid valve when needed.
Rinse the pinch solenoid valve in hot water.
6.
Perform points 3-4 when connecting e new bag.
Fig. 4.
10.
Trouble shooting Torn
Problem
Concentrate is
Dripping from outlet
pipe.
Mostly water or only
water coming from
outlet pipe
The drinks are not cold
Nothing happens
when I push the
buttons, and there is
no ”clicking” sound.
Only water is
dispendsed.
The taste is to
strong or weak.
Probable cause
Attend to
The tubes to the tower
needs a cleaning.
Clean tubes going up to
the tower.
The tube is kinked due
to incorrect length.
Cut the tube to correct
length.
The tube is twisted.
Untwist the tube.
The bag is empty.
Replace bag.
Failure in thermostat.
Replace thermostat.
Failure in cooling system.
CALL Service.
No power to the valves.
Check the valve on/off
switch inside the door.
A fuse in the transformer is
blown.
Remove power to the
dispenser and change
fuse.
The pinch solenoid valve is
not working properly.
Clean the pinch solenoid
valve with hot water.
The bag is not properly.
installed.
Disconnect the bag and
connect again.
The bag is empty.
Replace bag.
The ejector is not adjusted
correctly.
Adjust the brix.
11.
Trouble shooting Torn
Problem
Probable cause
Attend to
Water supply turned off
Check water supply
Water regulator turned off
or failed.
Check water regulator
The cooling coil has
frozen.
Shut off water supply and
Call service.
It constantly drips fluid
from the outlet pipes.
There may be dirt in the
water valve
Shut of water supply.
Open the water valve and
clean it.
The drinks are not
cold enough.
The thermostat is not
properly set.
Turn the adjustment
screw 1mm at a time.
See note 1.
Nothing happens
when you push the
buttons, and there is a
”clicking” sound.
Contact the supplier or
an authorised service
company.
Troubles with cooling
system.
12.
NOTES Torn
NOTES
NOTE 1.
The thermostat is factory adjusted and improper
adjustment may cause the cooling system to freeze
causing damage to the machine. Use caution when
adjusting the thermostat.
NOTE 2.
It is strongly recommended to use some sort of water
isolator in the water line in case of an emergency
leakage.
NOTE 3.
If juice machine has been frozen or not been in used for a
long time, inspect all couplings and water hose before
machine takes in use again.
NOTE 4.
Maximum ambient temperature in the room where
the dispenser is located should not exceed more
then 25 °C.
13.
Technical data Torn
Electrical connection
Water connection
Compressor
Refrigator
Cooling capacity
Cooling system
Dispenser measurement
230 V/50 Hz/ 2,5 A
3,0 m Tube with 3/8" internal thread (minimum 2,5bar
water pressure.)
Elektrolux GL 80
HFC-134 A Amount to fill 240 gram
294 W
Dry block with stainless-steel pipes inside.
Height
399 mm
With
145 mm
Depth
336 mm
14.
Torn
Juice machine
FOR SERVICE
Please contact your retail dealer
Din återförsäljare / Your retail dealer
...............................................................................
...............................................................................
...............................................................................
CREM International AB
Box 960, 671 29 ARVIKA, Sweden
Tel: +46 (0)570-477 00, Fax: +46 (0)570-47719
E-mail: [email protected] www.creminternational.com
Art. nr/Art. no. 1704147