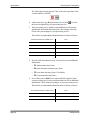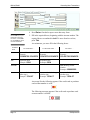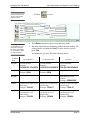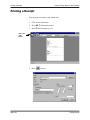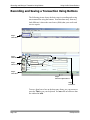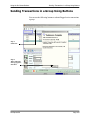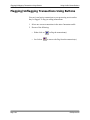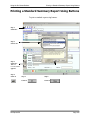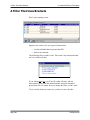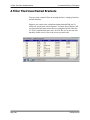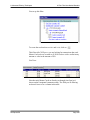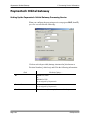
1
CN!Express R CX-6000® ~Single User~ Version 3.38 Federally-Approved AES Encryption Auric Systems International P.O. Box 458 Peterborough, NH 03458 603-924-6079 [email protected] [email protected] www.AuricSystems.com Copyright © 1994-2004 by Auric Systems International All rights reserved. CN!Express is a registered trademark of Auric Systems International Windows is a trademark of Microsoft Corporation. All other product names are trademarks of their respective owners. License Agreement 1. LICENSE: You have the non-exclusive right to use the following CN!Express program and documentation (“Program”). This Program may only be used on the number of computers licensed by you. You may physically transfer the Program from one computer to another, provided that the Program resides on only one computer at a time for each Program license. YOU MAY NOT USE, COPY, MODIFY, DECOMPILE, REVERSE ENGINEER, TRANSFER, OR DISTRIBUTE THE PROGRAM OR DOCUMENTATION EXCEPT AS EXPRESSLY PROVIDED IN THIS LICENSE AGREEMENT. 2. BACKUP AND TRANSFER: You may make copies of the Program solely for backup purposes. If you do so, you must reproduce and include the Program’s copyright notice on each backup copy. You may transfer this license to another party provided the other party agrees to these terms and conditions. If you transfer the license, you must simultaneously transfer the documentation and destroy all backup copies of the Program. 3. TERM: This license will terminate immediately and without notice if you fail to comply with any term or condition of this Agreement. You agree, upon such termination, to destroy all copies of the Program, including all documentation. 4. LIMITED WARRANTY: Program media, if any, is warranted to be free from defects in material and workmanship upon delivery to you. Upon return to us, postage prepaid, any media found by us to be defective when delivered to you will, at our election, be replaced or your purchase price will be refunded. We do not warrant that the operation of the Program, including documentation, will be uninterrupted or error-free. Except with respect to indemnification as set out below, in no event will we be liable for direct, indirect, special, incidental, or consequential damages arising out of the use of, or inability to use, the Program or documentation, and in no case shall our liability exceed the amount of the license fee. THE FOREGOING WARRANTY IS PROVIDED IN LIEU OF ALL OTHER WARRANTIES, EXPRESS OR IMPLIED AND, EXCEPT AS PROVIDED HEREIN, WE MAKE NO WARRANTIES OR REPRESENTATIONS OF ANY KIND, EITHER EXPRESS OR IMPLIED, WITH RESPECT TO THE PROGRAM, MEDIA OR DOCUMENTATION, INCLUDING THEIR QUALITY, PERFORMANCE, MERCHANTABILITY, OR FITNESS FOR A PARTICULAR PURPOSE. Some states do not allow the limitation of implied warranties so these limitations above may not apply to you. 5. INDEMNIFICATION: We agree to indemnify you and hold you harmless from and against any claims, actions, or demands alleging that the Program infringes any United States patent, trademark, copyright, or other intellectual property right of any third party registered with the United States Patent and Trademark Office. However, we shall have no obligation hereunder for or with respect to claims, actions, or demands alleging infringement that arise by reason of the combination of the Program or any part thereof with any items not supplied by us. The foregoing indemnities are conditioned on prompt written notice of any claim, action, or demand for which indemnity is claimed, complete control of the defense and settlement thereof by us, and your cooperation in such defense. 6. EXPORT CONTROLS: You may not use the Program or applications incorporating Program components except in compliance with all applicable United States export laws and regulations. 7. CHOICE OF LAW: This license shall be governed and construed in accordance with the laws of the State of New Hampshire, without giving effect to its conflicts of laws principles, and the courts of which shall have exclusive jurisdiction over all disputes arising hereunder. 8. ACKNOWLEDGMENT: YOU ACKNOWLEDGE THAT YOU HAVE READ THIS AGREEMENT, UNDERSTAND IT, AND AGREE TO BE BOUND BY ITS TERMS AND CONDITIONS. YOU ALSO AGREE THAT THIS AGREEMENT IS THE COMPLETE AND EXCLUSIVE STATEMENT OF AGREEMENT BETWEEN THE PARTIES AND SUPERSEDES ALL PRIOR PROPOSALS, AGREEMENTS, OR UNDERSTANDINGS, WRITTEN OR ORAL, WITH RESPECT TO THE SUBJECT MATTER OF THIS AGREEMENT. Should you have any questions concerning this Agreement, please contact in writing: Auric Systems International 85 Grove Street P.O. Box 458 Peterborough, NH 03458 CN!Express R CX-6000® ~Single User~ Version 3.38 Federally-Approved AES Encryption Auric Systems International P.O. Box 458 Peterborough, NH 03458 603-924-6079 [email protected] [email protected] www.AuricSystems.com Table of Contents Chapter 1. Welcome to CN!Express Single User ................. 1 Using This Manual .........................................................................2 Printing This Manual and the Quick Reference Card.....................3 Contacting Auric Systems International.........................................4 Chapter 2. Installing and Setting Up CN!Express ................ 5 Minimum and Recommended System Requirements ....................6 Installing CN!Express.....................................................................7 Starting Up the First Time ............................................................12 Changing the Default Password for ADMIN ...............................14 Setting Up Other Users.................................................................15 Uninstalling and Reinstalling CN!Express...................................22 Chapter 3. Starting Up, Shutting Down, First Transaction............................................................................. 23 Starting Up CN!Express ...............................................................24 Shutting Down CN!Express .........................................................25 Before You Try Your First Transaction .......................................26 Creating and Sending Your First Transaction ..............................27 Chapter 4. Going Live and Changing Your Password....... 31 Switching to the Live Version ......................................................32 Setting Up Your Processing Service ............................................33 Switching the Live Version into DEMO Mode............................35 Using the Live CN!Express ..........................................................39 Changing Your Password .............................................................40 CN!Express SU Page i Table of Contents CN!Express SU Chapter 5. Understanding the CN!Express Screen ........... 41 Understanding the CN!Express Screen ........................................42 Menu Bar ......................................................................................43 Print/Flag Buttons Bar ..................................................................44 Active and Completed Transactions Tables .................................45 Filter Buttons/Message Bar ..........................................................48 Data Entry Forms..........................................................................49 Transaction Buttons/Messages Bar ..............................................55 Status Bar......................................................................................56 Standard Buttons and Keyboard Commands................................57 Chapter 6. Recording New Transactions ............................ 59 Sale ...............................................................................................60 Authorization ................................................................................64 Delayed Capture/Deposit..............................................................68 Refund/Credit ...............................................................................70 Void ..............................................................................................75 Voice Authorization and Capture (Forced Capture).....................76 Partial Void...................................................................................80 Split Capture .................................................................................82 Chapter 7. Sending Transactions ........................................ 85 Sending Several Transactions in a Group.....................................86 Saving and Sending One Transaction in One Step.......................88 What Happens after You Send a Transaction...............................89 Chapter 8. Changing and Flagging Transactions .............. 91 Selecting a Transaction.................................................................92 Changing (Editing) an Active Transaction ...................................94 Deleting or Closing an Active Transaction ..................................95 Requesting Fraud Detection on a Transaction..............................97 Flagging or Unflagging an Active Transaction ............................99 Chapter 9. Changing Tables: Layout, Sorting, Filtering.. 103 Deciding Whether Your Changes Affect Both Tables ...............104 Adding, Removing and Re-ordering Columns on the Tables ....106 Sorting the Tables .......................................................................109 Filtering the Tables .....................................................................110 Page ii CN!Express SU CN!Express SU Table of Contents Chapter 10. Printing Tables, Reports, and Receipts........ 117 Printing the Tables......................................................................118 Printing a Standard Summary Report .........................................122 Changing the Print Setup for Tables and Reports ......................125 Customizing Table Printouts and Standard Reports...................126 Printing a Receipt .......................................................................128 Chapter 11. Customizing Your System Settings.............. 131 Changing the General Options ...................................................132 Setting Up Currencies.................................................................134 Setting Up Countries ..................................................................136 Changing Receipt Settings..........................................................138 Chapter 12. Working with Batches .................................... 141 Closing Batches ..........................................................................142 Batch History ..............................................................................143 Chapter 13. Importing, Exporting, and Archiving ............ 145 Importing Files ...........................................................................146 Exporting Transactions...............................................................152 Archiving Completed Transactions ............................................159 Chapter 14. Using the On-Screen Buttons ....................... 161 Recording and Saving a Transaction Using Buttons ..................162 Sending Transactions in a Group Using Buttons........................163 Flagging/Unflagging Transactions Using Buttons .....................164 Printing a Standard Summary Report Using Buttons .................165 Creating a Custom Report Using Buttons ..................................166 Chapter 15. Maintenance and Troubleshooting ............... 169 Maintenance Contract.................................................................171 Backup and Restore ....................................................................173 Troubleshooting Questions and Answers ...................................174 Appendix A. Advanced Filtering Techniques.................... 177 Understanding the Define Filter Screen .....................................178 CN!Express SU Page iii Table of Contents CN!Express SU A Filter with Two Conditions.....................................................181 A Filter That Uses Brackets........................................................186 A Filter That Uses Nested Brackets ...........................................188 Appendix B. Client/Server ................................................... 191 Appendix C. Processing Service Information ................... 193 Paymentech Orbital Gateway .....................................................194 Appendix D. Keyboard Shortcuts....................................... 197 Index..................................................................................... 205 Page iv CN!Express SU Chapter 1. Welcome to CN!Express Single User Thank you for selecting CN!Express Single User (SU) CX-6000 to process your credit card, purchase card, and check transactions. CN!Express connects you directly with your credit card, purchase card, and check processing service. CN!Express offers the following features: • Secure storage of credit card and checking account numbers, using Federally-approved AES encryption • Commands, fill-in-the-blank forms, menus, and buttons that make it easy for any user to record and send transactions • On-screen information about each transaction that you can customize for your individual needs • Prompts, messages, and reports that tell you the exact status of each transaction • Standard reports and filters available with one click of the mouse CN!Express works with many different operating systems, processing services, and currencies. No matter what processing service you use, and no matter where your business takes you, CN!Express is ready. This chapter contains information on using the manual and contacting Auric Systems International. CN!Express SU Page 1 Welcome to CN!Express Single User Using This Manual Using This Manual The step-by-step instructions in this manual explain how to operate CN!Express using your keyboard for most tasks. The names of keys on your keyboard are printed in bold as follows: Enter. Here are some examples: If You See . . . Do This . . . Press Enter. Press the Enter key. Press Alt T. Press the Alt key and the letter T key at the same time. Press Ctrl P. Press the Ctrl key and the letter P key at the same time. Press F2. Press the F2 function key. Press Y. Press the letter Y key by itself. The titles of screens and any information that appears on the screens (for example, the names of boxes or tabs) are printed as follows: Active Transactions. If you prefer to use only your mouse and the on-screen buttons to record, send, and report on transactions, see “Chapter 14. Using the On-Screen Buttons” on page 161. Page 2 CN!Express SU Printing This Manual and the Quick Reference Card Welcome to CN!Express Single User Printing This Manual and the Quick Reference Card You can view and print this manual from the Help menu. Press F1. The “Quick Reference Card” is also available from the Help menu (press Alt H, then Q), for easy reference while you work. The Quick Reference Card runs through the basic steps for starting up, shutting down, recording and saving a transaction, sending a transaction, editing and deleting a transaction, filtering, and printing. To view and print the manual and Quick Reference Card, you need Adobe Acrobat Reader. You can download Acrobat Reader for free: 1. Press Alt H (Help menu). 2. Press G (Get Acrobat Reader). 3. Follow the instructions at the Adobe Acrobat website. Bound, hard copies of this manual are also available from Auric Systems International. Contact support ([email protected]) to purchase your copies. CN!Express SU Page 3 Welcome to CN!Express Single User Contacting Auric Systems International Contacting Auric Systems International To contact Auric Systems International: Phone: 603-924-6079 E-mail: [email protected] (technical support) [email protected] (sales) Web Site: www.AuricSystems.com When you call, please have your serial number handy. When you purchased CN!Express over the Internet, the serial number and activation key were faxed or e-mailed to you. After you install the live CN!Express, you can find your serial number and activation key under the Help menu: 1. Press Alt H (Help menu). 2. Press A (About). 3. Scroll down to find Serial Number and then Activation Key. 4. Write down the numbers. 5. Press Enter to leave the Help menu. Page 4 CN!Express SU Chapter 2. Installing and Setting Up CN!Express This chapter describes the minimum and recommended system requirements for CN!Express Single User; how to install the software on your computer system; and how to set up CN!Express. CN!Express SU Page 5 Minimum and Recommended System Requirements Installing CN!Express Minimum and Recommended System Requirements Minimum System Requirements CN!Express requires: • A minimum of 128 Mbytes of memory • An active TCP/IP connection and fixed IP address for submitting transactions to your processing service. CN!Express runs on any of the following platforms: • NT 4.0 • NT 2000 • XP For initial installation, you’ll need approximately 40 Mbytes of hard disk space. You should install Internet Explorer 5.5 (or better) with 128-bit encryption. Recommended System Requirements For the best performance, use Windows NT 4.0, NT 2000, or XP, with a minimum of 128 Mbytes of memory. You should keep a minimum of 100 Mbytes of free disk space to ensure a long-lived and trouble-free installation. Additional information about system requirements is available at www.AuricSystems.com. Important Information Your processing service has its own minimum operating requirements. See “Appendix C. Processing Service Information” on page 193 for information on your specific processing service. CN!Express Single User is designed to be installed and run from the desktop. It should not be run from a shared server. If you’re working in a shared environment, use CN!Express Multi-User. Page 6 CN!Express SU Installing CN!Express Installing CN!Express Installing CN!Express CN!Express always automatically installs in the demonstration (not the live) version. After you configure CN!Express the way you want and practice using it, you switch manually to the live version. • With the demonstration version of CN!Express, transactions never go anywhere; the demonstration version merely acts as if they did. • With the live CN!Express, transactions are really sent to and processed by your processing service. (The live CN!Express also offers a DEMO mode. This is not the same as the demonstration version, although it acts the same. DEMO mode can be switched on and off for individual users.) You can install the demonstration version even if you haven’t purchased and registered the live CN!Express. The demonstration version lets you try out the application and procedures without worrying about mistakes. However, you can’t run the demonstration version on the same computer as the live version. 1. Begin the installation from the Auric Systems International web page (www.AuricSystems.com). Go to Downloads and follow the instructions for downloading CN!Express Single User CX-6000. The following screen appears: CN!Express SU Page 7 Installing CN!Express Installing CN!Express 2. Click on 3. Read the license screen. Print it if you like. Click on to accept the license and to view: 4. Click on Page 8 to view: CN!Express SU Installing CN!Express Installing CN!Express 5. Click on to view: 6. Click on to view: 7. Click on CN!Express SU to view a screen like the following: Page 9 Installing CN!Express Installing CN!Express Click on the processing service you want to use. 8. Click on to view: 9. Click on An icon appears on your desktop: Page 10 CN!Express SU Installing CN!Express Installing CN!Express After installing the demonstration version of CN!Express, you may want to: Do This . . . Auric Systems International strongly recommends that you practice using the features of CN!Express in the demonstration version before you switch to live. CN!Express SU For Instructions, See . . . START UP page 12 CHANGE THE ADMIN PASSWORD (RECOMMENDED) page 14 SWITCH TO THE LIVE CN!EXPRESS page 31 Page 11 Starting Up the First Time Installing CN!Express Starting Up the First Time When you “double click,” you click the mouse button quickly two times. You must type both the User name and Password. The User name is ADMIN. The Password is ADMIN. As soon as CN!Express starts up, change the password immediately, as explained on page 14. 1. On your computer desktop, double click on to view: 2. In the User box, type ADMIN (in all capital letters). 3. Press the Tab key on your keyboard. 4. In the Password box, type ADMIN (in all capital letters.) The screen hides your password and shows *****. 5. Press Enter to view a screen like the following: Page 12 CN!Express SU Installing CN!Express The same word appears when CN!Express is live and in the DEMO mode. CN!Express SU Starting Up the First Time The word DEMO appears in the upper right corner. As long as DEMO is on the screen, you can’t really send transactions to your processing service. Page 13 Changing the Default Password for ADMIN Installing CN!Express Changing the Default Password for ADMIN You should change the default password for the ADMIN user immediately. The ADMIN user has special privileges. For example, the ADMIN user can decide which users are allowed to give refunds and how much money they’re allowed to handle. You don’t want everyone to be able to make those decisions. Only the ADMIN user can change the ADMIN password. To change the default password for ADMIN: 1. Press Alt C (Configure menu). 2. Press S (Set Password) to view: 3. Type the default password ADMIN in the Current Password box. 4. Press the Tab key on your keyboard. Your new password must be at least four characters long. CN!Express is casesensitive. For example, ADMIN, Admin and admin are three different passwords. 5. Type a new password in the New Password box. (The password appears as a series of asterisks: ******.) 6. Press the Tab key on your keyboard. 7. Type your new password again in the Re-enter to Confirm box. (The password appears as a series of asterisks: ******.) 8. Press Enter. From now on, when you log in as ADMIN, you must use the new password. Do not forget your new ADMIN user password. Page 14 You can’t add or delete users, archive or change your processor setup unless you log into CN!Express as an ADMIN user; and you can’t log in without your password. CN!Express SU Installing CN!Express Setting Up Other Users Setting Up Other Users You must be an ADMIN user to add or delete other users or change their user information. You can add and delete users, change their user privileges (the types of information they can see or change on CN!Express), decide whether they can issue refunds, and limit the amount of money they can handle during a single transaction. Adding a User To add a user to the system: 1. Make sure you are logged into the system as an ADMIN user. 2. Press Alt C (Configure menu). 3. Press U (Users) to view: CN!Express comes with two user accounts: ADMIN (for the ADMIN user) and DEMO (so that anyone can use CN!Express in DEMO mode). 4. Press A (Add) to view: CN!Express SU Page 15 Setting Up Other Users Installing CN!Express A unique name for the user account (any combination of 4 to 20 characters). A check-mark in this box means the specific user always works in DEMO mode; since transactions aren’t really saved or sent to a processing service, this mode is most useful for training. The last and first names of the user. A unique password (at least four characters); you’ll see **** in the boxes. A check-mark in this box means the user must enter his or her password to start CN!Express; if you remove the check-mark, the user can change the password to no characters (blank) and still log in. Auric Systems International recommends that you keep a check-mark here. You can’t give two users the same user name or the same password. 5. Fill out the boxes. Auric Systems International recommends keeping the check-mark at Require Password for this User. 6. Click on the Privilege Settings tab to view: A check-mark in this box means the user can make refunds; if this box is left blank, the user can’t make refunds. A check-mark in this box means the user can export transactions; if this box is left blank, the user can’t export. Type the maximum amount that the user is allowed to handle during any transaction (including sales and refunds); if this box is left blank, the user can handle any amount (there isn’t any maximum). Page 16 CN!Express SU Installing CN!Express Setting Up Other Users 7. Click on the Defaults tab to view a screen like the following: The information you should enter on this screen depends on the requirements of your processing service. This screen shows the defaults that appear on the Main data entry form every time this particular user starts a new transaction. Each processing service handles fraud checking in its own way. Ask your processing service for an explanation of their requirements and options. • Under Action, a default action appears automatically. You can leave this as is or select another action. • If you leave Division blank, the default division (also known as Merchant ID) is the first one you’ve established under processor setup. Other divisions may be available. • The default class (way in which the transaction was received) is by MOTO (mail order or telephone). The other choices are recurring or E-commerce (over the Internet). • The default is no check-mark; your processing service won’t automatically check transactions for fraud. If you click on the box to add a check-mark, your processing service should automatically check all transactions for fraud. 8. When you’ve finished filling out the forms, press Enter to add the user to the list. 9. Press Enter to save your changes and exit the Configure Users screen. CN!Express SU Page 17 Setting Up Other Users Installing CN!Express Changing User Information If you aren’t the ADMIN user but want to change your own password, see “Changing Your Password” on page 40. 1. Type Alt C (Configure menu). 2. Press U (Users) to view: 3. Click on the user’s name (in this example, JJONES). 4. Press E (Edit) to view: Page 18 CN!Express SU Installing CN!Express Setting Up Other Users 5. Change any information you want to change. 6. To change the password, click on to view: 7. Type the current ADMIN password in the Password box. (The password appears as a series of asterisks: ******.) 8. Press ENTER to view: CN!Express SU Page 19 Setting Up Other Users The new password must be at least four characters long. CN!Express is casesensitive. For example, ADMIN, Admin and admin are three different passwords. Installing CN!Express 9. Type the new password into the unlocked Password box. (The password appears as a series of asterisks: ******.) 10. Type the password again in the Re-enter Password box. (The password appears as a series of asterisks: ******.) 11. Press Enter to enter the changes you’ve made. 12. Press Enter to save your changes and exit the Configure Users screen. Deleting a User 1. Type Alt C (Configure menu). 2. Press U (Users) to view: Page 20 CN!Express SU Installing CN!Express Setting Up Other Users 3. Click on the user’s name (in this case JJONES). You can’t delete the ADMIN user. You can delete the DEMO user. When you delete a user, you don’t delete any transactions that the user entered or processed. 4. Press D (Delete) to remove the user from the user list. CN!Express displays the following message: 5. Press Y (Yes). CN!Express displays a message like the following: 6. Press Enter. 7. Press Enter again, to save your changes and exit the Configure Users screen. CN!Express SU Page 21 Uninstalling and Reinstalling CN!Express Installing CN!Express Uninstalling and Reinstalling CN!Express To uninstall CN!Express (either the live working CN!Express or the demonstration version): 1. Exit CN!Express. 2. Click on the Start button on your desktop. 3. Click on Programs. 4. Click on CN!Express Single User. 5. Click on Remove CN!Express Single User. 6. Click on CN!Express is removed from your computer. 7. You must manually remove the CN!Express directory from your system. You can find it using Windows Explorer. The default name of the directory is CN!Express_SU and its default location is under Program Files. Decide whether you want to save the current data base of transactions. • If you do, first back up your data base, as explained in “Backup and Restore” on page 173. Then delete the entire directory. • If you don’t, delete the entire directory. To reinstall CN!Express, use the installation procedure described earlier in this chapter. Page 22 CN!Express SU Chapter 3. Starting Up, Shutting Down, First Transaction This chapter explains how to start up and shut down CN!Express. This chapter also describes how to create your first DEMO transaction in CN!Express. This chapter doesn’t explain everything you can view or do on the CN!Express screen. For more information, you’ll want to read “Chapter 5. Using the CN!Express Screen” on page 41 and “Chapter 6. Recording New Transactions” on page 59. CN!Express SU Page 23 Starting Up CN!Express Starting Up, Shutting Down, First Transaction Starting Up CN!Express To start up CN!Express: 1. On your desktop, double click If someone else was using CN!Express before you, their user name appears in the User box. You must type your own user name. CN!Express is casesensitive. For example, ADMIN, Admin and admin are three different passwords. Page 24 to view: 2. Type your User name if it isn’t already shown. 3. Press the Tab key on your keyboard. 4. Type your Password. (The password appears as a series of asterisks: *******.) 5. Press Enter. CN!Express opens on the main CN!Express screen. CN!Express SU Starting Up, Shutting Down, First Transaction Shutting Down CN!Express Shutting Down CN!Express To shut down CN!Express, do one of the following: • • Either press Alt F (File menu), then T (Exit). Or press Alt F4. When you shut down, CN!Express saves all the transactions you entered or changed, and all the user preferences, table layouts, sorts and configurations that you set up. CN!Express SU Page 25 Before You Try Your First Transaction Starting Up, Shutting Down, First Transaction Before You Try Your First Transaction You are about to learn how to send a transaction. You don’t want this first transaction to be really saved or really submitted to your processing service. Therefore, make sure you are working in either the demonstration version of CN!Express or in the DEMO mode of the live version. (For more information about the DEMO mode, see “Chapter 4. Going Live and Changing Your Password” on page 31.) Make sure that the word DEMO appears in the upper right corner of the CN!Express screen. If DEMO doesn’t appear, do not try the sample transaction. As long as DEMO appears on the upper right corner of the CN!Express screen, you can practice any procedure in this manual without affecting real credit cards, purchase cards, or checks, and without sending real transactions to the processing service. Page 26 CN!Express SU Creating and Sending Your First Transaction Starting Up, Shutting Down, First Transaction Creating and Sending Your First Transaction For this example, you must be in the DEMO mode or in the demonstration version of CN!Express. The word DEMO must appear in the upper right hand corner of your screen. Creating Your First (DEMO) Transaction 1. Press Ctrl 2 to view the Active Transactions table. 2. Press F2 (Main menu). Instead of pressing Enter in Step 3, you can click on 3. Press Enter to start a new transaction. 4. Type information into the boxes that are bold: In This Box . . . Type . . . Press the Tab key . . . Account (credit card 5151301400246102 Tab to the Exp box 0204 Tab to the Amount box 50 Tab to the Action box account number) Exp (expiration date of card) Don’t type a dollar sign in Amount. CN!Express automatically adds a $ to U.S. currency. (amount of transaction) Amount 5. The “action” describes the type of transaction (sale, refund/credit or void, for example). In the Action box, click on to view a list like the following: 6. Click on Sale or on Authorization and Capture. 7. If any other boxes are bold, you must Tab to them and fill them in. (Your screen is set up for your specific processing service. Each processing service requires different information.) Otherwise, go to Step 8. 8. Press Enter. CN!Express SU Page 27 Creating and Sending Your First Transaction Starting Up, Shutting Down, First Transaction You’ve just saved your first transaction. Your screen should look like this: After you enter the transaction, a flag appears automatically. This flag shows that your transaction is ready to send to your processing service. Also, after you enter the transaction, your screen shows a truncated (shortened) account number. Full account numbers appear on the screen only while you’re entering or editing a transaction. (The account number is the credit card, purchase card, or bank account number for the transaction.) For information on all fields, press ALT H (Help), then F (Field Reference). Page 28 The bottom half of your screen (the Main data entry form) may look different; it shows the exact boxes (fields) that your processing service expects. For example, if your processing service doesn’t expect Division ID information, that box won’t appear on your screen. CN!Express SU Starting Up, Shutting Down, First Transaction Creating and Sending Your First Transaction Sending Your First (DEMO) Transaction To send your first transaction to your processing service: 1. Press Alt T (Transaction menu). 2. Press F (Submit Flagged) The following message appears: 3. Wait. CN!Express DEMO mode simulates (goes through the motions of) sending the transaction to the processing service. When “processing” is complete, this message appears: 4. Press Enter. CN!Express SU Page 29 Creating and Sending Your First Transaction Starting Up, Shutting Down, First Transaction You’ve just submitted your first transaction (not really, though; in the demonstration version or DEMO mode, nothing goes to the processing service). CN!Express automatically moves the transaction off the Active Transactions table: 5. Press Ctrl 3 (Completed Transactions) to view: Congratulations! You’ve completed your first transaction. Creating a (Demo) Failed Transaction The previous example resulted in a successful transaction. If you want to see what happens when a transaction fails, repeat the procedure but enter an Amount with an odd number of cents (for example, type in 50.99). The demonstration version and DEMO mode of CN!Express are set up so that the “processing service” declines any transaction where the amount includes an odd number of cents. Page 30 CN!Express SU Chapter 4. Going Live and Changing Your Password This chapter explains how to switch to the live version of CN!Express, how to turn DEMO mode on and off, and how to try out a live transaction, actually sending it to your processing service. It also describes how to change your own password, even if you aren’t an ADMIN user. CN!Express SU Page 31 Switching to the Live Version Going Live and Changing Your Password Switching to the Live Version The live CN!Express requires an active TCP/IP connection to process transactions. (That is, the TCP/IP connection must be active if you want to submit transactions to the processing service.) After installing CN!Express, you may switch from the demonstration version to the live version at any time. Auric Systems International strongly recommends: • Practicing with and configuring CN!Express in the demonstration version • Placing the live version in DEMO mode when new users need to gain experience with the features of CN!Express (see page 35) To switch from the demonstration version to live: 1. Type Alt C (Configure menu). 2. Press K (Serial Number and Activation Key) to view: 3. Type in your serial number and activation key. When you purchased CN!Express over the Internet, the serial number and activation key were faxed or e-mailed to you. 4. Press Enter. When you go live, all the transactions you entered and submitted in the demonstration version disappear from the Active Transactions and Completed Transactions screens. Page 32 CN!Express SU Going Live and Changing Your Password Setting Up Your Processing Service Setting Up Your Processing Service You must set up the live CN!Express to handle your specific processing service. CN!Express is designed to work with many different processing services. Check with your processing service for its special setup requirements; also see “Appendix C. Processing Service Information” on page 193. To set up your processing service: 1. Make sure you’re logged into the system as an ADMIN user. 2. Press Alt C (Configure menu) 3. Press O (Processor Setup) to view a screen like the following: You can’t view this screen or make changes unless you’re an ADMIN user. When you install CN!Express in the demonstration version, this screen is already filled out for you. When you switch to the live CN!Express or change processing services, you must fill in information from your processing service. The screen, tabs, and boxes that you see are set up for your specific processing service and may look quite different from the ones shown above. 4. Fill in the boxes as needed. (Contact your processing service for their requirements, and refer to “Appendix C. Processing Service Information” on page 193.) 5. If the Send “Comment 1” Field to Gateway appears and if you don’t want to automatically send Comment 1 to your processing service, click on the box to remove the check-mark. Chapter 5 provides more information about comment fields. CN!Express SU Page 33 Setting Up Your Processing Service Going Live and Changing Your Password 6. Press Enter to save the changes. Page 34 CN!Express SU Going Live and Changing Your Password Switching the Live Version into DEMO Mode Switching the Live Version into DEMO Mode Only the ADMIN user can turn DEMO mode on and off. The following sections describe how to turn on, start up, and turn off the DEMO mode of the live CN!Express. You can’t switch from the live CN!Express back to the demonstration version (once you’re live, you’re always live unless you uninstall and reinstall). But you can switch from the live CN!Express from the LIVE mode to the DEMO mode. In DEMO mode, practice transactions aren’t really sent to the processing service; the actions taken in DEMO mode never affect real credit cards, purchase cards, or checks; and they never affect information in the live CN!Express. Turning on DEMO Mode You can turn on DEMO mode in two ways: When CN!Express is in DEMO mode, the word DEMO appears in the upper right hand corner. • Either log on to CN!Express using DEMO as the user name and as the password • Or change the user settings for a specific user; whenever that user logs on, CN!Express automatically starts in DEMO mode Once DEMO mode begins, any live transactions on the Active and Completed Transaction tables temporarily disappear. They reappear as soon as the DEMO user exits and a LIVE user logs on (someone who’s permitted to work with the live CN!Express). Transactions To change the user settings for a specific user: 1. You must log in as the ADMIN user. 2. Press Alt C (Configure menu). 3. Press U (Users). 4. Double click on the user’s name to view a screen like the following: CN!Express SU Page 35 Switching the Live Version into DEMO Mode The change affects only this one user; all other users may work in the live CN!Express. Going Live and Changing Your Password 5. Click on the box next to Demo/Training Mode to add a check-mark. 6. Press Enter. 7. Press Enter. 8. Press Alt F4 to exit CN!Express. 9. The user then logs in with his or her own user name and password. As soon as the user logs in, DEMO mode begins. Page 36 CN!Express SU Going Live and Changing Your Password Switching the Live Version into DEMO Mode Turning off DEMO Mode Only the ADMIN user can turn off DEMO mode. If the user is ready to work in the live CN!Express, DEMO mode must be turned off. To turn off DEMO mode: • Either exit CN!Express and log on as a user who’s permitted to work in LIVE mode • Or change the user settings for the specific DEMO user so that user can work in LIVE mode To edit the user settings: 1. Log into CN!Express as the ADMIN user. 2. Press Alt C (Configure menu). 3. Press U (Users). 4. Click on the user’s name to view a screen like the following: The change affects only this one user; you have to change user settings oneby-one. 5. Click on the box next to Demo/Training Mode to remove the checkmark. 6. Press Enter. 7. Press Enter. 8. Press ALT F4 to exit CN!Express. 9. The user then logs in with his or her own user name and password. When CN!Express is live, the word DEMO does not appear in the upper right hand corner. CN!Express SU When the user logs into CN!Express in the usual way, CN!Express is live for that user (not in DEMO mode). Any transactions the user created, saved, or submitted in DEMO mode no longer appear on the Page 37 Switching the Live Version into DEMO Mode Going Live and Changing Your Password or Completed Transactions tables. (They reappear as soon as the user returns to DEMO mode.) Active Transactions In LIVE mode, transactions are really saved and really sent to the processing service. Page 38 CN!Express SU Going Live and Changing Your Password Using the Live CN!Express Using the Live CN!Express When you’ve finished working in the demonstration version or in DEMO mode, you may want to try out the live CN!Express without completing a real transaction. Do not select Sale in the Action box. Otherwise, when you press Alt T, then F, the processing service will really charge $1 to the credit card holder. Since you have to use a real credit card number, make sure that you: • Type 1 (one dollar) in the Amount box • Type A (Authorize) in the Action box When the processing service finishes authorizing this transaction, it appears on the Active Transactions table (either as a successful authorization or as a delayed capture). You should immediately delete this $1 transaction: 1. Make sure you’re in the live version of CN!Express and not in DEMO mode (the word DEMO does not appear on the upper right hand corner of the screen). 2. Click on the transaction. 3. Press Alt T (Transaction menu). 4. Press D (Delete). 5. Press Y (Yes). CN!Express SU Page 39 Changing Your Password Going Live and Changing Your Password Changing Your Password To change your own password: 1. Make sure you’re logged into the system under your own User name and password. 2. Type Alt C (Configure menu). 3. Type S (Set Password) to view: If you don’t remember your current password, you can’t change it. You must ask someone with ADMIN privileges to help you. 4. Type your current password in the Current Password box. 5. Press the Tab key on your keyboard. Your password must be between 4 and 20 characters long. CN!Express is casesensitive. For example, JONES, Jones and jones are three different passwords. Page 40 6. Type a new password in the New Password box (you’ll see ******). 7. Press the Tab key on your keyboard. 8. Type your new password again in the Re-enter to Confirm box (you’ll see ******). 9. Press Enter to save your new password. From now on, you must use your new password when you start up CN!Express. CN!Express SU Chapter 5. Understanding the CN!Express Screen On the main CN!Express screen you can quickly switch between displays of work in progress (Active Transactions) and completed work (Completed Transactions). You can also quickly switch between the data entry forms for credit cards, purchase cards, and checks. You will work primarily on this main CN!Express screen, with commands, pull-down menus, messages, and on-screen buttons. This chapter explains the CN!Express screen, the data entry forms, and the on-screen buttons. Most of the tasks you want to perform in CN!Express can be handled from your keyboard, without using the buttons and the mouse. The use of keyboard commands is explained in the step-by-step procedures that follow this chapter. CN!Express SU Page 41 Understanding the CN!Express Screen Understanding the CN!Express Screen Understanding the CN!Express Screen Menu bar Print/Flag Buttons bar Data Entry forms Active Transactions/Completed Transactions tables Transactions Buttons/Messages bar Filter Buttons/Message Status bar bar The following sections briefly describe the functions of each part of the screen. To move around this screen using the keys on your keyboard, press Tab to move forward; Shift Tab to move back; and Ctrl Tab to view the next data entry form. Page 42 CN!Express SU Understanding the CN!Express Screen Menu Bar Menu Bar The Menu bar contains six menus: Import and export a file, print reports, archive completed records, print the Active Transactions or Completed Transactions table, change the print setup, exit CN!Express Add or change users, set password, set up processing service, change receipt or table layout or system settings Cut, copy, paste, select all on the data entry forms Create a new transaction, edit or save or delete or close a transaction, cancel changes to a transaction, submit transaction(s), print a receipt, change the flags on transactions, close batches, view batch history, void or refund transactions; other features may be available, such as split capture Get this user manual, the Quick Reference Guide, and field list; go to ASI home page; get system information (including serial no.); get free Acrobat reader Choose a data entry card to view, auto-fit columns, view Active or Completed Transactions tables, create or change or apply a filter, apply table layout, refresh the filter To view these menus using your keyboard, press the Alt key and a letter key at the same time, as follows: Press These Keys Together . . . After a menu appears, you can choose an item on the menu by pressing a key on your keyboard. Look for the underlined letter in the item’s name and press that key. For example, press Alt F, then T to Exit (shut down) CN!Express. To View . . . Alt F File menu Alt E Edit menu Alt T Transaction menu Alt V View menu Alt C Configure menu Alt H Help menu To leave a menu without making a selection, press Esc (not Enter). CN!Express SU Page 43 Print/Flag Buttons Bar Understanding the CN!Express Screen Print/Flag Buttons Bar The Print/Flag Buttons bar contains six buttons: Place a flag next to a transaction Print a receipt Print whichever transaction table is in view Print and view reports Remove a flag from a transaction Submit all flagged transactions You can also print by pressing the Ctrl key and a letter key as follows: Press These Keys Together . . . Page 44 To Print . . . Ctrl P The table you’re viewing Ctrl R Standard report CN!Express SU Understanding the CN!Express Screen Active and Completed Transactions Tables Active and Completed Transactions Tables CN!Express lists information on active transactions and completed transactions. Active Transactions Table Click on the Active Transactions tab to view: Completed Transactions Table Click on the Completed Transactions tab to view: You can also view these tables by pressing the Ctrl key and a number key at the top of the keyboard (don’t use the keypad): Press These Keys Together . . . CN!Express SU To View . . . Ctrl 2 Active Transactions table Ctrl 3 Completed Transactions table Page 45 Active and Completed Transactions Tables Understanding the CN!Express Screen Columns of Information The Active Transactions and Completed Transactions tables are set up to show eight columns of information when you first install CN!Express: • Flag • Account • Amount • Action • Status • Auth Code • Result Code • Response Text You can add columns to show information such as billing name and address, shipping name and address, and order date. For a detailed description of all the possible columns, press ALT H (Help), then F to view the field reference list. For information on changing the table layout, see “Chapter 9. Changing Tables: Layout, Sorting, Filtering” on page 103. Scroll Bars Once a transaction table contains more columns and/or more transactions than can fit on the screen, scroll bars appear on the bottom and on the right hand side. Page 46 CN!Express SU Understanding the CN!Express Screen Active and Completed Transactions Tables Making Columns Fit In the previous examples, the far left columns (for example, Bill don’t fit the screen; you have to scroll to see them. You can automatically re-size (auto-fit) the columns so that they all appear on the screen, with the width of each column adjusted to its contents. Address) To auto-fit: 1. Press ALT V (View). 2. Press U (Auto-Fit Columns) to view: If your table layout includes more than about 10 columns, you may still need to scroll after you auto-fit. If the contents of a column change (for example, entries are longer), you may want to auto-fit again. When you “drag,” you hold down the left mouse button and slide the entire mouse right or left. CN!Express SU Once you auto-fit, the change remains even if you shut down CN!Express and another user logs on, unless you manually change the size of the columns by dragging. For example, set your cursor on the line between Status and Auth Code, then drag right to increase the width of the Status column (as shown below) or drag left to decrease it. Page 47 Filter Buttons/Message Bar Understanding the CN!Express Screen Filter Buttons/Message Bar A filter lets you display a selected group of active and/or completed transactions (for example, all of the sales transactions that are over $100). The Filter Buttons/Message bar contains four buttons and two message areas. Define a custom filter Show all transactions Apply the custom filter and show only the filtered transactions Show only today’s transactions Page 48 Message tells you how many transactions are on view in the table Message tells you what type of transactions are in the table CN!Express SU Understanding the CN!Express Screen Data Entry Forms Data Entry Forms The six data entry forms are Main, Address, Add’l Purchase Card, Comments and Responses. With some processing services, you may see additional tabs (for example, Line Items). You can’t change the data entry forms if you’re viewing the Completed Transactions table. You can add, delete, and change information on all the forms except the Responses form. The Responses form displays information received from your processing service. To view a form, click on the tab for the form: You can also view these forms by pressing the following function keys on your keyboard: Press This Key . . . Most boxes (fields) limit the amount or kind of information you can enter. For example, the Account box on the Main form lets you type a maximum of 19 characters. To View . . . F2 Main data entry form F3 Address data entry form F4 Add’l Purchase Card data entry form F5 Line Items data entry form (if available) F6 Comments data entry form F7 Responses data entry form You can move from form-to-form by pressing two keys on your keyboard at the same time: Ctrl Tab. You can move from box-to-box within each form by pressing the Tab key on your keyboard. You must fill in the boxes marked in bold. The boxes you see on each form and the boxes that are bolded will depend on your processing service. The following is a brief summary of each form. CN!Express SU Page 49 Data Entry Forms Understanding the CN!Express Screen Main Form On the Main data entry form, you record information on credit card, purchase card, or check transactions. You must fill out the boxes marked in bold, especially the account number, expiration date, amount, and action for each new transaction. Click on to view: Click on to view: Click on Page 50 to view: CN!Express SU Understanding the CN!Express Screen Data Entry Forms The Class box offers three choices: for transactions received by mail order or telephone (the default) • MOTO • E-Commerce • Recurring for transactions received over the Internet when you’re billing an account repeatedly and probably regularly (for example, the account is billed monthly: the first time the account is billed, you select MOTO or ECommerce; every month after that, you select Recurring) You may type a comment in the Comment 1 and 2 boxes—information about the transaction that you want to store for your own use. Whatever you type also appears in the Comment 1 and 2 boxes on the Comments data entry form. The same two boxes appear on both forms. Your Main data entry forms may look different than the ones shown above: CN!Express SU • You may not see some of the buttons and boxes. If you don’t see them, you don’t need them. For example, international currencies aren’t available for some processing services. In that case, you won’t see the Currency box. If your processing service does accept international currencies, you can customize the list that appears in the Currency box (see “Setting Up Currencies” on page 134). • You may see additional buttons and boxes; for example, Customer IP. The Customer IP is used only with transactions received over the Internet (E-commerce). It’s shown only if your processing service uses and supports customer IP information. Page 51 Data Entry Forms Understanding the CN!Express Screen Address Form When entering addresses, use numbers wherever possible: 123 3rd Street instead of 123 Third Street. On the Address data entry form, you record the billing and shipping addresses for merchandise. Click on to view: Click on to view: If the bill-to address is the same as the ship-to address, you can quickly copy information from one form to the other by clicking either or On this form, you can customize the list of countries in the Country box (see “Setting Up Countries” on page 136). Page 52 CN!Express SU Understanding the CN!Express Screen Data Entry Forms Additional Purchase Card Form On the Add’l Purchase Card data entry form, you record additional information on purchase cards. Your processing service might require this information for some purchase cards. To record the order date, do one of the following: • Either type the date into the Order Date box • Or click on to view: Click on the Customer is Tax Exempt box if the customer is tax exempt. The default is no tax exemption. Comments Form On the Comments data entry form, you record and store information for your own use.Your processing service might make use of this information or it might not. In any case, the information is stored with the transaction, even after the transaction is completed. You can display it on the tables, export, and archive it like any other information. CN!Express SU Page 53 Data Entry Forms Understanding the CN!Express Screen • In the Comment 1, 2, 3, and 4 boxes, type information about the transaction that you want to store for your own use. Whatever you type also appears in the Comment 1 and 2 boxes on the Main data entry form. The same two boxes appear on both forms. • In Shipping Ref, type shipment information, such as the FedEx number. Responses Form You can view the Responses data entry form, but you can’t enter or change information. The processing service fills in this form when it responds to each submitted transaction. If your processing service supports fraud detection, it sends you the results of its fraud check somewhere on the Responses form. You might see special Fraud Detection boxes on your form. You must contact your processing service directly to find out whether they offer fraud detection, how to set it up, and how the processing service sends fraud information to you. Page 54 CN!Express SU Understanding the CN!Express Screen Transaction Buttons/Messages Bar Transaction Buttons/Messages Bar The Transactions Buttons/Messages bar contains two message areas and nine buttons: Message showing the date and time a transaction was processed and other information Message showing the status of the selected transaction Message showing the type of credit or purchase card Save and send one transaction immediately Unlock (re-open) the data entry form (allow changes) Select (show and highlight): The first transaction in the table Open blank data entry forms for a new transaction The transaction one line above Save changes to the data entry form(s) The transaction one line below Cancel changes to the data entry form(s) The last transaction in the table You can also perform some of these tasks with the following keys on your keyboard: Press This Key . . . CN!Express SU To Do This . . . Up and Down Arrows To move from transaction to transaction on the transaction table where you’re working Enter To save changes to the data entry form(s) and also open a blank set of forms for a new transaction Alt T, then H To cancel changes to the data entry forms Ctrl I To send one selected transaction immediately (Now!) Page 55 Status Bar Understanding the CN!Express Screen Status Bar When you move your cursor over a button, the Status bar shows a message explaining what the button does. It also shows whether the data entry forms are Locked (they can’t be changed) or Unlocked (opened; they can be changed). Page 56 CN!Express SU Understanding the CN!Express Screen Standard Buttons and Keyboard Commands Standard Buttons and Keyboard Commands The following buttons appear on many of the screens in CN!Express. Click on This Button . . . To Do This . . . Save all the changes you just made. Undo (cancel) all the changes you just made and return to the CN!Express screen. Bring back the original settings for this screen or data entry form that are shipped with CN!Express. Most of the tasks handled by the CN!Express buttons are also handled by keys on your keyboard. For a summary, see “Appendix D. Keyboard Shortcuts” on page 197. . CN!Express SU Page 57 Standard Buttons and Keyboard Commands Page 58 Understanding the CN!Express Screen CN!Express SU Chapter 6. Recording New Transactions CN!Express connects you directly with your processing service for fast and easy processing of credit cards, purchase cards, and checks. To complete a transaction, you: Usually, you’ll be filling out information on one transaction at a time. You can also import transactions from a file. See “Chapter 13. Importing, Exporting, and Archiving” on page 145. 1. Fill out information on the card holder’s transaction using the CN!Express data entry forms. 2. Save the transaction. 3. Send the transaction to your processing service on your own schedule. 4. If the processing service rejects the transaction, you have to change it before you re-send it. If the processing service accepts the transaction, your work is done! Your data entry forms may look different from the ones shown in this chapter. Your forms are set up to provide the exact information your processing service needs. CN!Express SU This chapter contains step-by-step instructions for the first two tasks, recording and saving a new transaction. The types of transactions you can record are sale, authorization, delayed capture/deposit, deposit, refund/credit, void, and voice authorization. Your processing service may use different names for these transactions. Some processing services also permit partial voids and split captures. Page 59 Sale Recording New Transactions Sale To record and save a sale transaction: When the processing service approves a sales transaction, it takes money (the Amount) from the card holder’s account and puts it in the merchant’s account. 1. Press Ctrl 2 to see the Active Transactions table. 2. Press F2 (Main data entry form). 3. Click on one of the following: Page 60 • Click on to view: • Click on to view: or or CN!Express SU Sale Recording New Transactions • Click on to view: 4. Press Enter if needed to open a new data entry form. Use the Tab key on your keyboard to move from box to box, not the Enter key. The Enter key saves the entire transaction. You Must Fill in . . . ACCOUNT EXP 5. Fill in the required boxes, beginning with the Account number. The required boxes are outlined in bold. To move from box to box, press Tab. At a minimum, you must fill in the following boxes: For Credit Card . . . For Purchase Card . . . Account Number Example: Account Number Example: Account Number Example: 12345678012345678 12345678012345678 12345678012345678 Expiration Date Example: 0204 Expiration Date Example: 0204 ROUTING AMOUNT For Check . . . Bank Routing/Transit Number Example: 929999292 Amount of sale (don’t type a dollar sign) Example: 1234.67 Amount of sale (don’t type a dollar sign) Example: 1234.67 Amount of sale (don’t type a dollar sign) Example: 1234.67 A message like the following appears if the credit card or purchase card account number is valid: CN!Express SU Page 61 Sale Recording New Transactions The following message appears if the credit card or purchase card account number is invalid: 6. At the Action box, type S (Sale) or click on recognized by your processing service). to select the action 7. Your processing service might recommend that you fill in more information on the Main data entry form (for example, a Bill Zip). Check with your manager or your processing service. 8. Then list the recommended information here for future reference: Recommended Fields on Main Form Fill In . . . 9. Press the following function keys if you need to record additional information: • F3 (Address data entry form) • F4 (Add’l Purchase Card data entry form) • F5 (Line Items data entry form, if available) • F6 (Comments data entry form) 10. Even if there are no bold boxes (required fields) on these forms, your processing service may recommend that you fill in additional information. Check with your manager or your processing service. Then list the recommended information here for future reference: Recommended Fields on Other Forms Page 62 Fill In . . . CN!Express SU Sale Recording New Transactions Recommended Fields on Other Forms Fill In . . . 11. Press Enter. CN!Express saves your transaction, adds it to the Active Transactions table, automatically locks it against further changes, and clears the data entry forms for the next transaction. Now you can start another new transaction. CN!Express SU Page 63 Authorization Recording New Transactions Authorization When the processing service approves an authorization transaction, it reserves enough money in the card holder’s account to complete the transaction (the Amount), and then holds it as a delayed capture/deposit. When you send an authorization request, you’re asking the processing service to determine if a credit card is valid; and if it is, to reserve money for the transaction. To record and save an authorization transaction: 1. Press Ctrl 2 to see the Active Transactions table. 2. Press F2 (Main data entry form). 3. Click on one of the following: Page 64 • Click on • Click on or or to view: to view: CN!Express SU Authorization Recording New Transactions • Click on to view: 4. Press Enter if needed to open a new data entry form. Use the Tab key on your keyboard to move from box to box, not the Enter key. The Enter key saves the entire transaction. You Must Fill in . . . ACCOUNT EXP 5. Fill in the required boxes, beginning with the Account number. The required boxes are outlined in bold. To move from box to box, press Tab. At a minimum, you must fill in the following boxes: For Credit Card . . . For Purchase Card . . . Account Number Example: Account Number Example: Account Number Example: 12345678012345678 12345678012345678 12345678012345678 Expiration Date Example: 0204 Expiration Date Example: 0204 ROUTING AMOUNT For Check . . . Bank Routing/Transit Number Example: 929999292 Amount of sale (don’t type a dollar sign) Example: 1234.67 Amount of sale (don’t type a dollar sign) Example: 1234.67 Amount of sale (don’t type a dollar sign) Example: 1234.67 A message like the following appears if the credit card or purchase card account number is valid: CN!Express SU Page 65 Authorization Recording New Transactions The following message appears if the credit card or purchase card account number is invalid: 6. At the Action box, type A (Authorization) (or click on the action recognized by your processing service). to select 7. Your processing service might recommend that you fill in more information on the Main data entry form (for example, a Bill Zip). Check with your manager or your processing service. Then list the recommended information here for future reference: Recommended Fields on Main Form Fill In . . . 8. Press the following function keys if you need to record additional information: • F3 (Address data entry form) • F4 (Add’l Purchase Card data entry form) • F5 (Line Items data entry form, if available) • F6 (Comments data entry form) 9. Even if there are no bold boxes (required fields) on these forms, your processing service may recommend that you fill in additional information. Check with your manager or your processing service. Then list the recommended information here for future reference: Recommended Fields on Other Forms Page 66 Fill In . . . CN!Express SU Authorization Recording New Transactions Recommended Fields on Other Forms Fill In . . . 10. Press Enter. CN!Express saves your transaction, adds it to the Active Transactions table, automatically locks it against further changes, and clears the data entry forms for the next transaction. Now you can start another new transaction. CN!Express SU Page 67 Delayed Capture/Deposit Recording New Transactions Delayed Capture/Deposit When the processing service approved the authorization, it reserved money in the card holder’s account. When you send a delayed capture/deposit transaction, the processing service actually takes that money (the Amount) from the card holder’s account and deposits it in the merchant’s account. After you send an authorization transaction to your processing service, the processing service decides whether to authorize the transaction or fail it. In either case, the transaction appears on your Active Transactions screen. Usually, if the authorization is successful, CN!Express automatically creates a delayed capture/deposit transaction, which appears in your Active Transactions table. The ADMIN user can set up CN!Express so that delayed capture/deposits must be created manually; however, this change is not recommended. The procedures below explain what you should do in each situation. Every processing service has its own deadline for completing an authorization and delayed capture. If you send the delayed capture/ deposit after that time, the processing service may return the transaction as Failed; or it may automatically generate a new authorization code and complete the transaction. Each processing service treats this situation in its own way. Handling an Automatic Delayed Capture/Deposit After your processing service receives the authorization transaction, it processes and sends it back. If the authorization is successful, CN!Express automatically creates a delayed capture/deposit transaction. Here’s what you see: If the Service . . . The Screen Shows This . . . Authorizes the transaction Does not authorize the transaction Page 68 CN!Express SU Delayed Capture/Deposit Recording New Transactions You don’t need to fill out or save any information for a delayed capture. (The processing service does that automatically.) But you must flag the Delayed Capture before you send it to the processing service: 1. Click on the delayed capture transaction that you want to submit. 2. Press Alt T (Transaction menu). 3. Press L (Flag). 4. Press F (Flag Selected). Handling a Manual Delayed Capture/Deposit To set up manual creation of delayed captures, see “Chapter 11. Customizing Your System Settings” on page 131. If the Service . . . After your processing service receives the authorization transaction, it processes and sends it back. The ADMIN user can set up your system to prevent automatic creation of a delayed capture/deposit. This change isn’t recommended; but here’s what you see: The Screen Shows This . . . Authorizes the transaction Does not authorize the transaction To manually create a delayed capture/authorization: 1. Double click on the successful (Authorized) authorization. 2. In the Main data entry form, tab to the Action box. 3. Press C (Delayed Capture) (or click on recognized by your processing service). to select the action 4. Press Alt T, then S to save your change. You must flag the transaction before you submit it. CN!Express SU Page 69 Refund/Credit Recording New Transactions Refund/Credit There are two ways to record a refund/credit transaction: When the processing service approves a refund/credit transaction, it takes money (the Amount) from the merchant’s account and places it in the card holder’s account. • If the original sale transaction is still on the Completed Transactions table, you can start your refund/credit transaction on the Completed Transactions table. • If the original sale transaction has been archived, you must start your refund/credit transaction by filling out the Main data entry form. Only the ADMIN user can decide if you’re allowed to issue credits and how much you’re allowed to refund (see “Adding a User” on page 15). Using the Completed Transaction Table for a Refund/Credit If the system settings are set to truncate account numbers in the data base, you won’t be allowed to use this procedure (see “Changing the General Options” on page 132). If you don’t see the Refund selection on the Transaction menu, you don’t have refund/credit privileges. 1. Press Ctrl 3 to see the Completed Transactions table. 2. Click on the sale transaction you want to refund. 3. Press Alt T (Transaction menu). 4. Press R (Refund). The following message is displayed: 5. Press Y. 6. CN!Express automatically creates a refund/credit transaction on the Active Transactions table. Now you can go to the Active Transactions table to process the refund. Page 70 CN!Express SU Refund/Credit Recording New Transactions Using the Main Data Entry Form for a Refund/Credit 1. Press Ctrl 2 to see the Active Transactions table. 2. Press F2 (Main data entry form). 3. Click on one of the following: CN!Express SU • Click on • Click on to view: • Click on to view: or or to view: Page 71 Refund/Credit Recording New Transactions 4. Press Enter if needed to open a new data entry form. Use the Tab key on your keyboard to move from box to box, not the Enter key. The Enter key saves the entire transaction. You Must Fill in . . . ACCOUNT EXP 5. Fill in the required boxes, beginning with the Account number. The required boxes are outlined in bold. To move from box to box, press Tab. At a minimum, you must fill in the following boxes: For Credit Card . . . For Purchase Card . . . Account Number Example: Account Number Example: Account Number Example: 12345678012345678 12345678012345678 12345678012345678 Expiration Date Example: 0204 Expiration Date Example: 0204 ROUTING AMOUNT For Check . . . Bank Routing/Transit Number Example: 929999292 Amount of sale (don’t type a dollar sign) Example: 1234.67 Amount of sale (don’t type a dollar sign) Example: 1234.67 Amount of sale (don’t type a dollar sign) Example: 1234.67 A message like the following appears if the credit card or purchase card account number is valid: The following message appears if the credit card or purchase card account number is invalid: Page 72 CN!Express SU Refund/Credit Recording New Transactions If you don’t see the Refund or Credit selection at the Action box, you don’t have refund/credit privileges. 6. At the Action box, press R (Refund/Credit) (or click on the action recognized by your processing service). to select 7. Your processing service might recommend that you fill in more information on the Main data entry form (for example, a Bill Zip). Check with your manager or your processing service. Then list the recommended information here for future reference: Recommended Fields on Main Form Fill In . . . 8. Press the following function keys if you need to record additional information: • F3 (Address data entry form) • F4 (Add’l Purchase Card data entry form) • F5 (Line Items data entry form, if available) • F6 (Comments data entry form) 9. Even if there are no bold boxes (required fields) on these forms, your processing service may recommend that you fill in additional information. Check with your manager or your processing service. Then list the recommended information here for future reference: Recommended Fields on Other Forms Fill In . . . 10. Press Enter. CN!Express SU Page 73 Refund/Credit Recording New Transactions CN!Express saves your transaction, adds it to the Active Transactions table, automatically locks it against further changes, and clears the data entry forms for the next transaction. Now you can start another new transaction. Page 74 CN!Express SU Void Recording New Transactions Void To record a void transaction: When the processing service approves a void transaction, it stops a transaction you already completed. The transaction never appears on the credit card holder’s statement. 1. Press Ctrl 3 to see the Completed Transactions table. 2. Click on the transaction you want to void. 3. Press Alt T (Transaction menu). 4. Press V (Void). A message like the following is displayed: If your processing service permits partial voids, a different message may be displayed. 5. Press Y. 6. CN!Express automatically creates a Void transaction on the Active Transactions table: The original transaction remains on the Completed Transactions table. The void on the Active Transactions table is treated like any other a new transaction (it must be flagged and submitted before it takes effect). Now you can go to the Active Transactions table and start another transaction. Each processing service has its own deadline for completing a void. If you send the void after that time, the processing service may return the transaction as Failed and nothing is voided. CN!Express SU Page 75 Voice Authorization and Capture (Forced Capture) Recording New Transactions Voice Authorization and Capture (Forced Capture) Your processing service provides you with the phone number for the Voice Authorization Network. When you need an authorization code, you phone the network. You must then type the authorization code onto the Main data entry form before you submit the transaction. If you omit the code, the processing service won’t process the transaction. Page 76 You can only ask for an voice authorization on a sale. When you receive authorization by phone, you should: 1. Press Ctrl 2 to see the Active Transactions table. 2. Press F2 (Main data entry form). 3. Click on one of the following: • Click on • Click on or or to view: to view: CN!Express SU Voice Authorization and Capture (Forced Capture) Recording New Transactions • Most processing services don’t give authorization codes for checks. Click on to view: 4. Press Enter if needed to open a new data entry form. Use the Tab key on your keyboard to move from box to box, not the Enter key. The Enter key saves the entire transaction. You Must Fill in . . . ACCOUNT EXP 5. Fill in the required boxes, beginning with the Account number. The required boxes are outlined in bold. To move from box to box, press Tab. At a minimum, you must fill in the following boxes: For Credit Card . . . For Purchase Card . . . For Check . . . Account Number Example: Account Number Example: Account Number Example: 12345678012345678 12345678012345678 12345678012345678 Expiration Date Example: 0204 Expiration Date Example: 0204 ROUTING Bank Routing/Transit Number Example: 929999292 AMOUNT Amount of sale (don’t type a dollar sign) Example: 1234.67 Amount of sale (don’t type a dollar sign) Example: 1234.67 Amount of sale (don’t type a dollar sign) Example: 1234.67 AUTH CODE Authorization code given to you during the voice authorization Example: 123456 Authorization code given to you during the voice authorization Example: 123456 Authorization code given to you during the voice authorization Example: 123456 CN!Express SU Page 77 Voice Authorization and Capture (Forced Capture) Recording New Transactions A message like the following appears if the credit card or purchase card account number is valid: The following message appears if the credit card or purchase card account number is invalid: 6. At the Action box, press V (Voice Authorization) (or click on select the action recognized by your processing service). to 7. At the Auth Code box, fill in the code you received from the processing service. 8. Your processing service might recommend that you fill in more information on the Main data entry form (for example, a Bill Zip). Check with your manager or your processing service. Then list the recommended information here for future reference: Recommended Fields on Main Form Fill In . . . 9. Press the following function keys if you need to record additional information: • F3 (Address data entry form) • F4 (Add’l Purchase Card data entry form) • F5 (Line Items data entry form, if available) • F6 (Comments data entry form) 10. Even if there are no bold boxes (required fields) on these forms, your processing service may recommend that you fill in additional information. Check with your manager or your processing service. Page 78 CN!Express SU Voice Authorization and Capture (Forced Capture) Recording New Transactions Then list the recommended information here for future reference: Recommended Fields on Other Forms Fill In . . . 11. Press Enter. CN!Express saves your transaction, adds it to the Active Transactions table, automatically locks it against further changes, and clears the data entry forms for the next transaction. Now you can start another new transaction. CN!Express SU Page 79 Partial Void Recording New Transactions Partial Void When a processing service approves a partial void transaction, it stops part of a transaction you already completed. That part of the transaction never appears on the credit card holder’s statement. A partial void lets you void part of a transaction. You might want to use a partial void (for example) if a customer buys $250 worth of goods and then cancels one item worth $40; you issue a partial void for just $40 of the transaction. Each processing service has its own deadline for completing a partial void. If you send the void after that time, the processing service may return the transaction as Failed and nothing is voided. To record a partial void transaction: 1. Press Ctrl 3 to see the Completed Transactions table. 2. Click on the transaction you want to partially void. 3. Press Alt T (Transaction menu). 4. Press V (Void) to view: 5. If you would like a partial void, click on the box next to Partial Void, then fill in the amount you want voided (for this example, say $100). 6. Press ENTER. 7. CN!Express automatically creates a Void transaction on the Active Transactions table for the amount you specified: Page 80 CN!Express SU Recording New Transactions Partial Void The original transaction remains on the Completed Transactions table. The partial void on the Active Transactions table is treated like any other new transaction. Now you can return to the Active Transactions table and start another transaction. CN!Express SU Page 81 Split Capture Recording New Transactions Split Capture When the processing service approved the authorization, it reserved money in the card holder’s account. When you send a split capture/deposit transaction, the processing service actually takes part of that money (part of the Amount) from the card holder’s account and deposits it in the merchant’s account. Split captures let you submit part of a delayed capture transaction. You might want to use a split capture (for example) if part of an order ships before the rest of the order; the split capture lets you process only the part that shipped. The following example assumes an original order of $150. Only part of the order (worth $50) was shipped. To record and save a split capture transaction: 1. Press Ctrl 2 to see the Active Transactions table. 2. Click on the delayed capture transaction you want to partially capture. For example: 3. Press Alt T (Transaction menu). 4. Press I (Split Capture) to view: 5. At the Capture Amount for this Transaction box, fill in the amount of the transaction you want to capture. Page 82 CN!Express SU Split Capture Recording New Transactions The rest of the amount appears automatically in the Remaining box, as shown below. 6. Let’s say you only want to capture $50 of the original $150 transaction. Type 50 in the Capture Amount box. That original transaction wasn’t flagged. If you want to flag the $50 portion (the Capture Amount) automatically, click on the box next to Flag Original Transaction. Now your screen looks like this: Say your original transaction actually was flagged. In that case, you just ignore the Flag Original Transaction box. The Capture Amount is flagged, even if the box isn’t check-marked. 7. Press Enter. Both transactions appear on the Active Transactions table. Since you clicked on the box in Step 6, a flag now appears next to the $50 transaction, as shown below: You can split any delayed capture as many times as you want. For example, you could split both the $100 transaction above and the $50 transaction. The split captures are treated like any other new transaction. Split captures are tracked on the Responses data entry form. Now you can start another new transaction. CN!Express SU Page 83 Split Capture Page 84 Recording New Transactions CN!Express SU Chapter 7. Sending Transactions After you record and save your transaction, you’re ready to send it to your processing service. You can record and send individual transactions in one step if you want to. In most cases, however, you want to record a lot of transactions and then send them in a group to your processing service. This procedure has two advantages. First, it lets you make changes to any of the transactions before you send them. Second, it cuts down on processing time, since many transactions are processed in a group. This chapter describes how to send transactions in a group, how to save and send one transaction in one step, and what happens after you send a transaction. CN!Express SU Page 85 Sending Several Transactions in a Group Sending Transactions Sending Several Transactions in a Group After you record and save transactions, you must send them to the processing service. To send several active transactions in a group: 1. Make sure appears next to every transaction you want to send to your processing service. If a flag doesn’t appear: • Click on the transaction. • Press Alt T (Transaction menu). • Press A (Flag). • Press F (Flag Selected). 2. Press Alt T (Transaction menu). 3. Press F (Submit Flagged). The following message appears on the screen: If you press the submission stops but only after it finishes the transaction it’s currently processing. A summary report pops up to tell you how many transactions reached the processing service before you pressed the button. Page 86 4. Wait until the message disappears (the processing service finishes with the transactions). A report appears automatically: CN!Express SU Sending Several Transactions in a Group Sending Transactions 5. Press Enter. The submission is finished. CN!Express SU Page 87 Saving and Sending One Transaction in One Step Sending Transactions Saving and Sending One Transaction in One Step Most processing services allow one-step submission for all types of transactions. If you think your processing service limits the use of this feature, contact the processing service or see “Appendix C. Processing Service Information” on page 193. To save and send a single transaction in one step: 1. Fill out the data entry forms for the transaction. You can click on Do not press the Enter key on your keyboard. 2. Press Ctrl I. at Step 2 instead of pressing Ctrl I. The transaction is automatically saved and sent to your processing service. You receive a message like the following: You can also use Ctrl I to send a single transaction after you’ve saved it. Click on the transaction to select it; then press Ctrl I. 3. Press Enter. Page 88 CN!Express SU What Happens after You Send a Transaction Sending Transactions What Happens after You Send a Transaction When your processing service finishes processing the transactions, here’s what you’ll see in CN!Express: When the Processing Service Accepts a Transaction . . . When the Processing Service Rejects a Transaction . . . only) The transaction stays in the Active Transactions table; the action becomes Delayed Capture/Deposit. The transaction stays in the Active Transactions table; status is Failed (you may need to fix the problem before you resend it). Sale or Refund/Credit or Delayed Capture/ Deposit or Void or The transaction moves to the Completed Transactions table (you don’t have to do anything). The transaction stays in the Active Transactions table; status is Failed (you must fix the problem before you resend it). The Action Was . . . Authorization (sales Voice Authorization In all cases the failed transaction is no longer flagged. The reason for the failure appears on the Responses data entry form. You may decide to close or delete the transaction; if you decide to resend the transaction, you should fix the problem first. What Happens on the Responses Form CN!Express receives a response from the processing service for each transaction you send; it adds the response to its database of information on the transaction. This information is shown on the Responses data entry form. To view the Responses data entry form, press F7. CN!Express SU Page 89 What Happens after You Send a Transaction Sending Transactions The following is an example of a response: Your processing service may not support fraud detection. Contact your processing service directly to find out if fraud detection is available and how to set it up. If your processing service offers fraud detection, it might place the fraud information in the Fraud Detection boxes shown above or in some other part of the Response form. Fraud detection information can help you decide whether to complete a transaction. If the chances of fraud are high, you may want to close or void the transaction. To see more information about fraud detection: 1. Click on (if available) to view: 2. When you’ve finished reading the details, press Enter. For information on how your specific processing service uses the Responses data entry form, contact your processing service. Page 90 CN!Express SU Chapter 8. Changing and Flagging Transactions You can’t change information on completed transactions, only on active transactions. You might want to change an active transaction for any number of reasons. For example: • You need to correct a mistake in the data entry forms. • You need to fix the transaction after the processing service declined it. • The card-holder asked you to cancel the transaction, and you need to delete or close it. This chapter contains step-by-step instructions for selecting a transaction, changing it, and deleting or closing it. It also explains how to flag and unflag transactions. CN!Express SU Page 91 Selecting a Transaction Changing and Flagging Transactions Selecting a Transaction Selecting One Transaction You select a transaction by clicking on it or by moving to it using the Up and Down Arrow keys on your keyboard. A selected transaction is highlighted and/or surrounded by a dotted line: Selecting Several Transactions That Are Listed Next to Each Other Suppose you want to select the first three transactions shown above. You can also hold down the Shift key while you press the Down Arrow key. 1. Click on the first transaction. 2. Hold down the Shift key on your keyboard 3. Click on the last transaction you want to select. 4. Release the Shift key. All the transactions between your clicks are highlighted: Page 92 CN!Express SU Changing and Flagging Transactions Selecting a Transaction Selecting Several Transactions That Are Not Listed Next to Each Other Suppose you want to select just the flagged transactions shown above. 1. Click on the first flagged transaction. 2. Hold down the Ctrl key on your keyboard 3. Click on each of the flagged transactions. 4. Release the Ctrl key. The exact transactions you click on are highlighted: Removing One Transaction from a Selected Group Suppose you’ve selected several transactions and want to remove one from the group: 1. Hold down the Ctrl key on your keyboard. 2. Click on the transaction you want to remove. 3. Release the Ctrl key and the transaction is no longer selected. CN!Express SU Page 93 Changing (Editing) an Active Transaction Changing and Flagging Transactions Changing (Editing) an Active Transaction To change or add to the information for any active transaction: Instead of double clicking in Step 1, you can select the transaction, then do one of the following: Either press Alt T, then E Or click on 1. Double click on the transaction. Change the information on any of the data entry forms. 2. When you’ve completed your changes, do one of the following: • Either save the changes: Press Alt T, then S. • Or cancel the changes: Press Alt T, then H. You can’t save your edits by pressing Enter. Now you can work on another transaction. Page 94 CN!Express SU Changing and Flagging Transactions Deleting or Closing an Active Transaction Deleting or Closing an Active Transaction You can’t delete or close a completed transaction. If you delete an active transaction, the transaction does not go through (for example, no refund is made), you remove it entirely from the system and no record is kept that the transaction ever existed. If you close an active transaction, the transaction does not go through (for example, no refund is made), but a record is kept. The closed transaction appears on the Completed Transactions table and can be exported or archived like any other transaction. Deleting a Transaction To delete an active transaction: 1. Click on the transaction. 2. Press Alt T (Transaction menu). 3. Press D (Delete). The following message appears: 4. Press Y (Yes). The transaction disappears from the Active Transactions table. It is never submitted and no record is kept that it ever existed. Closing a Transaction To close an active transaction: 1. Click on the transaction. 2. Press Alt T (Transaction menu). 3. Press C (Close). CN!Express SU Page 95 Deleting or Closing an Active Transaction Changing and Flagging Transactions The following message appears: 4. Press Y (Yes). The transaction disappears from the Active Transactions table. It is never submitted. However, a record is kept and the transaction appears on the Completed Transactions table. For example: Page 96 CN!Express SU Requesting Fraud Detection on a Transaction Changing and Flagging Transactions Requesting Fraud Detection on a Transaction You must always arrange for fraud detection directly with your processing service. Some processing services do not support fraud detection at all. Your processing service may allow you to request fraud detection on individual transactions. The default is that submitted transactions are not checked for fraud. You can request fraud checking in two ways: • By changing the default in the user set up (see “Setting Up Other Users” on page 15). Only the ADMIN user can change the default. • By requesting fraud checking for an individual transaction on the Main data entry form. If your processing service allows you to request fraud detection, a Check Fraud box appears on the Main data entry form: If a check-mark appears automatically for every new transaction, the default has been changed and every transaction is automatically checked for fraud. If the box is blank for new transactions, then transactions aren’t automatically checked for fraud but you can manually request fraud checking. The following sections describe how to manually mark or unmark a transaction for a fraud check. Marking a Transaction So It’s Checked for Fraud To mark one or more transactions for fraud detection: 1. Select the transaction(s). 2. Press Alt T (Transaction menu). 3. Press U (Fraud Detection). The following message appears: CN!Express SU Page 97 Requesting Fraud Detection on a Transaction Changing and Flagging Transactions By default, Yes is selected (a dot appears in the radio button). 4. Press Enter. On the Main data entry form for the transaction(s), a check-mark appears in the Check Fraud box. Unmarking a Transaction So It’s Not Checked for Fraud To unmark one or more transactions (they won’t be checked for fraud): 1. Select the transaction(s). 2. Press Alt T (Transaction menu). 3. Press U (Fraud Detection). The following message appears: 4. Click the radio button next to No (No Fraud Check). 5. Press Enter. On the Main data entry form for the transaction(s), the check-mark disappears from the Check Fraud box. Page 98 CN!Express SU Flagging or Unflagging an Active Transaction Changing and Flagging Transactions Flagging or Unflagging an Active Transaction CN!Express uses flags in the Active Transactions table to show which transactions will be sent to your processing service. • A flag ( ) means that the transaction is ready to send. • No flag means the transaction isn’t ready to send. CN!Express automatically places a flag next to every new transaction when you save it. You can also add and remove flags yourself. 1. Press Alt T (Transaction menu). 2. Press L (Flag) to view: Flag/unflag only the selected (highlighted) transactions Remove flags from all selected (highlighted) transactions that have flags; give flags to all selected transactions that don’t have flags. Flag only transactions with Authorized status. Flag/unflag all active transactions currently shown in the table (in view), even if they aren’t selected. Flag/unflag all active transactions even if they aren’t selected and aren’t shown in the table. (For example, you’re using the Today’s Transactions filter. If you click Flag All, yesterday’s active transactions are also flagged even though they aren’t in view.) 3. To choose one of the menu items, press the key for an underlined letter. For example: • To Flag Selected transactions, press the F key on your keyboard. • To Unflag All, press the L key on your keyboard. If you want to Toggle Selected Flags, you can skip the steps above and press Ctrl F. CN!Express SU Page 99 Flagging or Unflagging an Active Transaction Changing and Flagging Transactions Suppose you set up your screen as follows, with three transactions selected and all refund transactions filtered out (not showing): The following table shows what happens as to your screen as you select each type of flag. If You Press . . . The Screen Shows . . . ALT T, L, F (FLAG SELECTED) ALT T, L, T (TOGGLE SELECTED FLAGS) ALT T, L, Z (FLAG AUTHORIZED) ALT T, L, V (FLAG ALL IN VIEW) Page 100 CN!Express SU Changing and Flagging Transactions If You Press . . . Flagging or Unflagging an Active Transaction The Screen Shows . . . ALT T, L, A (FLAG ALL) NOTE: THE FILTERED REFUND TRANSACTIONS (NOT SEEN) ARE ALSO FLAGGED. CN!Express SU Page 101 Flagging or Unflagging an Active Transaction Page 102 Changing and Flagging Transactions CN!Express SU Chapter 9. Changing Tables: Layout, Sorting, Filtering CN!Express lists information on active transactions and completed transactions on two separate tables. You can change the appearance of these tables in several ways: • By changing the layout of the table(s) (adding, removing or reordering columns of information) • By sorting the information on transactions • By filtering out (hiding) certain transactions CN!Express remembers how the layout of tables and how they were sorted at the moment when you shut down. When you start CN!Express again, the tables appear with the same layout and sorts. However, CN!Express turns off any filter that’s active when you shut down. The filter still exists, but you have to reapply it after you start up. CN!Express SU Page 103 Deciding Whether Your Changes Affect Both Tables Changing Tables: Layout, Sorting, Filtering Deciding Whether Your Changes Affect Both Tables When you change the table layout or filter, you can apply your changes to both tables at the same time or just the table you are viewing. Press Alt V (View menu) to view: Auric Systems International recommends that you leave the checkmarks next to Apply Filter and Apply Table Layout. Page 104 The menu above shows the default: there’s a check-mark next to Apply Filter and another check-mark next to Apply Table Layout. So by default, any change you make applies to both tables. The menu below shows no check-mark next to Apply Filter. So any filter you turn on applies only to the table you’re viewing when you actually turn the filter on. However, Apply Table Layout still has a check-mark. If you change the table layout, both tables change. CN!Express SU Changing Tables: Layout, Sorting, Filtering Deciding Whether Your Changes Affect Both Tables You can remove or add check-marks as follows: 1. Press Alt V (View menu). 2. If you want to change the way the filter works, press I. If you want to change the way the table layout works, press Y. A check-mark means that whatever change you make next (change the filter/change the table layout) applies to both tables. No check-mark means that whatever change you make next applies only to the table you’re viewing at that time. CN!Express SU Page 105 Adding, Removing and Re-ordering Columns on the Tables Changing Tables: Layout, Sorting, Filtering Adding, Removing and Re-ordering Columns on the Tables You can change the table layout by adding, removing and changing the order of columns on the Active Transactions table and on the Completed Transactions table. (You decide whether your changes apply to both tables or only the table you’re viewing.) Every field on every data entry card can become a column on the tables. When you first install CN!Express, the tables are already set up to show eight columns: • Flag • Account • Amount • Action • Status • Auth Code • Result Code • Response Text These are the default columns. You might want to add columns to see additional information about transactions (for example, the billing addresses or the types of credit cards used). To add, remove or change the order of columns on the tables: 1. Press Alt C (Configure menu). Page 106 CN!Express SU Changing Tables: Layout, Sorting, Filtering Adding, Removing and Re-ordering Columns on the Tables 2. Press L (Table Layout) to view: The Flag column doesn’t appear on the Table Layout screen; you can’t hide or move the Flag column. 3. The two boxes on the screen list Available Columns (columns that are currently hidden from view) and Columns to Show (columns that appear on the tables). To move a column from one box to the other, click on the column name. Then: Click on . . . To Move . . . The selected column into the Columns to Show box All the columns into the Columns to Show box The selected column into the Available Columns box All the columns into the Available Columns box Return all columns to their default position (with seven columns listed in the Columns to Show box) CN!Express SU Page 107 Adding, Removing and Re-ordering Columns on the Tables Changing Tables: Layout, Sorting, Filtering 4. The first column shown in the Columns to Show box is the first column to appear on the tables (right after the flag). To change a column’s position, click on the column you want to move. Then: Click on . . . To Move a Column . . . To the top of the table (the first position on the screen, next to the flag) Up one spot Down one spot To the bottom of the table (the last position on the screen, farthest from the flag) 5. Press Enter to save your changes. CN!Express shows the tables with the columns you chose at Step 2 and in the order you chose at Step 3. Even if you shut down CN!Express, the table layout remains the way you left it. Page 108 CN!Express SU Changing Tables: Layout, Sorting, Filtering Sorting the Tables Sorting the Tables You can sort the Active Transactions and Completed Transactions tables in ascending or descending order for any one displayed column including the account number (Account). You sort each table separately; if you sort the Active Transactions table, you won’t automatically sort the Completed Transactions table. If you sort on the Flag column, ascending order places all flagged transactions last; descending order places all flagged transactions first. To sort a column: You can only sort on one column at a time. 1. Click on the column title. An arrow appears to show how the transactions are sorted: • In ascending order (smallest value to largest) • In descending order (largest value to smallest) 2. Click on the column title to switch back and forth between ascending and descending order. CN!Express SU Page 109 Filtering the Tables Changing Tables: Layout, Sorting, Filtering Filtering the Tables A filter lets you view some of the transactions in the tables while it hides the rest (for example, you might want to see only today’s transactions or only transactions under $100). You decide whether the filter applies to both tables or only the table you’re viewing. CN!Express provides one standard filter, and lets you create any custom filter. Standard Filter To view only today’s transactions: 1. Press Alt V (View menu). 2. Press T (Today’s Transactions) Your First Custom Filter For detailed information on how custom filters work, see “Appendix A. Advanced Filtering Techniques” on page 177. The following sections describe how to define, apply, turn off, re-start and change a basic custom filter. Suppose you want to view active transactions under $100 only. Normally, your Active Transactions table shows all active transactions, even those over $100: To create a custom filter that shows only transactions under $100: CN!Express lets you store only one custom filter. Every time you define a new filter, you replace the old filter. Page 110 1. Press Alt V (View menu). 2. Press E (Set Filter) to view: CN!Express SU Changing Tables: Layout, Sorting, Filtering Filtering the Tables 3. Click on Click here to add new condition to view: 4. Click on Action to view: 5. Click on Amount to view: CN!Express SU Page 111 Filtering the Tables Changing Tables: Layout, Sorting, Filtering 6. Click on is equal to to view: 7. Click on is less than to view: 8. Click on Page 112 and type 100 in the box that appears: CN!Express SU Filtering the Tables Changing Tables: Layout, Sorting, Filtering 9. Click on to view only transactions less than $100: Refreshing the Filter Let’s say you’ve set up and applied your filter showing all transactions less than $100. You begin to add new transactions, including several transactions that are greater than $100. Those transactions appear on the Active Transactions table even though the filter is on. To apply the filter to the new transactions: 1. Press Alt V (View menu). 2. Press S (Refresh). Refresh re-applies the filter, hiding all transactions over $100, even the new ones. Turning Off and Re-starting a Filter You also turn off a filter when you shut down CN!Express. However, the filter isn’t deleted. After you re-start CN!Express, you can restart the filter. CN!Express SU To turn off a filter and show all the transactions, press Alt V, then N (All Transactions). To re-start the filter, press Alt V, then F (Filtered View). Page 113 Filtering the Tables Changing Tables: Layout, Sorting, Filtering Changing a Filter To change the filter (to show all transactions between and including $50 and $100): 1. Press Alt V (View menu). 2. Press E (Set Filter) to view: 3. Click on is less than to view: 4. Choose is between. 5. Click on type 50 in the box. 6. Click on the second and type 100 in the box. Your filter should look like this: Page 114 CN!Express SU Filtering the Tables Changing Tables: Layout, Sorting, Filtering When you OK the new filter, the old filter is replaced. If you need the old filter, you have to build it again. 7. Click on to view all transactions between and including $50 and $100: Deleting a Custom Filter To delete a custom filter: You can’t delete a filter just by shutting down CN!Express. The filter is turned off, but you can restart it after you re-start CN!Express. 1. Press Alt V (View menu). 2. Press E (Set Filter). 3. Press C (Clear). 4. Press Enter. You also replace an old filter automatically whenever you define and Enter a new filter. CN!Express SU Page 115 Filtering the Tables Page 116 Changing Tables: Layout, Sorting, Filtering CN!Express SU Chapter 10. Printing Tables, Reports, and Receipts CN!Express lets you print either the Active Transactions table or the Completed Transactions table exactly as it appears on the screen. CN!Express also provides six standard reports. Each report summarizes different information about the transactions currently on view in either the Active Transactions or Completed Transactions tables. For example, one report (transaction action) tells you the total number and total dollar amount of transactions on the table you’re viewing, organized by the type of transaction. Two of the reports (Flagged Records and Flagged Records with Currency Breakdown) include all flagged transactions, whether or not they’re on view. Finally, CN!Express lets you print receipts for any transaction. This chapter explains how to print, change the appearance of, and change the content of table printouts and standard reports. It also explains how to print receipts. CN!Express SU Page 117 Printing the Tables Printing Tables, Reports, and Receipts Printing the Tables To print the table you are currently viewing: 1. Press Ctrl P to view a screen like the following: This is the print button. This screen shows a report that is set up to print on one page. Its orientation (the way the page is facing) is portrait. This is the default. 2. Press Ctrl P again to view: Page 118 CN!Express SU Printing Tables, Reports, and Receipts Printing the Tables 3. Press Enter to print. 4. Press Alt F, then C to exit the Print Preview screen. If the table you’re printing doesn’t fit comfortably on the page, two things may happen: • The table prints in such small type that you can’t read it. • Some of the columns on the table aren’t printed at all. If that’s the case, you must change the format of the page so that the table fits better. For example, you can do one or more of the following: • Change the print setup, so that the orientation of the page is landscape instead of portrait. CN!Express can fit more information across a landscape page. See “Changing the Print Setup for Tables and Reports” on page 125. • Unshrink the page, so that the table is printed across two or more pages. • Reduce the number of columns in the printout, so that CN!Express can print more of the table in larger type. The following sections describe how to unshrink the page and reduce the number of columns in the printout. You can customize a table printout by changing the layout, filtering, and sorting. CN!Express SU Page 119 Printing the Tables Printing Tables, Reports, and Receipts Shrinking the Page When you shrink the page, you’re telling CN!Express to print all the information on a table on one page. If you unshrink, CN!Express prints the information across the width of two or more pages. When your printout is complete, you have to physically place the pages side-byside to see the full table as it appears on your screen. To unshrink the page: 1. Press Ctrl P to view a screen like the following: This is the Shrink to Page button. The table is set up to print on one page. (If this status bar doesn’t appear, click on VIEW, then STATUS BAR.) 2. Press Page 120 to view: CN!Express SU Printing Tables, Reports, and Receipts Printing the Tables The table is set up to print across several pages. The table is now set up to print across three pages (in this case, portrait pages). Reducing the Number of Columns in the Printout When you print a table, you print exactly the information that shows on the screen. If you have problems fitting all that information on the printed page, you can change the table layout to show fewer columns, as described in Chapter 9. CN!Express SU Page 121 Printing a Standard Summary Report Printing Tables, Reports, and Receipts Printing a Standard Summary Report To print a standard summary report on the table you are currently viewing: 1. Press Ctrl R (Reports) to view: 2. Double click on the report you want, to view a screen like the following: This is the print button. These buttons let you zoom in and out. On the following pages are examples of the six types of reports. Page 122 CN!Express SU Printing a Standard Summary Report Printing Tables, Reports, and Receipts Records in Current View by Action Records in Current View by Card Type CN!Express SU Records in Current View by Status Records in Current View by Action, Status, and Card Type Page 123 Printing a Standard Summary Report Printing Tables, Reports, and Receipts Flagged Records Flagged Records with Currency Breakdown (Both of these reports include all flagged transactions, even if they are not on view; that is, the reports include flagged transactions that are filtered out.) 3. Click on 4. Press Enter to print the report. 5. Click on to exit the Print Preview screen. You can change the orientation of a report (portrait or landscape) by changing the print setup. You can customize a report by using filters. Page 124 CN!Express SU Printing Tables, Reports, and Receipts Changing the Print Setup for Tables and Reports Changing the Print Setup for Tables and Reports You can print tables and reports in either portrait or landscape (sideways). The default is portrait. To change the orientation of a report to landscape: 1. Press Alt F, then S to view: 2. Click on the Landscape radio button to change the orientation of the page to landscape. 3. Press Enter. From now on, every table printout and standard report is printed in landscape, until you change the print setup or shut down CN!Express. CN!Express SU Page 125 Customizing Table Printouts and Standard Reports Printing Tables, Reports, and Receipts Customizing Table Printouts and Standard Reports The Flagged Records report and the Flagged Records with Currency Breakdown report always show all flagged transactions, even if they’re not on view. You can’t customize them by changing the table’s layout or filter, only by adding or removing flags. Every table printout and most standard summary reports are based on the transactions currently on view in the Active Transactions or Completed Transactions table. So if you want to customize a printout or report, you have to change the transactions that are on view, as explained in Chapter 9. You can customize table printouts by changing the table’s layout, filter, and sort. Standard summary reports aren’t affected by changes in layout and sorts, but you can customize them by applying a filter. Here’s an example. Let’s say you start with this table: You request the standard report called Records in Current View by Action, Status, and Card Type. Here’s the report that CN!Express prints out: Page 126 CN!Express SU Customizing Table Printouts and Standard Reports Printing Tables, Reports, and Receipts If you apply a filter to the table to show only today’s transactions, your table looks like this: If you request the same standard report (Records in Current View by Action, Status, and Card Type), it now looks like this: Only the transactions currently on view are included in the report. The following steps explain how to use the CN!Express standard filter to create and print a report that includes only today’s transactions. 1. Press Alt V (View menu), then T (Today’s Transactions) 2. Press Ctrl R (Reports). 3. Choose the type of report you want. 4. Press Alt P (Print). 5. Click on 6. Click on CN!Express SU , then press Enter. to exit the Print Preview screen. Page 127 Printing a Receipt Printing Tables, Reports, and Receipts Printing a Receipt You can print a receipt for any transaction. 1. Click on the transaction. 2. Press Alt T (Transaction menu). 3. Press P (Print Receipt) to view: This is the print button. 4. Press Page 128 to view: CN!Express SU Printing a Receipt Printing Tables, Reports, and Receipts 5. Press Enter to print the receipt. 6. Click on to exit the Print Preview screen. A typical receipt contains two sections, one for the merchant and one for the customer. Each section contains the same information. For example: You can’t change the orientation of receipts (they’re always portrait). However, you can change their content if you’re an ADMIN user. For more information, see “Changing Receipt Settings” on page 138. CN!Express SU Page 129 Printing a Receipt Page 130 Printing Tables, Reports, and Receipts CN!Express SU Chapter 11. Customizing Your System Settings If you’re an ADMIN user, you can customize: • The way CN!Express handles authorizations • Some of the information that appears on the data entry forms • The content of receipts. Click on the Configure menu, then click on System Settings to view the following tab, where you can handle most of these tasks: Change the way authorizations are handled, truncate account numbers in the data base, and choose how reject files are handled. Set up the choice of currencies available on the MAIN data entry form and set the default currency (might not appear). Set up the choice of countries available on the ADDRESS data entry screen and set the default country. This chapter explains how to set your options under each tab. It also explains how to change receipt settings. CN!Express Page 131 Changing the General Options Customizing CN!Express Changing the General Options The general options control how captures are created (automatically or manually), whether account numbers are truncated in the data base, and the location of the reject file. 1. Press Alt C (Configure menu). 2. Press Y (System Settings) to view: 3. If necessary, click on the General tab. Typical default settings under the General tab are shown above; there’s only one check-mark, next to Automatically Convert Successful Auths to Pending Captures. 4. You may change any of the settings, as explained in the following table. Page 132 CN!Express Customizing CN!Express Changing the General Options Option . . . With a Check-Mark . . . Without a Check-Mark . . . Automatically Update Successful Auths When you send a sales transaction to your processing service for authorization and the processing service authorizes it, then CN!Express automatically converts the successful authorization to a pending deposit (delayed capture). CN!Express processes authorizations but doesn’t automatically create a delayed capture transaction (pending deposit). You must manually change the authorization to a delayed capture. Truncate Account Numbers From now on, CN!Express truncates (shortens) account numbers in the data base after processing is completed. You cannot recover the full account numbers. (If you select this option, (a) export files always contain truncated account numbers regardless of how you set up exports; and (b) you won’t be able to create refunds using the COMPLETED TRANSACTIONS table.) CN!Express does not truncate account numbers in the data base. (They are still truncated on the ACTIVE TRANSACTIONS and COMPLETED TRANSACTIONS tables.) Create Reject File in Separate Directory You select the directory where you want the reject file(s) stored. Reject file(s) remain in EXPORT directory 5. Click on CN!Express to save your change. Page 133 Setting Up Currencies Customizing CN!Express Setting Up Currencies Your processing service may accept only a few of the currencies available and require special setup arrangements. Ask your processing service about their options and requirements. On the Main data entry form, you might have a box that lets you choose the type of currency being used for the transaction. This box appears only if your processing service accepts multiple currencies. If your processing service only accepts U.S. dollars, CN!Express hides the Currency box and also hides the Currencies tab under Preferences. To change the choices available in the currency box or to change the default currency: 1. Press Alt C (Configure menu). 2. Press Y (System Settings). 3. Click on the Currencies tab to view: 4. Use the scroll bar to scroll through the currencies available. Click on the box next to a currency to add or remove a check-mark: • Page 134 If you want a type of currency to be a choice on the Main data entry form, make sure it’s check-marked. If necessary, click on the box to add a check-mark. For example: CN!Express Customizing CN!Express Setting Up Currencies • If you don’t want a type of currency to be a choice on the Main data entry form, make sure it isn’t check-marked. If necessary, click on the box to remove the check-mark. 5. Click on the Default Currency box to view a list of all currencies that have check-marks. For example: 6. Click on one currency. Every time you start a new transaction, this currency will automatically appear in the Currency box on the Main data entry form. This is the default. 7. Click on CN!Express to save your changes. Page 135 Setting Up Countries Customizing CN!Express Setting Up Countries On the Address data entry form, you have a box that lets you choose from a list of countries for billing or shipping addresses. To change the list or change the default country: 1. Press Alt C (Configure menu). 2. Press Y (System Settings). 3. Click on the Countries tab to view: You must enter the correct country for purchase cards, so make sure you check-mark every country where you expect purchase card transactions. Page 136 4. Use the scroll bar to view the countries available. Click on the box next to a country to add or remove a check-mark: • If you want a country to be a choice on the Address data entry form, make sure it’s check-marked. If necessary, click on the box to add a check-mark. For example: • If you don’t want a country to be a choice on the Address data entry form, make sure it isn’t check-marked. If necessary, click on the box to remove the check-mark. CN!Express Customizing CN!Express Setting Up Countries 5. Click on the Default Country box to view a list of all countries that have check-marks. For example: 6. Click on one country. Every time you start a new transaction, this country will automatically appear in the Country box on the Address data entry form. This is the default. 7. Click on CN!Express to save your changes. Page 137 Changing Receipt Settings Customizing CN!Express Changing Receipt Settings To change some of the content on your receipts: 1. Press Alt C (Configure menu). 2. Press R (Receipt Settings) to view: 3. You can type any information you like in each of the Line boxes. For this example, assume the information typed in is an address: Any Corporation, 111 Any Street, Anyplace, NH. 4. If you remove the check-mark next to Do not print expiration date, the expiration date is printed on the receipt. Auric Systems International recommends that you keep the check-mark. For this example, assume the check-mark remains. 5. Press Enter. From now on, when you print a receipt, the information you typed in the Line boxes appears: Page 138 CN!Express Customizing CN!Express CN!Express Changing Receipt Settings Page 139 Changing Receipt Settings Page 140 Customizing CN!Express CN!Express Chapter 12. Working with Batches This chapter describes how to close batches manually and view the batch history. If your processing service doesn’t support these capabilities, you won’t be able to use them in CN!Express. CN!Express Page 141 Closing Batches Working with Batches Closing Batches Most processing services offer a regular automatic schedule for closing out batches (groups of transactions). After a batch is closed, completed transactions can’t be changed further; for example, you can’t void them, even though the closed transactions still appear on your Completed Transactions table. Some processing services let you close batches manually, whenever you like. You must make arrangements for manual batch closes directly with your processing service. To close a batch manually: 1. Press Alt T (Transactions). 2. Press O (Close Batch) to view a screen like the following: You must repeat the manual close batch procedure separately for each division. 3. Press Enter. 4. Wait. When the batch is closed, a message like the following appears: 5. Press Enter. Page 142 CN!Express Batch History Working with Batches Batch History The batch history is a record of the batches that were closed manually. It doesn’t include batches closed automatically by the processing service. To view the batch history: 1. Press Alt T (Transaction). 2. Press B (Batch History) to view: 3. You can sort the information on the batch history screen by clicking on any one of the column headings. (You can only sort on one column at a time.) Each time you click, an arrow appears next to the column name: • means that the column is sorted in ascending order (starting with the smallest value and going up to the largest) • means that the column is sorted in descending order (starting with the largest value and going down to the smallest) 4. When you’ve finished viewing the batch history, press Enter to leave the screen. CN!Express Page 143 Batch History Page 144 Working with Batches CN!Express Chapter 13. Importing, Exporting, and Archiving For information on fields, press ALT H (Help), then F (Field Reference). You may want to view or print this list before you begin importing or exporting. CN!Express SU This chapter describes how to import and export files in CN!Express and how to archive. You must be an ADMIN user to archive. Page 145 Importing Files Importing, Exporting, and Archiving Importing Files You can export to either a Microsoft Excel file or a text file but you can import only from a text file. You can import transactions into the Active Transactions table from a text file. 1. Press Alt F (File menu). 2. Press I (Import) to view: 3. Double click on the name of the file you want to import to view: Page 146 CN!Express SU Importing Files Importing, Exporting, and Archiving Every column you want to import (Columns with Data from:) needs a field title. The Fields list shows the available field titles. Some of the field titles are marked with an asterisk (*). These fields are required and must be assigned to a column; for example, Account (account number), Amount, and Exp (expiration date). Step 4 describes how to assign field titles to columns. In the field list, the abbreviations stand for: A/N Alphanumeric DT Date LU Look-up N Number Y/N Yes/No or On/Off CN!Express remembers your choices under the File Layout and Default Values tabs; and keeps them the same for every import, until you change them. is used to access custom import templates, such as the ICV-style files supplied with CN!Express. CN!Express SU The field title includes information about the type and size of the field. For example, Account (A/N[19]) means that you can enter a maximum of 19 letters or numbers (alphanumeric: A/N) in the account field. 4. If a column title is labeled unassigned, you may assign a field title to it: • Either click to automatically assign field titles. • Or click on one of the titles in the Fields list and drag it to the correct unassigned column, to identify the column. Place the field title right on top of the word unassigned. • Or leave it unassigned; the information in that column won’t import. 5. Two tabs appear on the Configure Import screen: File Layout and Default Values. The following steps describe the choices offered under each tab. • If you don’t have any changes to the file layout or the default values, go directly to Step 5 on page 149. • If you are importing ICVerify® (ICV-style) files, go to “ICVerify® (ICV-Style) Files” on page 150. Page 147 Importing Files Importing, Exporting, and Archiving File Layout Tab The following information appears under the File Layout tab: 1. Choose a delimiter. The default delimiter is a tab. 2. If necessary, click on one of the choices under Options: • Click on First Row Contains Field Names if the first row in the imported file is a list of field names. CN!Express automatically tries to match and label the information in your file with the field names used in CN!Express. Auric Systems recommends leaving off field names when you prepare text files for import. • The check-mark on Fields Include Quotes removes the quotes around fields in your import file. If you remove the check-mark, your data looks like this: You want a clean file, without quotes. So be sure to check-mark this option if the file you’re importing has quotes around the data fields. • Page 148 Click on Expiration Date as YYMM if the expiration dates in your import file appear with the year first, then the month (that is, November 2003 appears as 03/11). A check-mark in this field alerts CN!Express that the file uses the YYMM format. CN!Express SU Importing Files Importing, Exporting, and Archiving Default Values Tab 1. Click on the Default Values tab to view: 2. You may need to change the default Action: • If your imported file includes an Action field for each transaction and if the column is labeled Action, leave the default Action as is. CN!Express ignores it and imports the action(s) listed in the Action column. • Otherwise, you must set the Default Field to one action (for example, refund/credit) for all imported transactions. All your imported transactions will show that same action when they appear on the Active Transactions table. 3. You may need to change other defaults, such as Division, Class (MOTO, recurring, or E-commerce), and Tender (credit card, purchase card, or check). The choices that appear depend upon your processing service. 4. Click on the Check Fraud box to add a check-mark if you want your processing service to check every imported transaction for fraud. 5. When you’ve filled out both File Layout and the Default Values the way you want them, press Enter. A message like the following appears: 6. Press Enter. CN!Express SU Page 149 Importing Files Importing, Exporting, and Archiving When the import is complete, the transactions appear on your Active Transactions table. Every column that you identified with a field title is imported. If an imported column doesn’t appear on the table, you need to change your table layout to show that column. ICVerify® (ICV-Style) Files CN!Express is able to import ICV-style files using built-in templates. (The same procedure works with any other custom-made import templates.) To import ICV-style files, on the Configure Import screen: 1. Click on to view: 2. Click on the template you prefer. 3. Press Enter. CN!Express automatically sets up the defaults for the import file. 4. If necessary, change the defaults as described earlier in this chapter. If you make changes, then want to undo them: Page 150 • Click on (don’t click on • Re-select the template you want. ). CN!Express SU Importing, Exporting, and Archiving Importing Files 5. When you’re satisfied with the ICV-style layout and when you’ve filled out both File Layout and the Default Values the way you want them, press Enter. A message like the following appears: 6. Press Enter. When the import is complete, the transactions appear on your Active Transactions table. Every column that you identified with a field title is imported. If an imported column doesn’t appear on the table, you need to change your table layout to show that column. CN!Express SU Page 151 Exporting Transactions Importing, Exporting, and Archiving Exporting Transactions If you want to store completed transactions and remove them from the Completed Transactions table, use the archive procedure, not export. When you export transactions, they are saved in a text (.txt or .csv) file or Microsoft Excel (.xls) file that you may be able to edit. However, the transactions also remain on the CN!Express Active Transactions or Completed Transactions table. You have two options for exporting transactions to a text file or Microsoft Excel file: • Using Quick Export • Using the Export Wizard Using Quick Export Quick Export exports the transactions from whichever table you’re currently viewing (Active Transactions or Completed Transactions). The current table layout and filter affect the amount of information and the kinds of transactions you export. (For example, if your table layout doesn’t include the billing address, the billing address isn’t exported. If your filter hides sales transactions, sales transactions aren’t exported.) 1. Press Alt F (File menu). 2. Press E (Quick Export) to view: 3. In the File name box, type a unique file name. (For this example, assume the file name is January.) Page 152 CN!Express SU Exporting Transactions Importing, Exporting, and Archiving Quick Export isn’t case-sensitive so it considers JANUARY, January and januaRy to be the same name. 4. Click on next to the Save as type box to choose how your transactions should be saved (either in a plain text file or in a Microsoft Excel file). 5. Press Enter to view: 6. Click on one radio button under Delimiter. A delimiter divides one item of information from the next in your file. The default delimiter is a Tab between each item for text files and a Comma between each time for Microsoft Excel files. 7. Click on one or more of the Options boxes: • Export Field Names in First Record is the default. It is recommended that you leave a check-mark in this box. places quotes around each text field, to make it clearer when a field ends. (This is especially helpful if you chose commas for your delimiter; if a text field contains commas, the quotes prevent confusion about the actual end of the field.) • Include Quotes Around Each Field • Show Unmasked Account Numbers should remain unchecked. When this box is check-marked the full account number is exported. Auric Systems International strongly recommends that you do not export full account numbers. (If you’ve changed your system settings to truncate account numbers in the data base, the exported account numbers are automatically truncated whether or not you check-mark this box.) 8. Press Enter. CN!Express SU Page 153 Exporting Transactions Importing, Exporting, and Archiving A message like the following appears: 9. Press Enter. All the transactions in the table you’re viewing are exported to a text or native Microsoft Excel file. Using the Export Wizard The Export Wizard exports transactions from either the Active Transactions or Completed Transactions table, even if you are not viewing that table. You decide exactly which transactions and which items of information (fields) you want to export. It doesn’t matter what layout or filter you’re using on the table. 1. Press Alt F (File menu). 2. Press X (Export Wizard) to view: After you type a file name, you can click on at any time and your files will automatically be exported, in the same way you last set them up. Page 154 3. Type a unique file name next to the last slash after the file path; for example: CN!Express SU Exporting Transactions Importing, Exporting, and Archiving C:\PROGRAM FILES\CN!EXPRESS_SU\EXPORT\JANUARY The Export Wizard isn’t case-sensitive so it considers JANUARY, January and januaRy to be the same name. 4. Click one of the choices under File Format, to choose whether your file is saved in Text or native Microsoft Excel format. 5. Press Alt N (Next) to view: 6. Click on one radio button under Record Type: • Completed Transactions is the default; it saves your completed transactions to an export file. • Active Transactions saves your active transactions to an export file. 7. Click on one of the choices under Filter: If you want a custom filter, you must build it here even if the transactions table is already filtered. CN!Express SU means that only today’s transactions in the table are exported. Today’s transactions are exported even if they aren’t visible in the table. This is the default. • Today’s Transactions • No Filtering • Custom Filter lets means that all the transactions in the table are exported (even the hidden transactions). you export only some transactions in the table (for example, only Visa transactions or only sales over $100). Page 155 Exporting Transactions Importing, Exporting, and Archiving If you select Custom Filter, click on to view the Custom Export Filter screen (for information on creating filters, see “Filtering the Tables” on page 110). 8. Click on if you change your mind and want to return to the default choices. 9. Press Alt N (Next) to view: The Select Fields screen works exactly like the Table Layout screen; see “Adding, Removing and Re-ordering Columns on the Tables” on page 106. 10. The fields listed in Columns to Show will be exported (the eight default fields are shown above). If you wish to export different information, move fields to and from Available Columns using the arrow keys in the center of the screen. You can also change the order of the columns by using the arrow keys on the right side of the screen. 11. Press Alt N (Next) to view: Page 156 CN!Express SU Exporting Transactions Importing, Exporting, and Archiving 12. Click on one radio button under Delimiter. A delimiter divides one item of information from the next in your file. The default delimiter is a Tab between each item. 13. Click on one or more of the Options boxes: • Export Field Names in First Record is the default. It is recommended that you leave a check-mark in this box. If you remove the check-mark, no field names appear in the export file. • Include Quotes Around Each Field places quotes around each text field, to make it clearer when a field ends. (This is especially helpful if you chose commas for your delimiter; if a text field contains commas, the quotes prevent confusion about the actual end of the field.) • Show Unmasked Account Numbers should remain unchecked. When this box is check-marked the full account number is exported. Auric Systems International strongly recommends that you do not export full account numbers. 14. Press Alt F (Finish). A message like the following appears: CN!Express SU Page 157 Exporting Transactions Importing, Exporting, and Archiving 15. Press Enter. All the transactions you specified are exported to a text or Microsoft Excel file. The Export Wizard remembers your changes. Re-Using the Export Wizard Say that the next time you export, you want to use the same setup you specified last time for the Export Wizard: 1. Press Alt F (File menu). 2. Press X (Export Wizard). 3. Type a file name. 4. Press Alt F (Finish). The transactions are exported in exactly same the way as the last export: from the same table and using the same filter, fields, delimiter, and so on. Page 158 CN!Express SU Importing, Exporting, and Archiving Archiving Completed Transactions Archiving Completed Transactions You can’t archive active transactions. Even if you’re viewing the Active Transactions table, you’ll only archive completed transactions. If you want to create a text or Microsoft Excel file without removing completed transactions from CN!Express, use the export procedure, not archive. When you archive, you first choose a set of transactions that were completed on or before a specific date that you select. Then you send those transactions to a text file for storage. The transactions no longer appear on the Completed Transactions table and are no longer available in CN!Express. It’s a good idea to archive completed transactions on a regular schedule, either weekly or monthly. You can store archives as long as you like. Before you delete an archive, make sure that you don’t need it to comply with Federal, State, or your own company policies. The following sections describe how to archive transactions and how to open archive files. You can read archives with a standard text editor, or you can load them into Microsoft Excel or a database program. Archiving Transactions To archive completed transactions: You must be an ADMIN user to archive. 1. Press Alt F (File menu). 2. Press A (Archive) to view: CN!Express automatically fills in the name of the archive file, based on the Archive Date. For example, 20030517.CNA is the file CN!Express SU Page 159 Archiving Completed Transactions Importing, Exporting, and Archiving name for the archive that includes files completed on or before 2003, in May (05), and on the 17th day. 3. You must select a cut-off date (Archive Date) for transactions that will be archived. Do one of the following: • Either type a date in the Archive Date box. • Or click on • Or keep the default date, which is 30 days earlier than today’s date (for example, if today is December 4, the default date is November 4). to view a calendar and select a date. CN!Express archives all transactions that occurred on or before the date you chose. 4. Press Enter to start the archive. 5. Wait. After a while, you’ll see a message like the following: If you archive again on the same day, CN!Express adds a consecutive number to the file name; for example, 20030517_001.CNA. 6. Press Enter. Your completed transactions are now archived. Page 160 CN!Express SU Chapter 14. Using the OnScreen Buttons The previous chapters in this manual described how to use keyboard short-cuts for data entry and processing. This chapter describes how to use the on-screen buttons and your mouse to record and send a transaction; flag or unflag a transaction; print a report; and change the contents of a report using a filter. This chapter doesn’t explain everything you can view or do with the buttons. For more information about individual buttons, see “Chapter 5. Understanding the CN!Express Screen” on page 41. CN!Express SU Page 161 Recording and Saving a Transaction Using Buttons Using the On-Screen Buttons Recording and Saving a Transaction Using Buttons The following picture shows the basic steps in recording and saving most transactions using the buttons. Your Main data entry form may look different; it shows the exact boxes (fields) that your credit card service expects. Step 1. Click here. Step 2. Click here. Step 3. Choose one. Step 4. Click here. Step 5. Fill out required boxes. Step 6. Click here. To move from box to box on the data entry forms, use your mouse or press the Tab key on your keyboard. You must fill out all boxes that are outlined in bold. Page 162 CN!Express SU Using the On-Screen Buttons Sending Transactions in a Group Using Buttons Sending Transactions in a Group Using Buttons You can use the following buttons to submit flagged active transactions a group: Step 1. Click here. Step 2. Wait. When the message appears, click here. CN!Express SU Page 163 Flagging/Unflagging Transactions Using Buttons Using the On-Screen Buttons Flagging/Unflagging Transactions Using Buttons You can’t send active transactions to your processing service unless they’re flagged. To flag (or unflag) transactions: 1. Select one or more transactions in the Active Transactions table. 2. Do one of the following: Page 164 • Either click on • Or click on to flag the transaction(s). to remove the flag from the transaction(s). CN!Express SU Using the On-Screen Buttons Printing a Standard Summary Report Using Buttons Printing a Standard Summary Report Using Buttons To print a standard report using buttons: Step 1. Click here. Step 2. Choose one. Step 3. Click here. The Print Preview screen appears. Step 4. Click on CN!Express SU Step 5. Step 6. Click on Click on Page 165 Creating a Custom Report Using Buttons Using the On-Screen Buttons Creating a Custom Report Using Buttons The Flagged Records report and the Flagged Records with Currency Breakdown report always show all flagged transactions, even if they’re not on view. You can’t customize those reports by changing the table’s layout or filter, only by adding or removing flags. Page 166 Most standard summary reports and all table printouts are based on the transactions currently on view. So if you want to change the content of the report or printout, you have to change the transactions that are on view. You need a filter. If you want a report that only shows transactions over $100, you need a custom filter. Custom filters let you choose exactly which transactions appear on your screen and on the report or printout. The steps shown on the next page explain how to use the CN!Express standard filter to create and print a standard summary report that includes only today’s transactions. CN!Express SU Using the On-Screen Buttons Creating a Custom Report Using Buttons Step 1. Click here. Step 2. Click here. Step 3. Choose one. Step 4. Click here. The Print Preview screen appears. Step 5. Step 6. Step 7. Click on Click on Click on CN!Express SU Page 167 Creating a Custom Report Using Buttons Page 168 Using the On-Screen Buttons CN!Express SU Chapter 15. Maintenance and Troubleshooting This chapter describes how to back up and restore the CN!Express data base and how to handle possible problems with CN!Express. If you need to contact Auric Systems International, please copy down any error messages you received and keep notes on what happened before and after the trouble started. This information will help us solve your problem quickly. To contact technical support for CN!Express: Phone: 603-924-6079 E-mail: [email protected] Web Site: www.AuricSystems.com Please have your serial number handy. When you purchased CN!Express over the Internet, the serial number and activation key were faxed or e-mailed to you. CN!Express SU Page 169 Maintenance and Troubleshooting You can also find your serial number and activation key under the Help menu: 1. Press Alt H (Help menu). 2. Press A (About). 3. Scroll down to Serial Number and then Activation Key. 4. Write down the numbers and press Enter to leave the Help menu. Your problem might involve your specific processing service. For troubleshooting tips for your processing service, refer to the CN!Express web site: www.AuricSystems.com. Page 170 CN!Express SU Maintenance Contract Maintenance and Troubleshooting Maintenance Contract After you switch to the live CN!Express (by entering your serial number and activation key), you immediately start your maintenance contract. To find out about or renew your contract: 1. Press Alt H (Help menu). 2. Press A (About) to view a screen like the following: 3. To renew your contract, click on the date when your Maintenance Expires, to view: CN!Express SU Page 171 Maintenance Contract Maintenance and Troubleshooting 4. Follow the directions on the screen. Page 172 CN!Express SU Backup and Restore Maintenance and Troubleshooting Backup and Restore You should back up the CN!Express data base regularly. Before you back up or restore, shut down CN!Express. To back up CN!Express, copy the DATA directory from your hard drive on to a zip disk or floppy. Look for the Data directory in your program files in the CN!Express_SU folder. If you need to restore the data base, copy the backup files over the existing DATA directory. CN!Express SU Page 173 Troubleshooting Questions and Answers Maintenance and Troubleshooting Troubleshooting Questions and Answers I can’t log in. Did you log in under the correct User Name? The CN!Express login screen always shows the User Name of the last user who logged in. Did you type your password correctly? You must type your password exactly the same way every time you use it, including capital letters. For example, ADMIN, Admin and admin are three different passwords. If this is the first time you’re using CN!Express, type ADMIN in the User box and ADMIN in the Password box. Once CN!Express starts up, please change the ADMIN password immediately. I can’t remember my password. An ADMIN user must reset your password. Speak to your manager. If you’re the ADMIN user and you can’t remember your password, contact Auric Systems International and ask about our password resetting service. I can’t enter information in the data entry forms. You may be viewing the Completed Transactions table. You can’t enter, change, or delete information if you’re viewing completed transactions. Press Ctrl 2 to view the Active Transactions table. Do one of the following: Page 174 • Either press Enter to open a new transaction • Or double click on a saved transaction to open it for editing CN!Express SU Troubleshooting Questions and Answers Maintenance and Troubleshooting I can’t see the transactions I want on the transaction tables. You may be in a filtered view. Do one of the following: Press . . . To View . . . Alt V, then N All the transactions in CN!Express Alt V, then T Just today’s transactions Alt V, then E To make sure your filter is set up correctly If you’re using the correct filter, you may need to refresh it. Press Alt V, then press S. The transactions you want may have been archived and are no longer available for viewing on CN!Express. See “Archiving Completed Transactions” on page 159. I can’t see some of the fields, data entry forms, and menus mentioned in this manual. CN!Express hides the fields, forms, and menus that your processing service doesn’t use and can’t process. For example, you won’t see the Line Items tab and data entry form if your processing service doesn’t use them. If you’re not sure what your processing service expects, see “Appendix C. Processing Service Information” on page 193. CN!Express hides some menus and screens because they’re only available for ADMIN users (for example, the screen for setting up the processing service). To see those menus and screens, you must be logged in as an ADMIN user. None of my transactions are going to the processing service even though I keep submitting them. Are you in DEMO mode? If you’re in DEMO mode, the word DEMO appears in the upper right hand corner of your screen. Also, the authorization codes for transactions begin with DEM. When you’re in DEMO mode, you aren’t really saving and sending transactions. You must ask an ADMIN user to turn off DEMO mode. Is your processing service currently available? You should see a message from CN!Express if it isn’t available. Contact your processing service directly for more information. CN!Express SU Page 175 Troubleshooting Questions and Answers Maintenance and Troubleshooting Are you interacting with your processing service in TEST mode? If you’re in TEST mode, the word TEST appears in the upper right hand corner of your screen, and your processing service isn’t really processing transactions. You must ask an ADMIN user to turn off TEST mode for your processing service (press Alt C, then O). I can’t switch users out of DEMO mode, even though there’s no check-mark next to Demo/Training on the User Information screen. You’re in the demonstration version of CN!Express. You must enter your serial number and activation key to switch to the live CN!Express. You can then switch users into and out of DEMO mode whenever you like. See “Chapter 4. Going Live and Changing Your Password” on page 31. Page 176 CN!Express SU Appendix A. Advanced Filtering Techniques This appendix describes how to create advanced custom filters. It assumes that you’ve read “Filtering the Tables” on page 110. CN!Express SU Page 177 Understanding the Define Filter Screen A. Advanced Filtering Techniques Understanding the Define Filter Screen To view the Define Filter screen: 1. Press Alt V, then E to view: Add (or delete) condition or bracket (Step 7) Relations of conditions to each other (Step 10) Field (Step 2) Relation of field to condition (Step 4) Condition (Step 6) You can filter on any listed field even though it doesn’t currently appear in the tables. 2. Click on Action to view a list of fields. 3. Click on the field you want (for example, Amount). 4. Click on is equal to to view the list of field relations: 5. Click on the field relation you want. Some relations may not be valid for some fields. For example, “is in list” is not valid for Created Date or Amount. Also, since Amount is a required field, it can never be “is null” (completely empty). Page 178 CN!Express SU Understanding the Define Filter Screen A. Advanced Filtering Techniques 6. Click on the condition line In some cases, the system brings up a menu or calendar. In other cases, a data entry box appears and you must type the condition: 7. Click on or to view 8. Do one of the following: • Either click on Add Condition to add a new condition line: For information on filters with two or more conditions, see “A Filter with Two Conditions” on page 181. • CN!Express SU Or click on Add Bracket to add a bracket: Page 179 Understanding the Define Filter Screen A. Advanced Filtering Techniques A bracket contains two or more conditions that act together. For more information, see “A Filter That Uses Brackets” on page 186. 9. Make the changes you want. 10. Click on the condition relation (all) to view: 11. Select the condition relation you want. You can apply and store just one custom filter at a time. When you press Enter for a new filter, the old one is automatically over-written. If you need the old one again, you’ll have to re-create it. Page 180 12. Click on to view the filtered table. CN!Express SU A. Advanced Filtering Techniques A Filter with Two Conditions A Filter with Two Conditions Suppose your Active Transactions table looks something like this: You set up this filter, so that you can view only sales that are equal to $100: The following sections describe what happens when you change each of the circled items in the filter. CN!Express SU Page 181 A Filter with Two Conditions A. Advanced Filtering Techniques Working with You’re using this table: The filter looks like this: Here’s what happens when you click on all and make a choice from the menu: When You Choose . . . The System Selects . . . All Transactions that meet all conditions: they are SALES and they are also exactly $100 Any Transactions that meet at least one of the conditions: either they are SALES or they are exactly $100 Page 182 So You See . . . CN!Express SU A. Advanced Filtering Techniques When You Choose . . . The System Selects . . . None Transactions that meet none of the conditions: they aren’t SALES and they also aren’t exactly $100 Not all Transactions do not meet at least one of the conditions: either they aren’t SALES or they aren’t exactly $100 CN!Express SU A Filter with Two Conditions So You See . . . Page 183 A Filter with Two Conditions A. Advanced Filtering Techniques Working with You’re using this table: The filter looks like this: Here’s what happens if you click on is equal to and make a choice from the menu: When You Choose . . . The System Selects . . . is equal to Transactions that are SALES and are exactly $100 (not less and not more) is not equal to Transactions that are SALES and are not exactly $100 Page 184 So You See . . . CN!Express SU A. Advanced Filtering Techniques When You Choose . . . The System Selects . . . is less than Transactions that are SALES and are less than $100 (does not include transactions that are exactly $100) is less than or equal to Transactions that are SALES and are either less than $100 or exactly $100 is greater than Transactions that are SALES and are greater than $100 (does not include transactions that are exactly $100) is greater than or equal to Transactions that SALES and are either greater than or exactly $100 is null Transactions that are SALES and do not have an amount filled in is in list Transactions that are SALES and are check-marked on the list. (A list of choices appears. Click on one or more choices.) is between Transactions that are SALES and are at least $XX and no more than than $XX (for this example, between $50 and $100) CN!Express SU A Filter with Two Conditions So You See . . . This choice is used with items such as Action or Card Type. It isn’t valid with Amount. Page 185 A Filter That Uses Brackets A. Advanced Filtering Techniques A Filter That Uses Brackets Here’s your starting screen: Suppose you want to view two types of transactions: • Credits (refunds) that are greater than $50 • Sales in any amount The following filter wouldn’t work. There aren’t any transactions that are both credits and sales. If you change all to any, you’ll see all credits, all sales, and any transactions (even voids and authorizations) where the amount is greater than $50. No matter how you change the filter, it won’t work. To see exactly what you want to see, you have to use a bracket. Page 186 CN!Express SU A. Advanced Filtering Techniques A Filter That Uses Brackets Set up this filter: Bracket This filter tells CN!Express that you’re looking for transactions that are either credits greater than $50 or sales in any amount. You’ll see: CN!Express SU Page 187 A Filter That Uses Nested Brackets A. Advanced Filtering Techniques A Filter That Uses Nested Brackets You can create complex filters by nesting brackets: setting up brackets and sub-brackets. Suppose you want to trace a duplicate transaction and find out if a credit was issued in the correct amount. You know that a Master Card was used, that both sales and credit were completed on the same day (11/20/01), and that both sales were for $50. But you’re not sure how much the credit was for. Here’s the screen you start with: Page 188 CN!Express SU A. Advanced Filtering Techniques A Filter That Uses Nested Brackets You set up this filter: To create the nest brackets at 3.2.1 and 3.2.2, click on This filter tells CN!Express you are looking for transactions that used Master Card and were created on 11/20/01 and are either credits in any amount or sales in the amount of $50. You’ll see: Note that only Master Cards are listed even though Card Type isn’t shown on the Completed Transactions table. The field you are filtering on doesn’t have to be a column in the table. CN!Express SU Page 189 A Filter That Uses Nested Brackets Page 190 A. Advanced Filtering Techniques CN!Express SU Appendix B. Client/ Server When you start up CN!Express, two programs start, not just one. The first program, the one where you manage transactions, is the CN!Express client. The other program is the CN!Express server. The server contains the CN!Express data base and business logic. When you work in CN!Express, both client and server must be running. The server starts automatically when you click on The server shuts down automatically when you shut down CN!Express. You should never shut the server down separately when CN!Express is running. Because of this client/server arrangement: CN!Express SU • You must have TCP/IP on when you’re submitting transactions to the processing service. • You can easily upgrade to a multi-user version of CN!Express in the future, if you desire. Page 191 B. Client/Server Page 192 CN!Express SU Appendix C. Processing Service Information This appendix contains specific information on the various checking, credit card, and purchase card processing services. If your processing service supports a particular feature of CN!Express, the fields and menus related to that feature appear on your screen. For example, if your processing service supports multiple currencies, the Currency box appears on the Main data entry form, and the ADMIN user can select from a list of currencies under System Settings. But if your processing service doesn’t support multiple currencies, neither the Currency box nor the list of currencies appears. Specifications, supported features, and system requirements are continually changing. CN!Express changes to keep pace. You can always find the latest information at www.AuricSystems.com. CN!Express SU Page 193 Paymentech Orbital Gateway C. Processing Service Information Paymentech Orbital Gateway Setting Up the Paymentech Orbital Gateway Processing Service When you configure the processing service setup (press Alt C, then O), you view a screen like the following: Click on each tab provided (Settings, Merchant IDs [also known as Division Numbers], URL/Proxy) and fill in the following information: Field Bin Fill Out by Typing . . . 000001 for Salem or 000002 for PNS or as assigned by Paymentech Terminal ID 001 or as assigned by Paymentech Time Zone Page 194 Your time zone (for example, Eastern or Pacific) CN!Express SU Paymentech Orbital Gateway C. Processing Service Information Field Fill Out by Typing . . . Installation ID Enter a number (of your own choosing) for the CN!Express installed on this computer. If CN!Express is installed on more than one computer in your company, you must enter a unique installation number for each one. (Paymentech uses this number to help create a unique identification for each transaction, for more precise detection of duplicates.) Send “Comment 1” Field to Gateway Check-mark the box if you want your processing service to automatically receive the information you placed in the comment 1 field (on the Main data entry form and/or the Comments data entry form). Merchant ID (called Division ID if Bin is 000001) ID assigned by Paymentech; you can add a description, but only the assigned number is processed (Tampa Merchant ID is 12 characters long and Salem Division Number is 6 characters long) Host URL URL assigned by Paymentech Use HTTPS proxy server Check-mark the box if you’re connecting to the Paymentech HTTPS gateway through a proxy server Address Address of the proxy server, if you’re using one Port Port for the proxy server, if you’re using one Changing the Server Connection You can change the default Server Connection information, if necessary (under the URL/Proxy tab). If CN!Express can’t immediately connect to your processing service, this information determines whether and for how long CN!Express keeps trying to connect. Option Timeout if No Response In: CN!Express SU With a Check-Mark . . . CN!Express waits for the processing service to respond during the amount of time shown in the Minutes:Seconds box. If there’s no response at the end of that time, CN!Express gives up. Without a Check-Mark . . . If CN!Express keeps waiting for the processing service to respond; CN!Express gives up waiting only when it’s paused or shut down. Page 195 Paymentech Orbital Gateway C. Processing Service Information The default (and minimum time) shown in the Minutes:Seconds box is 1 minute, 10 seconds. The maximum time is 59 minutes, 59 seconds. Within those limits, you can enter any length of time you prefer. How Paymentech Orbital Gateway Supports CN!Express Features Feature Paymentech Orbital Gateway . . . Check processing Supports Class Supports; you can select default class settings for imports (using the import screens) and for users (using the Configure Users screen) Close batch Supports Comment fields Supports, but only processes one comment field (Comment 1) Fraud detection Supports; you can select fraud detection for each transaction; fraud information appears in the overall error codes Multiple currencies Supports, but only for Paymentech Salem Multiple merchant IDs Supports as a CN!Express option Partial voids Supports Purchase Card Level II Supports; Purchase Card Level III is not supported on the Paymentech Orbital Gateway side Split captures Supports Page 196 CN!Express SU Appendix D. Keyboard Shortcuts This chapter describes how to use your keyboard to perform most actions and view most screens in CN!Express. CN!Express SU Page 197 Table of Keyboard Shortcuts D. Keyboard Shortcuts The following tables are organized by the type of key: Type of Keys Function Keys After a menu appears, you can choose an item on the menu by pressing a key on your keyboard. Look for the underlined letter in the item’s name and press that key. For example, press Alt F, then T to Exit (shut down) CN!Express. Alt Keys (Press both the Alt key and the letter key at the same time) To leave a menu without making a selection, press Esc, not Enter. Ctrl Keys (Press both the Ctrl key and the letter (or number) key at the same time) Press . . . F1 View Help (CN!Express Manual) F2 View Main data entry form F3 View Address data entry form F4 View Add’l Purchase Card data entry form F5 View Line Items data entry form (if available) F6 View Comments data entry form F7 View Responses data entry form Alt F View File menu Alt E View Edit menu Alt T View Transaction menu Alt V View View menu Alt C View Configure menu Alt H View Help menu Alt F4 Exit CN!Express Ctrl A Select all (in a field box) Ctrl C Copy Ctrl F Toggle flags for selected transactions Ctrl P Print table you’re viewing Ctrl R Print standard report Ctrl Instead of pressing Enter, you can click on Page 198 Other Keys To Do This . . . I Submit one transaction NOW! Ctrl V Paste Ctrl X Cut Ctrl 2 View Active Transactions table Ctrl 3 View Completed Transactions table Enter Save transaction, and open a new data entry form for the next transaction Tab Move to the next box in the data entry form Ctrl Tab Move to next data entry form CN!Express SU Table of Keyboard Shortcuts D. Keyboard Shortcuts The following table is organized alphabetically by type of task. Your processing service may not support some of these tasks. Type of Task Press These Keys . . . To Do This . . . Archive Archive Completed Records Alt F, then A Batches View Batch History Alt T, then B Close Batch Alt T, then O View Add’l Purchase Card Data Entry Form F4 View Address Data Entry Form F3 View Comments Data Entry Form F6 View Line Items Data Entry Form F5 View Main Data Entry Form F2 View Responses Data Entry Form F7 Copy Ctrl C Cut Ctrl X Paste Ctrl V Select All (in box) Ctrl A Edit Transaction Alt T, then E Exit CN!Express Exit (shutdown) Alt F, then T Export Begin Quick Export Alt F, then E Begin Wizard Alt F, then X Data Entry Form Edit CN!Express SU Or Click on This Icon . . . Page 199 Table of Keyboard Shortcuts Type of Task D. Keyboard Shortcuts Press These Keys . . . To Do This . . . Apply Filter to All Active and Completed (toggle) Alt V, then L Apply Filtered View Alt V, then F Refresh Filtered View Alt V, then S Set Filter (define a custom filter) Alt V, then E View All Transactions Alt V, then N View Today’s Transactions Alt V, then T Flag All Transactions (whether or not in view) Alt T, then L , then A Flag All Transactions in View Alt T, then L , then V Flag Authorized Alt T, then L , then Z Flag Selected Transactions Alt T, then L , then F Toggle Flags on Selected Transactions Ctrl F Unflag All Transactions (whether or not in view) Alt T, then L , then L Unflag All Transactions in View Alt T, then L , then I Unflag Selected Transactions Alt T, then L , then U View Flag Menu Alt T, then L Fraud Detection Request Fraud Detection Alt T, then U Help View CN!Express Manual F1 View Field Reference Alt H, then F View Quick Reference Guide Alt H, then Q View System Information Alt H, then A View Auric Systems International Home Page Alt H, then H Filter Flag Page 200 Or Click on This Icon . . . CN!Express SU Table of Keyboard Shortcuts Type of Task D. Keyboard Shortcuts Press These Keys . . . To Do This . . . Import Import Alt F, then I Print Change Print Setup Alt F, then S Print Receipt Alt T, then P Print Report Ctrl R Print Table Ctrl P Processing Service Setup Configure Processor Setup Alt C , then O Receipt Configure Receipt Settings (change content of receipt) Alt C , then R Print Receipt Alt T, then P Change Print Setup (change orientation of report) Alt F, then S Print Report Ctrl R Submit All Flagged Transactions Alt T, Submit One Transaction Immediately (NOW!) Ctrl Configure System Setup (for authorizations, currencies, countries) Alt C , then Y Exit CN!Express (shut down) Alt F, then T Report Submit System CN!Express SU Or Click on This Icon . . . then F I (or Alt T, then T ) Page 201 Table of Keyboard Shortcuts Type of Task Table Transaction User Page 202 D. Keyboard Shortcuts Press These Keys . . . To Do This . . . Apply Table Layout to Active and Completed (toggle) Alt V, then Y Auto-Fit Columns Alt V, then U Change Table Layout Alt C , then L Print Table Ctrl P Change Print Setup (change orientation of printout) Alt F, View Active Transactions Table Ctrl 2 View Completed Transactions Table Ctrl 3 Cancel Changes Alt T, then H Close Transaction Alt T, then C Delete Alt T, then D Edit Alt T, then E Open New Transaction (also saves previous transaction) Enter Refund/Credit Alt T, then R Save Transaction (without opening new transaction) Alt T, then S Split Capture Alt T, then I Submit All Flagged Transactions Alt T, then F Submit One Transaction Immediately (NOW!) Ctrl Void/Partial Void Alt T, then V Set Password Alt C , then S Set User Settings Alt C , then U View CN!Express Manual F1 View Quick Reference Guide Alt H , Or Click on This Icon . . . then S I then Q CN!Express SU Table of Keyboard Shortcuts CN!Express SU D. Keyboard Shortcuts Page 203 Table of Keyboard Shortcuts Page 204 D. Keyboard Shortcuts CN!Express SU Index A Account number defined 28 truncated during export 133, 153 truncated during refunds 133 truncated in data base 133 truncated on screen 28 Activation key 4, 32, 169–170 ADMIN user adding users 15–17 archiving transactions 159–160 changing default password 14 changing users 18–20 customizing system settings 131–139 delayed captures and 68, 69, 133 deleting ADMIN user 21 deleting users 20–21 hidden screens and 175 installing CN!Express 7–10, 11 passwords. See Passwords setting up the processing service 33, 193–196 turning DEMO mode on and off 35–38 Archive 159–160 Archive date 160 Auric Systems International contacting 169 recommendations 11, 16, 138, 153, 157 Authorizations Also see Transactions defined 64 delayed captures and 68–69, 133 first transaction 39 recording and saving 64–67 split captures and 82 CN!Express SU Page 205 CN!Express Index status of 89 Auto-fit 47 Automatically update successful auths 132, 133 B Backup 173 Batches close automatically 142 close manually 142 history 143 Buttons (overview) arrows moving columns 107, 108 sorting columns 143 bill-to address 52 cancel 57, 86 cancel changes to data entry forms 55 check 50 copy to billing 52 copy to shipping 52 credit card 50 default 57 details... 90 filter 48 finish (export) 154, 157 flag 44 layout templates 147 Now! 55, 88 OK 57 open data entry forms 55 print receipt 44 print report 44 print table 44 purchase card 50 reset (export options) 156 save changes to data entry forms 55 ship-to address 52 shrink to page 120 submit 44 transactions 55 unlock 55 Buttons, using 161–166 Page 206 CN!Express CN!Express Index C Capture Also see Delayed Captures/Deposit forced capture (voice authorization) 76–79 split capture 82–83 status of 89 system settings and 132–133 Capture amount for this transaction 82 Check See Processing service See Transactions Class (MOTO, E-Commerce, Recurring) 17, 51 Columns adding, removing, re-ordering 106–108 auto-fitting 47 default 106 Comments 33, 51, 54 Configure menu 15–21, 40, 43, 106–108, 131–139 Country 52, 136–137 Credit cards See Processing Service See Transactions Currency 51, 134–135 Customer IP 51 Customer is tax exempt 53 D Data base, truncate account numbers in Data entry forms 49–54 Defaults action 17 apply filter 104 class 17 country 131, 137 currency 131, 135 division (merchant ID) 17 export wizard 155 fraud check 17 importing 149 password 14 quick export 153 system settings 132 table layout 104, 106, 107 CN!Express SU 133 Page 207 CN!Express Index tax exemption 53 user information 17 Delayed Captures/Deposits Also see Transactions authorizations and 64 batch closings and 68 creating automatically 68–69, 132–133 creating manually 69 defined 68 flagging 69 status of (authorized/failed) 89 DEMO mode 7, 26–27, 32, 35–38 Demonstration version of CN!Express 7–11, 13 E E-Commerce 17, 51, 149 Edit menu 43 Export privileges 16 Quick Export 152–154 system settings and 133 Wizard 154–156 F Failed transactions 30, 89 File menu 43 Filters applying to tables 104–105 brackets 186–187 changing 114–115 changing relation of field to condition 184–185 changing relations of conditions 182–183 creating (defining) 110–113 creating for export file 155 customizing reports with 126, 166 deleting 115 Filter Buttons/Message bar 48 hidden transactions and 175 nested brackets 188 refreshing 113 restarting 113 standard (today’s transactions) 110, 127 turning off 113 Page 208 CN!Express CN!Express Index Flag adding or removing 99, 164 defined 28, 99 delayed captures/deposits 69 hiding or moving 107 split captures 83 toggling selected flags (Ctrl F) 99 Fraud detection 17, 54, 90, 97–98 Fraud detection score 90 H Help menu 43 I ICVerify® (ICV-style) files 147, 150–151 Import 146–151 Installation installing CN!Express 7–11 shared server warning 6 system requirements 6 TCP/IP connection 32 uninstalling CN!Express 22 K Keys (overview) all keys by task 199–203 Alt (to cancel changes) 55 Alt (to view menus) 43, 198 Arrows (to move from transaction to transaction) 55 Ctrl (to print) 44, 198 Ctrl (to select transactions) 93 Ctrl (to send a transaction Now!) 55 Ctrl (to view active/completed transactions tables) 45 Ctrl Tab (to move from form to form) 49 Enter (to save new transactions) 55, 61, 65, 72, 77, 198 Esc (to leave a menu) 43 F1-F7 (to view help and data entry forms) 198 Shift (to select transactions) 92 Tab (to move from box to box) 49, 198 L Live version of CN!Express 7, 32–39 Locked CN!Express SU Page 209 CN!Express Index Also see Unlock password 19 transaction 56 M Menus. See individual menus, such as Configure Microsoft Excel 152, 159 MOTO (mail order or telephone) 17, 51, 149 O Order date 53 P Partial voids Also see Transactions defined 80 recording and sending 80–81 status of 89 Password ADMIN 12 changing ADMIN default 12, 14 changing for user 18–20 changing your own 40 creating 16 entering at startup 12, 24 forgetting 174 resetting service 174 unlocking 19 Print CN!Express Manual 3 Quick Reference Card 3 receipts 128 reports 122, 126, 165, 166 setup 125 tables 118–121, 126 Privileges admin user 14 setting for individual users 16 Processing service batches 142 connecting with 195 currency and 134 data entry forms and 175 Page 210 CN!Express CN!Express Index fraud checking 17 interacting with CN!Express 1 operating requirements 6 Paymentech Gateway 194–196 responses 54, 89–90 sending transactions to 29–30, 59–83 setting up 33 Processor. See processing service Purchase cards Also see Processing service Also see Transactions country 136 data entry form (additional purchase information) 53 Q Quick Reference Card 3 R Receipt 128 Recurring transactions 17, 51 Refresh 113 Refunds/Credits Also see Transactions completed transactions table and 70 defined 70 Main data entry form and 71–74 privilege settings 16, 70, 73 status of 89 system settings and 133 Reports change content (filter) 166 customizing 126–127 filters and 126, 166 printing 122–125, 165, 166 Restore 173 S Sales Also see Transactions defined 60 first transaction (failed) 30 first transaction (successful) 27–30 recording and saving 60–63 CN!Express SU Page 211 CN!Express Index status of 89 Screens Active Transactions table 30, 45–46, 110, 113, 115, 126 Add’l Purchase Card data entry form 53 Address data entry form 52 Archive Completed Records 159 Batch History 143 Check (Main data entry) 61, 65, 72, 77 Choose Destination Location 8 Close Batch 142 CN!Express 12, 28, 29, 42, 162, 163 Comments data entry form 53–54 Completed Transactions table 30, 45–46 Configure Import 146 Configure Import, Default Values 149 Configure Import, File Layout 148 Confirm Void (partial void) 80 Credit Card (Main data entry) 60, 64, 71, 76 Data Entry Forms, general 49 Define Filter 111–112, 114–115, 178–180, 182, 184, 186, 187 Edit User Settings 19, 20, 36, 37 Enter Serial Number and Activation Key 32 Export Active (Completed) Transactions View to File 152 Export Wizard, Steps 1 through 4 154–157 Exporting Active (Completed) Transactions to Text File 153 Filter Buttons/Message bar 48 Finished (installation) 10 Fraud Check Settings 98 Login 12, 24 Main data entry form 50–51, 97 Menu bar 43 New User Information 15 Paymentech HTTPS Gateway 194 Preferences 132, 136 Print Preview (Receipt) 128 Print Preview (Reports) 122 Print Preview (Table Layout) 118 Print Setup 125 Print/Flag Buttons bar 44 Processor Setup 33, 194 Purchase Card (Main data entry) 60, 64, 71, 76 Ready to Install 9 Receipt Settings 138 Page 212 CN!Express CN!Express Index Re-Enter Password 19 Responses data entry form 54, 89–90 Select a Processor 9 Select File to Import 146 Select Layout Template (ICV-style imports) 150 Select Program Folder 8 Select Report 122, 165, 166 Set Password 14, 40 Split Capture 82 Status bar 56 System Setup, Countries 136 System Setup, Currencies 134 System Setup, General 132 Table Layout 107 Transactions Buttons/Messages bar 55 Users 15, 18, 20 Welcome 7 Scroll bars 46 Serial number 4, 169–170 Server 191 Shipping ref 54 Shutdown 25, 43, 113, 115, 198 Sorts 25, 109, 143 Split captures Also see Transactions defined 82 recording and saving 82–83 Startup 12, 24 System settings, customizing 132–137 T Tables. See Transactions. Also see Screens Tax exemption 53 TCP/IP connection 32, 191 Technical support 4, 169 Templates 147, 150–151 Tender, defined 149 TEST mode 176 Transaction menu 43, 99 Transactions Also see individual types of transactions, such as Sales archiving 159–160 choosing 92–93 CN!Express SU Page 213 CN!Express Index class of (MOTO, E-Commerce, Recurring) closing 95–96 closing batches 142 deleting 95 detecting fraud 97–98 editing 94 exporting 152–156 filtering. See Filters flagging or unflagging 99, 164 importing 146–151 layout of tables 104–108 limiting amount user can handle 16 partial voiding 80 printing. See Print recording and saving 59–83, 162 saving and sending one (Now!) 88 sending in a group 86–87, 163 sorting. See Sorts status of (failed, authorized) 89 unlocking 56, 94 voiding 75 Troubleshooting 169, 174–176 Truncate. See Account Numbers 17, 51 U Uninstall 22 Unlock password 19 transaction 56, 94 Users adding 15 changing user information 18 creating user name 16 creating, using and changing password. See Password logging in 24, 174 V View menu 43 Voice authorizations Also see Transactions defined 76 recording and sending Voids Page 214 76–79 CN!Express Also see Partial Voids Also see Transactions defined 75 recording and sending 75 status of 89 CN!Express Page 215 CN!Express Page 216 Index CN!Express