1
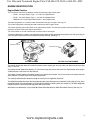
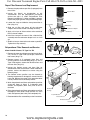
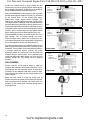
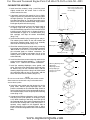
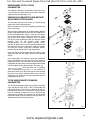
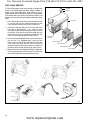
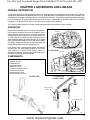
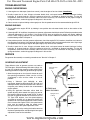
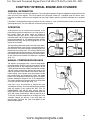
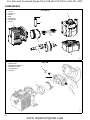
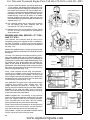
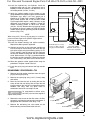
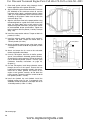
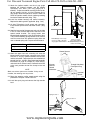
For Discount Tecumseh Engine Parts Call 606-678-9623 or 606-561-4983
2. Release the recoil spring tension on the rope by
removing the staple or knot in the starter handle
and slowly release the rope into the recoil housing
(diag. 5-2).
3. Remove the 5/16" retainer screw. On TC Type I
starters, remove the pawl retainer, brake spring,
and pawl.
4. Remove the starter pulley. CAUTION! Be careful
not to pull the rewind spring out of the blower
housing when removing the starter pulley. The
rewind spring will uncoil and expand with force if
removed from the blower housing, which can
cause serious injury.
ASSEMBLY PROCEDURE
Lubricate Here
1. Lightly grease the center leg and the area where
the rewind spring will rest in the blower housing
with "Chem-Lube" or "Lubriplate" (diag. 5-3).
2. Install a new starter spring if necessary. Securely
grip the rewind spring a short distance away from
the spring tail with a needlenose pliers. Position
the rewind spring in the blower housing and hook
the spring tail to the housing as shown. Make sure
the spring tail is fully seated before slowly
releasing the needlenose pliers from the spring.
Push the coiled spring into the recessed boss area
and discard the spring holder. Apply a thin coating
of "Chem-Lube" to the top of the spring (diag. 5-4).
5-3
Spring Tail
3. Insert the starter rope into the starter pulley and tie
a left handed knot in the end of the rope. Wind the
starter rope counterclockwise (as viewed from the
pulley bottom) on the pulley and place the end of
the rope in the notch in the pulley (diag. 5-5).
5-4
4. Place the pulley in the blower housing, press down
and rotate the pulley until the pulley drops down
and catches the end of the rewind spring. On TC
Type II/TM models, continue assembly at step 7
(diag 5-6).
5. Lightly grease the pawl retainer and place the pawl
(with the numbers up) on the retainer. Place the
brake spring on the center of the retainer with the
tab locating the pawl (diag. 5-7).
5-5
6. Install the retainer, pawl, and spring assembly on
the center leg, locate the notch in the center leg
and the tab of the retainer and align when installing
(diag. 5-8).
7. Insert the retainer screw and torque to 30-40 inch
pounds (3.4 Nm - 4.5 Nm).
8. Use the starter rope or fingers to turn the pulley
and pre-wind the recoil spring a minimum of 1-3/4
and a maximum of 2-1/2 turns in a
counterclockwise rotation.
9. Feed the starter rope through the starter grommet
and secure the starter handle using a left hand
knot.
5-6
Pawl
Spring
Retainer
5-7
www.mymowerparts.com
5-8
29