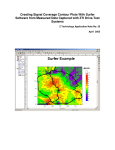
1
Z Technology
MeterMate Software
USER MANUAL
Version 2 for MeterMate Release 2
May 2006
Z Technology, Inc.
14950 NW Greenbrier Parkway
Beaverton, OR 97006 USA
Tel: 503-614-9800 Fax: 503-614-9898
MeterMate software User Manual
WARRANTY
Z Technology Inc. warrants to its Customers that the products it manufactures and sells will be free from
defects in materials and workmanship for a period of one (1) year from the date of delivery. If any such
product proves defective during the application warranty period, Z Technology Inc. at it option, either will
repair the defective product without charge for parts and labor or will provide a replacement in exchange
for the defective product.
In order to obtain service under this warranty, Customer must notify Z Technology Inc. of the defect before
the expiration of the warranty period and make suitable arrangements for the performance of service. Z
Technology Inc. will provide such service at its headquarters or at one of its authorized service centers.
Customer shall be responsible for all taxes, duties, packaging, shipping and insuring of the defective
product to the service center designated by Z Technology Inc. with all these expenses prepaid. Z
Technology Inc. shall pay for return shipping to Customer at the same location from which the product was
shipped.
This warranty shall not apply to any defect, failure or damage caused by improper use or improper or
inadequate maintenance and care. Z Technology Inc. shall not be obligated to furnish service under this
warranty a) to repair damage resulting from attempts by personnel other than Z Technology Inc.
representatives to install, repair or service the product; or b) to repair damage resulting from improper use
or connection to incompatible equipment.
THIS WARRANTY IS GIVEN BY Z TECHNOLOGY INC. IN LIEU OF ANY OTHER
WARRANTIES, EXPRESSED OR IMPLIED. Z TECHNOLOGY INC. AND ITS VENDORS
DISCLAIM ANY IMPLIED WARRANTIES OF MERCHANTABILITY OR FITNESS FOR A
PARTICULAR PURPOSE. Z TECHNOLOGY INC.' RESPONSIBILITY TO REPAIR OR
REPLACE A DEFECTIVE PRODUCT IS THE SOLE AND EXCLUSIVE REMEDY PROVIDED
TO THE CUSTOMER FOR BREACH OF THE WARRANTY. Z TECHNOLOGY INC. AND ITS
VENDORS WILL NOT BE LIABLE FOR ANY INDIRECT, SPECIAL, INCIDENTAL, OR
CONSEQUENTIAL DAMAGES, IRRESPECTIVE OF WHETHER Z TECHNOLOGY INC. OR
THE VENDOR HAS ADVANCE NOTICE OF THE POSSIBILITY OF SUCH DAMAGES.
MeterMate software User Manual
Table of Contents
SECTION 1: INTRODUCTION TO METERMATE..................................................................... 1-1
SECTION 2: METERMATE SPECIFICATIONS ........................................................................ 2-1
METERMATE SPECIFICATIONS .................................................................................................. 2-1
COMPUTER REQUIREMENTS ...................................................................................................... 2-2
SECTION 3: INSTALLATION .................................................................................................... 3-1
SECTION 4: OPERATION ......................................................................................................... 4-1
FIRST TIME OPERATION ............................................................................................................ 4-1
METER TAB .............................................................................................................................. 4-3
SETTINGS/GPS TAB ................................................................................................................. 4-4
USING A BLOCK CONVERTER .................................................................................................... 4-5
LOGGING TAB........................................................................................................................... 4-6
MENU BAR ............................................................................................................................... 4-7
TOOL BAR ................................................................................................................................ 4-8
ABOUT RECORDING .................................................................................................................. 4-8
EXAMPLE RECORDED DATA FILE ................................................................................................ 4-9
USB STYLE GPS RECEIVERS ................................................................................................... 4-9
COM PORTS IN W INDOWS DEVICE MANAGER ........................................................................... 4-9
SECTION 5: IMPORT DATA TO OTHER APPLICATIONS ...................................................... 5-1
W HY IMPORT TO OTHER APPLICATIONS ...................................................................................... 5-1
USING THE EXCEL IMPORT W IZARD ........................................................................................... 5-1
USING THE MICROSOFT MAPPOINT IMPORT W IZARD .................................................................. 5-5
IMPORTING INTO 3DFIELDS FOR CONTOUR PLOTTING ............................................................... 5-10
Using Excel to transform data format............................................................................... 5-12
Using the transformed data in 3DFields........................................................................... 5-21
MeterMate software User Manual
Page 0-5
Section 1: Introduction to MeterMate
MeterMate is a Windows application that communicates with a Z Technology R500 series
Field Strength meter via its RS-232 serial port to monitor or record to a log file Field Strength
measurements of a single frequency. For monitoring purposes, the user may select a time
delay between measurements from 1 second to 24 hours. If no delay is selected the
measurement time is about 200 mS per measurement. MeterMate is also GPS aware and will
tag Field Strength measurements with GPS location. Once tagged with GPS coordinates
powerful mapping analysis can be done. MeterMate is packaged with an Export Wizard that
can create files for import into applications such as Microsoft MapPoint, and Golden Software’s
Surfer 3D surface mapping. MapPoint allows you to create a colored dot trail on a map where
each color represents a signal level range and the location of the dot on the map indicates the
location of the measurement. Surfer allows you to create a colored contour image of the
measurement area where each color represents a range of signal strength. The Export wizard
also supports other applications like RadioSoft, for comparing measured data with predicted
signal strength. A generic format allows the user to create import files for applications like an
Excel spreadsheet.
This manual will describe how to install and operate MeterMate and the Export Wizard on the
users windows based PC with a Z Technology R-500 series field strength meter. For specific
descriptions of the Meter and it’s operation see the Meter User Manual.
If the PC has Microsoft MapPoint and/or Surfer a tool bar button will appear in MeterMate to
access those programs directly from within MeterMate. Additionally it will describe
•
How to export collected data and import into Microsoft Excel and display a time plot of
collected data.
•
How to export collected data and import into Microsoft MapPoint and display a dot plot of
collected data over a street map.
•
How to export collected data and import into Golden Software Surfer and display a color
contour plot of the measurement area.
MeterMate software User Manual
Page 1-1
Section 2: MeterMate Specifications
MeterMate Specifications
Application
Data Storage
Data Format
MeterMate software User Manual
R-500 series meter control software for Windows
98/2K/XP based computers.
1. Virtual meter front panel (Meter Tab) allows user to
monitor measurements, set frequency, set RF
Amplifier level, set IF Bandwidth, Enable/Disable
Audio, assign a call sign or frequency name for log
file.
2. Toolbar buttons to sample or record measurements,
start Data Export Wizard, start Microsoft MapPoint
(if installed), start Golden Software Surfer (if
installed.)
3. User Settings (Settings Tab) allows user to set
measurement units in dBm, dBuV, dBuV/m, mV,
mV/m, uV, uV/m, assign an Antenna Factor, enable
and specify a delay between measurements from 1
second to 24 hours. Enable and specify GPS COM
port. (a second RS-232 serial port is required)
Specify the COM port the meter is connected to.
4. Textual list display of measurements (Logging Tab)
Displays a list of recent measurements for user
comparison.
5. GPS status display (if GPS is connected)
Data Stored on PC Hard Drive to user specified folder,
default is “My Documents”
Format is comma delimited nonproprietary files
accessible for importing into other standard utilities.
If GPS is not enabled recorded data is:
PC date, PC time, frequency, frequency units, signal
strength, signal strength units, blank, blank, Frequency
Name, Antenna Factor.
If GPS is enabled, recorded data is:
PC date, PC time, frequency, frequency units, signal
strength, signal strength units, latitude, longitude,
Frequency Name, Antenna Factor, Altitude, Altitude
Units, Heading, Heading Units, Speed, Speed Units,
Quality, Satellites, HDOP, GPS UTC time.
.
Page 2-1
Computer
Requirements
Computer (Not Included)
MeterMate User Manual
Pentium class, 200 MHz, 32 Mb Memory, 6 Megabyes
Hard Drive space, or better running US Windows
98/2K/XP, RS-232 serial port.
If PC is a laptop, and not equipped with a built in serial
port Z Technology recommends a PCMCIA to Serial
adapter from Socket Communications. For single serial
port: model SLO707-078 - Rugged Serial I/O. For two
serial ports model SLO723-116 - Rugged Dual Serial
I/O.
(USB to Serial adapters are not recommended fo
connection to the Meter. USB to Serial adapters are
okay however for GPS connection.)
Page 2-2
Section 3: Installation
Your R-500 series meter is supplied with a CDROM labeled "MeterMate" This installation
requires a Windows98/XP PC with an RS232 serial port. Many PC’s have a built in RS232
serial port with 9 pin connector on the back panel of the PC. If your PC does not have an
RS232 Serial port you can install a PCMCIA type serial port adapter in a Laptop PC or a PCI
serial port adapter board in a desktop PC. USB serial port adapters are not recommended for
use with the R-500 series meters. Software installation follows the normal Windows application
installation procedure.
•
Insert the CDROM labeled "MeterMate" into your CDROM drive.
•
The CDROM will automatically begin to load the Installation program.
•
If this does not occur, click the Start button select Run
•
Browse to the D: drive (or the letter of your CDROM drive)
•
Select Setup.exe
•
Click OK
•
The MeterMate Installation screen will appear
Figure 1: MeterMate Installation Screen
Click “OK”, to proceed with the installation.
Figure 2: MeterMate Installation destination screen
MeterMate software User Manual
Page 3-1
Section 3: Operation
Click on the computer picture button to install MeterMate in the default directory,
or Click on the “Change Directory” button to install MeterMate somewhere else.
Figure 3: MeterMate Installation Program Group
Click on “Continue” to install MeterMate in the Z Technology program group.
The Z Technology program group will be created in not already present.
Figure 4: MeterMate Installation progress bar
During MeterMate installation, the progress bar will move from 0% to 100%.
Figure 5: MeterMate Installation complete
Click “OK” exit the Installation.
MeterMate User Manual
Page 3-2
Section 4: Operation
First Time Operation
Before the MeterMate application can communicate with the meter, the meter must be in
“Remote mode” The display of the meter shows “1 Port” when the meter is in Remote mode.
Put the meter in Remote mode:
•
Turn the meter on
•
Press the meter FUNCTION button
•
Turn the TUNE knob counterclockwise to F93
•
Press the FUNCTION button
Start MeterMate:
•
Click the “START” button
•
For Windows98 click “Program”, for WindowsXP click “All Programs”
•
Click “Z Technology”
•
Click “MeterMate”
To place a MeterMate shortcut on you desktop:
•
Click the “START” button
•
For Windows98 click “Program”, for WindowsXP click “All Programs”
•
Click “Z Technology”
•
Right Click “MeterMate”
•
Click “Send to”
•
Click “Desktop (as Shortcut)”
The first time startup MeterMate screen asks if you would like instructions on putting the meter
in remote mode, Click Yes for instructions, click No to continue.
MeterMate software User Manual
Page 4-1
Section 4: Operation
Figure 6: Need instructions to put meter in remote mode?
When MeterMate starts for the first time, it will assume that the meter is connected to the PC’s
COM1 Port, that the meter is turned on and in Remote mode. If your meter is connected to a
different COM port, the program will error, then allow you to move to the “Settings” tab and set
the correct COM port for your PC. Once set, the COM port number is remembered for the
next time MeterMate is started.
Figure 7: First Attempt to Communicate with meter
Click “OK”, the MeterMate application starts and attempts to initialize the meter.
Figure 8: Initializing the meter
The bottom line of the display is the Status line.
MeterMate User Manual
Page 4-2
Section 4: Operation
Here it shows the meter IF Bandwidth has just been set to WB (wideband). The status line
also shows the current PC time and data. Above the status line is
a Meter
Communication indicator. The Send and Recv lights flash green when there is communication
with the meter. They are flashing green in this example of initialization. To the right is
the Initialization Progress bar. It shows the progress of the initialization
process. When complete the MeterMate application is ready for user interaction. The “Meter”
Tab is visible. The user may type in a frequency, press “ENTER” to make the meter change to
that frequency, then click on the “Sample” button or the “Sample Continuous” button tool bar to
see the measurement data appear in the “Signal Level” section of the Meter Tab.
Meter Tab
Figure 9: Meter Tab
The “Meter” Tab is one of the three MeterMate viewable tabs. It can be thought of as a virtual
meter front panel. It displays measurement results in the Signal Level box. The current
frequency is displayed in the “Frequency” box. To change the frequency, click in the
“Frequency” box, the numbers will turn red. Type in the desired frequency, then press
“ENTER” on the keyboard, the numbers turn black indicating the frequency of the meter has
been changed. The “RF AMP”, and “BANDWIDTH” buttons show the state of the meter RF
Amp, and IF Bandwidth respectively. Clicking the buttons toggles the state. Similarly the
“AUDIO” button shows the state of the meters Audio decoder. Clicking the button toggles the
state.
MeterMate User Manual
Page 4-3
Section 4: Operation
Settings/GPS Tab
Figure 10: Settings/GPS tab
The Settings/GPS tab has two parts. The left pane allows the user to set the Signal Units.
Signal units can be dBm, dBuV, uV, uV/M, mV, mV/M or dBuV/M. If dBuV/M, uV/M or mV/M
is selected then an antenna factor can be entered. The antenna factor is added to the dBuV
measurement received from the meter to create dBuV/M signal units. A delay between
measurements can be enabled by checking the “DELAY” checkbox. When the DELAY is
enabled a delay in hours, minutes, and seconds can be entered. The COM Port box allows
the user to select a different PC COM for meter communication, and to enable a second COM
port for GPS communication. The GPS checkbox enables the selected GPS COM port.
When the GPS checkbox is checked, the right pane of the Settings/GPS tab becomes active.
The right pane displays GPS status.
Figure 11: GPS Port does not exist
Notice the GPS status line at the bottom shows “GPS Not Responding” and the COM number
on the bottom right shows “COM0” no matter what COM port was selected. This means the
selected COM port does not exist.
MeterMate User Manual
Page 4-4
Section 4: Operation
When the selected GPS port exists and is connected but no information is coming from the
GPS, the GPS status line shows “GPS Not Responding” and the COM port number is the true
COM port selected as shown in the figure below:
Figure 12: GPS Port exists but no communication
When the GPS port selected exists, is connected and information is coming from the GPS the
Communication indicator at the left side of the GPS status line blinks green, and the Status
line shows “GPS sending Data” as shown in the figure below:
Figure 13: GPS Port exists and is communicating
Using a Block Converter
There are two special issues to be aware of when using a Field Strength Meter in combination
with a Block Converter and controlling the combined system with MeterMate.
First, MeterMate can be used with a Field Strength Meter and Block Converter combination.
When this is done, care must be taken to correctly set the frequency in the MeterMate
“Frequency” Box. Since a Block Converter offsets the received frequency to one within the
tuning range of the Meter, MeterMate must set the Meter to the offset frequency not the Block
Converter’s received frequency.
As an example, when using a low frequency block converter, BC-BCB, the frequency to be
entered into the “Frequency” Box in MeterMate must be 10.000MHz above the desired AM
band receive frequency. Therefore, in order to measure an AM station at 800KHz, the
frequency of 10.800MHz must be used in MeterMate.
One additional requirement for proper Field Strength Meter operation with MeterMate is setting
of Function F13. The “BC” setting found under this Function is designed for use when
operating the Meter directly from the instrument’s front panel. When controlling the unit with
MeterMate, F13 must be set in “STD” mode.
MeterMate User Manual
Page 4-5
Section 4: Operation
Finally when using MeterMate, always set the Field Strength Meter to read in dBuV on the LCD
display. This is the default setting for the Meter. Use the SIGNAL UNITS box under the
“Settings/GPS” tab to select other units of measure such as dBuV/M or dBm. Since the Block
Converter has zero (0) conversion gain/loss, the Field Strength Meter power reading in dBuV
will be equal the reading in dBuV at the input to the Block Converter.
Logging Tab
The “Logging” tab lists measurements in line format as they would appear in a log file. The list
can be scrolled. The Logging tab will keep a scrollable buffer of up to 16000 characters.
Figure 14: Logging tab
Notice that as measurements are made lines are added to the Logging tab. If a one of the two
recording buttons was used to make the measurements, the line is added to the log file as a
measurement record. The “Send” “Recv” lights flash in the Meter COM box when the PC is
sending the command to make a measurement to the meter, and when the meter responds
with the measurement. The status line shows the count in Hours, Minutes, Seconds till the
next measurement if a delay between measurements has been enabled on the Settings/GPS
tab.
MeterMate User Manual
Page 4-6
Section 4: Operation
Figure 15: Logging tab while recording data
The red
message indicating that data is being saved to the open file.
The open file path and filename is shown in the MeterMate title bar.
Menu Bar
The menu bar contains 3 menu selections.
File Menu
Creates a New Data File to record data
Closes an Open Data File
Exit the program
Options Menu
Initializes the meter
Resets MeterMate to factory defaults
Help Menu
Displays software version
MeterMate User Manual
Page 4-7
Section 4: Operation
Tool Bar
When pressed, instructs the meter to take a measurement on the current
frequency and display the measurement in the Signal Level box in the
Meter Tab, as well as display a measurement record in the Logging Tab.
When pressed, instructs the meter to take continuous measurements on
the current frequency and display the measurement in the Signal Level
box in the Meter tab, as well as display a measurement record in the
Logging Tab. If a delay is enabled in the Settings/GPS tab, the delay
period will expire before the next measurement is made. A delay count
down appears in the status line at the bottom of the screen. Press the
“Stop” button to conclude the sampling session.
When pressed, instructs the meter to take a measurement on the current
frequency and display the measurement in the Signal Level box in the
Meter Tab, as well as display a measurement record in the Logging Tab. If
a recording file is open the measurement record will append to the open
file. If a recording file is not open, MeterMate will open a “File Open”
browse window and ask the user for a file name to save the measurement
records to. If a file that already exists is selected MeterMate will ask the
user if they would like to Append to the file or overwrite the file.
When pressed, instructs the meter to take continuous measurements on
the current frequency and display the measurement in the Signal Level
box in the Meter tab, as well as display a measurement record in the
Logging Tab. If a delay is enabled in the Settings/GPS tab, the delay
period will expire before the next measurement is made. A delay count
down appears in the status line at the bottom of the screen. If a recording
file is open the measurement record will append to the open file. If a
recording file is not open, MeterMate will open a “File Open” browse
window and ask the user for a file name to save the measurement records
to. If a file that already exists is selected MeterMate will ask the user if
they would like to Append to the file or overwrite the file. Press the “Stop”
button to conclude the recording session.
When pressed, stops the Continuous sampling or recording session
About Recording
MeterMate always appends measurement records to an open file. If no file is open and a
Record button is pressed, MeterMate will ask for a file to record measurement data to. If a file
that already exists is selected MeterMate will ask if the file is to be appended or overwritten.
After each measurement the recording file is saved (but still open). No recorded data is lost if
for some reason the PC locks up or stops operating.
MeterMate User Manual
Page 4-8
Section 4: Operation
Example recorded data file
Below is an example of a recorded data file
08/10/04,5:55:14 PM,106.700000,MHz,58.9,dBuV,45.477900,-122.670650
08/10/04,5:55:15 PM,106.700000,MHz,58.7,dBuV,45.477900,-122.670650
08/10/04,5:55:15 PM,106.700000,MHz,58.9,dBuV,45.477900,-122.670650
08/10/04,5:55:15 PM,106.700000,MHz,58.9,dBuV,45.477900,-122.670650
08/10/04,5:55:15 PM,106.700000,MHz,58.6,dBuV,45.477900,-122.670650
08/10/04,5:55:15 PM,106.700000,MHz,58.6,dBuV,45.477900,-122.670650
08/10/04,5:55:15 PM,106.700000,MHz,58.7,dBuV,45.477900,-122.670650
USB style GPS Receivers
USB style GPS receivers generally use a “virtual” COM port. Plugging in the USB GPS
receiver causes the PC to create a “virtual” COM port. The “virtual” COM port is only present
when the USB GPS receiver is plugged in. Therefore be sure to plug in the USB GPS receiver
before starting the MeterMate application.
COM Ports in Windows Device Manager
In order to determine what COM ports are available on your PC Windows has a tool called the
“Device Manager” that allows the user to see what hardware devices are connected to the PC.
Use the Device Manager to determine if your PC has COM Ports and if so what COM ports it
has available for connection to a meter or GPS.
To open Windows98 Device Manager:
•
Right click on the My Computer icon on the desktop
•
Click on “Properties”
•
Click on the “Device Manger” tab
To Open WindowsXP Device Manager
•
Click on “START”
•
Right click on “My Computer”
•
Click on “Properties”
•
Click on the “Hardware” tab
•
Click on the Device Manager button
MeterMate User Manual
Page 4-9
Section 4: Operation
Figure 16: Device Manager tab
Once the device manager is open to see a list of available COM ports.
•
Double click on Ports(COM and LPT)
Figure 17: Available COM & LPT ports
In this example there is a COM1 port available. Also notice that this example shows a modem
in installed. A modem may use a COM port that does not show up in the list of available COM
ports. The same is true of an IR (infrared) port. Do not assign the meter or the GPS to a port
used by a modem or a infrared interface.
MeterMate User Manual
Page 4-10
Section 5: Import data to other Applications
Why import to other applications
Measurement information by itself is sometimes confusing to analyze especially if you have a
lot of data. The MeterMate program automates the measurement process allowing you to
gather a lot of measurement data very quickly, or spread your measurements out over time to
do long term measurement sessions. Viewing your data graphically with a spreadsheet
program like Excel may sometimes give you further insights into your data.
With the addition of GPS capability, each measurement may be tagged with a GPS location,
This allows the data to be imported into popular mapping programs. Microsoft MapPoint is
one such program that allows direct import of data to create colored symbols that represent
different field strength values. This visual representation allows you to quickly identify weak
signal areas.
When enough data is collected, the data can be used to interpolate what a signal level would
be at a near by location inaccessible for measurement. There are a number of applications
that will do prediction of non measured areas based on results of measured areas. The result
is a contour map of lines or colors representing signal strength levels. “Surfer” by Golden
Software www.goldensoftware.com is one such commercial application. Another “3Dfields” by
Vladimir Galouchko www.3dfmaps.com is a shareware application.
Using the Excel import Wizard
Importing to Excel allows you to use an Excel Chart to view your data. One such handy
application of this is to view your data over time in graphic format. Below is an example of
data taken over time with the MeterMate application, then graphed with Excel.
•
Open Excel
•
Click the “File” menu then click “Open” this will open a file “Open” browse window
•
On the “Files of Type” box select “Text Files (*.prn; *.txt; *.csv)
MeterMate software User Manual
Page 5-1
Section 5: Import data to other Applications
•
Browse to the file you wish to import. In this case C:\My Documents\test 1hour.TXT
•
Click on the file you want to import then click on the “Open” button. The “Text Import
Wizard Step 1 of 3” window appears
•
Click “Next”, the “Text Import Wizard Step 2 of 3” window appears.
MeterMate User Manual
Page 5-2
Section 5: Import data to other Applications
•
Un-check the “Tab” box and click the “Comma” box note that the fields line up in
columns in the text display. Click “Next”, the “Text Import Wizard Step 3 of 3”
appears.
•
Click the “Finish” button, the data imports to an Excel spreadsheet.
•
If you see “########” in column B, the column is too narrow to show the data, double
click on the boundary between the B label and the C label column headers to widen
the column to the width of its contents.
•
Now that the data has been imported successfully it can be shown in a Chart.
Highlight the time column (B) and the signal strength column (E) by clicking on the B
MeterMate User Manual
Page 5-3
Section 5: Import data to other Applications
column label header then holding down the “Alt” key and clicking on the E column
label header.
•
in the tool
Once the (B) and (E) columns are highlighted, click on the Chart Icon
bar. This will open up the “Chart Wizard - Step 1 of 4 - Chart Type” window.
MeterMate User Manual
Page 5-4
Section 5: Import data to other Applications
•
In the “Chart Type:” area click on
Icon then click the “Finish” button. A chart
will appear over the excel data. It shows the signal strength (vertical axis) vs time
(horizontal axis). The Excel Chart Wizard allows you to choose the type of chart to
display your data, and by clicking Next, instead of Finish it will lead you through
labeling the chart and the axis of the chart.
Using the Microsoft MapPoint import Wizard
For data files that include GPS Latitude and Longitude fields, the data may be imported into
Microsoft MapPoint (available from your local computer software store) to create colored dots
representing signal strengths on the map at the measurement locations.
•
Open Microsoft MapPoint
•
Click the “Data” menu then click “Import Data Wizard” this will open the “Import Data
Wizard” browse window
•
Browse to the file you wish to import. In this case C:\My Documents\test.TXT
MeterMate User Manual
Page 5-5
Section 5: Import data to other Applications
•
Click on the file you want to import (in this case text.TXT) then click on the “Open”
button. The MapPoint “Import Wizard” window appears.
•
The separator character is pre-selected to be “Comma”. Click “Next >”, the next
screen of the “Data Import Wizard” appears.
•
Each field of the data file is listed with Column Headings F1, F2, F3, etc. As you scroll
to the right most fields you will see that the signal strength field is F5, the Latitude field
is F7, and the Longitude field is F8. Drag the scroll bar to the right to see the right
most fields.
MeterMate User Manual
Page 5-6
Section 5: Import data to other Applications
•
Click on the Data Type box of the F7 Column and you see a list of data types, scroll
down in the list to see “Latitude”, Click on “Latitude”
•
Click on the Data Type box of the F8 Column and you see a list of data types, scroll
down in the list to see “Longitude”, Click on “Longitude”
MeterMate User Manual
Page 5-7
Section 5: Import data to other Applications
•
The “Finish” button will become enabled. Click on the “Finish” button. The data import
process will begin. A progress bar will appear.
•
When the data Importing has been completed, a “Data Mapping Wizard – Map Type”
window appears. This wizard will guide you through the choices of how to map the
data.
•
Click on the “Multiple Symbols” choice, then click the ”Next >” button. The “Data
Mapping Wizard – Data Fields” window appears.
MeterMate User Manual
Page 5-8
Section 5: Import data to other Applications
•
Remember the signal strength field was field F5. In the “Select the data filed or
column to map” box click on “F5”, then click the “Next>” button. The “Data Mapping
Wizard – Legend” screen appears.
•
Click the “Finish” button. The imported data appears on the MapPoint map.
MeterMate User Manual
Page 5-9
Section 5: Import data to other Applications
Importing into 3Dfields for Contour Plotting
This import procedure is based on Z Technology Application Note 21 “Creating Signal
Coverage Contour Plots from Measured Data Captured with ZTI Drive-Test Systems”
This procedure will be a bit more cumbersome than using the ZTI Drive-Test system because
MeterMate software produces data in a format that must be transformed to be compatible with
3Dfields import format.
This section will describe how to transform the data from the MeterMate application using
Excel, and then import the data into 3Dfields.
The accuracy of the contouring is dependant on the number of measurements made, and their
distribution over the area of interest. The more the measurements and the better the
distribution the better the results.
Starting with a file of data collected from a TV broadcast in Baltimore. The plotted data on the
Z Technology, Inc (ZTI) Drive-Test system looks like the figure below. It is possible to upgrade
your meter to a Z Technology DriveTest system and still use the data you have collected with
your MeterMate software on the DriveTest system. (Contact the factory for details.)
MeterMate User Manual
Page 5-10
Section 5: Import data to other Applications
Figure 18: Baltimore data plotted on a ZTI DriveTest system
The table below shows the format of the raw data that was collected with the MeterMate
software and R-500 series with GPS Receiver attached to the recording PC.
11/17/03,21:30:02,663.25,MHz,60.5,dBuV/M,39.196932,-76.68592
11/17/03,21:30:07,663.25,MHz,60.5,dBuV/M,39.196932,-76.685923
11/17/03,21:30:13,663.25,MHz,60.5,dBuV/M,39.196933,-76.685925
11/17/03,21:30:19,663.25,MHz,60.2,dBuV/M,39.196933,-76.685927
11/17/03,21:30:24,663.25,MHz,60.5,dBuV/M,39.196935,-76.68593
11/17/03,21:30:30,663.25,MHz,60.6,dBuV/M,39.196937,-76.68593
11/17/03,21:30:36,663.25,MHz,60.2,dBuV/M,39.196937,-76.685932
11/17/03,21:30:41,663.25,MHz,60.1,dBuV/M,39.196938,-76.685933
11/17/03,21:30:47,663.25,MHz,60.2,dBuV/M,39.196938,-76.685935
11/17/03,21:30:53,663.25,MHz,60.2,dBuV/M,39.19694,-76.685935
11/17/03,21:30:58,663.25,MHz,59.8,dBuV/M,39.196942,-76.685937
The next table show below shows the desired format for import into 3Dfields.
MeterMate User Manual
Page 5-11
Section 5: Import data to other Applications
Longitude,Latitude,Power
-76.68592,39.196932,60.5
-76.685923,39.196932,60.5
-76.685925,39.196933,60.5
-76.685927,39.196933,60.2
-76.68593,39.196935,60.5
-76.68593,39.196937,60.6
-76.685932,39.196937,60.2
-76.685933,39.196938,60.1
-76.685935,39.196938,60.2
-76.685935,39.19694,60.2
-76.685937,39.196942,59.8
Using Excel to transform data format
Excel is a powerful tool to transform tabular data from one columnar format to another. We
need to re-arrange the field columns from the MeterMate order of:
Date,Time, Frequency, Frequency Units, Signal Strength, Signal Strength Units, Latitude Longitude
To 3Dfield import order of:
Longitude, Latitude, Power
In addition we need to add the textual field column headers. Note here that “Signal Strength”
is equivalent to “Power”
Follow the procedure below to do the transfomation.
•
Open Excel
•
Click the “File” menu then click “Open” this will open a file “Open” browse window
•
On the “Files of Type” box select “Text Files (*.prn; *.txt; *.csv)
MeterMate User Manual
Page 5-12
Section 5: Import data to other Applications
•
Browse to the file you wish to import. In this case C:\My Documents\Baltimore.TXT
•
Click on the file you want to import then click on the “Open” button. The “Text Import
Wizard Step 1 of 3” window appears
•
Click the “Next>” button, the “Text Import Wizard – Step 2 of 3” appears.
MeterMate User Manual
Page 5-13
Section 5: Import data to other Applications
•
Un-check the “Tab” box and click the “Comma” box note that the fields line up in
columns in the text display. Click “Next”, the “Text Import Wizard Step 3 of 3”
appears.
•
Click the “Finish” button, the data imports to an Excel spreadsheet.
MeterMate User Manual
Page 5-14
Section 5: Import data to other Applications
•
If you see “########” in column B, the column is too narrow to show the data, double
click on the boundary between the B label and the C label column headers to widen
the column to the width of its contents.
•
Columns A through D and column F are not needed so delete them. Click on the F
label of the column F header to highlight that column, then Right Click on it then select
“Delete”
MeterMate User Manual
Page 5-15
Section 5: Import data to other Applications
•
The 2 most right columns move left as the old F column was deleted.
•
Click on the A label header of the A column, hold the Shift key down then Click on the
D label of the D column header to highlight columns A through D. Then Right Click on
the D label and select “Delete”.
•
The remaining three columns move left.
•
We now have just the data needed for 3Dfields, but we need to change the order of
the fields and add textual headers in the first row of each column.
•
Click on the “1” label to highlight the first row, then Click on the “Insert” Menu and click
on “Row”
MeterMate User Manual
Page 5-16
Section 5: Import data to other Applications
•
In the new row type in “Power” in the left most column header, type in “Latitude ” in the
middle row column header, type in “Longitude” in the right most column header.
MeterMate User Manual
Page 5-17
Section 5: Import data to other Applications
•
The column headers have been added now we need to re-arrange the columns so they are in
the order of “Longitude, Latitude, Power”.
•
Click on the B column label to highlight the ‘Latitude’ column. Click on the “Edit” Menu then
click on “Cut” the B column will show a rotating dotted line around it. Click on the D column
label, then Click on the “Edit” menu again and click on “Paste”. The ‘Latitude’ column will now
be the right most column.
•
Click on the A column label to highlight the ‘Power’ column. Click on the “Edit” Menu then
click on “Cut” the A column will show a rotating dotted line around it. Click on the E column
label, then Click on the “Edit” menu again and click on “Paste”. The ‘Power’ column will now
be the right most column.
MeterMate User Manual
Page 5-18
Section 5: Import data to other Applications
•
Now the fields are in the desired order, we just need to remove the first two empty column, A
& B. Click on the A label hold the Shift key down then click on the B label. This highlights the
two empty columns. Click on the “Edit” menu then Click “Delete”. The two blank columns are
removed and the data is now correctly formatted for 3Dfields.
MeterMate User Manual
Page 5-19
Section 5: Import data to other Applications
•
Now save the file. Click the “File” menu, then click SaveAs
•
Under “Save as Type” Select “CSV [Comma delimited] (*.csv)” , then change the name from
“Baltimore.TXT “ Baltimore3D.CSV, then click the “Save” button. Excel may respond with a
message saying that the file is not in Excel format, Do you want to save to Excel format, Click
“No”
•
Close Excel.
•
The “.CSV” filename extension was necessary for Excel, we need to change the filename
extension back to “.TXT” for 3Dfields. Open MyDocuments and rename “Baltimore3D.CSV”
to “Baltimore3D.TXT”. A system message may appear “If you change a filename extension,
the file may become unusable, do you want to change?” Click YES.
MeterMate User Manual
Page 5-20
Section 5: Import data to other Applications
Using the transformed data in 3DFields
•
Open 3Dfields
•
Click the “File” menu then Click “Open”. A browse window opens. Browse to C:\My
Documents. Double click on the transformed file “Baltimore3D.TXT”. 3Dfields will display a
“dot trail” of the measured locations.
•
Click the "Objects" menu, then Click "Gridding Method". For the first time through select
"Inverse-Distance Method". (You may want to try some of the other methods later "System of
Linear Equations, or "Kriging".
•
Click the "Format" menu, then Click "Map Bar". This divides the active screen into two
sections.
•
In the left side you see a tree structure of choices. Click on the “Map List” branch of this tree,
then double click on "Color Fill Contours". A "Create contours" window appears. Choose the
default values by Clicking "OK". The resultant plot is the desired Color Contour Plot we have
been working towards.
MeterMate User Manual
Page 5-21
Section 5: Import data to other Applications
3Dfield provides the user with several ways to enhance the basic Contour Plot described above.
The user can customize colors, number of contour lines, graph titles, add an X-Y Axis (see the
Axis selection in the '
tree'on the left), etc. 3Dfield even provides an easy way to Print the Contour
Plot. The Application also will allow a user to store Plots within separate job folders for quick
retrieval without the necessity to remember the initial conditions selected when the contour plots
were first calculated. The printed contour map appears in the figure below.
MeterMate User Manual
Page 5-22
Section 5: Import data to other Applications
Figure 19: 3Dfield - Contours Calculated with “Inverse-Distance Method”
Contour Plots provide another tool to evaluate, analyze and display signal coverage
measurements. They can be a valuable tool for estimating coverage beyond the actual
measured locations and can provide extrapolations of expected coverage over an entire
service area. The method described here is an excellent addition to an engineer’s tool-set for
understanding performance of a single RF transmitter or an entire wireless or broadcast
network.
Of course, 3Dfield and all other Contouring programs have their limitations (for example
3Dfield does not directly take into account terrain or man-made obstructions.) When this is
understood, the operator can make full and effective use of Contour Plots.
Always remember if actual and precise data is required at a specific location, the best
approach is to take real measured data at that location using one of Z Technology’s R-500
series Field Strength Meter, or Z Technology integrated DriveTest system.
MeterMate User Manual
Page 5-23